

Page 1
Assembly of EVELO Delta X
The focus of this document is to assist with the assembly of your new EVELO
Delta X. The scope is intentionally narrow -- The “User Guide” that was
included with your bike covers a much broader spectrum of topics: fit
adjustments, battery care, controls etc.
Our Team is here to help 7 days a week!
877-991-7272
Feel Free to reach out!
Unboxing Your EVELO
1. Begin unboxing the bike by cutting the
banding then opening the box. Use caution
regarding the staples as they can be very
sharp.
2. Remove the small boxes.
3. The easiest way to get the bike out of the
box is to lie the box down on its side and
then slide it out. See image ----->
4. Remove packaging including zip ties.
Caution: sometimes the zip ties are used to
hold cables or wires in place. A good indicator is if the zip tie is touching a painted
surface of the bike—those should remain in
place.
5. Empty all the boxes so you know what
you are working with.
1
Page 2
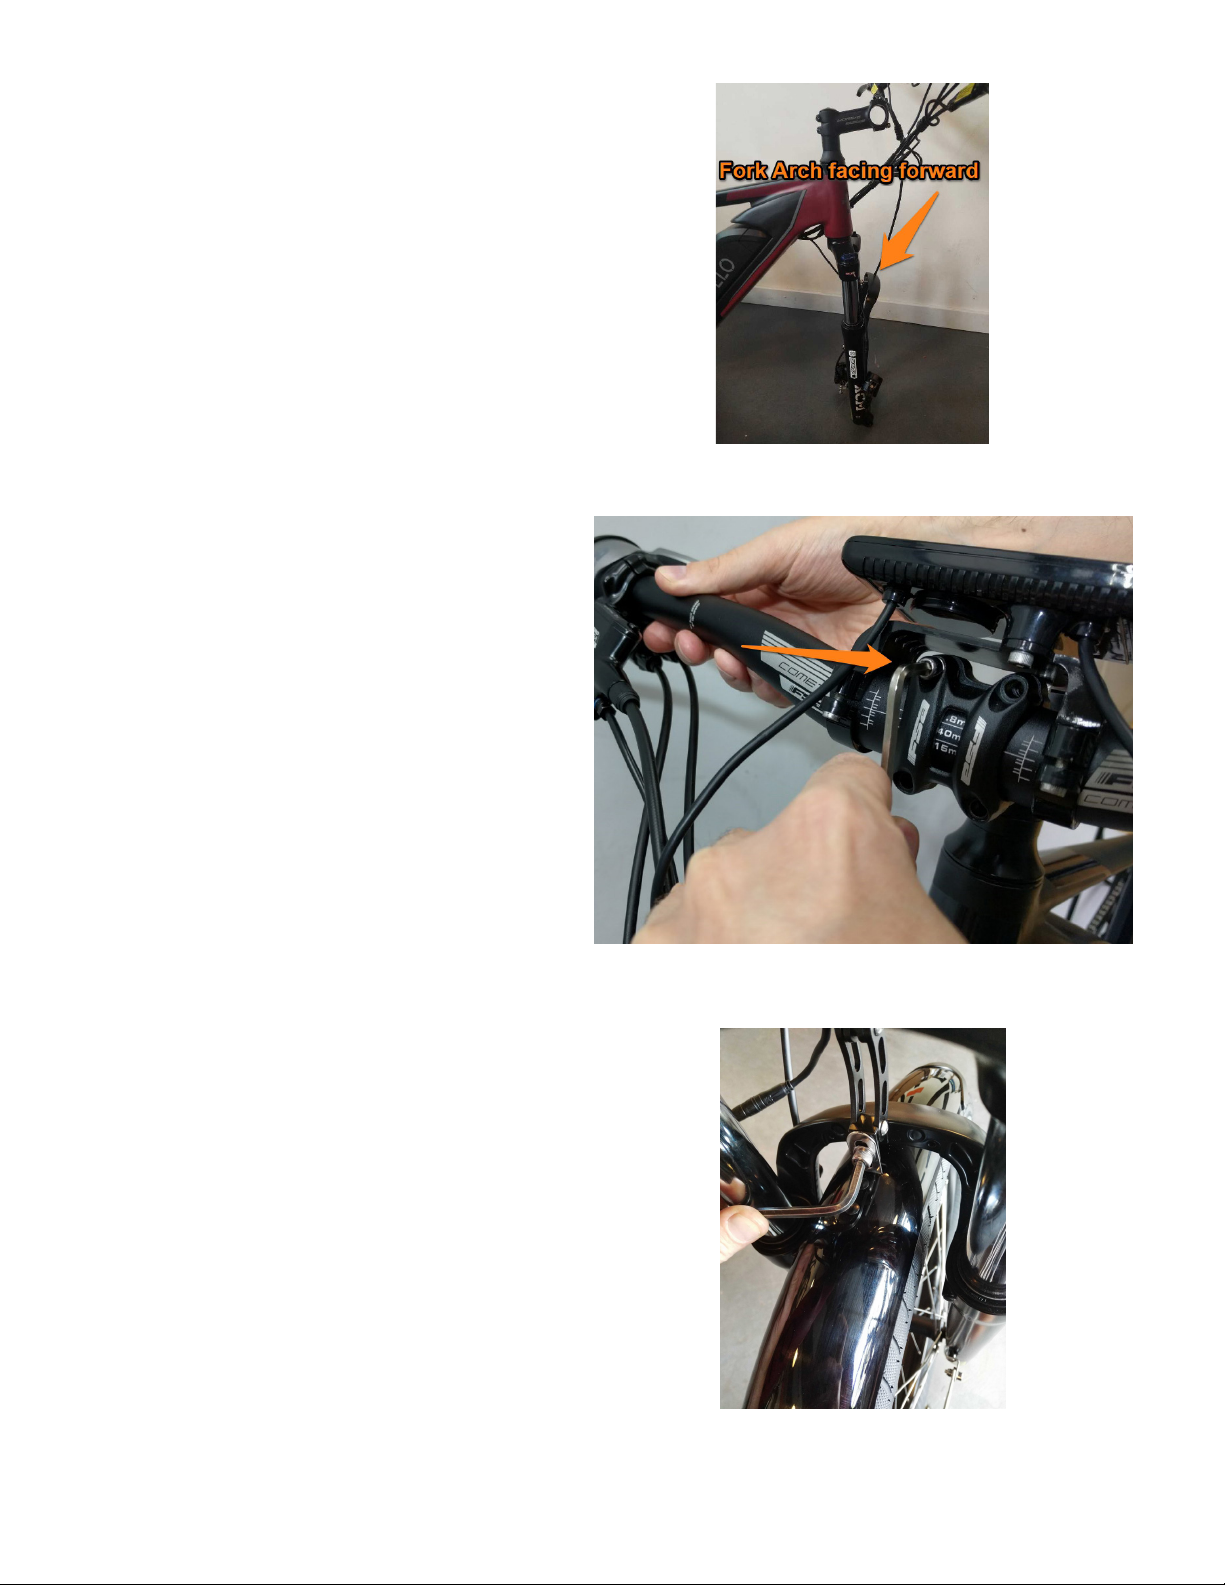
Rotate Fork (if needed)
Depending on how the bike was packed at the
factory, you may need to turn the forkso that
the Fork Arch is facing forward.
If needed, rotate the steering assembly so that the
cables aren’t wrapped around the frame and the
arch is facing forward. Both brake calipers should
be on the le hand side of the bike.
Install Handlebars
1. The handlebars are clamped to the stem with
four bolts and a faceplate. You will see these on
the forward end of the stem. Remove the four
bolts and the faceplate using the Allen wrench
provided.
2. Li the handlebars into place, and center the
knurled portion of the handlebars in the stem
clamping area. The display can be rotated out of
the way if it is interfering. Position the faceplate
over the four bolt holes, and thread all four bolts
into place. Get them fingertight then make some
positional adjustments before tightening them
securely.Note the gap at the top and the bottom
of the faceplate should be approximatly even.
3. Rotate the bars so the grips are apporximately
where you want them, and firmly tighten all 4
bolts.
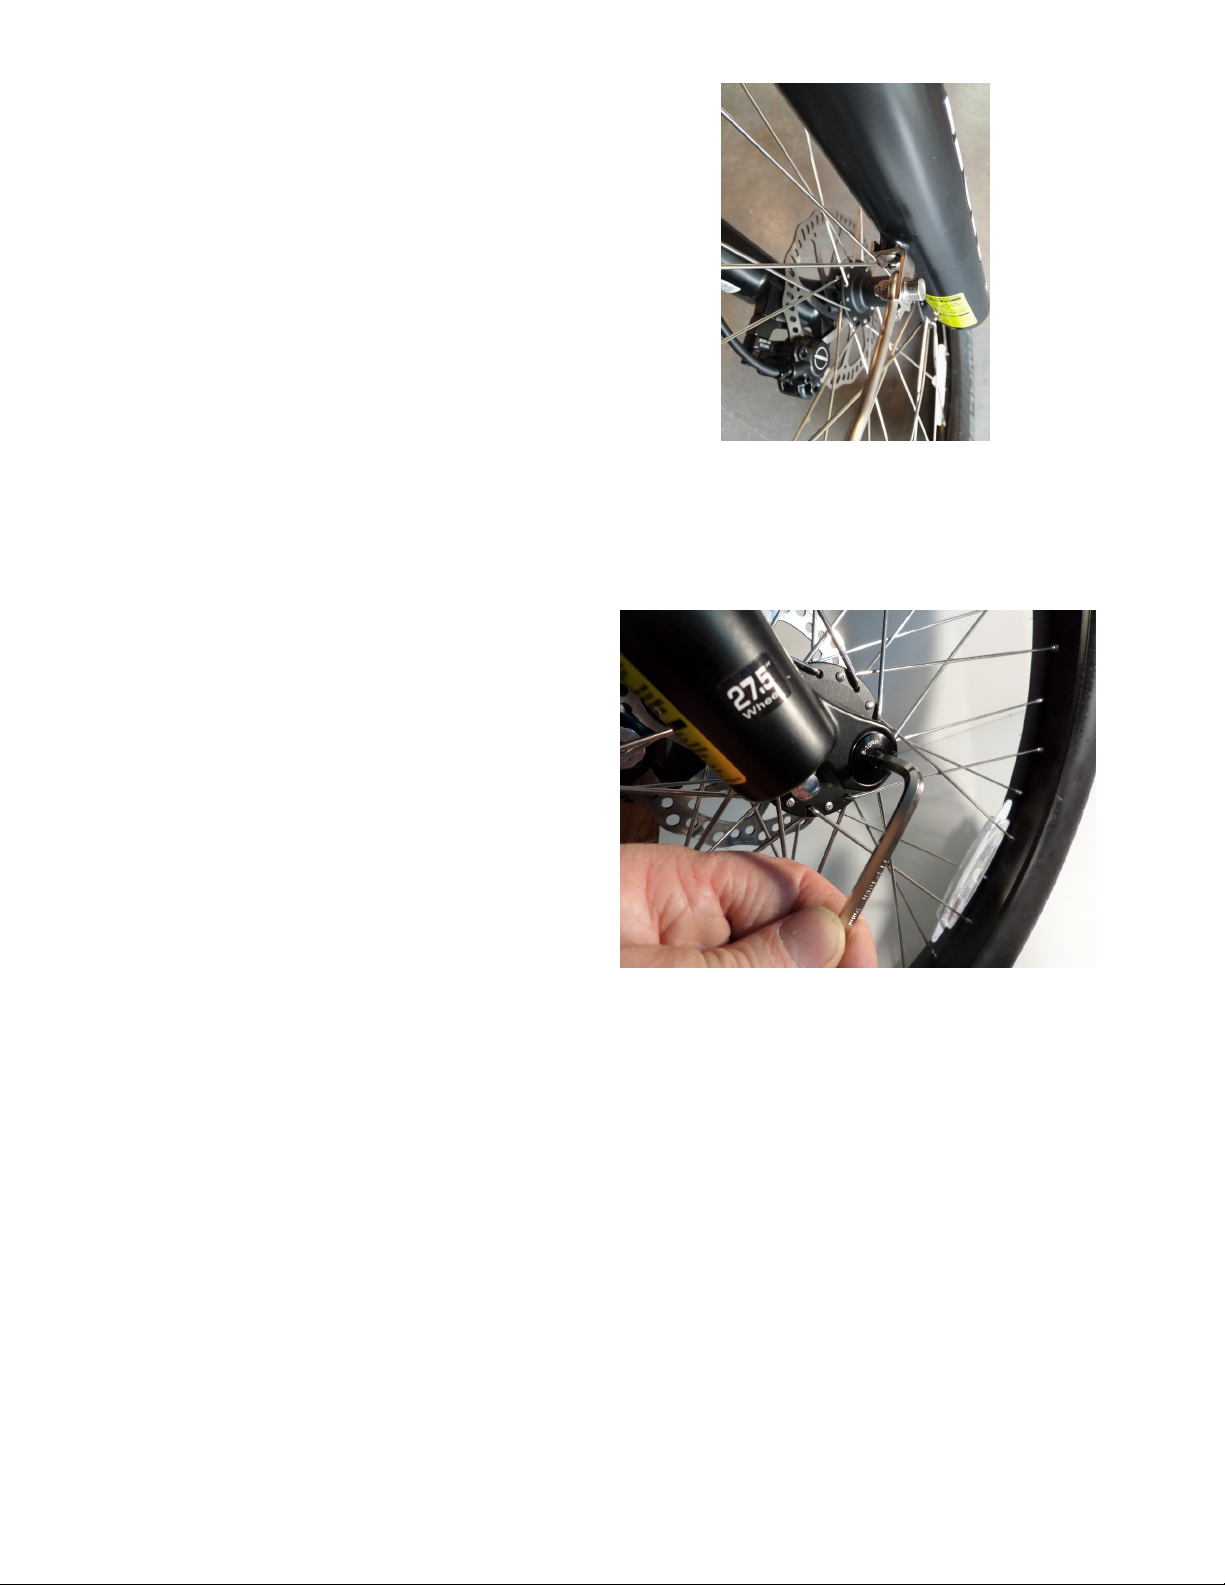
Install fender and headlight
1. Remove the bolt from fork arch.
2. Insert the bolt from the back side through a
washer, the fender tab the headlight bracket.
Begin threading the bolt in but just fingertight for
now.
2
Page 3
Install fender and headlight (cont.)
3. On the fork legs there are two brackets near
the bottom.
4. Aer removing them, pass one of the supplied
bolts through a washer, then the bracket, the
loop in the strut, add a washer, thread on the nut.
Tighten with tools provided.
5. Repeat on the other side.
6. Li the headlight into an upright position, Li
the fender up as far as it will go (the metal tab is
slotted) and tighten the bolt to hold it in place.
7. Plug in the headlight. There are 2 arrows on
the connector--place them so they point at each
other. Snap the ends together. (this connection
may already be done at the factory).
Install Front Wheel
1. To install the front wheel first remove all the
packaging.
2. Using a 5mm allen wrench, remove the axle
from the fork
3.Check the slot in the brake caliper for a plastic
spacer. Remove it if there is one.
4.Install the front wheel, taking care to fit the
brake disc into the slot in the caliper. You can now
lower the kickstand and let the weight of the bike
be supported by the front wheel.
4. Instert the axle through the fork and front
wheel. When it stops, thread it in with the 5mm
allen wrench.
3
Page 4
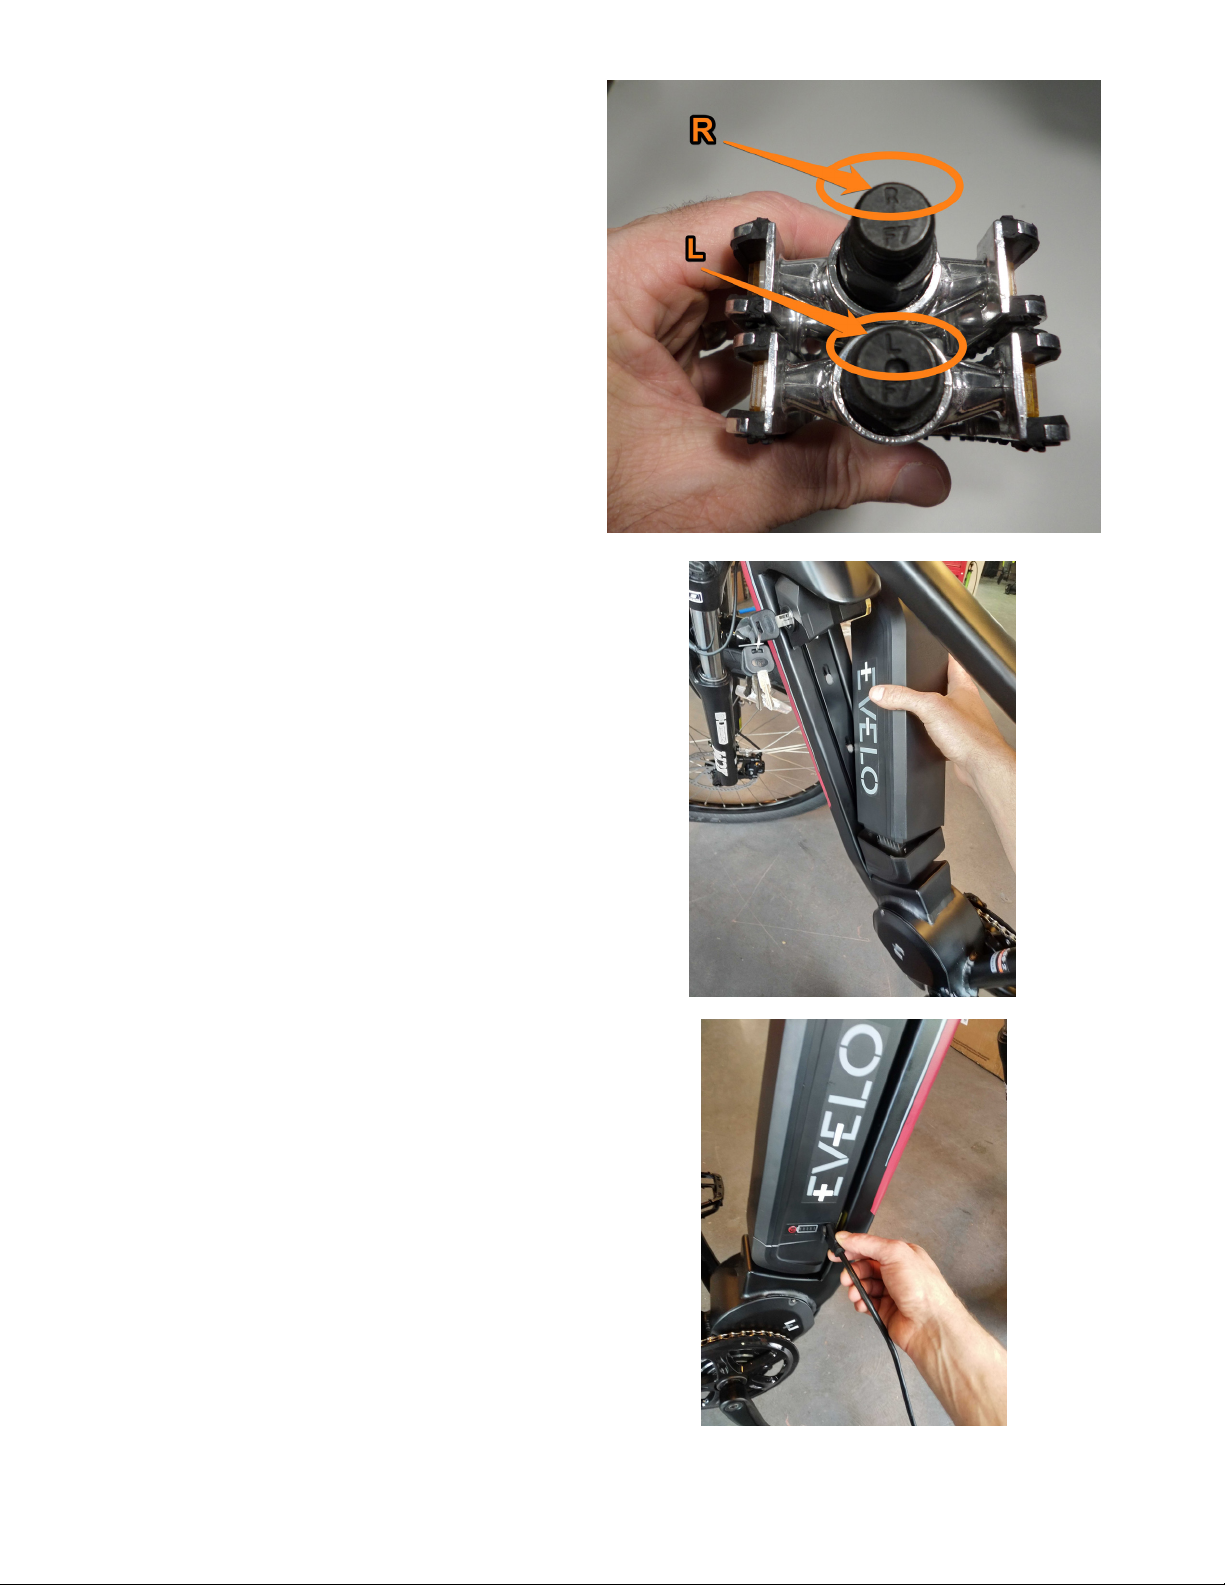
Install Pedals
Installation of the pedals requires a 15 mm
wrench.
It is important to note that the pedals are
threaded differently. The right pedal will screw
in clockwise, and the le pedal will screw
in counterclockwise. There is an L and an R
stamped into the end of each pedal for reference.
Screw both pedals in securely.
Use of Battery
Keys for your battery were attached to the bike
(typically the handlebars). We cannot replace
exact keys, so it is a good idea to keep one in a
safe place and use the other for daily use.
To release the battery, insert the key in the lock
and twist. While in the unlocked position, tip
the battery and li out of the bike.
To reinstall, place the tab at the bottom of the
battery into the slot in the dock and tip the battery inward until it clicks. Double check to make
sure that it is secure.
To charge your battery, first insert the charger
tip into the battery (there is a rubber door to
open).
Plug the charger into any standard outlet. It is
charged when the red light turns green.
This can be done with the battery either on or
off the bike.
4
Page 5

Serial Number Location
To register your bike on our website, you will
need to record the serial number. It is located
on the headtube of your bike, just above the
front fork.
There is considerable additional information in your “User Guide”. Of course, if you
ever have questions, our team is ready to help!
877-991-7272
5
 Loading...