

EVE audio SC408 User Manual

EVE AUDIO PRODUCT MANUAL
AUG 2013
SC407
SC408

SC407
SC408
EVE Audio product manual
SAFETY INSTRUCTIONS
To avoid the risk of electrical shock, do not attempt to open the unit.
There are no user-serviceable parts inside. Do not attempt to service the
equipment yourself. In case of problems, please contact your local dealer
or distributor.
This unit should be connected to a grounded power outlet. If you use
!
extension cords and power distributors they should be grounded as well.
Verify that the specied operating voltage on the rear side matches the
!
local mains voltage. If these values do not match you will have to adjust
the loudspeaker setting appropriately and change the fuse type.
Use only the fuse types specied on the rear side of the unit. Never bypass
the fuse.
Make sure that no liquids wet the inside of the cabinet. Never spray, pour
or spill liquids directly onto the unit.
Do not use a wet cloth nor ammable or acid chemicals for cleaning.
Do not touch the diaphragms of the loudspeaker and do not obstruct the
!
bass reex ports.
Make sure there is enough air ow behind the loudspeaker to maintain the
!
electronic components cool.
Do not expose this product to extreme temperatures.
!
The diaphragms build up a magnetic eld around the loudspeaker.
High sound pressure levels can damage your hearing permanently! Avoid
standing close to loudspeakers producing high sound pressure levels.
TABLE OF CONTENTS
1. INTRODUCTION ............................................................................4
2. QUICK START .................................................................................5
2.1. First Steps .............................................................................................................................5
2.2. Speaker Connection .........................................................................................................5
2.3. Powering On .......................................................................................................................5
3. OPERATION ...................................................................................6
3.1. First Steps .............................................................................................................................6
3.2. Horizontal/Vertical Orientation ....................................................................................7
3.3. The Grid ................................................................................................................................8
3.4. Operating Modes ..............................................................................................................8
3.5. Powering on/o: Standby Mode .................................................................................8
3.6. Volume Mode .....................................................................................................................9
3.7. Settings Menu ................................................................................................................. 10
3.8. Filter .................................................................................................................................... 10
3.9. Low Filter ........................................................................................................................... 11
3.10. High Filter.......................................................................................................................... 11
3.11. Low and High Filter Combinations .......................................................................... 12
3.12. Desk Filter ......................................................................................................................... 12
3.13. LED Mode .......................................................................................................................... 13
3.14. Saving Your Settings ..................................................................................................... 13
3.15. Power Switch ................................................................................................................... 13
3.16. DIP Switches ..................................................................................................................... 14
3.17. Mains Voltage Selector ................................................................................................. 14
3.18. Power Connector (IEC) ................................................................................................. 15
4. POSITIONING ..............................................................................15
4.1. Speaker Positioning + Rubber Feet ......................................................................... 15
4.2. Height and Distance ..................................................................................................... 16
4.3. Stereo Setup..................................................................................................................... 17
4.4. Stereo Setup + Subwoofer (2.1) ................................................................................ 17
4.5. Multichannel Setup (5.1) ............................................................................................. 18
4.6. Mixer/Workplace Reections ..................................................................................... 19
4.7. Room Acoustics .............................................................................................................. 19
5. TECHNICAL SPECIFICATIONS .....................................................21
6. COMPLIANCE ...............................................................................22
7. WARRANTY ..................................................................................23
2 3

SC407
SC408
EVE Audio product manual
1. INTRODUCTION
Thank you for your time and interest in the EVE Audio product range.
EVE Audio is a loudspeaker manufacturer based in Berlin, Germany, that
specializes in the development and design of unique studio monitors.
The use of rst-class components is our highest priority because we rmly
believe this is the only way to manufacture rst-class products.
You have chosen a loudspeaker from our Silvercone SC series. Both models
— SC407 and SC408 — were conceived as four-way systems.
An additional mid-range driver guarantees an excellent denition in the
mid frequencies, which raises the four-way system to a completely dierent
listening level. The two woofers reproduce the exact same frequency
range, while the mid-range driver and tweeter cover consecutive ranges.
Due to this design, the SC407/SC408 are symmetrically mirrored.
In a horizontal arrangement, the SC40X is ideal as fully symmetrical central
loudspeaker.
Both models feature EVE Audio‘s Air Motion Transformer taken from
the RS series. The mid-range driver and the two woofers sport a highquality chassis developed by EVE Audio. The lot is completed by the
implementation of high-resolution DSP technology plus powerful and
ecient ampliers.
We wish you a lot of fun with your EVE Audio monitors. If you have any
questions regarding our products, do not hesitate to contact your nearest
dealer or get directly in touch with us... We will be more than happy to help
you out!
All the best from Berlin.
The EVE Audio Team
2. QUICK START
If you already have experience with studio monitors, the Quick Start guide
ought to be more than enough to get you started.
For unexperienced users we recommend reading the whole user‘s manual
in order to prevent any misuse.
2.1. First Steps
Check the package components (loudspeaker, user‘s manual, power cord,
grille, rubber feet).
Check the voltage setting (see „Mains Voltage Selector“).
Check the setting of the DIP Switches (variable).
2.2. Speaker Connection
Connect one of the monitor inputs on the rear side (RCA or XLR) to the line
output of a playback source, for instance, an audio interface. The output
level should be as low as possible.
2.3. Powering On
Engage the Power switch on the rear side of the loudspeaker to turn it on
or o.
The LEDs around the Volume control on the front panel will light up
clockwise. If the LED on the right end is dimly lit, this indicates that the
loudspeaker is in Standby mode. Press the Volume control to turn the
loudspeaker on. If you turn the Volume control counter clockwise until the
LED on the left end lights up dimly the loudspeaker will be muted.
Increase the output level on the source device until the LED ring starts to
blink, then reduce the output level a bit. The maximum operating level for
the input (i.e. the analog to digital converter) is now set optimally. To set
the desired listening volume use the Volume control on the loudspeaker.
The LED ring indicates the volume setting. If the LED ring starts to blink,
reduce the output level on the signal source.
4 5
INTRODUCTION
Powering On
QUICK START
SC407
SC408
3. OPERATION
3.1. First Steps
EVE Audio product manual
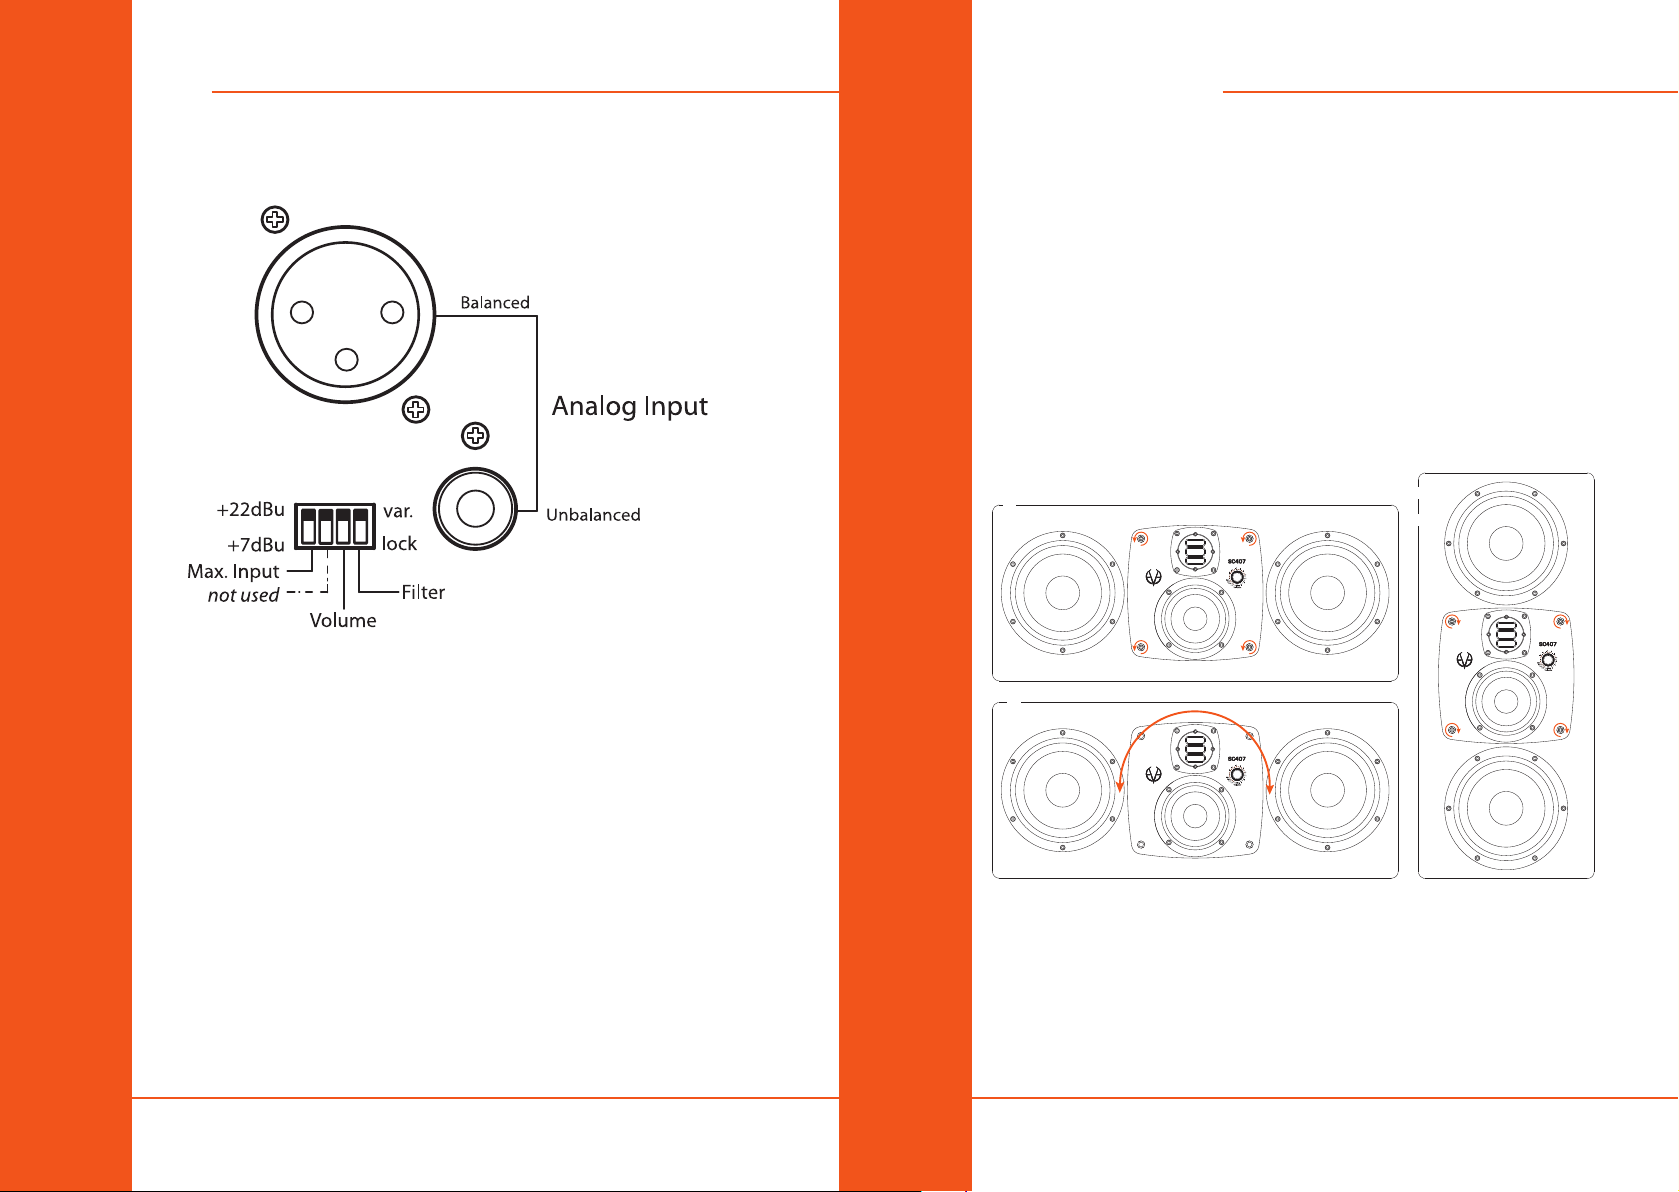
3.2. Horizontal/Vertical Orientation
The SC407 and SC408 can be used in horizontal or vertical position thanks
to the incorporated swiveling „Mid/High Silver Plate.“ By default, your
monitor is adjusted to be placed horizontally. To use it in vertical position,
turn the tweeter/mid-driver section 90º so that the sound transducer is
vertically oriented. Your dealer will be happy to this for you. If you would
like to do it by yourself after the monitors have been installed, follow these
steps:
• Remove the four screws of the mid/high plate.
• Turn the whole tweeter/mid-driver section 90º. The direction does not
really matter. Hold the tweeter/mid-driver section by the screws when
handling it.
• Fasten the tweeter/mid-driver section again with the screws. Tighten the
screws only a bit tighter than you would by hand.
1 3
Rear Connections & DIP Switches
Check the package components (loudspeaker, user‘s manual, power cord,
grille, rubber feet);
Check the voltage setting (see „Mains Voltage Selector“).
Check the setting of the DIP Switches (variable).
Connections: there are two input connectors on the rear side. These allow
the connection of balanced sources with XLR connectors or unbalanced
sources with RCA connectors.
• Pin assignment XLR: 1= Shield, 2= hot (+), 3= cold(-).
• Pin assignment RCA: Center conductor= Signal, Ring= Shield.
Both analog inputs can be used simultaneously, whereby the signals are
summed.
Depending on the setting of the Max. Input DIP switch on the rear panel,
the maximum level of the source signal should not exceed +7 dBu or +22
dBu (see Max. Input). If the input is overloaded the LED ring will start
blinking.
6 7
OPERATION
First Steps Horizontal/Vertical Orientation
! The whole procedure ought to be carried out with utmost care in order not
! To avoid damages due to metal parts ending up inside the twitter, we
2
to damage the surface of the speaker.
recommend you to place the protection grille immediately after any
modication.
OPERATION
 Loading...