

Page 1
EVCO S.p.A. DADO | Installer manual ver. 2.0 | Code 144EVD2E204
page 1 of 34
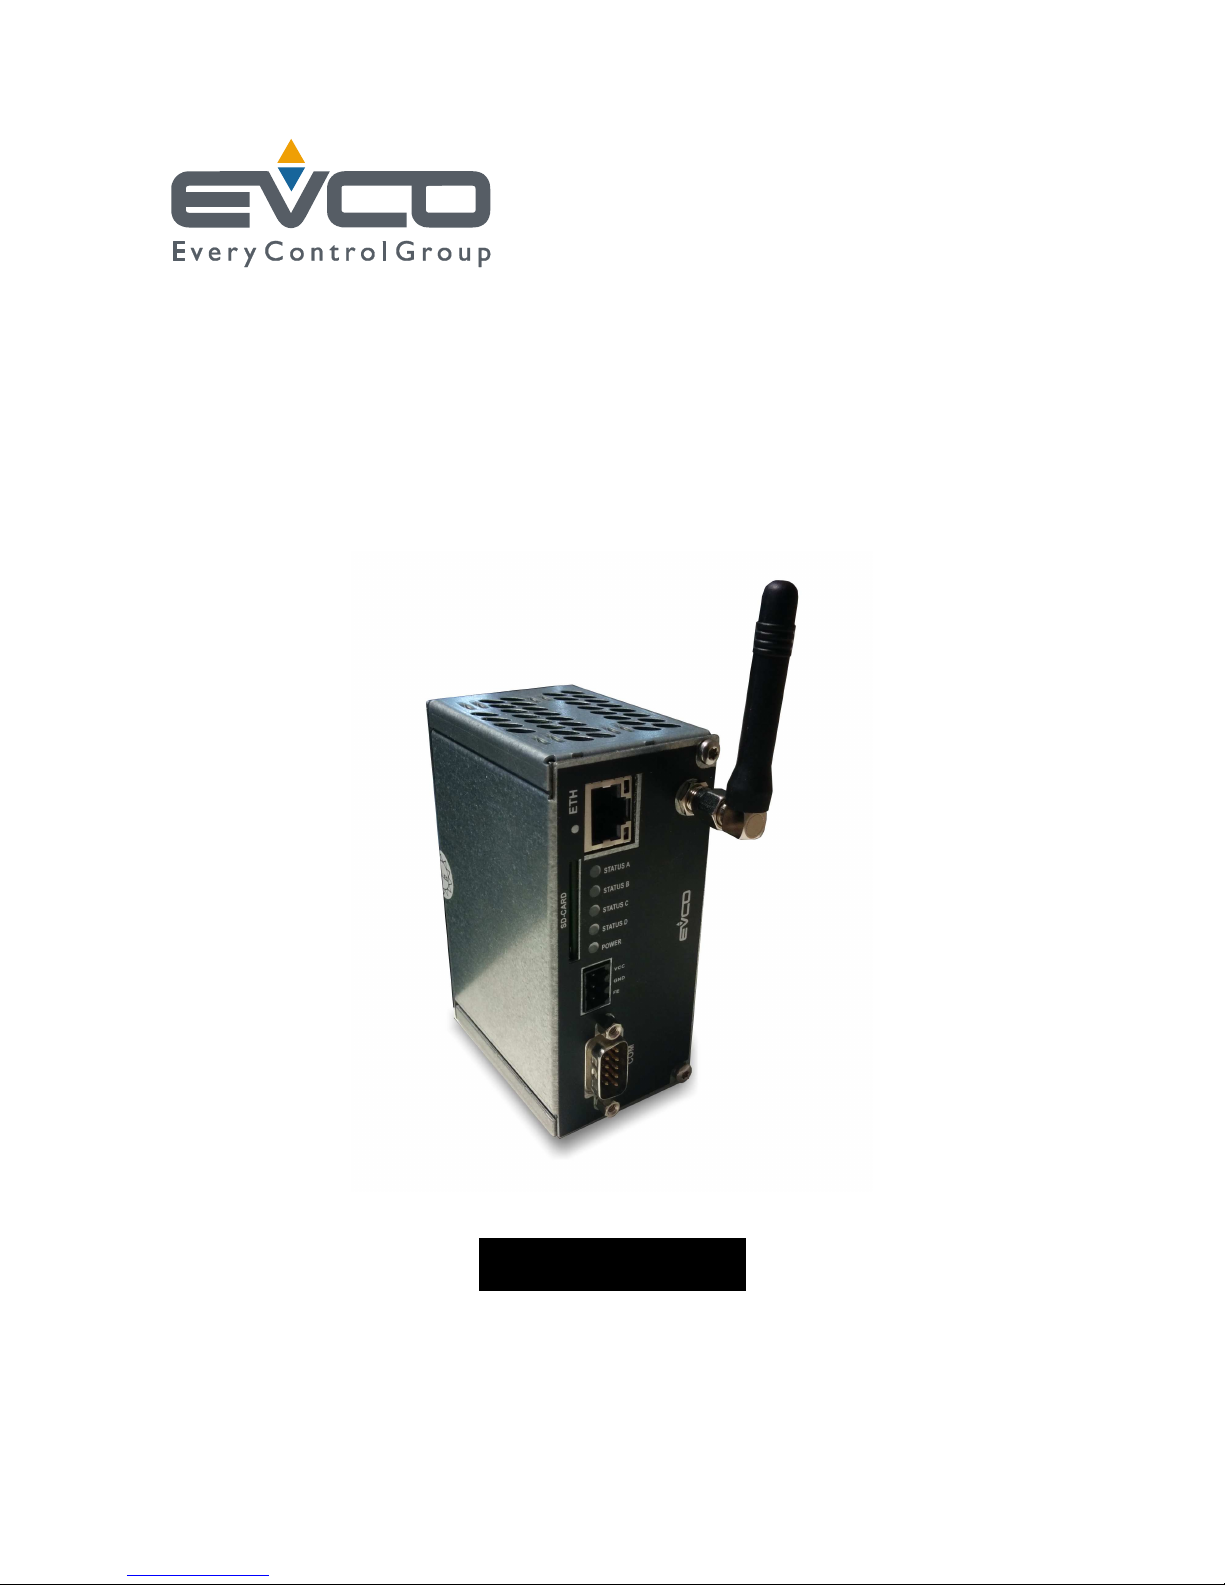
DADO
Internet / MODBUS Gateway
ENGLISH
INSTALLER MANUAL ver. 1.1
CODE 144EVD2E204
Page 2

EVCO S.p.A. DADO | Installer manual ver. 2.0 | Code 144EVD2E204
page 2 of 34
Important
Read this document thoroughly before installation and before use of the device and follow all recommendations; keep
this document with the device for future consultation.
The following symbols support reading of the document:
indicates a suggestion
indicates a warning.
Disposal
The device must be disposed of in compliance with local Standards regarding the collection of electric and electronic
equipment.
Page 3

EVCO S.p.A. DADO | Installer manual ver. 2.0 | Code 144EVD2E204
page 3 of 34
Index
1
INTRODUCTION ................................................................................................................................... 5
1.1 Introduction ................................................................................................................................... 5
1.2 Basic knowledge needed to install a DADO ......................................................................................... 5
1.2.1 IP / Ethernet / Internet ....................................................................................................... 5
1.2.2 Serial communication with devices and Modbus protocol ......................................................... 5
1.3 DADO identification ......................................................................................................................... 5
2
DESCRIPTION ...................................................................................................................................... 6
2.1 Description of DADO Ethernet interface .............................................................................................. 6
2.2 Description DADO Ethernet/GRPS interface ........................................................................................ 7
3
DIMENSIONS AND INSTALLATION .......................................................................................................... 8
3.1 DADO dimensions ........................................................................................................................... 8
3.2 DADO installation ............................................................................................................................ 8
3.2.1 Inserting SD-Card .............................................................................................................. 8
3.2.2 Inserting Sim Card (only for GPRS version) ........................................................................... 9
3.2.3 Antenna mounting .............................................................................................................. 9
3.3 ELECTRIC CONNECTION ................................................................................................................... 9
4
HOW IT WORKS ................................................................................................................................. 10
4.1 Preliminary configuration ............................................................................................................... 10
4.2 Connection to PC with direct Ethernet cable ...................................................................................... 11
4.3 Installing DADO in the user LAN ...................................................................................................... 11
4.4 Finishing Internet configuration....................................................................................................... 12
5
DADO internal web server ................................................................................................................... 13
5.1 User accounts ............................................................................................................................... 13
5.2 Network operation status ............................................................................................................... 13
In the first page of the web server it is possible to check details about the LAN/Internet communication .......... 13
5.3 Trouble-shooting network problems ................................................................................................. 14
5.4 Status page .................................................................................................................................. 14
5.5 Setting Windows PC in a Local Area Network (LAN) ........................................................................... 15
5.6 Network configuration .................................................................................................................... 17
5.7 Checking and setting the timezone (UTC offset) ................................................................................ 18
5.8 MODBUS connection ...................................................................................................................... 19
5.8.1 MODBUS RTU ................................................................................................................... 19
5.8.2 MODBUS slave address ..................................................................................................... 19
5.8.3 Typical settings ................................................................................................................ 19
5.9 EVCO controllers and MODBUS ....................................................................................................... 19
5.10 Serial interface ......................................................................................................................... 20
5.11 Connecting MODBUS RTU units over RS485 line ............................................................................ 21
5.12 Connecting MODBUS RTU units over an external RS232-RS485 interface.......................................... 22
5.13 Connecting MODBUS RTU units via an external MODBUS TCP module .............................................. 22
5.14 Connecting MODBUS TCP units over an Ethernet connection ........................................................... 22
5.15 Defining slave nodes .................................................................................................................. 23
5.16 Autodiscovery of end-devices ...................................................................................................... 24
5.17 Device setup ............................................................................................................................. 25
5.18 Serial communication statistics ................................................................................................... 26
6
FTP CLIENT FEATURE .......................................................................................................................... 27
7
MODBUS BRIDGE ............................................................................................................................... 28
7.1 Accessing devices with a MODBUS TCP master ................................................................................. 28
Page 4

EVCO S.p.A. DADO | Installer manual ver. 2.0 | Code 144EVD2E204
page 4 of 34
8
WATCHDOG ....................................................................................................................................... 29
9
GPRS OPERATION .............................................................................................................................. 30
9.1 Setting up GPRS ........................................................................................................................... 30
10
APPENDIX LIST OF USED TCP/UDP PORTS ............................................................................................. 31
Page 5

EVCO S.p.A. DADO | Installer manual ver. 2.0 | Code 144EVD2E204
page 5 of 34
1 INTRODUCTION
1.1 Introduction
DADO is a series of internet / MODBUS gateways, which communicate with the CloudEvolution internet portal via
Ethernet using the existing network infrastructure (on EVD2ETHB30), Ethernet or GPRS (on EVD2ETHG30).
It has been designed to be as much firewall-friendly as possible and to require a low data traffic. Static IP address not
requested.
1.2 Basic knowledge needed to install a DADO
1.2.1 IP / Ethernet / Internet
A basic IP, Ethernet and Internet comprehension is required. You are supposed to know the meaning of IP network,
MAC address, DHCP, static address, router, hub, PAT/NAT, firewall and to be familiar with the network configuration of
your Windows PC.
1.2.2 Serial communication with devices and Modbus protocol
A basic RS485 serial communication knowledge is required, functioning and wiring, Modbus protocol addressing and
communication parameters like baud rate, parity and stop bits, termination resistance, line polarization, daisy chain.
1.3 DADO identification
Each DADO has a serial number and a MAC address. These alphanumeric codes identify a DADO in the world,
regardless in which network it is located.
The serial number depends on the MAC address.
These codes can be found on the DADO side label.
Page 6
EVCO S.p.A. DADO | Installer manual ver. 2.0 | Code 144EVD2E204
page 6 of 34
2 DESCRIPTION
2.1 Description of DADO Ethernet interface
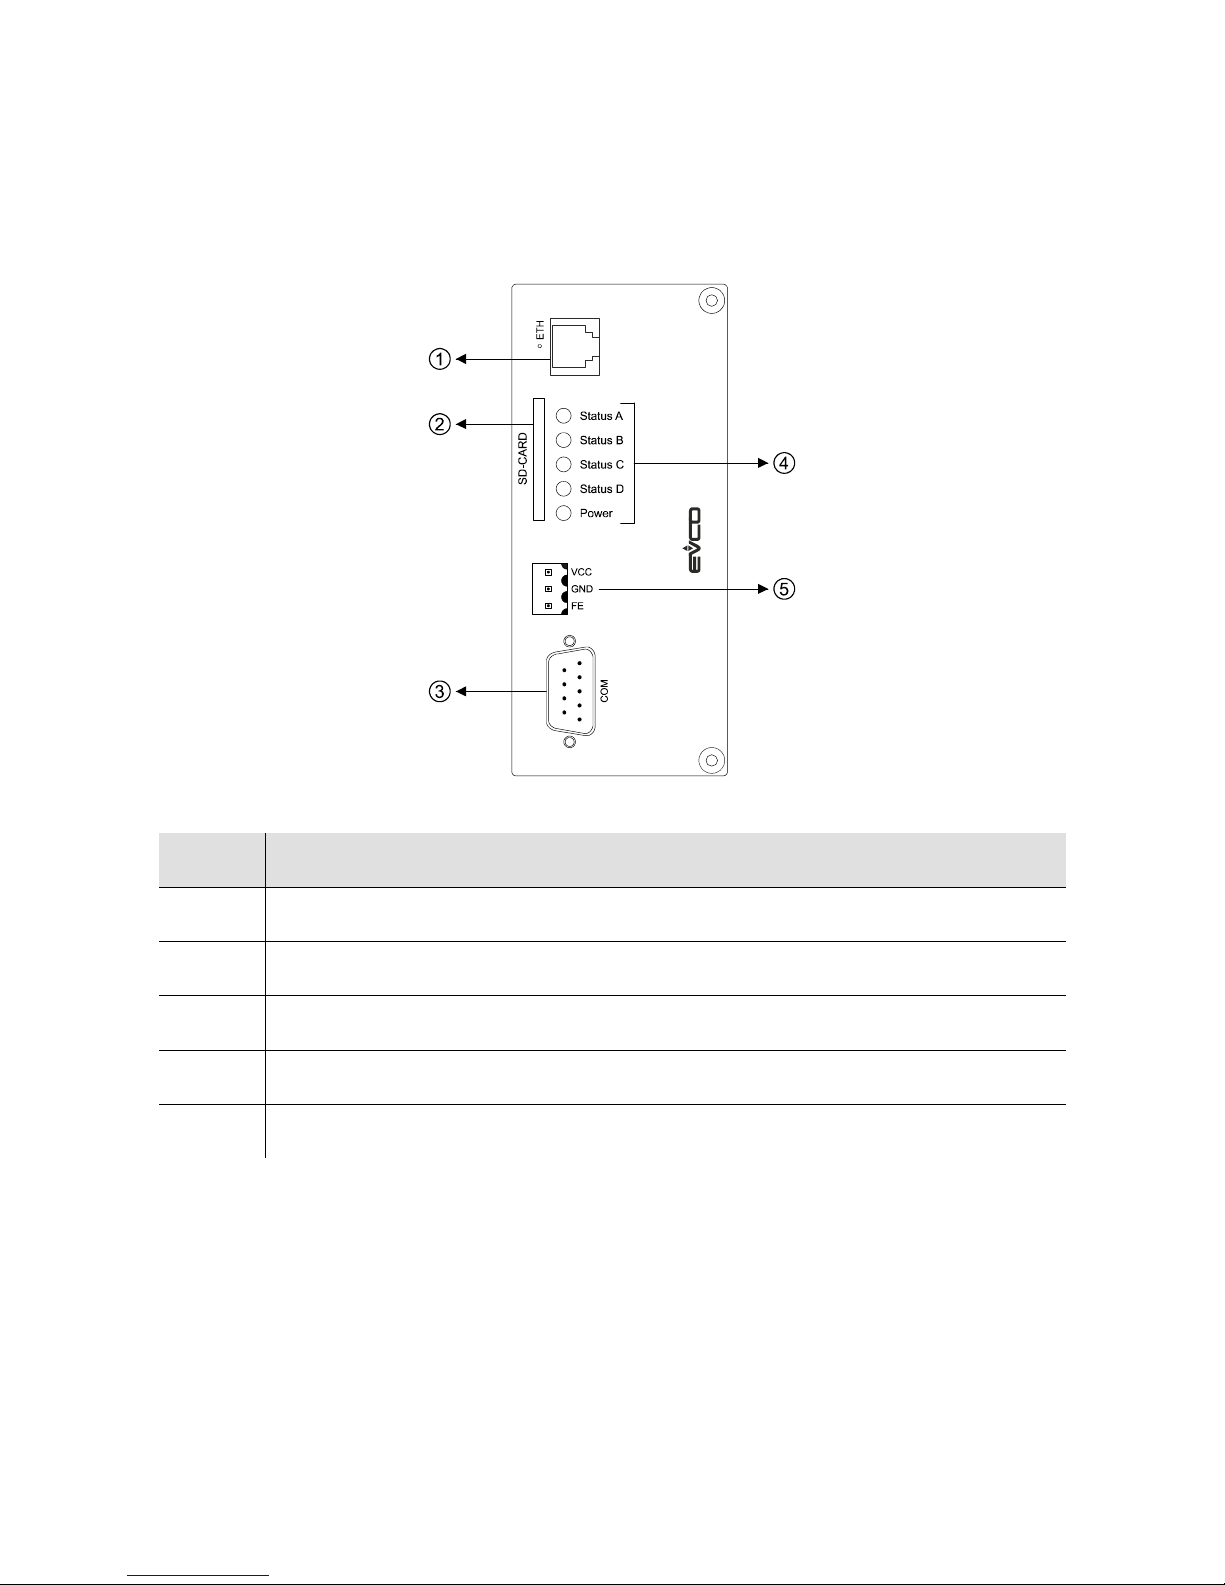
The following drawing shows the DADO Ethernet interface.
The following table describes DADO Ethernet interface parts.
Part Description
1 Ethernet port
2 SD card slot
3 COM port
4 Status LEDs
5 Power supply connector
For further information, see the next chapters.
Page 7
EVCO S.p.A. DADO | Installer manual ver. 2.0 | Code 144EVD2E204
page 7 of 34
2.2 Description DADO Ethernet/GRPS interface
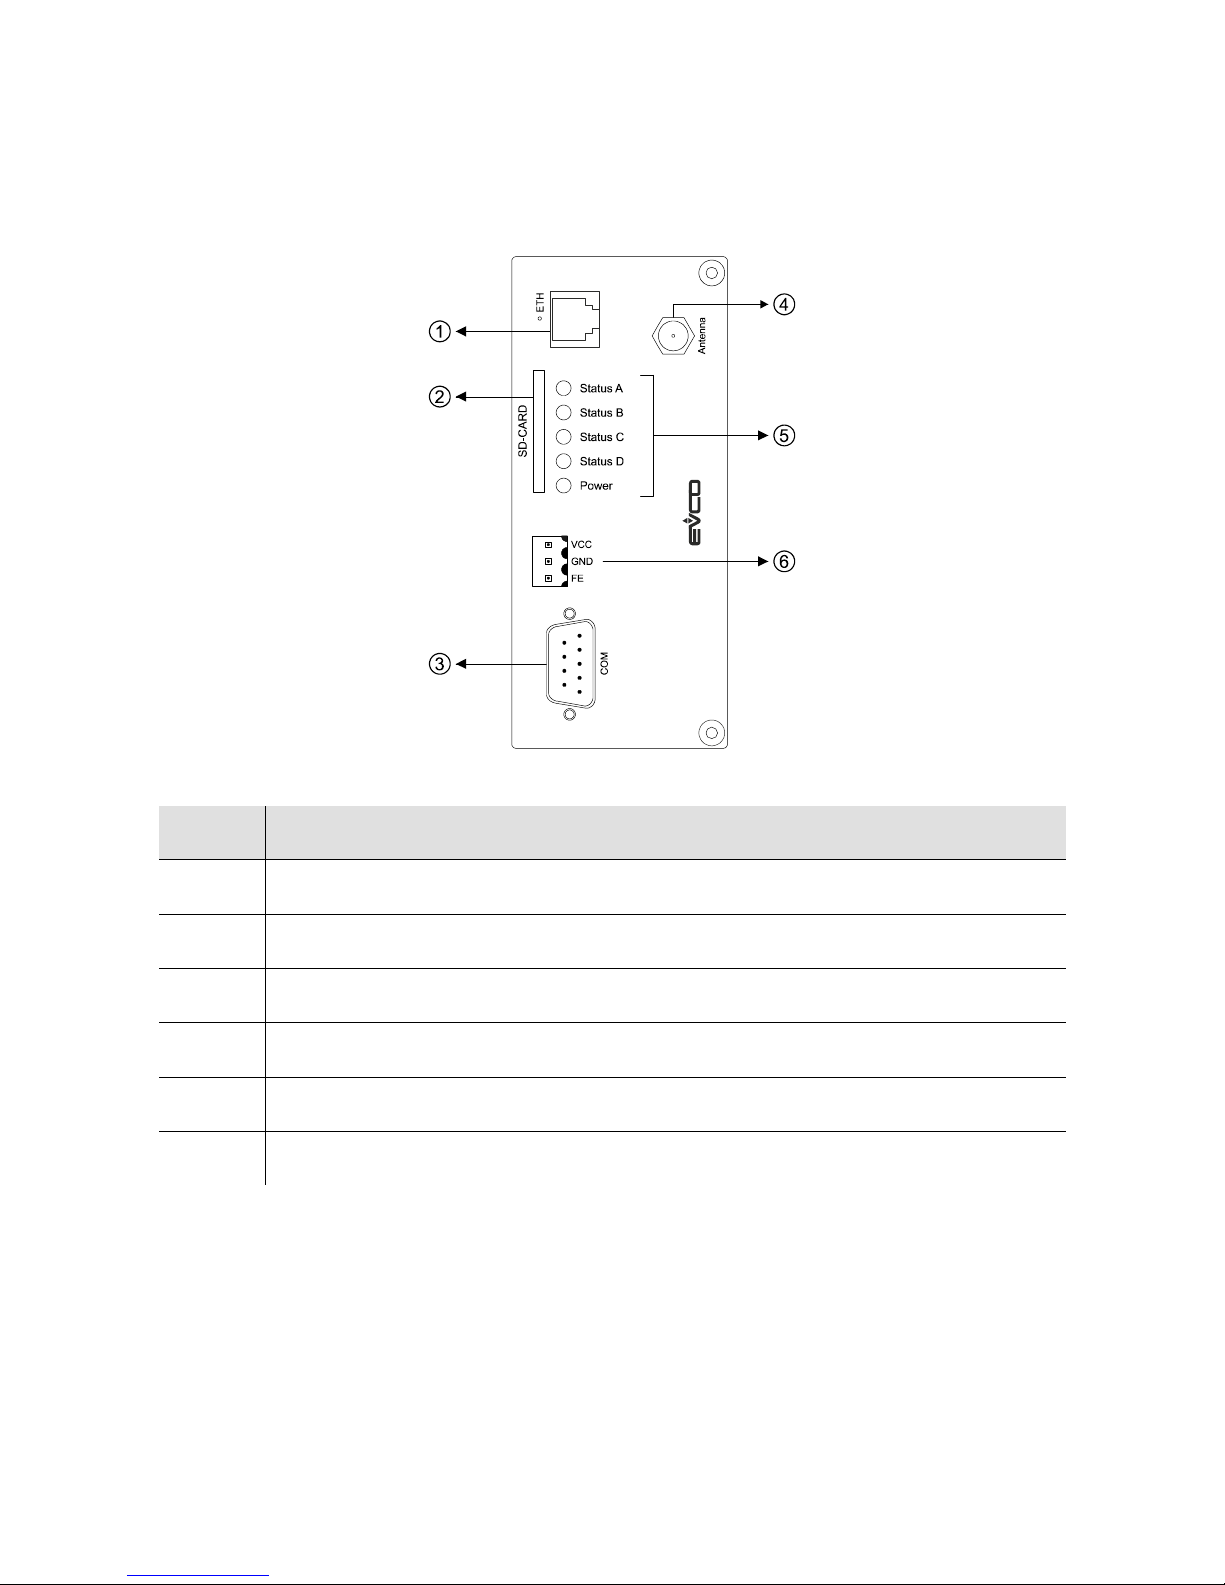
The following drawing shows the DADO Ethernet/GPRS interface.
The following table describes DADO Ethernet/GRSP interface parts.
Part Meaning
1 Ethernet port
2 SD card slot
3 COM port
4 Antenna connector
5 Status LEDs
6 Power supply connector
For further information, see the following chapters.
Page 8
EVCO S.p.A. DADO | Installer manual ver. 2.0 | Code 144EVD2E204
page 8 of 34
3 DIMENSIONS AND INSTALLATION
3.1 DADO dimensions
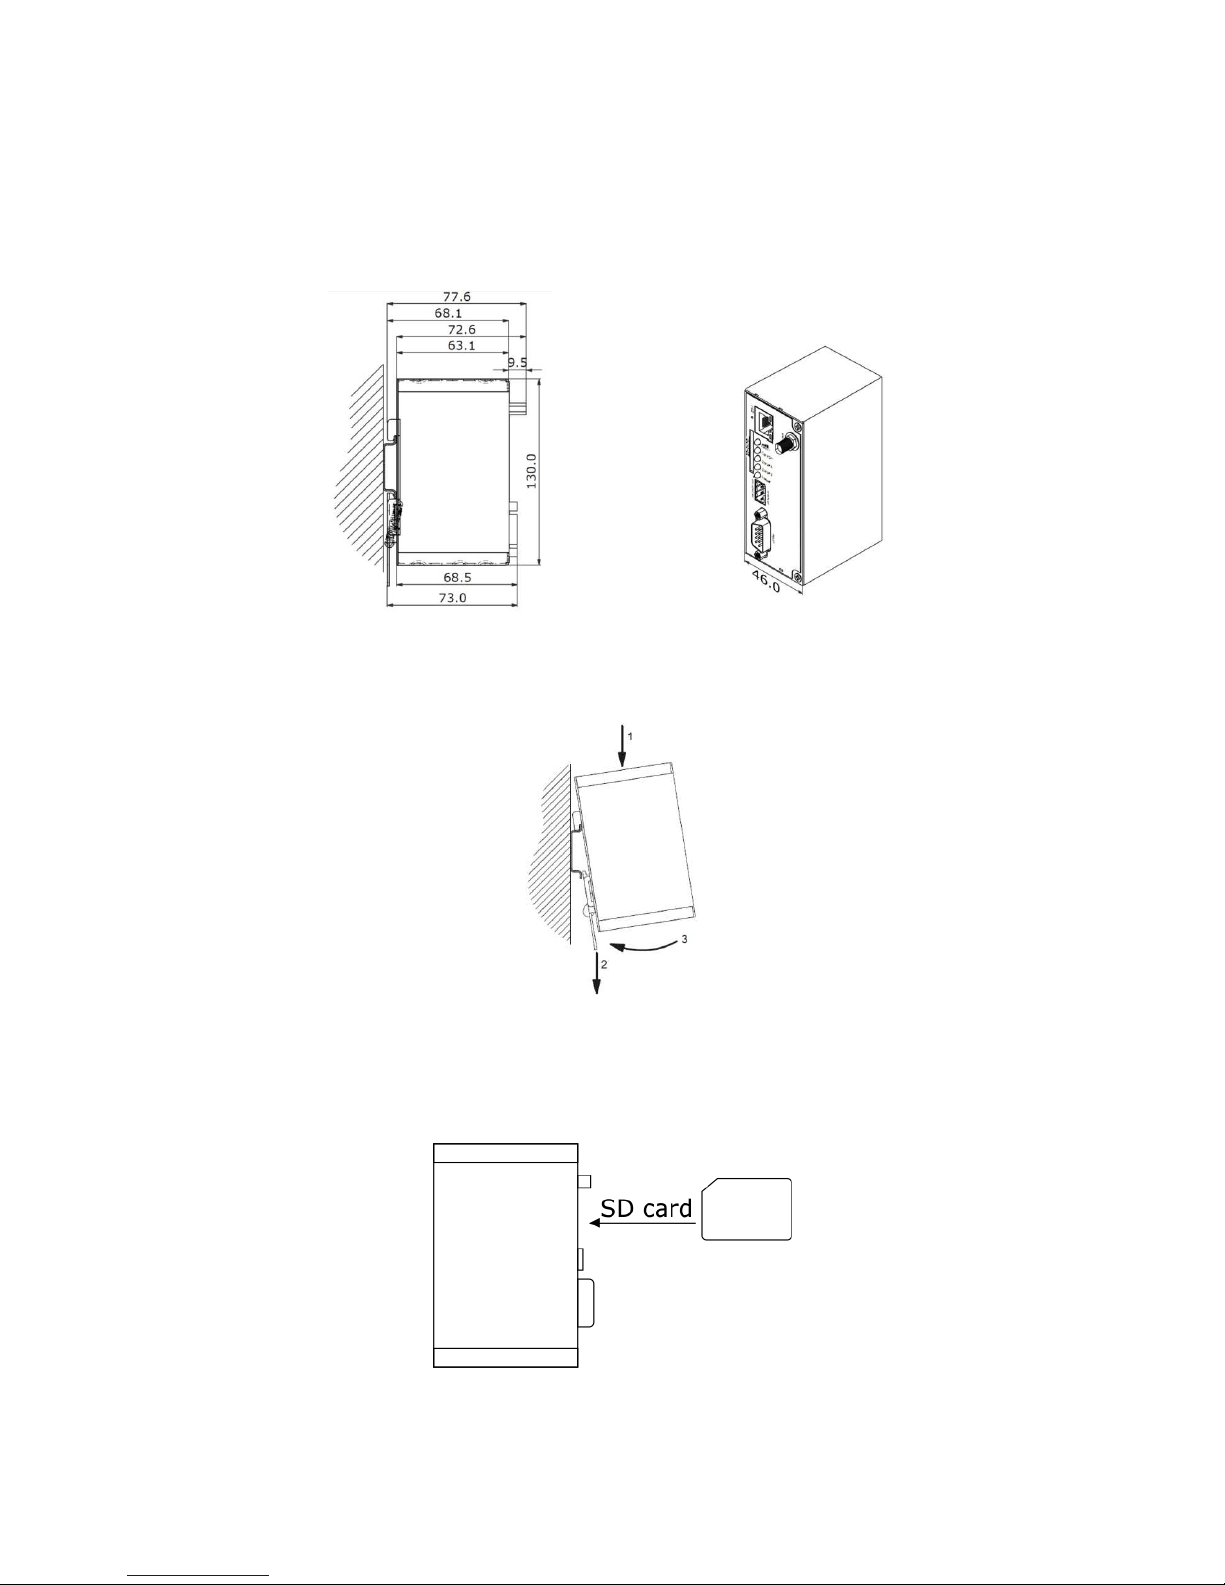
The DADO dimensions, expressed in mm, are indicated in the following drawing.
3.2 DADO installation
DADO is made for DIN rail installation.
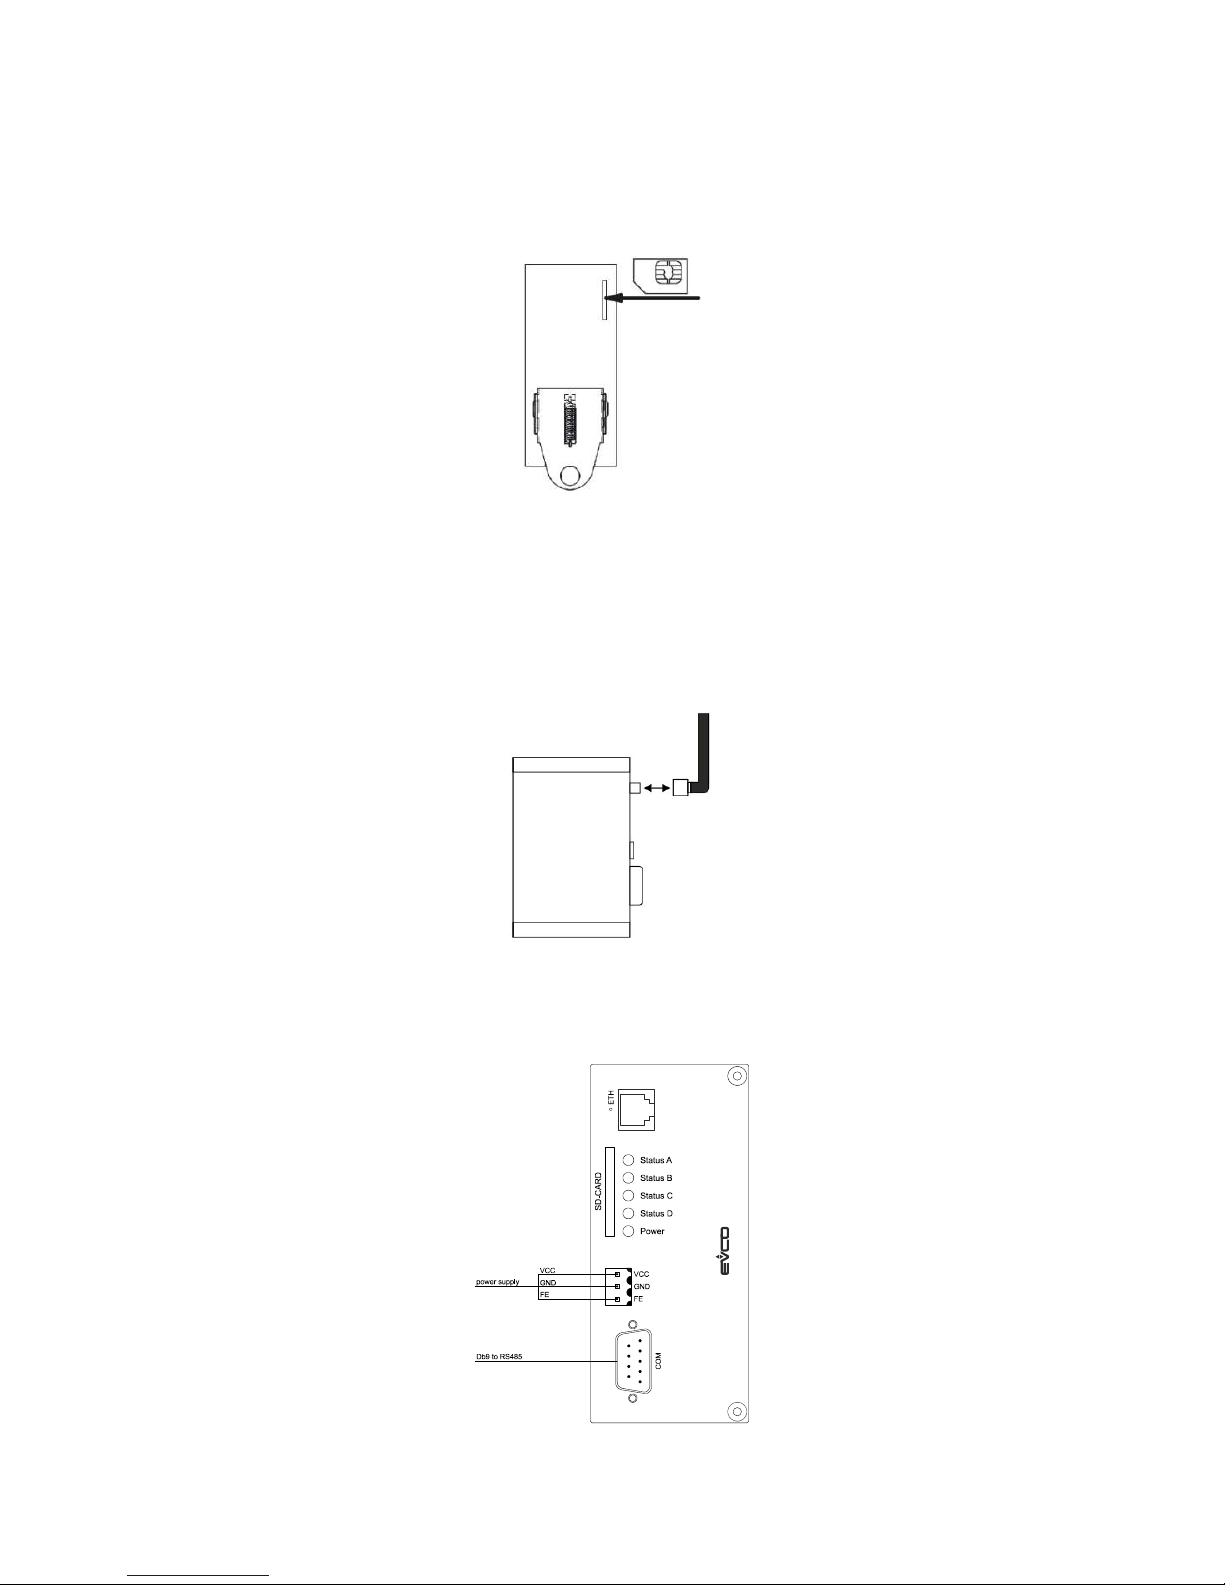
3.2.1 Inserting SD-Card
SD-Card must be inserted in the following way.
Page 9
EVCO S.p.A. DADO | Installer manual ver. 2.0 | Code 144EVD2E204
page 9 of 34
3.2.2 Inserting Sim Card (only for GPRS version)
Insert the SIM card in the device rear before the installation on the DIN rail, The device must be switched off (only on
EVD2ETHG30). It is recommended to remove the SIM card PIN before use in the device, to do this, insert the SIM card
inside a mobile phone and follow the documentation of the mobile phone to perform this operation.
3.2.3 Antenna mounting
Never use the device in areas where the operation of wireless equipment is prohibited. The location for the antenna
must guarantee the recommended radio electromagnetic limits (be at least 20 cm from persons and other antennas).
When the antenna is installed outdoors the lightning protection standard VDE V0185 must be complied with. The EMC
lightning protection zone concept must be observed. The device must be switched off during work on the antenna. It
can not be guaranteed that there will not be any harmful interference for other devices. In case of interferences install
the device or the antenna in another location (only for EVD2ETHG30).
3.3 ELECTRIC CONNECTION
The following drawing illustrates the DADO electric connection.
Page 10
EVCO S.p.A. DADO | Installer manual ver. 2.0 | Code 144EVD2E204
page 10 of 34
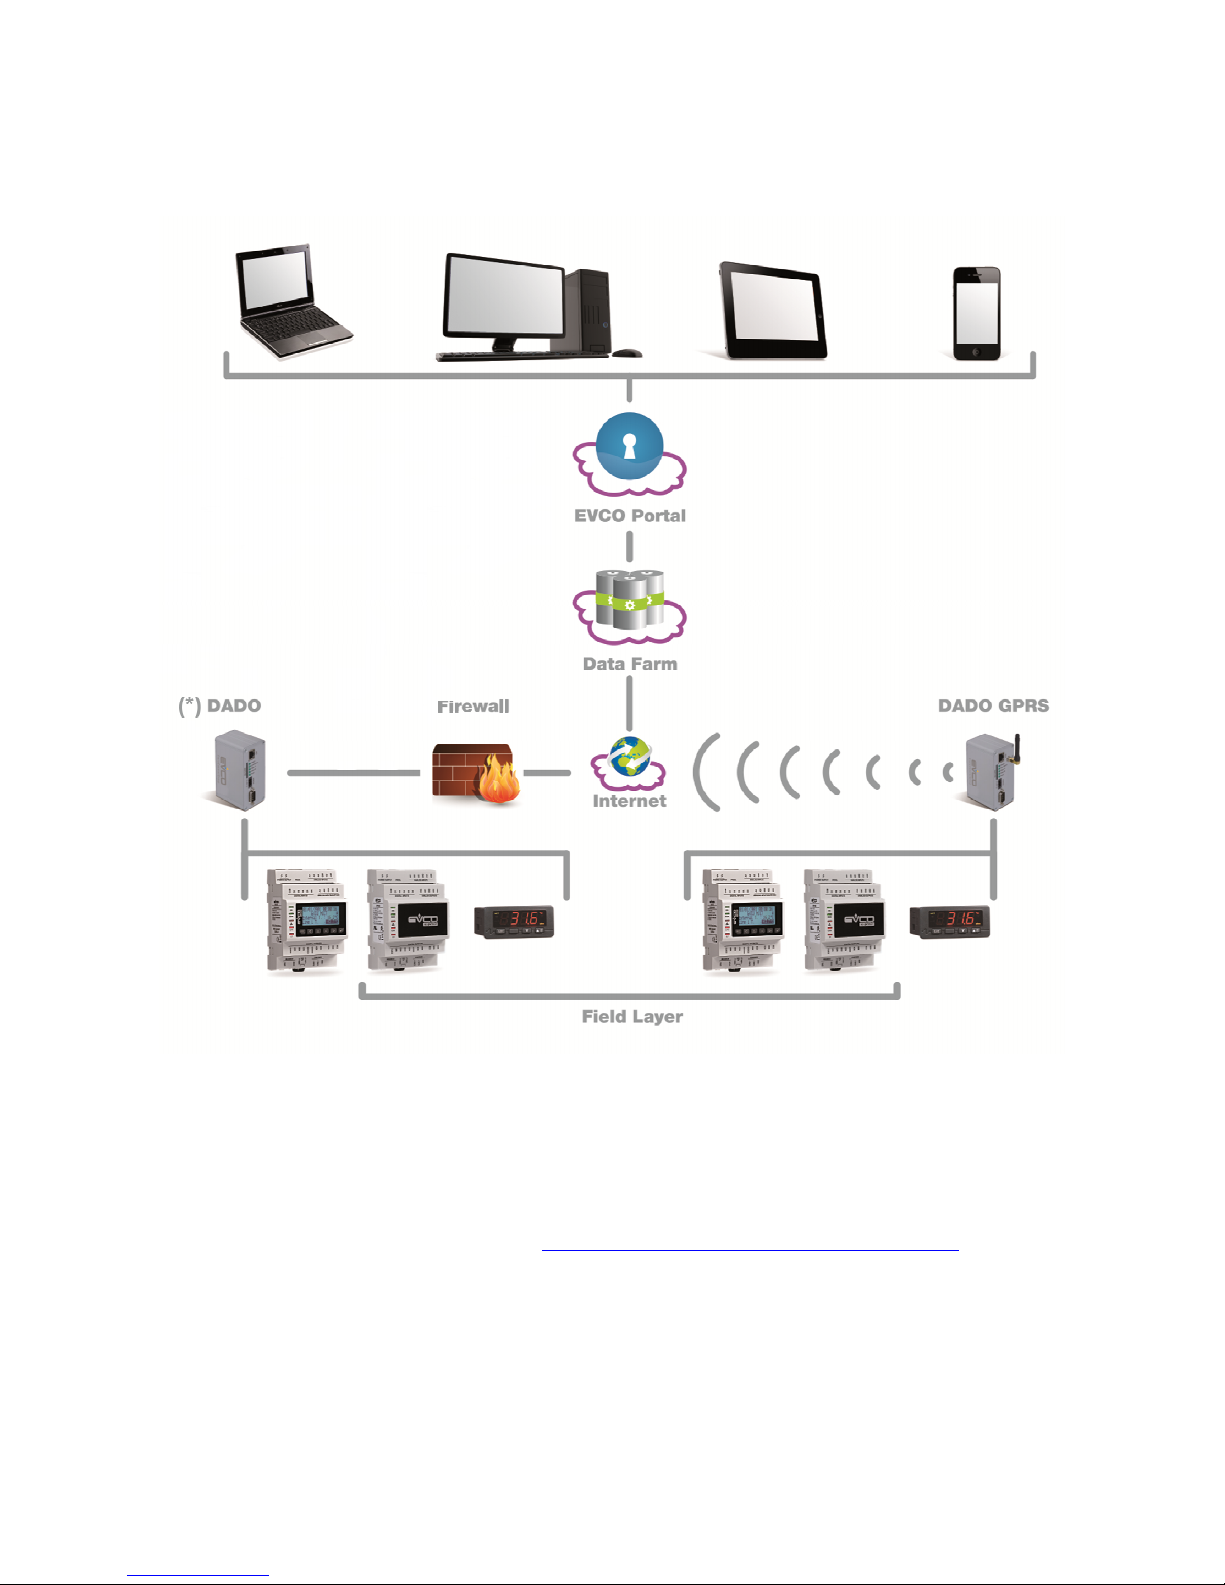
4 HOW IT WORKS
The following scheme illustrate the full system working.
(*)
: An external Wi-Fi adapter can be used for wireless connection to a Wi-Fi Hot Spot.
4.1 Preliminary configuration
When configuring DADO for the first time, you need first to establish a TCP/IP connection via ETHERNET port.
Note: Download the DADO_CFG software from http://www.evco.it/assets/doc/DADO_IPCFG_setup.zip . To run the
software, a Windows PC is required.
Page 11
EVCO S.p.A. DADO | Installer manual ver. 2.0 | Code 144EVD2E204
page 11 of 34
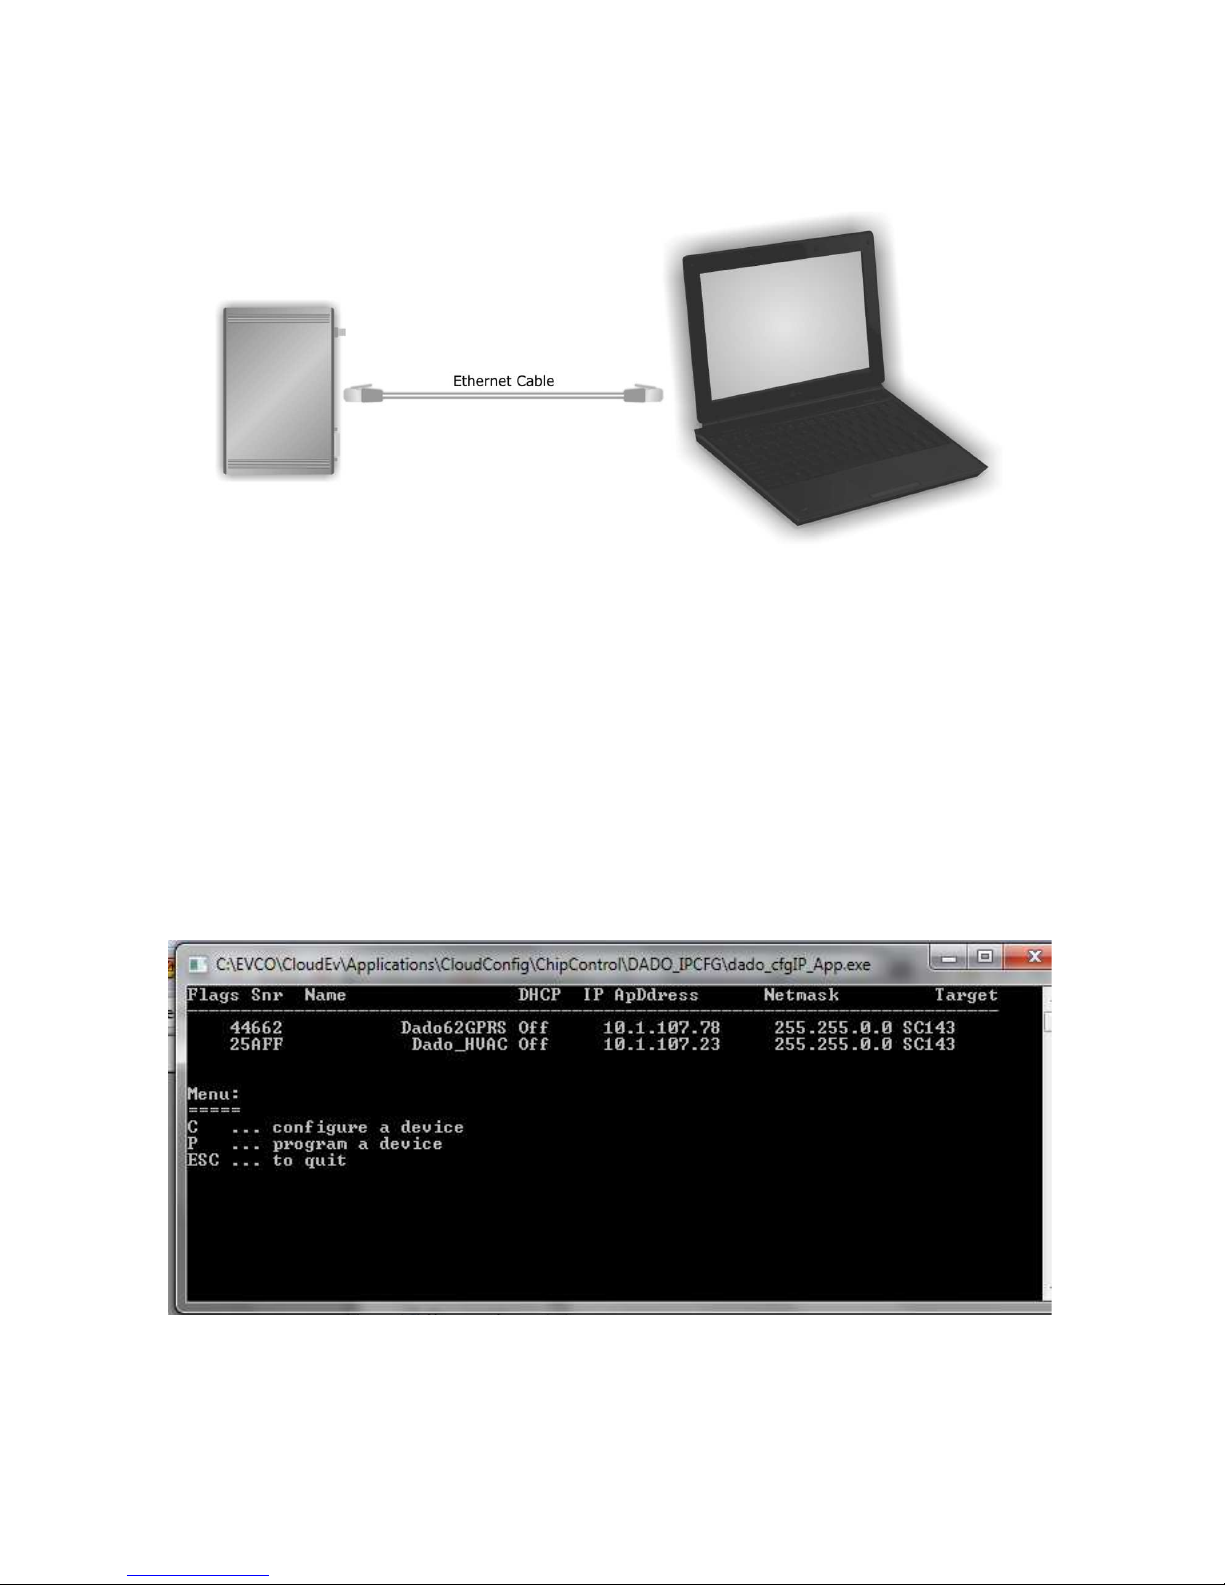
4.2 Connection to PC with direct Ethernet cable
Connect the Ethernet cable between DADO and PC.
Depending on the PC, a special Ethernet cross cable maybe required. Modern PCs usually don’t require this, so in
many cases also a common Ethernet cable can be used.
It is also possible to connect DADO with an Ethernet switch using two standard Ethernet cables.
After the connection between DADO and the PC is established, supply power to DADO and then run the DADO_CFG
software.
Note: It is not recommended to use the internal LAN for doing the first setup, because this can cause network
conflicts. It is recommended to configure the devices before connecting them on the internal LAN.
4.3 Installing DADO in the user LAN
Run DADO_CFG software, press key “C” (never press “P”) and set the values as requested by the software, then
reboot the device.
Whenever the DADO must be connected to the pre-existing LAN, it is necessary to require from your IT manager the
proper configuration to be used.
Page 12
EVCO S.p.A. DADO | Installer manual ver. 2.0 | Code 144EVD2E204
page 12 of 34
Your LAN could be using DHCP (dynamic IP addresses assignment). In case your LAN does not use DHCP, it is required
to program the DADO only according to the IT manager indication. A bad configuration can generate network conflicts
to equipment in your LAN, like PCs, servers, printers, and so on.
Setting: DHCP yes or no?
IP
MASK
Gateway
It is recommended to check static IP addresses using the ping command before configuring DADO.
4.4 Finishing Internet configuration
When the preliminary IP configuration phase is done, DADO can be connected to the Ethernet LAN. Finish the
configuration using internet browser to connect to the internal web server.
Type “http://IP address” , i.e. if the IP address is 192.168.1.100 you must type in the browser http://192.168.1.100.
In case of connection failure check your firewall settings (if a firewall software is present on your PC, an “exception
rule” may be needed) and check if Javascript is enabled.
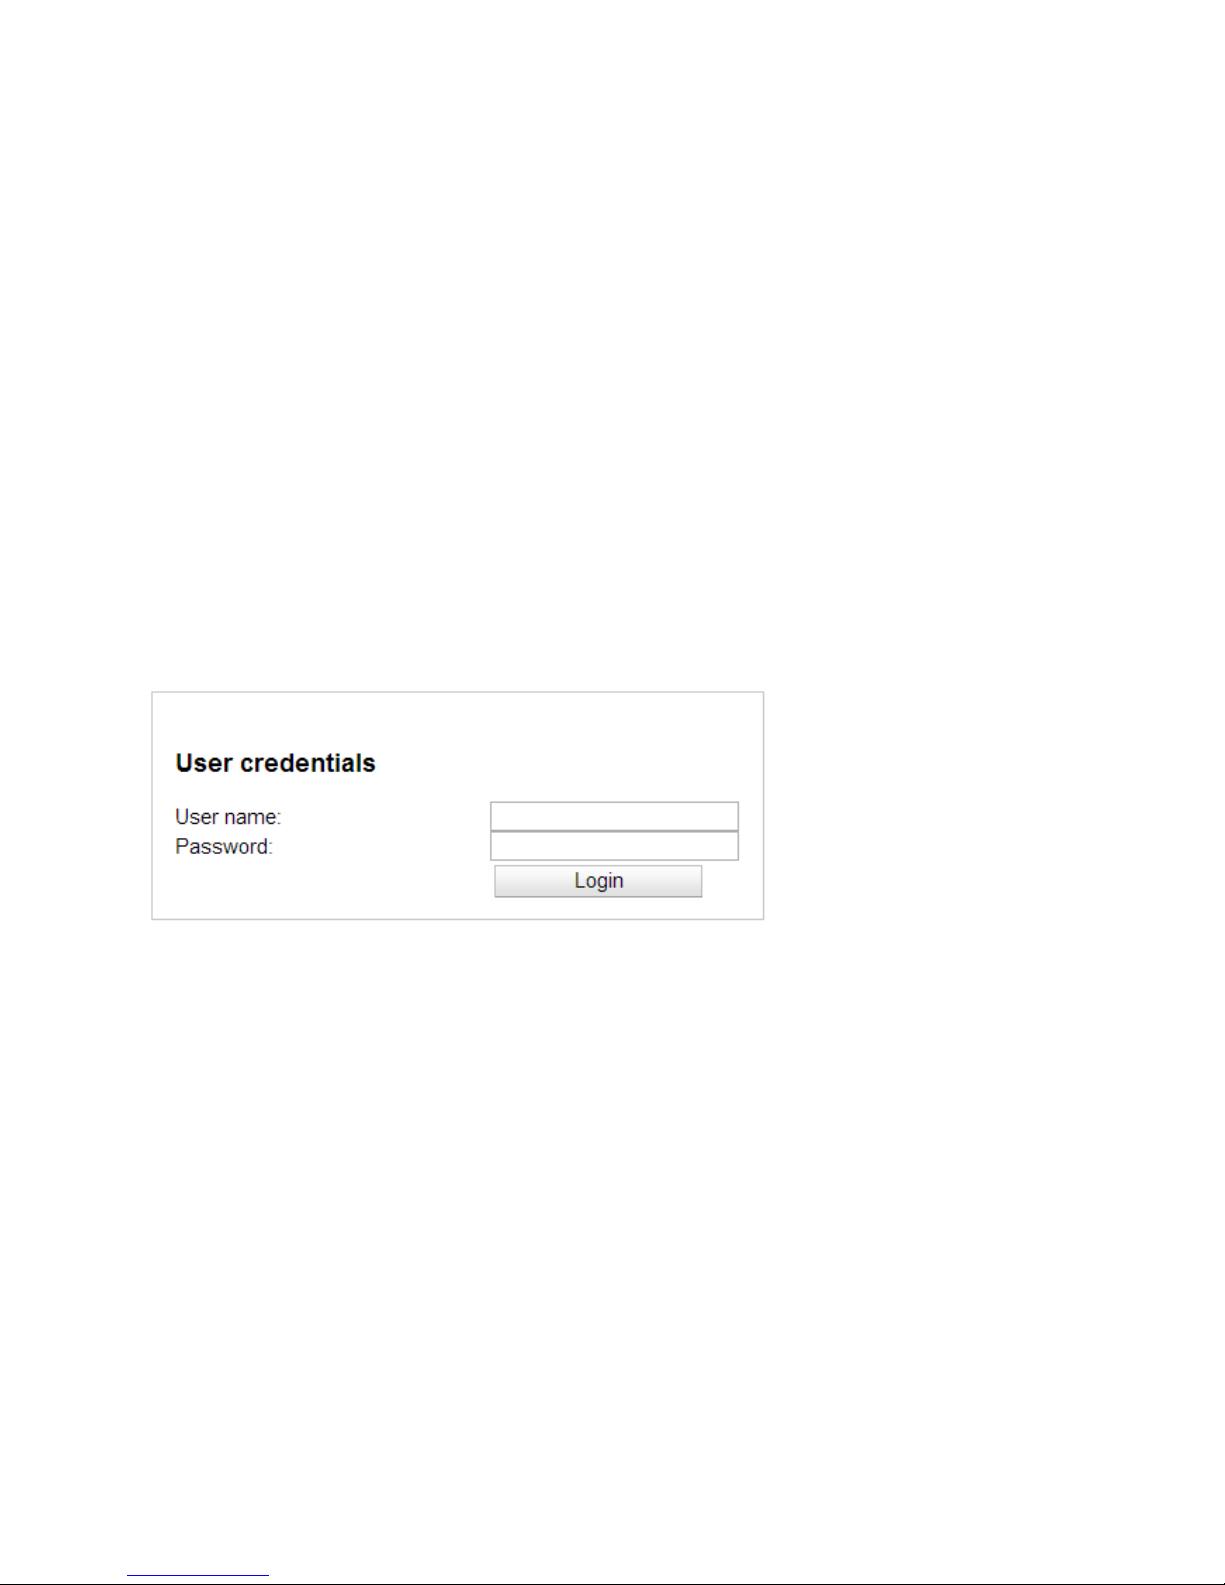
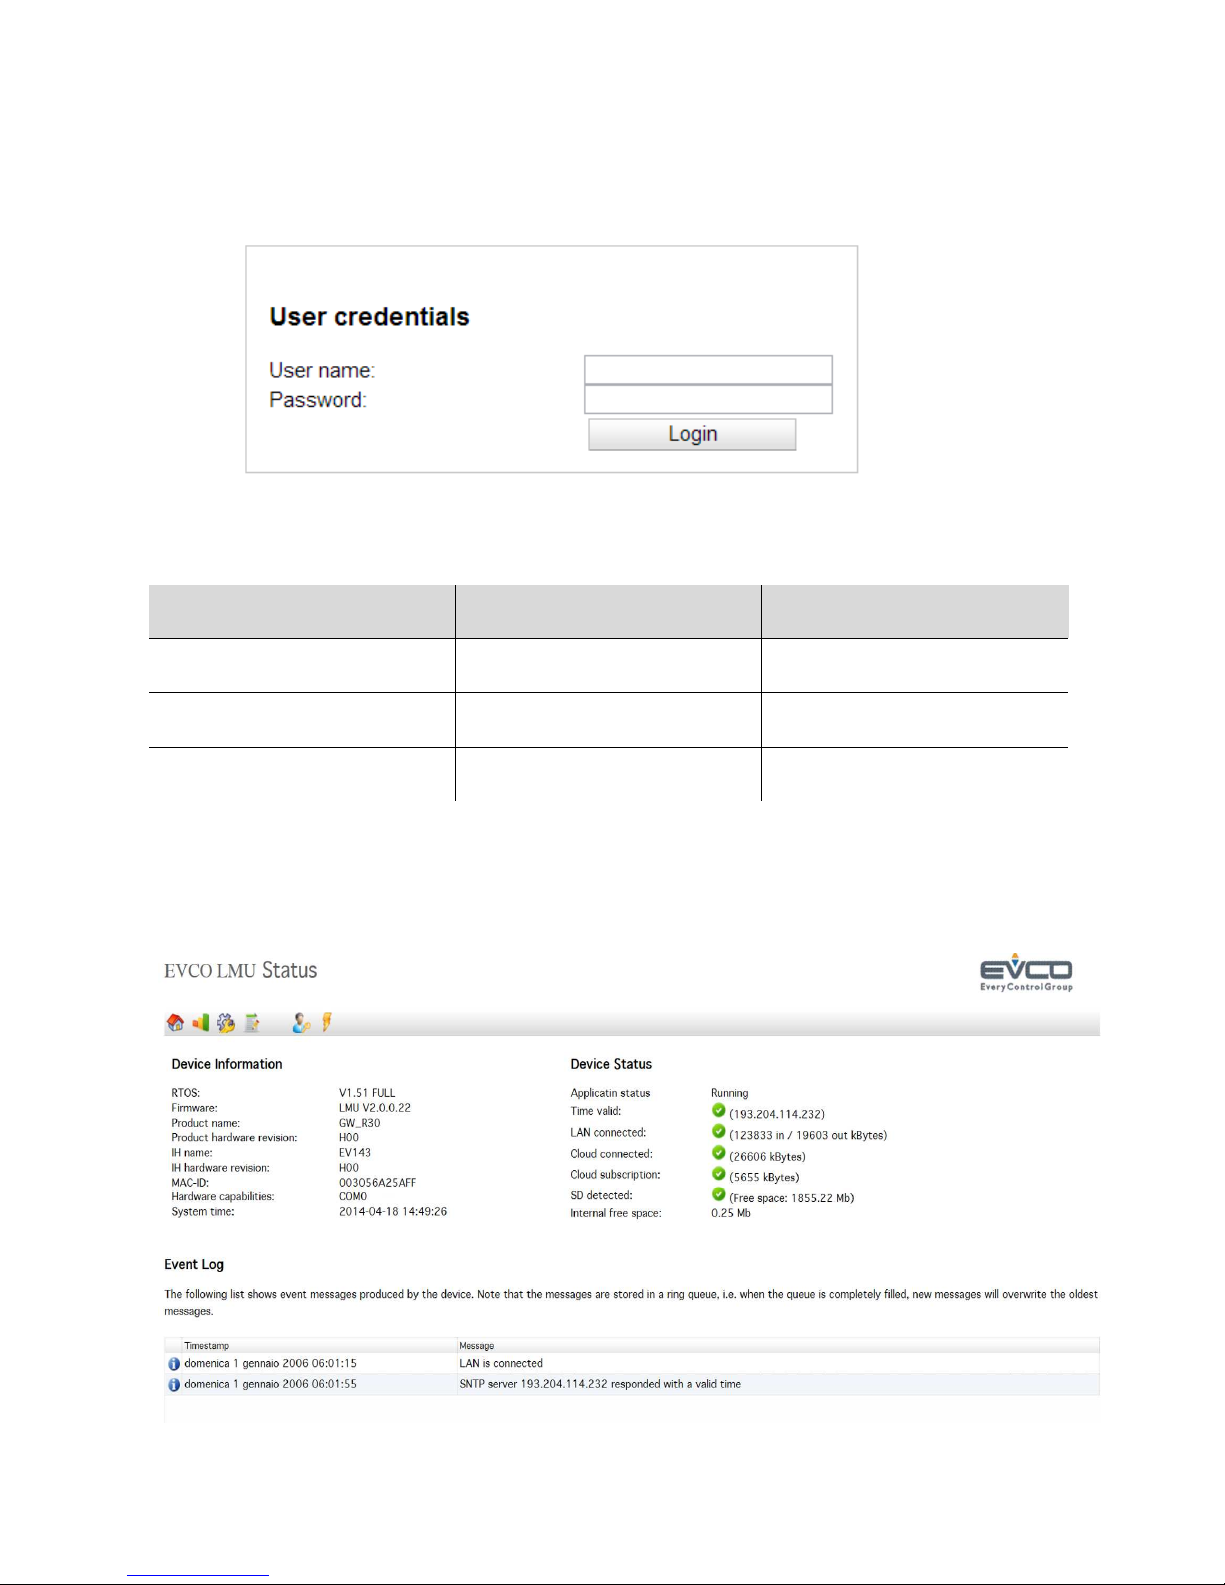
If all is correct, the following login page will be displayed.
See the User Accounts chapter to get more information on how to login to the DADO internal web server.
Check paragraph 5.6 for information on Network configuration; chapter 5.4 for the status of network settings, chapter
4.1 to see Preliminary Setup.
Page 13
EVCO S.p.A. DADO | Installer manual ver. 2.0 | Code 144EVD2E204
page 13 of 34
5 DADO internal web server
5.1 User accounts
Use the “installerHigh” account to login. See password in the table below.
Predefined User accounts User name Password
User/user User user
installerLow installerLow xyz01w
installerHigh installerHigh xyz02h
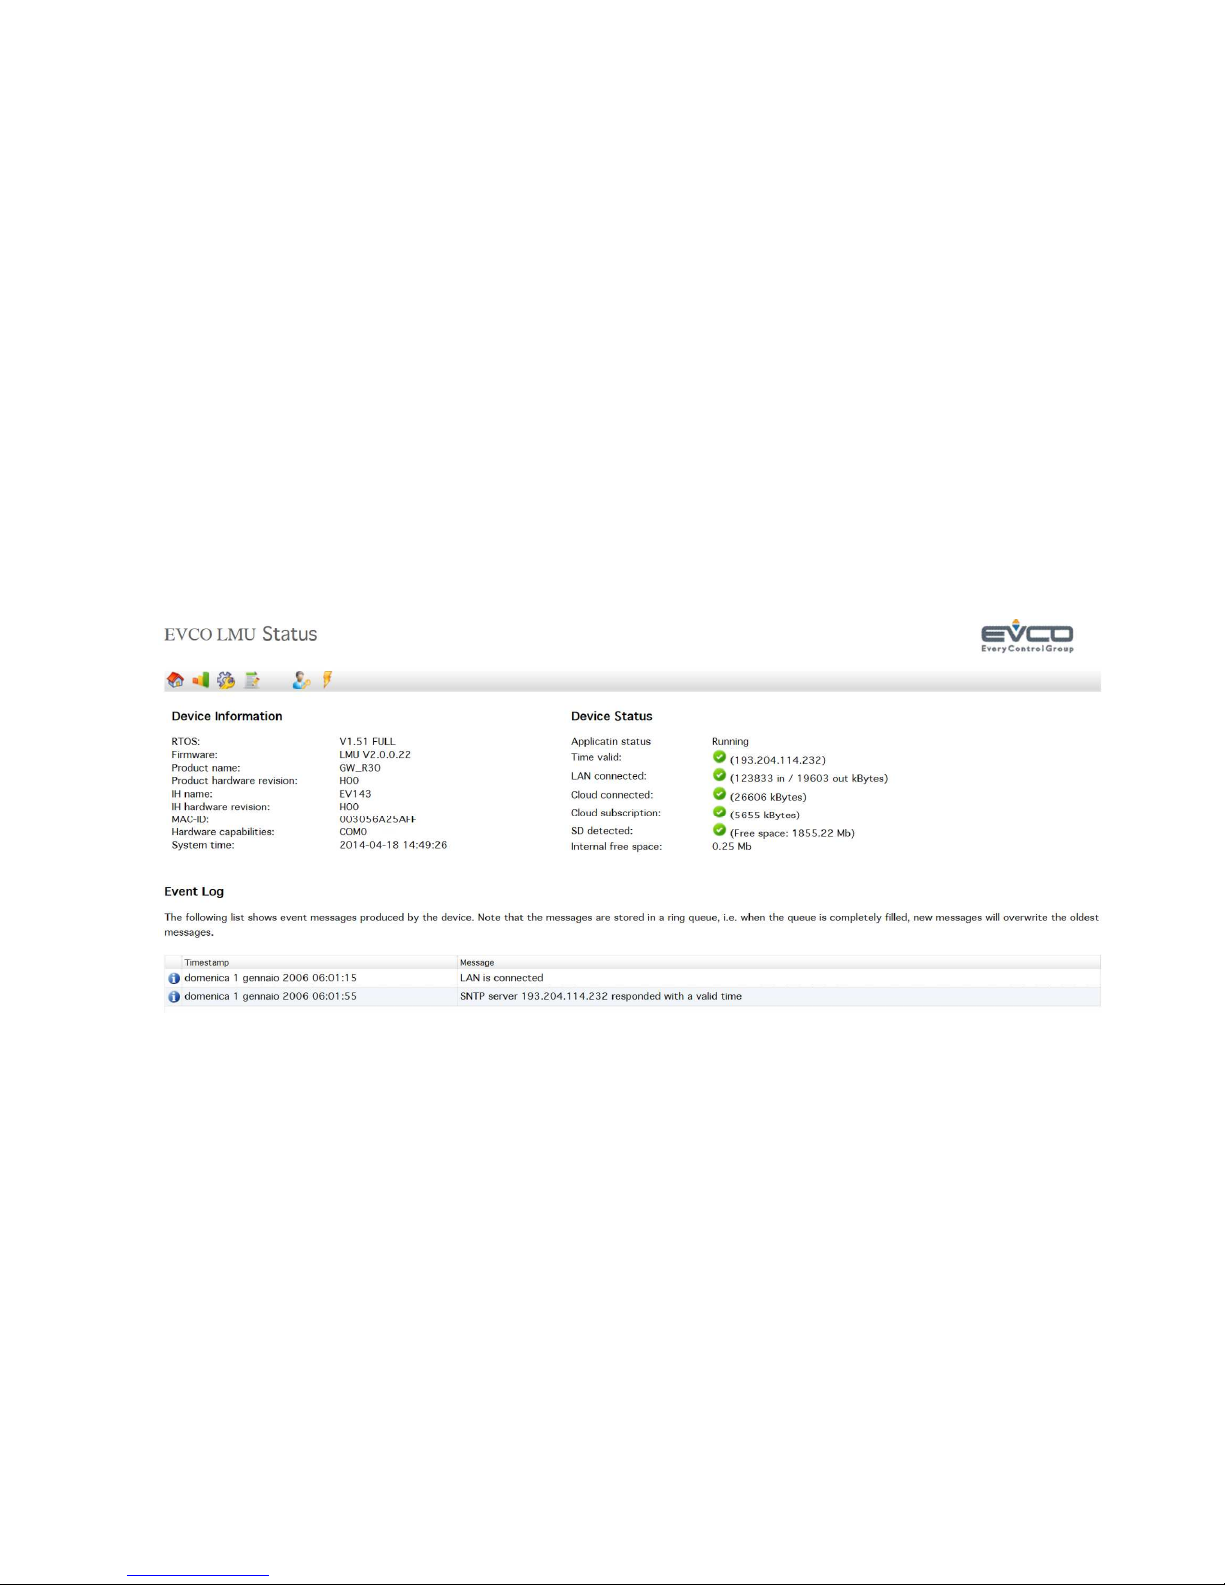
5.2 Network operation status
In the first page of the web server it is possible to check details about the LAN/Internet communication
Page 14
EVCO S.p.A. DADO | Installer manual ver. 2.0 | Code 144EVD2E204
page 14 of 34
5.3 Trouble-shooting network problems
In case of no operation:
- check the IP configuration against network conflicts
- check if the gateway can be reached
- check if time server sent a valid time
- check “cloud connection” status
- check “cloud subscription” status
- Check that TCP/UDP ports are allowed by the firewall (see appendix chapter 10 for the list of involved ports).
The fastest way to check and fix network/Internet issues is to use a Windows PC in the same LAN, this way it is
possible to check configuration and status. See the following paragraph for some tooltip about how to configure your
netbook in the LAN.
5.4 Status page
After logging in you will see the status page that contains:
- device information: it gives info about DADO firmware/hardware
- device status: it is a useful tool to see the present status of internet and devices connections
- event log: shows important events, useful to check the status.
Meaning of the most important items:
- RTOS: Real Time Operating System
- Product name: an internal code identifying the kind of DADO
- MAC-ID: It is the Ethernet MAC address
- System Time: you should see your current time
Page 15
EVCO S.p.A. DADO | Installer manual ver. 2.0 | Code 144EVD2E204
page 15 of 34
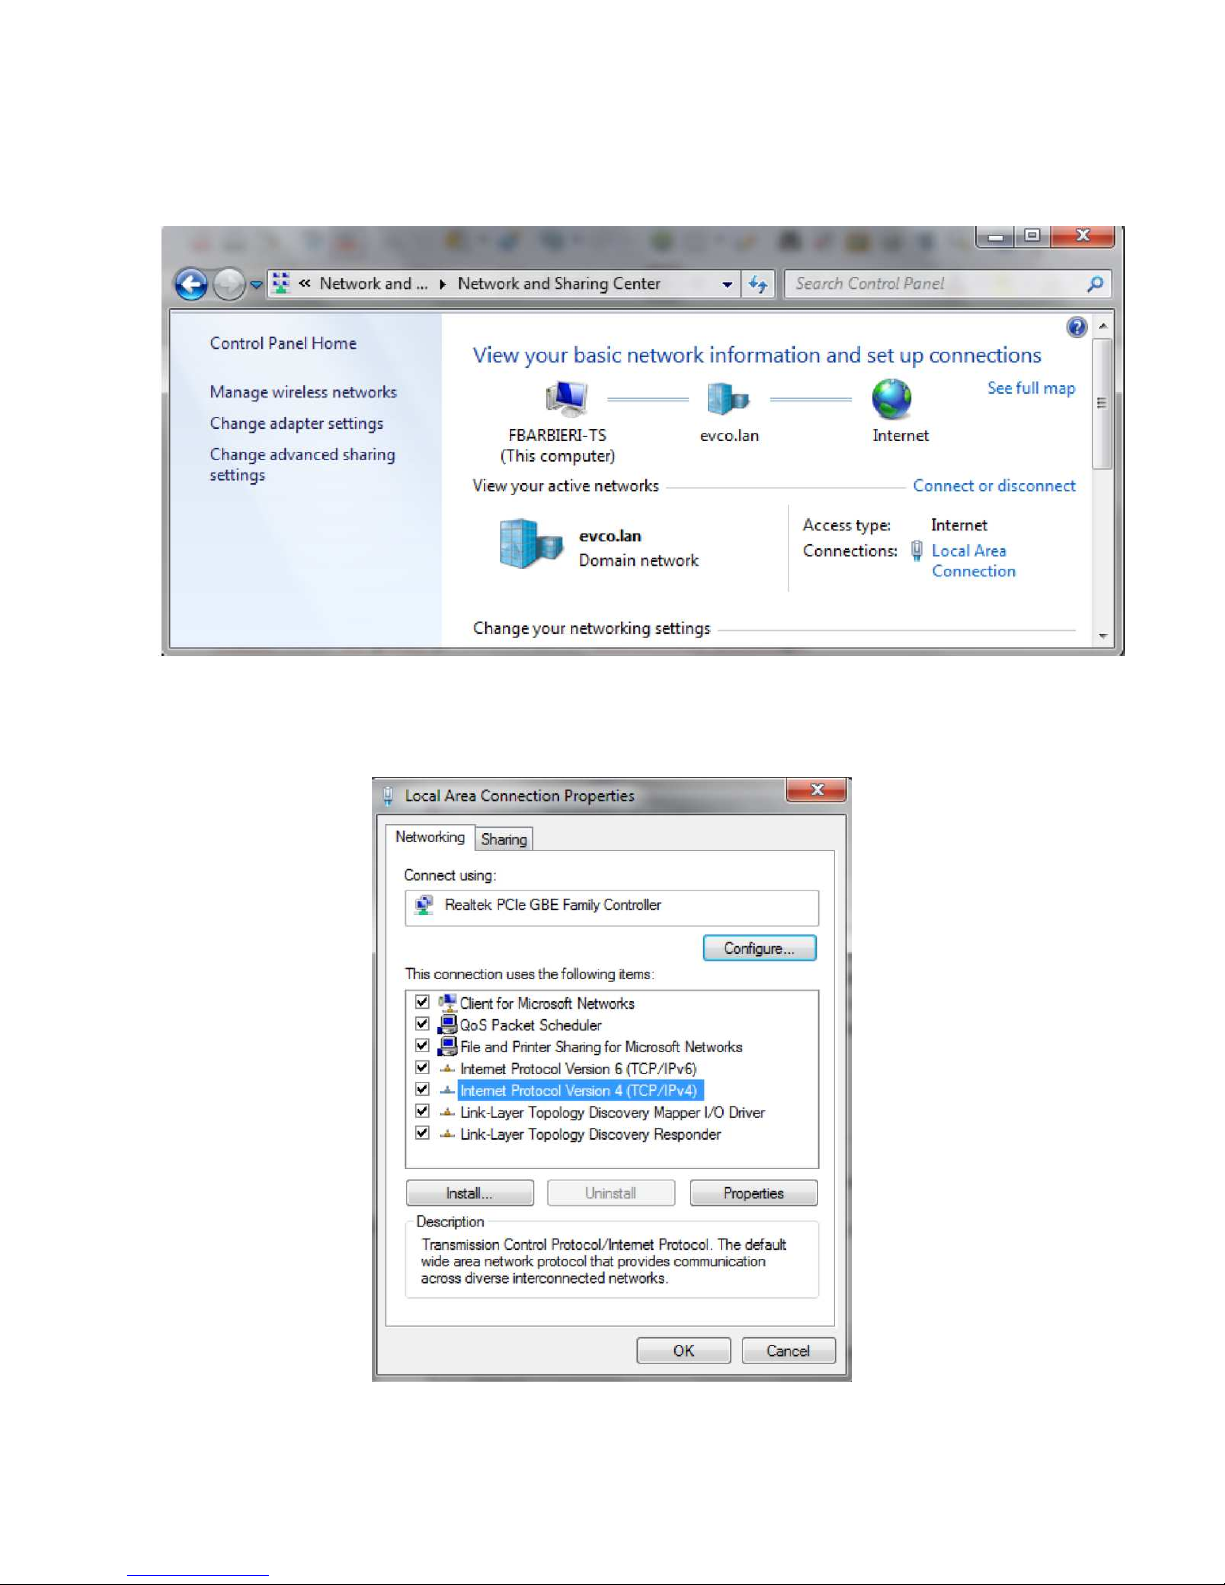
5.5 Setting Windows PC to be in user’s LAN
Go to control panel/Network and Internet/Network and sharing centre.
Open Change adapter settings, select Ethernet connection, then properties.
Note: Take note of your current LAN/Ethernet settings to restore configuration.
Page 16
EVCO S.p.A. DADO | Installer manual ver. 2.0 | Code 144EVD2E204
page 16 of 34
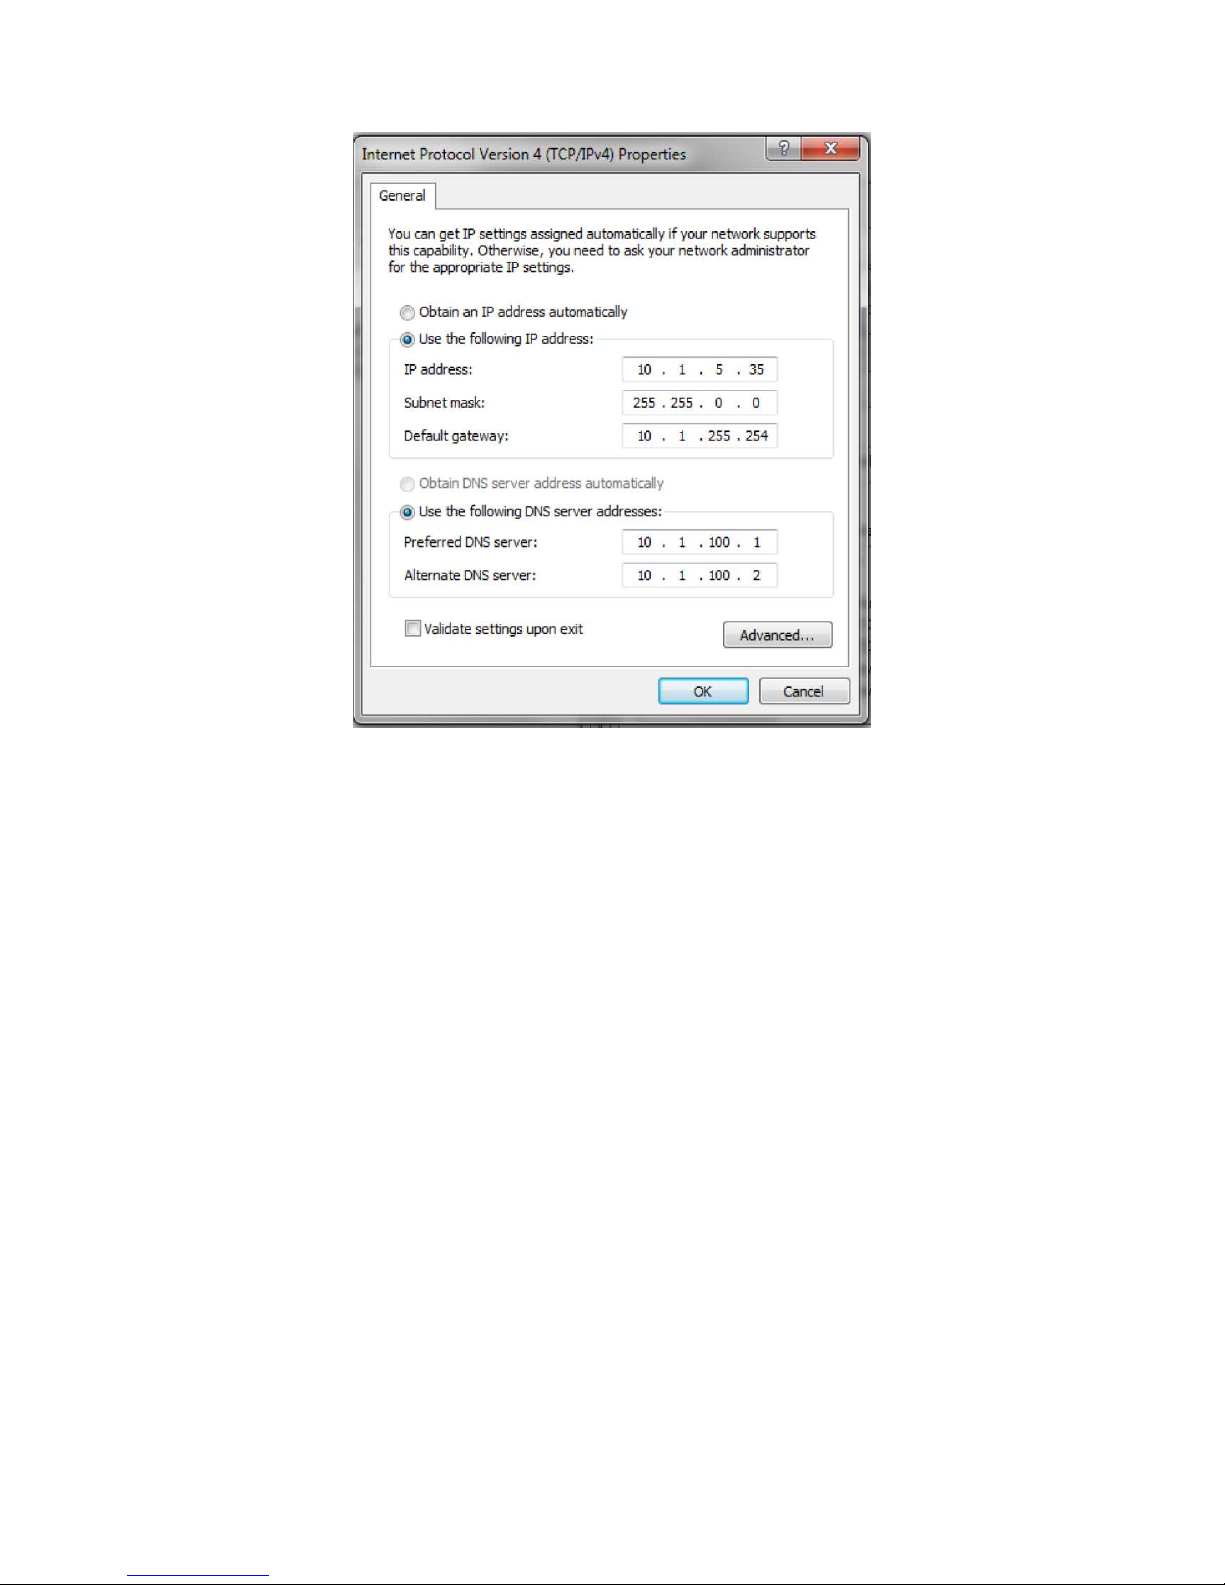
Properties of IPv4
Configure the IP address, mask, gateway, DNS1 (and DNS2 or leave empty) according to settings assigned by the I.T.
manager.
Be sure the Wi-Fi connection is disabled.
The IP address could be static or assigned dynamically via DHCP.
When IP is assigned via DHCP usually also the gateway address is automatic, but in some networks IP is dynamic
while the gateway must be specified statically.
DADO and PC must have their own IP address (usually only last part is different).
Page 17
EVCO S.p.A. DADO | Installer manual ver. 2.0 | Code 144EVD2E204
page 17 of 34
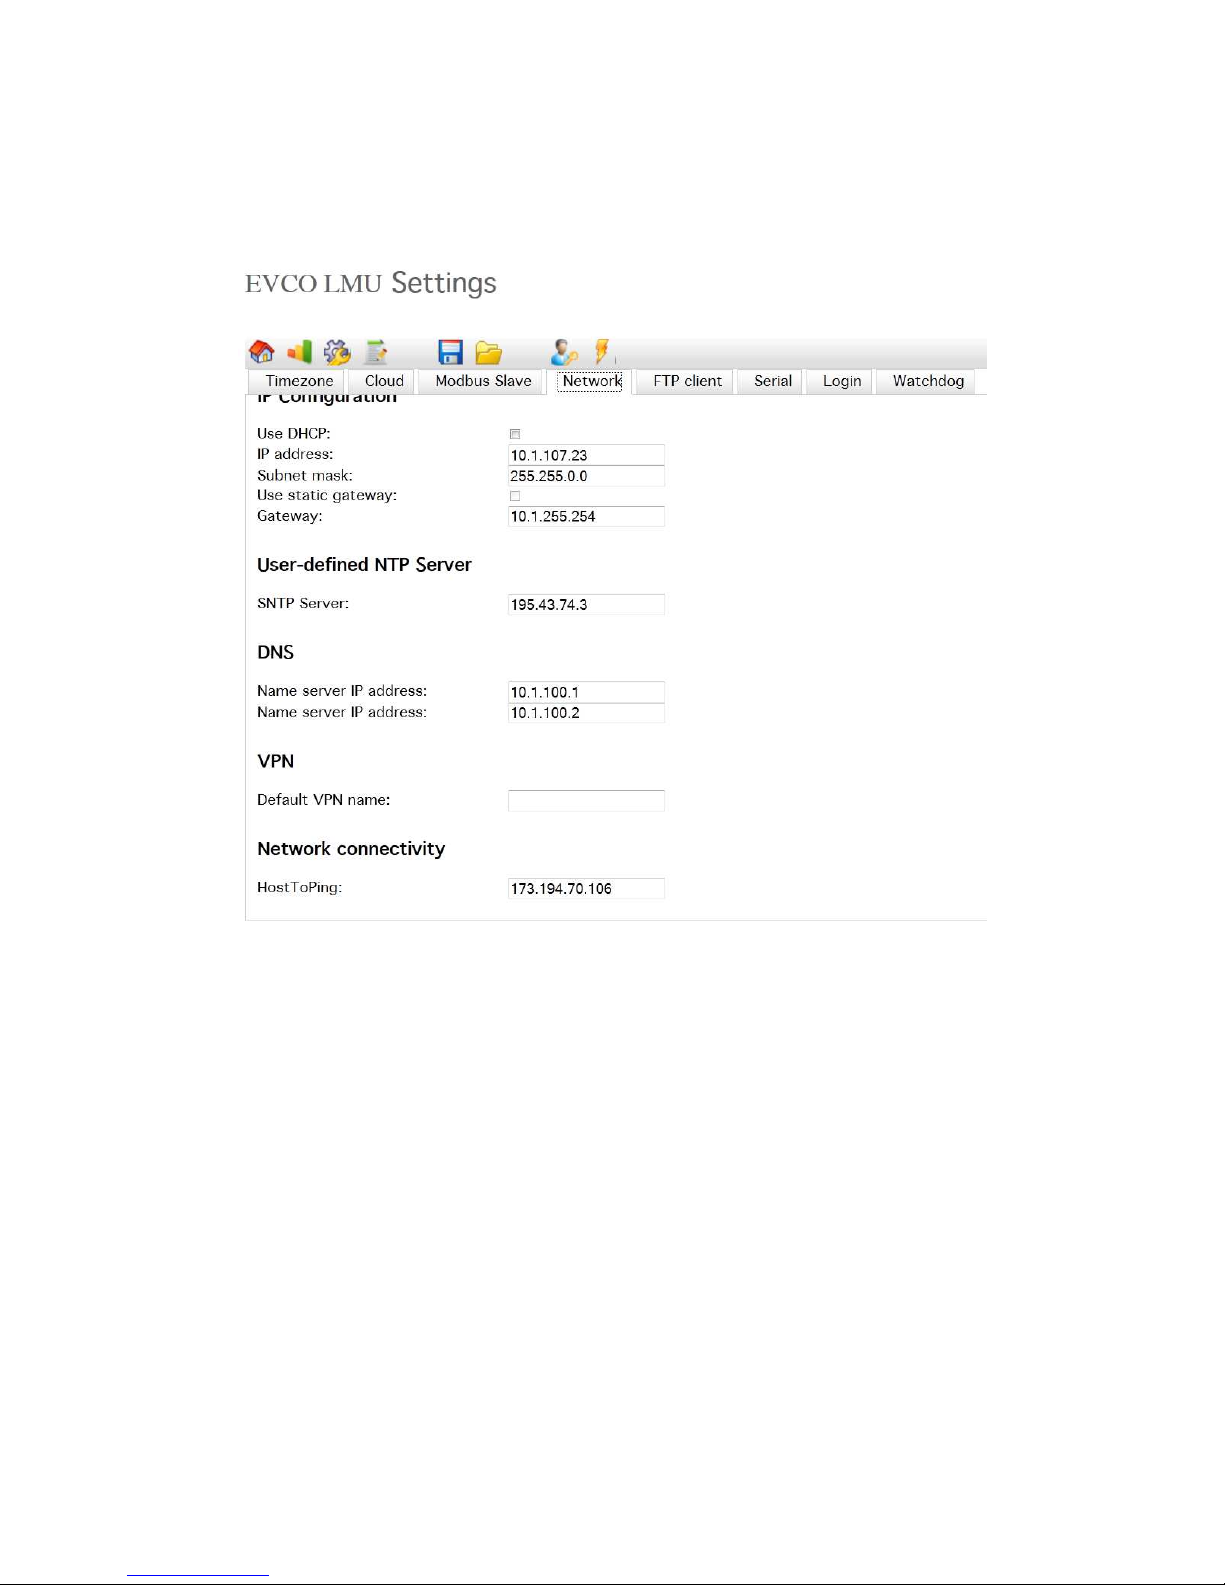
5.6 Network configuration
After the IP configuration is done it is necessary to complete the internet/LAN configuration, before DADO is able to
connect to the CloudEvolution portal.
Note: After changing the configuration, it is necessary to reboot the device.
Click the “reboot” icon on the icon bar line.
Basic LAN settings
Settings can be changed from the browser. In case of wrong configuration, it is possible to recover by executing
DADO_CFG.exe again.
The new configuration will take effect after rebooting.
DHCP
Check if your network is DHCP. Set by DADO_CFG
IP Address
It is not used if DHCP is active. Set by DADO_CFG.
Subnet Mask
It is not used if DHCP is active. Set by DADO_CFG.
Use Static Gateway
Used when DHCP is active, in case the DHCP server is not providing a correct gateway or a different one must be used
instead
Page 18
EVCO S.p.A. DADO | Installer manual ver. 2.0 | Code 144EVD2E204
page 18 of 34
Gateway
In case DHCP is active and USE STATIC GATEWAY is not, leave this box empty. Set by DADO_CFG.
SNTP server (time server)
User defined NTP (Network Time Protocol) server: address of a valid NTP server.
DADO is receiving the time from the Internet. Usually it is necessary to set this field with an internal or public NTP
server. For a list of public available NTP servers, consult the Internet, searching for “NTP public servers”.
DNS
Define primary and secondary DNS addresses.
Contact your I.T. Manager for proper values, or if you are in charge consult the Internet, searching for “Open DNS” or
“Public DNS servers”.
VPN
VPN stands for Virtual Private Network.
This field is not used by present DADO firmware. Leave the field empty.
Host To Ping
It is the IP address checked to verify the Internet connection status.
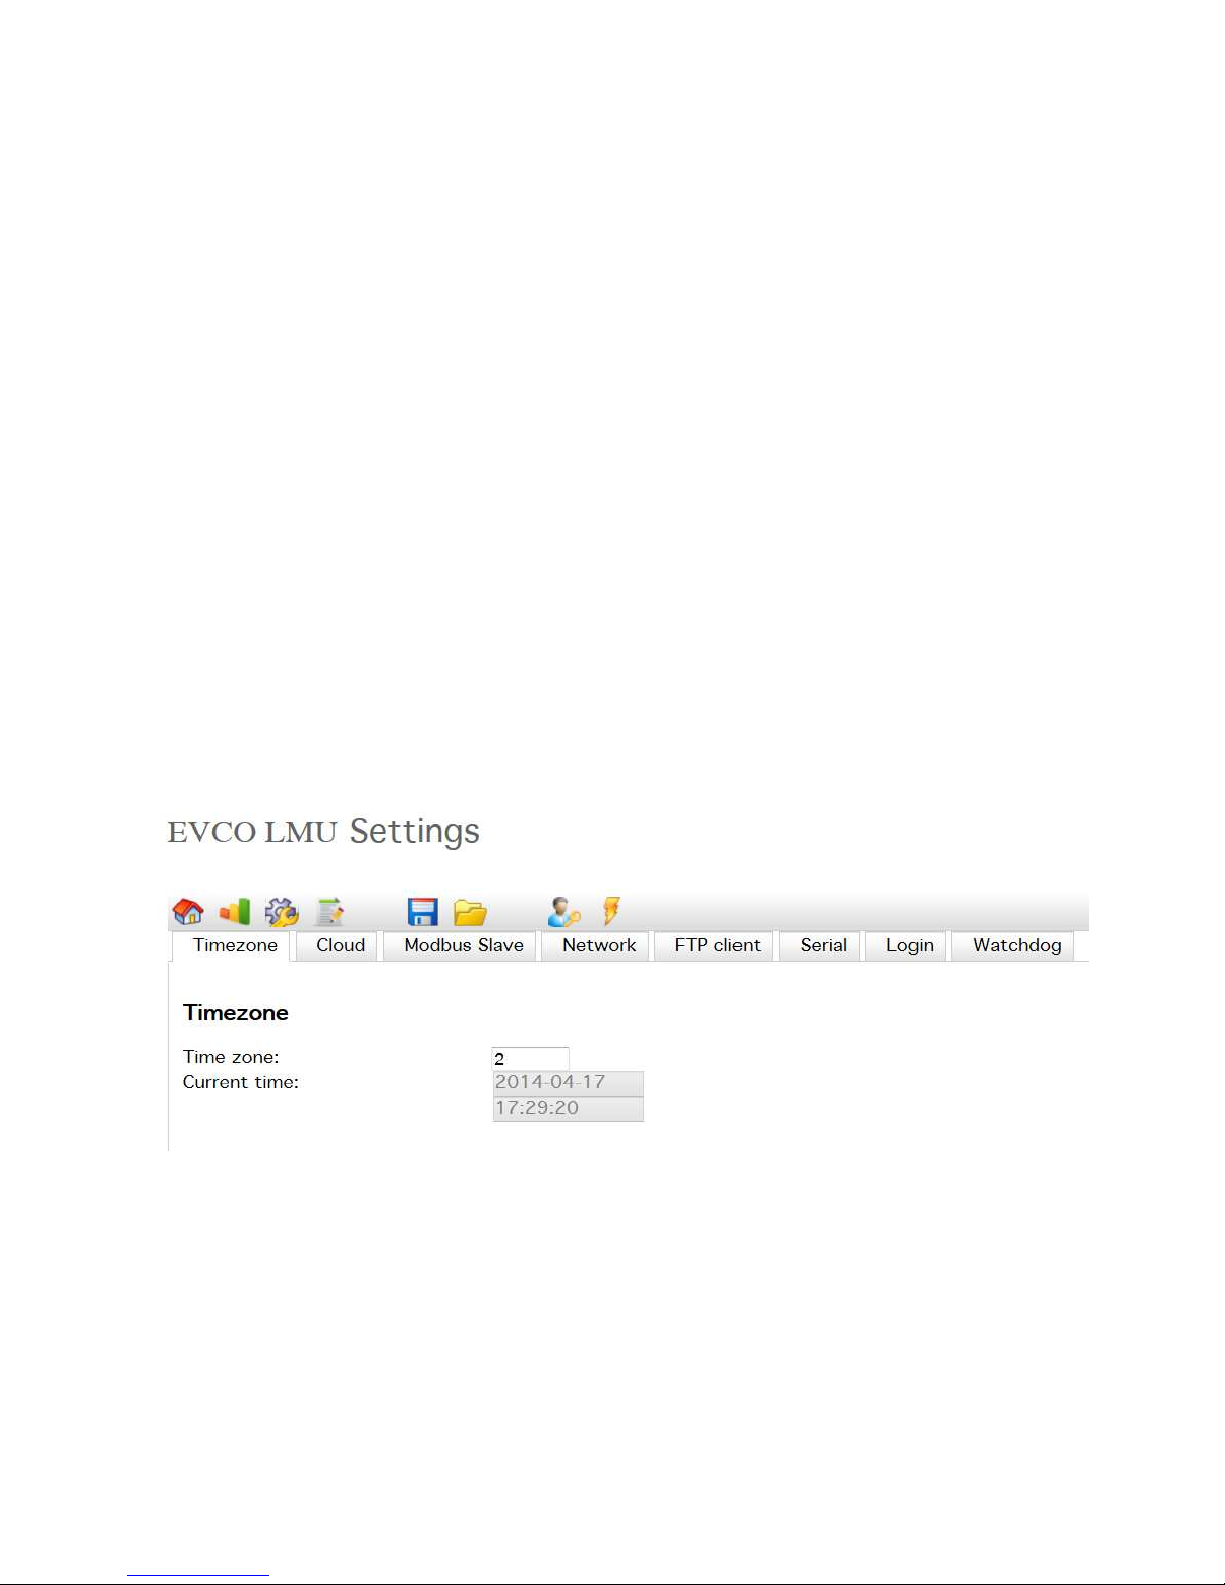
5.7 Checking and setting the timezone (UTC offset)
Before DADO can be used in the CloudEvolution portal it is necessary to set up the Time Zone offset.
The CloudEvolution portal must handle devices all over the world in different time zones, so it is necessary that DADO
and CloudEvolution portal be synchronized.
Example: in Italy the value is 1 or 2 respectively on the solar time and on the daylight saving time
This kind of setup must be done in the CloudEvolution portal.
Page 19

EVCO S.p.A. DADO | Installer manual ver. 2.0 | Code 144EVD2E204
page 19 of 34
5.8 MODBUS connection
DADO can be connected to EVCO devices via MODBUS protocol, the connection is usually done via RS485 serial line.
It is necessary a basic knowledge about MODBUS protocol addressing and communication parameters.
5.8.1 MODBUS RTU
Important: Each MODBUS slave node must be programmed with the same communication parameters (baud rate,
parity, stop bit) according to the MODBUS RTU specification.
5.8.2 MODBUS slave address
Each MODBUS slave must have a unique address, usually defined by a configuration parameter inside the slave.
An address is a number in the 1-247 range.
The MODBUS network can not work before this configuration is correctly completed. In case of an incorrect
configuration resulting in conflicts, the behaviour is not predictable, it is possible to get no data or bad readings.
5.8.3 Typical settings
A common configuration is assigning 1 to the first device, 2 to the second device and so on.
5.9 EVCO controllers and MODBUS
EVCO has different product lines, each one featuring different peculiarities bout MODBUS/Serial settings.
- Some devices require to be switched OFF/ON before a new configuration take effect, the
ON/Stand-by button could be not enough to make the device accept the new settings.
It is highly recommended to perform this “reboot” after setting devices.
- Some EVCO controllers has the “Direct RS485 printer” option. If the function is active, the serial
port is used as a Master and it may inhibit the operation of the entire RS485 MODBUS network. It
is necessary to configure parameters to enable “MODBUS slave port” function.
- Some EVCO controller is set by default on address 1, some other to address 247, it is necessary
to assign a unique address to each device.
- A conflict or no connection on address 1 or 247 could mean there are devices not properly set or
not reconfigured
- MODBUS RTU specification requires to have exactly 1 stop bit with parity bit (even/odd) and 2
stop bits with parity None. Some devices allow a free configuration of the number of bits, it is
mandatory to follow specifications, otherwise devices could not communicate or communicate in a
wrong way.
- Many Evco controllers use 9600 Baudrate as default communication speed.
Page 20
EVCO S.p.A. DADO | Installer manual ver. 2.0 | Code 144EVD2E204
page 20 of 34
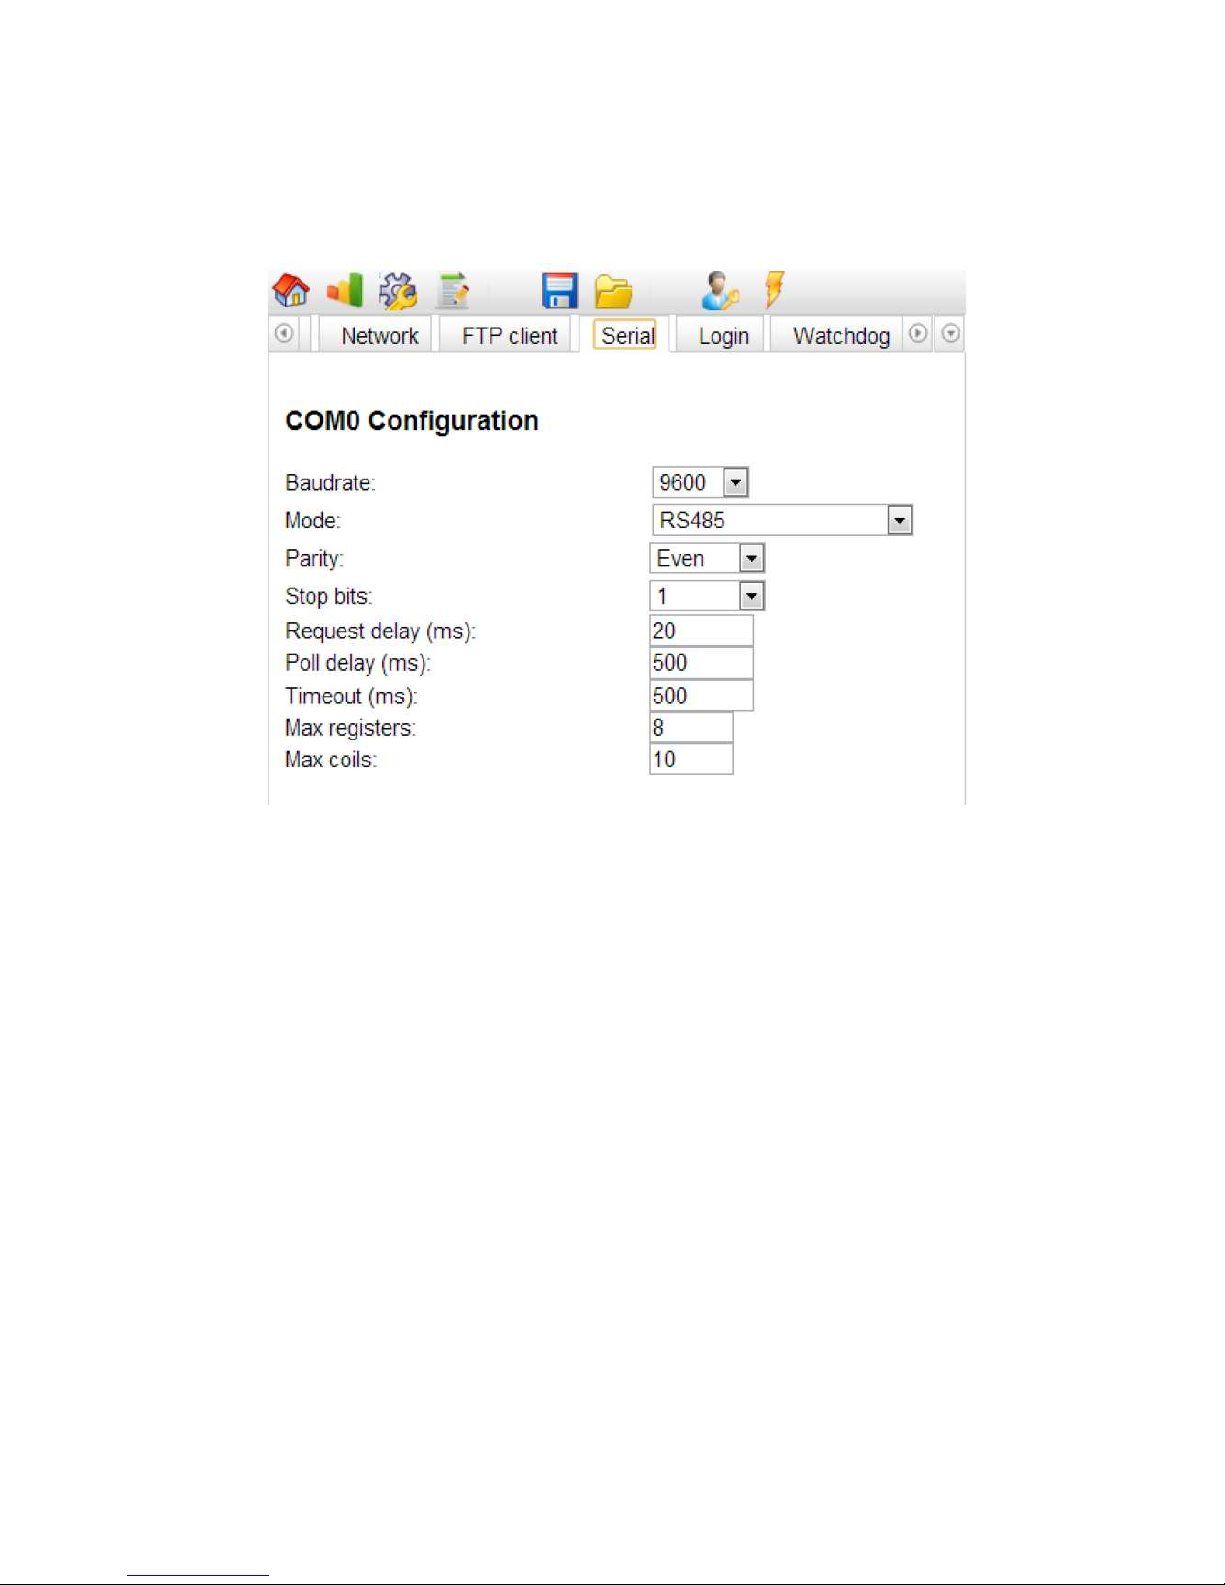
5.10 Serial interface
The COM0 port can be configured in two ways: RS232 or RS485
An adapter is necessary to connect to RS485 lines
- Baud rate: depends on how the MODBUS network has been set up;
- Mode: RS485 will configure the COM port as RS485 port, no external RS232-485 adapter module must be used. The
specific adapter is required between the DB9 connector and the 3 wires connection of RS485;
- Parity: parity bit (None, Odd, Even);
- Stop bits: according to the standard MODBUS specifications the number of stop bits required is strictly depending on
the usage of the parity, in others words with None: 2 stop bits, Even: 1 stop bit, Odd: 1 stop bit;
- Request delay (ms): it is the number of milliseconds between two requests, put 0 for maximum speed and increase
only in case of problems;
- Poll request delay: use the default value;
- Timeout: it is the base timeout for the command-reply sequence of MODBUS communication;
- Max registers: when possible MODBUS requests are grouped to speed up the polling loop. Some devices could
require a different value;
- Max coils: same as Max registers for “read coils” command.
Page 21
EVCO S.p.A. DADO | Installer manual ver. 2.0 | Code 144EVD2E204
page 21 of 34
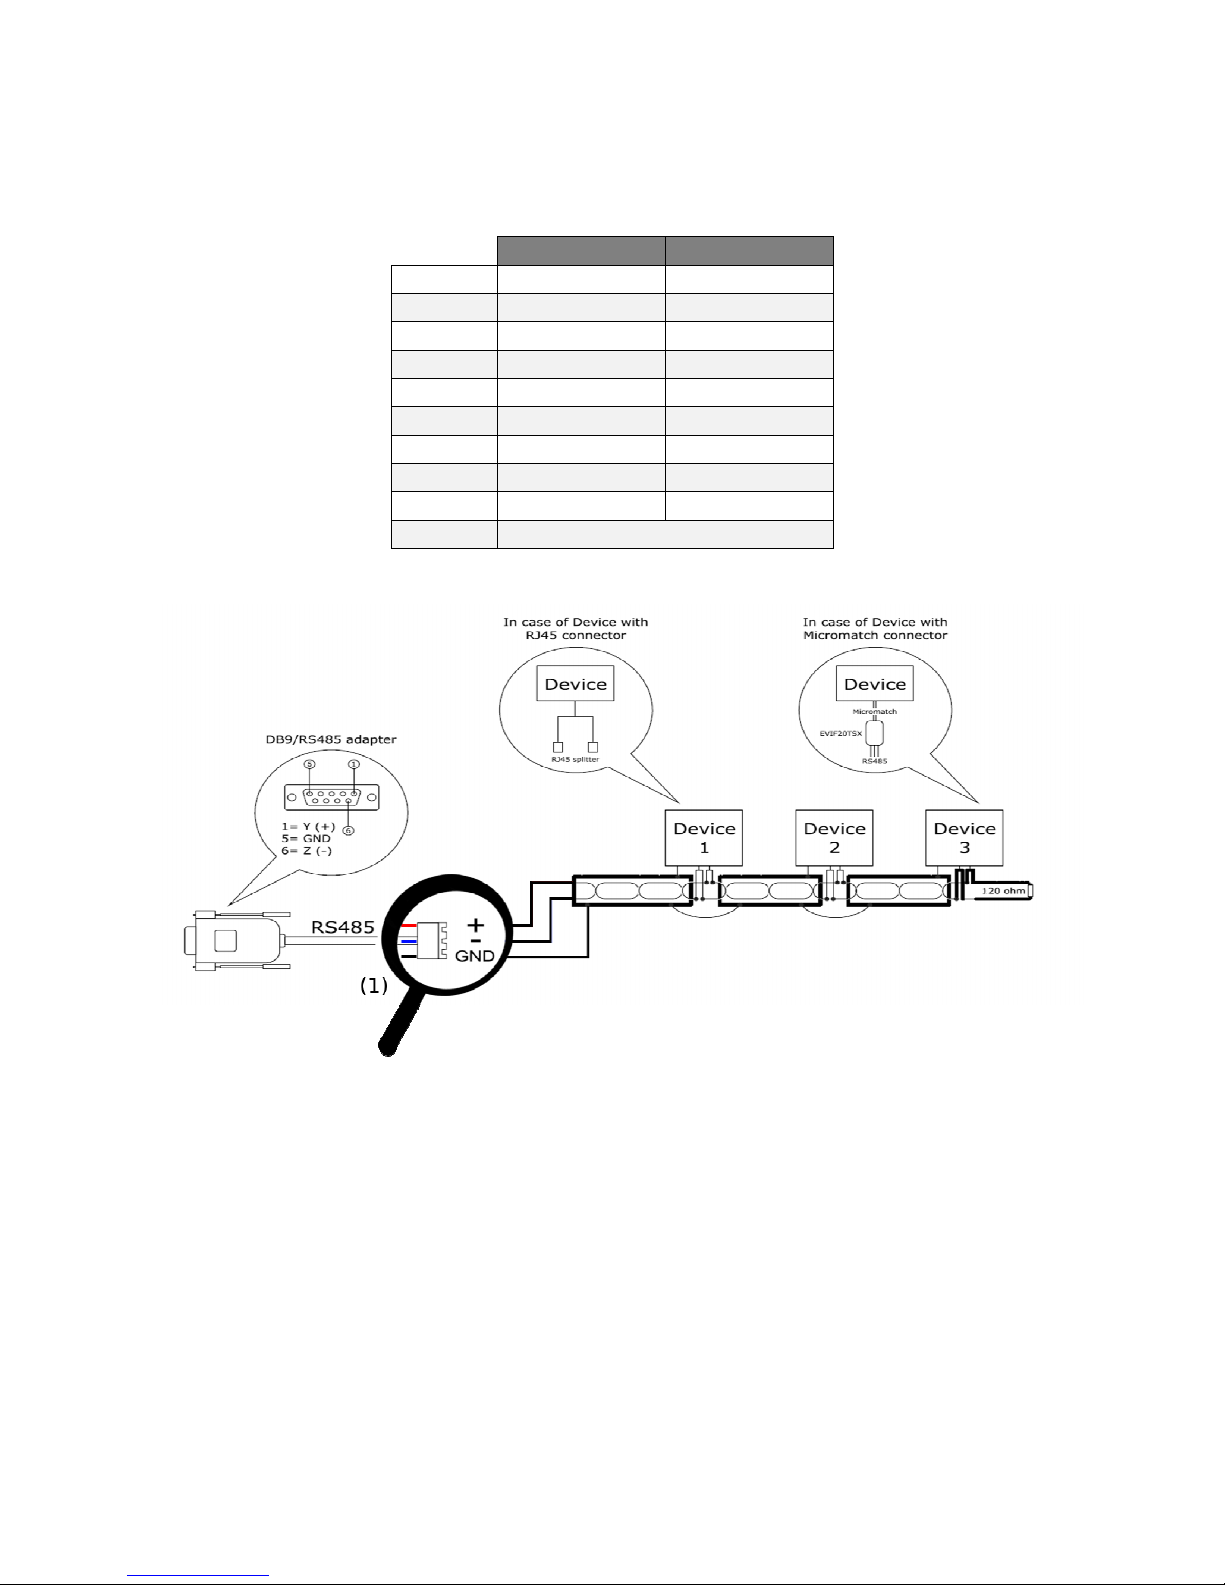
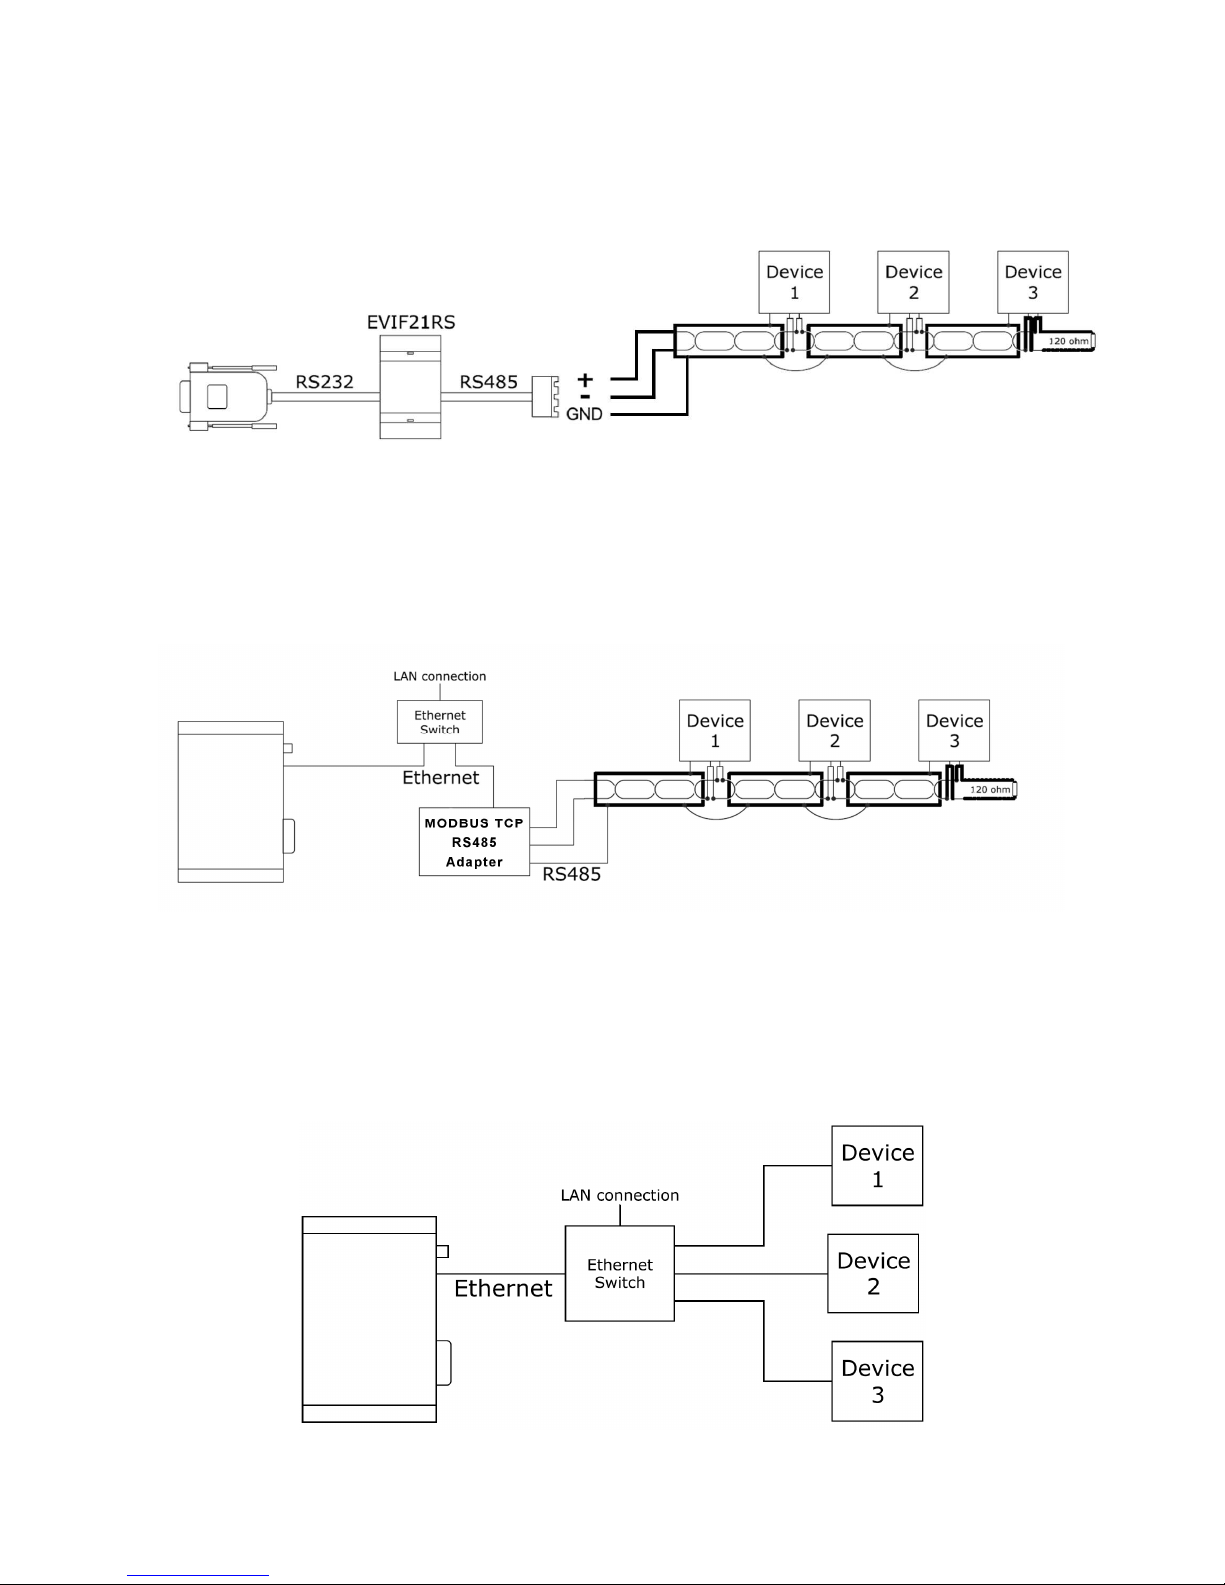
5.11 Connecting MODBUS RTU units over RS485 line
Use the adapter provided by EVCO, or an equivalent one according the table below:
RS232 RS485
Pin 1 NC Y (+)
Pin 2 RxD NC
Pin 3 TxD NC
Pin 4 NC NC
Pin 5 GND GND
Pin 6 NC Z (-)
Pin 7 RTS NC
Pin 8 CTS NC
Pin 9 NC NC
Housing Connected to functional earth
Consult the specification for each device, if it can be connected directly in RS485 or if it need an adapter.
Notes:
(1)
For the correct connection check wires colors: (Red for +, Blue for -, Black for GND) on the adapter.
Page 22
EVCO S.p.A. DADO | Installer manual ver. 2.0 | Code 144EVD2E204
page 22 of 34
5.12 Connecting MODBUS RTU units over an external
RS232-RS485 interface
5.13 Connecting MODBUS RTU units via an external
MODBUS TCP module
5.14 Connecting MODBUS TCP units over an Ethernet
connection
DADO can read directly devices acting as a “MODBUS TCP slave” protocol.
Page 23
EVCO S.p.A. DADO | Installer manual ver. 2.0 | Code 144EVD2E204
page 23 of 34
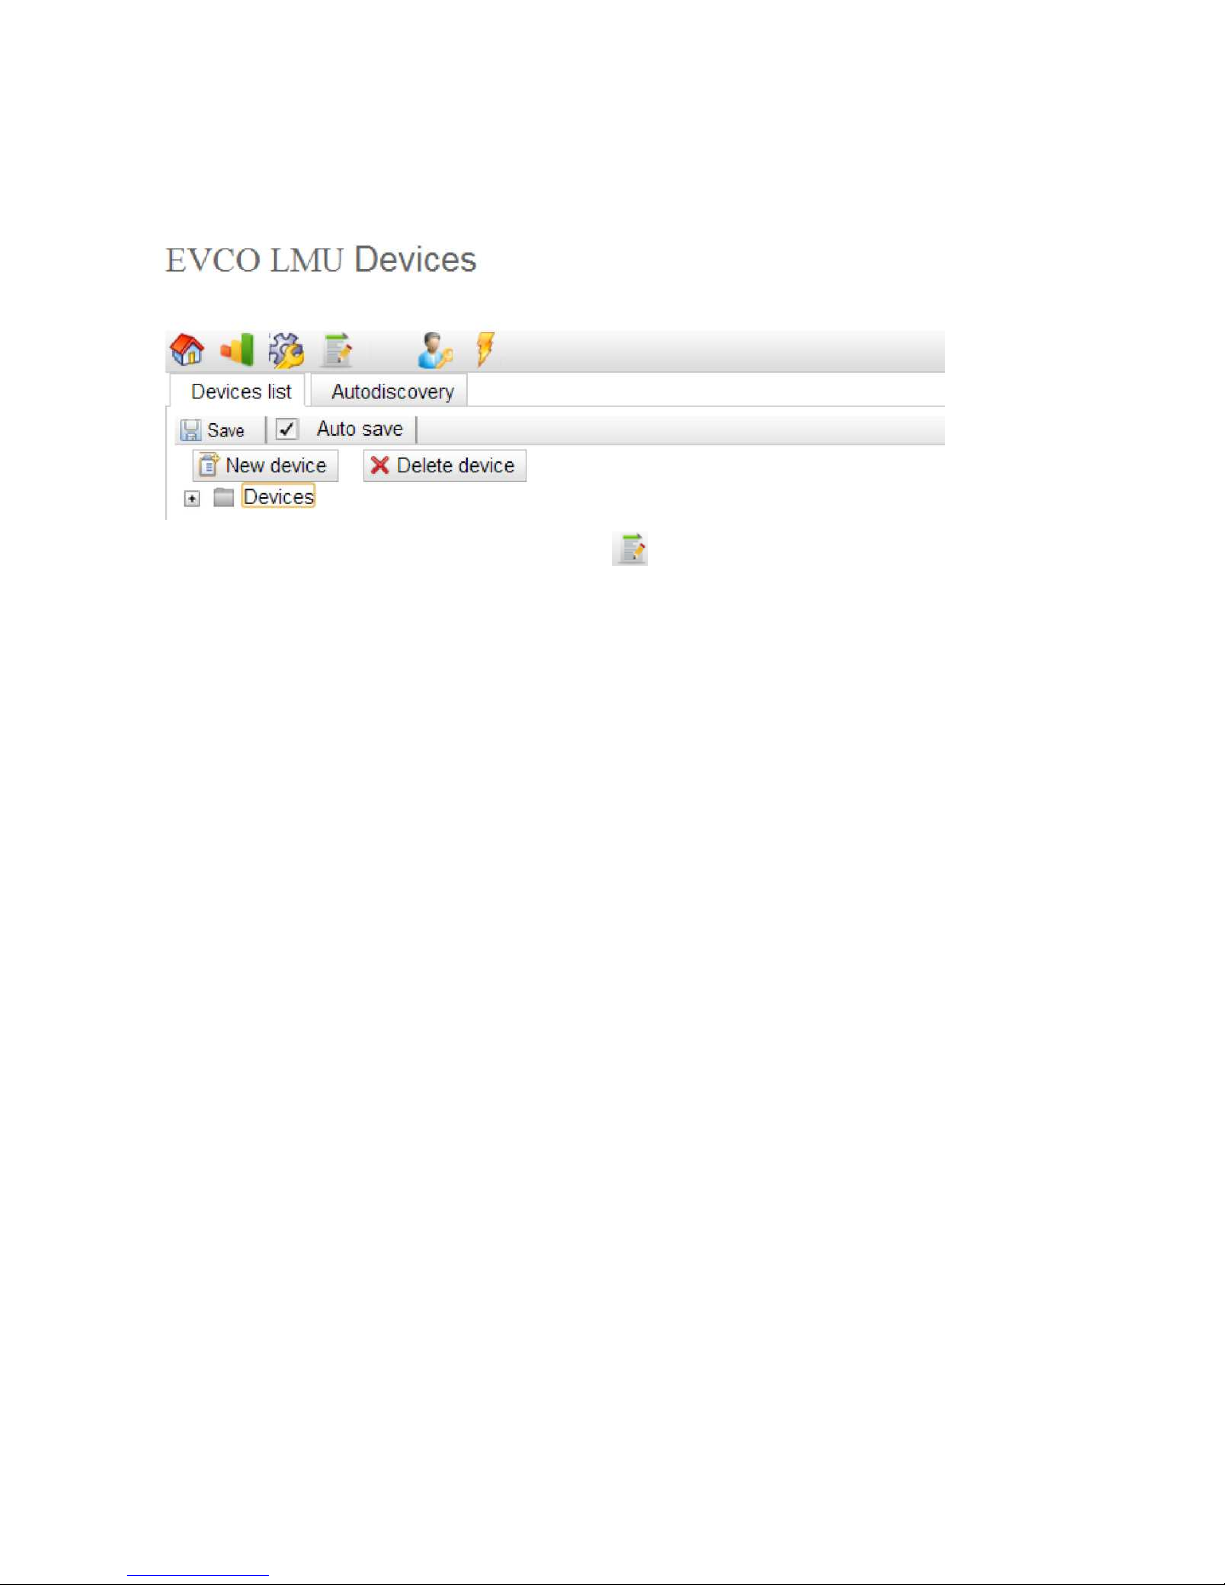
5.15 Defining slave nodes
DADO must be programmed to define the structure of the slave nodes connected.
This can be done via the Devices list, the reference icon is:
Page 24
EVCO S.p.A. DADO | Installer manual ver. 2.0 | Code 144EVD2E204
page 24 of 34
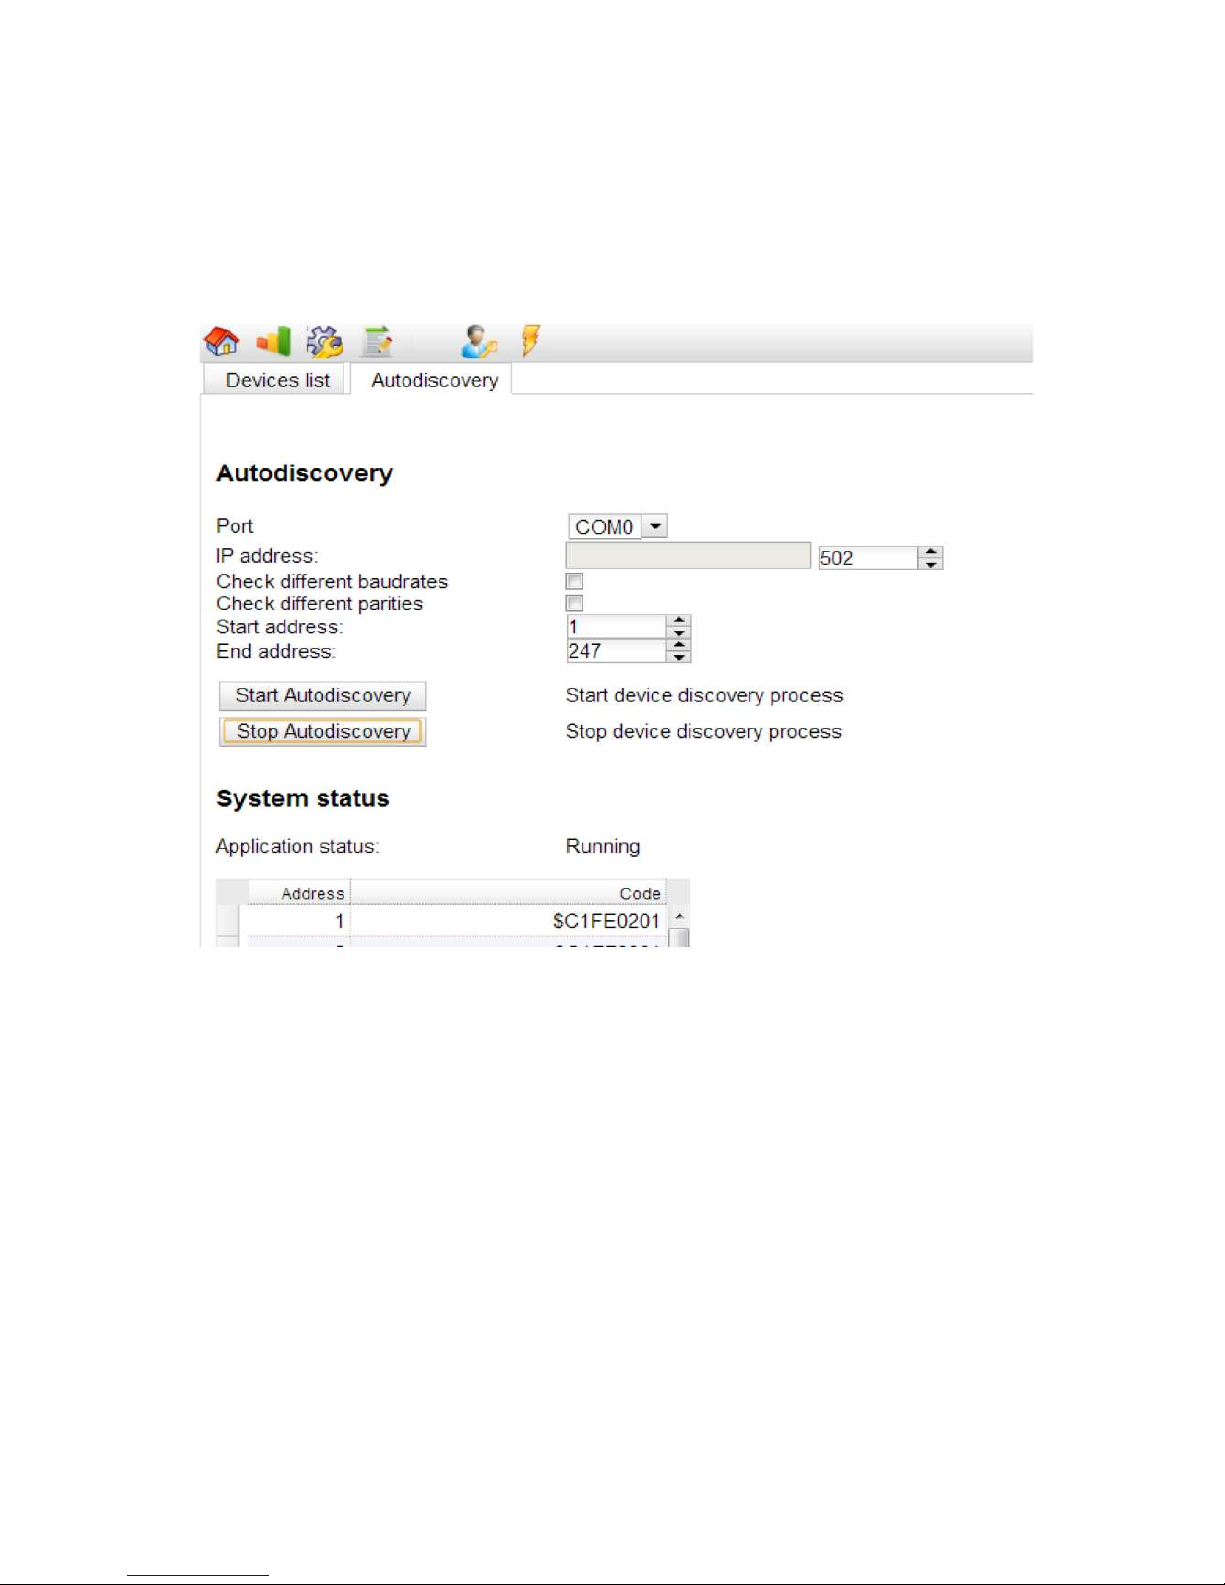
5.16 Autodiscovery feature
DADO has a procedure to discover automatically how many devices are connected, their MODBUS address and kind.
The procedure can not correctly detect devices in case of bad wiring, protocol conflicts, bad settings and so on.
In that case it maybe necessary to manually define or adjust the configuration.
Scanning a MODBUS RTU network (RS485)
- Port: COM0
- IP address/port: not used
- Check different baudrates: the autodiscovery will check also other baud rates
- Check different parities: the autodiscovery will check also other parities
- Start-end address: the scan will be limited inside the specified range, this is useful to speed up the process in case
you know the range in advance (you generally know because it is expected it was you to set the addresses).
Scanning a MODBUS TCP gateway
- Port: TCP
- IP address/port: of the gateway to scan
- Check different baudrates: not used, do not select
- Check different parities: not used, do not select
Result of autodiscovery
- the devices found are shown in the on screen list
- the code is a identifier telling the kind of electronic controller discovered
- refer to appendix (chapter 10) for a list of supported devices.
Page 25
EVCO S.p.A. DADO | Installer manual ver. 2.0 | Code 144EVD2E204
page 25 of 34
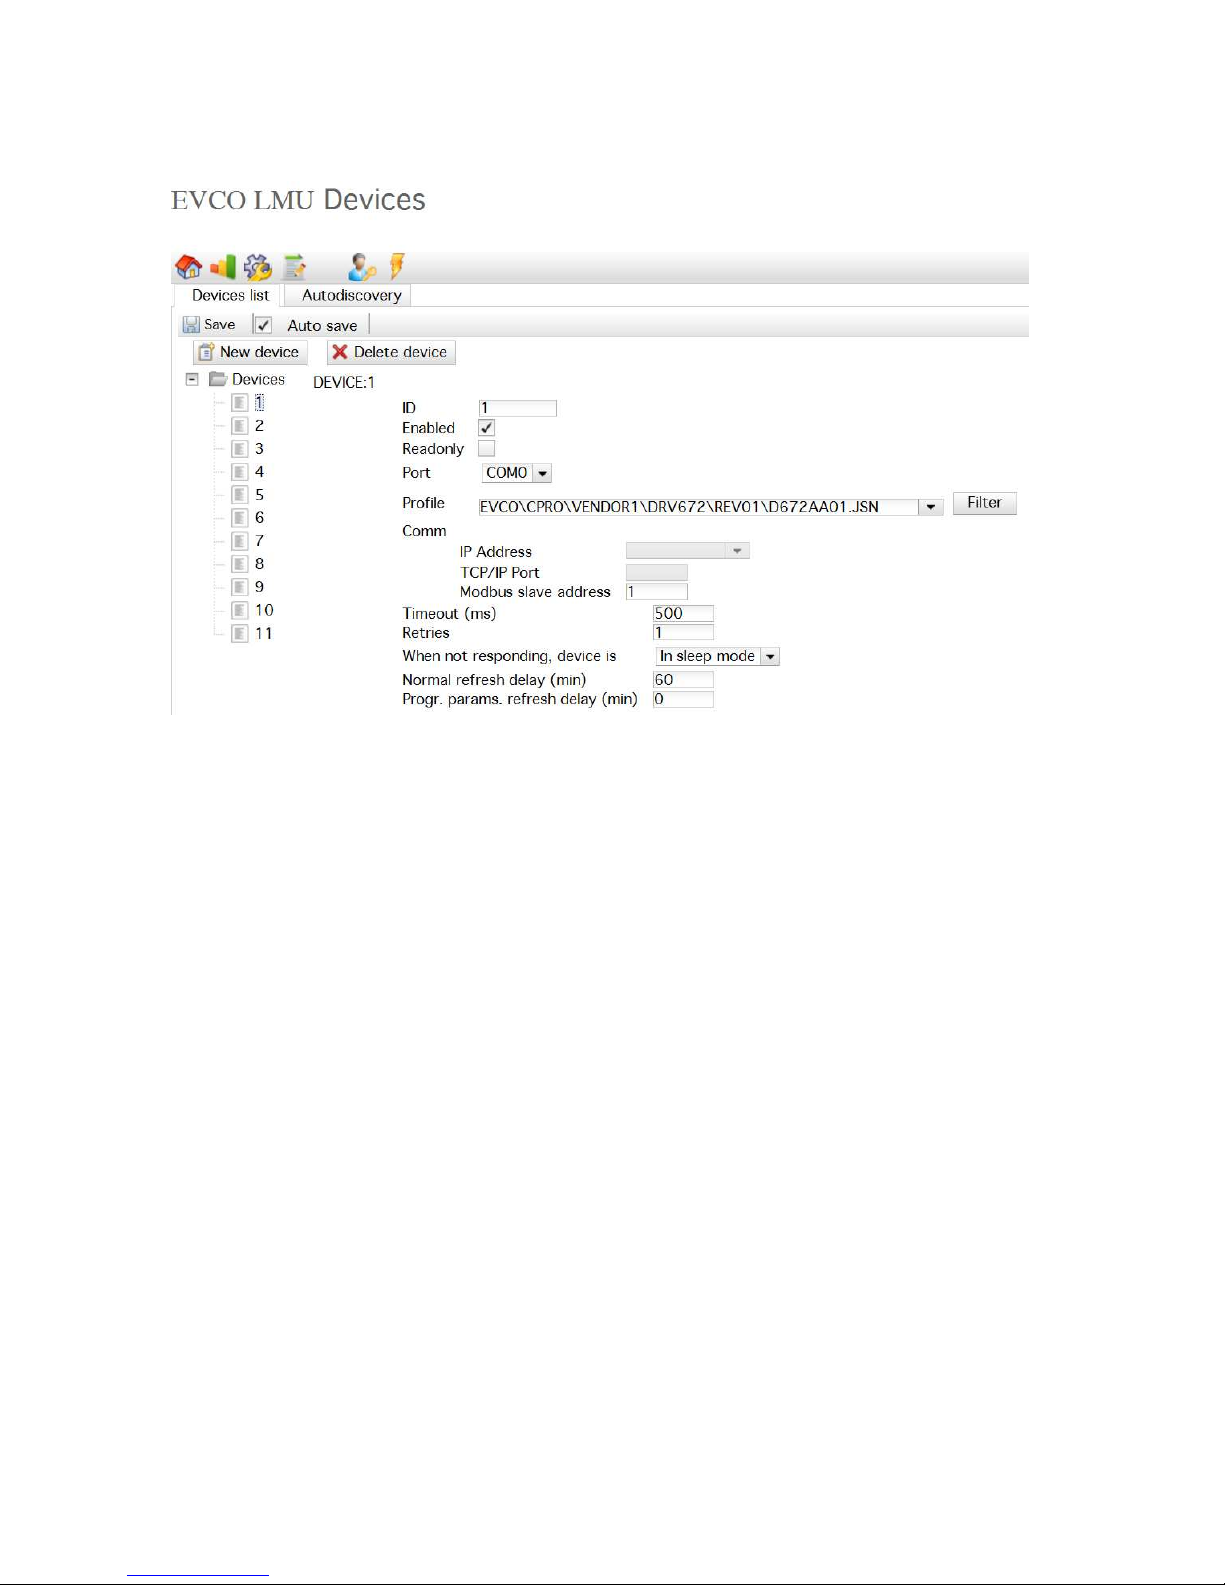
5.17 Device setup
- ID: progressive numeric identification of the device;
- Enabled: if not checked, the device is excluded from polling;
- Readonly: if enabled it is not possible to write on the device from the portal;
- Port: COM0 is the DB9 connector used for RS485/RS232 connections, TCP in case the slave is a
MODBUS TCP slave (connected via Ethernet)
- Profile: File path defining the end-device profile;
- Normal refresh delay: The number of minutes after which items must be re-sent to the portal, in
case their value is not changing;
- Program params. refresh delay: same as normal refresh delay for configuration parameters, if 0
the “normal refresh delay” will be used.
Page 26
EVCO S.p.A. DADO | Installer manual ver. 2.0 | Code 144EVD2E204
page 26 of 34
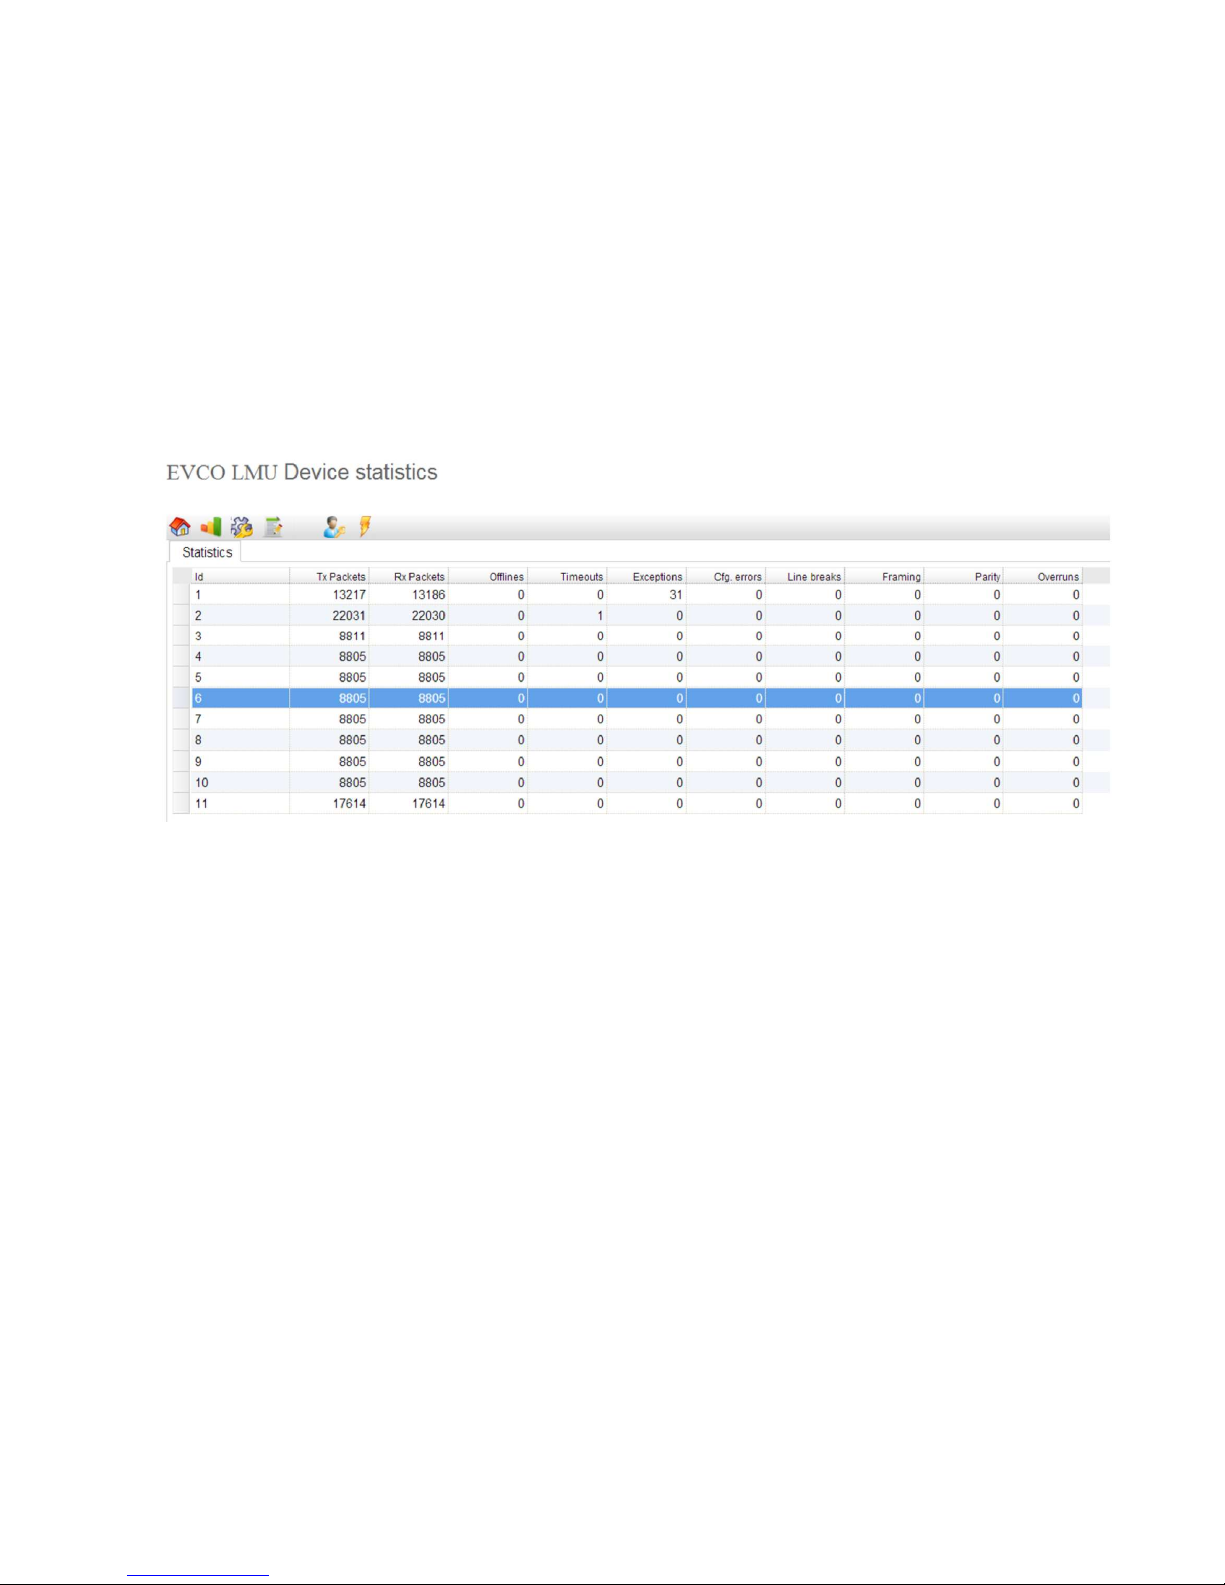
5.18 Serial communication statistics
This page contains useful information for checking correctness and quality of the MODBUS communication.
Timeouts, line breaks, parity or framing errors may indicate bad settings, network conflicts or bad wiring.
If Tx packets is equal to timeouts it means the slave node is not answering at all. This may indicate the address or
communication parameters settings are not correct, or the device is not correctly wired and powered up. In most
cases, the “exceptions” column may indicate an error in the profile describing the device, rather than a communication
problem.
Tx counter being equal to RX (and > 0) indicate an optimum communication.
Page 27
EVCO S.p.A. DADO | Installer manual ver. 2.0 | Code 144EVD2E204
page 27 of 34
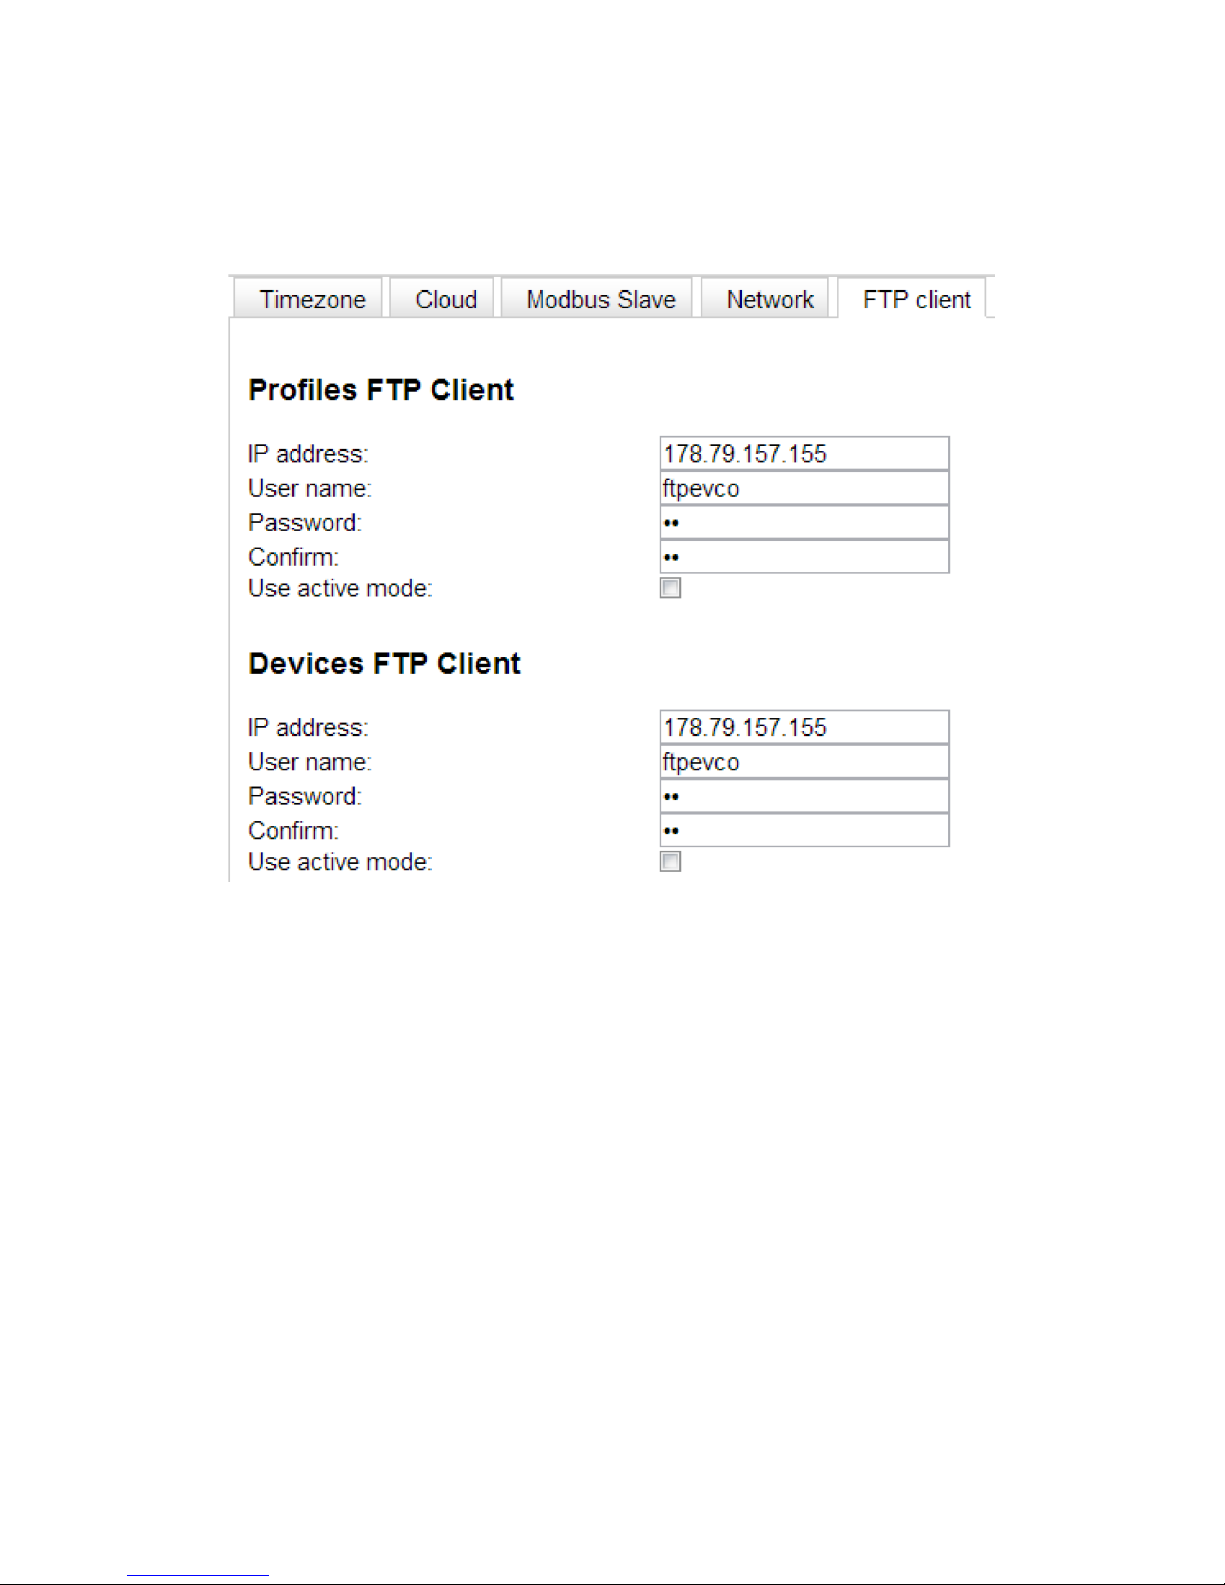
6 FTP CLIENT FEATURE
DADO can download profiles from the Internet and send its configuration.
In a common CloudEvolution application these settings has not to be changed.
Page 28
EVCO S.p.A. DADO | Installer manual ver. 2.0 | Code 144EVD2E204
page 28 of 34
7 MODBUS BRIDGE
7.1 Accessing devices with a MODBUS TCP master
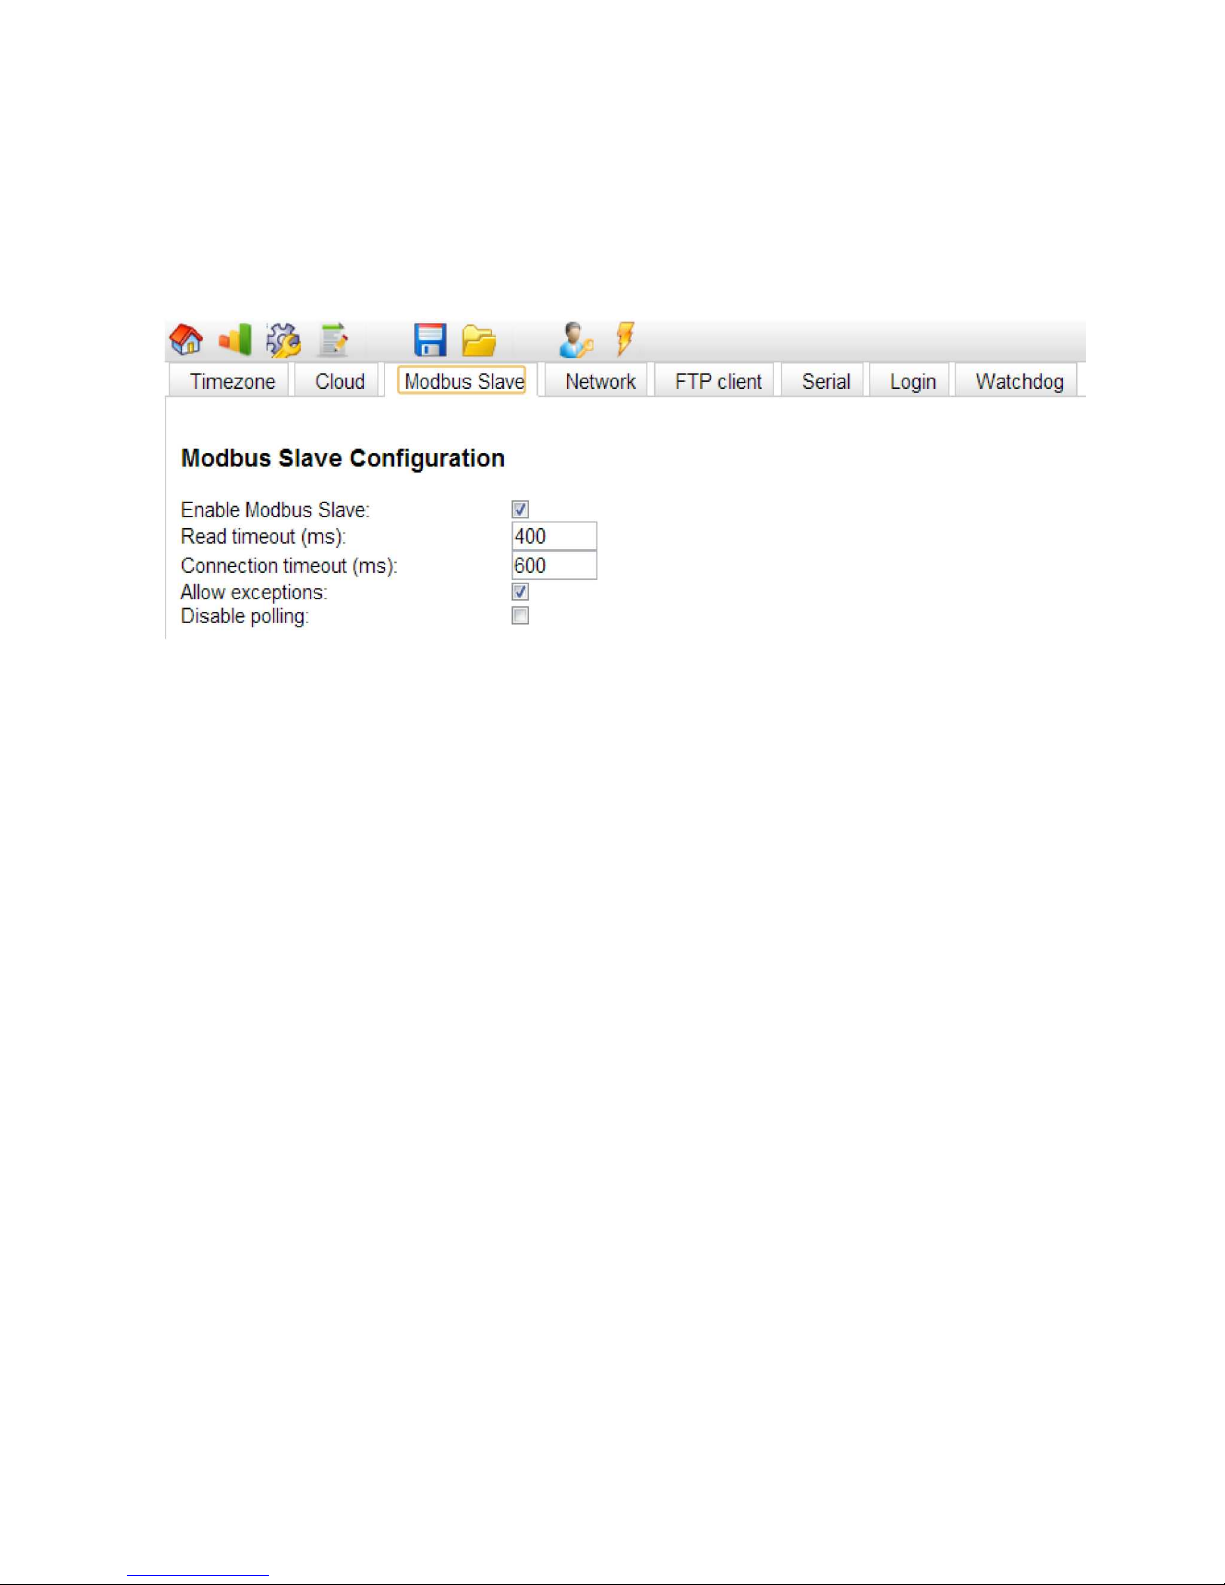
DADO offers an auxiliary function, it can act as a MODBUS TCP-MODBUS RTU bridge; every MODBUS TCP master (like
a S.C.A.D.A.) can access the devices connected to the RS485 line via MODBUS TCP connection (Ethernet connection).
- Enable MODBUS slave: when checked, DADO listen on TCP port 502 and routes incoming MODBUS TCP
requests to the serial line;
- Read timeout: external MODBUS request use this timeout, while internal generated request use the
settings defined per each device;
- Connection timeout: an open session is automatically closed by DADO (the server) if the client is inactive
for more than this time;
- Allow exceptions: when a slave is not answering, DADO will answer with an exception code 11 (gateway
timeout) if this option is checked, otherwise it will not answer;
- Disable polling: this disable the operation with CloudEvolution, check this option only if DADO has not be
used as a CloudEvolution gateway;
Page 29
EVCO S.p.A. DADO | Installer manual ver. 2.0 | Code 144EVD2E204
page 29 of 34
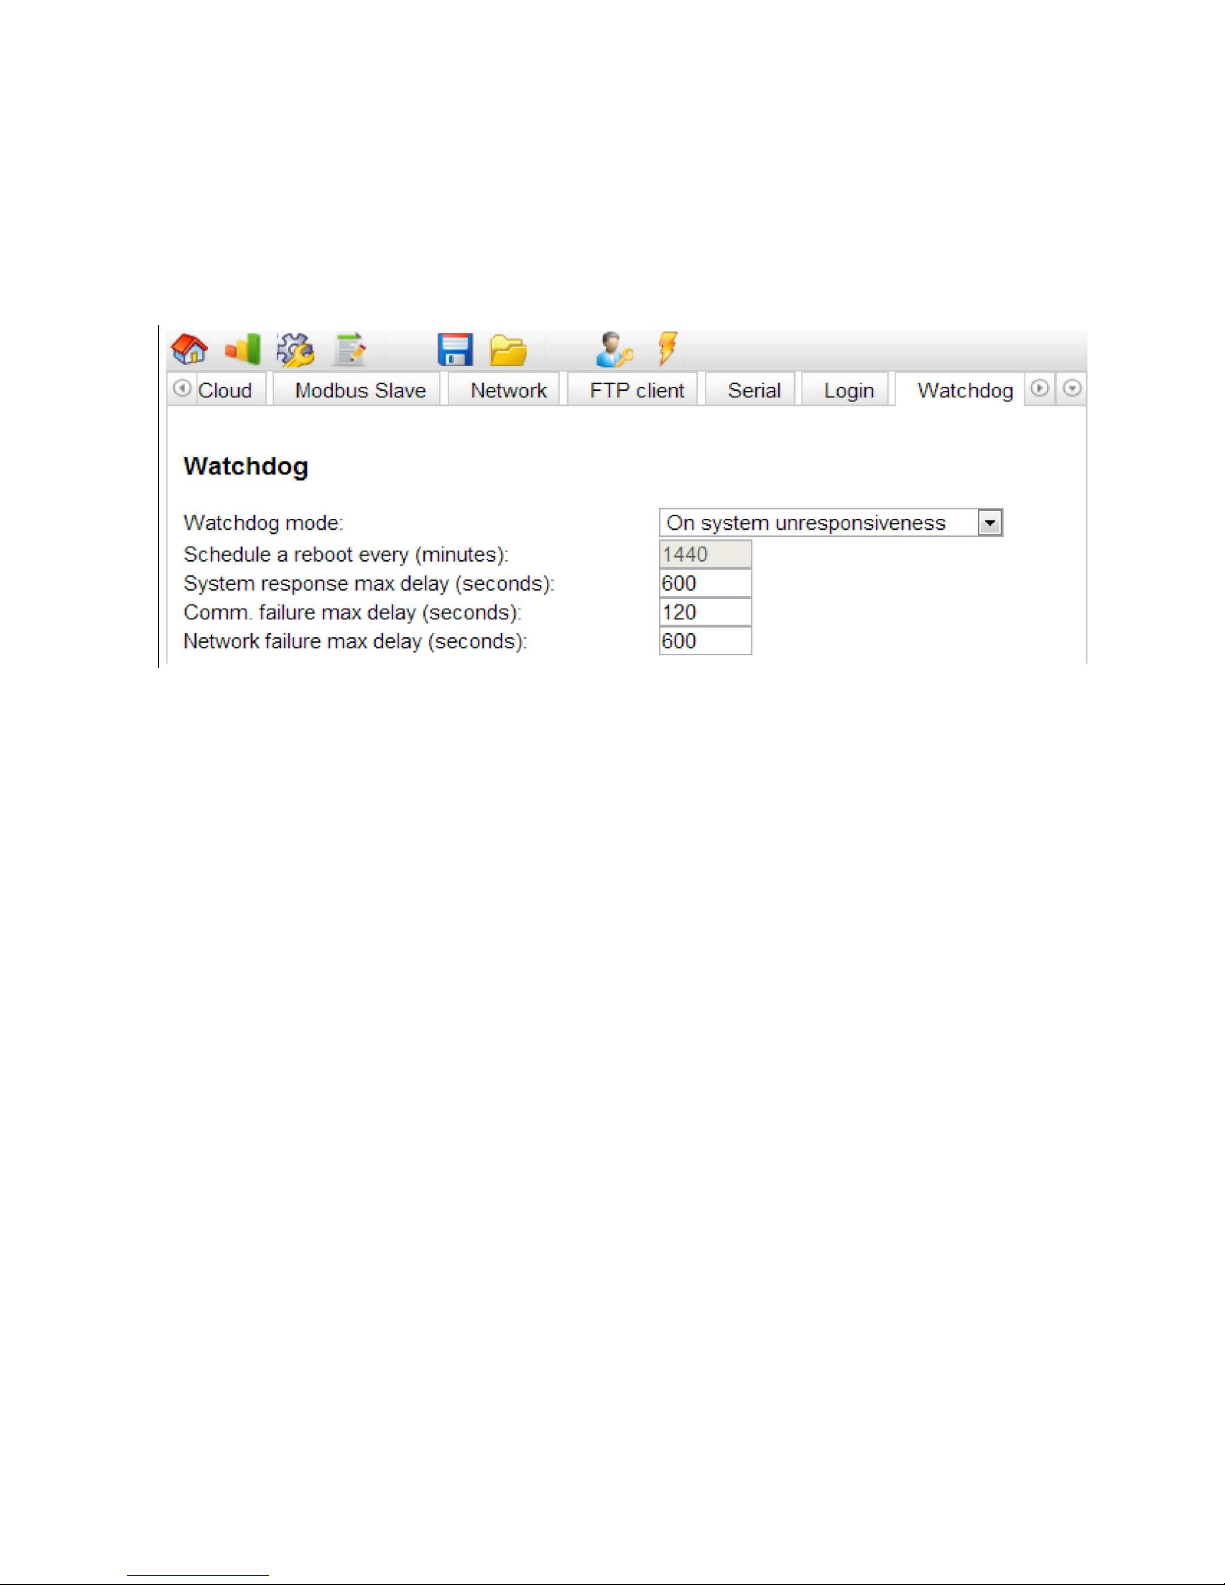
8 WATCHDOG
This feature is a redundant check on the DADO firmware/hardware internal status, usually it is not required.
In case of heavily electrical disturbed environment or other problems (Ethernet conflicts, power supply instability) it
may be a good to have option.
Page 30
EVCO S.p.A. DADO | Installer manual ver. 2.0 | Code 144EVD2E204
page 30 of 34
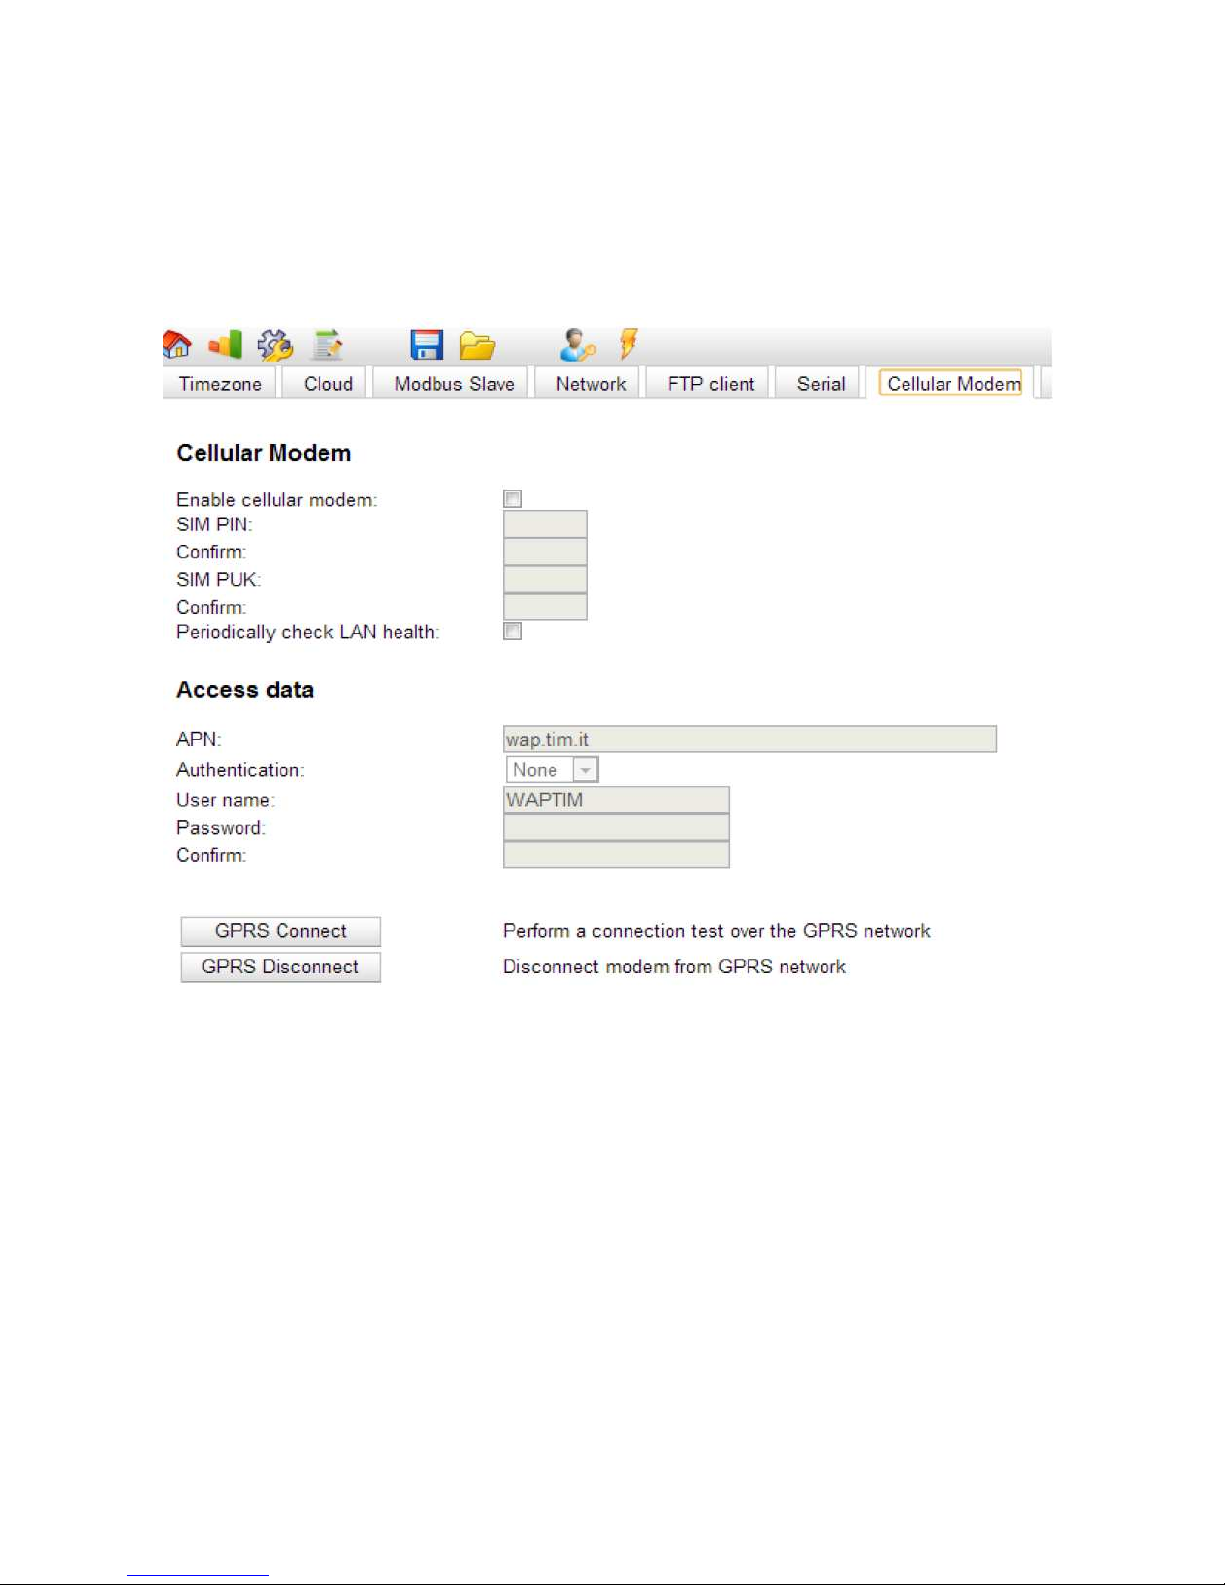
9 GPRS OPERATION
9.1 Setting up GPRS
See the paragraph 5.5 about how to connect DADO with PC.
Once the connection has been established, open the “Cellular Modem” tab.
APN, Authentication, user name and password depends on the kind of SIM-CARD used.
The SIM-CARD operation to be used for M2M (machine to machine) depends on your telephone company.
Page 31

EVCO S.p.A. DADO | Installer manual ver. 2.0 | Code 144EVD2E204
page 31 of 34
10 APPENDIX LIST OF USED TCP/UDP PORTS
The table below lists and describes the TCP and UDP ports in use:
Port Number Direction Public
Description Mandatory
1883 TCP Out Yes CloudEvolution Data communication
Yes
80 TCP Out Yes HTTP Yes
502 TCP Out/in No Modbus TCP No/yes ( yes only for Modbus TCP devices)
20, 21 TCP In/Out Yes FTP Yes
1993 TCP Out Yes
Encrypted CloudEvolution
Data communication
Yes
80 TCP In No Internal HTTP Web Server Yes
Page 32

EVCO S.p.A. DADO | Installer manual ver. 2.0 | Code 144EVD2E204
page 32 of 34
Page 33

EVCO S.p.A. DADO | Installer manual ver. 2.0 | Code 144EVD2E204
page 33 of 34
DADO
Internet / MODBUS Gateway
Installer manual ver. 2.0
GL - 45 / 14
Code 144EVD2E204
This document is exclusive property of EVCO. Reproduction and disclosure are prohibited without express authorisation
from EVCO.
EVCO is not liable for any features, technical data and possible errors stated in this document or deriving from use of
the same.
EVCO cannot be considered liable for damage caused by failure to comply with warnings given in this document.
EVCO reserves the right to make any changes without forewarning, without jeopardising the basic safety and operating
features.
Page 34

EVCO S.p.A. DADO | Installer manual ver. 2.0 | Code 144EVD2E204
page 34 of 34
EVCO S.p.A.
Via Feltre 81, 32036 Sedico Belluno ITALIA
Tel. 0437 / 8422
Fax 0437 / 83648
www.evco.it
 Loading...