

Page 1

installation manual
Elvi
Page 2

I’m home!
Let’s get started.
Page 3

installation manual
Elvi
Page 4

contents 1
safety precautions 2
components and features 3
1. unpack Elvi 5
2. install wall dock 7
3. install charging cable 11
4. install station 12
5. activate Elvi 13
6. install cable dock (optional) 14
7. switch charging cable (optional) 16
8. charge with Elvi 18
9. troubleshooting 19
10. warranty 21
11. declaration of conformity 22
contents
1
Page 5

Warning: Chance of electric shock.
• Read the supplied documentation carefully to familiarize yourself
with all safety instructions and regulations before using this product.
• This product is designed and tested in accordance with international standards.
• The use of this product is limited to those applications it is designed for.
• Installation, maintenance and repairs of this product are only to be performed
by qualied personnel.
• Incorrect installation or repairs may cause hazardous situations
for the user of this product.
• This product is used in combination with a power source.
• Always switch off power before any maintenance activity.
• This product does not contain any component that can be maintained
by the user.
• Make sure that the product is only used under the correct operating conditions.
• Make sure that the main power is disconnected before storing or
transporting this product.
• Make sure that the power line to this product is installed on a dedicated circuit
breaker on your service panel that is protected by an adequate RCD.
MCB must be in line with the capacity of the charging cable
(3.7, 7.4, 11, 22 kW).
• For RCD, we advise you to use 40A, 30mA type A. Local regulations
may be applicable and vary depending from your region or
country of residence.
The installing party must always ensure that the station is installed according to the
local regulations. In case the Amperage rating of the charge cable lies above the
Amperage rating of the applied protective device (MCB), the installer / user should
change the station settings in the Hey EVBox app or via hey.evbox.com. This will
be signaled by a warning in the app. Installation or modication of the service panel
should always be performed by a qualied electrician.
EVBox is not responsible for any damage that occurs if this product is transported
in a different packaging than the packaging in which the product was originally
supplied. Store this product in a dry environment; the storage temperature must
be between –25°C and +60°C.
EVBox strives to produce products of the highest quality. EVBox products
are fully CE certied and compliant with the essential requirements of
EMC Directive 2014/30/EU and Low Voltage Directive 2014/35/EU.
More details can be found at evbox.com or in the Installation Manual.
EVBox products are sold with a limited warranty described at
evbox.com/general-terms-conditions.
safety precautions
2
Page 6
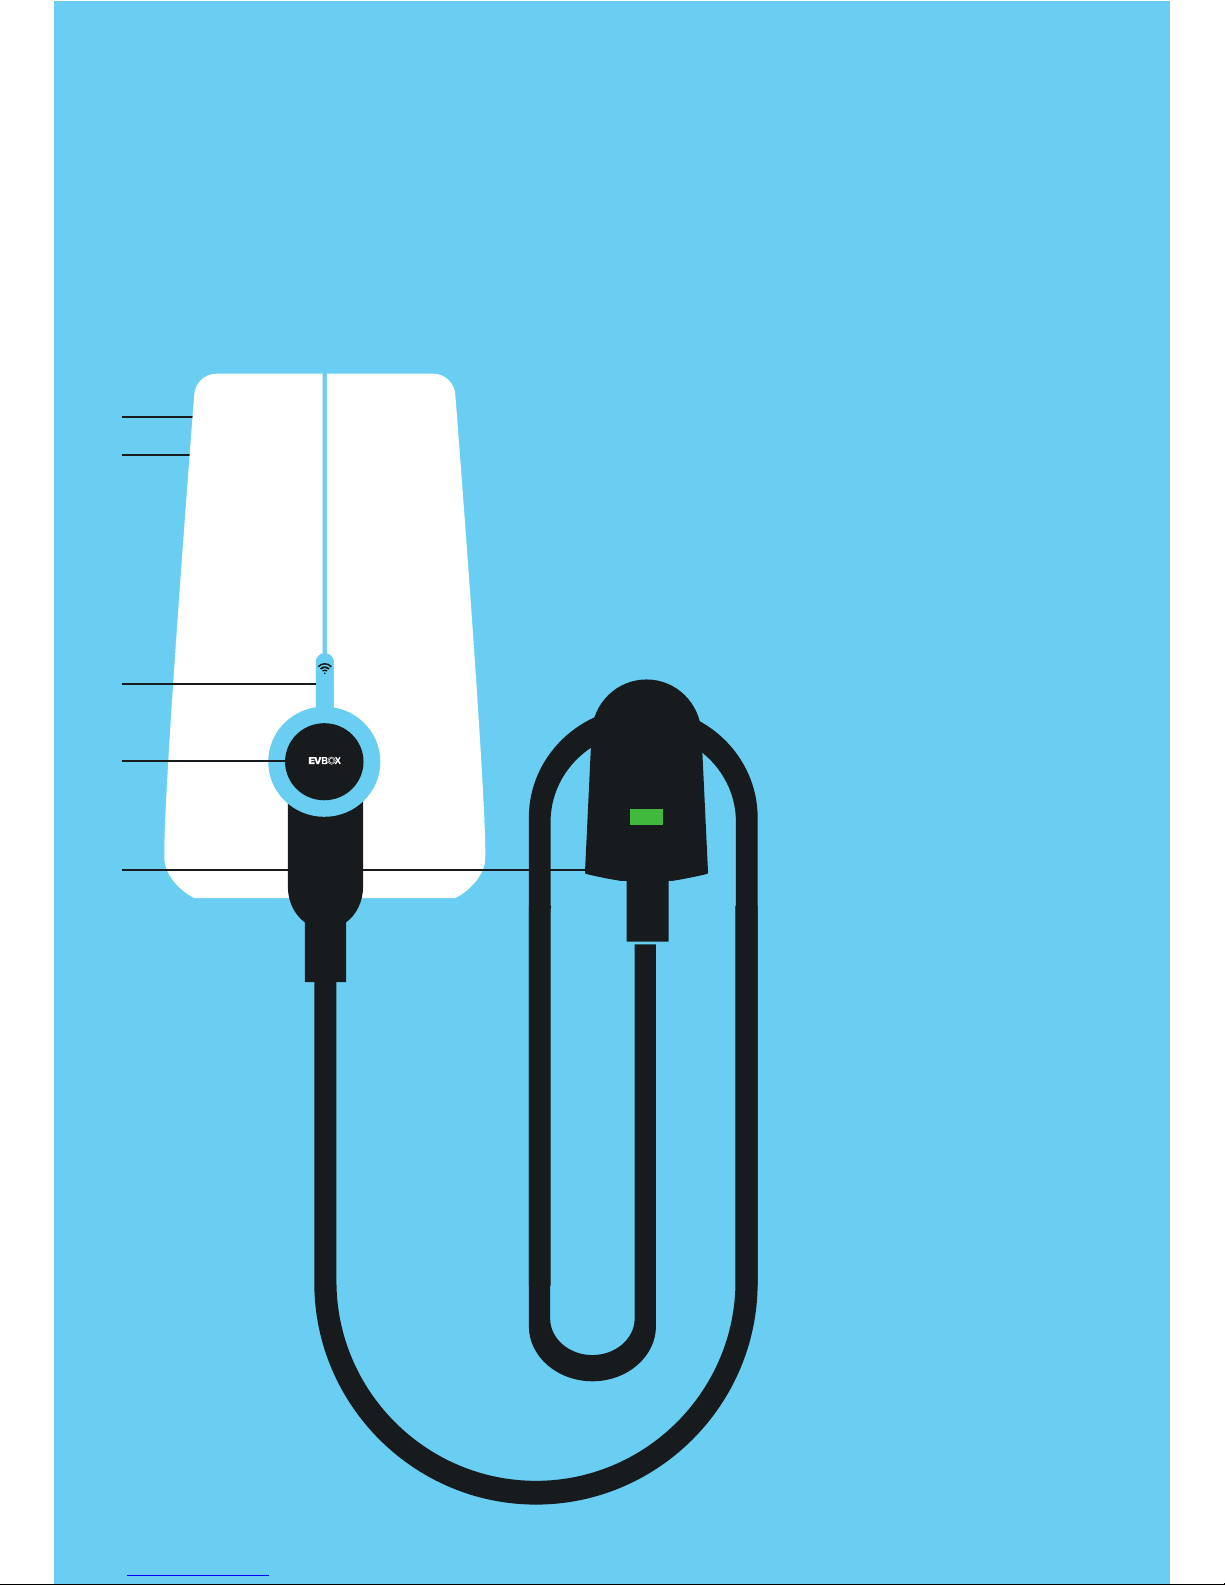
components
& features
Charging cable & cable dock
Elvi’s charging cable is
compatible with all types
of electric vehicles that
can handle capacities
from 3.7kW up to 22kW.
The cable dock (sold
separately, part. No.290135)
secures the cable in its
position when Elvi is not in use.
Note: Make sure to select a
charging cable/plug that is
compatible with your car.
Card reader
This is the area where you
scan your Charge Card or Key
fob. Elvi reads the data from
your card to start or stop a
charging session.
Operating system
Elvi is connected via a
built-in Dual Band WiFi
connection or via an
optional UMTS modem.
Start and stop your charging
session with your charge card,
key fob, or remotely via
the app.
1
1
2
2
3
3
4
4
5
5
Housing
Elvi consists of a wall dock,
a charging station, and a
charging cable.
Elvi is designed with rugged
high-impact strength plastics
that make its housing durable,
shockproof, weatherproof
and colorfast.
LED indicator
EVBox is the innovator
behind the LED ring.
This smart status indicator
helps you to understand what
Elvi is doing at all times.
3
Page 7
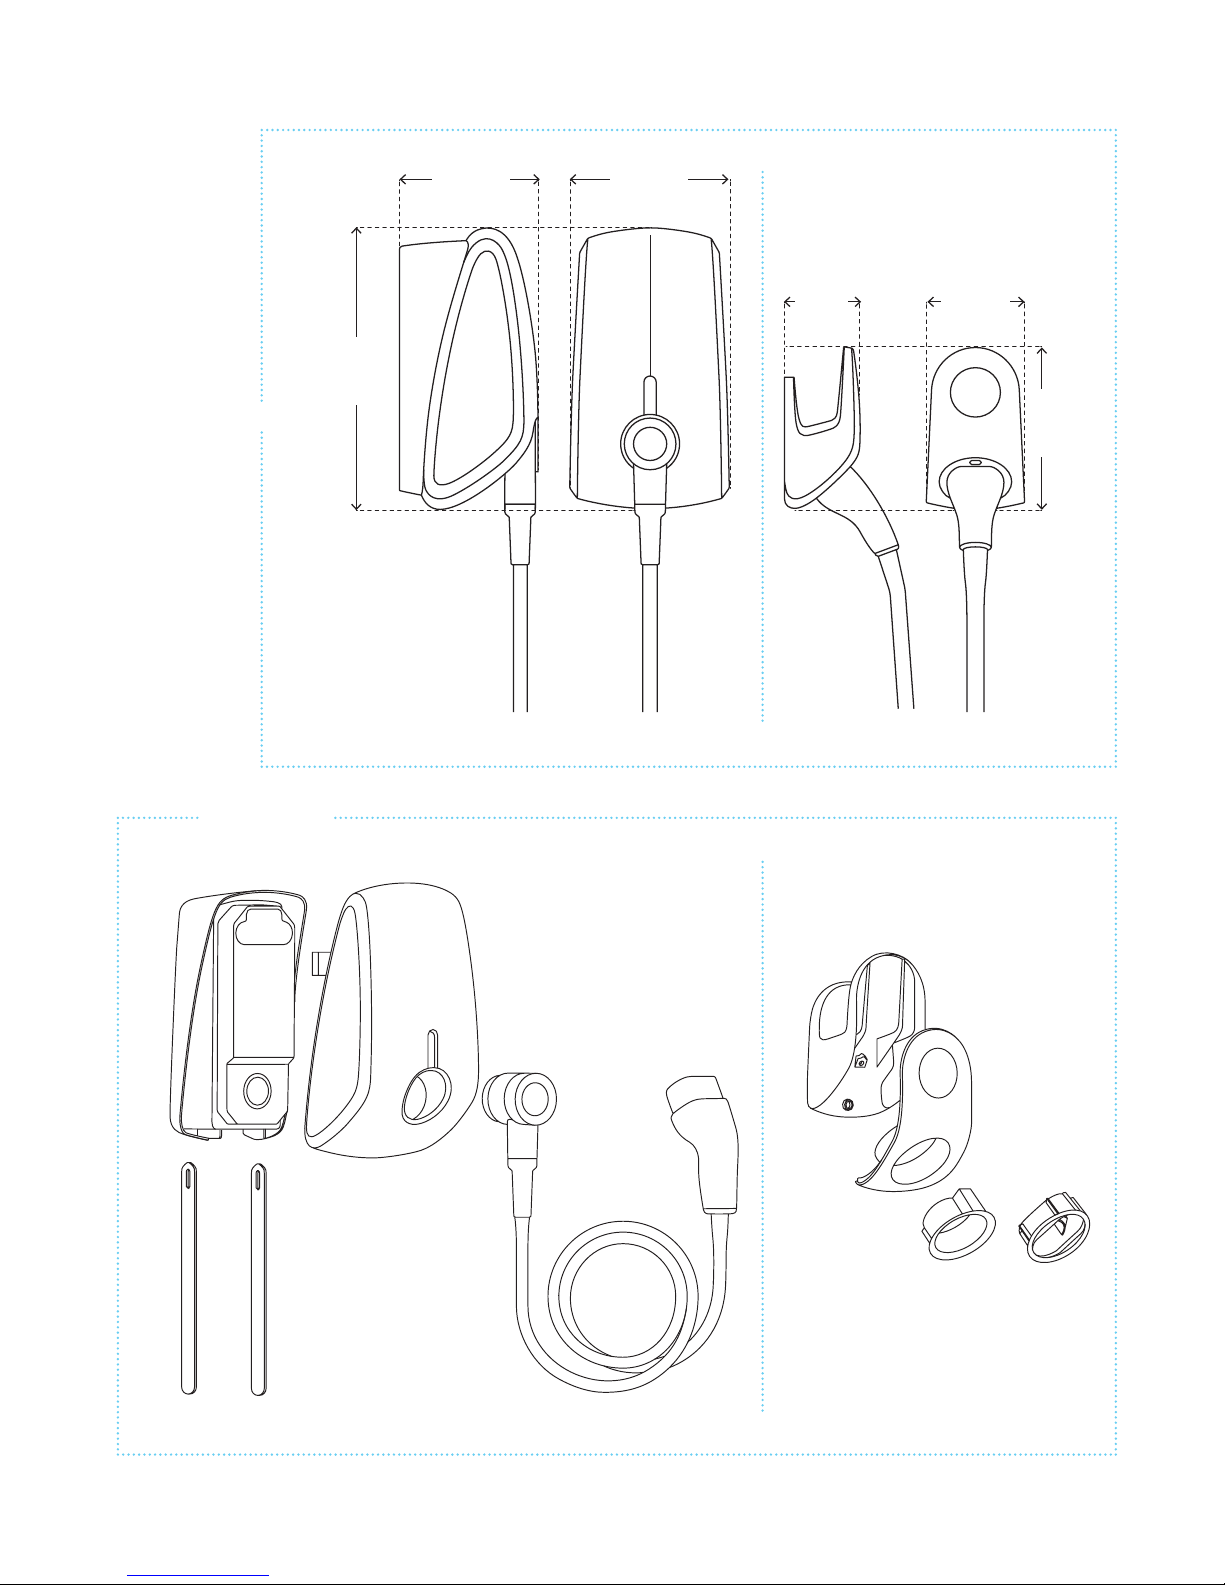
mD m
D94mm
W122mm
H197mm
H328mm
Components
Dimensions
Cable dock
(sold separately)
Cable dock
(sold separately)
Wall dock Station
Keys
Charging
cable
Cable dock
Wall base
Cable dock
Plug holder
Charge plug
Type 2
Cable dock
Plug holder
Charge plug
Type 1
Cable dock
Front cover
Charging plug
(type 2 in
example)
4
D 161 m
W 186
Page 8
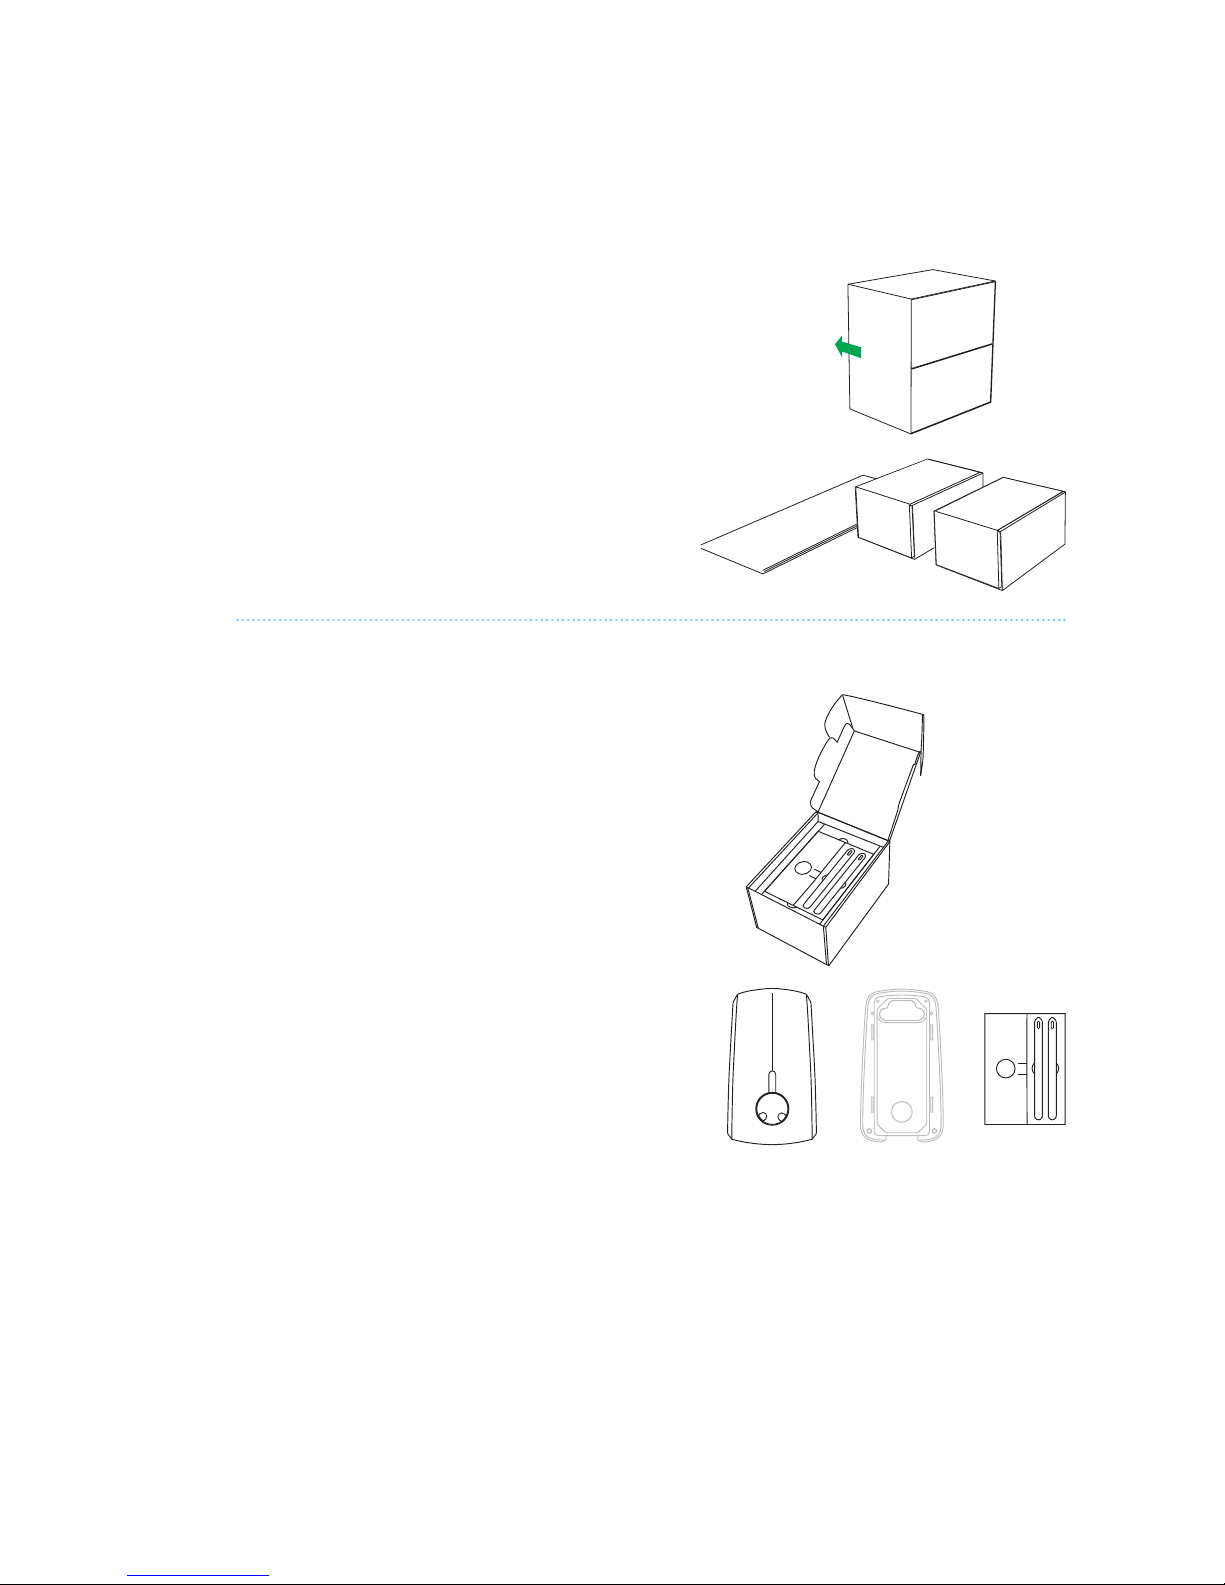
1. unpack Elvi
1.1
Place Elvi’s package on a at & stable surface.
Remove sleeve.
1.2
Set the boxes aside.
Box 1 contains the charging station
Box 2 contains the charging cable
1.3
Open the charging station box.
Put the instructions folder aside.
The keys you see in this folder
are only required to remove
the charging station from its wall dock.
This is needed for maintenance,
or if the charging cable needs to be changed.
Note: After installation, hand over the folder
including the keys and the charge card
to the user.
1.4
Lift the charging station,
along with its cardboard buffer,
from its box.
1.5
Lift the wall dock from its box.
Skip this step if the wall dock
has been installed beforehand.
In the latter case, the wall dock is
not included in the box.
5
Page 9
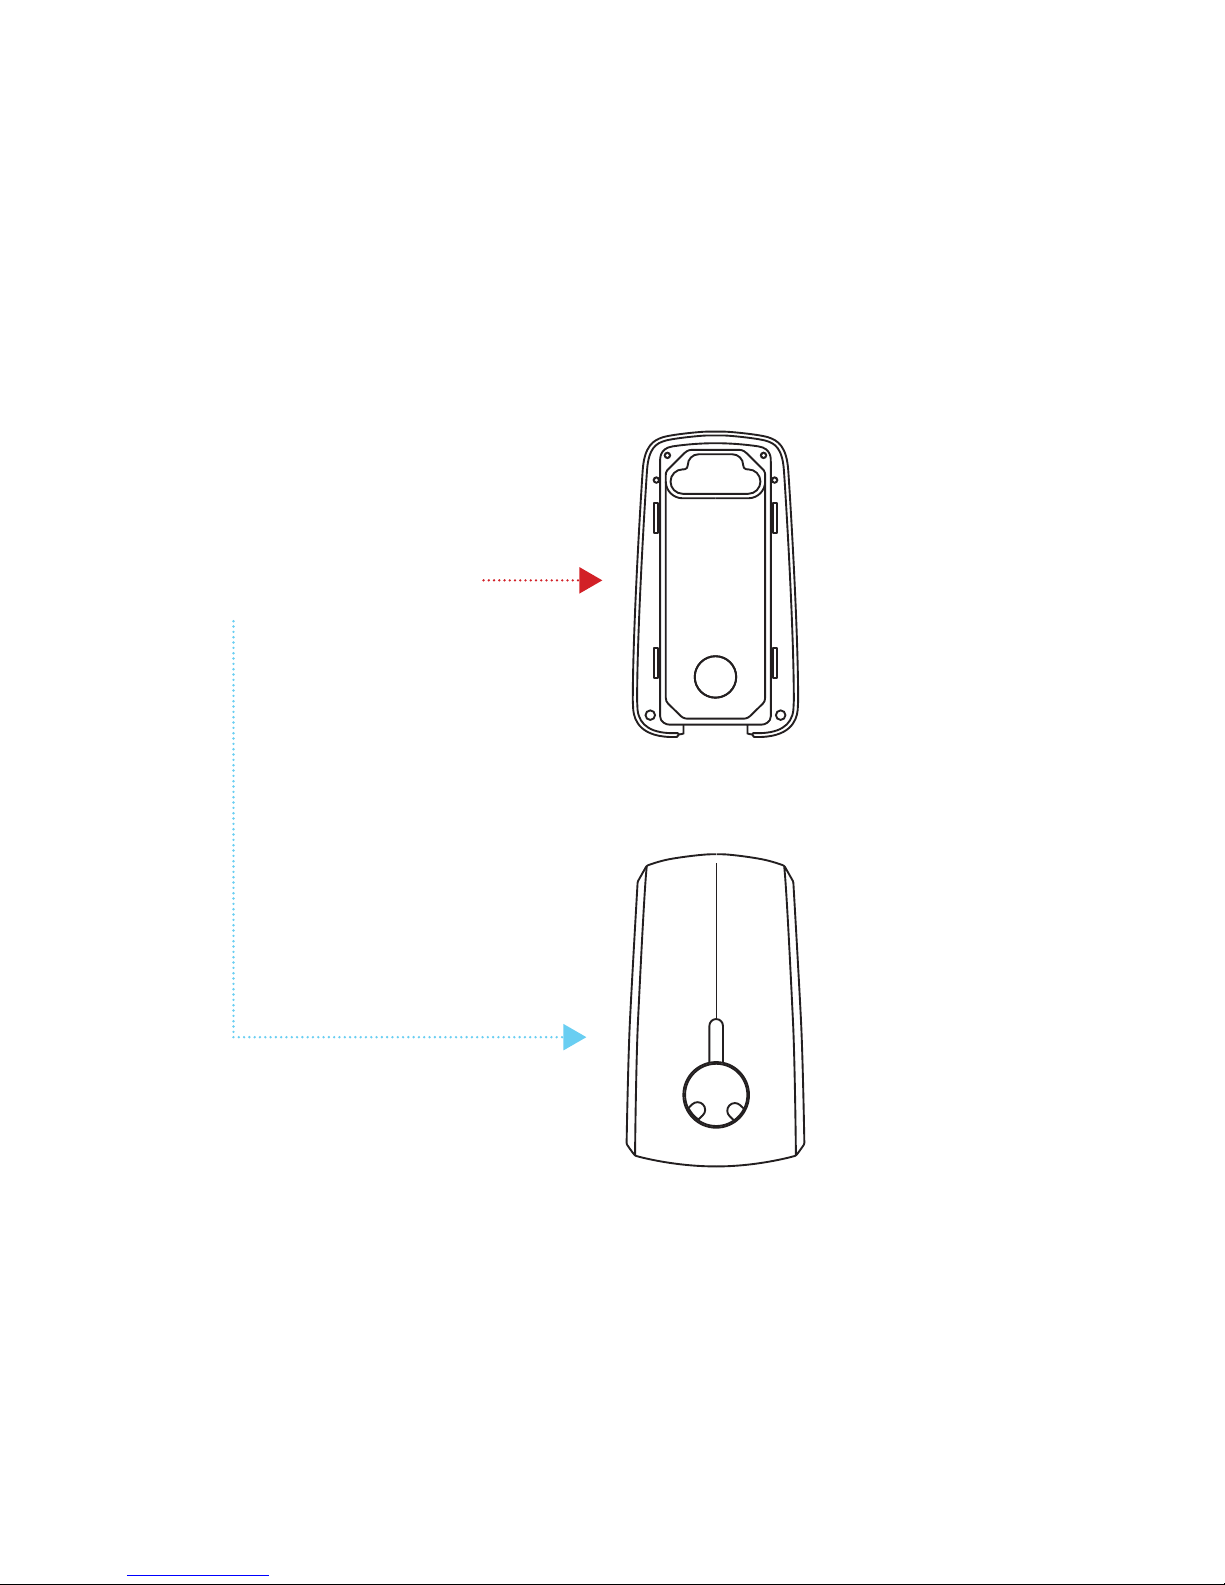
1. unpack Elvi
Wall dock
already installed? Go to next page
Go to page 11
YES
NO
6
Page 10
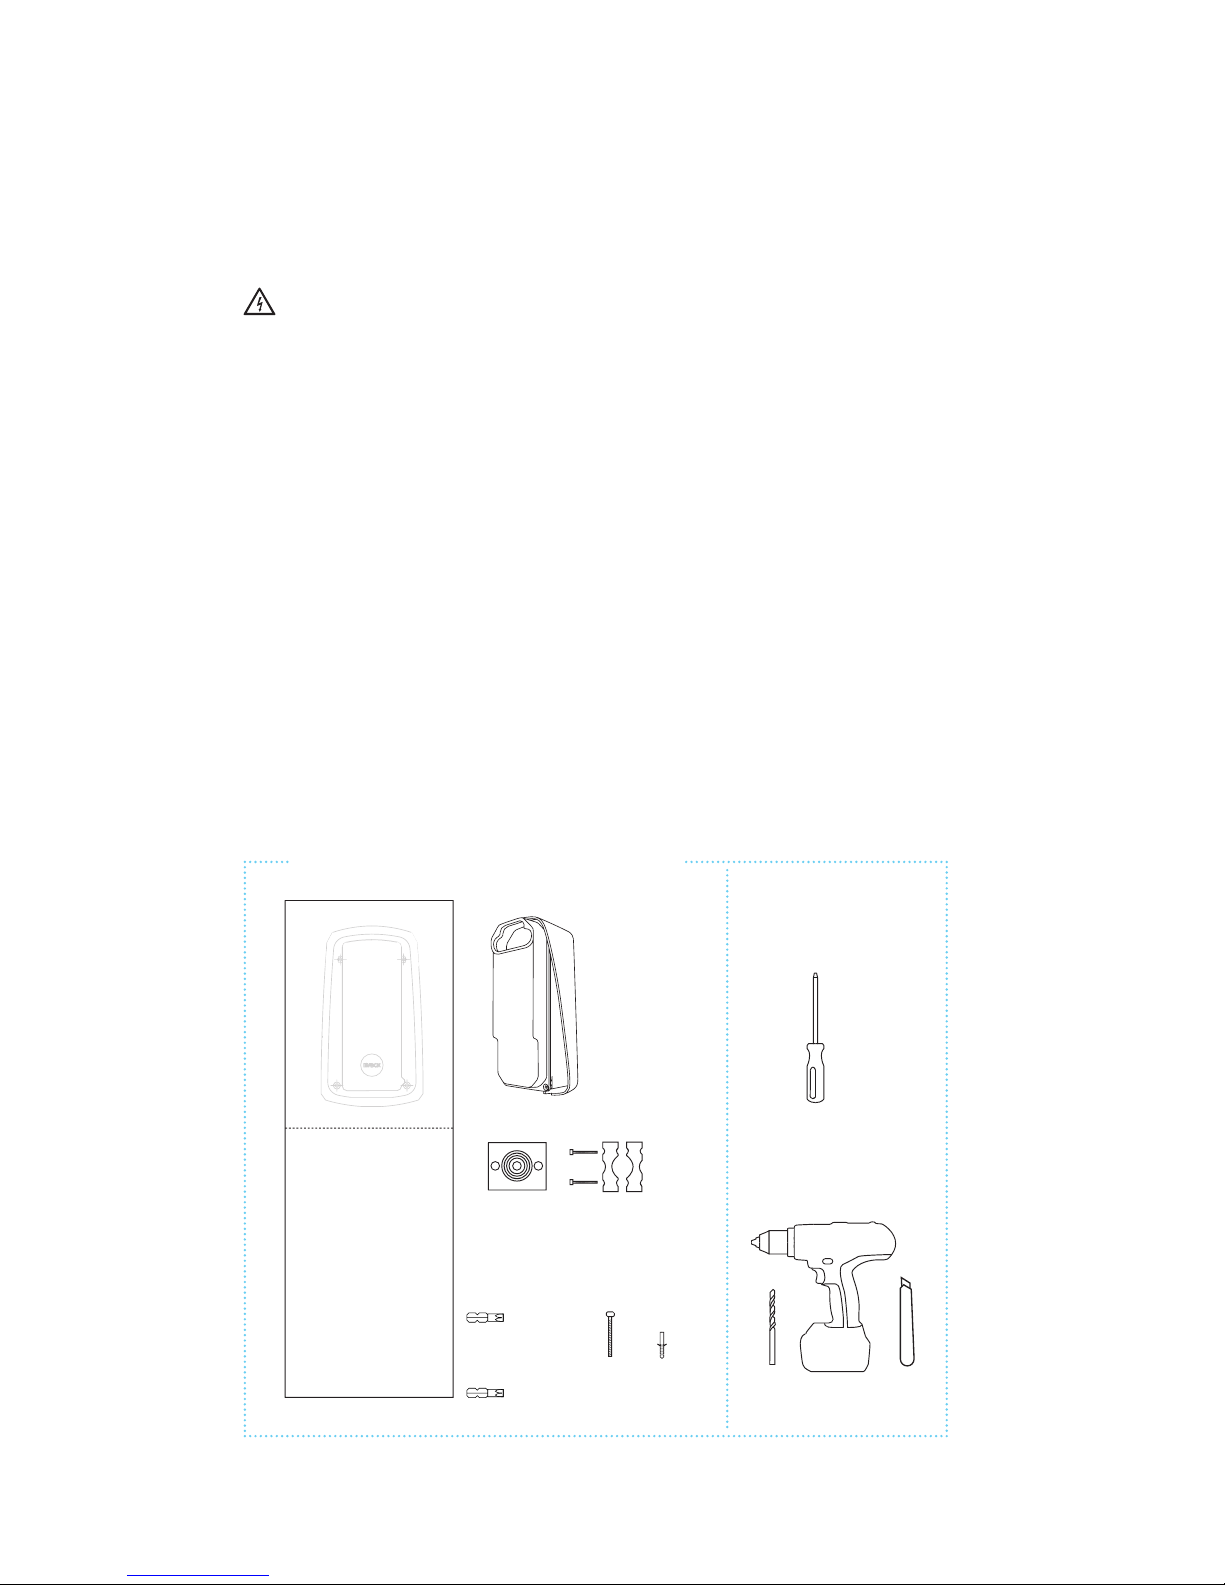
Before installing the wall dock
Make sure the power line you’re using is switched off on your service panel.
Make sure that the power line to Elvi is installed on a dedicated circuit breaker
on your service panel, which is protected by an adequate RCD. MCB must be in line
with the capacity of the charging cable (3.7, 7.4, 11, 22 kW). In case the Amperage
rating of the charge cable lies above the Amperage rating of the applied protective
device (MCB), the installer / user should change the station settings in the
Hey EVBox app or via hey.evbox.com. For RCD, we advise you to use a 40A,
30mA AC type A.
Keep in mind that local regulations may be applicable and may vary depending on
your region/country of residence. The installing party must always ensure
that the station is installed according to the local regulations.
In case the values between the charging cable and protection level (MCB)
are different, the installer / user should change the station settings
in the Hey EVBox app. This difference will be signaled by
a warning in the Hey EVBox app.
Installation settings of your service panel should always be performed
by a qualied electrician.
8mm drill
drilling machine
knife
4x
screw 6x70mm
4x
plug 8x65mm
1x bit T20
1x bit T30
Flat head
screwdriver
2. install wall dock
7
Tools you need to install the wall dock
Included
in the box
Not included
in the box
Page 11
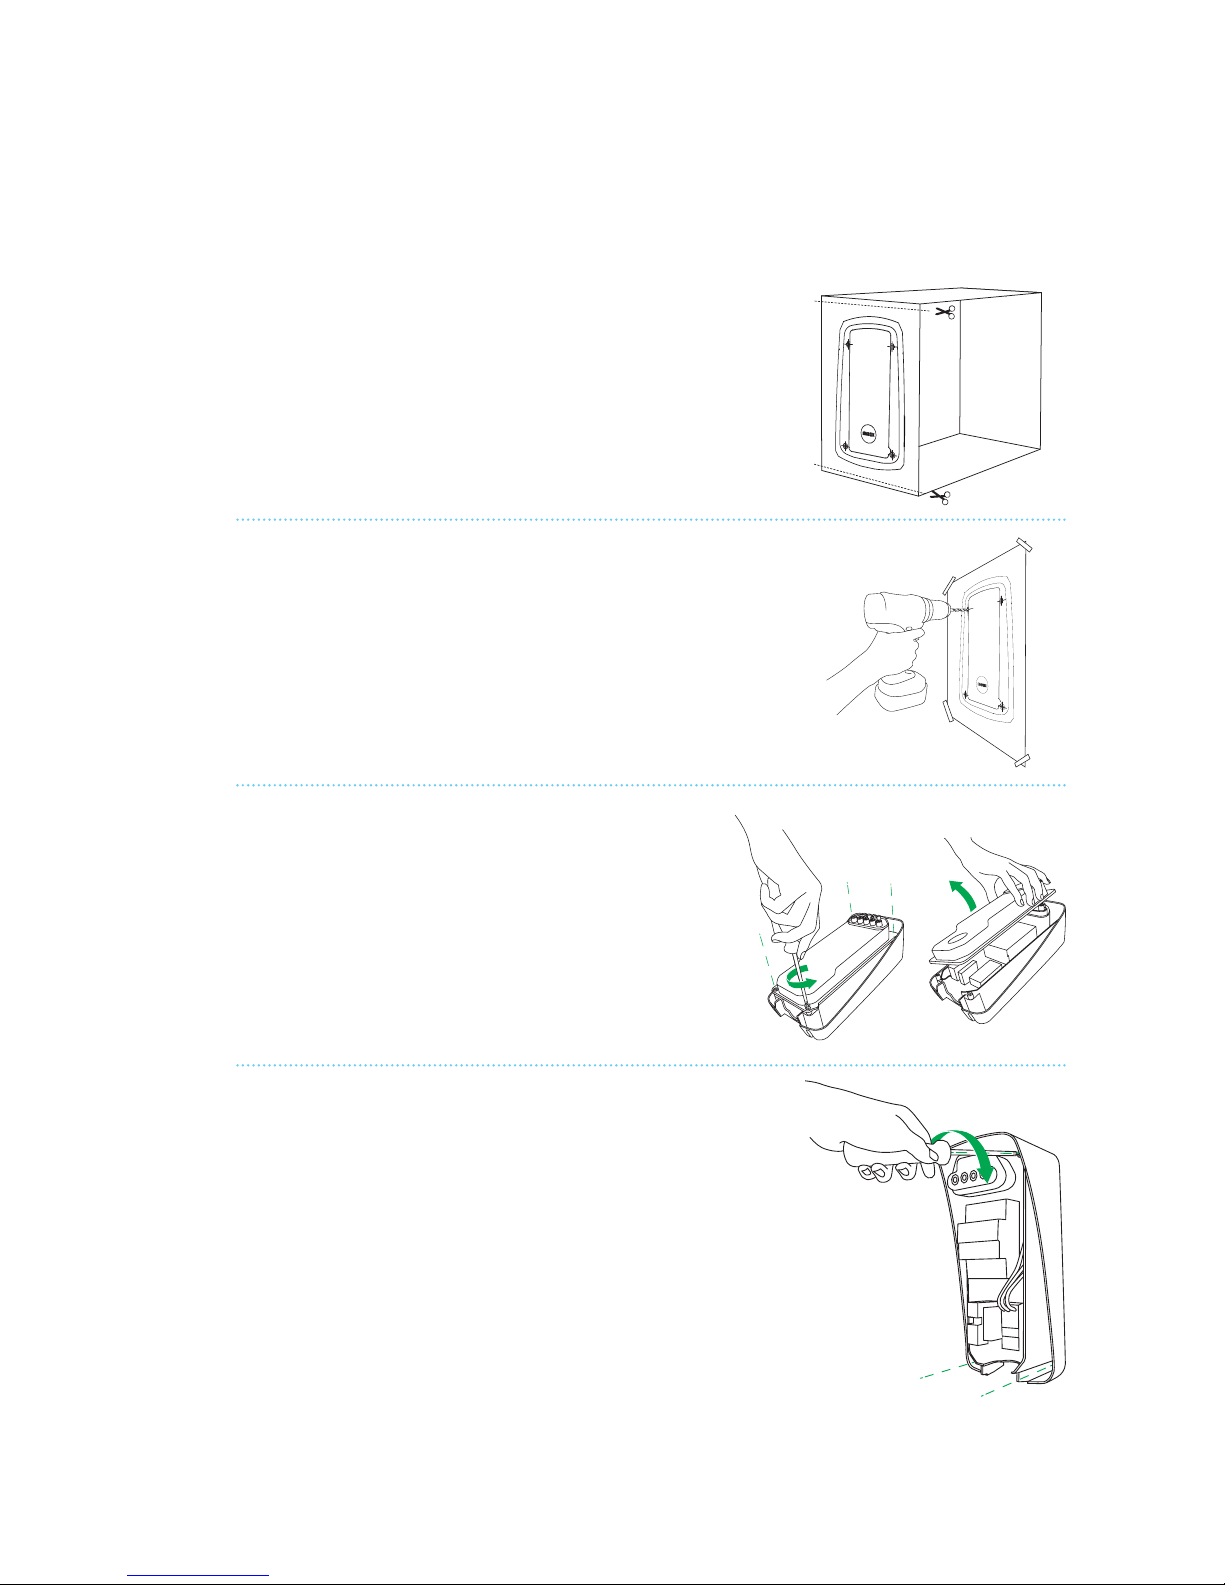
2. install wall dock
2.1
Select a solid and at vertical surface
to install the wall dock. The surface must be able
to carry a vertical load of 20 kg.
2.2
At the bottom of the box’s sleeve,
you’ll nd a drilling template.
Cut the drilling template from the sleeve.
2.3
Place the drilling template onto the wall
and mark the 4 mounting points
on the wall.
2.4
Drill holes with a drill round of 8 mm.
Use the supplied 8x65 mm plugs and
6x70 mm screws.
2.5
Remove the window cover of the wall mount
(4 corner screws – 3x Torx T20 (use supplied bit T20)
+ 1x Slotted (use regular screw driver)
2.6
Screw the wall dock onto the wall
Use the supplied Torx T30 bit
to fasten the screws.
8
Page 12
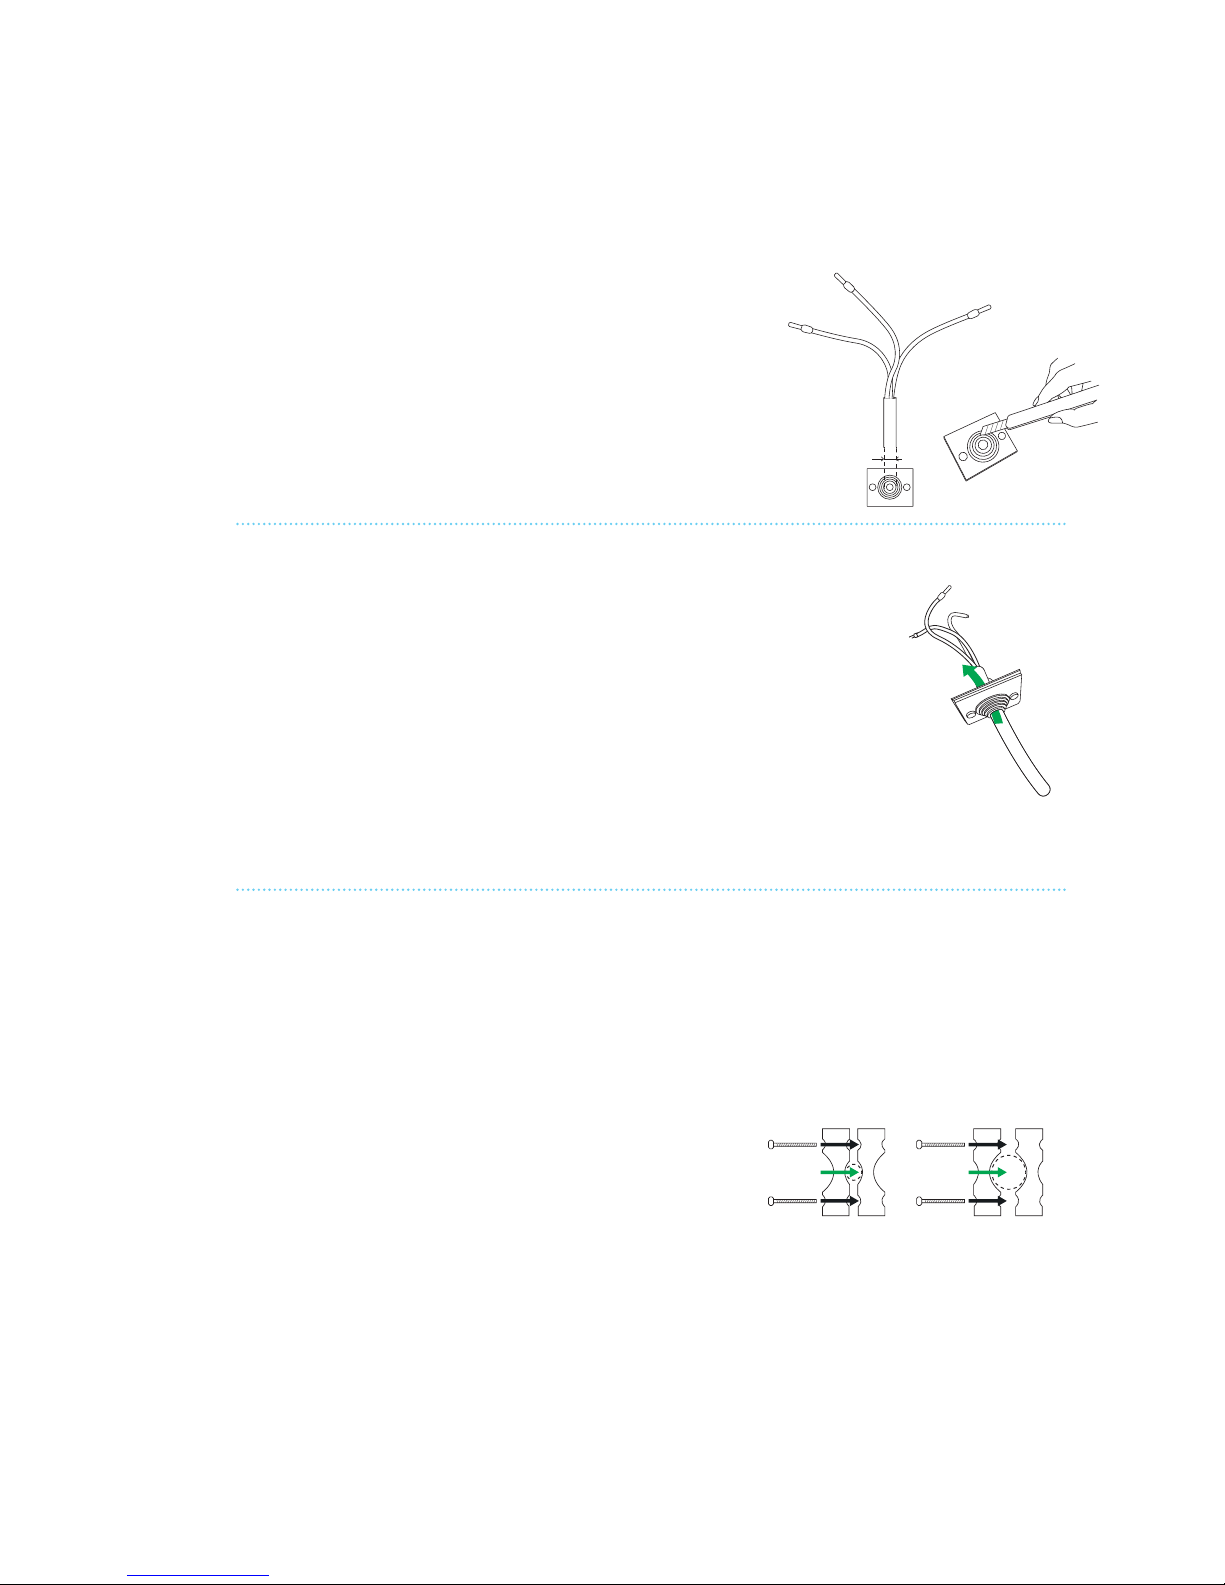
2. install wall dock
x mm
2.7
Cut off the right diameter of the rubber seal to allow the
power cable and optional data cables to come in.
Note: Strain release and rubber seal are supplied in a
separate bag in the box.
2.8
Feed the power line and
optional data wiring through the seal.
Length power line = 230 mm.
Strip the power line over a length of 180 mm.
In case of stranded (exible) wiring, please use
wire end sleeves with a ferrule length of 12-15 mm,
and apply a square crimp for optimal t into the
connection terminals.
2.9
Assemble the strain release.
Depending on the feed wire thickness,
you can use either the small or large diameter
on the strain release. Simply ip the symmetrical
parts to create a different strain release diameter.
The strain release also accommodates
for extra data cables on two sides
(e.g. UTP/CAT5E/CAT6).
Small Large
Optional data
Optional data
Power line
9
Page 13
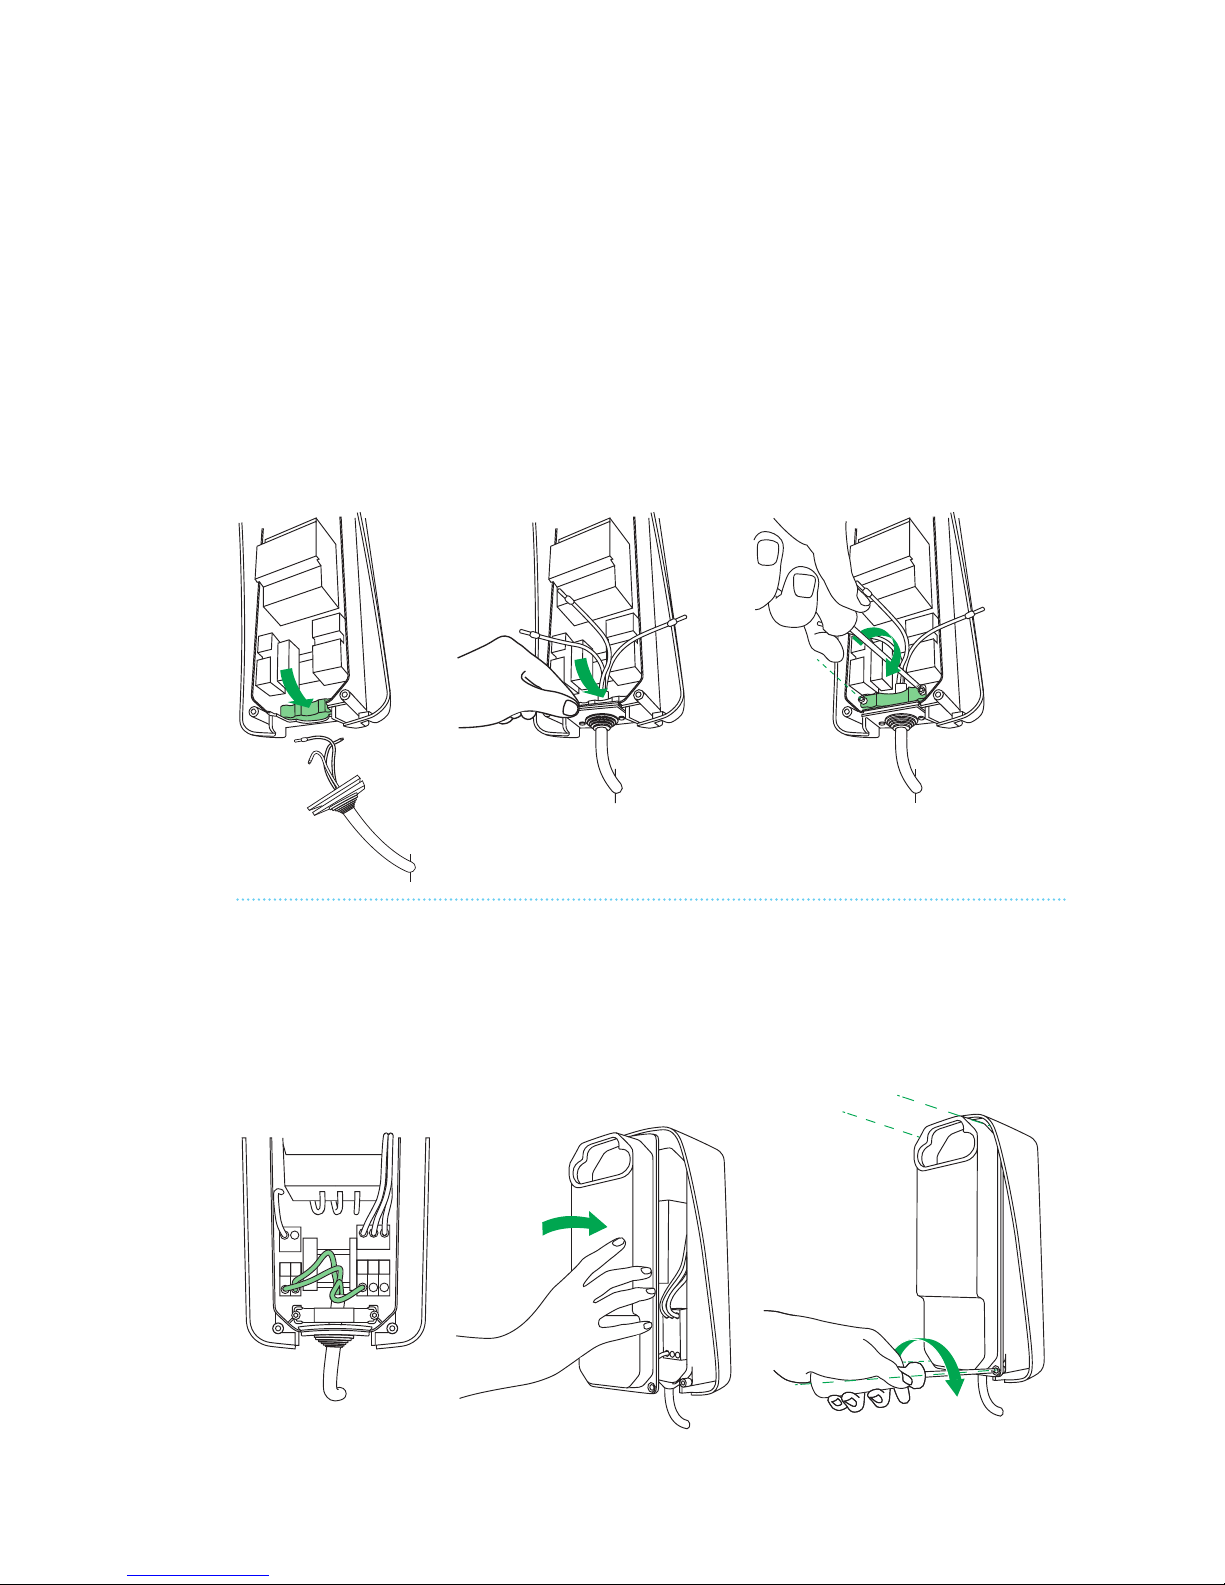
2. install wall dock
2.10
Place one part of the strain release in the bottom of the wall dock.
Place the feed wire over the bottom part of the strain release and
mount the rubber seal in the outer edge of the wall dock.
Place the top part of the strain release over the feed wire
and use the two screws 4x40 mm Torx T20 head to x the strain release
on the feed wire. Do not overtighten.
PE N
L1 L2 L3
2.11
Connect the wiring. Assemble window.
Make sure no wiring is protruding from under the cover window.
Tighten the bolts with T20 bit. Do not over-tighten the bolts.
Special bolt on the bottom right corner. To seal the installation with
a temper evident seal, use a regular at head screw driver.
Note: Installation example of a
1-phase connection of Elvi.
10
Page 14
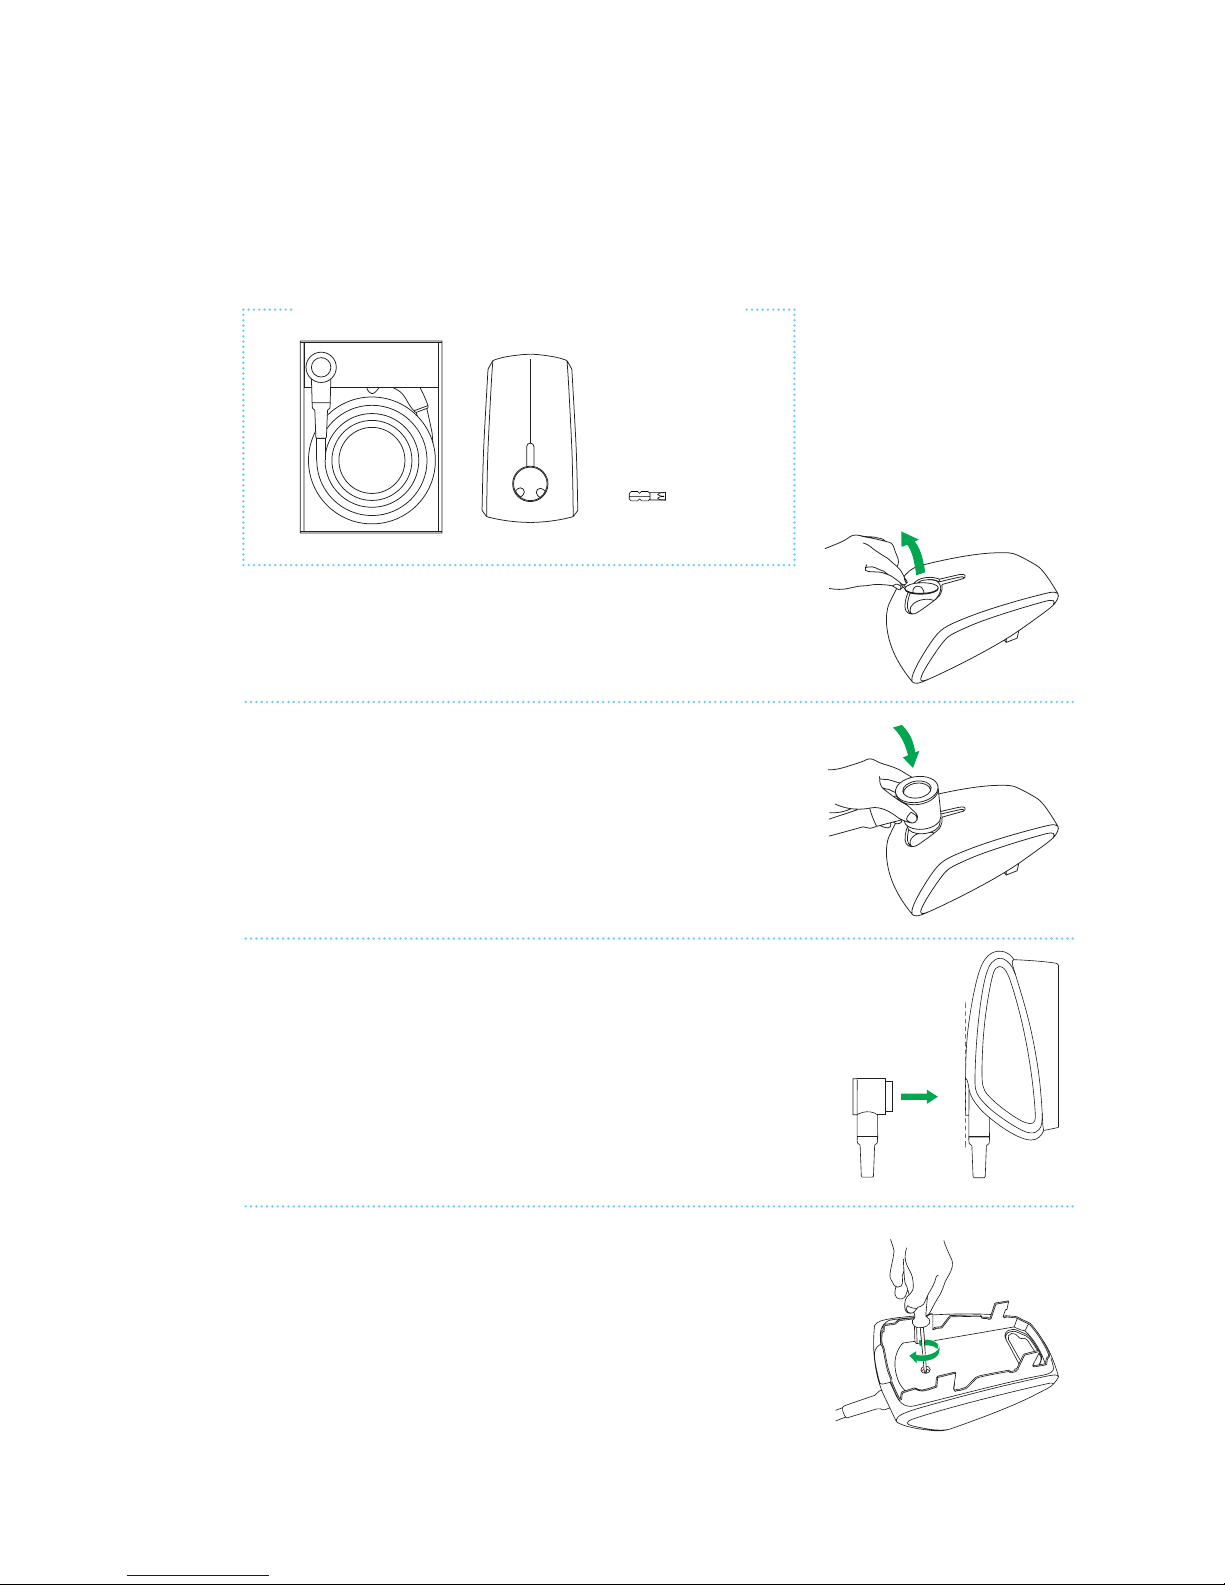
3. install charging cable
3.1
Unpack the charging cable box.
Remove the cardboard cover from the station’s socket.
3.2
Take the cable out of the box and plug it in to the station.
When plugging in the charging cable, properly support Elvi
and the four snap ts on the back of Elvi. Check if the seal on
the plug is present before inserting the plug.
This is to ensure that the proper IP rating is met.
Tools you need to install the charging cable
3.3
Make sure you press it until the cable plug with LED ring is
rmly secured and the LED ring is at the same height as the
outer surface.
3.4
Turn the station around and put the front face of the station
on a soft surface. Place the bolt and rmly tighten the bolt
with the T30 bit.
Re-conrm that the cable bolt is tightened properly.
Check again if the charging cable is rmly connected to the
station and LED ring is at the same height
as the outer surface.
11
1x bit T30
Page 15
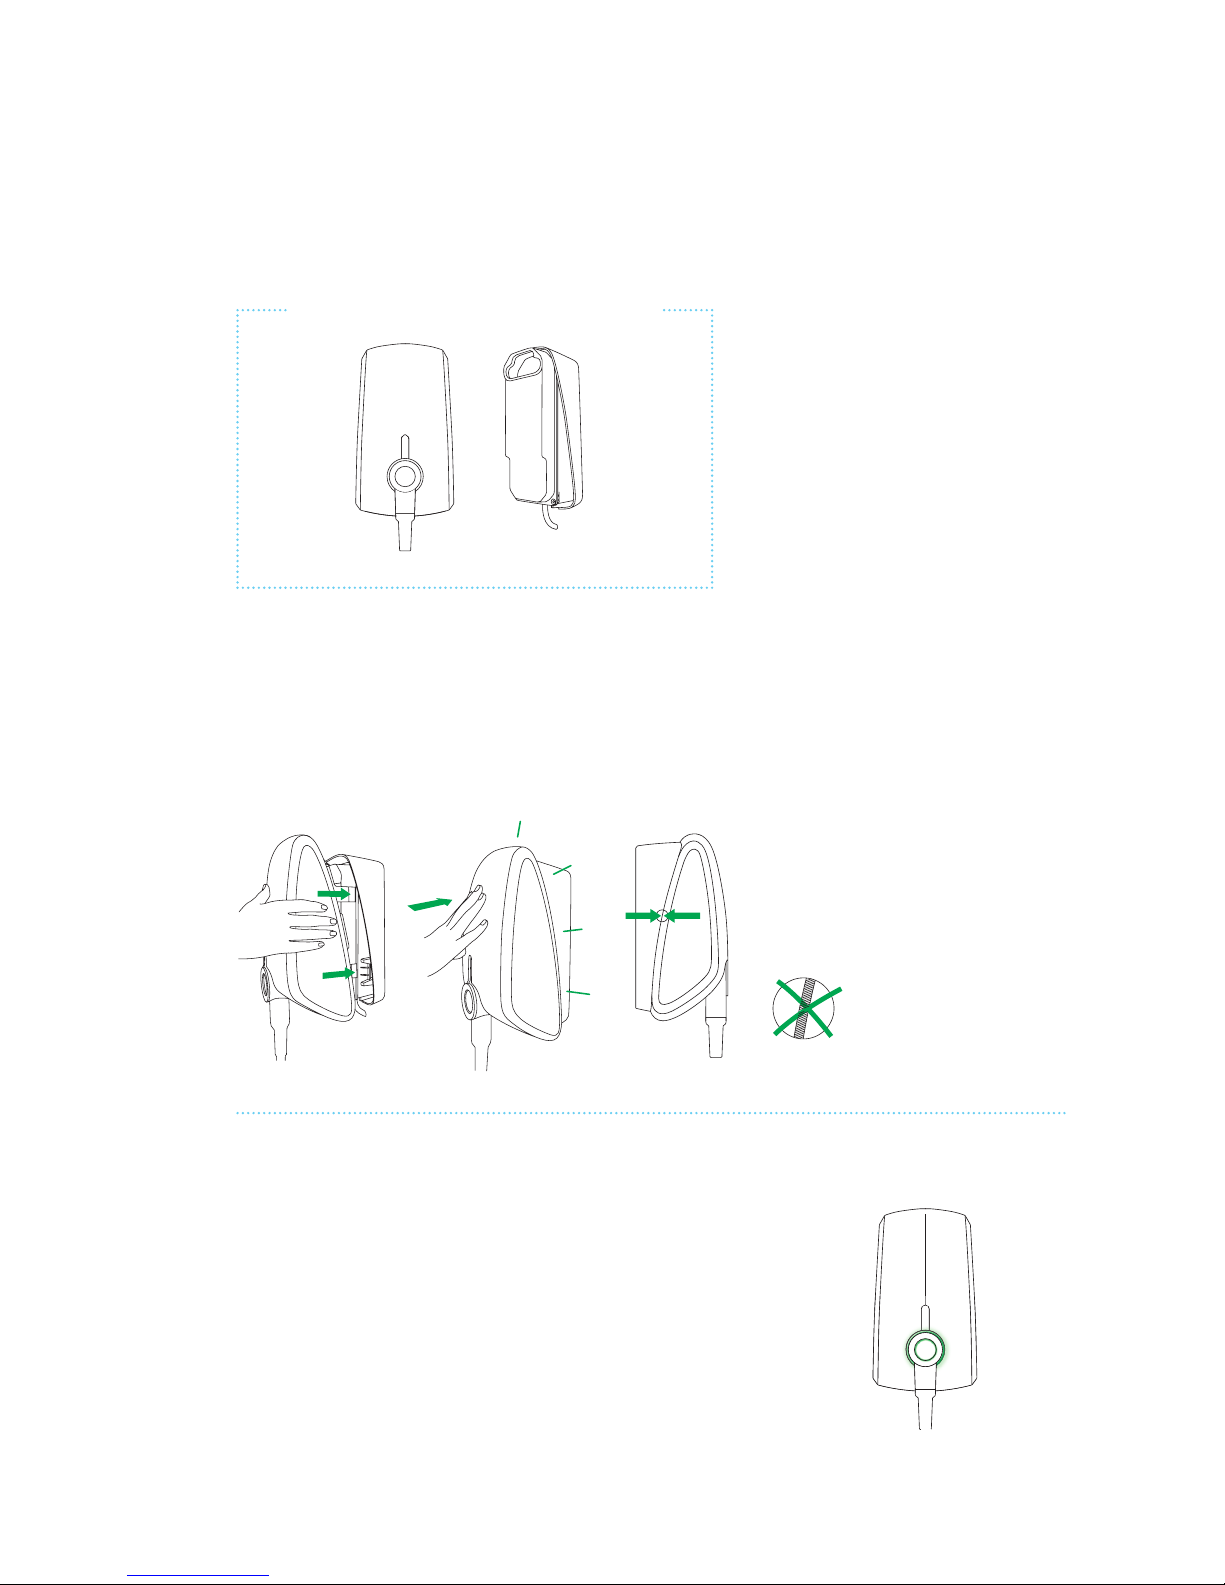
4. install station
Before mounting, take a note of Elvi’s station ID.
This can be found on the backside of the station.
4.1
Align the station against the wall dock and press until you hear a clicking sound.
If you doubt if the connection is fully secured, check if there’s no air gap
between the wall dock and the station, and rmly press on all four corners.
4.2
Switch on the power to the station on the service panel. Elvi will switch on
automatically. This is indicated by a blinking red LED ring.
Note
When the station is powered up, the LED ring should ash RED, and
switch to GREEN after 2 minutes. If the LED ring shows
no color, this may indicate improper installation of the
charging cable. In this case, please check / repeat step
3.3 and 3.4.
Tools you need to install the station
No specic tools needed for this step.
CLICK
12
Page 16
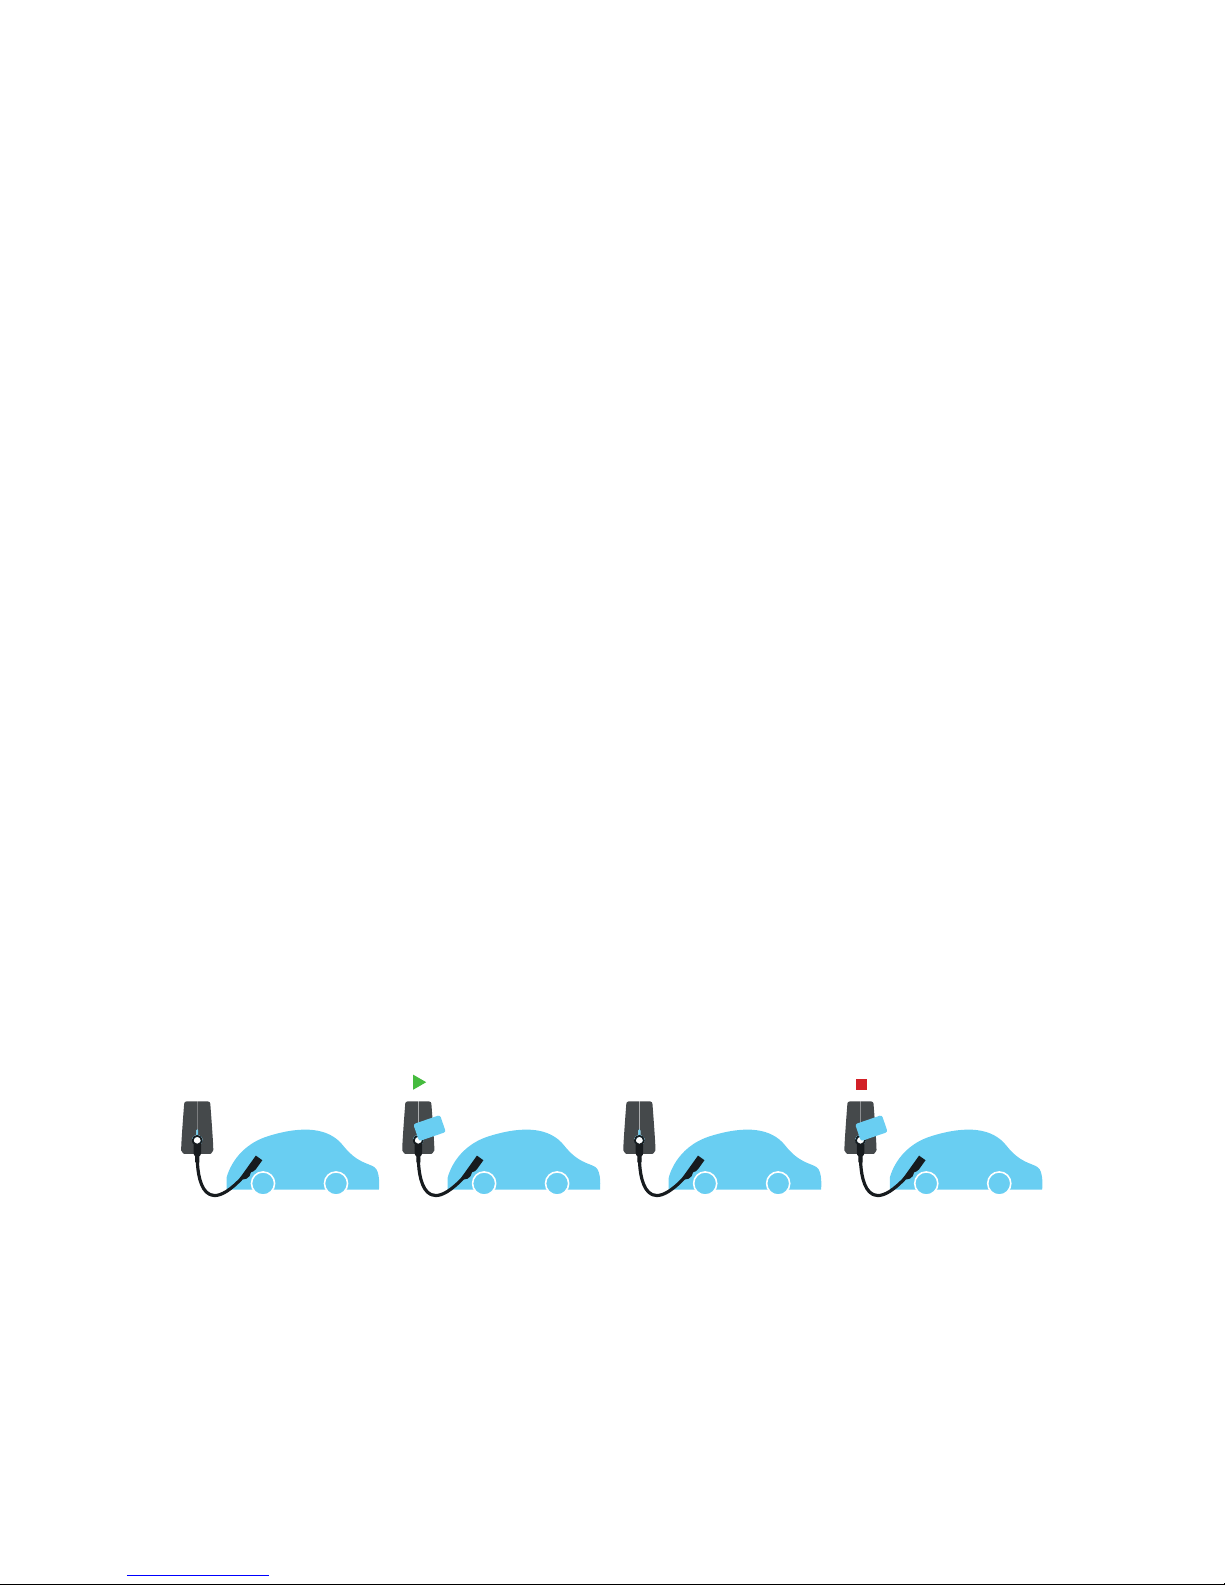
5. activate Elvi
5.1
Download the Hey EVBox app in your app store.
The app is available for both Android and iOS.
5.2
Login to your account in the app.
If you don’t have an account yet, please create a new account in the app.
Register Elvi in the app by adding its Station ID and Security Code.
Find the Station ID and Security Code inside the left ap
of the supplied cardboard folder.
Find the charge card in the supplied folder inside the Elvi box.
5.3
Follow the steps in the app to connect Elvi.
5.4
Activate your charge card in the Hey EVBox app.
If you have a keyfob, this needs to be registered separately from your charge card
in the app. Your charge card and key fob have separate ID numbers.
Elvi’s ready to charge!
Start and stop every charging session by holding your charge card / key fob
in front of Elvi. Your charge card / key fob tracks and registers all your
charging sessions in your Hey EVBox account. Alternatively, you can simply unplug
your car from the charging station to stop your charging session.
Need more help?
If you need assistance with setting up Elvi or your Hey EVBox account,
please contact us at [email protected].
Start Stop
13
Page 17
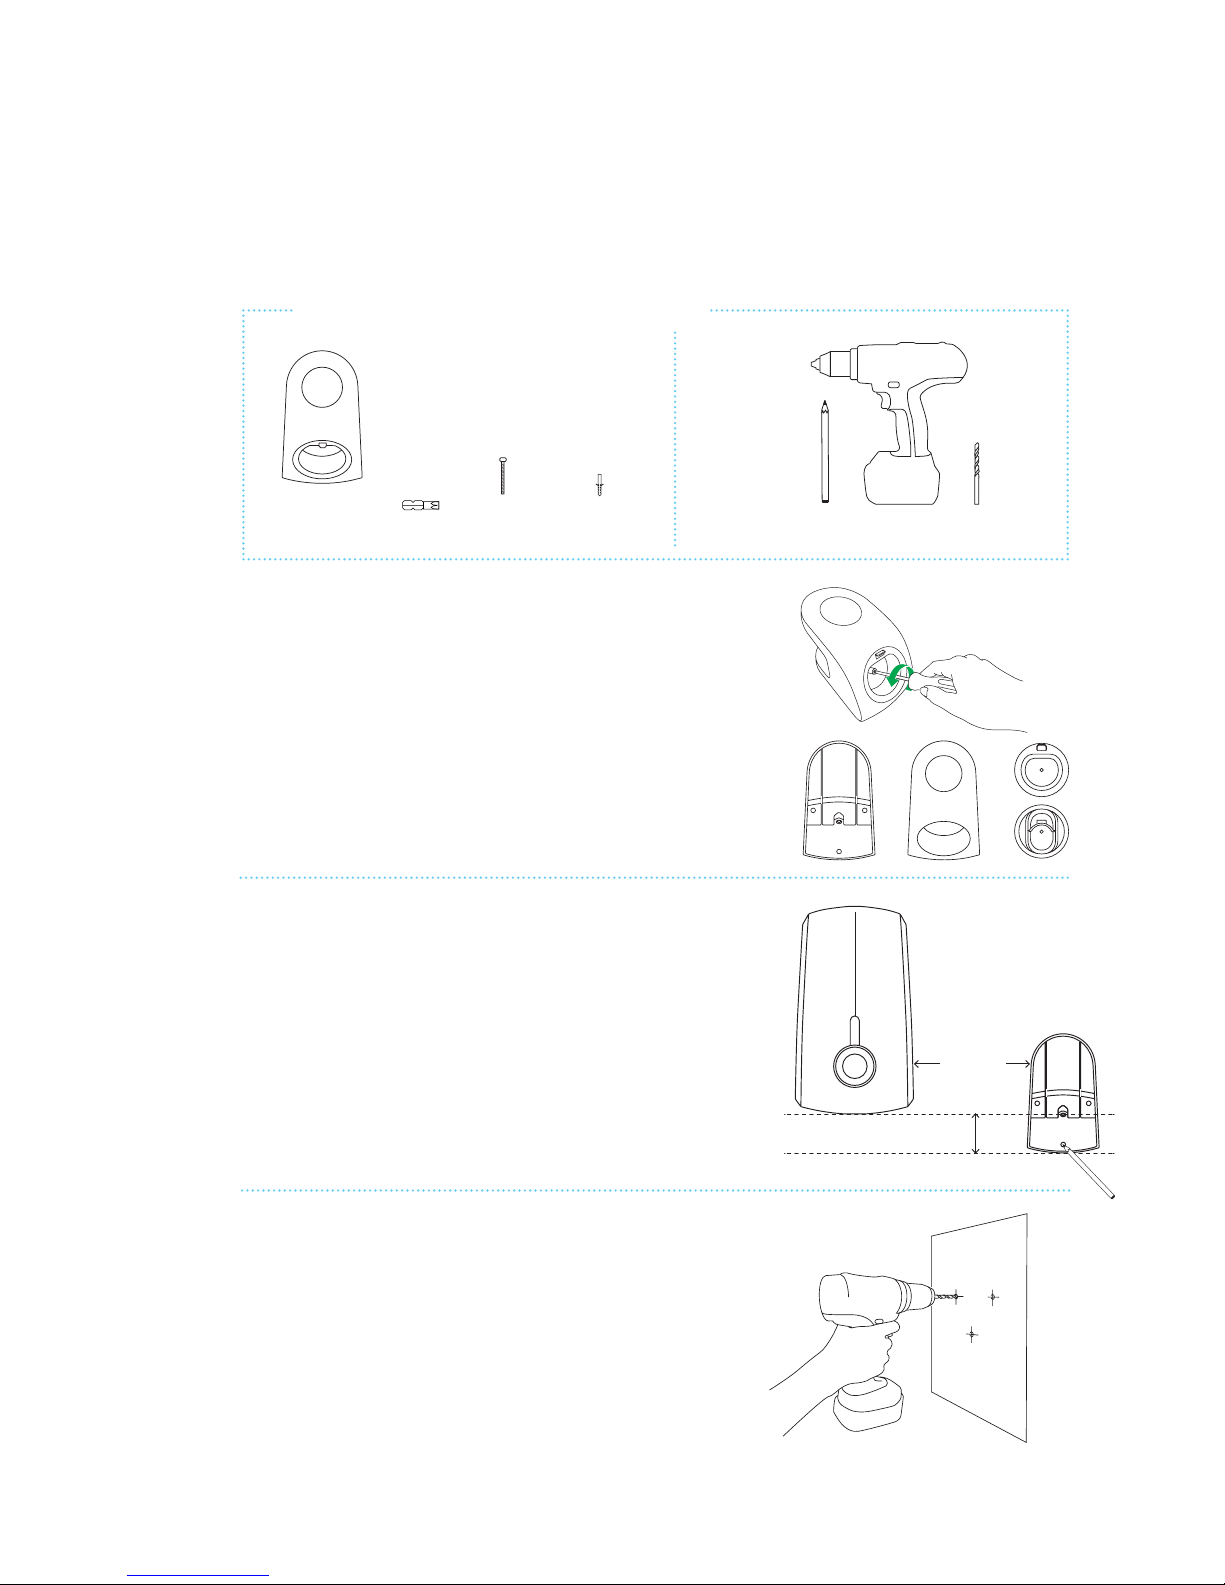
~ W 300 mm
H 65 mm
6. install cable dock
sold separately
The Elvi Cable Dock is sold separately,
part. No.290135.
6.1
Unpack your Elvi cable dock.
De-assemble the cable management
system by loosening the Torx bolt with
the T30 bit.
6.2
Place the cable dock’s wall base on a solid and
at surface. Choose the position on the wall of
your cable dock (should be on the side of your
station at a comfortable height within 1 meter
at least).
Use the cable dock’s wall base as a drilling
template to mark the 3 holes to drill.
Make sure it is leveled.
6.3
Drill holes with drill round 8 mm
Use supplied plug 8x65 mm and
screws 6x70 mm length.
Tools you need to install the cable dock
14
8mm drill
drilling machine
pencil
3x
screw 6x70mm
3x
plug 8x65mm
Included
in the box
Not
included
in the box
Bit T30
Page 18
6. install cable dock
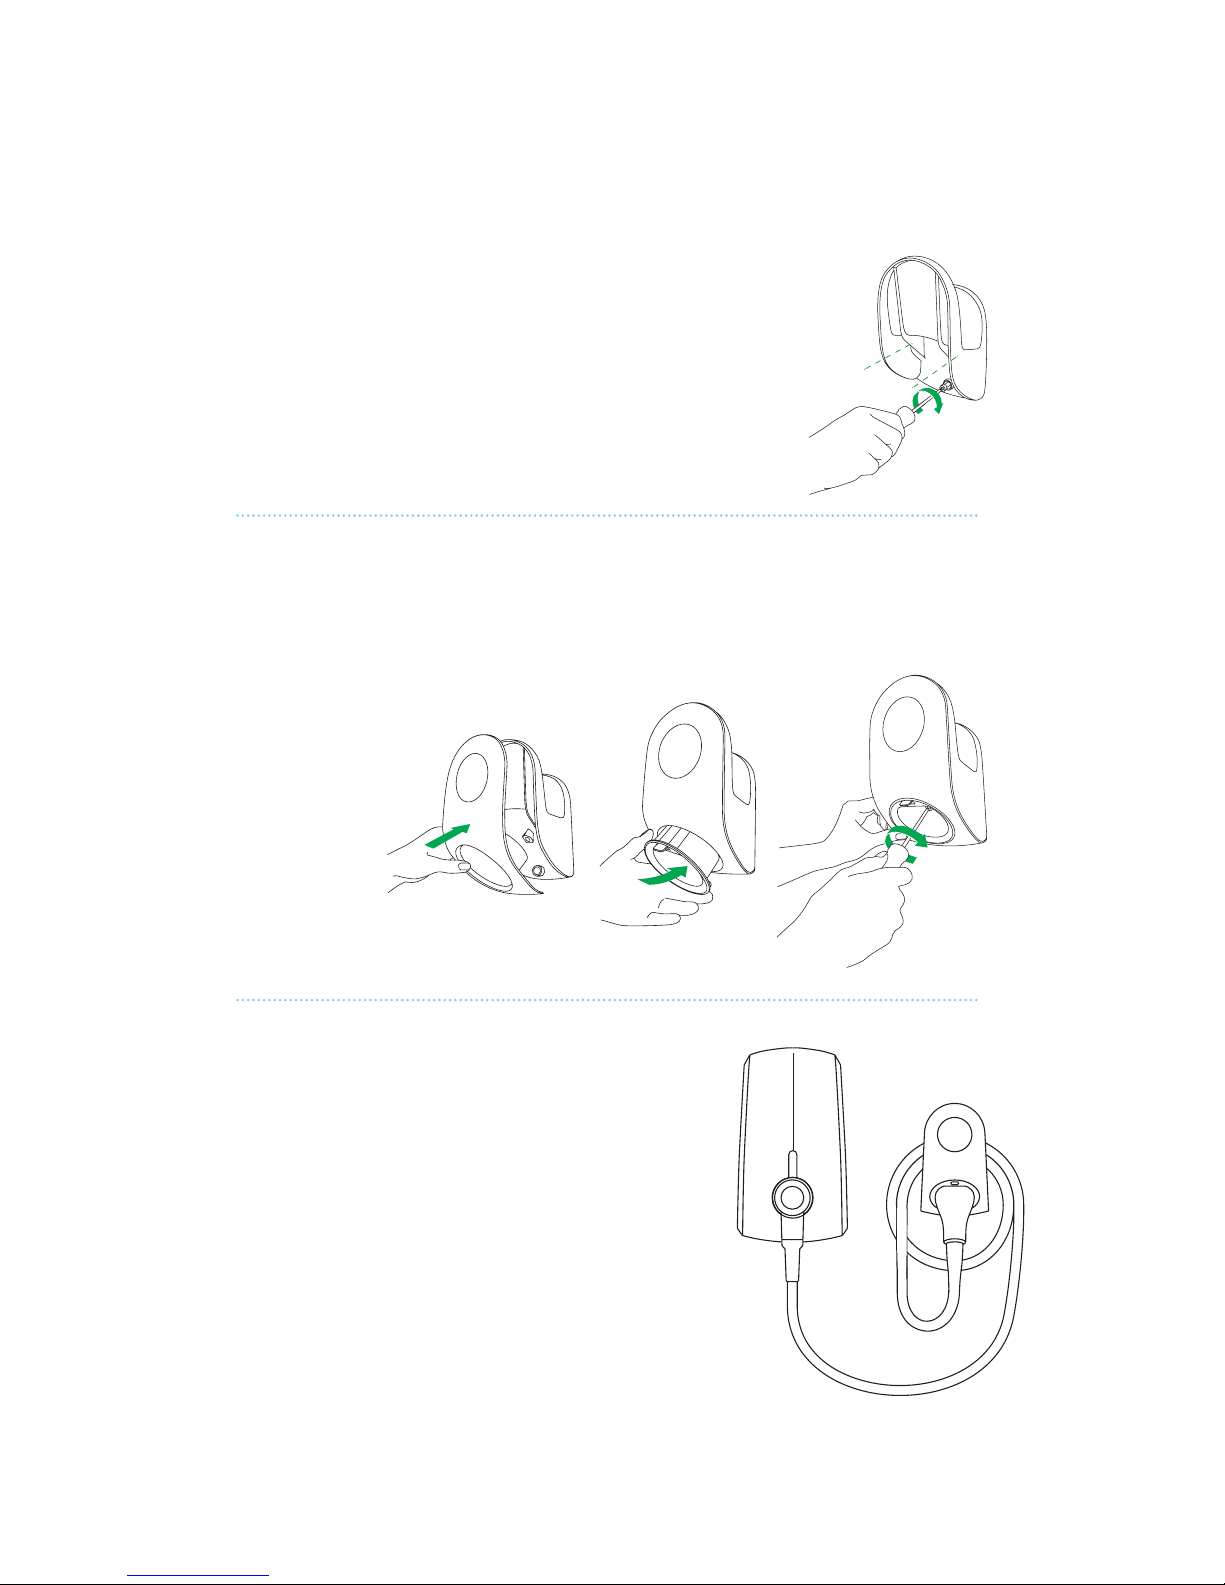
6.4
Place the cable dock’s wall baseon the wall and fasten the screws.
Do not overtighten.
6.5
The Elvi cable dock (290135) is supplied with a plug holder
for Type 1 and Type 2 charging plugs.
Insert the right charge plug holder for your situation
into your cable dock (Type 1 or Type 2).
Fasten the bolt with the T30 bit,
do not overtighten.
Success!
You’re all set.
15
Page 19
7. switch charging cable
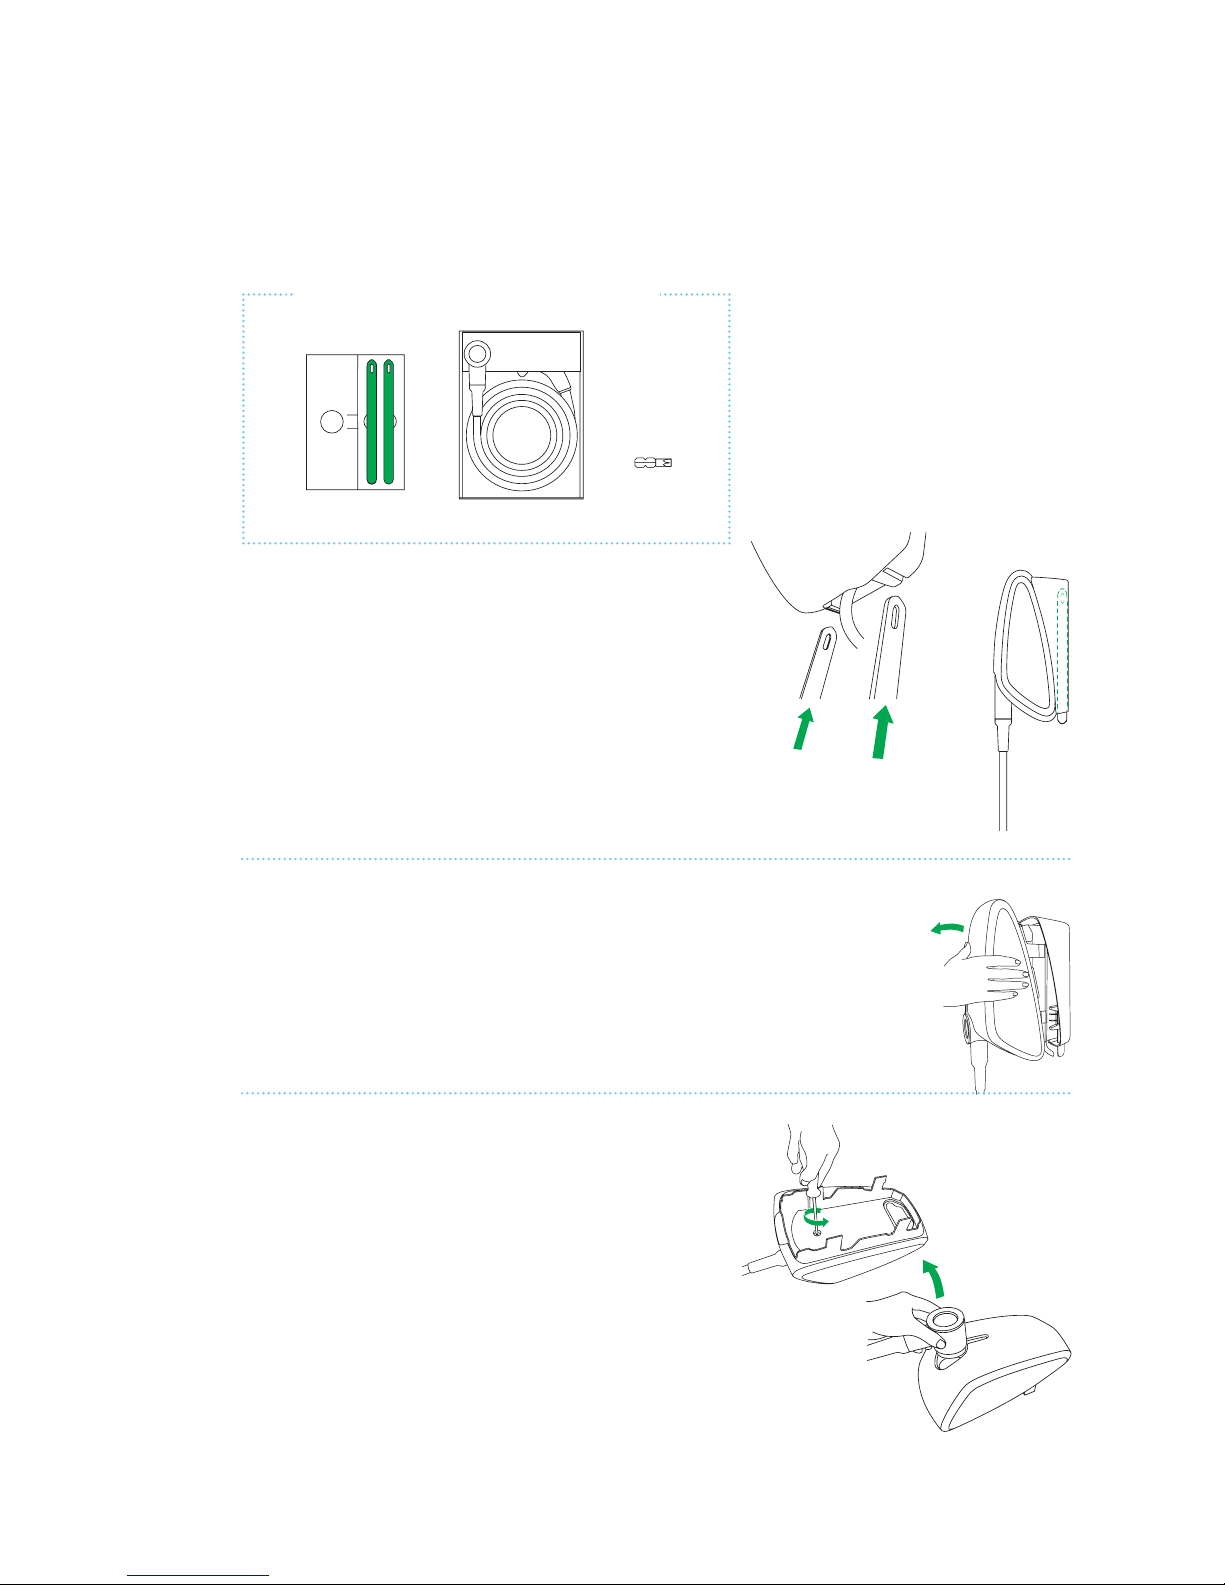
7.1
Make sure your Elvi is powered off on the service
panel, the LED ring in the charging plug should
be off.
Remove the keys from the folder in the box.
Insert the keys into the slots on the bottom of the
wall dock. This releases the snap t connection of the
charging station to the wall dock. Make sure to push
them in until they only stick out approx.
50 mm and cannot be pushed any further.
Now you can remove your charging station from the
wall dock. Note that is still xed on the connector
(socket) of the wall dock and will require some force to
pull it off. Take the charging station of in a straight line.
Do not twist or skew the charging station.
This might damage the station’s snap ts.
Remove the keys from Elvi’s wall dock.
7.2
Turn the charging station around and put the front face
of the station on a soft and stable surface.
Untighten the bolt in the back with the supplied Torx
T30 bit, and take the bolt out.
7.3
Take the cable out of the charging station.
Optimally, please store it in its original packaging.
Make sure to place the station on its side while
unplugging in the cable.
Tools you need to switch the cable
16
Bit T30
Page 20
7. switch charging cable
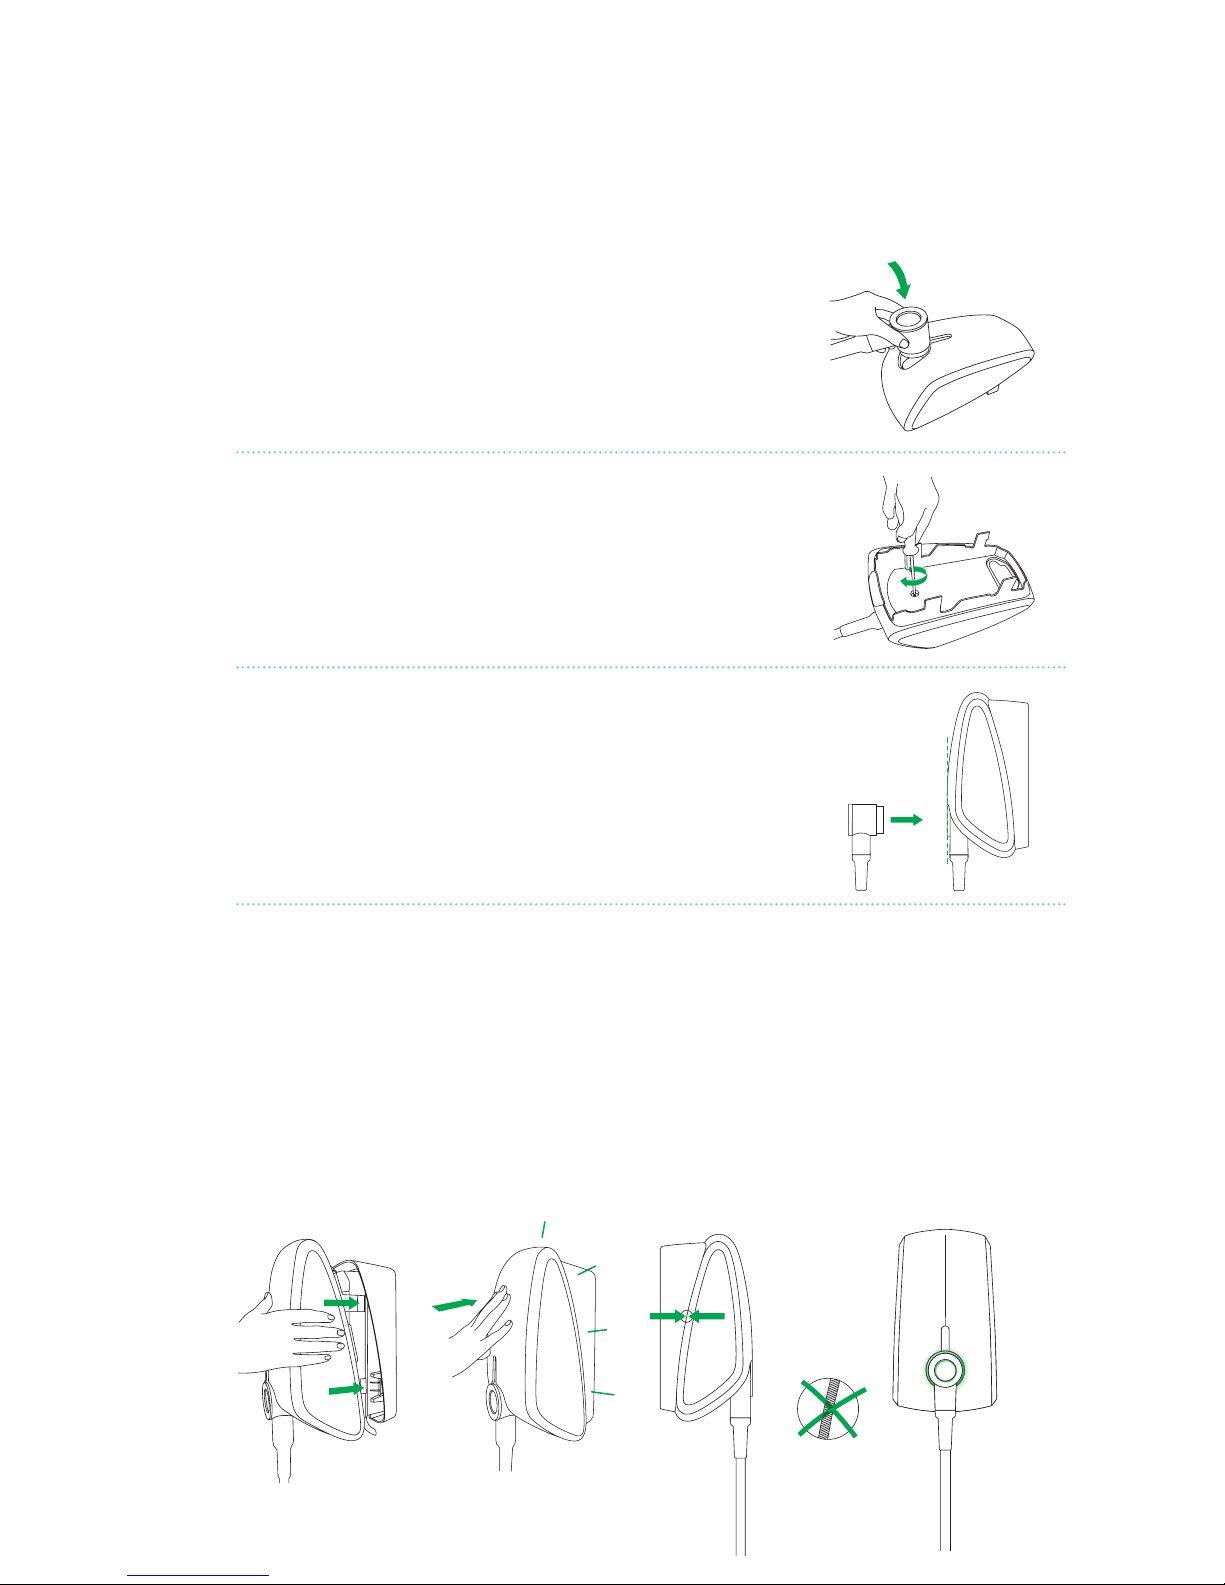
7.4
Take the new charging cable out of the box. Place the station
on its side and plug the cable into the station.
Make sure you press it until the charging cable plug with
LED ring is rmly secured and lays ush to the surface of the
charging station.
7.5
Turn the station around and put the front face of the station on
a soft and stable surface. Place the bolt and rmly tighten the
bolt with the supplied Torx T30 bit.
7.6
Re-conrm that the cable bolt is tightened properly.
Check if the charge cable is rmly connected to the station and
LED ring is at same height as RFID logo
Warning double check if charge cable plug is properly secured
into the station with the bolt.
7.7
Align the station against the wall dock and the connectors
and press until you hear a clicking sound.
7.8
When upgrading your charging cable to a version that is suitable for higher power
application, make sure the applied RCD and MCB in the service panel are in line with local
regulations, and are adequate for the type of installed charging cable and the amount of
power Elvi can release (3.7, 7.4, 11 or 22 kW). Switch on the power to Elvi. Check with your
installer if the selected output power from your Elvi can be supported by your local electrical
installation. The setting of your maximum available power in Hey by EVBox may need to be
adjusted to the new situation.
CLICK
17
Page 21
8. charge with Elvi
Start charging
1. Plug Elvi’s charging cable into your car.
• If you’re using a cable dock (optional) and a type 1 cable, press the release
button on the cable plug, then release the cable from the dock, and plug the
cable into your car.
• If you’re using a cable dock (optional) and a type 2 cable, press the release
button on the cable dock, then release the cable from the dock, and plug the
cable into your car.
2. To start and stop a charging session, you can use a registered charge card,
key fob, or your Hey by EVBox app.
3. Hold your charge card (RFID Card) in front of the reader, marked with icon.
4. Elvi reacts with a beep. This means that your card is being authorized.
5. Elvi’s LED ring turns blue when it starts charging.
Stop charging
1. Hold your charge card (RFID Card) in front of the reader, marked with icon.
2. Elvi reacts with a beep. This means that your charge card / keyfob is being
authorized. Elvi’s LED ring turns green when it stops charging.
3. Unplug Elvi’s charging cable from your car and place the charging cable
back into Elvi’s cable holder. Alternatively you can unplug your charging cable
from your car directly and end your session.
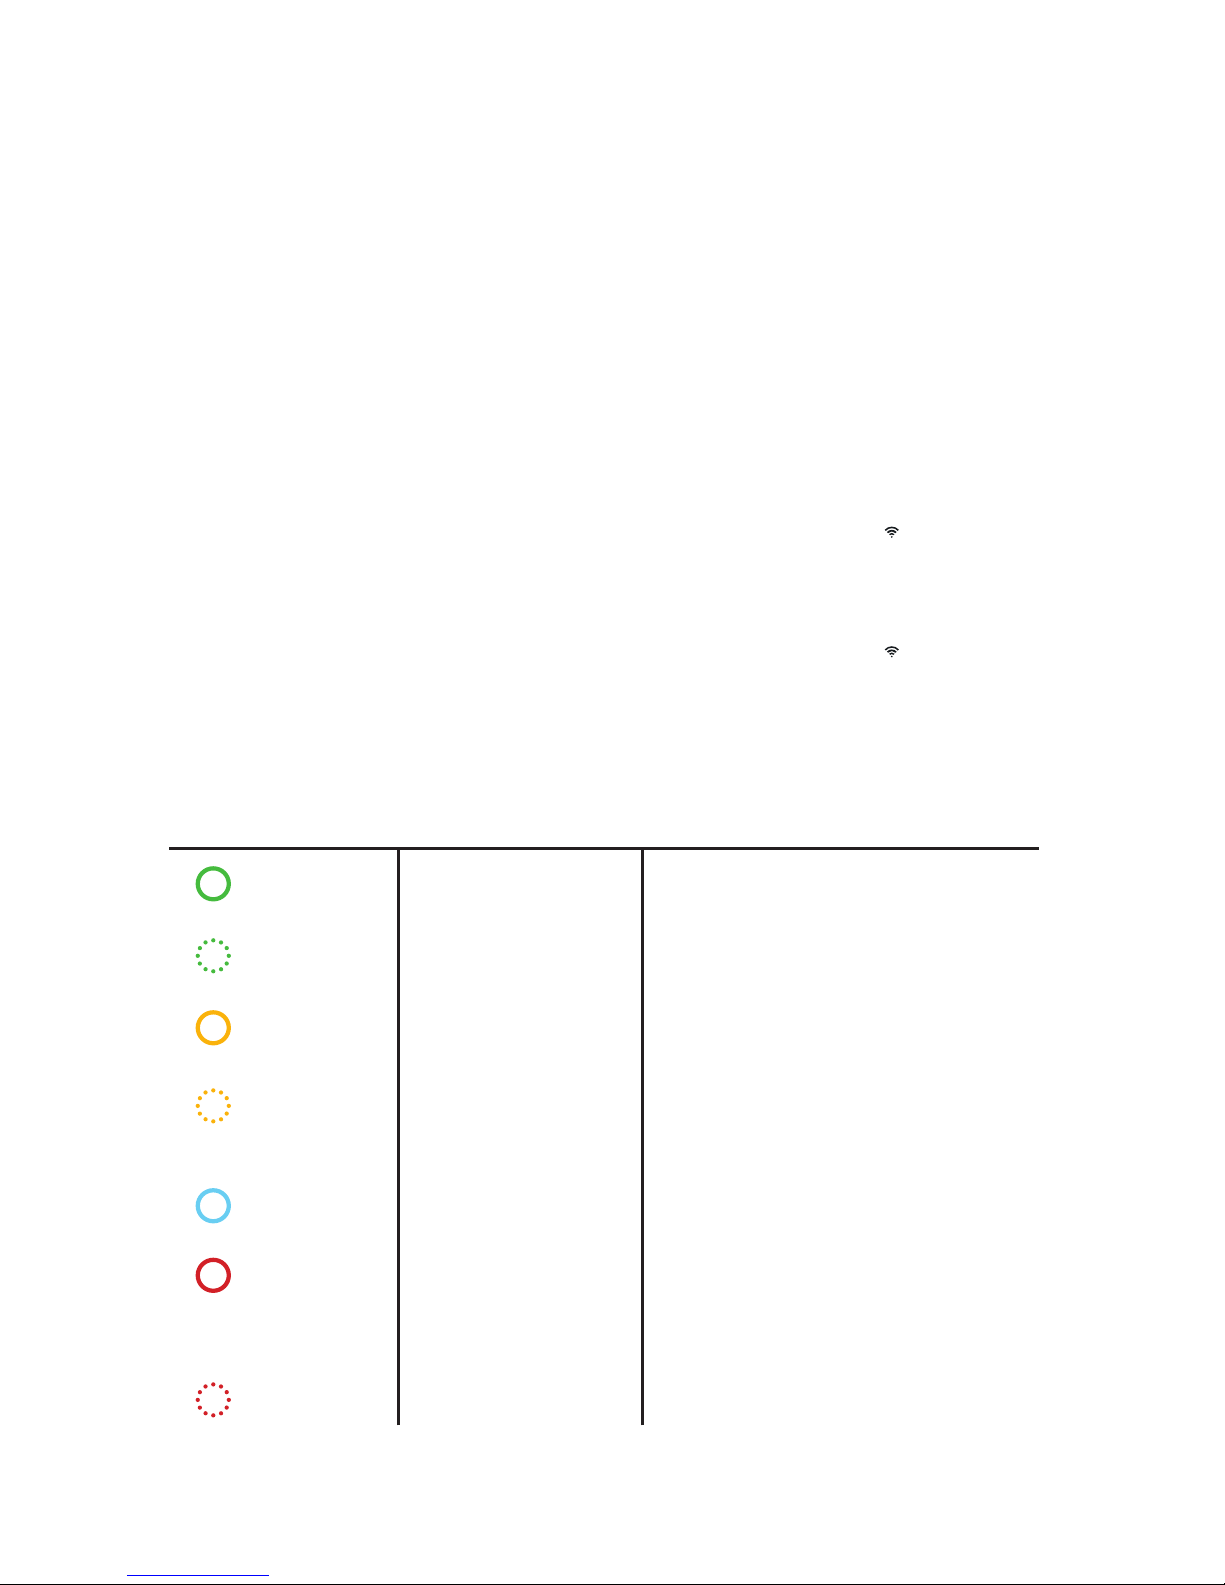
What you see What it means What to do
LED ring off
or green
Elvi is ready for use. Plug Elvi’s charging cable into the car.
LED ring
green ashing
Your charge card is being
veried.
Wait until LED ring turns blue.
LED ring
yellow
The car is fully charged. Unplug Elvi’s charging cable from the car and
place the cable back into Elvi’s
cable holder.
LED ring
yellow ashing
Charging session is in
queue, optionally in Smart
Charging
environment
When power becomes available,
charging will start or resume,
and the LED ring will turn blue.
LED ring
blue
Elvi is charging the car. The car is charging.
LED ring
red
Elvi is experiencing
an error.
Check the troubleshooting chapter in this
manual for solutions. If this does not solve the
issue, contact your installer or supplier of Elvi, or
message us at [email protected].
LED ring
red ashing
Your charge card is not
authorized to charge.
Contact your charge card service
operator, or apply for a free authorized charge
card at evbox.com/products.
18
Page 22

9. troubleshooting
What you see What it means What to do
Charging
station
does not react
No power to charging
station
• Check residual current
device and circuit breaker on
the service panel (check by
user). If off, switch it on.
• Is the supply cable entering
the charging station live?
The LED ring should be on.
• Turn the charging station off.
Turn it on again after
20 seconds, by ipping the
circuit breaker or main switch
to Elvi.
Residual current
device prevents
charging.
LED ring blinks
red 10x.
• Grounding error in the
charging station
• Special ground
resistance needed for
the vehicle
• Fault in the vehicle
or defective charging
cable
Contact your service
technician for inspection
and solution. No user
serviceable parts.
LED ring
lights up red
constantly
Grounding fault Check if your electrical installation
is properly grounded. Contact your
service technician in case of doubt,
and to solve the local grounding
situation.
Please see next page for more troubleshooting instructions.
19
Page 23
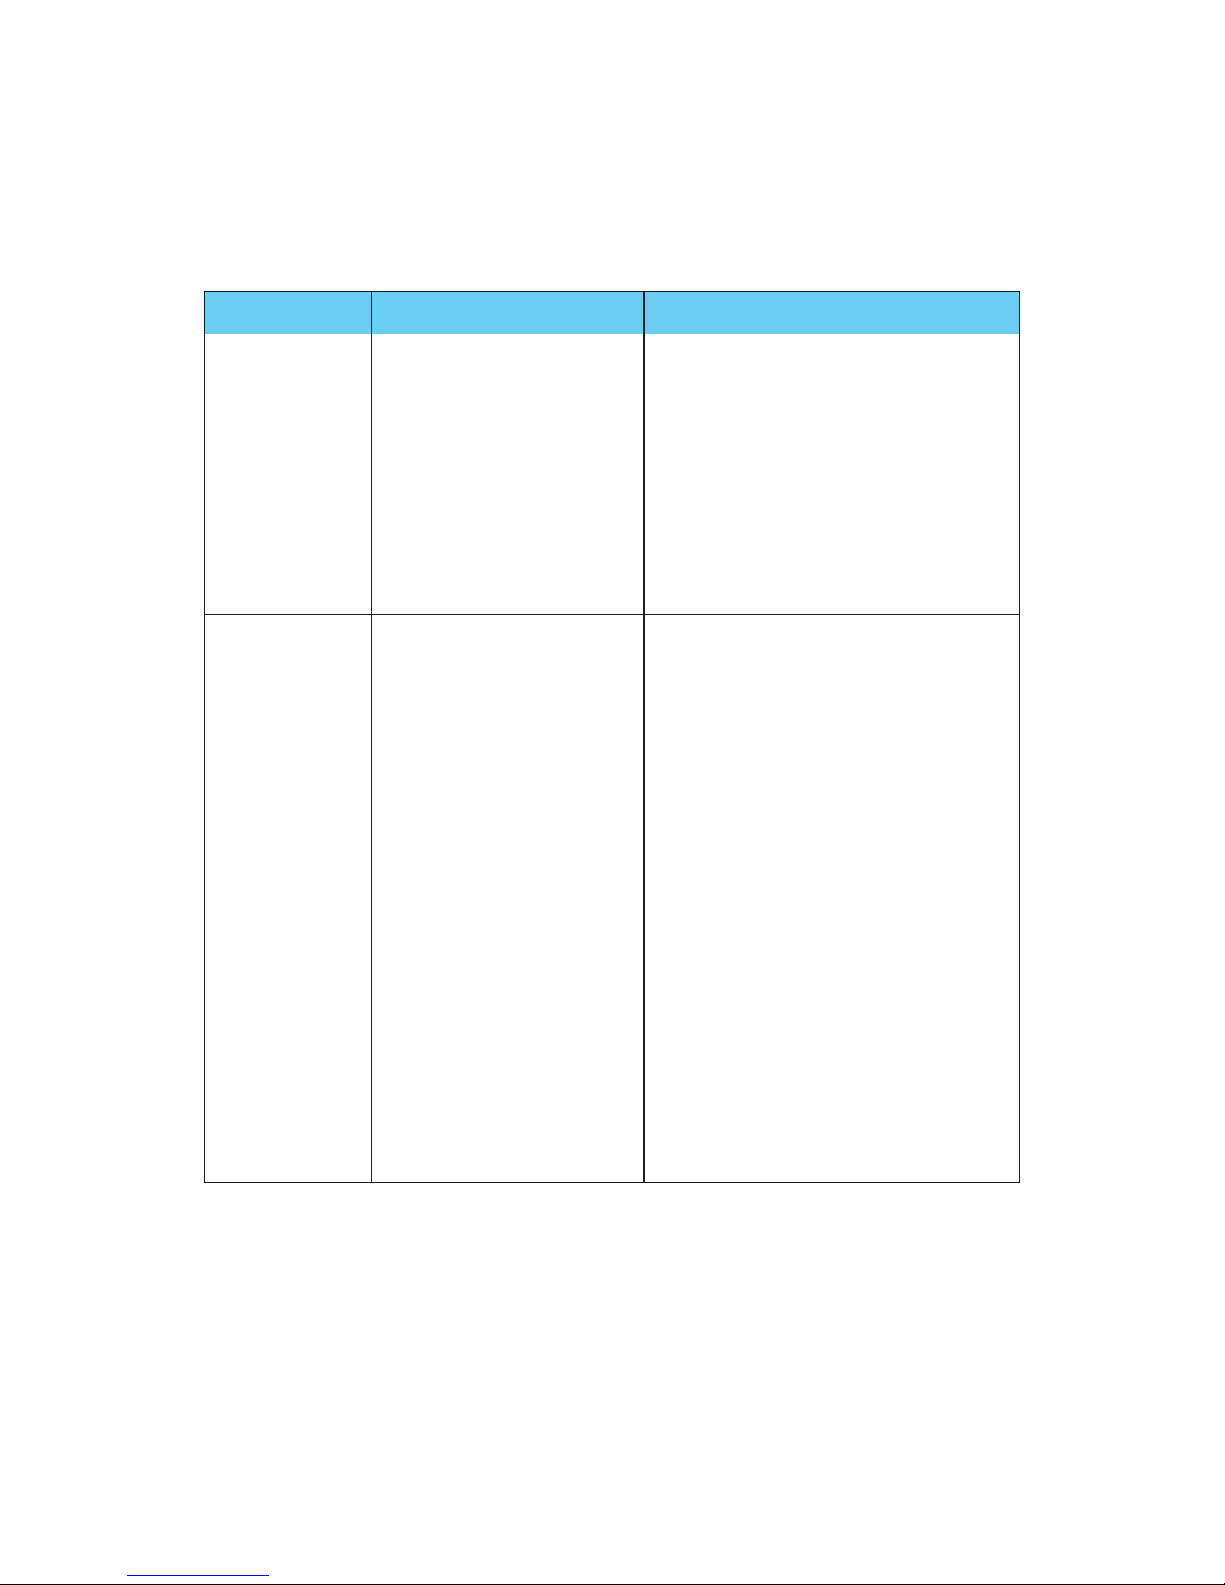
What you see What it means What to do
LED ring
lights up
yellow
constantly
• Vehicle is on a timer
• Vehicle is fully charged
• Grounding resistance
is too high, with specic vehicles,
this must be
< 50 Ohm
• Is the charging cable plug
properly inserted into the
vehicle? (check by user)
• Change the setting of the timer in
the vehicle. (check by user)
• Replace the charging cable. (user
serviceable)
• Is the Ground Resistance
correct? (grounding
measurement by electrician)
Red LED
starts ashing
immediately
after the card is
held against the
reader
• Charge card is not
authorized for
charging at this
charging station.
• There is no
communication
with the
Hey by EVBox app.
• Is the charge card registered
correctly? (check by user)
• Check the settings of your
charging station in the
Hey by EVBox app or via
hey.EVBox.com. (check by user)
• Check if you have proper WiFi
reception where Elvi is installed.
(check by user)
• Reboot your WiFi network rst.
Then reboot Elvi, and check the
WiFi reception. (check by user)
• Check in the Hey by EVBox app
if your WiFi network is properly
connected to Elvi.
Reconnect again.
(check by user)
• If your Elvi is equipped with the
optional UMTS module, check
if Elvi is in contact with the local
cellular network and if it has proper reception. (check by charging
point operator)
9. troubleshooting
20
Page 24

10. warranty
15.1 Products have a two-year warranty against defects in materials or manufacturing
defects. If Customer detects any damage / defect / shortcoming to the Product he must
notify, within a reasonable time and in any event within ten (10) days, EVBox under
statement of all possible details of the defect, the defect or malfunction via
[email protected] and / or +31 88 77 55 444.
15.2 Clause 15.1 applies only to Products which are taken directly from EVBox
and not by third parties such as resellers, installation partners or other third parties.
15.3 EVBox can charge Customers not being consumers, travel costs, transportation
costs or other costs of resolving a defect or malfunction.
15.4 Customer should send loose Products such as faulty cables, Charge Cards or
Charge Key Fobs, back to EVBox. Any transportation costs are for the expense
of the Customer.
EVBox does not guarantee that the Products and Services it delivers are without defects
and will function without interruption EVBox has a best effort obligation to repair defects
in the Products and Services within a reasonable time.
15.5 In case the customer has reported a malfunction, defect or failure EVBox can
postpone the recovery of the defects until a new version of the Product and/or Service
is put into service. EVBox does not guarantee that defects in software or other items
that are not developed by EVBox, will be repaired. EVBox is entitled to apply problem
avoiding restrictions and/or apply workarounds. If a Service and/or Product is developed
by EVBox and commissioned by Customer EVBox can charge its usual rates for repair of
any defects.
15.6 EVBox is not responsible for checking the accuracy and completeness of the results
of the Service and the data generated using the Service. Customer can check the results
of the Service and the data generated using the Service.
15.7 Customer shall, on the basis of the information provided by EVBox on measures to
prevent and limit the consequences of failures, defects in service, mutilation, loss of data
or other incidents, identify the risks to its organization and, if necessary, take additional
measures . EVBox is prepared upon request by Customer to if reasonably possible to
cooperate with Customer to incorporate the additional measures necessary. EVBox can
charge Customer for the additional work using its normal fees. EVBox is not responsible
for repair of damaged or lost data.
This warranty statement is subject to change.
Please refer to evbox.com/general-terms-conditions for the latest version.
21
Page 25

11. declaration
of conformity
in accordance with Machinery Directive 2006/42/EC
EVBox B.V.,
NL registration KvK 32165082_000018683428
Pedro de Medinalaan 31, 1086XP Amsterdam, The Netherlands
declares under its’ sole responsibility that the following products:
• Article series E1160-XX50XX: EVBox Charging station,
1-phase 16A with charge cable
• Article series E1320-XX50XX: EVBox Charging station,
1-phase 32A with charge cable
• Article series E3160-XX50XX: EVBox Charging station,
3-phase 16A with charge cable
• Article series E3320-XX50XX: EVBox Charging station,
3-phase 32A with charge cable
provided that they are installed, maintained and used in the applications for which they
were designed, in accordance with professional practices, relevant installation standards
and manufacturer’s instructions for use and installation, are CE certied and comply with
the essential requirements of EMC Directive 2014/30/EU and Low Voltage Directive
2014/35/EU in accordance with the following standards:
• EN/IEC 61000-6-2 (2005)
• EN/IEC 61000-6-3 (2007) + A1 (2011)
• EN/IEC 61000-3 2 (2014)
• EN/IEC 61000-3-3 (2013)
• EN/IEC 60529-1 (1989) +A1 (1999) + A2 (2013)
• EN/IEC 60950-1 (2005) + A1 (2009) + A2 (2013)
• EN/IEC 60950-22 (2005)
• EN/IEC 61851-1 (2010)
• EN/IEC 61851-22 (2001)
• EN/IEC 62196-1 (2014)
• EN/IEC 62196-2 (2017)
Amsterdam, December 28, 2017
A.D.S. van de Leur
Chief Technical Ofcer
22
Page 26

The present document is drawn up by way of information only and does not constitute an offer binding
upon EVBox. EVBox has compiled the contents of this document to the best of its knowledge.
No express or implied warranty is given for the completeness, accuracy, reliability or tness for particular
purpose of its content and the products and services presented therein. Specications and performance
data contain average values within existing specication tolerances and are subject to change without
prior notice. Prior to ordering, always contact EVBox for the latest information and specication. EVBox
explicitly rejects any liability for any direct or indirect damage, in the broadest sense, arising from or
related to the use and/or interpretation of this document. EVBIM_082017 © EVBox B.V.
EVBox strives to produce products of the highest quality. EVBox products
are fully CE certied and compliant with the essential requirements of
EMC Directive 2014/30/EU and Low Voltage Directive 2014/35/EU.
More details can be found at EVBox.com or in the Installation Manual.
EVBox products are sold with a limited warranty described at
evbox.com/general-terms-conditions.
© 2018 EVBox B.V. All rights reserved. Elvi®, EVBox® and the EVBox logo
are trademarks or registered trademarks of EVBox B.V. in the EU and
in other countries.
EVBox B.V.
Pedro de Medinalaan 31
1086 XP Amsterdam
The Netherlands
[email protected]
evbox.com
Page 27

I’m all set!
Let’s charge.
Page 28
Article number: 999481
EVBIM_082017 © EVBox B.V.
 Loading...