

Page 1

Elvi
installation manual
Page 2

I’m home!
Let’s get started.
Elvi
installation manual
Page 3

contents
general
contents 1
safety precautions 2
components and features 3
1. unpack Elvi 5
2. install wall dock 7
3. install charging cable 11
4. install station 12
5. activate Elvi 13
6. install cable dock (optional) 14
7. change charging cable (optional) 16
8. charge with Elvi 18
9. troubleshooting 19
10. warranty 21
11. declaration of conformity 22
Errors or Inaccuracies
For any inaccuracies or omissions, or to provide feedback and suggestions, send an
email to [email protected].
Communication Regulations (FCC)
This device complies with Part 15 of the FCC rules and Industry Canada licenseexempt RSS standard(s). Operation is subject to the following two conditions: (1)
This device may not cause harmful interference and (2) this device must accept any
interference received, including interference that may cause undesired operation.
Americans with Disabilities Act (ADA) Compliance
While single-family residential installations do not have complex parking
requirements, commercial, public and multi-unit residential installation have
additional parking considerations that include Americans with Disabilities Act (ADA)
accessible EVCS spaces and meeting the minimum requirements for spaces in
parking lots and facilities. EVCS site hosts often experience challenges in providing
ADA accessible EVCS spaces in addition to standard EVCS spaces while maintaining
the minimum requirements for parking. Consideration of the available parking is
important for residents as well as employers and employees. Installing charging in
unassigned spaces or common areas for availability to all residents at MUDs requires
compliance with ADA accessibility regulations.
Please check with your State and Local government agencies to understand and
implement the necessary accommodations for people with disabilities.
Product and environmental characteristics
The charging station has been CE-certied by the manufacturer and bears the CE
logo. The relevant declaration of conformity may be obtained from the manufacturer.
The charging station has been UL-certied by the manufacturer and bears the UL
logo for USA and Canada. The relevant declaration of conformity may be obtained
from the manufacturer.
The charging station complies with the RoHS Directive (RL 2011/65/EU). The relevant
declaration of conformity may be obtained from the manufacturer.
Electrical and electronic appliances, including accessories, must be disposed of
separately from the general municipal solid waste. Recycling of materials saves
raw materials and energy and makes a major contribution to conserving the
environment.
E481618
1 2
Page 4

1. safety regulations
1. safety regulations
Please read the documentation provided with the charging station to familiarize yourself with the safety instructions and directions before you install, operate or maintain
the charging station.
Warning: risk of electric shock
• Always switch off power to your charging station at the circuit breaker before
installing, maintaining or servicing the product.
• This charging station may only be installed, maintained and repaired by
appropriately trained, qualied, and authorized personnel, who have full
responsibility for complying with the applicable standards and installation
regulations.
• In the event of danger and/or accidents, have the charging station disconnected
immediately by an electrician or facility manager.
• Do not operate the charging station if it, or the charging cable, is physically
cracked, frayed, or otherwise visibly damaged. Consult an EVBox employee, the
distribution company and/or a qualied electrician right away in order to avoid
any risk of electrical shock.
• Do not direct powerful jets of uids onto the charging station, and never operate
with wet hands. Do not submerge the EV plug into liquids.
• Do not insert ngers or other objects, such as wire, tools or needles, inside of
the charging port or plug port.
• Carefully read Elvi instructions and the vehicle’s operating instructions in your
owners handbook before charging your electric vehicle.
• Failure to follow these guidelines may result in serious injury or even death.
• The installing party must always ensure that the station is installed according to
the country specic connection and local regulations.
• Incorrect connection of the device grounding conductor can result in electric
shock. Consult a qualied electrician or service technician in case of doubt
whether the product is correc tly grounded. Do not make any modications to
the plug supplied with the product – in case of misst, have a suitable outlet
installed by a qualied electrician.
Cautions
• Use this charging station for mode 3 compatible electric vehicles with an
SAE-J1772 charge port only. Refer to your vehicle’s owner manual to determine
the suitable plug type.
• This product contains no user-serviceable parts. Consult EVBox or your
distributor for more information. Do not attempt to service or repair the charging
station yourself.
• In case of a relocation, do not attempt to reinstall the charging station yourself.
This must be done by appropriately trained, qualied, and authorized personnel,
who have full responsibility for complying with the applicable standards and
installation regulations.
• This product may impact the operation of implanted electronic medical devices.
Before operating the charging station check with the supplier of the electronic
medical device if its operation can be inuenced by charging effects.
• Incompetent installation or repairs may result in danger to the user and could
result in warranty void.
• Do not install a faulty charging station or a station with a noticeable issue. For
instructions on installation, see page xx.
• Do not switch on the product if any of the present covers are not properly in
place.
• Ensure that the charging station or the charging cable never come into direct
contact with heat sources or water.
• Ensure that the charging station is used under the stated operating conditions
(see “Technical specications” on page xx).
• Do not use explosive or readily ammable substances in the vicinity of the
charging station.
• Persons unable to assess the dangers involved in operating a charging station
should not use the charging station.
• Do not allow children to operate this device. Adult supervision is required when
children are in the proximity of a charging station in use.
• Make sure that the charging cable does not become mechanically damaged
(kinked, jammed or driven over) and that the contact area does not come into
contact with heat sources, dirt or water. For proper storage of Elvi charging
cable, EVBox box has designed the Elvi Cable Dock (Article number 290135).
• While charging, the cable must be completely unwound and connected to the
vehicle without overlapping loops (this is to avoid the risk of the charging cable
from overheating).
• Always pull on the plug’s hand grip and never on the charging cable itself.
• Do not operate the charging station in temperatures outside the ambient
temperature rating of -13°F (-25°C) to 109°F (43°C). Operating Elvi outside the
indicated ambient temperatures may result into early de-rating of the applicable
output power or early termination of the charging session.
Remarks
• This charging station has been designed and tested in accordance with
international standards.
• This charging station must be used exclusively for the purpose intended.
• The charging station complies with Safety Class I (the charging station is supplied
with a ground terminal for safety) and voltage Category III.
• Do not modify the charging station in any way. This will result in loss of warranty
and liability and may lead to dangerous circumstances!
• In case the Amperage rating of the charging cable lies above the Amperage
rating of the applied protective device (MCB), the installer / user must change
the station settings in the Hey by EVBox app or via hey.evbox.com. This will be
signaled by a warning in the app.
• Do not use cleaning solvents to clean any of the Elvi components. The outside of
the charging station, the charging cable, and the connector end of the charging
cable can be wiped with a clean, dry cloth to remove accumulation of dirt and
dust.
3 4
Page 5

1. safety regulations
1. safety regulations
FCC REGULATORY STATEMENTS
This device complies with Part 15 of the FCC rules. Operation is subject to the
following two conditions.
1) This device may not cause harmful interference.
2) This device must accept any interference received, including interference that may
cause undesired operation.
Warning: Changes or modications not expressly approved by the party responsible
for compliance could void the user’s authority to operate this equipment.
Note: This equipment has been tested and found to comply with the limits for
a Class B digital device, pursuant to part 15 of the FCC Rules. These limits are
designed to provide reasonable protection against harmful interference in a
residential installation. This equipment generates, uses, and can radiate radio
frequency energy and, if not installed and used in accordance with the instructions,
may cause harmful interference to radio communications. However, there is
no guarantee that interference will not occur in a particular installation. If this
equipment does cause harmful interference to radio or television reception, which
can be determined by turning the equipment off and on, the user is encouraged to
try to correct the interference by one or more of the following measures:
• Reorient or relocate the receiving antenna.
• Increase the separation between the equipment and receiver.
• Connect the equipment into an outlet on a circuit different from that to
which the receiver is connected.
• Consult the dealer or an experienced radio/TV technician for help.
This equipment should be installed and operated with a minimum distance of 20 cm
between the radiator and any part of the human body.
US contact information:
335 Madison Ave., 4th Floor
Grand Central Tech
New York, NY 10017, USA
+1 (646) 930-6305
Canadian Regulatory Statements
This device complies with Industry Canada license-exempt RSS standard(s).
Operation is subject to the following two conditions: (1) this device may not cause
interference, and (2) this device must accept any interference, including interference
that may cause undesired operation of the device.
(FR) Le présent appareil est conforme aux CNR d’Industrie Canada applicables aux
appareils radio exempts de licence. L’exploitation est autorisée aux deux conditions
suivantes : (1) l’appareil ne doit pas produire de brouillage, et (2) l’utilisateur de
l’appareil doit accepter tout brouillage radioélectrique subi, même si le brouillage
est susceptible d’en compromettre le fonctionnement.
Under Industry Canada regulations, this radio transmitter may only operate using
an antenna of a type and maximum (or lesser) gain approved for the transmitter by
Industry Canada. To reduce potential radio interference to other users, the antenna
type and its gain should be so chosen that the equivalent isotopically radiated
power (e.i.r.p.) is not more than that necessary for successful communication.
(FR) Conformément à la réglementation d’Industrie Canada, le présent émetteur
radio peut fonctionner avec une antenne d’un type et d’un gain maximal (ou
inférieur) approuvé pour l’émetteur par Industrie Canada. Dans le but de réduire
les risques de brouillage radioélectrique à l’intention des autres utilisateurs, il faut
choisir le type d’antenne et son gain de sorte que la puissance isotrope rayonnée
équivalente (p.i.r.e.) ne dépasse pas l’intensité nécessaire à l’établissement d’une
communication satisfaisante.
This equipment complies with the ICES RF radiation exposure limits set forth for an
uncontrolled environment. This equipment should be installed and operated with a
minimum distance of 20cm between the radiator and any part of the human body.
(FR) Cet équipement est conforme aux limites d’exposition aux radiations ICES
dénies pour un environnement non contrôlé . Cet équipement doit être installé et
utilisé à une distance minimale de 20 cm entre le radiateur et une partie de votre
corps.
Note: This device, when operated in the band 5150–5250 MHz, is only for indoor
use to reduce the potential for harmful interference to co-channel mobile satellite
systems.
(FR) Tout appareil destiné à la bande 5150 – 5250 MHz devra être exclusivemenl
utilisé en intérieur a n de réduire les risques de pertuarbatians électromagnétiques
gênantes sur les systémes de satellite mobile dans un même canal”
Note: Some electric vehicles require an external ventilation system to prevent the
accumulation of hazardous or explosive gasses when charging indoors. Consult the
vehicle’s owner manual to determine whether or not your electric vehicle requires
ventilation during charging. This charging station is not designed for charging these
vehicles and must not be used for charging electric vehicles that require external
ventilation.
Transport and storage
Ensure that the main power source has been disconnected when storing or
transporting the charging station. No liability can be accepted for damage during
the transportation process if the charging station is transported in anything other
than its original packaging.
Store the charging station in a dry environment. The product is preferably stored
at room temperature. If this is not possible, storage temperature must be between
50°F and 113°F with a maximum humidity level of 95% non-condensing.
EVBox strives to manufacture products of the highest quality. EVBox products for
the US market are UL 2594 tested and compliant. For the Canadian market, they
are CSA C22.2 No. 280-16 tested and compliant. For the EU market, they are CE
certied and compliant with the essential requirements of
EMC Directive 2014/30/EU and Low Voltage Directive 2014/35/EU.
More details can be found at evbox.us or in this Installation Manual.
EVBox products are sold with a limited warranty described at
evbox.us/general-terms-conditions.
65
Page 6

components
& features
6.37 .2
Cable dock
(sold separately)
3.7
Operating system
1
2
1
Elvi is connected via a
built-in dual band WiFi connection or via an optional
UMTS modem.
Start and stop your charging
session with your charge
card, key fob or remotely via
the app.
3
4
5
Housing
2
Elvi consists of a wall dock,
a charging station and a
charging cable.
Elvi is designed with rugged,
high-impact strength plastics
that make its housing durable,
robust, weather-resistant and
wear-resistant.
Card reader
3
This is the area where you scan
your charge card or key fob.
Elvi reads the data from your
card to start or stop a charging
session.
LED indicator
4
EVBox is the innovator
behind the LED ring.
This smart status indicator
helps you understand what
Elvi is doing at all times.
Dimensions
12.9
(inch)
Components
Wall dock Station
Cable dock
(sold separately)
4.8
7.8
Cable dock
Charging cable & cable dock
5
The Elvi charging cable is
compatible with all types of
electric vehicles that can handle capacities from 3.7 kW up
to 22 kW.
The cable dock (sold separately, part. No. 290135) secures
the cable in its position when
Elvi is not in use.
Note: Make sure to select a
charging cable/plug that is
compatible with your car.
Keys
Charging
cable
Charging plug
(type 2 in
example)
Wall base
Cable dock
Front cover
Cable dock
Plug holder
for Type 1
Charging
plug
7
8
Page 7
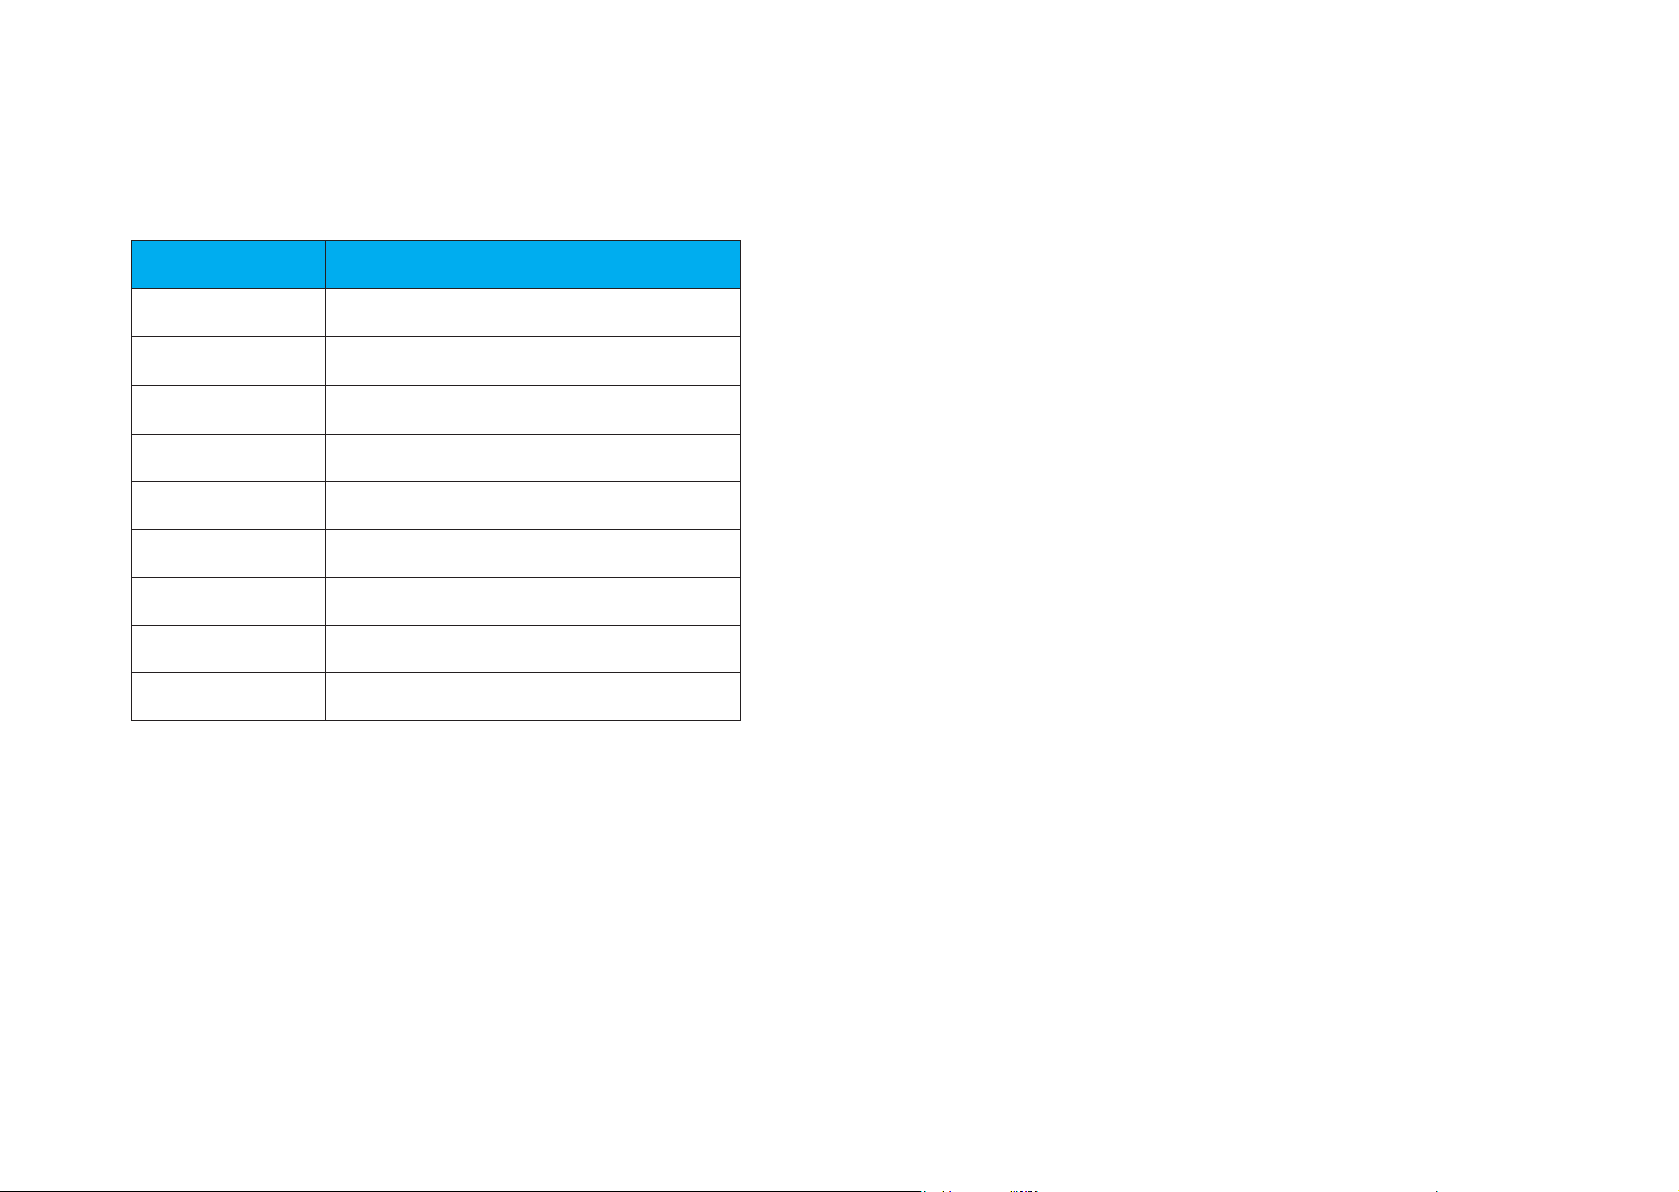
3. technical specications
Item Description
Connection capacity 120 / 240 V AC - 60 Hz
Output power
(via charging cable)
Temperature range -13 °F to +140 °F (-25 °C to +60 °C) for storage and oper-
Operating humidity Max. 95% - non condensing
Max. Installation height 6560 ft (+2000 m) above sea level
Housing Polycarbonate UL94 V-0
Dimensions (LxWxH) 13 x 7 x 6 in (328 x 186 x 161 mm)
Weight 24.2 lbs (11 kg), 1-phase 32 A station with 25 ft (8 m) cable
Communication protocol OCPP 1.5 S, 1.6 S, 1.6 J
max 32 A, 2-phase installation (3.7 - 7.4 kW)
ation
109
Page 8
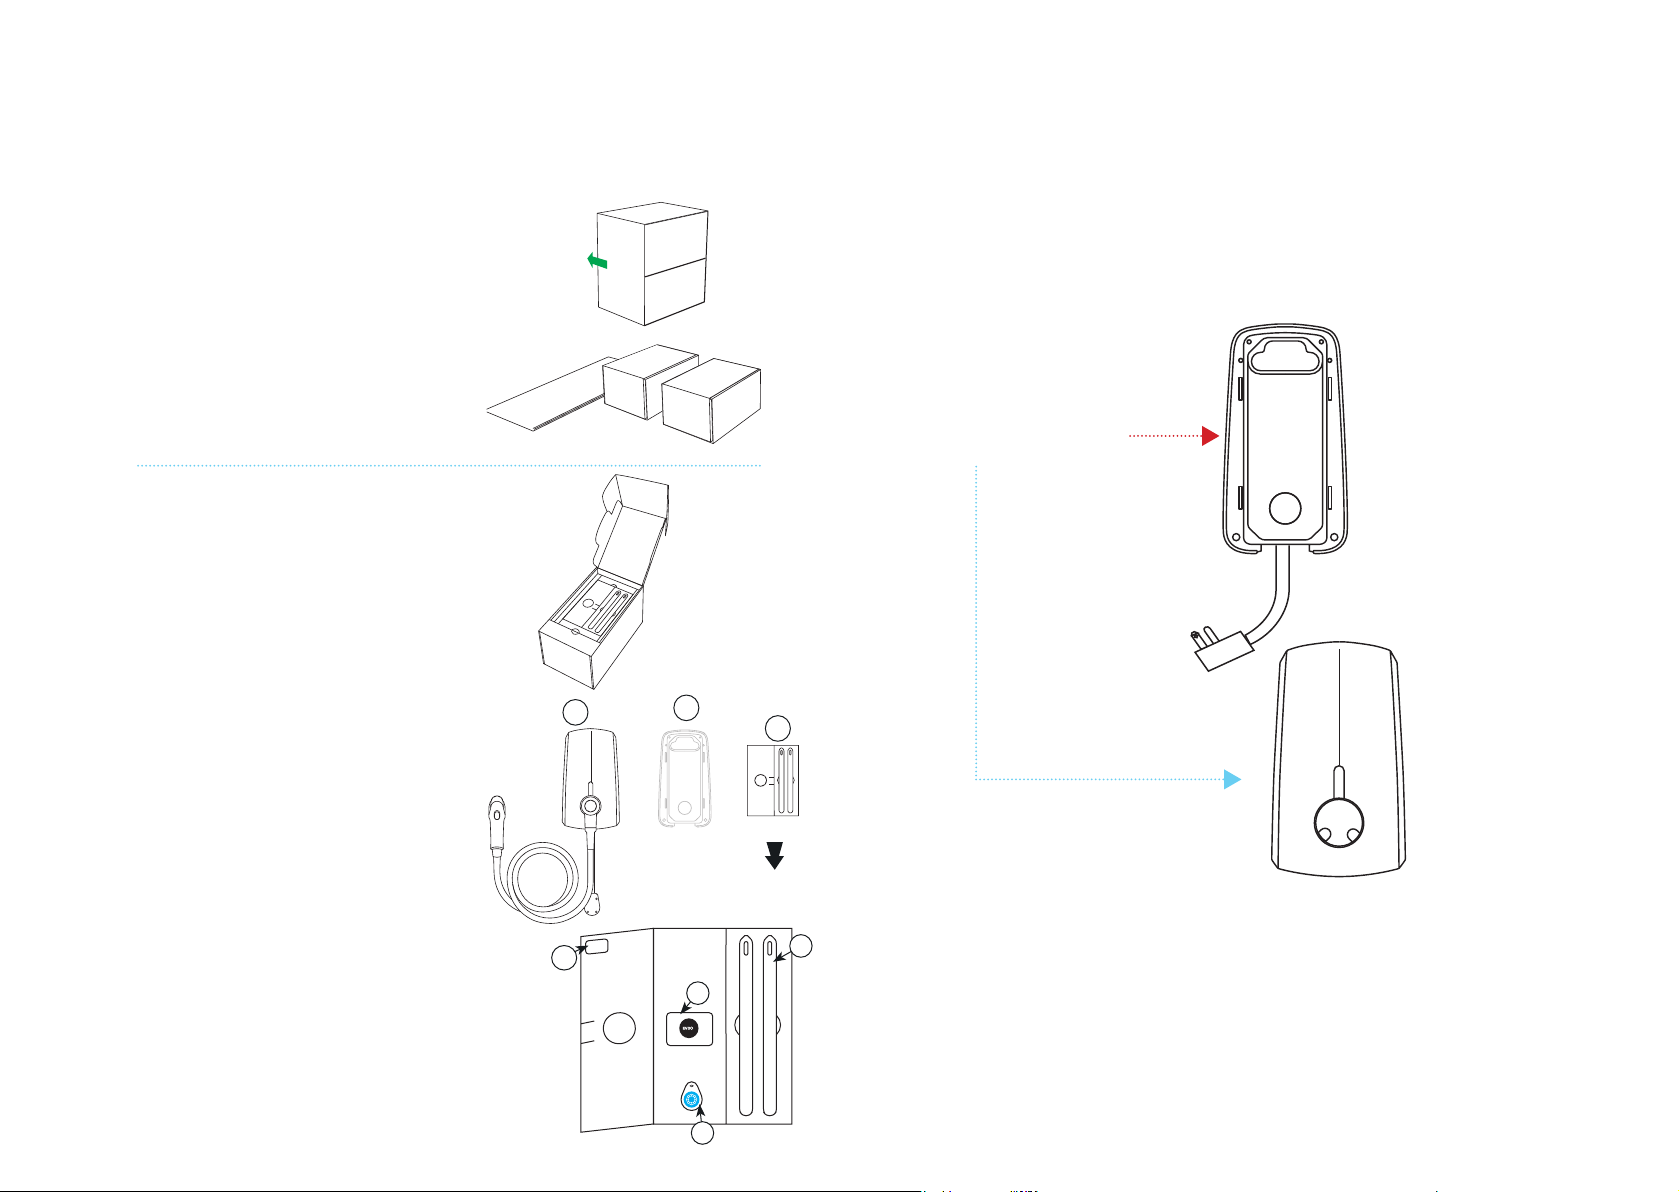
1. unpack Elvi 1. unpack Elvi
1.1
Place Elvi package on a at and stable surface.
Remove sleeve.
1.2
Set the boxes aside.
Box 1 contains the charging station.
Box 2 contains the charging cable.
Open the charging station box.
Put the instructions folder (A) aside.
The keys (B) found in this folder are only needed
for removing the charging station (C) from its wall
dock (D) (in case of maintenance or to change the
charging cable).
Note: After installation, hand over the folder to
the user, as it also contains the charge card (E),
the key fob (F) and station ID + security code (G).
1.4
Take out the charging station together with its
cardboard buffer from its box.
1.5
Take out the wall dock from its box.
Skip this step if the wall dock is already installed.
(In this case, the wall dock is not included in the
box.)
Wall dock
NO
already installed? Go to next page
YES
C
G
D
A
Go to page 11
B
11
E
F
12
Page 9

2. install wall dock
2. install wall dock
Safety requirements
Warning: Always perform a visual inspection for damage before starting a
charging session. Check that the contact area of the charging plug is free from dirt
and moisture; check the charging cable for cuts or abrasions to the insulation and
check the charging cable plug of Elvi for rm seat.
Connecting and installing this product must be done by a qualied electrician.
The owner or user is responsible for the installation, operation, and maintenance of
the charging station, whereby both the law regarding the safety of persons, animals
and property must be observed, as well as the installation instructions enforced in the
country of use.
Read the Safety instructions before starting work on the installation of this charging
station.
Warning: Risk of electric shock.
Before installing the wall dock, make sure the power line(s) which are used are
switched off on your service panel.
Warning: The installation settings of your service panel must always be adjusted
by a qualied electrician.
Be aware that local regulations for the installation of charging stations/electric vehicles
supply equipment may be applicable and these may vary depending on your region/
country of residence. The installing party must always ensure that the charging station/
electric vehicle supply equipment is installed according to the local regulations.
Ensure that the correct supply voltage/power and the service panel are properly
secured.
• Before shipment, each EVBox charging station is checked for correct connections
and the charging station is operationally tested.
• Before switching on the charging station, check that the power source available
corresponds to the conguration settings of the product as described in this
manual.
• Ensure that the equipment is used under the correct operating conditions.
• Never operate the product in wet, dusty or explosive surroundings.
• Ensure that there is always adequate space (at least 8”) surrounding the product
for ventilation purposes.
Planning the installation
Minimum Requirements
• Review the capacity of the electrical installation and calculate the existing
electrical load in order to determine the maximum allowable operating
current. Take into consideration any applicable local safety margins when
calculating the maximum allowable operating current, in order to prevent
black-out situations
• Calculate the distance between the service panel and charging station and
apply the appropiate wire guage for the calculated distance in order to
ensure minimal voltage drop.
• Obtain any necessary permits from the local authority that has jurisdiction
and conrm that the follow-up inspection is performed by a qualied
electrician after completion of the installation.
• Use only copper conductors.
• Use conductors that are sized in accordance with local wiring regulations.
The selected cable gauge must be able to sustain periods of a constant
load up to 40A.
• The use of protective devices is mandatory. The circuit protection device
chosen must incorporate a suitable residual-current device (RCD) and
overcurrent protection in relation to the electrical load selected.
• The circuit breaker must be in line with the capacity of the charging cable
(3.7, 7.2 kW). If the amperage rating of the charging cable is different than
the amperage rating of the MCB, the installer/user must change the station
settings in the mobile station management application and/or backend
portal as provided by the supplier of this product.
Location
Position the charging station in surroundings not subject to extreme sunlight
conditions, high heat or excessive water exposure. Make sure the charging
station is installed on a location where it is not prone to damage from the outside.
The charging station can be installed on a at and sturdy wall or on the optional
pole to create a free standing installation.Consult EVBox or your distributor for
more details.
13 14
Page 10
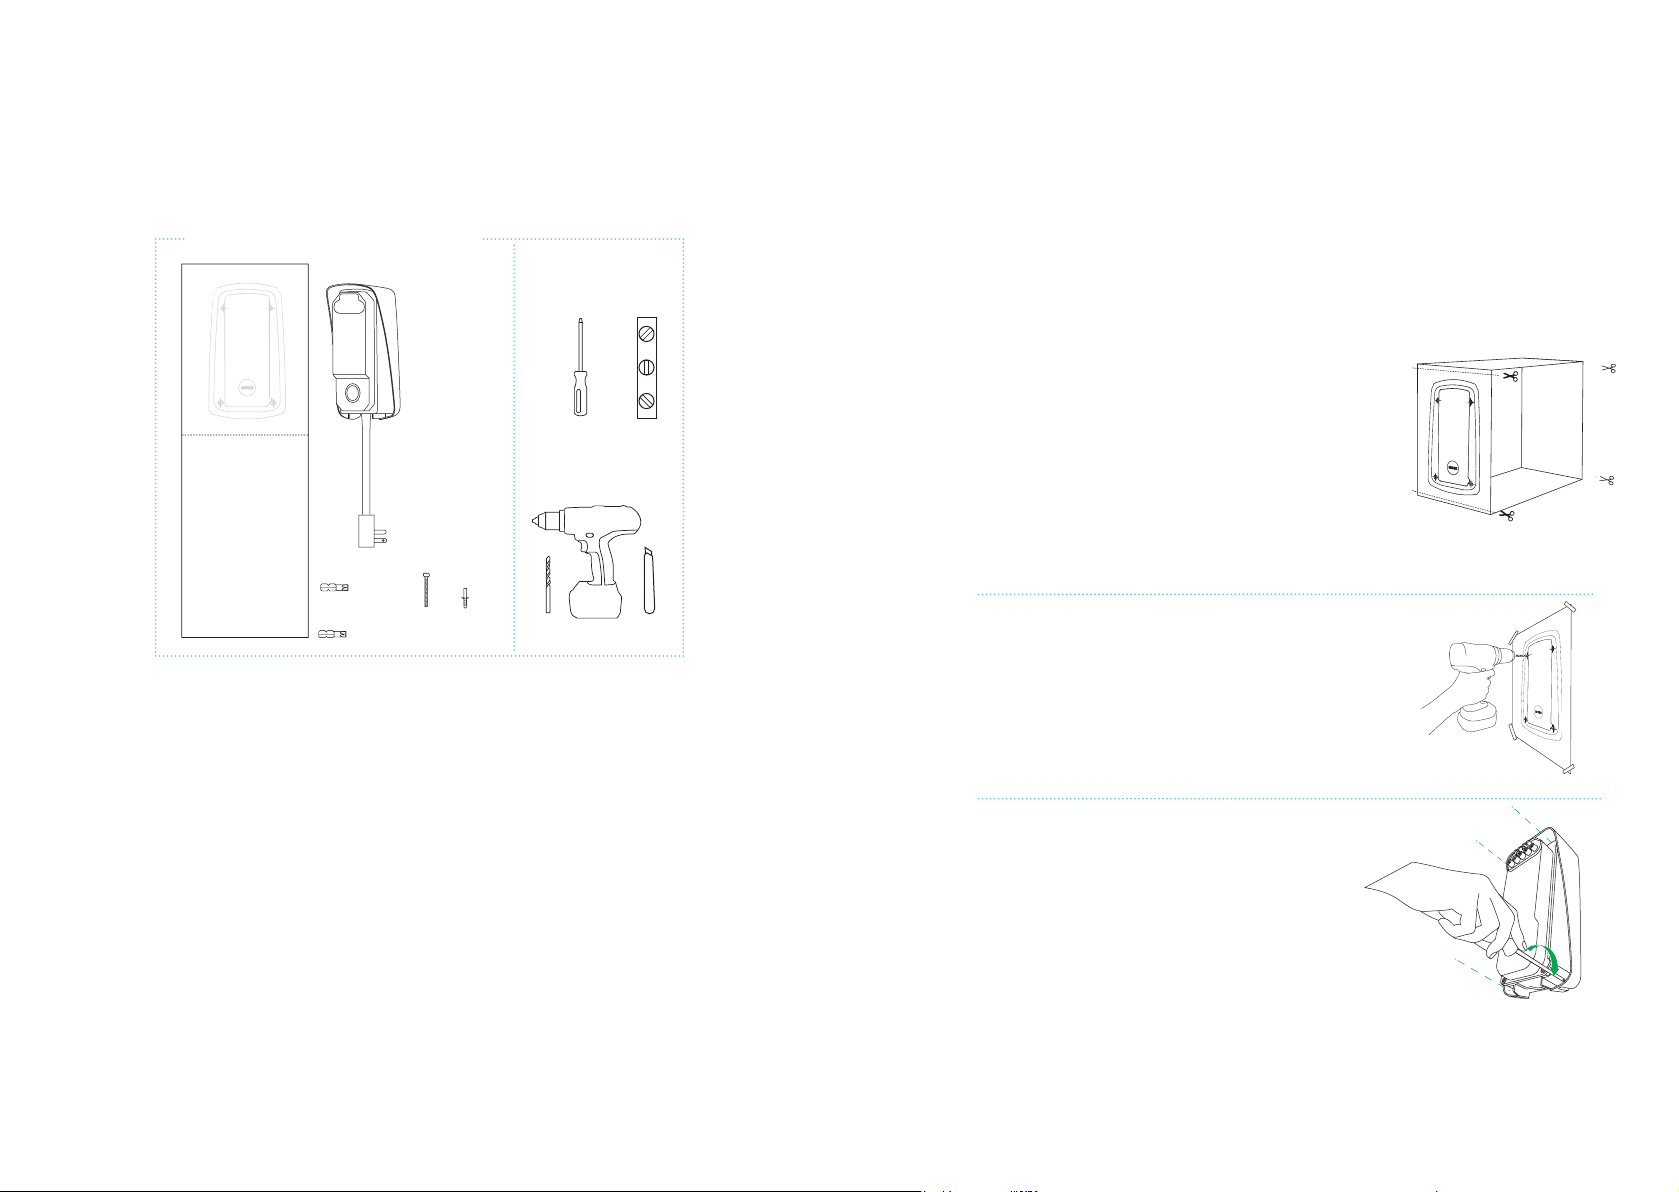
2. install wall dock
2. install wall dock
Tools you need to install the wall dock
1x bit T20
1x bit T30
Included
in the box
4x
screw 5x70mm
plug 8x65mm
4x
Not included
in the box
Flat head
screwdriver
drilling machine
8mm drill
bubble
level
knife
Pre-installation checklist
• The cellular network connectivity on the network of the selected operator at the
location of installation is suitable for a continuous mobile communication.
• The available current capacity on location of installation is known (available amperage).
• The reccommended tools are available on site.
• An electric vehicle or an EVSE tester is available on site for nalising the installation
and performing the commissioning of the charging station.
• The mounting option is selected and the necessary provisions are made.
• The ideal mounting height is determined by plugging the station’s power cord into the
power outlet and making sure that the power cord is straight or has a gentle curve, but
it is never stretched.
• All the units and accessories ordered are delivered, inspected and free of damage.
Installation steps
2.1
Select a solid and at vertical surface for installing the
wall dock.
Ensure that the surface is even and solid enough to
resist a pull force of at least 220 lbs (100 kg).
Determine the ideal mounting height by plugging
the wall dock’s power cord into the power outlet and
making sure that the power cord is straight or has a
gentle curve, but it is never stretched.
Note: In case no ideal mounting height can be
achieved, it might be necessary to reposition the
power outlet.
2.2
Find the drilling template at the bottom of the box’s
sleeve and cut it out.
2.3
Place the drilling template onto the wall and use a
level device (e.g. bubble level) to vertically align the
template. Mark the 4 mounting points on the wall and
remove the template.
2.4
Drill holes with a drill round of 8 mm or 5/16”.
2.5
Mount the wall dock at onto the wall using the
supplied 8x65 mm plugs and 5x70 mm screws.
Fasten the screws with the supplied Torx T25 bit.
Do not overtighten.
15 16
Page 11

3. activate Elvi
3.1
Download your mobile Elvi station management application from the location
provided by your operator or service provider. For more details, contact your operator
or service provider.
3.2
Log in to your account in the app.
If you don’t have an account yet, create a new account in the app.
Register Elvi in the app by adding its station ID and security code.
Find the station ID on the back of your Elvi or in the supplied folder inside the Elvi
packaging.
Find the security code in the supplied folder inside the Elvi packaging.
Find the charge card in the supplied folder inside Elvi packaging. Alternatively, a
charge card can be sent to you separately by mail (this depends on your operator or
service provider). For more details, contact your operator or service provider.
3.3
Follow the steps in the app to connect Elvi.
Note: The charging station operates with a WiFi or cellular connection (optional). Elvi
will always search for WiFi but it will choose the cellular connection (optional) when
WiFi is not found.
3.4
Activate your charge card in the mobile station management application and/
or backend portal account as provided by the operator or service provider for this
product.
If you have a key fob, this needs to be registered separately from your charge card.
Your charge card and key fob have separate ID numbers.
Elvi is ready to charge!
Start and stop every charging session by holding your charge card/key fob in front of
Elvi. Your charge card/key fob tracks and registers all your charging sessions in your
mobile station management application and/or backend portal account as provided
by the operator or service provider of this product. Alternatively, you can simply
unplug your car from the charging station to stop your charging session.
Need more help?
If you need assistance with setting up Elvi or your mobile station management
application and/or backend portal account contact your operator or service provider
of this product for further support.
Start Stop
Page 12
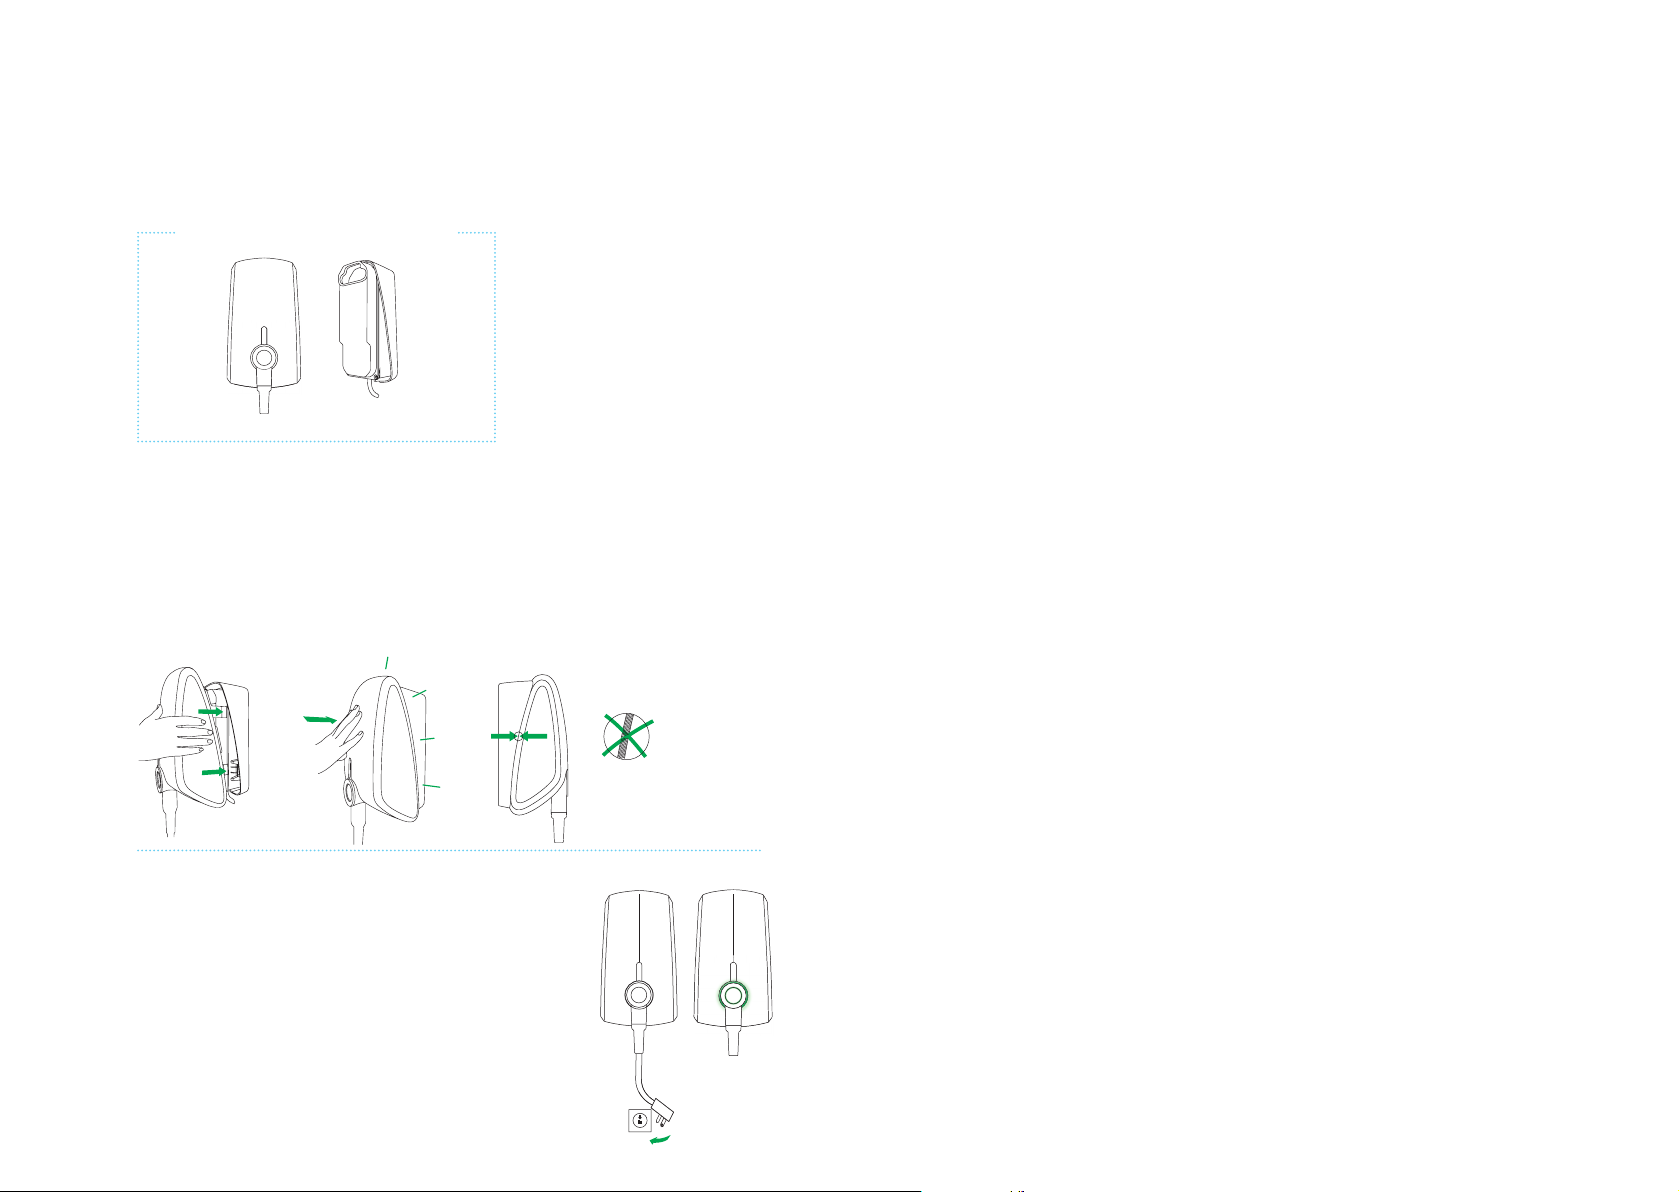
4. install station
4. install station
Tools you need to install the station
No specic tools needed for this step.
Before mounting, write down Elvi station ID.
This can be found on the backside of the station.
4.1
Align the station against the wall dock and press it in a straight
line until you hear a clicking sound.
To ensure that the connection is fully secured, press rmly on all
four corners and check that there is no air gap between the wall
dock and the station.
CLICK
Post-installation check list
• The LED ring must be solid GREEN when in the ready state.
• Initiate a charge session and use an EVSE tester.
• The LED ring should turn blue when the charging session is in progress.
• For Elvi with cellular connectivity it might be required to contact your stations’
operator or service provider to commission your Elvi and its cellular connection.
Maintenance
The owner or user is responsible for the maintenance of the charging station, whereby
both the law regarding the safety of persons, animals, property must be observed, as
well as the installation regulations in force in the country of use.
• Dirt and natural organic matter on the outside of the charging station can be
cleaned off using a damp soft cloth.
• Regularly check the EV plug for damage and for foreign matter inside the EVSE
plug.
• To protect the charging cable when not in use, an optional Elvi cable dock is
available for proper plug docking and cable storage. Contact the supplier of
your Elvi for details on options and accessories.
17
4.2
Plug Elvi into the power outlet.
Switch on the power to the station on the service panel. Elvi
will switch on automatically and the LED ring will be blinking
red. The LED ring’s color will switch to GREEN after 2 minutes
indicating that the station is available and ready to charge your
car.
Note
In case the LED ring does not show any color, it may be due to
improper installation of the charging cable. In this case, please
check / repeat steps 3.3 and 3.4. (chapter..)
note for myself: update the plug and outlet socket
18
Page 13
5. install cable dock
sold separately
5. install cable dock
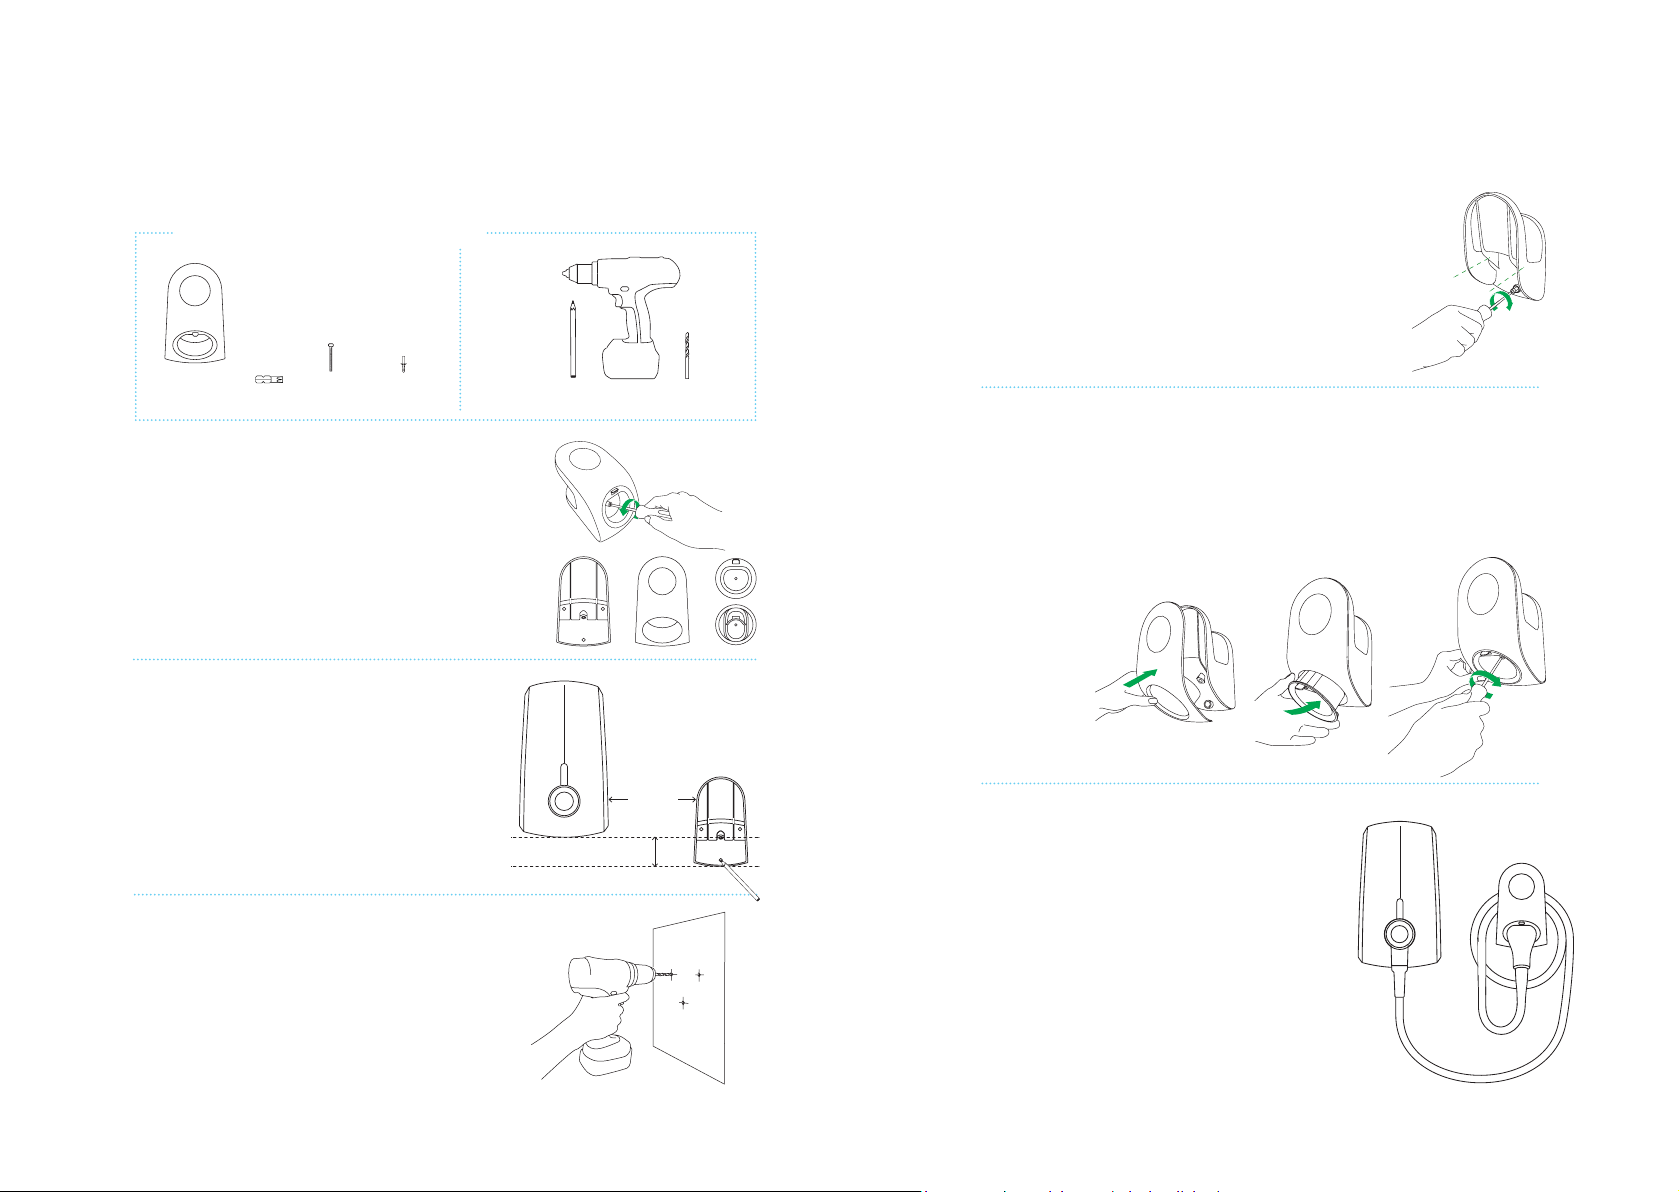
Tools you need to install the cable dock
Included
in the box
3x
screw 6x70mm
3x
Bit T30
The Elvi cable dock is sold separately.
Contact the supplier of your Elvi for details about
options and accessories.
5.1
Unpack your Elvi cable dock.
Disassemble the charging cable holder by
removing the Torx bolt with the T30 bit.
5.2
Place the cable dock’s wall base on a solid and
at surface. Position the cable dock on the wall as
illustrated (it should be to the side of your station
and at a comfortable height within at least 3ft 3
3/8” (1 meter) from the ground).
Use the cable dock’s wall base as a drilling
template to mark the 3 holes to be drilled.
Make sure it is level.
plug 8x65mm
Not
included
in the box
pencil
drilling machine
8mm drill
~ W 300 mm
H 65 mm
5.4
Place the cable dock’s wall base on the wall and fasten
the screws.
Do not overtighten.
5.5
The Elvi cable dock is supplied with two plug holder
options: one for Type 1 (SAE J1772) and one for Type 2
(IEC 62196) charging plugs.
Choose the plug holder that corresponds to your
charging cable and insert it into the cable dock.
Fasten the bolt removed in step 5.1 with the T30 bit.
Do not overtighten.
Success!
5.3
Drill holes with drill round 5/16” (8 mm).
Use the supplied plugs 8 x 65 mm and screws
6 x 70 mm length.
19
You’re all set.
20
Page 14
6. change charging cable
6. change charging cable
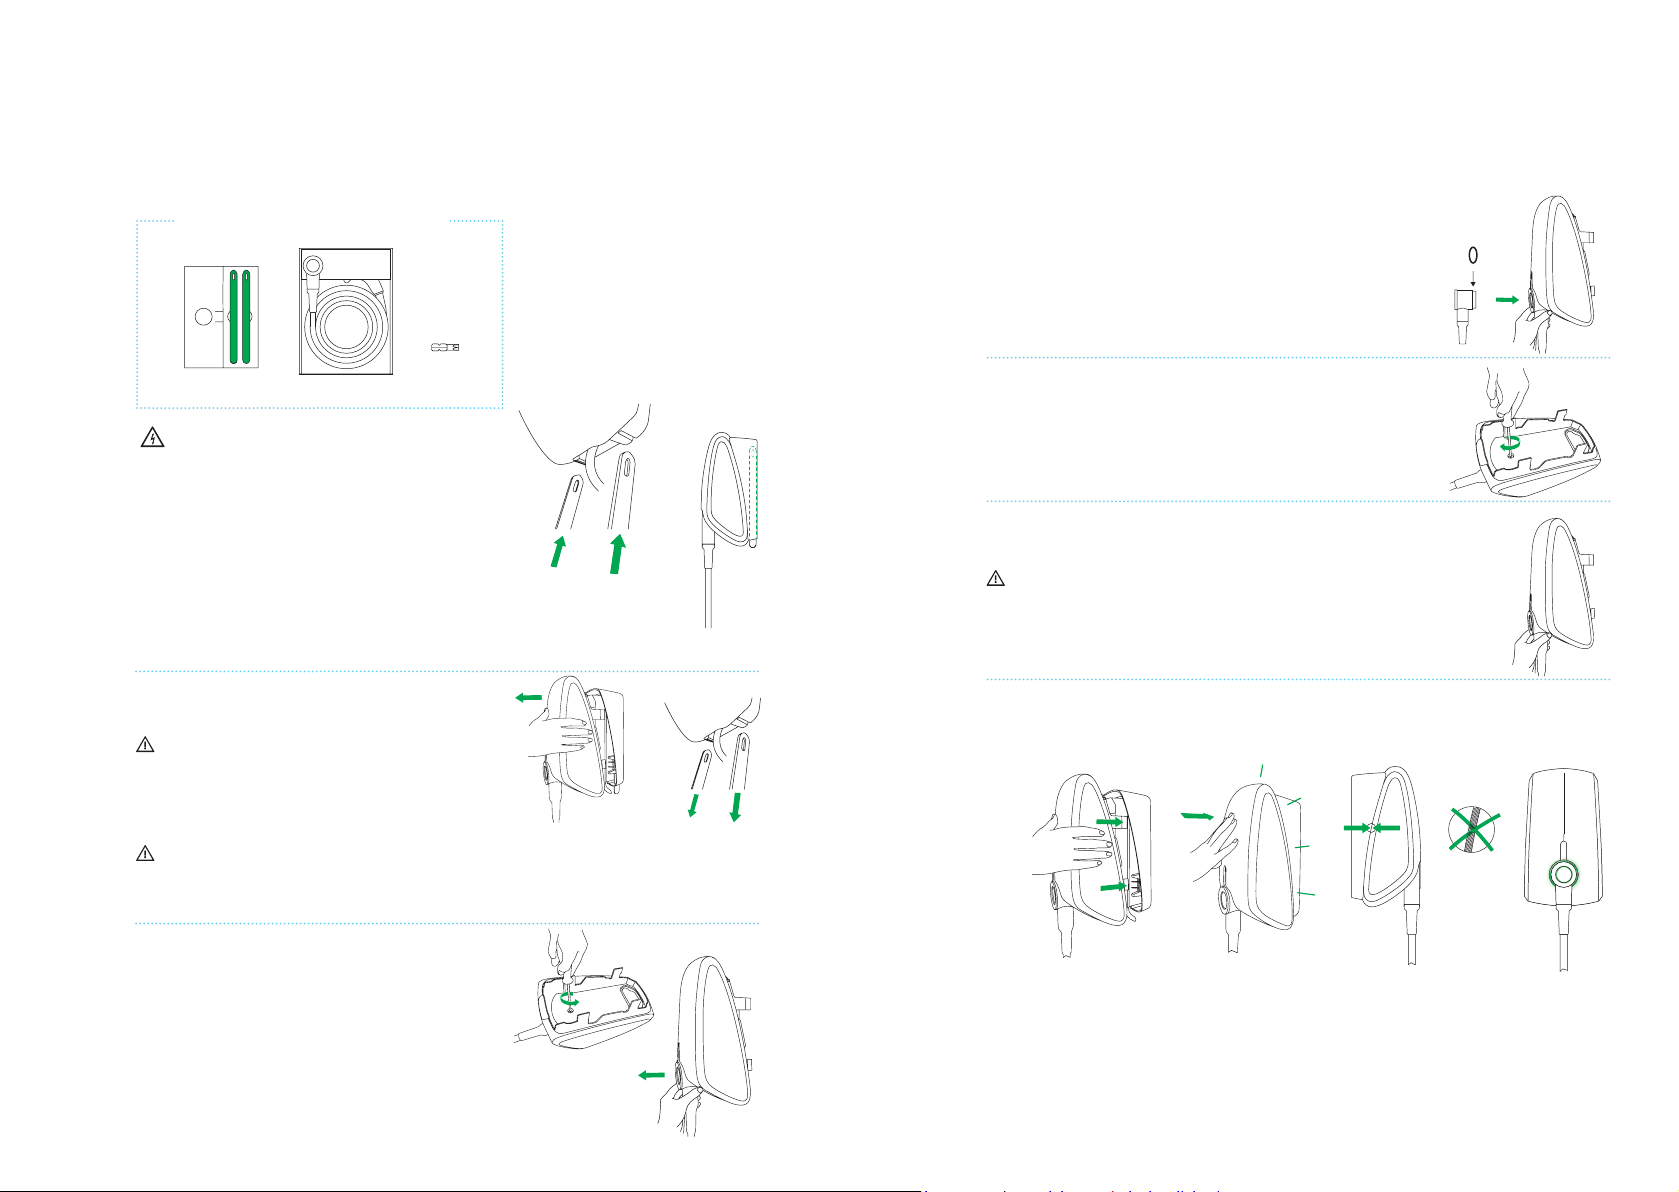
Tools you need to change the cable
Bit T30
Warning: Risk of electric shock.
Before changing the charging cable, make sure that the
power line you’re using is switched off on your service
panel. The LED ring of the charging plug must be off.
6.1
Take out the keys from the folder in the box.
Insert the keys into the slots in the bottom of the wall
dock. This releases the snap-t connection of the
charging station to the wall dock. Make sure to push
them in until they only stick out approx. 2” (50 mm) and
cannot be pushed in any further.
Now you can remove your charging station from the
wall dock. Pull the charging station away from the wall
dock in a straight line.
Caution: Do not twist or skew the charging station,
as that might damage the station’s snap ts and/or
connectors.
Be aware that the charging station is still xed on the
connector (socket) of the wall dock and it requires some
force to pull it off.
Caution: Do not use the charging cable for pulling
the station out of the wall dock.
6.4
Take the new charging cable out of the box. Check that the
rubber sealing ring on the charging plug is in place and not
twisted. This is to ensure that the proper ingress protection
levels are met (IP54 for EU and NEMA 3R for US).
Place the station on its side and plug the cable into the station.
Make sure you press the charging cable until it is rmly secured.
6.5
Turn the station around and place the front face of the station on
a soft and stable surface.
Insert the bolt and tighten it rmly with the supplied Torx T30 bit.
6.6
Place the station on its side.
Caution: double check that the charging cable plug is
properly secured into the station with the bolt.
6.7
Align the station against the wall dock and the connectors and press it in a straight line until
you hear a clicking sound. To ensure that the connection is fully secured, press rmly on all four
corners and check that there is no air gap between the wall dock and the station.
CLICK
21
Take out the keys from Elvi wall dock.
6.2
Turn the charging station around and place the front
face of the station on a soft and stable surface.
Untighten the bolt in the back with the supplied Torx
T30 bit and take the bolt out.
6.3
Place the station on its side and unplug the old cable
out of the charging station.
It is best to store the old cable in its original packaging.
6.8
When upgrading your charging cable to a version that is suitable for higher power application,
make sure that the applied RCD and MCB in the service panel are in line with local regulations,
and are also adequate for the type of charging cable installed and the amount of power Elvi
can supply (3.7or 7.2 kW).
Check with your installer whether the selected output power from your Elvi can be supported
by your local electrical installation. The setting of your maximum avialable amperage may
need to be adjusted in the mobile station management application and/or backend portal
account as provided by the operator or service provider for this product. For further details,
contact your operator or service provider.
22
Page 15
7. charge with Elvi
Start charging
1. Plug Elvi charging cable into your car. If you’re using a cable dock (optional) and
a type 1 cable, press the release button on the cable plug, then release the cable
from the dock, and plug the cable into your car.
2. To start and stop a charging session, you can use a registered charge card, key
fob, or your Hey by EVBox app.
3. Hold your charge card (RFID Card) in front of the reader, marked with icon.
4. Elvi reacts with a beep sound. This means that your card is being authorized.
5. Elvi LED ring turns blue when it starts charging.
Stop charging
1. Hold your charge card (RFID Card) in front of the reader, marked with icon.
2. Elvi reacts with a beep sound. This means that your charge card / keyfob is being
authorized. Elvi LED ring turns green when it stops charging.
3. Unplug Elvi charging cable from your car and place the charging cable back into
Elvi’s cable holder. Alternatively you can unplug your charging cable from your
car directly and end your session.
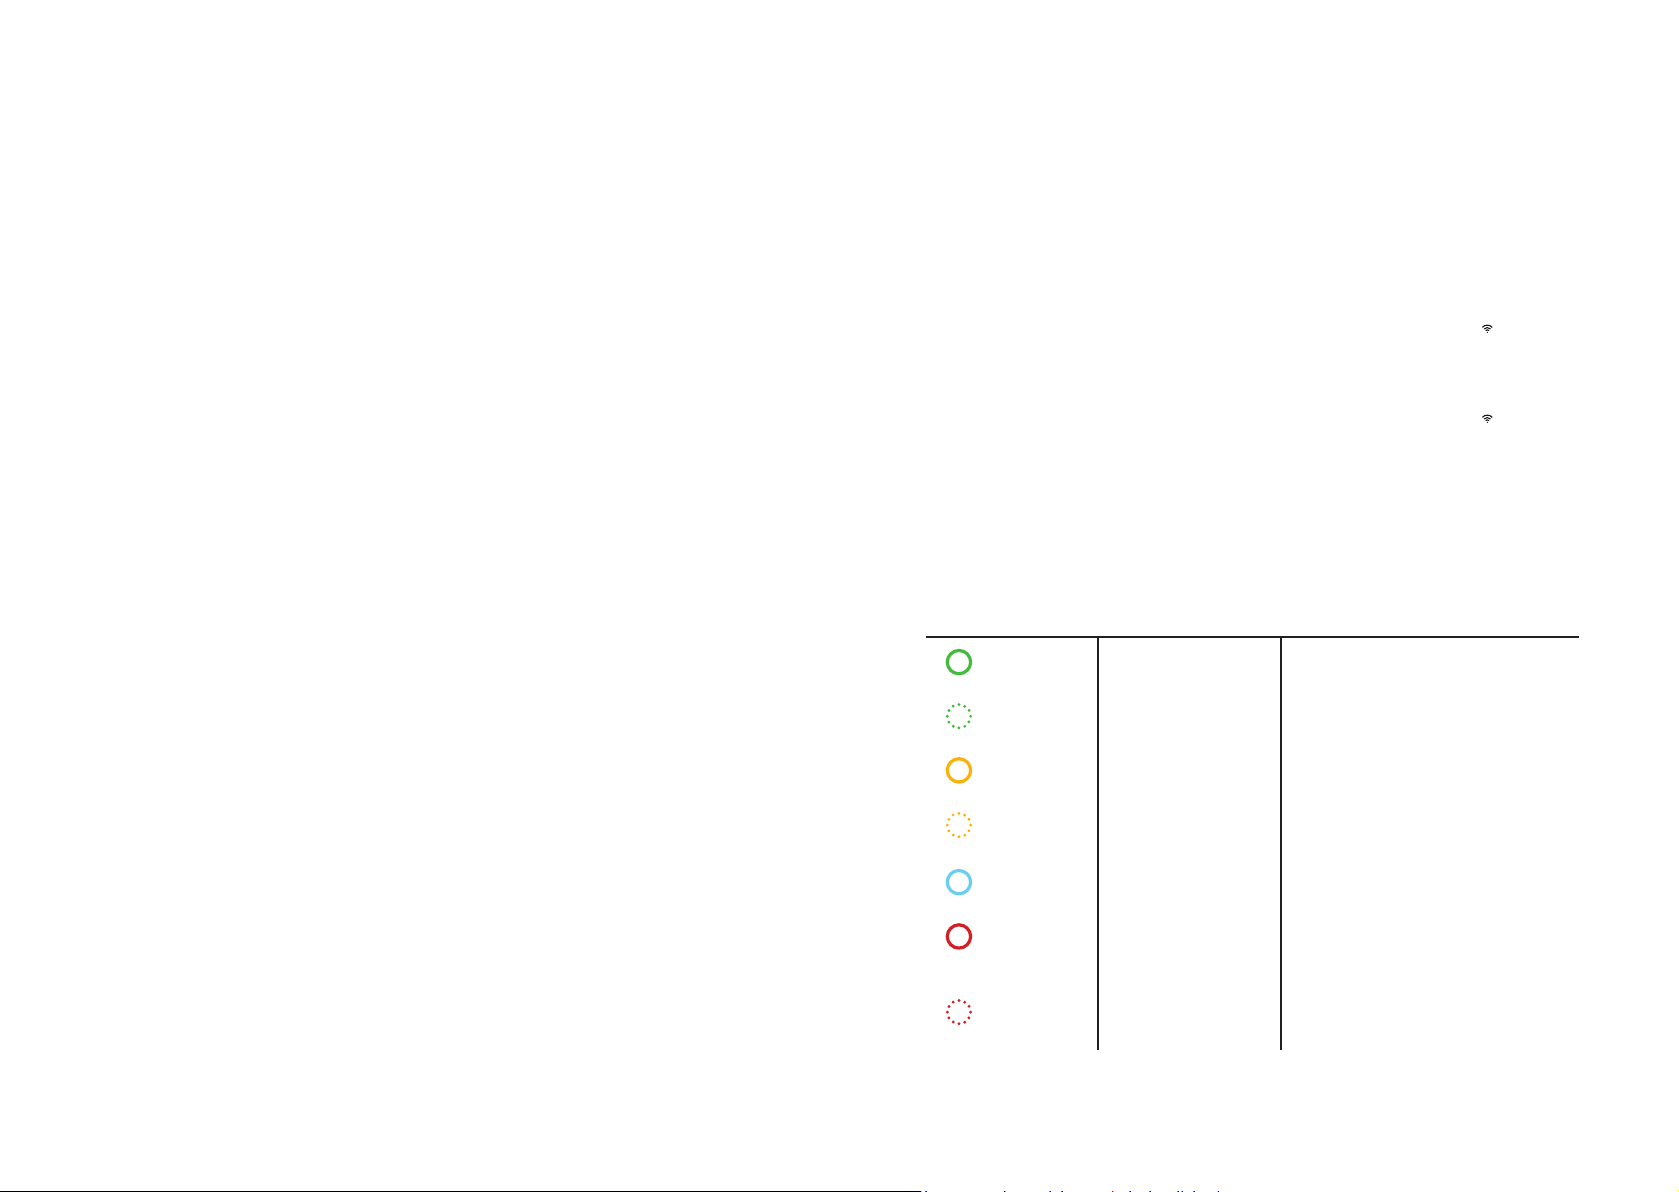
What you see What it means What to do
23
LED ring off
or green
LED ring
green ashing
LED ring
yellow
LED ring
yellow ashing
LED ring
blue
LED ring
red
LED ring
red ashing
Elvi is ready for use. Plug Elvi charging cable into the car.
Your charge card is being
veried.
The car is fully charged. Unplug Elvi charging cable from the car and
Charging session is in
queue, optionally in Smart
Charging environment
Elvi is charging the car. The car is charging.
Elvi is experiencing
an error.
Your charge card is not
authorized to charge.
Wait until LED ring turns blue.
place the cable back into Elvi cable holder.
When power becomes available,
charging will start or resume,
and the LED ring will turn blue.
Check the troubleshooting chapter in this
manual for solutions. If this does not solve the
issue, contact your installer or supplier of Elvi, or
message us at [email protected].
Contact your charge card service
operator, or apply for a free authorized charge
card at evbox.com/products.
24
Page 16

8. troubleshooting
8. troubleshooting
Problem Possible cause Solution
Charging
station
does not react
Residual current
device prevents
charging.
LED ring blinks
red 10x.
LED ring
lights up red
constantly
Please see next page for more troubleshooting instructions.
No power to charging
station
• Grounding error in the
charging station
• Special ground
resistance needed for
the vehicle
• Fault in the vehicle
or defective charging
cable
Grounding fault Check whether your electrical
• Check that residual current
device and circuit breaker on
the service panel are on (check
by user).
• Check that the supply cable
entering the charging station
is live. The LED ring should
be on.
• Turn the charging station off.
Turn it on again after
20 seconds, by ipping the
circuit breaker or main switch
to Elvi.
Contact your service
technician for inspection
and solution. There are no user
serviceable parts.
installation is properly grounded.
Contact your service technician
in case of doubt, and to solve the
local grounding situation.
Problem Possible cause Solution
LED ring
lights up
yellow
constantly
Red LED
starts ashing
immediately
after the card is
held against the
reader
• Vehicle is on a timer
• Vehicle is fully charged
• Grounding resistance
is too high, with specic vehicles,
this must be
< 50 Ohm
• Charge card is not
authorized for
charging at this
charging station.
• There is no
communication
with the
Hey by EVBox app.
• Check that the charging cable
plug is inserted into the
vehicle properly (check by user)
• Change the setting of the timer in
the vehicle. (check by user)
• Replace the charging cable. (user
serviceable)
• Check that the Ground Resistance
is correct (grounding
measurement by electrician)
• Check that the charge card is registered correctly? (check by user)
• Check the settings of your
charging station in the
Hey by EVBox app or via
hey.evbox.com. (check by user)
• Check that there is proper WiFi
reception where Elvi is installed.
(check by user)
• Reboot your WiFi network rst.
Then reboot Elvi, and check the
WiFi reception. (check by user)
• Check in the Hey by EVBox app
that your WiFi network is properly
connected to Elvi.
Reconnect again.
(check by user)
• If your Elvi is equipped with the
optional UMTS module, check
that Elvi is in contact with the
local cellular network and that it
has proper reception. (check by
charging point operator)
25
26
Page 17

9. warranty
10. declaration
10.1 EVBox warrants its Equipment against Errors and defects in materials and
workmanship for twenty-four (24) months from the date of delivery, during which time it will
use its best efforts to repair any Errors if any. However, any such problems encountered out
of any causes that are not attributable to EVBox shall be for Customer’s risk and account.
10.2 At its sole discretion, EVBox will repair or replace any Errors and/or defective
Equipment during the warranty period. EVBox may conduct warranty services at any
location, at its sole discretion, and EVBox may apply temporary patches, solutions, and or
restrictions relating to the Equipment as part of the warranty services.
10.3 The warranties hereunder do not cover faults or damages arising from faulty,
careless, or improper treatment, faulty and unauthorized commission, improper storage
or unloading and unauthorized modications, incorrect use or misuse of Equipment, and
improper or defective environmental circumstances, or a failure caused by a product for
which EVBox is not responsible. EVBox does not warrant that Equipment will operate
without interruption or error.
10.4 Warranty claims are only allowed and EVBox will only be obligated to conduct
warranty services, provided Customer is not breaching any of its obligations towards
EVBox, and EVBox has been informed of the warranty claim in detail, within ten (10) days
of the date on which the defect rst occurred.
10.5 Unless stated by EVBox in writing otherwise, discounted Equipment is not
covered by any warranty.
10.6 TO THE MAXIMUM EXTENT PERMITTED BY APPLICABLE LAW, EVBOX,
ITS LICENSORS, THIRD PARTY SUPPLIERS, AND AFFILIATES HEREBY DISCLAIM ALL
WARRANTIES, CONDITIONS, CLAIMS OR REPRESENTATIONS WITH RESPECT TO THE
EVBOX EQUIPMENT AND/OR SERVICES WHETHER EXPRESS, IMPLIED OR STATUTORY
OR OTHERWISE, INCLUDING, BUT NOT LIMITED TO IMPLIED WARRANTIES OR
CONDITIONS OF MERCHANTABILITY, QUALITY, NON-INFRINGEMENT, COMPATIBILITY
OR OF FITNESS FOR A PARTICULAR PURPOSE. NO ADVICE OR INFORMATION,
WHETHER ORAL OR WRITTEN, OBTAINED FROM EVBOX OR ELSEWHERE WILL CREATE
ANY WARRANTY OR CONDITION NOT EXPRESSLY STATED IN THESE TERMS AND
CONDITIONS.
10.7 Customer warrants not to: (i) copy, modify, translate, or reverse engineer any
portion of the Equipment and/or Services; (ii) use any robot, spider, another automated
device, or manual process to monitor or copy the Software or parts thereof; (iii) reformat
or frame any portion of the Software; (iv) interfere with the access of any other users of
the Software; (v) transmit any viruses, worms, defects, Trojan horses or other items of a
destructive nature through the Software; (vi) use the Software to violate the security of any
computer network, crack passwords or security encryption codes; or (vii) use any device,
software or routine that interferes with the proper working of the Software.
This warranty statement is subject to change.
Please refer to evbox.com/general-terms-conditions for the latest version.
of conformity
MANUFACTURER’S DECLARATION
(in accordance with Appendix II-B of the Machinery Directive 2006/42/EG)
EVBox B.V., Fred. Roeskestraat 115, 1076 EE Amsterdam, The Netherlands, declares
under sole responsibility that the product:
EVBox North America, 15 Metrotech Center, oor19, Brooklyn, New York, 11201,
declares under sole responsibility that the product:
Article, B232X-650XX EVBox Charging station, Input: 2-phase, max 32Amps. Output:
Max 7.4kWh
UL2594 Finalized
UL2231 Finalized
UL991 Finalized
UL50E Finalized – NEMA 3R accredited
NFPA 70 Compliant
UL 1998 Finalized
OCPP 1.6 SOAP and JSON implemented
OCPP 1.5 SOAP implemented
OCPP 1.2 SOAP implemented
PCI DSS Not available
ISO/IEC 1443 Accredited
ISO/IEC 18092 Accredited
27
28
Page 18

The present document is drawn up by way of information only and does not constitute an offer binding
upon EVBox. EVBox has compiled the contents of this document to the best of its knowledge.
No express or implied warranty is given for the completeness, accuracy, reliability or tness for particular
purpose of its content and the products and services presented therein. Specications and performance
data contain average values within existing specication tolerances and are subject to change without
prior notice. Prior to ordering, always contact EVBox for the latest information and specication. EVBox
explicitly rejects any liability for any direct or indirect damage, in the broadest sense, arising from or
related to the use and/or interpretation of this document. EVBM_122018 © EVBox North America, Inc.
EVBox strives to manufacture products of the highest quality. EVBox products for the US market are
UL 2594 tested and compliant. For the Canadian market, they are CSA C22.2 No. 280-16 tested and
compliant. For the EU market, they are CE certied and compliant with the essential requirements of
EMC Directive 2014/30/EU and Low Voltage Directive 2014/35/EU.
More details can be found at evbox.us or in the Installation Manual.
EVBox products are sold with a limited warranty described at
evbox.us/general-terms-conditions.
© 2018 EVBox North America, Inc. All rights reserved. EVBox® and the EVBox logo
are trademarks or registered trademarks of EVBox B.V. in the EU and
in other countries.
EVBox North America, Inc.
335 Madison Ave, 4th Floor
New York, NY 10017, USA
[email protected]
I’m all set!
Let’s charge.
Page 19

EVBIM_122018 © EVBox B.V.
 Loading...