


200 School St
http://www.evatontechnologies.com/
Pittsburgh, PA 15220-2718
SDIY MDRONE
Assembly Manual
Revision A - Parts & PCB Kit
Introduction
Thanks for purchasing the SDIY1MDRONE kit from Evaton Technologies! The
SDIY MDRONE kit is a battery-powered standalone tabletop drone synth that
can be built in just a few evenings. The SDIY MDRONE kit is available as just
parts and PCB (build your own case), or as a complete parts + PCB + pre-drilled
enclosure, for those who wish to get up and running right away2.
The SDIY MDRONE voice architecture consists of three independent squarewave oscillators, which are mixed in a fixed summing mixer. The mixer output
is then fed to a semi-resonant bandpass filter, with adjustable center frequency
and bandwidth. A “Grit” setting allows overdriving the filter for dirtying-up the
sound and making a more hard-hitting timbre.
Output is a 1/4” mono (TS) line-level audio jack.
Skill Level
The SDIY MDRONE kit, while not necessarily aimed at the complete novice,
can be built by anyone with some soldering experience. All components are
standard, readily-available thru-hole components. The spacing of the
components on the circuit board is generous, so that no special tools are
required to install. These instructions assume you already know how to solder,
and cut and strip wires.
Precautions
Soldering irons are HOT! Be careful not to touch the business end of your
soldering iron at any time. Also note that components that have been soldered
will remain hot for a few moments. If you need to hold something to solder it, it
is recommended NOT to use your fingers. Wear long pants and long sleeves to
avoid solder splash from burning exposed skin.
1
Synthesizer Do-It-Yourself
2
If you purchased this kit as a complete parts + PCB + enclosure kit, additional instructions for the
enclosure will be included in your shipment.

200 School St
Pittsburgh, PA 15220-2718
http://www.evatontechnologies.com/
Tools Required
A few basic electronic assembly tools are needed to complete the assembly
of the circuit board. If you are building your own case, some additional tools
are required to drill holes.
Tools Required - PCB assembly:
Soldering iron. Minimum 25 watt pencil iron; preferred temperature-
•
controlled, but not necessary.
Small wire cutter
•
Wire stripper
•
Electronic solder. 60/40 lead/tin or 63/37 lead/tin, or lead-free. Use rosin-
•
core solder. Do NOT use acid-core3 (plumbing) solder!
Pair of needle nose pliers (optional) for bending leads and holding
•
components
Small bench vise or “helping hands” (optional) for holding the PCB.
•
Small adjustable wrench or 10mm deep-well socket, for tightening
•
potentiometer nuts
9/32” open-end wrench for tightening toggle switch nuts
•
De-soldering braid (optional) for cleaning up mistakes
•
Multimeter with ohms and volts setting. Not a necessity, but handy for testing.
•
Tools Required - Case assembly:
Phillips screwdriver
•
If building your own case, a 9/32”, 13/64”, and 3/8” drills are required, to
•
drill holes for the potentiometers, toggle switches, and output jack.
Also Required:
9V battery. Alkaline preferred, but heavy-duty is fine, too. A properly
•
constructed SDIY MDRONE will run many hours on a single battery.
1/4” mono patch cord (TS)
•
3
Acidcore music is great. Acid core solder is not.
Page 2
200 School St
Pittsburgh, PA 15220-2718
http://www.evatontechnologies.com/
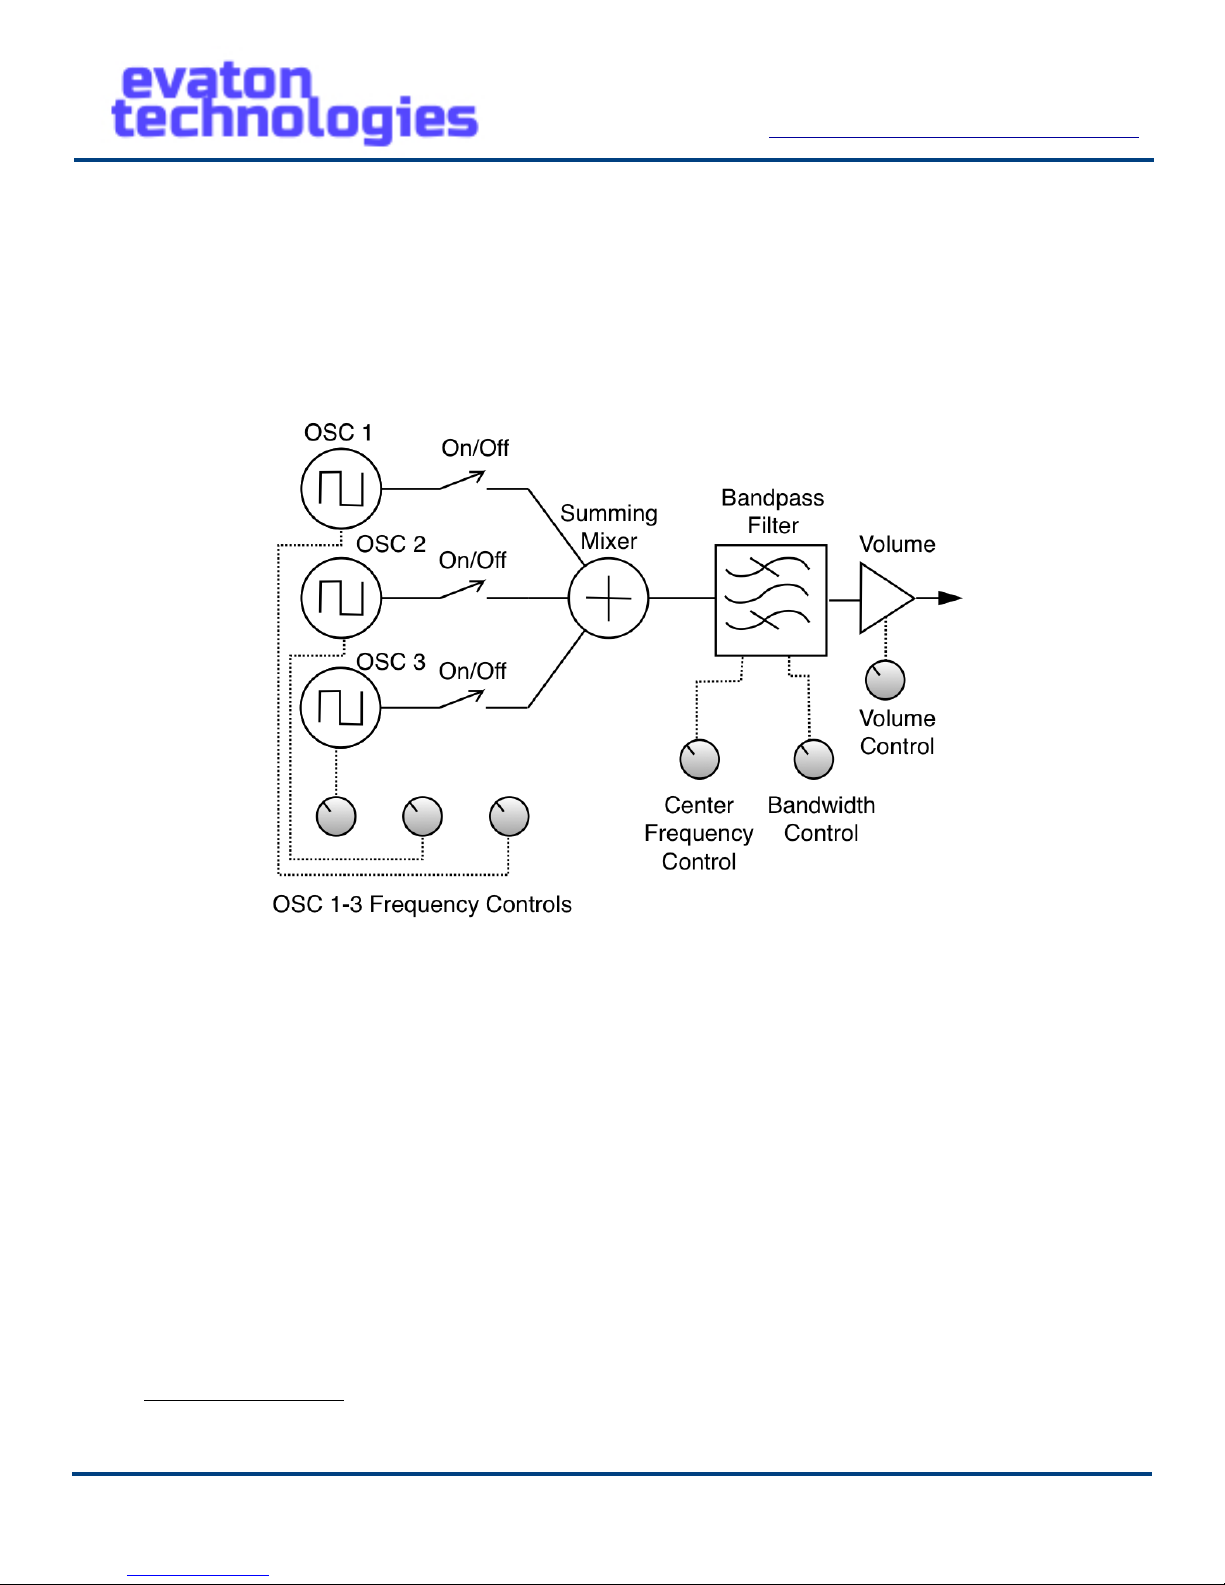
Signal Flow
The SDIY MDRONE consists of three square wave generators that feed a
summing mixer. Each oscillator can be turned on and o! with a switch. Each
oscillator’s frequency can be controlled by a front panel knob. The output of
the summing mixer feeds a bandpass filter. The filter bandwidth and center
frequency can be controlled with front panel knobs.
Circuit Theory
While it is not necessary to completely understand exactly how the circuits in
the SDIY MDRONE work, a top-level description of the theory is presented here,
for those who’d like to get a little more acquainted with electronics. Please see
the included schematic diagram to follow along4. The schematic is divided up
into a few logical sections: The oscillators, the summing mixer, the virtual
ground reference, and the bandpass filter.
Oscillators
The three oscillators are the type known as a “relaxation oscillator.” In a
relaxation oscillator, a capacitor is slowly charged up from zero volts until the
voltage across the capacitor passes a certain threshold, at which time, the
circuit begins to discharge the capacitor. Once the capacitor voltage falls below
4
Or skip ahead to the next section; there won’t be an exam on this material!
Page 3

200 School St
Pittsburgh, PA 15220-2718
http://www.evatontechnologies.com/
a certain voltage, the circuit again begins charging the capacitor. The charge
and discharge rate is determined by the resistance of the control knob on the
front panel.
If we look at the schematic, OSC 1 is formed by the capacitor C6, resistor
R17, and variable resistor (potentiometer) R16, and is controlled by the 40106
Schmitt Trigger chip. A Schmitt trigger circuit outputs zero volts when the input
is above a certain voltage. It outputs 9 volts when the input is below a certain
voltage. So, looking at the voltage on C6, it starts at zero volts, so the output of
IC1A is 9 volts. That 9 volts gets fed back onto C6, and it starts to charge.
Once C6’s voltage gets high enough, IC1A switches its output from 9 volts
to zero volts. C6 now begins to discharge. This repeats over and over again,
making an oscillation!
IC1B takes this rising and falling voltage and turns it into an on/o! signal (a
square wave!). Adjusting R16 (the front panel knob) adjusts how quickly C6
charges and discharges, thus setting the frequency.
OSC 2 and OSC 3 work the same way.
Summing Mixer
U1A is an operational amplifier (op-amp). It adds together the three signals
coming through R2, R4, and R18. An op-amp connected in this configuration is
called a Summing Amplifier.
Virtual Ground Source
R5, R6, and U1D form a bu!ered voltage divider. 9 volts goes through R5
and R6 to ground. Because R5 and R5 are equal in value, the voltage at pin 12
on U1D is exactly half that voltage, or 4.5 volts. U1D is configured as a “unity
gain follower,” meaning that the output at pin 14 is exactly the same voltage as
the input on pin 12, but it can drive a bigger load without the voltage being
a!ected.
The “virtual ground” of 4.5 volts is required because the SDIY MDRONE
operates from a single 9V supply. Most op-amp circuits require a positive
voltage supply and a negative voltage supply to operate. We can “fake out” the
op-amps by creating this “virtual ground” that is exactly half the battery
voltage, and then pretend that the 0 volts terminal of the battery is actually
“negative 4.5 volts with respect to virtual ground”. Then the +9V terminal of the
battery is “positive 4.5 volts with respect to virtual ground.”
Page 4

200 School St
Pittsburgh, PA 15220-2718
http://www.evatontechnologies.com/
Bandpass Filter
The bandpass filter is an active filter that uses two op-amps and capacitors
and resistors to filter out signals that are outside of its “pass band”.
Frequencies of sound that are below the filter’s pass band are removed, and
frequencies that are higher than the pass band are also removed, but
frequencies that fall inside the pass band are passed through to the output. The
width of the pass band (the di!erence between the highest frequency that can
pass and the lowest frequency that can pass) is called the filter bandwidth.
The frequency that falls exactly halfway between the lowest frequency that
can pass and the highest frequency that can pass is called the center frequency
of the filter, or FC. R23 adjusts the bandwidth of the filter, and R13 adjusts the
F
C.
While this is a very basic description of the filter operation, a more thorough
description of how the filter does this is beyond the scope of this manual.
Further reading is suggested if you want to gain a better understanding of opamp filters5.
Kit Contents
A bare printed circuit board (PCB) and 18-foot (6m) spool of wire
•
2x 0.01 µF 16V capacitors
•
3x 0.1 µF 16V capacitors
•
3x 1.0 µF 16V capacitors
•
1x 470Ω resistor
•
2x 1.1kΩ resistor
•
4x 4.7kΩ resistors
•
9x 10.0kΩ resistors
•
1x 47kΩ resistor
•
4x 100kΩ linear potentiometers
•
1x 100kΩ audio potentiomer (Frequency Pot)
•
1x 5kΩ audio potentiometer (Volume Pot)
•
2x 14-pin DIP IC sockets
•
1x LM324 op-amp IC
•
1x CD40106 Hex Schmitt Trigger IC
•
5x DPDT switches
•
9V battery snap and battery holder
•
1/4” mono audio output jack
•
5
While there are many good books on the subject, an internet search of “active filter design” will also
yield some very useful datasheets and application notes from various op-amp vendors that are quite
thorough. The filter in the MDRONE is a dual-amplifier passband design.
Page 5

200 School St
Pittsburgh, PA 15220-2718
http://www.evatontechnologies.com/
Assembly Instructions
Note On Assembly Of Front Panel Components
While most of the components on the SDIY MDRONE get soldered directly to
the PCB, the front panel components are first soldered to wires, and then the
wires are soldered to the board. Leave long enough wires to allow easy
assembly at the end. While assembling the PCB, it’s best to just solder the front
panel components to long leads (6 to 8 inches), and leave them laying beside
the board. Don’t attempt to install the front panel components into the front
panel until the board is completely assembled.
Preparation
To begin assembly, clear a space on your workbench6. It helps to have good
lighting, and your tools located where they can be easily reached. Plug in your
soldering iron and let it come up to temperature. It helps to have a dampened
sponge nearby, to wipe the solder tip on to keep it clean. Place the bare circuit
board in the middle of your work area, with the white silkscreen legend facing
you.
The next few paragraphs will go step-by-step through the process of
assembling the circuit board. You may wish to check these steps o! as you go,
to keep track of your place.
____ Sockets
First, install the two IC sockets in the locations U1 and U2 on the PCB. There
is a notch at one end of the socket. Line up the notch in the socket with the
notch in the white component outline on the board.
To install the socket, place the socket in the holes on the board for the
socket, and make sure the socket is flat against the board all the way around.
You can use a piece of clear tape to hold the socket in place while you solder
the pins. Remove the tape after soldering.
____ Virtual Ground Resistor Divider
Install two of the 10kΩ resistors (brown/black/orange) into locations R5 and
R6 on the board. Carefully bend the leads of the resistors so that they fit
through the two holes in the board at the ends of the component outline. Bend
the leads slightly on the back side of the PCB to hold the resistors in place, and
6
Hey, that’s my first step. My bench is always a complete mess!
Page 6

200 School St
Pittsburgh, PA 15220-2718
http://www.evatontechnologies.com/
solder the resistors in place. When you are sure you’ve made a good solder
joint on all four pads, cut the excess leads o!.
____ 9V Battery Snap
The 9V battery snap comes with pre-stripped leads. The red lead is the
positive lead, and the black lead is the negative. Solder the black lead to the
hole marked P8 on the PCB. Solder the red lead to the hole marked P7.
____ Power Switch
Get one of the toggle switches out, and solder a 6inch wire to one of the center pins. It doesn’t matter
which center pin. Solder another 6-inch wire to
another pin on the same side of the switch. Although
the kit ships with DPDT7 switches, we will be using
them as if they were SPST8 switches. The switch is
“ON” when the toggle lever is pointing away from the
pair of pins you’ve soldered to.
Now solder the other end of one of those wires to
the hole marked P6 on the PCB. Solder the other wire
to the hole marked P5 on the circuit board.
____ Test Power-Up
At this point, we can perform a simple test of the circuit board, if you have a
multimeter with OHMS and VOLTS settings. First, we’ll check that there is not a
power-to-ground short circuit. Set your meter to the OHMS (Ω) setting.
Put one meter probe on
one contact of the 9V
battery snap, and put the
other probe on the other
contact of the 9V battery
snap. The meter should
read an infinite number of
ohms (open-circuit). If not,
go back and check your
solder joints.
7
Double-Pole-Double-Throw
8
Single-Pole-Single-Throw
Page 7

Pittsburgh, PA 15220-2718
http://www.evatontechnologies.com/
Now, flip the power switch. The meter should still read infinite resistance
(open-circuit).
Next, change your multimeter to the VOLTS
setting. If it is a manual-range meter, make
sure it is set up to read at least 9 volts full
scale. Many meters will have a 0-20V setting.
Put the positive (red) probe of the
multimeter on the positive (smaller) terminal of
your 9V battery. Put the negative (black) probe
on the negative (larger) terminal of the 9V
battery. The multimeter should read
somewhere between 9 and 10 volts.
Congratulations! Your battery is good!
Now, for our first functional test of the board. Plug
the battery into the 9V snap. Touch the negative
probe of the multimeter to pin 7 of the socket in
U2. Touch the positive probe to the lead of R6 that
is nearest the edge of the PCB. Turn the power
switch ON. The multimeter should read 9 volts.
200 School St
Now, with the negative lead of the multimeter still
touching pin 7 of the U2 socket, touch the positive
probe to the other end of R6. The meter should
read approximately 4.5 volts. If not, unplug the
battery, and go back and check your work. If
everything worked out, turn o! the power switch,
and unplug the battery from the 9V snap before
continuing assembly.
____ 0.1 µF Bypass Capacitors
Now, install the three 0.1 µF bypass capacitors into C3, C4, and C5 locations
and solder into place. It does not matter which direction these three capacitors
are installed. After soldering, trim the leads. You may wish to repeat the Test
Power-Up section again after installing these three capacitors, just to verify
there are no short-circuits.
Page 8

Pittsburgh, PA 15220-2718
http://www.evatontechnologies.com/
____ 10kΩ Resistors
Install the remaining 10kΩ resistors into locations R2, R4, R7, R8, R10, R18,
and R22.
____ 1.1kΩ Resistor
Install a 1.1kΩ resistor in location R14. There will be another 1.1kΩ resistor
left over; we’ll talk about this a little later.
____ 4.7kΩ Resistors
Install 4.7kΩ resistors into locations R3, R17, and R19. There will be one
4.7kΩ resistor left over; we’ll talk about this a little later.
____ 47kΩ Resistor
Install the 47kΩ resistor into location R9.
200 School St
____ 470Ω Resistor
Install the 470Ω resistor into location R24.
____ 0.01 µF (10,000 pF) Capacitors
Install the 10,000 pF capacitors into locations C2 and C8. It does not matter
which way you install them.
____ 1.0 µF Capacitors
The 1.0µF capacitors are polarized electrolytic capacitors. These are the
timing capacitors for the three oscillators. Because they are polarized, you must
pay attention to which direction you install them. The capacitor has a gray
stripe on one side. The lead next to this stripe is the negative lead. The other
lead is the positive lead. Make sure the positive lead (the lead opposite the gray
stripe) is installed in the hole marked with a plus sign (+) on the board. Install
the 1.0 µF capacitors in locations C1, C7, and C6. You may have to bend C6 just
slightly in order to clear the chip socket.
___ Take a break!
At this point, nearly all the thru-hole components have been soldered to the
board. Only a 4.7k resistor and a 1.1k resistor remain. The rest of the
Page 9

200 School St
Pittsburgh, PA 15220-2718
http://www.evatontechnologies.com/
components are front-panel components. Take a break for a moment9, and recheck your solder joints; make sure all the components you installed so far
have good joints.
And Now, A Few Words About Potentiometers
The next steps of assembling your SDIY MDRONE involve wiring up the
front-panel components. As mentioned earlier, it’s best to wire the front panel
components, and lay them out beside the board, rather than attempting to
mount the front panel components first and then wiring.
There are six potentiometers included with the kit. Four of them are 100kΩ
linear potentiometers, one is a 100k audio-taper pot, and one is a 5kΩ audiotaper potentiometer.
The PCB outline for the potentiometers has three numbered pads. These
correspond to the three legs of the potentiometers, as labelled in the photo on
the left. Wire pin 1 to the leftmost pin, pin 2 to the center, and pin 3 to the
rightmost pin on the potentiometer. If your knobs seem to turn backwards of
what you expect, reverse pins 1 and 3. (This may be the case for the Bandwidth
knob -- if you prefer to think of it as a Resonance knob, you may wish to
reverse pins 1 and 3).
9
It was at this very moment that I also took a break from writing this assembly manual. Whew!
Page 10

200 School St
Pittsburgh, PA 15220-2718
http://www.evatontechnologies.com/
$ The included
potentiometers feature
an anti-rotation lug. If
you want to use this
lug, you’ll need to drill
an extra hole for each
potentiometer. Unless
you’re making your
case out of an
extremely slippery
material10, you
probably won’t need to
use the lug. This will
save you from drilling 6
extra holes, but you’ll need to remove the
antirotation lug. This is easy to do with a small
pair of pliers. Just hold the potentiometer firmly in
one hand, grasp the antirotation lug firmly with
the pliers, and wiggle the pliers back and forth.
The tab will usually break very cleanly.
And finally, solder the wires to the long leads on
the pots. Although there are rivet holes on the
pot, it’s best to solder to the long leads, which
put the solder iron heat a little further away from
the inner mechanism of the pot.
Ok, with that said, we’re ready to finish
construction of the SDIY MDRONE!
____ 5kΩ Audio Potentiometer (Volume Pot)
Solder one 6- to 8-inch wire to each of the three leads on the 5kΩ
potentiometer. Bearing in mind the numbering scheme mentioned above,
solder the other end of each of these three wires to pads 1, 2, and 3 of the
potentiometer outline R11 on the PCB.
You may wish to use a permanent marker to write on the back of this
potentiometer, to label it “Volume Control”.
10
Some plastics are a bit slippery, and might require the anti-rotation lug.
Page 11

200 School St
P6
Pittsburgh, PA 15220-2718
http://www.evatontechnologies.com/
____ 100kΩ Linear Taper Potentiometers
Solder one 6- to 8-inch wire to each of the three leads on each of the 4
100kΩ linear (B100K) potentiometers. Solder the other ends of these wires to
the pads for R1, R16, R20, and R23. You may want to use a permanent marker
to label these pots as follows:
R16: OSC 1
•
R20: OSC 2
•
R1: OSC 3
•
R23: Filter Width (Q)
•
____ 100kΩ Audio Taper Potentiometer
Solder one 6- to 8-inch wire to each of the three leads on the 100kΩ audio
(A100K) potentiometers. Solder the other ends of these wires to the pads for
R13. Label this potentiometer “Filter Frequency (Fc)”
____ Toggle Switches
Next, solder two 6- to 8-inch wires to each of the 5 toggle switches, as
shown here:
____ Power Switch
Label the first toggle switch “Power”. Solder one of the leads to the hole
marked “P5” on the PCB, and the other lead to P8.
____ Osc 1 Switch
Label the next toggle switch “Osc 1”. Solder one of its leads to P15, and the
other lead to P16.
Page 12

Pittsburgh, PA 15220-2718
http://www.evatontechnologies.com/
____ Osc 2 Switch
Label the next toggle switch “Osc 2”. Solder one of its leads to P17, and the
other lead to P18.
____ Osc 3 Switch
Label the next toggle switch “Osc 3”. Solder one of its leads to P19, and the
other lead to P20.
200 School St
____ Grit Switch
11
This is an optional switch, which selects “Grit” or “Non-Grit” audio modes. In
Grit mode, the bandpass filter is overdriven somewhat, which makes a dirty,
gritty sound. Non-Grit mode is just barely overdriven, giving a much cleaner
sound. Certain settings of the knobs will still cause a slight amount of dirt when
in Non-Grit mode, but for the most part will be clean.
To select between Grit and Non-Grit, you need to decide the value of the
resistor R21.
If you want Grit mode all the time, install a 4.7kΩ resistor in R21 now, and
leave out the final toggle switch.
If you want Non-Grit mode all the time, install a 1.1kΩ resistor in R21 now,
and leave out the final toggle switch.
11
The Grit Selection is technically a “circuit-bend” -- additional functionality added to the circuit, after it
was designed! The SDIY MDRONE is ripe ground for circuit bending; see the appendix for more circuitbending ideas.
Page 13

200 School St
Pittsburgh, PA 15220-2718
http://www.evatontechnologies.com/
If you want to be able to select between Grit and Non-Grit, then install a
4.7kΩ resistor in R21, and also solder one end of a 1.1kΩ resistor to one end of
the 4.7kΩ resistor. Solder the free end of the 1.1kΩ resistor to one of the leads
of the final toggle switch. Solder the remaining lead of the toggle switch to the
other end of the 4.7kΩ resistor.
____ Audio Output Jack
Finally, solder a 6-to-8-inch wire to each of the two solder lugs on the
audio output jack. The lug which connects to the TIP connection is the Audio
Signal, and the other lug is the Audio Ground. Solder the other end of the Audio
Signal wire to the hole marked P2 on the PCB. Solder the Audio Ground wire to
the hole marked P12 on the PCB.
____ Insert the TL084
Insert the TL084 Op-Amp integrated circuit into the socket marked U1 on
the PCB. Take note that there is a notch on the integrated circuit at one end.
Make sure this notch faces the end of the socket nearest the “U1” label. (It
should match the notch in the socket, if you installed the socket correctly.)
You may need to carefully bend the pins on the chip; they tend to be sprung
fairly heavily from the chip factory. This is because, normally a chip would be
inserted by a machine, and the extra springiness is required by the insertion
machine. Since we’re installing by hand, you may need to use a pair of needle
nose pliers to bend the pins slightly inward to make it easier to install into the
socket.
____ Insert the CD40106
Insert the CD40106 Hex Schmitt Trigger integrated circuit into the socket
marked U2 on the PCB. Again, take care to align the notched end of the chip to
the end of the socket nearest the “U2” label on the PCB. It should match the
notch in the socket.
____ R12 and R15
There are two resistor locations on the PCB marked “See Text”. Do not install
these resistors.
Page 14

200 School St
Pittsburgh, PA 15220-2718
http://www.evatontechnologies.com/
____ C9 and C10
Do not install anything in C9 and C10 at this time. They are locations
provided for help with additional circuit-bends.
____ (optional) Functional Test
At this point, the MDRONE should be ready to produce sound. You may want
to test this before going to the trouble of mounting the knobs, switches, and
output jack to the panel. To do so, carefully plug a 1/4” mono audio patch
cable (not included) into the audio output jack. Plug the other end of this cable
into your audio output system -- a mixer, PA amplifier, etc.
Turn o! the Power, OSC 2 and OSC 3 switches. Plug in a 9V battery.
Turn the R11 Volume potentiometer to its center position. Switch on the
Power switch (P5/P8). Turn on the OSC 1 switch. You should hear a constant
tone from your amplifier. Rotate the OSC 1 potentiometer (R16) left and right.
The tone should go down and up in pitch.
Turn o! the OSC 1 switch, and turn on OSC 2. You should hear a tone again.
Now rotate the Osc 2 potentiometer (R20). The pitch should go up and down.
Repeat this for the OSC 3 switch and potentiometer, R1. Now rotate the Filter
Width (R23) potentiometer. The sound color should change. Likewise for the
Filter Frequency (R13) potentiometer.
Finally, rotating the Volume knob should make the sound get louder and
quieter. If all of this works, then it’s time to begin assembling the knobs and
switches to the panel. If not, go back and check your work carefully.
____ Assembling the Controls
Turn o! the power to the SDIY MDRONE. If you are using the optional pre-
made case, follow the case assembly instructions in the case assembly manual.
If you have made your own case, you’ll need to drill six 9/32” holes, one for
each of the potentiometers, and five 13/64” holes, one for each of the toggle
switches. You’ll need to also drill a single 3/8” hole for the audio output jack.
Included in these directions are a sample drill template. If you print this PDF
at 1:1 scale, you should be able to use the sample drill template to locate the
holes for a front panel, and also use the template as an overlay for your panel if
you so choose. Two versions of the template are provided; one does not have
the Grit switch, in case you chose not to implement this feature.
Page 15

200 School St
Pittsburgh, PA 15220-2718
http://www.evatontechnologies.com/
After drilling the holes, poke the potentiometers thru the holes, and fasten
with the included washer and nut. Do the same for the toggle switches and
audio output jack. You’ll have to drill a separate hole for the audio jack; it’s not
shown on the template, that way you can put it on the side of the case if you
like.
____ Assembling the Knobs
The final step of assembly is to install the knobs onto the potentiometer
shafts. Turn all of the shafts fully counter-clockwise, and then push on each
knob so that the pointer on the knob aligns roughly to the 7 o’clock position.
That’s it! The SDIY MDRONE is ready to use.
Operating the SDIY MDRONE
Using the SDIY MDRONE is easy and fun. Each of the three oscillators can be
turned on or o!, using the Osc On/O! toggle switches. The pitch of each
oscillator can be controlled with the Osc1 thru Osc3 knobs.
The Filter Width and Filter Frequency knobs can be used to alter the
harmonic content (timbre) of the drone.
Turning the Grit switch on and o! (if you’ve implemented this feature)
selects between mostly clean audio and rather dirty audio. Note that when the
Grit switch is in the “on” position, the signal is clean. You may wish to rotate
the switch so that it matches up with how you want the Grit label to indicate.
The volume knob controls the output signal level. Note that the output can
go somewhat above normal line level; make sure the device you are plugging it
into can handle that signal level before turning the volume up all the way.
Appendix - More Circuit Bending Ideas
The SDIY MDRONE is ripe for circuit bending. In addition to the ideas listed
here, please join the Evaton Technologies User Forum, and follow the SDIY
MDRONE thread. More circuit bending ideas will be posted there, and you can
also post up your own experiments, too, so others can try hacking the circuit
the way you have!
Page 16

200 School St
Pittsburgh, PA 15220-2718
http://www.evatontechnologies.com/
Filter Capacitor Hack
This circuit bend is easy to implement -- simply install a 0.47 uF 16V
capacitor into locations C9 and C10. Then, connect a DPDT switch as shown in
the following diagram. Now, toggling this switch shifts the center frequency of
the bandpass filter very low. In combination with the Grit, this can make some
interesting sounds. Experiment with di!erent values of capacitors, or even put
diodes or LEDs in place of C9 and C10, instead of the capacitors!
Page 17

200 School St
R5
1N4001
Edge of PCB
Pittsburgh, PA 15220-2718
http://www.evatontechnologies.com/
Virtual Ground Diode Hack
This circuit bend requires a toggle switch and a diode. Pretty much *any*
diode will work; a 1N4001 is shown in the following diagram. Even an LED will
work, to a di!erent degree.
Solder the Anode end of a
diode to the end of R5 that is
furthest from the edge of the PCB.
The Anode end is the end
opposite the stripe on the diode.
Solder a wire from the cathode
end (the striped end) to a toggle
switch.
Solder a wire from the other
terminal on the toggle switch to
the end of R5 that is nearest the
edge of the PCB.
What this circuit bend does is
to shift the voltage level of the
virtual ground much closer to
zero volts. This destabilizes the
filter, causing it to be prone to
chaotic oscillations, as well as
starves out the signals going into
the summing mixer. Try it and
see!
More Circuit Bends
Check back periodically on the Evaton website to see more circuit bending
ideas, or, please join the Evaton Technologies user forums at:
http://www.evatontechnologies.com/apps/forums
And be sure to post up some of your own circuit bending experiments!
Page 18


OSC 1
Grit
OSC 1
Power
ONONON
OFF
OFF
OFF
ON
OFF
OSC 1
FcQON
OFF
OSC 1
Volume
OSC 2
OSC 3
Filter
evaton
technologies
SDIY MDRONE
OSC 1
Power
ONONON
OFF
OFF
OFF
ON
OFF
OSC 1
Fc
Q
OSC 1
Volume
OSC 2
OSC 3
Filter
evaton
technologies
SDIY MDRONE
 Loading...