

Page 1
ICE MAKER INSTRUCTION
MANUAL
Nexberg Pty Ltd
16 Enterprise Street
CALOUNDRA QLD 4551
Tel : 07 5492 7777
Email : [email protected]
Page 1
Page 2
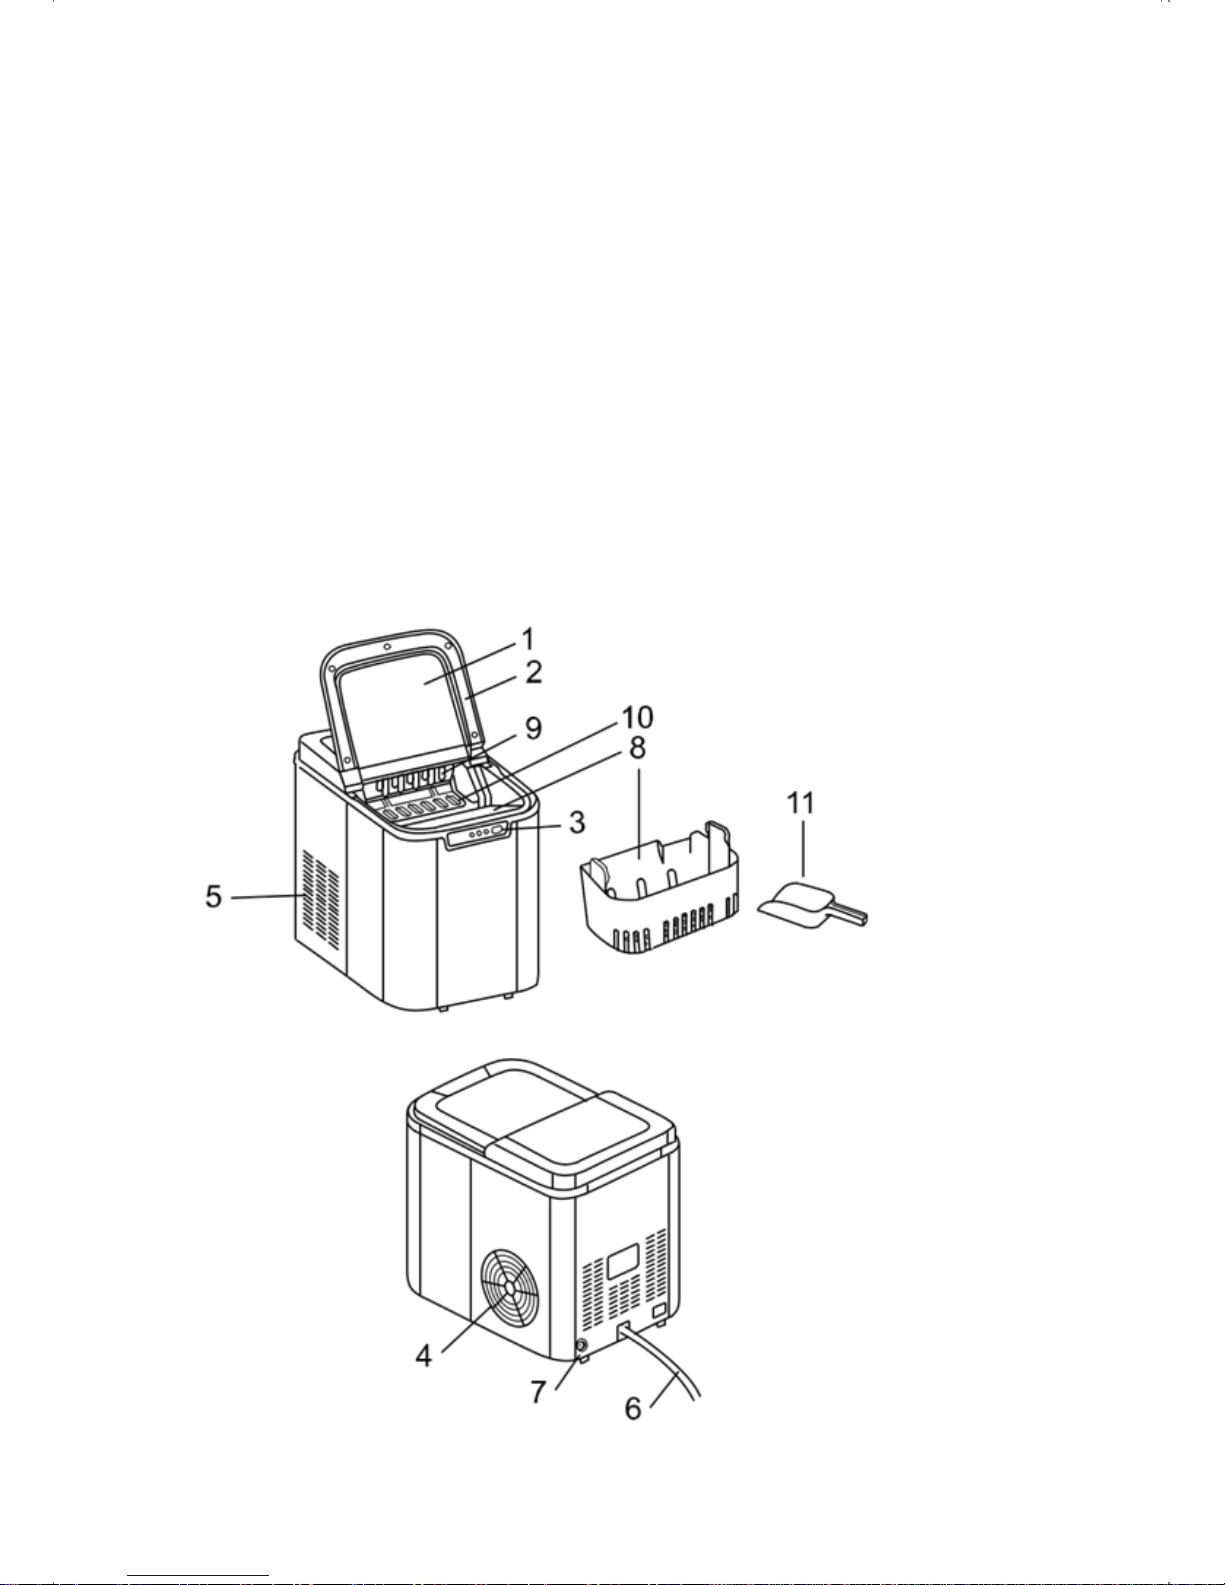
Description of parts
1 Transparent window
2 Cover
3 Operation panel
4 Air outlet
5 Air inlet
6 Power cord
7 Water outlet
8 Ice storage box
9 Refrigeration Unit
10 Ice making box
11 Shovel
Page 2
Page 3
Instruction Manual
Thank you for choosing the Evakool
Icemaker. We hope you will enjoy using
the appliance.
Symbols in these Instructions for use
Important information for your safety is specially
marked. It is essential to comply with these
instructions in order to avoid accidents and
prevent damage to the machine:
WARNING:
This warns you of dangers to your health
and indicates possible injury risks.
CAUTION:
This refers to possible hazards to the
machine or other objects.
NOTE:
This highlights tips and information.
Contents
Location of Controls……………….…………….2
Instruction Manual ............................................ 3
Technical Specifications ................................... 5
Troubleshooting ................................................ 4
Disposal . .......................................................... 5
General Notes
Read the operating instructions carefully before
putting the appliance into operation and keep
the instructions including the warranty, the
receipt and, if possible, the box with the internal
packing. If you give this device to other people,
please also pass on the operating instructions.
• The appliance is designed exclusively for
private use and for the envisaged purpose.
This appliance is not fit for commercial use.
• Do not use it outdoors. Keep it away from
sources of heat, direct sunlight, humidity
(never dip it into any liquid) and sharp edges.
Do not use the appliance with wet hands.
If the appliance is humid or wet,
unplug it immediately.
• When cleaning or putting it away, switch off
the appliance and always pull out the plug
from the socket (pull the plug itself, not the
lead) if the appliance is not being used and
remove the attached accessories.
• Do not operate the machine without
supervision. If you leave the room you
should always turn the device off.
Remove the plug from the socket.
• The device and the mains lead have
to be checked regularly for signs of
damage. If damage is found the
device must not be used.
• Use only original spare parts.
• In order to ensure your children’s safety,
please keep all packaging (plastic bags,
boxes, polystyrene etc.) out of their reach.
WARNING:
Do not allow small children to play with the
packaging as there is a danger of
suffocation!
Special safety information
for this unit
WARNING:
• Only use drinking water without additives!
Additives remain in the water circuit
and contaminate the appliance.
• Do not seal or block the ventilation
openings in the housing.
• Do not damage the refrigerant circuit.
CAUTION:
Please observe a waiting period of 2 hours
before initial operation and after moving the
appliance for the coolant to settle; otherwise
the compressor can be damaged.
• Do not store explosive substances
such as aerosol cans with a flammable
propellant in this appliance.
• Do not try to repair the appliance on your
own. Always contact an authorized
technician. To avoid the exposure to
danger, always have a faulty cable be
replaced only by the manufacturer, by our
customer service or by a qualified person
and with a cable of the same type.
Page 3
Page 4
• This appliance can be used by children
aged from 8 years and above and persons
with reduced physical, sensory or mental
capabilities or lack of experience and
knowledge if they have been given
supervision or instruction concerning use of
the appliance in a safe way and understand
the hazards involved.
• Children shall not play with the appliance.
• Cleaning and user maintenance shall not
be made by children without supervision.
• Move and store the appliance only upright.
• Do not place the appliance on or in
close proximity of heat sources, such
as ovens, heaters, etc.
• Place the appliance on a stable, level surface.
Keep a distance of at least 15 cm on all sides.
• This appliance is designed for making ice
cubes from drinking water. It is intended
for domestic use and similar applications
such as e. g. staff kitchens in shops,
offices and other workplaces.
It is not intended for the following usage:
• in agriculture;
• by guests in motels, hotels and
other accommodation;
• in bed & breakfast establishments;
• in catering and other wholesale use.
Intended Use
This appliance makes ice cubes from
drinking water.
The appliance is only intended for this use. Use
this appliance only as described in this user
manual. Do not use this appliance commercially.
All other use is not intended and can cause
damages to the appliance and even injuries.
Unpacking the device
• Unpack the device.
• Remove all packaging materials such as
foils, filling material, cable ties and
cardboard packaging.
NOTE:
The appliance may still be covered in
some residues from the manufacturing
process. Please clean the appliance
as described in chapter “Cleaning”.
Operation
CAUTION:
Please observe a waiting period of 2 hours
before initial operation and after moving the
appliance for the coolant to settle; otherwise
the compressor can be damaged.
Mains Power Connection
• Be sure the voltage of the appliance (rating
plate) corresponds with the mains voltage
before connecting to mains power supply.
• Connect the appliance to a properly
installed wall outlet.
Page 4
Page 5
Making Ice Cubes
NOTE:
For hygienic reasons do not use the ice
cubes from the first cycle.
1. Connect the mains plug to the wall
socket. Do not turn on the ice maker
within 30 minutes after moving.
2. Open the lid and remove the ice
cube container.
3. Pour water into the water tank up to the
MAX-marking. Please use drinking
water for making ice.
CAUTION:
Only use drinking water without additives!
NOTE:
• The MAX marking is inside the water
tank, around the lower edge of the ice
cube container.
• The water level must be below the ice
cube container.
• Only use water at room temperature.
4. Replace the ice cube container and
close the lid
5. Press key to start making ice.
6. The process takes around 10 minutes.
7. Keep the lid closed.
NOTE:
• Depending on water/ambient temperature
the first ice cubes come out a bit smaller
• Due to fast freezing the ice cubes can
look milky. This is the air trapped in the
water and does not influence the
quality of the ice cubes.
Main switch
Press to start / stop the ice cube production
Press to resume making ice cubes
after adding water when water tank is empty;
the indicator lamp ADD WATER turns off.
Press to eliminate errors
Indicator Lamp ICE FULL
• The lamp indicates the ice storage box is full.
Remove all the ice cubes from the box.
• The low temperature protection (ambient
temperature is lower than 5ºC)
Indicator Lamp ADD WATER
The Indicator lamp turns on if the water tank is
nearly empty .The unit turns off automatically.
1. Open the lid and remove the ice cube box
2. Pour water into the water tank up to the
MAX-marking. Please use drinking
water for making ice.
3. Replace the ice cube container and close
the lid. Press key to start making ice.
Indicator Lamp RUNNING
• The indicator lamp starts flashing as soon
as unit was plugged into the wall socket.
• During operation indicator lamp
illuminates continuously.
CAUTION:
Wait at least 3 minutes before turning the
appliance on again, otherwise the
compressor can be damaged.
Cleaning
WARNING:
Always disconnect from mains power
supply before cleaning.
Stop Ice Cube Production
Press key to stop Ice cube production
NOTE:
Before finally stopping the appliance
automatically empties the water tank and
dissolves already produced ice cubes.
CAUTION:
• Do not use harsh or abrasive
cleaning agents.
• Do not use chemicals, acids, petrol
or oil products.
• Do not submerge the appliance in water.
Page 4
Page 6
NOTE:
• For hygienic reasons exchange the
water in the tank after 24 hours.
• To avoid fungi and bacteria leave
the lid open after use.
Ice cube container
Remove the ice cube container and clean it with
a mild detergent under running warm water.
Casing and Interior
• Clean casing and interior with a damp cloth
• Use a diluted solution of vinegar and water
Drain Residual water
Drain the residual water if the appliance is
not in use for a longer period of time.
Rest the appliance on a table edge. Hold a
bowl under residual water drain valve.
• Turn the residual water drain valve anticlock-wise to drain off the rest of water.
• Close the residual water drain valve after
the residual water has been drained.
Storage
• We recommend that you keep the
appliance in the original packing if you
do not intend using it for long periods.
• Always keep the appliance out of the reach
of children in a dry, well-ventilated place.
Troubleshooting
Problem
Possible Cause
Solution
WORK indicator light is
Power Source is not switched on.
1.
Check the power supply matches
not illuminating.
2.
Check the power cord is connected
correctly
3. Internal components are damaged.
Contact Evakool.
ICE FULL indicator
1.
Ice tray is full.
1.
Remove the ice cubes.
light is illuminating.
2.
Low-temperature protection
2.
Move the Ice maker to a warmer
(temperature is lower than 5ºC).
place, where the ambient
temperature is higher than 5ºC.
ADD WATER indicator
Water Shortage
1.
Add drinking water into Ice maker,
light is illuminating.
and press
Button.
2.
Water supply system is damaged.
Contact Evakool.
ICE FULL and ADD
1.
Ice Making box is inserted
1.
Check whether any foreign body
WATER indicator lights
in wrong position.
stuck the Ice making box.
are both illuminating.
2.
Internal components are damaged.
Ice making performance
Contact Evakool.
is not good. Abnormal
noise.
1.
Heat elimination is bad.
1.
Clean the dust on the cooling fan
2.
Water temperature is too high.
and air inlet/outlet part.
3.
Ambient temperature is too high.
2.
Fill normal temperature water.
4.
Refrigerant leaks.
3.
Do not place the appliance in high
Fan or pump is damaged.
temperature conditions.
4.
Refrigerating system is damaged.
Contact Evakool
.
Page 5
Page 7

Noise emission
The emission value is < 70 dB(A)
Technical Specifications
Model: .........................................
EK IceMaker
Voltage supply:....................
220-240V~ 50/60Hz
Power input:.................................................
0.9A
Ice cube production:.................
10-15 kg / 24 hrs
Water tank volume:..................
approx. 2.2 Litres
Coolant:..............................................
R134a/46g
Blowing gas:................................................
C5H
10
Protection class:.................................................
I
Climate class:.....................................
SN/N/ST/T
Net weight: ..............................................
10.5 kg
The right to make technical and design
modifications in the course of continuous
product development remains reserved.
This device complies with all current CE
directives, such as electromagnetic compatibility
and low voltage directive and is manufactured
according to the latest safety regulations.
Disposal
Meaning of the “Wheelie Bin” Symbol
Take care of our environment, do not dispose of
electrical appliances via the household waste.
Dispose of obsolete or defective electrical
appliances via municipal collection points.
Please help to avoid potential
environmental and health impacts
through improper waste disposal.
You contribute to recycling and other
forms of utilization of old electric and
electronic appliances.
Your municipality provides you with
information about collecting points.
Page 6
Page 8

 Loading...