

Page 1
Open this leaflet for calibration/testing/maintenance
instructions.
Changing Batteries
1. Open battery
compartment
lid (with
attached
lanyard loop).
2. Remove old
batteries;
replace
with fresh
ones. Note
polarity as
shown in battery compartment. See Diagram 1.
3. Recalibrate after battery change.
INC
+
+
DEC
Diagram 1
Warranty
Eutech Instruments warrants its meter free from
manufacturing defects for 2 years and electrode
module for 6 months. If r epair, adjustment or
replacement is necessary and has not been the result
of abuse or misuse within the time period, please
return the tester – freight prepaid – and correction
will be made without charge. Out of warranty products
will be repaired on a charge basis.
Return Of Items
Authorization must be obtained from Eutech’s
distributor before returning items for any reason.
When applying for authorization, please include
information regarding the reason the item(s) are to
be returned.
Note: We reserve the right to make improvements in
design, construction and appearance of products
without notice. Prices are subject to change without
notice.
• Waterproof & Floats
• Replaceable Electrode
• Auto-off
• Automatic Temperature
Compensation (ATC)
Page 2
Waterproof ECScan High Instructions
Before You Begin
Remove electrode cap. Soak electrode for a few
minutes in alcohol to remove oils.
Calibration
Tester is factory calibrated. However, to ensure
accuracy, calibrate conductivity on a regular basis.
Select a calibration standard appropriate for the
ECScan High tester (between 2.00 mS and
19.90 mS). It is best to select a standard close
to the test solution value.
1. Open battery compar tment lid (end with
lanyard loop).
2. Orientate the battery compar tment as
shown in Diagram 1.
3. Rinse electrode in deionized water, then
rinse it in calibration standard, then dip it
into a container of calibration standard.
4. Switch unit on (ON/OFF key). Wait
several minutes for display to stabilize.
5. Press the INC or DEC key to adjust
reading to match the calibration
standard value.
6. After 3 seconds without a key press,
the display flashes 3 times, then
shows ‘ENT’. The tester accepts
calibration value; returns to
measurement mode.
7. Replace battery cap.
Conductivity Testing
1. Remove electrode cap. Switch unit on (ON/OFF
key).
2. Dip electrode into test solution. Make sure sensor
is fully covered.
3. Wait for reading to stabilize (Automatic
Temperature Compensation corrects for
temperature changes). Note reading.
4. Press ON/OFF to turn off tester. Replace electrode
cap. Note: Tester automatically shuts off after
8.5 minutes of non-use.
HOLD Function
Press HOLD key to freeze display. Press HOLD again
to release.
Tester Maintenance
• To improve performance, clean the electrode
by rinsing them in alcohol for 10 to 15 minutes.
• Replace all batteries if low battery indicator
appears, or if readings are faint or unstable.
• If you experience drift, periodically let electrode
fully dry.
When you need a new electrode, see “Electrode
Replacement” on insert in back of box.
Self-Diagnostic MessagesSelf-Diagnostic Messages
Self-Diagnostic Messages
Self-Diagnostic MessagesSelf-Diagnostic Messages
bAt Weak batteries–replace with fresh ones specified
by manufacturer .
Err Wrong keypress.
Or, Ur Over range/Under range signal, or electrode
is not in contact with solution, or electrode is failing.
---- Calibration mode activated but not performed.
68X247755 11/00 Rev 0
Page 3

Open this leaflet for calibration/testing/maintenance
instructions.
Changing Batteries
1. Open battery
compartment
lid (with
attached
lanyard loop).
2. Remove old
batteries;
replace with
fresh ones.
Note polarity
as shown in
battery compartment. See Diagram 1.
3. Recalibrate after battery change.
INC
+
+
DEC
Diagram 1
Warranty
Eutech Instruments warrants its meter free from
manufacturing defects for 2 years and electrode
module for 6 months. If repair, adjustment or
replacement is necessary and has not been the result
of abuse or misuse within the time period, please
return the tester – freight prepaid – and correction
will be made without charge. Out of warranty products
will be repaired on a charge basis.
Return Of Items
Authorization must be obtained from Eutech’s
distributor before returning items for any reason.
When applying for authorization, please include
information regarding the reason the item(s) are to
be returned.
Note: We reserve the right to make improvements in
design, construction and appearance of products
without notice. Prices are subject to change without
notice.
• Waterproof & Floats
• Replaceable Electrode
• Auto-off
• Automatic Temperature
Compensation (ATC)
Page 4

Waterproof ECScan Low Instructions
Before You Begin
Remove electrode cap. Soak electrode for a few
minutes in alcohol to remove oils.
Calibration
Tester is factory calibrated. However, to ensure
accuracy, calibrate conductivity on a regular basis.
Select a calibration standard appropriate for the
ECScan Low tester (between 200 µS and
1990 µS). It is best to select a standard close
to the test solution value.
1. Open battery compar tment lid (end with
lanyard loop).
2. Orientate the battery compar tment as
shown in Diagram 1.
3. Rinse electrode in deionized water, then
rinse it in calibration standard, then dip it
into a container of calibration standard.
4. Switch unit on (ON/OFF key). Wait
several minutes for display to stabilize.
5. Press the INC or DEC key to adjust
reading to match the calibration
standard value.
6. After 3 seconds without a key
press, the display flashes 3 times,
then shows ‘ENT’. The tester accepts
calibration value; returns to
measurement mode.
7. Replace battery cap.
Conductivity Testing
1. Remove electrode cap. Switch unit on (ON/OFF
key).
2. Dip electrode into test solution. Make sure
sensor is fully covered.
3. Wait for reading to stabilize (Automatic
Temperature Compensation corrects for
temperature changes). Note reading.
4. Press ON/OFF to turn off tester. Replace
electrode cap. Note: Tester automatically
shuts off after 8.5 minutes of non-use.
HOLD Function
Press HOLD key to freeze display. Press HOLD again
to release.
Tester Maintenance
••
• To improve performance, clean the electrode
••
by rinsing them in alcohol for 10 to 15 minutes.
• Replace all batteries if low battery indicator
appears, or if readings are faint or unstable.
• If you experience drift, periodically let electrode
fully dry.
When you need a new electrode, see “Electrode
Replacement” on insert in back of box.
Self-Diagnostic MessagesSelf-Diagnostic Messages
Self-Diagnostic Messages
Self-Diagnostic MessagesSelf-Diagnostic Messages
bAt Weak batteries–replace with fresh ones
specified by manufacturer.
Err Wrong keypress.
Or, Ur Over range/Under range signal, or electrode
is not in contact with solution, or electrode is failing.
---- Calibration mode activated but not performed.
68X247754 11/00 Rev 0
Page 5
Twist-off
Battery
Compartment
Lanyard
connection
Replaceable
Sensor
• Push-button calibration
• Fast, stable, repeatable readings
• Available through authorized distributors
SPECIFICATIONS
Tester TDScan TDScan ECScan ECScan
Range 0 to 0 to 0 to 0 to
Resolution 10 0.10 10 0.10
Accuracy ±1% Full Scale
TDS factor 0.4 to 1.0 selectable Calibration 200 to 2 .00 to 200 to 2.00 to
Standard 1990 10.00 1990 19.90
Range ppm ppt µS/cm mS/cm
Calibration 1 point (calibration range is ±30%
ATC 0 to 50 °C
Temp 2% per °C
Coefficient
Operating 0 to 50 °C
Temp
Power Four X 1.5V
Battery (Type: A76, LR 44 or V136A);
Dimension; Tester: 16.5 cm x 3.8 cm; 90 g
Weight Boxed: 22 cm x6 cm x 5 cm; 170 g
Low High Low High
1990 10.00 1990 19.90
ppm ppt µS/cm mS/cm
ppm ppt µS/cm mS/cm
of factory default parameter)
> 140 hrs continuous use
Manufactured By:
Eutech Instruments Pte Ltd
Blk 55, Ayer Rajah Crescent,
#04-14/24, Singapore 139949
Tel: (65)778 6876 Fax: (65)773 0836
E-Mail: marketing@eutechinst.com
Web-Site: http://www.eutechinst.com
Made in Singapore
68X247828 11/00 Rev 0
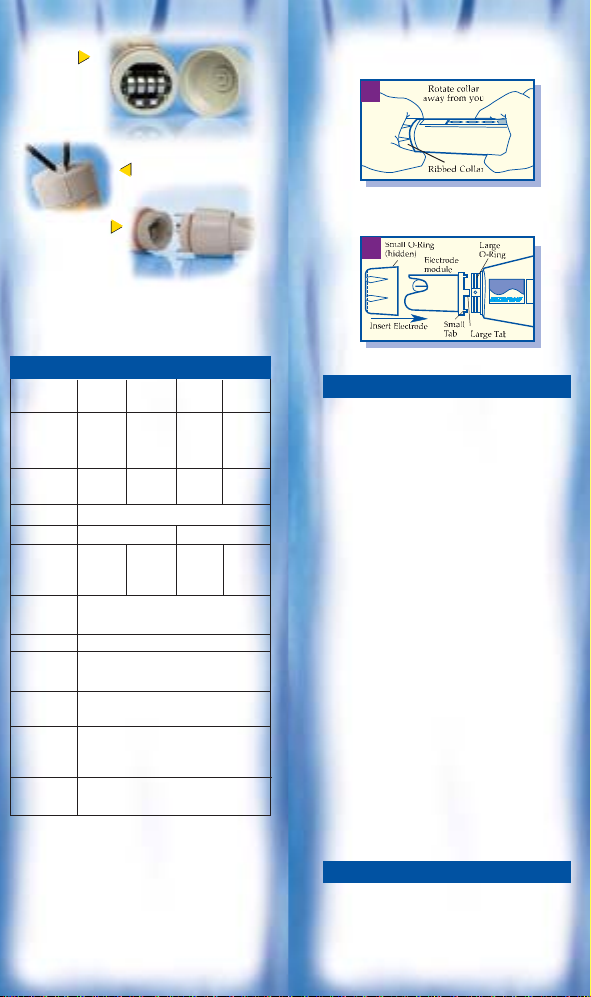
REMOVE THE OLD ELECTRODE
(Picture A)
A
(Picture B)
REPLACE THE ELECTRODE
B
Electrode Replacement
You can replace the electrode module
at the fraction of the cost of a new
tester. When the tester fails to calibrate
or gives fluctuating readings in
calibration standards, you need to
change the electrode.
1. With dry hands, grip the ribbed tester
collar with electrode facing you. Twist
the collar counter clockwise (see picture
A). Save the ribbed tester collar and
O-ring for later use.
2. Pull the old electrode module away from
the tester.
3. Align the four tabs on the new module
so that they match the four slots on the
tester (see picture B).
4. Gently push the module onto the slots
to sit it in position. Push the smaller
O-ring fully onto the new electrode
module. Push the collar over the module
and thread it into place by firmly twisting
clockwise.
Applications
Water quality testing • water and
Wastewater treatment • hydroponics
• pools • boilers • factories • ecology
studies • and more!
 Loading...