

EUTECH INSTRUMENTS ALPHA PH 500 PHORP 2-WIRE TRANSMITTER (REVISION 1), pH 500 LCD Transmitter Instruction Manual
Instruction Manual
pH 500 LCD Transmitter
2-wire pH/ORP Transmitter with Display
Tec hnolo
gyM
adeEa
sy...
68X216829
03/02 version 1

Preface
This manual serves to explain the use of the pH 500 transmitter. It functions in two
ways, firstly as a step by step guide to help you to operate the transmitter.
Secondly, it serves as a handy reference guide. It is written to cover as many
anticipated applications of the transmitter as possible. If there are doubts in the use
of the transmitter, please do not hesitate to contact the nearest Authorized
Distributor.
Eutech Instruments/ Oakton Instruments will not accept any responsibility for
damage or malfunction to the transmitter caused by improper use of the instrument.
Remember to fill in the guarantee card and mail it back to your authorized
distributor or Eutech Instruments Pte Ltd.
The information presented in this manual is subject to change without notice as
improvements are made, and does not represent a commitment on the part of
Eutech Instruments Pte Ltd/ Oakton Instruments.
Copyright © 2002 Updated on Mar 2002. All rights reserved.
Eutech Instruments Pte Ltd/ Oakton Instruments

TABLE OF CONTENTS
1 INTRODUCTION 1
2 PREPARATION 2
2.1 Power Supply Requirements 2
2.2 Connecting the Electrode and Temperature Probe 3
3 INSTALLATION 4
3.1 Wall Mount 4
3.2 Panel Mount 5
4 DISPLAY AND KEYPAD FUNCTIONS 6
4.1 Display 6
4.2 Keypad 7
5 CALIBRATION 8
5.1 Preparing the Transmitter for Calibration 8
5.2 pH Calibration 9
5.3 Relative mV Calibration 10
5.4 Temperature Calibration 10
6 ADVANCED SETUP FUNCTIONS 11
6.1 Offset Setting (Unavailable in ORP mode) 11
6.2 Output Range Setting 12
6.3 Temperature Compensation Setting (Unavailable in ORP mode) 13
6.4 HOLD Current Setting 15
6.5 Out-of-Range Current Setting 15
6.6 Configuration 16
7 PROBE CARE AND MAINTENANCE 17
8 TROUBLE SHOOTING GUIDE 19
9 SPECIFICATIONS 20
10 TECHNICAL DIMENSIONS 21
11 ACCESSORIES 22
12 WARRANTY 24
13 RETURN OF ITEMS 24
1
1 INTRODUCTION
Thank you for selecting a Eutech Instruments/ Oakton Instruments transmitter. The
pH 500 pH/ORP Transmitter is a microprocessor-based instrument that is designed
to be sturdy and user-friendly. It is capable of measuring pH, mV and temperature.
This transmitter has many user-friendly features – all of which are completely
accessible through the water-resistant membrane keypad. Your transmitter includes
an instruction manual and a warranty card.
Please read this manual thoroughly before operating your transmitter.
MEAS
癈
READY
.
.
A
TC
pH
2
Preparation
Remove screws from the four corners at the back of the Transmitter, and remove
back cover.
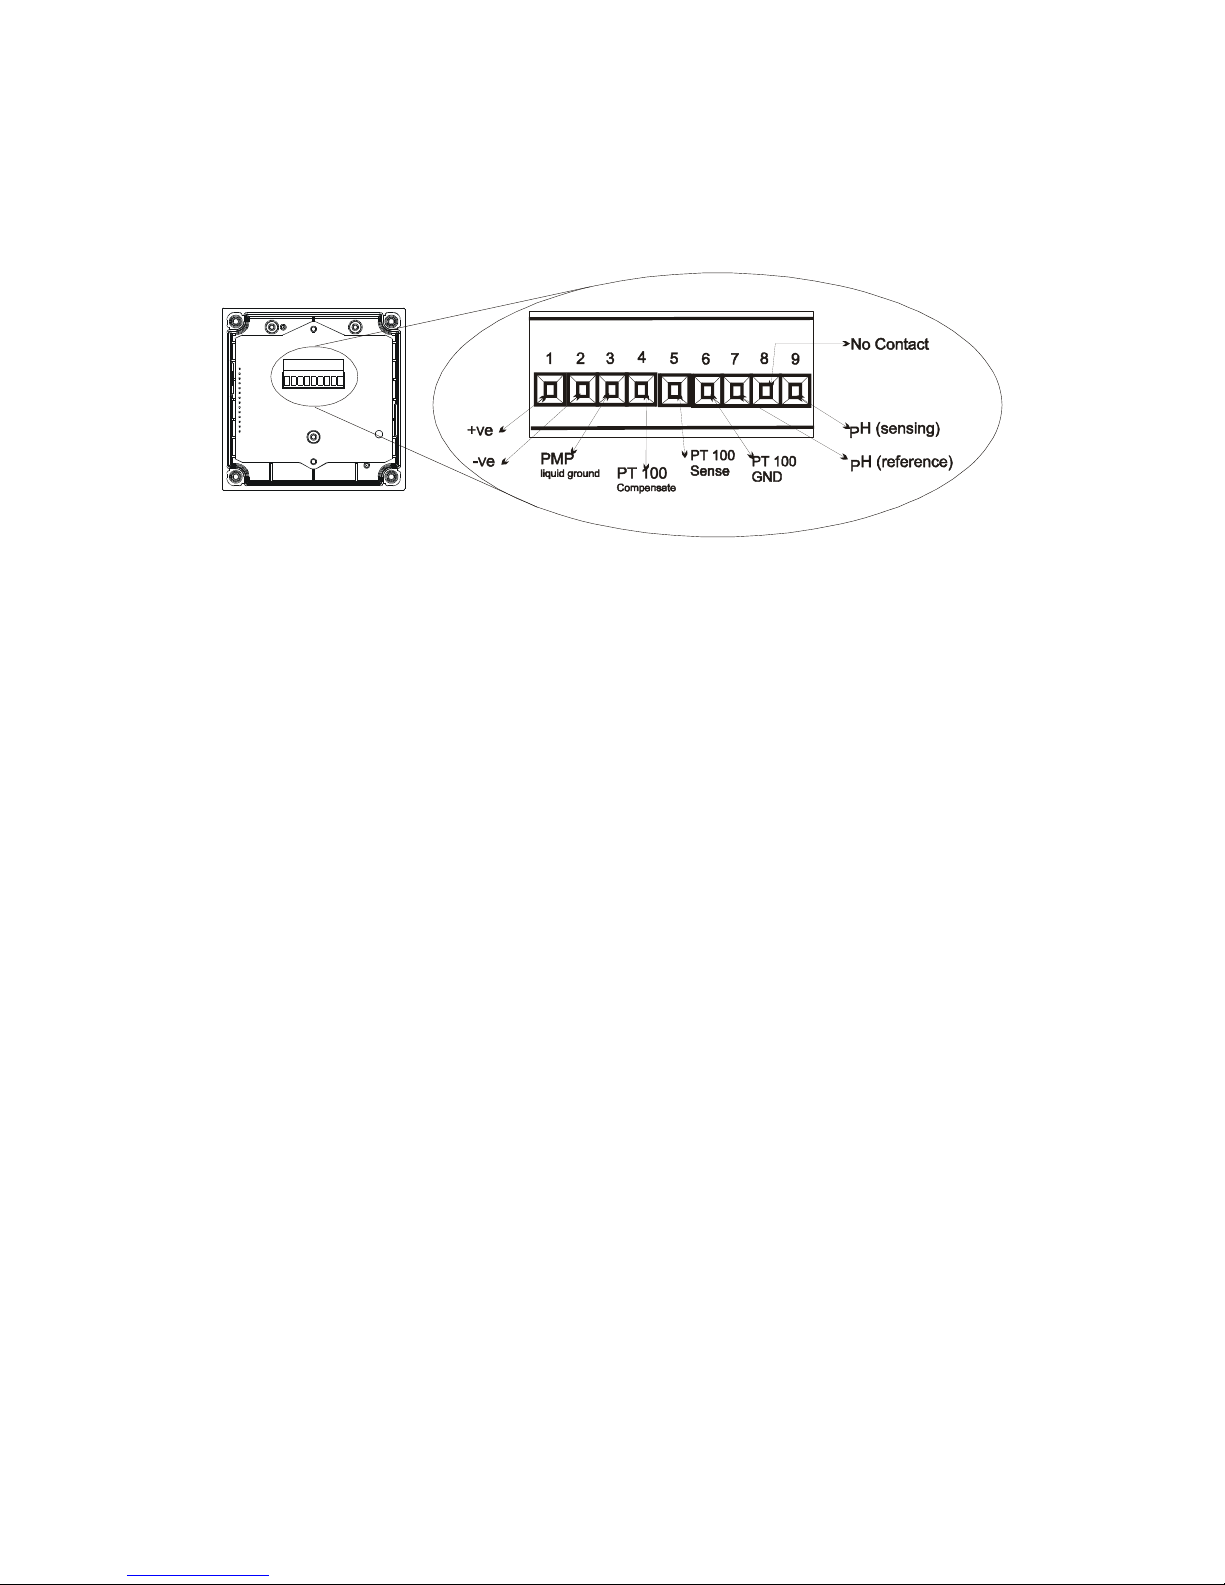
Connectors should be exposed as follows:
All wiring is done on the detachable 9-pin connector. Using a suitable screwdriver,
loosen screws from top of connector.
When inserting the wires, always hold connector with top screws facing up.
1.1 Power Supply Requirements
This transmitter requires a 12 to 24V DC power supply. Other Transmitters and/or a
chart recorder may be connected in series.
Insert positive loop wire from power supply to pin 1, tighten screw.
Insert negative loop wire to pin 2, tighten screw. This wire may be linked to the
positive terminal of next transmitter (pin 1) / Chart recorder or to negative terminal
of power supply
.

3
1.2 Connecting the Electrode and Temperature Probe
To connect the pH or ORP electrode:
The Eutech Instruments pH transmitter uses any
standard pH or ORP.
Remove BNC connector from cable. Two wires
will be exposed:
Strip insulation, just enough to expose bare wires.
IMPORTANT: For pH/ORP sensing cable, remember to strip the inner black
layer (screen) and expose the clear plastic sheath.
Insert pH sensing cable into pin 9 of connector. Tighten screw.
Insert pH reference cable into pin 7 of connector. Tighten screw.
To connect temperature probe:
For Automatic Temperature Compensation (ATC), this transmitter requires a
temperature probe, Pt 100, 3-wire.
3-wire probe:
Insert brown wire to pin 4 of connector. Tighten screw.
Insert red wire to pin 5 of connector. Tighten screw.
Insert green wire to pin 6 of connector. Tighten screw.
2-wire probe:
Take a small length of wire and short pins 4 and 5 of connector. Insert red wire into
pin 5 of connector and tighten screws.
Insert green wire to pin 6 of connector. Tighten screw.
IMPORTANT: Temperature probe should always be together with pH probe,
even during calibration. Make sure no bare wires are exposed and all screws
are tightened for proper contact.
To connect Potential Matching Pin (Liquid electrical interferences):
Connect the additional wire from the electrode to pin 3. Transmitter must be
configured to ‘Symmetrical mode of operation’ - Please refer to ‘Advanced Setup
Functions’, Section 6.6.2 - ‘Selecting Asymmetrical or Symmetrical Mode of
Operation.
Insulation
pH reference
Clear sheath
pH sensing
Screen
4
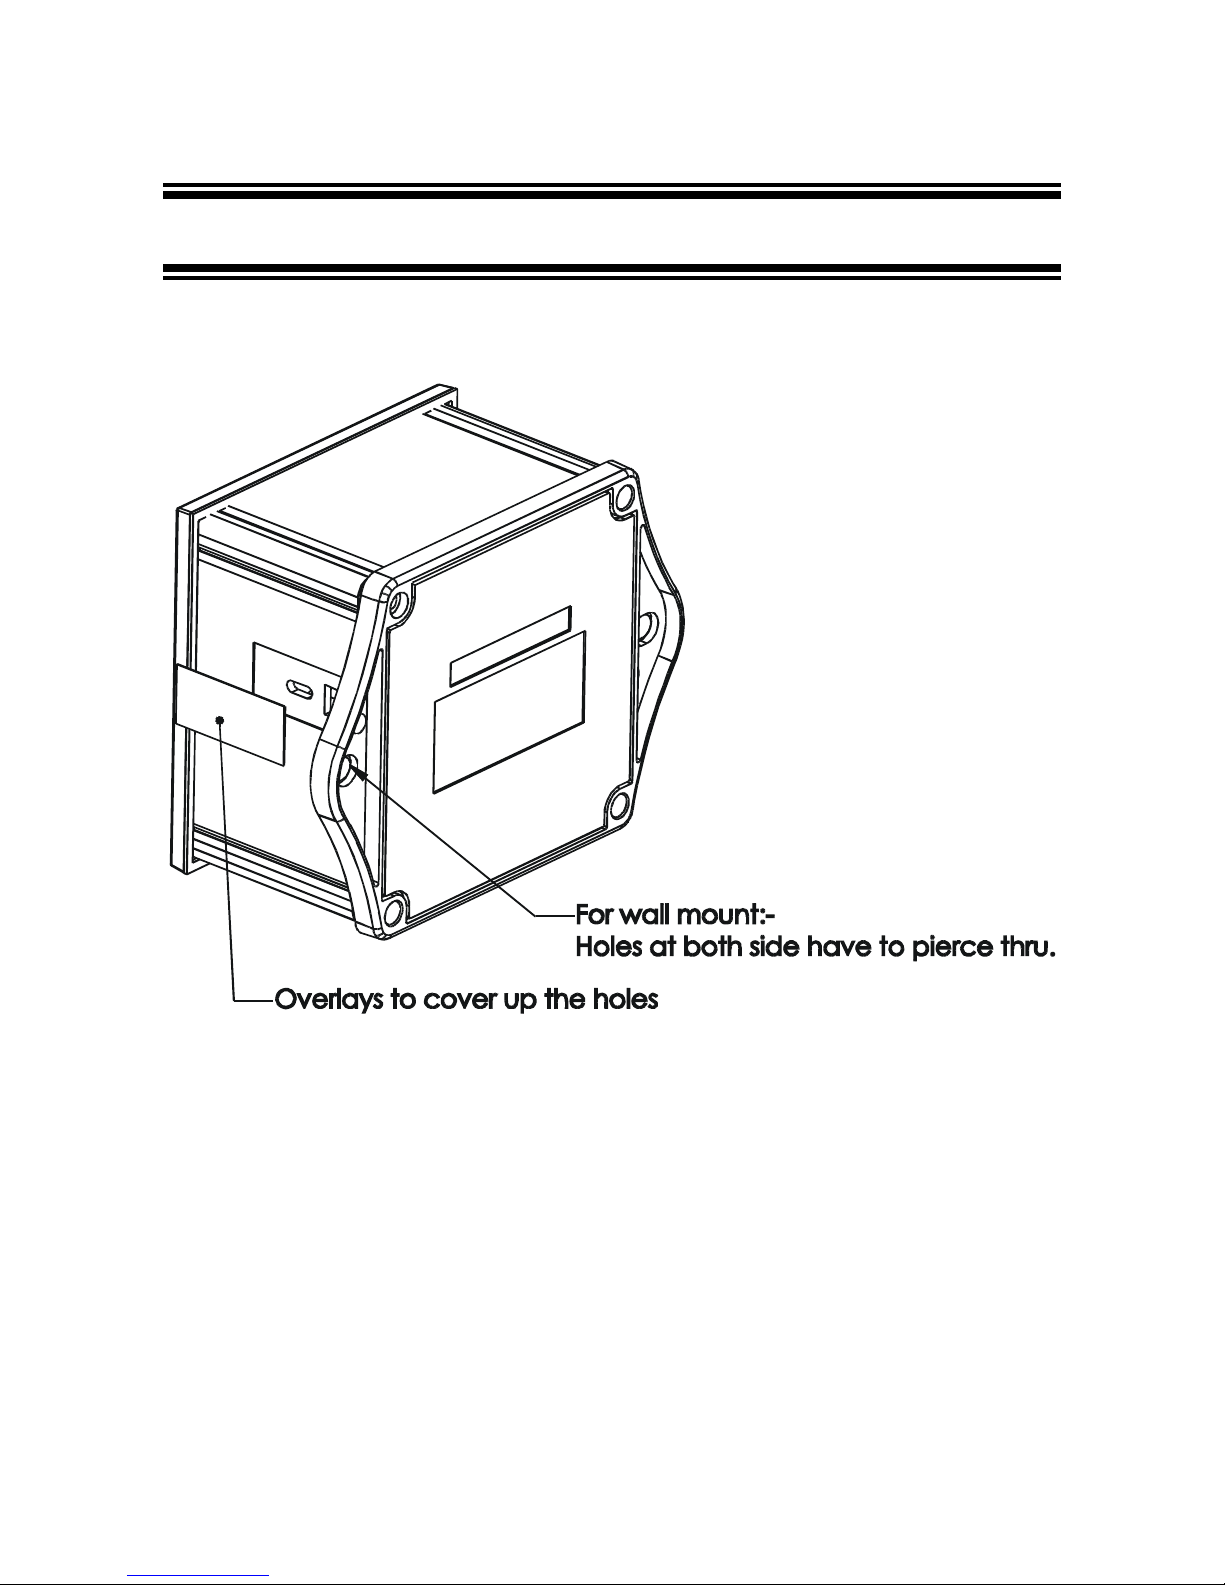
2 INSTALLATION
2.1 Wall Mount
5
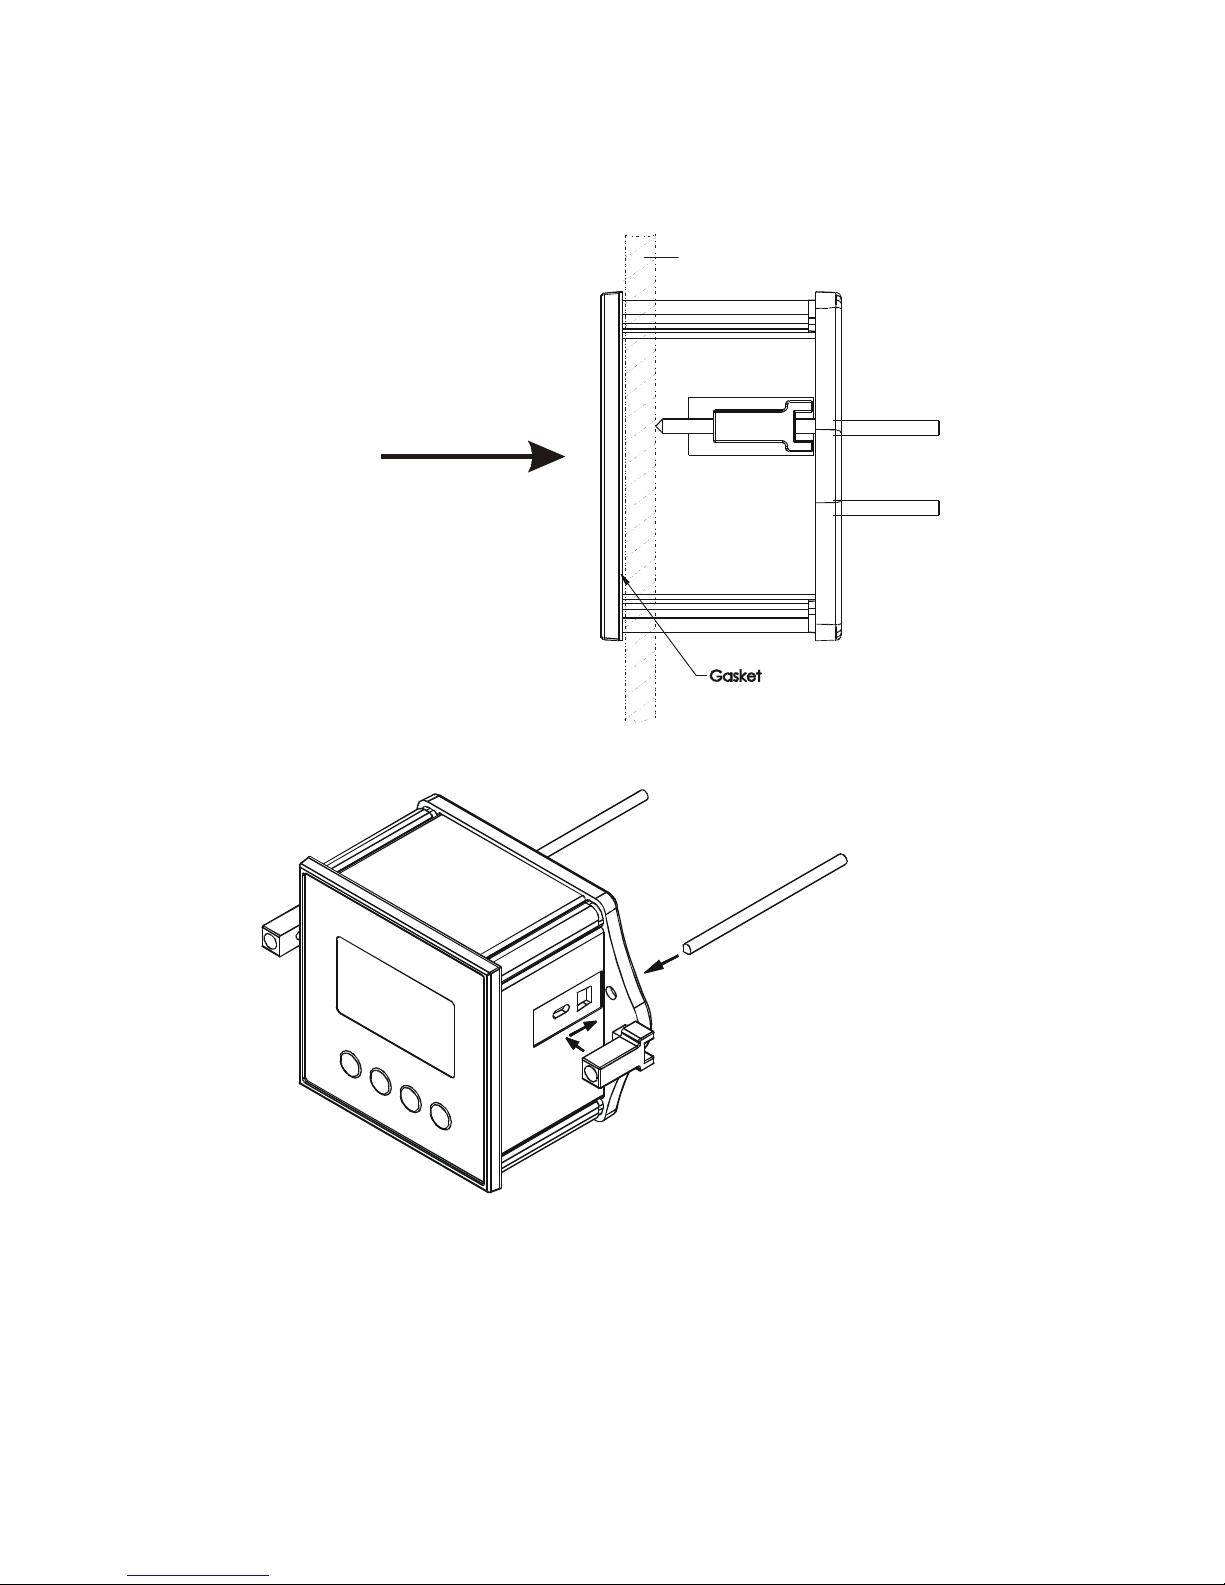
2.2 Panel Mount
1. Prepare panel cut-out of
92.0 mm by 92.0 mm
2. Remove back cover of
transmitter and slide it
through panel cut-out
Panel (side)
3. Attach lugs to either
side of transmitter
4. Thread rods through
lugs until transmitter
is held in place against
panel
6
3 DISPLAY AND KEYPAD FUNCTIONS
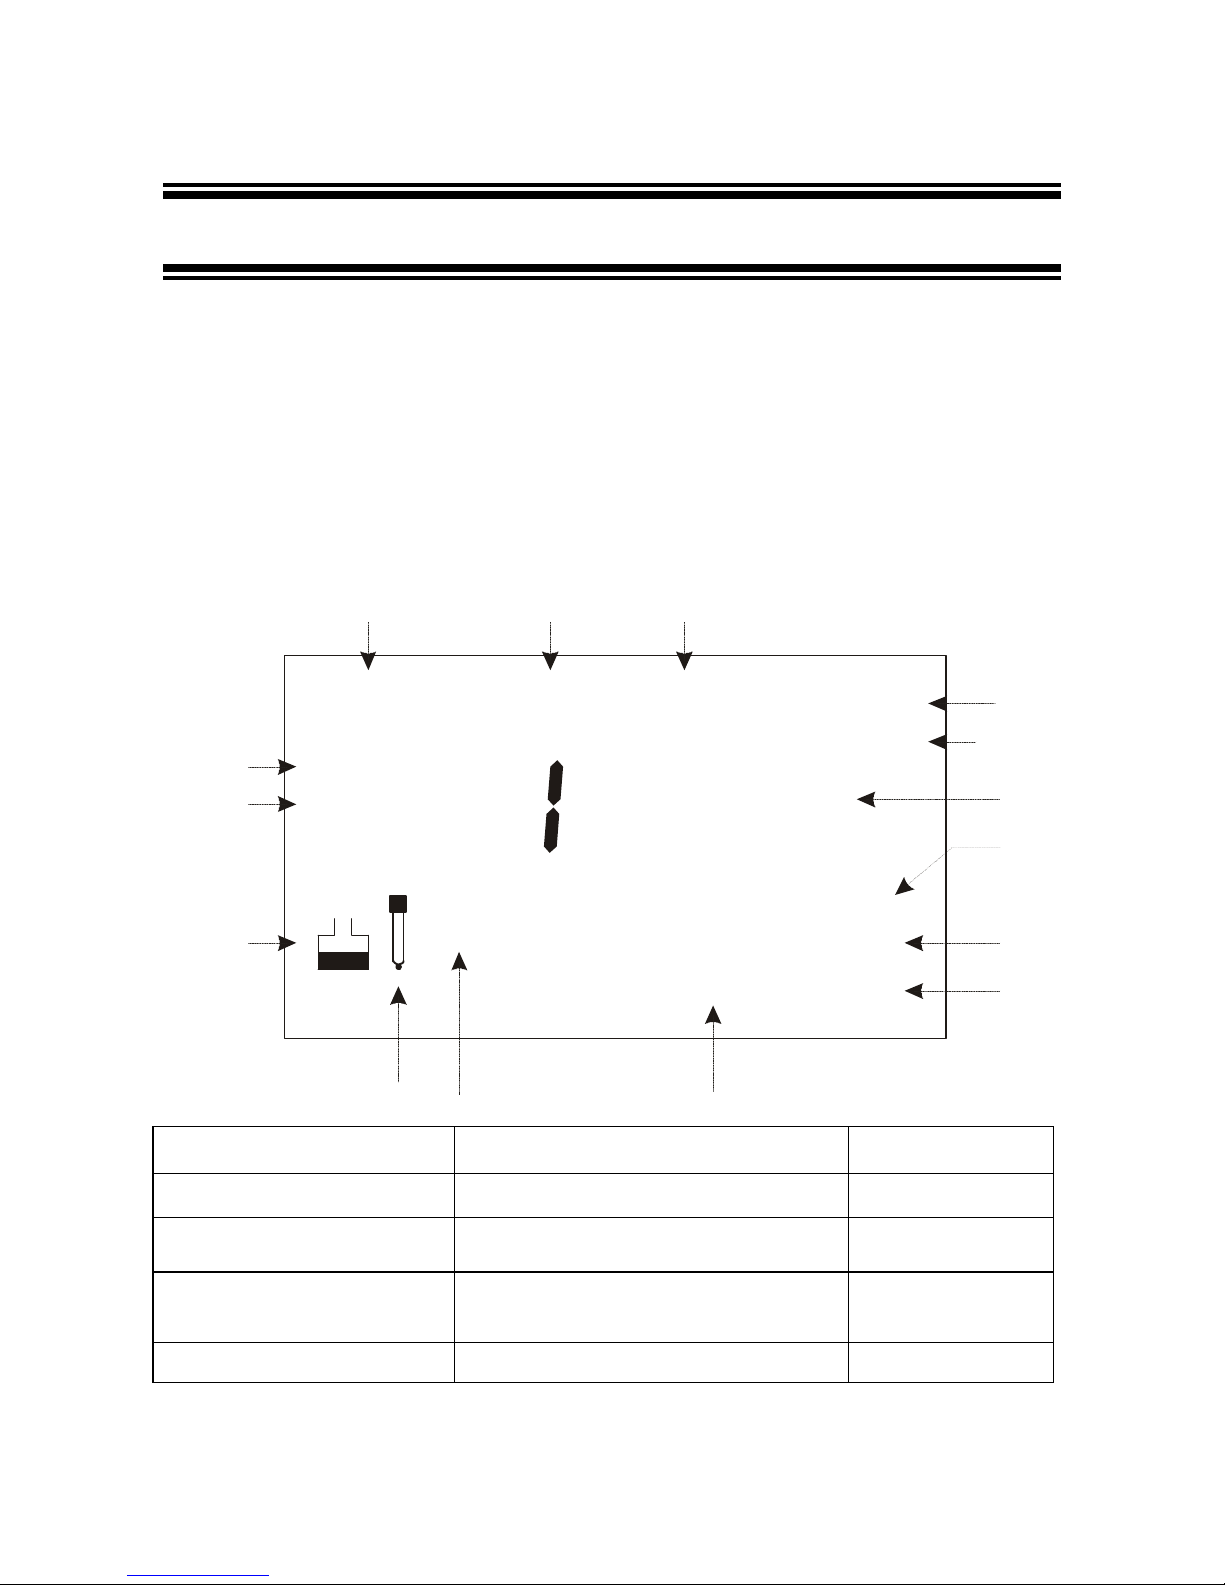
3.1 Display
The LCD has a primary and secondary display.
• The primary display shows the measured pH, mV or Relative mV
value.
• The secondary display shows the measured temperature. In
Calibration mode, pH buffer values are displayed here; while
measured mV values are displayed in the ORP Calibration mode.
SETUP MEAS CAL
HOLD
pH
癈
READY
-.8.8.8
-1.8.8.8
ATC
pH
mV
ERR
123
4
5
6
7
8
9
10
1112
13
14
15
1. SETup mode indicator
6. Primary display 11. ERRor indicator
2. MEASurement mode indicator
7. Temperature indicator
12. Probe indicator
3. CALibration indicator 8. pH buffer selection indicator
13. Buffer indicator
4. mV indicator
9. Automatic Temperature Compensation
indicator
14. HOLD indicator
5. pH indicator
10. Secondary display 15. READY indicator
 Loading...