

Page 1

EcoScan CON 5
Conductivity Handheld Meter
EcoScan TDS 5
TDS Handheld Meter
Instruction Manual
68X243602 ver 2.0 08/99 Technology Made Easy…
Page 2

EcoScan CON 5 / T DS 5
Table of Contents
1. INTRODUCTION 2
1.1 Introducing the EcoScan Series 2
2. GETTING STARTED 3
2.1 Description of Keypad Functions 3
2.2 Description of LCD Annunciators 3
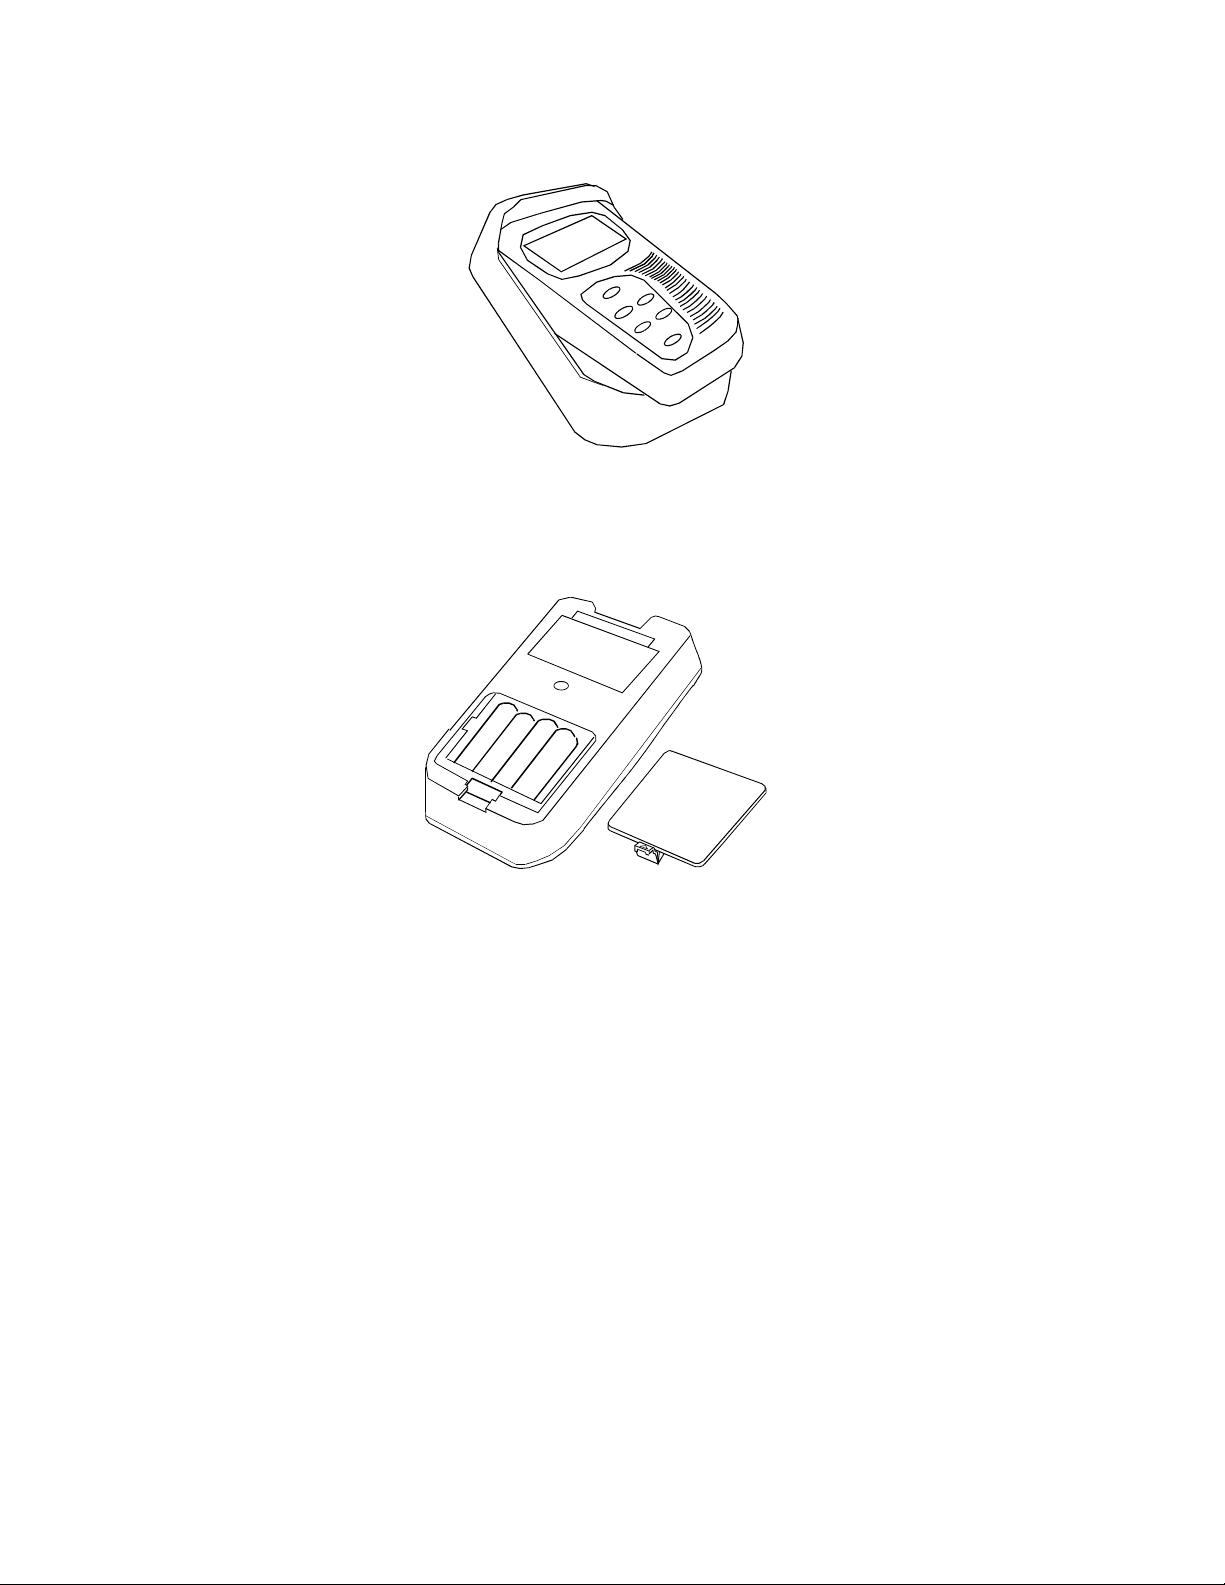
2.3 Inserting & Removing the Rubber Boot 3
2.4 Inserting New Batteries 4
2.5 Battery Replacement 5
2.6 Connecting the Electrode and Temperature Sensor 5
2.7 Switching the Meter On 6
2.8 Setting the Conductivity-to-TDS Conversion Factor (EcoScan
TDS 5 Only) 7
3. CALIBRATION 8
3.1 Conductivity Calibration (EcoScan CON 5) 8
3.2 TDS Calibration (EcoScan TDS 5) 9
3.3 Temperature Calibration 10
3.3.1 With Temperature probe For Preselected Curve 10
3.3.2 Without Temperature probe (no ATC) 12
4. MEASUREMENT 13
4.1 Taking Measurement 13
4.2 Holding a Reading 13
4.3 Releasing a Held Reading 13
5. PROBE CARE AND MAINTENANCE 14
6. TROUBLESHOOTING 14
7. SPECIFICATIONS 15
8. ACCESSORIES 16
Page 3

EcoScan CON 5 / T DS 5
1. INTRODUCTION
1.1 Introducing the EcoScan Series
Thank you for purchasing Eut ech Instruments’ EcoSc an Conductivit y and Tot al
Dissolved Solids (TDS) meter series. These economy microprocessor-based
handheld meters deliver up to ±1% full-scale accuracy. It has a large custom
LCD (Liquid Crystal Display) for clear and easy reading.
o
EcoScan CON 5 measures Conductivity (uS/mS) and Temperature (
the EcoScan TDS 5 measures Total Dissolved Solids (TDS) and Temperature
o
C). These sturdy meters measure up to 3 different ranges with auto-ranging
(
capability that switches to appropriate measuring range automatically.
The instruction manual is organised for quick reference with step-by-step
procedures that give you thorough review of the various features and meter
operations.
Included with your meter are a 2 stainless steel pin Conduct ivity electrode with
built-in temperature sensor (for ATC), a rubber boot, 4 alkaline “AAA” batteries,
instruction manual and warranty card. To order other accessories and buffer
standard solutions, please refer to the Section on Accessories for more
information.
C) while
2
Page 4

EcoScan CON 5 / T DS 5
2. GETTING STARTED
2.1 Description of Keypad Functions
The EcoScan CON 5/TDS 5 meter has 6 keys on its splash-proof keypad.
These comprise ON/OFF, HOLD/ENTER, CAL, MODE, ∆ and ∇ keys.
ON/OFF: Powers the meter on and turns it off. Meter directly enters
measurement mode when you switch it on.
MODE: Selects measurement mode for Conductivity/TDS or Temperature,
CAL: Allows calibration mode for Conductivity/TDS and Temperature, or to
abort calibration without confirming any set value.
HOLD: Freezes the measured reading for easy viewing.
ENTER: Confirms calibration value.
∆∆∆∆ (UP) / ∇∇∇∇ (DOWN): Scrolls up and down to the values during calibration.
2.2 Description of LCD Annunciators
The meter has a large custom LCD that consists of 3½-digit segments and
operation annunciators for uS/mS or ppm/ppt and
annunciators include “HO” (when the HOLD function is activated) and “LO” (low
battery condition).
o
C (Temperature). Other
HO
-1.8.8.8
LO
o
C
umS
pptm
2.3 Inserting & Removing the Rubber Boot
1. To remove meter from rubber boot, push out from the bottom edges of
meter until it is completely out of boot. Ensure that the cables of
Conductivity electrode or temperature probe are not connected.
3
Page 5
EcoScan CON 5 / T DS 5
2. To insert meter into rubber boot, slide in from the top of meter before
pushing the bottom edges of meter down to set it into position. Lift up the
stand at the back of meter for bench top applications if necessary.
2.4 Inserting New Batteries
The battery compartment is found at the back of instrument. To open the battery
compartment, push in the direction of arrow and lift up the cover. Note the
polarity of battery before inserting into position. After replacement, place cover
back and press down until it locks tight.
4
Page 6
EcoScan CON 5 / T DS 5
2.5 Battery Replacement
A “LO” annunciator in the LCD alerts you when battery power is running low.
Replace with the same type as recommended by the manufacturer.
1420
LO
Caution: Power off the meter when changing battery.
uS
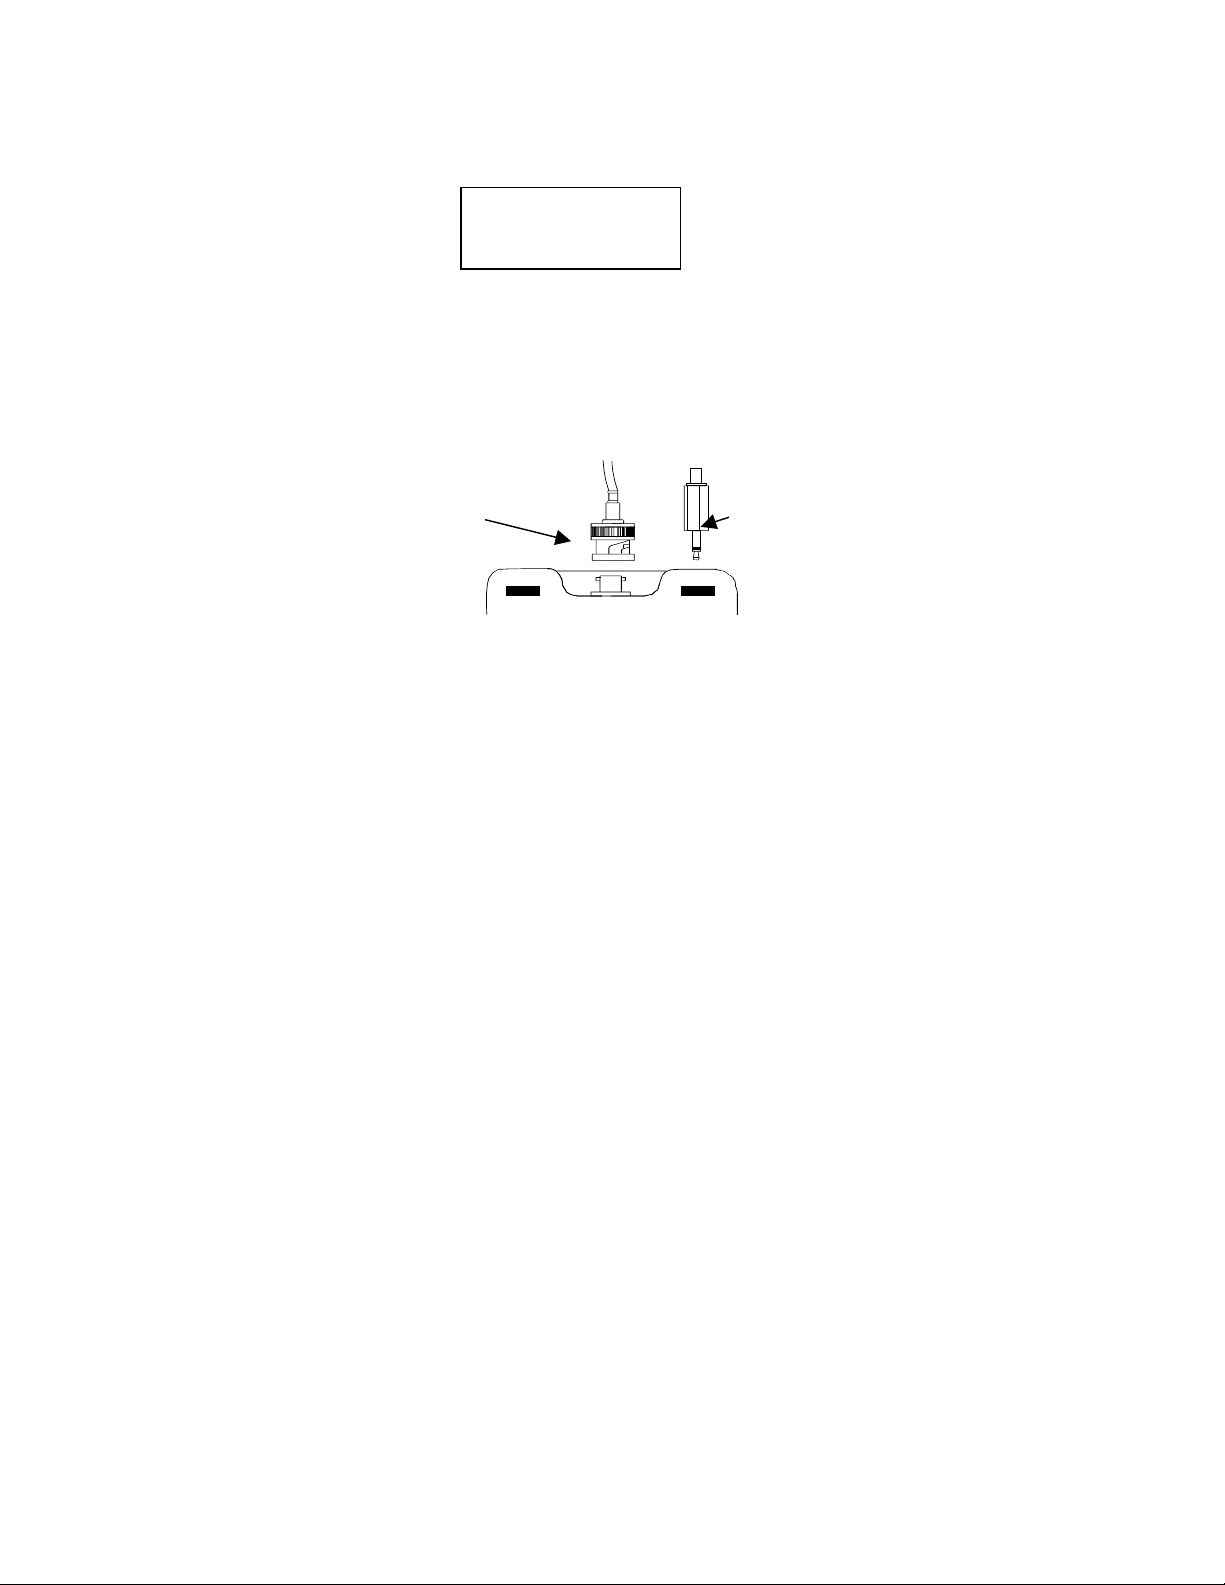
2.6 Connecting the Electrode and Temperature Sensor
To connect electrode into meter, align the connector slots with the posts of
meter’s socket and rotate connector clockwise until it locks. Do not force when
connecting. To remove, simply rotate the connector in anti-clockwise direct ion
until it unlocks, and slide the connector off the socket.
BNC of
Conductivity
electrode
Insert the mini phono jack of temperature sensor into the s ocket on the meter.
Unplug the phono jack when not in use or you measure Conductivity or TDS
without any temperature compensation.
Phono jack of
Temperature
probe
5
Page 7

EcoScan CON 5 / T DS 5
2.7 Switching the Meter On
1. Press ON/OFF key to power up your meter. All LCD segments display
momentarily as the meter performs a self-diagnostic test, per shown in
section 2.2. The LCD switches into Conductivity or TDS measurement
mode.
2. Press MODE key to choose your desired mode of measurement with its
corresponding annunciator displays in the LCD. For t emperature mode, the
measured reading can be 25.0
temperature value if there is no temperature probe, or the current measured
value if a temperature probe is connected.
3. The LCD displays “Ur” if the meter reading exceeds the ma ximum or “Or” if
under minimum possible measurement range (refer to section on
Specifications).
o
C (factory default) or the last calibrated
Ur Or
6
Page 8

EcoScan CON 5 / T DS 5
2.8 Setting the Conductivity-to-TDS Conversion Factor (EcoScan
TDS 5 Only)
The EcoScan TDS5 is set to a default conversion factor of 0.67. This shoul d
give good results for most applications (including natural waters and other
applications that calibrate t o 442 standard s olutions). Y ou can adj ust the factor
for different salts, chemicals, or nutrient solutions using the fol lowing proc edure.
Note the meter allows adjustment of 0.50 to 0.85.
1. Turn meter on and press HOLD key. The “HO” annunc iator appears on the
upper left corner of the LCD and the reading freezes.
HO
326
2. Press CAL key and the LCD will display “F.67” indicating the current factor.
ppm
F.67
3. Adjust the TDS factor using ∆∆∆∆ (up) or ∇∇∇∇ (down) key.
F.56
4. Press ENTER key to confirm and the meter reverts to its measurement
mode.
7
Page 9

EcoScan CON 5 / T DS 5
3. CALIBRATION
3.1 Conductivity Calibration (EcoScan CON5)
The meter is capable of calibrating 1 point per range (3 points across entire
measurement range). If a range is not calibrated, the meter automatically
detects the closest range calibrated and uses the calibration information.
Calibrate to all measurement ranges to ensure the highest accurac y throughout
all measurement range. Note that EcoScan will not accept calibration values
less than 40 µS/cm (20 ppm). All new calibration values will automatically
override existing data.
If you are measuring in solutions with Conductivity lower than 100 µS/cm or
TDS lower than 50 ppm, calibrate the meter at least once a week to get good
accuracy. If you are measuring in the mid ranges and you wash the probe in
deionised water and store it dry, calibrate t he meter once a month. If you take
measurements at extreme temperatures, calibrate at least once a week.
Ensure that you use new Conductivity standard solutions or sachets during
calibration. Do not reuse standard solutions as it may be contaminated and
affect the calibration and accuracy of measurements. Store solutions in a dry,
cool environment if possible.
Always rinse the probe with either tap water or rinse solution before and after
each calibration/sample measurement to avoid cross-contamination. For details
please refer to section on Probe care and maintenance.
1. Pour a known standard solution e.g. 1413 µS/cm into a clean container.
Power on the meter, and the meter will automatically enter Conductivity
measurement mode.
2. Immerse the electrode sufficiently into one of the containers of your
standard solution. Stir gently and wait for reading to stabilise (approx. 30
seconds). Tap the electrode lightly on the bottom of the container to remove
any air bubbles trapped.
3. Press CAL key to enter calibration mode. The LCD shows “CA”
momentarily, and display shows the factory calibrated value flashing.
8
Page 10

EcoScan CON 5 / T DS 5
CA
4. Press ∆∆∆∆ (up) or ∇∇∇∇ (down) key to scroll the reading until the displayed value
matches your standard solution i.e. 1413 µS/cm.
5. Press ENTER key to confirm calibration and the LCD displays the new set
reading and revert to measurement mode.
1413
6. A lt ernativel y you can abort the new calibrated value by pressing CAL key to
exit from calibration mode.
Important: Meter allows a tolerance range of 30% of its measured reading. You
will not able to scroll through to the desired value if reading is out of its
tolerance.
3.2 TDS Calibration (EcoScan TDS 5)
The calibration procedure for the EcoScan TDS 5 is the same as EcoScan CON
5 (refer to section 3.1 for details).
1395
uS
uS
9
Page 11

EcoScan CON 5 / T DS 5
3.3 Temperature Calibration
3.3.1 With Temperature probe For Preselected Curve
The temperature sensor included with your meter is factory-calibrated. Over
time, the temperature calibration may drift and require recalibration. If you
replace the probe you should calibrate temperature probe prior to Conductivit y
or TDS calibration.
1. Connect your temperature probe to the meter. Press MODE key to enter
Temperature mode until “
2. Compare the displayed value to a NIST certified thermometer or other
thermometer known to be accurate. For best accuracy, place probe and
thermometer in a constant temperature bath.
3. Press CAL key to enter temperature calibration mode. The LCD shows
“CA” momentarily and the displayed reading flashes.
CA
4. Press ∆∆∆∆ (up) or ∇∇∇∇ (down) key until the display shows the correct
temperature. The arrow keys will scroll to the maximum allowable value of
o
C.
±5
5. Press ENTER key to confirm calibration. The LCD displays “CO”
momentarily, and the meter reverts to measurement mode.
o
C” annunciator appears in the LCD.
o
26.5
C
o
C
CO 25.0
10
Page 12

EcoScan CON 5 / T DS 5
3.3.1.1 With Temperature probe (with Curve Selection)
In the event the temperature probe has drifted too far from its original
characteristic – due to age and use or if the probe is being replaced, it may be a
good idea to match the probe to the best curve. There are 3 curves
programmed in the unit. To choose the curve, proceed as follows:
1. Connect your temperature probe to the meter. Press MODE key to enter
Temperature mode until “
o
C” annunciator appears in the LCD.
2. Compare the displayed value to a NIST certified thermometer or other
thermometer known to be accurate. For best accuracy, place probe and
thermometer in a constant temperature bath.
3. Press CAL key to enter temperature calibration mode. The LCD shows
“CA” momentarily and the displayed reading flashes.
4. Press MODE key once. Note the reading. This is with respect to the cu rve
1.
5. Press ∆∆∆∆ (up) key once. The display will change to a different value which is
with respect to curve 2. Note the reading. Press ∆∆∆∆ (up) key again, the
reading now will be with respect to curve 3. Choose the curve which gives
its reading closest to the actual value.
6. Press ENTER key and the display blinks once. The c urve selection has now
been made. To match the value exactly with the standard value, press ∆∆∆∆
(up) or ∇∇∇∇ (down) key, the display can be set to the exact value. Press
ENTER to confirm.
11
Page 13

EcoScan CON 5 / T DS 5
3.3.2 Without Temperature probe (no ATC)
If no temperature probe is used, the meter compensates for Conductivity or
TDS response based on a new calibrated temperature value manually set by
you or at 25
1. Press MODE key to enter into Temperature mode until “
LCD.
2. Compare displayed value to a NIST certified thermometer or other
thermometer known to be accurate.
3. Press CAL key to enter temperature calibration mode. The LCD shows
“CA” momentarily and the displayed reading flashes. Note that this
displayed value should either be 25.0
o
C (factory default).
o
C” shows in the
o
C or last set temperature value.
o
C
CA
4. Press ∆∆∆∆ (up) or ∇∇∇∇ (down) key until the display shows the correct
temperature. The arrow keys will scroll to the maximum allowable value of
o
C.
±5
5. Press ENTER key to confirm calibration. The LCD displays “CO”
momentarily, and the meter reverts to measurement mode.
25.0
o
C
CO 25.0
12
Page 14

EcoScan CON 5 / T DS 5
4. MEASUREMENT
4.1 Taking Measurement
1. To begin measurement, rinse probe thoroughly with deionised water to
remove any impurities.
2. Power on meter and the meter will automatically go into Conductivity/ TDS
measurement mode. Press MODE key to select your desired mode of
operation between Conductivity/TDS and Temperature.
3. Dip probe sufficiently, with the tip of probe completely immersed, into
sample. Stir and tap it gently to remove any air bubbles trapped. Wait for
the reading to stabilise. Note reading.
4.2 Holding a Reading
To freeze or hold your reading, press HOLD key once. The LCD displays ”HO”
annunciator to indicate the HOLD function is activated.
HO
mS
4.3 Releasing a Held Reading
Press HOLD key again to deactivate the HOLD function or to release your
frozen reading. The meter returns to measurement mode, and the “HO”
annunciator disappears from the LCD.
mS
13
Page 15

EcoScan CON 5 / T DS 5
5. PROBE CARE AND MAINTENANCE
Keep your Conductivity probe clean. Do not strike the probe against any hard
surface, and never scratch the stainless steel pins with hard mat erial.
Wash the probe thoroughly with tap or deionised water after each use.
Do not immerse the probe in oily solutions. To remove oil films or oxidation,
clean electrode with alcohol.
Clean it with a mild detergent solution. Blot it dry. Wash thoroughly in tap water
and then in deionised water. Recalibrate the meter after cleaning it.
6. TROUBLESHOOTING
Problem Cause Solution
No display a) Batteries not in
place.
Unstable reading a) Di rt y elect ro de.
b) Broken electrode.
“E2” display a) Error in calibration. a) Recalibrate the instrument.
a) Insert batteries.
b) Re-insert batteries in correct polarity.
a) Clean electrode and recalibrate.
b) Replace electrode.
“E3” display a) Faile d
Not able to
calibrate
initialization.
b) Display freezes.
c) Faulty electrode.
a) Turn off meter and turn it on. Return if
necessary.
b) R elea se re adi n g b y pressing HOLD
key.
c) Replace electrode.
14
Page 16

EcoScan CON 5 / T DS 5
7. SPECIFICATIONS
Model EcoScan
Conductivity Range 0 to 199.9 uS, 0 to 1999 uS; 0 to
19.99 mS
Resolution 0.1, 1 uS; 0.01 mS
Accuracy +/- 1% full sca le
TDS Range 0 to 99.9, 0 to 999 ppm; 0 to
9.99 ppt
Resolution 0.1, 1 ppm; 0.01 ppt
Accuracy +/- 1% full sca le
TDS Factor 0.50 to 0.85 (user selectable –
0.67 default)
No. of Calibration
1 to 3 points (1 per range)
Points
Temperature Range 0.0 to 100.0 oC
Resolution/Accuracy 0.1 oC; +/- 0.5 oC
Temp. Coefficient 2% / oC
Temperature
Compensation
Automatic or manual (from 0 to
80
o
C)
Features
Auto Ranging Yes
Hold Function “HO”
Auto Shut Off After 17 minutes
Low Battery
“LO”
Indication
Error Message
“E2”, “E3”
Display
Display Single Custom LCD
Operating
0 to 50
o
C
Temperature
Power Requirements 4 x “AAA” Alkaline Batteries
Battery Life > 100 hours
Meter Dimensions 14 x 7 x 3.5 cm
Meter Weight 200g
CON 5
TDS 5
•
•
•
•
•
•
•
••
••
••
••
••
••
••
••
••
••
••
••
••
••
••
••
EcoScan
15
Page 17

EcoScan CON 5 / T DS 5
8. ACCESSORIES
Accessories available:
EC-CONSEN45B: Epoxy-body 2-stainless steel pins Conductivity Electrode
with built-in ATC sensor, 12 x 110 mm
EC-CON-100BT: 100 uS Conductivity Standard Solution (480 ml per bottle)
EC-CON-500BT: 500 uS Conductivity Standard Solution (480 ml per bottle)
EC-CON-1413BT: 1413 uS Conductivity Standard Solution (480 ml per bottle)
EC-CON-2764BT: 2764 uS Conductivity Standard Solution (480 ml per bottle)
EC-CON-1288BT: 12.88 mS Conductivity Standard Solution (480 ml per bottle)
EC-442-50BT: 50 ppm Standard Solution (480 ml per bottle)
EC-442-300BT: 300 ppm Standard Solution (480 ml per bottle)
EC-442-1000BT: 1000 ppm (1 ppt) Standard Solution (480 ml per bottle)
EC-442-3000BT: 3000 ppm (3 ppt) Standard Solution (480 ml per bottle)
EC-CON-447BS: 447 uS Conductivity Standard Sachets (20 ml x 20 per box)
EC-CON-1413BS: 1413 uS Conductivity Standard Sachets (20 ml x 20 per box)
EC-CON-2764BS: 2764 uS Conductivity Standard Sachets (20 ml x 20 per box)
EC-CON-15000BS: 15’000 uS (15 mS) Conductivity Standard Sachets (20 ml x
20 per box)
16
Page 18

EcoScan CON 5 / T DS 5
NOTES
Technology Made Easy…
EUTECH INSTRUMENTS PTE LTD.
Blk 55, Ayer Rajah Cres cent #04-14/24
Singapore 139949
Tel: (65) 778 6876 Fax: (65) 773 0836
E-mail: marketing@eutechinst.com
Web-site: http://www.eutechinst.com
17
 Loading...