

Instruction Manual
CyberScan pH 1500
Bench pH/mV Meter
Tec hnolo
gyM
adeEa
sy...
68X292327
Rev 0 12/02

PREFACE
Thank you for selecting the Eutech Instruments CyberScan pH 1500
bench meter.
The instruction manual serves to explain the use of the CyberScan
pH 1500 bench meter as a step-by-step operational guide to help you
familiarize with the meter’s features and functions. It is structured
sequentially with illustration of diagrams that explains the various
functions and setup menus available.
This manual is written to cover as many anticipated applications and
uses of the CyberScan pH 1500 bench meter as possible. If there are
doubts in the use of the meter, please do not hesitate to contact the
nearest Eutech Instruments’ Authorised Distributors or call us at (65)
6778-6876 for Eutech Instruments’ Customer Service Dept. for
assistance.
Kindly remember to complete the warranty card and mail it back to
your Authorized Distributors or Eutech Instruments Pte Ltd.
Eutech Instruments reserve the rights to change, make improvement
and modify specifications without prior notice and cannot accept any
responsibility for damage or malfunction to the instrument caused by
improper use.
Copyright © 2002 Eutech Instruments Pte. Ltd.
All rights reserved. Draft, August 2002.

TABLE OF CONTENTS
1 INTRODUCTION 2
1.1 Introducing the CyberScan Series 2
2 GETTING STARTED 3
2.1 Meter Overview 3
2.2 CONNECTORS 4
3 USING THE METER 6
3.1 Electrodes 6
3.2 Temperature Probe 8
3.3 Display / Keys 9
3.4 Screen Display 10
4 SETUP MENUS 11
4.1 Using the Meter 11
4.1.1 P1.0 View pH Electrode Offset 13
4.1.2 P2.0 View pH Electrode Slope 14
4.1.3 P3.0 pH Buffer Group 15
4.1.4 P4.0 pH Resolution 17
4.1.5 P5.0 Temperature Unit 19
4.1.6 P6.0 Stability Indicator 21
4.1.7 P7.0 Baud Rate 22
4.1.8 P8.0 Parity Bit 24
4.1.9 P9.0 Stop Bit 26
4.1.10 P10.0 Print Data 28
4.1.11 P11.0 Clear Stored Data 29
4.1.12 P12.0 Clear Buffer Values 31
4.1.13 P13.0 View mV offset 32
4.1.14 P14.0 Clear mV offset 33
5 PH OPERATION 34
5.1 Standardization 34
5.2 pH Electrode Diagnosis Indicator 39
6 mV OR RELATIVE mV OPERATION 40
6.1 Absolute mV 40
6.2 Relative mV 41
6.3 Temperature Calibration 42
7 MEASUREMENT 43
8 MEMORY 44
8.1 Store Value Into Memory 44
8.2 Recall Value From Memory 44
9 PRINT DATA 45
9.1 Printing Data 45
10 pH THEORY 46
10.1 Measuring pH 47
11 CLEANING 48
12 TROUBLESHOOTING 48
13 METER SPECIFICATIONS 49
14 ACCESSORIES 50
15 WARRANTY 52
16 NOTICE OF COMPLIANCE 53

Instruction Manual CyberScan pH1500
2
1
INTRODUCTION
1.1 Introducing the CyberScan Series
Thank you for selecting the Eutech Instruments CyberScan pH1500
bench-top meter. This instruction manual describes the operation of
the meter. The state-of-art meter that you have purchased is easy to
operate and will guide you through the various functions by displaying
easy to understand prompts. This manual should answer any
questions that might arise in operating your meter, however, do not
hesitate to call our Technical Support at (65) 6778 6876 (ext 839) or
fax at (65) 6773 0836.
This instruction manual is designed to provide all the information
necessary to guide you through the process of measuring pH or mV
with a series of prompts on the screen.
)
You will find this symbol appearing in this manual; it indicates useful
tips that ease your meter operation.
The CyberScan pH1500 meter provides microprocessor precision in
a compact benchtop design that is easy to use. This metre allows you:
Measure pH, absolute mV or relative mV
Select one of three sets of standard buffer groups
Standardise with up to five buffers
It all adds up to rapid, completely automatic, intuitive operation.
Instruction Manual CyberScan pH1500
3
2
GETTING STARTED
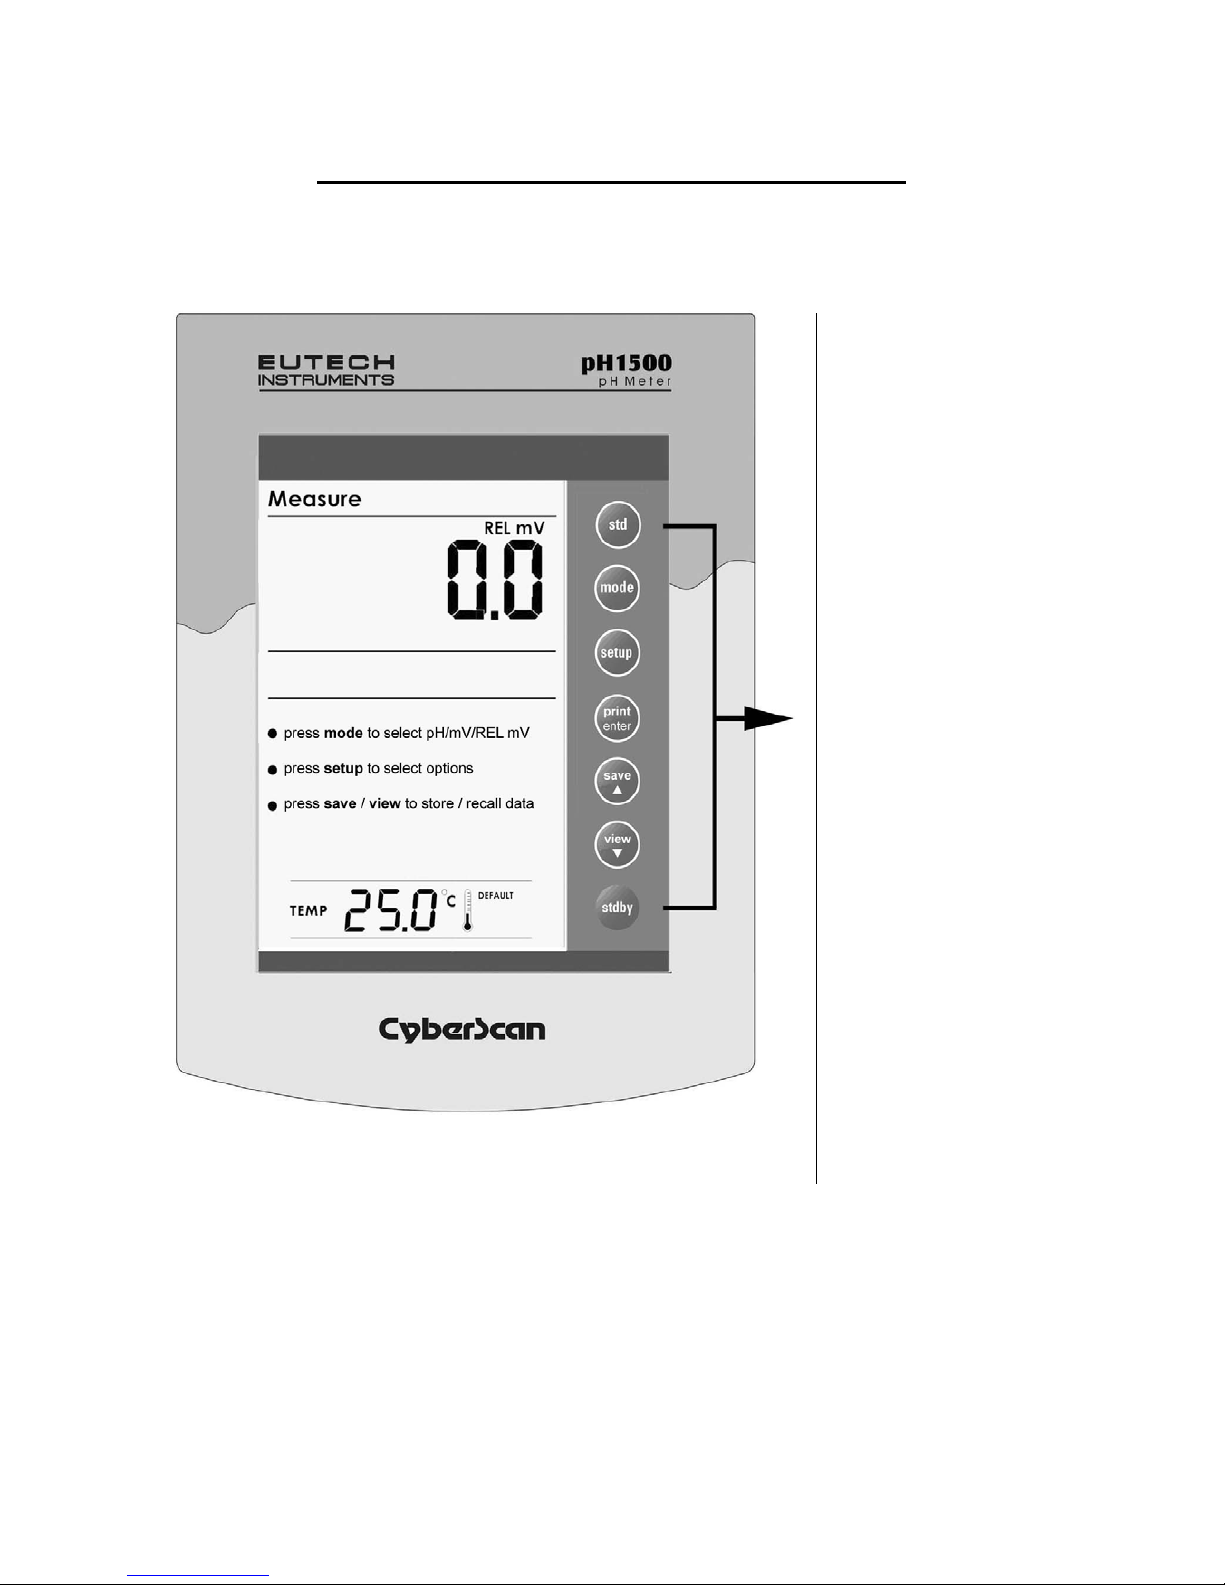
2.1 Meter Overview
Instruction Manual CyberScan pH1500
4
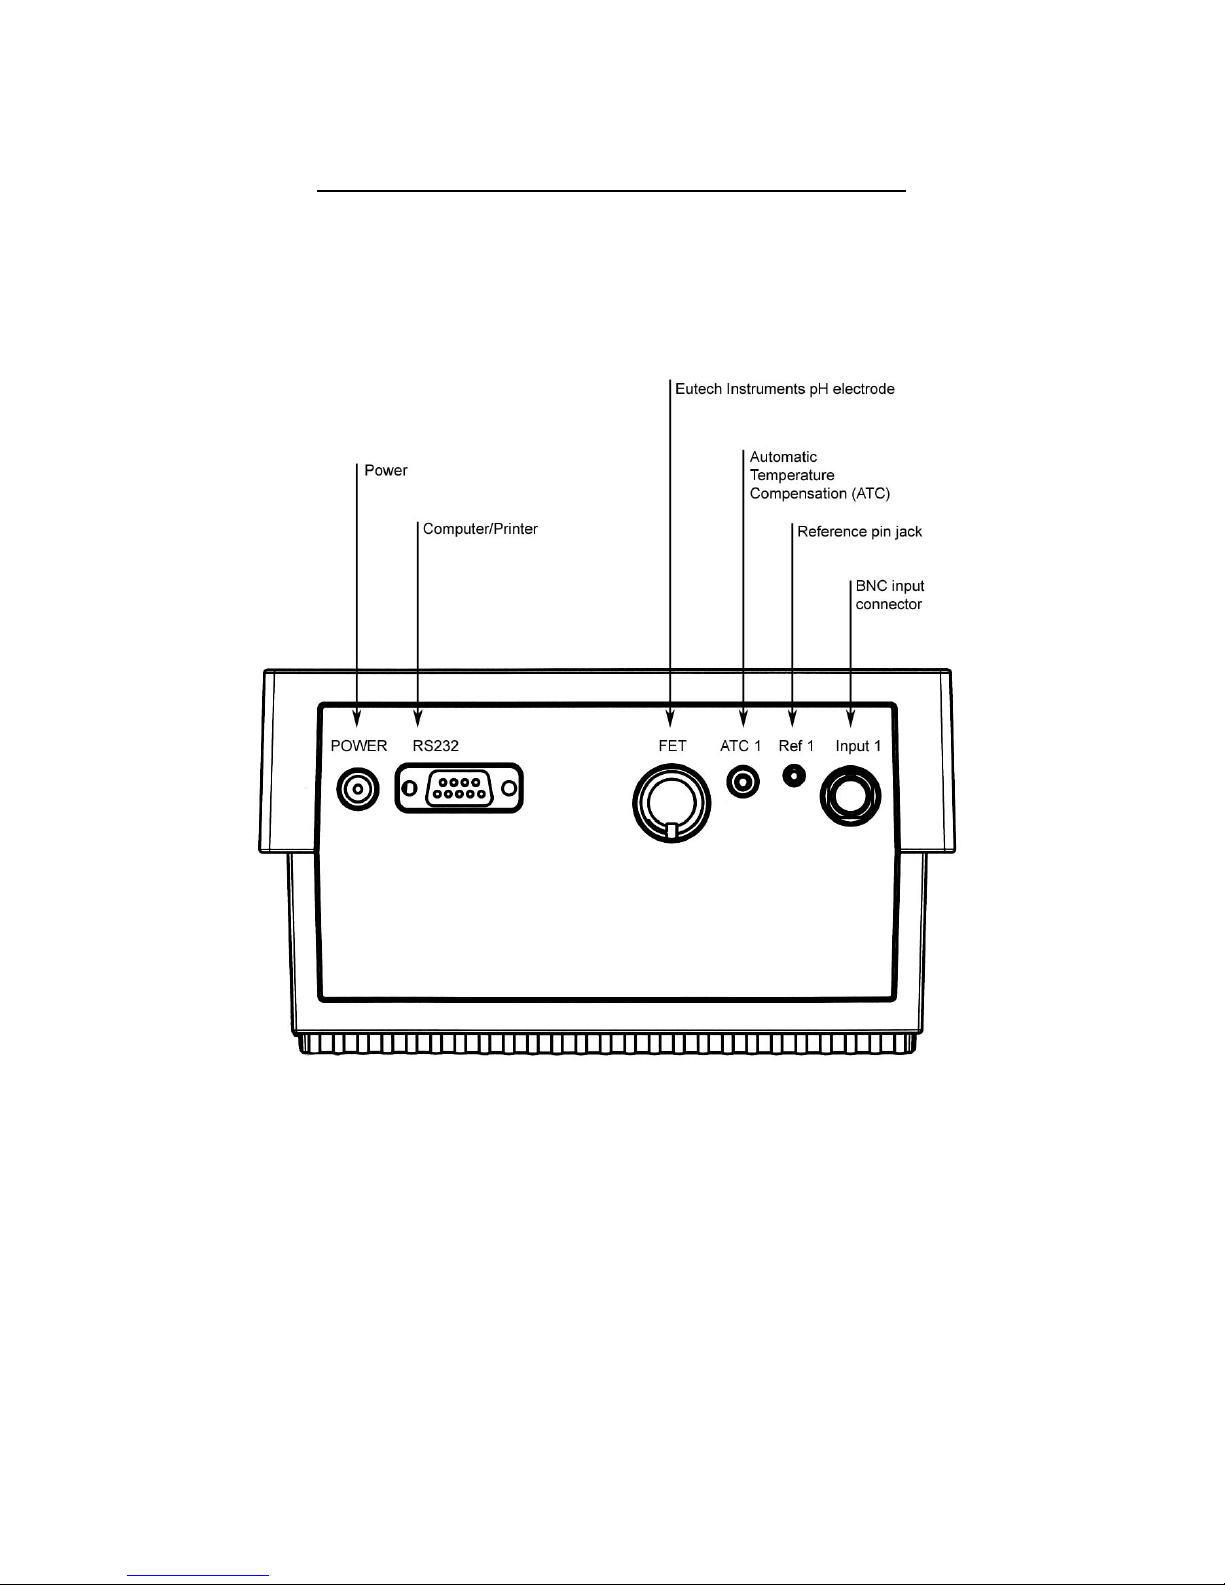
2.2 CONNECTORS
1.
Review the layout and arrangement of the rear connector panel.

Instruction Manual CyberScan pH1500
5
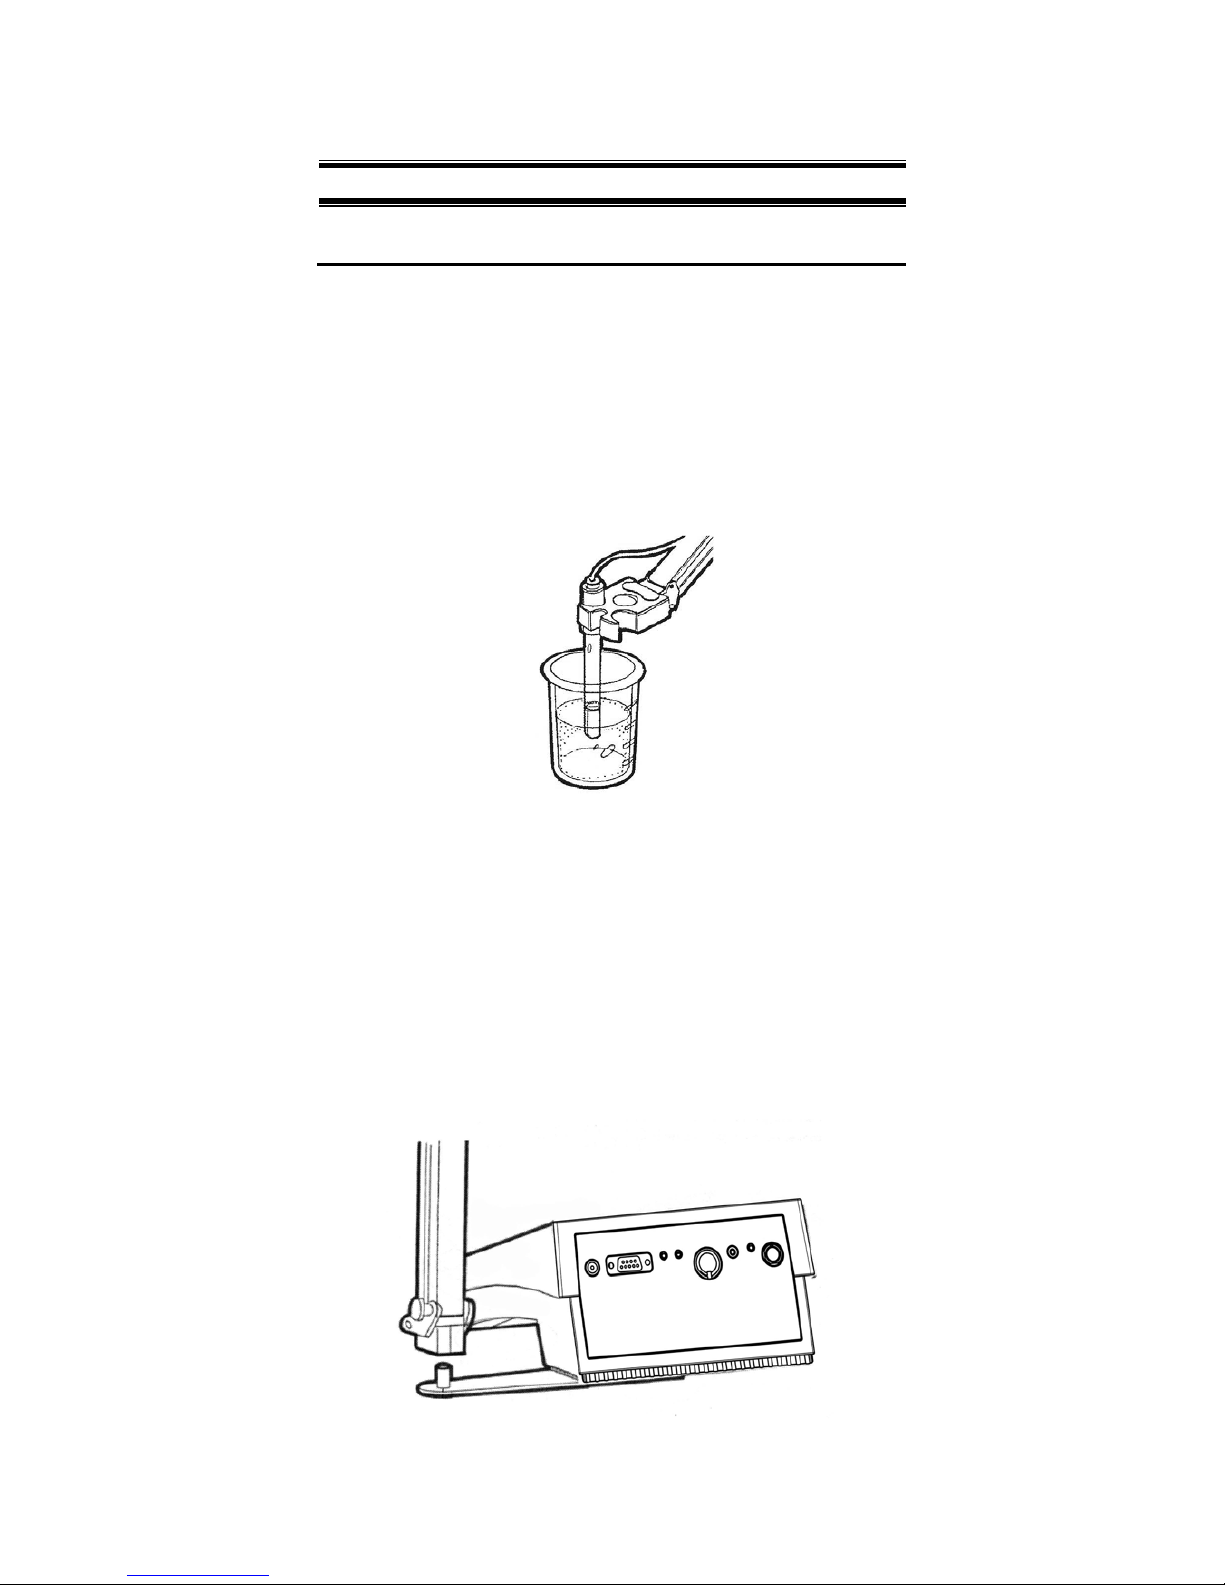
2.
Connect the electrode arm to the base.
3.
Connect the power cable to the connector cable to the rear
connector panel power jack and to a power source.
Instruction Manual CyberScan pH1500
6
3
USING THE METER
3.1 Electrodes
This meter allows you to use two types of electrodes: the
conventional glass pH electrode and the Eutech Instruments field
effect transistor (FET) pH electrode. If both types of pH electrodes
are connected, the meter will read the FET electrode.
1.
Carefully remove the protective cover from the end of the
electrode. Before first using your glass pH electrode, or
whenever the pH electrode is dry, soak it 2-4 hours in
electrode storage solution, pH 4 buffer, or KCI solution.
2.
Remove the shorting cap on BNC connector. Install the
combination pH electrode by plugging it into the BNC input
connector (Twisting to lock in place).
If a combination electrode isn’t used, install the indicating pH
electrode into the BNC input connector. Plug the reference
electrode into the reference pin jack. Also, install the ATC probe into
the ATC jack.
Option: install the optional FET electrode by plugging it into the FET
jack on the back meter panel. Allow the Eutech Instruments electrode
to warm up five minutes before use.

Instruction Manual CyberScan pH1500
7
) Do not discard the BNC shorting cap.
3. Rinse and blot-dry (don’t wipe) electrodes between each
measurement. Rinse electrodes with distilled or deionised water, or a
portion of the next solution to be measured.
4. Between measurements, store conventional pH electrodes
storage solution, pH 4 buffer, or KCI solution. Always leave
the filling hole of liquid filled combination electrodes open.
Refill when the level of solution gets below the
manufacturer’s recommended level.
) Proper electrode care is fundamental for obtaining reliable pH
measurements. Improper care of the electrode may cause
the meter reading to drift, respond slowly, or produce
erroneous readings. For this reason, the electrode should
always be conditioned and used in accordance with
manufacturer’s instructions.

Instruction Manual CyberScan pH1500
8
3.2 Temperature Probe
For more accurate pH measurement, a temperature probe (supplied
with the meter) is used for Automatic Temperature Compensation
(ATC). Once the temperature probe is connected into its socket
(located at the back of meter), the ATC icon is displayed on the
screen to indicate that the meter is in ATC Measure mode. If the
temperature probe is not connected the meter displays 25.0
o
C or 77
o
F as the default temperature value. When in ATC mode, the meter
allows fine offset temperature adjustment of ±5.0
o
C (±9.0 oF) from
mV mode by pressing the std key. Use ▲ or ▼ key to set the desired
value and press enter key to confirm. The meter returns to the
Measure mode.
Instruction Manual CyberScan pH1500
9
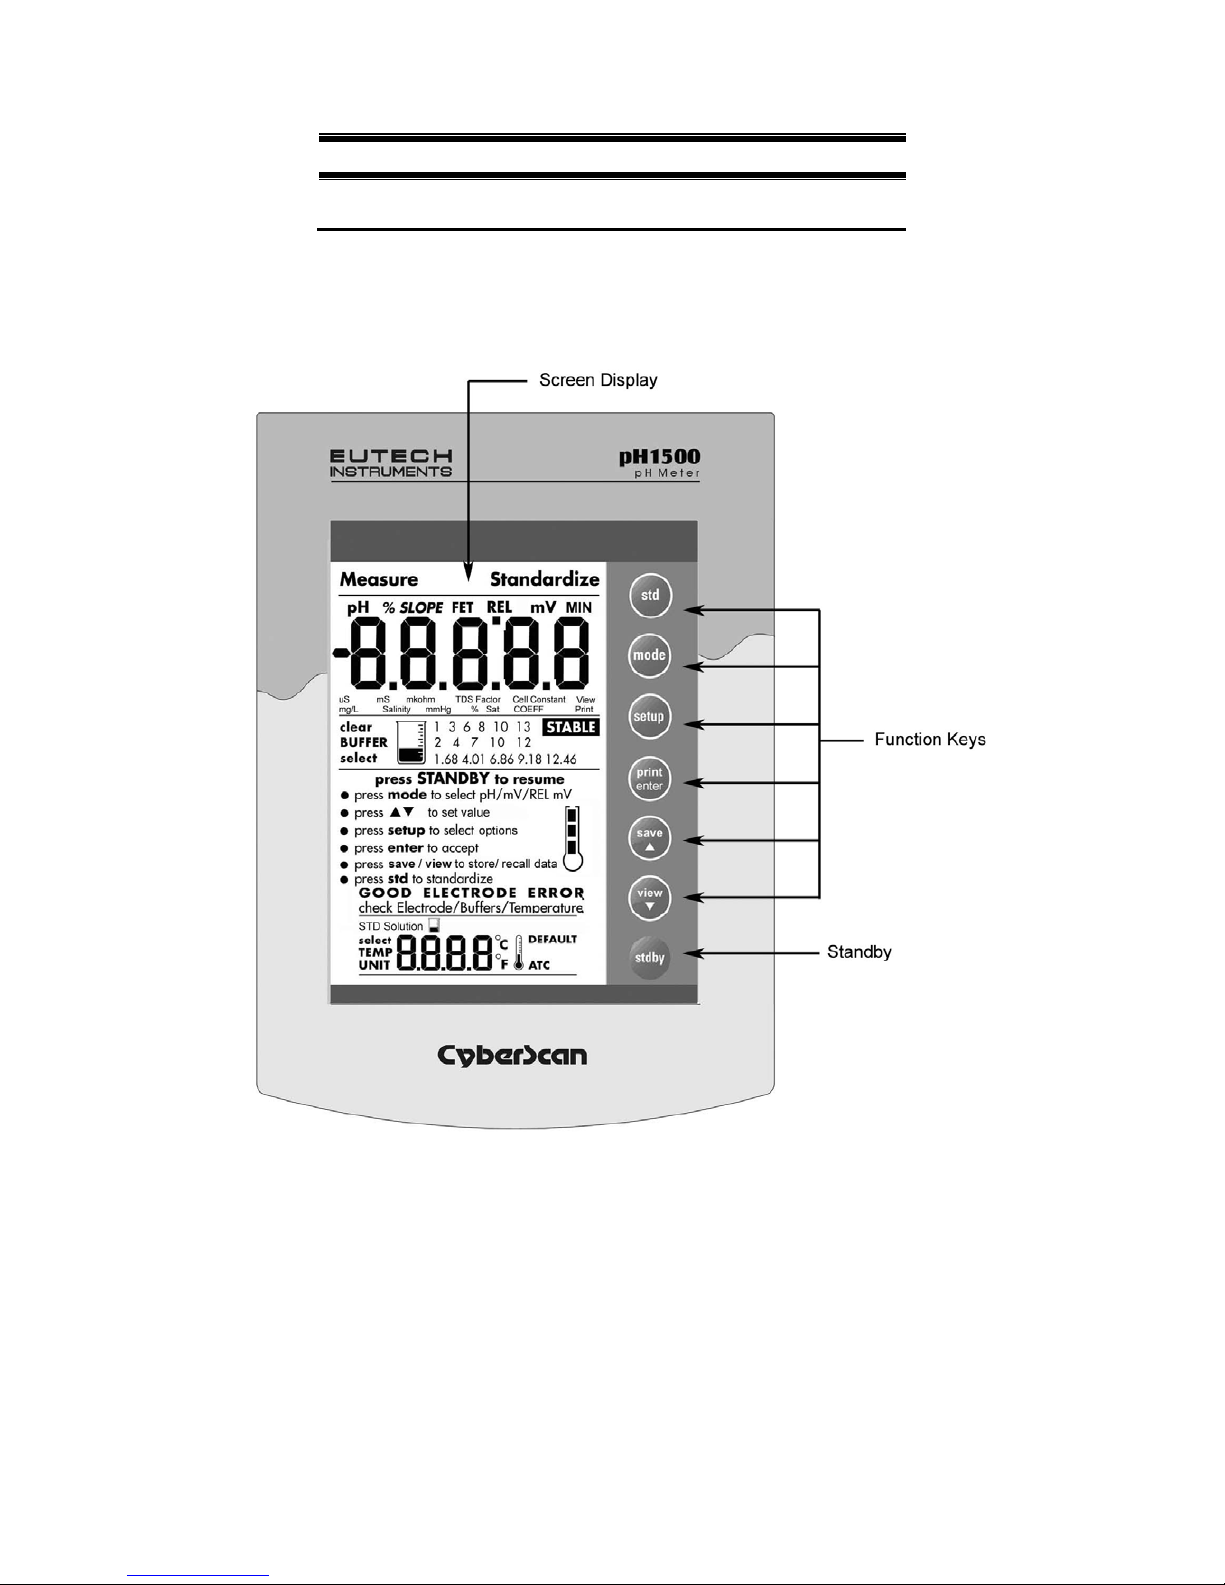
3.3 Display / Keys
Overview of the meter screen display and function key layout.
Press std key to initiate
standardization. Or press std
key at the Standardize mode
allows you to exit and return to
Measure mode.
Press mode to select pH, mV
and Relative mV.
Press setup key to access
setup for configuration of meter
setting.
Press print key to print stored
data from memory or current
reading to a PC or printer
(depending on meter setup).
Press enter key to confirm
selection or change being
made.
Press ▲ key to increment
value or scroll up selection.
Press ▼ key to decrement
value or scroll down selection.
Press save key to store
displayed data into memory
Press view key to recall and
select memory location of
stored data
Press stdby key to start up or
put the meter in standby mode.
Instruction Manual CyberScan pH1500
10
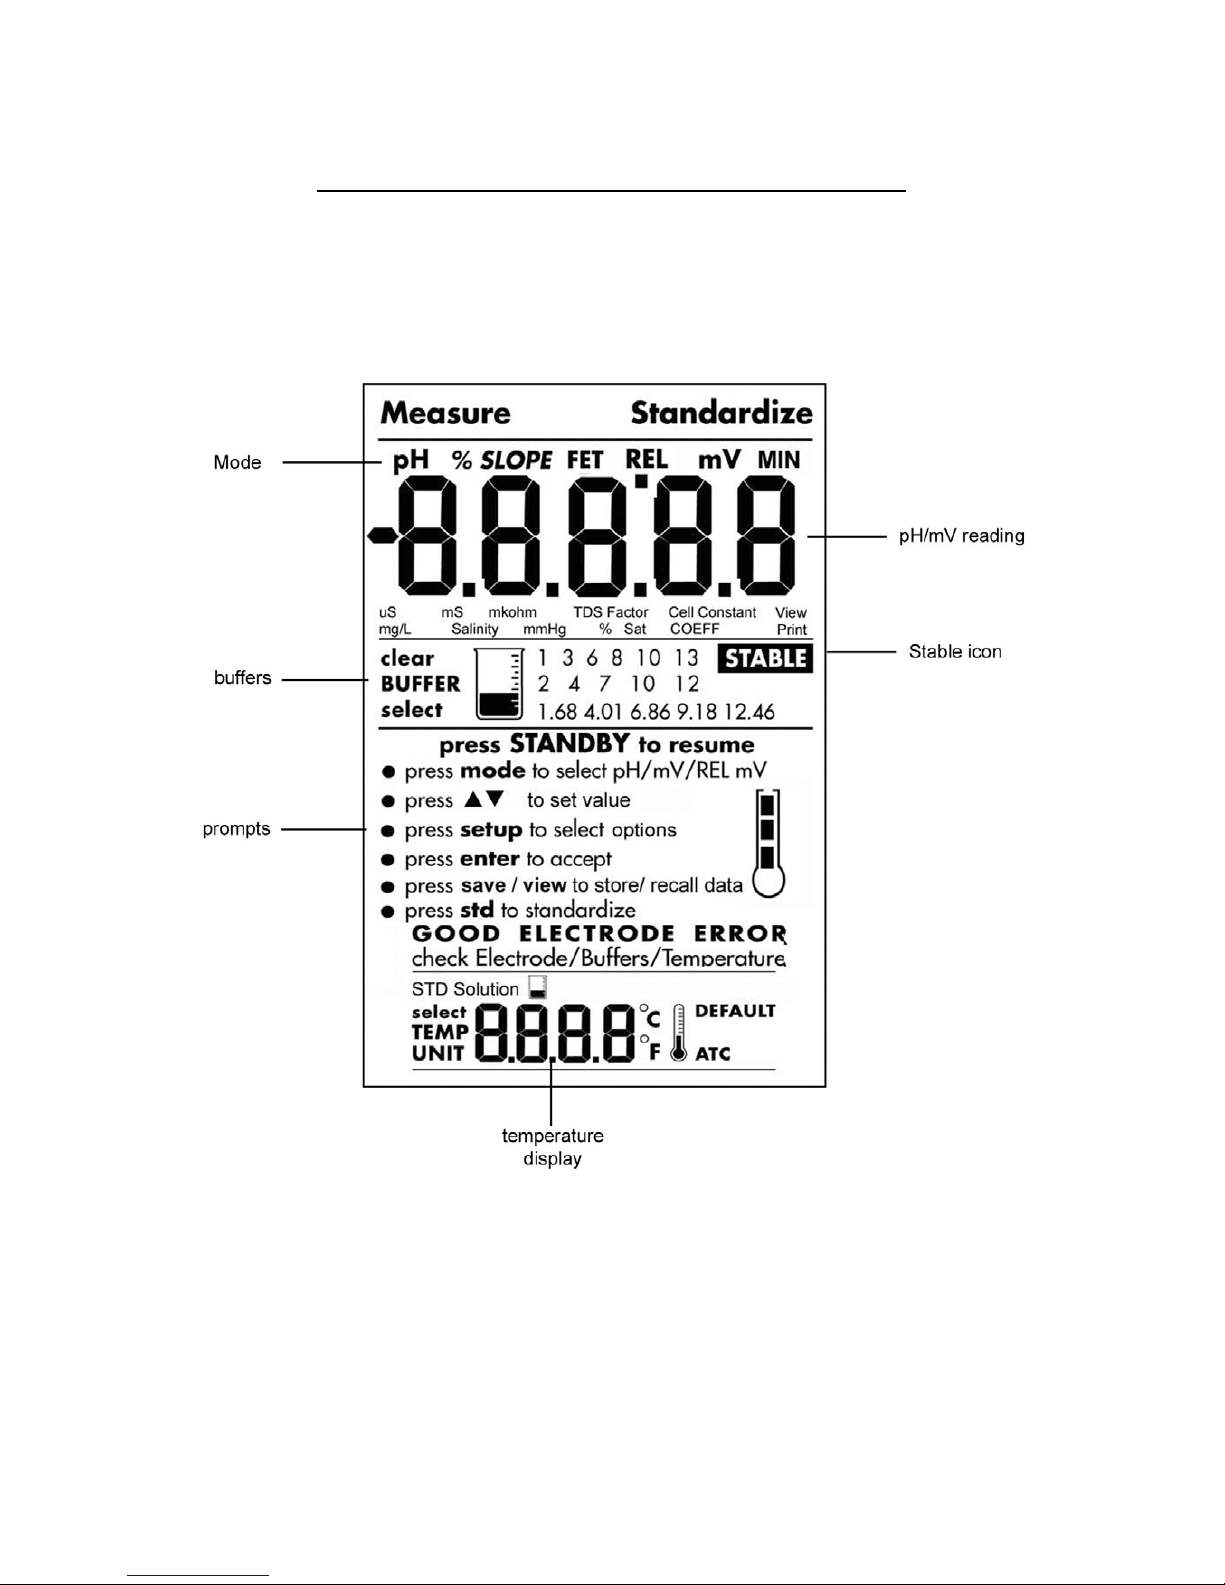
3.4 Screen Display
Familiarise yourself with the layout of the digital screen display.

Instruction Manual CyberScan pH1500
11
std
setup
print
enter
save
view
4
SETUP MENUS
4.1 Using the Meter
The setup button brings you to the setup menus of the various
parameters. Press setup while in measurement OR standardization
to access to the setup menus. The ▲ and ▼ keys allow you to
change several operating parameters. While in the setup mode you
may:
Press the std key at any time to return to the
Measure screen without making a change or
selection in the setup mode. Note new change will
not be effected as no confirmation is done.
Press the setup key anytime to access the setup
mode in the measurement mode. The menu
displays the first setup menu P1.0.
Press the enter key to accept a change or
selection of desired option in the displayed
parameter. The meter will then return to the next
setup
Press the ▲ and ▼ keys to scroll through
(increment and decrement setup menu
respectively) the remaining selection options
available.
Instruction Manual CyberScan pH1500
12
pH
View
pH
View
% SLOPE
BUFFER
select
pH
select
STABLE
Print
Print
Print
Print
Data
Data
clear
BUFFER
P1.0
View pH electrode offset
-
Allows you t o view pH electrode
offset in mV after 1- point
standardization.
P2.0
View pH electrode slope
- View the pH electrode slope in
% after 2-point standa rdization
is successfully done.
P3.0
pH buffer group
- Select from 3 different buffer
groups, each containi ng 5-6
buffers, for auto bu ffer
recognition.
P4.0
pH resolution
-
Select vari ous pH resolution
either 0.1, 0.01 or 0.001.
P5.0
Temperature Unit
- Select unit of measure for
Temperature either in °C or °F.
P6.0
Stability Indicator
-Set the stability indicator to be
displayed on the screen.
P7.0
Baud Rate
- To set the baud rate
(bits of second) of the
communication protocol
interface.
P8.0
Parity Bit
- Set the parity bit of the
communication protocol
interface.
P9.0
Stop Bit
- Set the stop bit of the
communication protocol
interface.
P10.0
Print Data
- To print current displayed
data or data s tored in the
meter’s memory to a
computer or pri nter via
Rs232.
P11.0
Clear Stored Data
- To clear all stored data sets
for new data to be stored.
P12.0
Clear Buffer Values
- To clear the standardized
buffer v alues.
P14.0
Clear mV offset
-Select to clear of retain mV
offset stored earlier.
P13.0
View mV offset
mV
View
clear
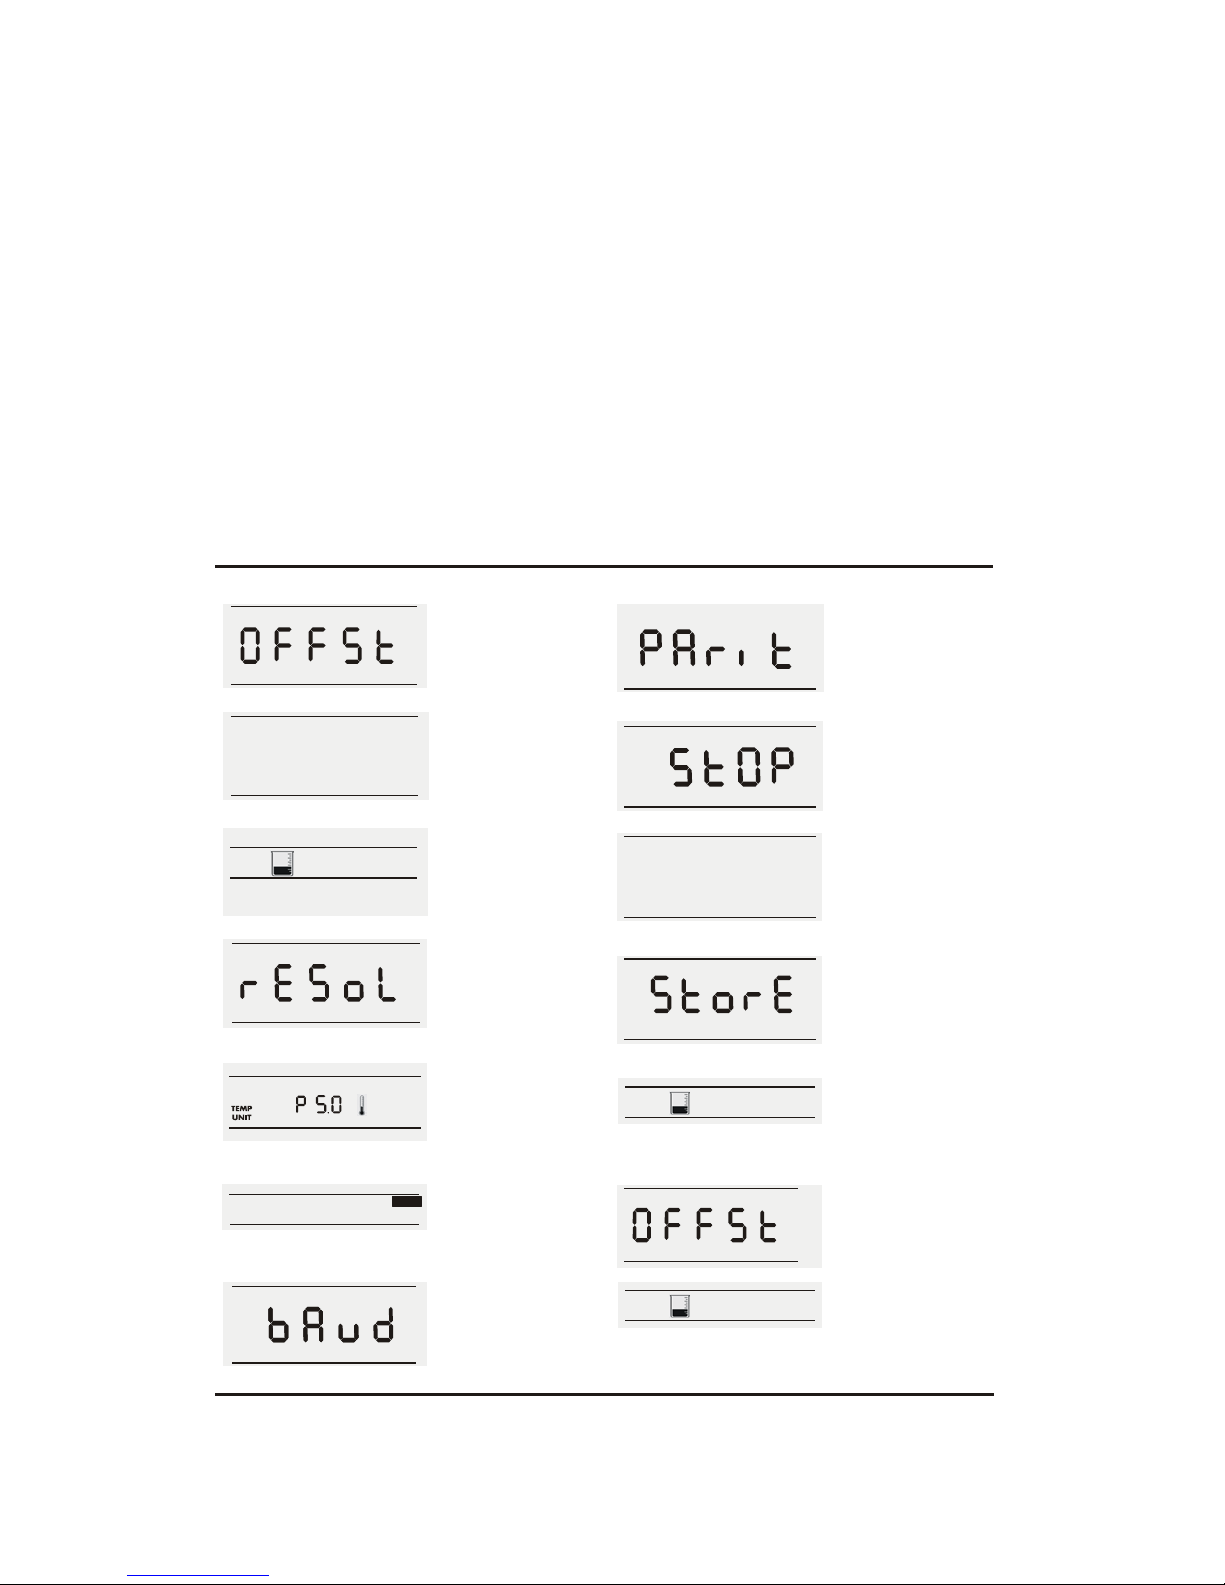
In the setup mode, there are 12 setup menus for you to change the
operating parameters to suit your individual preference as well as to
configure RS232 communication interface protocol for printing.
While you are in each parameter Measure mode, pressing setup key
allows you to access all 12 setup menus (P1.0 to P12.0) in the pH
mode and other setup menus for mV and Relative mV modes. Refer
to Overview of Setup Menus below.
Mode Setup Menus Accessible
pH P1.0 to P12.0
mV P5.0 to P11.0
REL mV P5.0 to P11.0, P13.0 & P14.0
) If you do not wish to make a selection or change the
option, pressing std key at any point of time allows you
to abort the setup menu and return to the Measure
mode.
Overview of Setup menus
Instruction Manual CyberScan pH1500
13
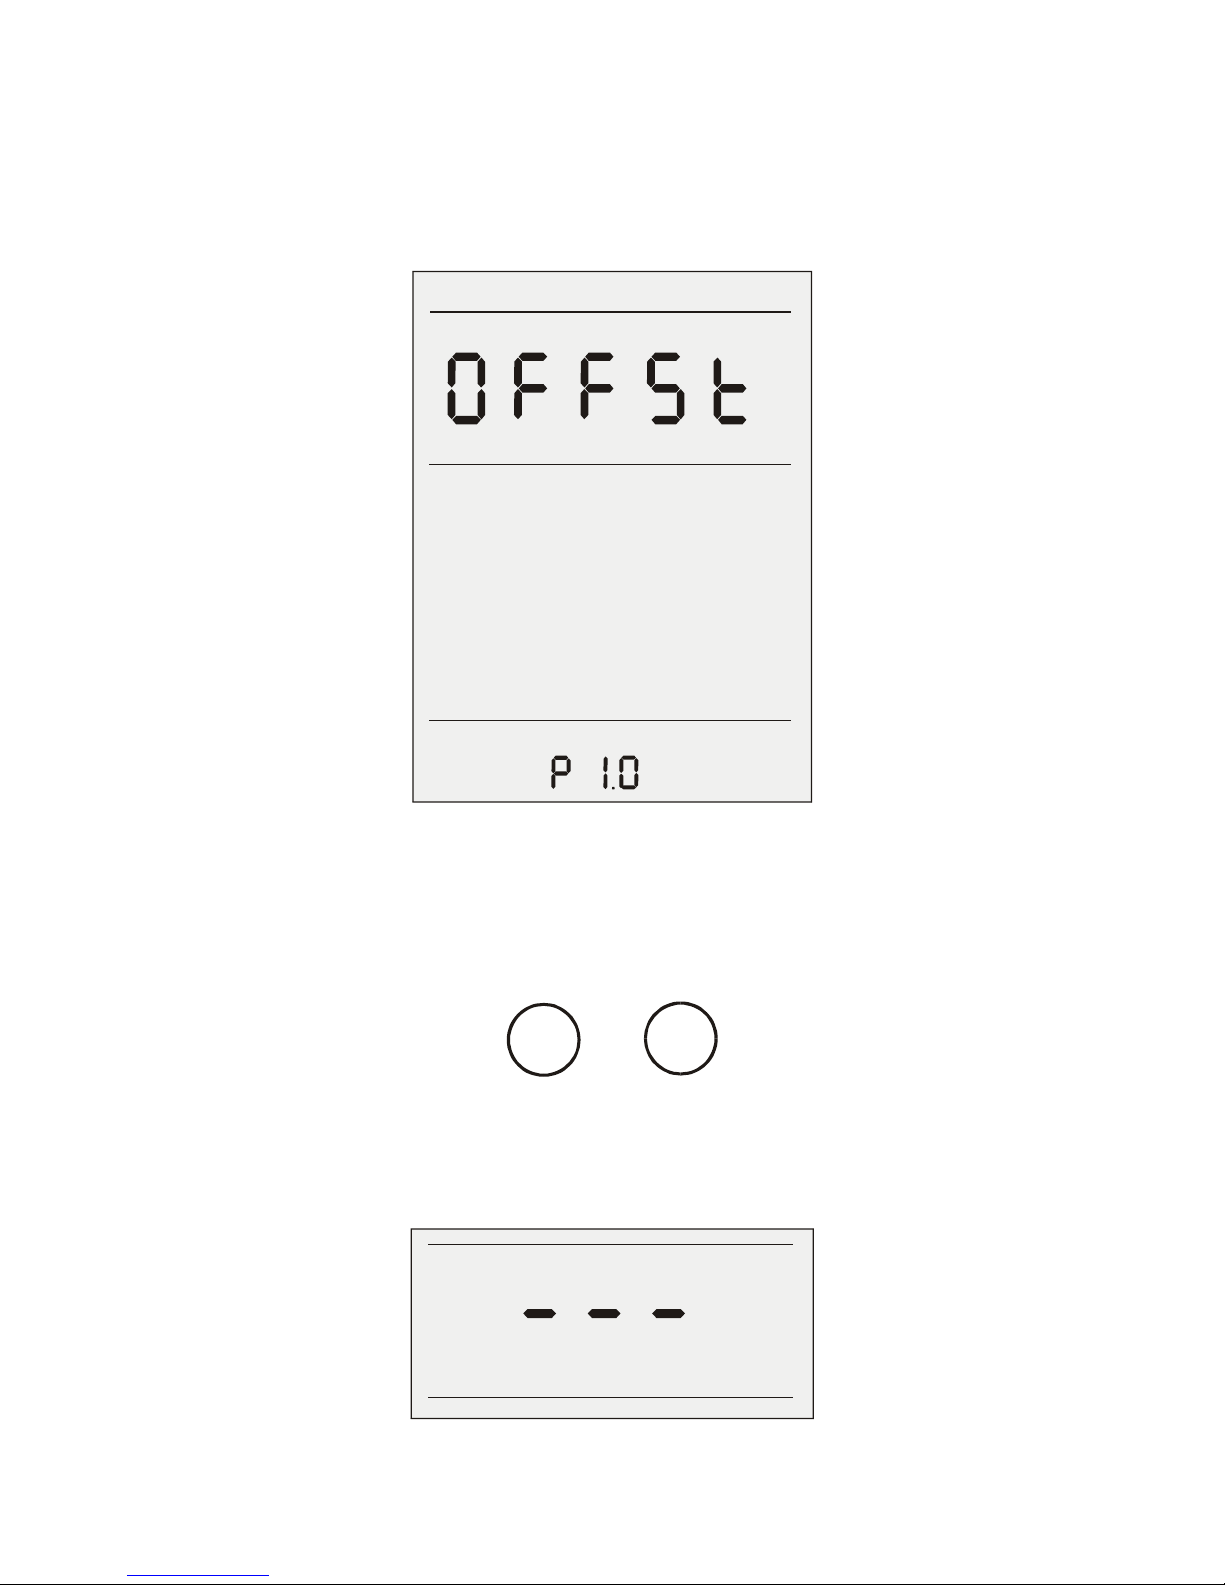
4.1.1 P1.0 View pH Electrode Offset
This setup menu allows you to view the pH electrode offset in mV
after 1-point standardization is successfully done.
pH
View
press to set value
press to accept
enter
ELECTRODE
To view pH electrode offset
1. Access View the pH electrode offset menu from pH measurement
screen by pressing setup key
2. Press ▲ and ▼ keys to scroll until display shown as above.
save
view
3. Press enter to view the offset. A series of dashes “- - -“ will be
displayed if the unit has not been standardized.
pH mV
Instruction Manual CyberScan pH1500
14
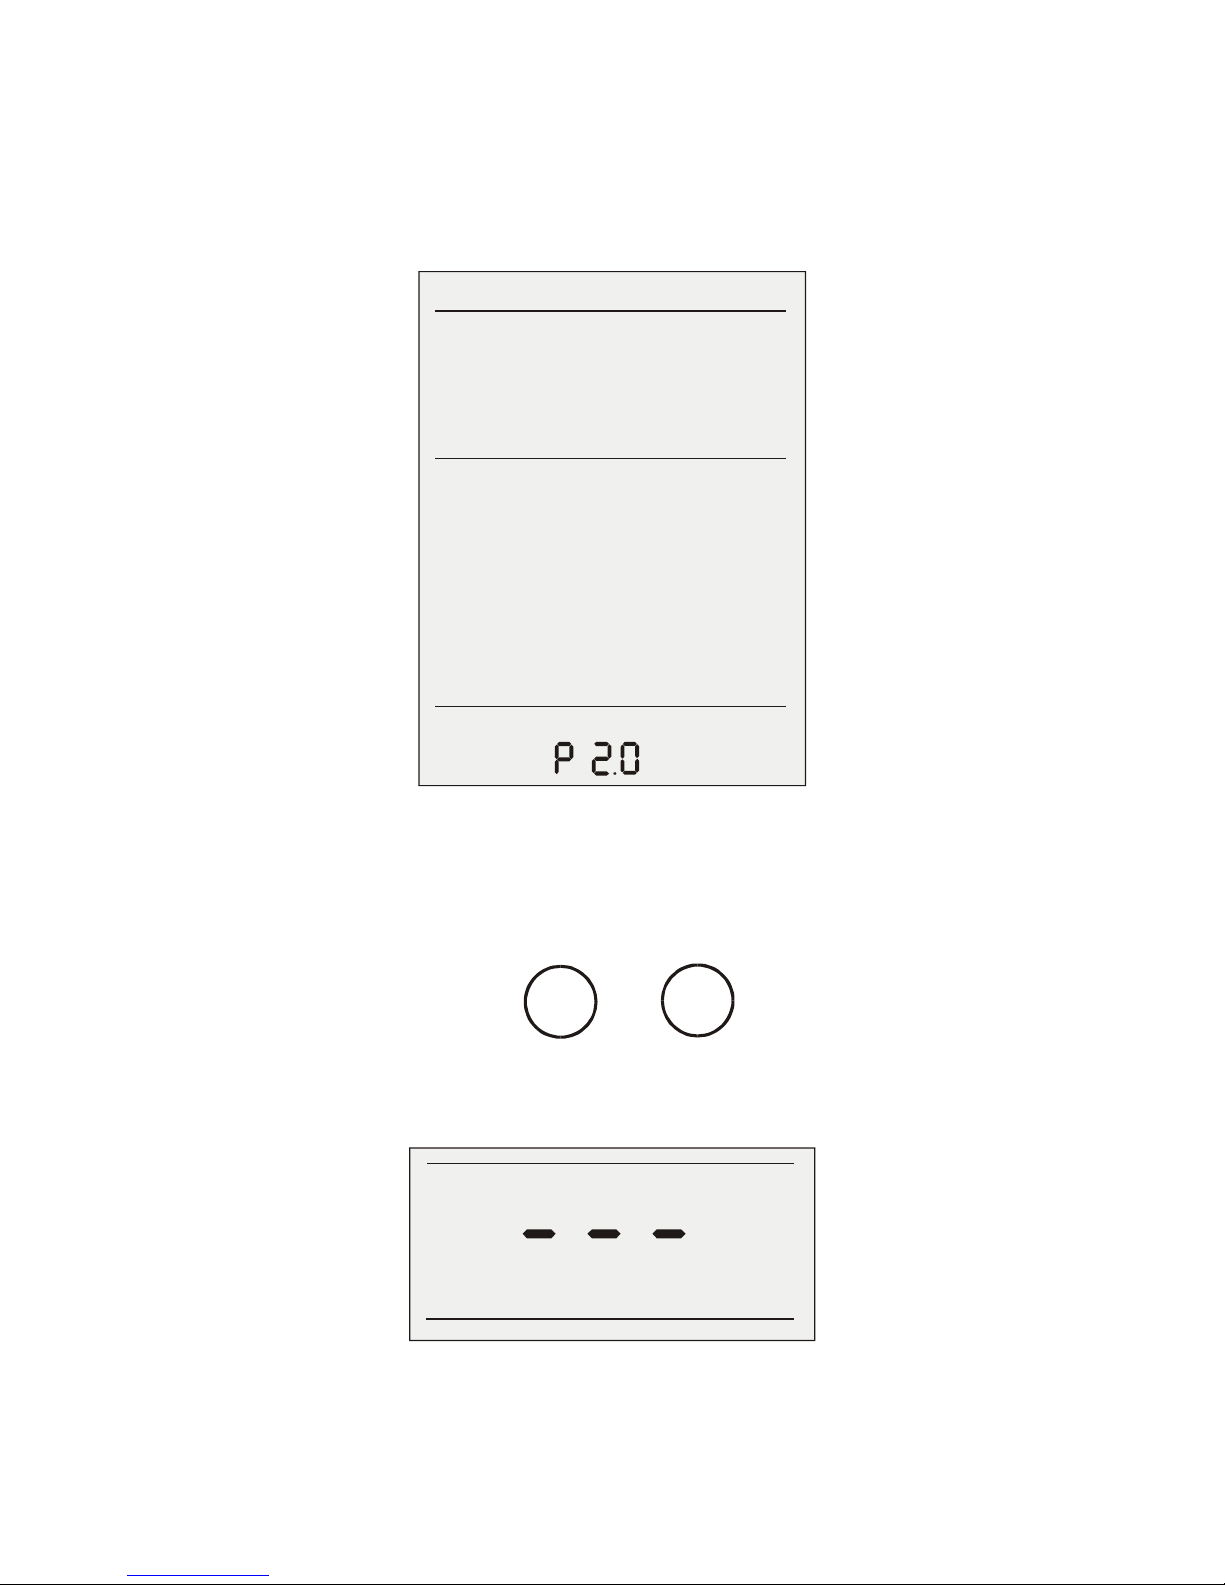
4.1.2 P2.0 View pH Electrode Slope
This setup menu allows you to view the pH electrode slope in % after
2-point standardization is successfully done.
pH
View
press to set value
press to accept
enter
ELECTRODE
% SLOPE
To View pH Electrode Slope
1. Access the View pH Electrode Slope menu from the pH Measure
screen by pressing the setup key.
2. Press ▲ and ▼ keys to scroll until display shown as above.
save
view
3. Press enter to view the offset. A series of dashes “- - -“ will be
displayed if the unit has not been standardized
pH % SLOPE
Instruction Manual CyberScan pH1500
15
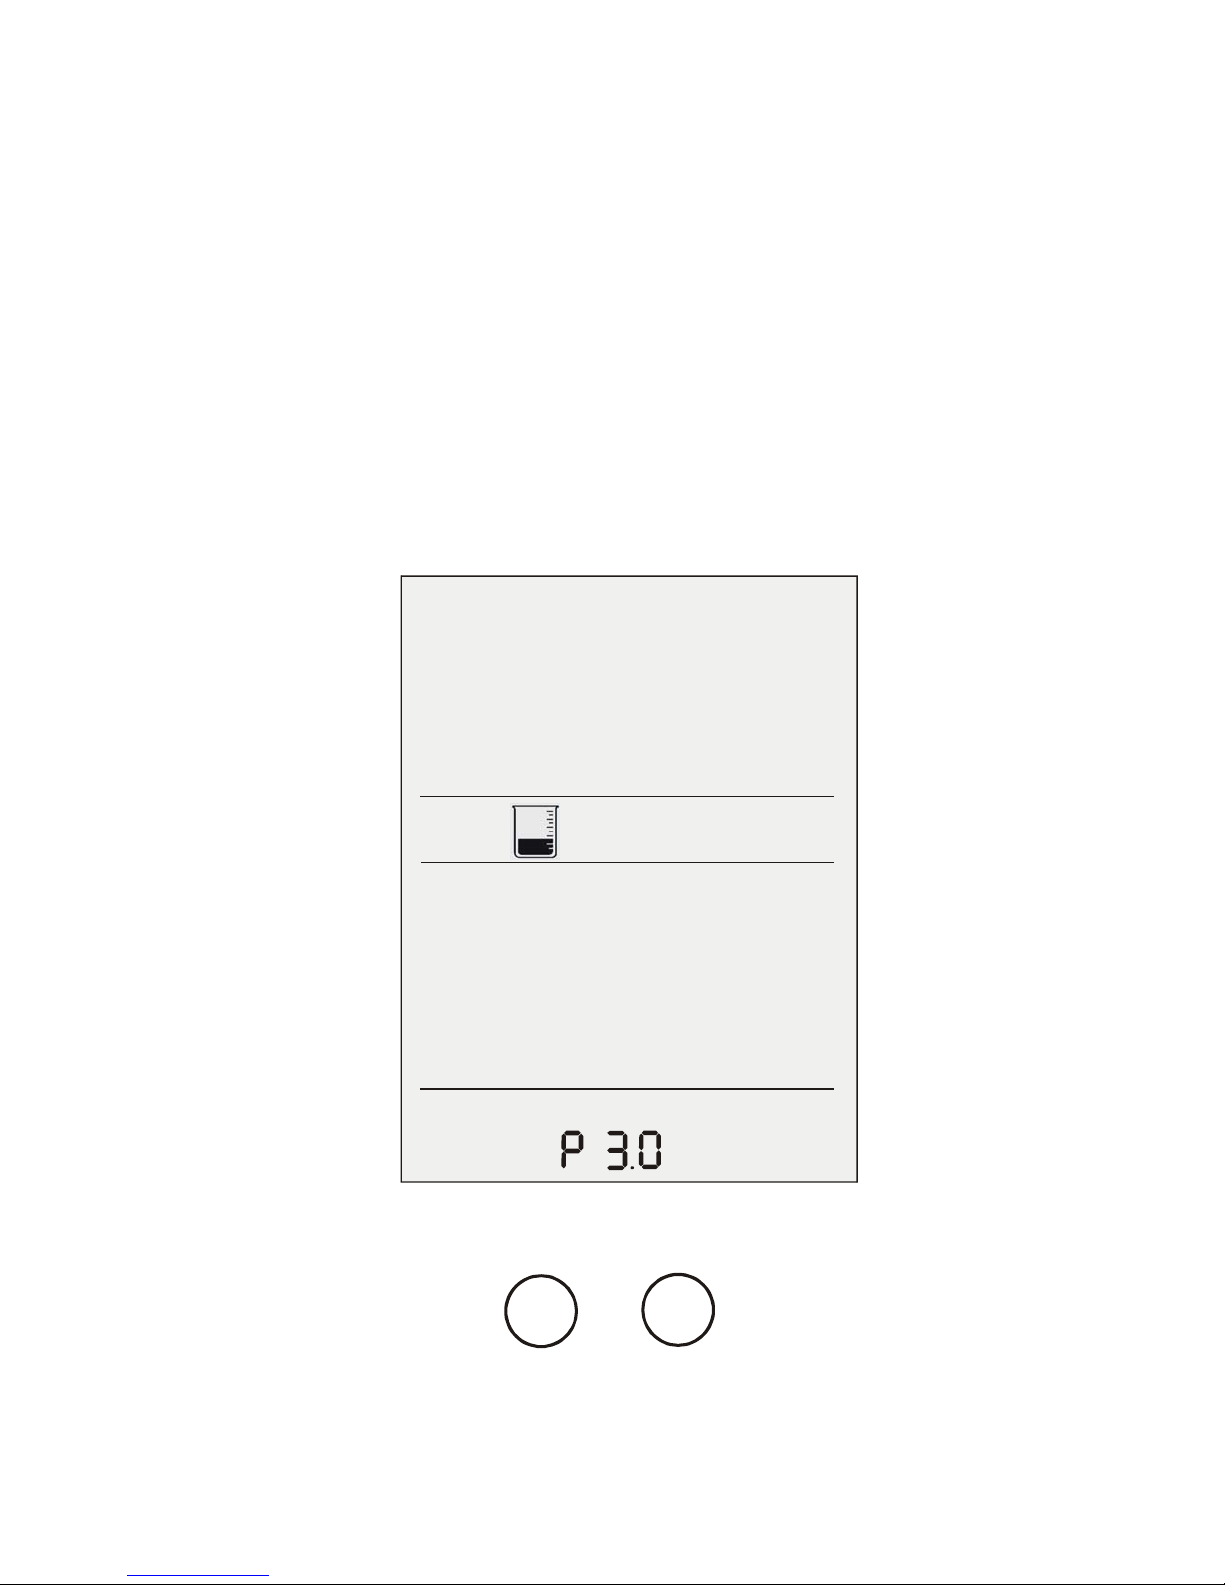
4.1.3 P3.0 pH Buffer Group
This setup option allows you to select from 3 different buffer groups,
each containing 5 buffers, for auto buffer recognition.
The 3 buffer groups are:
USA buffers: 2, 4, 7, 10 and 12
European buffers: 1, 3, 6, 8 and 10
NIST buffers: 1.68, 4.01, 6.86, 9.18 and 12.46
To Set pH Buffer Group
1. Access the Select Buffer menu from the pH Setup Screen by
pressing the setup key.
press to set value
press to accept
enter
ELECTRODE
BUFFER
select
2. Press ▲ and ▼ keys to scroll until display shown as above.
save
view
.

Instruction Manual CyberScan pH1500
16
print
enter
3. Press enter to make a selection..
1 3 6 8 10 13
2 4 7 10 12
BUFFER
select
BUFFER
select
1.68 4.01 6 .86 9. 18 12.46
BUFFER
select
save
view
save
view
4. To make a change or selection to the desired buffer group, press
enter key.
5. Use the ▲ or ▼ keys to scroll through the options available until
the desired buffer group is displayed.
6. Press enter key to accept the desired buffer group or press std
key to return to Measure mode without making any changes.
7. Continue to access other setup menu using ▲ or ▼ keys OR
press std key once to go to next setup page OR press std key
twice to return to Measure mode.

Instruction Manual CyberScan pH1500
17
4.1.4 P4.0 pH Resolution
This setup option allows you to select various pH resolution either
0.1, 0.01 or 0.001.
To Select pH Resolution
1. Access the Select pH Resolution menu from the pH Measure
screen by pressing the setup key.
2. Use the ▲ or ▼ key to scroll until the display “rESoL” is
displayed.
save
view
pH
press to set value
press to accept
enter

Instruction Manual CyberScan pH1500
18
std
print
enter
3. Press enter key to make selection and use the ▲ or ▼ key to
choose either 0.1 (one decimal place), 0.01 (two decimal place)
or 0.001 (three decimal place).
pH
pH
pH
save
view
save
view
4. Press enter key to confirm selection OR press std to exit from
this page.
5. Continue to access other setup menu using ▲ or ▼ keys OR
press std key to exit from the setup and return to Measure mode.

Instruction Manual CyberScan pH1500
19
4.1.5 P5.0 Temperature Unit
This setup option allows you to select unit of measure for
Temperature either in °C or °F.
To Select Temperature Unit
1. Access the Select Temperature Unit menu from any parameter
Measure screen by pressing the setup key.
2. Use the ▲ or ▼ key to scroll until the Select Temp Unit icon is
displayed.
save
view
select
press to set value
press to accept
enter

Instruction Manual CyberScan pH1500
20
print
enter
std
3. Press enter key to make selection and use the ▲ or ▼ key to
choose either °C or °F.
select
°C
select
°F
save
view
4. Press enter key to confirm selection OR press std to exit from this
page.
5. Continue to access other setup menu using ▲ or ▼ keys OR press
std key to exit from the setup and return to Measure mode.

Instruction Manual CyberScan pH1500
21
print
enter
std
4.1.6 P6.0 Stability Indicator
This setup option allows you to set the stability indicator to be
displayed on the screen whenever reading has stabilized, thus
minimizes guesswork.
To Set Stability Indicator
1. Access the Set Stability Indicator menu from any Measure screen
by pressing the setup key.
2. Use the ▲ or ▼ key to scroll until the screen displays the stable
icon is shown.
save
view
STABLE
press to set value
press to accept
enter
3. Press enter key to make selection and use the ▲ or ▼ key to toggle
between NO or YES. Select YES to display stable icon to be shown
whenever readings stabilize or NO if no indicator is needed.
4. Press enter key to confirm selection OR press std to exit from this
page.
5. Continue to access other setup menu using ▲ or ▼ keys OR press
std key to exit from the setup and return to Measure mode.

Instruction Manual CyberScan pH1500
22
4.1.7 P7.0 Baud Rate
This setup option allows you to set the baud rate (bits per second) of
the communication protocol interface.
To Set Baud Rate
Print
press to set value
press to accept
enter
1. Access the Set Baud Rate menu from any Measure screen by
pressing the setup key.
2. Use the ▲ or ▼ key to scroll until the screen display as shown.

Instruction Manual CyberScan pH1500
23
3. Press enter key to make selection and use the ▲ or ▼ key to
toggle between 4800, 9600, 19200 and 38400.
save
view
press to set value
press to accept
enter
Print
Print
press to set value
press to accept
enter
4. Press enter key to confirm selection OR press std to exit from
this page.
5. Continue to access other setup menu using ▲ or ▼ keys OR
press std key to exit from the setup and return to Measure mode.

Instruction Manual CyberScan pH1500
24
4.1.8 P8.0 Parity Bit
This setup option allows you to set the parity bit of the communication
protocol interface.
To Set Parity Bit
1. Access the Set Parity Bit menu from any Measure screen by
pressing the setup key.
2. Use the ▲ or ▼ key to scroll until the screen display as shown.
save
view
press to set value
press to accept
enter
Print
press to set value
press to accept
enter
Print

Instruction Manual CyberScan pH1500
25
3. Press enter key to make selection and use the ▲ or ▼ key to
toggle between 0 (none), 1 (odd) or 2 (even).
save
view
save
view
4. Press enter key to confirm selection OR press std to exit from
this page.
5. Continue to access other setup menu using ▲ or ▼ keys OR
press std key to exit from the setup and return to Measure mode.

Instruction Manual CyberScan pH1500
26
4.1.9 P9.0 Stop Bit
This setup option allows you to set the stop bit of the communication
protocol interface.
To Set Stop Bit
1. Access the Set Stop Bit menu from any Measure screen by
pressing the setup key.
2. Use the ▲ or ▼ key to scroll until the screen display as shown.
save
view
press to set value
press to accept
enter
Print
press to set value
press to accept
enter
Print

Instruction Manual CyberScan pH1500
27
3. Press enter key to make selection and use the ▲ or ▼ key to
toggle between 1 or 2.
save
view
save
view
4. Press enter key to confirm selection OR press std to exit from
this page.
5. Continue to access other setup menu using ▲ or ▼ keys OR
press std key to exit from the setup and return to Measure mode.

Instruction Manual CyberScan pH1500
28
4.1.10 P10.0 Print Data
This setup option allows you to print current displayed data or data
stored in the meter’s memory to a computer or printer via its RS232
interface port. Note all the communication protocol for both the meter
and computer/printer must match before successful printing can be
performed.
To Select Print Data Option (Current / Memory)
1. Access the Select Print Data Option menu from any Measure
screen by pressing the setup key.
2. Use the ▲ or ▼ key to scroll until the screen display as shown.
save
view
press to set value
press to accept
enter
Print
Data
3. Press enter key to make selection and use the ▲ or ▼ key to
toggle between Current or Memory data print out selection. Press
enter for the desired selection OR press std to exit from this
page.
4. Press enter key to confirm selection.

Instruction Manual CyberScan pH1500
29
4.1.11 P11.0 Clear Stored Data
This setup option allows you to clear all stored data sets (from
previous measurements) in the meter’s memory for new data to be
stored. Note old data sets will be overwritten by any new data sets in
the event when the stored locations have exceeded.
To Clear Stored Data
1. Access the Clear Stored Data menu from any Measure screen by
pressing the setup key.
2. Use the ▲ or ▼ key to scroll until the screen displays as shown.
save
view
press to set value
press to accept
enter
Print
press to set value
press to accept
enter
Data
clear

Instruction Manual CyberScan pH1500
30
std
print
enter
3. Press enter key to make selection and use the ▲ or ▼ key to
toggle between NO or YES. Select YES to clear all stored data
sets or NO if no change is made.
save
view
4. Press enter key to confirm selection OR press std to exit from
this page.
5. Continue to access other setup menu using ▲ or ▼ keys OR
press std key to exit from the setup and return to Measure mode.

Instruction Manual CyberScan pH1500
31
std
print
enter
4.1.12 P12.0 Clear Buffer Values
This setup option allows you to clear the standardized buffer values.
To Clear Buffer Values
1. Access the Clear Buffer Values menu from the pH Measure
screen by pressing the setup key.
2. Use the ▲ or ▼ key to scroll until the screen displays the clear
BUFFER icon along with the previously buffer values being
standardized.
save
view
press to set value
press to accept
enter
clear
BUFFER
3. Press enter key to make selection and use the ▲ or ▼ key to
toggle between NO or YES. Select YES to clear all the existing
buffer values or NO if no change is to be made.
4. Press enter key to confirm selection OR press std to exit from
this page.
5. Continue to access other setup menu using ▲ or ▼ keys OR
press std key to exit from the setup and return to Measure mode.

Instruction Manual CyberScan pH1500
32
View
press to set value
press to accept
enter
ELECTRODE
mV
4.1.13 P13.0 View mV offset
This setup option allows you to view the standardized mV offset
values.
To view mV offset values
1. Access the View mV offset values menu from the REL mV
Measure screen by pressing the setup key.
2. A series of dashes “- - -“ will be displayed if the unit has not been
standardized

Instruction Manual CyberScan pH1500
33
4.1.14 P14.0 Clear mV offset
This setup option allows you to clear the standardized mV offset
values.
To Clear mV offset Values
1. Access the Clear mV offset values menu from the REL mV
Measure screen by pressing the setup key.
2. Use the ▲ or ▼ key to scroll until the screen displays the Offset
screen with the CLEAR icon along.
3. Press enter key.
4. Use the ▲ or ▼ key to scroll between YES or NO to clear the
REL mV offset values.
5. Press enter to confirm the selection.
press to set value
press to accept
enter
clear
View
mV

Instruction Manual CyberScan pH1500
34
5
PH OPERATION
5.1 Standardization
Because electrodes vary in their response, you must standardize or
calibrate your pH meter and electrode to compensate for electrode
variation. The more frequently you standardize or calibrate, the more
accurate your measurements. Standardize at least daily, or more
often, for accurate results. The meter allows for automatic calibration
with auto buffer recognition for up to 6 buffer values from choice of
either 1 of the 3 buffer groups available or 6 custom pH buffer values
selected from any of these 3 buffer groups (Depending on buffer
selection).
It is recommended that you perform at least 2 point calibration for
optimum meter accuracy.
Always rinse the electrode with tap or distilled water between different
pH buffers to avoid carry-over.
To delete a previous standardization (if performed earlier), refer to the
Section 4.1.12 for details on how to clear pH buffer values.

Instruction Manual CyberScan pH1500
35
)
This meter allows for automatic calibration using up to 6 buffers.
Press mode key to toggle
between different modes until the
pH Measure mode is displayed.
Press std key to begin
standardization. Similarly pressing
std key again at the Standardize
mode exits and returns to the
Measure mode.
Immerse the rinsed electrode(s) into a buffer from the selected
buffer group. Stir moderately.

Instruction Manual CyberScan pH1500
36
A. Using Standard Buffer Group
a. Press std key to access the standardize mode while you are in the
pH Measure mode.
b. Meter starts scanning the buffer from the already selected buffer
group. Proceed to step c to begin standardization. Press setup key if
you need to select other buffer group. Use ▲ or ▼ key to select
desired buffer group and press enter key to confirm selection.
1 3 6 8 10 13
1.68 4.01 6. 86 9.1 8 12.46
BUFFER
select
2 4 7 10 12
BUFFER
select
BUFFER
select
save
view
save
view
c. The meter automatically scans and recognizes the pH buffer being
standardized, it locks and displays the closest suitable pH buffer
value on the screen. When the stable icon appears, the buffer value
flashes on the screen, prompting if you wish to confirm the selection.
d. Press enter key to make selection. The displayed buffer value
flashes momentarily and the meter automatically accepts the
calibration point. The first calibration point (pH offset) is successfully
performed.
e. If incorrect selection is made or the electrode condition does not meet
the meter’s criteria, an error message prompts you to troubleshoot or
take remedial action. Press enter key to escape from the error
message window.

Instruction Manual CyberScan pH1500
37
f. Repeat the above step c through e for the second and subsequent
calibration points. Meter automatically returns to the Measure mode
after the last 5
th
calibration point has been performed. In the pH
Measure mode, the screen shows all the buffer values being
standardized. An error message Err2 will be displayed if there is more
than 6 points pH standardization being performed.
Note:
If the “EURO” buffer is selected, meter returns to measurement mode
automatically after 6
th
point calibration.

Instruction Manual CyberScan pH1500
38
std
B. Using Custom Buffer Values
a. Press std to access the standardize mode while you are in the pH
Measure mode.
b. Proceed to step c to begin standardization. Press setup key if you
need to select other buffer group. Use ▲ or ▼ key to select desired
buffer group and press enter key to confirm selection.
c. The meter automatically scans and recognizes the pH buffer being
standardized; it locks and displays the closest suitable pH buffer
value on the screen. When the stable icon appears, the buffer value
flashes on the screen, prompting if you wish to confirm the selection.
d. Press enter key to make selection. The displayed buffer value
flashes momentarily and the meter automatically accepts the
calibration point. The first calibration point (pH offset) is successfully
performed.
e. If incorrect selection is made or the electrode condition does not meet
the meter’s criteria, an error message prompts you to troubleshoot or
take remedial action. Press enter key to return to standardization
using correct buffer values.
f. However for custom buffer values, the next buffer value must be
more than 2 pH apart from the last standardized buffer value. When
standardizing the second or subsequent buffer value, the screen
scans and displays the rest of not-standardized buffer values.
g. To select other buffer value from another buffer group, press the
setup key and use ▲ or ▼ key to choose the desired buffer group.
Press enter key to confirm selection.
h. Similarly the meter scans, displays the available not-standardized
buffer values of the buffer group and locks onto the closest buffer
value for your selection.
i. Press enter key to confirm selection.
j. Repeat the above step g through i for the subsequent calibration
points. Meter automatically returns to the Measure mode after the last
5
th
calibration point has been performed. An error message Err2 will
be displayed if there is more than 6 points pH standardization being
performed.
k. In the pH Measure mode, the screen shows all the buffer values
being standardized.
) When the ATC probe is connected, the meter will continually adjust
for temperature. Therefore the buffer values may vary slightly from
the nominal values because of temperature variations.

Instruction Manual CyberScan pH1500
39
5.2 pH Electrode Diagnosis Indicator
There is an electrode diagnosis icon that indicates the condition of pH
electrode being used.
The STABLE icon will appear once the reading is stabilised. If the
meter is calibrated with 2 or more points, then meter displays the
electrode characteristic indicator bar with appropriate segments.
All 3 segments lighted: 102% < Slope < 90%
2 segments lighted: 90% < Slope < 80%
1 segment lighted: 80% < Slope < 70%
None lighted: Slope < 70%
mV measurement (absolute)
Press the mode to go to the mV measurement mode. Meter displays
the current mV value with stable icon if the reading is stable.
REL mV measurement
Press the mode key to select the REL mV measurement mode.
Meter displays the REL mV value if the meter has already been
standardized. Otherwise it displays the absolute value of the oRP
solution.
Temperature measurement
If the temperature probe is not connected then meter displays 25°C in
pH1500 model or manually adjusted temperature value in pH 1500
and default icon on the secondary display.
If the temperature probe is connected then meter senses the actual
temperature and displays it with ATC icon.
Memory in/ Recall functions
While in the measurement mode, by pressing the key will store the
displayed data in the non-volatile memory.
While in the measurement mode, by pressing the key will retrieve
data from the non-volatile memory on last in first out basis. (LIFO)
By pressing enter key user can scroll through the rest of the memory
locations.
Serial communication interface (RS232)
Meter will be able to communicate with PC which has the user
interface software installed. Serial printer can also be connected to
the meter to get the print out of the current displayed data or data
stored in the memory by pressing enter/ print key.
Error messages
Err: Communication receive buffer is overflowing
Err1: Communication error due to baud rate/ parity/ frame/ stop
Err2: More than 6 points pH calibration

Instruction Manual CyberScan pH1500
40
mode
save
6
mV OR RELATIVE mV OPERATION
6.1 Absolute mV
Millivolts (mV) measurement is used primarily for measuring redox
potential (also known as ORP, oxidation reduction potential). You will
normally use a platinum ORP electrode, combined with a reference
electrode, to measure redox potential (ORP) of a test sample. ORP
measurements indicate the oxidizing or reducing capability of a
solution. You can also use ORP values to monitor or control solutions
requiring a set amount of oxidants or reductants. Calibration of ORP
is not necessary. However it is essential to cross-reference using
known Quinhydrone or Pre-treatment ORP solutions to ensure good
working condition and response of ORP electrode being used from
time to time.
1.
Press mode key until your meter displays the mV mode.
2.
Immerse the electrode in a sample solution.
3.
The stable icon appears when reading stabilizes. The reading
may be recorded at this time by storing into meter’s memory
using ▲ save key.

Instruction Manual CyberScan pH1500
41
mode
std
6.2 Relative mV
The Relative mV mode helps you to standardize certain analytical
and monitoring activities such as filtrations.
1.
Press mode until your meter displays the Relative mV mode.
2.
Immerse the electrode in a sample solution.
3.
Press std and use the or keys to adjust the mV value to
the std solution value. Press enter key to confirm the
adjustment.
Note: Maximum adjustable mV offset value is ±150.0 mV.

Instruction Manual CyberScan pH1500
42
6.3 Temperature Calibration
1.
Press mode to go to the absolute mV measure screen
2.
Press std. this will take you to the temperature calibration (MTC or ATC)
3.
Press p or q to adjust the temperature.
4.
Press enter to confirm the reading.
Note: Maximum adjustable temperature offset is ±5°C/ 9°F.

Instruction Manual CyberScan pH1500
43
7
MEASUREMENT
1. Immerse the electrode (along with temperature probe if available
for the measurement of pH) into the sample solution. Stir
moderately.
Make sure that the meter is in the Measure mode.
2. When the meter senses that the reading has stabilized, the stable
icon will appear under the reading. The reading may be recorded
at this time.
)Stirring with a magnetic stir bar and stirrer provides faster
electrode response.

Instruction Manual CyberScan pH1500
44
save
print
enter
save
view
8
MEMORY
8.1 Store Value Into Memory
In any Measure mode, press ▲ save key to store the displayed
reading into the meter’s non-volatile memory. A memory location is
shown momentarily and the meter returns to the Measure mode.
8.2 Recall Value From Memory
In any Measure mode, pressing ▼ view key retrieves data from the
meter’s memory on the Last-In-First-Out (LIFO) basis. The screen
displays the last stored memory location. To view stored data in that
particular memory location, press enter key. If you wish to view data
at specific memory location, use ▲ or ▼ key to scroll and select.
Press enter key to view data contents.
Pressing enter key repeatedly allows you to view data contents until
a series of dashes appear on the display which indicates an empty
data location.
Pressing std key allows you to return to the Measure mode in any
sequence of memory recall.

Instruction Manual CyberScan pH1500
45
std
print
enter
9
PRINT DATA
9.1 Printing Data
Depending on the print option in the meter setup, pressing print key
allows you to print either current displayed reading or stored data
from meter to a PC or printing device via a RS232 communication
cable. Ensure that both meter and peripheral have the same
configuration in terms of baud rate, parity bit and stop bit. Please
check with the printer’s or peripheral’s manufacturers for details of
any specific settings of the device in use.
If there is an error message during operation, the screen displays
Err1 as shown below. This indicates a communication error due to
incorrect baud rate, parity or stop bit being selected. Press std key to
return to the Measure mode.

Instruction Manual CyberScan pH1500
46
10
pH THEORY
The measurement of pH plays an important role in quantifying and
controlling acidity and alkalinity levels for industry and research. pH is
a measure of the acidity or alkalinity of a solution and can be
represented by this equation:
pH= -log [H+]
With [H+] representing the concentration of hydrogen ions in the
solution. pH is sometimes referred
to as power of the hydrogen ion in a solution.
By using a pH meter, you can most precisely determine exact pH
levels of solutions. For example, rather than saying that lemon juice is
quite acidic, you can say that lemon juice has a pH of 2.4. an exact
pH value is often required to control or optimise acidity levels for
manufacturing processes or for basic research.
pH values generally range from 0 to 14, with a pH value of 7 being
the neutral point, or the value of pure water. The pH values above the
neutral point represent increasing alkalinity, whereas pH values
below the neutral point represent increasing acidity.

Instruction Manual CyberScan pH1500
47
10.1 Measuring pH
To measure pH, the meter receives a millivolts signal from a glass
bulb electrode that is sensitive to hydrogen ions. Therefore the
potential developed at the glass bulb is directly related to the pH of
the solution.
The glass bulb electrode is paired with a reference electrode which
completes the electrical measuring circuit and provides a stable
reference point. These two electrodes can be separated or they can
be joined to create a combination electrode. The combination glass
electrode makes a single connection to the pH meter which converts
the electrodes millivolts output to pH unit, and displays the result.
This meter can also use a field effect transistor (FET) electrode for
measuring pH. This type of electrode employs an ion-sensitive solid
state membrane as part of a transistor to measure the hydrogen ion
concentration of a solution. The FET is paired with a reference
electrode and counter electrode that maintain a constant potential
while the FET responds to the sample.

Instruction Manual CyberScan pH1500
48
11
CLEANING
This meter requires no regular maintenance, but it is recommended
to occasionally wipe down the front with a damp cloth from time to
time. If there are any further questions regarding maintenance, call
the Eutech Instruments Technical Support hotline at (+65) 6778
6876.
12
TROUBLESHOOTING
Most troubles arise out of a problem with the electrode, not the meter.
However, a meter check can be performed, and is simple to do.
1. To test the meter for correct operation, install the BNC (input)
shorting cap. Press the mode key to access the mV mode, and
note the mV reading. If the meter reads 0+/-1 mV, it is measuring
correctly.
2. The meter will display Electrode Error when it detects an error in
electrode response. During standardization, the message
indicates that the electrode has a slope of less than 90% or more
than 102%. The Electrode Error message can indicate a bad
electrode(s), bad buffer(s) or a bad standard sequence
technique.

Instruction Manual CyberScan pH1500
49
13
METER SPECIFICATIONS
Display Custom LCD
Screen Size 7.2 x 10.6 cm
Measurement display height 5.5 cm
Temp./others display height 1.6 cm
Keypad controls 7 keys (membrane)
Memory
Internal Diagnostics yes
pH Mode
Range -1.999 to 19.999
Resolution 0.1/0.01/0.001
Relative Accuracy ± 0.002
Automatic Buffer Recognition yes
Calibration Points 5/6
FET yes
mV Mode
Range -1800.0 to 1800.0
Resolution 0.1
Accuracy ± 0.2
Temperature Mode
Range -5 to 105
o
C 9 (23°F or 221°F)
Resolution 0.1
Accuracy ± 0.3
o
C
General
Inputs/ outputs BNC, Pin, ATC, DIN (for FET)
Electrical Requirements 115/60
230/50
Impedance >10
12
ohms
Meter Size 14.0 X 19.5 X 8 cm
Meter Weight 650 g
RS232 Input

Instruction Manual CyberScan pH1500
50
14
ACCESSORIES
Consult your Authorized Distributors for these items and other range
of specialized pH electrodes or Ion Selective Electrodes.
Replacement Meter & Meter Accessories
EC-FG73504-01B Refillable Glass-body combination pH electrode with 1m
cable length and BNC connector
EC-FC72522-01B Sealed polymer gel plastic-body combination double
junction pH electrode with 1m cable length and BNC
connector
EC-FC72522R-01B Refillable plastic-body combination double junction pH
electrode with 1m cable length and BNC connector
EC-FC79602-01B Sealed polymer gel plastic-body double junction ORP
electrode with 1m cable length and BNC connector
EC-FC79602R-01B Refillable plastic-body combination double junction ORP
electrode with 1m cable length and BNC connector
Temperature probe (for ATC)
EC-DAS2000
Data Acquisition Software in WINDOWS
version (1 unit of
CD-ROM)
ECCA01M09F09 Meter to computer communication 1 m cable length (9-pin
female to 9-pin male)
ECCA01M09F25 Meter to computer communication 1 m cable length (9-pin
male to 25-pin female)
ECCA01M09M25 Meter to computer communication 1 m cable length (25-pin
male to 25-pin male)
60X130115 110/120V AC/DC 9V 500mA power adapter (50/60 Hz) – 2-
flat pin type centre negative, US
60X130117 220/230V AC/DC 9V 500mA power adapter (50/60 Hz) – 3-
flat pin type centre negative, UK
60X130118 220/230V AC/DC 9V 500mA power adapter (50/60 Hz) – 2-
round pin type centre negative, Euro

Instruction Manual CyberScan pH1500
51
Calibration Solutions
EC-BU-1BT pH 1.68 calibration buffer (480ml bottle)
EC-BU-4BT pH 4.01 calibration buffer (480ml bottle)
EC-BU-7BT pH 7.00 calibration buffer (480ml bottle)
EC-BU-10BT pH 10.01 calibration buffer (480ml bottle)
EC-BU-12BT pH 12.45 calibration buffer (480ml bottle)
EC-DPC-BT Protein Cleaning Solution for pH electrode (480 ml per
bottle)
EC-RE-005 Storage Solution for pH electrode (480 ml per bottle)
EC-RE-001 Ag/AgCl Electrolyte with Ag/AgCl (for refilling electrode)
EC-ORP-PRE Pre-treatment Solution 475mV (480ml bottle)
EC-ORP-QUIN Quinhydrone 255mV (480ml bottle)
EC-AST-PK pH sachet assortment pack; 5 each of pH4.01, 7.00, 10.01
and deionized water (20 x 20 ml per box)
EC-BU-4BS pH 4.01 buffer sachets (20 x 20 ml per box)
EC-BU-7BS pH 7.00 buffer sachets (20 x 20 ml per box)
EC-BU-10BS pH 10.01 buffer sachets (20 x 20 ml per box)
EC-RIN-WT Deionised water rinse sachets (20 x 20 ml per box)
EC-PH-ELSTDC Electrode Stand for bench meter
)
For a complete selection of electrodes and accessories,
please contact your Eutech Instruments nearest distributor or
sales representative for details.

Instruction Manual CyberScan pH1500
52
15
WARRANTY
Eutech Instruments supplies this bench meter with a 3-year warranty
and 6-month warranty for electrode against manufacturing defects
from the date of purchase. If repair or adjustment is necessary and
has not been the result of abuse or misuse within the warranty period,
please return, freight prepaid, and correction will be made without
charge. Out of warranty items will be repaired on a charge basis.
Exclusions to the Warranty
The warranty shall not apply to defects resulting from:
• Improper or inadequate maintenance by customer;
• Unauthorized modification or misuse;
• Operation outside of the environmental specifications of the
products.
Return of Items
Authorization must be obtained from your Eutech Instruments’
Authorized Distributor or Eutech Instruments’ Customer Service Dept.
before returning items for any reason. When applying for
authorization, please include data regarding reason the items are to
be returned.
Packing the item for repair should be done using the original
packaging or material, with information about any fault identified.
Shipment damage as a result of inadequate packaging is your or your
distributor’s responsibility, whoever applicable.
Note:
Eutech Instruments reserves the rights to make improvements
in design, construction, and appearance of products without
notice.

Instruction Manual CyberScan pH1500
53
16
NOTICE OF COMPLIANCE
Warning
This meter generates, uses, and can radiate radio frequency energy.
If not installed and used properly, that is in strict accordance with the
manufacturer’s instructions, it may cause interference to radio
communications. It has been tested and found to comply with the
limits for a Class A computing device pursuant to Subpart J of Part 15
of FCC Rules, which are designed to provide reasonable protection
against such interference when operated in a commercial
environment. Operation of this equipment in a residential area may
cause interference, in which case the user, at his own expense, will
be required to take whenever measures may be required to correct
the interference.
This product is to be used only as described in the manual. This
product is for indoor use only, and must be used in a well ventilated
area.
Warning!
To meet or exceed FCC regulations and comply with CE
requirements, the Eutech Instruments supplied power supply must be
used. Use of a power supply that is not approved by Eutech
Instruments may cause safety hazards and/or cause unit to exceed
EMC limits and/or damage unit. When using his meter with a
computer or printer, a shielded RS232 cable must be used to meet or
exceed FCC regulations, and comply with CE Mark requirements.

For more information on Eutech Instruments products, contact your
nearest Eutech Instruments distributor or visit our website listed
below:
Manufactured by:
Eutech Instruments Pte Ltd.
Blk 55, Ayer Rajah Crescent,
#04-16/24 Singapore 139949
Tel: (65) 6778 6876
Fax: (65) 6773 0863
E-mail: marketing@eutechinst.com
Web-site: www.eutechinst.com
Distributed by:
 Loading...