

Page 1

USB Network Shared Storage
User’s Guide
Page 2
FCC Certifications
This Equipment has been tested and found to comply with the limits for a Class B
digital device, pursuant to part 15 of the FCC Rules. These limits are designed to
provide reasonable protection against harmful interference when the equipment is
operated in a commercial environment. This equipment generates, uses, and can
radiate radio frequency energy and, if not installed and used in accordance with the
instruction manual, may cause harmful interference to radio communications.
Operation of this equipment in a residential area is likely to cause harmful
interference in which case the user will be required to correct the interference at his
own expense.
This device complies with Part 15 of the FCC Rules. Operation is subject to the
following two conditions: (1) this device may not cause harmful interference, and (2)
this device must accept any interference received; including interference that may
cause undesired operation.
CE Mark Warning
This equipment complies with the requirements relating to electromagnetic
compatibility, EN 55022 class B for ITE, the essential protection requirement of
Council Directive 89/336/EEC on the approximation of the laws of the Member States
relating to electromagnetic compatibility.
Company has an on-going policy of upgrading its products and it may be possible that
information in this document is not up-to-date. Please check with your local
distributors for the latest information. No part of this document can be copied or
reproduced in any form without written consent from the company.
Trademarks:
All trade names and trademarks are the properties of their respective companies.
Copyright © 2005, All Rights Reserved.
1
Page 3

TABLE OF CONTENTS
OVERVIEW ..............................................5
UNPACKING INFORMATION..................................................................5
INTRODUCTION TO THE USB NETWORK SHARED STORAGE .6
Key Features ................................................................... 7
Front Panel ...................................................................... 8
Power Button .....................................................................................................8
Backup Button....................................................................................................8
LEDs Definition ..................................................................................................8
Rear Panel .................................................................... 10
Reset Default Button........................................................................................10
LAN Port...........................................................................................................10
Power Adapter Socket .....................................................................................10
INSTALLATION GUIDE........... 11
HARDWARE INSTALLATION................................................................ 11
SOFTWARE INSTALLATION.................................................................13
Installing the PNMD ........................................................ 13
Installing the EZIP Backup ............................................... 15
MAKING CONNECTION WITH THE DEVICE....................................17
Before you start .............................................................. 17
IP Protocol Setup ............................................................................................. 17
Windows 98/Me: ..............................................................................................18
Windows 2000: ................................................................................................20
Windows XP:.................................................................................................... 22
Connecting the device with PNMD .................................... 24
To access to folders in the device ..................................... 28
MANAGEMENT GUIDE........... 30
STARTING T HE GRAPHIC USER INTERFACE (GUI)...................30
USING THE GRAPHIC USER INTERFACE (GUI)..........................32
Understanding the GUI ........................................................ 32
Management items list ......................................................... 33
STATUS ....................................................................................................34
DISK .........................................................................................................35
Folder- Folder Configuration............................................. 35
To Configure Folder Properties...................................................................35
To Add a New Folder....................................................................................39
2
Page 4

To Delete a Folder ........................................................................................40
Disk- HD Configuration.................................................... 41
NETWORK...............................................................................................42
Host- Host Name Setting ................................................. 42
IP Address- IP address Setting......................................... 43
To Enable DHCP Client ...............................................................................43
To Configure the IP address for the device ..............................................43
SYSTEM...................................................................................................44
Administrator- Superuser Password Setting ....................... 44
Time- System Time Setting .............................................. 45
User- User Configuration ................................................. 46
To Configure a User......................................................................................46
To Add a New User.......................................................................................47
To delete a user.............................................................................................48
Group- Group Configuration............................................. 49
To add a new group......................................................................................49
To delete a group ..........................................................................................50
To configure a group.....................................................................................51
OPTION....................................................................................................52
FTP- FTP Configuration................................................... 52
Security IP- IP Filter Setting ............................................. 53
Security MAC- MAC Filter Setting ..................................... 54
File Download- File Download Configuration ...................... 55
MAINTENANCE ......................................................................................56
Upload/ Download Configuration ...................................... 56
Backup the Device Configuration Status:..................................................56
Reload the Device Configuration Status: ..................................................57
Code Page .................................................................... 57
Firmware Upgrade .......................................................... 57
Restart the System ......................................................... 58
Reset to Factory Default .................................................. 58
Syslog Information .......................................................... 58
WEB SERVER........................................................................................ 59
Web Server.................................................................... 59
Administration WEB ........................................................................................ 59
Web Server Configuration ..............................................................................60
USB .........................................................................................................61
Detail ............................................................................ 61
Disk Setup ..................................................................... 61
USB Storage information .............................................................................61
To Format Your USB Storage device ........................................................62
Mount/ Dismount Your USB Storage on Port II to the Device ...............62
Printer Setup.................................................................. 63
Procedures to setup the printer...................................................................63
3
Page 5

Clean Printer Job Queue ................................................. 67
APPENDIX ............................................. 68
TO USE THE BACKUP BUTTON........................................................68
TROUBLE SHOOTING ..........................................................................71
PRODUCT SPECIFICATION ................................................................74
4
Page 6

Overview
Thank you for purchasing the product. Read this chapter to know your
USB Network Shared Storage.
Unpacking information
Before getting started, please verify that your package includes the following items:
1. One USB Network Shared Storage. 2. One power adapter
3. One Quick Installation Guide 4. One Utility/ Manual CD
5
Page 7
Introduction to the USB Network Shared Storage
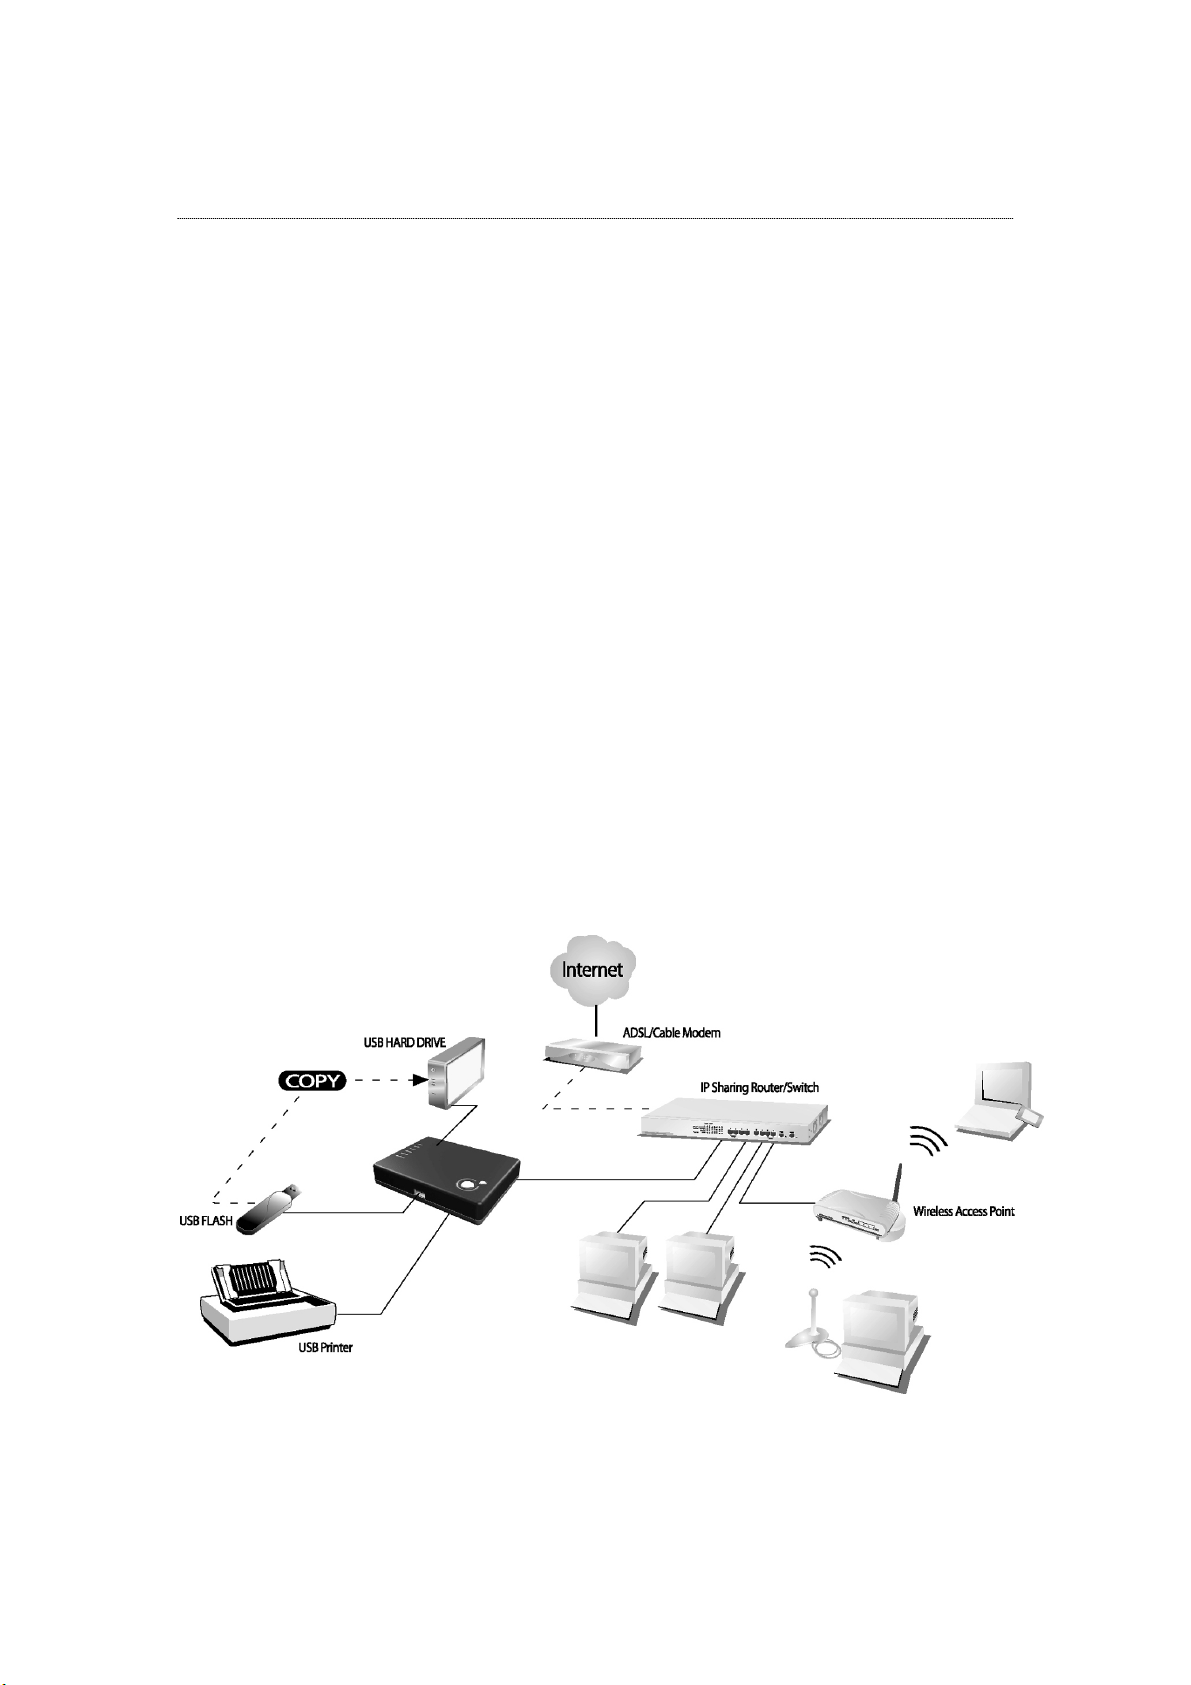
Easily back-up your data and share them, this product shifts any of your USB
interface storage devices to a NAS (Network Attached Storage) easily. With connection to an
external hard disk, it provides an excellent data storage and sharing solution for your various
demands -- small business, SOHO (Small Office or Home Office) or personal requirement
The USB Network Shared Storage embeds FTP server, Samba Server and HTTP
server. After connecting your USB storage to the device, members in your LAN will be able
to upload/download files to/from your USB storage device via “My Neighborhood” or FTP
client. You can also construct a WEB site with the HTTP server to share your files. The
embedded printer server also brings you terrific convenience on sharing your printer.
User-friendly and high compatibility, this product provides 2* USB ports for
connecting your USB storage devices and USB printer. With equipping a copy button, you can
also copy the file in one USB storage device to the other conveniently. The device is
compatible with Windows95/ 98/ 98SE/ ME/ XP/ 2000/NT4.0. The set-up procedures and
operation are simple and user-friendly.
6
Page 8

Key Features
Supports CIFS/SMB for Microsoft
Network to remote users easily retrieve
files using “My Neighborhood”
WEB-based User Interface (UI) for easy
configuration
Supports one touch copy to copy files
from USB port 2 to port 1
Built-in Samba server
Embeds FTP server for FTP clients to
transfer files conveniently.
Embeds Web server for Web site
construction.
Supports group access management.
Supports Reading/writing for connected
USB storage in EXT3, FAT32 file format.
Support firmware update over the
Graphic User Interface (GUI)
Supports eight currently connected
Samba users and eight currently
connected FTP users.
Complies with FCC, CE, and VCCI Class B
certification.
Supports USB memory stick (pen drive),
USB Hard Disk
Embeds USB printer server
Supports user name & password for 50
sets.
Supports access management for 100
folders
Supports static IP & DHCP client network
environment.
Compatible with Windows 95 /98 /98SE
/ME /XP /2000 /NT4.0/Linux/ MAC OS
Supports code page for
multiple-language characters (English,
German, French, Italian, Spanish,
Portuguese, Russian, Japanese,
Traditional Chinese, Simplified Chinese,
Korean)
Provide three Pre-defined User authority
levels, all / power / guest for accessing
Auto-detection for newly installed USB
Storage
Auto-detection for newly installed USB
Storage
7
Page 9
Front Panel
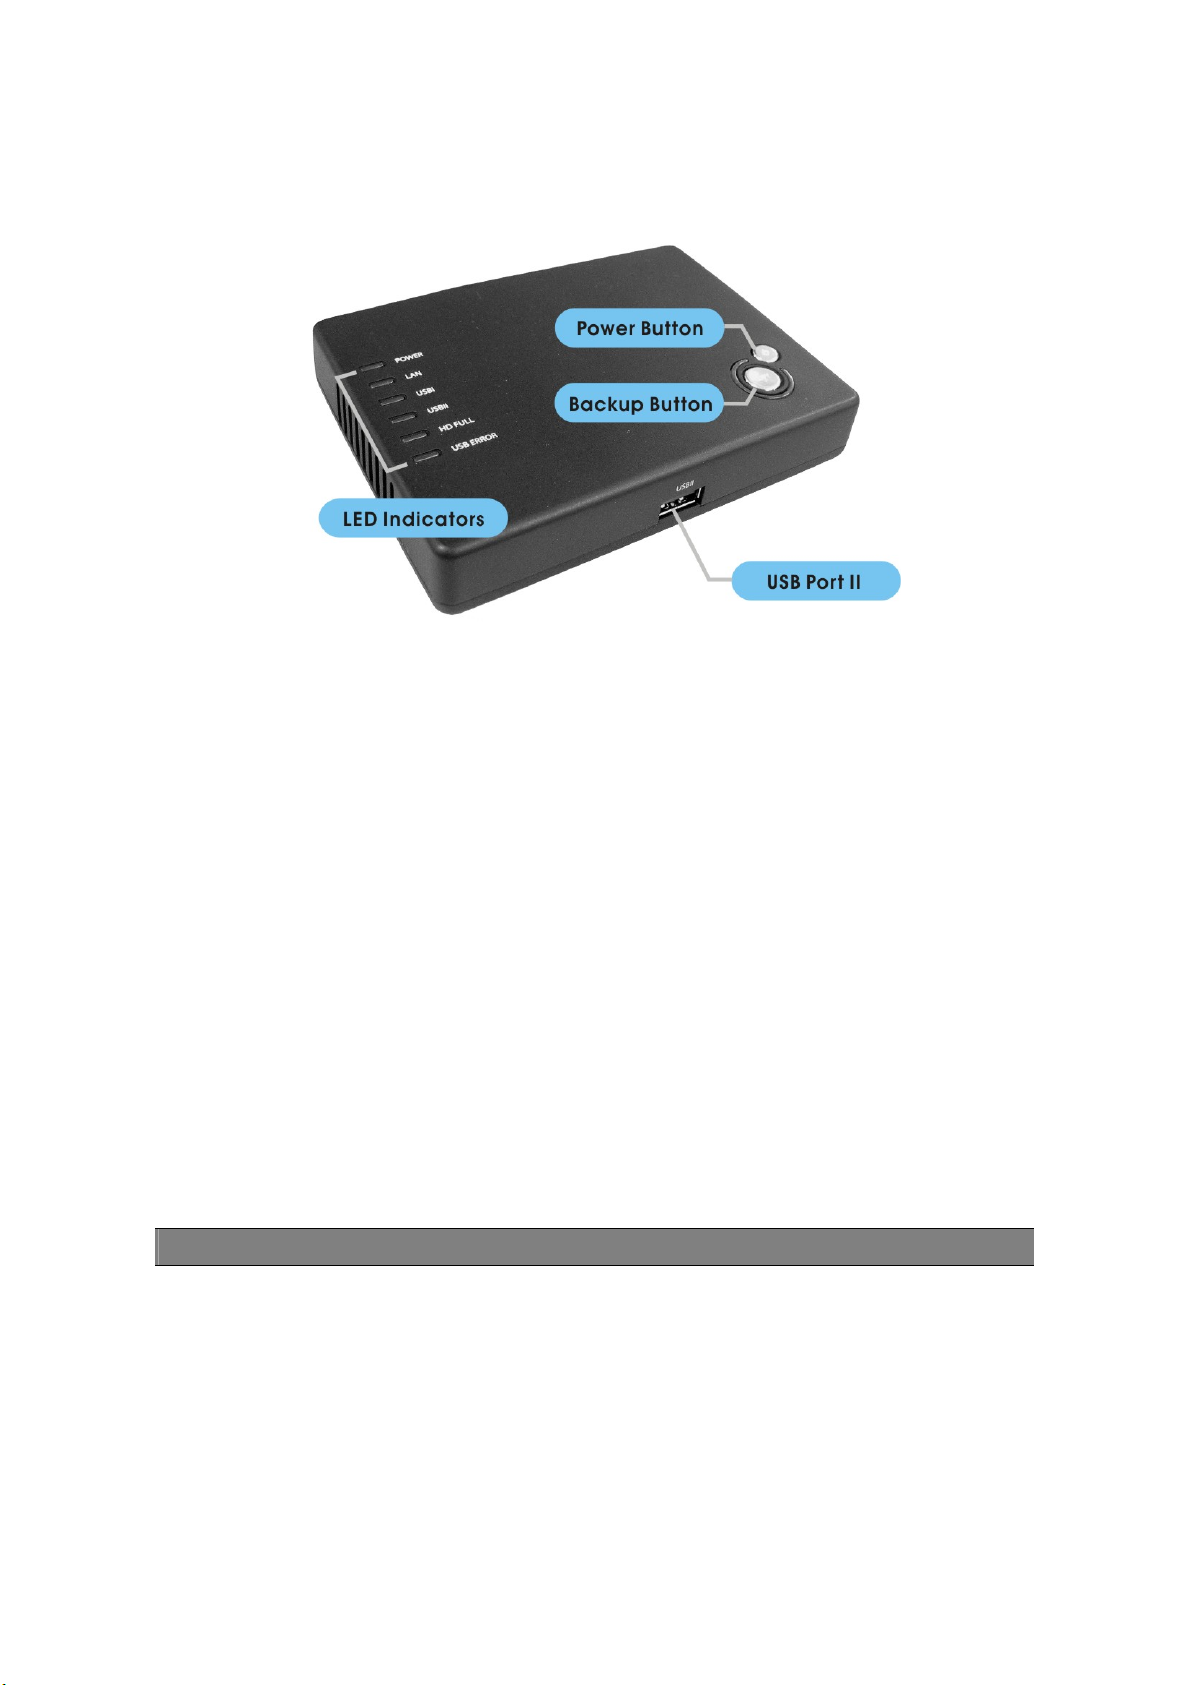
Power Button
To activate the device, press this Power button after connecting the device to an
appropriate power outlet with the provided power cord.
To power off, press and hold the button for two seconds until the Power LED starts
to blink.
Backup Button
Press the Backup button to copy files form USB port II to port I.
Note: To get instruction about the backup button, please refer to Appendix for
more information.
LEDs Definition
LED Status
Power
Steady Green Power on
Blinking Green System rebooting
LAN
Off Power off
Green Valid connection on LAN port
Blinking Green Data transmitting on LAN port
Off Invalid connection on LAN port
8
Page 10

Green USB device connected USB I
Off No connection
Green USB device connected USB II
Off No connection
HD Full Amber The USB HD that connected to USB
port 1 is full.
USB Error Amber Invalid copy after press the Backup
button.
Note: when this LED is lit, please
refer to “Syslog Information
detailed information.
Off Invalid connection on LAN port
” for
9
Page 11
Rear Panel
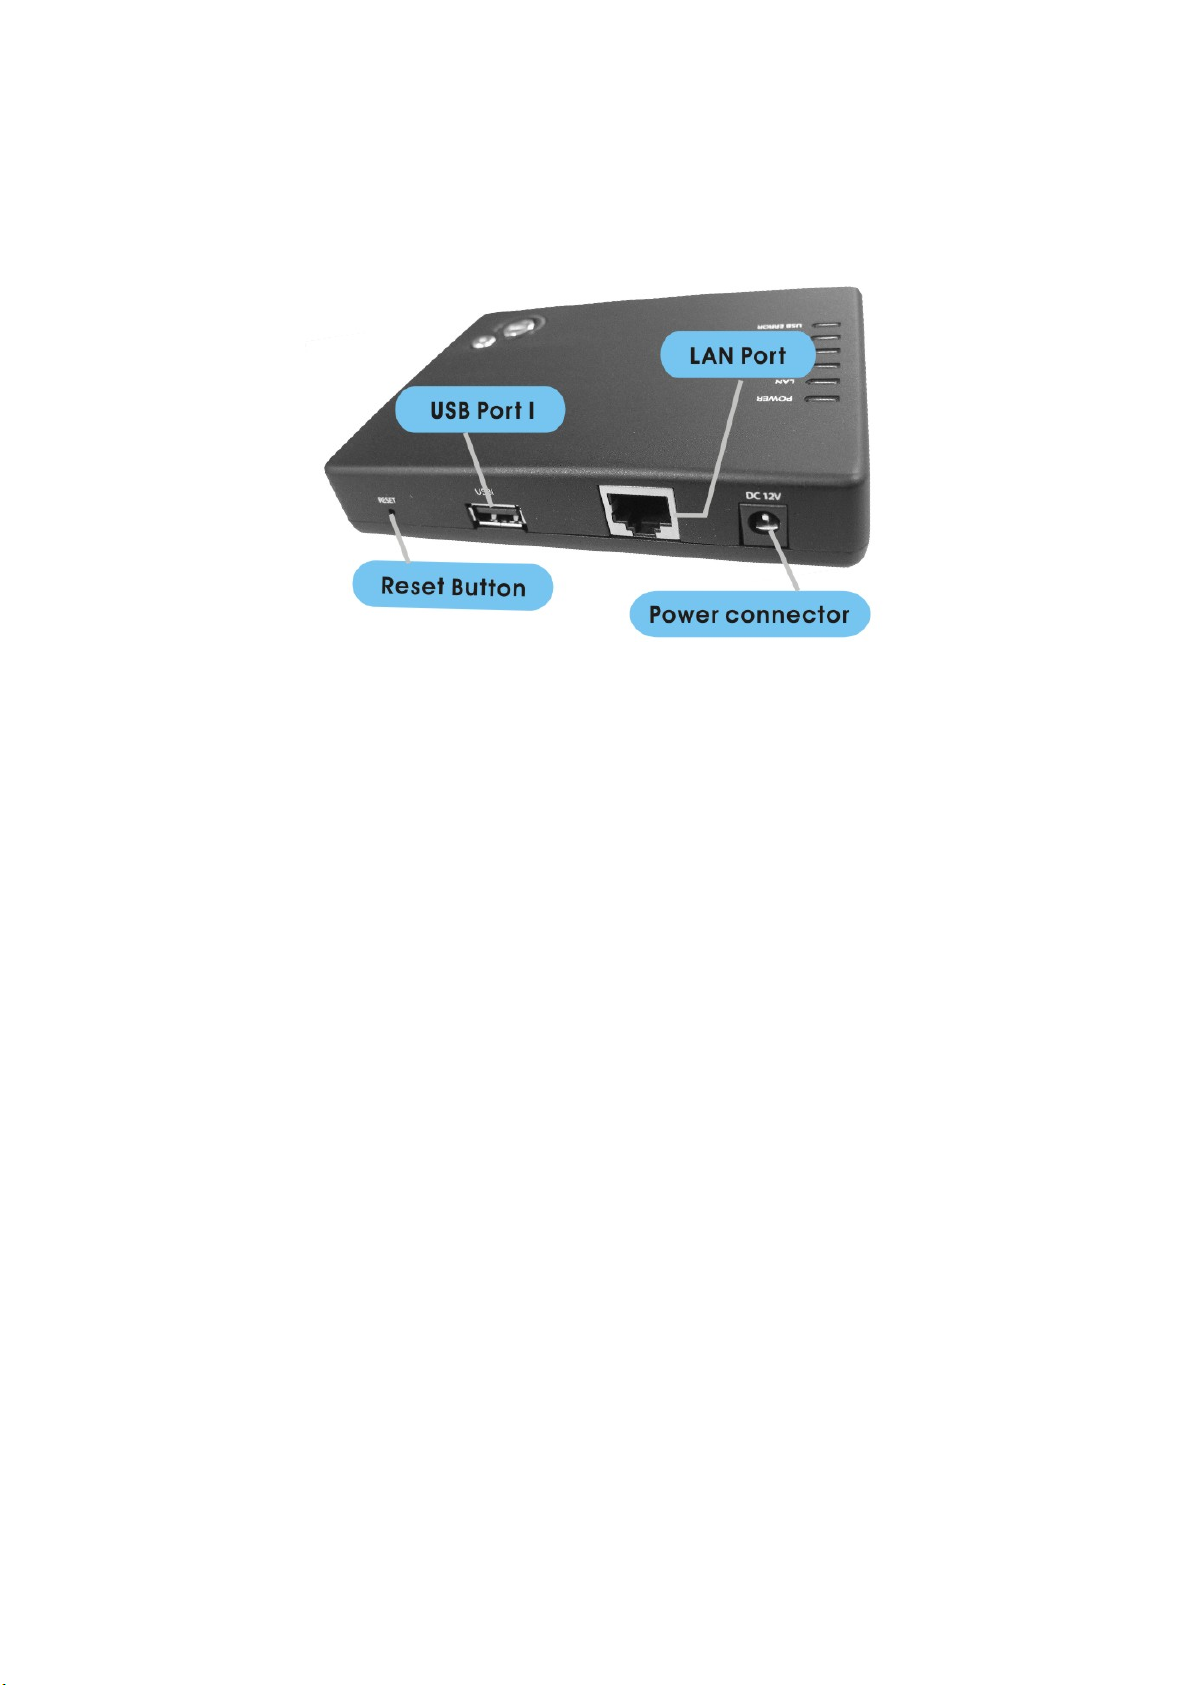
Reset Default Button
Press and hold the Reset Default Button for 4 seconds to reset all configurations
to factory default settings.
Note:
1. All configurations that are done by users will be removed from the device.
2. The device also supports restoring factory by software. To get instruction
restoring factory default parameters, see” Reset to Factory Default”
LAN Port
Connect the port with RJ-45 cable to your switch or IP sharing router.
Note:
To get instruction connecting the device to your LAN, refer to “Making
Connection with the Device”.
Power Adapter Socket
The socket for connecting the included power adapter.
10
Page 12
Installation Guide
Hardware Installation
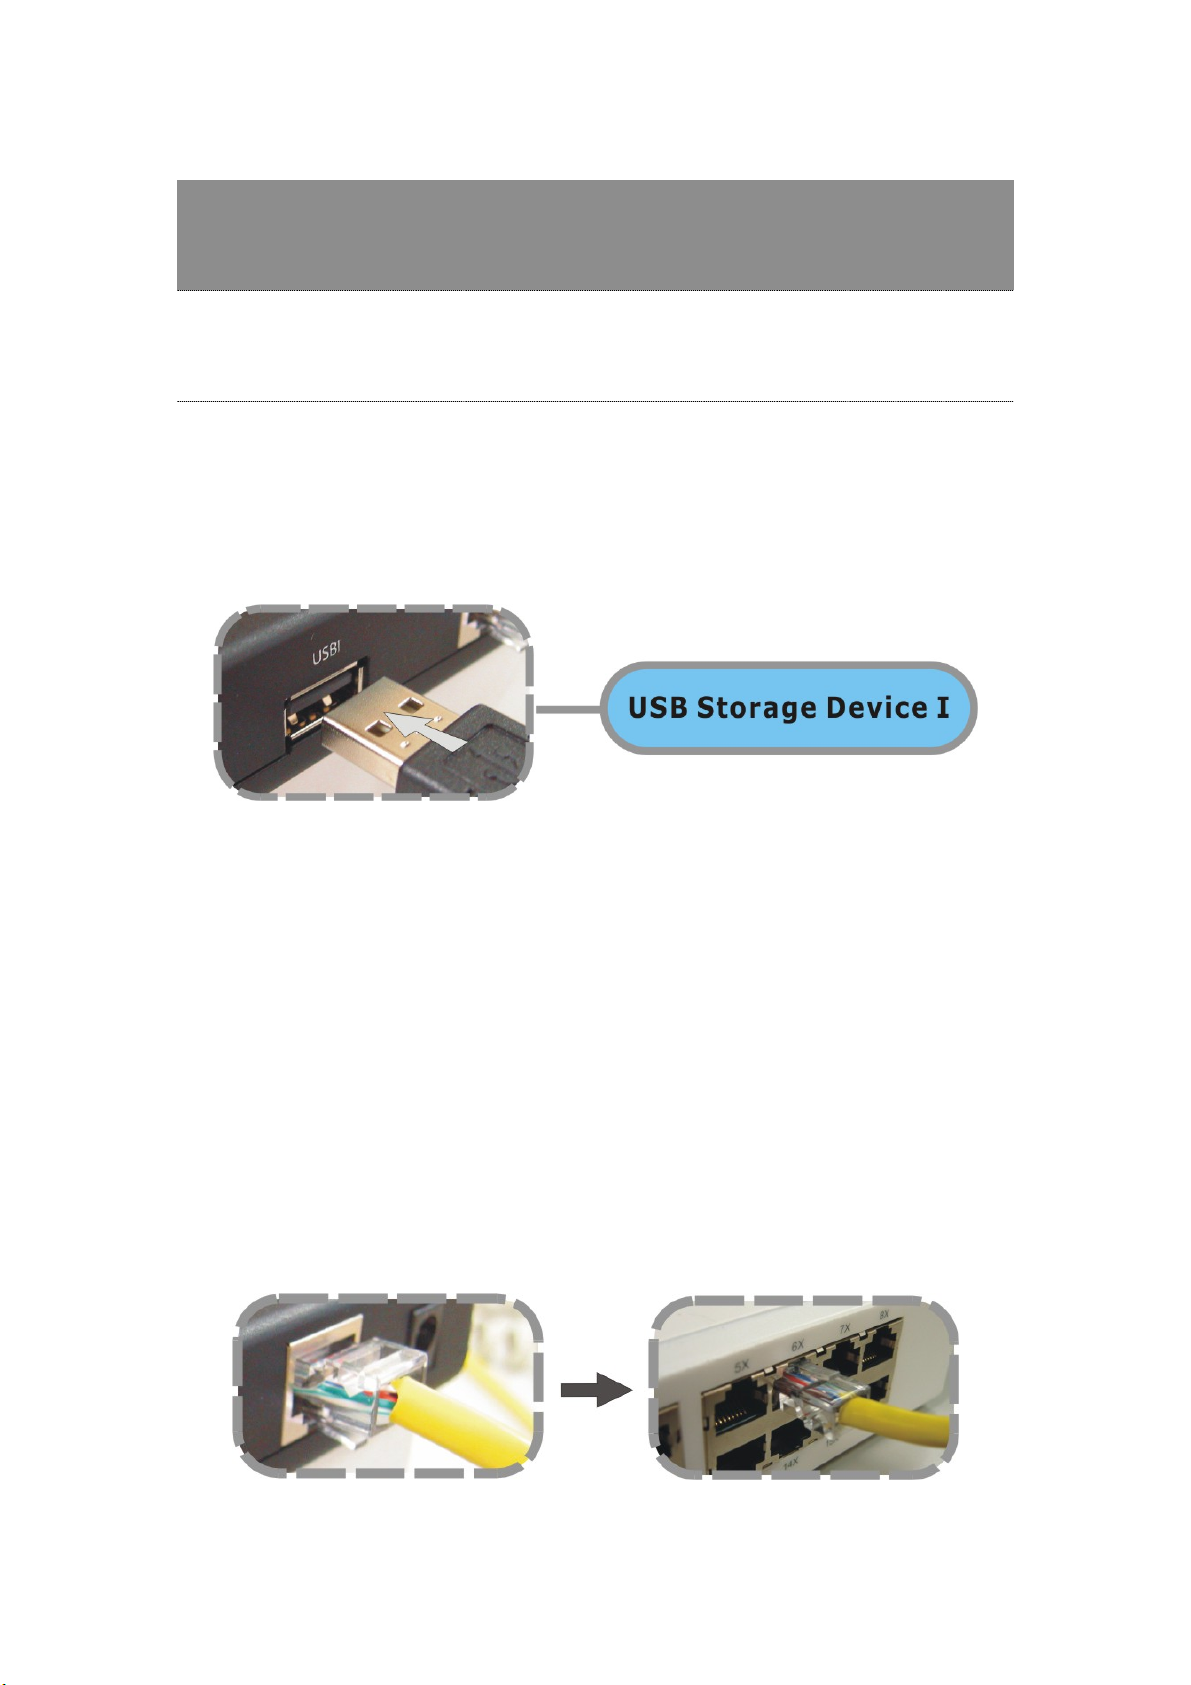
1. Connect the master USB storage device to USB port I
Note:
An USB hard drive with larger capacity is recommended for connecting to USB port
I, which is regarded as the master storage device for this product. After pressing the
Backup button on this product, the master storage device is the destination of the
copied files from the USB port II.
2. Connect one end of a RJ-45 cable to the LAN port on the device.
3. Connect the other end of the cable to your IP sharing router or switch
11
Page 13
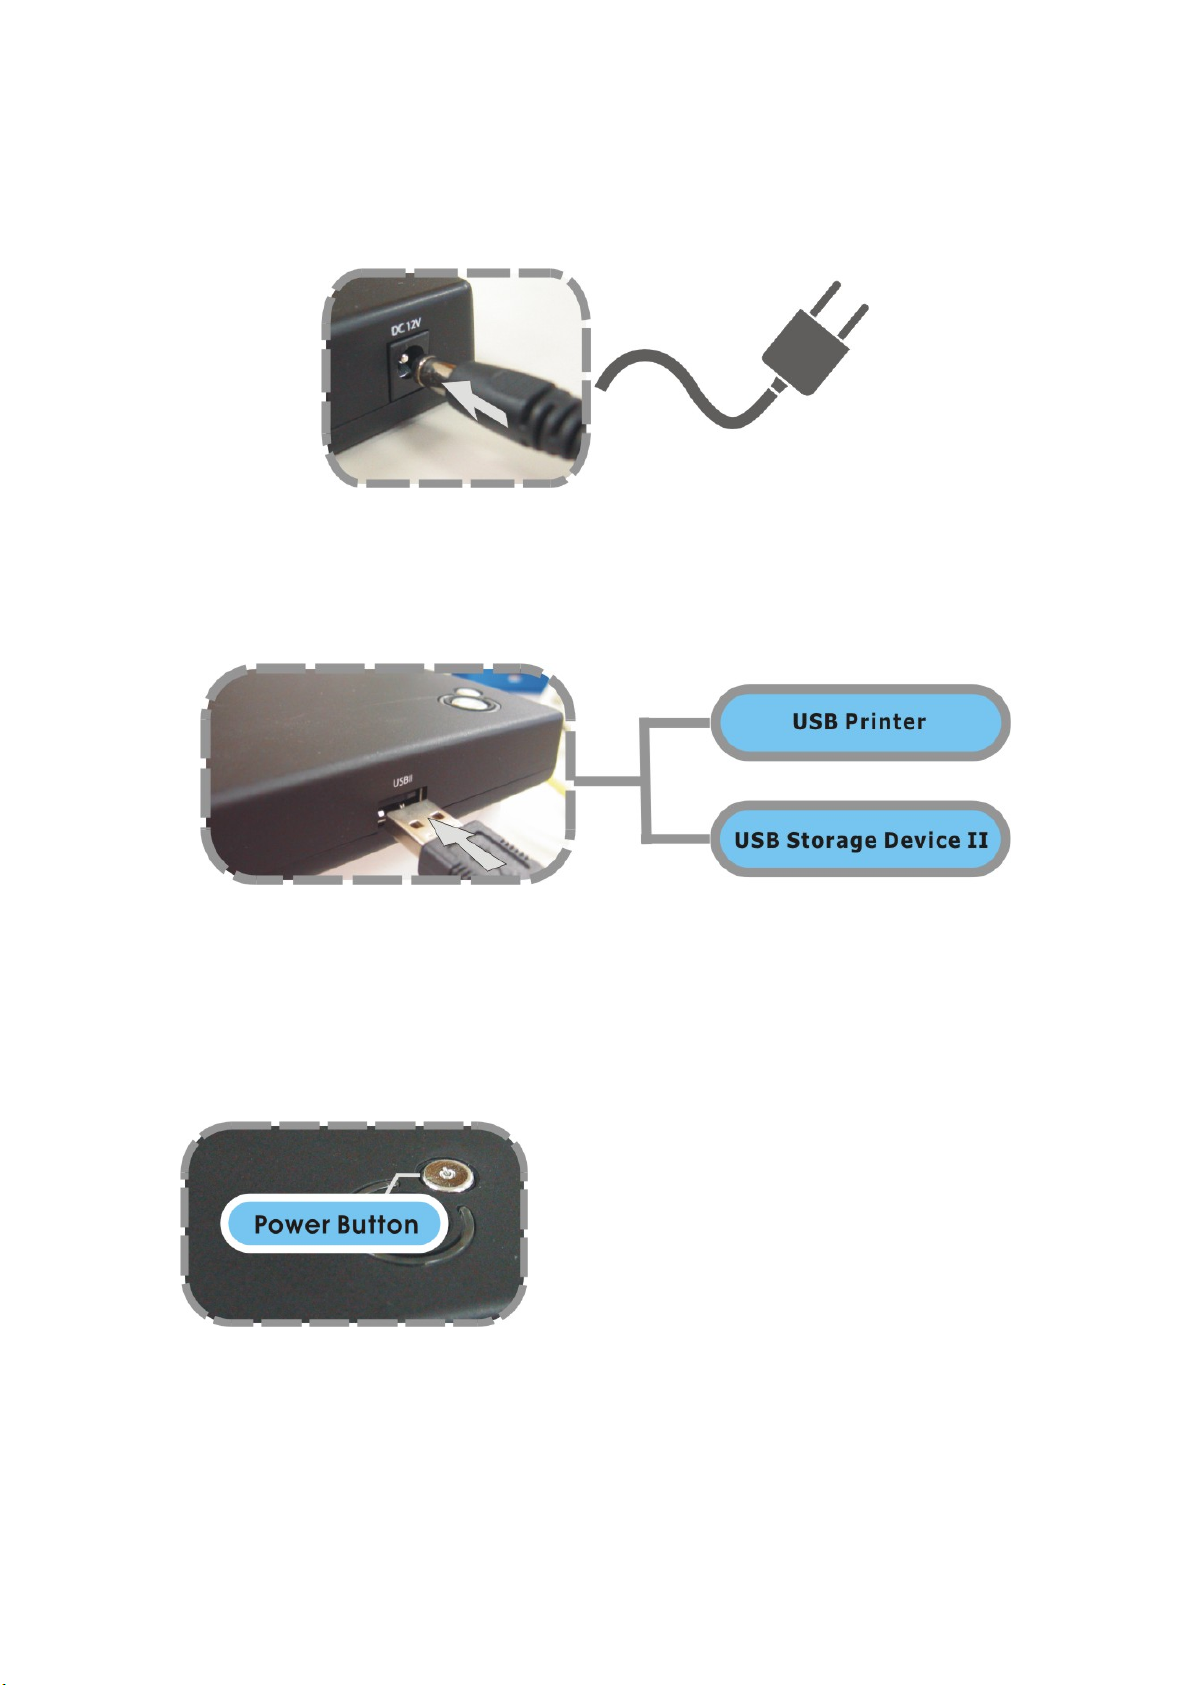
4. Connect the power adapter with the connector end to the DC socket and the plug
end to an outlet.
5. Find the USB cable that came with your USB storage or USB printer. Insert the
USB Type A end of the cable to the device, the other end to your USB storage or
USB Printer.
Note: The Type A end of the USB cable is usually the end that connects to your
computer.
6. Press the power button to power on.
12
Page 14
Software Installation
Note: The PNMD and EZIP backup supports Windows 2000/XP only.
Installing the PNMD
This PNMD program helps users to get accessed to those NAS in your LAN. Please
follow the instructions to install the software.
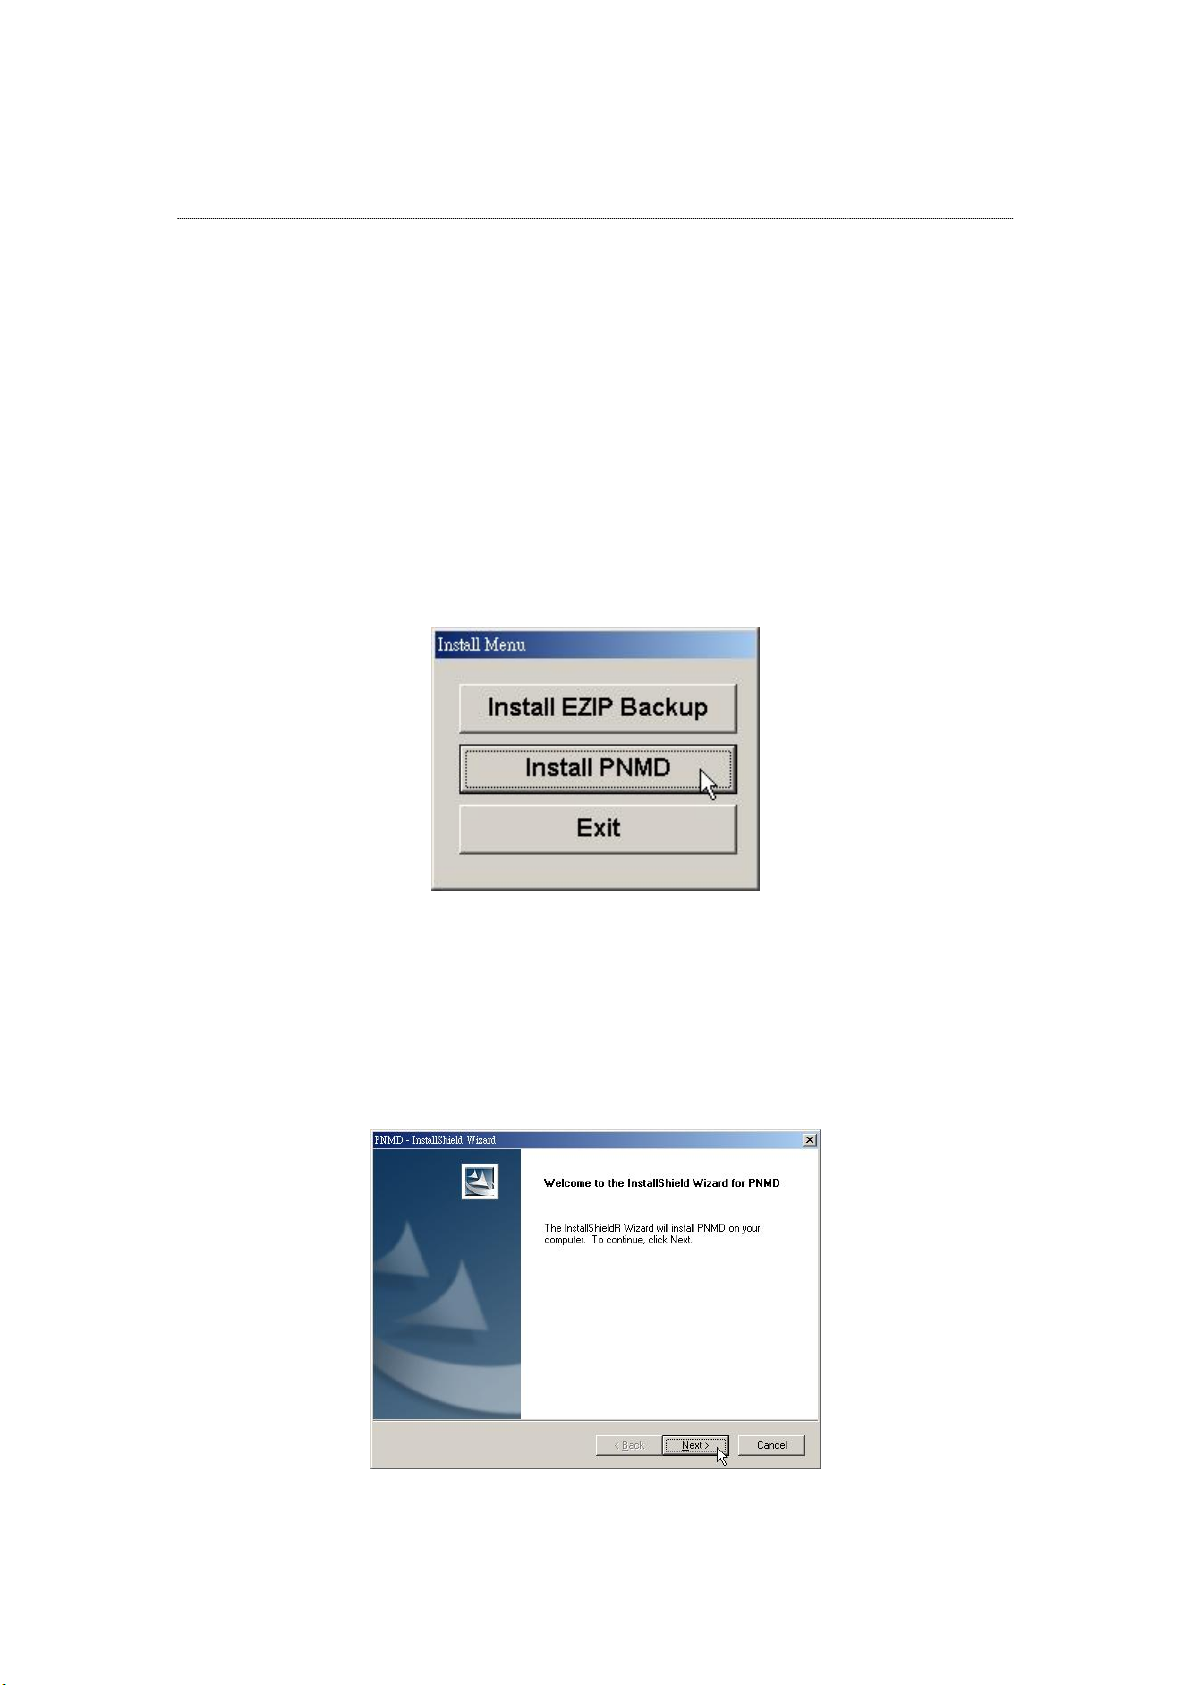
1. Insert the CD-Rom that came with this product to your CD-Rom drive. The main
menu pops up automatically. Click the “Install PNMD” button to start
installation.
Note: If the auto-run program is not activated, please click on “My Computer”
your CD-Rom Drive then click the Install Menu icon to start the main menu.
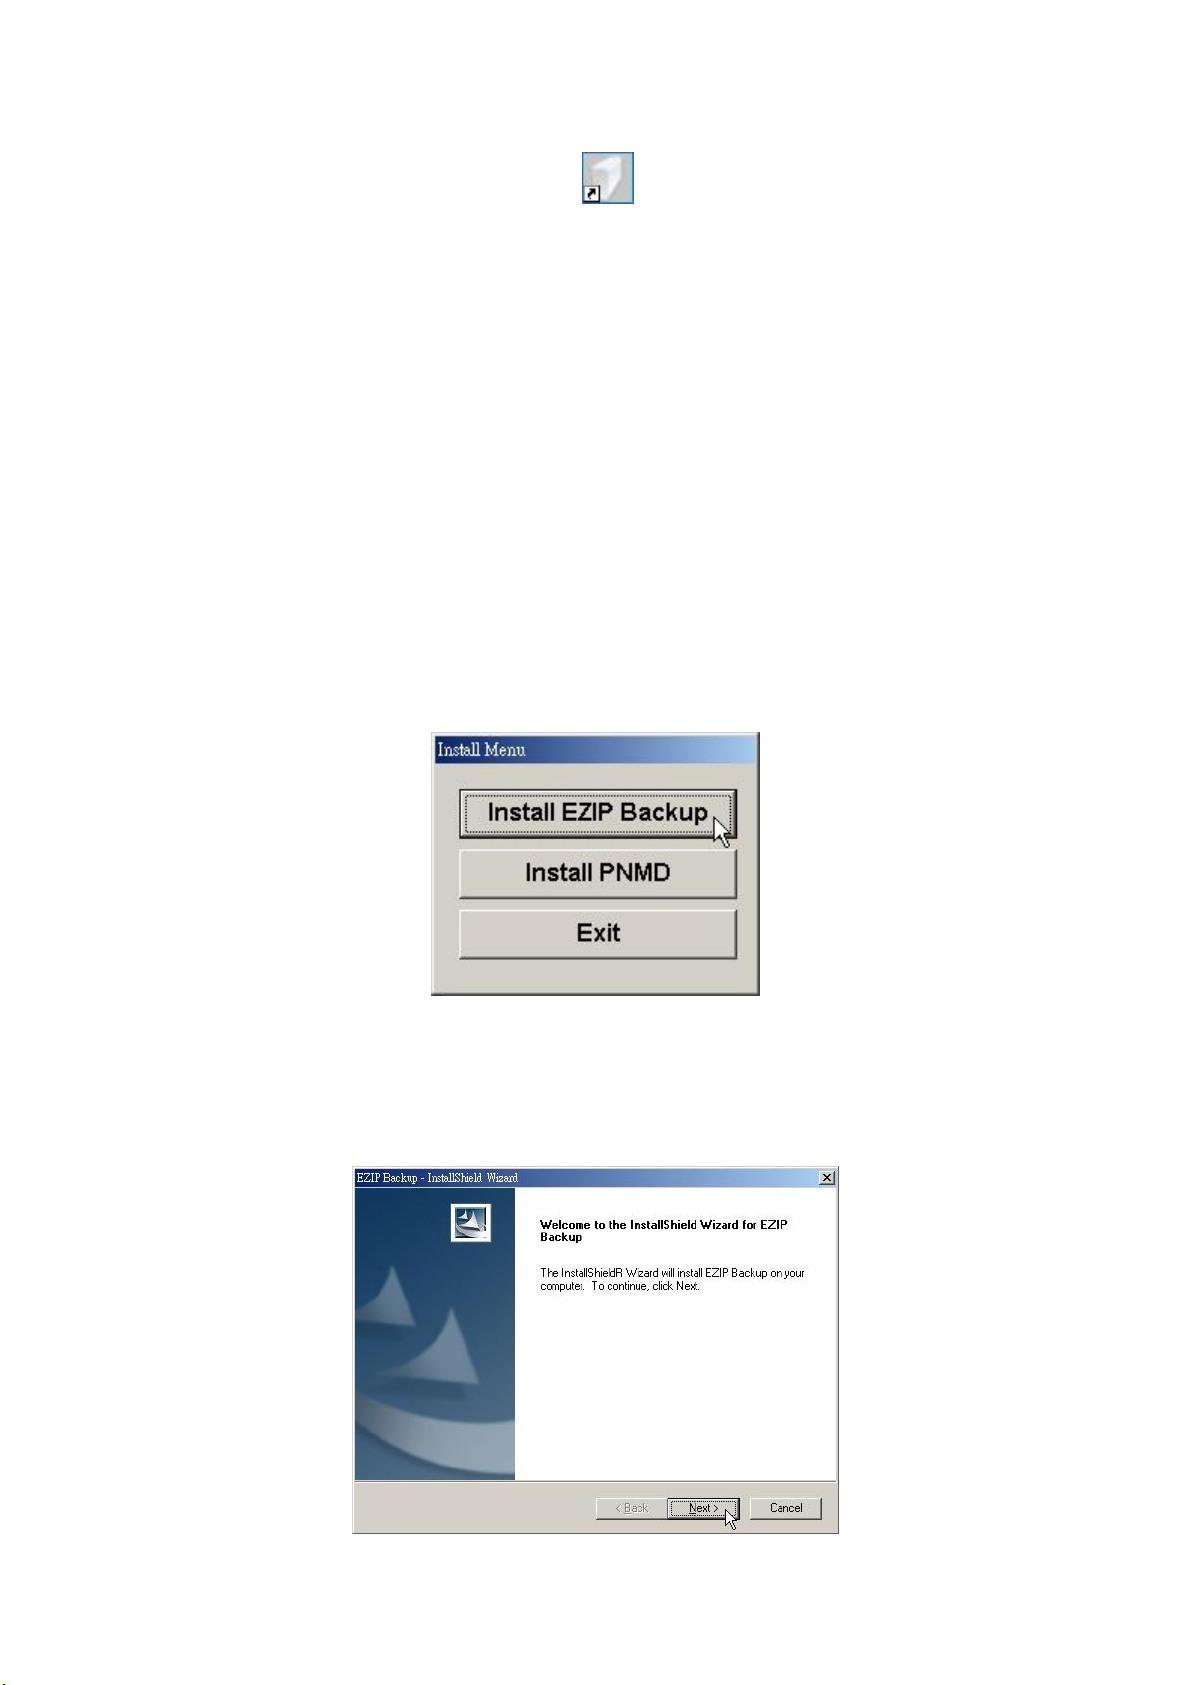
2. Click “Next” on the welcome window.
13
Page 15
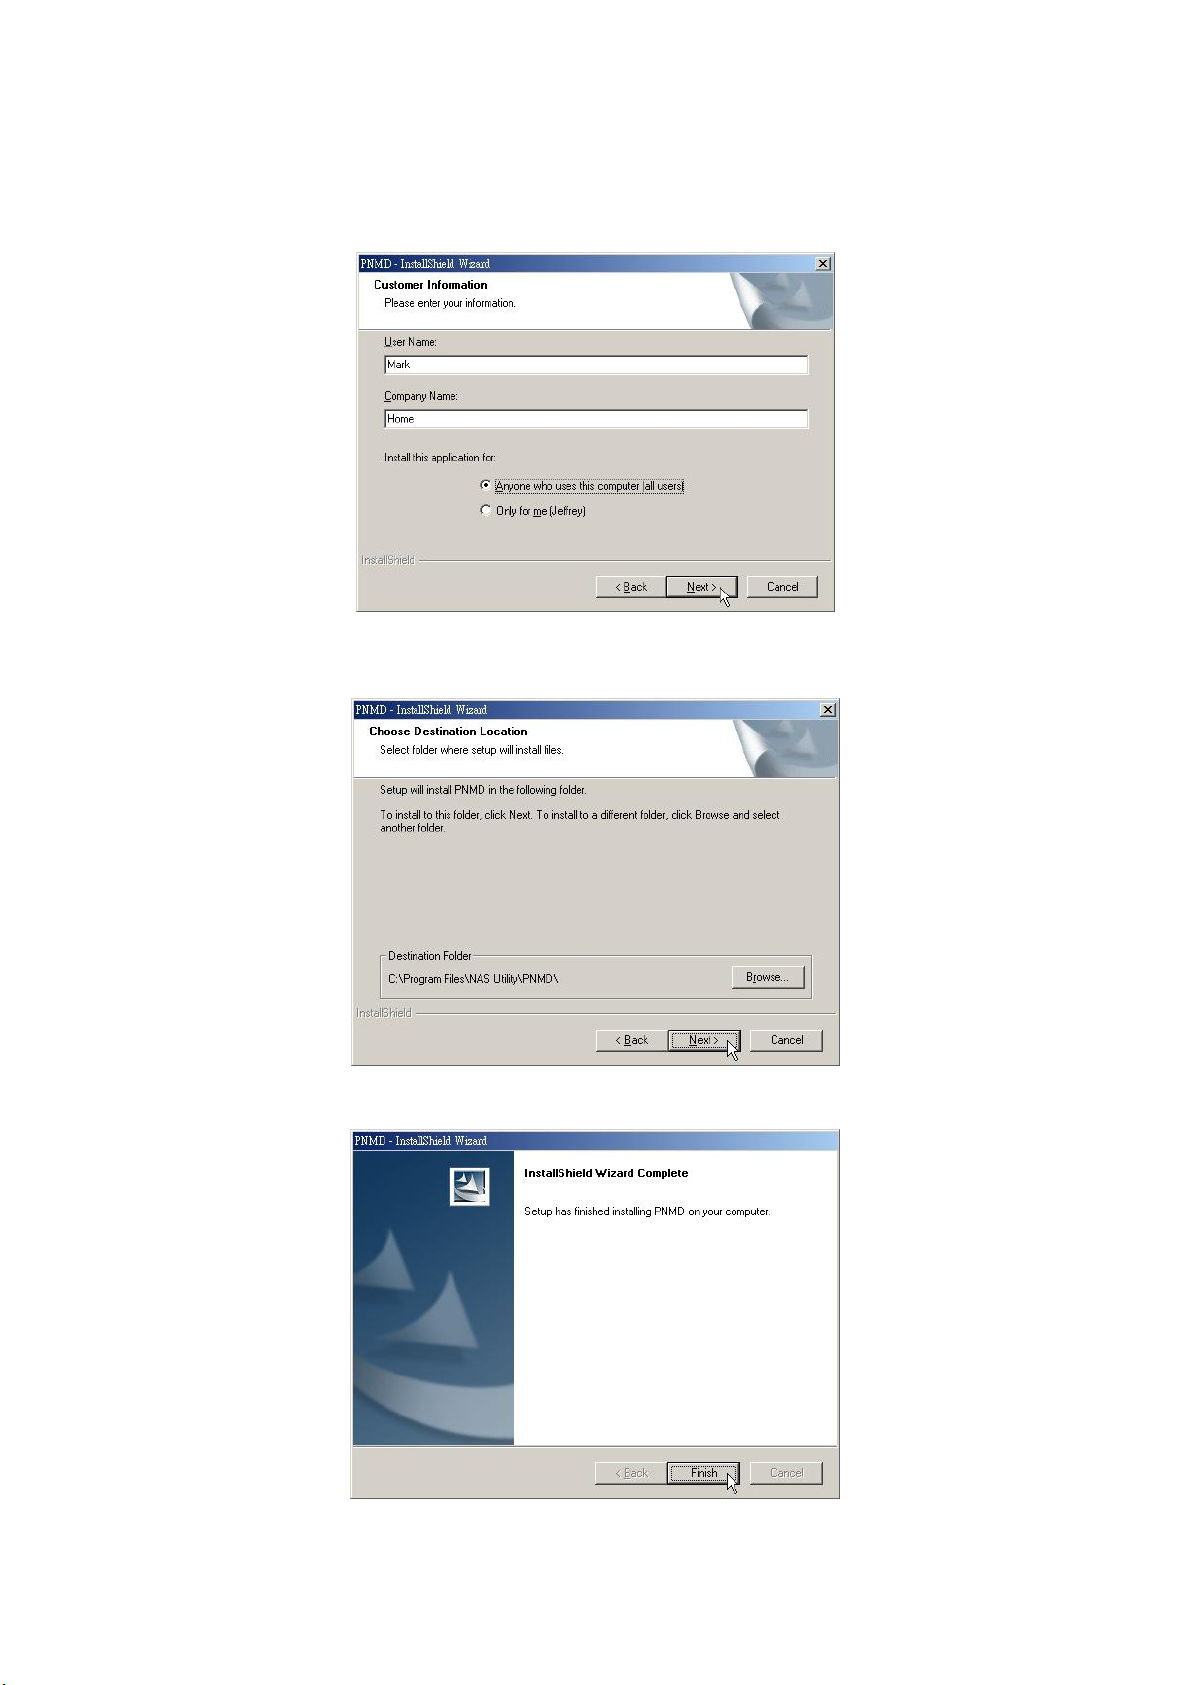
3. Fill your User Name and Company name in their respective blanks.
Select if you want this software to be used by anyone who uses this computer or
yourself only. Click Next to proceed.
4. Choose the destination folder for this software and click “Next” to start
installation. You may click Browse to change the location.
5. Click “Finish” to complete the software installation.
14
Page 16
6. After successful installation, the
desktop.
shortcut shows on your windows
Note: For instructions using the software, please refer to chapter “Making
Connection with the Device”.
Installing the EZIP Backup
This EZIP Backup helps users to backup files on your computer to the hard drive
connecting to the product. Please follow the instructions below to install the
software.
1. Insert the CD-Rom that came with this product to your CD-Rom drive. The main
menu pops up automatically. Click the “Install EZIP Backup” button to start
installation.
Note: If the auto-run program is not activated, please click on “My Computer”
your CD-Rom Drive then click the Install Menu icon to start the main menu.
2. Click “Next” on the welcome window.
15
Page 17
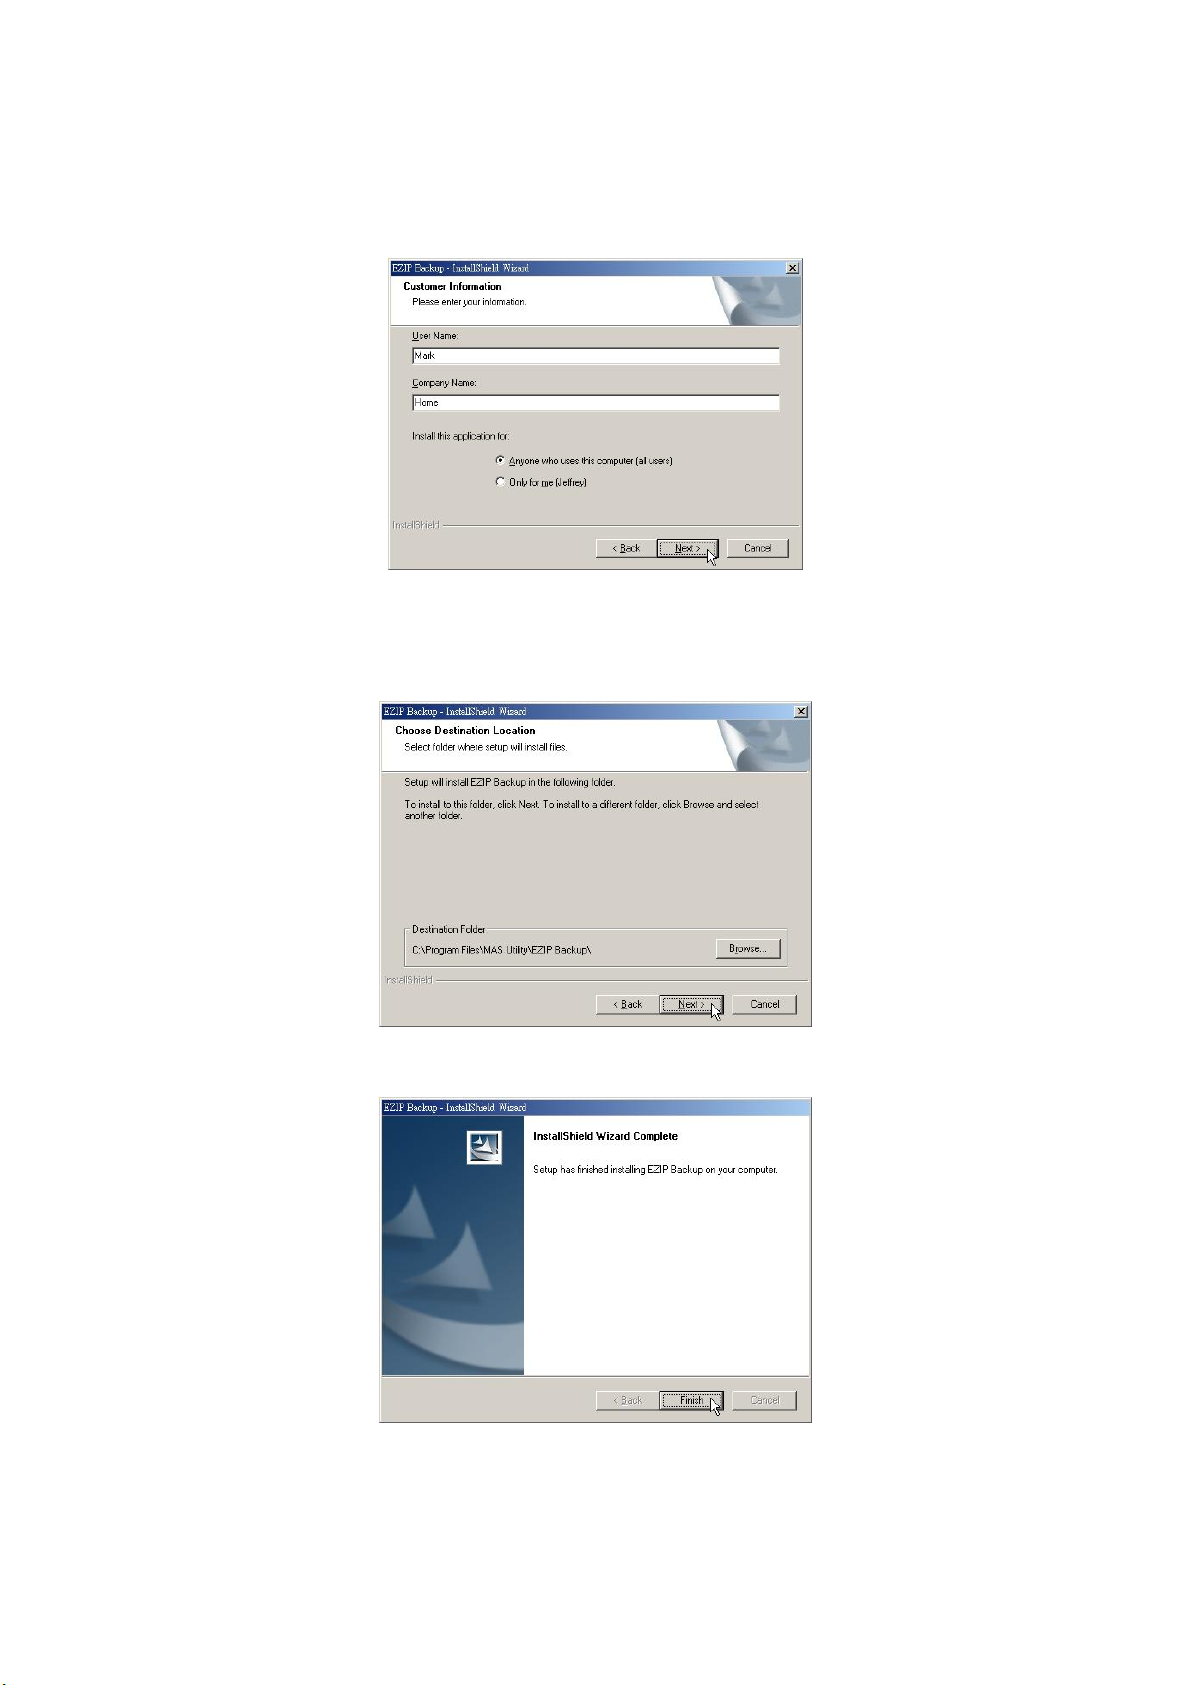
3. Fill your User Name and Company name in their respective blanks.
Select if you want this software to be used by anyone who uses this computer or
yourself only. Click Next to proceed.
4.
Choose the destination folder for this software and click “Next” to start
installation. You may click Browse to change the location.
5. Click “Finish” to complete the software installation.
16
Page 18

6. After successful installation, the
desktop.
shortcut shows on your windows
Note: For instructions using the software, please refer to chapter “ Using EZIP
Backup to backup your files” in Appendix.
Making Connection with the Device
Before you start
IP Protocol Setup
Configuring the network protocols
For users to launch the device easily, we provide a convenient PNMD, which detects
this device automatically in your LAN.
To function the PNMD correctly, please make sure that your PC DOES NOT obtain
IP address automatically or the PNMD will not be able to initialize the setup
procedure according to your network settings.
Note: If you have accessed the device and enabled the DHCP function for the
device. You are allowed to use the PNMD without specifying static IP address for
your computer.
The following chapter indicates how to configure an IP address for your PC. Users
that have got a specified IP, please skip this chapter to “Connecting the device
with PNMD” to proceed.
How to configure the TCP/IP network protocol of your PC
Before the following IP protocol settings, you have to get an IP address in advance.
If you don’t have any IP address or you are not going to access the device via our
PNMD, please choose an IP between 192.168.1.2~255 as your IP address. Please
DO NOT choose 192.168.1.1 for the IP address (192.168.1.1) has been set as the
default IP for this device.
Note:
1. The default network setting of the device:
IP address: 192.168.1.1
Subnet Mask: 255.255.255.0
DHCP Client: Disabled
2. In the following TCP/IP configuration guide, the IP address “192.168.1.2 ” is
assumed to be your IP address.
17
Page 19
How to configure the TCP/IP network protocol
Windows 98/Me:
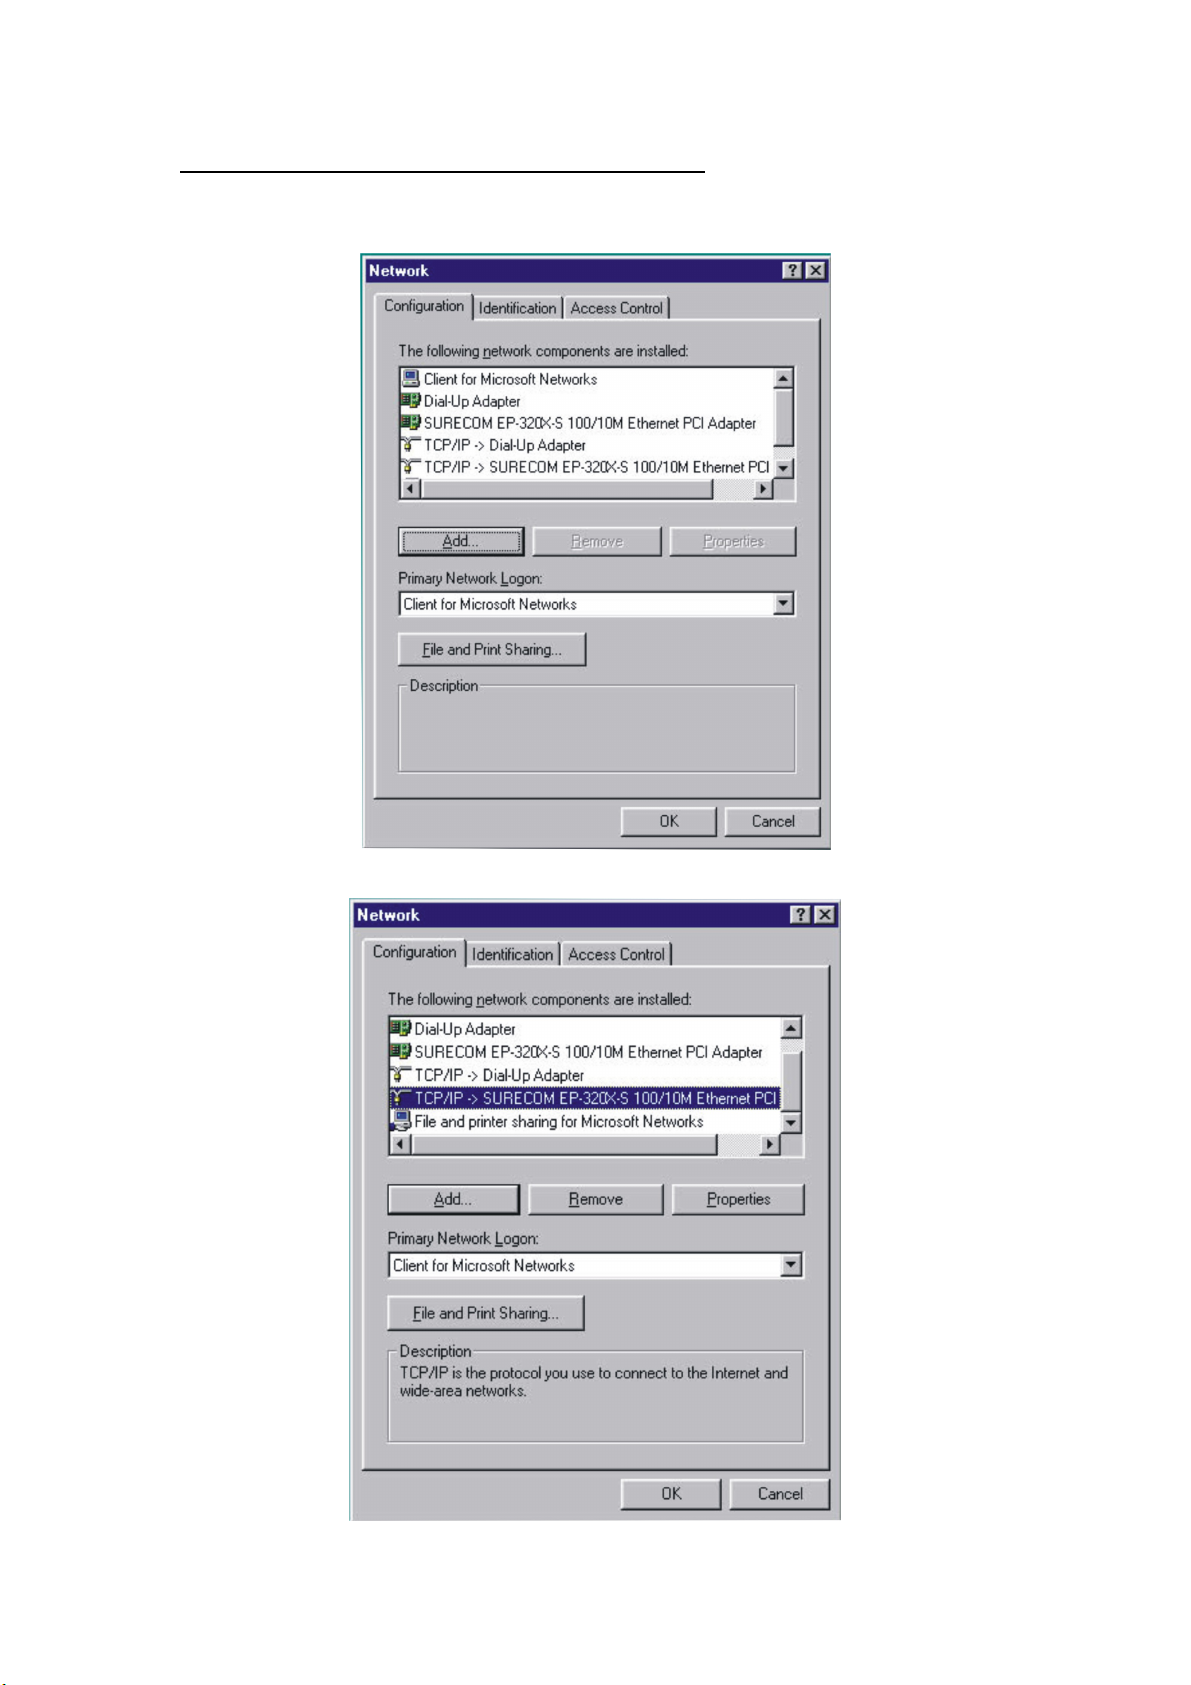
1. Click on Start Settings Control Panel Network.
2. Click “TCP/IP (Your Ethernet Adaptor)” then click the “Properties” button.
18
Page 20
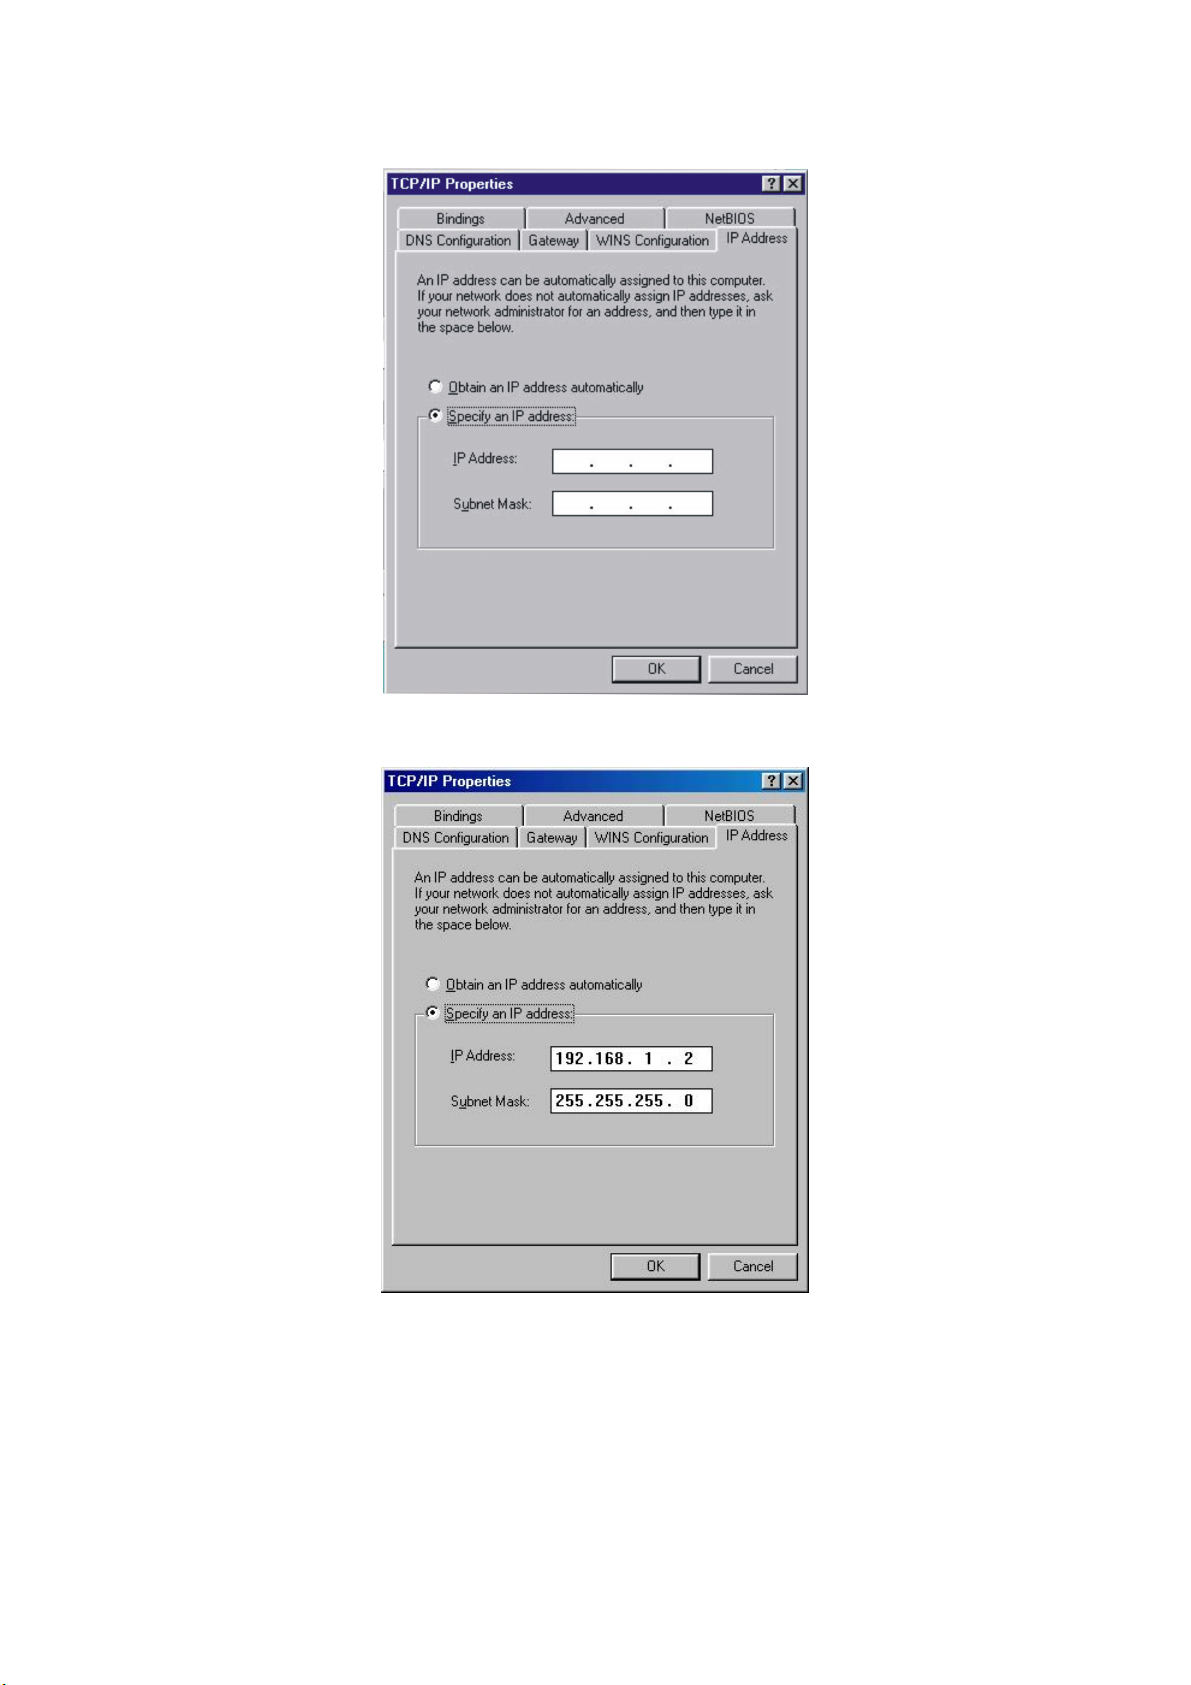
3. Click the “IP Address” tab and click on “Specify an IP Address”.
4. Fill in the IP address. State the subnet mask to be 255.255.255.0.
5. Click OK and OK. Now, the system may ask for your Windows disc, follow the
steps then restart your computer.
19
Page 21
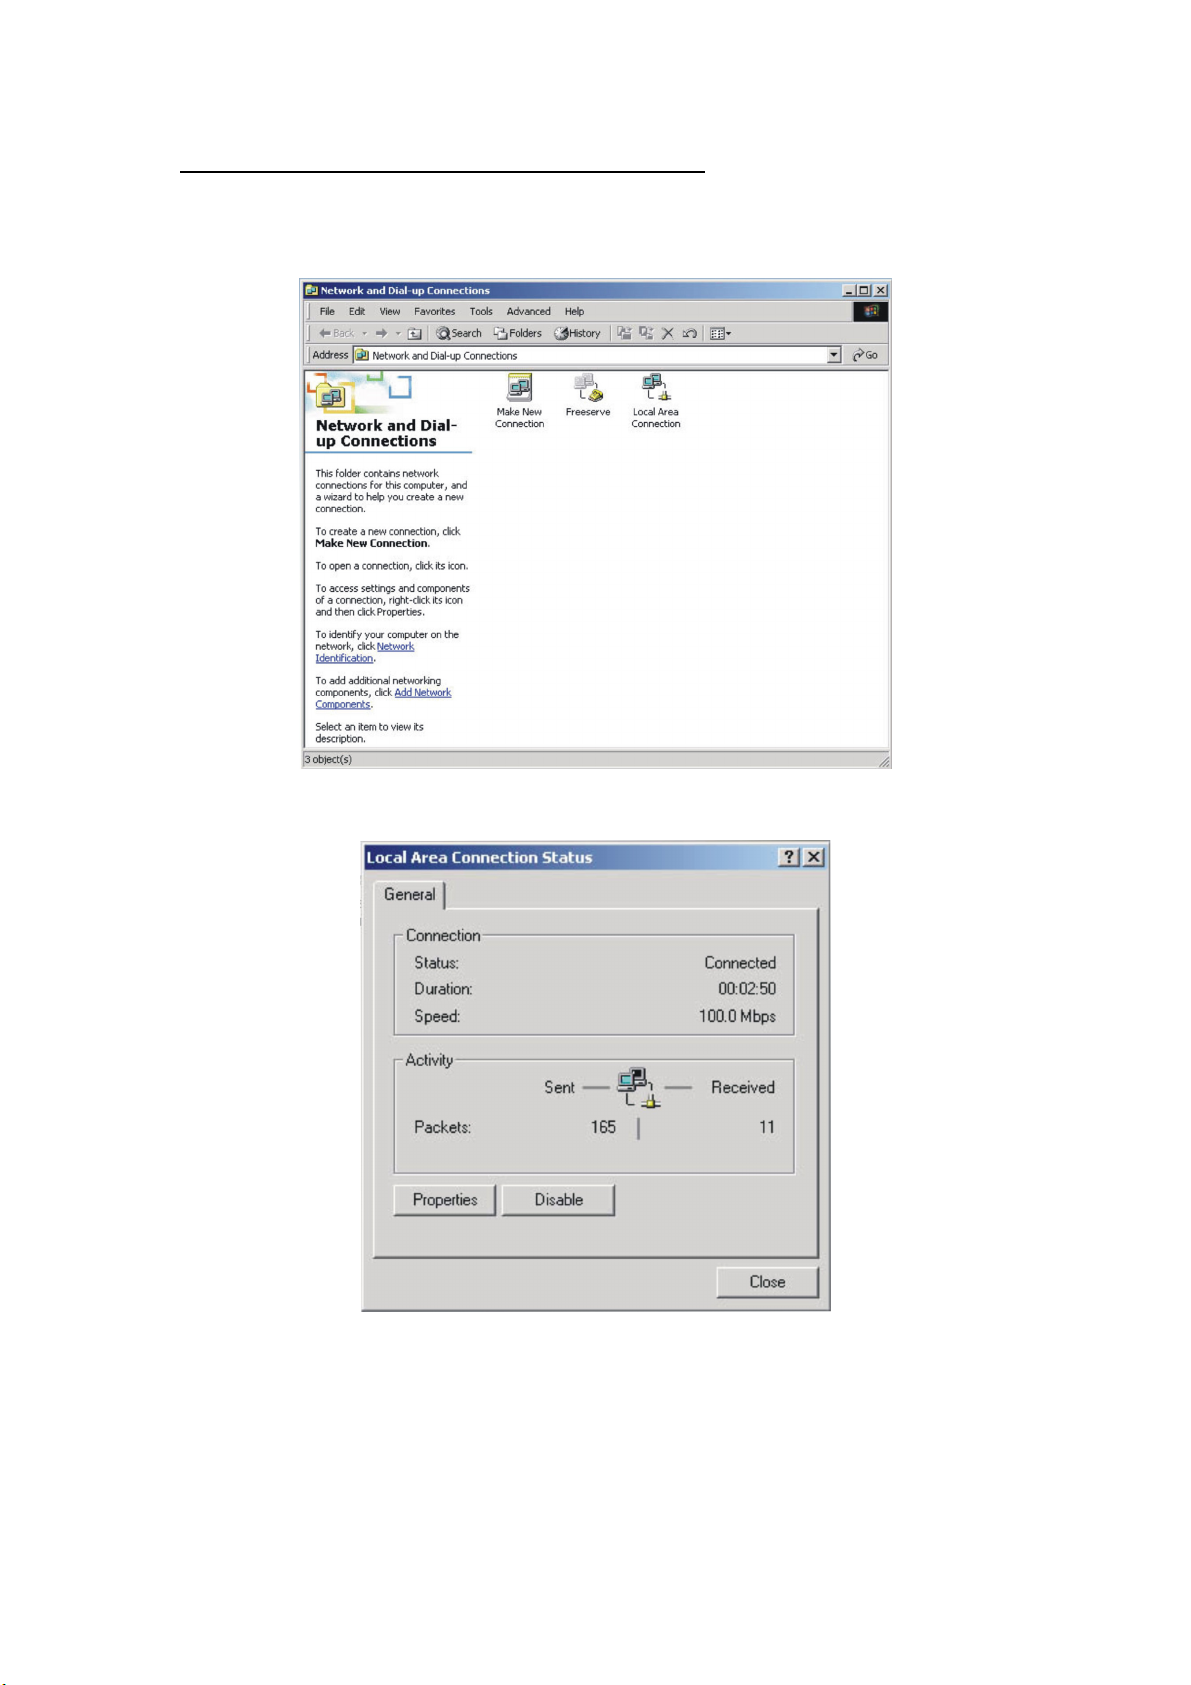
How to configure the TCP/IP network protocol
Windows 2000:
1. Click on Start Settings Network and dial-up connections.
2. Choose Local Area Connection and click Properties.
20
Page 22
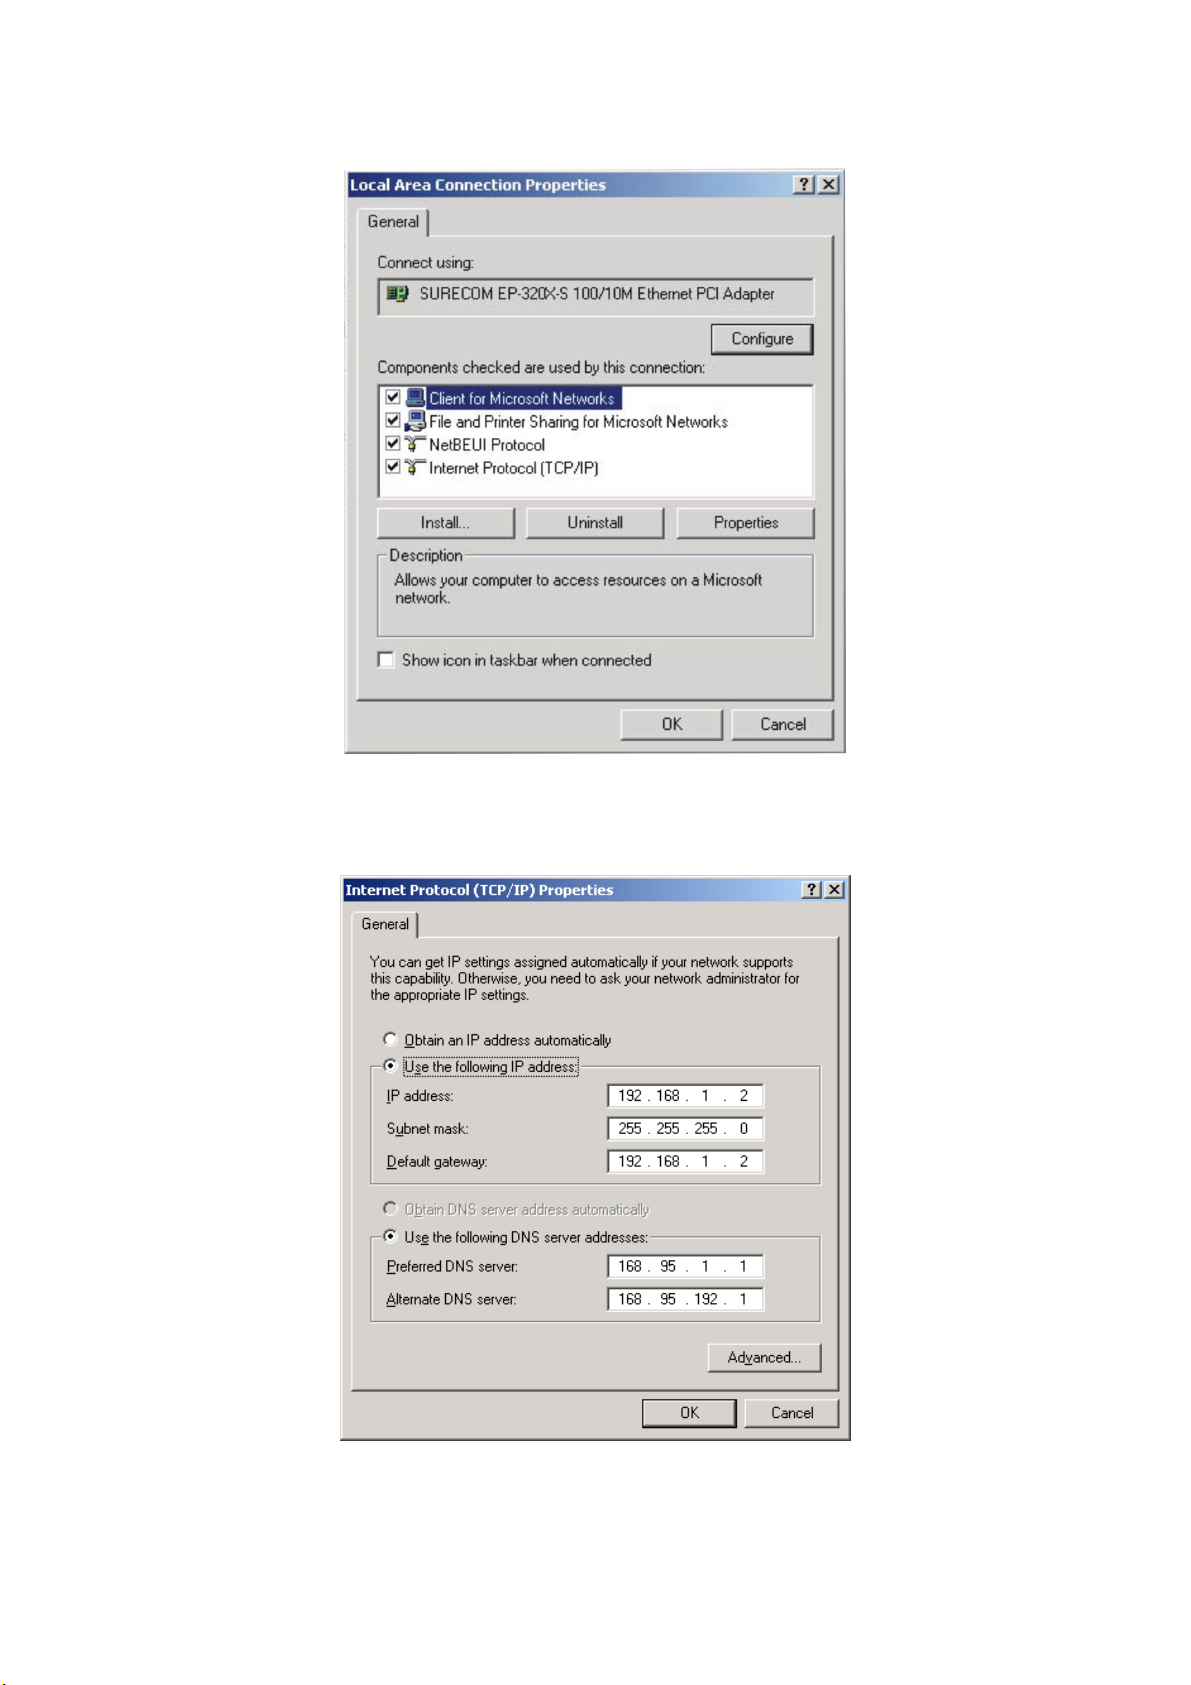
3. Click on Internet protocol (TCP/IP) then click Properties.
4. Select “Use the following IP address”.
State the subnet mask to be 255.255.255.0.
Click OK and OK then restart your computer.
21
Page 23
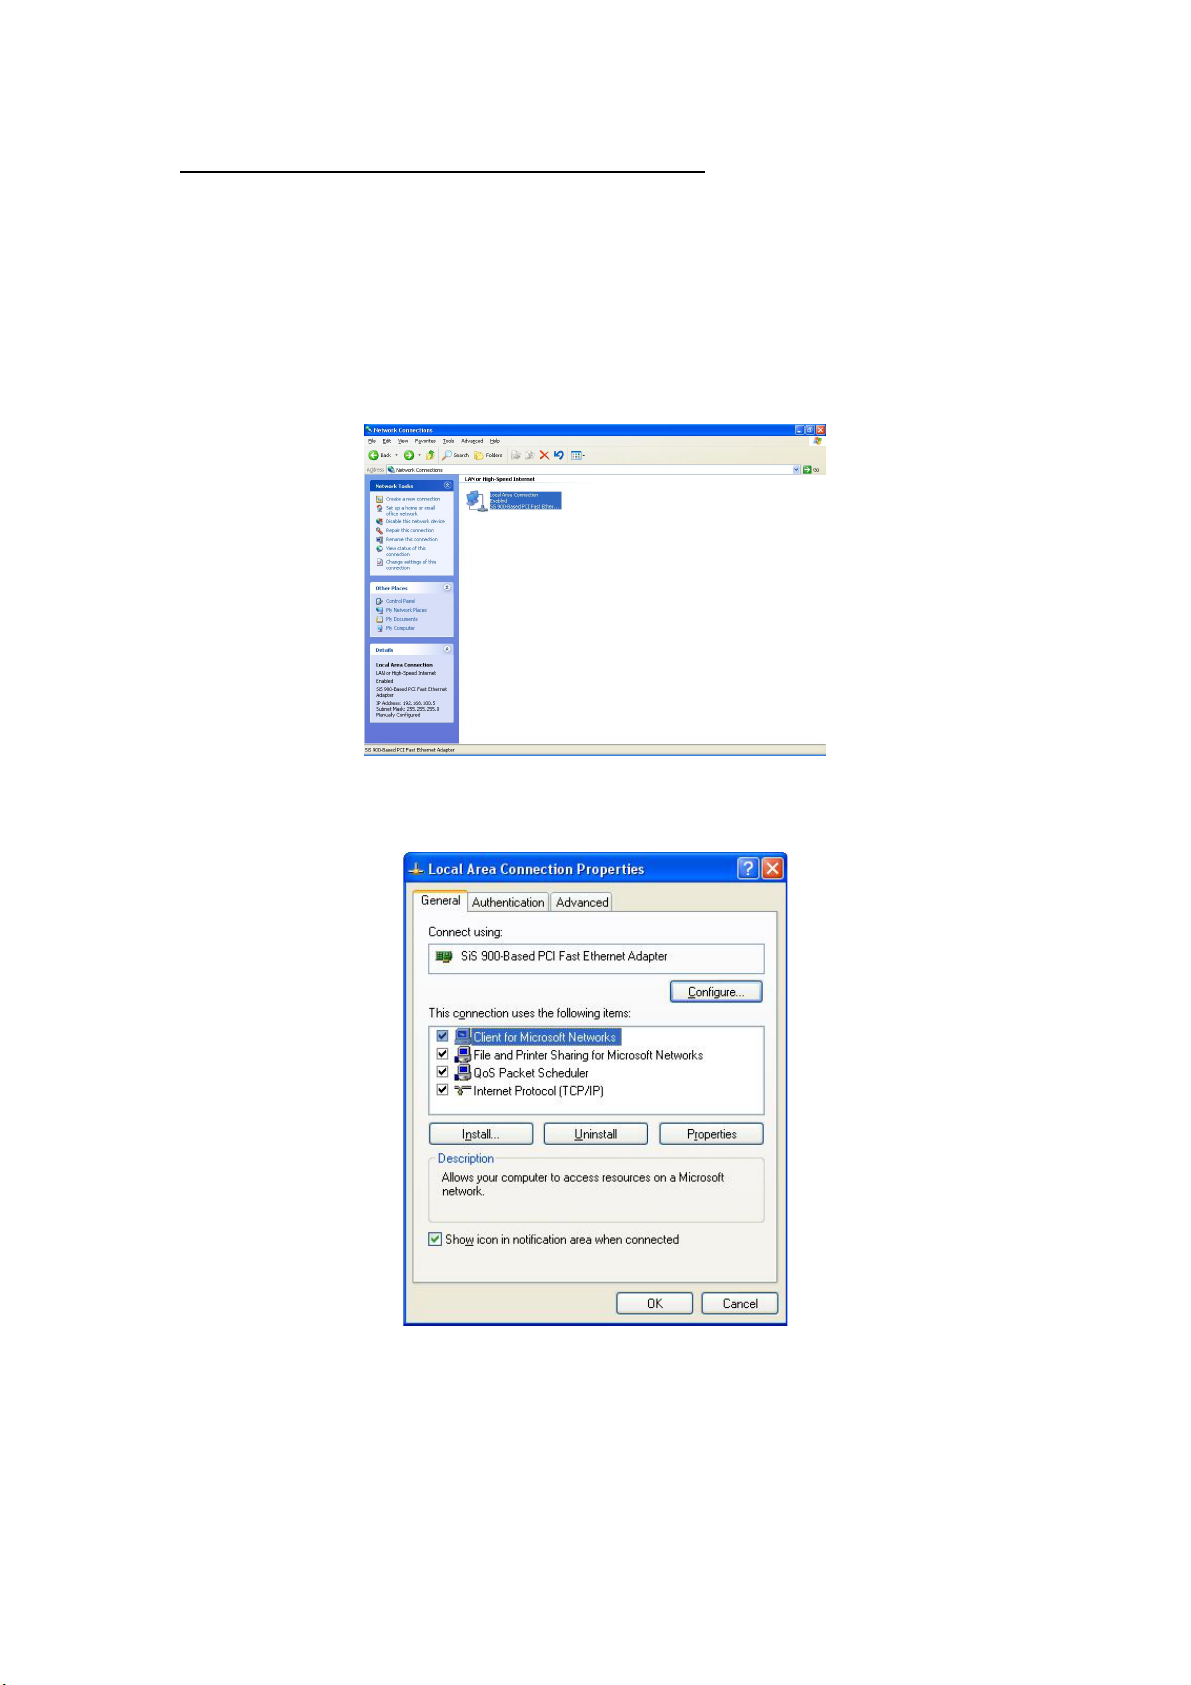
How to configure the TCP/IP network protocol
Windows XP:
1. If you are in Classic Start menu view, click StartSettingsControl
PanelNetwork Connections.
If you are in Start menu view, click StartControl PanelNetwork
Connections.
2. Double click “Local Area Connection”
3. Choose Internet Protocol (TCP/IP), click Properties and select ‘Use the
following IP Address’.
22
Page 24
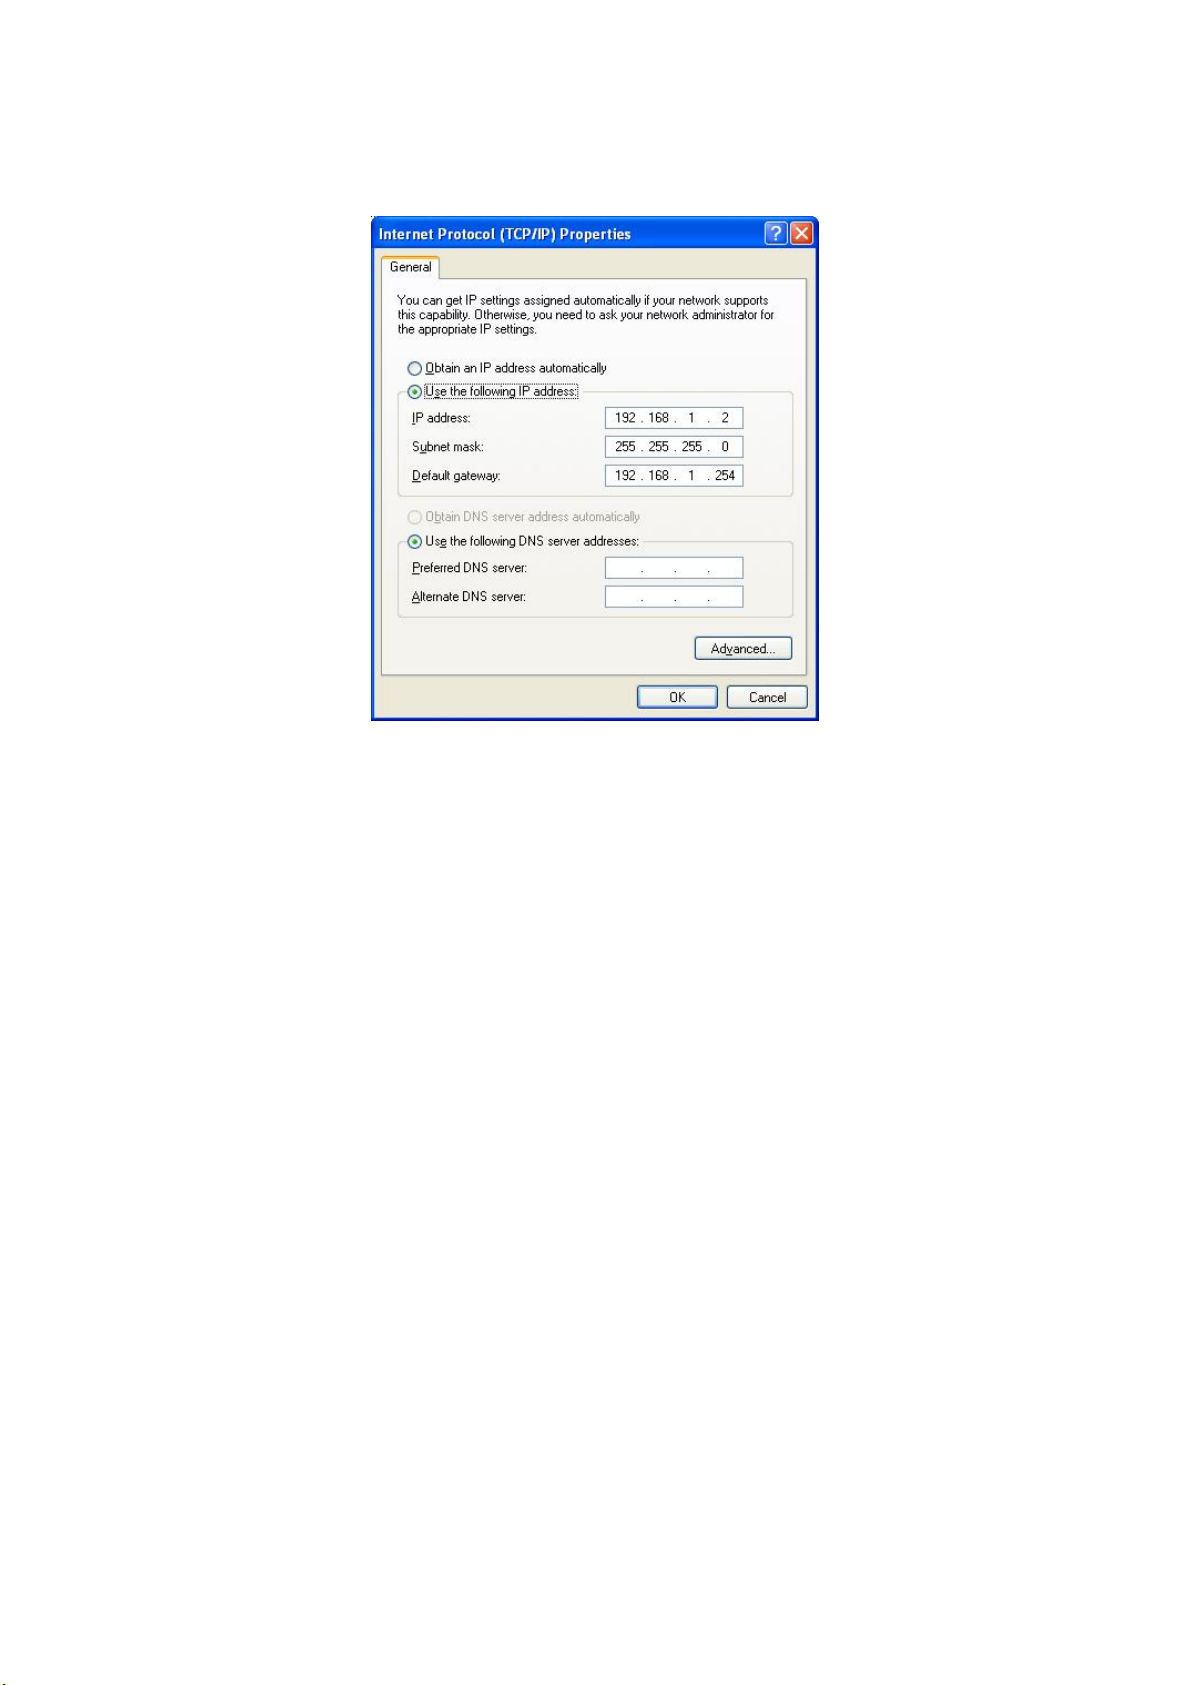
4. Fill in the IP Address. The subnet mask is entered automatically on Windows XP.
Click OK.
The IP setting of your PC is completed now. Please refer to the following guide to
proceed.
23
Page 25
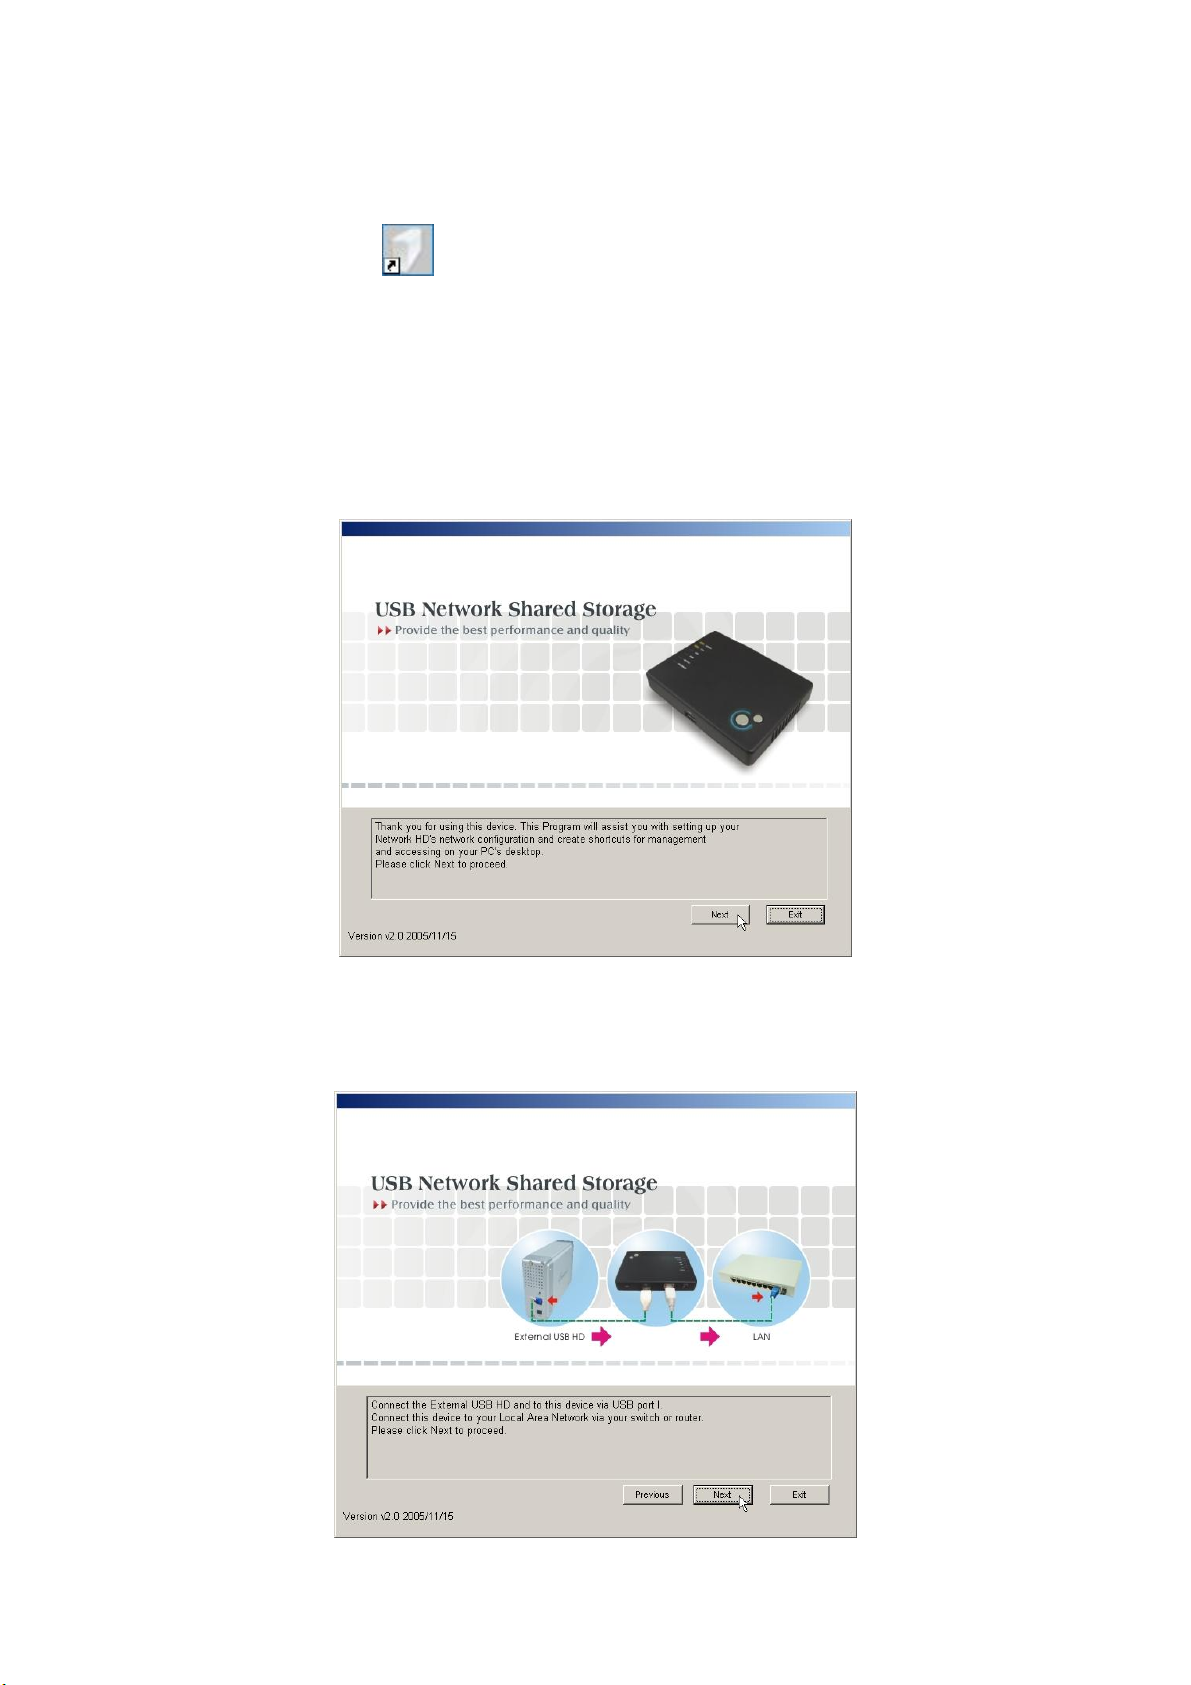
Connecting the device with PNMD
1. Double click the shortcut on your desktop. The PNMD begins scanning this
device in your LAN. The welcome window pops up. Please click “Next” to
proceed.
Note: This window pops up only when there is no device detected. It guides users
to attach cables for the device. If the PNMD detects this product successfully, the
window is not going to appear. Please skip to step 4 to continue.
2. Connect the USB Port I to your USB hard drive and the LAN port to your switch
or IP sharing router respectively.
24
Page 26
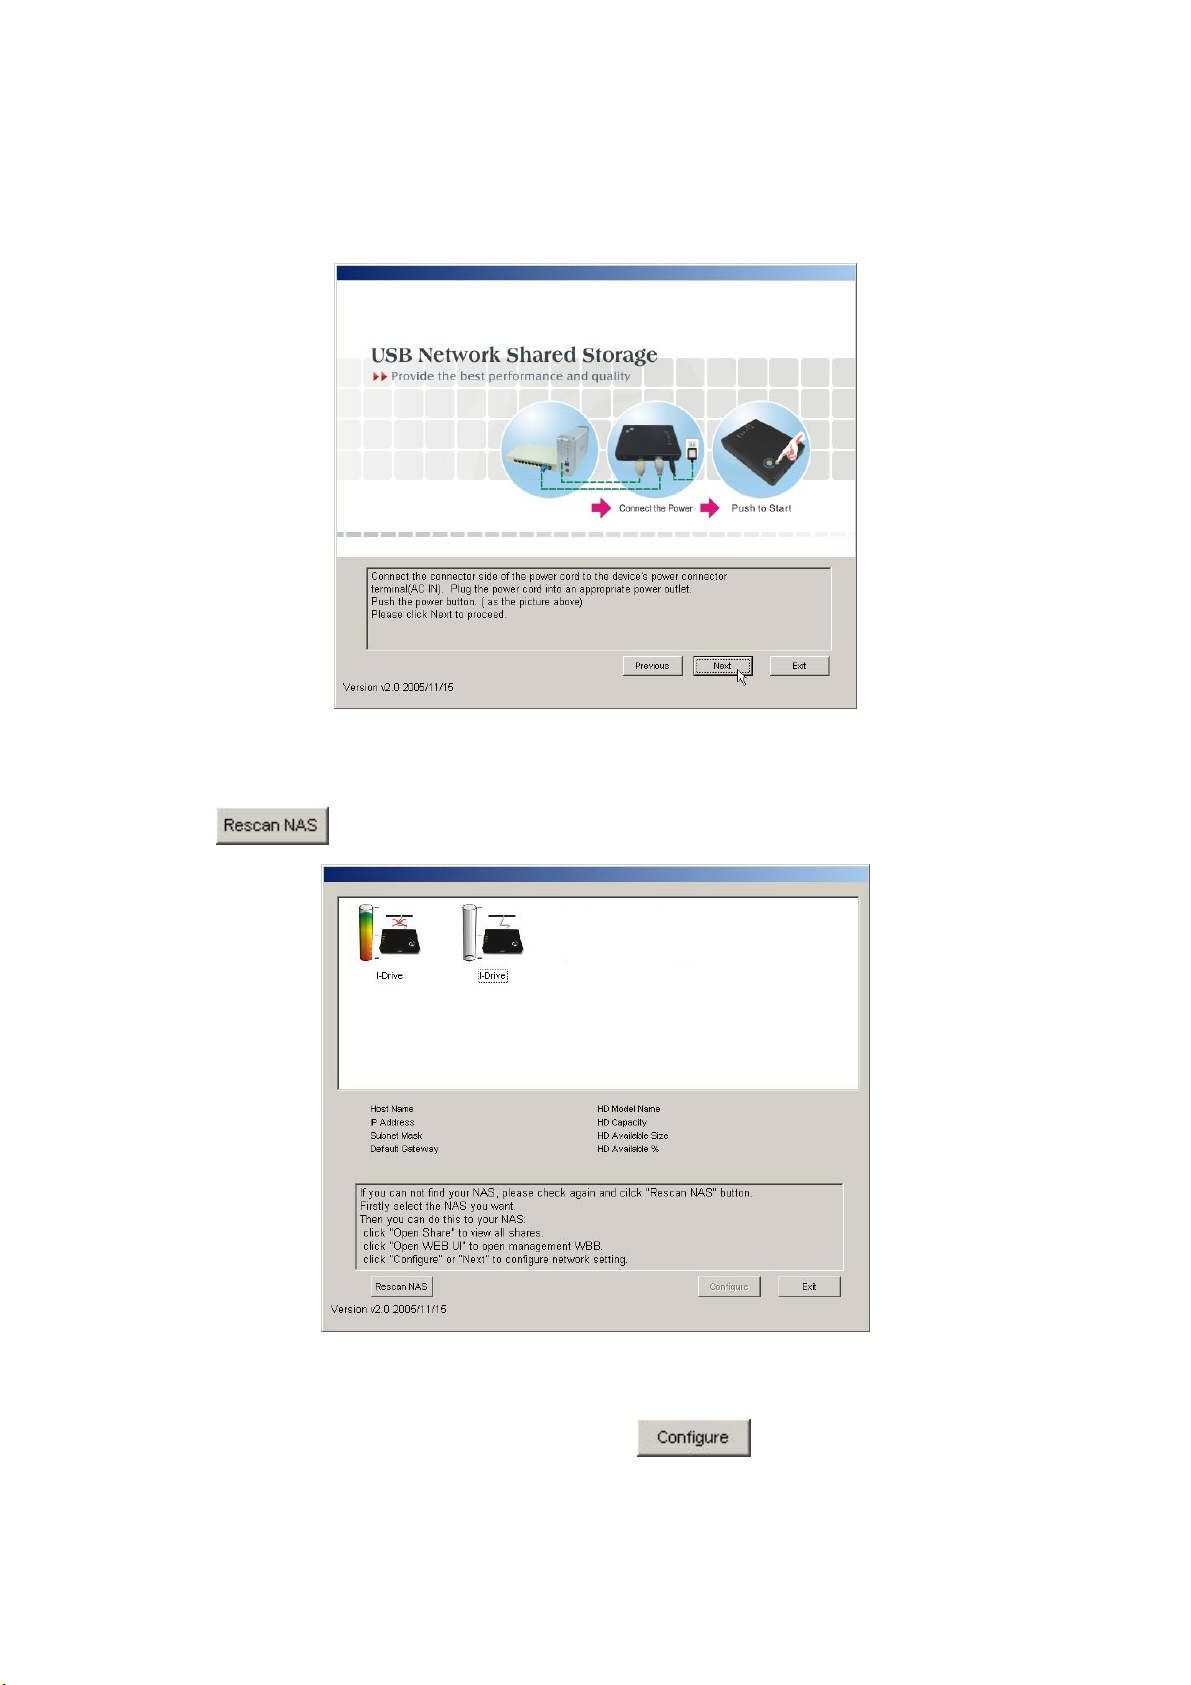
3. Connect the power adapter and press the power button to power on the device.
Click “Next”. The PNMD scans the device again.
4. After scanning, the menu shows the device in your LAN. You may click the
button to search for NAS in your LAN again.
5. The window shows the connection status of this device in your LAN. You may
click on each icon to get detailed information of each device. Select the one that
you are going to connect to and click the
25
button.
Page 27
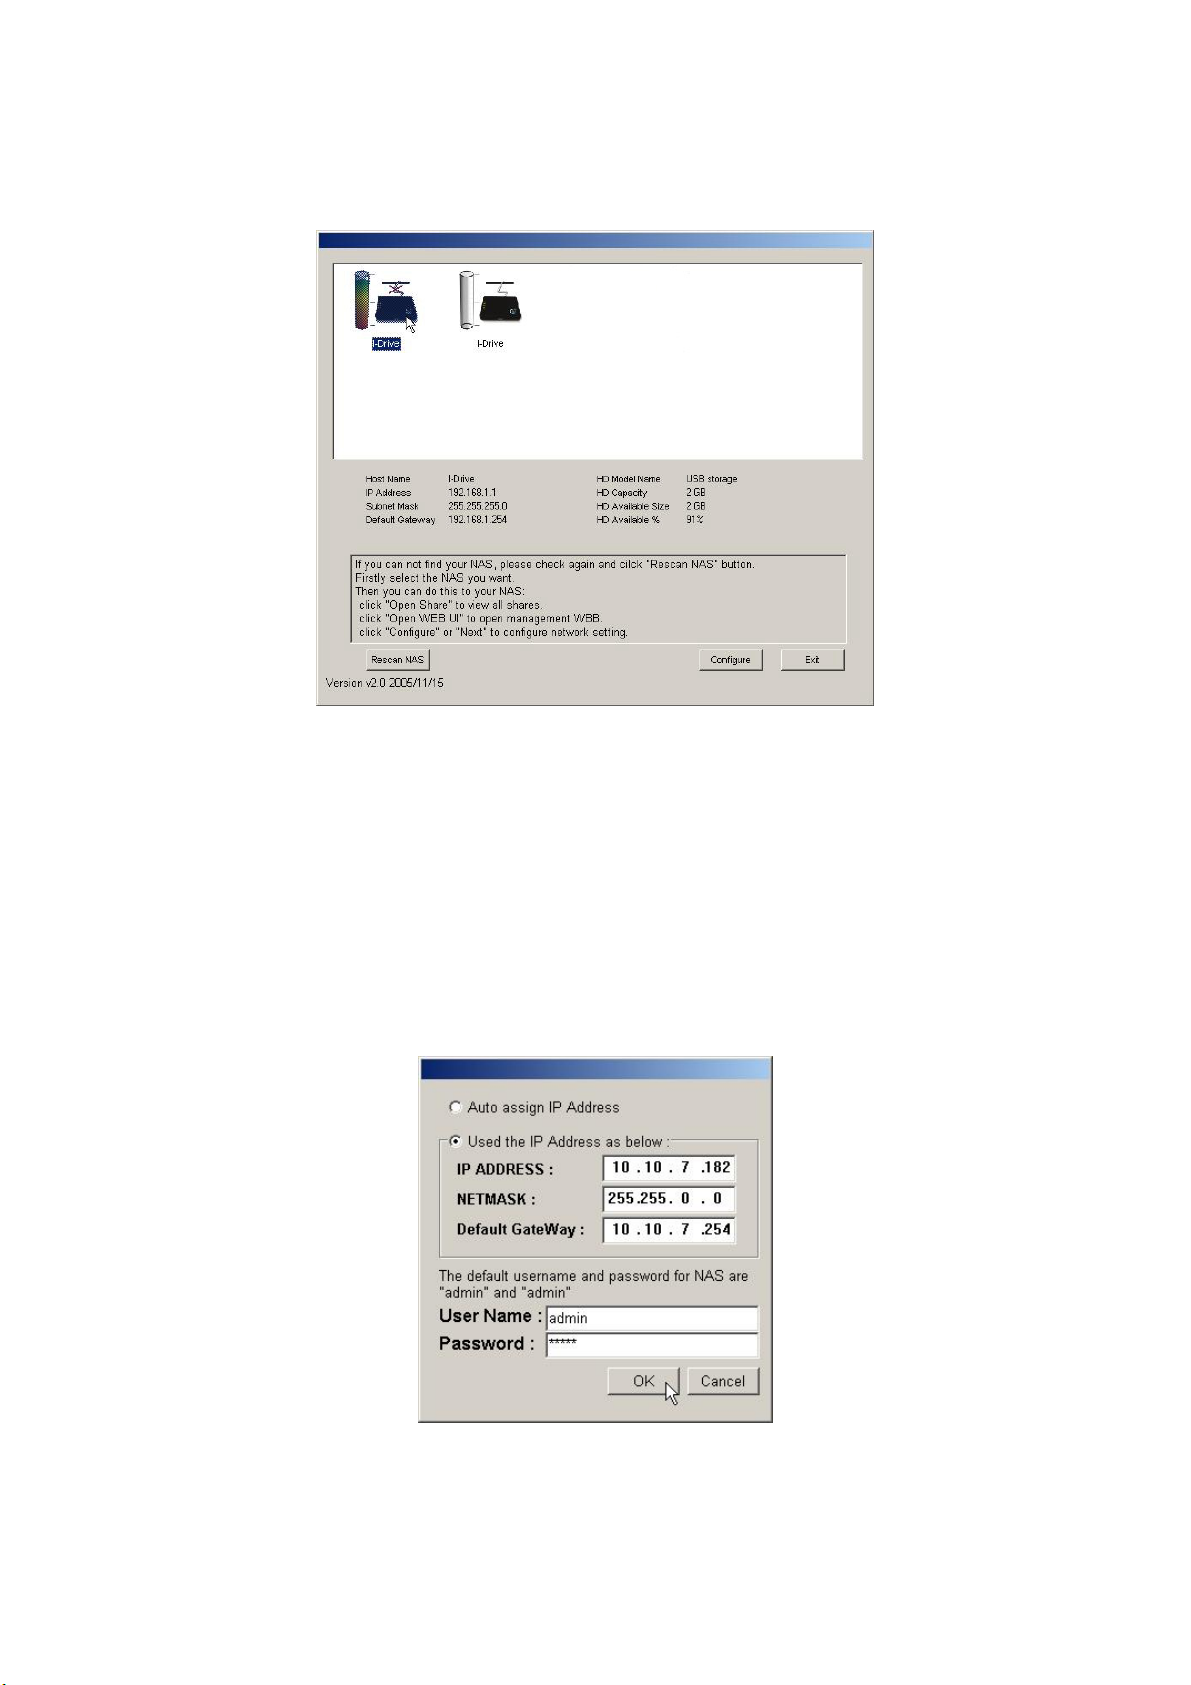
Note: The HD capacity indicates the available space of the USB hard drive on USB
Port I.
6. You may select “Auto assign IP Address”, which allows the PNMD to assign IP
addresses for the device, or select “Use the IP Address as below”, fill in IP
address manually for this device. Enter the username and password and click
OK.
Note:
The default username/ password is admin/ admin. To get information modifying the
username and password, see “Administrator- Superuser Password Setting”
26
Page 28
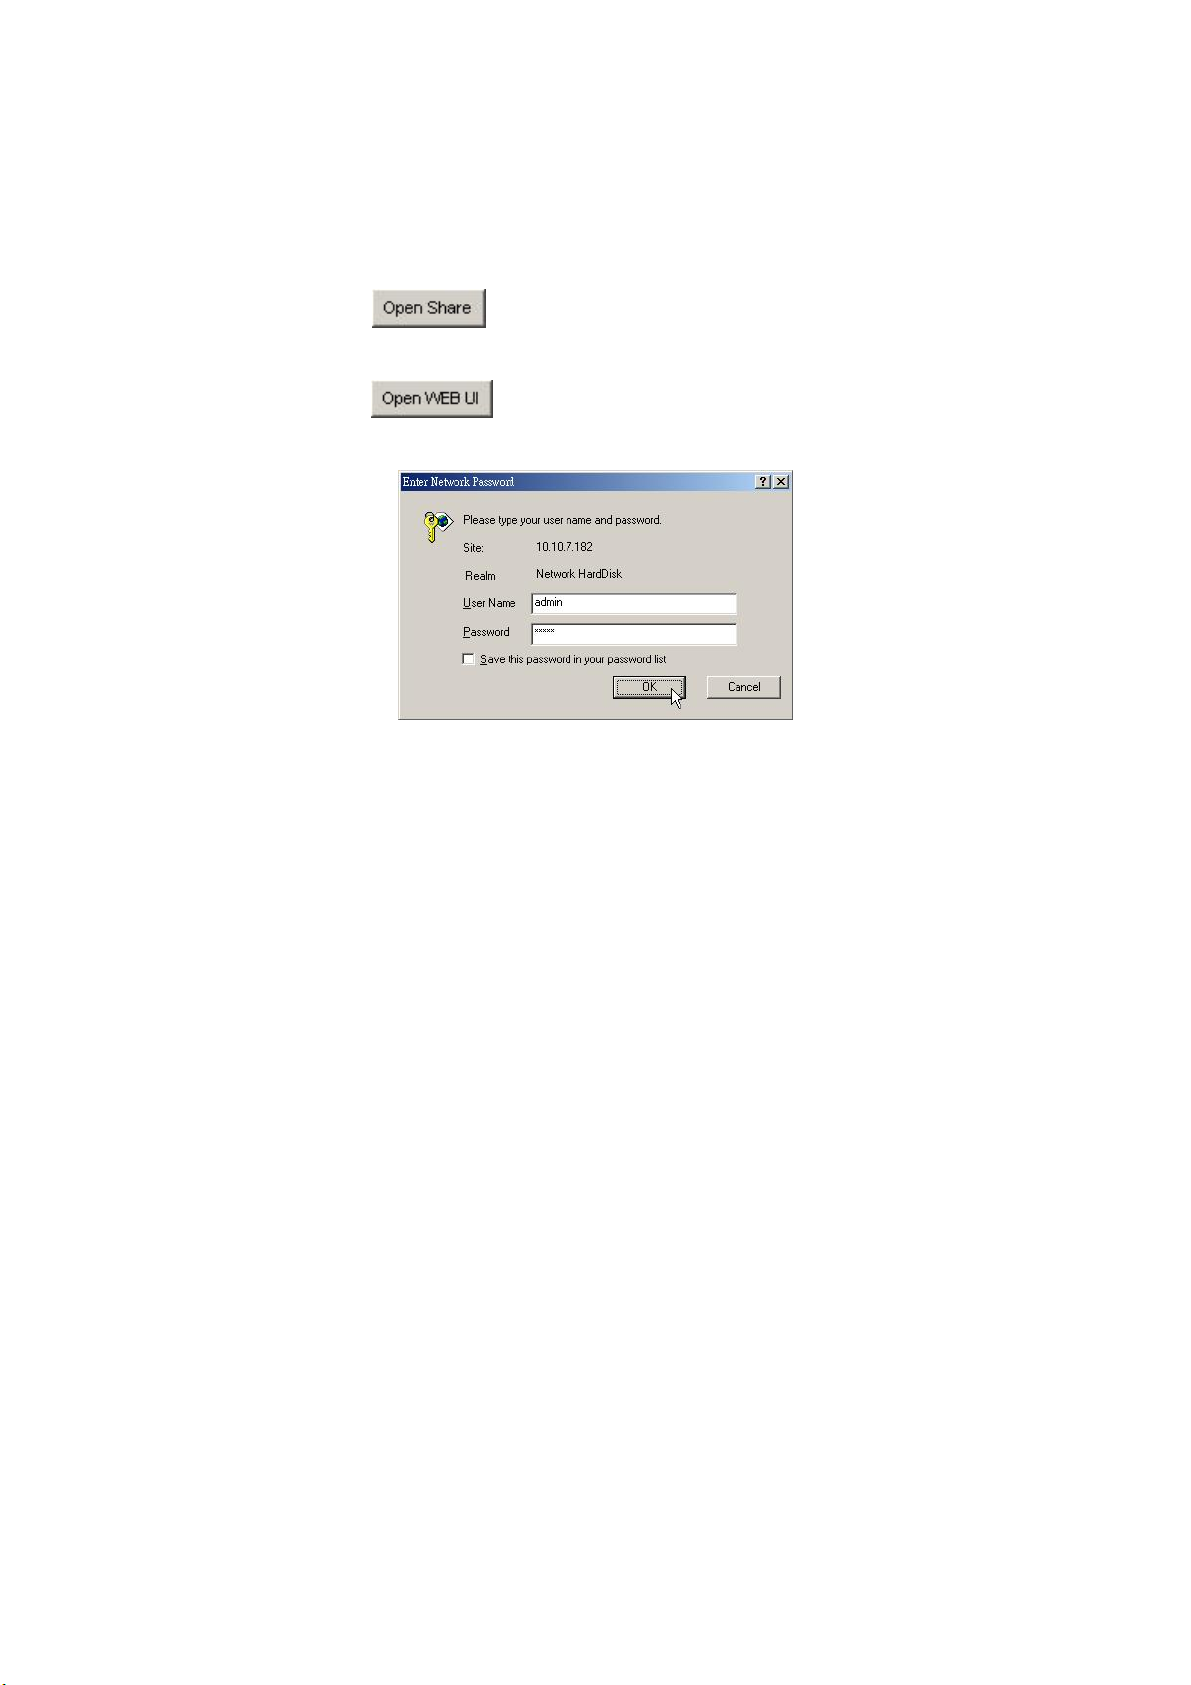
7. After successful IP address setting, the PNMD rescans this device in your LAN
automatically.
8. Select your NAS. You may:
Click the
that connects to the device.
Click the
OK to open the GUI interface.
button to access to folders of the USB hard drive
button. Fill in the username and password and click
Note: To get instructions using the GUI, please see “Using the Graphic User
Interface (GUI)”
27
Page 29
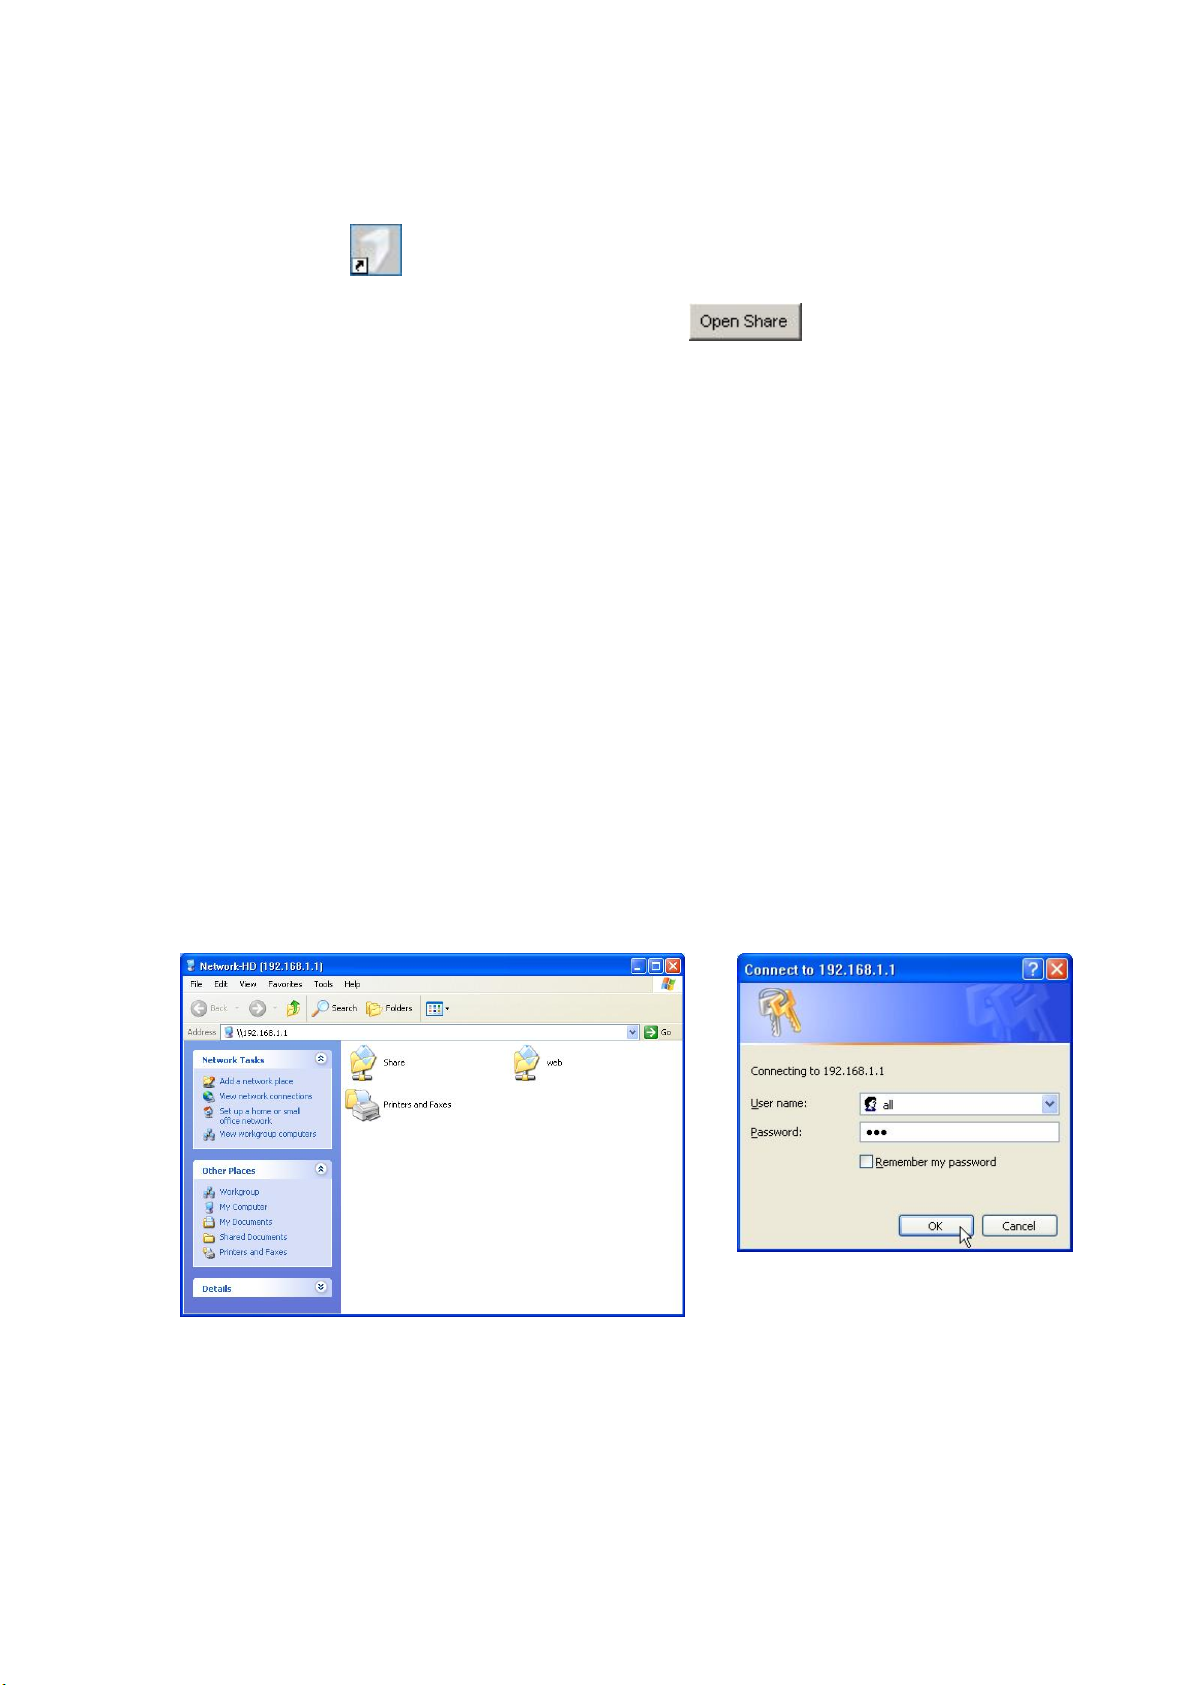
To access to folders in the device
Double click the shortcut on your desktop to start the PNMD. The PNMD
window pops up. Select this device and click the
The device provides three default accounts for users. The account names are also
their default password respectively.
All: The account is allowed to read/write all the folders in the
device as default.
Power & Guest: The account is allowed to read all folders in the device.
Note:
1. You can change the authorities of the three predefined users for getting
accessed to each folder. To change their authorities, please see ” To Configure
Folder Properties”
2. To add or configure a account, please see “To Configure a User”
3. Users that would like to use another set of username/ password after getting
accessed to any folder please log off your operation system and log on again.
button.
Tip:
You can also access to folders with a web browser. The following procedures use
assumptions below:
28
Page 30
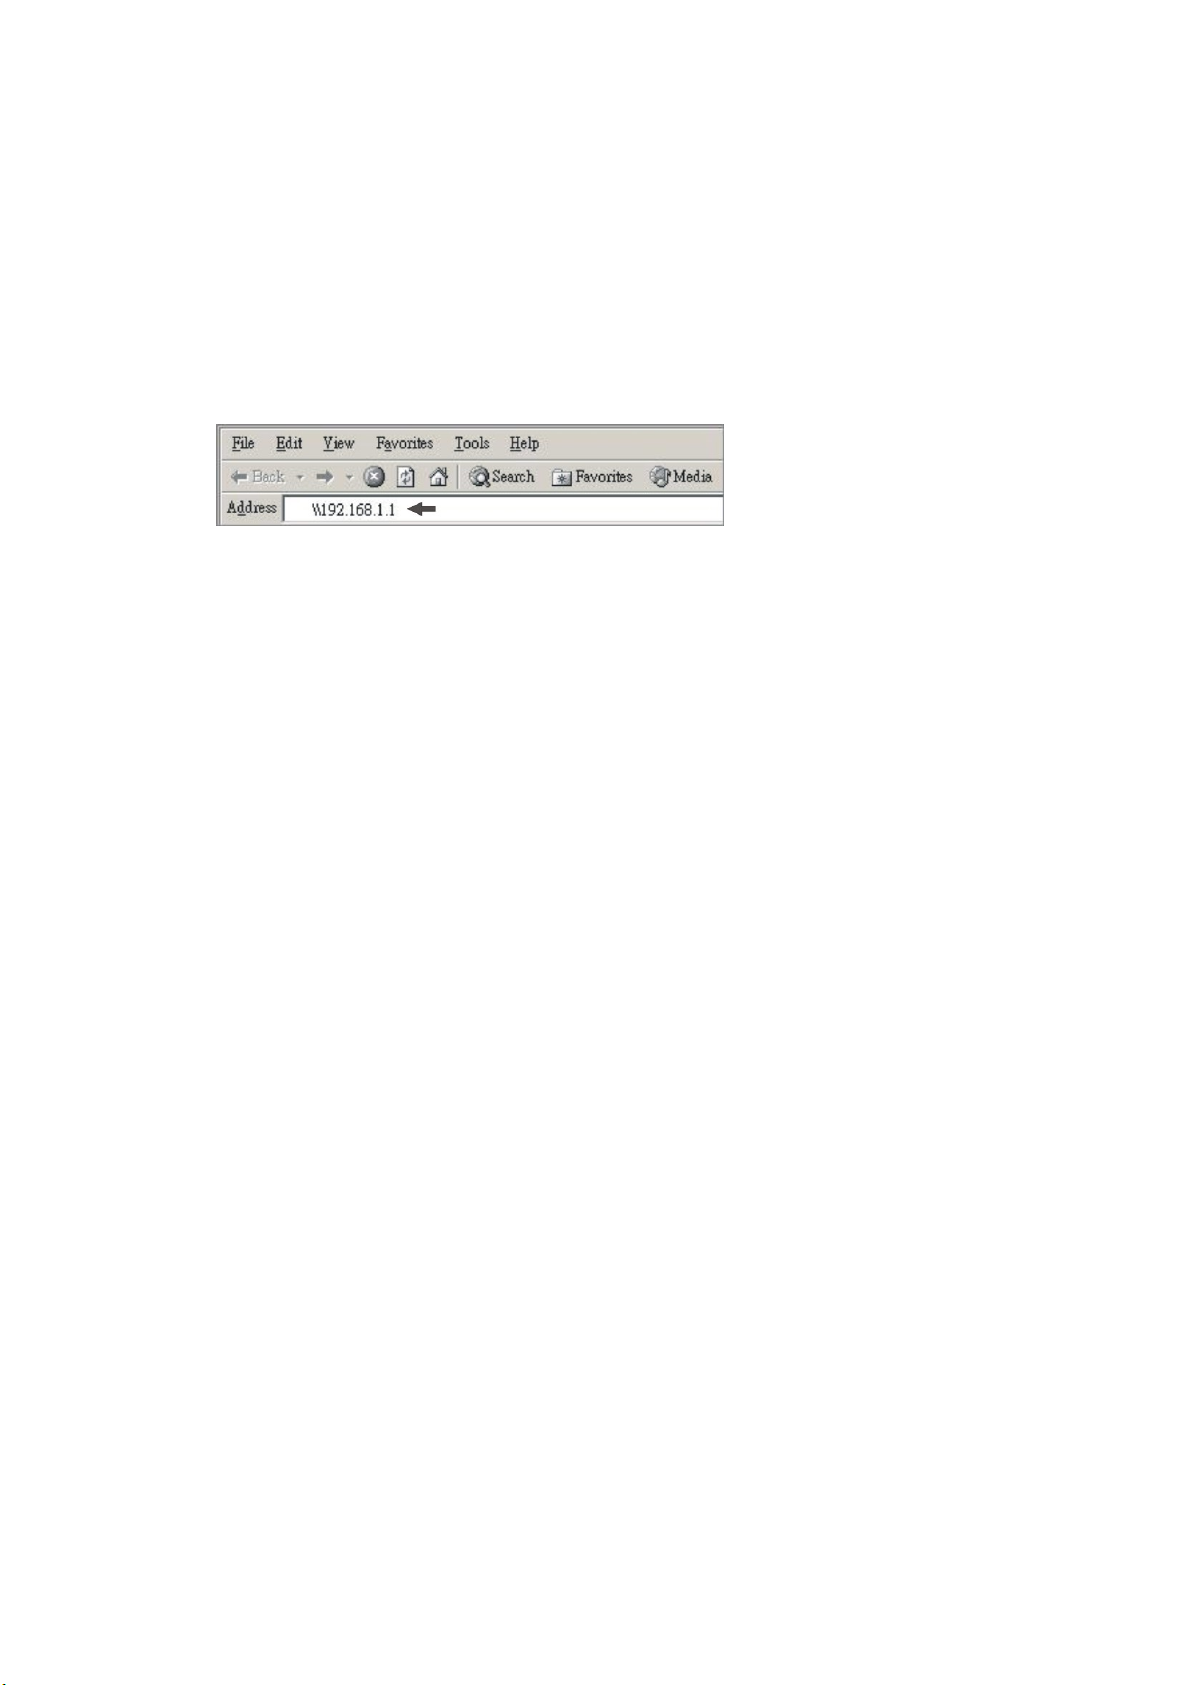
The device’s IP address: 192.168.1.1
Your computer’s network setting: IP address: 192.168.1.2
Subnet mask: 255.255.255.0
Default Gateway: 192.168.1.2
1. Open a web browser.
2. Fill 2 backslashes and the device’s IP address in the address bar and press
<enter>
Note: You should have your computer and the device configured in a LAN. For
information about configuring the network settings, see “Assign a Static IP
address for your computer.”
29
Page 31
Management Guide
Read this chapter to understand the management interface of the
device and how to manage the device.
Starting the Graphic User Interface (GUI)
The Graphic User Interface (GUI) is the management interface of this device. Most
parameters and settings are configured over the GUI.
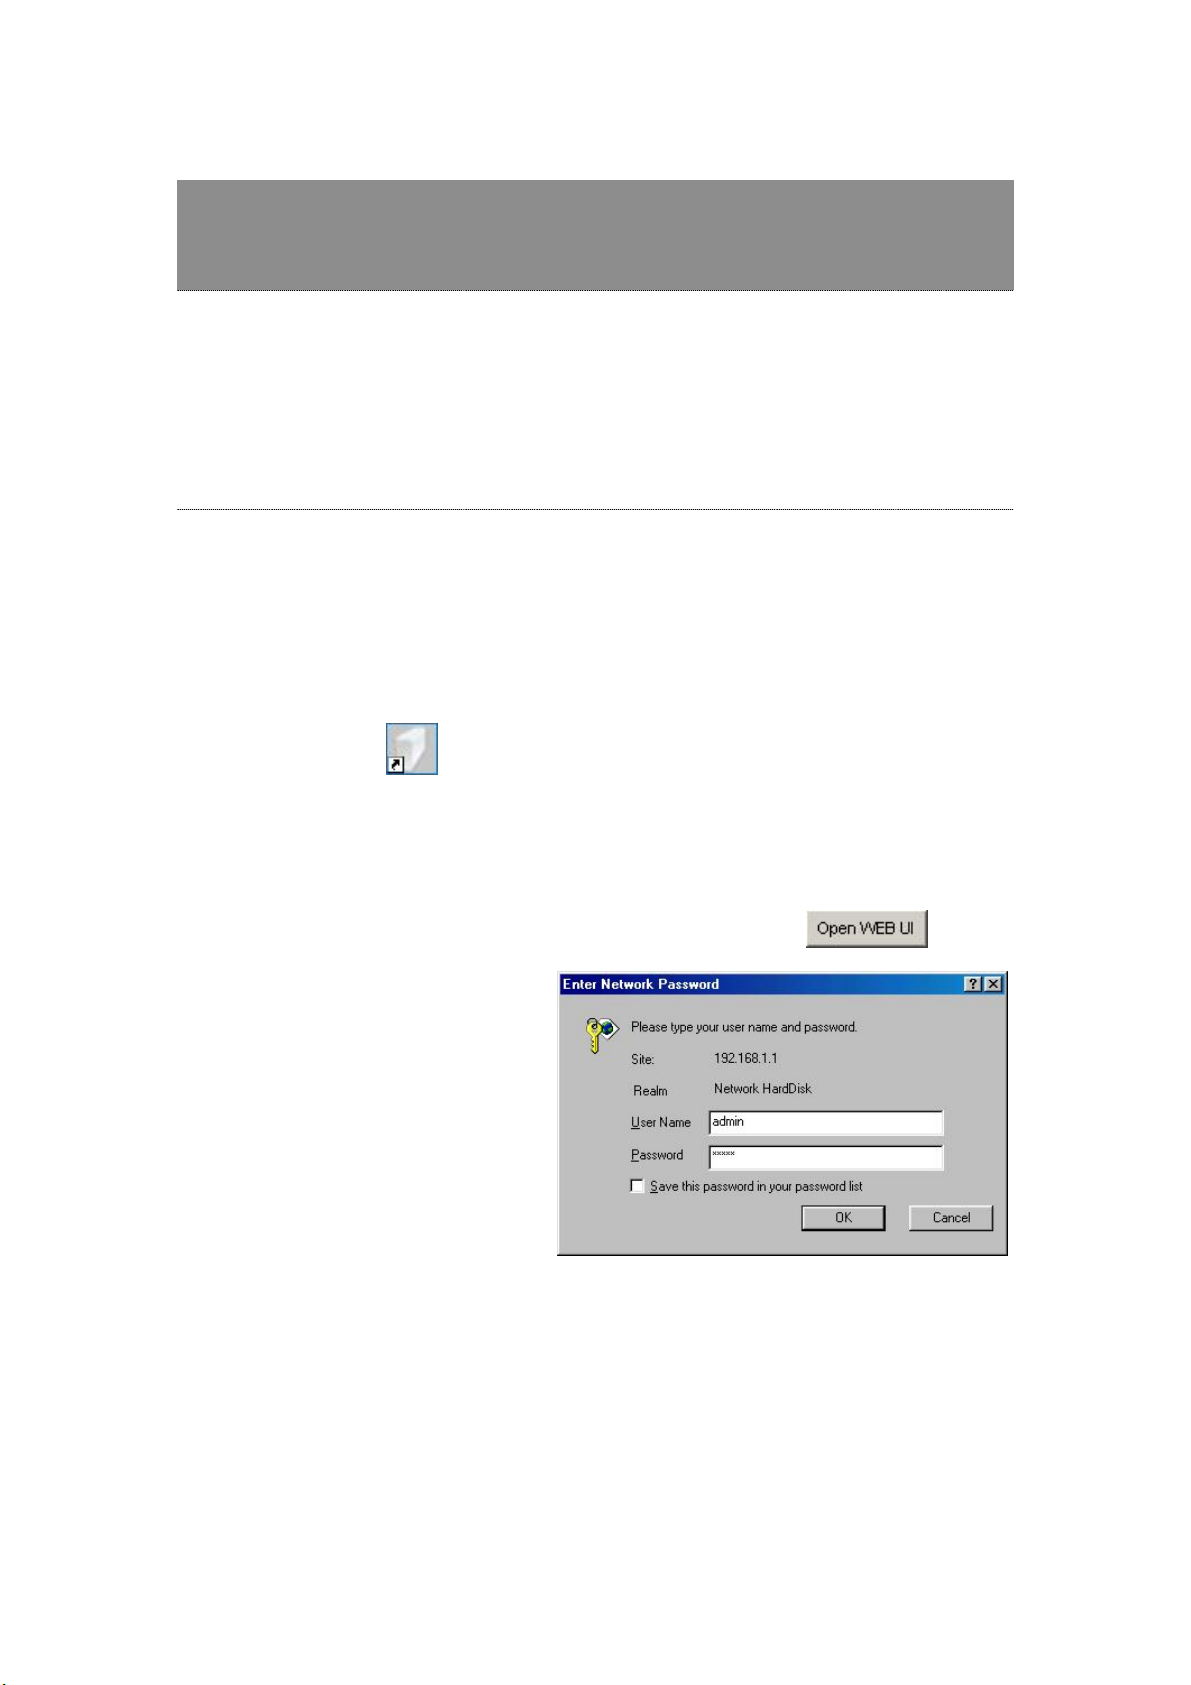
To get access to the GUI,
1. Double click the
Note: To get instruction installing the PNMD, please see “ Installing the PNMD”
shortcut on your desktop to start the PNMD.
2. The PNMD window pops up. Select your NAS and click the button.
3. When the “Enter Network
Password” window pops up,
enter a user name and
password.
4. Click OK. The GUI Opens.
Note:
1. The default user name and password is admin/ admin. To change the username/
password, please refer to “Administrator- Superuser Password Setting.”
2. Both the User Name and Password are case sensitive and alphanumeric.
30
Page 32
Tip:
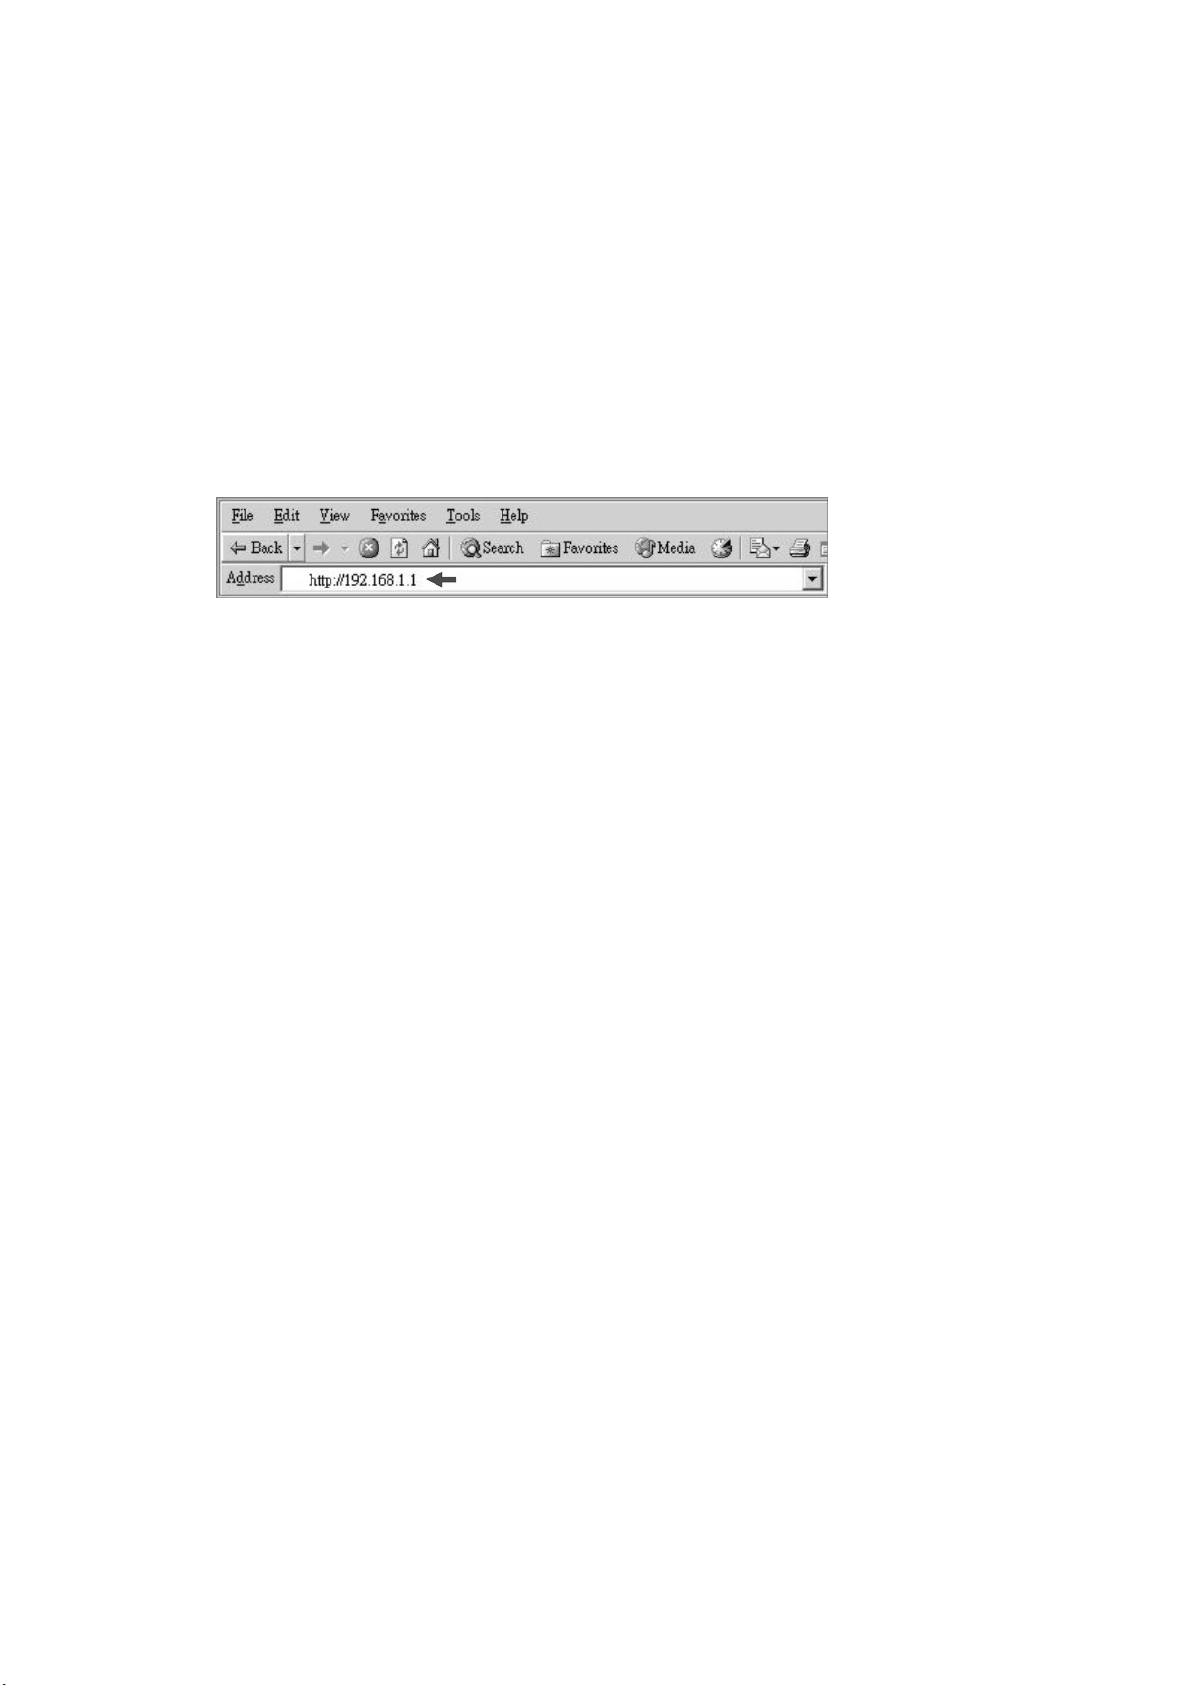
You can also start the GUI with a web browser. The following procedures use
assumptions below:
The device’s IP address: 192.168.1.1
Your computer’s network setting: IP address: 192.168.1.2
Subnet mask: 255.255.255.0
Default Gateway: 192.168.1.2
1. Open a web browser.
2. Enter the device’s IP address in the address bar and press <enter>
Note: You should have your computer and the device configured in a LAN. For
information about configuring the network settings, see “Assign a Static IP
address for your computer.”
3. When the “Enter Network Password” windows pops up, enter a user name
and password.
4. Click OK. The GUI opens.
31
Page 33
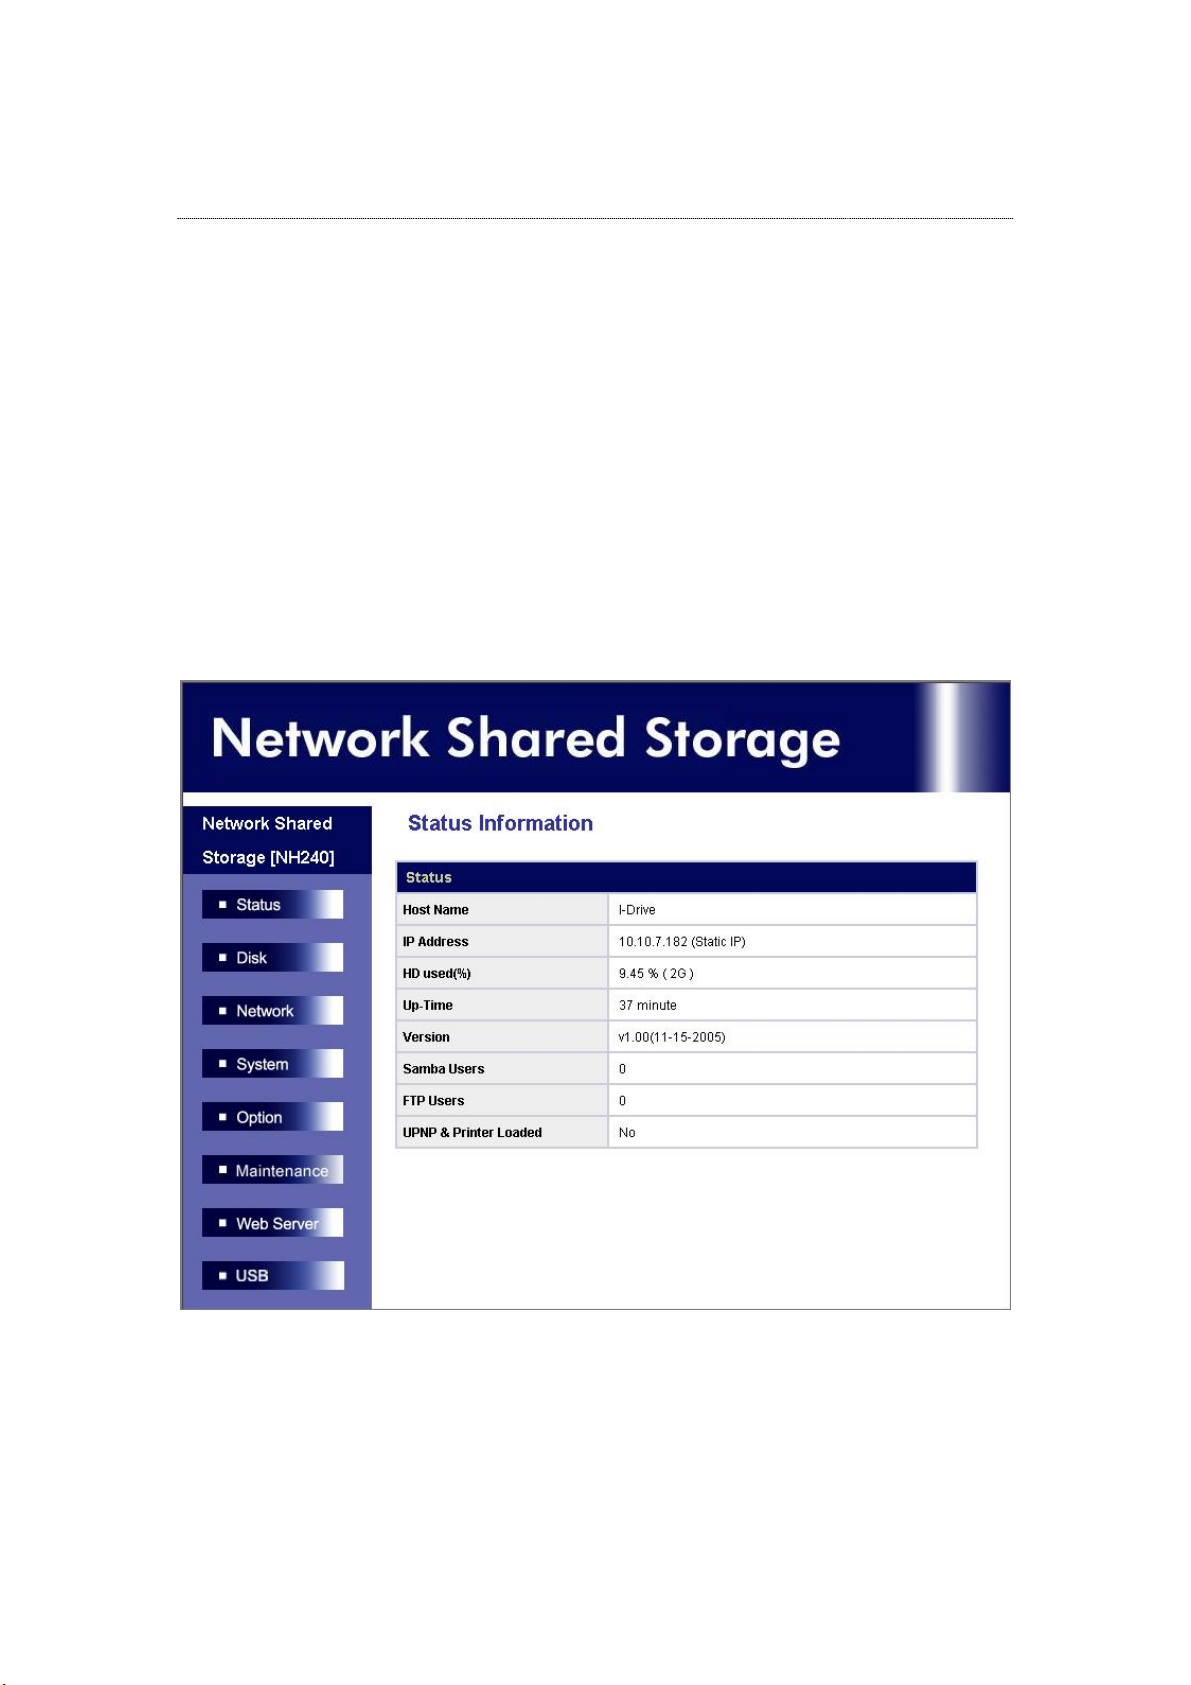
Using the Graphic User Interface (GUI)
This section provides an introduction to the GUI.
Understanding the GUI
The GUI is consisted of the following components,
1. Configuration categories: Located on the left side of each page. Lists the
configuration categories on this device. To get access to each category, click on
the button that you are going to configure.
2. Configuration items: Located on the right side of each page. Shows the items
that can be configured. You can click on the tabs that listed above to access to
each sub-categories.
Note: For detail information about configuring each item, please refer to the
management instruction for each configuration category.
32
Page 34

Management items list
T
T
T
T
T
T
T
The following table lists the information and items that you can configure with the
GUI. For detail instruction, please refer to the following chapters.
Category Sub-category Information
Status Status Shows the status information of this device
including Host name, IP address, HD used
percentage(USB port I), system up-time, firmware
version, current Samba users and FTP users.
Disk
Disk To format the USB storage device (Port 1) in EXT3
Network Host
IP address
System Administrator To change the Superuser name and password.
Time
User
Group To make users in groups. Add users to groups or
Option FTP Change FTP properties including Port number,
Security IP
Security MAC
File Download To add or delete download tasks.
Maintenance Maintenance Provides device maintenance including backup the
Web Server Web Server To change the Web server prosperities.
USB Detail Shows the USB device information that currently
Disk Setup To setup the properties of the connected USB
Printer Setup To enable/ disable the printer server functionality.
Clean Printer
Folder
Job Queue
o add a new folder, delete a folder, change
folder-access authentication and set up folder
properties.
(Note: Those new folders will be added to the
device on port I)
format
o change the device’s host name, Work group
name and description.
o configure the network settings for the device
including IP address, Sub network Mask, Gateway,
DNS server, and DHCP enable/ disable.
o set up the system time zone, synchronize time
and assign a timeserver for the device.
o add a new user, delete a user, setup user
authorities and change user properties.
remove users from groups.
timeout setting and enable/disable anonymous
access.
o configure the allowed or denied IP addresses for
getting access to the device.
o configure the allowed or denied MAC addresses
for getting access to the device.
status of your configuration on the device, selecting
code page, firmware upgrade, system restart, and
reset factory default. Show system log information,
select default copy button folder and enactive the
UPNP and USB printer function for the device.
connects to the device.
device. While USB port II is connected with an USB
storage device, you can also mount the USB storage
device on the product and format the connected
USB storage in EXT3 file format.
To remove all printer jobs that waiting for printing.
33
Page 35
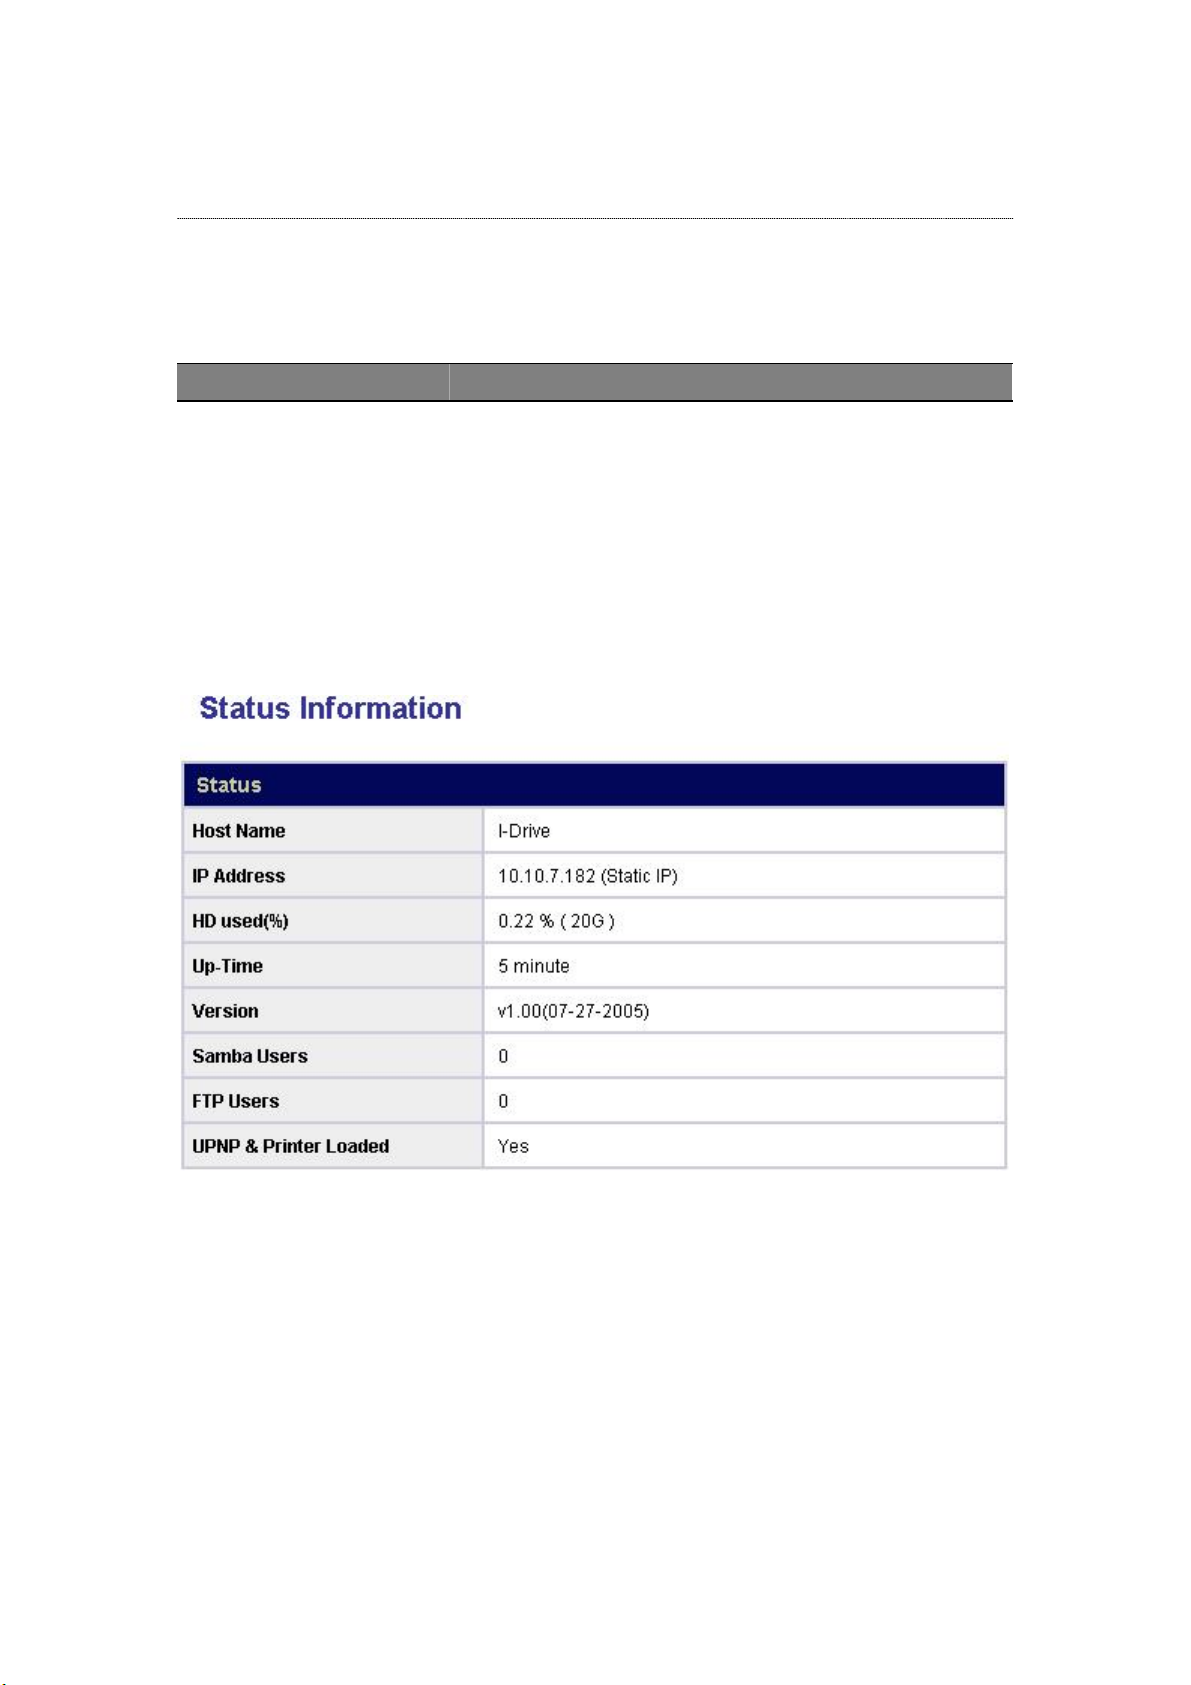
Status
The Status page shows the following information of the device. To open the Status
page, click the Status on the configuration categories list.
Items Information
Host name The identification of this device.
IP-address The IP address of the device
HD used (%) The usage percentage of HD (Total amount of HD)
Up-time The estimate time that you power the device on
Version The firmware version of the device.
Samba Users The number of members who is currently using the
device by Samba
FTP Users The number of members who is currently using the
device by FTP client
UPNP & Printer Loaded Check if the UPNP and Printer functions are applied.
34
Page 36
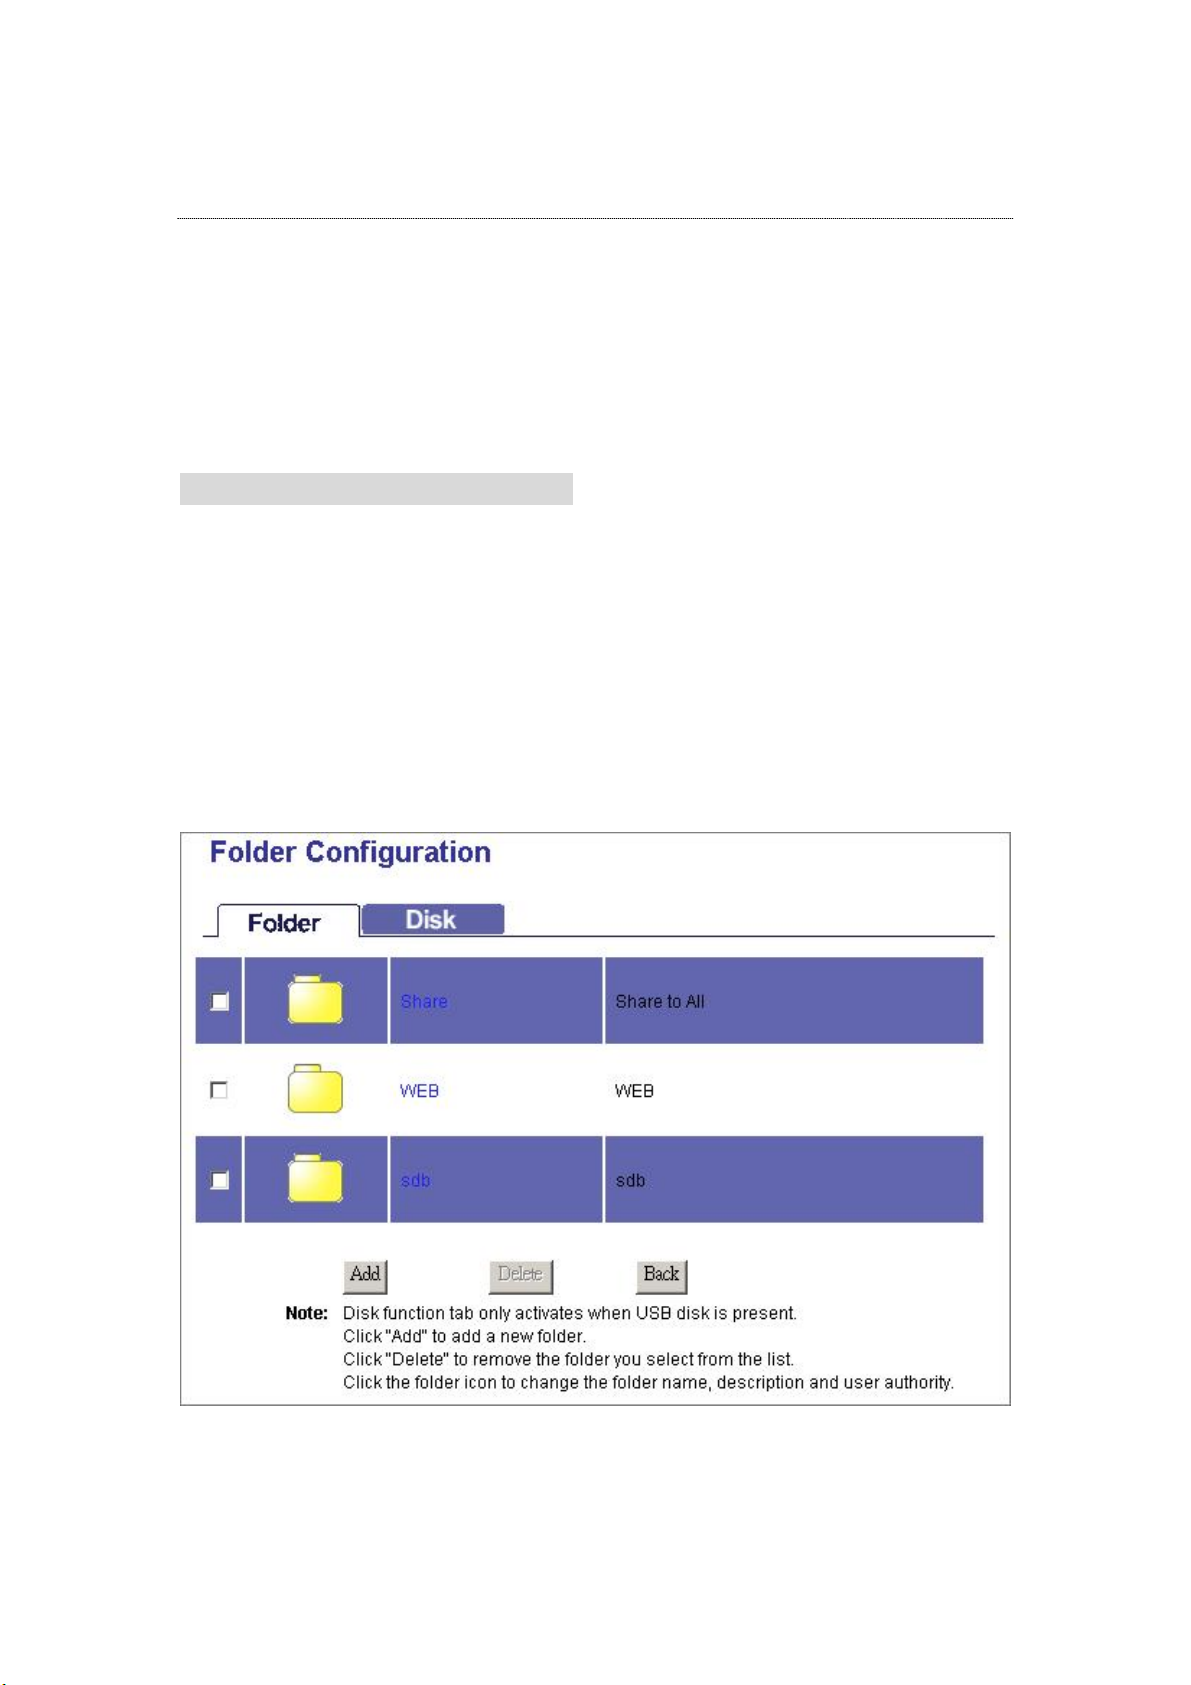
Disk
The Disk page allows users to:
1. Change the properties of folders.
2. Format the hard disk that connected to the device with IDE connector.
To open the Disk page, click the Disk on the configuration categories list
Folder- Folder Configuration
The folder configuration allows users to add folders, delete folders and change folder
properties.
Note: Only the folders in USB I Port will be listed automatically. To share and
configure the folders in USB Port II, you have to mount it first. Please refer to
“Mount/ Dismount Your USB Storage on Port II to the Device” for
instruction.
To Configure Folder Properties
Click on the folder that you are going to configure.
35
Page 37
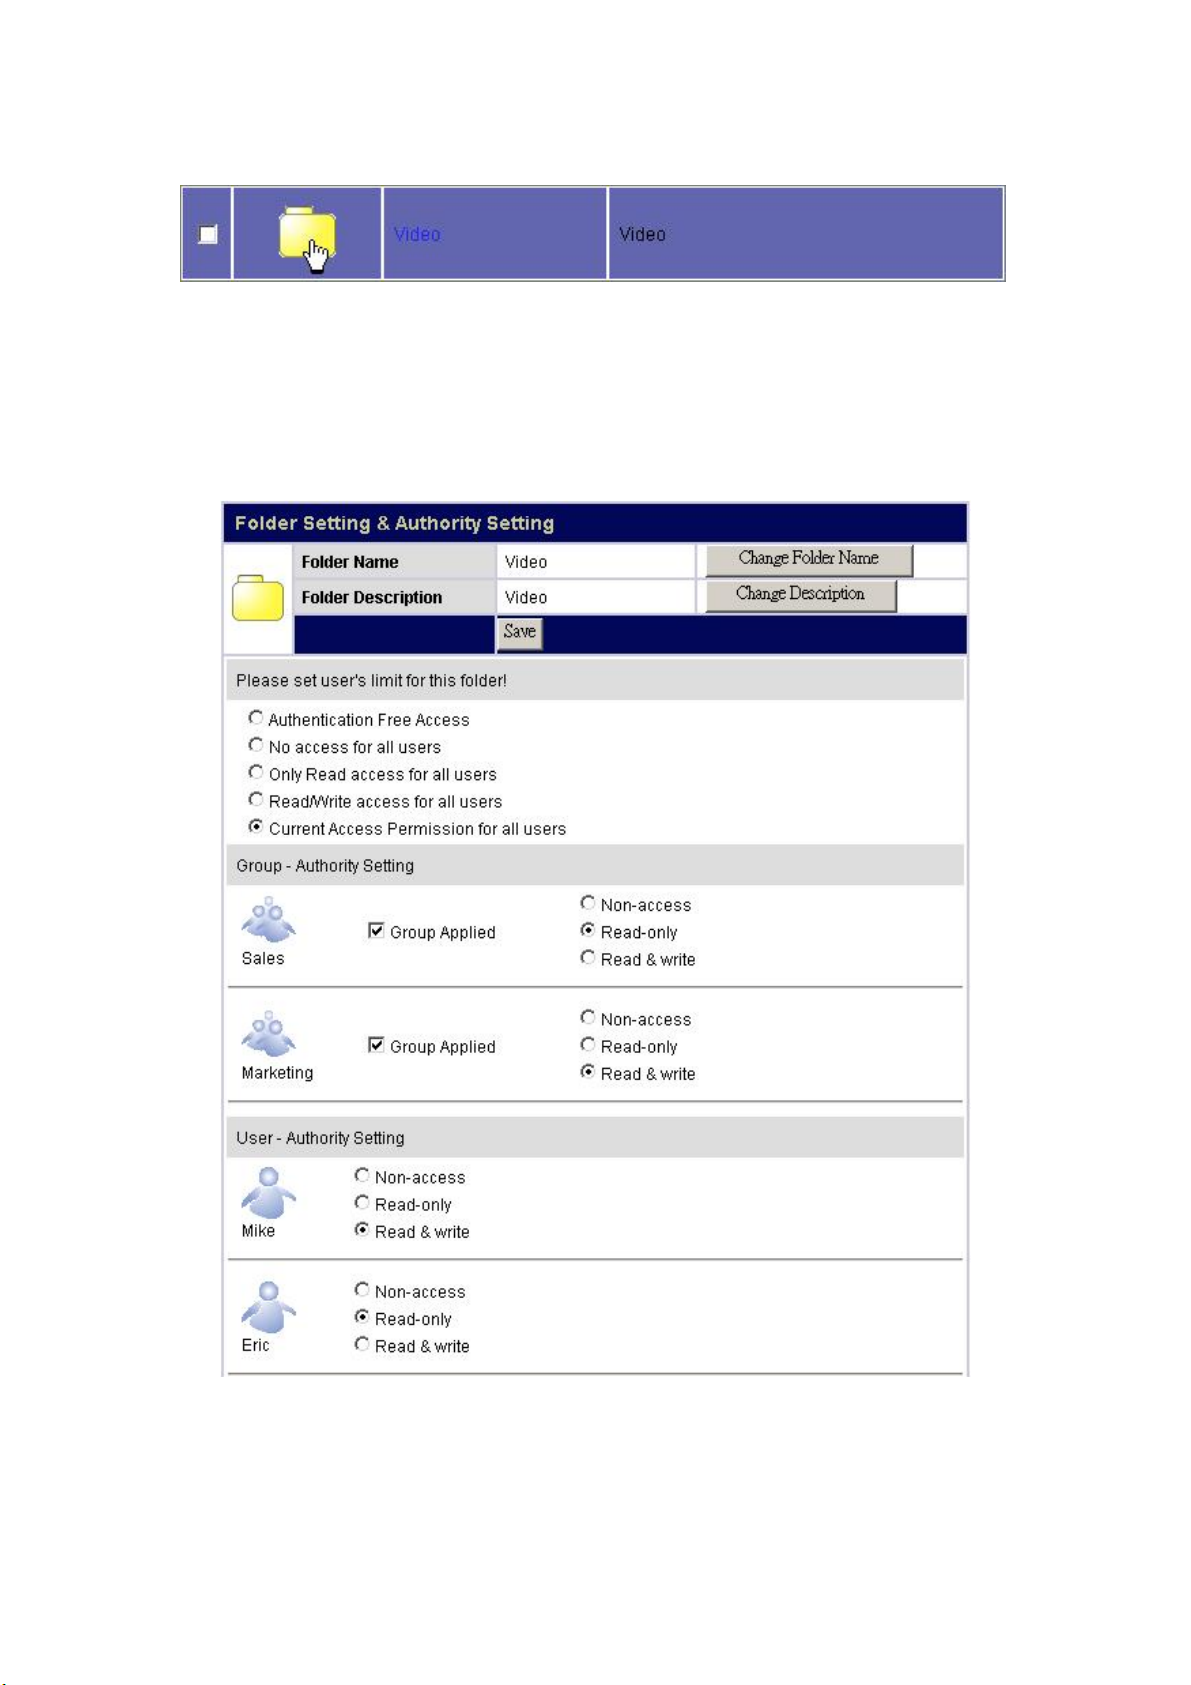
The folder configuration page shows up. This page allows users to:
Change Folder Name/ Folder Description.
Add or remove authorized users or groups for this folder.
Change folder-accessing authority level for users and groups.
36
Page 38
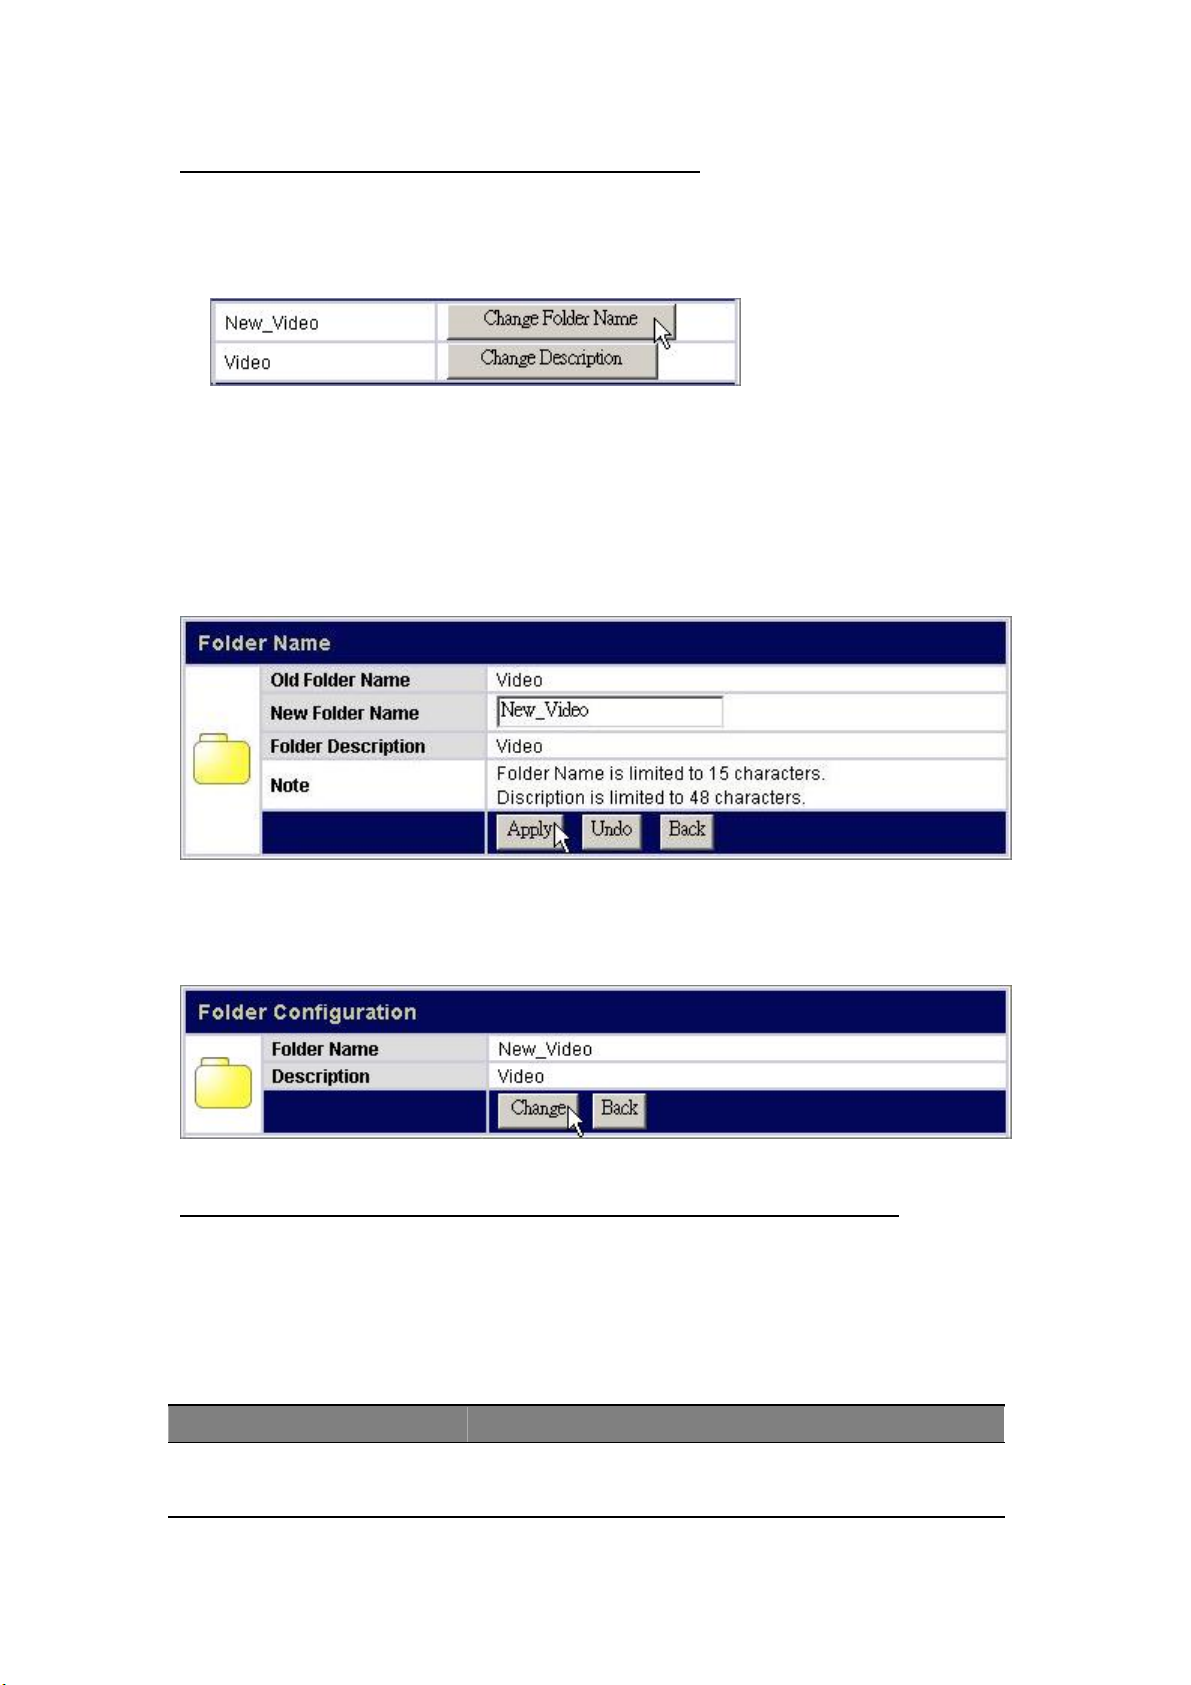
To change the folder name/ folder description
1. Click on “Change Folder Name” or “Change Description” icon. The Folder
Name/ Folder Description Setting page shows up.
2. Fill in the new name or new description for the folder and click “Apply”.
Note:
Folder Name (0~15 characters): The name for the folder.
Description (0~48 characters): A note for the folder.
Both folder name and description are alphanumeric.
Blank character is not allowed for folder name and description.
3. The folder name/description is replaced successfully. You may click “Change” to
do more configurations for this folder or click “Back” to return to folder list.
Configure folder-accessing authority level for users and groups.
1. Configure the access-permission rules for all users by pre-defined levels.
Select one level and click “Save” to apply this authority for all users. The
pre-defined levels use the following access permission rules:
Pre-defined Levels Access Authority
Authentication Free
Access:
No authentication. Everyone is allowed to get
access to this folder without username and
password.
37
Page 39
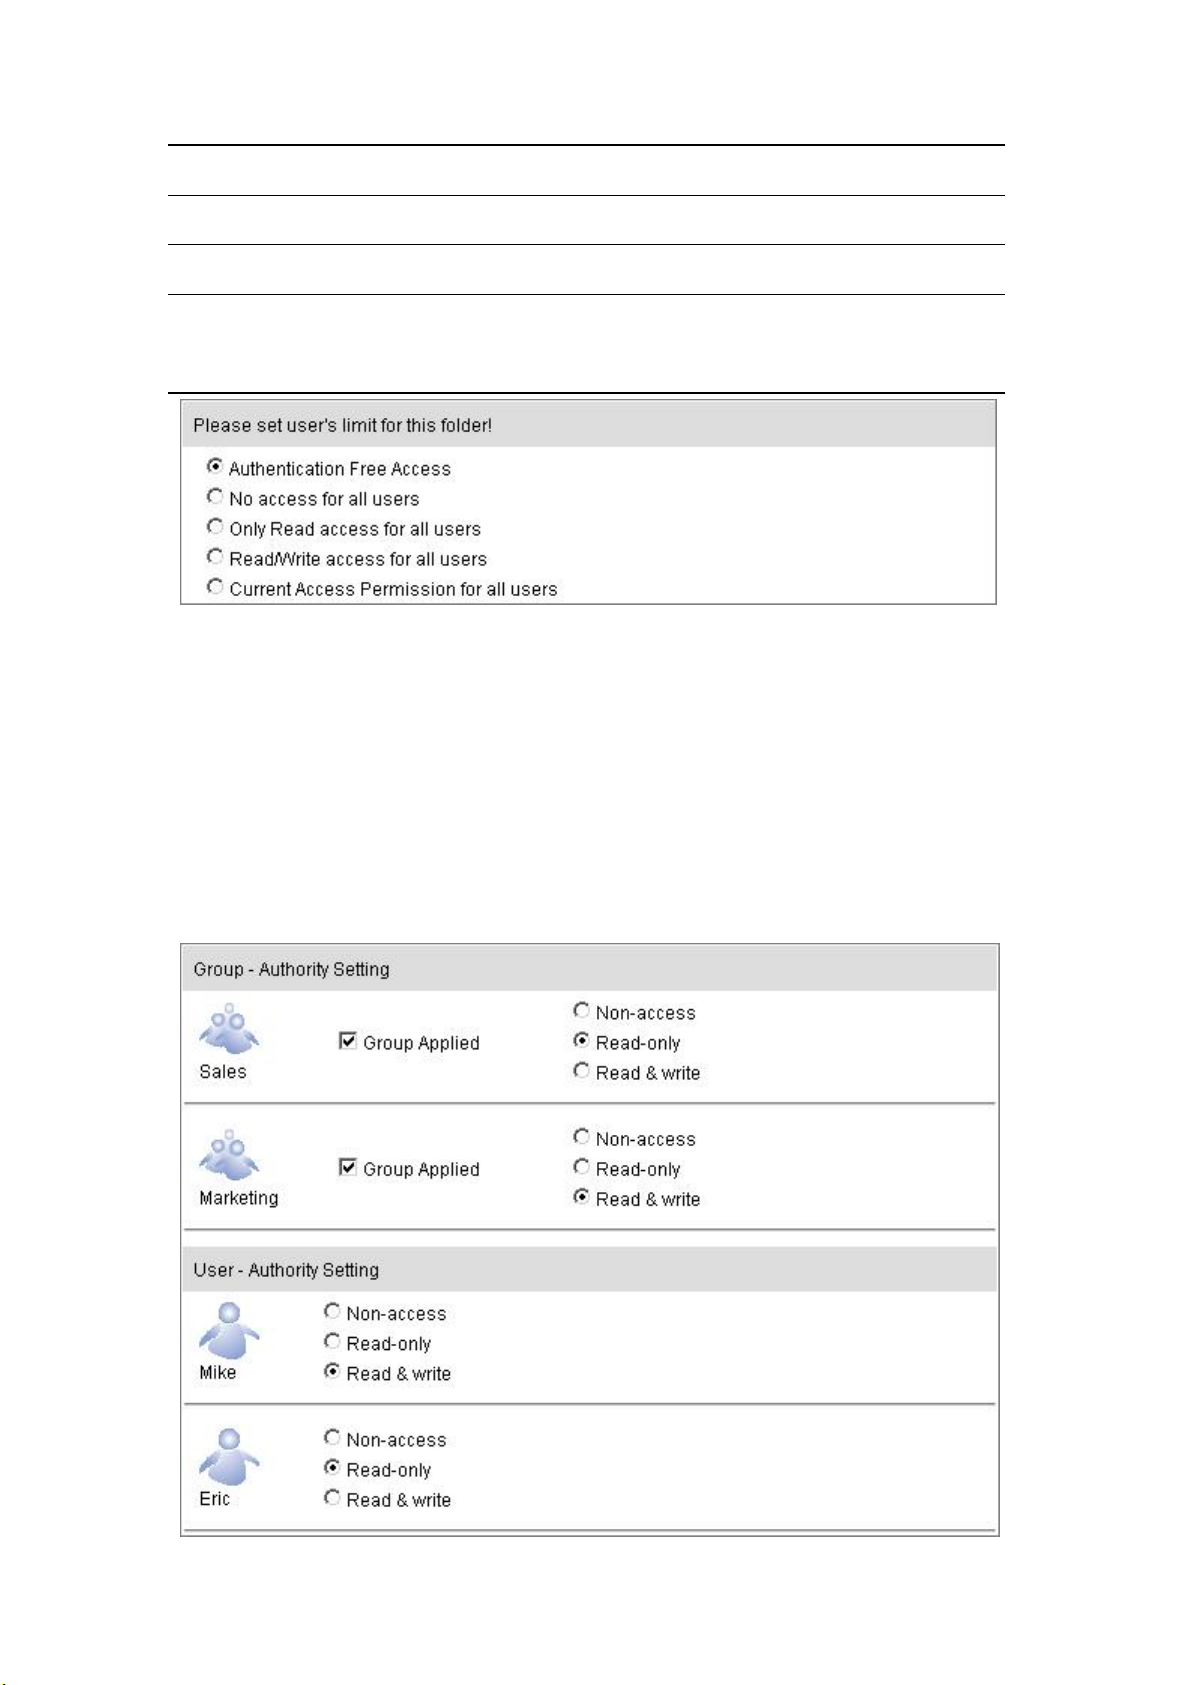
No access for all users: No accessing. No user is allowed to get access to
this folder.
Only Read access for all
users:
Read/ Write access for
All users are allowed to read in this folder.
Modification in this folder is not allowed.
All users are allowed to read and write this folder.
all users:
Current Access
Permission for all users:
The folder uses user-defined authority settings. The
access permissions in “Group-Authority Setting”
and “User-Authority Setting” will be applied to
this folder.
2. Configure the access-permission rules by groups and users:
Note: Before starting, you have to click “Current Access Permission for all
users” in the “Please set user’s limit for this folder”.
By Group: Mark the checkbox to select an authorized group. Select an
access-permission rule for this group and click “Save” to apply.
By User: Select an access authority for each user. Click “Save” to apply.
38
Page 40
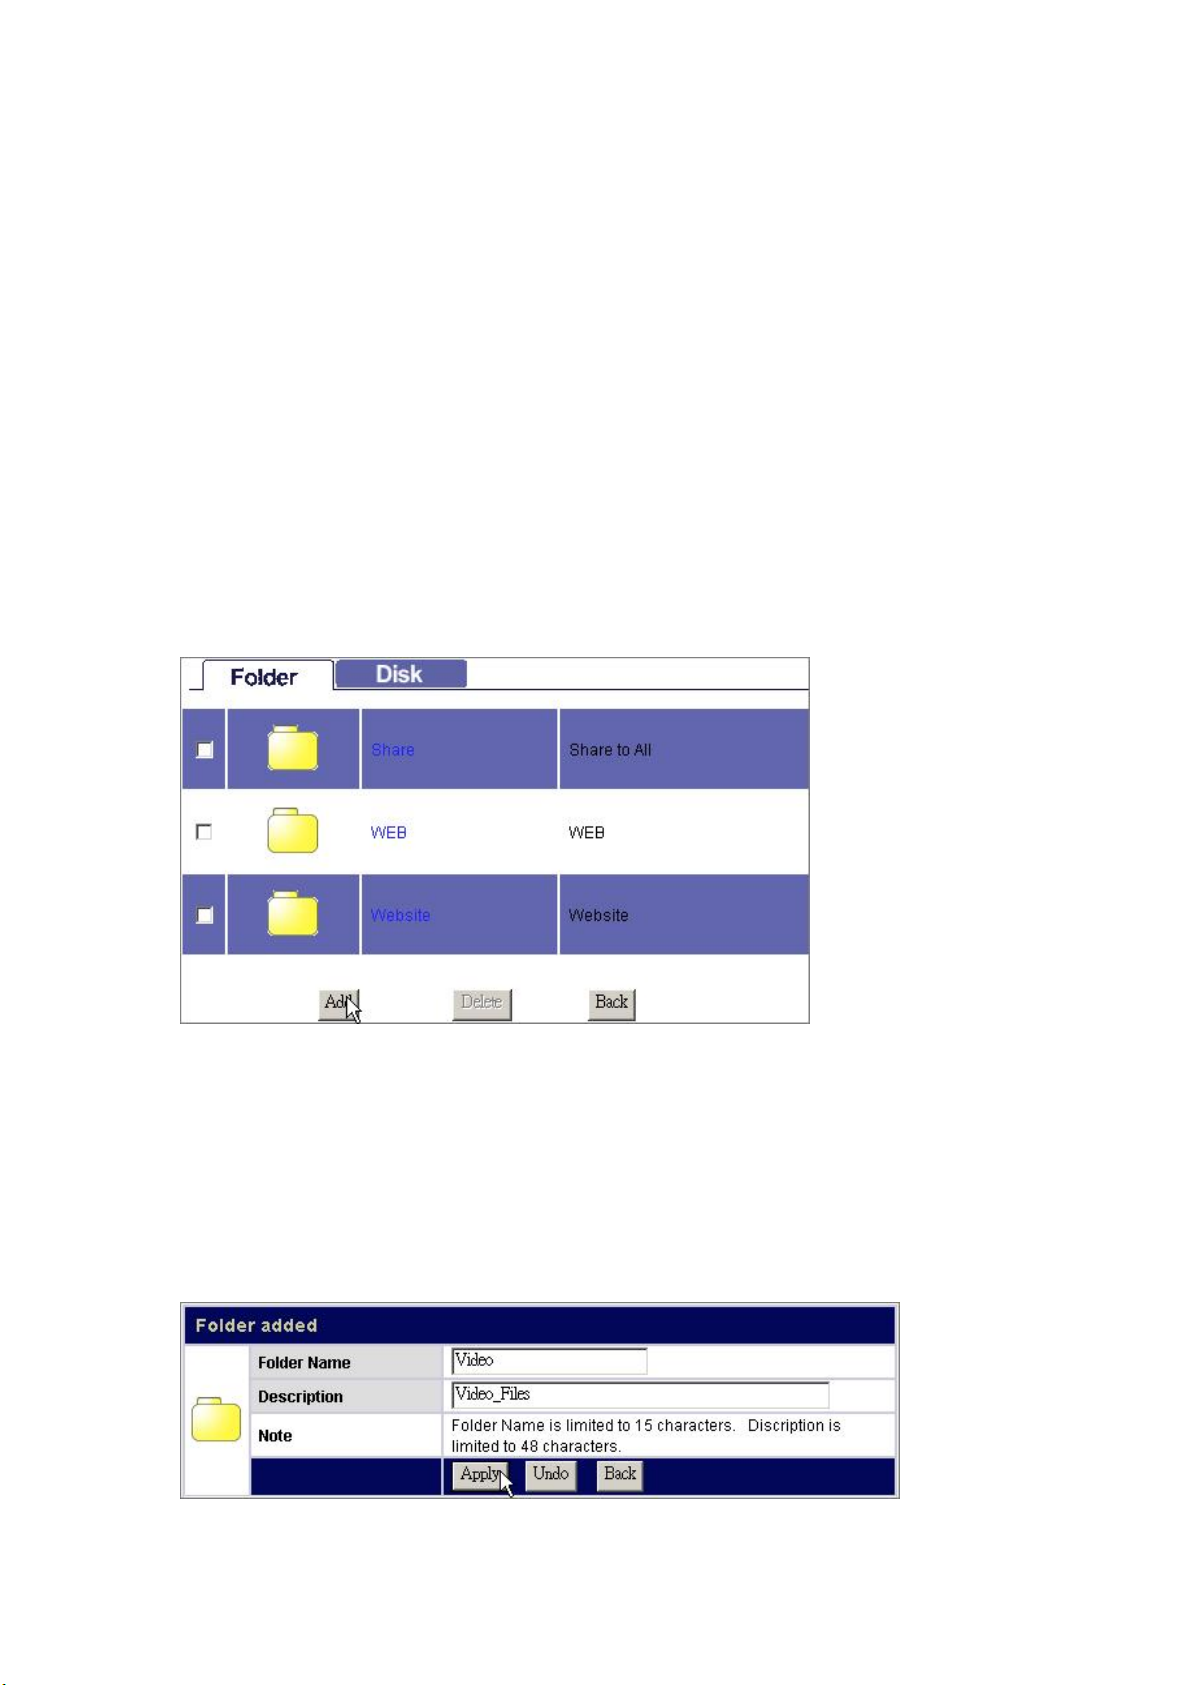
Tips: To do an efficient access-authority configuration, please refer to the following
recommend procedures:
Step1. Select a Pre-defined authority level for all users. (Ex, Click “No Access for
all users” to configure all users as “Non-access” for this folder.
Step2. Click “Current Access Permission for all users” to allow configuration
by groups or users.
Step3. Specify the users that have different authorities. (Ex, Click “Read &
Write” for “Mike” and Click “Read-Only” for “Eric”).
Step4. Click Save to apply. (Ex, Click “Save” to allow ”Mike” to Read/Write this
folder and “Eric” to read this folder. Other users are not allowed to access
this folder.)
To Add a New Folder
1. Click the “Add” button on folder list.
2. Specify a folder name and description for the newly added folder. Click “Apply” to
enable.
Note:
Folder Name (0~15 characters): The name for the folder.
Description (0~48 characters): A note for the folder.
Both folder name and description are alphanumeric.
Blank character is not allowed for folder name and description.
39
Page 41
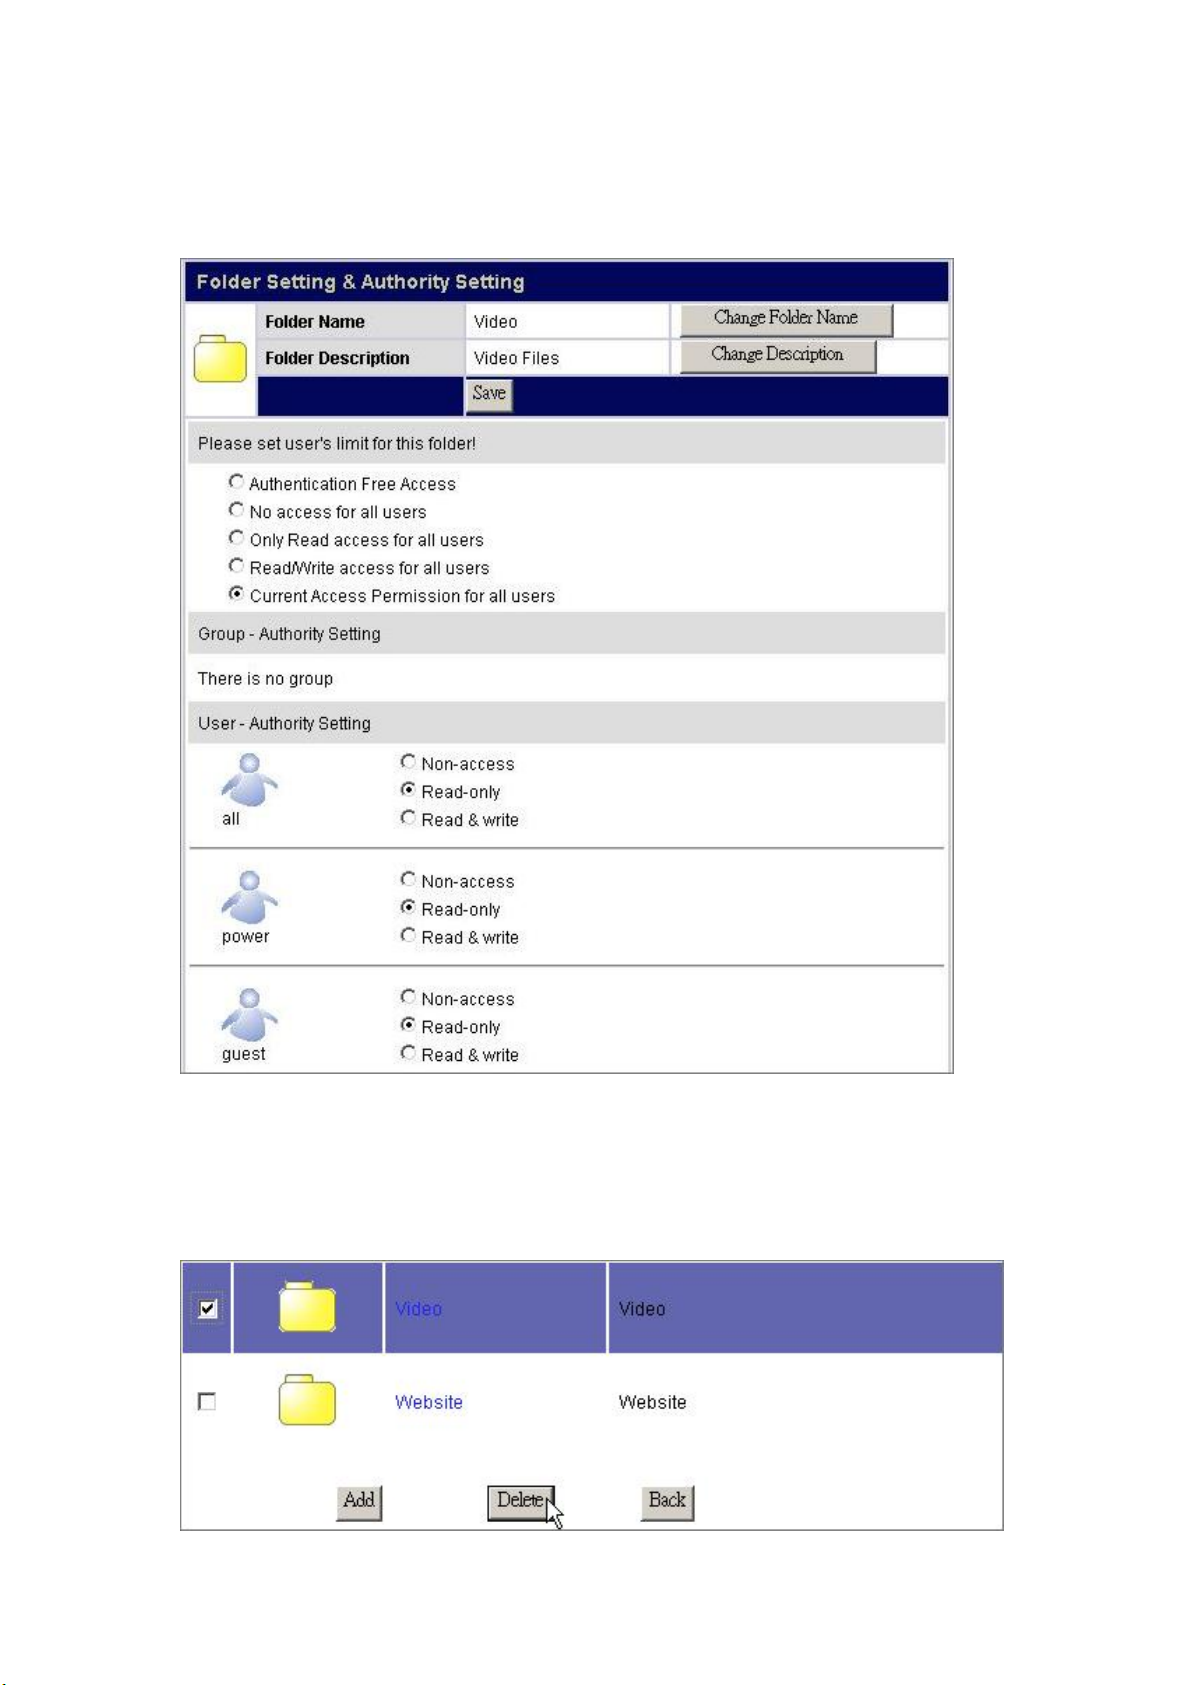
3. Setup the folder properties and click “Save” to apply.
Note: For detail folder configuration, see “To configure folder properties”
To Delete a Folder
1. Mark the check box of the folder that you are going to delete.
2. Click Delete to delete the folder.
40
Page 42
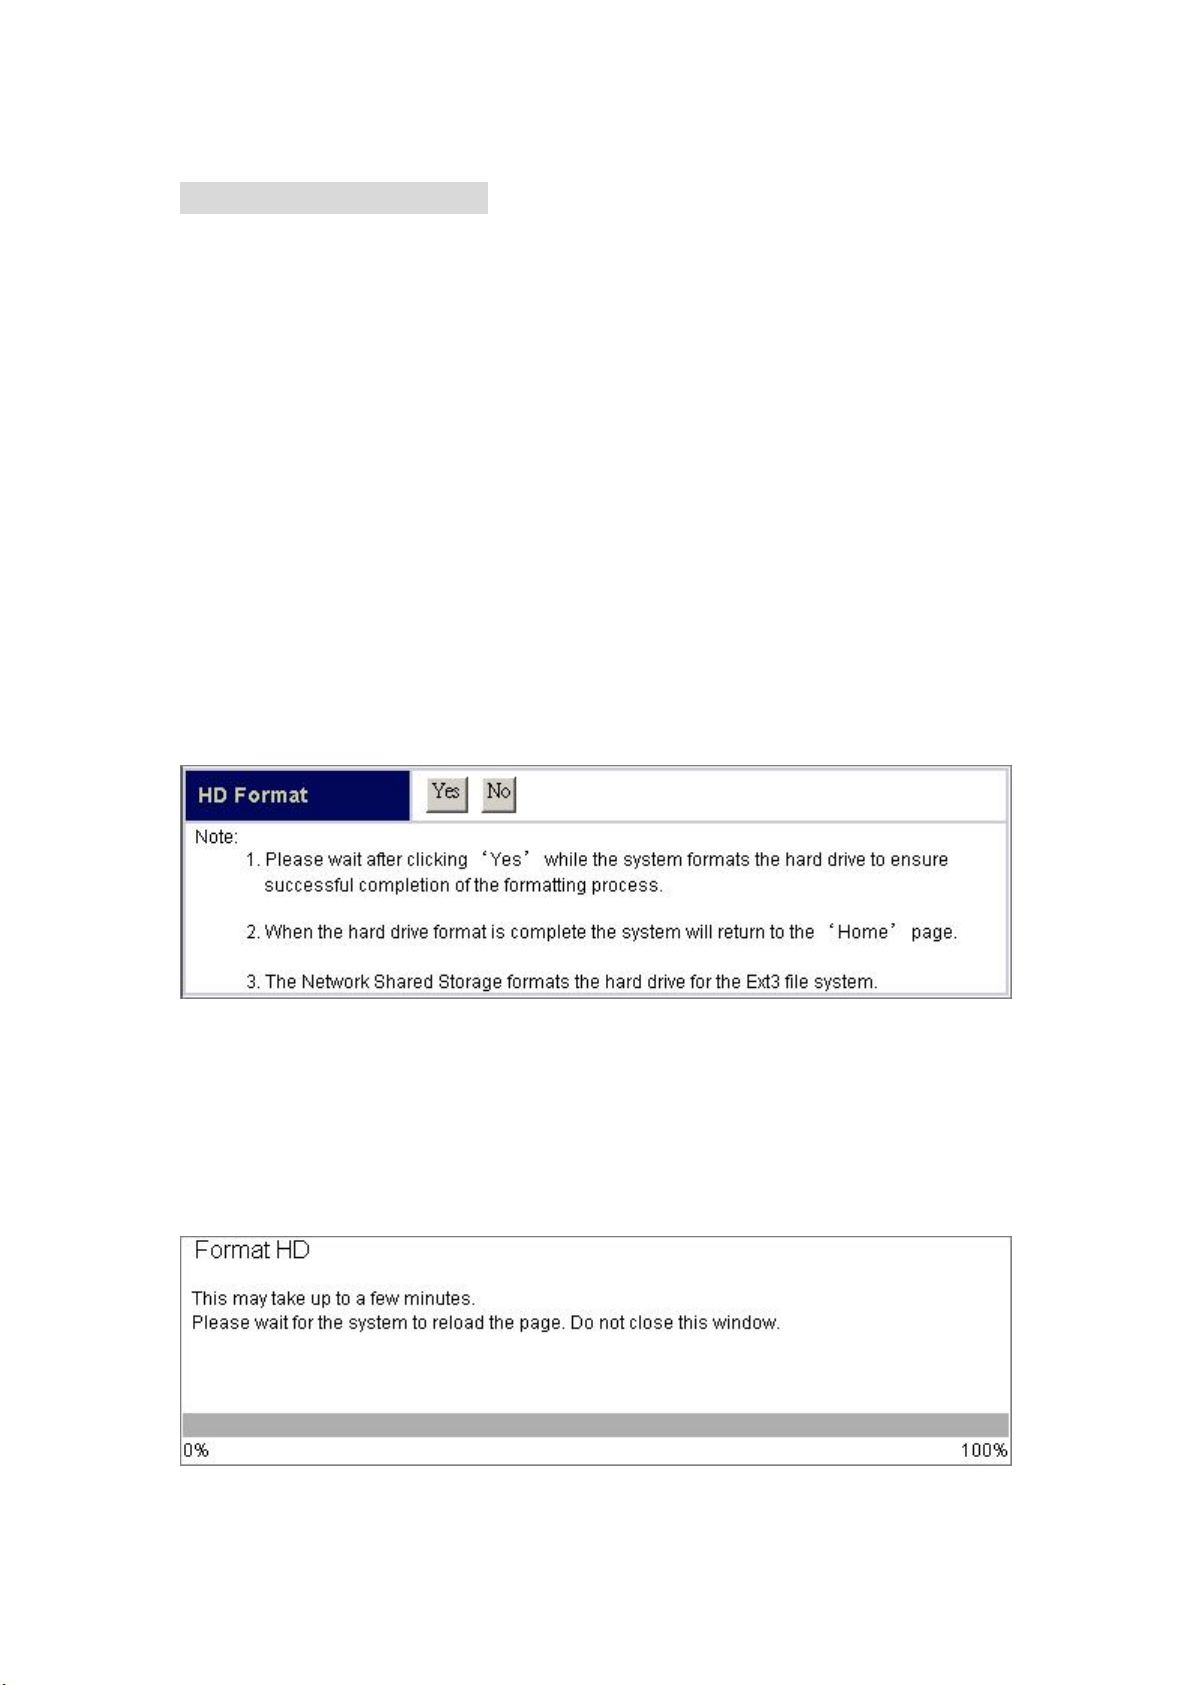
Disk- HD Configuration
1. To f ormat your USB hard dis k in EXT3 for mat, c lick “Yes” to execute HD Format.
Caution:
All files within the hard disk will be erased while HD Format is executed.
Note:
1. The HD Format function formats the USB disk on USB Port I only. To format
the USB storage device on Port II, please see “To Format Your USB
Storage device”
2. The Hard Disk will be formatted as EXT3 format. Please note that Windows
cannot recognize EXT3. If the USB hard drive is likely to connect to your
Windows operation system, please format this USB Hard drive on your
Windows before connecting to this product.
2. After confirmation for HD formatting, the system starts formatting the hard disk.
It may take several minutes according to the storage size of your hard disk.
Please wait and DO NOT execute other configuration for this device while
formatting.
41
Page 43
Network
The Network page allows users to:
1. Configure general device information
2. Configure the network setting for the device.
To open the Network page, click the Network on the configuration categories list.
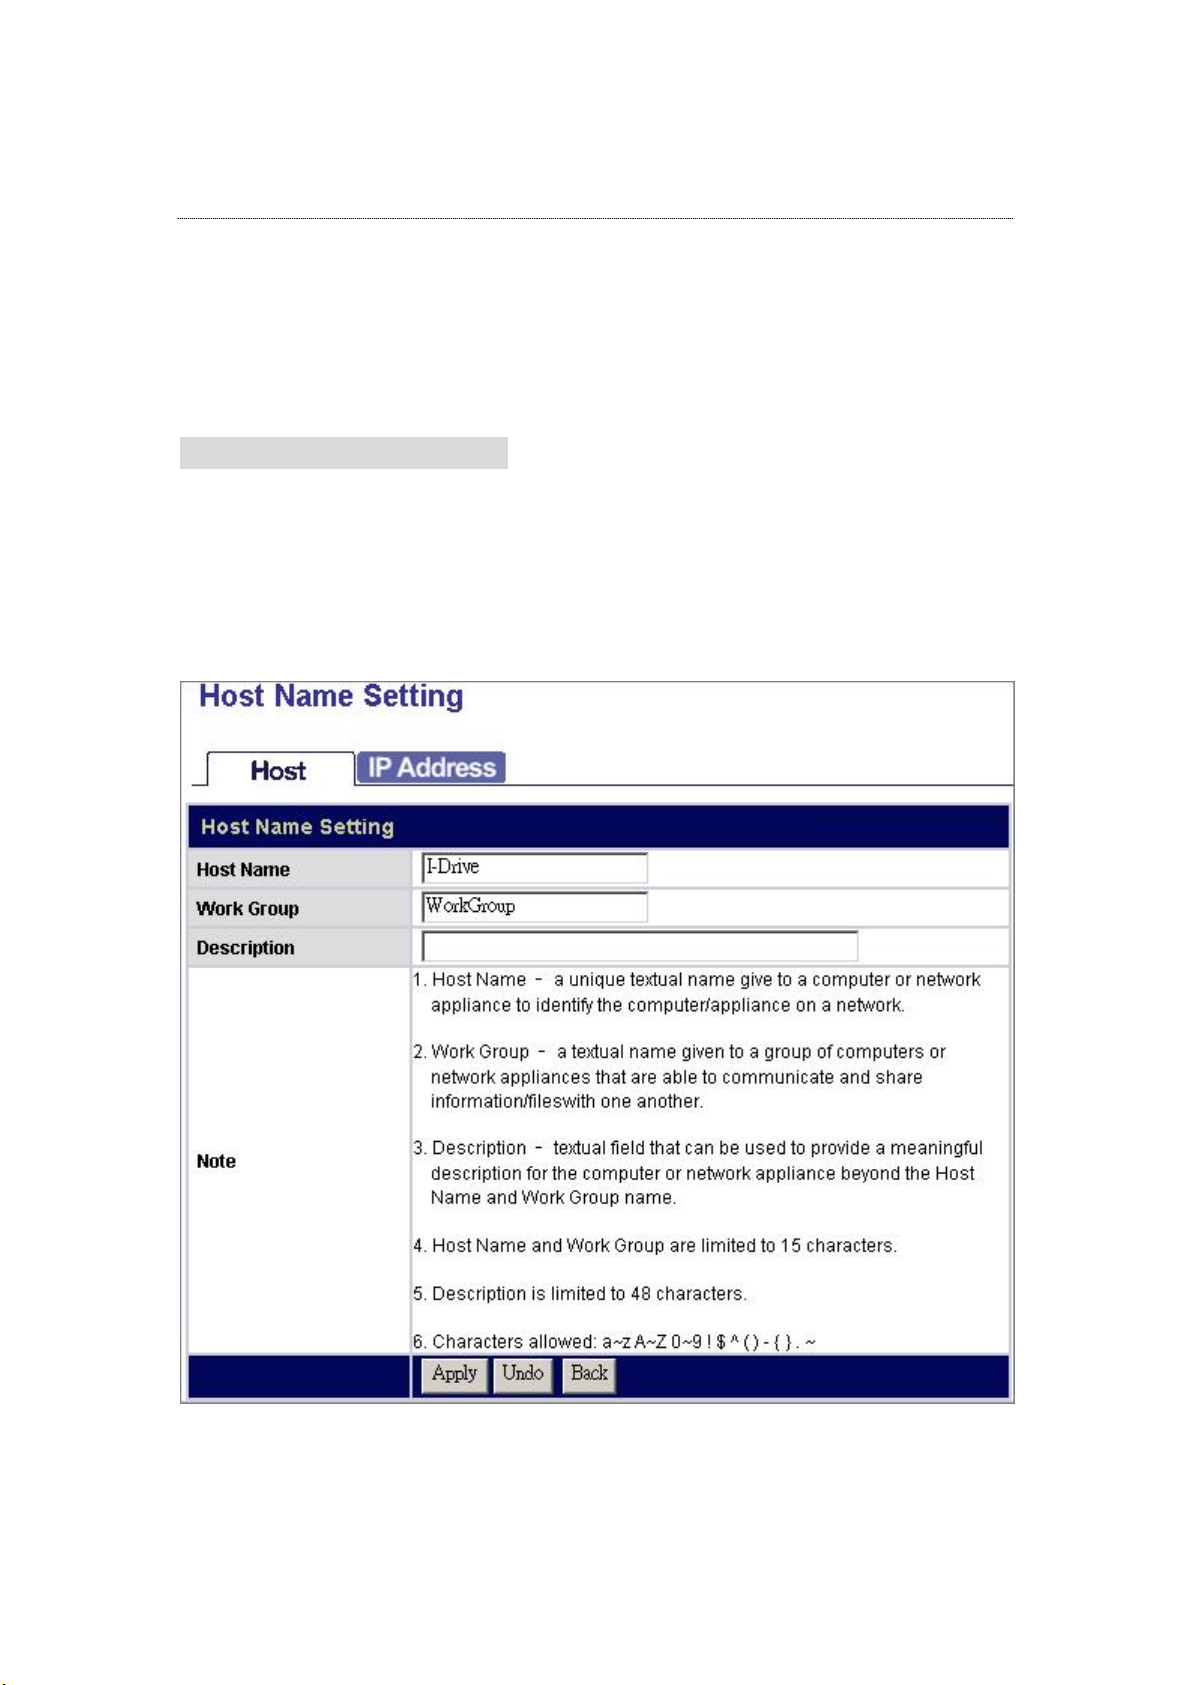
Host- Host Name Setting
Host Name (1~15 characters): Define the user-defined device name.
Workgroup (1~15 characters): Defines the workgroup name for the device
which is going to be shown on “Network
Neighborhood”
Description (1~48 characters): Define a note for the device.
42
Page 44
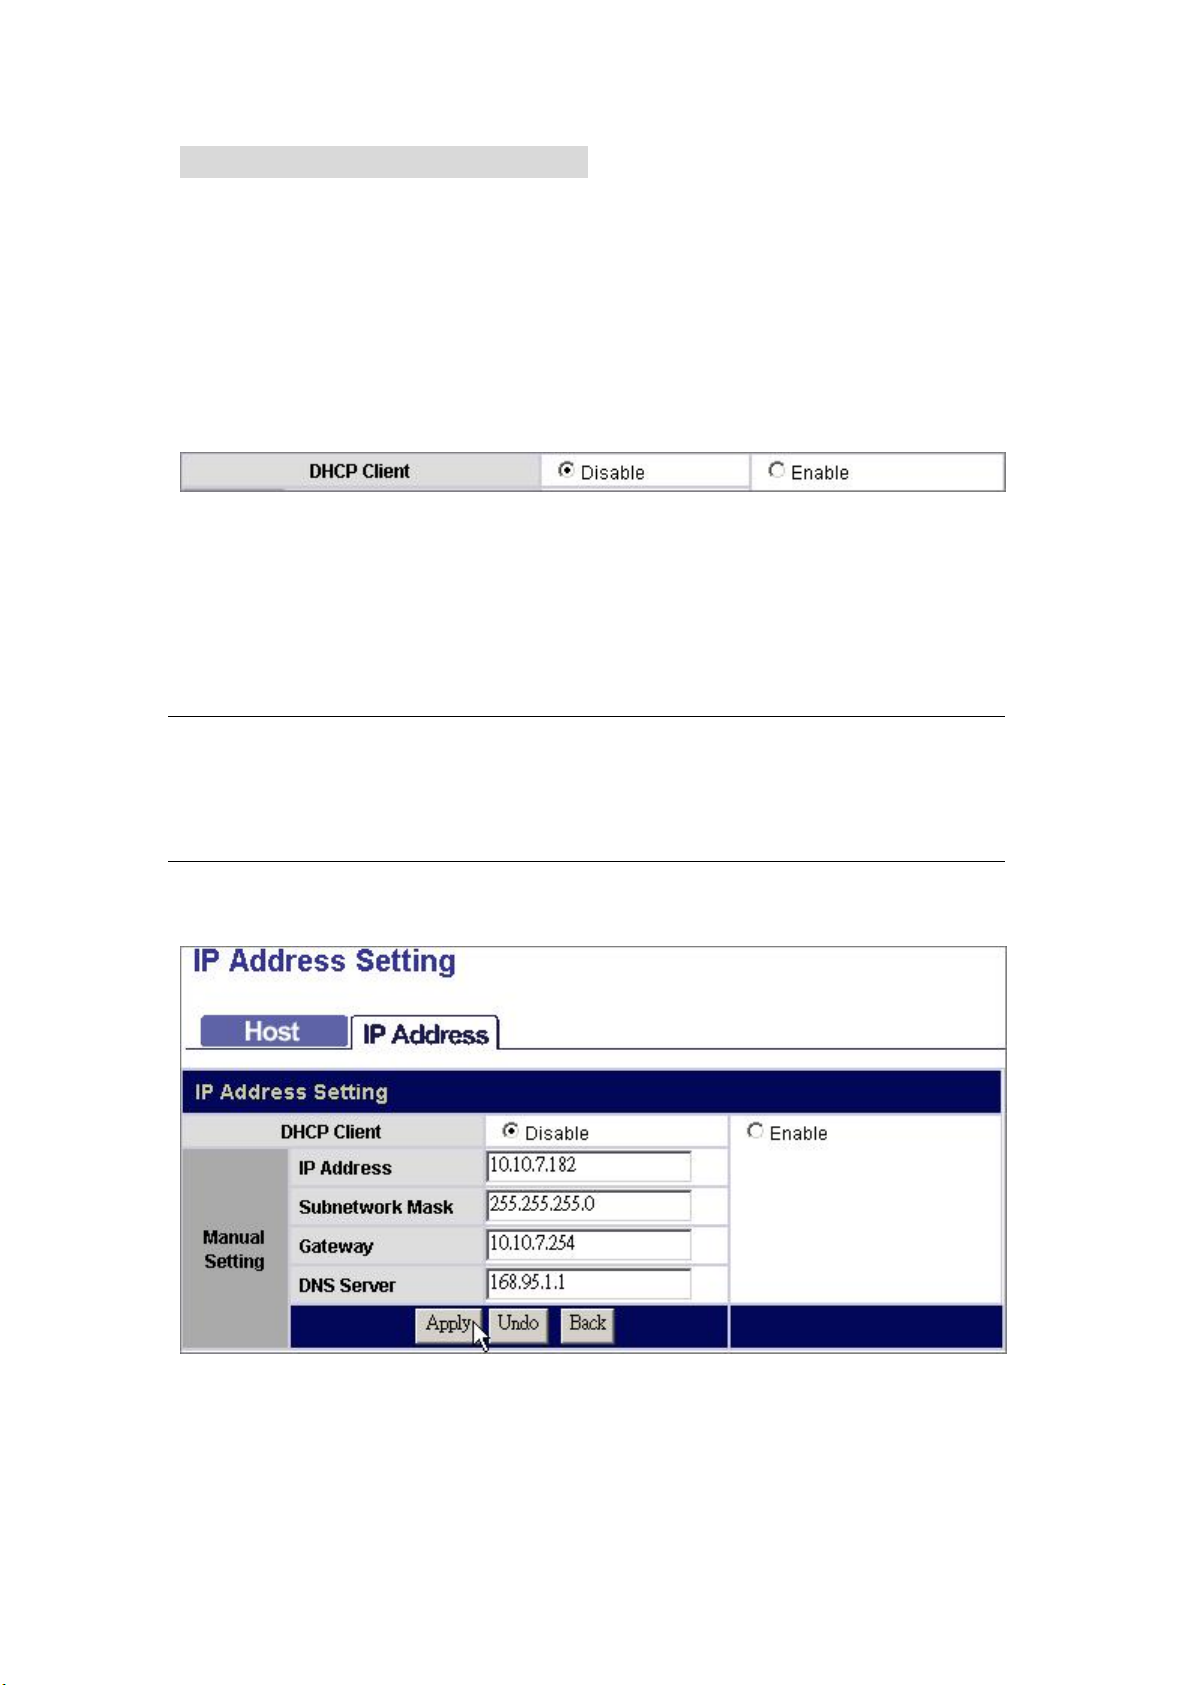
IP Address- IP address Setting
To Enable DHCP Client
Click “Enable” to enact this device as a DHCP client and click “Disable” to
disqualify.
Note: To get more information for enabling the DHCP server or not, please see” IP
Protocol Setup”.
To Configure the IP address for the device
The IP Address Setting contains parameters of the device network setting. To modify,
fill in each blanks and click “Apply” to execute.
IP Address: Specifies the device IP
Subnet Mask: Defines the Subnet Mask
Gateway: Defines the default gateway
DNS Server: Defines the DNS server
43
Page 45
System
The System page allows users to:
1. Configuring Superuser name and password.
2. Synchronize system time
3. Add, delete and configure a user
4. Add, delete and configure a group
To open the System page, click the System on the configuration categories list.
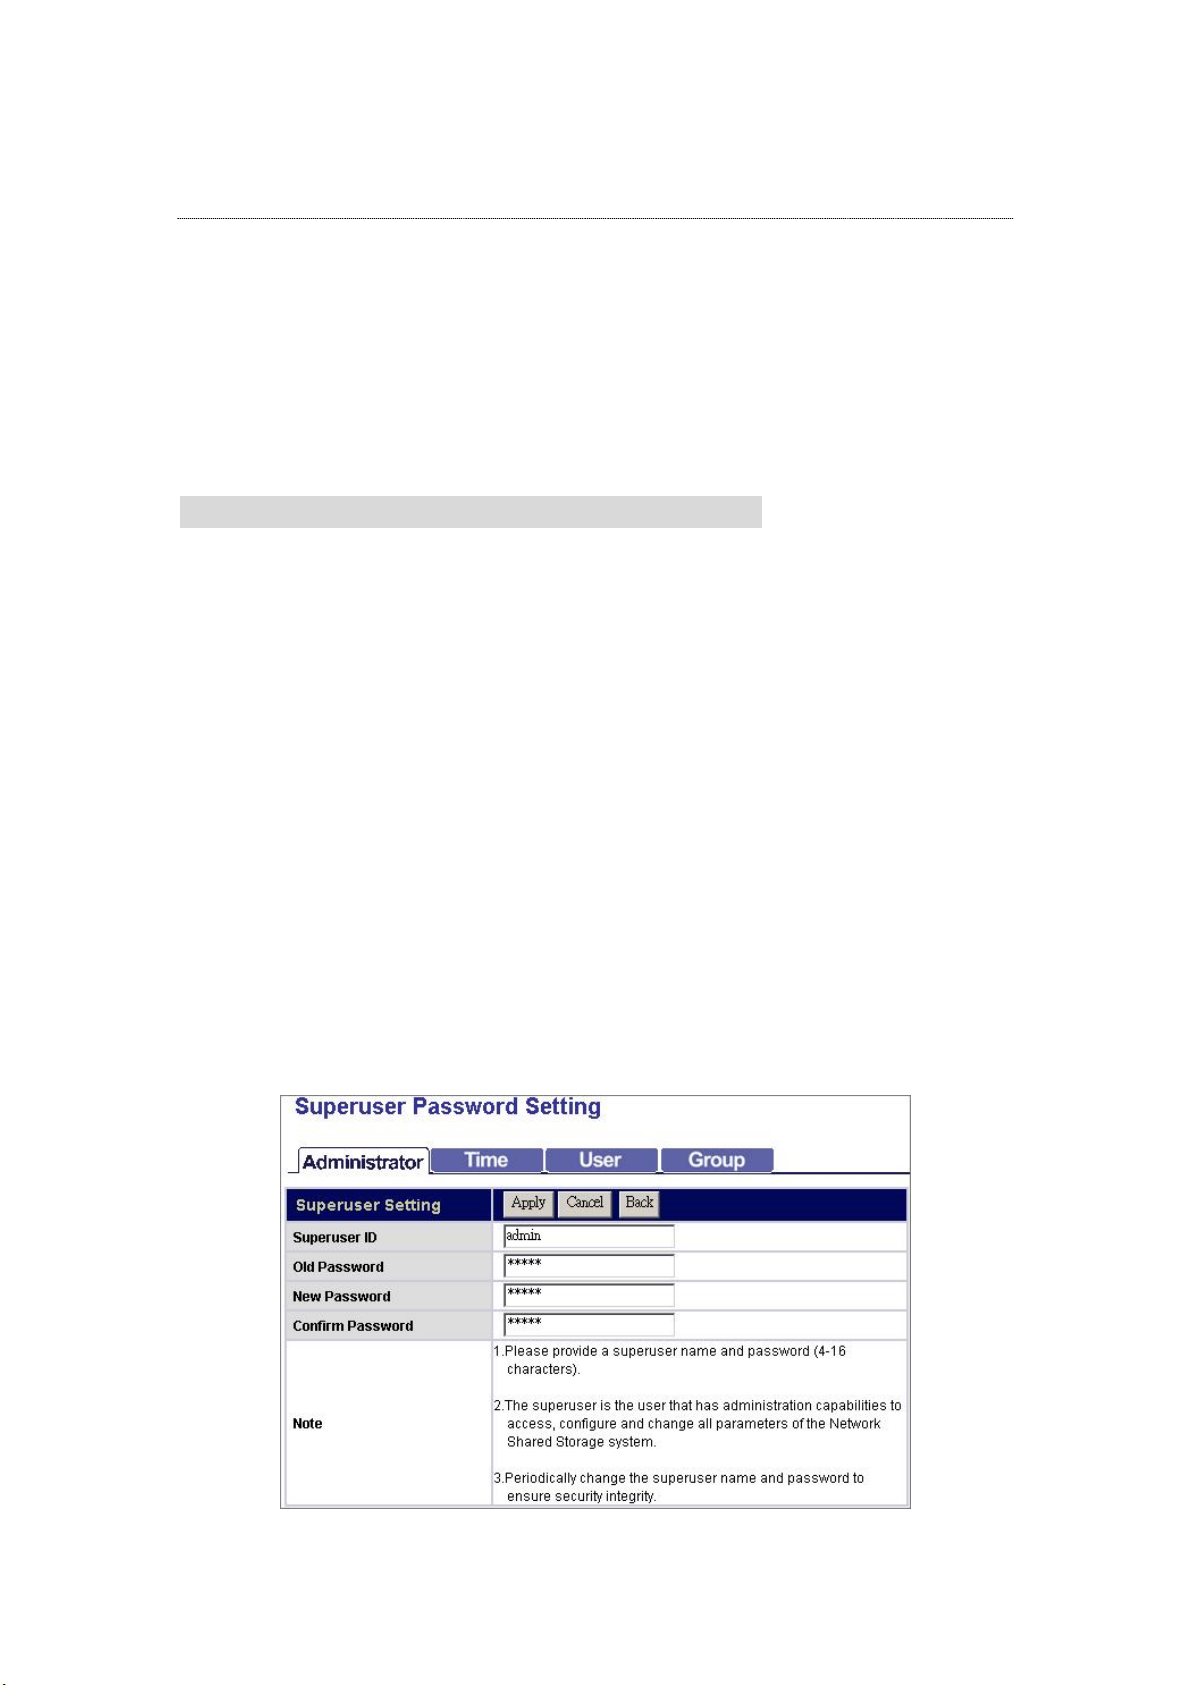
Administrator- Superuser Password Setting
This page provides Superuser ID and password configuration which are used for
getting access to the Graphic User Interface.
To modify the Superuser ID and password:
1. Define a Superuser Name(4~16 characters) in the Superuser ID box
2. Fill in the original Superuser password (4~16 characters) in the Old Password
box.
3. Define a new password (4~16 characters) in the New Password box.
4. Fill in the newly defined password (4~16 characters) in the Confirm Password
box.
5. Click “Apply” to execute the new Superuser name and password.
Note:
1. The default Superuser ID and password are admin/ admin.
2. The Superuser ID and password are both case-sensitive and alphanumeric.
3. To enforce the security, it is recommended to change the Superuser ID and
password periodically.
44
Page 46
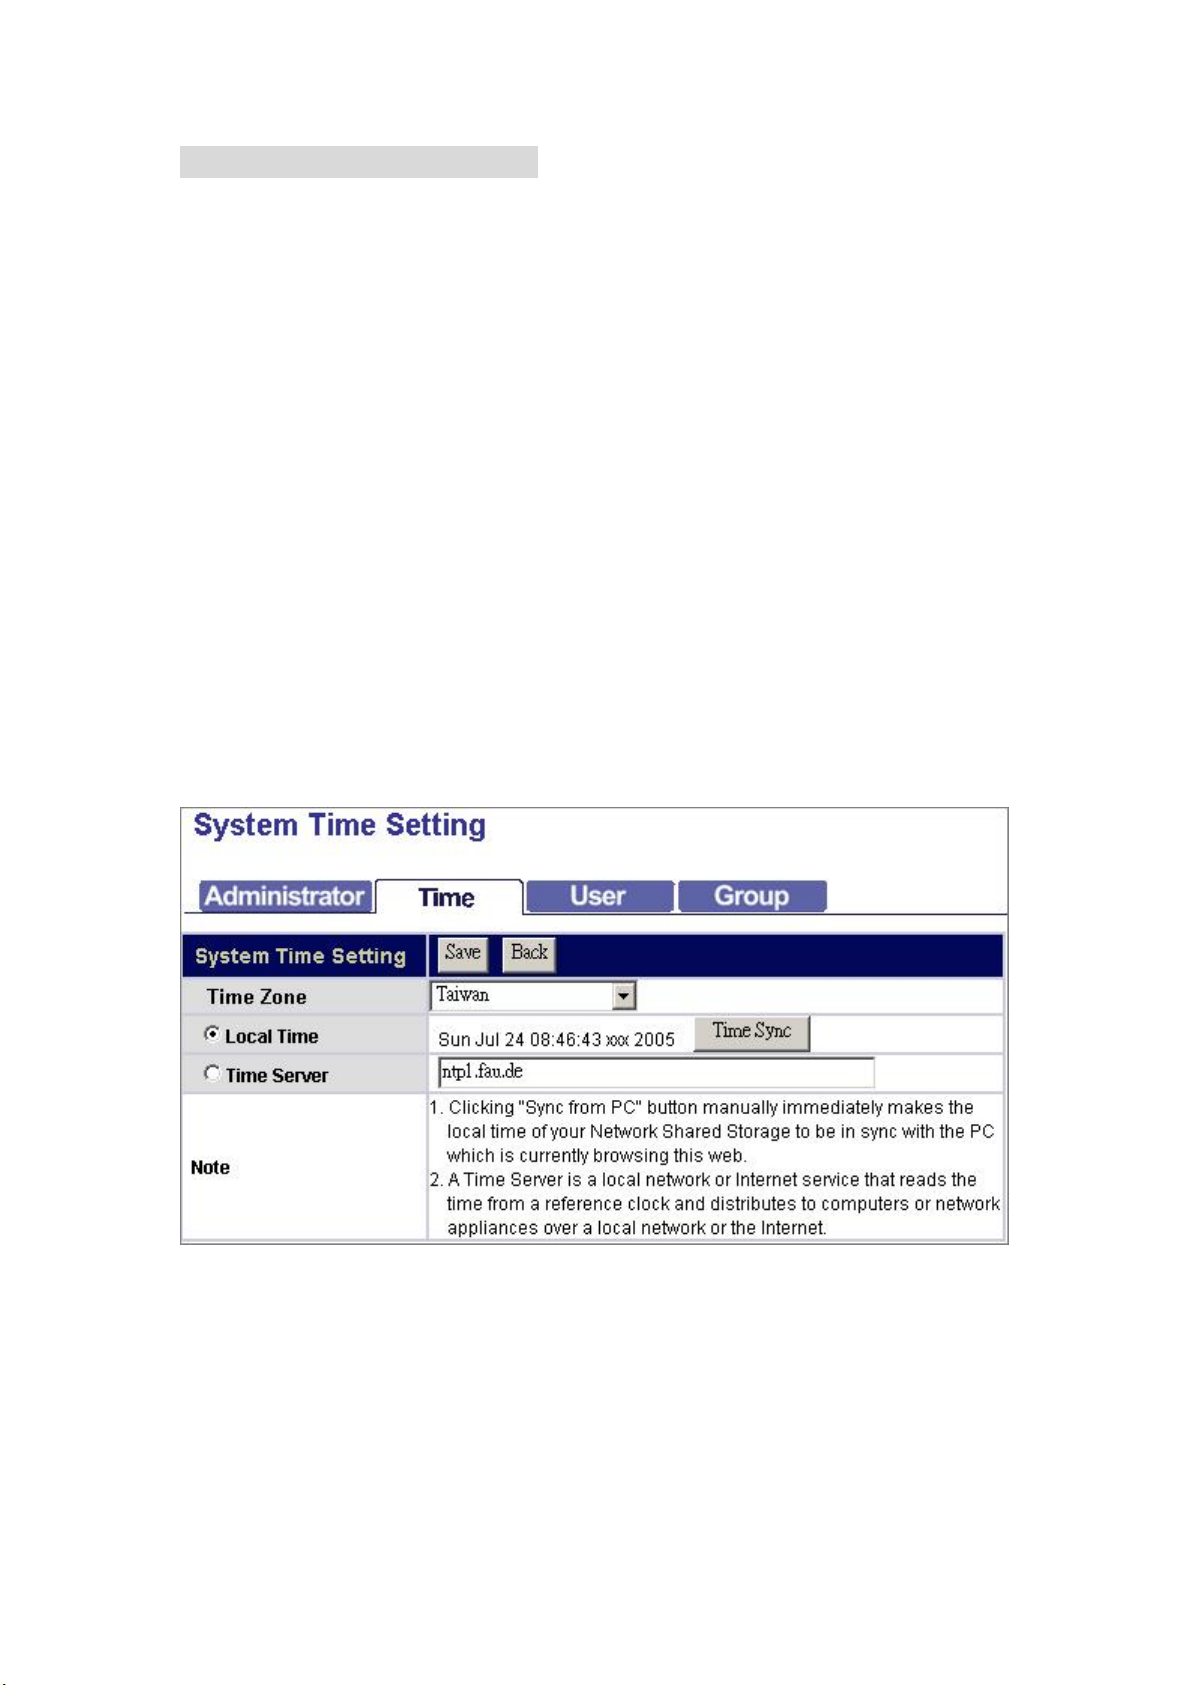
Time- System Time Setting
The Time page provides time synchronizing function. You can synchronize the time
by applying the time on your computer to the device or by connecting to a time
server.
To configure the device time:
1. Select the time zone that corresponds to your region from the Time Zone drop
list.
2. To apply the time on your computer to the device, select “Local Time” and click
“Time Sync” button
3. To synchronize the time from a time server, select “Time Server”, fill in a time
server address in the Time Server box and click “Time Sync” to execute.
4. Click “Save” to apply your configuration or click “Back” to abort.
Note: the synchronized time will be applied by next reboot. To reboot the device,
please see “Restart the System”
45
Page 47
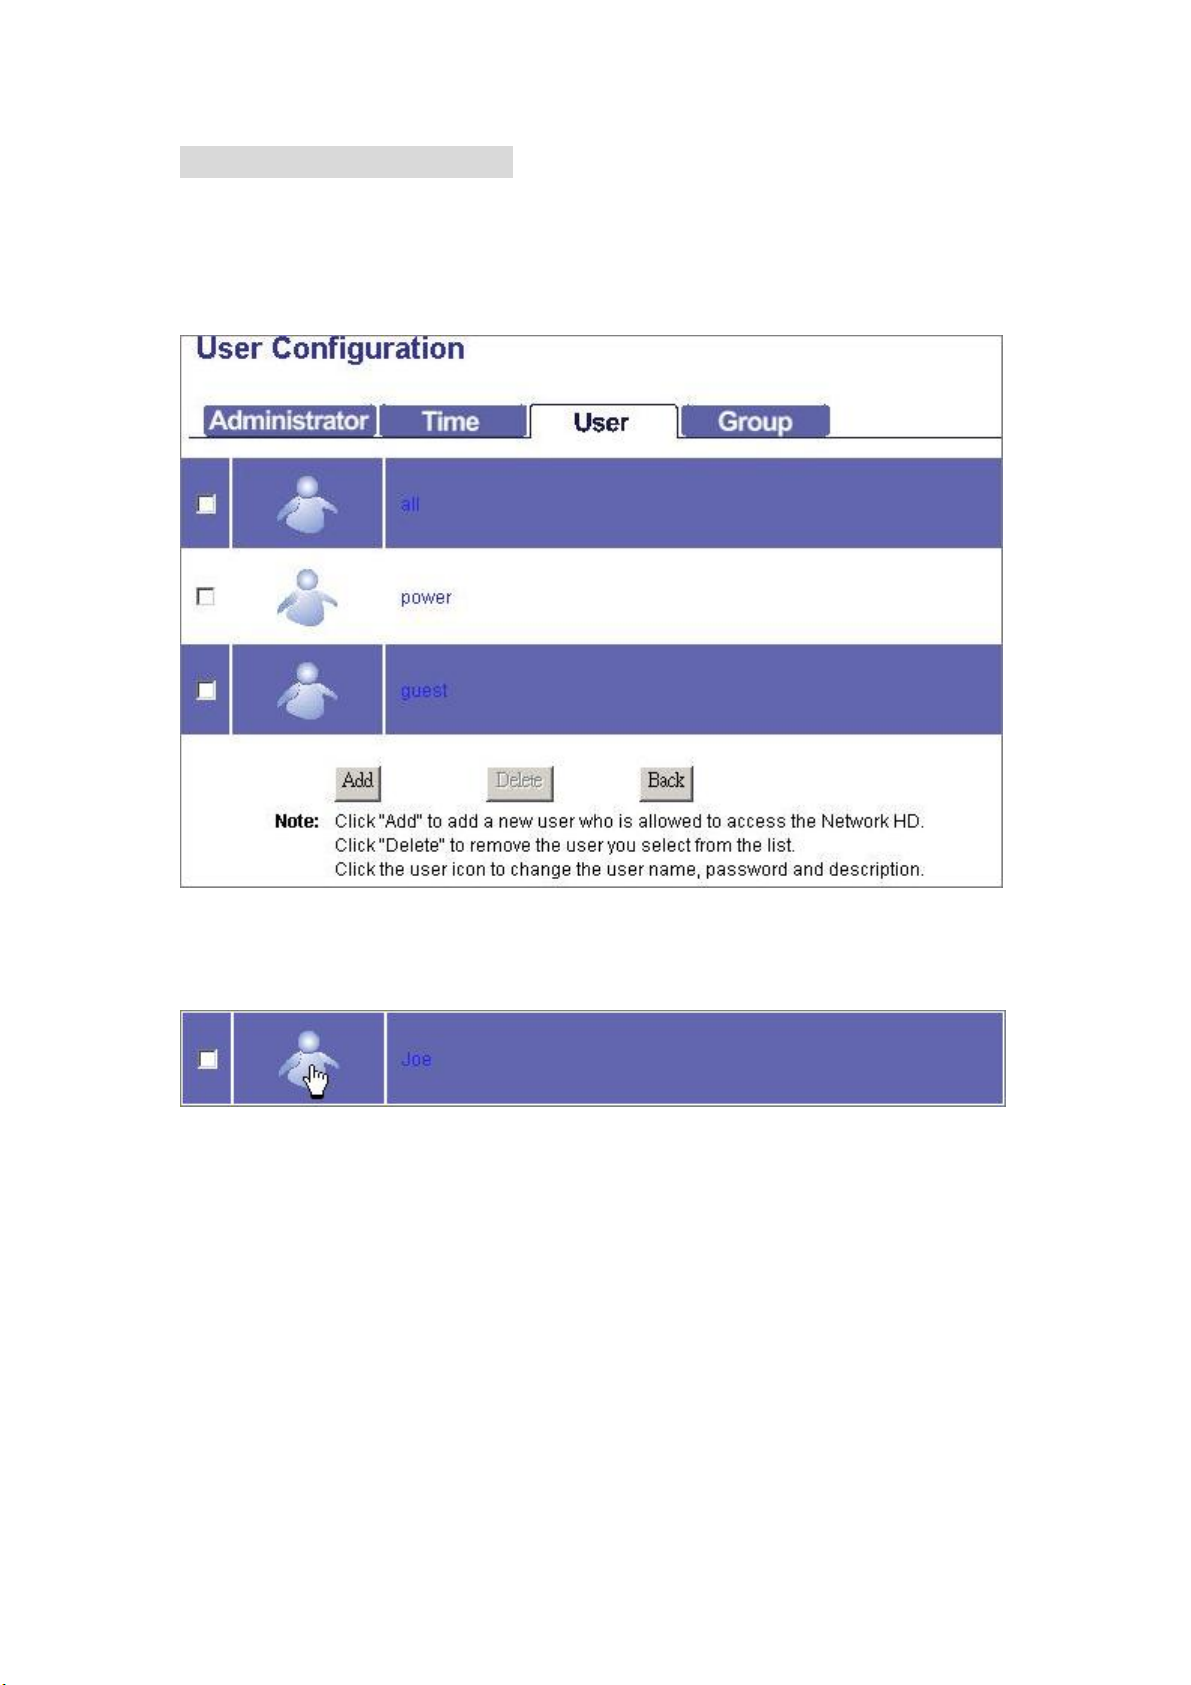
User- User Configuration
The User page allows users to:
Add users
Delete users
Modify user properties
To Configure a User
1. Move the cursor onto the icon of the user that you are going to configure.
2. You can change the user’s properties by modifying the settings on each item..
User Name(4~16 characters): Specify a name for the newly added user.
New Password(4~16 characters): Enter a username for the new user
Confirm Password(4~16 characters) Enter the new password again to confirm
the password
User Description( 0~47 characters) Fill in a description as a note for the user
FTP Access Click “Yes” to allow this user to access the
device with FTP client. Click “No” to deny
FTP access.
Note: The username and password for
accessing the FTP server are the same
with the one that configured above.
46
Page 48
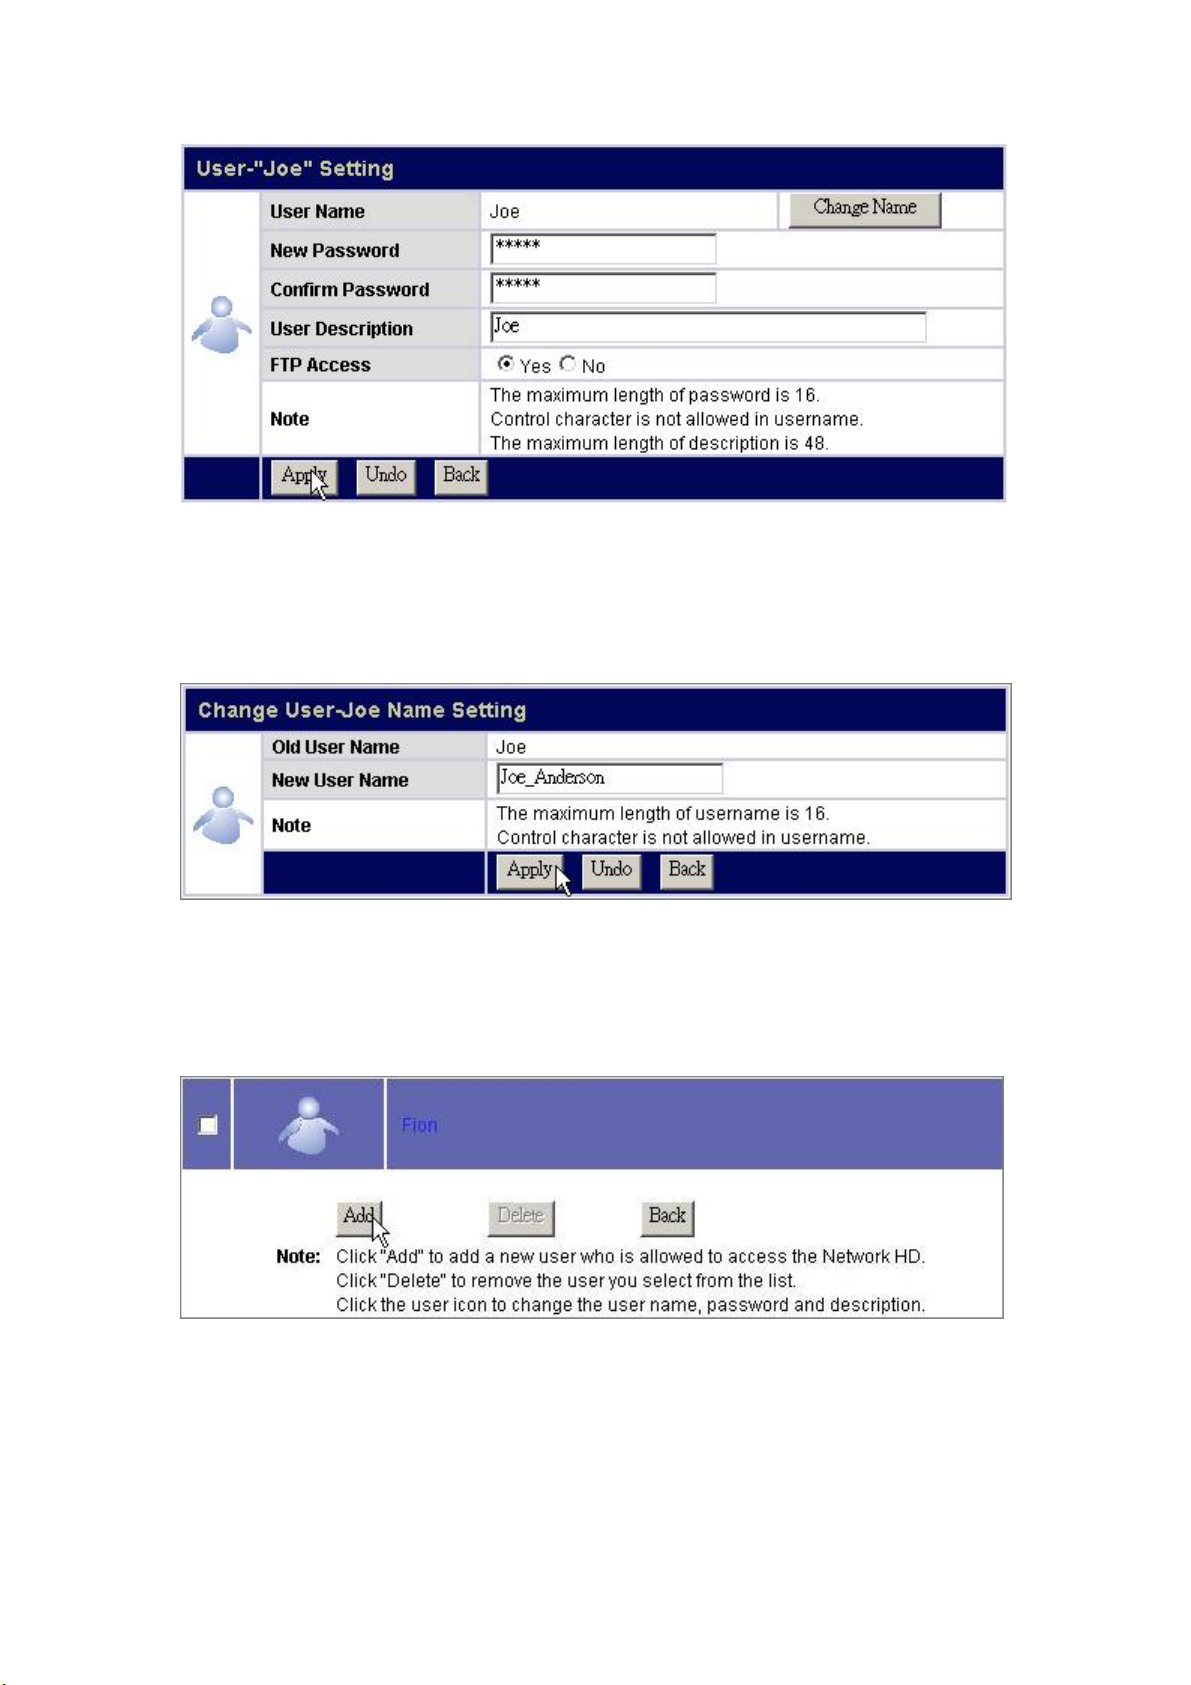
3. To change the user name, click the “Change Name button”. T he c ha n ge
username page shows up. Fill in the new user name in the “New User Name”
box. Click “Apply” to execute.
To Add a New User
1. Click the “Add” button on the user list
2. Define the user properties.
Note: For more information about each item, see “To Configure a User”
47
Page 49
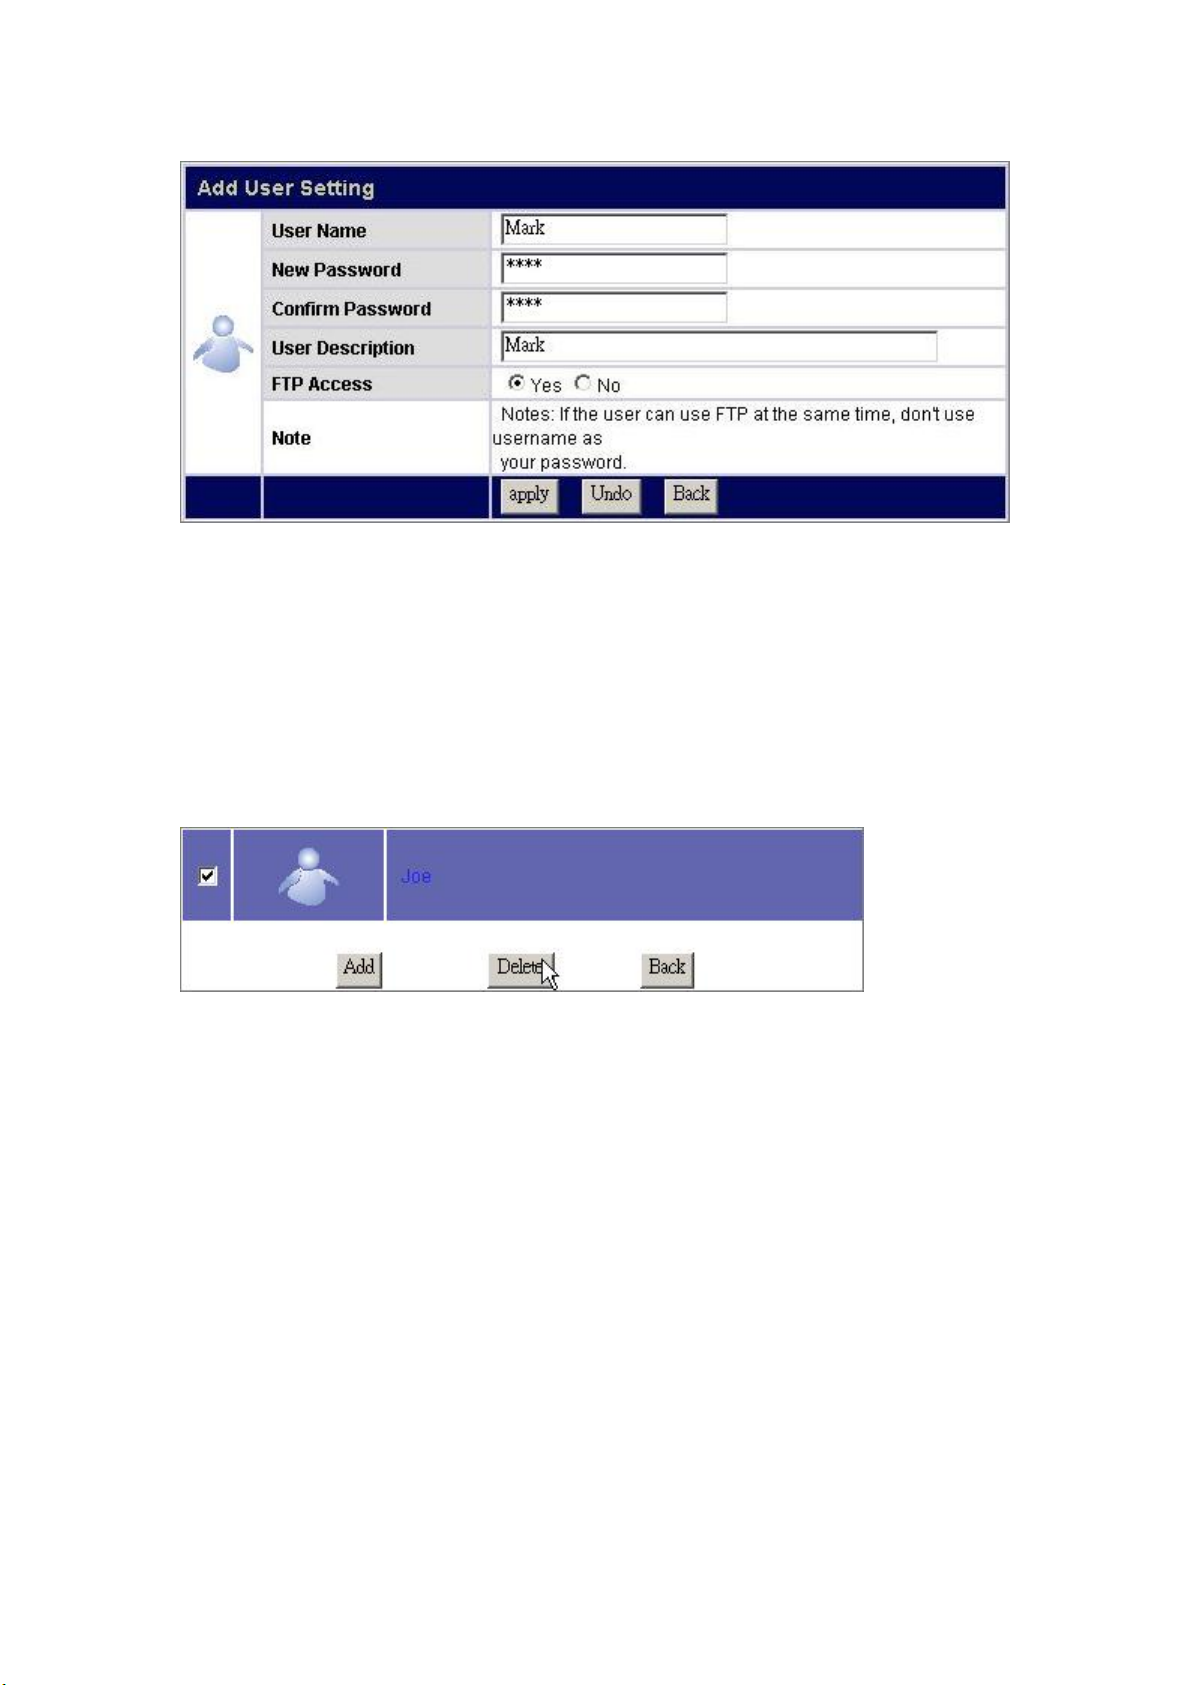
3. Click “apply” to add the new user.
To delete a user
1. Select the user that you are going to remove from the device. Mark the check
box of the user.
2. Click the “Delete” button to remove the user.
48
Page 50
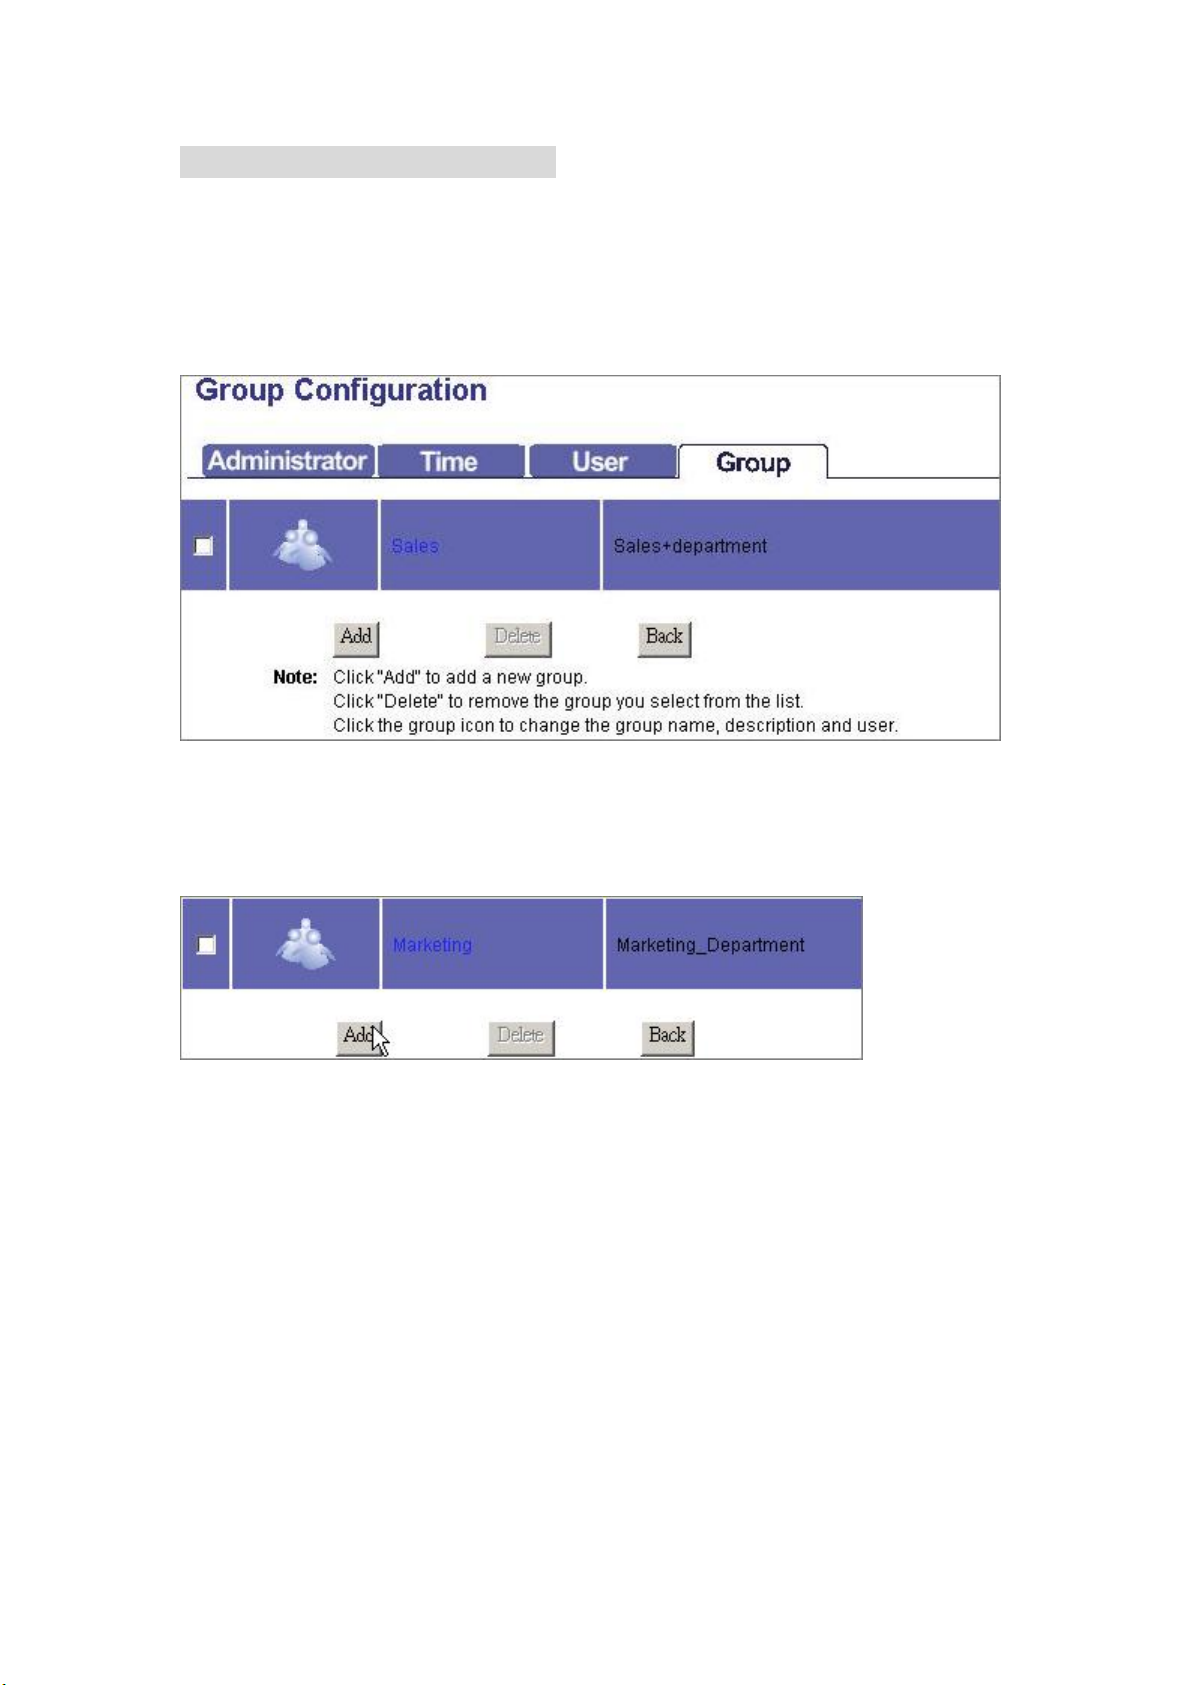
Group- Group Configuration
The Group page allows users to:
Add groups
Delete groups
Modify group properties
To add a new group
1. Click “Add” button.
2. Configure the properties for this group.
Group Name
(0~15 characters)
Group Description
(0~48 characters)
Authorized Users Select group members by marking the check boxes.
Enter a group name as the group ID.
(Note: The group name must be started with an alphabet)
Fill in description as a note for the group
49
Page 51
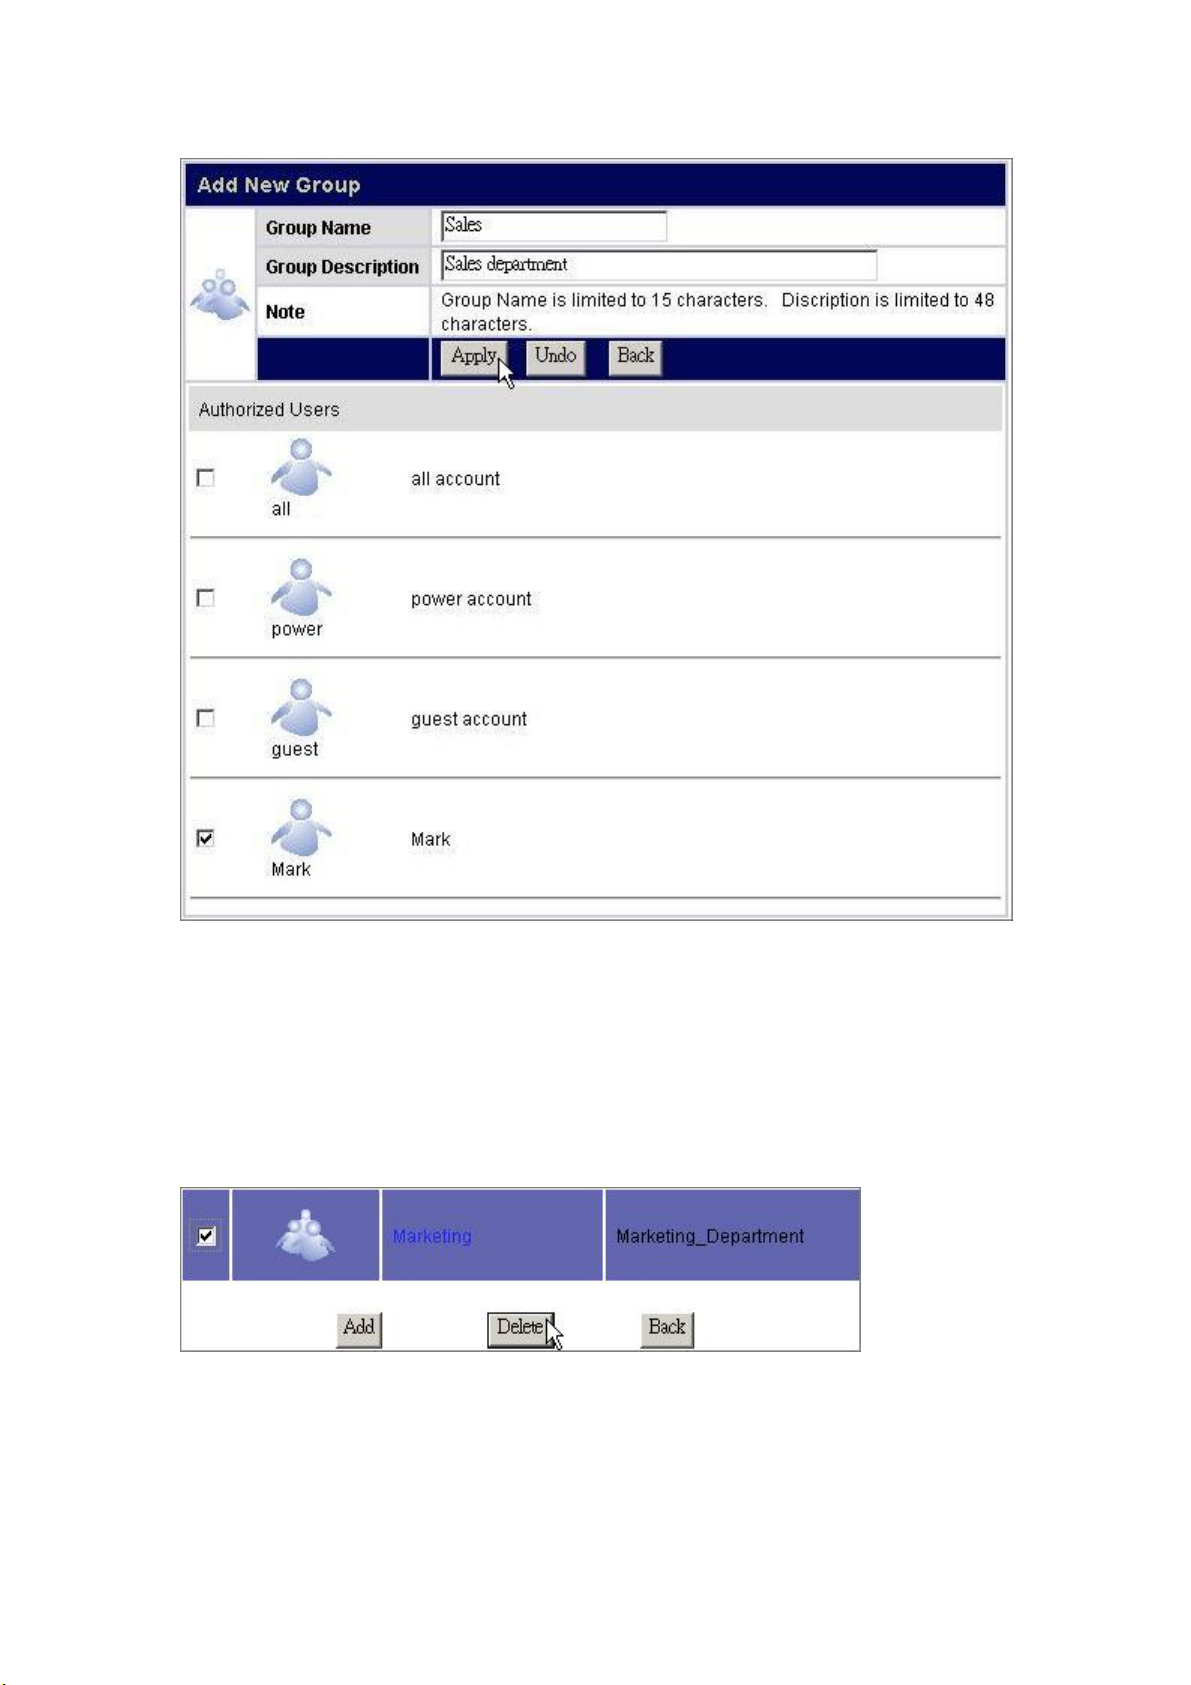
3. Click “Apply” to add the new group, click ”Undo” to reload previous
configuration and click “Back” to return to group list.
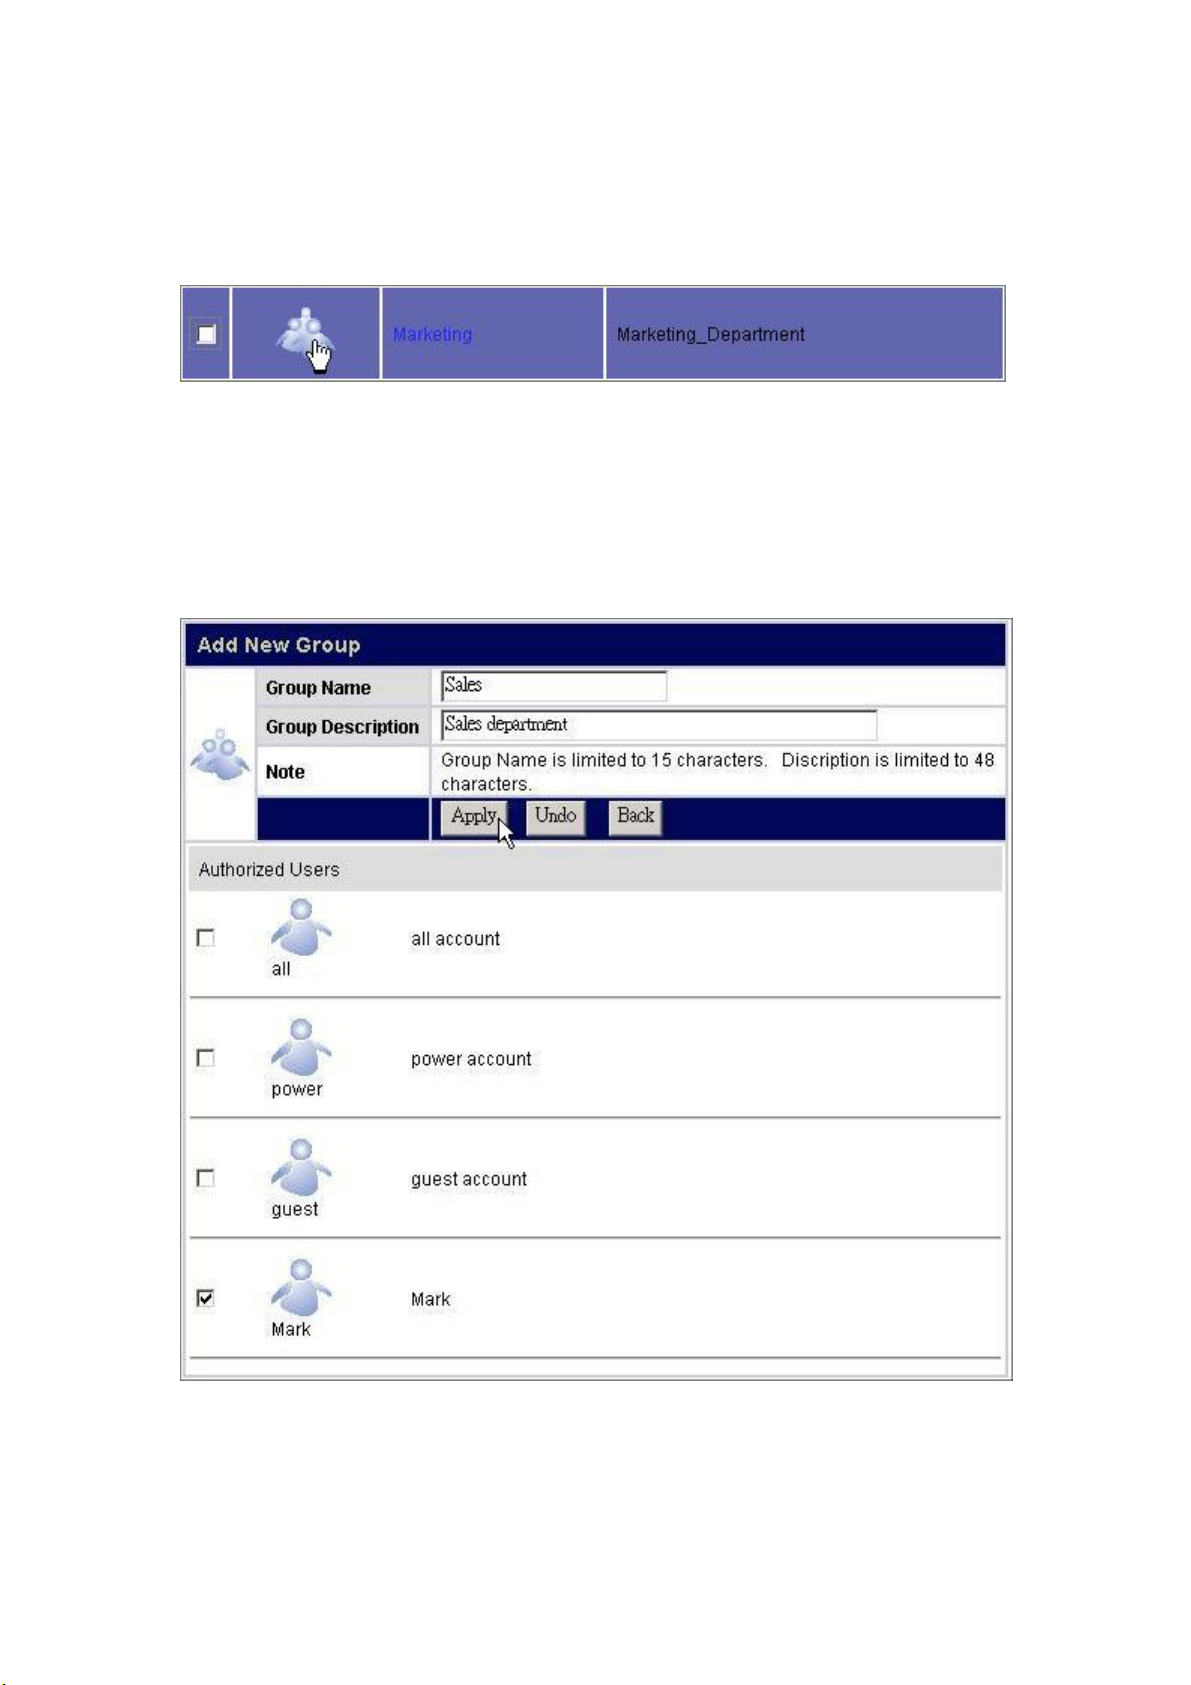
To delete a group
1. Mark the check box of the group that you are going to delete.
2. Click “Delete” to remove the group or click “Back” to return to group list.
50
Page 52
To configure a group
1. Click the icon of the group to configure.
2. Modify the properties for the group. Click “Apply” to execute the modification,
click ‘Undo” to reload previous configuration or click “Back” to return to group
list.
Note: For more information about the items, please see “To Add a New Group”.
51
Page 53
Option
The Option page allows users to:
1. Configure FTP settings.
2. Ensure the device security by IP and MAC filter.
3. Download files with this device.
To open the Option page, click Option on the configuration categories list
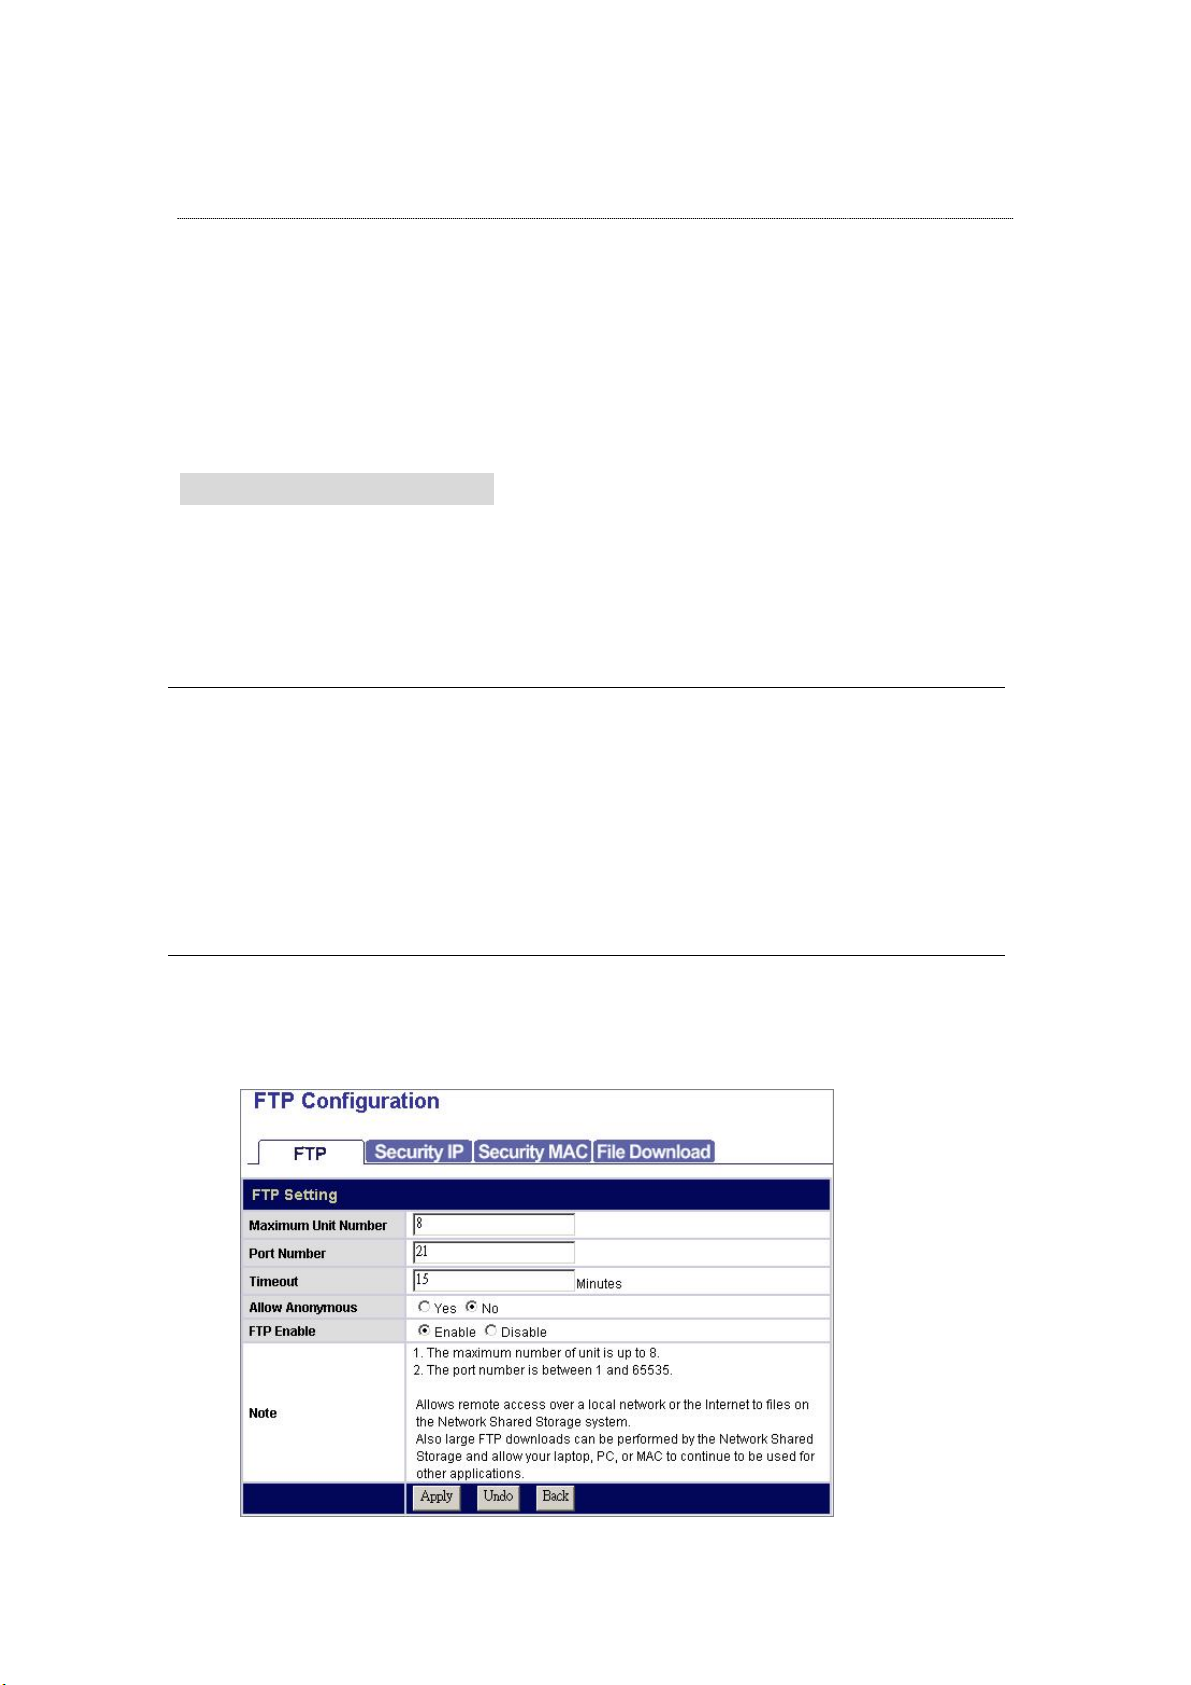
FTP- FTP Configuration
The device embeds a FTP server that allows users to access this device by FTP client.
To setup the FTP server properties, please refer to the following table and click
“Apply” to execute your settings.
Maximum Unit Number: The maximum allowed users that connect with the
device simultaneously. Please fill in a number form 1
to 8.
Port Number: The Port number of the FTP server. Please fill in a
number from 1 to 65535.
Time out: The allowed time that keeps the FTP server
connected with a FTP client. The FTP server
terminates the connection if the client fails to
response during the specified Time Out period.
Allow Anonymous: Allow FTP client to connect with the device without
username/ password authentication.
Note: Please DO NOT use the number 80 as the Port Number. As default, port 80
is the Administration Port for the device. To get more information about the
Administration Port, please refer to “Administration WEB”
52
Page 54
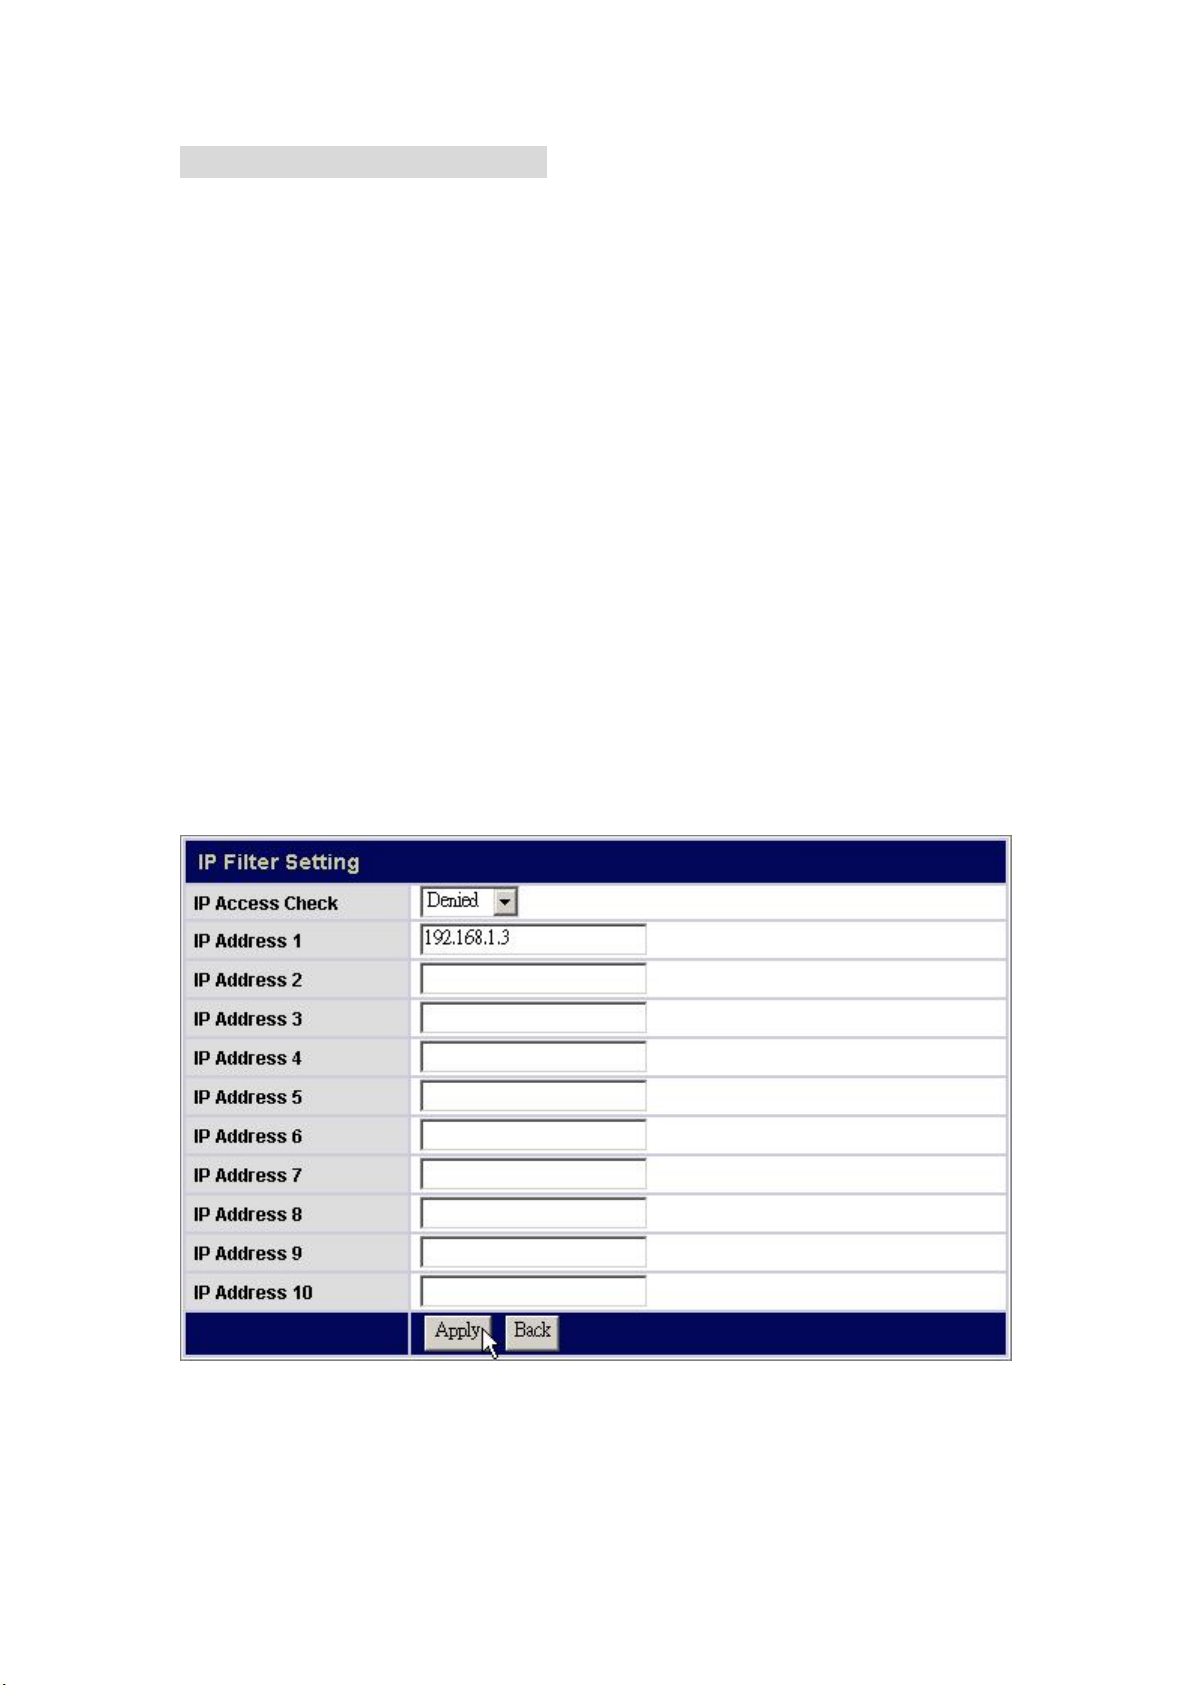
Security IP- IP Filter Setting
The Security IP function provides access management by IP address filtering. There
are three modes for the IP filter.
1. Disable: Disable the IP Filer function. All IP addresses are allowed to access the
device.
2. Allowed: Setup the IP addresses that are allowed to access the device. Only the
configured IP addresses have the right to access the device.
3. Denied: Setup the IP addresses that are denied to access the device. The listed
IP addresses will not be able to access the device.
Tip:
For example, to prevent the IP address “192.168.1.3” from connecting with the
device:
1. Select “Denied” From the “IP Access Check” drop list.
2. Fill the IP address “192.168.1.3” in the IP Address 1 box.
3. Click “Apply” to execute your configuration.
53
Page 55
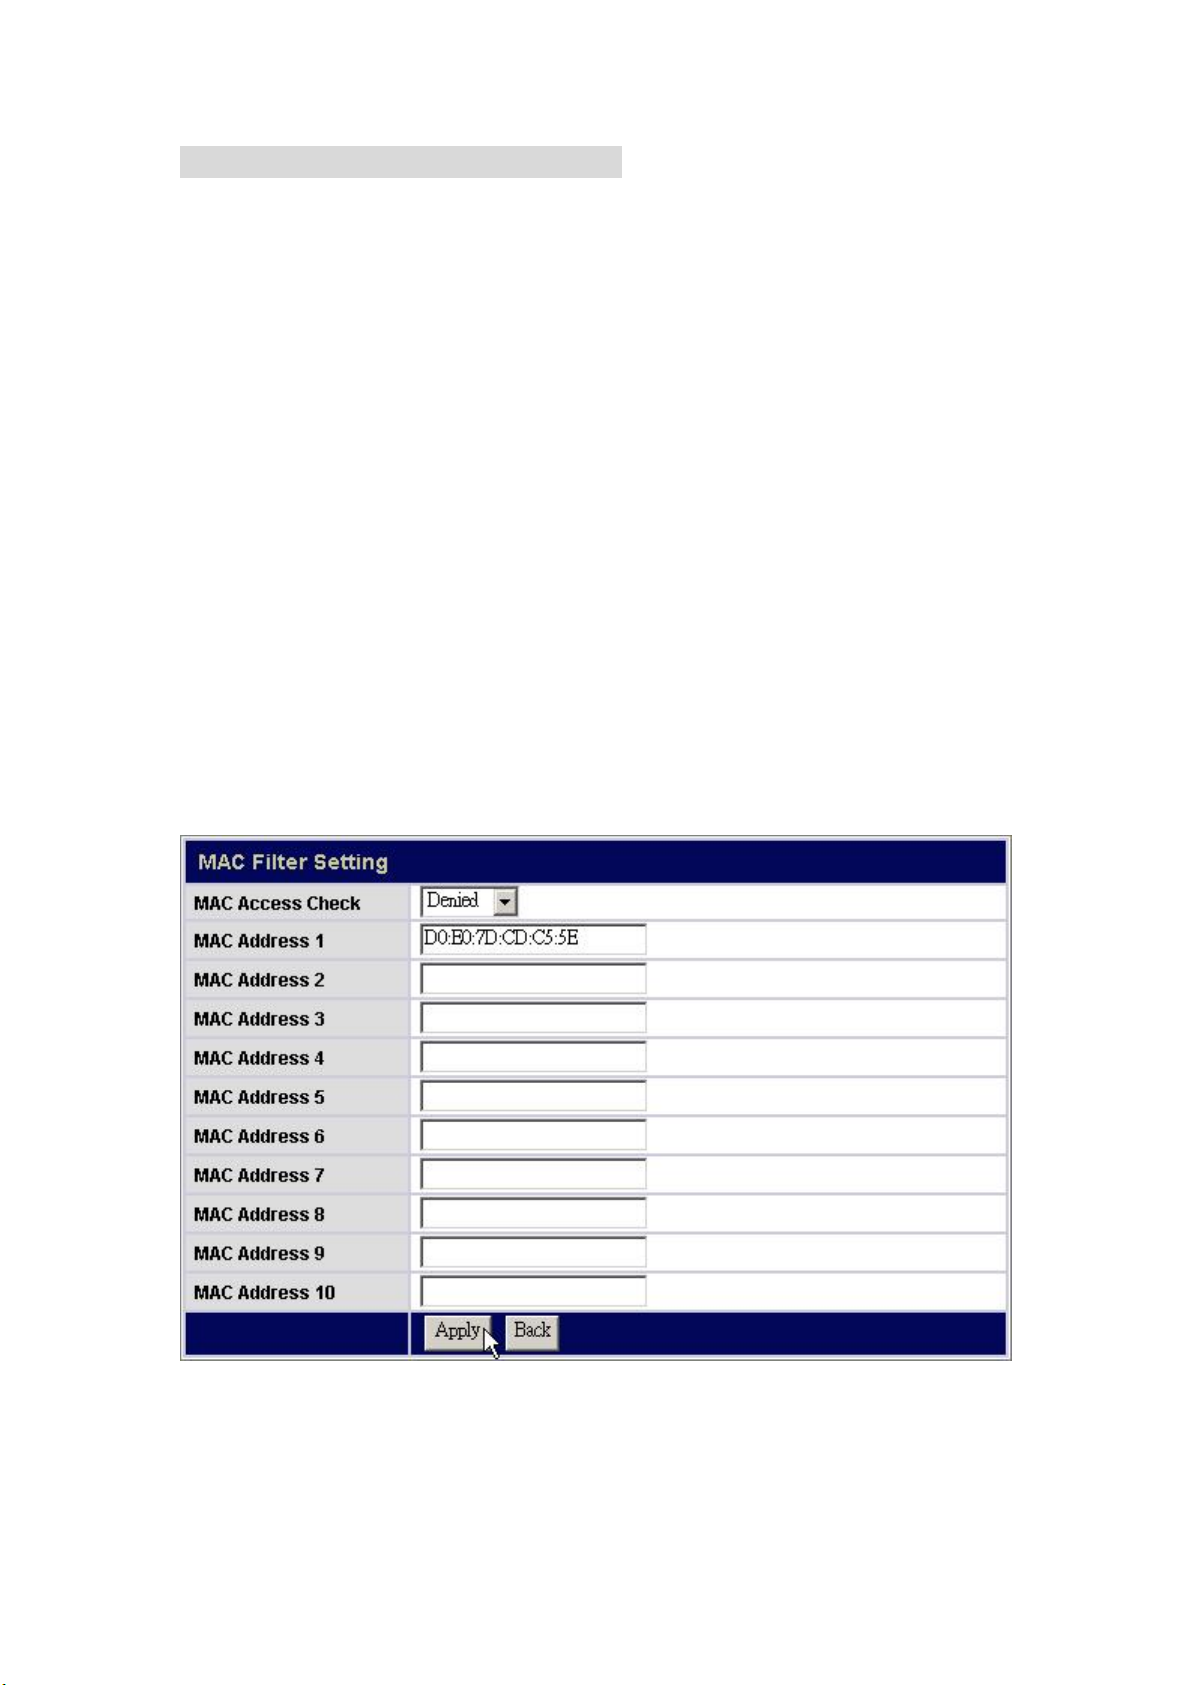
Security MAC- MAC Filter Setting
The Security MAC function provides access-management by MAC address filtering.
There are three modes for the MAC filter.
1. Disable: Disable the MAC Filer function. All MAC addresses are allowed to
access the device.
2. Allowed: Setup the MAC addresses that are allowed to access the device. Only
the configured MAC addresses have the right to access the device.
3. Denied: Setup the MAC addresses that are denied to access the device. The
listed MAC addresses will not be able to access the device.
Tip:
For example, to prevent the MAC address “D0:E0:7D:CD:C5:5E” from connecting
with the device:
1. Select “Denied” From the “MAC Access Check” drop list.
2. Fill the MAC address “D0:E0:7D:CD:C5:5E” in the MAC Address 1 box.
3. Click “Apply” to execute your configuration.
54
Page 56
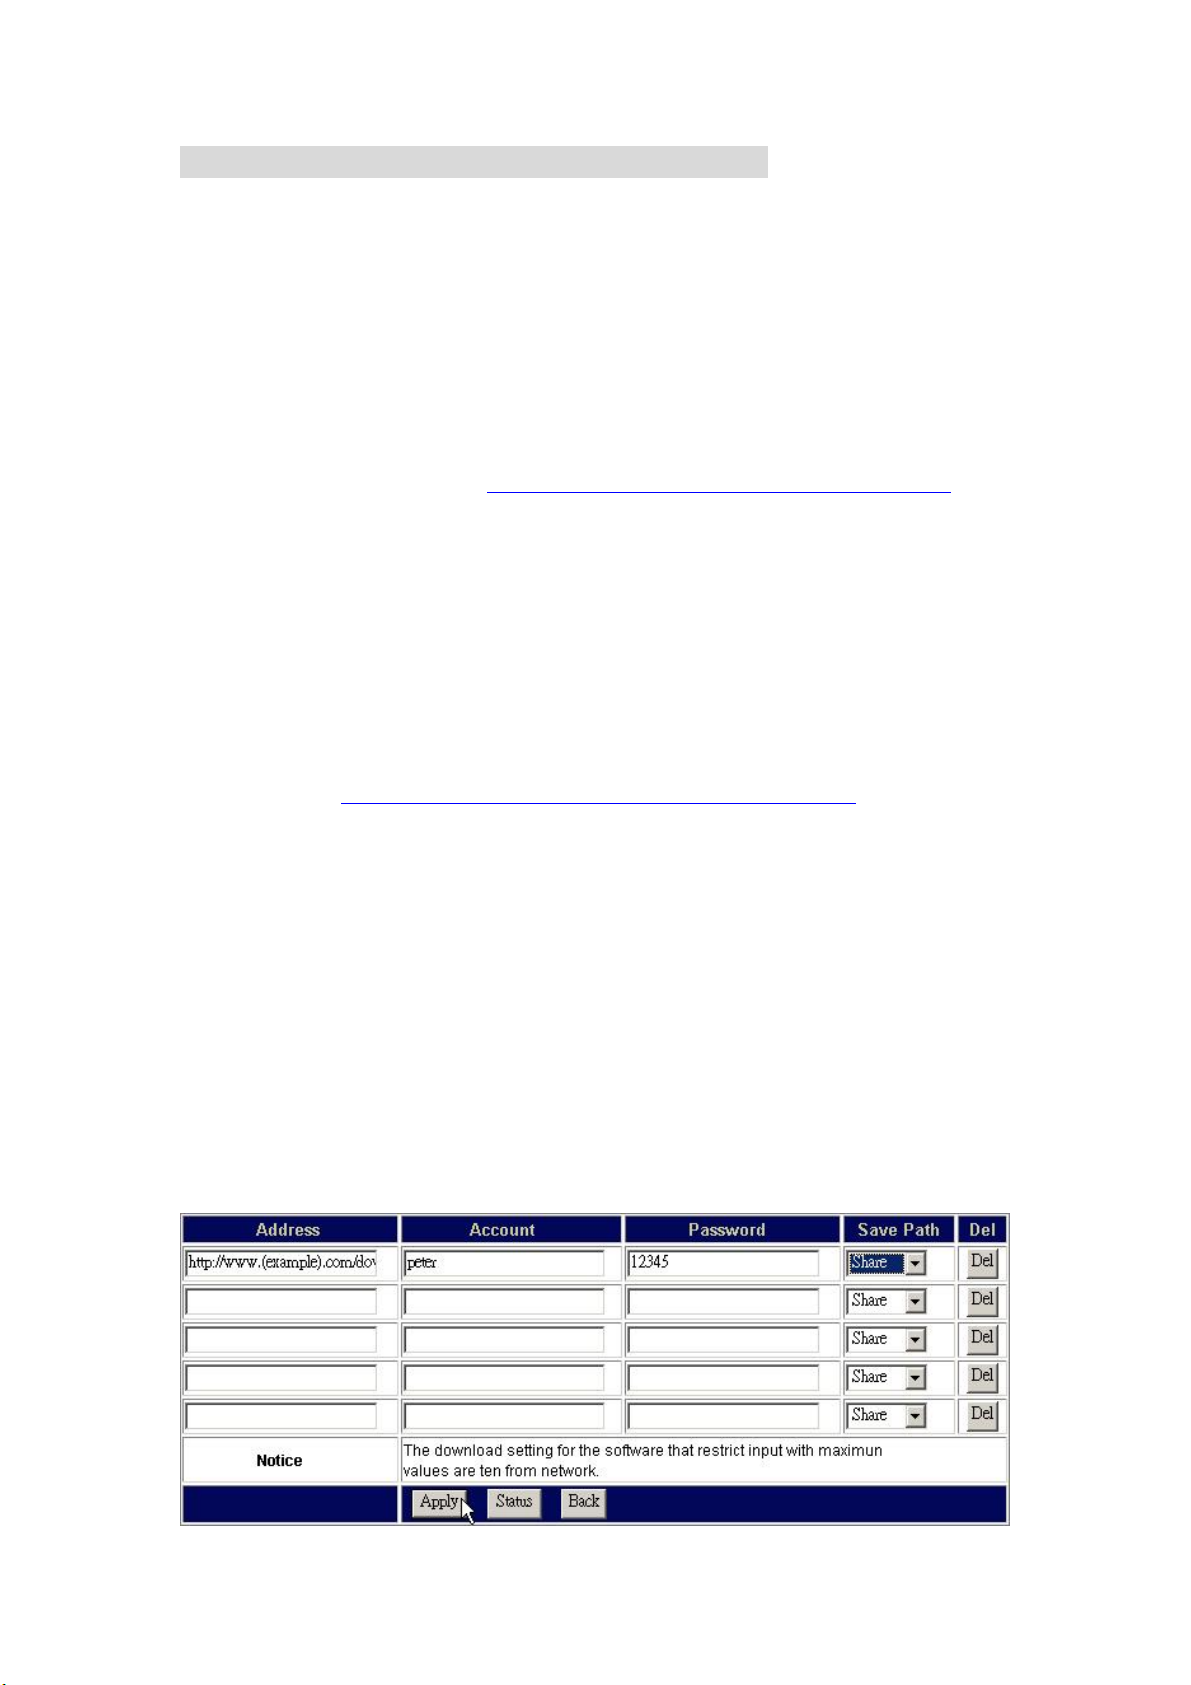
File Download- File Download Configuration
The File Download page allows users to download files with this device.
Note: Before using this function, you should load the “ntx_leo.tgz” first.
To get information for installing the “ntx_leo.tgz” file, please see” UP&P &
Printer”
The instruction below uses the following assumptions:
The address for downloading: http://www.(example).com/downloads/sample_file
The authorized account name: peter
Password:12345
The target folder where the downloaded data is going to be placed: Share
Note: The download address, account name and password are made up for the
example. There is no such an address and account.
To start a download task
1. Fill the address you get for downloading files in the “Address” box. (ex, enter
the address http://www.(example).com/downloads/sample_file
to the
“Address” box)
2. Enter an account name and password in the “Account” and “Password” box
respectively. (Ex, enter “peter” in the “Account” box and “12345” in the
“Password” box.
3. Select a folder to place the downloaded data in “Save Path” drop list. (Ex,
Select the folder Share from the drop list.)
4. Click Apply to perform file download.
5. To cancel or terminate a download task, click the “Del” button to erase the
download information then click “Apply” to execute. The download status page
displays to show the information of the download task.
6. You may also click the “Status” button to check the download information.
55
Page 57
Maintenance
The Maintenance page allows users to:
1. Backup/ download the configuration status of the device.
2. Select Code Page for the device.
3. Upgrade the device firmware.
4. Restart the system
5. Reset factory default.
6. Apply UP&P and Printer server function to the device.
To open the Maintenance page, click the Maintenance on the configuration
categories list.
Upload/ Download Configuration
The Upload/ Download configuration column allows users to backup and download
the configuration status of the device.
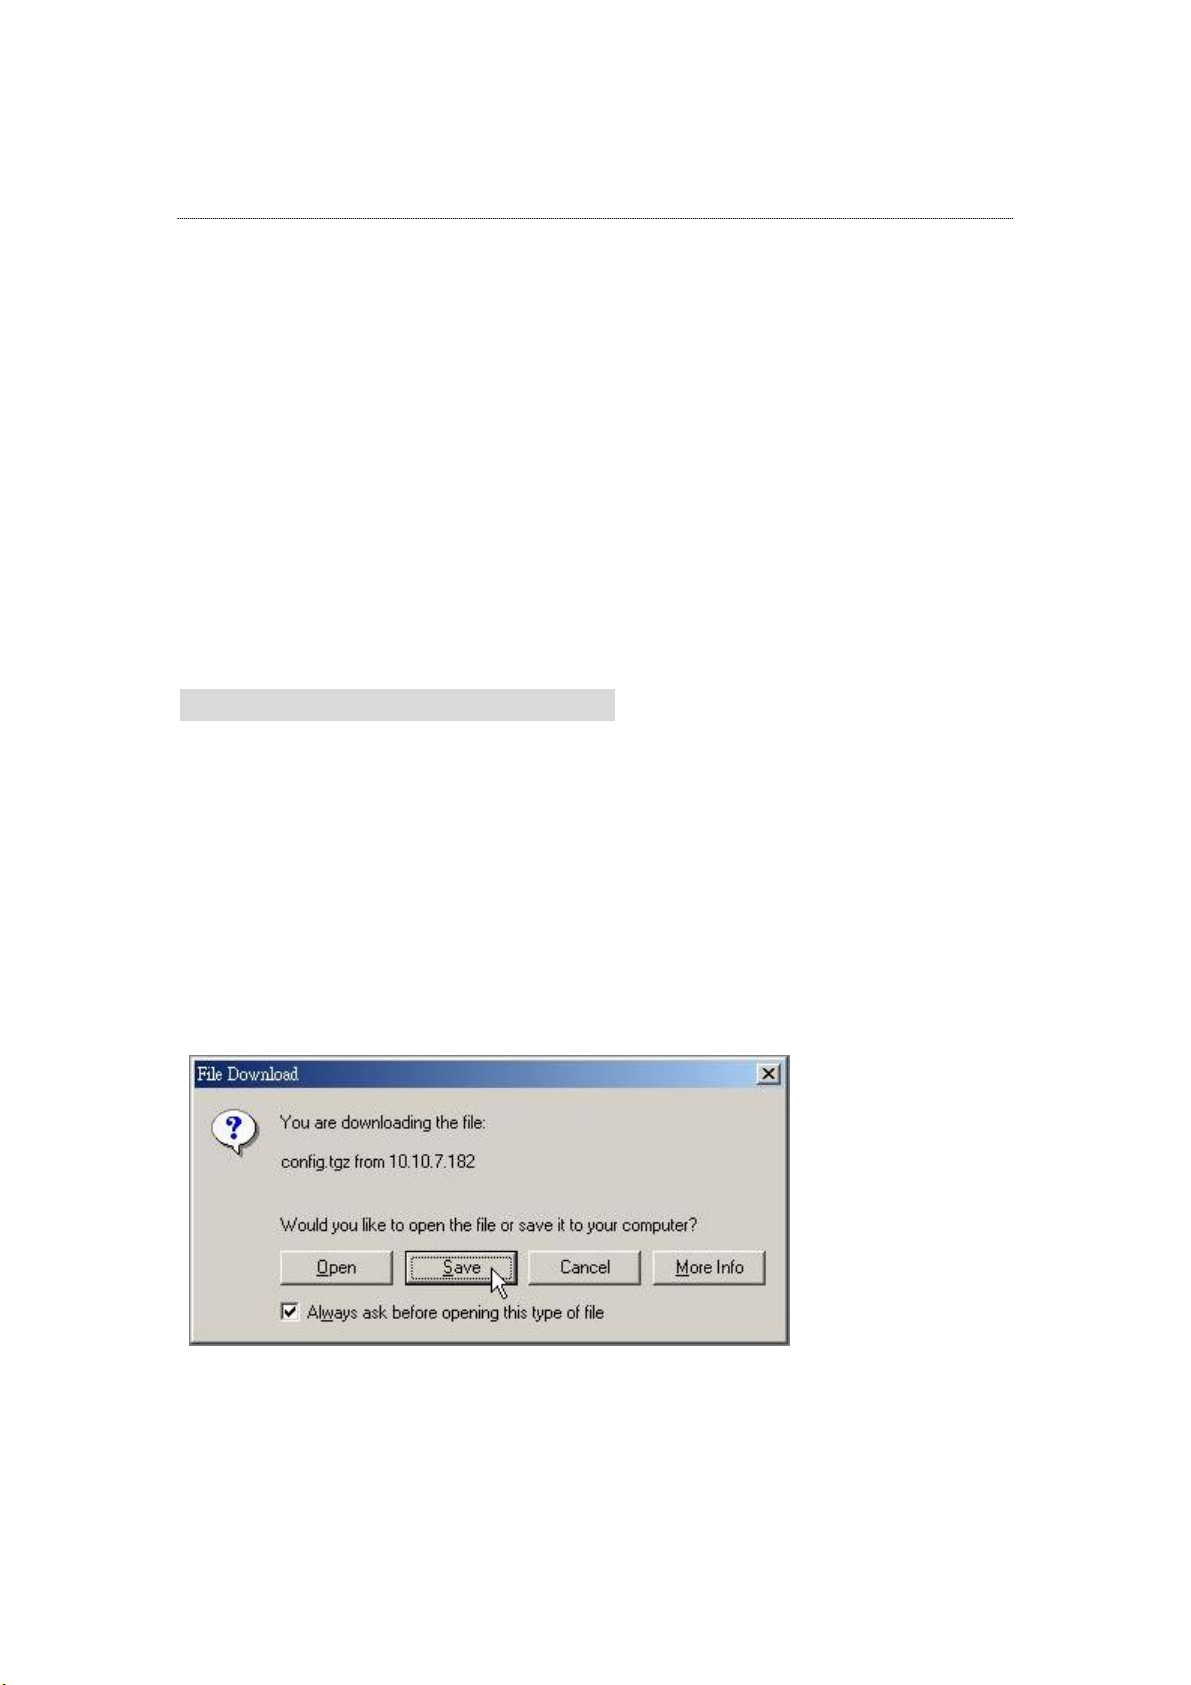
Backup the Device Configuration Status:
1. Click the Download button.
2. The File Download dialogue window pops up, click “Save”.
Specify a folder to place the downloaded data and click “Save”. Click “Close” to
complete.
56
Page 58
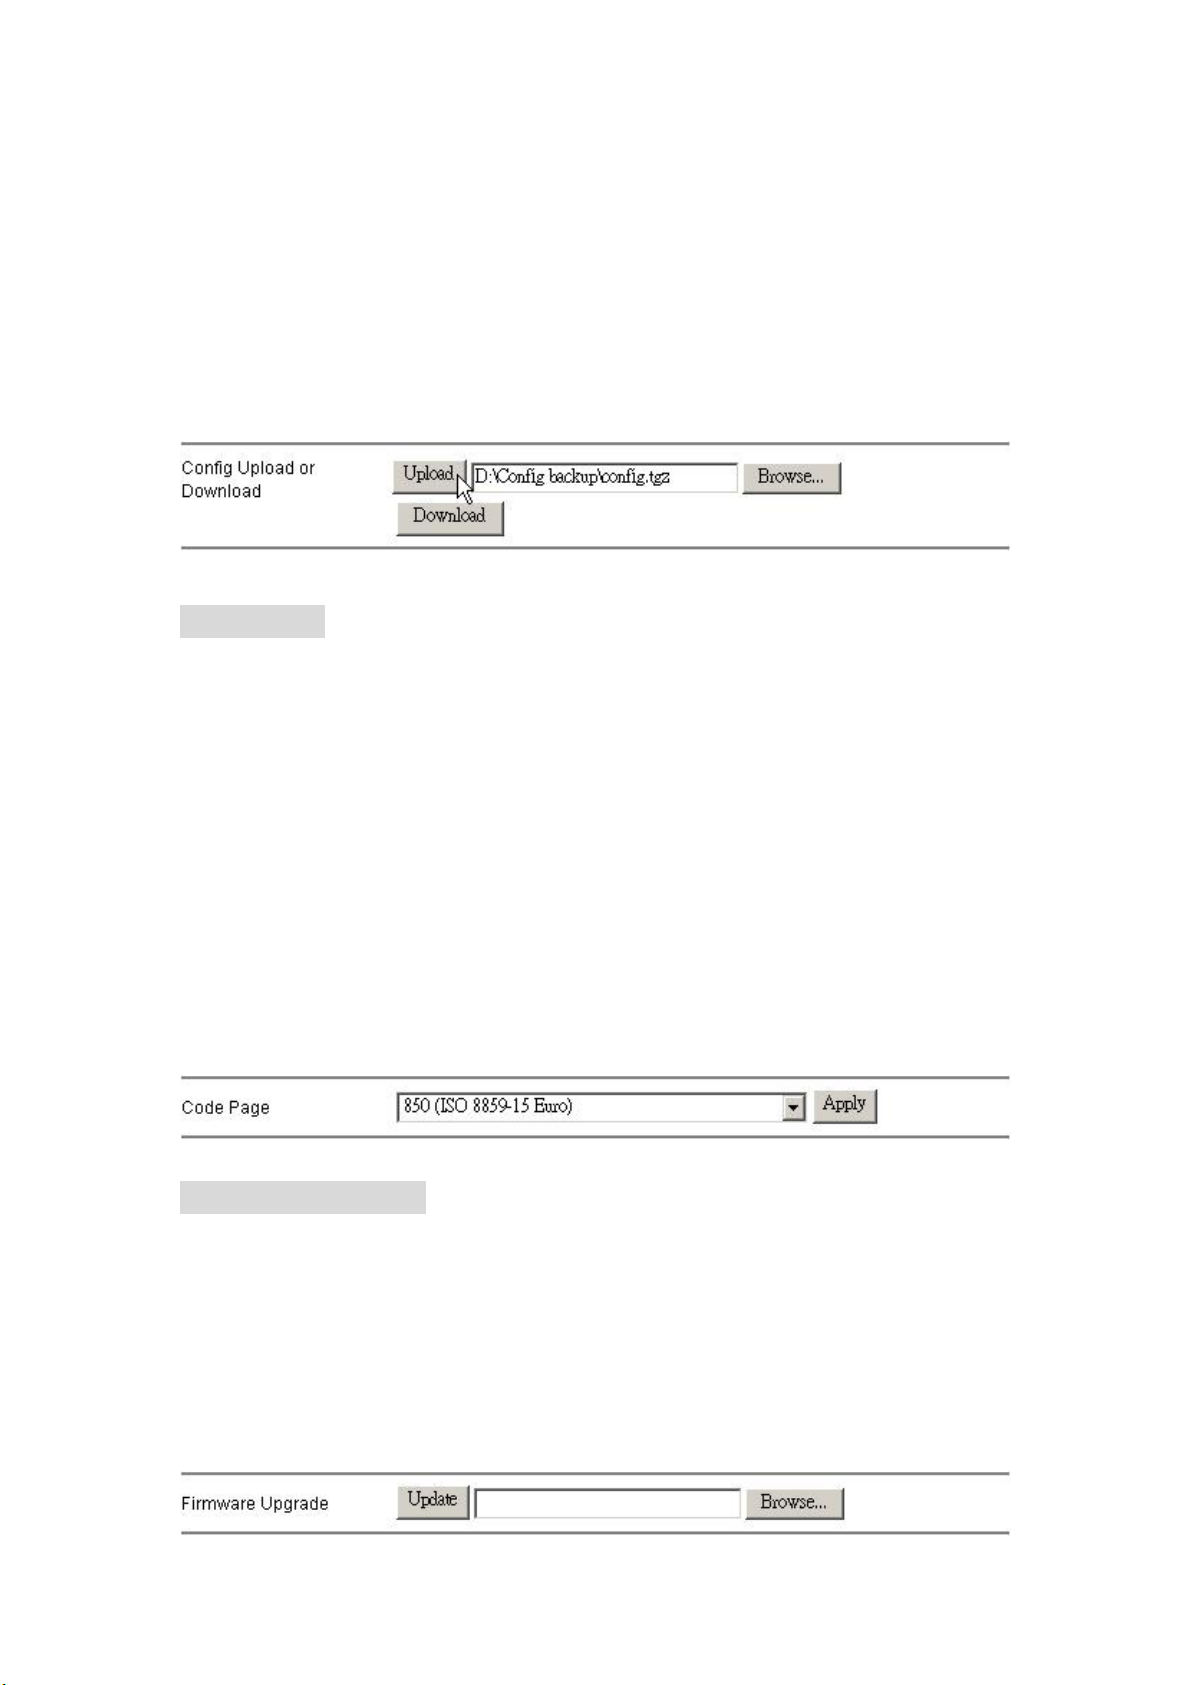
Reload the Device Configuration Status:
1. Click “Browse” and locate the file that you backup before.
Note: To know how to backup the configuration status, see” Backup the
Configuration Status”
2. Click “Upload” to execute.
3. The system restarts automatically to reload your previous configuration.
Code Page
For USB storage devices that formatted as FAT16 or FAT32, you must ensure the
code page is corresponding to the language of the file name (or folder name) in your
USB storage. It assures the file name and the folder name in your USB storage
device to be recognized properly.
To apply another code page, select a proper code page from the drop list and click
“Apply” to execute.
Note: As default, the code page is configured to be corresponding to your region.
Changing the code page is not recommended unless you got unrecognizable
characters on file name or folder name.
Firmware Upgrade
To upgrade the firmware, click the “Browse” button to locate the firmware. Click the
“Update” button to perform firmware upgrade.
Note: To get new firmware of the device, please contact your distributor for more
information.
57
Page 59
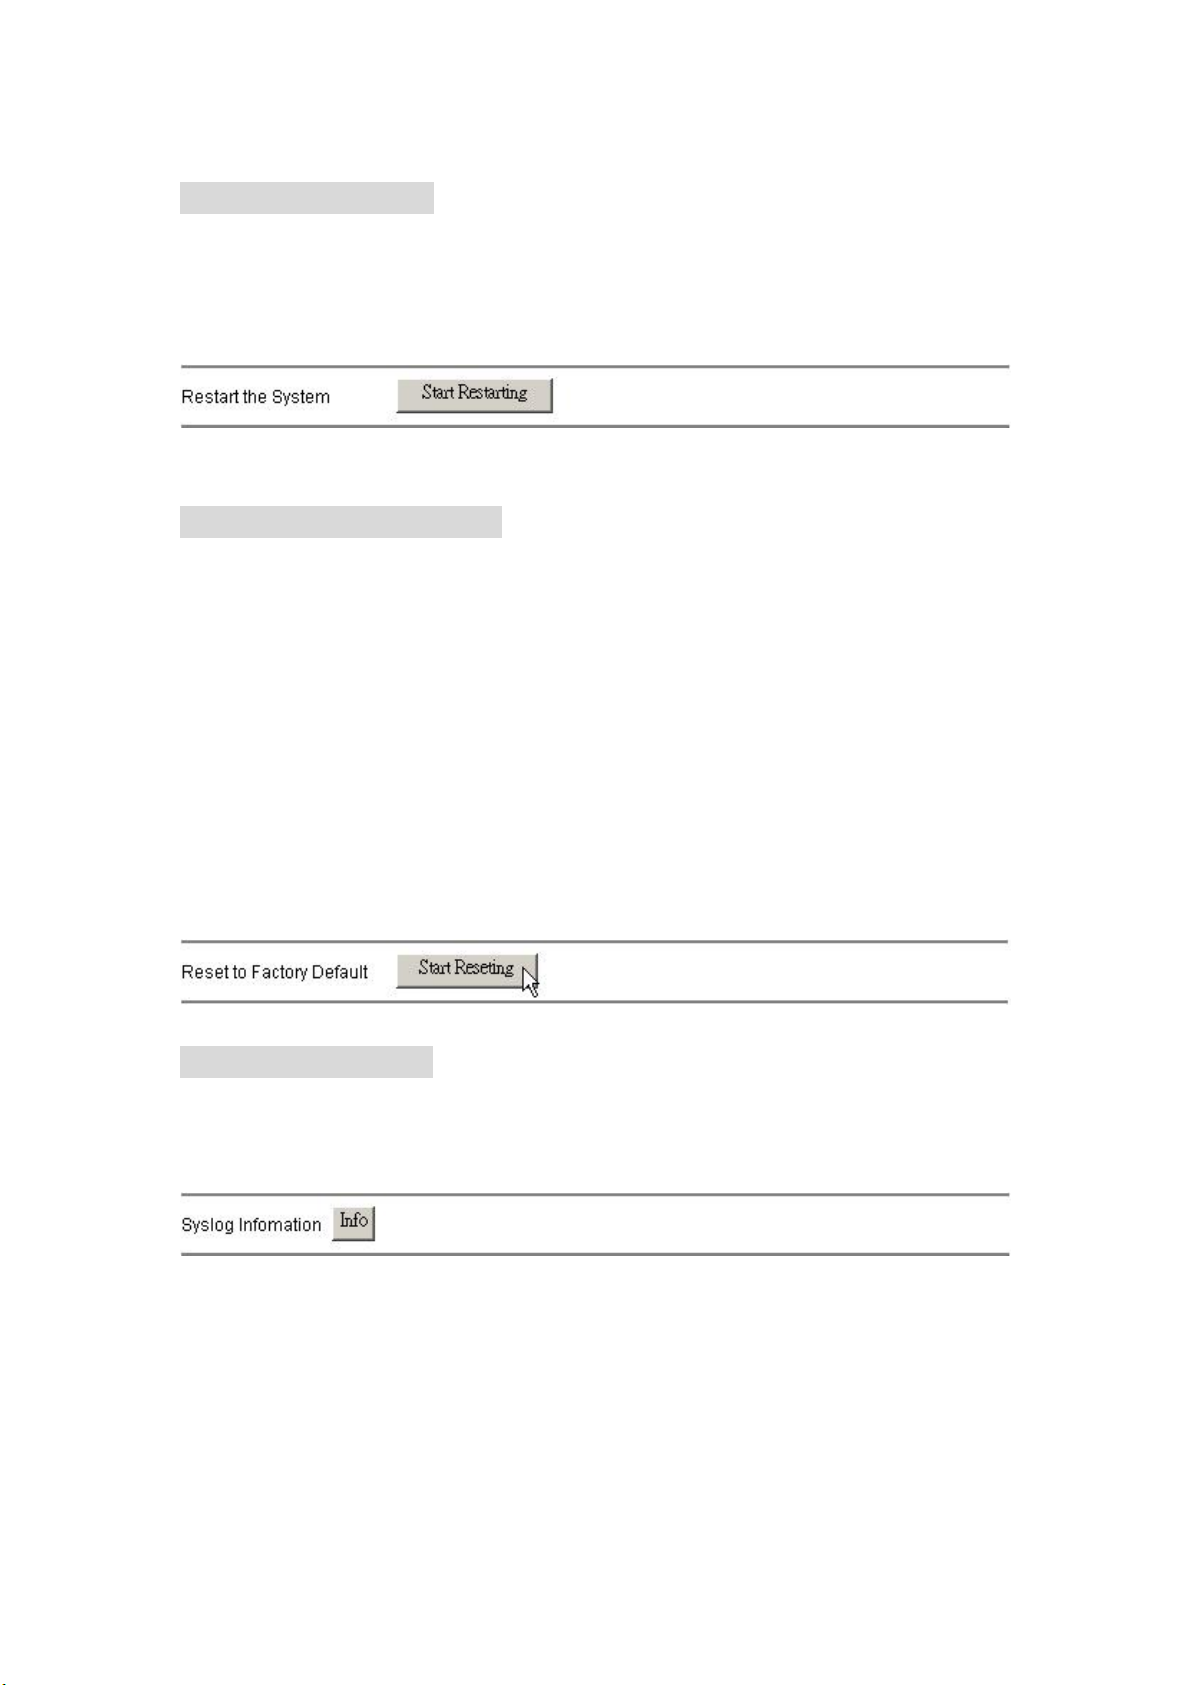
Restart the System
This column allows users to restart the system. To perform system restarting, click
the “Start Restarting” button.
Reset to Factory Default
To restore the factory default configuration for the device, click the “Start
Resetting” button to execute.
Note:
1. All the user-defined configurations will be erased and replaced as factory default
setting.
2. We recommend users to backup the configuration status before restoring factory
default. To get more information for backup your configuration, see “Backup the
Device Configuration Status”
Syslog Information
Click “Info” to get system log, which records operations on the USB port.
58
Page 60
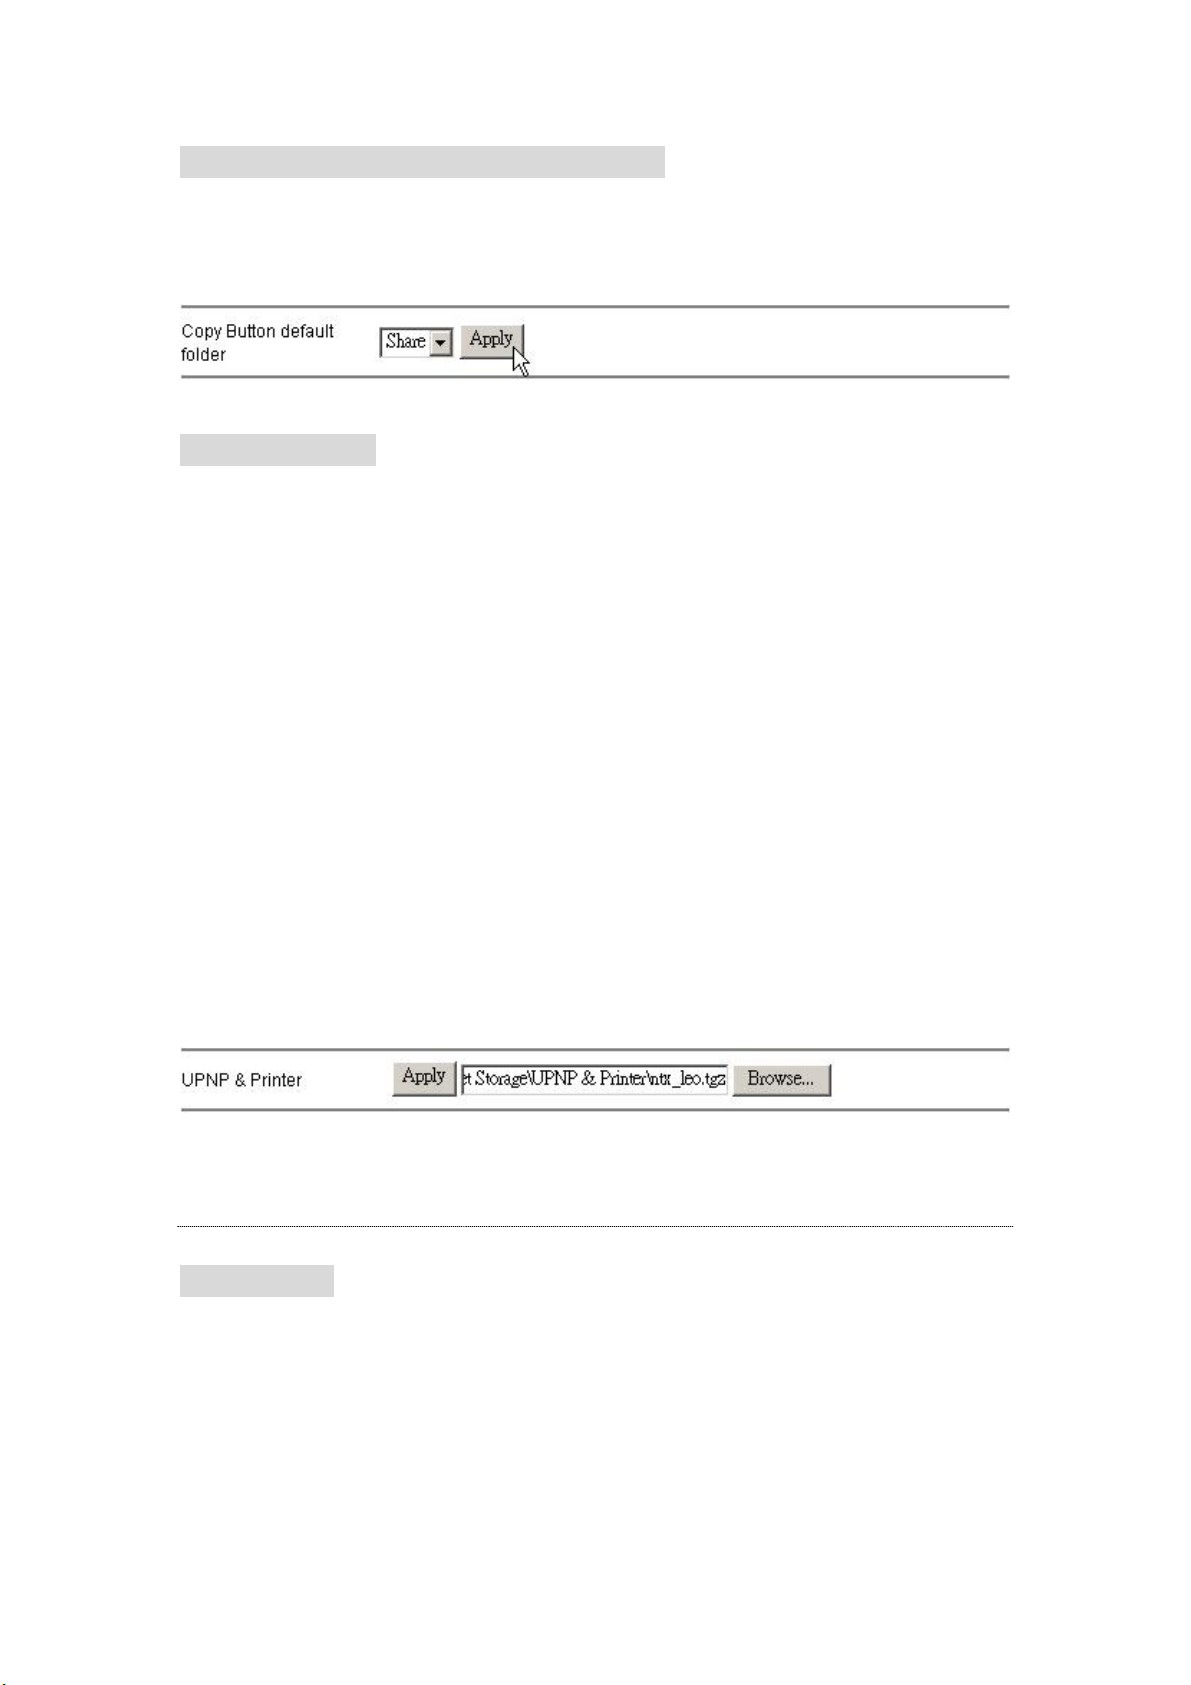
Select Backup Button Default Folder
Select a folder from the drop list and click “Apply” to activate. The files on USB Port
II will be copied to this folder on USB Port I after pressing the Backup button.
UPNP& Printer
To enable the UPNP and printer server function for the device, you have to install the
“ntx_leo.tgz” file to the device before any configuration.
To install the file,
1. Insert the included CD and click the “Browse” button.
Note: The installation window may auto-run. Click “EXIT” to close it.
2. Select your CD-Rom drive. Double click on the “UPNP & Printer” folder. Select
the “ntx_leo.tgz” file and click “Open” to browse the file.
3. Click “Apply” to perform installation.
4. It takes a few seconds to perform installing, please wait upon installation.
Note: This file is going to be installed on the USB hard drive on USB port I. Please
note that you will have to install it again after you replacing the USB hard drive on
USB port I.
Web Server
Web Server
Administration WEB
The Administration port is the port for accessing the Web-based management
interface.
To modify the Administration Port, enter a port number from 1 to 65535 then click
Apply to save your configuration.
59
Page 61
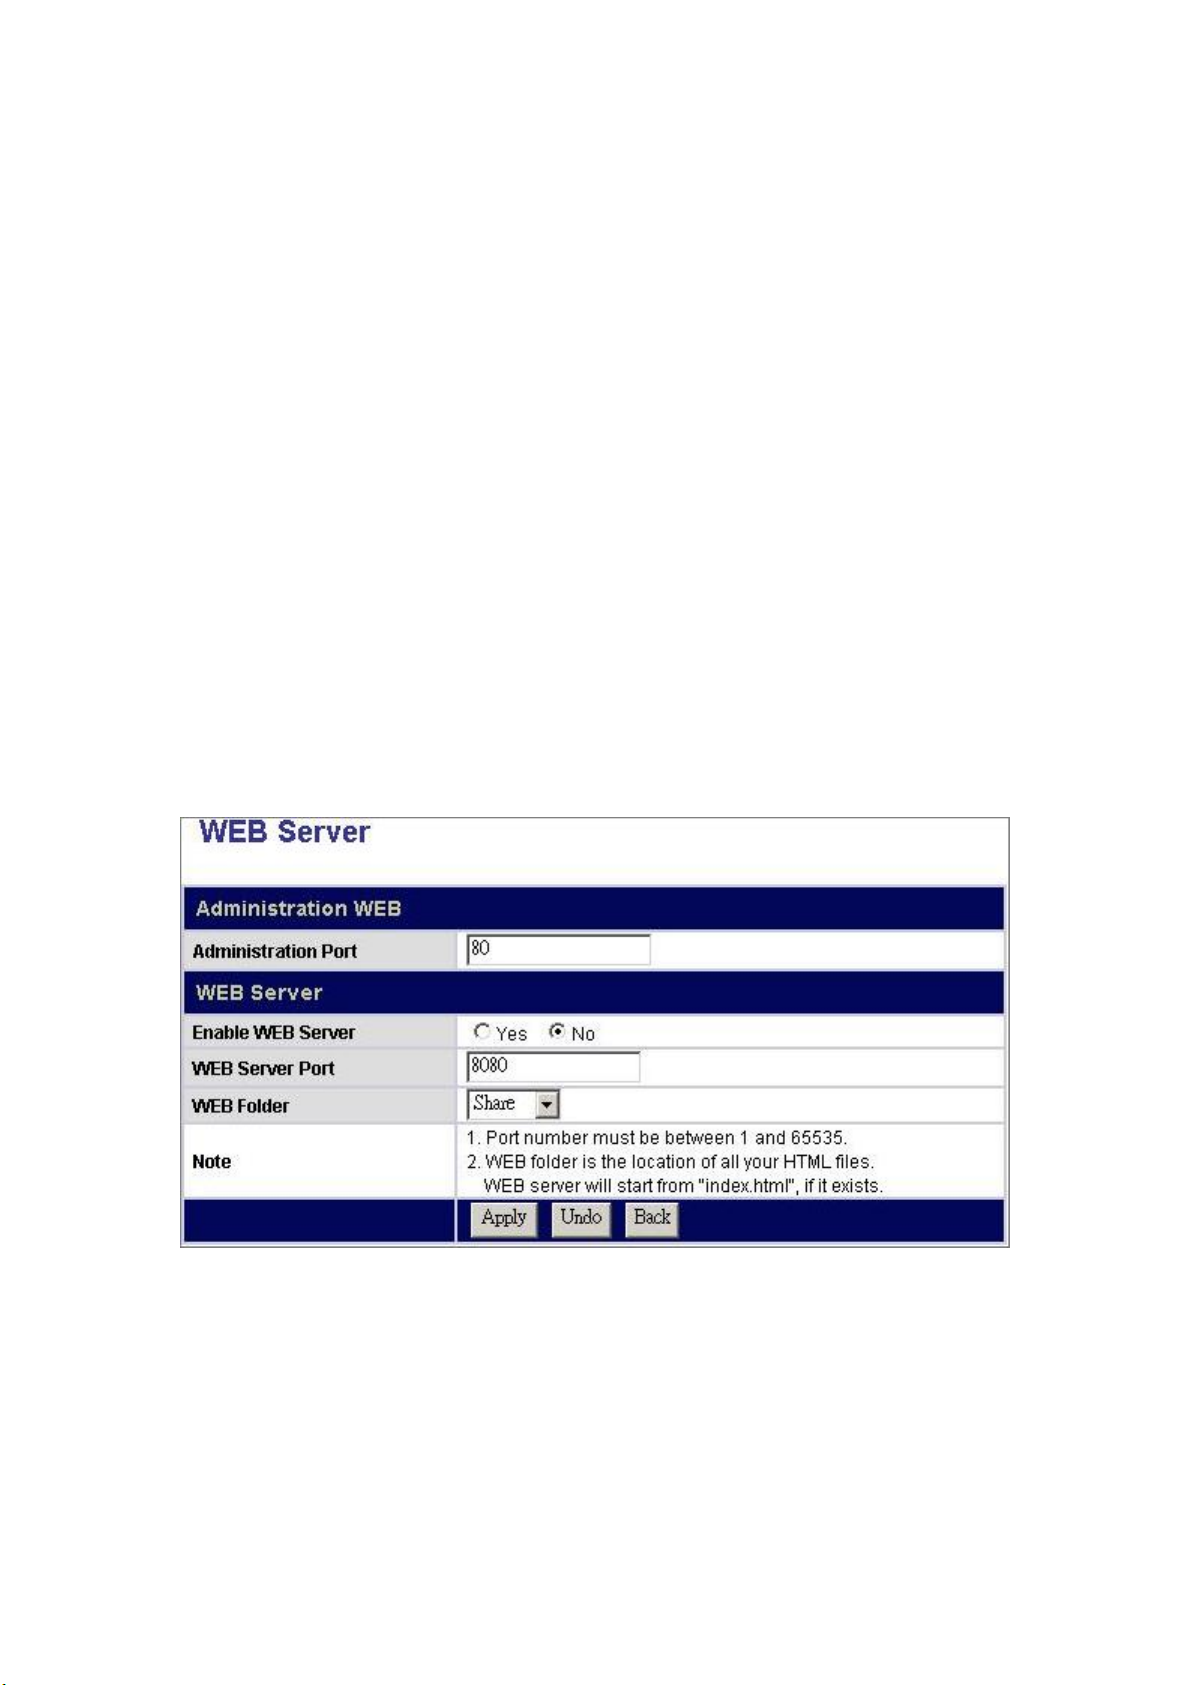
Note: The Port 80 is configured as the default Administrator WEB Server Port.
Web Server Configuration
The device embeds a WEB server that allows users to construct a Website.
To activate the WEB server,
1. Click “Yes” to enable.
2. Specify a port number from 1~65535.
3. Specify a “WEB Folder” where you place your HTML files.
Note:
1. The WEB server supports HTML format only.
2. As default, the Port 80 is not allowed to be setup as the WEB server port for
“80” has been configured as the Administration port.
3. We also provide a Website template for you to build-up a Website and enjoy the
WEB server properties easily. To use the template, insert the included CD, copy
the data in the folder “WEB Template”. Paste those data in the folder that you
configured as the “WEB Folder”
60
Page 62
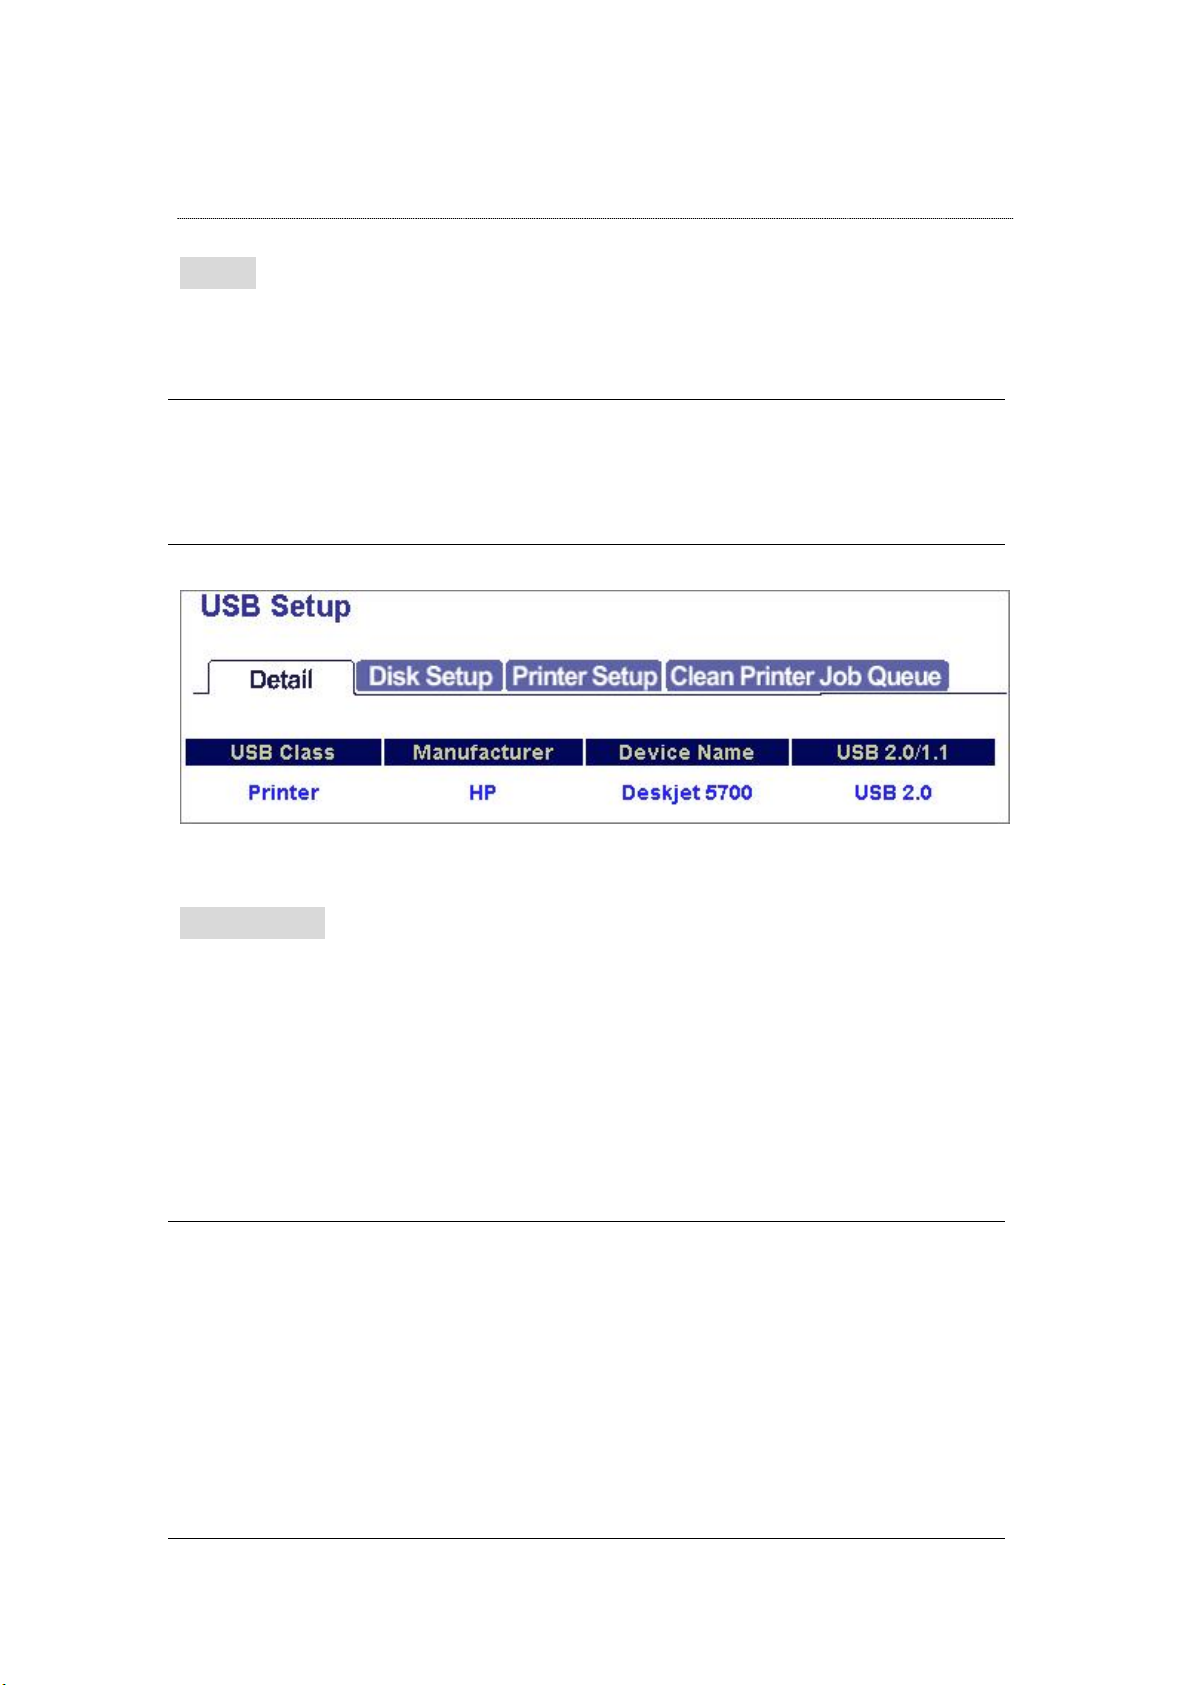
USB
Detail
The Detail page shows the information of the connected USB devices:
USB Class: The USB device type.
Manufacturer: The manufacturer of the connected USB device
Device Name: Name of the connected USB device.
USB 2.0/ 1.1: The USB standard supported by the connected USB device.
Disk Setup
The Disk Setup page allows users to:
1. Get information about the connected USB storage.
2. Format the connected USB storage device.
3. Mount the USB storage to the device.
USB Storage information
Name (1~16 characters):
Description:
Define a name for the USB storage device.
Note: The name is also the folder name after
mounting the USB storage to the device. For more
information to mount the device, please see”
Mount/ Dismount Your USB Storage to the
Device”
The partition order of the USB storage device.
Note:
1. The device recognizes the first four partitions of
your USB storage only. We recommend users not
to format the USB storage for more than 4
partitions.
2. The device support one connected USB storage
61
Page 63
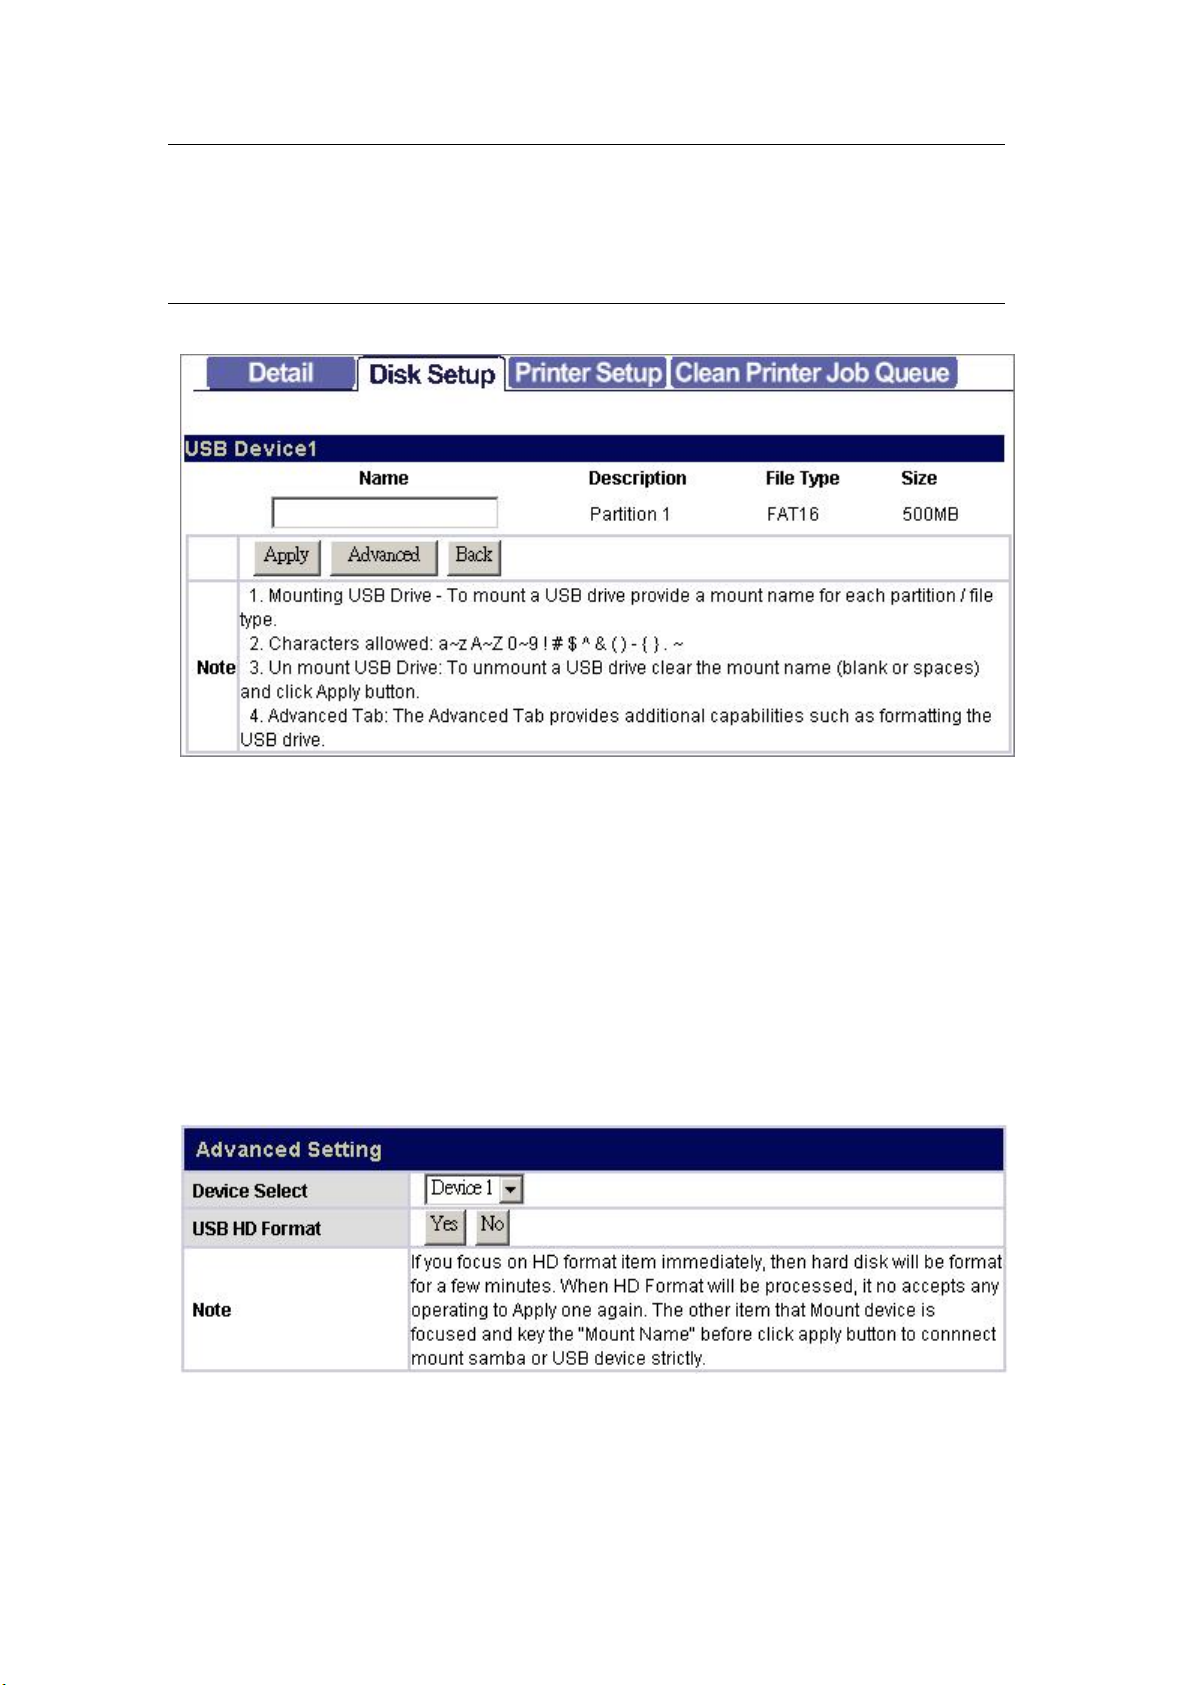
File Type:
Size:
device. Only one USB storage device can be
recognized while there are two USB storage
device connected simultaneously.
The format of the file type of the connected USB
storage device.
The space of the connected USB storage device.
To Format Your USB Storage device
1. Click the “Advanced” button.
2. Select the device that you are going to format from the drop list.
3. Click “Yes” to perform formatting.
4. The system starts formatting. It may take several minutes according to the size
of your USB storage device. Please wait and DO NOT execute other
configuration for this device while formatting.
Mount/ Dismount Your USB Storage on Port II to the Device
62
Page 64
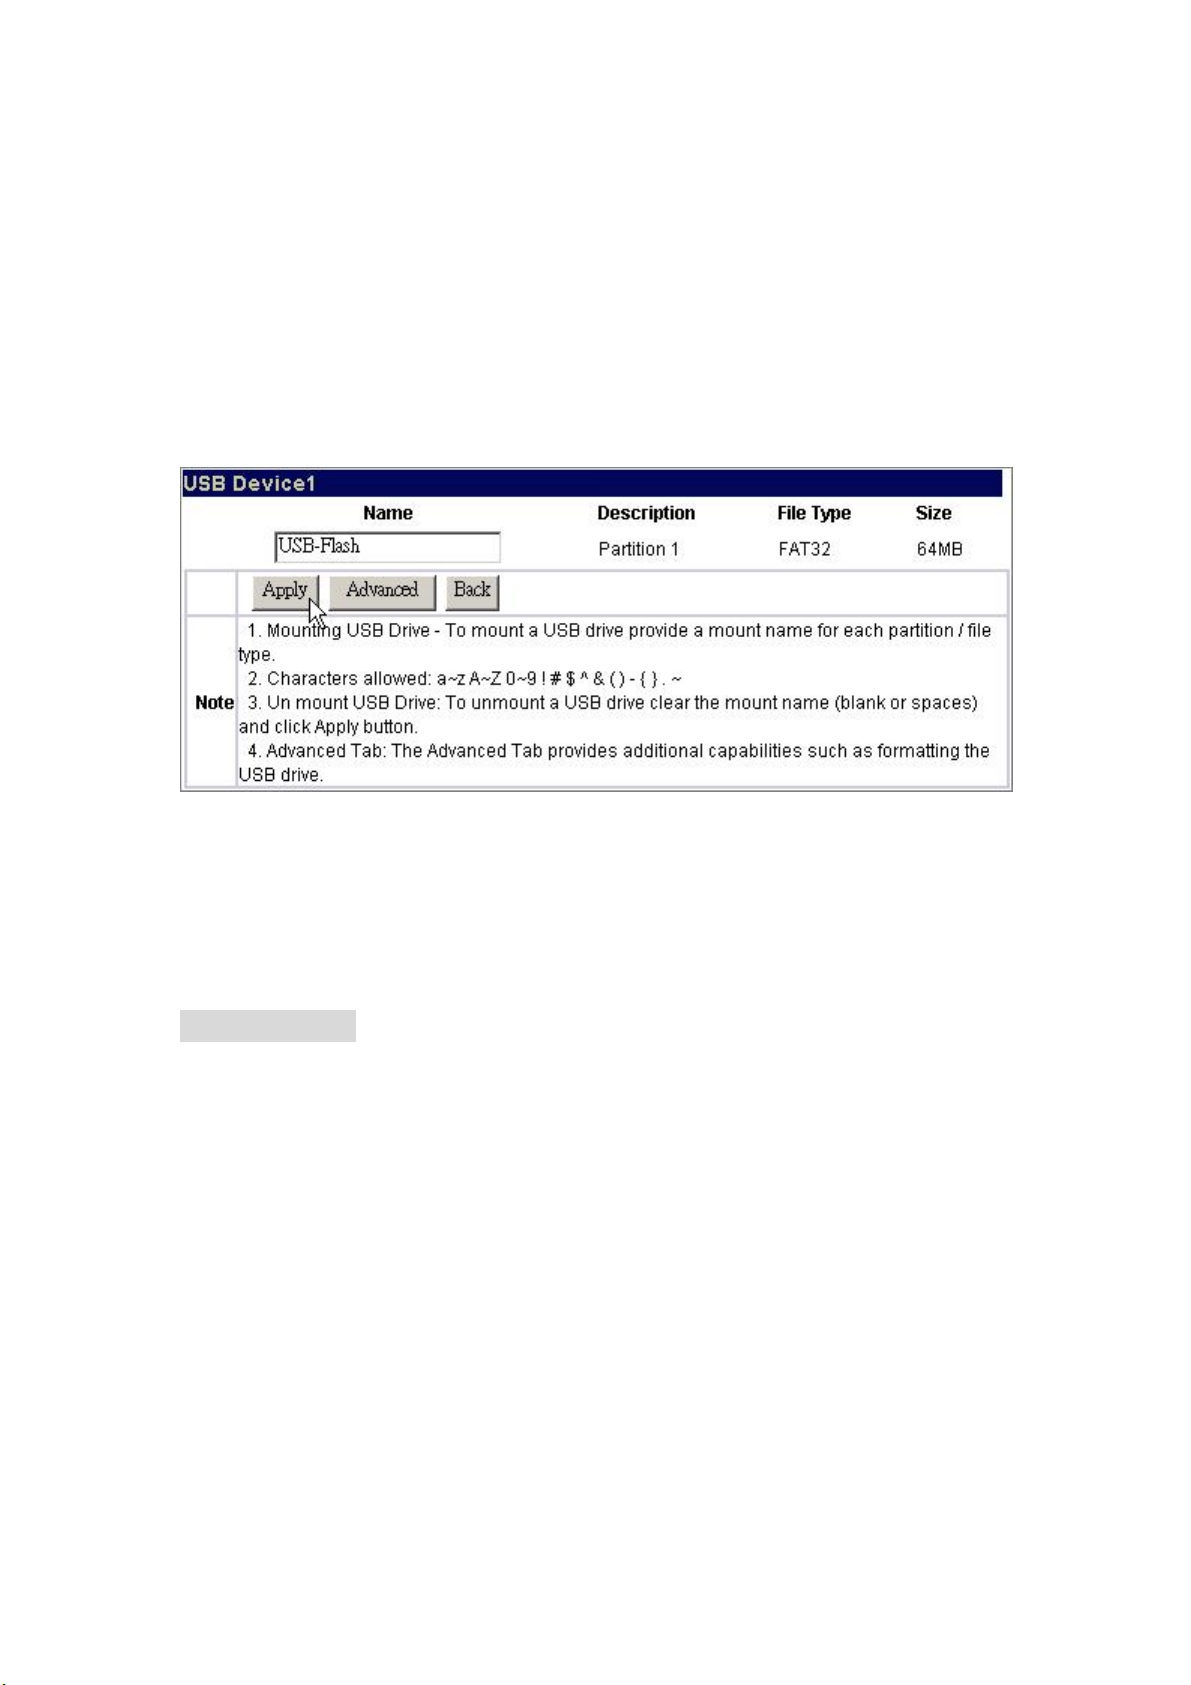
Please refer to the following procedures to mount your USB storage to the device:
Note: Before mounting the device on port II, please ensure that there is valid USB
storage device connection on USB port I.
1. Connect your USB storage to the USB port on the device.
2. Open the GUI. Click Disk Disk Setup.
3. Enter a name for the USB storage in the “Name” box and click “Apply”
4. The device is mounted. The system creates a folder for the USB storage.
5. To remove the USB storage from the device, click Disk Disk Setup in GUI.
Erase the name in the “Name” box and click “Apply”. The device is dismounted
and ready to be removed now.
Printer Setup
Procedures to setup the printer
Note: Before installing the printer on port II, please ensure that there is valid USB
storage device connection on USB port I.
1. Connect the USB cable of your printer to the device. Power on your printer.
2. Open the GUI and click “Maintenance”. Install the printer server file to the
device in the “uPnP and Printer” column.
Note: To get information for installing the printer server file, please see” uPnP and
Printer”
3. Click USB Detail, your can see the information of your printer.
63
Page 65
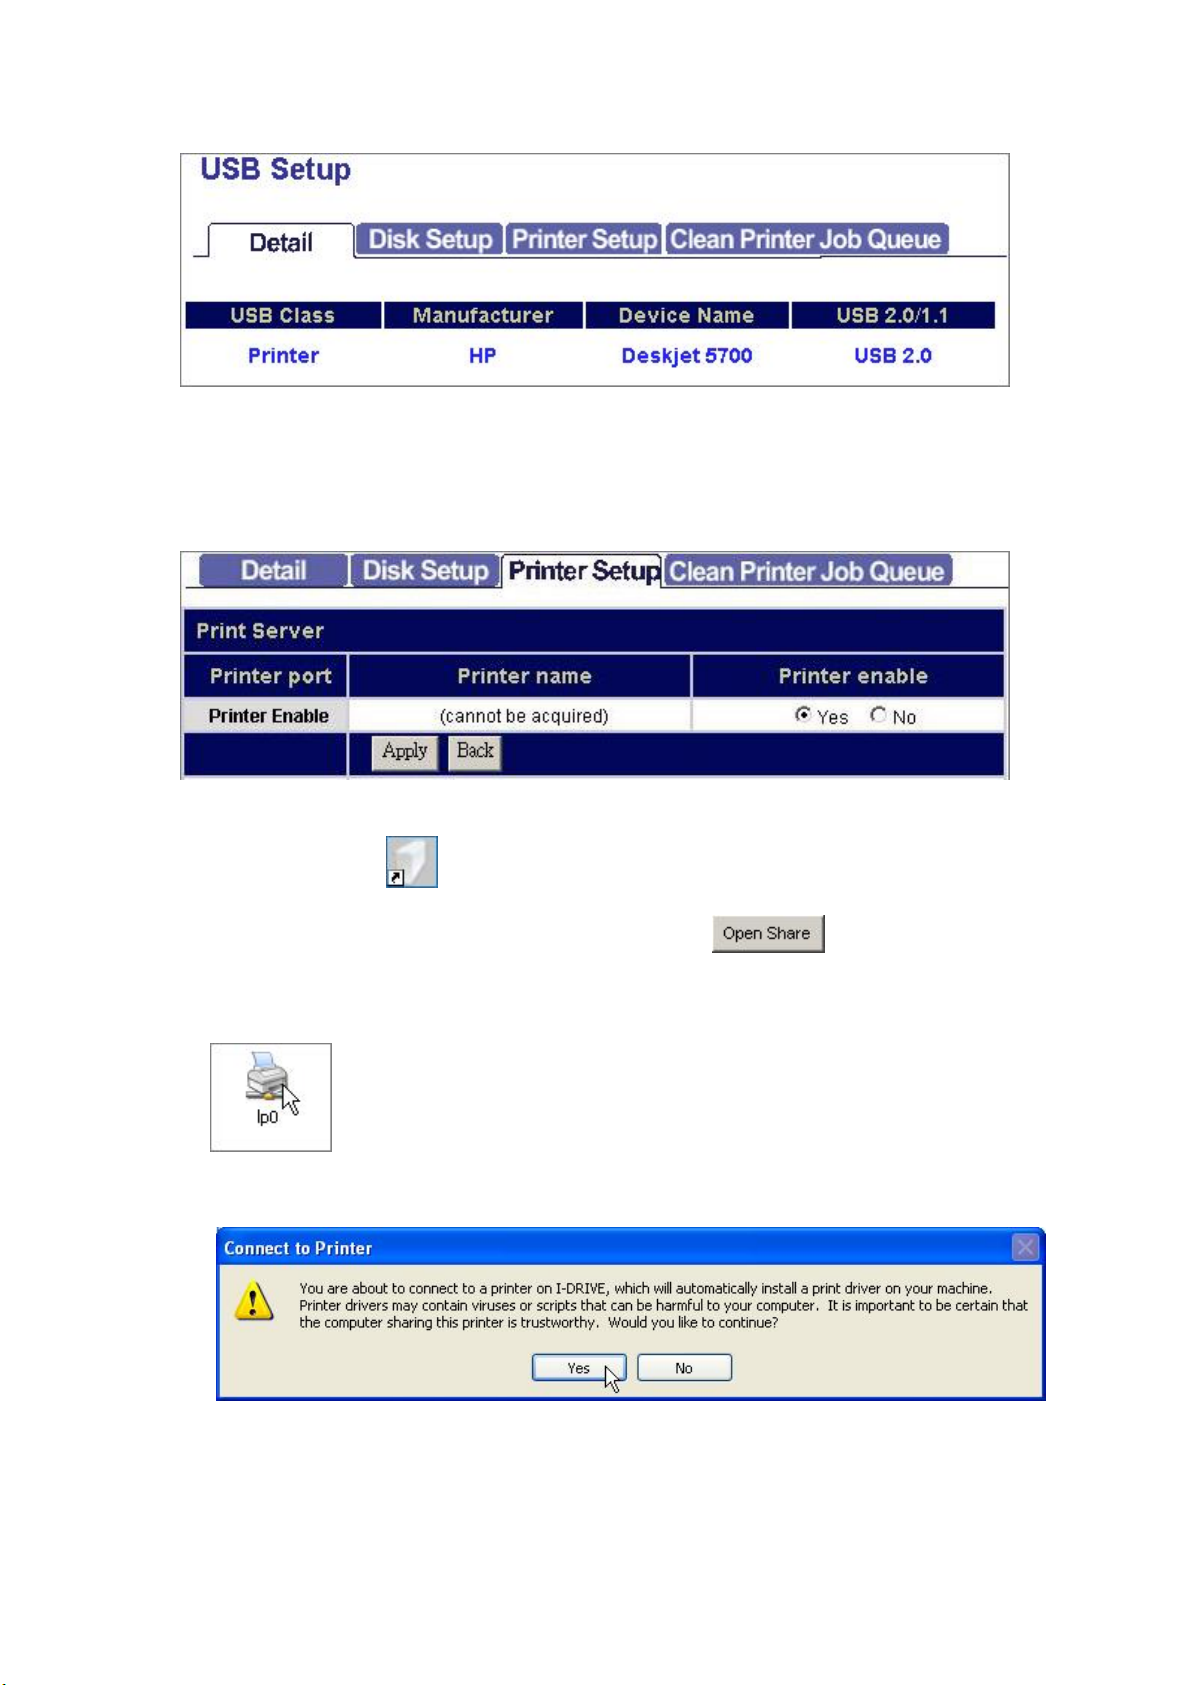
4. Click Printer Setup, Click “Yes” in the “Printer enable” column and click “Apply”
Note: After finishing the four steps above, the printer server function is activated.
To setup the computers that are going to use the printer, please follow the
instructions from step 5.
5. Double click the
window pops up. Select your NAS and click the
shortcut on your desktop to start the PNMD. The PNMD
button.
6. You can find a printer icon. Double click on this icon to proceed.
7. The system asks for installing the driver for the printer. Click “Yes” on the
warning dialogue windows to proceed.
64
Page 66
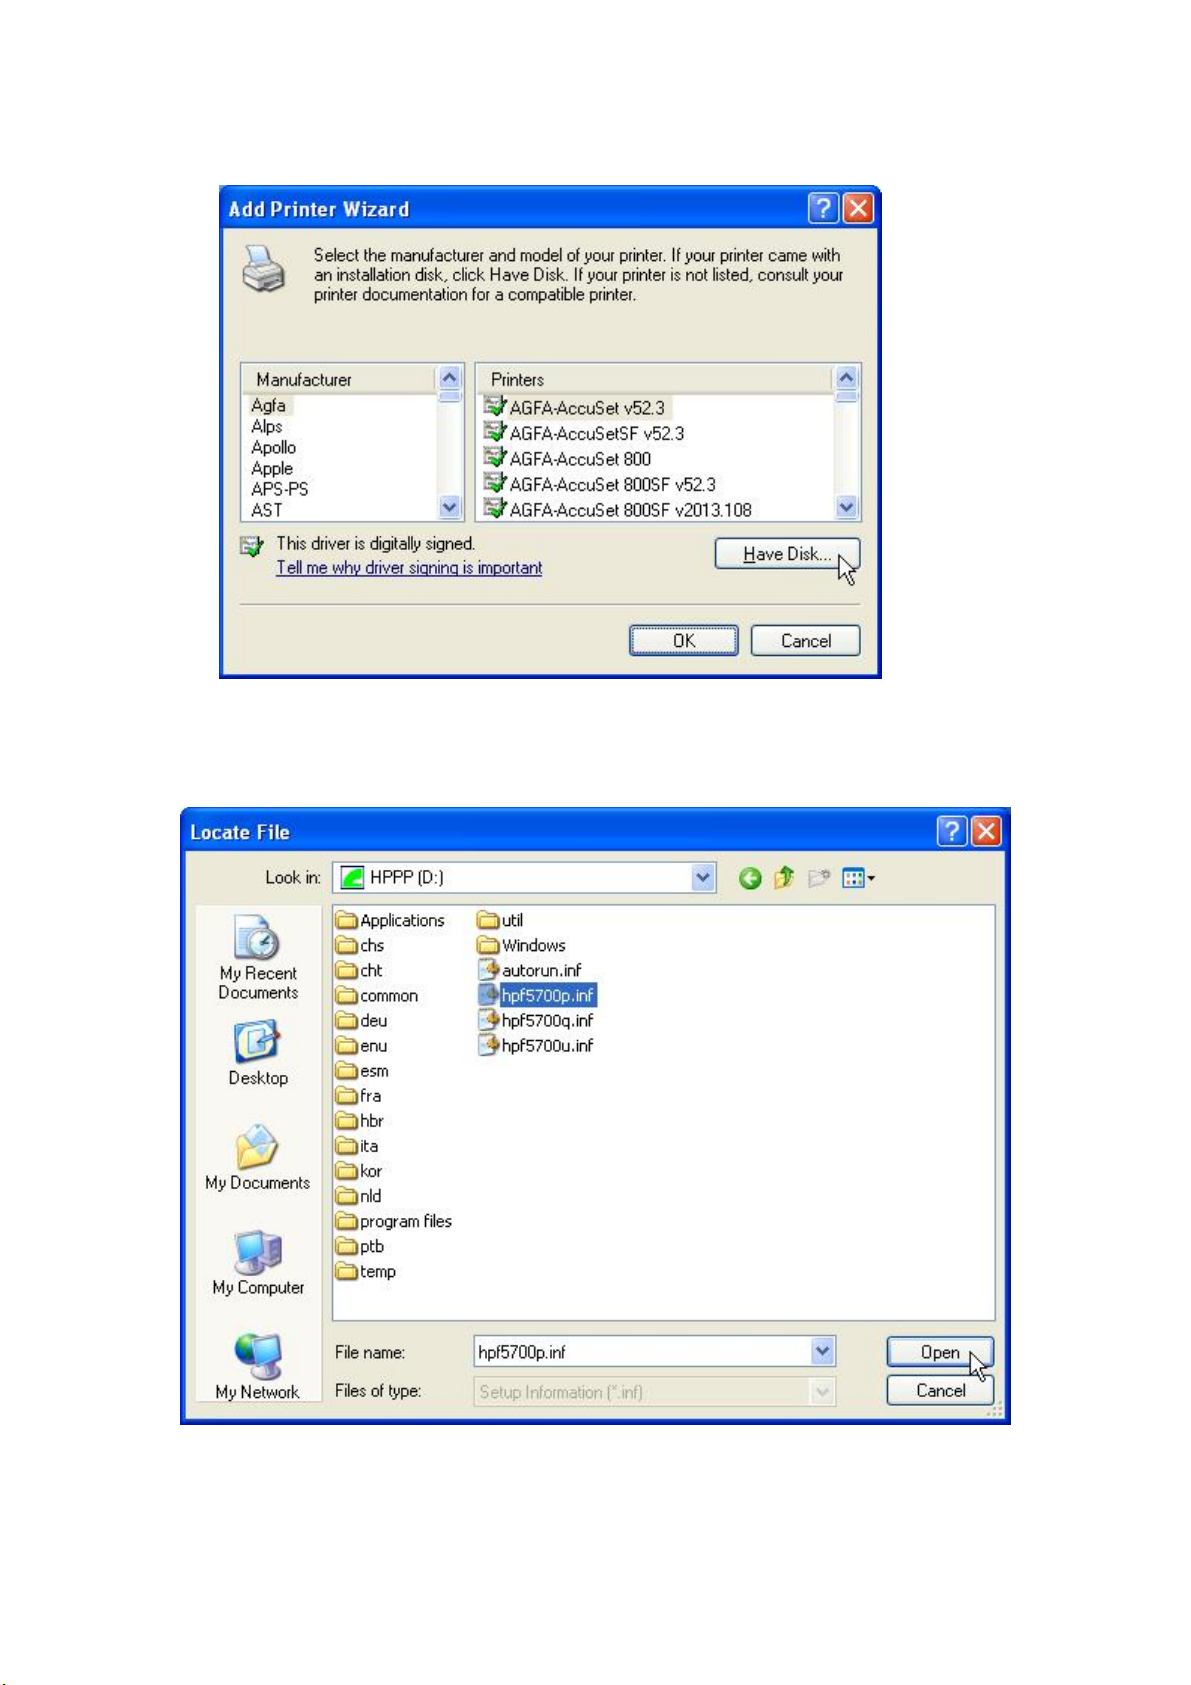
8. Insert your CD that came with your printer. Click the “Have Disk Button”
9. Browse to the driver in your CD. Click “Open” to browse the driver.
Tip: The correct driver is usually the file with the product name in“*. inf” format.
65
Page 67
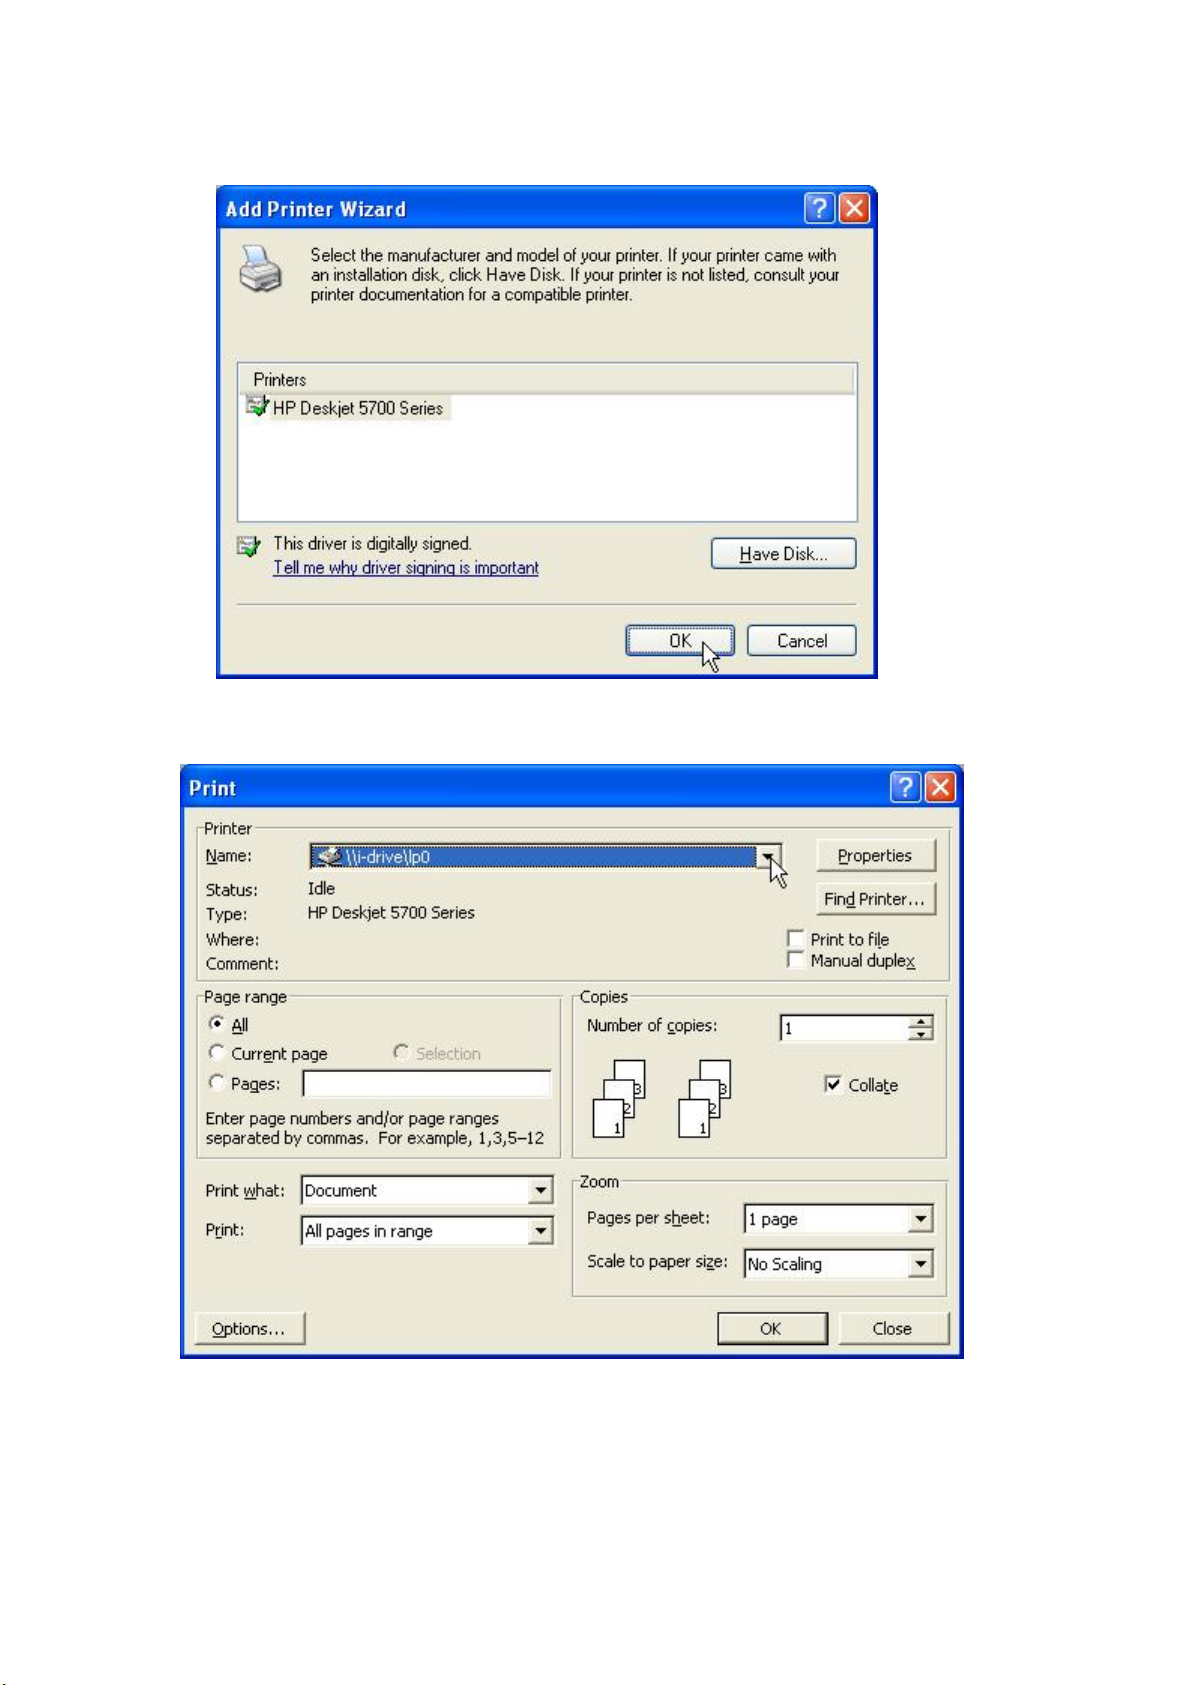
10. Click the “OK” button to start driver installation.
11. The printer is ready for use now.
66
Page 68
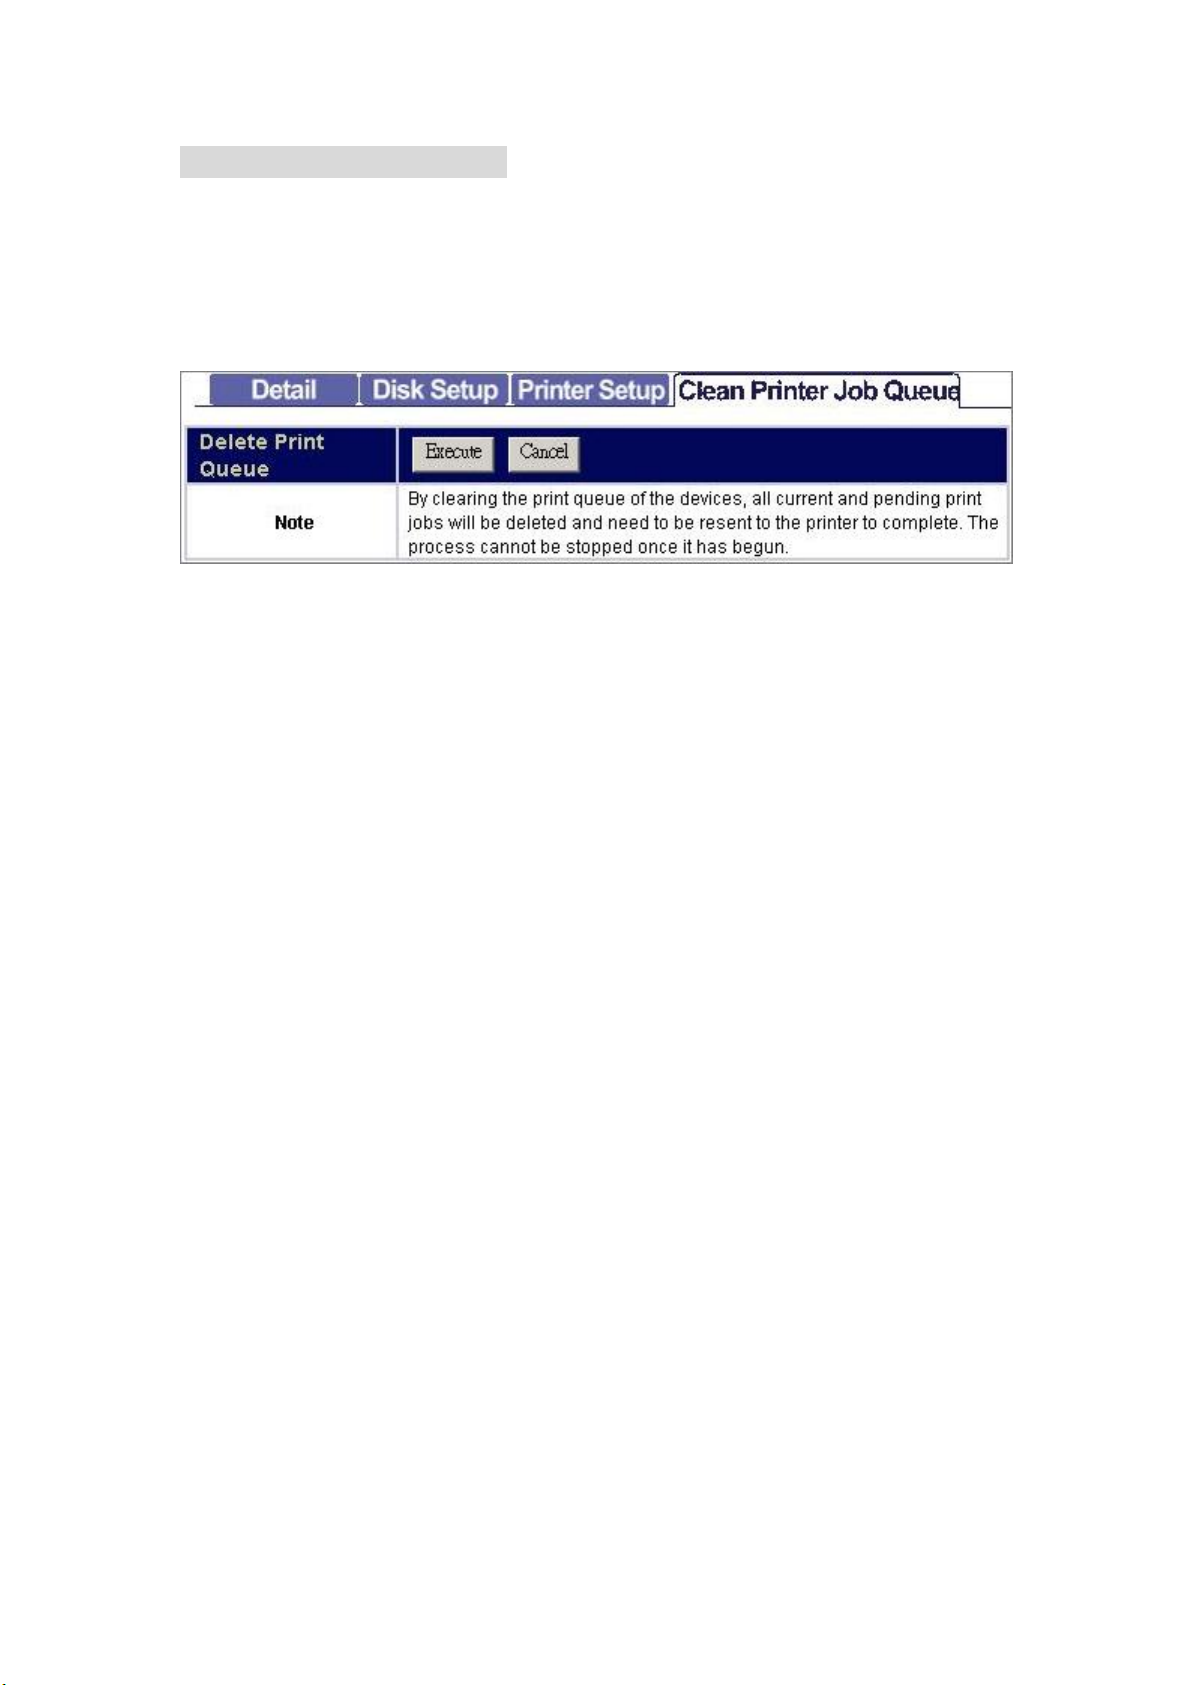
Clean Printer Job Queue
The Clean Printer Job Queue allows users to clean the pending print jobs that wait
for printing.
To perform cleaning printer job queue, click the “Execute” button and click “Yes” to
confirm.
67
Page 69
Appendix
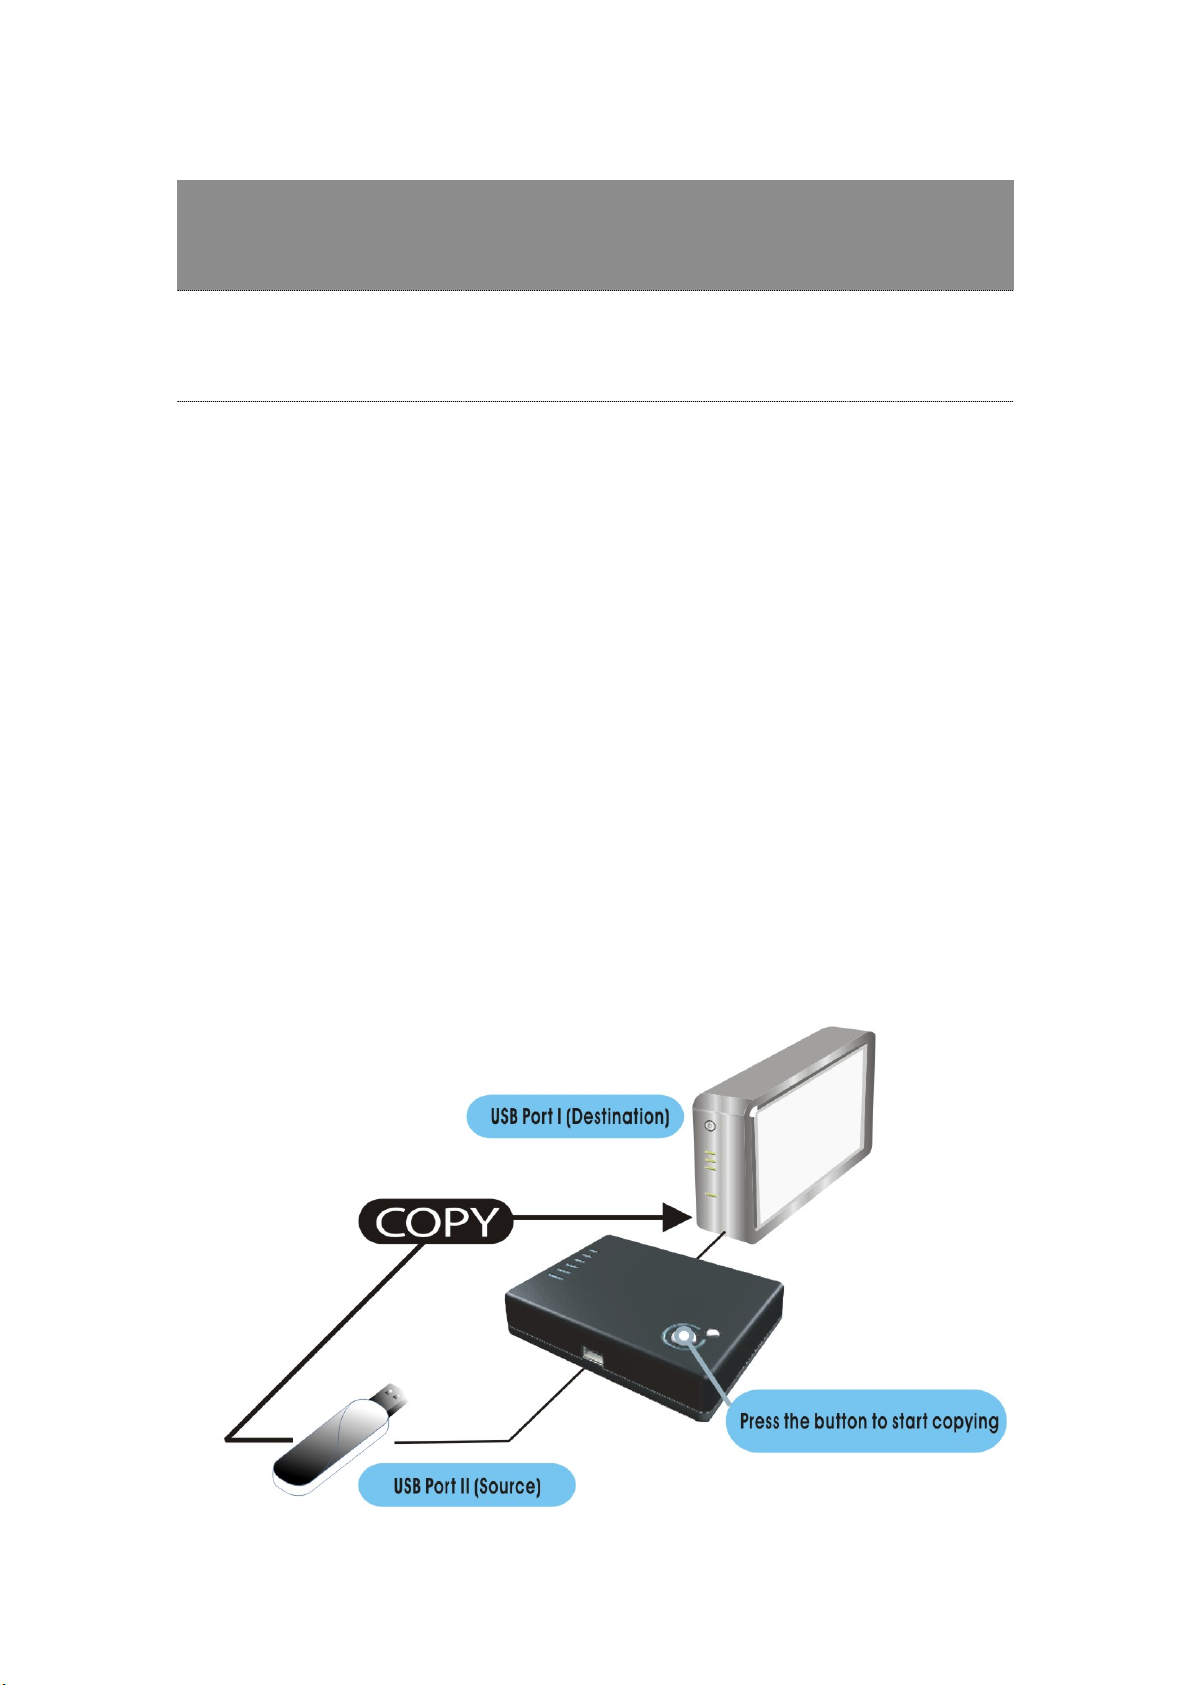
To Use the Copy Button
This device equips a “Backup” button, which allows you to copy files from USB
Port II to Port I by simply clicking the backup button.
To use the one touch copy function, please refer to the following instruction:
1. Power on this product.
2. Connect the destination USB hard drive to port I on this product.
3. Connect the source USB storage device to port II on this product.
4. Press the Backup button. The Backup LED lights blue while data is transmitting.
5. Copying is completed after the copy LED being off.
Note:
Please check if the USB Error LED illuminates after pressing the backup button. This
diagnostic LED is lit to inform users that this copy is failed. To get detail information
about this error, please refer to “Syslog Information”.
68
Page 70
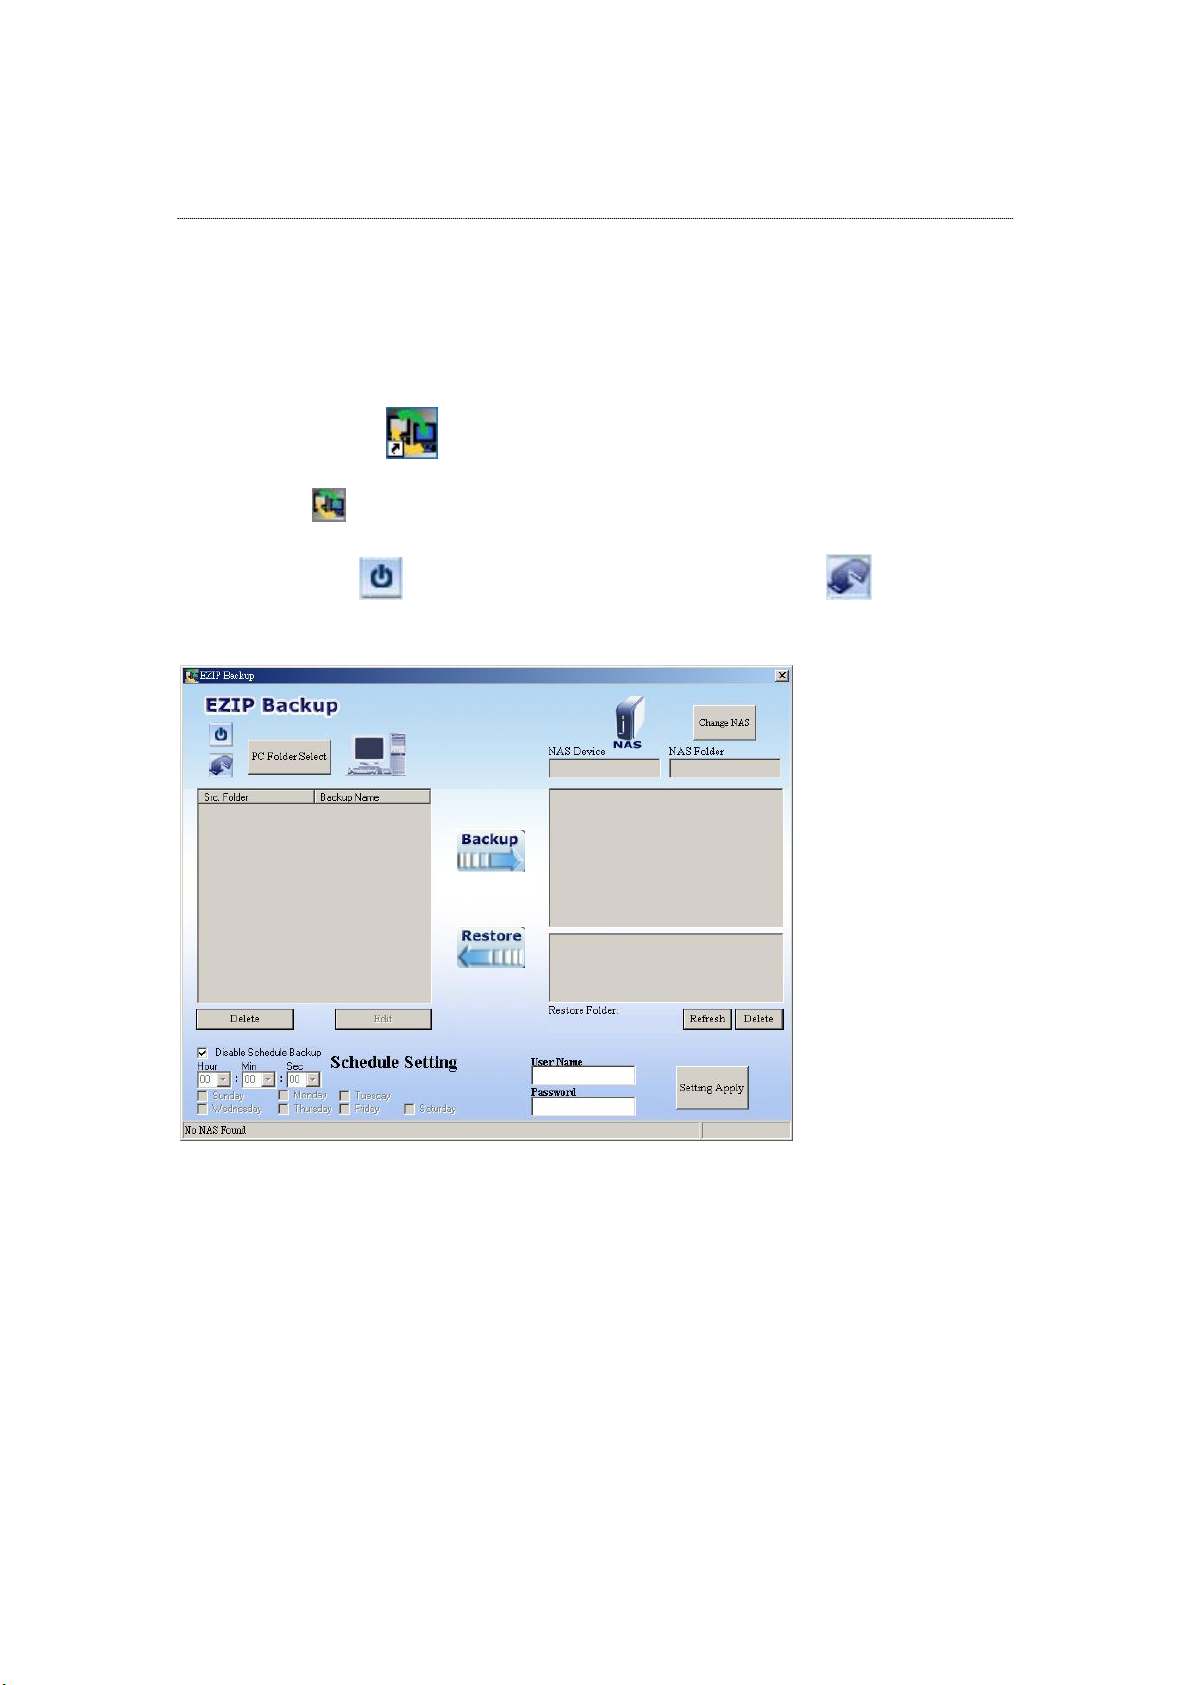
Using EZIP Backup to back up your files
This program helps users to backup the files on you computer to your NAS.
Those back-upped files are going to be compressed as *.zip format.
1. Double click the
2. Click the
may click the
minimize this window to system tray.
icon on system tray. The “EZIP Backup” window pops-up. You
shortcut on your desktop.
button to close this program or click the button to
69
Page 71
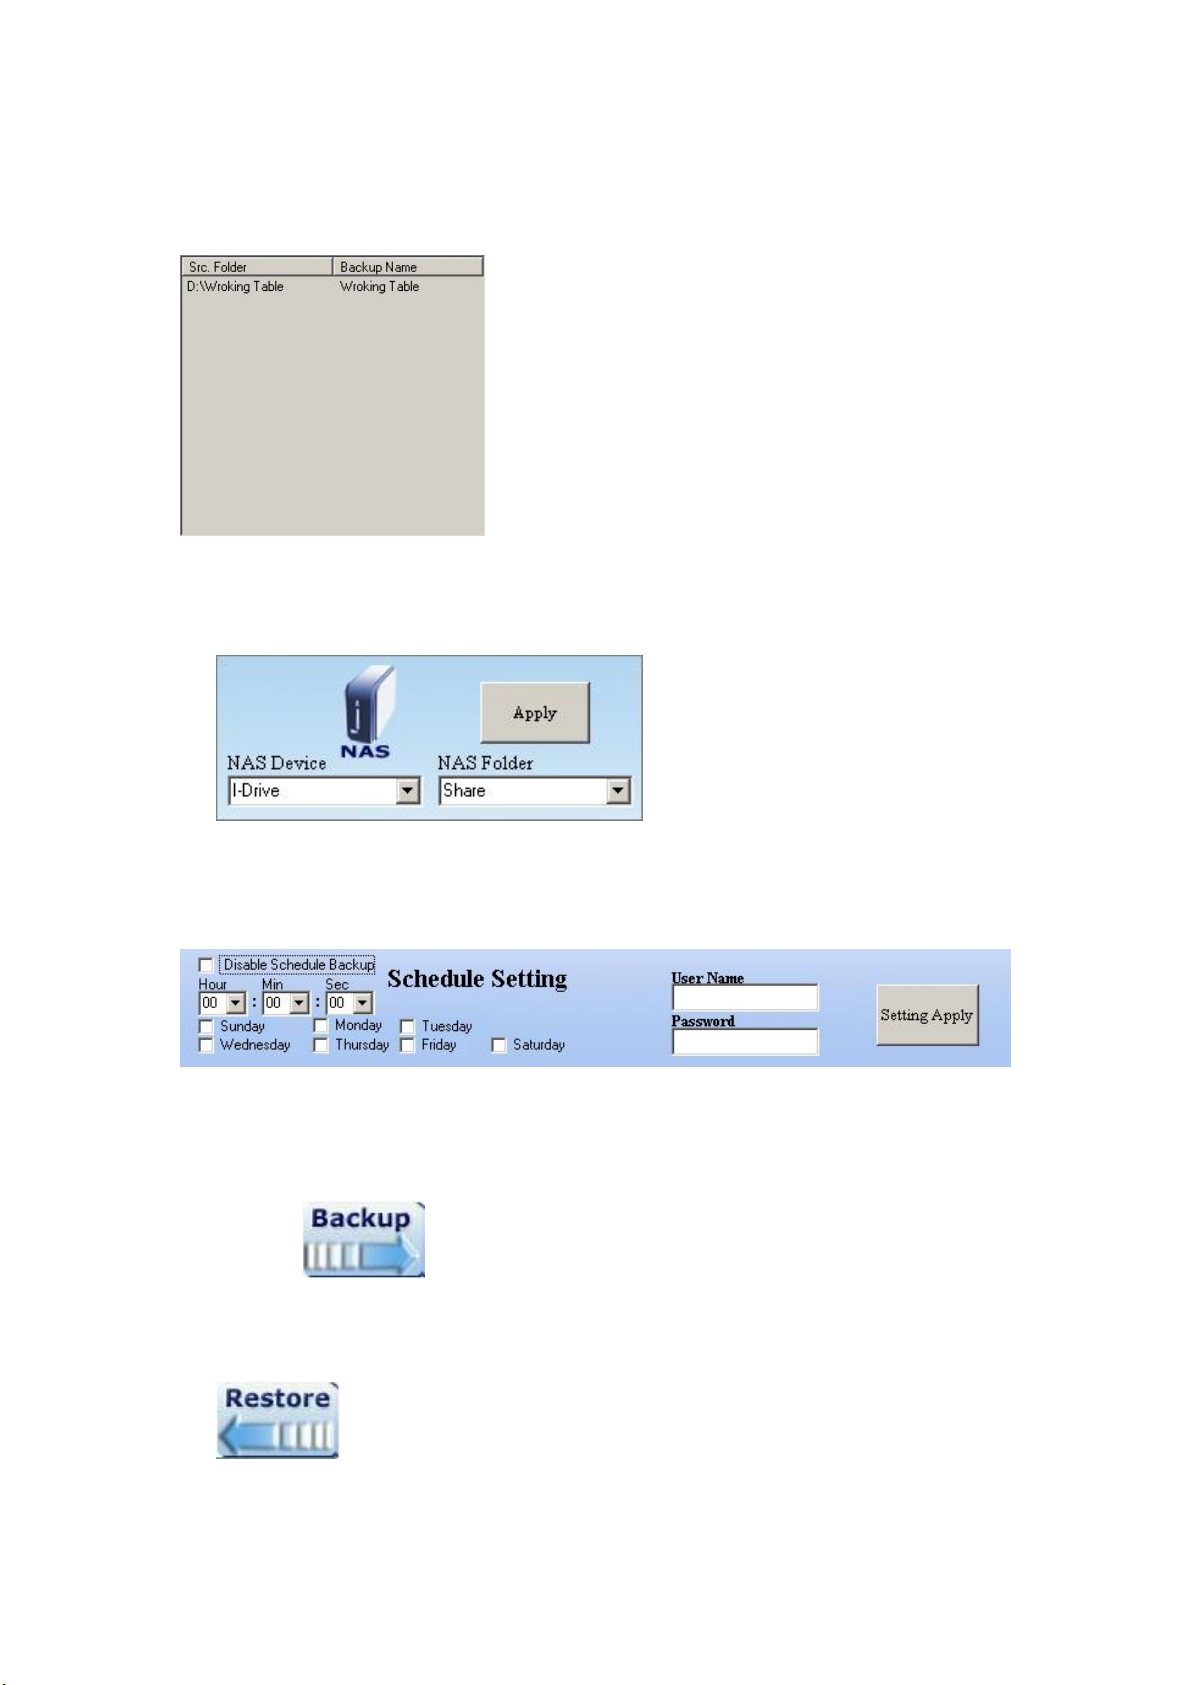
3. Click “PC Folder Select” button. Browse a folder that you are going to backup
and click OK. The folder that you selected shows on the list.
4. Click the “Change NAS” button to select a NAS. Select a NAS in the NAS device
drop list. Select a destination folder for locating the back-upped files.
5. Fill in a user name and password for accessing this folder. Select the time that
you are going to execute backup. Click “Setting Apply”.
6. Click the “Apply” button on the up-right corner of the window.
7. Click the
button to start backup.
8. To restore a back-upped file to your PC, select the file on the list and click
to perform restoring.
70
Page 72

Trouble Shooting
1. How to shut down the device properly?
Ans.
To shut down the system properly, press the power button on the front panel for
four seconds until the Power LED start to blink then go off.
2. The PNMD can’t configure My Network setting.
Ans.
Make sure that your RJ-45 cable is connected with the device and your
PC/Switch.
Check if the LINK/ACT LED illuminates.
Check the power of the device, your PC and Switch. Make sure that it’s on.
Check your PC’s IP address, make sure that it has a static IP or connects
with a router with DHCP client. For instruction about the IP setting, Please
refer to the “IP Protocol Setup” Chapter.
Reboot the system with Web-based UI or press the Reset Default Button to
restore the factory default setting and reboot.
3. I use this device as a Web/ FTP server, but the users that outside the
LAN can’t access it.
Ans.
For WAN users to get access to the FTP or WEB server, you should link the
device to a router with appropriate configuration. Please make sure that:
1. The NAT functionality is enabled in your router.
2. In the port-mapping session, the “Internal Host IP” should be
configured as the IP address of this Device and the value of “Port”
should be corresponded to the port number of the WEB server or FTP
server you configured.
(Ex, If the IP address of your device is 10.10.7.251, the port number
of your FTP is configured as 21 and the port for Web Server is as 8888,
you should add or modify a port mapping record, set the Internal
Host IP address as 10.10.7.251, the Port as 21. then add or modify
another port mapping record, set the Internal Host IP address as
10.10.7.251 and the Port as 8888)
3. Before allowing the device to communicate with Internet, we
strongly recommend users to add a Firewall device to secure your
network from being invading.
4. I can’t access this device.
Ans.
Check the LINK/ACT LED of Device illuminates.
Reboot the system with Web-based UI or press the Default Button to
restore the Factory default setting and reboot.
When there are over 8 concurrently connected users for Samba or FTP
users, the system blocks the upcoming users. Please check the Samba
Users / FTP Users.
71
Page 73

5. I have accessed the USB storage device, but I can’t get access to the
folders.
Ans.
Verify you have the correct username and password.
If you have accessed to any folder in the HD and would like to use another
set of username/ password for different authority, please log off your
operation system and log on again.
6. There are unrecognizable characters as the file name.
Ans.
For USB storage device with FAT16 or FAT32 format, using other
languages that different from your code page may lead this file to
unrecognizable. To show the file correctly, please refer to the chapter
“code page” for more information.
7. I have followed the procedures to setup the printer and it just doesn’t
work.
Ans,
Check if you power your printer on.
Verify that the cables are connected correctly
Make sure that you enactive the printer server functionality, you can refer
to “Printer setup” for more information
You may select an incompatible printer. Click Start Setup Control Panel.
Double click the printer icon. Remove this printer and install a different
driver and try again.
The device supports one connected USB printer only. Printers connections
on both USB ports of the device may led the printer functioned
unsuccessfully.
If you have installed a USB printer to this device before and would like to
install a new one, please click Start SetupControl Panel, right click on
the “idrive\lp0” icon, and delete it. Then, follow the instructions in
“Procedures to setup your printer” to install the new printer.
8. The printer failed to function after I replaced the USB hard drive
on USB port 1.
Ans,
Check if you install the printer server file for the device. Please note that
you have to install this file again after you connecting a new USB storage
device on USB port I. To get information for installing the printer server file,
please see ” UP&P and Printer”
9. My USB device cannot be detected.
Ans,
Ensure that you power on the USB device.
Verify if the USB device works normally with other device, for example,
your computer.
Your USB device may be not compatible with this product. You can check
this in “Syslog Information”.
The previous USB storage device may not be compatible with the device.
72
Page 74

Please restart the system and insert this USB device again.
10. I find only the folders of USB port I after accessing. Where are the
folders of Port II?
Ans,
Only the folders in USB I Port will be listed automatically. To share and
configure the folders on USB Port II, you have to mount it first. Please
refer to “Mount/ Dismount Your USB Storage on Port II to the
Device” for instruction.
The USB hard drive on USB port I may be off. No connection on USB port
I will lead the USB II to be functioned unsuccessfully.
73
Page 75

Product Specification
Standard
IEEE 802.3, IEEE 802.3u
Support Protocol
TCP/IP, HTTP, SMB, FTP, EXT3
Support concurrently connected Users
Samba: Eight Users / FTP: Eight Users
Interface
One 10/100Mbps RJ-45 Ethernet port
One Default Button
Connection speed
10/100Mbps
Support Hard Diskette
One removable 3.5” external HD (ATA)
Diagnostic LEDs
Power(Green), HDD ACT(Amber) USB I(Green),
USB II(Green), LINK/ACT(Green), USB Error (Amber)
Dimensions
220(L)x 132(W)x 60(H) mm
Operating Temperature
Operating - 0~40 ; Storing ℃ - -10~65℃
Power Supply
DC 12V 1A External power adapter
Certification
FCC, CE, VCCI Class B
74
61NB-02210+207/C
 Loading...