

Eurowash EW340, EW341 Instruction Manual

INSTRUCTION MANUAL FOR DISHWASHERS
Page 1 of 12
GB
CONTENTS
CHAP 1 PREFACE ..................................................................................................................... 2
CHAP 2 INSTALLATION ............................................................................................................ 2
2.1 U
NPACKING ........................................................................................................................ 2
2.2 P
OSITIONING ....................................................................................................................... 2
2.3 E
LECTRICAL CONNECTION ................................................................................................... 3
2.4 P
LUMBING CONNECTION ...................................................................................................... 3
2.5 C
ONNECTION TO THE DRAIN LINE ......................................................................................... 4
CHAP 3 RISKS AND IMPORTANT WARNINGS ....................................................................... 4
CHAP 4 USING YOUR APPLIANCE .......................................................................................... 5
4.1 S
YMBOLS USED ................................................................................................................... 5
4.2 S
TARTING UP ...................................................................................................................... 5
4.3 L
OADING AND WARMING UP ................................................................................................ 5
4.4 W
ASHING CYCLE ................................................................................................................. 5
4.5 T
URNING OFF THE APPLIANCE ............................................................................................. 6
4.6 D
ISCHARGING THE APPLIANCE ............................................................................................. 7
4.6.1 Models without discharging pump ............................................................................. 7
4.6.2 Models with discharging pump .................................................................................. 7
4.7 R
EGENERATING THE ION EXCHANGE RESINS ....................................................................... 7
4.8 E
ND OF SERVICE ................................................................................................................. 8
CHAP 5 MAINTANANCE ............................................................................................................ 8
5.1 H
YGIENE AND CLEANING ...................................................................................................... 8
5.2 R
OUTINE MAINTENANCE (DAILY) ........................................................................................... 8
5.3 W
EEKLY MAINTENANCE ....................................................................................................... 9
5.4 A
NNUAL MAINTENANCE ..................................................................................................... 10
CHAP 6 ADJUSTMENTS AND SETTINGS .............................................................................. 10
6.1 D
ISPENSER ....................................................................................................................... 10
6.1.1 Rinse agent dispenser ............................................................................................. 10
6.1.2 Models with no detergent metering unit .................................................................. 11
6.1.3 Models with detergent dispenser (available on request) ......................................... 11
CHAP 7 DEINSTALLATION ..................................................................................................... 12
CHAP 8 DISPOSAL .................................................................................................................. 12
8.1 C
ORRECT DISPOSAL OF THIS PRODUCT ............................................................................. 12
In legal terms, the manufacturer reserves the property of this document. It is forbidden to reproduce it or divulge it with any means
without prior written authorisation.
The manufacturer reserves the right to introduce changes in order to achieve the improvements it deems necessary without prior notice.
-
-
INSTRUCTION MANUAL FOR DISHWASHERS
Page 2 of 12
GB
Chap 1 PREFACE
Failure to follow the instructions provided in the attached documentation may jeopardize
safety of the appliance and immediately cancel the warranty.
The warnings contained in this manual provide important information regarding
safety during the various installation, operation and maintenance stages.
Carefully store all documentation near the appliance; give it to the technicians and operators who
will be using it. It is the operator’s duty to read, understand and learn this manual before
starting any operation on the machine. The appliance is intended for the professional washing of
dishes for communities, so installation, use and maintenance must in all cases to be performed by
trained personnel who follow the manufacturer’s instructions. Do not leave within the reach of
children. The choice of materials, construction in conformity with CE safety directives and complete
testing ensure the quality of this machine. In addition to this manual, you will find in the machine:
• wiring diagram
• topographic table
The manufacturer declines all responsibility for damage to things or injuries to persons
deriving from failure to comply with the instructions given or from improper use of the
machine.
Chap 2 INSTALLATION
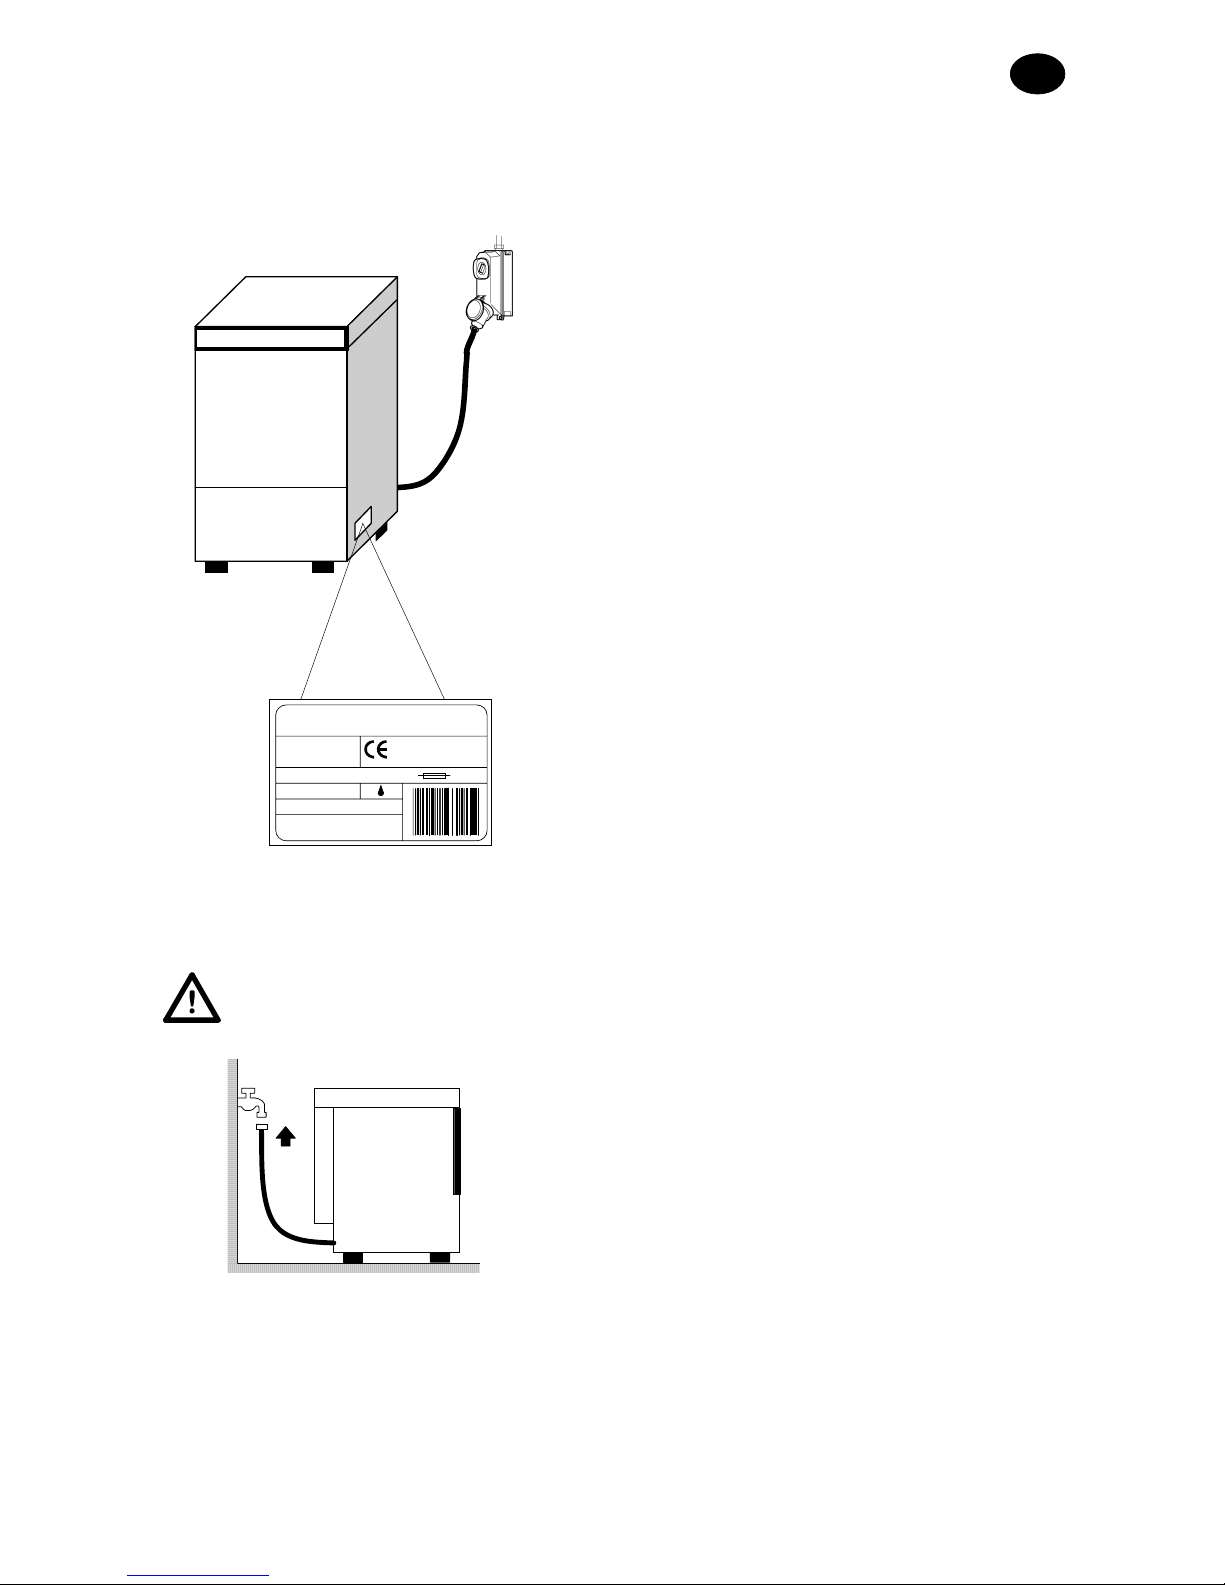
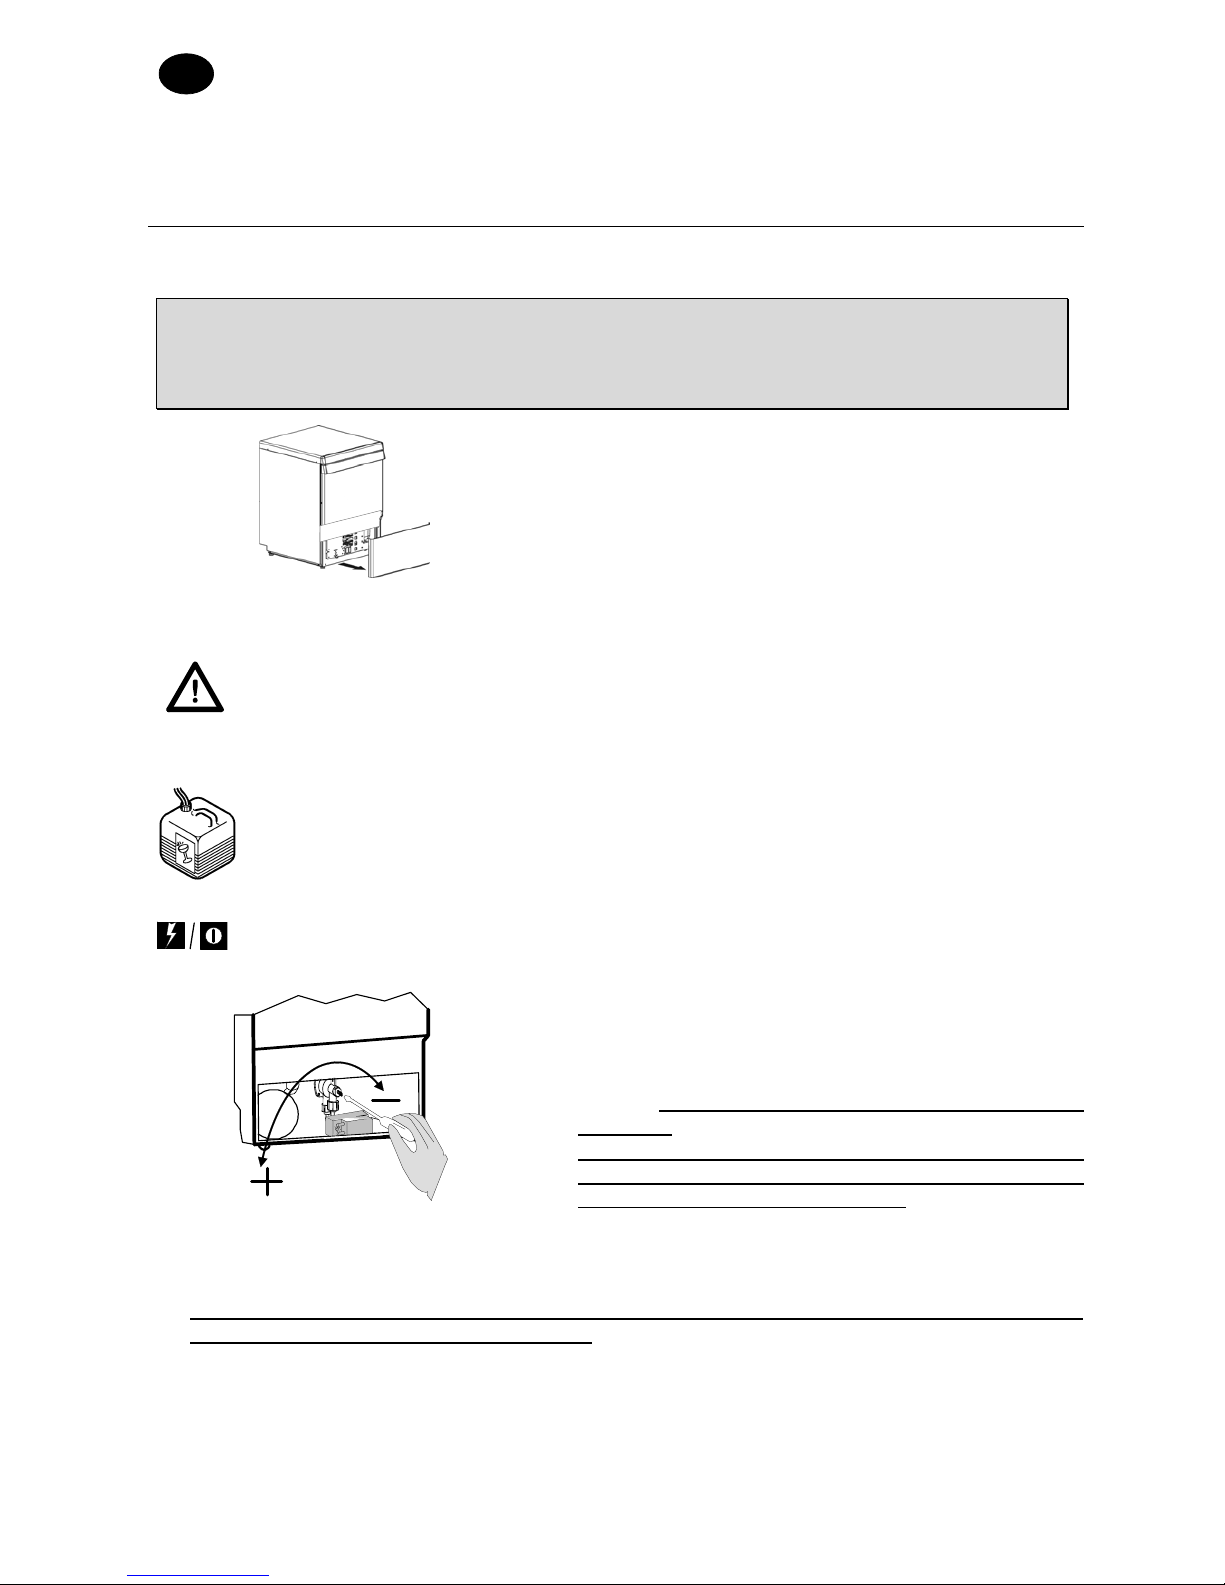
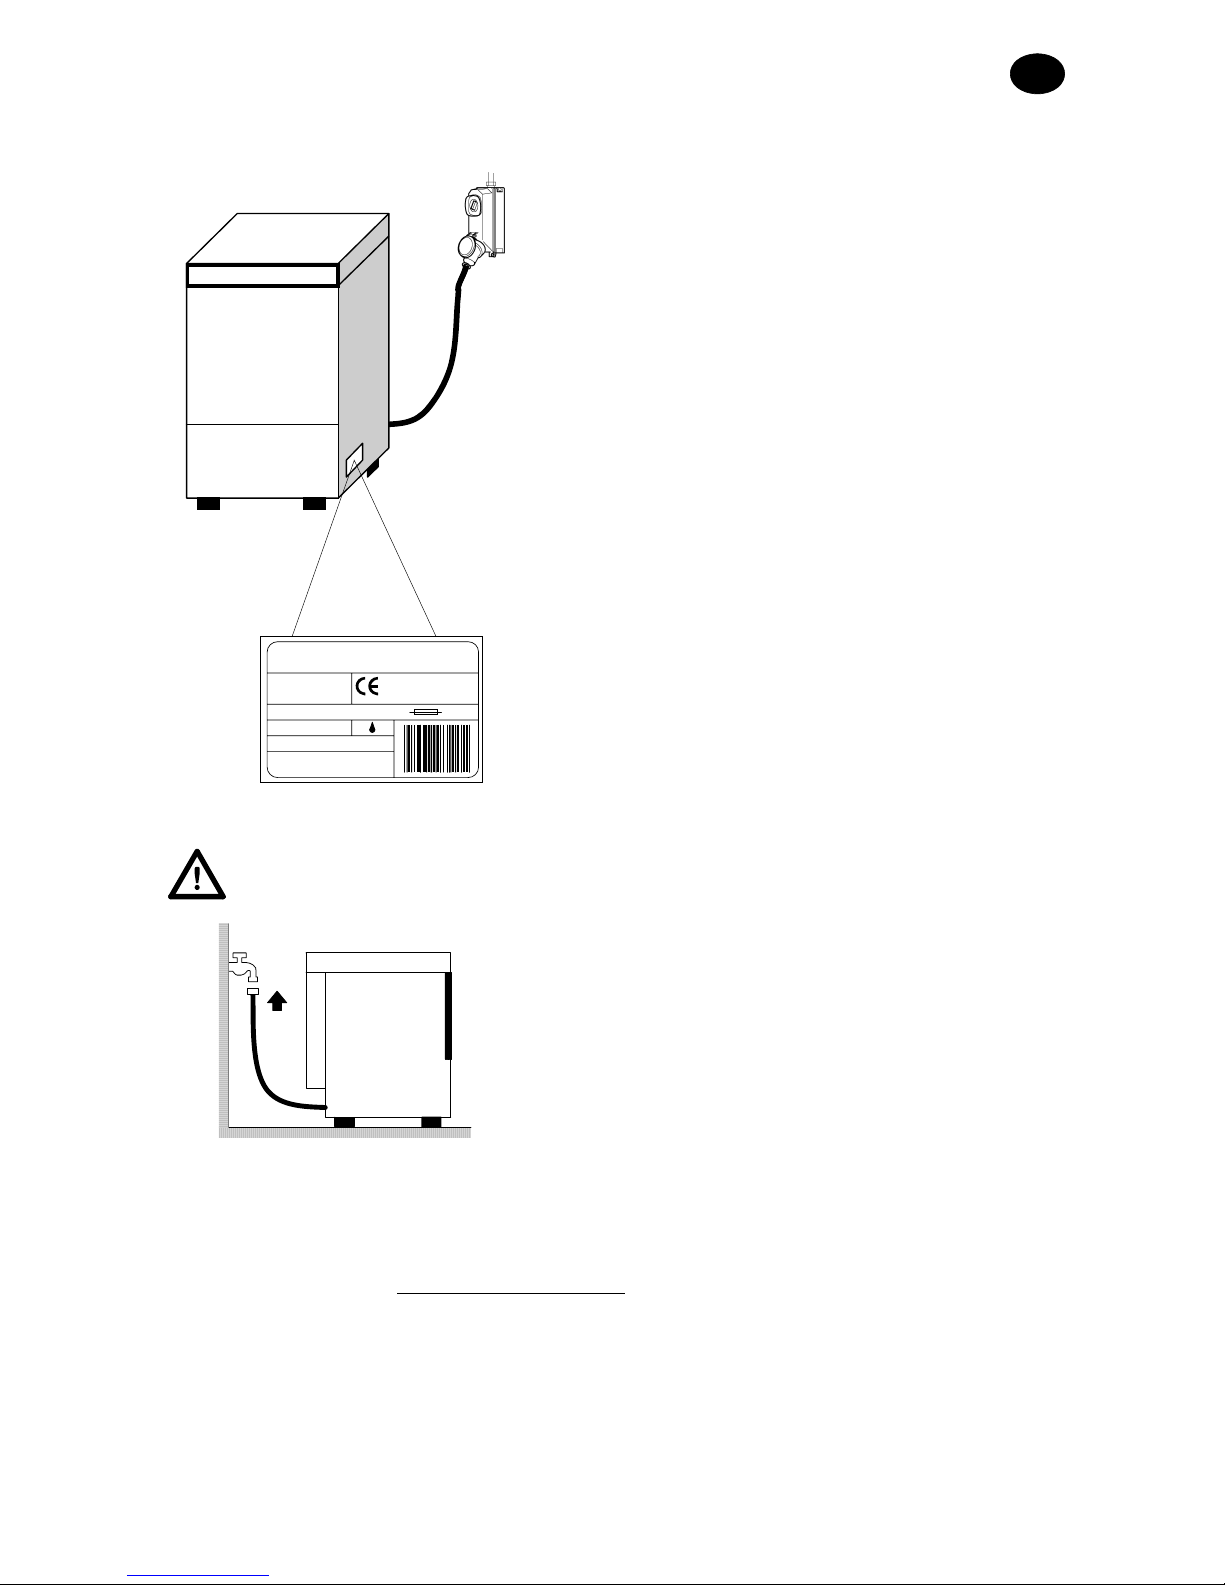
Proper installation is essential in order for the machine to operate well. Some of the data needed for
machine installation can be found on the data plate
placed on the right side of the machine and in
duplicate on the cover
of this manual.
Only qualified, authorised technicians must install the machine.
2.1 Unpacking
Check that the packing is in perfect condition and write down any damage found on the delivery
note. After you have removed the packing, make sure the appliance is intact. If the machine is
damaged, immediately notify the dealer by fax or by registered letter with advice of receipt and the
haulage contractor that transported it. If the damage is such as to jeopardize machine safety, do not
install and/or use until a qualified technician services it.
The packing components (plastic bags, foam polystyrene, nails, etc. ...) must not be
left within the reach of children and pets as they may be dangerous.
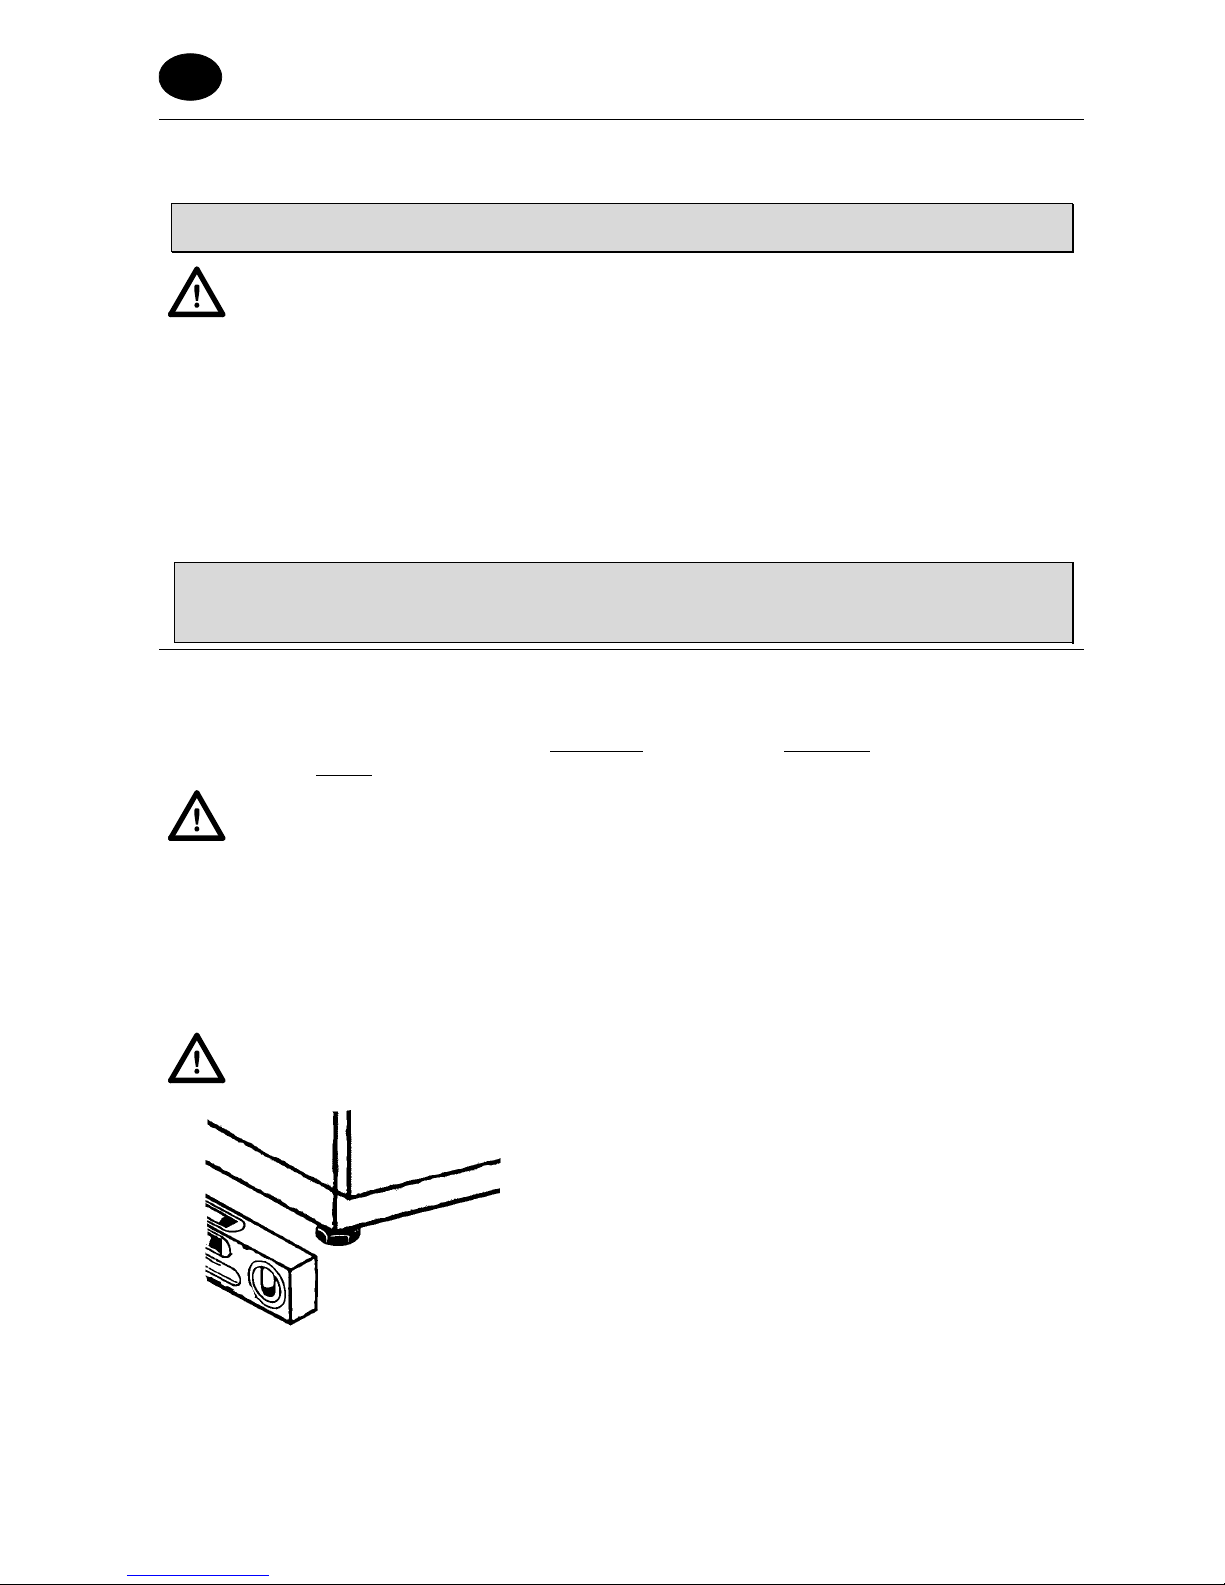
2.2 Positioning
• Check that there are no objects and materials in the
installation area that can be damaged by steam that
may exit the machine during operation, or at least
that they are sufficiently protected.
• In order to ensure stability, install and balance the
machine on its four feet.
• Different installation solutions must be agreed upon
and approved by the manufacturer.

INSTRUCTION MANUAL FOR DISHWASHERS
Page 3 of 12
GB
Mod.
V~ Hz kW A
S/N
H2O
kPa °
C
2.3 Electrical connection
• There must be an omnipolar type of main switch
that disconnects all contacts, including the
neutral, with a distance of at least 3 mm between
the open contacts and with safety circuit breaker
tripping or connected with fuses, to be sized or
calibrated in conformity with the power indicated on
the machine’s data plate.
• The main switch must be located on the electric line
close to the installation, and it must serve only one
appliance at a time.
• Electric network voltage and frequency must coincide
with those given on the data plate.
• There must be an effective earthing system in
conformity with the prevention standards in force for
operator and equipment safety.
• The power supply cable (type H07RN-F only) must
not be pulled or crushed during normal operation or
routine maintenance.
• The unipotential terminal fastened to the body must
be connected to a unipotential cable having a section
suited to the application.
• Respect the polarities indicated in the wiring
diagram.
• Consult that attached wiring diagram for additional
information.
Do not use adaptors, multiple socket-outlets or cables of inadequate type and section
or with extension connections not compliant with plant engineering standards in
force.
2.4 Plumbing connection
The appliance is to be connected to the water network
with a hose. There must be a slide on-off, ball or gate
valve able to quickly and completely turn off the water
if necessary between the water network and the
appliance’s solenoid valve. The on-off valve must be on
the line near and right before the appliance.
• If the system is new or barely used, have the water run a long time before making the
connection.
• The water supply, temp erature and pressure must be compatible with what is indicated on the
machine’s technical data plate.
•
If the water’s hardness is greater than 14 F (8 dH), we recommend you use the machine with
internal water softener (available on request
). If the water’s hardness is greater than 35 F (19.5
dH), we recommend you install an external water softener upline of the solenoid valve.

INSTRUCTION MANUAL FOR DISHWASHERS
Page 4 of 12
GB
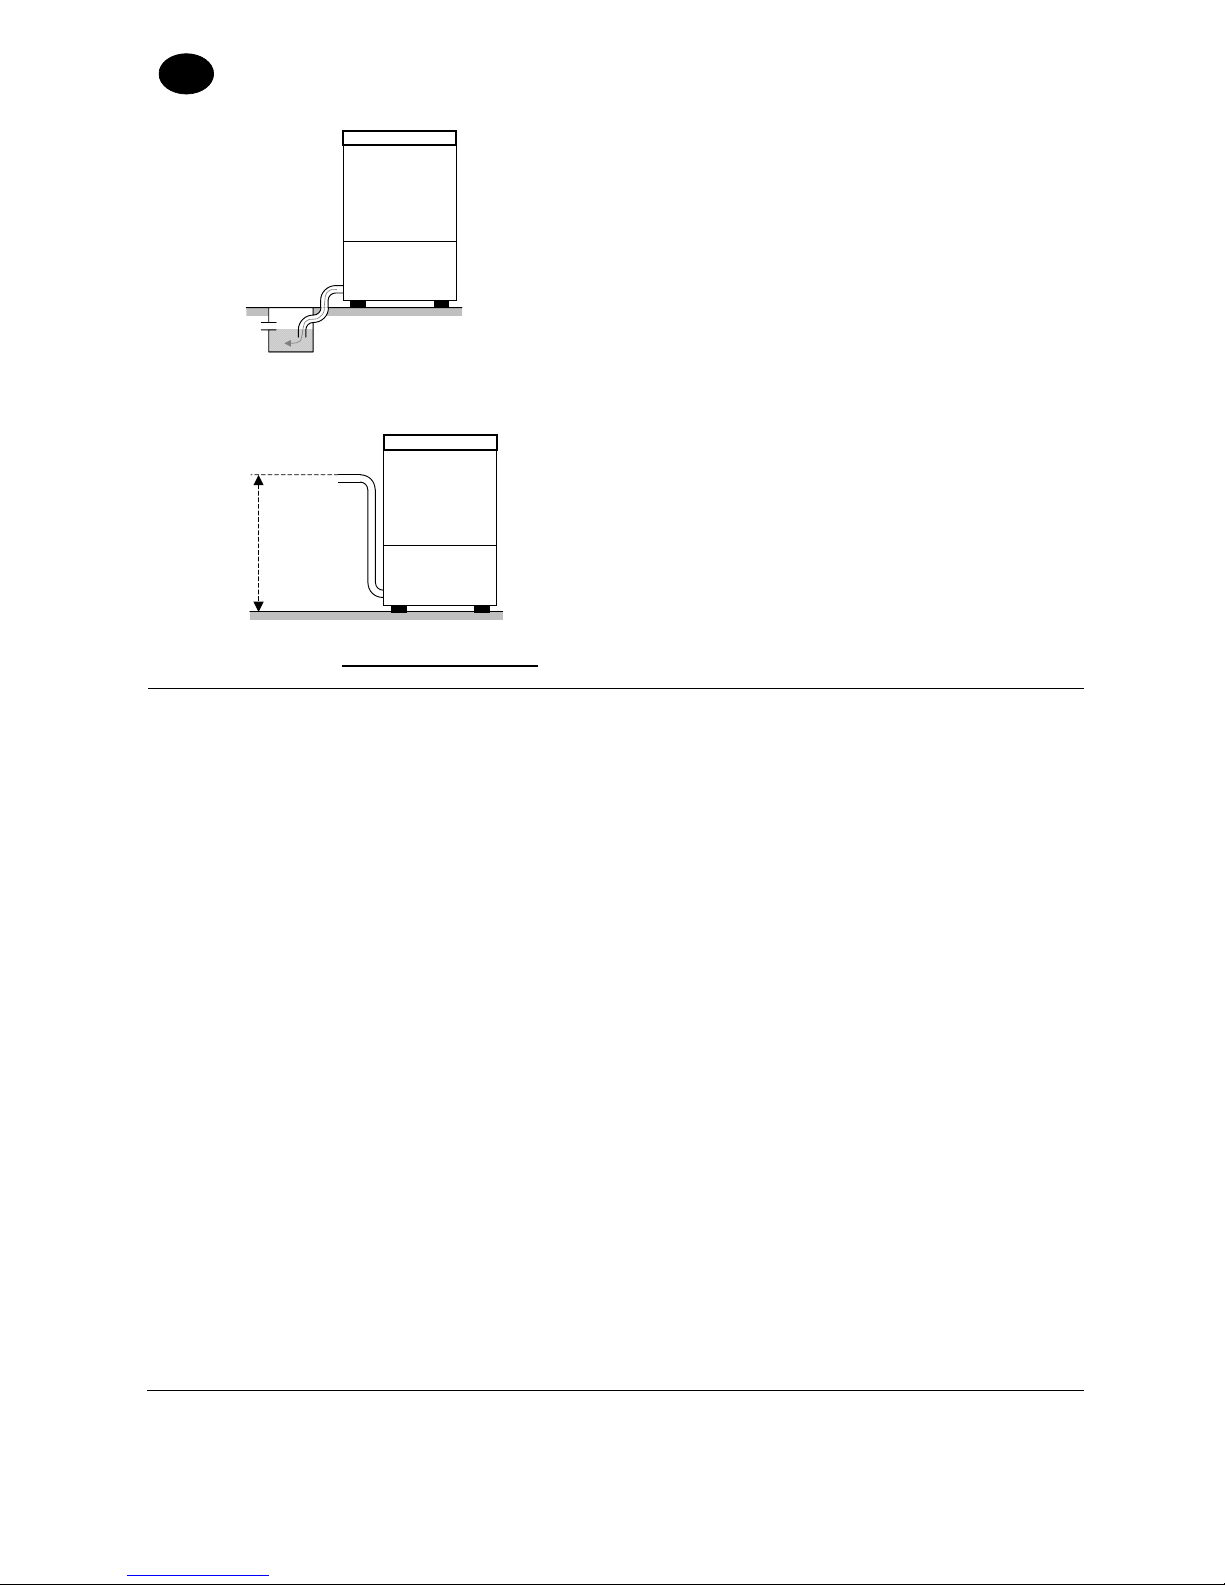
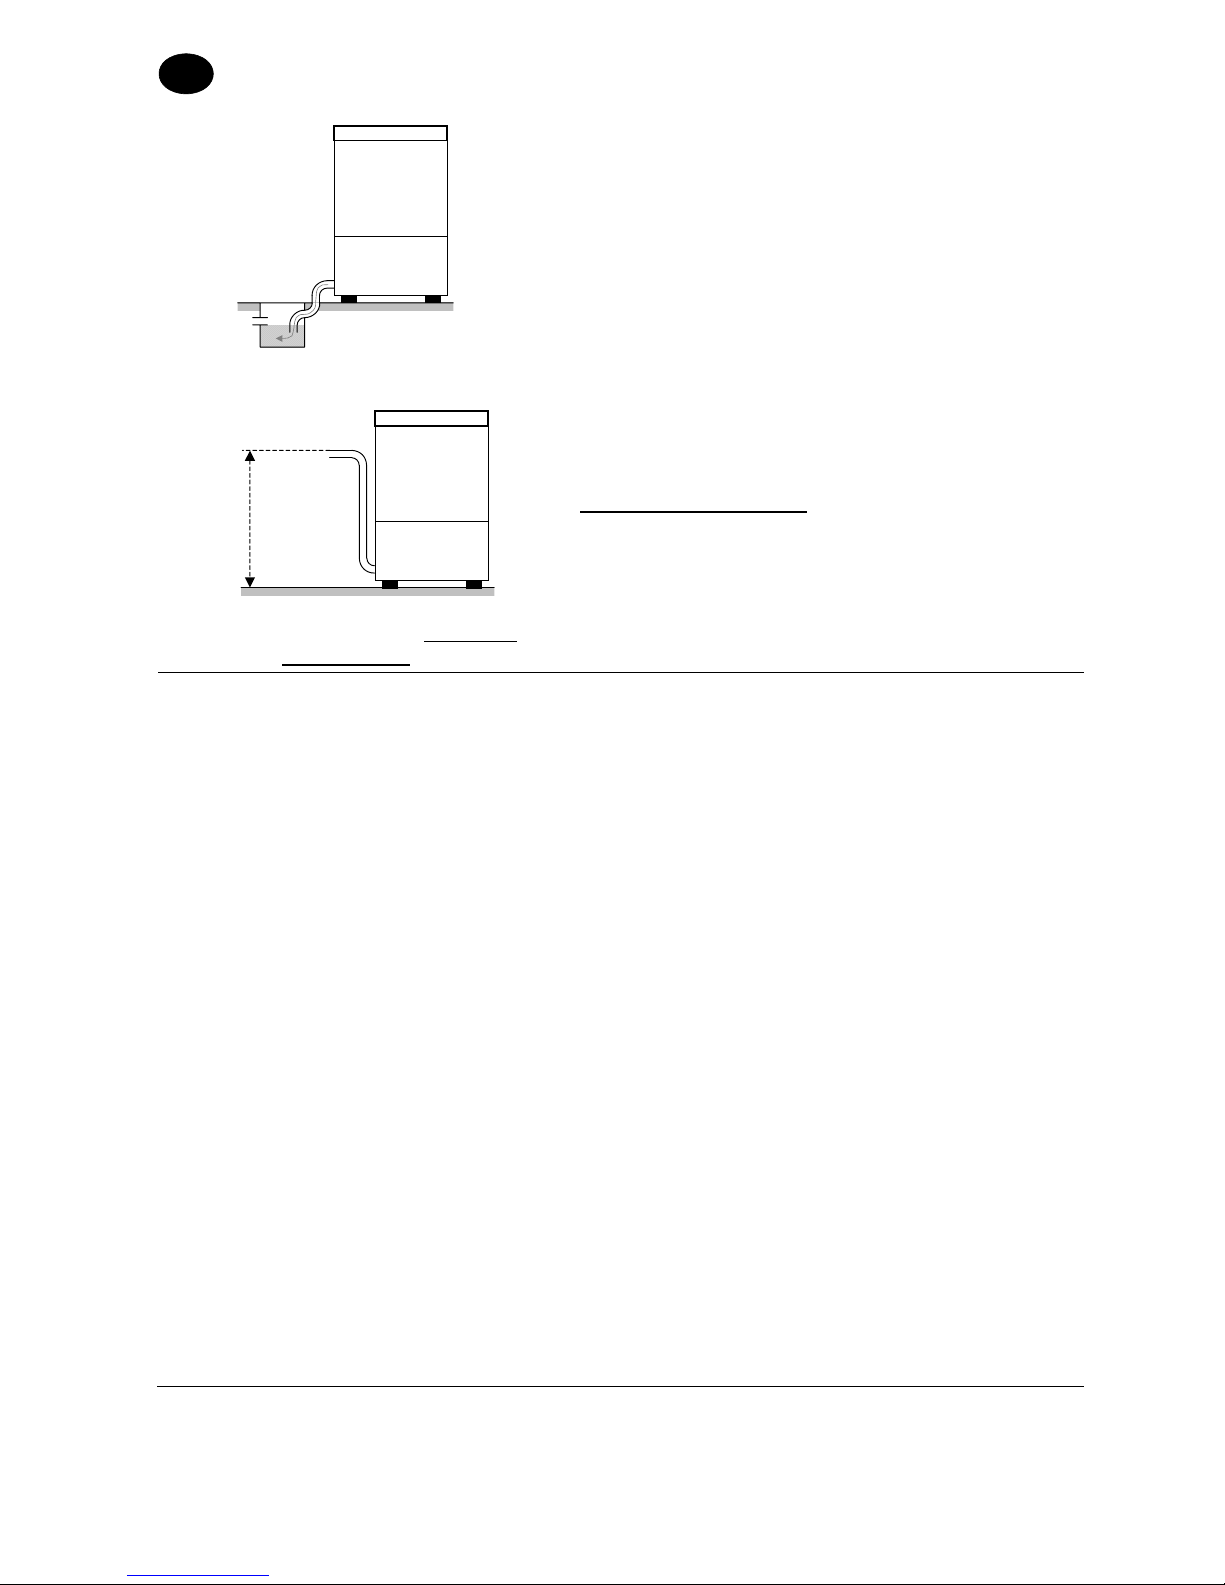
Free drain
2.5 Connection to the drain line
• The drain line must be made up of a free water
trap of a size proportionate to the delivery of the
drain pipe supplied with the machine. The pipe must
be able to reach the water trap without being
pulled, squeezed, bent, crushed, pressed or
forced by anything.
• The tank empties by gravity, so the drain must be at
a lower level than the base machine.
Max.
1 m
With discharge pump (available on
request)
• If the drain is not at a lower level than the base of the
machine, you can use the version equipped with a
discharge pump (available on request
).
• In this case the maximum drain height is 1 m.
•
A
lways check that the drain works properly and that it
is not clogged.
•
A
ll other solutions must be previously agreed upon
and approved by the manufacturer.
Chap 3 RISKS AND IMPORTANT WARNINGS
• This appliance is to be used only for the use for which it was expressly designed. All other uses
are to be considered unfit and therefore dangerous.
• The specialised personnel who will install the machine is obliged to appropriately instruct
the user on the appliance’s operation and any safety measures that are to be complied
with, also by providing practical demonstrations.
• Any type of service done on the machine, also in the case of failure, must be performed only by
the manufacturer or by an authorised service centre and by qualified personnel, using only
original spare parts.
•
A
lways disconnect or separate the machine from the electric and water networks before
performing maintenance, repairs or cleaning.
• Untrained personnel must NOT use the machine.
• The machine must NOT remain live when it is not used.
• NEVER open the machine door quickly if it has not finished the cycle.
• NEVER use the machine without the factory-installed safety attachments.
• NEVER use the machine for washing object of a type, shape, size or material not guaranteed for
machine washing or not perfectly intact.
• NEVER use the appliance or its parts as a ladder or support for people, things or animals.
• NEVER overload the open door of front-loading machines, which are sized to support only the
rack loaded with kitchenware.
• NEVER immerse bare hands in the washing solutions.
• NEVER turn the machine over after installation.
INSTRUCTION MANUAL FOR DISHWASHERS
Page 5 of 12
GB
Chap 4 USING YOUR APPLIANCE
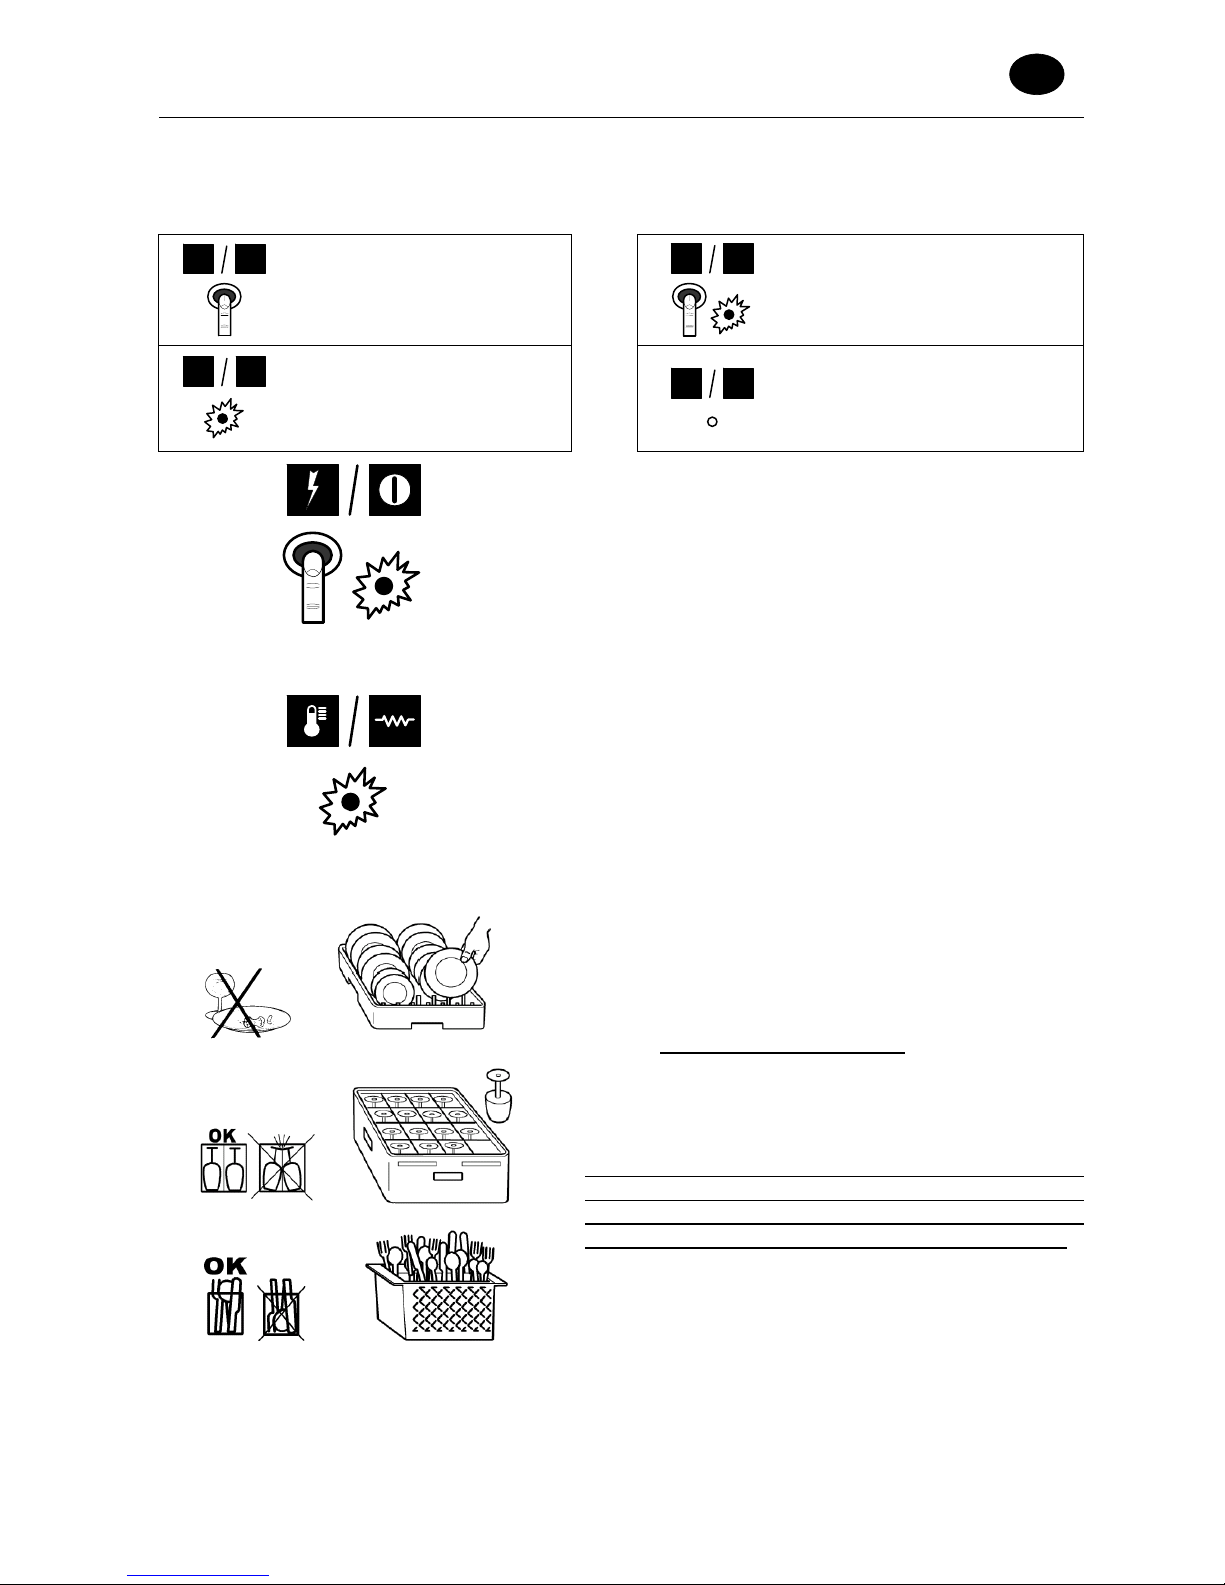
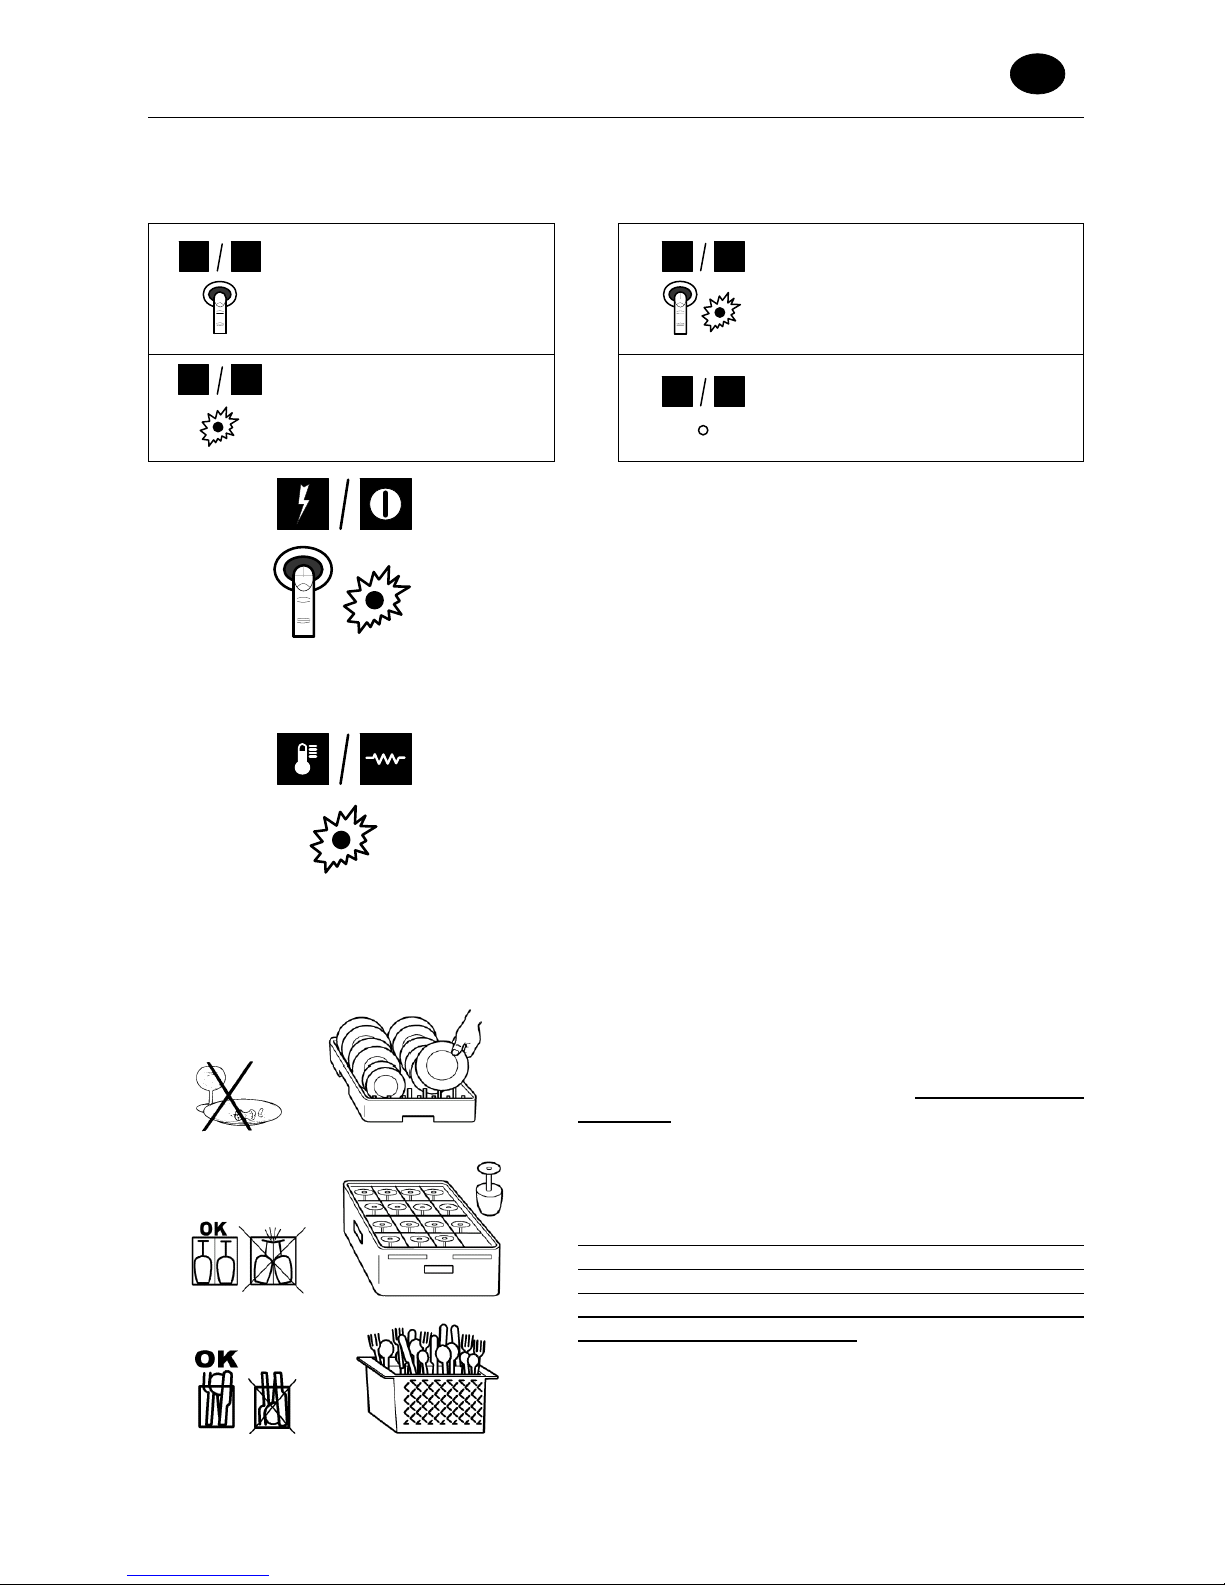
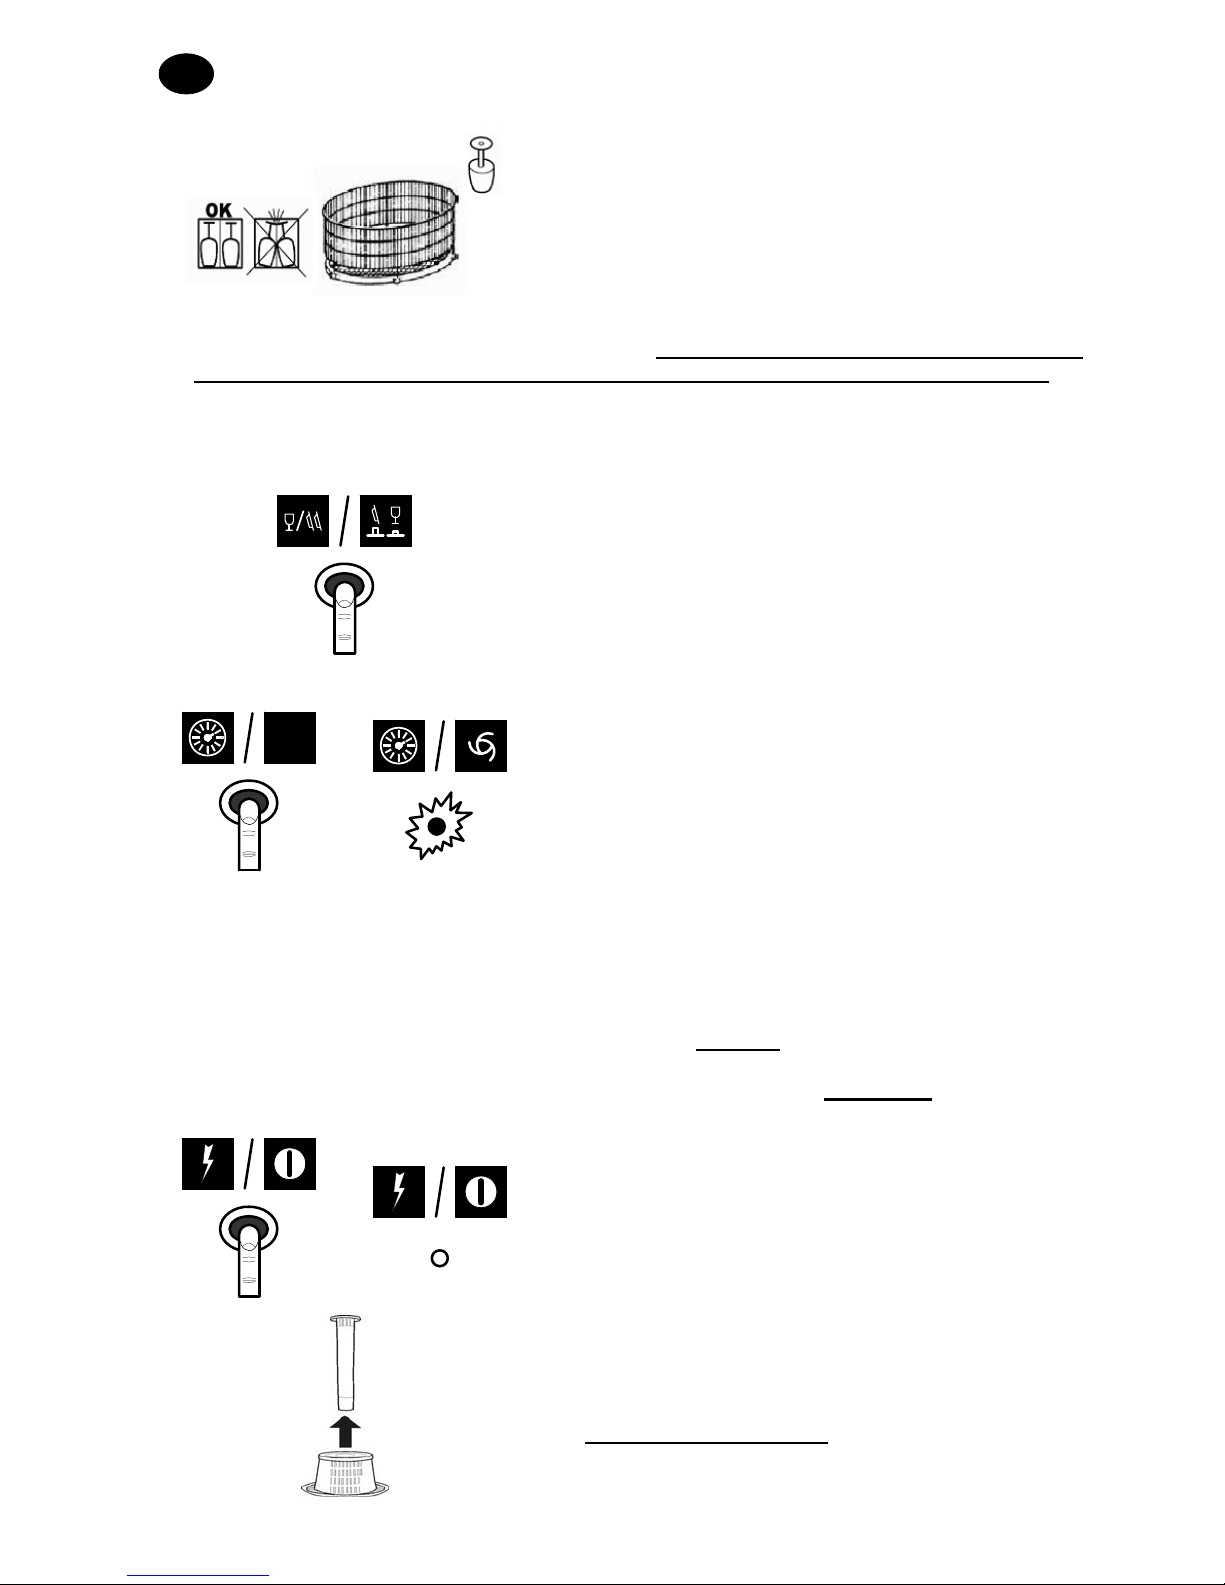
4.1 Symbols used
? ?
?
Push the button
corresponding to one of the
symbols shown.
? ?
?
Push the button corresponding
to one of the symbols shown.
The related warning light
illuminates.
? ?
?
The warning light
corresponding to one of the
symbols shown lights up.
? ?
?
The warning light
corresponding to one of the
symbols shown turns off.
4.2 Starting Up
1. Open the main water tap and engage the main
electrical switch.
2. Ensure the overflow cap is present.
3. Push the “on/off” button shown here. If present, the
related warning light will light up.
4.3 Loading and Warming Up
• If the tank is empty, the appliance starts filling up once
switched on.
• Once the tank is filled up, the warm up process is
started. If present, the related warning light goes off.
•
A
s tank and boiler reach the set temperature, the
warning light turns off.
• To reduce the waiting time, it is possible to carry out
an empty cycle, 5-10 minutes after starting the
appliance.
4.4 Washing Cycle
• Check for the presence of dishwashing detergent and
rinse agent. Information on the type of products and
quantities to be used (automatic or manual) is given in
chapter “Adjustments and settings”
.
• Use an adequate rack; do not overload the rack o
r
place dishes on top of each other. Always remove
large food particles from dishes; do not load dishes
with dry food residues.
• Place empty bowls upside down in rack. Load dishes
and similar items slanted on dedicated rack with
internal surface facing upwards. Accommodate all
silverware in the supplied basket with handles-down.
• Wash only items approved for dishwashing.
• It is advisable to wash the dishes immediately afte
r
use, in order to prevent any residuals from hardening
and sticking on them.

INSTRUCTION MANUAL FOR DISHWASHERS
Page 6 of 12
GB
For versions with rotating basket:
• If possible, run the cycle only with the basket full,
evenly distributing the dishes.
• Place the lightest dishes near the middle of the rack,
and the heaviest ones near the outside.
• Place the smallest dishes near the middle of the rack,
and the largest ones near the outside.
• Load rack into dishwasher and shut the door.
• For versions with rotating basket, make sure the basket turns freely, lightly spinning i
t
clockwise, then close the door and start the cycle.
• In order to avoid damages, only load items approved for dishwashing.
• Do not place silver and stainless steel cutlery in the same basket. This may corrode the steel
and cause the silver to burnish.
On appliances featuring different washing times, select
the appropriate time for the loaded items by using the
“time selection” knob shown here.
START
• To start the cycle, press the “start” button shown.
• If available, the “cycle warning light” lights up to
indicate that the cycle has started.
•
A
fter the washing portion of the cycle is terminated,
the appliance automatically initiates the rinse and
discharge operations. At the end of the cycle, the
warning light turns off.
• If during the cycle the door is accidentally opened, the appliance will automatically stop. To
resume the cycle, simply shut the door.
• For a quick drying, immediately remove the rack from the dishwasher, once the cycle is
terminated.
• If the washing solution is found to be excessively dirty or dirt residues are spotted on the
tank filter, carry out the standard maintenance operations as described in the
“Maintenance”
chapter.
• To perform other cycles, repeat the operations listed in the “Washing cycle”
paragraph.
4.5 Turning Off the Appliance
Press the “On/off” button as shown. If present, the
corresponding warning light will turn off.
INSTRUCTION MANUAL FOR DISHWASHERS
Page 7 of 12
GB
4.6 Discharging the Appliance
4.6.1 Models without discharging pump
1. Turn off the appliance as described in the “Turning of
f
the Appliance” paragraph, above.
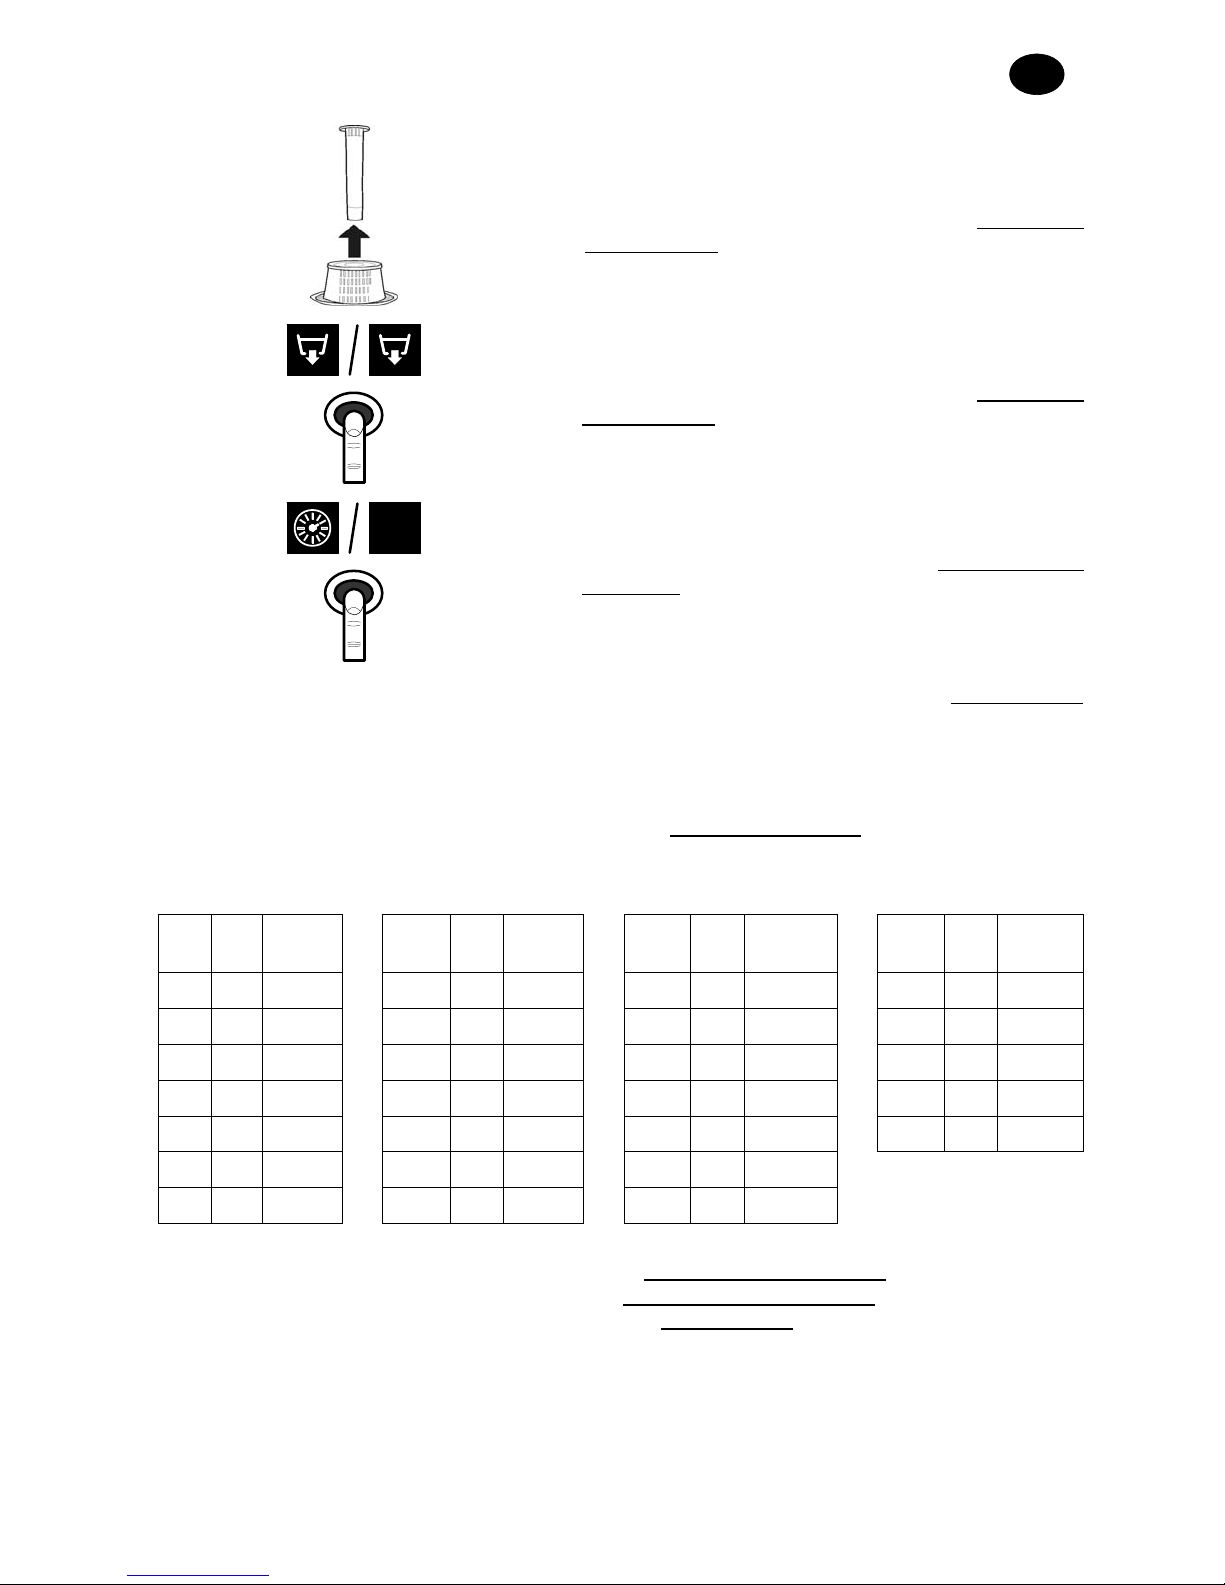
2. Remove the overflow cap: wait until the tank is
completely empty.
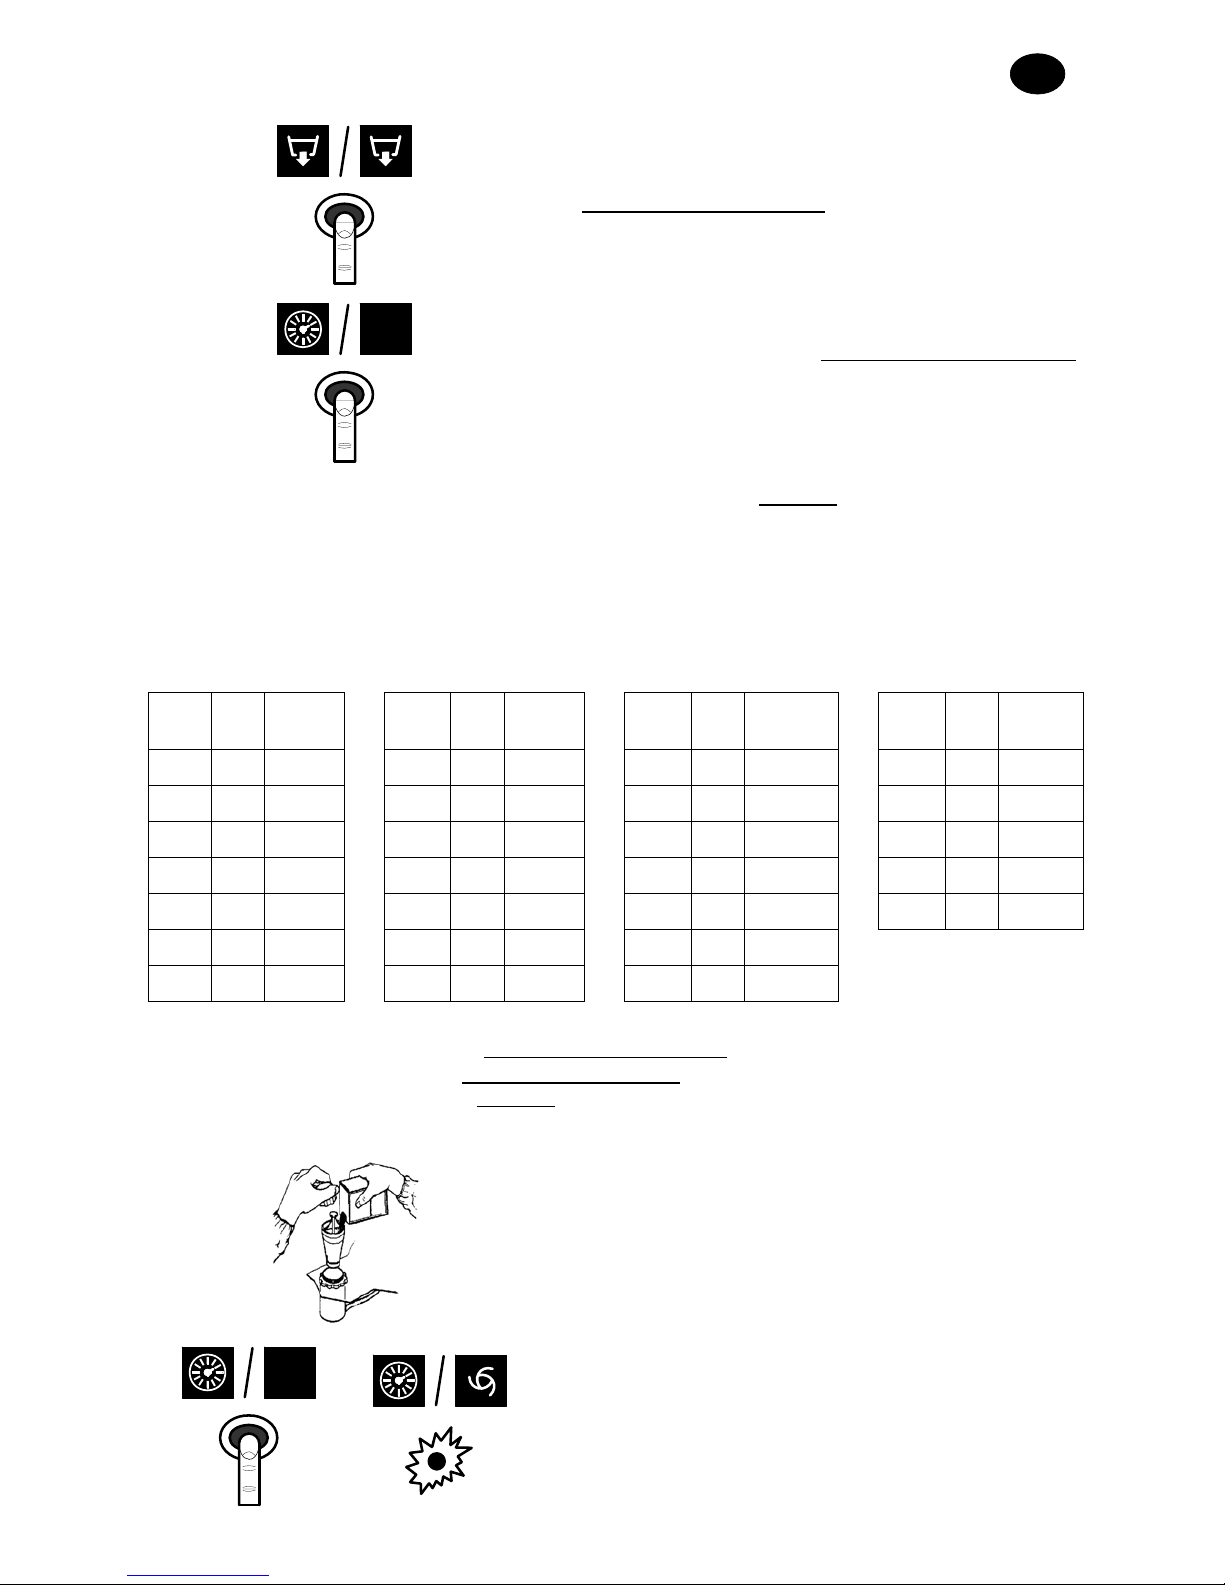
4.6.2 Models with discharging pump
1. Turn off the appliance as described in the “Turning of
f
the Appliance” paragraph, above.
2. Remove the overflow cap and shut the door.
3. Push the “discharging pump” button shown to drain.
START
4. On models without the “discharging pump button”, turn
off the appliance as described in the “Turning off the
Appliance” paragraph, above.
5. Remove the overflow cap and shut the door.
6. Push the “start” button, shown to drain.
• With the tank completely empty, clean the appliance as described in the “Maintenance”
paragraph.
• Turn off the appliance whenever the overflow cap is removed.
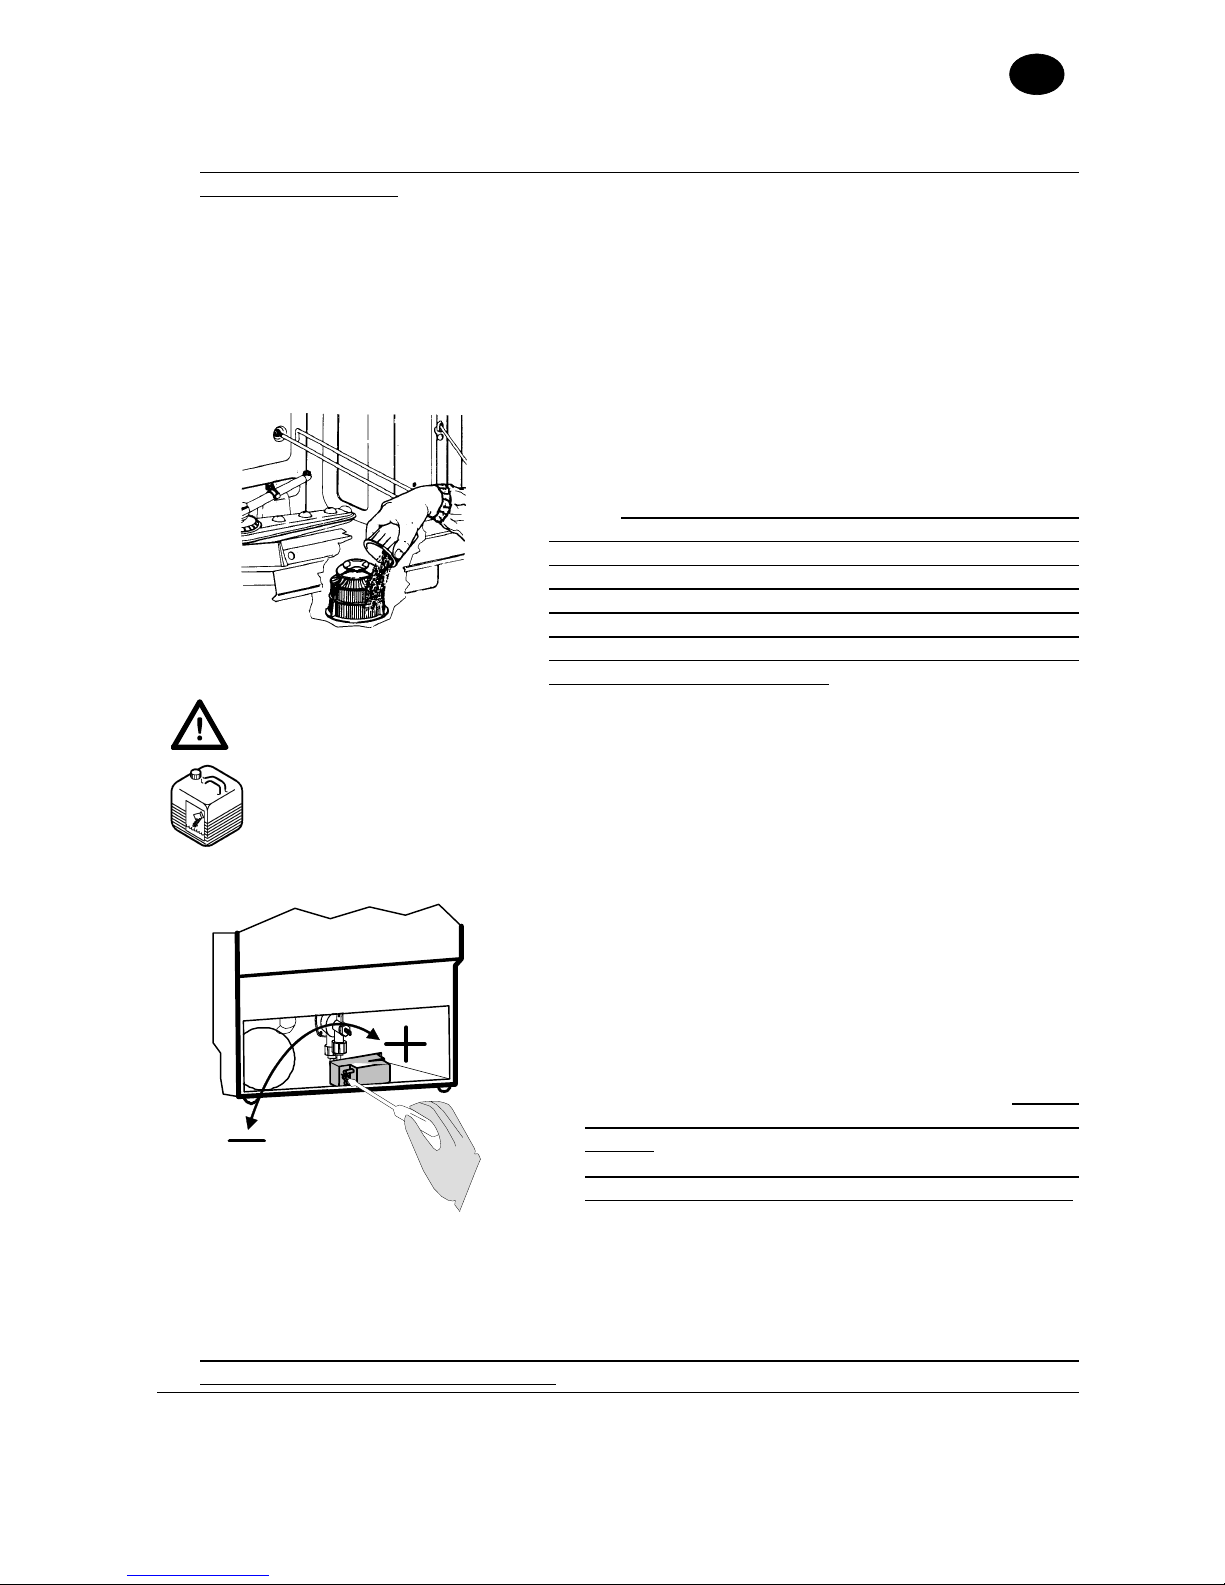
4.7 Regenerating the Ion Exchange Resins
If the machine is equipped with an internal softener (available on request
), in order to ensure its
correct performance, it is necessary to periodically regenerate the ion exchange resins. The numbe
r
of cycles between each regeneration is set by the hardness of the water, according to the following
table.
dH F
No. of
Cycles
dH F
No. of
Cycles
dH F
No. of
Cycles
dH F
No. of
Cycles
6,0 10 153 9,5 17 107 13,5 24 73 17,5 31 52
6,5 11 147 10,0 18 100 14,0 25 70 18,0 32 50
7,0 12 140 10,5 19 93 14,5 26 67 18,5 33 48
7,5 13 133 11,0 20 87 15,0 27 63 19,0 34 47
8,0 14 127 12,0 21 83 15,5 28 60 19,5 35 43
8,5 15 120 12,5 22 80 16,0 29 57
9,0 16 113 13,0 23 77 17,0 30 53
• It is suggested to carry out the regeneration during breaks.
• Turn off the appliance as indicated in paragraph “Turning off the appliance”
.
• Drain the appliance as indicated in paragraph “Discharging the appliance”
.
• Clean the dishwasher as directed in chapter “Maintenance”. At the end of the cleaning
procedure, open the main water tap and engage the main electrical switch.
INSTRUCTION MANUAL FOR DISHWASHERS
Page 8 of 12
GB
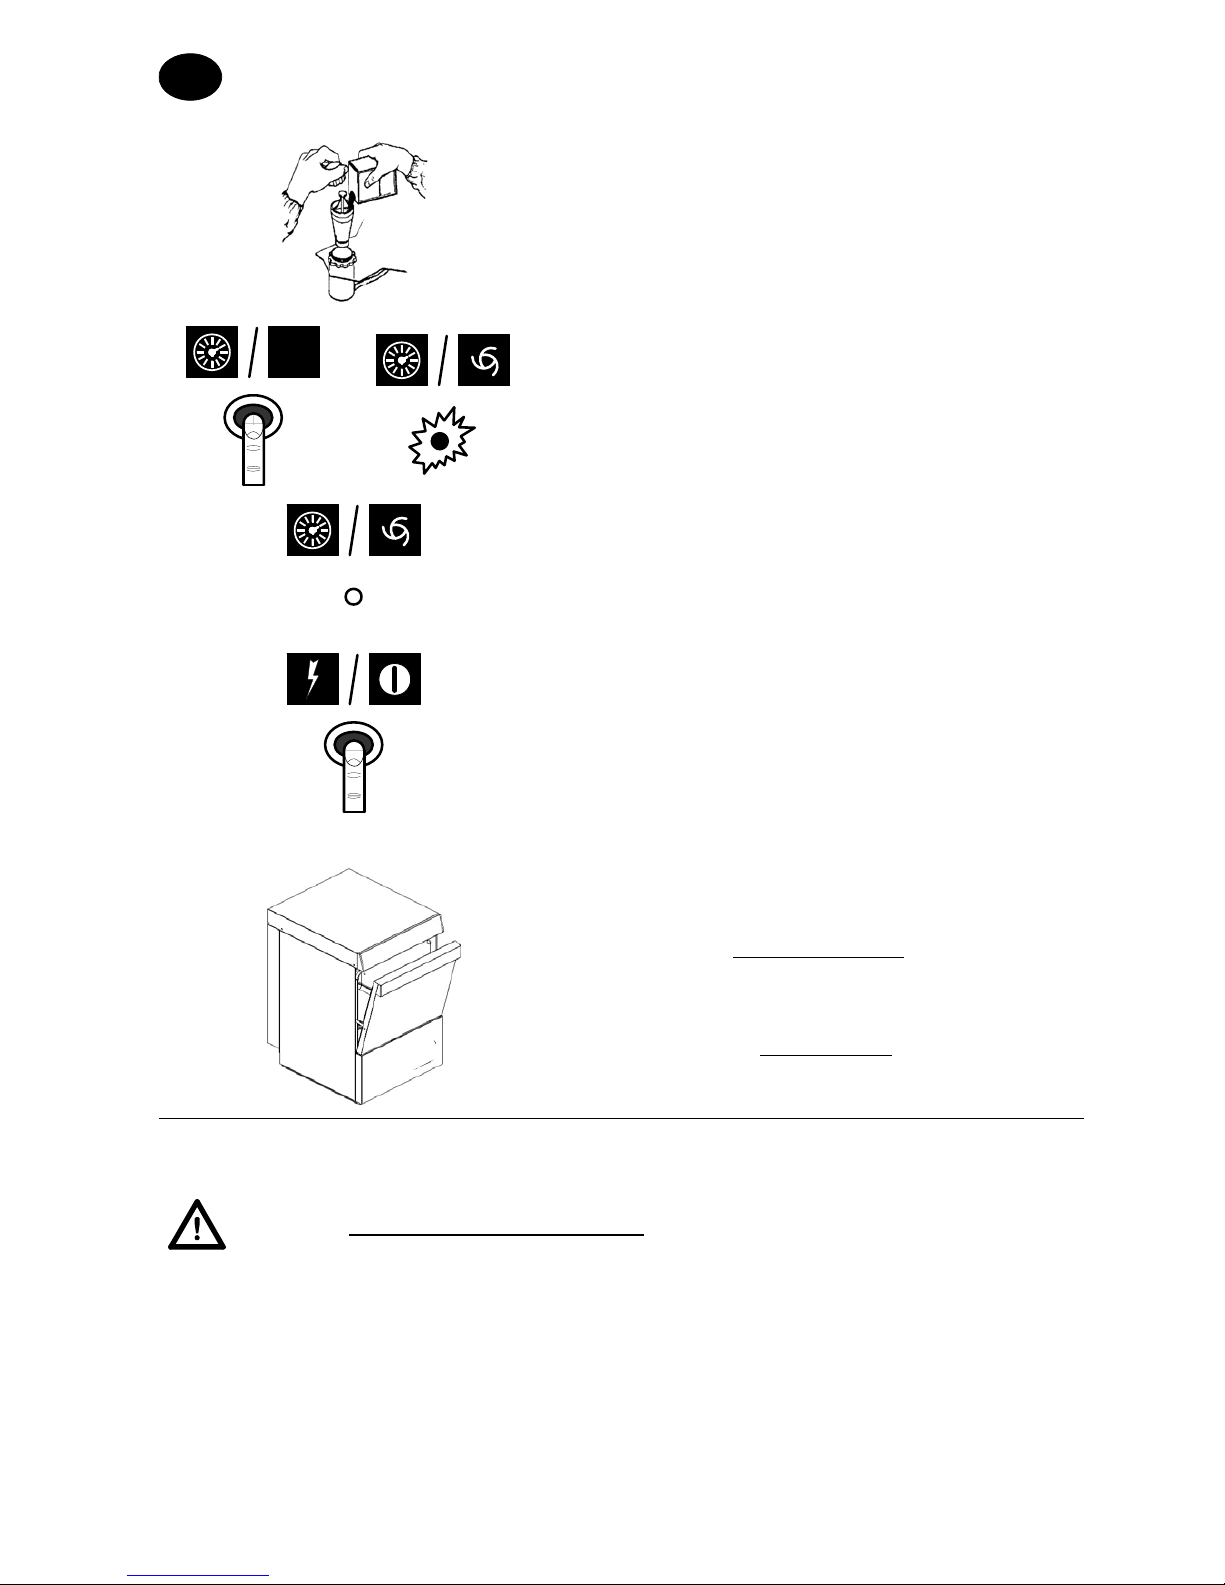
• Make sure the overflow cap has been removed.
• Open the salt dispenser inside the tank.
• Pour approx. 250g of regenerating salt (cooking salt
with no additives and grains of 1-2 mm in diameter).
• Close the dispenser flap.
• Shut the door
START
• Without turning the appliance on, press the “start”
button until the “cycle warning light” goes off.
• The regeneration cycle is then started and will last fo
r
approximately 20 minutes.
• The regeneration is completed when the cycle
warning light turns off.
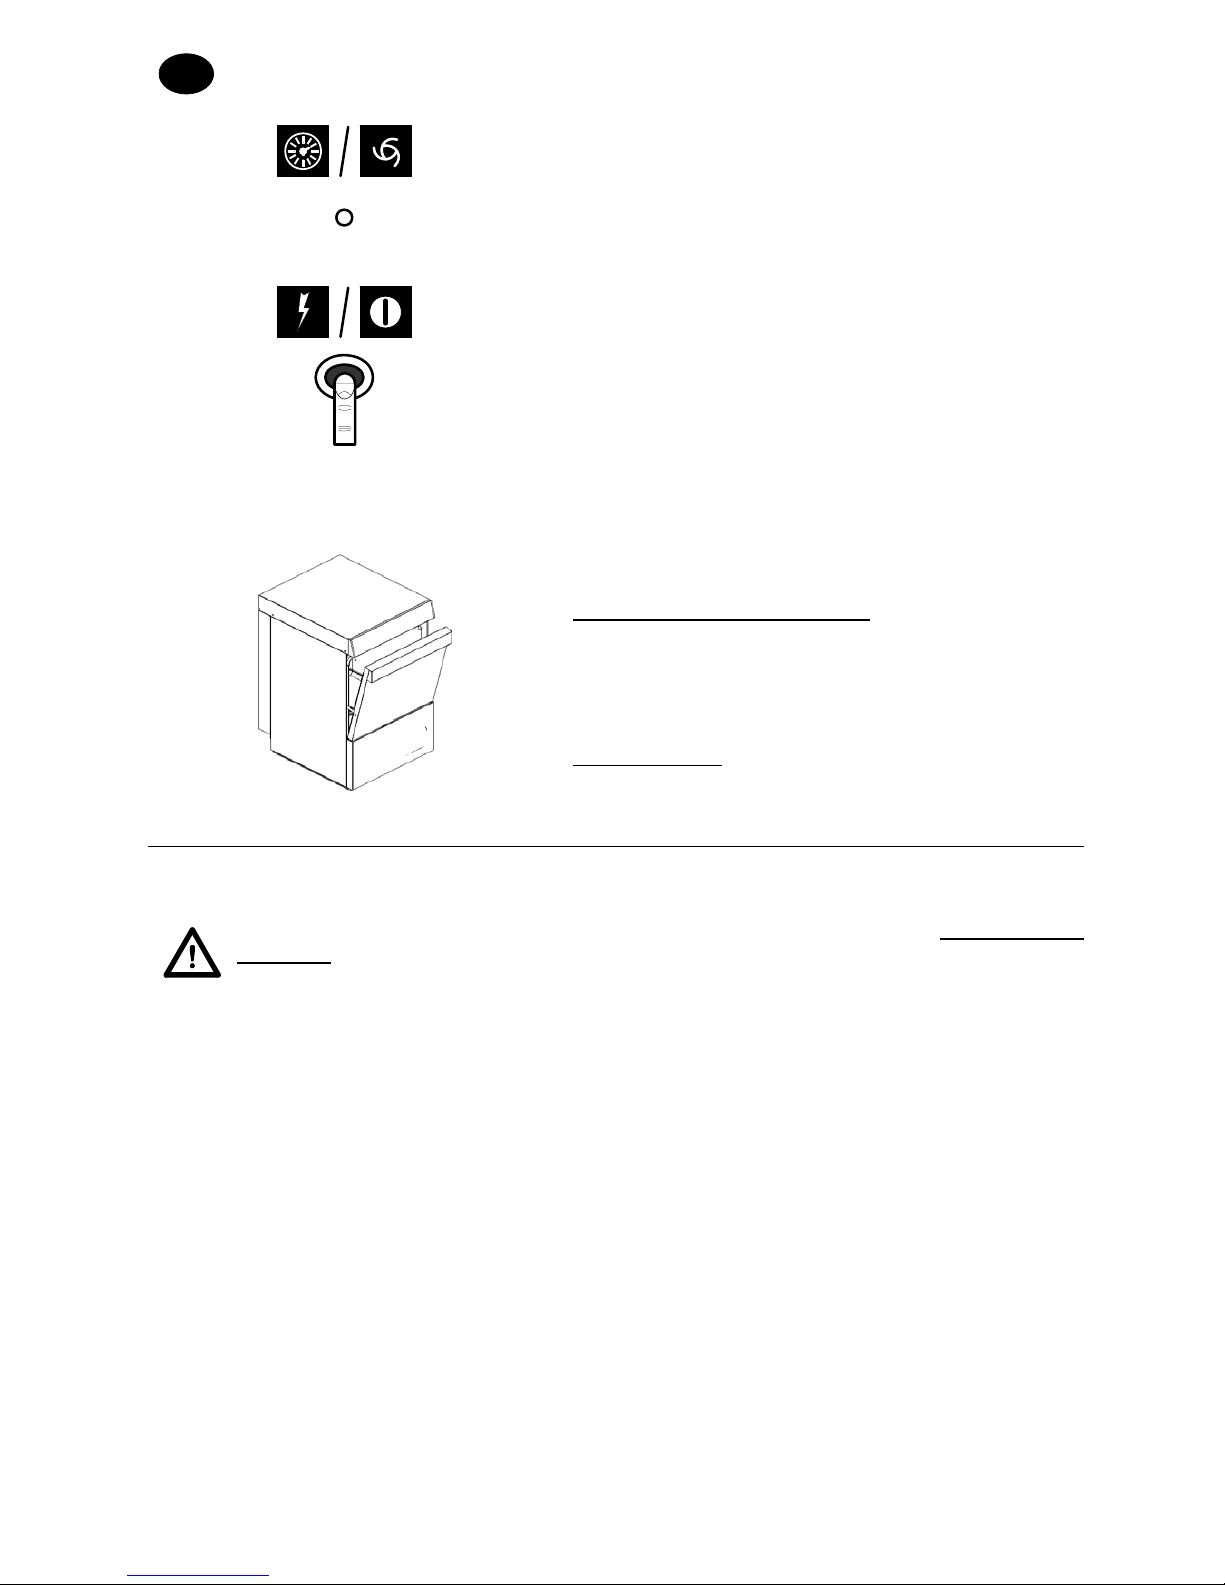
At the end of the regeneration cycle, with the tank empty
and the overflow cap removed, it is suggested to:
• Turn the appliance on by pressing the “On/off” button
shown.
• Let water run through for approx. 1 minute so to
remove salt residues from the tank.
• Turn the appliance off by pressing the “On/off” button;
hence refit the overflow cap.
The appliance is now ready to resume its service.
4.8 End of Service
•
A
t the end of the day always drain the machine as
described in the “Machine draining”
section.
• Disconnect the power supply by means of the
main switch and close the external water cock.
• Perform routine maintenance and clean the machine
as described in the “Maintenance”
section.
• If possible, leave the door ajar to prevent the formation
of bad smells inside.
Chap 5 MAINTANANCE
Before carrying out any maintenance operation, drain all the water as described in
paragraph “Discharging the Appliance”
, cut the power by disengaging the main
electric switch, and shut the external water valve.
5.1 Hygiene and cleaning
To guarantee machine hygiene the routine (daily), weekly and yearly maintenance operations
indicated below must be regularly performed. Also carry out a periodical sanitising treatment with
suitable non-corrosive products available on the market.
5.2 Routine maintenance (daily)
• If dirt residues are found at the bottom of the tank:
• Remove and clean racks, overflow, and filter.

INSTRUCTION MANUAL FOR DISHWASHERS
Page 9 of 12
GB
• To clean the steel tank, do not use abrasive detergents or objects; instead, use a lightly soaped
damp cloth.
• Do not use pressurised water jets as these may damage the electrical system.
5.3
W
eekly Maintenance
• Perform routine maintenance.
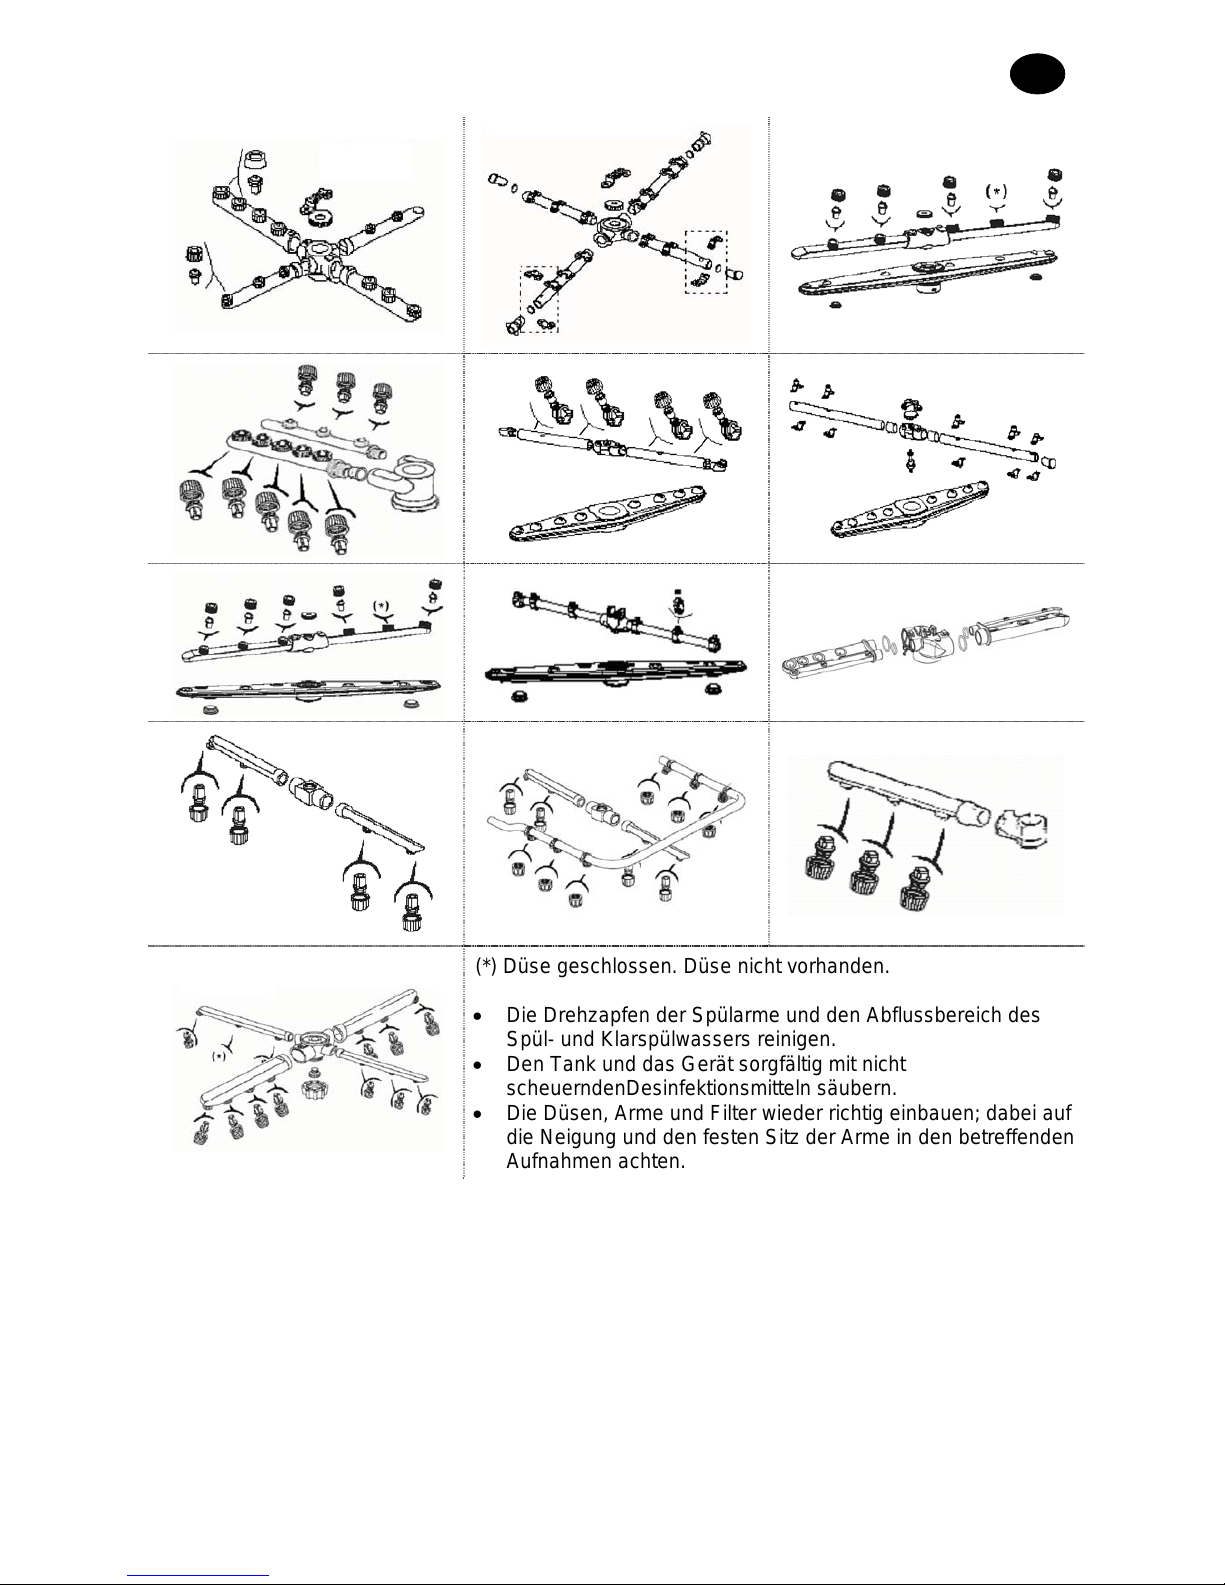
• Remove and clean the wash and rinse arms and nozzles.
Illustrated below are the possible configurations of upper and lower wash/rinse arms.
(*) Spray closed. Nozzle not present.
• Clean the arm rotation pins and the wash and rinse water
outlet zone.
• Carefully clean the tank and machine, using non-abrasive
disinfectant products.
• Correctly refit the nozzles, arms and filters, paying attention to
the inclination and coupling of the arms in their respective
seats.

INSTRUCTION MANUAL FOR DISHWASHERS
Page 10 of 12
GB
5.4 Annual Maintenance
Have your appliance carefully inspected by an authorised technician, and in particular:
• Remove residues from the bottom of the tank.
• Remove and deep clean wash arms and diffusers.
• Thoroughly clean the weir inserted in the lower wash arm shaft and the water exit area.
• Correctly refit weir, pivoting pins and wash arms.
• Inspect the conditions of the sealing gaskets and the wear of other components such as pumps,
dispensers, etc.
• Inspect the settings of washing detergent and rinse agent dispensers.
• Inspect and eventually clean the resistors.
If the appliance is not used for long periods of time, it is necessary to have it adequately setup. I
f
you have any suspects about the presence of ice, do not run the appliance until an authorised
technician has inspected boiler and pipes.
Chap 6 ADJUSTMENTS AND SETTINGS
The following adjustment and setting operations may be carried exclusively by qualified
and authorised personnel, paying the utmost care and attention, and taking all
precautions in the event that safety features are bypassed.
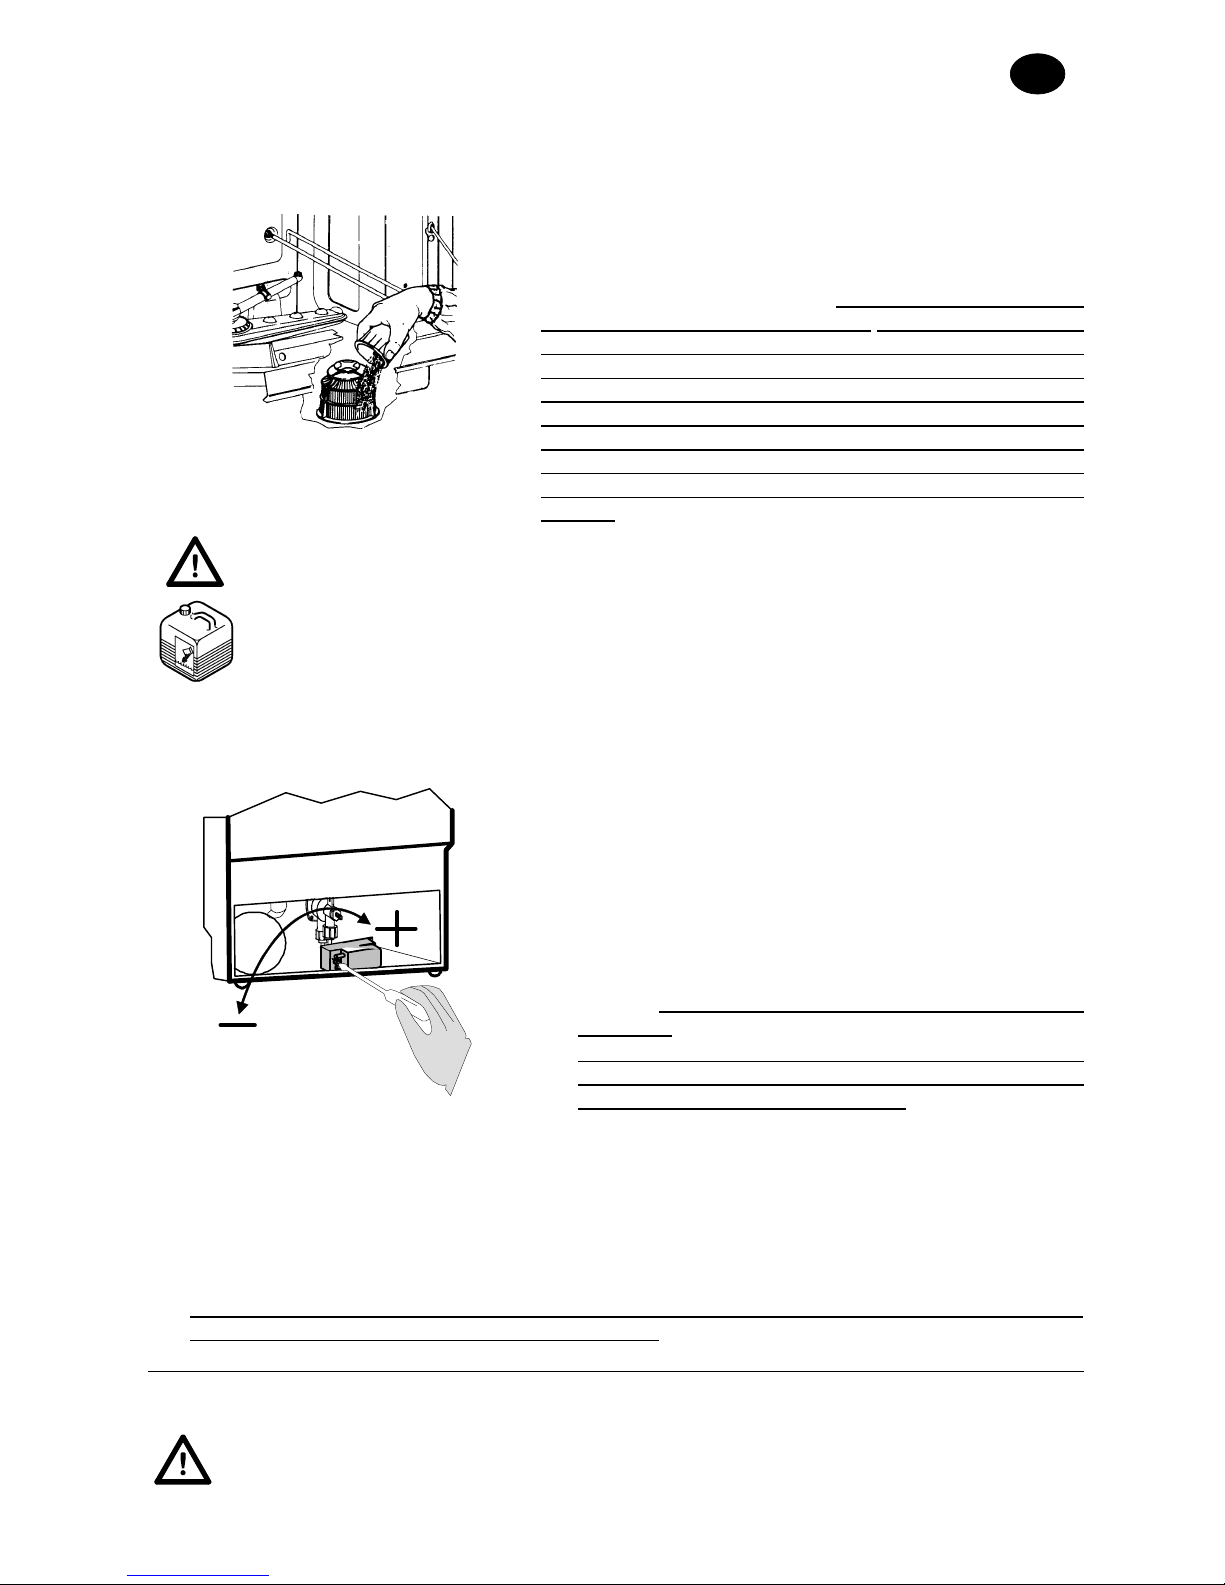
6.1 Dispense
r
Before the zeroing operation may be carried out,
dispenser(s) and supply pipes must be filled up. The
zeroing is performed via the adjusting screws which may
be reached by removing the front panel underneath the
tank door.
• The warranty does not cover damages resulting from improper use of the
dispenser(s) or incorrect manual feed.
• Type and dosage of detergent and rinse agent are crucial in affecting the
appliance’s performance and service life. Use only liquid products for industrial
washing with antifoaming agents.
• Adjustments must be made with the appliance hot and correct amount o
f
washing product.
6.1.1 Rinse agent dispense
r
The level of rinse agent inside the container must be adequate; it must never be
completely emptied, or topped-up with corrosive or impure products. To fill up the supply
pipe and the dispenser, turn on the appliance and start the washing cycle, wait fo
r
approx. 20 seconds and press the “On/off” button for 8-10 times with intervals of
approximately 10 seconds. Leave it pressed to let the cycle terminate.
•
Turning the adjusting screw anticlockwise, reduces
the quantity of rinse agent released, while turning it
clockwise, increases the dosage.
• For a rough estimate concerning the amount of rinse
agent required for the first zeroing operation, refer to
the dosage suggested by the manufacturer of the
product.
• The screw adjustment must be refined on the basis o
f
the results obtained after at least three rinsing cycles,
so to let the system settle.
• Striations on washed items and the formation of foam within the washing solution indicate an
excessive quantity of rinse agent. Items covered with water drops and long drying time, indicate
INSTRUCTION MANUAL FOR DISHWASHERS
Page 11 of 12
GB
insufficient amount of rinse agent.
• To obtain optimum results, use only rinse agents with a manufacturer’s suggested dosage o
f
less than 1.5 gr. /litre.
• 7.9 cm of pipe = 1 ml. of product (= 1 gr. of product with a density of 1 kg/dm
3
). The amount of
water used for the rinsing process is approx. 3 litres/cycle.
• Do not modify the height difference between tank and appliance after setting the dosage.
• If the height difference between tank and base of appliance is more than 80 cm, the dispense
r
may not work correctly.
• If rinse aid is not used, completely close the dispenser adjustment screw.
6.1.2 Models with no detergent metering unit
Manual feed is discouraged as it does not guarantee
the optimal results offered by an automatic system. If,
however, an automatic dispenser is not used, introduce
the detergent in the pump intake filter area every five
cycles, in the dosage suggested by the manufacturer o
f
the detergent. Refer to the technical specifications to find
out the amount of water used in the tank; the quantity
used for rinsing is approx. 3 litres. At every top-up, add a
quantity of detergent corresponding to the quantity of
water in the tank and the five following rinsing cycles. Fo
r
following dosages only add the amount of detergent
required for rinsing operations.
The installation of a detergent dispenser is always recommended.
6.1.3 Models with detergent dispenser (available on request)
The level of detergent inside the container must be adequate; it must never be
completely emptied, or topped-up with corrosive or impure products. To fill up the supply
pipe it is sufficient to turn on the appliance and perform the first loading with the unit connected.
•
Turning the adjusting screw anticlockwise decreases
the amount of detergent released, while turning it
clockwise, increases the dosage (from 1 to 1.5 ml pe
r
rinse per mark, corresponding to approx. 1.2 – 1.8 gr.
of product with density 1.2 kg/dm
3
). Check the
appliance’s technical specifications to find out about
the amount of water in the tank.
• For a rough estimate concerning the amount of rinse
agent required for the first zeroing operation, refer to
the dosage suggested by the manufacturer of the
product.
• The screw adjustment must be refined on the basis o
f
the results obtained after at least three rinsing cycles,
so to let the system settle.
• At the end each cycle, no foam must be present in the tank.
• If foam is present, first check the type of detergent used and eventually replace with a more
adequate one. If foam is still present, check the water temperature in the tank is correct and
eventually reduce the dosage of detergent until all foam is successfully eliminated.
• With the dispensers supplied, it is necessary to use only detergent with a manufacturer’s
suggested dosage less than 5 gr. /litre.

INSTRUCTION MANUAL FOR DISHWASHERS
Page 12 of 12
GB
Chap 7 DEINSTALLATION
Only qualified and authorised technical personnel can perform deinstallation.
• Turn off the power to the machine with the external main switch.
• Shut off the external water supply tap.
• Completely disconnect the machine from the electric and water supply networks.
• Empty, clean and completely prepare all the internal water circuits, measuring devices, pumps
and boiler.
• Completely empty the detergent and rinse aid dispensers and tubes connected to them, making
sure to correctly dispose of the detergent and rinse aid (contact the supplier of the products
used)
Chap 8 DISPOSAL
There are no materials on our machines that require special disposal procedures.
8.1 Correct Disposal of this product
(Waste Electrical & Elctronic Equipment)
(Applicable in European Union and other European countries with
separate collection systems)
This marking shown on the product or its literature, indicatess that
it should not be disposed with other household wastes at the end
of its working life. To prevent possible harm to the environment or
human from ncotrolled waste disposal. Please separate this from
other types of wastes and recycle it responsibly to promote the
sustainable reuse of material resources.
Household usures should contact either the retailer where thet
purchased this product or their local government office, for detils of
where and how they can take this item for evironmentallly safe
recycling.

BEDIENUNGSANLEITUNG FÜR GESCHIRRSPÜLMASCHINE
Seite 1 von 12
D
INHALT
KAP 1 EINLEITUNG ................................................................................................................. 2
KAP 2 INSTALLATION ............................................................................................................ 2
2.1 A
USPACKEN ........................................................................................................................ 2
2.2 A
UFSTELLEN ....................................................................................................................... 2
2.3 E
LEKTRISCHER ANSCHLUSS ................................................................................................ 3
2.4 W
ASSERANSCHLUSS ........................................................................................................... 3
2.5 A
BFLUSSANSCHLUSS .......................................................................................................... 4
KAP 3 RISIKEN UND WICHTIGE WARNHINWEISE .............................................................. 4
KAP 4 BEDIENUNG DER MASCHINE .................................................................................... 5
4.1 B
EDEUTUNG DER BENUTZTEN SYMBOLE .............................................................................. 5
4.2 E
INSCHALTEN ..................................................................................................................... 5
4.3 F
ÜLLEN UND HEIZEN ........................................................................................................... 5
4.4 S
PÜLZYKLUS ....................................................................................................................... 5
4.5 A
USSCHALTEN DER MASCHINE ............................................................................................ 6
4.6 E
NTLEEREN DER MASCHINE ................................................................................................ 6
4.6.1 Maschine ohne Abwasserpumpe .................................................................................. 6
4.6.2 Maschine mit Abwasserpumpe ..................................................................................... 7
4.7 H
ARZ-REGENERATION ......................................................................................................... 7
4.8 B
ETRIEBSENDE ................................................................................................................... 8
KAP 5 WARTUNG .................................................................................................................... 8
5.1 R
EINIGUNG UND HYGIENE ................................................................................................... 8
5.2 I
NSTANDHALTUNG (TÄGLICH) ............................................................................................... 8
5.3 W
ÖCHENTLICHE WARTUNG ................................................................................................. 8
5.4 J
ÄHRLICHE WARTUNG ......................................................................................................... 9
KAP 6 EINSTELLUNGEN UND KONTROLLEN ................................................................... 10
6.1 D
OSIERVORRICHTUNGEN ................................................................................................... 10
6.1.1 Glänzmittel-Dosiergerät ............................................................................................... 10
6.1.2 Gerät ohne Spülmittel-Dosiergerät .............................................................................. 11
6.1.3 Gerät mit Spülmittel-Dosiergerät (auf Anfrage erhältlich) ............................................ 11
KAP 7 ABBAUEN .................................................................................................................. 11
KAP 8 ENTSORGUNG ........................................................................................................... 12
8.1 K
ORRELTE ENTSORGUNG PRODUKTS ................................................................................ 12
Der Hersteller behält sich entsprechend der Gesetze die Eigentumsrechte am vorliegenden Dokument vor. Ohne vorherige schriftliche
Genehmigung sind die Vervielfältigung und Weitergabe dieses Dokuments verboten.
Der Hersteller behält sich dass Recht vor ohne Vorankündigung durch Verbesserungen, die von ihm für notwendig befunden wurden,
die vorliegende Anleitung zu ändern.
-
-

BEDIENUNGSANLEITUNG FÜR GESCHIRRSPÜLMASCHINE
Seite 2 von 12
D
Kap 1 EINLEITUNG
Die Nichtbeachtung der in der vorliegenden Anleitung enthaltenen Anweisungen kann die
Sicherheit des Geräts beeinträchtigen und führt zum sofortigen Verfall der Garantie.
Die in der vorliegenden Bedienungsanleitung enthaltenen Warnhinweise geben
wichtige Sicherheitsanweisungen bei den einzelnen Installationsphasen, dem
Gebrauch und der Wartung.
Die gesamte Dokumentation sorgfältig in der Nähe des Geräts aufbewahren; sie muss den
Technikern und Bedienern ausgehändigt werden. Der Bediener ist verpflichtet die vorliegende
Bedienungsanleitung vor jeglicher Arbeit an der Maschine zu lesen, zu verstehen und zu
lernen. Das Gerät ist für das gewerbliche Geschirrspülen in Gemeinschaftsküchen vorgesehen, d. h.
die Installation, der Betrieb und die Wartung erfolgen durch ausgebildetes Fachpersonal, das sich an
die Herstelleranweisungen halten muss. Von Kindern fernhalten. Die Qualität dieser Maschine wird
durch die Materialauswahl, der Herstellung gemäß den CE-Sicherheitsnormen und durch eine
vollständige Abnahme garantiert. Außer der Bedienungsanleitung wird folgendes mit der Maschine
mitgeliefert:
• Schaltplan
• Detaillierte Zeichnung für die Anbringung der einzelnen Maschinen-Bauteile
Der Hersteller übernimmt keine Haftung für Sach- oder Personenschäden bei Nichteinhaltung
der gegebenen Anweisungen oder unangemessenem Einsatz der Maschine.
Kap 2 INSTALLATION
Eine richtige Installation ist grundlegende Voraussetzung für ein gutes Funktionieren der Maschine.
Einige wichtige Angaben für die Maschineninstallation befinden sich auf dem Typenschild auf der
rechten Maschinenseite, die auch als Kopie auf dem Deckblatt der Bedienungsanleitung
wiedergegeben sind.
Die Installation darf ausschließlich von qualifiziertem und autorisiertem
Fachpersonal vorgenommen werden.
2.1 Auspacken
Die Verpackung auf Schäden überprüfen. Eventuelle bemerkte Schäden auf dem Lieferschein
vermerken. Nach dem Entfernen der Verpackung überprüfen, ob das Gerät vollständig ist. Ist die
Maschine beschädigt, sofort den Verkäufer per Fax oder Einschreiben mit Rückantwort und den
Transportunternehmer, der das Gerät transportiert hat, benachrichtigen. Beeinträchtigen die
Schäden die Maschinensicherheit, die Maschine vorm Eingriff eines Fachtechnikers nicht installieren
bzw. benutzen.
Die Verpackungsteile (Plastiktüten, Styropor, Nägel usw.) von Kindern und
Haustieren fernhalten. Die Verpackungsteile können mögliche Gefahrenteile
darstellen.
2.2 Aufstellen
• Prüfen, dass sich im Installationsbereich keine
Gegenstände oder Materialien befinden, bzw. diese
ausreichende geschützt sind, die vom Wasserdampf
, der während des Betriebs aus der Maschine
austreten kann, beschädigt werden können.
• Um die Stabilität sicherzustellen, die Maschine
installieren und mit den vier Stellfüßen nivellieren.
•
A
ndere Installationslösungen müssen mit dem
Hersteller vereinbart und von diesem genehmigt
werden.
BEDIENUNGSANLEITUNG FÜR GESCHIRRSPÜLMASCHINE
Seite 3 von 12
D
Mod.
V~ Hz kW A
S/N
H2O
kPa °
C
2.3 Elektrischer Anschluss
• Es muss ein Hauptschalter vorhanden sein, mit
dem alle Kontakte einschließlich des Nullleiters
getrennt werden. Die getrennten Kontakte
müssen einen Abstand von mindestens 3 mm
haben. Der Schalter muss über einen
magnetthermische Schutzvorrichtung ausgelöst
bzw. zusammen mit Sicherungen gekoppelt
werden. Die Sicherungen und der Schalter müssen
anhand der auf dem Typenschild angegebenen
Maschinenleistung ausgelegt werden.
• Der Hauptschalter muss sich an der Stromleitung in
der Nähe des Aufstellungsortes befinden. Am
Hauptschalter darf stets nur ein Gerät angeschaltet
sein.
• Die Stromspannung und die Frequenz des
Stromnetzes müssen mit den Angaben auf dem
Typenschild übereinstimmen.
• Für die Sicherheit des Bedieners sowie die
Gerätesicherheit muss entsprechend der geltenden
Schutzvorschriften eine ausreichende Erdung
vorgesehen werden.
• Das Anschlusskabel darf ausschließlich ein Kabel
des Typs H07RN-F sein. Das Kabel darf beim
normalen Maschinenbetrieb oder der normalen
Wartung nicht gezogen bzw. gequetscht werden.
• Die am Gehäuse befestigte Äquipotenzial-Klemme
muss an ein Äquipotenzial-Kabel angeschlossen
werden, das einen für die Anwendung geeigneten
Querschnitt haben muss.
• Beachten Sie die auf dem Schaltplan
angegebene Polarität.
• Für weitere Informationen siehe den anliegenden
Schaltplan.
Keine Adapter, Mehrfachstecker, Kabel mit unzureichendem Querschnitt oder mit
V
erlängerungsanschlüssen verwenden, die nicht den geltenden Anlagennormen
entsprechen.
2.4 Wasseranschluss
Das Gerät wird mit einem Schlauch an die
Wasserleitung angeschlossen. Zwischen dem
Wasseranschluss und dem Elektroventil im Gerät muss
ein Absperrventil (Schieber, Kugelhahn oder
Schieberventil) angebracht werden, das in der Lage
sein muss notfalls ein schnelles und vollständiges
Absperren der Wasserversorgung sicherzustellen.
Das Absperrventil muss sich an der Wasserleitung in
der Nähe und direkt vor dem Gerät befinden.
• Ist die Anlage neu und wenig benutzt worden, vorm Anschließen lange das Wasser laufen
lassen.
• Die Wasserversorgung, Temperatur und Druck, muss mit den Angaben auf dem Typenschild
der Maschine übereinstimmen.
• Liegt die Wasserhärte über 14 F (8 dH) raten wir dazu die Maschine mit eingebautem
Wasserenthärter zu benutzen (auf Anfrage erhältlich). Liegt die Wasserhärte über 35 F (19,5 dH)
raten wir dazu einen externen Wasserenthärter vor dem Elektroventil zu installieren.
BEDIENUNGSANLEITUNG FÜR GESCHIRRSPÜLMASCHINE
Seite 4 von 12
D
Freier Abfluss
2.5 Abflussanschluss
• Die Abflussleitung muss aus einer Grube mit
freiem Siphon bestehen. Die Maße müssen für
den Durchsatz des mit der Maschine mitgelieferten
Abflussrohrs geeignet sein. Das Abflussrohr muss
ohne gezogen, gebogen, gedrückt, gequetscht oder
sonst wie behindert zu werden zur Grube geleitet
werden.
• Das Entleeren der Grube erfolgt durch Schwerkraft,
d. h. der Abfluss muss sich unterhalb des
Maschinenboden befinden.
Max.
1 m
Mit Abflusspumpe (auf Anfrage erhältlich
)
•
Falls sich der Abfluss nicht unterhalb des
Maschinenboden befindet, kann ein Modell mit
A
bflusspumpe (auf Anfrage erhältlich) benutzt
werden.
• In diesem Fall ist die maximal zulässige Höhe des
Abflusses gleich 1 Meter.
• Stets prüfen, dass der Abfluss richtig funktioniert
und nicht verstopft ist.
• Alle anderen Lösungen müssen vorher mit dem
Hersteller abgesprochen und von diesem genehmigt
werden.
Kap 3 RISIKEN UND WICHTIGE WARNHINWEISE
• Dieses Gerät ist nur für den Zweck vorgesehen, für das es ausdrücklich entwickelt wurde. Jeder
andere Einsatz ist ungeeignet und daher gefährlich.
• Das Installations-Fachpersonal ist angehalten den Nutzer in angemessener Weise über
die Bedienung des Geräts und eventuell zu beachtende Sicherheitsmaßnahmen, auch mit
praktischen Vorführungen, zu unterrichten.
• Alle Arbeiten an der Maschine, auch bei Störung bzw. Ausfall, dürfen nur vom Hersteller oder
einem autorisierten Kundendienst bzw. Fachpersonal vorgenommen werden. Dabei müssen
ausschließlich Original-Ersatzteile verwendet werden.
• Vor Wartungsarbeiten, Reparatur und Pflege die Maschine stets vom Stromnetz und dem
Wasseranschluss trennen.
• Die Maschine darf NICHT von nicht ausgebildetem Personal benutzt werden.
• Die Maschine darf NICHT unter Spannung bleiben, wenn sie nicht benutzt wird.
• Solange der Spülzyklus nicht beendet ist, NIEMALS schnell die Gerätetür öffnen.
• Die Maschine NIEMALS ohne die vom Hersteller vorgesehenen Schutzvorrichtungen benutzen.
• Die Maschine NIEMALS zum Spülen von Gegenständen benutzen, die von Form, Ausmaßen
oder Material nicht zum Spülen in Maschinen garantiert oder die nicht perfekt vollständig sind.
• Das Gerät oder Geräteteile NIEMALS als Trittleiter oder Halterung für Personen, Sachen oder
Tiere verwenden.
• Die geöffnete Klappe der Maschine mit Frontladung NIEMALS überlasten. Die Klappe ist so
ausgelegt, dass sie nur den mit Geschirr beladenen Korb aushält.
• NIEMALS nackte Hände in die Spüllösung tauchen.
• Die Maschine nach der Installation NIEMALS kippen.
BEDIENUNGSANLEITUNG FÜR GESCHIRRSPÜLMASCHINE
Seite 5 von 12
D
Kap 4 BEDIENU NG DER MASCHI NE
4.1 Bedeutung der benutzten Symbole
? ?
?
Die Taste drücken, die
einem der angegebenen
Symbole entspricht.
? ?
?
Die Taste drücken, die einem
der angegebenen Symbole
entspricht. Die entsprechende
Kontrolllampe schaltet sich
ein.
? ?
?
Die zu den angegebenen
Symbolen gehörende
Kontrolllampe schaltet sich
ein.
? ?
?
Die zu einem der
angegebenen Symbolen
gehörende Kontrolllampe
schaltet sich ein.
4.2 Einschalten
1. Den Wasserhahn öffnen und den Strom-Hauptschalte
r
einschalten.
2. Prüfen, ob der Überlauf vorhanden ist.
3. Den seitlich gezeigten Schalter "Einschalten/
A
usschalten" drücken. Wenn vorhanden, schaltet sich
die entsprechende Kontrolllampe ein.
4.3 Füllen und Heizen
• Wenn die Wanne leer ist, beginnt sich das Gerät beim
Einschalten automatisch zu füllen.
• Ist die Wanne voll beginnt das Heizen. Bei den
Geräten, wo sie vorhanden ist, schaltet sich die
entsprechende Kontrolllampe ein.
• Die Kontrolllampe schaltet sich aus, wenn Wanne und
Boiler die eingestellt Temperatur erreicht haben.
• Um die Wartezeit zu verkürzen, kann 5 – 10 Minuten
nach dem Einschalten ein Leerzyklus ausgeführt
werden.
4.4 Spülzyklus
• Kontrollieren, ob Spül- und Glänzmittel vorhanden
sind. Informationen zu den zu verwendenden
Produkten und deren Dosierung (automatisch ode
r
manuell) befinden sich im Kapitel "Einstellungen und
Kontrollen".
• Einen geeigneten Korb verwenden. Der Korb darf nicht
überladen werden. Das Geschirr nicht übereinande
r
legen. Das Geschirr stets vorspülen; nie Geschirr
mit angetrockneten oder festen Resten einsetzen.
• Leere Behälter umgedreht in den Korb stellen. Telle
r
und ähnliches geneigt in den Tellerkorb einsetzen. Die
innere Oberfläche muss nach oben gerichtet sein. Das
Besteck so in den Besteckkorb einsetzen, dass der
Griff auf den Korbboden weist.
• Ausschließlich für den Gerätetyp passendes
Geschirr spülen.
• Es wird empfohlen, das Geschirr sofort nach dem
Gebrauch zu waschen, so dass der Schmutz nicht
verhärten und sich nicht auf dem Geschirr festsetzen
kann.
BEDIENUNGSANLEITUNG FÜR GESCHIRRSPÜLMASCHINE
Seite 6 von 12
D
Ausführung mit Drehbkorb:
• Führen Sie den Spülzyklus möglichst mit vollem Korb
und gleichmäßig verteiltem Geschirr aus.
• Stellen Sie das leichtere Geschirr in die Mitte des
Korbs, das schwerere Geschirr an den Korbrand.
• Stellen Sie schmales Geschirr in die Mitte des Korbs,
breites Geschirr an den Korbrand.
• Den Korb in die Maschine laden und die Tür schließen.
• Bei Ausführungen mit Drehkorb sicherstellen, dass der Korb frei dreht; drehen Sie ihn dazu
von Hand leicht nach rechts, schließen Sie dann die Tür und schalten Sie den Spülzyklus ein.
• Um Bruch und Beschädigungen zu vermeiden nur unbeschädigtes und für Maschinenspülung
garantiertes Geschirr verwenden.
• Niemals Silberbesteck und Besteck aus rostfreiem Stahl in den gleichen Besteckkorb geben.
Das Silber könnte anlaufen und der Stahl könnte korrodieren.
Bei den Geräten, bei denen unterschiedliche Spülzeiten
vorhanden sind, die dem Geschirr angepasste Spülzeit an
dem seitlich gezeigten Schalter "Zeitwahl" einstellen
START
• Zum Einschalten des Zyklus die seitlich gezeigte Taste
"Start/ Zyklus-Start" drücken.
• Bei den Geräten, wo sie vorhanden ist, schaltet sich
die entsprechende "Zyklus-Kontrolllampe" ein, um
anzuzeigen, dass der Spülzyklus läuft.
• Nach der Spülphase wird automatisch die Abspül- und
A
bpumpphase eingeleitet und der Zyklus endet. Bei
Zyklusende schaltet sich die Kontrolllampe aus.
• Wird die Tür während des Zyklus versehentlich geöffnet, wird die Maschine automatisch
angehalten. Um den Spülvorgang wieder fortzuführen, reicht es aus die Tür zu schließen.
• Um ein schnelles Trocknen zu haben, den Korb bei Zyklusende sofort aus der Maschine ziehen.
• Ist die Spüllösung zu schmutzig oder werden Schmutzreste am Wannenfilter bemerkt,
muss die ordentliche Wartung, wie im Kapitel "Wartung
" beschrieben, vorgenommen
werden.
• Um weitere Spülzyklen auszuführen, erneut die im Abschnitt "Spülzyklus
" angegebenen
Arbeitsschritte vornehmen.
4.5 Ausschalten der Maschine
Die Taste "Einschalten/ Ausschalten" wie seitlich gezeigt
drücken. Bei den Geräten, wo sie vorhanden ist, schaltet
sich die entsprechende Kontrolllampe aus.
4.6 Entleeren der Maschine
4.6.1 Maschine ohne Abwasserpumpe
1. Die Maschine wie im vorstehenden Abschnitt
"Ausschalten der Maschine
" angegeben ausschalten.
2. Den Überlauf herausziehen: abwarten bis die Wanne
vollständig leer ist.
BEDIENUNGSANLEITUNG FÜR GESCHIRRSPÜLMASCHINE
Seite 7 von 12
D
4.6.2 Maschine mit Abwasserpumpe
1. Die Maschine wie im vorstehenden Abschnitt
"Ausschalten der Maschine
" angegeben ausschalten.
2. Den Überlauf herausziehen und die Tür schließen.
3. Die seitlich gezeigte Taste "Abwasserpumpe" drücken,
um das Wasser abzulassen.
START
4. Bei den Geräten ohne die Taste "Abwasserpumpe" das
Gerät wie im Abschnitt "Ausschalten der Maschine
"
angegeben ausschalten.
5. Den Überlauf herausziehen und die Tür schließen.
6. Die seitlich gezeigte Taste "Start/ Zyklusstart" drücken,
um das Wasser abzulassen.
• Bei vollständig entleerter Wanne die Maschine wie im Kapitel "Wartung
" beschrieben reinigen.
• Die Maschine jedes Mal ausschalten, wenn der Überlauf herausgezogen wird.
4.7 Harz-Regeneration
Ist das Gerät mit einem eingebauten Wasserenthärter (auf Anfrage erhältlich) ausgestattet, muss für
den richtigen Betrieb des Wasserenthärters regelmäßig eine Harz-Regeneration vorgenommen
werden. Die Anzahl der Zyklen zwischen einer Regeneration und der nächsten muss entsprechend
der nachstehenden Tabelle auf den Härtegrad des Wassers festgelegt werden.
dH F
ZyklusAnzahl
dH F
ZyklusAnzahl
dH F
Zyklus-
Anzahl
dH F
Zyklus-
Anzahl
6,0 10 153 9,5 17 107 13,5 24 73 17,5 31 52
6,5 11 147 10,0 18 100 14,0 25 70 18,0 32 50
7,0 12 140 10,5 19 93 14,5 26 67 18,5 33 48
7,5 13 133 11,0 20 87 15,0 27 63 19,0 34 47
8,0 14 127 12,0 21 83 15,5 28 60 19,5 35 43
8,5 15 120 12,5 22 80 16,0 29 57
9,0 16 113 13,0 23 77 17,0 30 53
• Wir empfehlen die Harz-Regeneration während der Arbeitspausen vorzunehmen.
• Die Maschine wie im Abschnitt "Ausschalten der Maschine
" angegeben ausschalten.
• Die Maschine wie im Kapitel "Entleeren der Maschine
" beschrieben entleeren.
• Die Maschine wie im Kapitel "Wartung" beschrieben reinigen. Nach der Reinigung wieder den
Wasserhahn öffnen und den Strom-Hauptschalter einschalten.
• Sicherstellen, dass der Überlauf entfernt wurde.
• Den Salzbehälter in der Wanne öffnen.
• Ungefähr 250g Regenerations-Salz (Küchensalz ohne
Zusätze mit Korngröße von 1 oder 2 mm) in den
Behälter füllen.
• Den Behälter fest verschließen.
• Die Tür schließen.
START
• Ohne die Maschine einzuschalten, die Taste "Start/
Zyklusstart" solange drücken, bis die entsprechende
Kontrolllampe aufleuchtet.
• Der Regenerationszyklus beginnt und dauert ungefäh
r
20 Minuten.
BEDIENUNGSANLEITUNG FÜR GESCHIRRSPÜLMASCHINE
Seite 8 von 12
D
• Wenn sich die Zyklus-Kontrolllampe ausschaltet, ist
der Regenerationszyklus beendet.
A
m Ende des Regenerationszyklus , bei leerer Wanne und
ohne Überlauf, empfehlen wir:
• Das Gerät durch Drücken der seitlich gezeigten Ein-
/
Aus-Taste einschalten.
• Für ungefähr 1 Minute Wasser laufen lassen, so dass
Salzreste aus der Wanne entfernt werden.
• Das Gerät mit der Ein-/ Aus-Taste ausschalten und
den Überlauf wieder einsetzen.
Die Maschine ist jetzt bereit, um wieder beladen zu
werden.
4.8 Betriebsende
•
A
m Ende des Tages das Gerät immer entleeren. Halten
Sie sich dabei an die Anweisungen im Abschnitt
“Entleerung des Geschirrspülers
.
• Mit dem Hauptschalter die Stromversorgung
trennen und den Hahn der Wasserzufuh
r
schließen.
• Die normalen Wartungsarbeiten ausführen und das
Gerät entsprechend der Beschreibung im Abschnitt
“Instandhaltung”
reinigen.
• Lassen Sie die Tür möglichst angelehnt, um das
Entstehen unangenehmer Gerüche im Inneren zu
vermeiden.
Kap 5 WARTUNG
Vor jeglicher Wartungsarbeit die Maschine, wie im Abschnitt "Entleeren de
r
Maschine" beschrieben, vollständig entleeren, die Stromversorgung am
Hauptschalter trennen und den äußeren Wasserhahn schließen.
5.1 Reinigung und Hygiene
Zur Aufrechterhaltung der Hygiene des Gerätes sind regelmäßig die im Folgenden beschriebenen
täglichen, wöchentlichen und jährlichen Wartungsarbeiten auszuführen. Das Gerät muss
außerdem regelmäßig mit geeigneten handelsüblichen Produkten entkeimt werden.
5.2 Instandhaltung (täglich)
• Wenn Schmutzreste am Wannenfilter festgestellt werden.
• Die Körbe, den Überlauf und den Filter ausbauen und reinigen.
• Zum Reinigen der Stahlwanne keine scheuernde Produkte oder Gegenstände benutzen. Es
muss mit einem feuchten, leicht eingeseiften Lappen gereinigt werden.
• Keinen Druckwasserstrahl benutzen, da dieser die elektrische Anlage beschädigen könnte.
5.3 Wöchentliche Wartung
• Die normalen Instandhaltungsarbeiteni ausführen.
• Die Spül- und Klarspülarme und -düsen reinigen.
Die folgende Abbildung zeigt die möglichen Anordnungen der oberen und unteren Spül/Klarspülarme.
BEDIENUNGSANLEITUNG FÜR GESCHIRRSPÜLMASCHINE
Seite 9 von 12
D
(*) Düse geschlossen. Düse nicht vorhanden.
• Die Drehzapfen der Spülarme und den Abflussbereich des
Spül- und Klarspülwassers reinigen.
• Den Tank und das Gerät sorgfältig mit nicht
scheuerndenDesinfektionsmitteln säubern.
• Die Düsen, Arme und Filter wieder richtig einbauen; dabei auf
die Neigung und den festen Sitz der Arme in den betreffenden
Aufnahmen achten.
5.4 Jährliche Wartung
Die Maschine von einem Fachtechniker sorgfältig überprüfen lassen. Folgendes muss besonders
überprüft werden:
• Ablagerungen aus der Wanne entfernen.
• Die Spül- und Nachspülarme und Düsen vollständig ausbauen und reinigen.
• Die Drosselvorrichtung in der Säule des unteren Spülarms und den Ausgangsbereich des
Wassers gründlich reinigen.
• Die Drosselvorrichtung, die Zapfenwelle und die Spül- und Abspülarme wieder richtig einbauen.
• Den Zustand der Dichtungen und den Verschleiß der anderen Bauteile wie Pumpen,
Dosiervorrichtungen usw. überprüfen.
• Überprüfung der Einstellungen der Dosiervorrichtungen für Glänz- und Spülmittel.
• Die Heizwiderstände überprüfen und gegebenenfalls reinigen.
BEDIENUNGSANLEITUNG FÜR GESCHIRRSPÜLMASCHINE
Seite 10 von 12
D
Soll die Maschine für einen längeren Zeitraum stillgelegt werden, muss sie entsprechend vorbereitet
werden. Wird bei neuer Inbetriebnahme befürchtet, dass das Gerät zwischenzeitlich eingefroren war,
darf es nicht benutzt werden, bevor der Boiler und die Leitungen nicht von einem Fachtechnike
r
überprüft wurden.
Kap 6 EINSTELLUNGEN UND KONTROLLEN
Die folgenden Einstellungs- und Kontrollarbeiten dürfen ausschließlich von
ausgebildetem und autorisiertem Fachpersonal vorgenommen werden. Diese müssen mit
größter Sorgfalt und Aufmerksamkeit vorgehen und geeignete Schutzmaßnahmen treffen,
wenn die Maschinen-Schutzvorrichtungen umgangen werden.
6.1 Dosiervorrichtungen
Vor der Eichung des oder der Dosiervorrichtungen
müssen die Zuleitungen gefüllt sein. Die Eichung erfolgt
über die entsprechenden Stellschrauben. Diese sind nach
Abbau des Frontpaneels unterhalb der Wannentü
r
zugänglich.
• Schäden aus falschen Einsatz des oder der Dosiervorrichtungen oder nach eine
r
falschen manuellen Dosierung sind nicht durch die Garantie abgedeckt.
• Die Auswahl und die Dosierung des Spül- und des Glänzmittels sind
ausschlaggebend für ein gutes Spülergebnis und die Lebensdauer des Gerätes.
Nur Flüssigprodukte für gewerblichen Einsatz mit Schaumbremse verwenden.
• Die Einstellungen müssen bei warmer Maschine mit gut dosiertem Produkt
vorgenommen werden.
6.1.1 Glänzmittel-Dosiergerät
Der Glänzmittelstand im Behälter muss ausreichend sein. Der Behälter darf sich nie
vollständig entleeren, er darf nicht mit korrosiven oder verschmutzen Flüssigkeiten gefüllt
werden. Zum Füllen von Zuleitung und Dosiergerät die Maschine einschalten, den
Spülzyklus starten, ungefähr 20 Sekunden abwarten und dann die Taste "Einschalten/ Ausschalten"
8-10 Mal in einem Abstand von jeweils 10 Sekunden drücken. Gedrückt halten, um den
Spülzyklus zu beenden.
•
Bei Drehen der Stellschraube in Uhrzeigersinn
verringert sich, bei Drehen gegen den Uhrzeigersinn
erhöht sich die Menge des abgegebenen Glänzmittels.
• Für Angaben bezüglich der Produktmenge zur ersten
Eichung siehe die Angaben des Produktherstellers zu
r
Dosierung.
• Die Feineinstellung erfolgt nach Bewertung de
r
Ergebnisse von mindestens drei Spülzyklen, um
gleichmäßige Ergebnisse zu haben.
• Streifen auf dem Geschirr und Schaumbildung in der Spüllösung sind Zeichen für eine
übermäßige Glänzmittelmenge. Mit Wassertropfen bedecktes Geschirr und längere
Trockenzeiten sind Zeichen für Glänzmittelmangel.
• Um gute Ergebnisse zu erzielen, sollten nur Glänzmittel verwendet werden, bei denen die
Herstellerempfehlung unter 1,5 g/ Liter liegt.
• 7,9 cm Leitung = 1 ml Produkt (= 1 g Produkt mit Dichte gleich 1 kg/dm
3
). Zum Nachspülen
werden ungefähr 3 Liter pro Zyklus verwendet.
• Nach Einstellung der Dosierung den Höhenunterschied zwischen Kanister und Maschinenboden
nicht ändern.
• Ist der Höhenunterschied zwischen Kanister und Maschinenboden größer als 80 cm, kann es
sein, dass das Dosiergerät nicht richtig funktioniert.
• Wenn kein Klarspülmittel verwendet wird, die Stellschraube des Dosierers vollständig schließen.
BEDIENUNGSANLEITUNG FÜR GESCHIRRSPÜLMASCHINE
Seite 11 von 12
D
6.1.2 Gerät ohne Spülmittel-Dosiergerät
Von einer manuellen Dosierung wird abgeraten, da
gute Ergebnisse wie bei einer automatischen
Dosiervorrichtung nicht garantiert sind. Wird trotzdem
keine automatische Dosiervorrichtung benutzt, muss das
Spülmittel alle 5 Zyklen im Bereich des PumpenAnsaugfilters eingefüllt werden. Die Spülmittelmenge muss
den Herstellerangaben entsprechen. Wir verweisen auf die
technischen Daten, um die in der Wanne enthaltene
Wassermenge zu kennen. Für das Nachspülen werden
ungefähr 3 Liter Wasser benutzt. Bei jeden Füllen die fü
r
die in der Wanne enthaltene Wassermenge und die
nächsten 5 Nachspülvorgänge benötigte Dosierung
hinzufügen. Bei den anschließende Dosierungen muss nu
r
das zum Nachspülen benötigte Spülmittel hinzugefügt
werden.
Es wird immer zur Installation eines automatischen Spülmittel Dosiergeräts
angeraten.
6.1.3 Gerät mit Spülmittel-Dosiergerät (auf Anfrage erhältlich)
Der Spülmittelstand im Behälter muss ausreichend sein. Der Behälter darf sich nie
vollständig entleeren, er darf nicht mit korrosiven oder verschmutzen Flüssigkeiten gefüllt
werden. Um die Zuleitung zu füllen reicht es aus abzuwarten, dass sich die Maschine mit
angeschlossenem Dosiergerät füllt.
• Bei Drehen der Stellschraube gegen den
Uhrzeigersinn verringert sich, bei Drehen in
Uhrzeigersinn erhöht sich die Menge des
abgegebenen Spülmittels. (um 1 ÷ 1,5 ml pro
Nachspülen pro Zacke, das entspricht ungefähr 1,2 ÷
1,8 g Produkt mit Dichte gleich 1,2 kg/dm
3
). Für die
Wassermenge in der Wanne siehe die technischen
Daten.
• Für Angaben bezüglich der Produktmenge zur ersten
Eichung siehe die Angaben des Produktherstellers zu
r
Dosierung.
• Die Feineinstellung erfolgt nach Bewertung de
r
Ergebnisse von mindestens drei Spülzyklen, um
gleichmäßige Ergebnisse zu haben.
• Am Zyklusende darf sich kein Schaum in der Wanne befinden.
• Ist Schaum in der Wanne, muss als erstes die Art des verwendeten Spülmittels kontrolliert und
dieses gegebenenfalls durch ein geeignetes Spülmittels ausgewechselt werden. Bildet sich
weiterhin Schaum, muss die richtige Wassertemperatur in der Wanne überprüft und eventuell die
Spülmittelmenge soweit reduziert werden, bis sich kein Schaum mehr bildet.
• Für die mitgelieferten Dosiervorrichtungen dürfen nur Spülmittel benutzt werden, bei denen die
Herstellerempfehlung weniger als 5 g/ Liter beträgt.
Kap 7 ABBAUEN
Der Abbau darf nur von ausgebildetem und autorisiertem Fachpersonal
vorgenommen werden.

BEDIENUNGSANLEITUNG FÜR GESCHIRRSPÜLMASCHINE
Seite 12 von 12
D
• Die Stromversorgung zur Maschine am externen Hauptschalter trennen.
• Den externen Hahn für die Wasserversorgung schließen.
• Die Maschine vollständig von der Strom- und Wasserversorgung trennen.
• Alle Wasserkreisläufe, die Dosiervorrichtungen, die Pumpen und den Boiler entleeren, reinigen
und präparieren.
• Entleeren Sie die Spülmittel- und Klarspülerdosierer samt dazugehörigen Leitungen; entsorgen
Sie die Spül- und Klarspülmittel umweltgerecht (wenden Sie sich bei Fragen hinsichtlich der
Entsorgung an den Hersteller der benutzten Produkte).
Kap 8 ENTSORGUNG
An unseren Maschinen gibt es keine Materialien, für die besondere Entsorgungsmaßnahmen
benötigt werden.
8.1 Korrelte Entsorgung Produkts
(Elektromüll)
(Anzuwenden in den Ländern der Europäischen Union und anderen
euroäischen Ländern mit einem separafen Sammelsystem)
Die Kennzeichnung auf dem Produkt bzf., auf der dazugehörigen
Literaut gibtan, dass es nach seiner Lebesdauer nicht zusammen mit
der normalen Haushaltsmüll entsorgt werden darf. Entsorgen Sie
dieses Gerät bitte getrennt von andern Abfällen, um der Umwell bzw.
der menschllchen Gesundheit nicht durch unkotrollirte Müllbeseitigung
zu stofflichen Ressourcen zu förden.
Private Nutzer sliten den Händler, bei dem das Produkt gekauft
wurde, oder die zuständigen Behörden kontakieren, um in Erfahrung
zu brigen, wie sie das Gerät auf umweltfreudliche Weise recycein
können.
Gewerbliche Nutzer sollten sich an thren Lieferanten wenden und die
Bedingungen des Verkaufsvertrags konsultieren. Dieses Produkt darf
nicht zusammen mit anderem Geerbemüll entsorgt werden.

MANUEL D’INSTRUCTIONS POUR LAVE-VAISSELLE
Pag. 1 sur 12
F
TABLE DES MATIÈRES
CHAP 1 PREFACE ..................................................................................................................... 2
CHAP 2 INSTALLATION ............................................................................................................ 2
2.1 DÉSEMBALLAGE .................................................................................................................. 2
2.2 P
OSITIONNEMENT ............................................................................................................... 2
2.3 B
RANCHEMENT ÉLECTRIQUE ................................................................................................ 3
2.4 B
RANCHEMENT HYDRAULIQUE ............................................................................................. 3
2.5 B
RANCHEMENT À LA LIGNE D'ÉVACUATION ............................................................................ 4
CHAP 3
RISQUES ET AVERTISSEMENTS IMPORTANTS ...................................................... 4
CHAP 4 UTILISATION DE LA MACHINE .................................................................................. 5
4.1 SIGNIFICATION DES SYMBOLES UTILISÉS .............................................................................. 5
4.2 M
ISE EN MARCHE ................................................................................................................ 5
4.3 R
EMPLISSAGE ET CHAUFFAGE ............................................................................................. 5
4.4 C
YCLE DE LAVAGE ............................................................................................................... 5
4.5 A
RRÊT DE LA MACHINE ........................................................................................................ 6
4.6 V
IDAGE DE LA MACHINE ....................................................................................................... 7
4.6.1 Machine sans pompe d’évacuation .................................................................................. 7
4.6.2 Machine avec pompe d’évacuation .................................................................................. 7
4.7 R
ÉGÉNÉRATION .................................................................................................................. 7
4.8 F
IN DE SERVICE ................................................................................................................... 8
CHAP 5
ENTRETIEN .................................................................................................................. 8
5.1 NETTOYAGE ET HYGIÈNE ..................................................................................................... 8
5.2 E
NTRETIEN COURANT (JOURNALIER) .................................................................................... 8
5.3 E
NTRETIEN HEBDOMADAIRE ................................................................................................. 9
5.4 E
NTRETIEN ANNUEL .......................................................................................................... 10
CHAP 6
RÉGLAGES ET CONTRÔLES ................................................................................... 10
6.1 DOSEURS ......................................................................................................................... 10
6.1.1 Doseur liquide de rinçage .............................................................................................. 10
6.1.2 Appareil sans doseur de liquide de lavage .................................................................... 11
6.1.3 Appareil avec doseur de liquide de lavage (disponible sur demande) .......................... 11
CHAP 7
DESINSTALLATION ................................................................................................... 12
CHAP 8 MISE EN DÉCHETTERIE ........................................................................................... 12
8.1 COMMENT ÉLIMINER CE PRODUIT ....................................................................................... 12
Le constructeur se réserve selon les termes de la loi la propriété du document présent avec interdiction de reproduction et de
divulgation par n'importe quel moyen sans préalable autorisation écrite de sa part.
Le constructeur se réserve le droit d'apporter des modifications sans préavis afin de réaliser des améliorations qu'il aura jugé
nécessaires.
-
-

MANUEL D’INSTRUCTIONS POUR LAVE-VAISSELLE
Pag. 2 sur 12
F
Chap 1 PREFACE
Le non respect des indications fournies dans la documentation ci-jointe compromettrait la
sûreté de l'appareil et ferait immédiatement déchoir la garantie.
Les avertissements contenus dans ce manuel fournissent d'importantes indications
concernant la sécurité durant les différentes phases d'installation, utilisation et
entretien.
Conserver soigneusement toute la documentation dans un environnement proche de l'appareil; la
remettre aux techniciens aptes à l'utilisation de l'appareil. Le technicien a l'obligation de lire,
comprendre et apprendre ce manuel avant de commencer une quelconque opération sur
l'appareil. L’appareil est destiné au lavage professionnel de la vaisselle pour les collectivités c'est
pourquoi l'installation, l'utilisation et l'entretien restent exclusivement destinés à un personnel formé
qui observe les intructions du constructeur. Ne pas laisser à la portée des enfants. Le choix des
matériaux, la construction selon les directives de sûreté de la CE et une révision complète
garantissent la qualité de l'appareil. En plus de ce manuel, sont présents dans l'appareil :
• schéma électrique
• table topografique
Le constructeur décline toutes responsabilités pour dommages matériels ou aux personnes
dûs à l'inobservance des instructions données ou à une utilisation inappropriée de
l'appareil.
Chap 2 INSTALLATION
Une installation correcte est fondamentale pour le bon fonctionnement de l'appareil. Certaines
données nécessaires pour l'installation de l'appareil sont repérables sur la plaque signalétique
apposée sur le côté droit de l'appareil lui-même et en copie sur la couverture de ce manuel
L’installation doit être exclusivement exécutée par des techniciens qualifiés et
autorisés.
2.1 Désemballage
Vérifier l'intégrité de l'emballage et écrire sur la feuille de livraison les éventuelles détériorations
subies. Après avoir éliminé l'emballage s'assurer que l'appareil est intact; si l'appareil est
détérioré, avertir immédiatement le revendeur par fax ou par recommandé avec A.R et le
transporteur qui n'a pas effectué le transport. Si les dommages sont suffisants à pouvoir porter
préjudice à la sûreté de l'appareil ne pas l'installer ni l'utiliser jusqu'à l'intervention d'un technicien
qualifié.
Les éléments de l'emballage (sacs en plastique, polystirène expansé, clous ect ...) ne
doivent pas être laissés à la portée des enfants et des animaux domestiques car ils
représentent un danger potentiel.
2.2 Positionnement
• Vérifier que les objets ou matériaux se trouvant dans la
zone d'installation et qui pourraient être endommagés
par la vapeur d'eau sortant de l'appareil pendant son
fonctionnement soient absents ou suffisament
protégés.
• Pour garantir la stabilité, installer et niveller l'appareil
sur ses quattre pieds.
• Les différentes solutions d'installation doivent être
prises en accord et approuvées par le constructeur.
MANUEL D’INSTRUCTIONS POUR LAVE-VAISSELLE
Pag. 3 sur 12
F
Mod.
V~ Hz kW A
S/N
H2O
kPa °
C
2.3 Branchement électrique
• Un interrupteur général de type onnipolaire doit
être préexistant de façon à interrompre tous les
contacts, y compris le neutre. Il doit y avoir une
distance d'au moins 3 mm entre les contacts
ouverts, un déclenchement magnétothermique de
sécurité ou accouplé à des fusibles. Dimensioner ou
tarrer les contacts en conformité à la puissance
indiquée sur la plaque signalétique de l'appareil.
• L’interrupteur général doit se trouver sur la conduite
électrique près de l'installation et ne doit servir
exclusivement qu'un appareil à la fois.
• Tension et fréquence du réseau électrique doivent
coincider avec ceux de la plaque signalétique.
• Une installation de mise à terre efficace doit être
présente qui soit correspondante aux normes de
prévention en vigueur afin de garantir la sécurité de
l'opérateur et de l'appareil.
• Le câble d'alimentation exclusivement de type H07RNF, ne doit être ni mis en traction ni applati durant le
fonctionnement ou l'entretien quotidien.
• La barette nybloc d’équipotentialité fixé au corps doit
être branché à un câble d’équipotentialité de section
adaptée à l'application.
• Respecter les polarités indiquées sur le schéma
électrique.
• Pour de plus amples informations consulter le schéma
électrique ci-joint.
Ne pas utiliser d'adaptateurs, de prises multiples, de câbles de type ou de section
inadaptés ou avec des jonctions de ralonge non conformes aux normes d'installation
électrique en vigueur.
2.4 Branchement hydraulique
L’appareil doit être raccordé au réseau hydraulique à l'aide
d'un tube flexible. Entre le réseau hydraulique et
l'électrovalve de l'appareil il doit y avoir une vanne d'arrêt à
tiroir, sphère ou rideau capable d'arrêter rapidemment et
complètement l'eau si nécessaire. La vanne d'arrêt doit
se trouver sur la ligne juste avant l'appareil.
• Si l'installation est neuve ou a été peu utilisée, faire couler l'eau pendant quelque temps avant
de procéder au raccord.
•
L’alimentation en eau, température et pression doit être compatible avec ce qui est indiqué
sur la plaque signalétique technique de l'appareil.
• Si la dureté de l'eau est supérieure à 14 F (8 dH) nous conseillons d'utiliser l'appareil avec un
adoucissant interne (disponible sur demande)
. Si la dureté de l'eau est supérieure à 35 F (19,5
dH) nous conseillons d'installer un adoucissant externe avant l'électrovalve.
MANUEL D’INSTRUCTIONS POUR LAVE-VAISSELLE
Pag. 4 sur 12
F
Evacuation libre
2.5 Branchement à la ligne d'évacuation
• La ligne d'évacuation doit être formée d'un siphon
libre de dimension adaptée à la portée du tuyau
d'évacuation fourni avec l'appareil. Le tuyau doit
pouvoir rejoindre le siphon, sans être trop tiré, plié,
écrasé, pressé ou forcé.
• La vidange de la cuve se fait par gravité c'est pourquoi
l'évacuation doit se trouver à un niveau inférieur à la
base de l'appareil.
Max.
1 m
Avec pompe d'évacuation (disponible
sur demande)
• Dans le cas où l'évacuation ne serait pas à un niveau
inférieur à la base de l'appareil, il est possible d'utiliser
la version équipée d'une pompe d'évacuation
(disponible sur demande)
• Dans ce cas la hauteur maximum de l'évacuation est
égale à 1 m.
• Toujours vérifier que l'évacuation fonctionne
correctement et qu'elle ne soit pas bouchée.
• Toute autre solutiuon doit être prise en accord et
approuvée par le constructeur.
Chap 3 RISQUES ET AVERTISSEMENTS IMPORTANTS
• Cet appareil est uniquement destiné à l'utilisation pour laquelle il a été spécialement conçu.
Toute autre utilisation serait considérée comme impropre et donc dangereuse.
• Le personnel spécialisé qui effectue l'installation est tenu d'instruire correctement
l'usager sur le fonctionnement de l'appareil et les éventuelles mesures de sécurité à
respecter en fournissant au besoin une démonstration pratique.
• Tout type d'intervention sur l'appareil, même en cas de panne, devra être exclusivement
effectué par un personnel qualifié provenant de la maison constructrice ou d'un centre
d'assistance autorisé, en utilisant exclusivement les pièces de rechange originales.
• Toujours débrancher ou isoler l'appareil du réseau électrique et hydraulique avant d'effectuer
des mesures d'entretien, réparations et nettoyage.
• L'appareil NE DOIT JAMAIS être utilisé par un personnel non formé.
• L'appareil NE DOIT JAMAIS rester sous tension lorsqu'il n'est pas utilisé.
• NE JAMAIS ouvrir vite la porte de l'appareil tant que le cycle n'est pas terminé.
• NE JAMAIS utiliser l'appareil sans les protections prévues par le constructeur.
• NE JAMAIS utiliser l'appareil pour laver des objets de type, forme, mesure ou matériau non
garantis pour le lavage en machine et pas parfaitement intègres.
• NE JAMAIS utiliser l'appareil ou ses parties en tant que marche ou support pour les personnes,
objets ou animaux.
• NE JAMAIS surcharger la porte des appareils à chargement frontal dont les dimensions sont
prévues pour soutenir uniquement le panier et la vaisselle.
• NE JAMAIS plonger les mains nues dans les solutions de lavage.
• NE JAMAIS renverser la machine après son installation.

MANUEL D’INSTRUCTIONS POUR LAVE-VAISSELLE
Pag. 5 sur 12
F
Chap 4 UTILISATION DE LA MACHINE
4.1 Signification des symboles utilisés
? ?
?
Appuyer sur la touche
correspondant à un des
symboles indiqués.
? ?
?
Appuyer sur la touche
correspondant à un des
symboles indiqués. Le voyant
correspondant s’allume.
? ?
?
Le voyant correspondant à
un des symboles indiqués
s’allume.
? ?
?
Le voyant correspondant à un
des symboles indiqués
s’éteind.
4.2 Mise en marche
1. Ouvrir le robinet d’arrivée d’eau et branche
r
l’interrupteur général d’électricité.
2. Vérifier la présence d’un trop-plein.
3.
A
ppuyer sur le bouton “marche / arrêt” indiqué à côté.
Le voyant correspondant s’allume, si existant.
4.3 Remplissage et chauffage
• Si le bac est vide, la machine commence à se rempli
r
automatiquement à la mise en marche.
• Si le bac est plein, le chauffage commence. Le voyant
correspondant s’allume sur les machines où il est
présent.
• Le voyant s’éteind quand la cuve et le chauffe-eau ont
atteint la température établie.
• Pour réduire le temps d’attente, il est possible
d’effectuer un cycle à vide 5÷10 minutes après la mise
en marche.
4.4 Cycle de lavage
• Contrôler la présence de liquides de lavage et rinçage.
Les informations concernant le type de produit à
utiliser et le dosage (automatique et manuel) se
trouvent au chapitre “Réglages et contr
ôles”.
• Utiliser un panier adapté, le remplir sans le surcharge
r
et sans superposer les couverts. Toujours
débarrasser les couverts de leurs résidus; ne pas
mettre les couverts contenant des résidus secs ou
solides.
• Placer les récipients vides retournés dans le panier.
Mettre les assiettes et assimilés dans le panier incliné
approprié avec la surface interne tournée vers le haut.
Mettre les couverts mixtes dans le panier approprié
avec les manches tournés vers le haut.
• Laver uniquement la vaisselle adaptée à ce type de
machine.
• Il est conseillé de laver la vaisselle aussitôt après son
utilisation afin d'éviter que les saletés ne durcissent ou
ne se fixent sur la vaisselle.
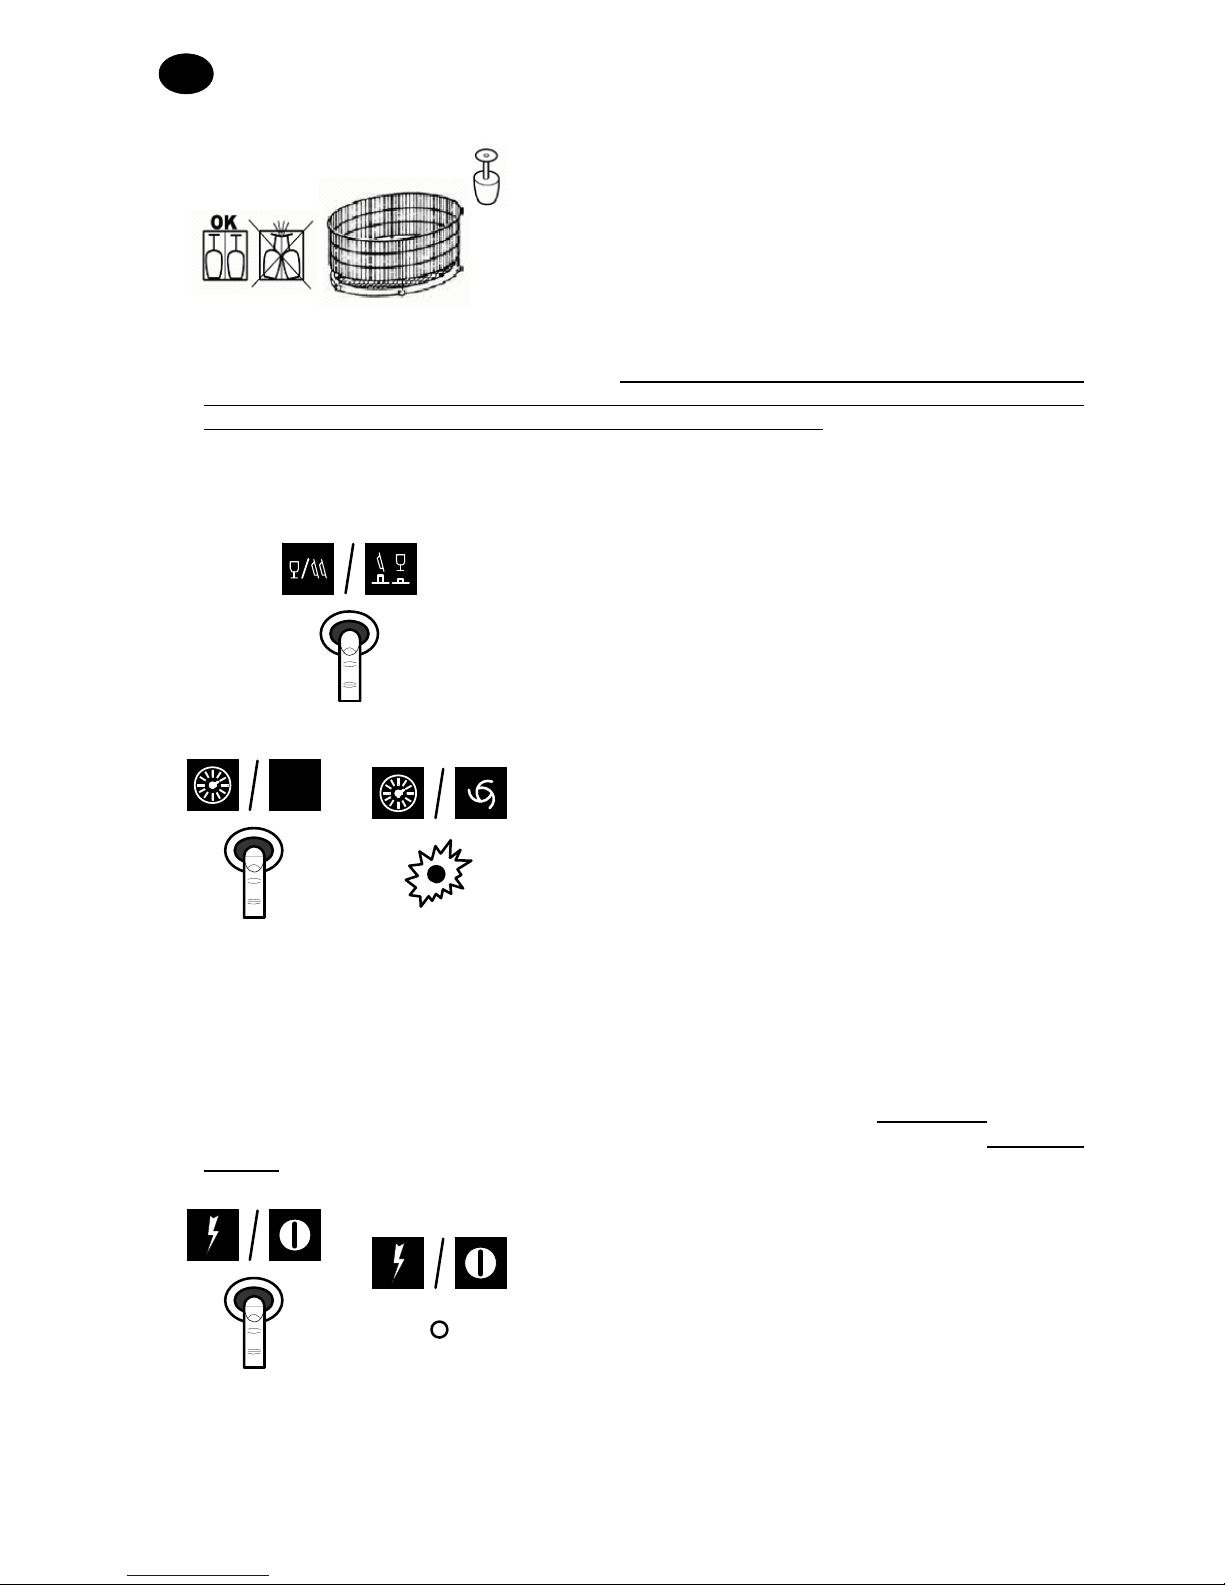
MANUEL D’INSTRUCTIONS POUR LAVE-VAISSELLE
Pag. 6 sur 12
F
Pour les versions avec panier tournant :
• Si possible, mettre en fonction le cycle uniquement
lorsque le panier est plein et la vaisselle répartie
uniformément dans celui-ci.
• La vaisselle plus légère doit être chargée au centre du
panier, celle plus lourde vers l'extérieur.
• La vaisselle plus étroite doit être chargée au centre du
panier, celle plus large vers l'extérieur.
• Charger le panier dans la machine et fermer la porte.
• Pour les versions avec panier tournant, s'assurer que le mouvement rotatif du panier ne
présente pas de points durs, en imprimant au panier une légère poussée dans le sens des
aiguilles d'une montre. Fermer ensuite la porte et démarrer le cycle.
• Pour éviter les dommages, n’utiliser que la vaisselle en bon état et garantie pour le lavage en
machine.
• Ne pas mettre les couverts en argent et en acier inoxidable dans le même panier. L’argent
noircirait et l’acier pourrait rouiller.
Dans les machines où il existe différents temps de lavage,
sélectionner le temps de lavage adéquat au moyen de
l’interrupteur « sélection temps” indiqué à côté.
START
• Pour mettre le cycle en marche, appuyer sur le bouton
“start / mise en marche” comme indiqué à côté.
• Dans les machines où il est présent, le “voyant de
cycle” s’allume pour signaler que le cycle de lavage
fonctionne.
•
A
près la phase de lavage, les phases de rinçage et
d’évacuation de l’eau partent automatiquement puis le
cycle se termine. Le voyant s’éteind à la fin du cycle.
• Si la porte est accidentellement ouverte durant le cycle, la machine s’arrête automatiquement.
Pour reprendre la cycle là où il a été interrompu, il suffit de refermer la porte.
• Pour obtenir un séchage rapide, sortir immédiatement le panier de la machine à la fin du cycle.
• Si la solution de lavage apparait sale ou si on remarque des résidus de saleté sur le filtre
du bac, procéder à l’entretien ordinaire comme expliqué au chapitre “Entretien”
.
• Pour effectuer les cycles successifs, répéter les gestes décrits au paragraphe “Cycle de
lavage”.
4.5 Arrêt de la machine
Appuyer sur la touche “marche/arrêt” comme indiqué à
côté. Le voyant correspondant s’éteind sur les machines
où il est présent.
 Loading...