

Eurotronic SPARmatic comet User's Manual And Guarantee
programmable energy-saving
radiator thermostat
User manual and Guarantee
www.eurotronic.org
5
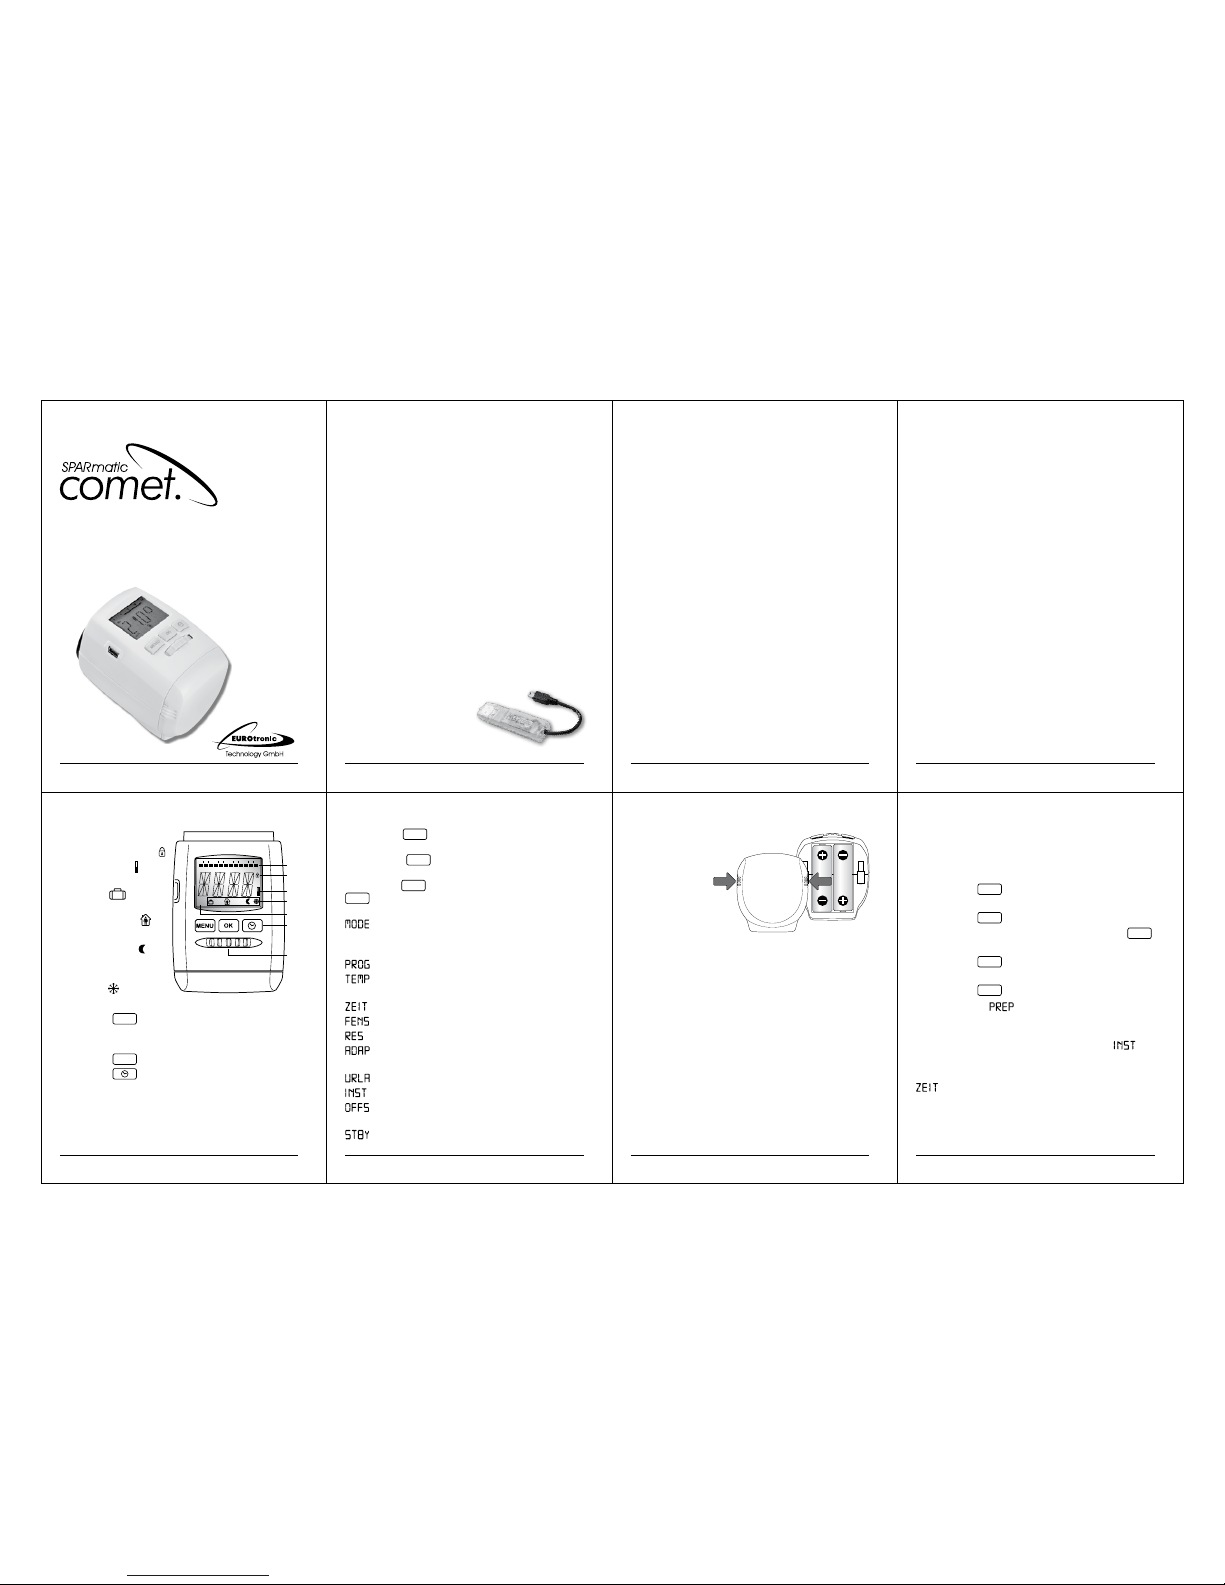
Display and control elements
1 Heating times
2 Child lock act ive
3 Battery lo w
4.a Travel functi on
active
4.b Co mfort temp e rature active
4.c Economy tempe -
rature active
4.d Window/fre eze
protection f unction
active
5. AUTO or MANU mode a ctive
6.a But ton
MENU
– leads to the main me nu
(starting fro m regular display); wit hin the
menu one keypress le ads to the previous l evel
6.b But ton
OK
– confi rmati on of setting
6.c Button
– timer functi on
7 Selector whe el
Mo Di Mi Do Fr Sa So
:
AUTO
MANU
0 246 12 18
1
4
2
3
5
7
6
2
By the way…
Do you already know about PROGmatic? – You can
programme SPARmatic comet by hand or you can
use our convenient programming stick to copy your
personally specifi ed heating and economy times onto
all your EUROtronic energy-saving radiator thermostats at your home which have a programming port in
a matter of seconds.
PROGmatic is available
from specialised stores
and at:
www.eurotronic.org
6
Set up menu
By pressing
MENU
you will arrive at the set up menu.
Please choose one of the items with the selector
wheel. With
OK
you can select o ne menu item
and with the sele ction wheel t hey can be adjusted .
The bu tton
OK
co nfi rms the setting. The button
MENU
leads to the previo us level.
to select the mo de
AUTO = automatic mode
MANU = manual m ode
setting of time p rogramme
setting of c omfort and
economy tempe rature
setting of date and t ime
window fu nction
reset of the devic e to factory pr eset
starting of a n ew adaptation
to adjust the valve
travel functio n
install ation functi on
adaptati on of temperatur e
to the room situat ion
sta ndby function
3
Index
4 – Scope of deliver y, application as dir ected
5 – Display and contro l elements
6 – Set up menu
7 – Inserting / rep lacing batter ies
8 – Setting date and tim e
9 – Installation
10 – Dismounting
11 – Adaptation
12 – Basic operating mo des
13 – Setting heating a nd economy time s
14 – Setting comfo rt and econ omy temperature
15 – Manual operatio n
15 – Additional sett ing possibili ties
19 – Cleaning and used devi ces
20 – Adapter
21 – Help
22 – Declaration of C onformity a nd Guarantee
7
Inserting / replacing batteries
In order to open th e battery
compart ment please
push at the marked
positions to
remove
the cover.
Then inser t the
batteries as s hown
in the illustrat ion.
Do not use accu mulator s!
Ensure tha t the polar ity is co rrect!
Attenti on:
Never recharg e batteri es, danger of explosion! Do
not short- circuit batter ies! Do not disassembl e batteries! Take low batteries out of the device immediately. Keep batterie s away from ex treme warming
– dan ger o f lea kage! Do n ot ap ply u sed a nd ne w
batteries toge ther. If needed, clean the batter y and
the contacts bef ore using them. Keep the bat teries
away from children. When getting in touch with battery acid in stantly irrigate the aff ected parts with
clear water and c all a doctor.
4
Please read the user m anual before you place the
thermostat . Keep the docume nts for later questions and provide them if you pass the thermostat
on to other perso ns.
Scope of de livery
1 SPARmatic com et
energy saving rad iator thermo stat
1 User manual
1 Connector
3 Adapters
Applica tion as dir ected
By purchasing the SPARma tic comet energysaving radiator ther mostat you own a program mable radiator ther mostat which c an be used for
temperature reg ulations in enc losed rooms an d
therefore, it c an contrib ute to the reduc tion of heating energy. – Ple ase use the thermostat only for
this purpose.
The EUROt ronic pr ogramming port is intended
ONLY fo r our EUROtronic programming stick .
Never connect other devices with the progra mming port!
8
Setting date and time
After inserting the batteriesy for the fi rst time the date
will fl ash on the display. Now, date and time can be
set.
Set date with the selector wheel.
Confi rm with
OK
.
Set month with the selector wheel.
Confi rm with
OK
.
Set day with the selector wheel. Confi rm with
OK
.
Set hour with the selector wheel.
Confi rm with
OK
.
Set minute with the selector wheel.
Confi rm with
OK
– That´s it.
On the display
will be shown. Now, the motor will completely move to the installation position
in order to make the installation easier. As soon as
SPARmatic comet is ready for installation
will
be shown on the dis play.
You can also set date and time via the menu item
later on. But in case of that, SPARmatic comet
does not move to the installation position.
➔ In case of replacing batterie s, t he store d t ime
programme will remain active. You should
check the specifi ed time to ensure that.
9
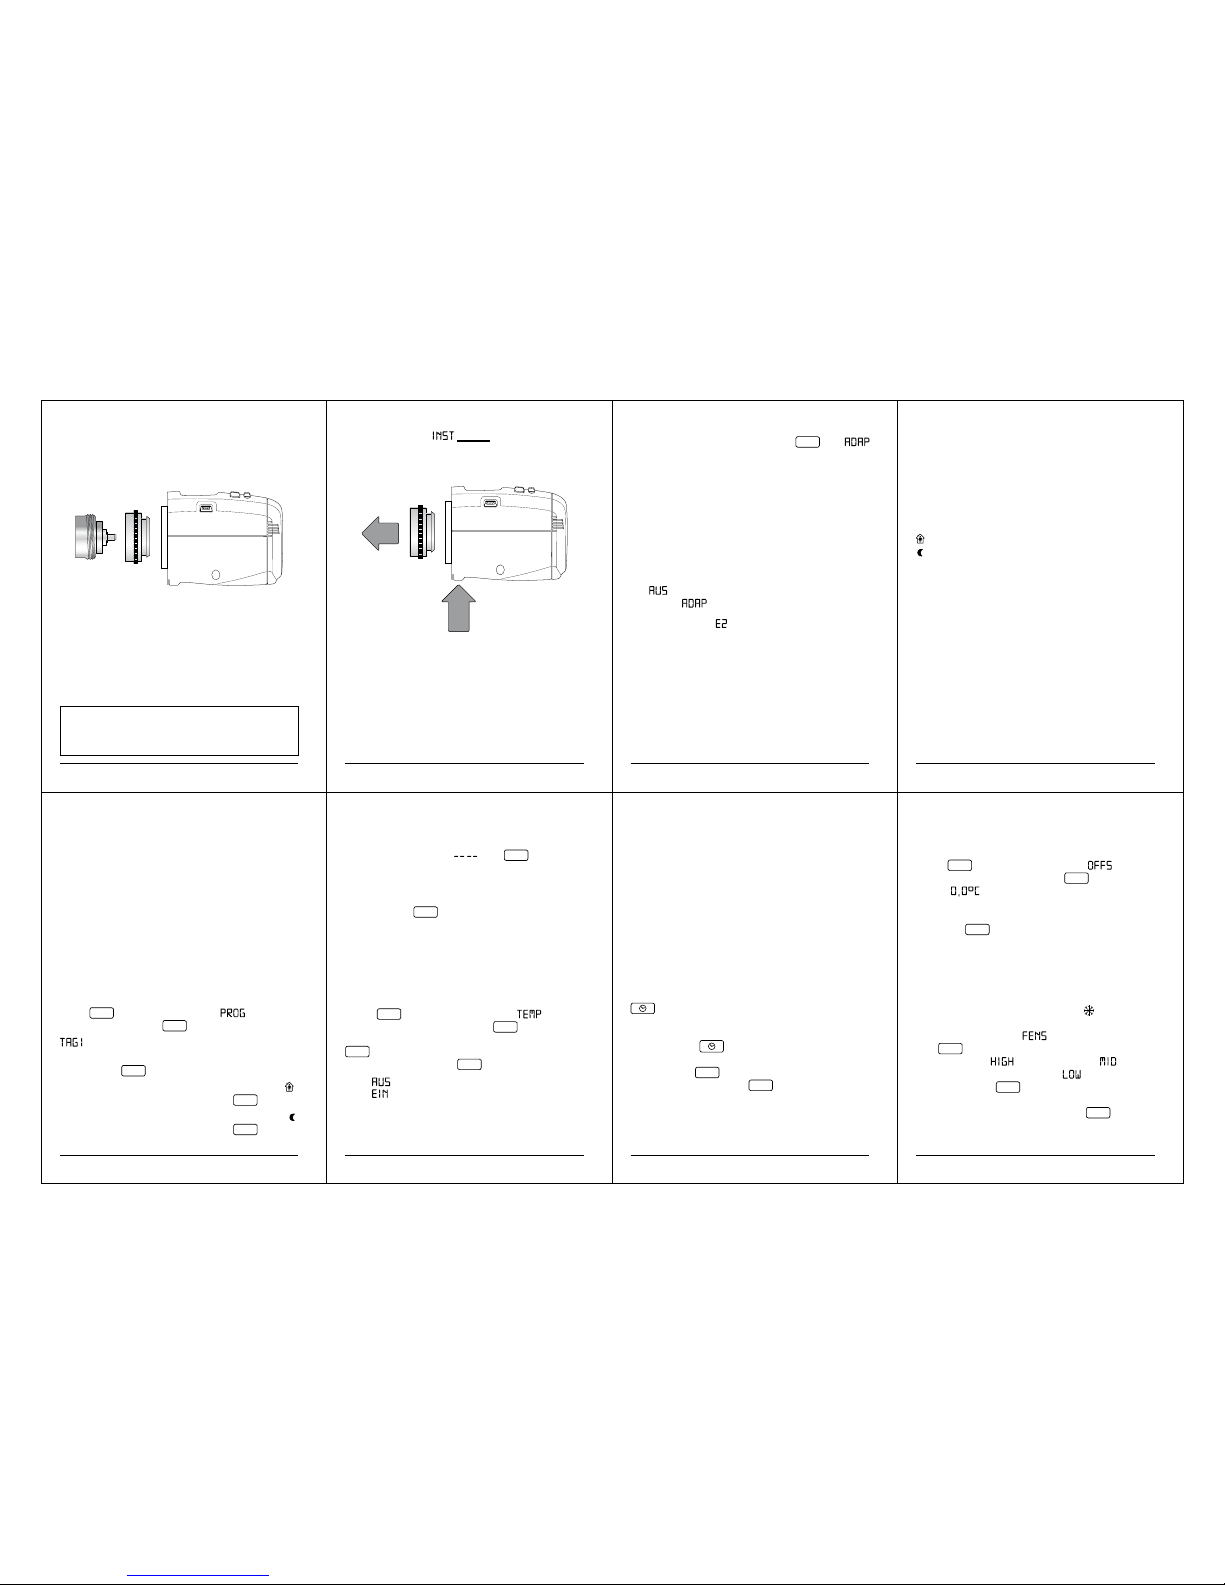
Installation
SPARmatic comet can be quickly and easily mounted on al l common valves (see adapter table).
It can be installed without grime and water spots
because the he ating circuit i s not interrupte d.
1. Turn the manual thermo stat head up
completely, loosen t he fastening and
pull the therm ostat off of th e valve.
2. Use an appropr iate adapter, if required,
and push it onto the val ve.
3. Screw the conn ector on the valve
or the adapter.
4. Now, you put SPARmatic co met on the
connector unt il it noticeab ly clicks into pla ce.
Additional inf ormation abo ut the differ ent
adapters are prov ided on page 20 or at:
www.eu rotronic .org
13
Setting heating and economy times
With SPARmatic comet it is possible to set 4 he ating
and 4 economy times per day – one for each day or
one for a block of several days.
TAG1 to TAG7 represent the weekdays from Monday to Sunday. Additionally, the corresponding days
are shown as abbreviation below the menu bar on
the display.
Block cons tructi on:
T1–5 = same programme from Monday to Friday
T
1– 6 = same programme from Monday to Saturday
T 1 –7 = same programme from Monday to Sunday
➔ For non- programmed days the factory preset
remains active.
Setting o f an individ ual progra mme:
Press
MENU
. Select the menu item with the
selector wheel. Press
OK
.
for Monday is shown on the display.
Select day/block with the selector wheel.
Confi rm with
OK
.
Set the beginning of the 1
st
heating time (symbol )
with the selector wheel. Confi rm with
OK
.
Set the beginning of the 1
st
economy time (symbol )
with the selector wheel. Confi rm with
OK
.
10
➔ In case of a later installa tion, please switch
in the menu to
before you ins tall the
device. Herewi th the installat ion is facilit ated.
Dismounting
➔ In order to dismount SPARmatic comet press
the rel easing device to loosen the locking device. Now, pull the SPARmatic comet off of the
valve.
14
Now, if desired, a 2nd, 3rd or 4th heating/economy
time can be entered.
➔ - If you do not want to set a further heating/eco-
nomy time confi rm „
“ with OK.
The next day for programming is shown on the display.
➔ If you do not want to enter a further day, leave the
menu with
MENU
. If the temperature is shown on
the display the programming is fi nished.
➔ Within the blocks you c an also overwrite single
days with differing times.
Setting comfort and economy
temperature
Press
MENU
. S elect the menu item
w ith the
selector wheel. Co nfi rm with
OK
. Set comfort
temperature with the selec tor wheel . Confi rm with
OK
. Set the economy temperature with the selec-
tor wheel. Confi rm with
OK
.
Area
: 8°C, fre eze protection func tion is active
Area
: valve is c ompletely open
11
Adaptation
Initial installa tion: Press the button OK until
appears on the disp lay so that SPARmatic comet
will be able to sta rt i ts adapt ation. The devi ce wil l
adapt itsel f to the stroke of your valve b ody. To do
this the valve will now be opene d and closed several times to store t he end points.
In som e cas es thi s pro cess can take a few minutes. After successf ul adaptation it returns to normal
mode.
➔ S hould adaptation become necessary again,
e.g. if your radiator does not cool down in the
-Position, pl ease press in the menu the
button
until adaptatio n starts ag ain.
➔ I f the mistake
is shown on the di splay place
SPARmatic comet onto the radiator valve an d
then take the batterie s ou t fo r a short time in
order to execute a reset .
15
➔ B y th e way: Maximum en ergy saving can be
obtained with an ec onomy temperature which
is about 5 ˚C below the comfort tempe rature.
Manual operation
With the selector wheel an adaptation of the ro om
temperature is pos sible at any time. In the AUTOmode it remains active until the next switch poi nt
is reached. Now, the usual programme becomes
active again.
Further functions
Timer func tion
The timer functio n is selected with the time r-button
. With this fu nction a user- defi ned temperature for a programmable period can be enter ed.
This c an be very useful in ca se of a party, for example. Press
. First, t he time f or which the
time programme has been deacti vated is shown.
Confi rm with
OK
. Now, the desired temperature
can be set. Confi rm with
OK
.
12
Basic operating modes
MANU- mode
In the MANU-mode SPARmatic c omet adjusts to
the manually spe cifi ed tempe rature.
AUTO-mod e
In the AUTO- mode SPARma tic comet c hanges
between to temp eratures acc ording to the time
programme th at has been set:
comfor t temper ature (factor y preset 21°C)
economy te mperatu re (factory pr eset 16°C)
The he ating a nd ec onomy ti mes c an be specifi ed
via the adjustable t ime programme. It is pos sible
to set 8 switch points (4 h eating and 4 economy
times) per day at the m ost. SPARma tic comet has
the following f actory pre set:
Heating t ime:
Heating with c omfort tem perature
(factory pre set: 1
st
heating time at 07:00)
Economy tim e:
lowering to eco nomy temperatur e
(factory pre set: 1
st
economy time at 2 2:00)
16
Offse t
If the perceived temperat ure signifi cantl y differs
from the set thermostat tempe rature a temperature
set up can be executed.
Press
MENU
. Select the menu item with the
selector wheel. C onfi rm with
OK
. The degree
setting
will fl ash on the displ ay. Now, set up
the desired adaptatio n for the temperature (from -5
up to +5°C) with the selector wheel. Confi rm your
entry with
OK
. The temperatur e display does not
change!
Window func tion
If you open a window and consequently the temperature drop s signifi cantly, SPARm atic comet will
automaticall y close the heating valve in order to
save energy. The display will show
. Afterwar ds,
SPARmatic com et will resume nor mal operati on.
For the set up select
in the menu. Confi rm
with
OK
. First, the sensibility is selected with the
selector wheel (
= high sensibility, = medi-
um sensibili ty (factor y preset),
= low s ensibili-
ty). Confi rm with
OK
. Now, you enter the time (10
min (factory preset) - 60 min) for which the valve
should remain c losed. Confi rm with
OK
.
 Loading...