

Eurotronic EOS 30 User Manual
EOS 30
ENG REV 02
Warning
Dear customer, thank you for having purchased a product from EUROTRONIC. This instructions sheet contains important information about the
ways of use and the safety of the installation. Follow the instructions and keep them for future reference.
Radio devices cannot be used in the places that have factors of influence such as: close to police stations, airports, banks and hospitals.
It is important to carry out a technical control before using radio system. Only use radio frequency when you do not create problems to the
functioning of the receivers and the emitters.
If more than one installation are functioning in the same frequency, both could be blocked and could not work properly.
Technical features:
Feeding:
Temperature of work
Dimensions
Channels
Grups
Daily programms
Rolling code
Frequency
1 battery 3 V type CR 2032
0°C ÷ + 50°C
42 x 135 x 18 mm:
1
8
Yes
Yes
433,92 MHz
Push buttons:
PROG
CH-
CH+
▲
▼
STOP
STOP+ CH+
To record programs in the receivers
To select previous channel
To select following channel
UP
DOWN
STOP
To activate and deactivate sun function
(whenever it gets ready of captor of the sun)
To activate and to deactivate sun function:
To activate sun function: press STOP button and + during 4 seconds until the led light turns on. The remote control will emit an order to the
receiver and then sun function will be activated.
To deactivate sun function: press STOP button and + during 4 seconds until the led light turns off. The remote control will emit an order to the
receiver and then sun function will be deactivated.
Battery replacement:
EOS 30 is feed by two 3 V battery CR 2032 type. To replace the battery open the low lid of the emitter EOS 1 and extract the exhausted battery
replacing it by a new one. Replace the lid to its initial position.
Attention there is danger of explosion if the battery is replaced with an wrong type of battery. Make sure that you dispose of old batteries
into suitable container.
All the products and the specific skills quoted in this document are submitted to changes without previous notice.
Except personal authorizations and specific cases previously reconciled by EUROTRONIC, the device has to be used exclusively with
EUROTRONIC receivers.
EUROTRONIC can not be considered to be in charge of possible damages caused by improper, erroneous use or unreasonable cases.
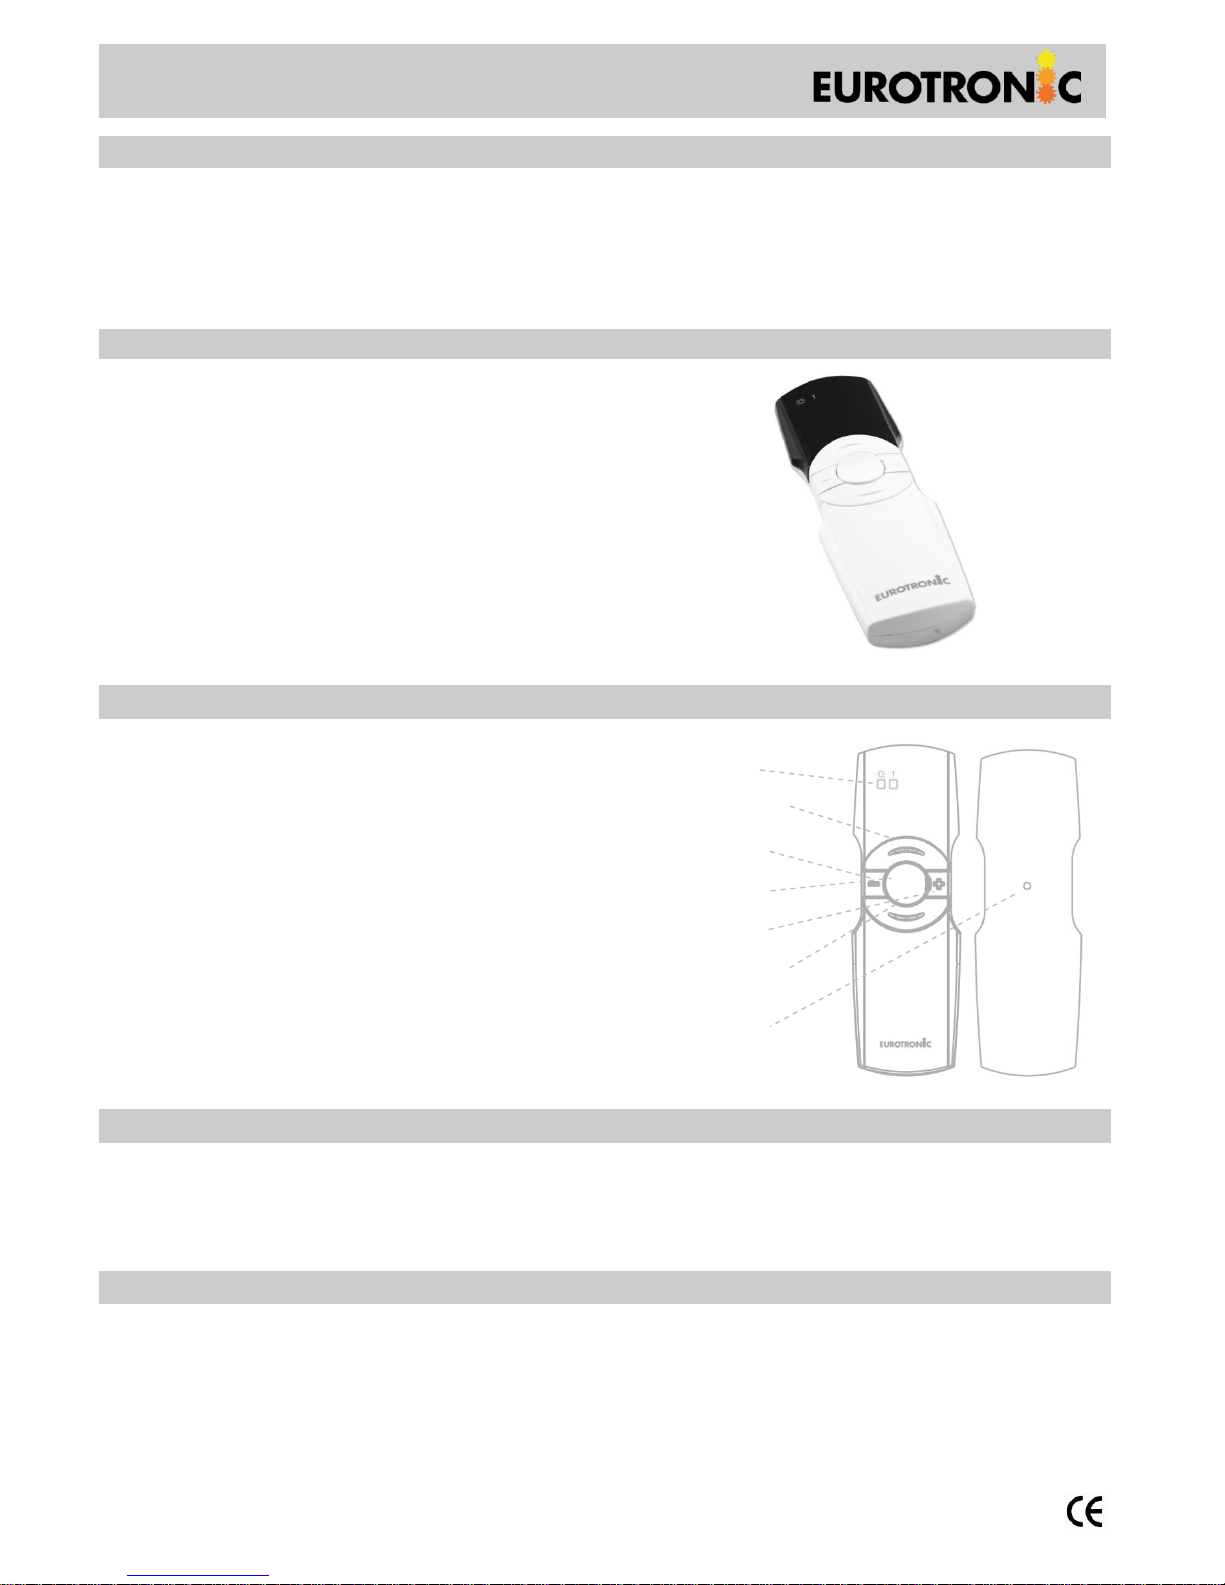
EOS 1
LED
SUBIDA
CH -
STOP
CH +
BAJADA
PROG

PROGRAM MENU
With this menu you can program the parameter adjustment of the transmitter device. To move around the menu use the CH + and CH- buttons.
To enter in each section of the menu press the STOP. To exit each section press STOP again.
h (time)
Press the STOP button to modify the hour. When symbol appears you can modify the hour. Using buttons you can programm current
time. Push STOP to exit from main menu.
d (day)
Press STOP button to modify the day. When symbol appears you can modify the day. Using buttons you can programm the selected day.
Push STOP to exit from main menu.
CHANNEL (active channels)
Each channel can be enabled or disabled so that the transmitter can be adapted to installation requirements.
Press the STOP button to change channels. When symbol appears, you can change the channel.
Press keys to move the channels until you reach the desired.
Press CH- to change the channel status. "OFF" appears indicating that the channel is disabled and if "On" is enabled.
Once enabled or disabled all desired channels Press STOP to exit back to main menu. alir al menu principal.
GENERAL (group from 1 to 8)
A GENERAL channel can group individual channels. When the GENERAL channel is selected individual channels that will work as grouped.
Press STOP to group channels. When symbol appears, channels can be grouped.
Press keys to move the channels until you reach the desired channel.
Press CH-to change the channel status. "OFF" appears indicating that the channel is not added to the general group. If "on" appears indicates
that this channel is added to the general group.
Once the desired channels grouped press STOP to exit to main menu. principal.
TIMER (time program from 1 to 6)
It has 6 time schedules to send automatic actions in the day and hour in the selected week.
For the run time programs, you need the timer to be activated. To activate the timer press keys simultaneously until "ON" appears on the
left side of the time display. If you want to disable the timer, press keys until "OFF" appears on the left side of the time display.
Select the time schedule to be configured (01 to 06). Press STOP to start modifying the time programming.
d (manual mode day)
Press the STOP button to change the days you want to make such an event schedule. Symbol appears to indicate that you can modify the days.
Press keys to move the channels until you reach the desired. Press CH- to change the channel status. "OFF" appears indicating that the
channel is disabled and if "On" appears channel is enabled.
Once enabled or disabled all desired channels press the STOP button to go to the next level.
f (Actio to make automatic operation)
Press the STOP button to modify the action you want to make such an event schedule. Symbol appears to indicate that you can modify the
days. Press keys to move through the different available actions:
order of rise
intermediate position motor (star or venus)
order of descent
intermediate position in TOP-TRONIC engines
Once enabled, press the STOP desired action to pass the next level.
h (hour)
Press the STOP button to change the days you want to make such an event schedule. Symbol appears to indicate that you can modify the
hour. Press keys to program the hour you want to make such an event schedule.
CHANNEL (channels will react to automatic operation)
Each channel can be enabled or disabled to respond to the automatic operation. Press the STOP button to change the channel symbol appears
to indicate that you can change the channel.
Press the keys to move the channels until you reach the desired.
Press CH- to change the channel status. "OFF" appears indicating that the channel is disabled. "On" appears if is enabled.
Once enabled or disabled all desired channels Press the STOP button to go the next level. nivel.
GENERAL (general channels will react to automatic operation)
Each channel can usually be enabled or disabled to respond to the automatic operation. Press the STOP button to change the general channels.
Symbol appears to indicate that you can change the channel.
Press the keys to move the channels until you reach the desired general.
Press CH- to change the overall channel state. "OFF" appears indicating that the overall channel is disabled. "On" appears if is enabled.
Once enabled all channels or disabled all general selected channels press STOP to pass the next level.
Press programming button (back side of the control) to exit to the main menu and thus end the program process.
PROGRAM MENU Press PROG + STOP to enter until h
will appear
 Loading...