


COMET
Kontaktmöglichkeiten
Kundenservice:
Eurotronic Technology GmbH
Südweg 1 |
36396 Steinau-Ulmbach
Telefon: +49 (0) 6667 91847-0
E-Mail: info@eurotronic.org |
Internet: www.eurotronic.org
Technische Änderungen jederzeit vorbehalten. Kompatibilitätsangbenben ohne Gewähr.
Bezeichnung Comet Wifi
EAN 4260012711998
Artikelnummer 700200
Versorgungsspannung 2 x 1,5V LR6/Mignon/AA
Gewindeanschluss M30 x 1,5mm
Wirkungsweise Typ 1
Abmessungen (B x H x T) 62 x 68 x 83 mm
Gewicht 230 g (inkl. Batterien)
Schutzart IP20
Verschmutzungsgrad 2
HINWEIS: Eine ausführliche Bedienungsanleitung steht Ihnen online zur Verfügung:
https://eurotronic.org/service/downloads/
LIEFERUMFANG
1x Comet Wifi Energiesparregler, 2 LR6/Mignon/AA Batterien, Kurzanleitung, 3 Adapter
(Danfoss RA; RAV, RAVL)
HINWEIS: Überprüfen Sie bitte den Lieferumfang auf Vollständigkeit und Unversehrtheit.
WARN-/ SICHERHEITSHINWEISE
Bestimmungsgemäße Verwendung
Mit dem Comet Wifi haben Sie einen programmierbaren Heizkörperregler erworben, der zu
einer Temperaturregelung in geschlossenen Räumen verwendet wird und so zur Reduzierung
der Heizenergie beiträgt. Bitte verwenden Sie Comet Wifi nur zu diesem Zweck.
Sicherheitshinweise
Comet Wifi ist für die Verwendung in Gebäuden vorgesehen.
Betreiben Sie Comet Wifi nur wie in der Bedienungsanleitung beschrieben.
Warnhinweise
Batterien niemals wieder aufladen, nicht kurzschließen, nicht auseinander nehmen Explosionsgefahr! Erschöpfte Batterien umgehend aus dem Gerät entfernen.
Batterien vor starker Erwärmung schützen – erhöhte Auslaufgefahr!
Keine gebrauchten und neue Batterien zusammen verwenden.
Wenn Kinder mit dem Energiesparregler oder der Verpackung spielen, können sie Kleinteile
verschlucken und ersticken.
6.) Nach erfolgreicher Konfiguration, können Sie Ihr neues Thermostat benennen. Um alle
Änderungen zu speichern, klicken Sie anschließend auf den Button “Speichern“.
7.) Nach erfolgreichem Hinzufügen des Comet Wifi zu Ihrem WLAN-Netzwerk, fährt Comet Wifi
in den Installationsmodus. Im Display Ihres Comet Wifi wird “Ad“ angezeigt.
Beginnen Sie nun mit der Montage am Heizkörper.
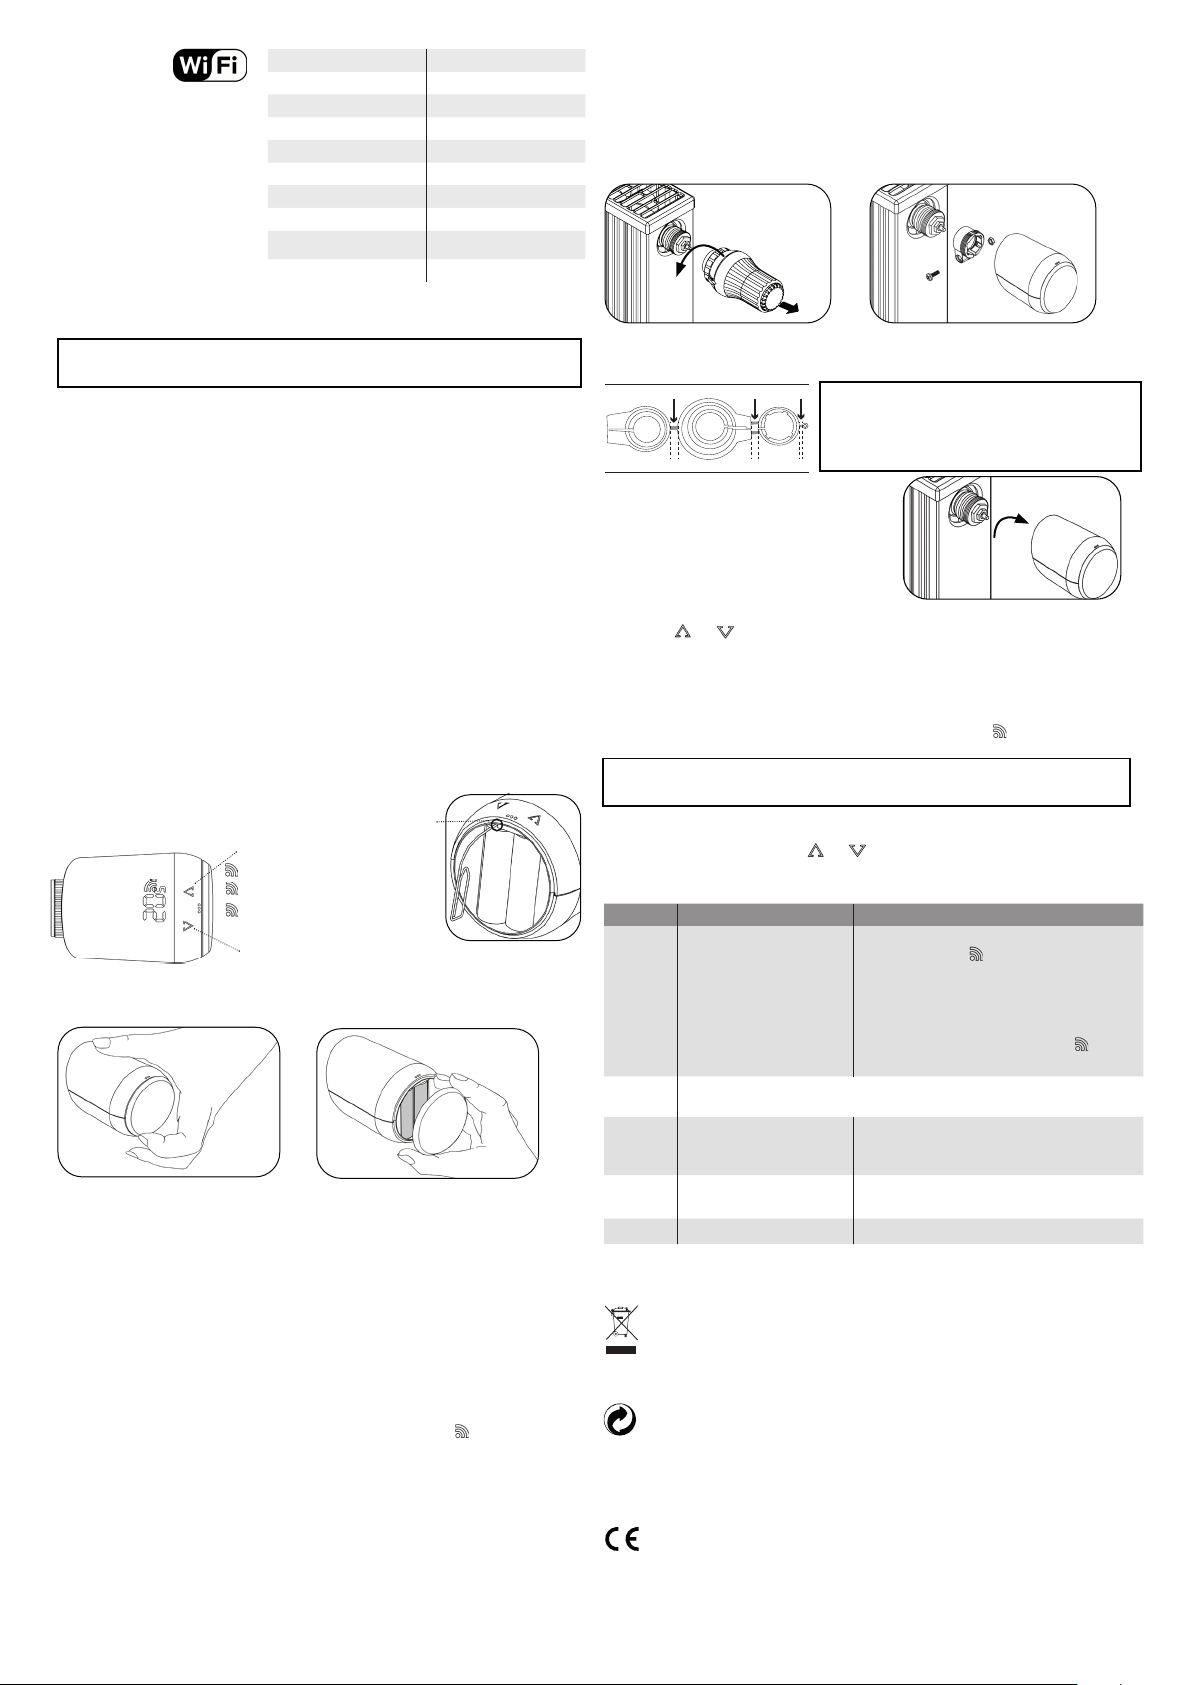
MONTAGE AM HEIKÖRPER
1. Alten Thermostatkopf ganz aufdrehen, Befestigung lösen und vom Ventil abziehen.
2. Wählen Sie ggf. einen passenden Adapter und montieren Sie ihn auf das Ventil.
HINWEIS: Entfernen Sie die Verbindungsstücke der Kunststoff-Adapter restlos, bevor Sie einen der beiliegenden Adapter verwenden! Informationen zu den einzelnen Adaptern
finden Sie unter: www.eurotronic.org/Service/FAQ.
3. Drehen Sie das Thermostat auf das Ventil bzw.
auf den Adapter, indem Sie die Überwurfmutter im
Uhrzeigersinn aufdrehen.
Achten Sie darauf, dass sich das Gerät auch bei späterer Montage / Demontage im Installationsmodus
befindet. Bitte montieren/demontieren Sie das Gerät
ausschließlich in dieser Position.
4. Nach vorgenommener Montage, kann Comet Wifi mit dem Adaptieren starten, dafür bitte
die Taste und zusammen für ca. 5 Sekunden gedrückt halten. Nach erfolgreicher Adaptierung geht Comet Wifi in den Normalbetrieb über, die LEDs zeigen die Solltemperatur an.
ANLERNMODUS AKTIVIEREN
Um den Anlernmodus Ihres Comet Wifi erneut zu aktivieren, drücken Sie bitte die tiefer
liegende Taste im Batteriefach (siehe Bedien- und Anzeigelemente). Im Display erscheint “PA“
und blinkt.
HINWEIS: Um an den tiefer liegenden Taster zu gelangen, benötigen Sie eine Büroklammer
oder einen ähnlich dünnen und spitzen Gegenstand.
BEDIEN- UND ANZEIGEELEMENTE
Taster für Anlernmodus
Temperatur erhöhen
blinkt = Server wird gesucht
leuchtet = Mit Server verbunden
leuchtet nicht = Keine Verbindung
zum Server vorhanden
Temperatur senken Anlernmodus aktivieren
BATTERIEN EINLEGEN
1. Entfernen Sie den Batteriedeckel, indem Sie ihn an der Einkerbung nach oben ziehen.
2. Legen Sie nun die Batterien ein.
Achten Sie auf die richtige Polarität! Verwenden Sie keine Akkus!
3. Bringen Sie den Batteriedeckel wieder am Comet Wifi an, indem Sie ihn aufdrücken bis
es klickt.
ERSTE SCHRITTE
1. Eurotronic Wifi App herunterladen
Laden Sie sich die Eurotronic Wifi App aus dem Google Play Store oder Apple Store herunter.
2. Raum in der App anlegen
Erstellen Sie in der App einen neuen Raum. Legen Sie einen Raumnamen fest und ordnen
Sie Ihrem Raum ein Icon oder ein selbst erstelltes Bild zu.
3. Hinzufügen zu einem WLAN-Netzwerk
1.) Nachdem Sie die Batterien eingelegt haben befindet sich Comet Wifi bereits im Hinzufügemodus. Im Display des Thermostats wird “PA“ (Pairing) angezeigt und das Funksymbol
blinkt. In der App wischen Sie nach Erstellen des neuen Raumes bitte nach links, um die
Gerätesuche zu starten.
2.) Nach erfolgreicher Suche wird der Comet Wifi unter “Gefundene Thermostate“ angezeigt.
Klicken Sie auf das neu gefundene Thermostat.
3.) Nun können Sie bestimmen, in welches WLAN-Netzwerk der Comet Wifi eingebunden
werden soll. Wählen Sie Ihr gewünschtes WLAN-Netzwerk aus.
4.) Geben Sie das Passwort für Ihr WLAN-Netzwerk ein. Klicken Sie anschließend auf
“Passwort prüfen“. Wenn das WLAN-Passwort korrekt ist, wird der Button “Thermostat einrichten“ aktiviert. Bitte klicken Sie auf diesen Button.
5.) Bitte klicken Sie nun auf den Button “Thermostat einrichten“, um den Hinzufügevorgang
abzuschließen.
RESET
Für einen Reset halten Sie bitte die Tasten und zusammen für 10 Sekunden gedrückt.
FEHLERBEHEBUNG
Problem Ursache Lösung
Es wird
kein Thermostat
gefunden.
E1-E3 Durch das Drücken einer beliebigen Taste wird die Fehleranzeige im Display ge-
E1 Keine Adaption möglich. Comet
E2 Ventilhub zu kurz oder Batte-
E3 Keine Ventilbewegung möglich. Sicherstellen, dass Ventilstößel frei beweglich ist.
Comet Wifi befindet sich nicht
mehr im Anlernmodus.
löscht und die Adaptierung startet neu.
Wifi ist nicht am Heizkörper
montiert.
rieleistung zu schwach.
Während des Anlernmodus wird auf dem Thermostat “PA“ angezeigt und das Funksymbol blinkt.
Der Anlernmodus ist nur für 2 Minuten aktiv. Wenn
das Thermostat in diesem Zeitraum nicht zu einem
WLAN-Netzwerk hinzugefügt wird, erscheint auf
dem Thermostat “Ad“.
Bringen Sie Ihren Comet Wifi erneut in den Anlernmodus. Auf dem Display des Thermostats
erscheint wieder “PA“ und blinkt. Folgen Sie nun
der Erklärung unter “Erste Schritte“.
Gerät korrekt am Heizkörper montiert? Bitte montieren Sie den Comet Wifi korrekt am Heizkörper.
Ventilstößel per Hand mehrmals öffnen und schließen oder neue Batterien einsetzen.
RECHTLICHE HINWEISE
UMWELTSCHUTZ:
Ab dem Zeitpunkt der Umsetzung der europäischen Richtlinien 2012/19/EU in nationales Recht
gilt folgendes: Elektrische und elektronische Geräte sowie Batterien dürfen nicht mit dem Hausmüll
entsorgt werden. Der Verbraucher ist gesetzlich verpflichtet, elektrische und elektronische Geräte sowie
Batterien am Ende ihrer Lebensdauer an den dafür eingerichteten, öffentlichen Sammelstellen oder an
die Verkaufsstelle zurückzugeben. Einzelheiten dazu regelt das jeweilige Landesrecht.
®
Entsorgen Sie die Verpackung sortenrein. Geben Sie Pappe und Karton zum Altpapier, Folien in die
Wertstoff-Sammlung.
Die Symbole auf dem Produkt, der Gebrauchsanleitung oder der Verpackung weisen auf diese Bestimmungen
hin. Mit der Wiederverwertung, der stofflichen Verwertung oder anderen Formen der Verwertung von Altgeräten/Batterien leisten Sie einen wichtigen Beitrag zum Schutz unserer Umwelt.
KONFORMITÄTSERKLÄRUNG:
Hiermit erklärt die Eurotronic Technology GmbH, dass der Comet Wifi Heizkörperthermostat der Richt
linie 2014/53/EU entspricht. Der vollständige Text der EU-Konformitätserklärung ist unter der
folgenden Internetadresse verfügbar: https://eurotronic.org/service/downloads.
Garantiehinweise finden Sie unter www.eurotronic.org
COMET
Support and Contact
Customer Service:
Eurotronic Technology GmbH
Südweg 1 |
36396 Steinau-Ulmbach
Telefon: +49 (0) 6667 91847-0
E-Mail: info@eurotronic.org |
Internet: www.eurotronic.org
Technical modifications are subject to change. All descriptions for compatibility are without engagement.
Name of device Comet Wifi
EAN 4260012711998
Article number 700200
Supply Voltage 2 x 1,5V LR6/Mignon/AA
Connection M30 x 1,5mm
Method of operation Typ 1
Dimensions (B x H x T) 62 x 68 x 83 mm
Weight 230 (incl. batteries)
Degree of protection IP20
Degree of pollution 2
6.) After successful configuration, you can rename your thermostat. In order to save all changes you have done, please select the button “Save“.
7.) After Comet Wifi has joined your wireless network successfully, Comet Wifi is going to
installation mode. “Ad“ is shown on the display of Comet Wifi.
Please start to mount Comet Wifi on the radiator now.
MOUNTING ON RADIATOR
NOTE: For a more detailed installation and operation guide please visit:
https://eurotronic.org/service/downloads/
SCOPE OF DELIVERY
1x Comet Wifi energy-saving radiator, 2 LR6/Mignon/AA batteries, quick start guide, 3
adapters (Danfoss RA; RAV, RAVL)
NOTE: Please check the delivery scope for completeness and intactness.
WARNING/SAFETEY
Intended Use
This device is designed to adjust the temperature in your rooms comfortably and completely
according to your needs while helping you to reduce your heating costs
effectively. Please use Comet Wifi only for this purpose.
Safety instructions
Comet Wifi is designed for the use in buildings.
Operate Comet Wifi only as described in the installation and operation guide.
Warning instructions
Do not heat, short-circuit, charge or disassamble batteries. Risk of explosion! Take low batteries out of the device immediately.
Protect batteries from excessive heat – increased risk of battery leakage.
Do not use new and used batteries together.
When children play with the thermostat or packaging, they might swallow small parts and
suffocate.
CONTROL AND DISPLAY ELEMENTS
Button for joining mode
Increase temperature
blinking = searching for server
lights = connected to server
does not light = no connection
to server
Decrease temperature
Activation of joining mode
INSERTING BATTERIES
1. Remove the battery cover by pulling it upwards at the notch.
2. Now insert the batteries. Pay attention to the correct polarity! Do not use rechargeable
batteries.
3. Place the battery cover back on the Comet Wifi by pressing until it clicks.
1. Unscrew the old thermostatic head completely, loosen the fastening and pull it off the valve
2. If necessary, select a suitable adapter and mount it on the valve.
NOTE: Remove the connectors of the plastic adapters
completely before using one of the included adapters! For
Danfoss RA/RAV, use the enclosed screw and nut. Information about adapters: www.eurotronic.org/Service/FAQ.
3. Screw the thermostat onto the valve or adapter
by turning the union nut clockwise.
Make sure that the device is in the installation mode
even if it is installed/removed later. Only assemble/
disassemble in this position.
4. After successful mounting, Comet Wifi can start with the adaptation. Please hold down
the buttons and for 5 seconds. After successful adaptation, Comet Wifi switches to
normal operation, the display shows the setpoint temperature.
ACTIVATION OF JOINING MODE
In order to activate the joining mode of Comet Wifi again, please press the lower push button
in the battery compartment. Afterwards Comet Wifi shows “PA“ and is blinking.
NOTE: To use the lower push button in the battery compartment, you need to use an item
like a paper-clip or a similar fine and pointed item.
RESET
For a reset please keep the buttons and pressed for 10 seconds.
TROUBLESHOOTING
Problem Ursache Lösung
Thermostat
cannot be
found
E1-E3 By pressing any button, the error message in the display is deleted and the adaptation
E1 No adaptation possible. Comet
E2 Valve stroke too short or battery
E3 No valve movement possible. Make sure that the valve tappet can move freely.
Comet Wifi is not in the joining
mode anymore.
restarts.
Wifi is not mounted on the
radiator.
power too low.
During the joining mode the thermostat shows “PA“
and the radio symbol is blinking. The joining mode is
active for 2 minutes. If the thermostat is not joining a
wireless network within this time, the display will show
“Ad“ after 2 minutes.
Please start the joining mode of your Comet Wifi again.
The display of Comet Wifi shows “PA“ and is blinking. Please follow the explanation within “First steps“.
Device correctly mounted on radiator?
Mount the Comet Wifi correctly on the radiator.
Open and close the valve tappet several times by hand
or insert new batteries.
FIRST STEPS
1. Download the Eurotronic Wifi App
Download the free Eurotronic Wifi app from the Google Play Store or Apple App Store.
2. Create a room within the App
Create a new room within the app. Determine a name for your room as well as an icon.
Alternatively you can use your own picture.
3. Joining a wireless network
1.) After you have inserted the batteries, Comet Wifi is already in the joining mode. The
display of the thermostat shows “PA“ (Pairing) and the radio symbol is blinking. Please
swipe to the left within the app, so that the app is starting to search for devices.
2.) After successful search, Comet Wifi is displayed within “Found thermostats“. Please
select the new found thermostat which is shown.
3.) Now you can determine, which wireless network your Comet Wifi should join. Please
choose your desired wireless network.
4.) Please enter the password for your wireless network. Afterwards, please select the button “Checking password“. If your entered password is correct, the button “Set up thermostat“
is activated. Please press this button.
5.) Please select the button “Save“ in order to complete the joining process.
LEGAL INFORMATION
ENVIRONMENT PROTECTION:
From the date of transposition of the European Directives 2012/19/EU into national law, the following
shall apply: Electrical and electronic devices as well as batteries must not be disposed of with household
waste. The consumer is legally obliged to return electrical and electronic equipment and batteries at the
end of their service life to the public collection points set up for this purpose or to the point of sale. Details are
regulated by the respective national law.
®
Dispose of the packaging sorted by type. Add paperboard and cardboard to the waste paper, foils to the
recyclables collection.
The symbols on the product, the instruction manual or the packaging refer to these regulations. By recycling,
material utilisation or other forms of utilisation of old devices/batteries, you make an important contribution to
the protection of our environment.
DECLARATION OF CONFORMITY:
Eurotronic Technology GmbH hereby declares that the Comet Wifi radiator thermostat
complies with all applicable European Economic Area regulations of Directive 2014/53/EU.
The full text of the EU Declaration of Conformity is available at the following internet address:
https://eurotronic.org/service/downloads.
Warranty information is available online: www.eurotronic.org.
 Loading...