

Page 1
The intelligent Bluetooth enabled
energy-saving radiator thermostat
User manual and Guarantee
Pleas e read the us er manual be fore inst alling t he thermo stat .
Pleas e keep the in struct ion manual f or later r eference e .g.
remounting the thermost at on another radiator.
Included in delivery
1 Come t energy -saving B luetoo th enabled r adiator t hermos tat
1 User ma nual
1 Conn ector
3 Adap ters (Dan foss RA , Danfos s RAV, Danf oss RAVL )
Safety Instructions
• For in door use on ly
• Use pr oduct onl y as describ ed in the user m anual.
• For us e in dry dus t free env ironmen ts, keep ou t of direc t sunligh t.
• Disco ntinue us e of produc t if it is obv iously da maged.
• This p roduct sh ould not be o pened, al tered, mo dified or
reengineered.
Warni ng: Never re charge, sh ort or tak e the bat teries apa rt.
Exp losion ha zard! Remo ve used bat terie s from devi ce immedia tely.
Pro tect bat teries f rom high te mperatu res to avoi d risk of lea kage!
Do not u se combina tion of ne w and used bat terie s. Clean th e batteri es and cont acts bef ore use. Ke ep batte ries away f rom child ren.
Avoid c ontact w ith ski n and eyes. In c ase of cont act wit h batter y
acid im mediatel y rinse t he affec ted area th oroughl y with pl enty of
clean w ater and see k medical at tent ion.
Intended Use
In purc hasing the C omet Blu e energy- saving ra diator t hermos tat
you no w own a progr ammable ra diator t hermost at to be use d
for re gulatin g tempera ture and re ducing heat ing energ y costs i n
enclo sed rooms . – Please us e the ther mostat o nly for th is purpos e.
Inserting/replacing batt eries
Remo ve the bat tery cov er by press ing the bat tery c over upwar ds
(1) at th e highligh ted poin t and then ta king it ou t (2).
(2)
(1)
Inser t the bat terie s as shown in t he applian ce.
Do not u se rechar geable bat teries! E nsure cor rect +/- p olarity
orientation!
Set ting date a nd time
Af ter inser ting t he batt eries fo r the fir st time t he date wi ll flash o n the
displ ay. Date an d time can no w be set.
Set da te using t he selec tor wheel . Conf irm wi th
OK
.
Set mo nth usin g the selec tor wheel . Co nfirm w ith
OK
.
Set da y using the s elector w heel. Confirm wit h
OK
.
Set ho ur using th e selecto r wheel. Confirm wi th
OK
.
Set mi nute usi ng the selec tor whee l. Confirm wit h
OK
.
– Tha t´s it.
will a ppear on the d isplay. Th e motor wi ll now move c omplet ely to the o pen posi tion in ord er to accommo date easy i nstall .
As soo n as Comet B lue is ready f or insta llation
will a ppear on
the di splay. (
– is sel ectable in t he menu at an y time). Do n ot
pres s any other b utton s! Connec t device wi th the coup ling ring .
> mounting.
Comet Blue automatically switches between summer and winter
time s etti ngs. You can al so set date a nd time lat er via the m enu
opt ion
. But in t his case, C omet Blue d oes not aut omatica lly
open t o the inst allatio n positi on.
• When r eplacing ba tter ies, the s tored ti me schedul e will
remai n active . You can check th is by noti ng the spec ified ti me.
Installat ion
Come t Blue can be q uickly a nd easily m ounte d on all well k nown val ve
conne ctors (s ee adapt er table) . It can be in stalle d cleanly a nd easil y
wit hout in terrup ting t he hot wat er flow.
valve – a dapter – connector
valve – connector
1. Open the o ld therm ostat ic valve com pletel y, undo the con nector
and rem ove from t he radiat or.
2. If require d select th e appropr iate adap tor and push o n to valve.
3. Screw the co nnector o nto the va lve or adapt er.
4. Attach t he Comet B lue to the co nnector b y pushing un til
you hea r a noticeab le click.
You will f ind addit ional infor mation abo ut the dif ferent
adapte rs at: www.eurotronic.org
ATTENTION: You shou ld be able to c onnect Co met Blue wi thout
appl ying forc e. Ensure t hat the app liance is in t he „
“ or „ “
position.
• Af ter disco nnectin g the Come t Blue fro m the radia tor
(e.g . to reprog ram or move t o anothe r radiato r), pleas e ensure
that „
“ is sho wing in men u window be fore at tempt ing
to re -insta ll the dev ice. Only a ttach C omet Blue t o radiat or
when
is showing in menu.
Adaptation (Synchronisation)
Init ial inst allatio n: Press t he butt on OK unt il appear s on
the di splay, Com et Blue wil l now be able t o start i ts sync hronisation p rocess. T he device w ill adapt i tself t o the str oke of your va lve
body. To do t his the va lve will be o pened and cl osed sever al times
to st ore the end p oints . This proc ess can take u p to a few minu tes.
Af ter succes sful adap tation i t retur ns to norma l mode.
• Sho uld fur ther adapt ation be n ecessar y, e.g. if t he radiat or
does no t cool dow n when in the O FF posi tion, pr ess the
but ton again u ntil
is shown in t he menu win dow and
the ada ptati on process w ill star t again.
• If t he error me ssage
show s in the disp lay connec t Comet
Blue t o the radia tor and rem ove batt eries for a f ew seconds
to ini tiate a r eset.
Ther e are two me thods for p rogramm ing your ene rgy-sa ving controll er. If you sho uld want to p rogram th e Comet Blu e via your sm art
phone o r tablet pl ease read ch apter 1. Ins truct ions for Blu etooth.
If you w ant to prog ram the dev ice manuall y please re ad chapter 2 .
manual programming using touch keys.
1. Instructions for Bluetooth
Down load the f ree Appli cation “E UROpro g” from Ap p Store( iOS)
or Goog le Play St ore (An droid) as re quired and i nstall o n your
smar tphone o r tablet . In the set tings me nu activa te the Blu etooth
func tion of yo ur smart phone or tab let.
Open t he app aft er having i nstalle d on your
smar tphone o r tablet . Now selec t Comet Blu e
devi ce on the st art page.
Creating Room Profiles
To add a roo m press the m enu but ton. Ent er the name o f the room
in the p rovided s pace and conf irm your s electio n with OK . Now
choos e the room y ou have just e ntered an d press men u again to add
an appliance (radiator).
Selec t and press “ Connect ” to search
for th e appliance . When the a ppliance
is loca ted the me ssage”Ne w Comet Blu e”
will a ppear in disp lay. Selec t this opt ion.
If th is is the ini tial ins tallat ion you wil l be
asked t o provid e a PIN – this is 000 000.
This P IN can be chan ged in the men u in
order t o diff erentia te betw een mult iple
appli ances. You can a lso end the p rocess
at any t ime by pres sing “Can cel” or
alte rnativ ely sta rt the pro grammin g in the
“Of fline Mo de” with out connec ting to
the appliance.
Attention! The Com et Blue wil l now synch ronise wi th the da te
and ti me from you r smartp hone or tab let.
Prog ramming o f Comfor t and Econo my Tempera ture set tings
Simp ly adjust t o the desi red Comf ort and Eco nomy temp eratur e
set tings in t he corres ponding sp aces by usin g the arrow l ocated
on the r ight hand s ide.
Setting the Offset Temperature
Becaus e the temp erature i s measured d irectl y at the radi ator it
can dev iate fro m other par ts of th e room. In or der to balan ce this
devi ation we can p rogram an o ffset t emperat ure. For e xample if
19° C is measure d instead o f the progr ammed 21° C then the o ffset
will b e 2°C.
Current Temperature
The cu rrent tem peratu re is shown i n the App.
Time Schedules
It is po ssible t o program eac h day indiv idually or t o set a prog ram
for a bl ock of days e. g. Mon-F ri.
Individual Comfort Times
ON – Each day ( Mon-Su n) is allocat ed an indiv idual heat ing/s aving
profile.
OFF – Weekda ys (Mon- Fri) and we ekends (Sa t-Sun) ar e allocate d
different prof iles.
Daily C omfort T imes
ON – 4 hea ting and 4 sav ing time s chedules pr ogramma ble per day.
OFF – 2 h eating an d 2 saving ti me schedul es program mable per da y.
Child safety lock
ON – Chi ld safet y lock acti vated
Of f – Child saf ety lock d eactiva ted
Setting Comfort Time Zones
You can no w start p rogramm ing your dail y/blo ck setti ngs depend ing on y our select ed time sch edule. Cl ick on “Sta rt Time 1” a nd
selec t the time y our radia tor shall s tart hea ting. T hen click on “S top
Tim e 1” and enter t he time at w hich your ra diator sh all swit ch back
to energy-saving temperatur e.
Vacation Function
Here y ou can pre pro gram your vac ation ti mes. Duri ng these t imes
the C omet Blue w ill keep the t emperat ure at you r set level s. Up to
six va cation pr ofiles ca n be set. To pro gram your va cation pr ofile
use th e arrow on t he right an d enter you r start d ate and tim e then
ente r the end dat e and time o f your vacat ion. Las tly set t he tempera ture tha t will be val id for the co mplete vac ation pr ofile.
Saving your room profiles
To save you r room pro files on A pple devic es click on “P rofile” i n
the t op right of y our screen o r using the m enu butt on for And roid
devices.
Transferring the room profiles
Once yo u have fini shed prog ramming y ou can trans fer desi red room
prof ile devi ce to the Co met Blue by u sing the “D one” comma nd
on App le device s or via the me nu butt on on Andr oid devic es. An
over view of t he progra mmed prof iles sho wing name , tempera ture
and hea ting sche dule will n ow appear on y our screen .
Edit ing or Delet ing Room Pr ofile
To edit or c omplete ly delet e your progr ammed roo m profil e use the
“Edi t” comma nd upper rig ht of scree n on Apple de vices or th e menu
button on Android devices.
2. Manual Operation using touch keys and
scroll wheel.
Set ting date a nd time
Af ter inser ting t he batt eries fo r the fir st time t he date wi ll flash o n the
displ ay. Date an d time can no w be set.
Set da te using t he selec tor wheel . Conf irm wi th
OK
.
Set mo nth usin g the selec tor wheel . Co nfirm w ith
OK
.
Set da y using the s elector w heel. Confirm wit h
OK
.
Set ho ur using th e selecto r wheel. Confirm wi th
OK
.
Set mi nute usi ng the selec tor whee l. Confirm wit h
OK
.
– Tha t´s it.
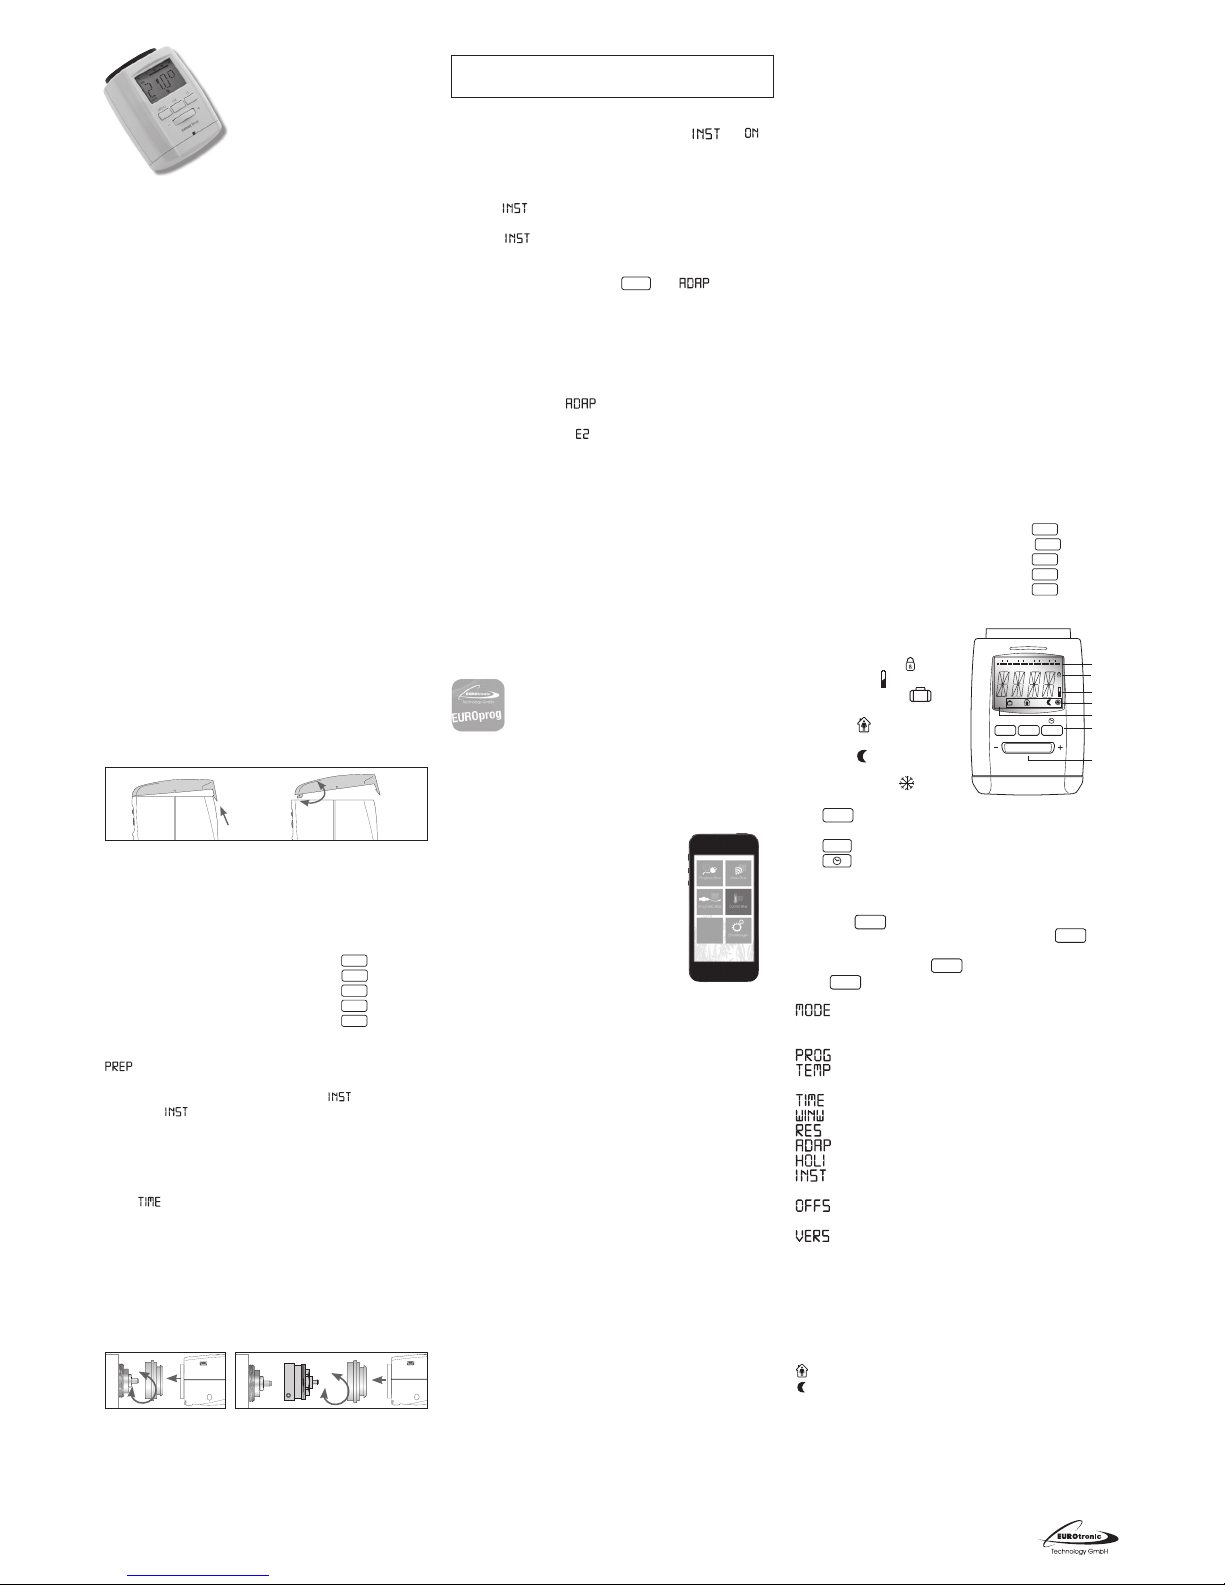
Display and controls
1 Heat ing times
2 Chil d lock acti ve
3 Bat ter y l ow
4.a Vaca tion functi on
4.b Com fort te mperatu re
acti ve
4.c Eco nomy temp eratur e
act ive
4.d W indow/ freeze pr otecti on
fun ction ac tive
5 AUT O or MAN mo de activ e
6.a
MENU
but ton- dir ectly t o the main men u ( standar d display );
in the m enu one keyp ress tak es you back to t he previo us level
6.b
OK
But ton – conf irms comm ands
6.c
But ton – time r functi onalit y
7 Selec tor wheel
Set Up M enu
By pre ssing
MENU
you wi ll arriv e at the set up m enu. Plea se
choos e one of the i tems wit h the sele ctor whee l. Wit h
OK
you can s elect one me nu item and w ith the s electi on wheel th ey
can be adj usted. T he but ton
OK
conf irms the s ettin g. The
but ton
MENU
take s you back to th e previou s level.
Mode selec t
AUT O = automa tic mode
MA NU = manual mod e
programming of room profiles
sett ing of com fort and
econo my temper ature
sett ing of date an d time
open window function
rese t of the dev ice to fact ory defa ult
st arting o f a new valve a djustm ent
vacation f unction
installation functi on (Please only attach the control-
ler to t he couplin g ring whe n INST sho ws on screen)
o ffse t adjustm ent bet ween temp erature i n the room
and at r adiator
Displ ays the cur rent fir mware ver sion of th e device
Basic operating modes
MANU- Modus
In MA N-mode C omet Blue a djusts t o the manual ly specif ied
temperature.
AUT O-Modu s
In AU TO-mod e Comet Bl ue switch es betw een two te mperatu res in
accord ance to the t ime schedu le that has b een progra mmed:
comfort temperature (factory default 21°C)
economy temperature (fact ory defa ult 16°C )
Heat ing and econ omy times c an be specif ied in the ad justabl e time
prog ramme. It i s possibl e to set up to 8 s witchi ng point s (4 heatin g
and 4 eco nomy time s) per day. Fac tory de fault for C omet Blu e is:
Heating time: Heatin g with com fort t emperat ure
(fac tory def ault: 1s t heatin g time at 07 :00)
Economy time: Loweri ng to econom y tempera ture
(fac tory def ault: 1s t economy t ime at 22 :00)
www.eurotronic.org
Mo Di Mi Do Fr Sa So
:
AUTO
MANU
02
461218
MENU OK
1
4
2
3
5
7
6
comet blue
Page 2
Set ting Heat ing and Ener gy Saving S chedule
Wit h Comet B lue it is pos sible to s et up to 4 heat ing and 4 ene rgy saving ti mes per day – ei ther fo r individ ual days or f or a block of se veral
days . DAY 1 to DAY 7 rep resent s the week days from M onday to Su nday. Additionally, the corresponding days are shown as abbreviation
belo w the menu bar o n the disp lay.
Block programing:
T 1–5 = s ame progr amme from M onday to Fr iday
T 1– 6 = same progr amme from M onday to Sa turday
T 1–7 = sam e program me from Mon day to Sund ay
• For no n-prog rammed day s the fact ory defa ult remai ns active .
Set ting an indi vidual pro gramme
Pres s
MENU
. Selec t the menu i tem using the selector wheel.
Pres s
OK
. DAY 1 for M onday is sh own on the d isplay. Se lect day/
block w ith the s electo r wheel. C onfirm w ith
OK
. Set t he star t of
the 1s t heating t ime (sy mbol
)wi th the se lector w heel. Con firm
wit h
OK
. Set t he star t of the 1st economy time (symbol ) wi th the
selec tor whee l. Conf irm wit h
OK
. Now, i f desired , a 2nd, 3rd or 4th
heat ing/eco nomy tim e can be ente red.
• I f you do not wa nt to set a f urthe r heating /econom y time
conf irm „ - - - -“ wi th
OK
. The ne xt day for p rogramm ing is
show n on the dis play. If yo u do not want t o enter a f urther d ay,
leave t he menu wi th
MENU
.
• I f the temp erature i s shown on t he displa y the prog ramming is
fin ished. W ithin t he blocks yo u also can ove rwri te single d ays
wit h diff erent ti mes.
Set ting Com fort and En ergy Savi ng Temperat ures
Pres s
MENU
. Selec t the menu i tem with t he selec tor wheel .
Conf irm wit h
OK
. Set co mfort t emperat ure wit h the selec tor
whee l. Confi rm with
OK
. Set t he energy s aving tem peratur e with
the se lector w heel. Con firm wi th
OK
.
Area O N: 8°C , freeze pr otecti on funct ion is acti ve
Area O FF: valve is c omplete ly open
• E nergy Sav ing Tip: Max imum ener gy savin g can be achieve d
using a n economy t emperat ure about 5 ° C below the c omfor t
temperature.
manual operation
Wit h the sele ctor whee l a manual adju stmen t of the room t emperature i s possibl e at any time . In AUTO m ode this ad justed s ettin g
remai ns activ e until th e next sw itch poin t is reached a fter wh ich
the se t program me becomes ac tive agai n.
Further Functions
Timer function
The t imer func tion is sel ected usi ng the tim er-but ton
. Wit h
this f unctio n a user-def ined temp eratur e can be enter ed for a set
peri od. This ca n be very use ful in case o f a part y, for exampl e.
Pres s
. Fir st the ti me for which t he time pr ogramme ha s
been de activat ed is show n. Conf irm wit h
OK
Now th e desired
temp erature c an be set. C onfirm w ith
OK
. In the s elected p eriod
it is no t possib le to change t he temper ature man ually, the w heel is
locke d. Press me nu to unlock i t.
Offset
If th e perceive d room temp erature d iffer s signif icantly f rom the se t
ther mosta t tempera ture a temp eratur e offse t can be conf igured.
Pres s
MENU
. Selec t the menu i tem w ith the s elector w heel.
Conf irm wit h
OK
. The de gree set ting will f lash on the
displ ay. Now usin g the selec tor wheel e nter the d esired te mperature o ffse t (from -5 °C to +5 °C). Con firm en try wit h
OK
.
NOTE: The t emperat ure displ ay will not c hange.
Open W indow Fun ction
If som eone opens a w indow an d as a conseque nce the tem peratu re
drop s signif icantly, C omet Blu e will aut omatica lly close t he heati ng
valv e in order to s ave energ y. The disp lay will sh ow
. Af ter the
pre-set interval Comet Blue will resume normal operation.
To acti vate thi s functi on select “
” in the m enu. Con firm wi th
OK
.
Fir st, the l evel of sen sitiv ity is s elected u sing the se lector
whee l (
= high se nsiti vity, = medium sensitivity (factor y
defa ult),
=low s ensiti vity ). Conf irm wit h
OK
. Now en ter the
time b etwee n 10 minute s (facto ry defau lt) and 6 0 minute s for which
the va lve shoul d remain clo sed. Con firm wi th
OK
.
Vacation Function
You can se lect the te mperatu re that wi ll be acti ve during t he time
you are a way. Aft er this pe riod the or iginall y defined p rogramm e
becom es active a gain. Pre ss
MENU
. Selec t the menu i tem “ ”.
Conf irm wit h
OK
( appear s on the disp lay). Usi ng the selec tor wh eel set th e end date of t he vacati on funct ion (= date o f the
recom mencemen t of the regu lar heati ng times) . Confir m with
OK
.
Set t he time and co nfirm w ith the bu tton
OK
. The si gnal OFF
flas hes on the di splay. Now s et the temp eratur e and confi rm with
OK
. appear s on the disp lay. Wit h
MENU
the f unction ca n be
deactivated.
Child lock
You can lo ck Comet Blu e to prote ct the dev ice from ta mpering .
Pres s the but tons
OK
+ at t he same time f or about 2
secon ds until t he
signa l appears – de vice is now lo cked.
By using this button combination again the symbol disappears
and you r elease th e lock.
Pausi ng Heatin g - Closing t he Comet Bl ue Valve
Pres s
MENU
. Usin g the selec tor wheel s elect the ite m .
Conf irm wit h
OK
. Selec t MAN and c onfirm w ith OK. Set t he
temp erature o n the displ ay to OFF. T he valve is n ow closed an d
work ing wit hout a tim e programm e. The calc ificat ion prote ction
func tion rema ins activ e. Aft er the heat ing pause s witch in t he menu
to th e AUTO- mode and you r set progr amme will b e resumed .
All re set
Pres s
MENU
. Usin g the selec tor whee l select th e menu ite m .
Conf irm wi th
.
OK
flas hes, conf irm wit h
OK
. Come t Blue
is now i n factor y defaul t sett ing and read y for conf igurat ion as
described for initial operation.
choose.
Free ze protec tion and ca lcifica tion pro tection f unctio ns are acti ve
automatically:
Freeze protection function
If th e tempera ture drop s below 6° C, Comet B lue opens th e valve
unt il the temp erature r ises to ab ove 8°C. T his prev ents the r adiators from freezing.
Calcification protectio n function
To preve nt radiat or valves f rom calcif ying Co met Blue pe rform s
a calci ficatio n protec tion prog ramme once a w eek – ever y Friday
morning.
Cleaning and used devices cleaning
To clean th e Comet Bl ue use only a dr y or ligh tly damp clo th. Avoi d
chemi cal solven t – this coul d possibl y damage th e device.
Used devices
Do not t hrow old de vices and pa ckaging in to the hous ehold was te.
Thes e items can b e recycled . Check for f urther i nforma tion wi th
your lo cal autho rities .
Information concerning environmental protection:
Since t he adopt ion of the E uropean gui delines
20 02/ 96/ EG and 20 06/ 66/E G into nat ional law t he
foll owing app lies: Ele ctric and e lectro nic devices a s
well as b atter ies may not b e disposed o f with t he normal
house hold ref use. The co nsumer is le gally req uired to
dispo se of thes e articl es throug h the off icial colle ction po ints or
to re turn the m to the place o f purchase . Local res trict ions and
requi rement s are set by lo cal autho rities . The sym bol found o n the
prod uct, packa ging or user s manual ind icates th e classif ication o f
the pr oduct. B y disposi ng of these u sed device s and batt eries in a
resp onsible ma nner you are p laying an im porta nt role in ou r effor ts
to pro tect our en vironm ent.
Adap ter
Heime ier, Junker s Landys +Gyr, MN G,
Honeywell, Braukmann threadmeasure
dimen sion of M 3 0x1,5
no adap ter
required
Danf oss RAV (acco mpanyin g pin must
be plugged on the valve tapped)
Danf oss RA
Danf oss RAV L
Pleas e remove al l the connec tion piec es of the pla stic
adapt ers befo re you use one o f the at tached adap ters!
Pleas e complet ely remo ve the conne ction ro ds highlig hted in gre y
prio r to assemb ly the adap ter. You can fi nd additi onal brass a dapter
model s that are s ubject to a ch arge: www.eurotronic.org
Help an d error mes sages
Problem Cause Solution
Batteries do not have
enough power.
Replace batteries.
Heating
element
does not
warm up.
Is the boiler water
temperature O.K.?
Valve does not open,
is it calcified after
the summer pause/
heating pause?
Adjust the temperature of
the boiler water. Remove
the Comet Blue, move
the valve back and forth
per hand or with a tool.
Heating
element does
not cool
down.
Valve does not close
completely. It may be
that the closing point
of your valve seat has
shifted.
Adapt again (see
“Adapting”) Move the
valve stem several times
by hand, it may be that
adaptation is impossible
because your valve is
calcified or the seat
no longer performs its
function.
Pressure
piece falls
out (This can
also cause
an E1-error)
Due to an e ndless
thre ad the pres sure
piece , which is si tuated
at the b otto m, can fall
out i f the device h as
not be en affi xed on the
valve.
Put in the pressure
piece. The device can
be adapted by pressing
the
MEN
- poin t or by
removing and inserting
the ba tteri es.
The en dless thr ead is
rot ating now a nd fixes
the pr essure pi ece
again . Just ins tall it to
the ra diator an d adapt
it onc e again.
-
By pressing any key the error message will
be deleted in the display and the adapter is
re-started.
No adaptation possible.
Comet Blue is not
installed to the heater.
Is the installation OK?
Install Come t Blue to the
heater.
Valve stroke is too
short.
Open and close the
valve several times
manually or replace the
batteries.
Motor movement is
not possible.
Does the valve stem
move freely?
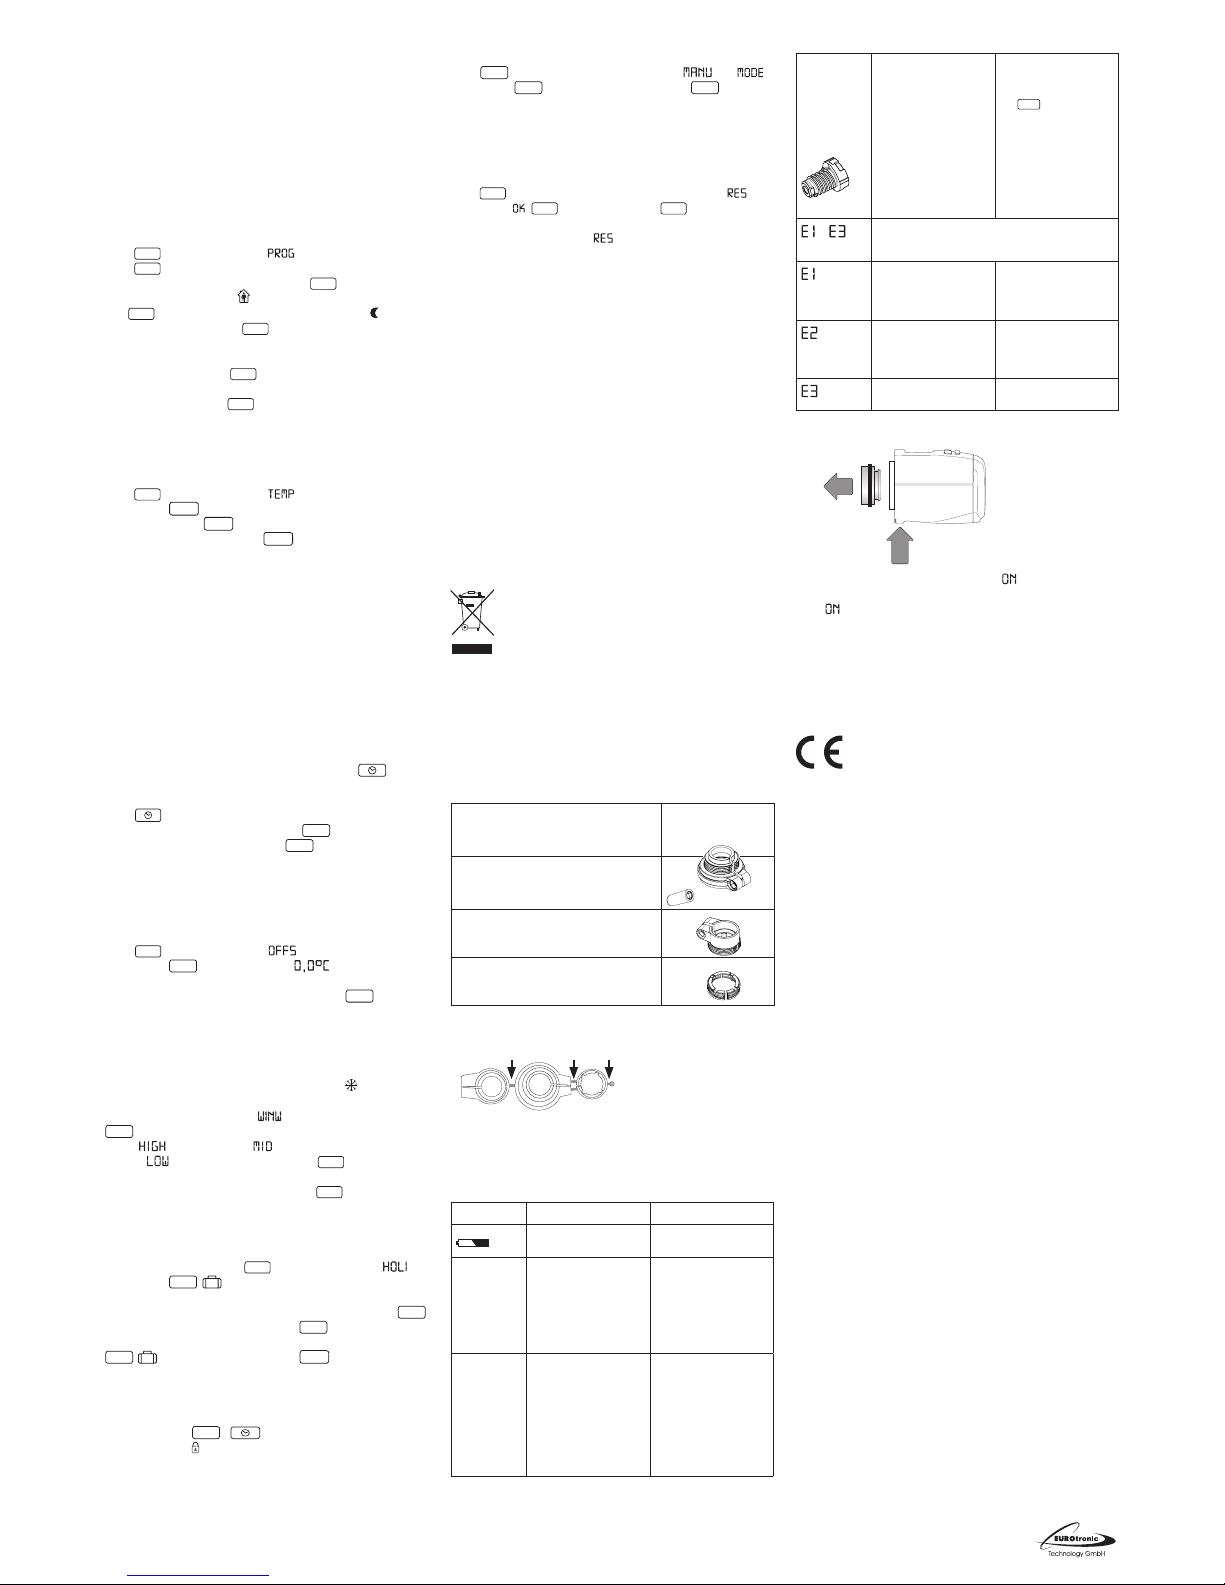
Demo unting th e Comet Blu e
press
• To re move the C omet Blue s et at Pos. (using the wheel
turn p ast the hi ghest te mperat ure of over 2 8 C° to pos ition
), wai t for a shor t period a nd then pre ss on the un locking
devi ce to detach t he quick- r elease cat ch and pull t he Comet
Blue f rom the val ve.
Technical Datails:
Out put Power : +0 dBm a t 3.0 V
Opera ting Fr equency : 2.4 GHz
Declaration of Conformity
Euro tronic Tech nology Gm bH hereby co nfirm t hat this
device conforms and complies with all fundamental
requirements , demands and other relevant stipulation s of the guid elines 19 99/ 5/EG . The declar ation of c onform ity
accord ing to the R & T TE guid elines 9 9/5 /EG are av ailable at :
www.eurotronic.org
Guarantee
The t hree-y ear warran ty begi ns on the day o f purchase . Please kee p
the re ceipt as ev idence of pu rchase in t he futur e. During t he guaran tee per iod, def ective r adiator t hermos tats m ay be sent to t he serv ice
addre ss below. P lease ens ure suf ficient p ostage i s paid. A new o r
repai red devic e will the n be sent to yo u free of cha rge. Fol lowing
expi ry of the g uarante e, you may st ill send t he defec tive dev ice to
the ad dress bel ow for repa irs. Ple ase ensure s uffic ient pos tage is
paid. R epairs ca rried ou t after t he guaran tee perio d are subjec t to a
charg e. Your legal r ights ar e not aff ected by t his guaran tee. Th ere
is no ne w warrant y perio d start ing when r epairin g or replacin g the
devi ce. Please n ote tha t we only gra nt warran ty on th e functi on of
the de vice. We wi ll not gran t warran ty for t he intera ction be tween
the t hermos tat and th e botto m part of t he valve. T he techn ical data
is onl y valid for t he use of th e follow ing valve s: Heimei er, Junker s
Land ys + Gyr, MN G, Honey well, Br aukmann (m easure of t hread M3 0
x 1,5) , Ovent rop (M3 0 x 1,5) Dan foss R A, RAV and R AVL . Please see
the co mbinati ons of the d evices on ou r websit e (www .eurot ronic.
org / Adapter l ist) EU ROtr onic does no t issue a gua rantee w hen using
the t hermos tat wit h valves w hich are no t mentio ned above.
Eurotronic Technology GmbH
Südw eg 1
363 96 Steinau-Ulmbach
Telefo n: 0 66 67 / 9 18 47-0
Servicehotline: 0 66 67 / 9 18 47-17
eMail: info@eurotronic.org
Internet: www.eurotronic.org
Verp. -Nr. 90 0 000 3 74 | Stand : 2015/ 06
www.eurotronic.org
+ accompanying
pin, only for RAV!
 Loading...