

Eurotrike Lowrider, Girlz Talk Owner's Manual

Tools required for proper assembly:
1. Small adjustable wrench
2. Phillips head (star) screwdriver
2
Getting Started:
Step 1. Remove all the parts from the carton and lay out on the floor. Compare
the parts to those shown in Fig 1. and ensure you have all the required parts.
These are the main components of your trike:
1. Rear wheels & rear axle assembly.
2. Seat and seat bracket to frame assembly.
3. Front frame.
4. Handlebar assembly.
5. Front wheel/fork and pedal assembly.
6. Front mudguard and steering clamp assembly.
7. Accessories: Handlebar pad (Low Rider boys only)
Basket & Handlebar streamers (Girlz Talk girls only)
Fig. 1
built tough for
active playtime adventure
Congratulations on purchasing a new Eurotrike tricycle. EuroTrike designs the
highest quality, innovative and feature packed tricycles and scooters for kids from
infants upwards. Our design principles incorporate the simplest ideals of functionality
and fun with strong use of graphics and bold colour to enhance and add further
dynamic to a child's first riding experiences.
Built solid using steel construction and completely lead free coatings, all EuroTrikes
are built to withstand the test of time.
Built for active play, Eurotrike models promote total fun, safety, fitness and
imagination whilst aiding in the proper development of your child's gross motor skills.
PLEASE READ THIS MANUAL CAREFULLY AND FAMILIARISE YOUR SELF
WITH THE DIAGRAMS BEFORE BEGINNING ANY ASSEMBLY
THIS MANUAL CONTAINS SAFETY WARNINGS AND RECOMMENDATIONS
FOR SAFE USE AND MAINTENANCE.
CAUTION: ASSEMBLY MUST BE CARRIED OUT BY A COMPETENT ADULT.
? EDGES MAY BE PRESENT DURING ASSEMBLY AND
KEEP SMALL PARTS AWAY FROM CHILDREN DURING ASSEMBLY
CONSUMER SAFETY HINTS FOR TRICYCLES
Children should only ride this tricycle under the supervision of a competent adult.
NEVER use near steps, sloping driveways, hills, roadways, alleys or around swimming pool
areas. When riding this tricycle always wear shoes and an approved safety helmet.
NEVER allow more than one rider. Off road riding and riding at night is hazardous.
NEVER ride this tricycle at night. Riding in violation of local traffic laws is prohibited. If this
tricycle is fitted with a tip tray it is not intended to be used to carry passengers. If fitted with seat
belt, always ensure the seat belt is correctly adjusted to fit the rider.
Owners Manual For Tricycle Models -
Lowrider (Boys) Girlz Talk (Girls)
CAUTION: ADULT SUPERVISION REQUIRED.
WE RECOMMENDED THE USE OF AN APPROVED
SAFETY HELMET WHEN RIDING THIS TRICYCLE
1
4
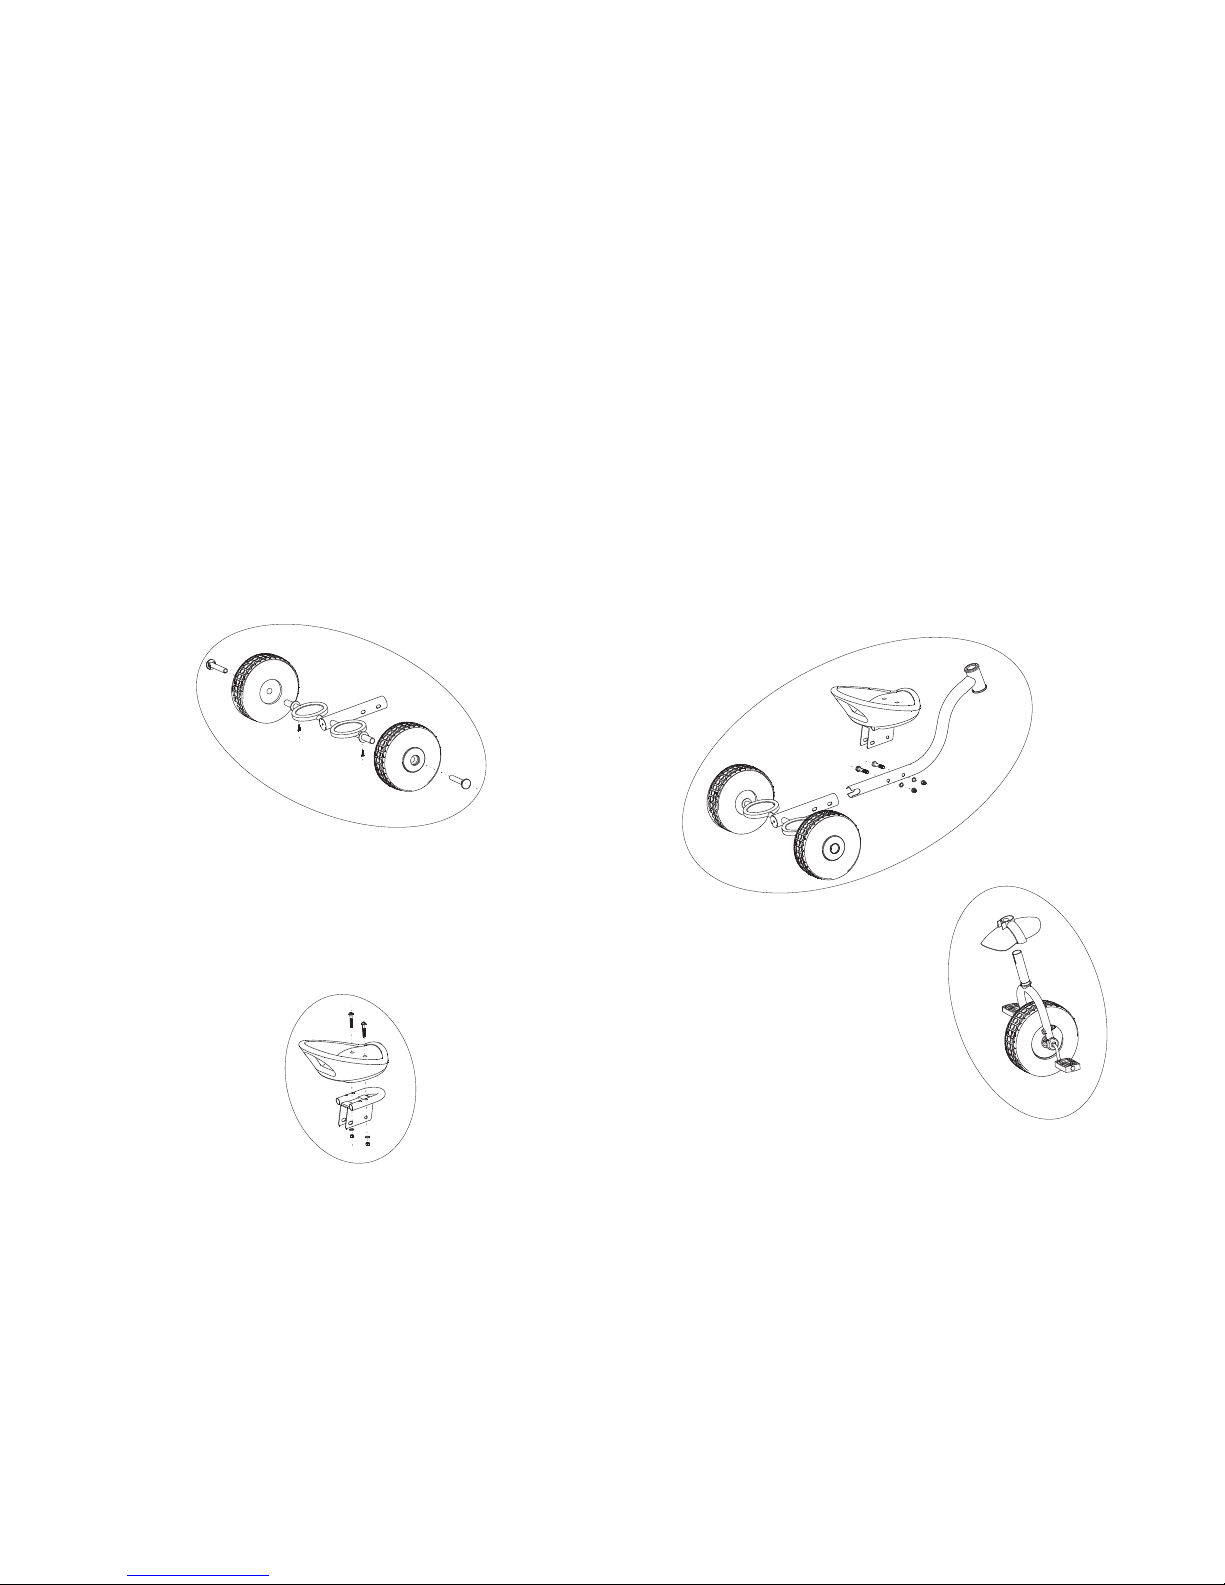
Step 4.
Install the front main frame as in Fig. 4
1. Locate the front main frame section as shown in fig 4..
2. Slide the front main frame tube inside the rear main tube of the rear axle
assembly.
(note the front section has a shaped end that when inserted correctly locates
around the rear axle)
3. Place the seat assembly in position and line up the holes for the frame through
bolts.
4. Using the long through bolts insert them through the seat assembly bracket and
through both tubes of the main frame.
5. Place one washer and one dome nut on each bolt and tighten securely using the
Fig. 4
Fig. 5
Step 5.
Install the front mudguard as shown in
Fig 5.
1. Locate the front mudguard and front
wheel assembly.
2. Slide the mudguard from the top over
the steering tube of the front wheel
assembly making sure the slot in the
steerer tube is towards the back.
wrench
3
Step 2.
Install the rear wheels as in Fig. 2
1. Slide the Right hand wheel onto the rear axle assembly.
2. Insert the rear plastic hub cap throught the centre of the wheel. (note the hole in
the hubcap should be lined up with the hole in axle assebly at the bottom) Push the
hubcap all the way on so the two holes line up.
3. Place the small self tapping screw through the hole in the axle and screw into the
hupcap using a phillips head screwriver. Ensure the screw is tight and test that the
wheel can rotate freely. (Dont worry if the wheel is a little tight as it will begin to spin
freely when used.)
4. Follow the same procedure for the Left hand wheel
Fig. 2
Step 3.
Install the seat to the seat bracket as in Fig. 3
1. Locate the saddle bracket and the saddle. Locate the 2 long bolts, 2 whashers
and 2 nuts as shown in fig 3.
2. Pass the two bolts through the seat from the top and through one of the positions
in the saddle bracket. Install one washer and one nut on each then tighten using a
philips head screw driver whilst holding the nut with the adjustable wrench.
Fig. 3
 Loading...