

Page 1

Use, Maintenance and Assembly Instructions
Sport-Thieme Adventure-Tramp
Art. no. 97505
1. Safety Instructions
2. General Data
3. Assembly Instructions
4. Structure
5. Safety Rules for Trampoline Use
6. Maintenance/Servicing
7. Parts List
1
1
2
4
6
7
9
Page 2

1
1
1. Safety instructions
The trampoline has been tested and corresponds to the DIN EN 1176.
2. General Data Sport-Thieme Adventure-Tramp
2.1 Location decision
Possible locations for the Sport-Thieme Adventure-Tramp:
• Schools and kindergarten
• Outdoor and indoor swimming pools
• Amusement parks
• Holiday parks and campsites
• Shopping centres
• Indoor play centres
• Supervised/unsupervised playgrounds (depending on the jumping bed)
2.2 Product description
Art. no. 97505
The Sport-Thieme Adventure-Tramp belongs to the ground trampolines, i.e. it was constructed to be put into a pit.
Shoes may be worn to jump on the black wire reinforced belt material.
It is also suitable for multiple installations. We recommend a sufcient safety clearance/space (approx. 150 - 200 cm) between the trampolines. There must be no obstacles or objects located in the space between.
2.3 Technical data and dimensions
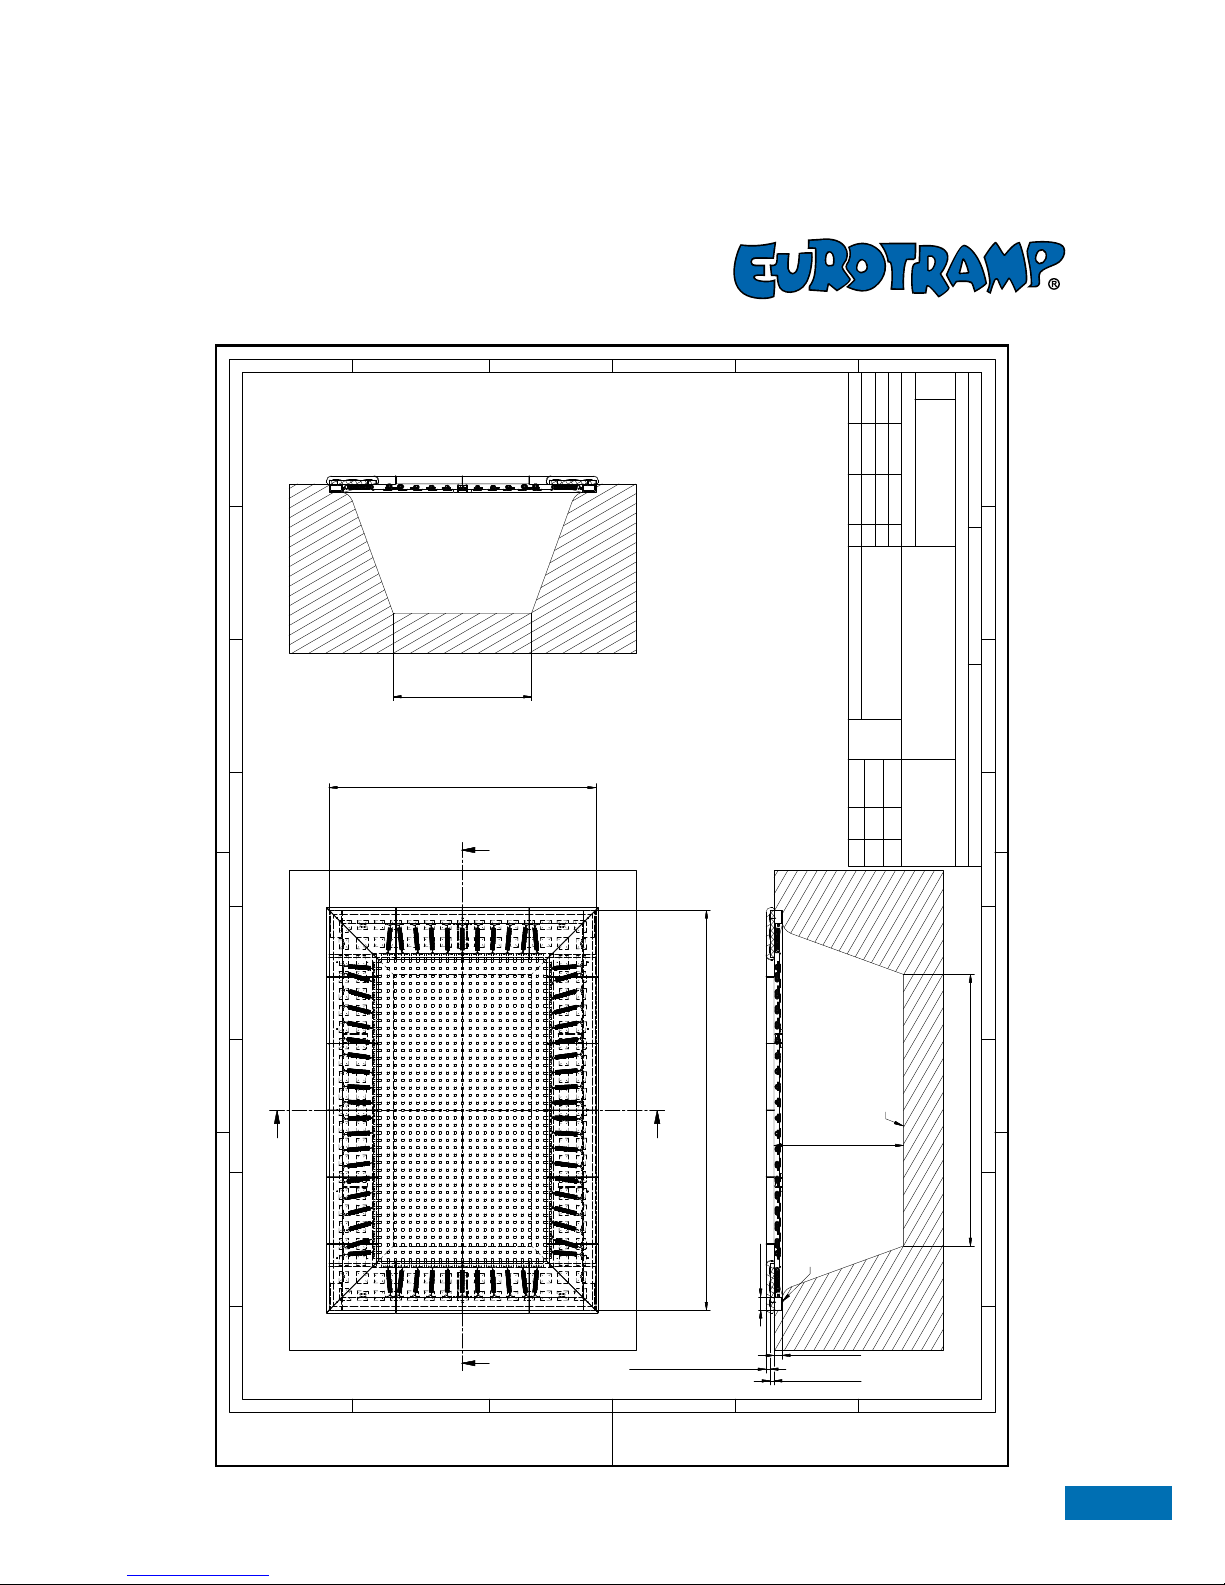
• Galvanised frame made of steel prole, L x W x H: 300 x 200 x 6 cm
• Measures jumping bed: 235 x 134 cm
• Steel springs: 62 pieces/trampoline
• Frame cover made of 3 cm bonded impact protection
• The trampoline is delivered disassembled
• The anchor bars have to be hooked into the jumping bed by yourself
Page 3

2.4 Conditions of use
BG/GUV-SI 8095 must be observed for installation of the trampoline in schools and
kindergarten.
• Use of the trampoline in moist, rainy, snowy or icy weather conditions is prohibited.
• Shoes may be worn to jump on the wire-reinforced black belt material.
• Jumping on the trampoline is only permitted in the intended way. Jumping must
be limited to feet-rst jumps. Landing on the back or stomach and somersaults are
prohibited.
3. Assembly instructions
1
2
The shown sheet metal angle serves as a support for the screwed-on screen printing
plates. The frame proles must be tted around so that the closed side of the sheet metal
angle points upwards.
Page 4
1
3
5 6
The eyelets for the corner springs can be ignored for the Sport-Thieme Adventure-Tramp; these are only required for other ground trampolines.
3 4
21
Caution: The ground trampoline illustrated here is not the Sport-Thieme Adventure-Tramp,
but assembly is identical.
Page 5

4
11
1211
13
9 10
7
8
Page 6
5
A-A ( 1 : 20 )
B-B ( 1 : 20 )
A
A
B B
1
2 3
4
5
6 7 8
F
2
3 4 5
6
7 81
A
B
C
D
E
A
B
C
D
E
F
Datum Name
Bearb.
Gepr.
Maßstab
Werkstoff
Rohteil/Halbzeug/Ausgangsteil
Benennung:
Copyright by Eurotramp. All right reserved. Referred to protection notice ISO 16016
Ähnlich: Ers. für:
Zeichnungs - Nr.:
Model - NR.:
Name
Datum
Änd - Nr.:
Ä-Ind
Blatt:
Eurotramp-Trampoline
Kurt Hack GmbH
conrad09.12.2011
Adventure
Einbauzeichnung
Adventure zusammenbau
Thieme
PLOTUSER 00.00.0000
1
1:20
1
Blattgröße: A3
/
Anordnung von Fallschutzplatten kann Abweichen
array of safety slabs may vary
Einbauzeichnung gültig für Version mit "Kidstrampfeder"
drawing valid for model with "Kidstramp spring"
min. 2000
min. 1000
970
min.
100-120 Auflage/support area
100 Rahmen/frame
60
Rahmen/frame
Drainage vorsehen/arrange for drainage
2000 Rahmen/frame
3000 Rahmen/frame
30
Holz/wood
30
Fallschutzmatte/rubber padding
Page 7

6
4. Structure
4.1 Planning information
• The type of pit arrangement and the area surrounding the pit depend on the local
conditions.
• Ask the landscape gardener or responsible building company which digs out the pit
in case of any doubt.
4.2 Assembly instructions
The trampoline is delivered disassembled. Sufcient numbers of helpers are required
to unload the trampoline from the truck and bring it to the place of installation. The
trampoline can be installed ready-for-use on-site by the retailer‘s trained personnel in
individual cases on request.
4.3 Weight
The weight per frame is approx. 150 kg without impact protection.
4.4 Digging the pit
• Dig out the pit according to the installation draft (see page 5).
• Pit edge reinforcement should be planned if the ground is not stable (sand).
• A fully circumferential foundation can be placed in the pit, on which the frame parts
are positioned, or the corresponding pedestals should be at least planned in the
corners.
• The pit edges in the lower area should be excavated at a slight angle to prevent the
soil from slipping down.
• The pit base should have a drainage possibility (e.g. layer of pebbles) if the base lay-
er is not permeable to water, so that the water can soak into the ground. There is
otherwise the danger of the pit lling up with water if the ground is not permeable
to water (clay or cement layer).
4.5 Surrounding area design
The design of the area surrounding the ground trampoline depends on the specic
conditions in individual cases. An impact protection with a natural base or another
suitable type of impact protection (designed for a free fall height of 100 cm) should be
foreseen.
Page 8

7
4.6 Jumping bed assembly
• The top side of the black belt material is marked (thicker thread).
• Hook the jumping bed in (best done by 2 persons).
• Hook in two steel springs per corner rst to x the jumping bed.
• Hook the springs onto the jumping bed.
• Hook the springs on the long sides onto the frame rst and then the top end
springs. Always hook the springs on opposite sides in at the same time to prevent
unnecessary excess tension on the springs.
4.7 Necessary special tools
No special tools are required for assembly. A mounting tool for the springs, which is
enclosed with each ground trampoline, is recommended for easier replacement of the
springs.
4.8 Safety clearances
Top: A clearance of minimum 3.50 m (no branches or power lines etc.) should be above the trampoline.
Side: A clearance of at least 1.50 m must be taken into account on all sides for all trampolines.
4.9 Care and care products
The Sport-Thieme Adventure-Tramp doesn‘t require any special care.
5. Safety rules for trampoline use
To enjoy jumping on a trampoline it is extremely important to avoid accidents and injuries.
Therefore the following rules must be observed:
The most important points:
• Jump alone as several jumpers at one time poses a big risk.
• Never jump off the trampoline. Anyone who underestimates the forces on the tram-
poline exposes themselves to signicant dangers.
• Consider your skills as far as condition and motor function are concerned.
• Serious injuries are not only caused by falling from the trampoline; uncontrolled jum-
ping can cause performers to land on the head or neck leading to serious injuries.
Page 9

8
All exercises with a turn (somersault or landing on the stomach etc.) are therefore
strictly prohibited on the trampoline.
• Caution must be exercised at colder times of the year. However, there is no reason
to stop using the trampoline once snow has been removed from the jumping bed.
• Long-lasting snow loads cause unnecessary strain to the springs. Snow must be
regularly and carefully removed or the jumping bed can be removed during the
winter months. There is also the option of purchasing a wooden cover that can be
walked on, which protects the jumping bed from the inuences of weather and
prevents use of the apparatus.
• Strong gusts of wind have a negative effect on use of the trampoline.
6. Maintenance/Servicing
Should any defects on the jumping bed, impact protection or springs be identied that prevent safe jumping, the trampoline must be cordoned off or the defects immediately rectied. In case of any doubt whether the apparatus is suitable for use, it should be inspected
by an expert (playground operator, apparatus attendant or maintenance company). The pit
under ground trampolines can be cleaned by at least partially unhooking the jumping bed
from the springs.
6.1 Measures
• Missing parts are to be replaced.
• Damaged jumping beds are to be replaced.
• Over-extended, damaged and tired springs are to be replaced. You can recognise
that this is the case if the distances between the spring coils are uneven or if there
are remaining extensions in the spring that do not return to the original position
when the tension is released. The springs on one side of the trampoline bed should
be unhooked with the help of the supplied mounting tool. The springs can then be
taken out of the welded suspension hooks on the frame. The important thing is that
the springs are always hooked in with the eyelet pointing downwards (hook in on
the frame rst and then on the bed). The supplied mounting tool is a suitable aid; it
makes hooking in easier if the suspension hooks are raised slightly on the bed.
Page 10

6.2 Maintenance and repairs cycles
9
TYPE OF INSPECTION FREQUENCY CONTENT
Normal visual inspection
• Monthly, if the trampoline
is used occasionally
• Weekly, if the trampoline
is used quite a lot
• Daily, if the trampoline is
used very often or if there
is a high risk of vandalism
• Visual control of the jumping bed,
impact protection and number of
springs
• Check whether the trampoline and
its surroundings are clean and whether there are any sharp edges, etc.
Operational inspection
Every three months if the
trampoline is used occasionally, every month if it is
used a lot
Additionally to the visual control:
• Control whether the pit has been
lled up with grit or anything else
• Control whether there are any de-
fects caused by corrosion
• Control whether there are any mis-
sing parts
• Control whether there has been
excessive wearout
Annual main inspection Annualy
General control whether the trampoline is fool-proof. That‘s why additionally
to the visual and operational control
you have to check whether
• the jumping bed is hinged properly
• the frame has any fracture or other
defect
• the steel springs are broken or over-
stretched
• the rubber sheets are xed properly
• the spring ears point downwards
both at the jumping bed side and at
the frame side
Mounting tool Hinging or unhinging the steel
springs with the mounting tool
Hinging or unhinging the steel
springs with the mounting tool
Page 11
Name Units
Longitudinal members with spring suspension 2
Cross-members with spring suspension 2
Steel springs 62
Longitudinal wooden cover 2
Horizontal wooden cover 2
Jumping bed 1
Anchor bars 62
Impact protection* 20
Ram guard bar 6 x 980 mm + 2 x 320 mm +
2 x 260 mm
Plate screws 32
Winged drilling screw 16
Adhesive for impact protection 4
* Caution: relevant for TÜV:
Only impact protection from the company Kraiburg may be used!
Eurotramp Trampoline - Kurt Hack GmbH
Zeller Straße 17/1
73235 Weilheim, Germany
Tel. +49-7023 - 9495-0
Fax +497023 - 9495-10
E-Mail [email protected]
www.eurotramp.com
We are pleased to remain at your disposal to answer any questions:
10
You can receive all spare parts from Eurotramp on request!
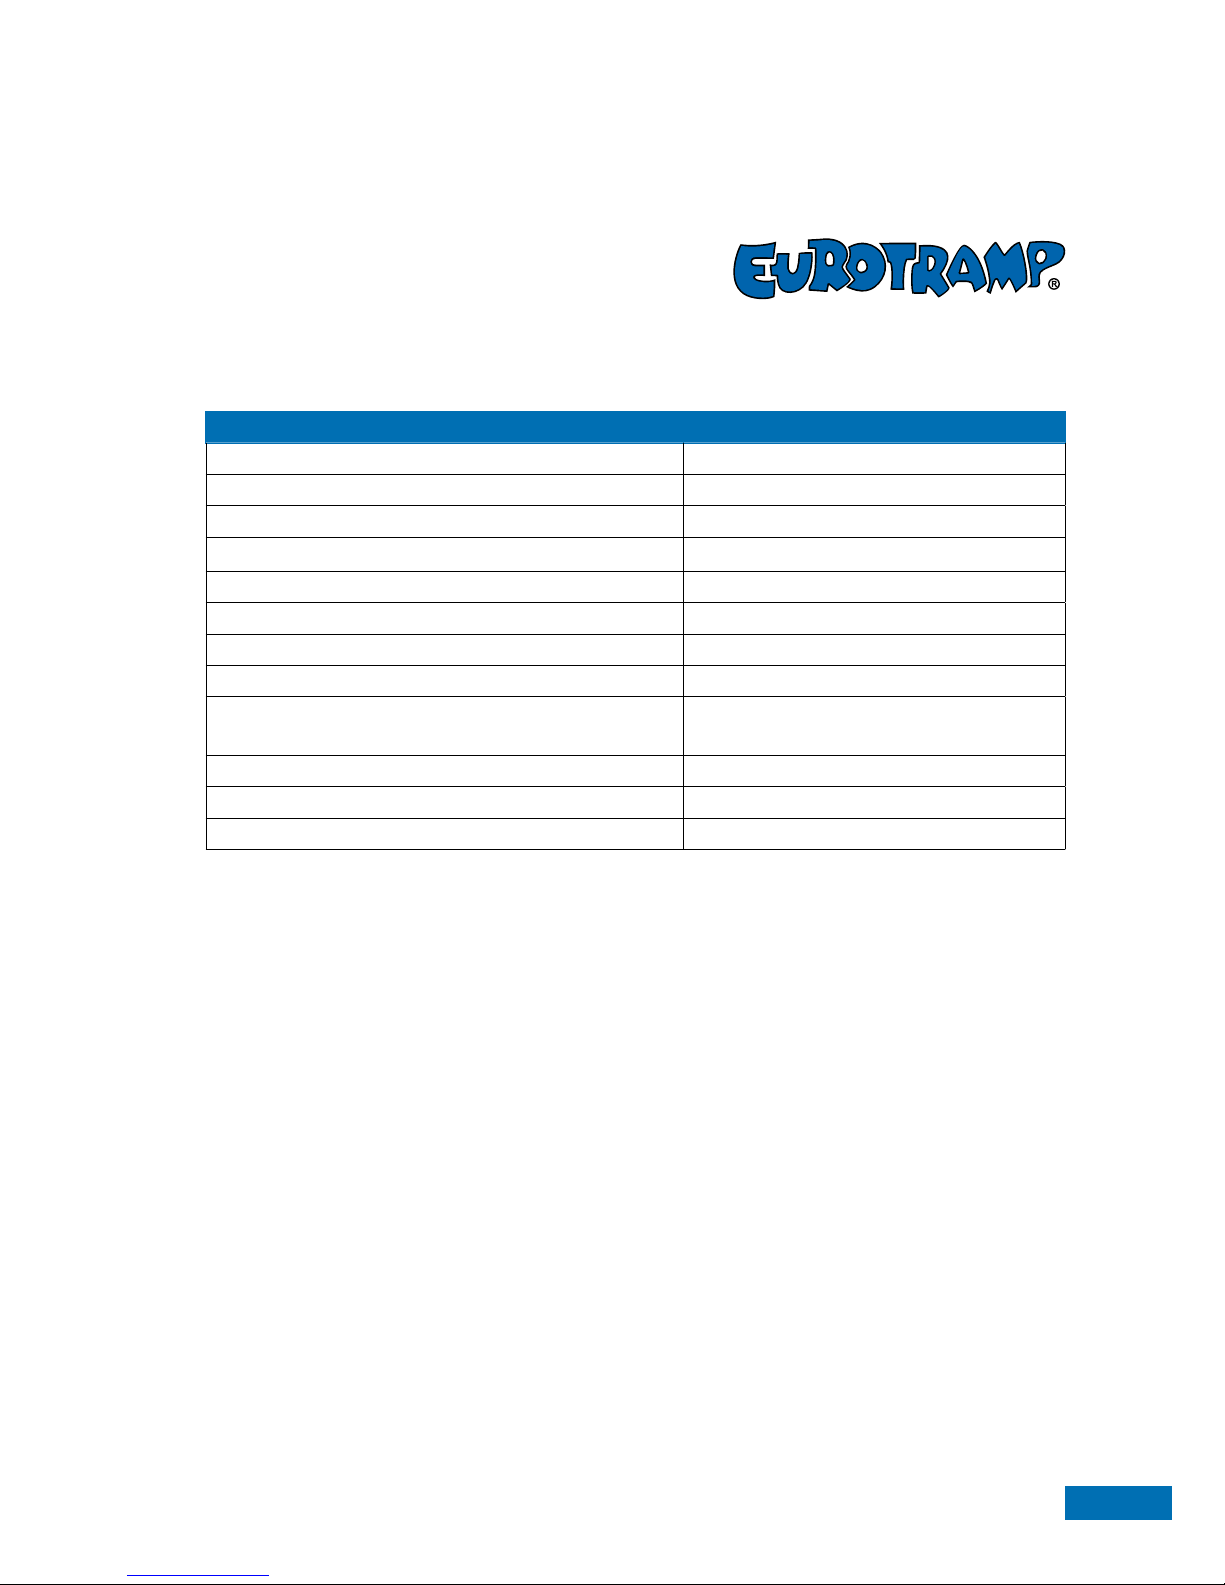
6.3 Parts list
Page 12

Page 13

 Loading...