

Page 1
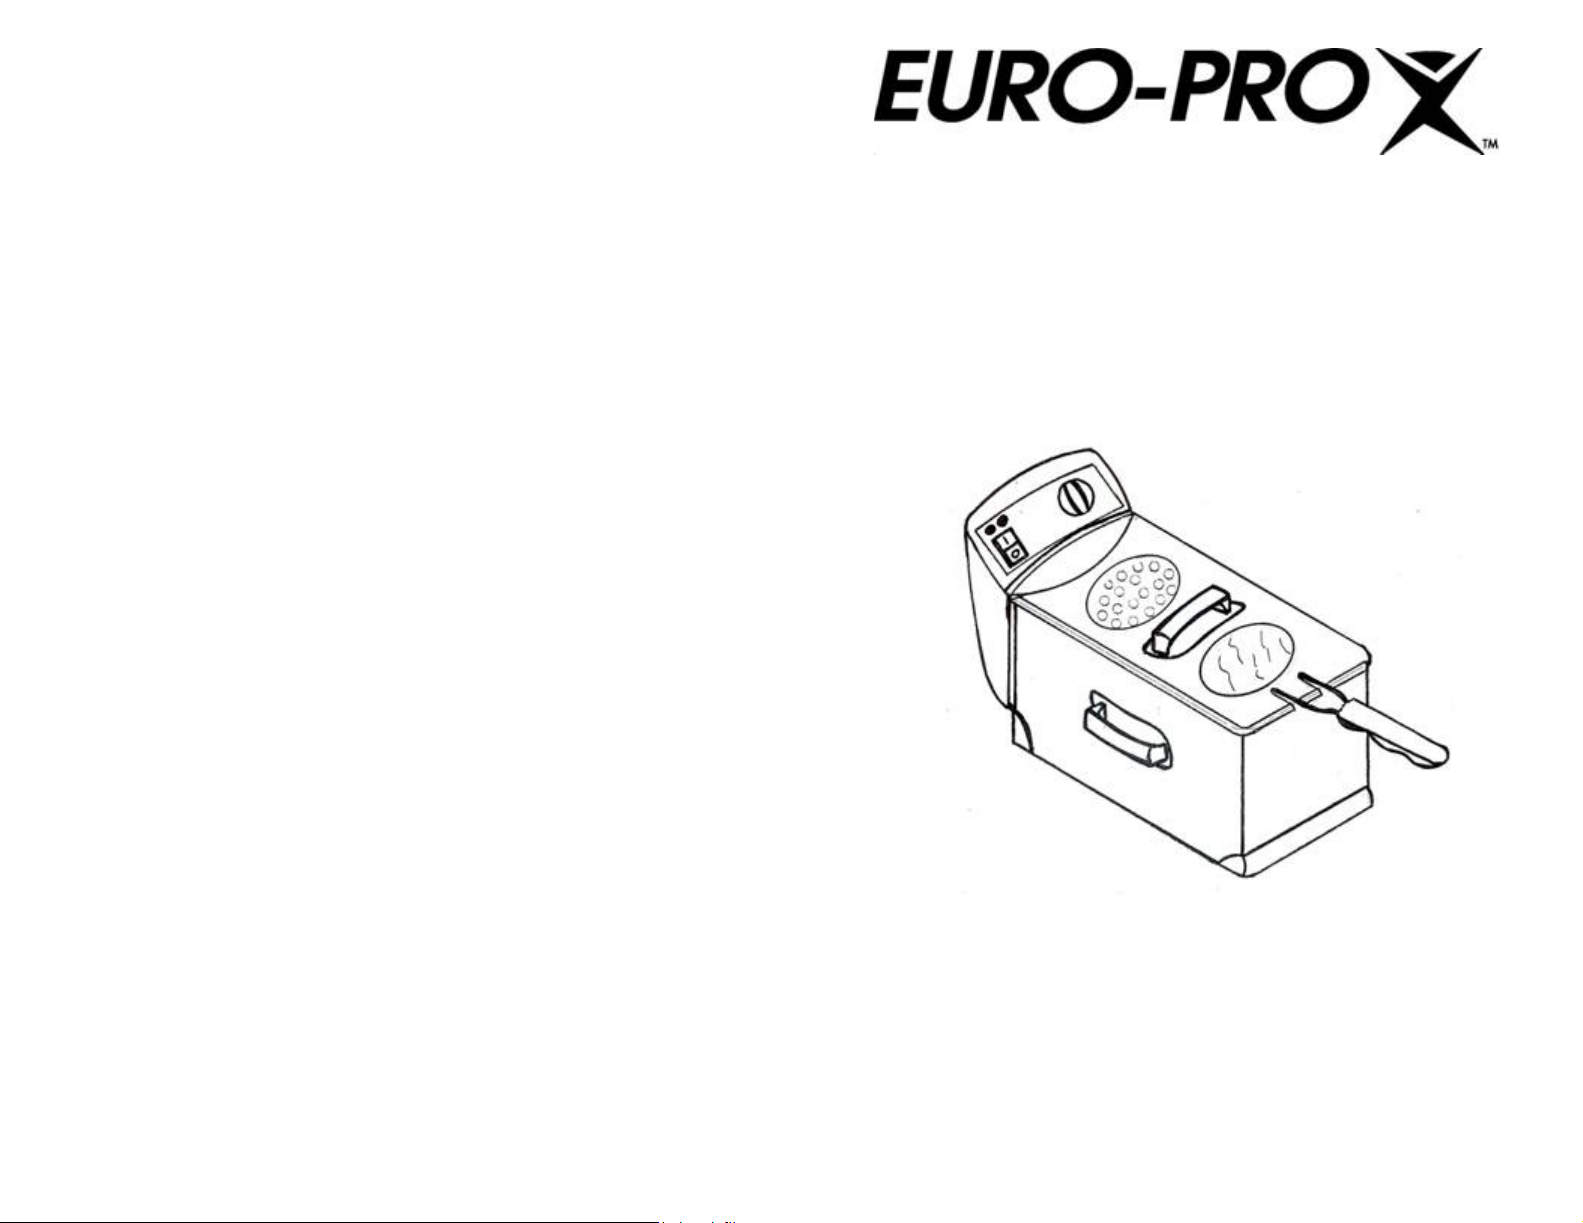
Professional Deep Fryer
Use and Care Instructions
Model F1063
USA: EURO-PRO Corporation Canada: EURO-PRO Corporation
94 Main Mill Street, Door 16 4400 Bois Franc
Plattsburgh, NY 12901 St. Laurent, QC H4S 1A7
Tel.: (800) 798-7398 Tel.: (514) 842-869
For information or assistance:
www.euro-pro.com
Page 2
F1063
ONE (1) YEAR LIMITED WARRANTY
EURO-PRO CORPORATION warrants this product to be free from defects in material and
workmanship for a period of one (1) year from the date of the original purchase, when utilized for
normal household use, subject to the following conditions, exclusions and exceptions.
If your appliance fails to operate properly while in use under normal household conditions within
the warranty period, return the complete appliance and accessories, freight prepaid to
EURO-PRO Corporation, 94 Main Mill Street, door 16 Plattsburgh, NY 12901
If the appliance is found by EURO-PRO to be defective in material or workmanship, EURO-PRO
will repair or replace it free of charge. Proof of purchase date and $ 14.95 to cover the cost of
return shipping and handling must be included. *
The liability of EURO-PRO Corporation is limited solely to the cost of the repair or replacement of
the unit at our option. This warranty does not cover normal wear of parts and does not apply to
any unit that has been tampered with or used for commercial purposes. This limited warranty does
not cover damage caused by misuse, abuse, negligent handling or damage due to faulty
packaging or mishandling in transit. This warranty does not cover damage or defects caused by
or resulting from damages from shipping or repairs, service or alterations to the product or any of
its parts, which have been performed by a repair person not authorized by EURO-PRO.
This warranty is extended to the original purchaser of the unit and excludes all other legal and/or
conventional warranties. The responsibility of EURO-PRO Corporation if any, is limited to the
specific obligations expressly assumed by it under the terms of the limited warranty. In no event is
EURO-PRO Corporation liable for incidental or consequential damages of any nature whatsoever.
Some provinces do not permit the exclusion or limitation of incidental or consequential damages,
so the above may not apply to you.
This warranty gives you specific legal rights, and you may also have other rights which vary from
province to province.
*Important: Carefully pack item to avoid damage in shipping. Be sure to include proof of
purchase date and to attach tag to item before packing with your name, complete address
and phone number with a note giving purchase information, model number and what you
believe is the problem with item. We recommend you insure the package (as damage in
shipping is not covered by your warranty). Mark the outside of your package “ATTENTION
CUSTOMER SERVICE”. We are constantly striving to improve our products, therefore the
specifications contained herein are subject to change without notice.
------------------------------------- ------------------------------------------------------------------------------------------------------ --------------------------
Please fill out and mail the product registration card within ten (10) days of purchase in order to
OWNERSHIP REGISTRATION CARD
validate the foregoing Limited Warranty. The registration will enable us to contact you in the
unlikely event of a product safety notification. By returning this card you acknowledge to have read
and understood the instructions for use, and warnings set forth in the accompanying instructions.
RETURN TO EURO-P RO CORPORATION, 94 Main Mill Street, door 16 Plattsburgh, NY 12901
F1063
______________________________________________________________________
Appliance model
______________________________________________________________________
Date purchased Name of store
______________________________________________________________________
Owner’s name
______________________________________________________________________
Address City State Zip code
Printed in China
9
Page 3
OPERATING INSTRUCTIONS cont.
8. Cleaning Instructions
Warning: Always remove the plug
from the wall socket before cleaning.
Allow the deep fryer and the oil to cool
completely (approximately 2 hours)
before cleaning. Never immerse the
control panel, cord or plug in water or
any other liquid.
• Follow the cleaning instructions on
page 4. (Before using for the First
Time)
• Never immerse the control panel, cord
or plug in water or any other liquid.
• Do not place the control panel, cord or
plug in the dishwasher.
• Clean the control panel only with a
damp cloth.
• The oil container, frying basket, lid
cover and filter can be washed in the
dishwasher.
• The body of the deep fryer can be
washed in warm soapy water. Do not
put the body of the deep fryer in the
dishwasher.
• Any other servicing should be
performed by EURO-PRO Corporation.
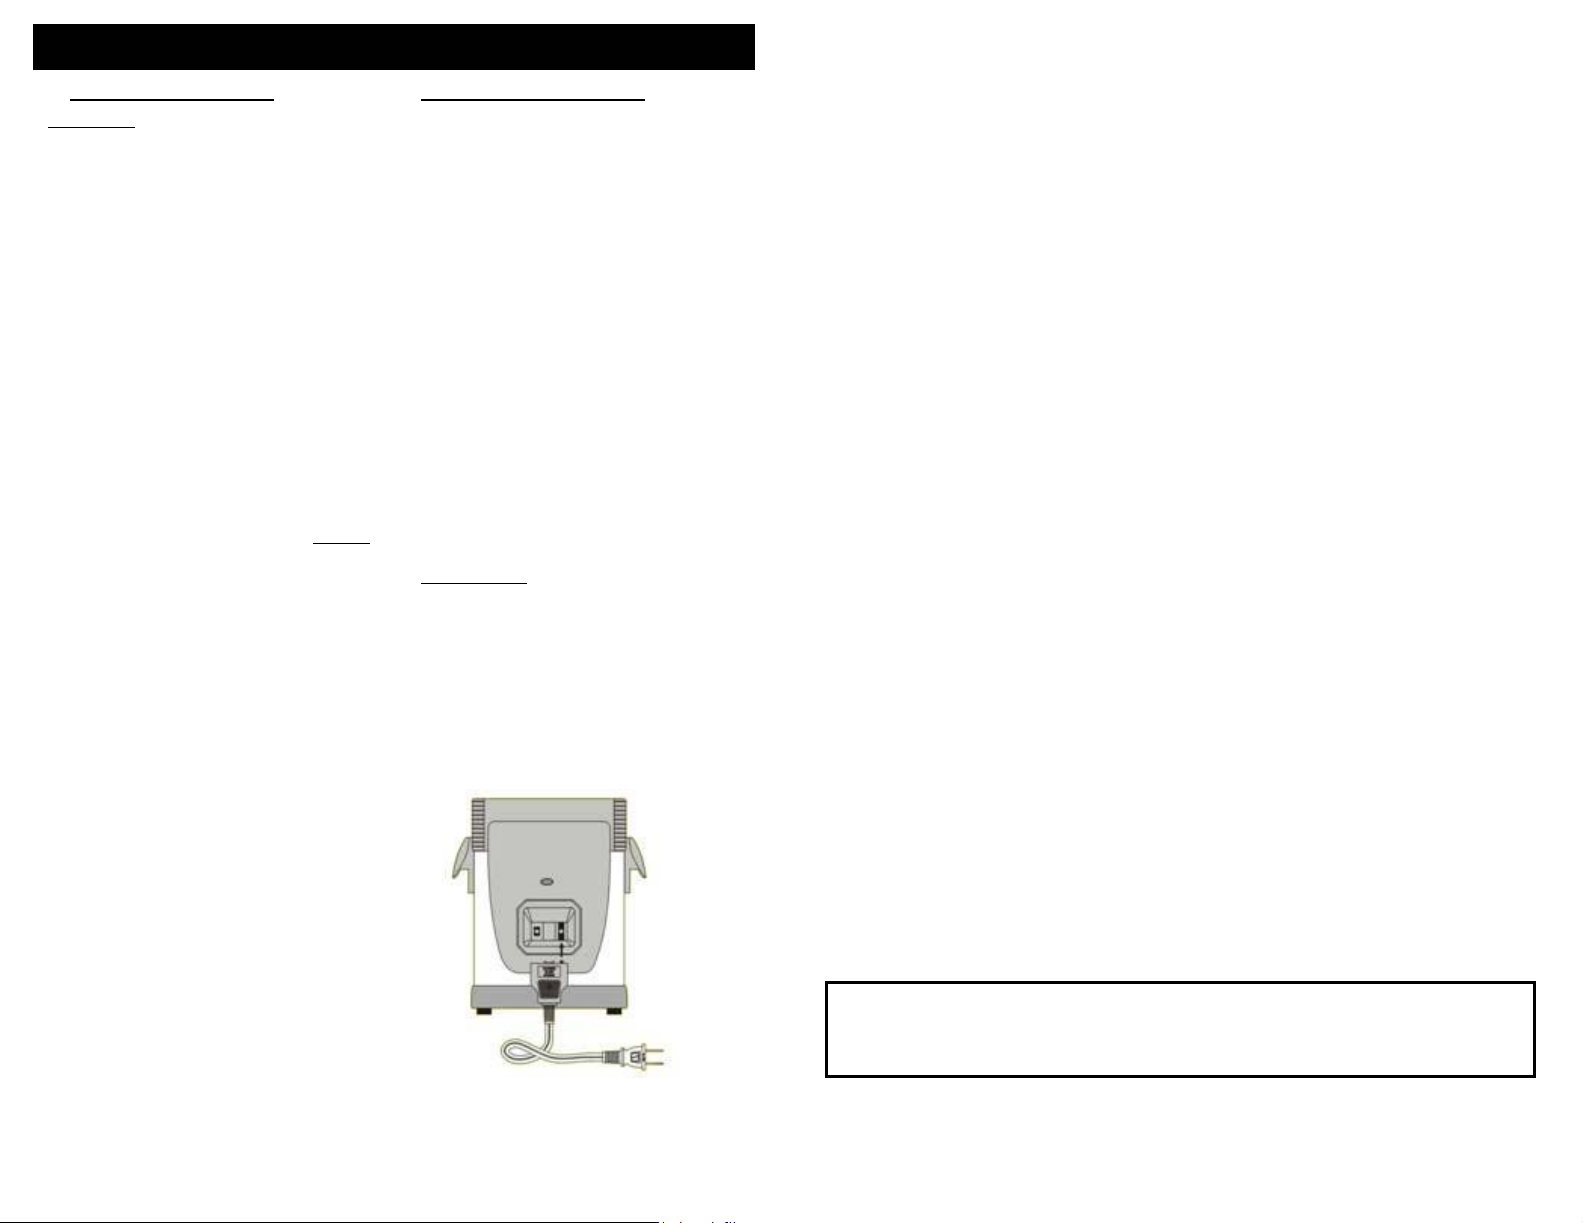
Detachable Power Cord
Your EURO-PRO Deep Fryer has been
specifically designed with your safety in
mind. EURO-PRO has incorporated a
unique detachable power supply cord.
This power supply cord cord is
designed to “Break Away” from the fryer
body in the event that the supply cord is
inadvertently pulled. This is intended to
prevent the tipping of the appliance and
hazardous spillage of hot oil.
The female receptacle portion of the
power supply cord is permanently
attached to the rear of the the control
panel.
To connect the male power cord plug to
the female receptacle on the appliance,
orient the male plug so that it mates
with the female receptacle. The male
plug can only be inserted one way. If
the male plug will not go into the
receptacle on the appliance, rotate the
male plug 180°
IMPORTANT
become detached from the appliance
during use, it is important to:
1. Unplug the power cord from the wall
outlet.
2. Turn off the appliance at the control
panel.
3. Re-attach the power cord to the
appliance.
4. Re-connect to power outlet.
5. Turn the appliance back on.
: Should the male plug
IMPORTANT SAFETY INSTRUCTIONS
When using electrical appliances, basic safety precautions should always be
followed, including the following:
1. Read all instructions for use carefully
and look at the illustrations before you
start using the appliance.
2. Do not touch hot surfaces, always use
handles or knobs.
3. To protect against electrical shock, do
not immerse cord and plug of this
appliance in water or other liquids.
4. Close supervision is necessary when
any appliance is used by or near
children.
5. Unplug from outlet (not from
receptacle on appliance) when not in
use and before cleaning. Allow to cool
before putting on or taking off parts
and before cleaning the appliance.
6. Do not operate any appliance with a
damaged cord or plug, or after the
appliance malfunctions, has been
dropped or damaged in any manner.
Return the appliance to EURO-PRO
Corporation for examination, repair
or adjustment. See warranty.
7. Never plug in before the control panel
is installed in the body of the fryer and
the heating element is placed in the oil
reservoir.
8. Never overfill the fryer with oil. Fill
only between the minimum and
maximum levels, as indicated inside
the oil reservoir.
9. Be sure handle is properly assembled
to the basket and locked in place.
See detailed assembly instructions.
10. The use of accessory attachments not
recommended by the appliance
manufacturer may cause injuries.
11. Always insert heating element in the
appliance first, then plug into the wall
outlet. To disconnect, remove plug
from wall outlet then wait for the unit
to cool completely before removing
the heating element.
12. Extreme caution must be used when
moving any appliance containing hot
oil or other hot liquids.
13. Do not leave appliance unattended
while in use.
14. Do not use outdoors.
15. Do not let cord hang over the edge of
the table, counter or touch hot
surfaces.
16. Do not place on or near a hot gas or
electric burner, or in a heated oven.
17. Do not use appliance for other than
intended household use.
18. Ensure that basket handle is correctly
assembled and locked in place. (See
assembly instructions.)
SPECIAL SAFETY INSTRUCTIONS
• A short power supply cord is provided to
reduce the risk resulting from becoming
entangled in or tripping over a longer
cord. An extension cord (or longer
detachable cord) is not recommended
for use with deep fryers.
• Never plug in the control panel before it
is installed in the body of the fryer with
the heating element inside the oil
container.
• Do not immerse the control panel and
heating element in water.
• When opening the lid after frying, first
release the lid by pushing the latch with
your finger, then wait a moment to allow
the steam inside to escape before
opening fully.
• To avoid a circuit overload, do not
operate another high wattage appliance
on the same circuit.
This appliance has a polarized plug (one blade is wider than the other). To reduce
the risk of electric shock, this plug is intended to fit into a polarized outlet only one
way. If the plug does not fit fully into the outlet, reverse the plug. If it still does not fit,
contact a qualified electrician. Do not attempt to modify the plug in any way.
SAVE THESE INSTRUCTIONS
FOR HOUSEHOLD USE ONLY
8 Rev. 12/01C
1
Page 4
CONTENTS
OPERATING INSTRUCTIONS cont.
Important Safeguards ………………………………………………………….....
Special Safety Instructions ……………………………………………………...
Main Components ………………………………………………………………..
#1 Using for the First Time ……..….…………………………………………….
- Prior to First Use, Clean the Unit Thoroughly …….………………………..
#2 Filling the Stainless Steel Container With Oil …………..………………….
- Using Solid Fat …………..……………………………………………………
#3 Installing the Control Panel Into Its Place ……..…………………………….
#4 Using the Deep Fryer …………………...……………………………………..
- Pre-Heating ………………….………………………………………………….
- Filling the Frying Basket ……….………………………………………………
- Frying Food …………………………………….……………………………….
#5 At the End of Cooking ………………….………………………………………
#6 Frying Tips ……………………………..………………………………………..
#7 Filtering and Changing the Oil ………………………………….…………….
#8 Cleaning Instructions ……………………….………………………………….
Detachable Power Cord
Your EURO-PRO Deep Fryer has been specifically designed with your safety
in mind. EURO-PRO has incorporated a unique detachable power supply
cord. This power supply cord cord is designed to “Break Away” from the fryer
body in the event that the supply cord is inadvertently pulled. This is intended
to prevent the tipping of the appliance and hazardous spillage of hot oil.
The female receptacle portion of the power supply cord is permanently
attached to the rear of the the control panel.
To connect the male power cord plug to the female receptacle on the
appliance, orient the male plug so that it mates with the female receptacle.
The male plug can only be inserted one way. If the male plug will not go into
the receptacle on the appliance, rotate the male plug 180° and insert again.
IMPORTANT
during use, it is important to: 1) Unplug the power cord from the wall outlet. 2)
Turn off the appliance at the control panel. 3) reattach the power cord to the
appliance. 4) Re-connect to the power outlet. 5) Turn the appliance back on.
: Should the male plug become detached from the appliance
6. Frying Tips
1
1
3
4
4
5
5
5
5
5
6
6
6
7
8
8
• Do not mix different oils or new and
old oil together.
• Replace oil regularly. In general, oil
will be tainted fast when frying food
containing a lot of protein, (such as
poultry, meat and fish). When oil is
used mainly to fry potatoes and is
filtered after each use, it can be used
up to 8 to 10 times, but do not use
the same oil for more than 6 months.
• Always replace all oil as soon as it
starts foaming when heated or when
color becomes dark or when it has a
rancid smell or taste or becomes
syrupy.
• Make sure that the food to be fried is
dry.
• Remove loose ice from frozen food
before frying. Rinse and pat dry.
• To cook evenly, pieces should be the
same size and thickness.
• Thicker pieces will take longer to
cook.
Important: When frying frozen food
such as French Fries, you should not
exceed 1.25 lb. (568 gr.). For best
results, limit quantity to 1 Lb. (454
gr.) or less.
7. Filtering & Changing The Oil
• Make sure the deep fryer is unplugged
and the oil has cooled before cleaning
or storing the deep fryer.
• The oil does not need to be changed
after each use. In general, the oil will
be tainted rather quickly when frying
food containing a lot of protein (such
as poultry, meat or fish). When oil is
mainly used to fry potatoes and is
filtered after each use, it can be used 8
to 10 times. However, do not use the
same oil for longer than 6 months.
• To filter the oil first make sure the oil
has cooled and then empty the oil from
the oil container into another container
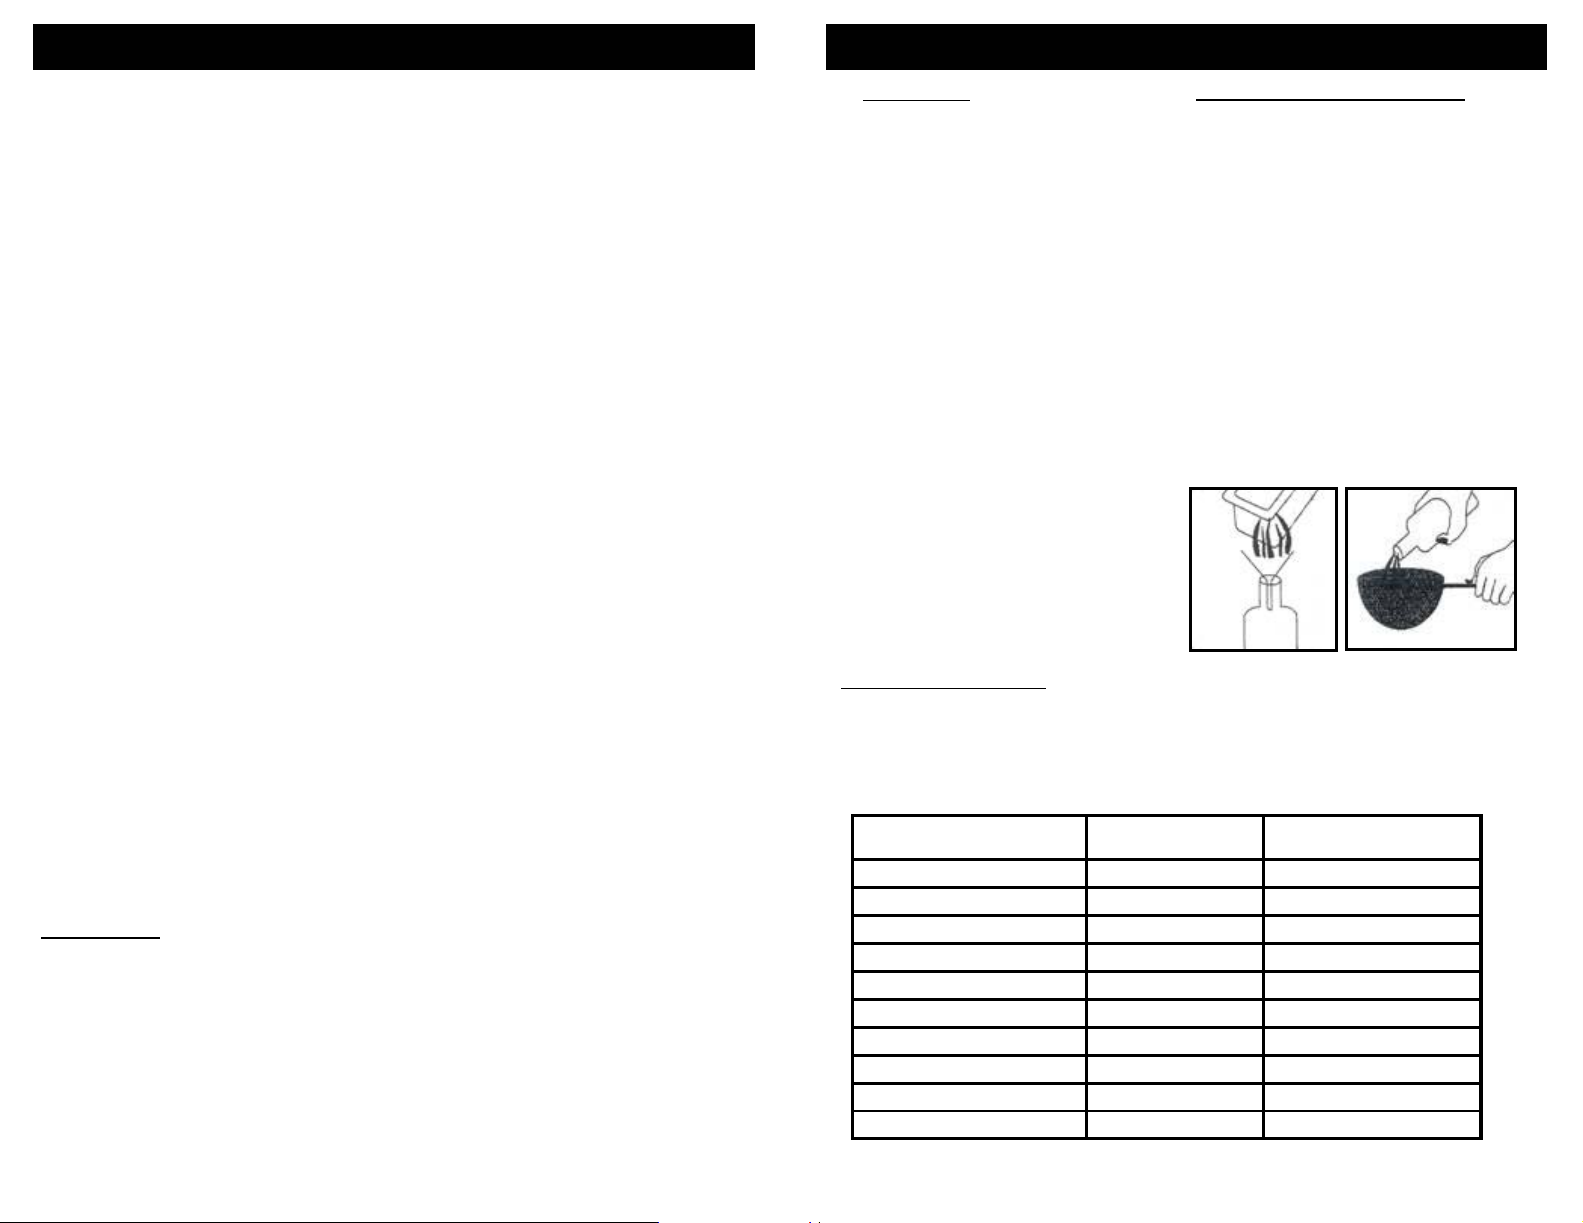
or bottle. Fig. 7
Wash and dry the oil container and
basket. Refill the oil container with the
oil, pouring the oil through a wire
strainer or paper filter. Fig. 8
Fig. 7
Fig. 8
Temperature Settings
The following cooking times reflect only the approximate time needed to fry one
basket 1/2 full. The exact time may be different depending on actual quantity,
personal cooking preferences, size and thickness of pieces, etc...
In general, use lower settings for delicate foods (vegetables, fish) and higher settings
for frozen foods, French Fries and Chicken.
Food Cooking Time Temperature
French Fries 6-9 minutes
Fish Fillets 3-5 minutes
Chicken Fingers 6-8 minutes
Chicken Pieces 13-20 minutes
Fried Zucchini 3 minutes
Fried Mushrooms 3 minutes
Onion Rings 3 minutes
Donuts 3-5 minutes
Apple Beignets 4 minutes
Shrimp 4-6 minutes
375°F
320°F
350°F
350°F
320°F
320°F
320°F
350°F
350°F
320°F
2
7
Page 5
OPERATING INSTRUCTIONS cont. GETTING TO KNOW YOUR DEEP FRYER
Pre-Heating
(cont.)
Warning: In order to avoid injury or
burns, never touch any metal parts on the
deep fryer because they may be hot.
• Pre-heating the oil will take up to 15
minutes depending on the temperature
selected.
• The temperature indicator light will
come on when the temperature is set
and the deep fryer is “on” showing that
the heating element is in operation.
This light goes off when the set
temperature is reached. (Fig. 6) The
temperature light may go on and off
several times during frying. This
indicates that the temperature is being
thermostatically maintained.
Temperature
Indicator
Light
On/Off
Switch
Fig. 6
Filling the Frying Basket
• Do not fill the frying basket when it is
immersed in oil.
• Place the food in the frying basket. Do
not overfill it and never exceed the
maximum quantities. For optimum
results and shorter frying time, basket
should be only 1/2 full.
• The basket has approximately 1.5 lb.
food capacity. It will hold 3-4
average size pieces of chicken.
• Do not fill the basket higher than the
MAX line on the basket with frozen
food.
Warning: When frying foods, always
remove the frying basket from the deep
fryer before filling with food because oil will
spatter and cause burns. Be especially
cautious when frying frozen foods.
Caution: When frying frozen foods such as
French Fries, you should not exceed
1.25 Lb. (564 gr.). For best crispy results limit
quantity to 1 Lb. (454 gr.). Clean off any ice
from frozen food prior to frying. Failure to do
so may cause fryer to overflow when food is
placed in oil.
Frying Food
• Always use the frying basket to fry food.
• Always close the lid cover during frying.
• When the oil is pre-heated, ready
indicator light will come on it indicating
that the desired temperature is reached.
• Slowly lower the frying basket into the
hot oil. Lowering the frying basket too
quickly can result in the oil overflowing
and splashing.
• Replace the lid carefully.
• It is normal for steam to escape through
the sides of the lid while frying.
• Avoid standing too close to the deep
fryer while it is working.
Warning: When opening the lid cover
after frying, lift up the lid slightly, then wait
to allow steam to escape before opening
the lid completely. Keep face away from
unit to avoid burns caused by escaping
steam.
5. At the End of Cooking
Warning: When you have finished frying,
always turn the temperature setting dial to
lowest position, turn off power switch and
unplug the deep fryer from wall outlet. To
avoid injury or burns, do not touch any
metal surfaces as they are hot.
• Set the temperature setting dial to the
lowest position, (turn fully counter
clockwise.).
• Turn On/Off switch to the "OFF" position.
• Unplug the main cord from the wall
socket.
• Lift up the lid cover slowly and wait to
allow steam to escape before opening
the lid cover completely.
• Lift up the frying basket by the handle.
Place it on the oil container and allow
the food to drain for a minute.
• Once the oil has drained from the
frying basket, the basket may be lifted
off and the food served.
Warning: Always let the deep fryer
cool completely (approximately 2 hours)
before cleaning or storing. Never carry or
move the deep fryer with hot oil inside.
6
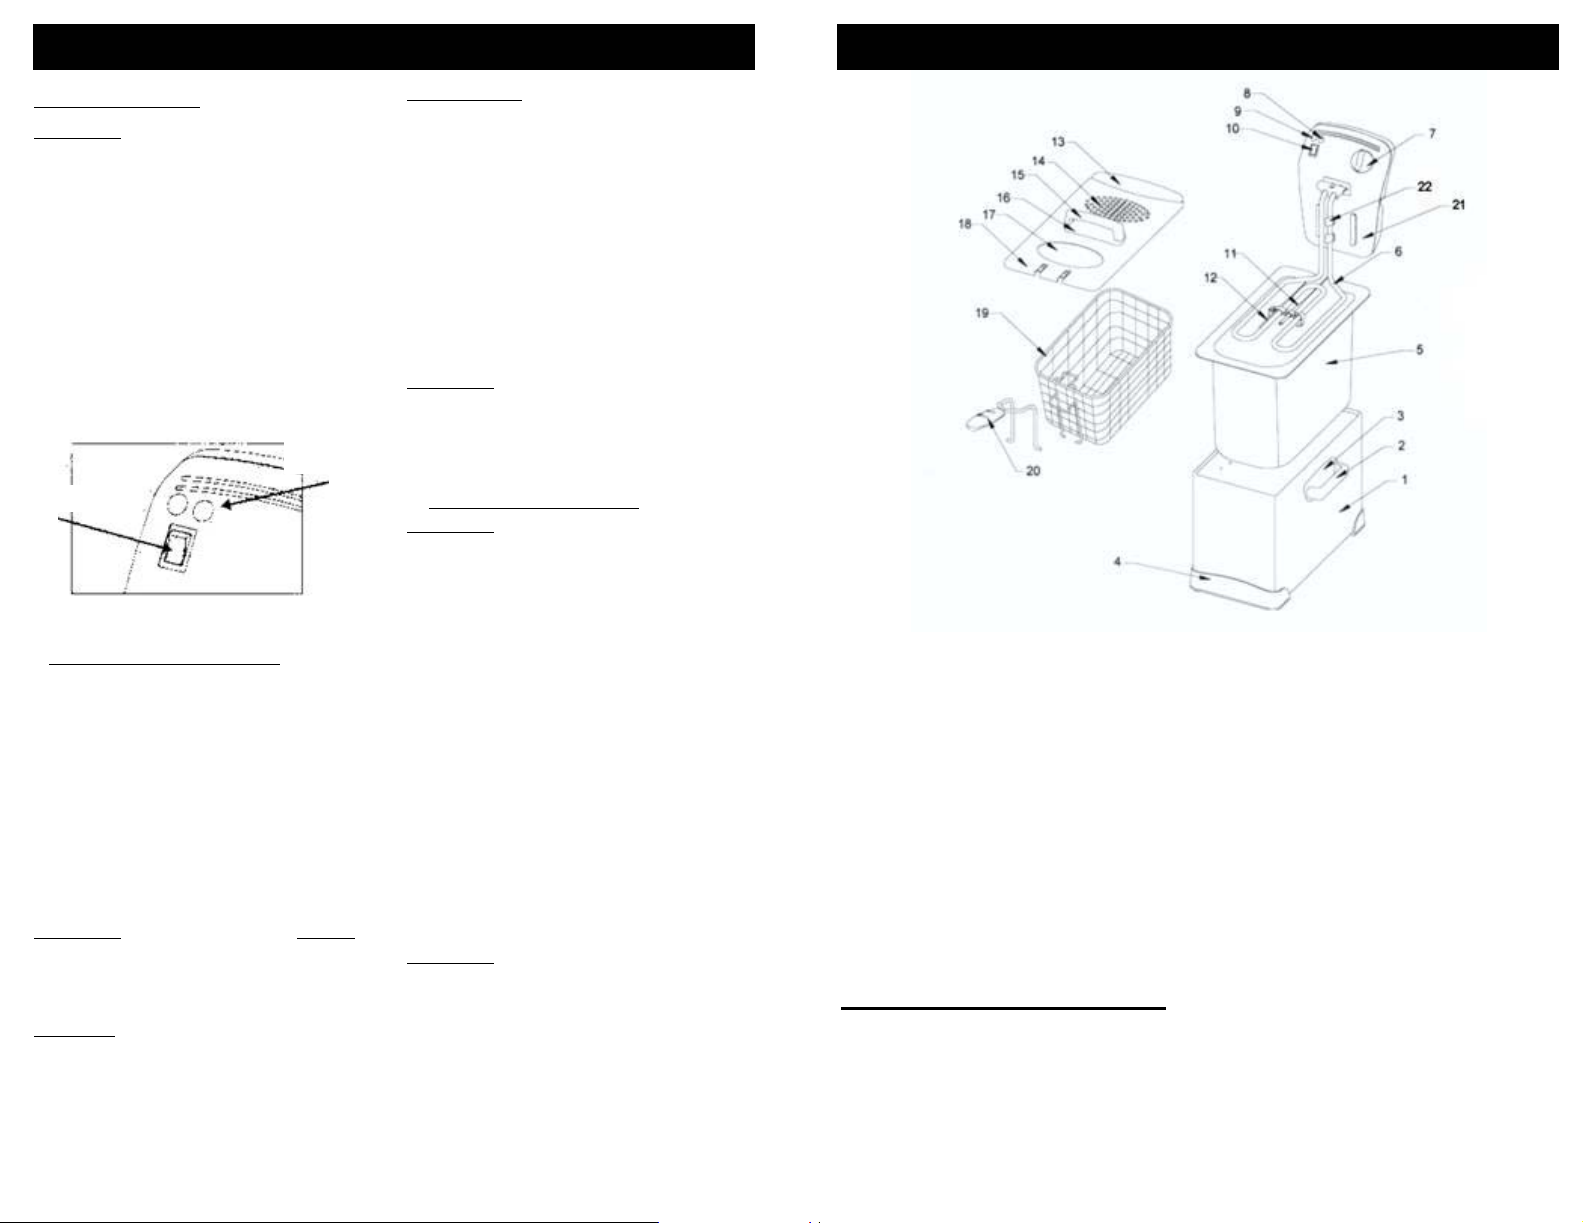
1. Body
2. Body Handle
3. Body Handle Plate
4. Bracket
5. Oil Container
6. Heating Element
7. Adjustable Temperature Control
8. Temperature Indicator Light
9. Power “ON” Indicator Light
10. On/Off Switch
11. Thermostat
12. Limitation Thermostat
Technical Specifications
Voltage: 120V., 60Hz.
Power: 1700 Watts
Oil Capacity: 5 Liters
13. Decorative Plate
14. Filter (*cannot be seen)
15. Lid Handle
16. Lid Handle Plate
17. Window
18. Lid Cover
19. Frying Basket
20. Basket Handle
21. Control Panel With Heating Element
23. Heater Clip
3
Page 6
OPERATING INSTRUCTIONS
OPERATING INSTRUCTIONS cont.
Read all the sections of this booklet and follow all the instructions carefully.
1. Using for the First Time
Warning: Never plug in the control panel
when it is not installed in the fryer body
with heating element in the oil container.
Do not immerse the control panel, cord or
plug in water.
Warning: This unit should not be used
to boil water.
Prior To First Use, Clean The Unit
Thoroughly
Warning: Always let the fryer cool
completely for 2 hours before taking it apart
for cleaning. Never carry or move the
Deep Fryer with hot oil inside. Before
cleaning, always make sure the plug is not
in the wall socket.
• All components with the exception of the
electrical parts, can be washed in warm
soapy water. Dry thoroughly before use.
• Use basket handle to remove the frying
basket. Always make sure the basket
handle is securely attached to the
basket. To attach the handle to the frying
basket, insert the metal part of the
handle inside the metal bracket on the
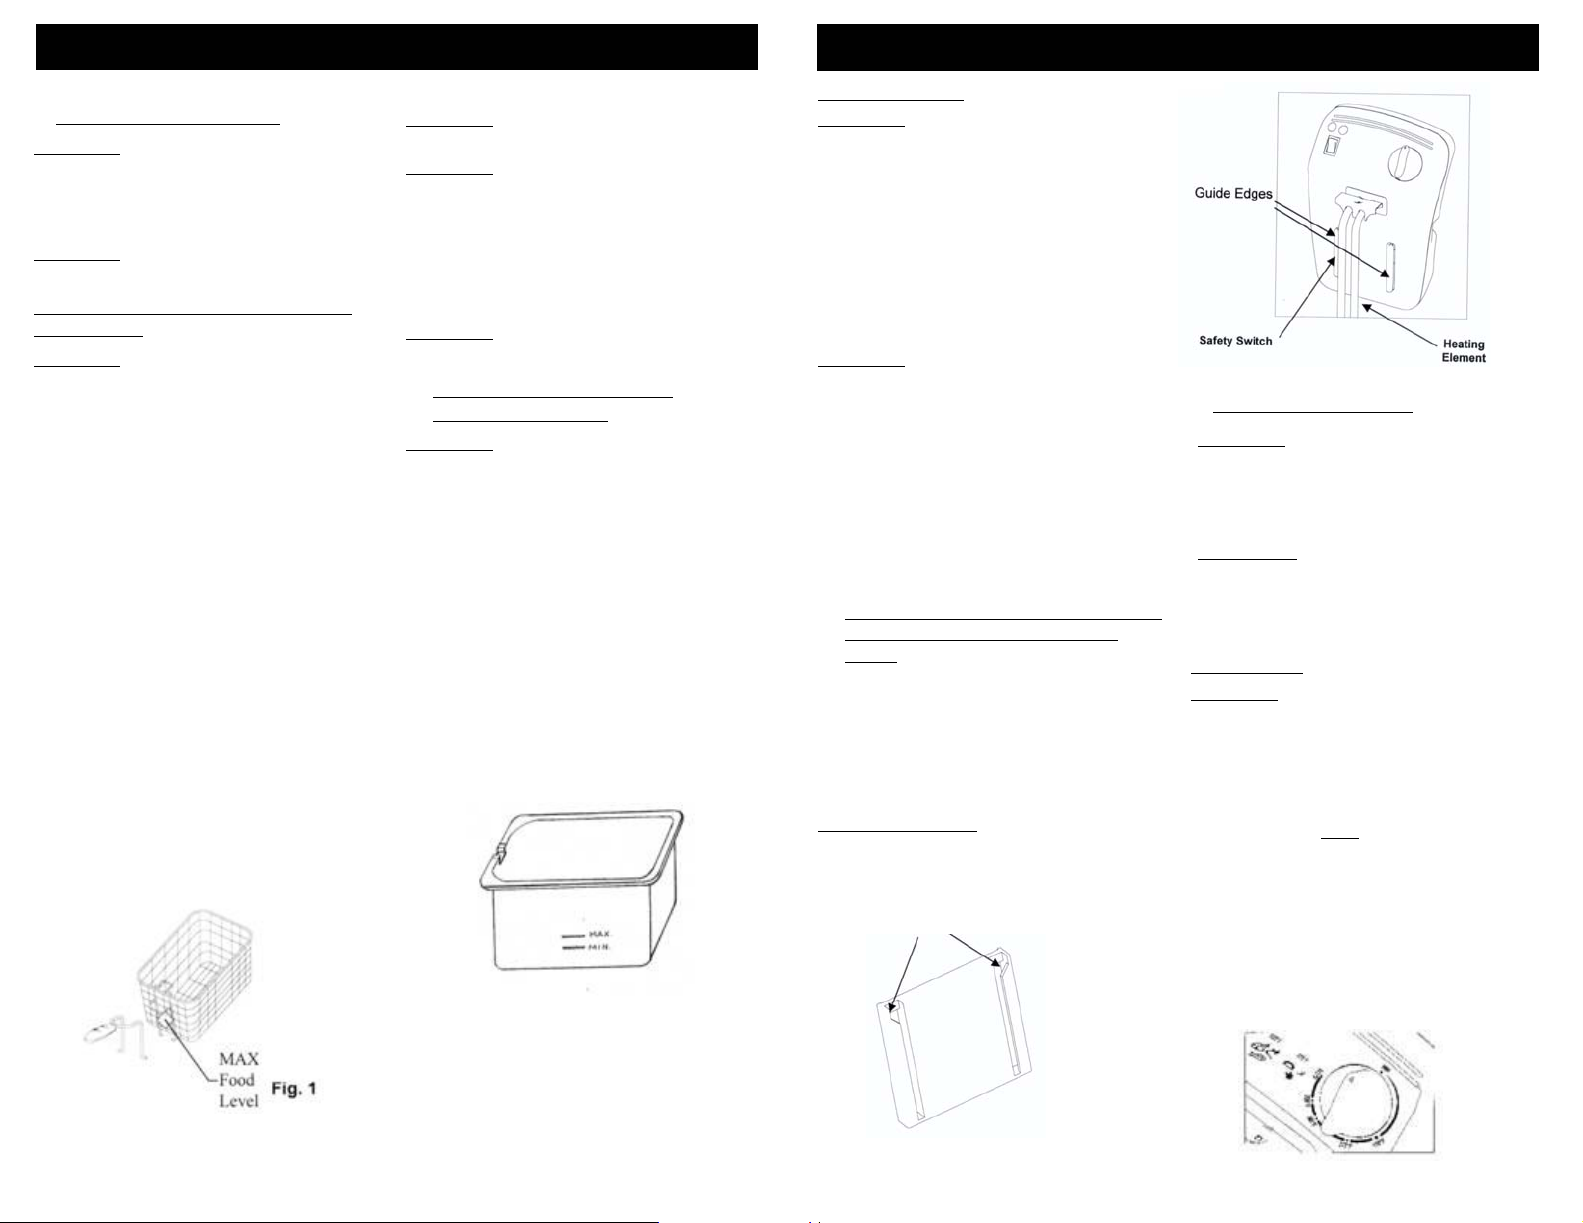
frying basket. (Fig. 1)
• Lift the control panel with heating
element out of its slots by pushing it up
from the bottom with one hand while
holding the body of the deep fryer with
your other hand.
• Remove the oil container.
• Clean the oil container and the frying
basket with hot water, dishwashing liquid
or other non-poisonous detergent and
non-abrasive sponge.
Warning: Never immerse the control
panel in water or any other liquids.
Warning: All components must be
completely dried before filling with oil
or using. Special care must be taken
to ensure the washable oil filter in the
lid is completely dry, otherwise the
filter will not function properly and may
lead to steam being trapped within the
fryer during use.
Warning: Never exceed "MAX" line when
filling the basket with food.
2. Filling the Stainless Steel
Container With Oil
Warning: Never plug in the Deep Fryer
before filling with oil to specified level.
Always make sure control panel is
securely in place in the body and the
heating element is inside the oil in the
container before plugging in.
• Use blended vegetable oil, pure corn oil
or canola (rapeseed) oil. Do not use
olive oil, margarine, lard or drippings.
• The oil level must always be maintained
between the minimum and the maximum
levels marked inside the oil container.
Check the oil level before each use. For
best results, keep the oil close to the
maximum level (19 cups/4.5 liters). Fig. 2
• Never mix different oils and fats together.
Do not mix old and new oil.
Fig. 2
Using Solid Fat
Warning: Do not put solid shortening in
the oil container or the frying basket.
• If using solid vegetable shortening, melt
it first in a separate pan and then very
carefully pour the melted fat into the oil
container.
• Previously used solid vegetable
shortening which has curdled and
hardened in the oil container should be
removed from the oil container and
melted in a separate pan before reusing.
Warning: If you try to melt the solidified
fat in the oil container, there is a risk of
warm melted fat suddenly sputtering from
below through the still solid top layer of fat.
Therefore use only the following procedure:
• Make sure the fat is at room
temperature. If the fat is very cold, there
is a greater risk of splashing.
• Using a fork, carefully make some holes
in the fat. Make sure the lid is securely
closed while fat is melting. Set
temperature dial to 320º F (160º C).
3. Installing the “Control Panel With
the Heating Element” Into its
Place
• Lift up the Control Panel with Heating
Element.
• Insert the "Guide Edges" on the Control
Panel (Fig. 4) into the "Guide Rails"
mounted on the metal body. (Fig. 3)
• Slide the "Guide Edges" down till the
end.
Important Notice: The Automatic
Safety Interlock Switch ensures that the
unit will not operate unless the Control
Panel has been inserted into the "Guide
Rails" on the metal body correctly.
Guide Rails
Fig. 3
Fig. 4
Control Panel
4. Using the Deep Fryer
Warning: Never plug in the Deep Fryer
before filling with oil to specified level.
Always make sure control panel is securely
in place in the body and the heating
element is inside the oil in the container
before plugging in.
Important: Ensure the control panel is
fitted correctly to the main unit otherwise
the unit will not function. This is not a
defect. This product is fitted with a safety
interlock switch to prevent the unit from
turning on accidentally.
Pre-Heating
Warning: Never plug in the Deep Fryer
before filling with oil. (See "Filling"
instructions on page 4.) Always unplug
the appliance when not in use.
• Make sure the oil level in the oil
container is between the "minimum "
and "maximum lines inside the oil
container. Do NOT
line on the oil container when filling with
oil.
• The frying basket should not be immersed
in the oil during the pre-heating.
• Replace the lid cover.
• Plug the appliance into a 120-volt outlet.
• Turn the On/Off switch to the "ON"
position.
• Select the desired temperature on the
temperature setting dial. (Fig. 5)
exceed the "MAX"
Back of Main Body
4
5
Fig. 5
 Loading...