

European Home Joist 42, Scaffold 72, Scaffold 42, Scaffold 60, Joist 60 Installation Manual
...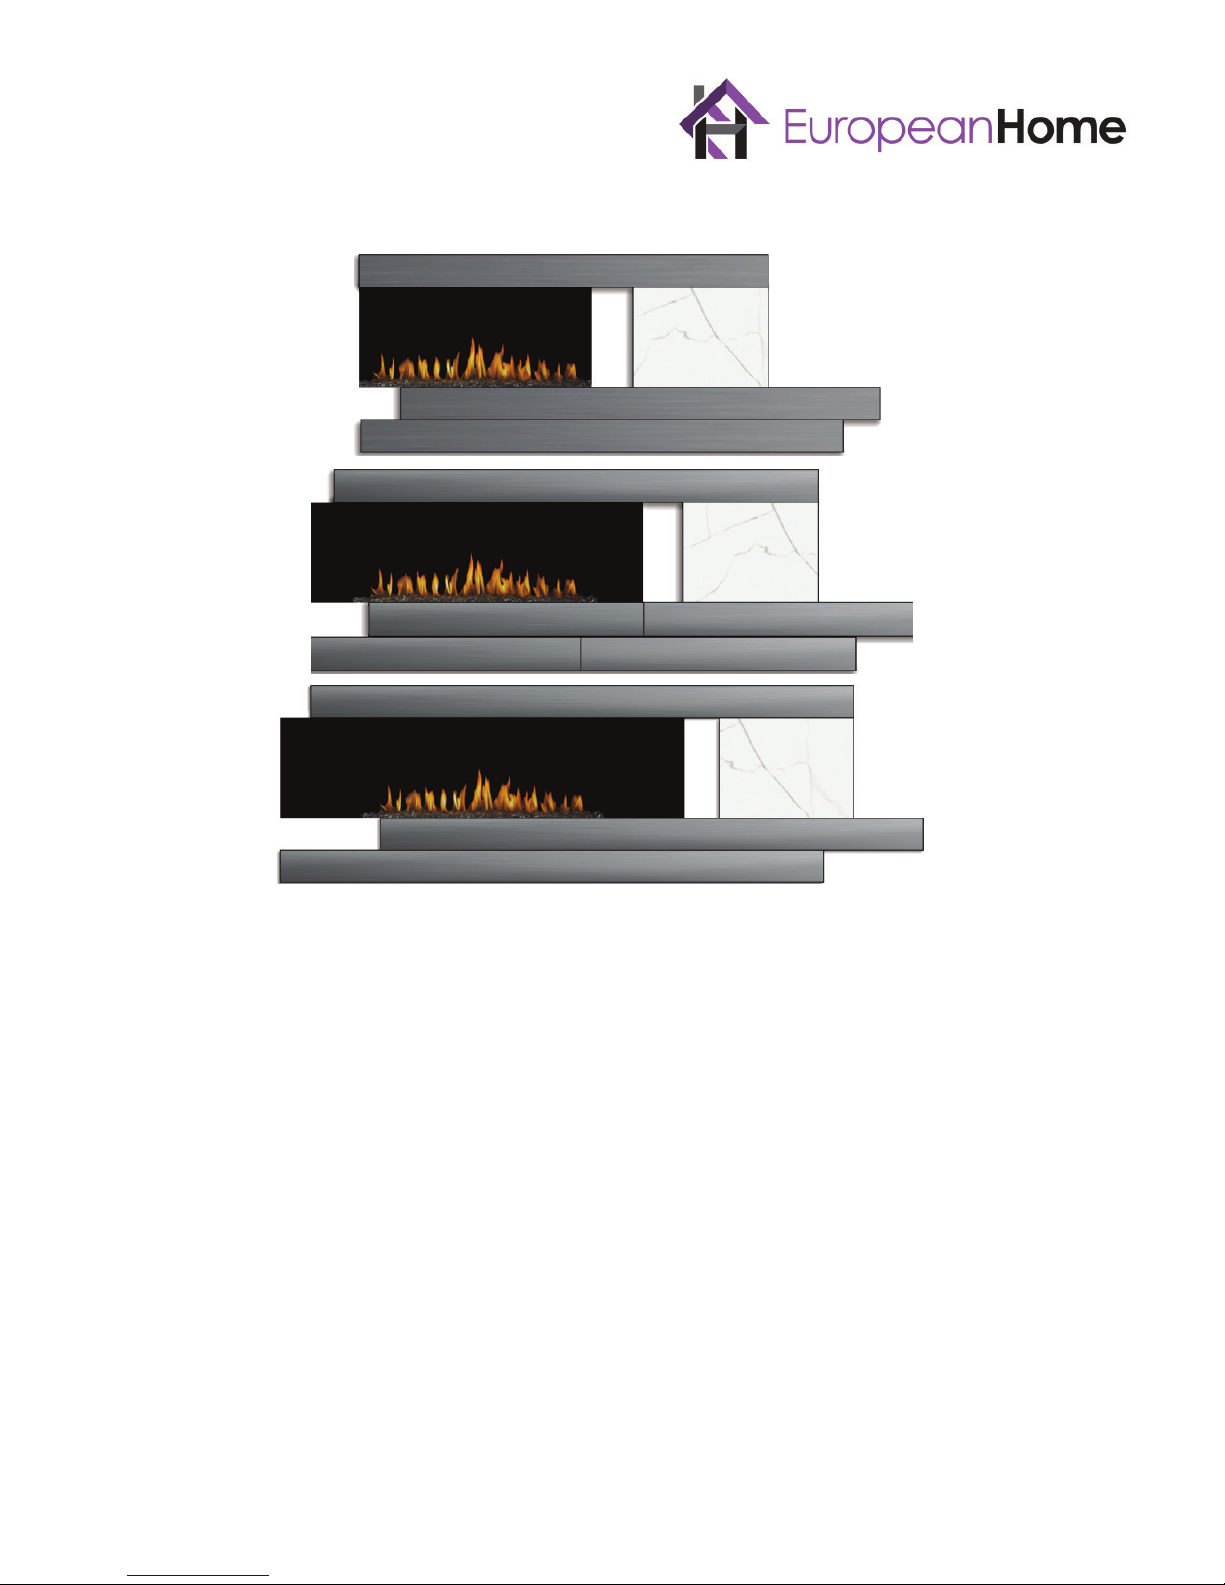
Joist
Designer Surround
Installation Guide
Exclusively designed to fit these
European Home H Series Fireplaces:
H-42-1
H-42-ST
Designer Surround for H Series EuropeanHome.com
H-60-1
H-60-ST
1
H-72-1
H-72-ST
November 2017

TABLE OF CONTENTS
Important Information 3
Specications and Dimensions 5
Pre-Installation Planning 6
Installation 7
Maintenance 12
Warranty 13
Designer Surround for H Series EuropeanHome.com
2

IMPORTANT INFORMATION
PRODUCT INSTALLATION RECORD
Installer: Please complete this form. Customer: Please retain this information.
Purchased From
Date of Purchase
Installed By
Date of Installation
Surround Serial Number
Thank you for your purchase of a Designer Surround for H Series!
Your Designer Surround for H Series is a proprietary combination of modern non-combustible materials
designed to please the eye and delight the senses.
Since your Designer Surround for H Series is designed to install, and perform, like ceramic tile, it should be
installed by a professional.
Please refer to your dealer for additional information for professional installers .
Designer Surround for H Series EuropeanHome.com
3
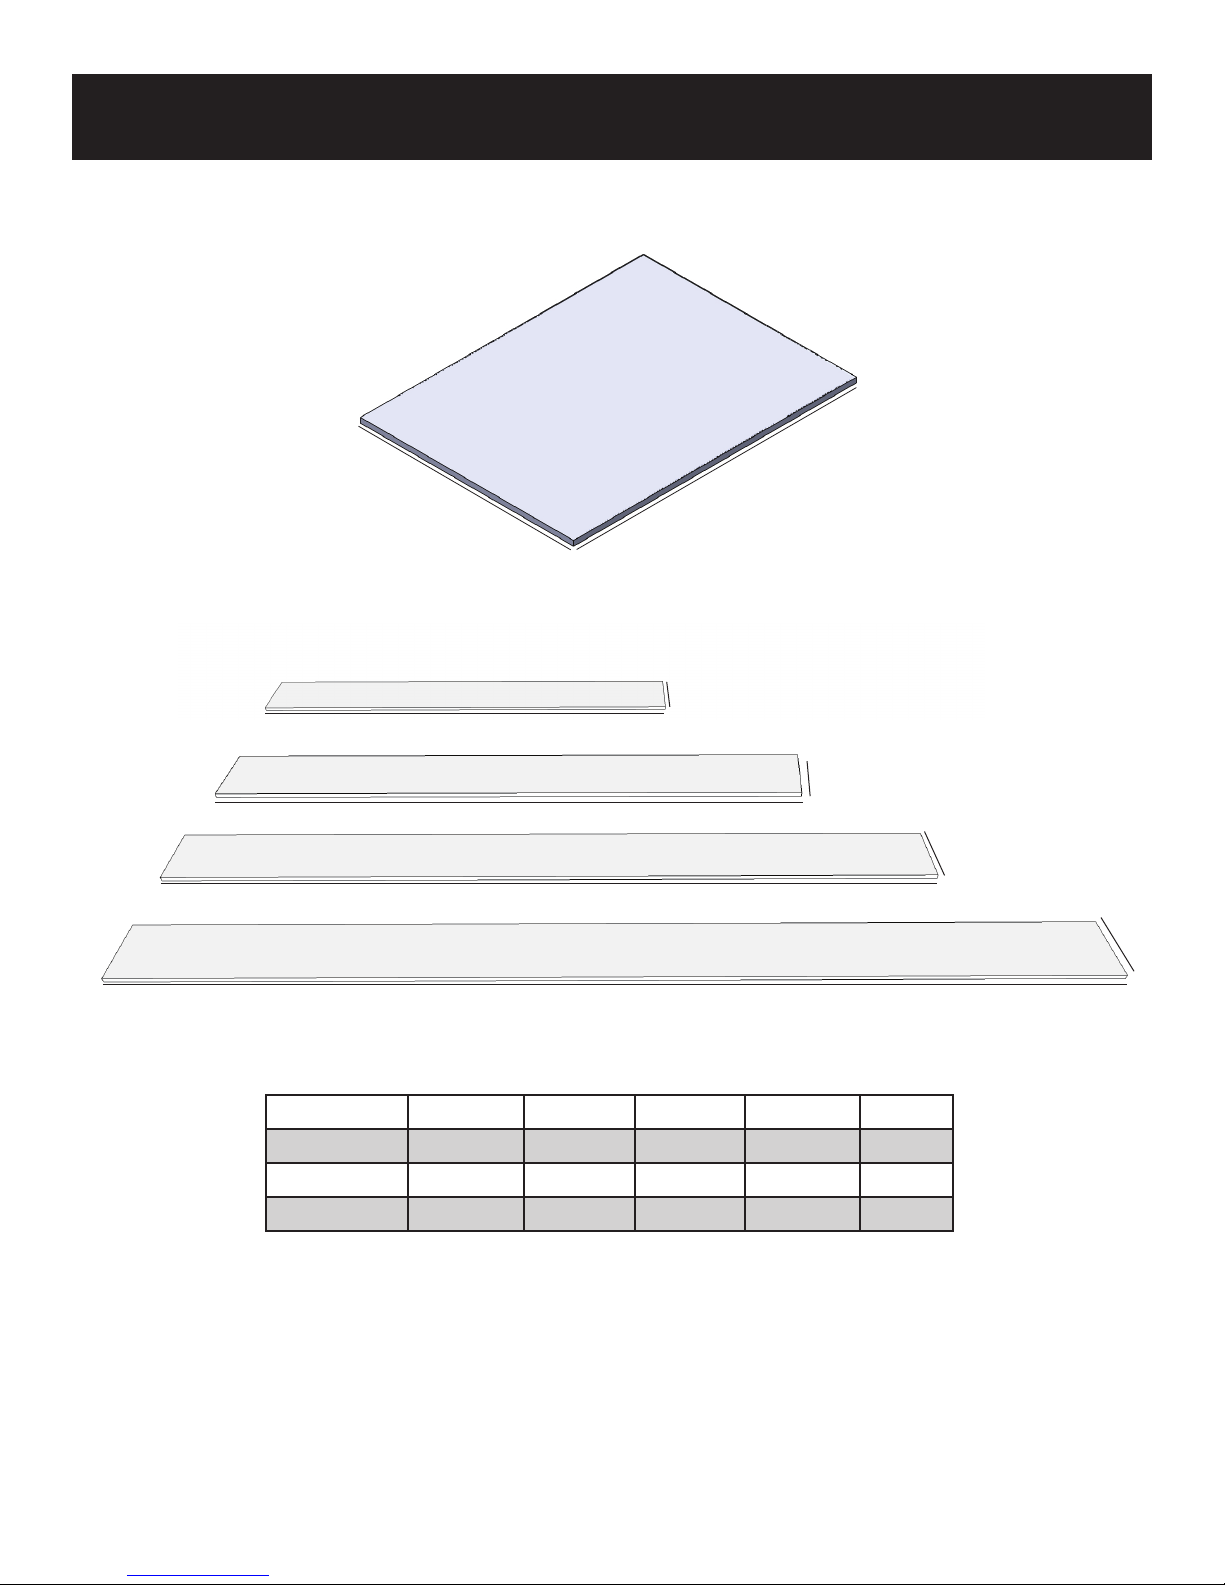
JOIST SURROUND PANELS
24”
18”
Joist Tile Panels
6”
48”
6”
72”
6”
84”
6”
96”
Joist Metal Panels
42” Joist - 1 2 - 1
60” Joist 4 - 1 - 1
72” Joist - - - 3 1
Each surround contains Metal and Tile Panels according to the chart, above.
Designer Surround for H Series EuropeanHome.com
48” Metal 72” Metal 84” Metal 96” Metal 24” Tile
All surround panels are 7/16” thick
4
SPECIFICATIONS and DIMENSIONS
SPECIFICATIONS and DIMENSIONS
95”
Metal
Tile Tile
42” H Series Fireplace
Metal
Metal
Joist 42
112”
Metal
38”
60” H Series Fireplace
Metal
Metal
Joist 60
117”
Metal
Tile Tile
72” H Series Fireplace
Metal
Metal
Tile
Metal
Metal
38”
38”
Designer Surround for H Series EuropeanHome.com
Joist 72
5
5

PRE-INSTALLATION PLANNING
BEFORE YOU BEGIN
These surrounds are intended to be installed in the same manner as a french cleat system.
Please read these instructions thoroughly before proceeding. There is information which is important for safe
and eective installation.
Please inspect the shipment for completeness and any damage. Contact your retailer if any damage is found.
Do not install the surround with any damaged or substituted parts.
For the best nished results, please consider hiring a professional Carpenter or Contractor to install these
surround panels. Dealer can also be referred.
Before you begin your installation you should have the following tools and supplies:
• Gloves
• Pencil
• Impact Gun
• Drill
• Level
• Tape Measure and Framing Square
• Lint-free Cloth
• Stud-nder
• #8 Screws (Bugle Head)
Included with the Surround Panels:
• Various sized Z-Clips
Designer Surround for H Series EuropeanHome.com
6

INSTALLATION
LAYING OUT THE PANELS
The panels of the Designer Surround for H Series are made to t against the replace opening and each other.
First, hold a metal panel up to the lower edge of the replace and mark the wall with a light pencil line along
the lower edge of the metal panel(s). Then draw a straight line parallel to the right edge of the replace opening at the distance shown below as appropriate for your surround model. The intersection of these two lines
is the starting point for the installation.
20” right of
replace opening
12” down from replace
Starting
Point
12” down from replace
Layout Lines for the Joist 42
(not to scale)
16” right of
replace opening
Starting
Point
Layout Lines for the Joist 60
(not to scale)
12” right of
replace opening
12” down from replace
Designer Surround for H Series EuropeanHome.com
Starting
Point
Layout Lines for the Joist 72
(not to scale)
7

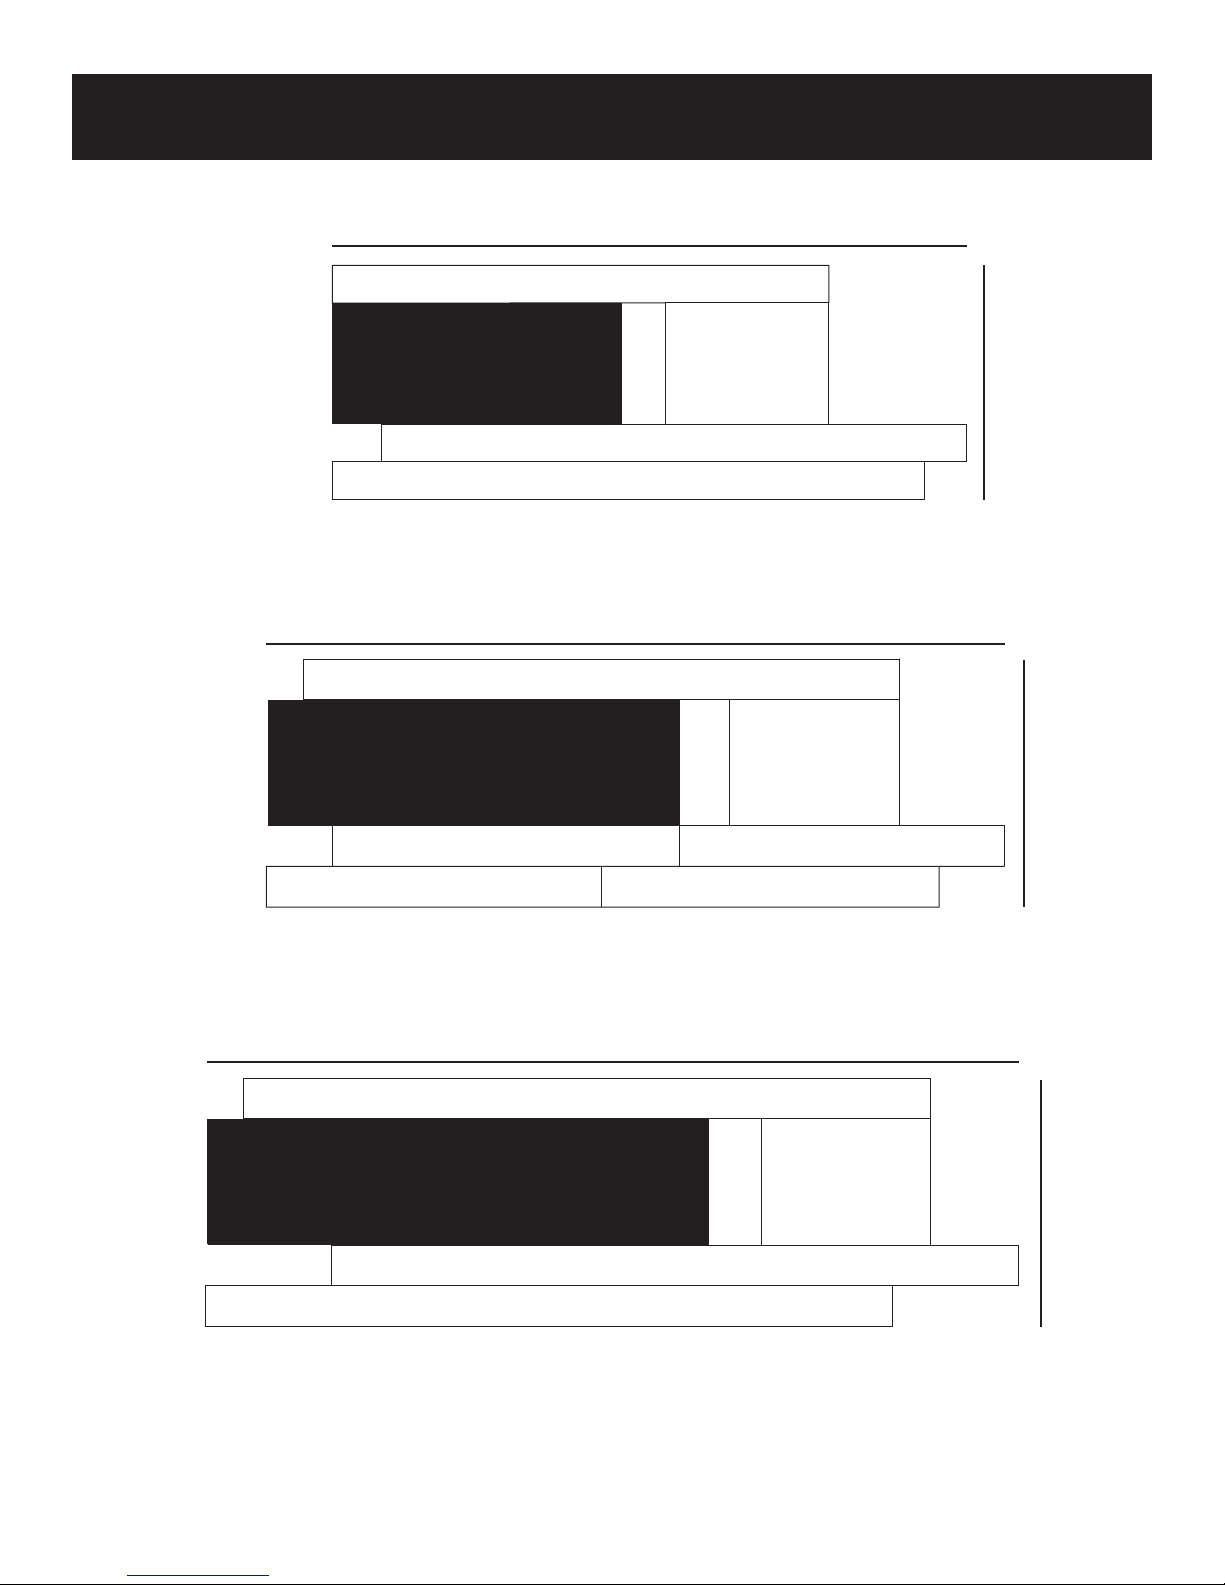
INSTALLATION: WALL LAYOUT
The metal panels and tile panels should be applied to the wall in the order shown below.
INSTALLATION
4 (Metal)
Tile
42” H Series Fireplace
60” H Series Fireplace
1 (Metal)
2 (Metal)
3 (Tile)
1 (Metal)
2 (Metal)
Joist 42
6 (Metal)
5 (Tile)
4 (Metal)
3 (Metal)
Joist 60
Tile
Designer Surround for H Series EuropeanHome.com
72” H Series Fireplace
4 (Metal)
3 (Tile)
1 (Metal)
2 (Metal)
Joist 72
8

INSTALLATION: WALL LAYOUT + Z-CLIPS
NOTE ABOUT ZCLIPS
Z-clips installed on the wall should have the interlocking side facing up. The slotted side of the clips face
the wall. The length of the clips is to account for contact with the existing wall stud behind the wall sheeting. Mount the Z-clips to studs only.
ZCLIP INSTALLATION PREP REFER TO GRAPHICS ON PAGES 1011
• Use a stud-nder to mark the stud locations above, below, and anking the replace within the relevant
area you will be installing the surround. Screw into these locations for structural integrity. Note, you can
drill into the replace cabinet using 3/4” self tapping screws.
• The included z-clips should exceed 16” slightly. Holes are predrilled to 16” to line up with the rule of 16”
on center. There should be center drilled holes as well.
• Before sinking the second screw, make sure you level the clip o along the guideline.
Ideal Stud Framing Example
Designer Surround for H Series EuropeanHome.com
9

INSTALLATION: WALL LAYOUT
INSTALLATION
Using the starting point and the edges of the replace, mark lines on the wall using the measurements
appropriate to your model, below.
Red lines Represent guidelines for Z-clip; draw these in as guides for mounting.
2 5/16”
2 5/16”
2 3/16”
2 3/16”
2 3/16”
2 3/16”
24”
Layout Lines for the Joist 42
(not to scale)
24”
6”
2 5/16”
24”
6”
6”
6”
2 5/16”
24”
6”
6”
Layout Lines for the Joist 60
(not to scale)
2 5/16”
24”
2 3/16”
2 3/16”
Layout Lines for the joist 72
(not to scale)
Designer Surround for H Series EuropeanHome.com
10
24”
6”
2 5/16”
6”
6”

INSTALLATION
The areas in gray, below, show where the Z-clips is to be applied to the wall.
2 3/16”
2 5/16”
2 3/16”
2 3/16”
2 5/16”
2 3/16”
24”
Align Z-Clips to the Red Lines
(42”- not to scale
24”
6”
2 5/16”
24”
6”
6”
)
6”
2 5/16”
24”
6”
6”
Align Z-Clips to the Red Lines
(60”- not to scale)
2 5/16”
24”
2 3/16”
2 3/16”
Align Z-Clips to the Red Lines
(72”- not to scale
Designer Surround for H Series EuropeanHome.com
11
)
24”
6”
2 5/16”
6”
6”

MAINTENANCE
SURROUND MAINTENANCE
Weekly Cleaning
Both the metal and tile panels should be wiped with a lint free cloth to remove any dust then wiped with a
damp cloth.
Yearly Cleaning
Both the metal and tile panels should be wiped with a lint free cloth to remove any dust then wiped with a
damp cloth.
Designer Surround for H Series EuropeanHome.com
12

WARRANTY
WARRANTY
European Home Warranty
Designer Surround for H Series
European Home warrants this product against defects in materials and workmanship for a period of TWO (2)
YEAR from the date of original retail purchase.
If a defect exists, European Home will, at its option, either (1) provide needed components using new or
refurbished replacement parts or (2) exchange the product with one which is new or which has been manufactured from new or serviceable used parts and is at least functionally equivalent to the original product. A
replacement product/part assumes the remaining warranty of the original product or ninety (90) days from
the date of replacement or repair, whichever provides longer coverage for you. When a product or part is
exchanged, any replacement item becomes your property and the replaced item becomes the property of
European Home. All warranty claims must be submitted through the dealer from which you purchased the
product. Check with your dealer in advance for any costs to you when arranging a warranty call. Shipping
and/or delivery charges for parts are not covered by this warranty.
Nothing in the above shall be deemed to imply that this warranty shall apply to work which has been
abused or neglected or shows evidence of changes or modications by others with or without permit, damages caused by the acts of God, building settlement or moving, re or vandalism. In addition, installation of
this product that varies from the requirements stated in the instruction manual will void the warranty.
Designer Surround for H Series EuropeanHome.com
13
13

Designer Surround for H Series EuropeanHome.com
EUROPEAN HOME
a division of Europa Ja, Inc.
30 Log Bridge Road
Building 300 - Suite 303
Middleton, MA 01949
www.europeanhome.com
IGHVFJS 1.0
14
 Loading...