

Euromaid Spartan SB4BBILPG, Spartan SB4BBING, Spartan SB4BFSLPG, Spartan SB4BFSNG, Spartan SB4BFS User Manuals
...Page 1

Spartan 4 Burner BBQ’s
SB4BFS
SB4BBI
Spartan BBQ’s User Manuals
euromaid.com.au
1800 805 300
customerservice@hapl.com.au
by
Page 2
AG
S
Installation and Oper
a
d
YOU MUST READ THIS OWNER’S GUI
D
BEFORE OPERATING OUR GAS GRILL
DANGER
If you smell gas:
﹗
1. Shut off gas to the appliance.
2. Extinguish any open flames.
3. Open lid.
4. If odor continues, keep away from the
appliance and immediately call your g
a
supplier or your fire department.
Leaking gas may cause a fire or explosion
Which can cause serious bodily injury or
death, or damage to property.
WARNING:
﹗
1. Do not store or use gasoline or other
flammable liquids or vapors in the
vicinity of this or any other appliance.
2. An LP cylinder not connected for use
shall not be stored in the vicinity of th
i
or any other appliance.
ypp
WARNING: Follow all leak-check
procedures carefully in this manual
prior to barbecue operation. Do this
even if the barbecue was dealer-assembl
e
﹗
UN
ting instruction manual
omestic outdoor gas barbecue
E
NOTICE TO INSTALLER: These
instructions must be left with the
owner and the owner should keep
them for future use
THIS GAS APPLIANCE IS DESIGNED
s
FOR OUTDOOR USE ONLY
WARNING: Do not try to light
this appliance without reading
the “Lighting Instruction”
section of this manual
﹗
ATTENTION: This product has
been safety tested and is only
certificated for use in a specific
﹗
s
country
.
WARNING: Do not attempt to
make any repair to gas carrying
or gas burning components .
Your actions, if you fail to follow
this product warning, may cause
﹗
d
a fire or an explosion resulting
in serious personal injury or death
and damage to property.
FOR HOUSEHOLD USE ONLY
SAVE THESE INSTRUCTIONS
FOR FUTURE REFERENCE
Masterluxe
Models: SB4BBILPG, SB4BBING, SB4BFSLPG & SB4BFSNG
Page 3

DANGERS AND WARNING
DANGER
﹗
Fail
ure to follow the Dangers, Warnings a
n
Manual may result in serious bodily injur
y
causing damage to property
1. Do not lift the barbecue using the contro
l
p
anel can damage gas handling and elec
t
WARNING
﹗
p
handling and electrical components can
r
and damage to property.
2. Do not store a spare or disconnected liq
u
gas grill.
3. Improper assembly may be dangerous.
P
instructions in this manual
4
.
After a period of storage, and/or non
-
use
for gas leaks and burner obstructions
b
manual for correct procedures.
5. Do not operate the gas barbecue if there
6. Do not use a flame to check for gas leak
s
7. Combustible materials should never be
w
the back or sides of your gas barbecue.
8. Do not put a barbecue cover or anythin
g
under the barbecue.
9. Your gas barbecue should never be use
d
barbecue may be very hot. Keep young
c
10. You should exercise reasonable care wh
e
be hot during cooking or cleaning and
s
while in operation.
11. Should the burners go out while in oper
a
and wait five minutes before attempting
12. Do not use charcoal or lava rock in your
13. Never lean over open grill or place hand
s
14. Should a grease fire occur, turn off all b
u
15. Do not enlarge valve orifices or burner p
16. Th
e gas barbecue should be thoroughly
c
17. Conversion for use on natural gas must
t
18. Do not attempt to disconnect any gas fit
t
19. Use heat-resistant barbecue mitts or glo
20. Keep any electrical supply cord and the
surfaces
21.Do not use this barbecue unless all part
assembled according to the instruction
s
22. Remove all packing material before use.
23. Built in version to be installed only on
n
diagram on page 8 (installation).
Cautions contained in this owner’s
or death, or in a fire or an explosion
panel as a handle. Lifting by the control
rical components. Damage to gas
p
esult in serious bodily injury or death
id propane cylinder under or near this
lease carefully follow the assembly
,
the gas barbecue should be checked
efore use. See instructions in this
is a gas leak present.
.
ithin 1000mm overhead and 250mm from
flammable on, or in the storage area
by children. Accessible parts of the
hildren away while it is in use.
n operating your gas barbecue. It will
hould never be left unattended or moved
tion, turn all gas valves off. Open the lid
to relight using the lighting instructions.
gas barbecue.
or fingers on the front edge of the firebox.
rners and leave lid closed until fire is out.
orts when cleaning the valves or burners.
eaned on a regular basis.
only be performed by an authorized person
NG kit01 with approved injector sizes.
ing while your barbecue is in operation.
ves when operating barbecue.
fuel supply hose away from any heated
s are in place. The unit must be properly
outlined in the “Assembly Guide”.
on combustion surfaces such as concrete
or bricks with 15mm clearance from sides, 120mm back and 1000mm overhead. Refer to
using only the Spartan conversion ki
Page 4
ASSEMBLY GUIDE
CAUTION: Although we m
assembl
y p
rocess is as e
a
﹗
yp
with fabricated steel part
s
if improperly handled du
r
while handling any parts
IT IS STRONGLY RECOM
PROTECTED WITH A PAI
WARNING: Care must be
t
﹗
assembled according to th
the grill properly could c
r
other bodily harm.
WARNING: Do not lift the
handle. Lifting by the co
n
electrical components. D
a
components can result i
n
﹗
damage to property.
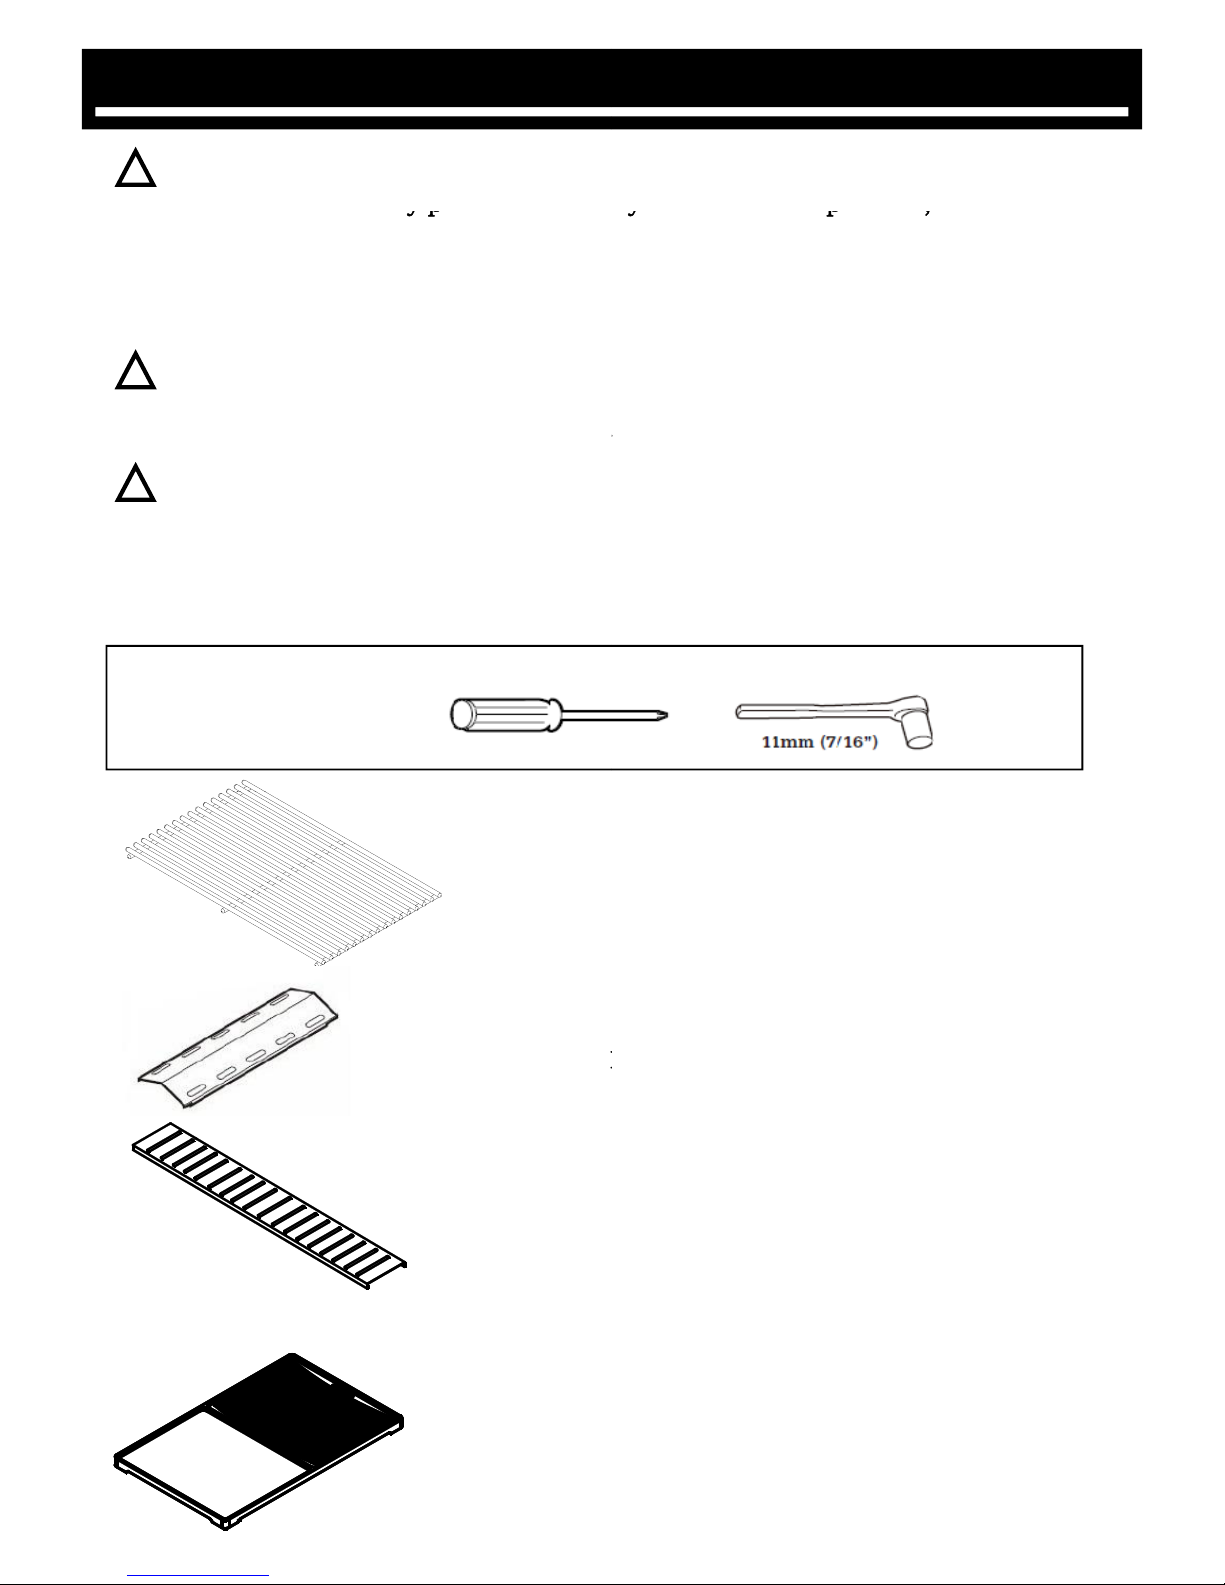
TOOLS NEEDED
COO
K
FLA
M
WA
R
CAST IR
O
PLATE
ake every effort to ensure that the
sy and as safe as possible, it is inherent
yp,
that corners and edges can cause cuts
ing assembly procedures. Be careful
during assembly.
MENDED THAT HANDS BE
R OF WORK GLOVES.
aken to ensure that this grill is
instructions. Failure to assemble
eate a fire hazard or cause burns or
barbecue using the control panel as a
trol panel can damage gas handling and
mage to gas handling and electrical
serious bodily injury or death and
ING GRATE 1
E TAMER
4
MING RACK
1
N COOKING
1
Page 5
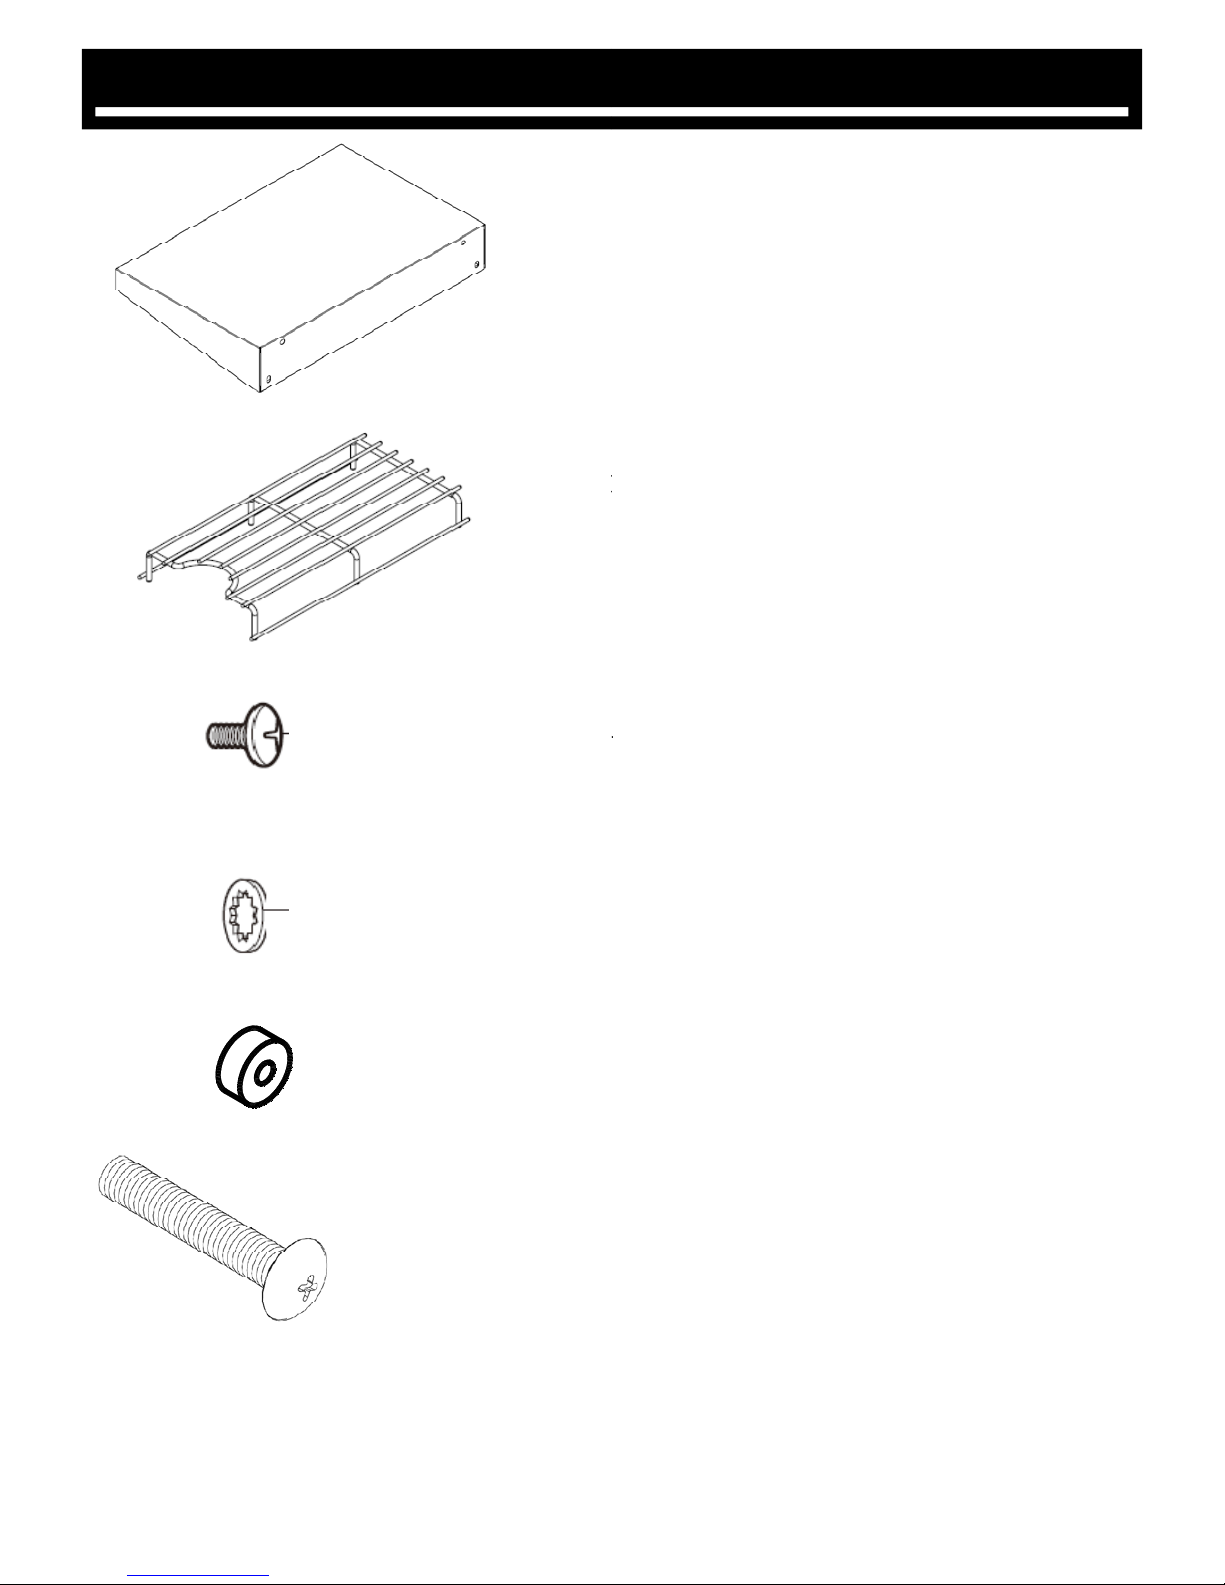
ASSEMBLY GUIDE
SID
E
SIDE
B
COO
K
TRUSS HE
A
1/4”-20 U
WASHE
R
FIBERGLAS
S
TRUSS HEA
D
1/4”-20 U
N
SHELF 2
URNER
ING GRATE
1
D SCREW
NC×1/2”
2
10
SPACER
8
SCREW
C×1 ”
8
Page 6

ASSEMBLY GUIDE
Put the flame tamers, cooki
n
and warming rack into positio
CAUTION: Always remove the war
m
NOTE: Please install fiberglass spa
c
shelf when attaching the st
a
g grates (cast iron cooking plate)
ing rack when using the rotisserie.
er between grill side panel and side
inless steel side shelf.
Page 7
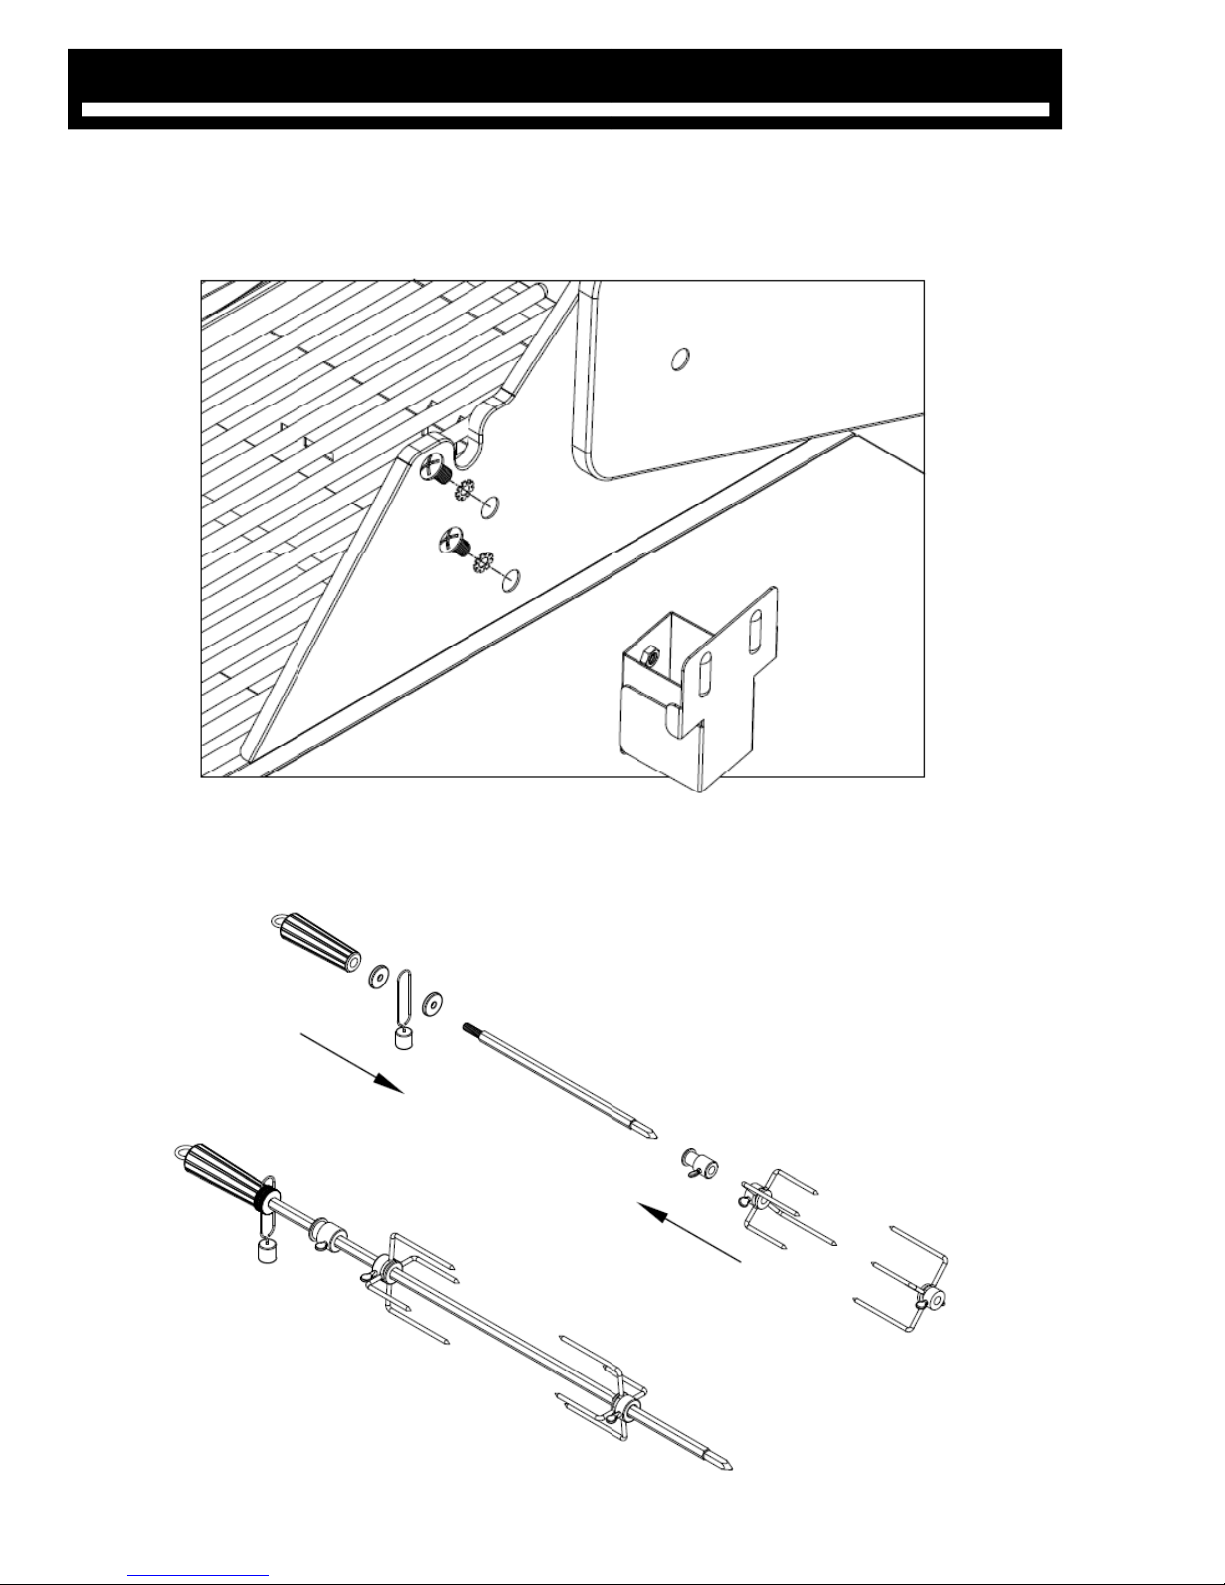
ASSEMBLY GUIDE
Screw rotisserie motor mounti
n
washers on the right side of th
Assemble the stainless rotisser
i
g bracket using 2 bolts &
firebox
e kit as following diagram
Page 8

ASSEMBLY GUIDE
Attach rotisserie motor by slidin
g
mounting bracket .Then insert poi
rod into rotisserie motor. Insert r
o
panel of the firebox as the other e
n
it on the rotisserie motor
end of the rotisserie
tisserie roller into the left
d as shown
Page 9

ASSEMBLY GUIDE
This gas barbecue is designed for use wit
h
supply hose (regulator) should already be
Place the gas cylinder
inside th
e gas barbecue
cabinet.
a portable 9 kg LPG cylinder. The gas
securely attached to the barbecue
Gas type & injector size table
Page 10

IMPORTANT
We urge you to read this manual carefully a
n
This will help assure you of the most enjoya
b
gas grill. We also advise you to keep this m
a
WARNING: Your grill has been designed
rating plate. Do not attempt to operate y
o
warning could lead to a fire hazard and
b
CAUTION: FOR YOUR SAFETY Do not s
t
﹗
﹗
beneath the grill burner box or in the vi
c
WARNING: Be sure to have your LP (pro
p
An incorrectly filled or an overfilled LP t
a
combined with the warming of the LP ta
n
cause LP gas to be released by the press
u
increase causes the propane to expand.
can be explosive
﹗
CAUTION: Never operate your grill under a
n
CAUTION: This grill is not intended to be i
n
It is also not intended to be installed in or o
n
WARNING: For your safety, do not store or
u
liquids in the vicinity of this or any other a
p
lead to a fire, explosion and bodily harm.
INSTALLATION Liquid Propane Gas
Built in Natural Gas and Pr
o
d to follow the recommendations enclosed.
le and trouble-free operation of your ne
w
nual for future reference.
to operate using only the gas specified on the
ur grill on other gases. Failure to follow this
odily harm, and will void your warranty.
ore any flammable materials in any cabinets
inity of your grill.
ane) tank filled by a reputable propane dealer.
nk can be dangerous. The overfilled condition
k (a hot summer day, tank left in the sun) can
re relief valve on the tank since the temperature
LP gas released from the tank is flammable and
y overhead combustible construction.
stalled in or attached to a recreational vehicle.
a boat.
se gasoline or other flammable vapors and
pliance. Failure to follow this warning could
Grill
pane LPG Installation
SAFETY INFORMATION
Page 11

Built in Natural Gas and
P
This barbecue must be installed in accor
d
authorities, gas, electricity and any other
latest published versions of AS/NZS 5601
cylinder location.
Natural gas conversion and installation
m
authorised person using the approved na
t
sizes, Part No Ngkit1. The regulator must
operating, the pressure test point is locat
e
Must NOT be installed within 1000
mm of
bricks.
Gas inlet connection is located at the fron
750mm above the floor. The inlet connect
i
high. Flexible connection must be certified
10mm in diameter and up to 1500mm lo
n
hot surface. The installer must test the o
p
The tradesperson must build the minimum
shown, when the barbecue is in the insta
l
provided to ensure the hose and regulato
r
connected/disconnected to the barbecue
g
750mm clearance below the barbecue is r
ventilation must be at least 200cm² openi
n
ground level) and 200cm² openings at the
assembly, refer to pages 3,
4&5
.
ropane LPG Installation
ance with the requirements of local
statutory regulations, as well as the
Gas Installations, pipe sizing and LPG
ust only be performed by an
ural gas conversion kit and injector
be set to 1.0kPa, with all burners
d on the regulator.
overhead surfaces such as concrete or
t right hand side of the barbecue,
on thread is 5/8”SAE male flare and
to
class B or D of AS/NZS1869
,
g and must not be in contact with any
eration of the barbecue and instruct
combustion air inlet clearances as
led position, adequate access must be
assembly can be easily
as inlet. If an LPG cylinder is used,
equired and the cylinder enclosure
gs at the bottom(below 125mm from
top of the enclosure. For barbecue
the overall dimensions are 1060mm long,
615mm wide and 605mm or 1240mm
the user before leaving. If the barbecue cannot be adjusted to perform correctly
or for parts or service, our nationwide service team can be contacted on our toll free
customer service number 1800 805 300 or by logging on to customersupport.hapl.com.au
Page 12

INSTALLATION
Locating Your Grill
1.
Your Gas Grill is manufactured for outdoor use o
n
monoxide while in operation and the gas should n
Never operate this grill indoors (inside your hom
e
2. When locating your grill, choose a safe outdoor lo
surfaces and out of traffic paths.
3. Consult your local codes for possible additional r
e
4. As your grill uses gas, it requires air to burn pro
p
as to obstruct the flow of combustion and ventila
t
’
5.
When possible, adjust your grills position to red
Combustible materials should never be within 100
0
your gas barbecue. Built in barbecues must only be
combustible surface such as concrete or bricks with
This appliance shall only be used in an above grou
n
without stagnant areas, where gas leakage and produ
dispersed by wind and natural convection. Any encl
o
comply with one of the following:
Within a partial enclosure that includes an ove
r
Within a partial enclosure that includes an ove
r
the following shall apply(i) at least 25% of the total wall area is complet
e
(ii)
At least 30% of the remaining wall area is o
p
Leveling
It is important for the proper operation of th
e
()
gp
An enclosure with walls on all sides, but at lea
s
no overhead cover. In the case of balconies, at
l
wall areas shall be and remain open and unres
ly! Any grill, charcoal or gas, produces carbon
be
allowed to accumulate in a confined area
.
or recreational vehicle or any enclosed area).
cation away from flammable or combustible
strictions on location or operation of your grill.
erly. Do not locate your grill in such manner or
ion air around the grill.
the likelihood of wind blowing onto it
.
mm overhead and 250mm from the back or sides of
installed by an authorized person on a non
d open-air situation with natural ventilation,
of
combustion are rapidly
sure in which the appliance is used shall
head cover and no more than two walls.
head cover and more that two walls,
ly open; and
en and unrestricted.
grill that it be located on a level surface.
t one permanent opening at ground level and
east 20% of the total of the side, back and front
tricted.
and 1000mm overhead, refer to page 10.
combustion air clearances of 15mm sides, 120mm rear
Page 13

CONNECTION Liquid Propane Gas G
r
Type of Gas
1. Your LP grill is factory built to operate usi
n
operate your grill on gases other than the t
2. The regulator supplied with your liquid pr
o
pressure and is for use with propane gas o
factory supplied hose assembly must be u
s
LPG gas cylinder.
3. If replacement of the hose and/or regulato
r
are required.
4. For safety and design reasons, the convers
to operation using natural gas requires an
o
Handling Liquid Propane Gas
Propane gas should be handled and stored
w
gas dealer, when having your tank fill, for a
of propane gas tanks. Most dealers will be gl
handle your tank. Make sure your tank is n
well-ventilated area in an upright position a
w
Portable Installation
Complete portability is afforded to the grill
h
when so installed, it is necessary to use a 9
other size. The tank retainer is designed to
a
WARNING: Do not let the
regulator hose loop up
towards the bottom of
the firebox
ill
g liquid propane only. Never attempt to
specific on the grill rating plate
.
pane gas grill is set for 2.75kPa
nly. This regulator and the
ed when operating your grill with a 9kg
becomes necessary, factory specific parts
ion of a grill from operation using LP gas
approved natural gas conversion kit for
page 7.
ith care. We suggest asking your propane
short course in handling, care and storage
to
instruct you on how to store and
ever stored inside! Keep it outside in a
ay from your gas grill.
ead when mounted on the portable cart.
kg capacity liquid propane tank. Use no
ccommodate only this size tank.
the grill. If this becomes necessary, refer t
Page 14

CONNECTION
When connecting the regulator end of the hos
e
fitting in an anti-clockwise direction and firml
y
WARNING
: Do not use a tool to tighten the
regulator coupling and could cause a leak
r
or in a fire or an explosion causing damage
To ensure that this does not cause difficulty in ligh
t
1. Make sure all burner valves are OFF.
2. Open cylinder valve and wait 5 seconds.
3. Follow li
g
hting instructions.
gg
When connecting or replacing any gas pipe or fittin
g
compound approved for use with natural and prop
a
for leaks using soapy water and a spray bottle.
Gas Leak Checks
Never use a match or flame for leak detecti
o
Brush the solution onto connection points
a
escaping gas. If leaks are detected, shut off
retighten connections, then repeat the lea
k
operation before placing the tank into its s
t
tank in the compartment, recheck the tan
k
WARNING
: If soapy water is used for leakag
rinsed with clean water.
WARNING: Never use an open flame when
t
flame may result in serious bodily injury
o
causing damage to property.
CAUTION: Never transport or move your
g
pyg
manual valve on your liquid propane gas
CAUTION: Place dust cap on cylinder val
v
use. Only install the type of dust cap on
t
with the cylinder valve outlet that is pro
v
of caps or plugs may result in leakage of
to the cylinder, turn the left hand POL threaded
hand tighten.
connection. Using a tool could damage the
esulting in serious bodily injury or death,
to property.
ing the grill, follow these instruction
s, all joints must be sealed with leak-proof sealing
ne gases. After making connections, check all joints
n. Use soapy water or testing solution.
nd look closely for bubbles indicating
the main gas supply valve and securel
y
test. On cabinet models, perform this
orage compartment. After placing the
to see if any connections were disturbed.
test, the fittings must be thoroughly
esting for gas leaks. Use of an open
r death, or in a fire or an explosion
rill or grill tank without first closing the
tank.
e outlet whenever the cylinder is not in
he cylinder valve outlet that is provided
ided with the cylinder valve. Other types
propane.
IMPORTANT:
Page 15

NORMAL OPERATION
WARNING: Your grill was not designed to o
p
Main Burner (s) on at the same time. Failu
r
overheating condition which would dama
ge
gg
WARNING: Keep any electrical supply cord
heated surfaces.
Lighting Your Grill
DANGER: Make sure that the lid is in the f
u
light your grill. Failure to open the lid coul
d
in serious bodily injury or death, or in a fire
property.
WARNING: The burner control knobs must
b
the liquid propane cylinder tank valve. If th
turn on the LP cylinder valve, the “excess
g
limiting the gas flow of gas from the LP cyli
n
cylinder valve and burner control knobs. Th
DANGER: When the “excess gas flow contr
o
of gas is still flowing to the burners. After t
u
least 5 minutes for the gas to clear before a
t
to do so may result in an explosive flame-u
p
or death.
Snap Ignition Operation
pg p
Always open the lid before lighting
the burners
Each control knob has its own igniter
electrode built in. To create a spark you
must push the control knob in (A) and
turn to “START /HIGH”(B)
This action will generate gas flow and
a spark to the burner lighting tube (C).
You will hear a “snap” from the
igniter .You will also see a 3-5 inch
orange flame coming from the burner
lighting tube at the left side of the
burner (D)
Conti
nue to hold the burner control
knob in for two seconds after the snap.
This will allow gas to flow completely
down the burner tube (E) and insure
ignition.
Check that the burner is lit by looking
through the cooking grates. You should
see a flame. If burner does not light on
first try, push control knob in and turn
to OFF
WARNING: If the burner still does not light,
t
wait 5 minutes to let the gas clear and repe
a
erate with the Rotisserie burner and the
e to follow this warning will lead to an
grill components and cause bodily harm.
gp y
and the fuel supply hose away from any
ll open position any time you attempt to
lead to delayed ignition which may result
or an
explosion causing damage to
e in the OFF position before turning on
ey are not in the OFF position, when you
as flow control” feature will activate,
der. If this should occur, turn off the LP
start over
.
l” feature is activated, a small amount
u
rning OFF the cylinder valve, wait at
tempting to light the barbecue. Failure
, which can cause serious bodily injury
urn the burner control knob to OFF and
t with a hand held ignition device.
Page 16

NORMAL OPERATION
Preheating Grill
It is extremely important that your grill be up t
lighting close the lid and preheat the grill on
“
gg p g
ensure that the cooking grate is hot enough fo
r
WARNING: Never leave a grill unattached to
out of control. Grease fires can be severe a
n
and bodily harm.
WARNING: Please remember that this is an
o
of the grill generate extreme heat. We have t
the contact areas. However, it is impossible
Therefore, use good judgment and a certai
n
product. We suggest a covered, protected h
a
Wait until your unit is turned off and prop
e
to place. Failure to follow this warning cou
l
-
Propane Tank Shut
Off
After the burner box cools down, the propane
t
want to wait for the burner box to cool down,
u
tank valve.
Main Burner Snap Ignition
Note: Each control knob snap igniter creates a
lighting tube. You generate the energy for the
s
t
urning to
“START/HI”. Thi
s w
ill ignit
e each
Follow the simple steps listed below to light th
e
1. Open the lid and make sure that all burner
s
2. Turn main gas supply on.
3. Push the control knob in and turn to “STA
R
continue to hold control knob in for two sec
o
burner lighting tube and then main burner
.
4. Check that the burners is lit by looking thr
o
If burner does not light on first try, push c
o
WARNING: Make sure that the lid is in the full
o
position any time you attempt to light your gril
Failure to open the lid could lead to delayed ig
n
which may result in serious bodily injury or de
a
or in a fire or an explosion causing damage to
property.
WARNING: Do not lean over an open barbecue.
DANGER: Failure to open the lid while igniting
t
burners, or not waiting 5 minutes to allow the
g
clear if the main burner (s) does not light, may r
in an explosive flame-up which can cause bodi
l
injury or death.
WARNING: If the burner does not light, turn th
e
burner control knob to OFF and wait 5 minut
e
gas clear and repeat with a hand held ignition
d
o temperature before you begin using it. After
HIGH” for 10 minutes. This preheating will
pg
proper grilling.
guard against possible grease fires getting
d cause grill damage, property damage
utdoor gas cooking appliance. Many areas
every precaution to protect you from
to isolate all high temperature areas.
degree of caution when grilling on this
nd during operation or hot to the touch.
rly cooled down before moving from place
d result in personal injury.
ank valve should also be closed. If you do not
se a covered hand to turn off the propane
spark from the igniter electrode to the burner
park by pushing in the control knob and
individual b
urner.
Main Burner (s) of your grill:
are in the OFF position.
T/HI” until you hear the igniter snap
nds. This action will spark the igniter, the
ugh the cooking grates. You should see a flame.
ntrol knob in and turn to OFF.
pen
l.
ition
th,
he main
as to
y
selected
s to let the
evice.
Page 17

Side Burner Snap Ignition
Note: Each control knob snap igniter create
s
NORMAL OPERATION
the burner lighting tube. You generate the en
control knob and turning to “START/HI”.
Follow the simple steps listed below to light
1. Open the lid and make sure that all burn
e
2. Turn main gas supply on.
3. Push the control knob in and turn to “S
T
continue to hold control knob in for two s
the burner lighting tube and then side b
u
4. Check that the burners is lit by looking t
h
a flame. If burner does not light on first
t
Repeat lighting procedure a second time.
5. Verify Side Burner has ignited by visual i
n
DANGER: Failure to open the lid while igni
t
the Side Burner, or not waiting 5 minute
s
allow the gas to clear if the Side Burner d
o
not light, may result in an explosive flame
-
which can cause bodily injury or death.
WARNING: If ignition still does not occur, t
u
control knob to OFF and wait 5 minutes t
the gas clear before try again to light burn
e
WARNING: Do not lean over an open barbe
c
WARNING: If the burner does not light, turn
Side Burner control knob to OFF and wait
minutes to let the gas clear and repeat wit
h
hand held ignition device.
a spark from the igniter electrode to
for the spark by pushing in the
This will ignite each individual burner.
the Side Burner (SB) of your grill:
rs are in the OFF position.
ART/HI” until you hear the igniter snap
econds. This action will spark the igniter,
rner.
rough the cooking grates. You should see
ry, push control knob in and turn to OFF.
spection of a flame.
ing
to
es
up
rn
o let
r.
ue.
the
5
a
Page 18

TROUBLE SHOOTING
PROBLEM
CHECK AN
D
IGNITION SYSTEM
Be sure that there is gas
CAUTION: Always turn the g
a
tank before proceeding with
a
procedures
If, for any reason, the snap i
g
the main burner (s), repeat t
h
described on the grill control
MAIN GRILLING
BURNERS
WARNING: The lid must be i
n
any time you attempt to ligh
t
open the hood could lead to
d
resulting in bodily harm.
After shutting off the main g
a
cooking grate and flame tam
e
counter clockwise and check
sparking to the igniter tube.
T
several times
Check to be sure burner por
t
burner (venturi) and orifice (
s
obstructions. Also, if your gr
i
a prolonged period of time, c
h
spider webs have been forme
BURNERS WITH
POOR FLAME
the burner (venturi) or over
o
On an LP grill, if an extremel
y
or is hard to ignite, the flow-
l
have activated. To reset the f
l
burners control knobs to HI.
Turn burner control knobs
O
regulator to the cylinder. Tu
r
Refer to lighting Instructions
.
GAS IS LEAKING
check all connection fittings
,
gas valve, then tighten the lo
o
or replace with identical part
s
If problems can not be corrected by using these
Customer Service.
CURE IMPORTANT
flow to the burners
s supply off at the
ny troubleshooting
nition fails to ignite
e lighting procedures
panel
If the main burner (s)
still fails to ignite, make
sure that there is gas
flowing to the burner (s).
the full open position
your grill. Failure to
elayed ignition
s supply, remove the
rs. Turn snap igniter
if the electrode is
ry the snap igniter
s, shutter, end of the
) are free of any
ll has been stored over
eck to make sure no
d in the shutter end of
If you still have a poor
rifices.
low flame is present,
imiting device may
ow limiter turn all
Wait at least 1 minute.
FF, reconnect the
n cylinder valve slowly,
fl
ame, please contact
dealer for further
assistance or call
Customer Service.
gas supply hose or
se connection fittings
.
If you still have a leak,
please contact dealer for
further assistance or call
Customer Service.
methods, please contact dealer or call
Page 19

MAINTENANCE
Cleaning the Lid
The exterior of the lid should be maintain
e
of the lid may be cleaned with a solution of
remove any grease build-up.
IMPORTANT
Keep appliance area clear and free from co
m
flammable vapors and liquids at all times.
Do not locate your grill in such a manner o
and ventilation air around the grill.
As part of the normal maintenance schedu
l
openings are free and clear from debris.
WARNING: Do not lift the barbecue using
t
control panel can damage gas handling an
d
handling and electrical components can re
s
damage to property.
Cleaning the Stainless Steel Cooking Grate
To keep your grill operating properly, the
plate should be cleaned regularly.
1. The stainless steel cooking grate & cooki
post-heating period. As soon as the 10 mi
n
gas off. Open the lid with a covered hand a
n
grid surface.
Cleaning the Flame Tamers
Your stainless steel heat distribution plat
e
use of a brass long-handled brush.
Cleaning the Burner Box
Clean when cooking grate and flame tam
e
Clean out any ash or deposits from burne
cloth.
Allow to dry before replacing all parts. A
s
the bottom of the burner box. It can be scr
a
putty knife.
Use a soap and water solution to clean af
t
the hood in the down position may cause a
begin to flake (this is not paint). If this dev
e
water and soap solution. Be careful not to
Preserve Your Cabinet, Control Panel and
S
Your cabinet, control panel and shelves a
r
stainless steel looking its best is a simple
m
with clear water and wipe dry. It’s that e
a
liquid dishwashing detergent and water sol
u
nonmetallic brush can be used. Do not u
s
d with a stainless steel cleaner. The inside
warm water and liquid detergent to
bustible materials, gasoline and other
r otherwise obstruct the flow of combustion
e, check to be sure that all ventilation
he control panel as a handle. Lifting by the
electrical components. Damage to gas
ult in serious bodily injury or death and
& cooking plate
stainless steel cooking grate & cooking
plate can be easily cleaned after the
utes post-heating is completed, turn the
d with the use of a brass brush, rub the
s should also be brushed down with the
rs are removed from burner box
r box using warm soapy water and a soft
mall amount of grease may accumulate on
ped up and discarded with a flat-blade
er you have scraped. Prolonged grilling with
grease build up inside the hood that will
lops, clean the inside of the lid with a warm
get the burner wet.
helf/Shelves
e made from stainless steel. To keep the
atter. Clean it with soap and water, rinse
sy. We recommend the use of a diluted
tion. For stubborn particles, the use of a
e a wire brush on your cooking shelf.
Page 20

MAINTENANCE
CAUTION: Do not use a wire brush or abras
i
shelves of your grill as this will scratch th
e
Grease Fires
The recommendations in the Maintenance
in the Normal Operation section concerning
extremely important for two reasons:
C
A
UTION: When cleaning surfaces be sure t
o
preserve the look of your stainless steel.
1. Keep your grill cooking at its best by ke
e
transmitting components clean. Keeping yo
u
grill cooking properly.
2. For safety reasons. A dirty grill is susce
p
amount of cooking, the types of food cooke
d
heating and the amount of cleaning perfor
m
a grease fire. A build up of meat fats, cookin
ignite and cause a severe grease fire.
If a grease fire were to occur on grill, flam
e
box. A severe grease fire could lead to a bur
n
to feed the fire and, obviously, make the fir
e
Any type of fire requires that the grill com
p
i
nvolved be checked for continued safe oper
a
system (hose, manifold, tank, fittings, etc...)
solution, to verify the source of the leak. If
n
likely a grease fire. A grease fire can be seve
r
property damage and/or cause bodily harm.
do you. Follow our cleaning recommendatio
n
WARNING: Check the grease tray for grease
grease to avoid a grease fire.
Cleaning the barbecue burners
Burners clogged with food or insects can ig
damage your barbecue.
To reduce the chance of flash back fire, yo
u
as per these instructions monthly in period
s
not been used for a period over three month
s
Removal of burners (authorized person onl
y
1. Turn all the burners to OFF position.
2. Ensure LPG cylinder is OFF.
3.Detach the LPG gas regulator from you
4. Remove the cooking grate or cooking p
l
5. Remove the two (2) screws holding eac
h
knob bezel (As shown below )
ve cleaners on the lid, cabinet and
surface.
section, concerning cleaning our grill, and
preheating and post-heating your grill are
rub in the direction of the grain to
ping the cooking surfaces and heat
r grill clean is the best way of keeping your
tible to grease fires. Depending on the
, the amount of preheating and post-
ed on a grill, any grill can be susceptible to
marinades, basting sauces, salts, etc. can
s would probably be seen under the burner
ed hose or regulator which would allow gas
worse.
onents (hose, regulators, LP tanks, etc...)
on. If a leak is suspected, the gas supply
must be leak tested, using a soapy water
o leak is found, then the problem was most
e enough to damage your grill and/or cause
We do not want this to happen and neither
s to avoid grease fires.
build-up before each use. Remove excess
nite in a flashback fire, which can severel
y
should clean the burner tubes and ports
of heavy use, and again if the barbecue has
.
)
gas barbecue
.
ate, flame tamers and grease tray.
valve to the control panel and control
Page 21

MAINTENANCE by authorized
p
6. Loosen the control panel by removing
two (2) screws and washers on each end
7. Pull control panel away from grill a few
Disconnect wire from the electronic igni
t
for the rotisserie burner.
erson only
inches.
er
Page 22

MAINTENANCE by authorized
p
You can now lift out the burner
tube for inspection
.
If there is dust or dirt on the screens,
brush the spider/insect screen lightly,
with a soft bristle brush, (i.e. an old
toothbrush)
CAUTION: Do not clean the spider/insect
screens with hard or sharp tools. Do not
dislodge the spider/insect screens or
enlarge the screen openings.
Cleaning the tube Spider/Insect Screens
Your gas barbecue, as well as any outdoor
g
and other inserts. They can nest in the ve
n
block the normal gas flow, and can cause
This could result in a fire in and around th
e
causing serious damage to your gas barbe
The burner tube air shutter is fitted with a
spiders and other insects access to the b
u
openings.
We recommend that you inspect the Spider
inspect and clean the Spider/Insect scree
n
1. The smell of gas in conjunction with the
b
2. Barbecue does not reach temperature.
3. Barbecue does not heat evenly.
4. One or more of the burners do not ignite.
DANGER: Failure to correct the above
mentioned symptoms may result in a
fi
re, which can cause serious bo
dil
y
injury or death, and cause damage to
property.
erson only
as appliance, is a target for spiders
turi(1) of the burners tubes. This
the gas to flow back out the air shutter.
air shutters, under the control panel,
.
stainless steel screen (2) to prevent
rner tubes through the air shutter
/Insect screens at least once a year. Also,
s if any of the following symptoms occur:
urner flames appearing yellow and lazy.
Page 23

Cleaning the main tube burner
1. To clean the gas ports of your main burners
MAINTENANCE by authorized
p
use a stiff bristle brush to brush the openings
.
2. Refer to: Removal of burners for the removal
of the burner tube.
3. you can now lift the burner tube out of the
burner box and inspect inside with a flashlight.
4. Clean the inside of the burners with a wire
(a straightened-out coat hanger will work).
Check and clean the air shutter openings at the
ends of the burners
.
5. Check and clean the valve orifices on the valves.
Use a steel bristle brush to clean the outside of th
e
burners. This is to make sure that all burner port
s
are fully open.
Cleaning the tube burner entry
To clean the inlet of the burner, bend a stiff wire
o
wire coat hanger into a small hook as shown and pus
the wire into the inlet of the burner tube several time
s
to remove any debris. Alternatively you can use a bo
t
cleaner brush, or use an air hose to force air throug
h
the tube.
Replacing the Main tube burners
1. Your gas barbecue must be OFF and cool.
2. Turn OFF gas source.
3. Remove the cooking grate and the flame tamers,
exposing the burner tubes.
4. Remove control knobs, bezels and disconnect
wire to the electronic igniter for the rotisserie
burner.
5. Then remove the control panel.
To reassemble, reverse steps 3 through 5 a
b
,pg
CAUTION: The burner openings must be
positioned properly over the valve orifice.
Check proper assembly before fastening
manifold/control panel in place.
WARNING: After reinstalling the gas lines,
they should be leak test with a soap and
water solution before using the barbecue.
Batter
y
Unsc
r
old b
a
w
rap
m
instal
l
erson only
r
tle
ov
e
replacement of rotisserie burner igniter
ew the push button igniter and remove the
ttery and replace with a new one. The shrink
ust be removed from the battery before
ation.
 Loading...