

Page 1
COOKING
APPLIANCES
Operating
Instructions
Page 2
CONTENTS
SAFETY FIRST
ELECTRICAL REQUIREMENTS
LOCATION OF CONTROIS
INSTALLATION INSTRUCTIONS
BEFORE FIRST USE
OPERATING YOUR COMPACT COOKER
HOTPLATES OPERATION
OVEN OPERATION
GRILL OPERATION
CLEANING AND CARE
PROBLEM SOLVING
DO’S AND DON’TS
GUARANTEE DETAILS
PAGE
2
3
3
4
4
5
5
7
7
8
8
9
10
- 1 -
Page 3

Congratulations on your choice of a Euromaid quality multi function
Compact Cooker which has been designed to give you service for
many years.
WARNING!
IMPORTANT:
DO NOT connect the Compact Cooker to the electricity supply until
all packing and transit protectors have been removed.
Declines to accept any liability should the instructions not be
followed.
This Compact Cooker must only be used for its intended purpose i.e.
the cooking of items.
The mains lead must not come in contact with any part of the
appliance during and after operation.
To obtain the best possible performance and trouble free operation
from your appliance it is very important to carefully read these
instructions.
Failure to observe these instructions may invalidate your right to free
service during the warnanty period.
We suggest you keep these instructions in a safe place for easy
reference.
IMPORTANT TIPS FOR YOUR SAFETY
(1) During operation of this appliance the door and outer surfaces
will get hot. Take care not to touch surfaces during use.
(2) Ensure the appliance is positioned in a location where it cannot
be reached by children.
(3) Always use oven gloves when removing the grill rack,baking tray
and dishes from inside the oven when in use.
(4) Always switch off the appliance and unplug from the mains
socket when the appliance is not in use, before cleaning, or in
the unlikely event of a product failure becoming apparent.
(5) Close supervision while cooking with this appliance is
recommended at all times however special care should be taken
when cooking oily, and fatty foods as overheating of such food
can cause them to catch fire.
- 2 -
Page 4
ELECTRICAL REQUIREMENTS
Before you insert the plug into the wall socket make sure that the volfage
and the frequency shown on the rating plate at the rear of the appliance
corresponds to your electricity supply.
We recommend that this appliance is connected to the mains supply via a
switched suitable and fused socket in a readily accessible position.
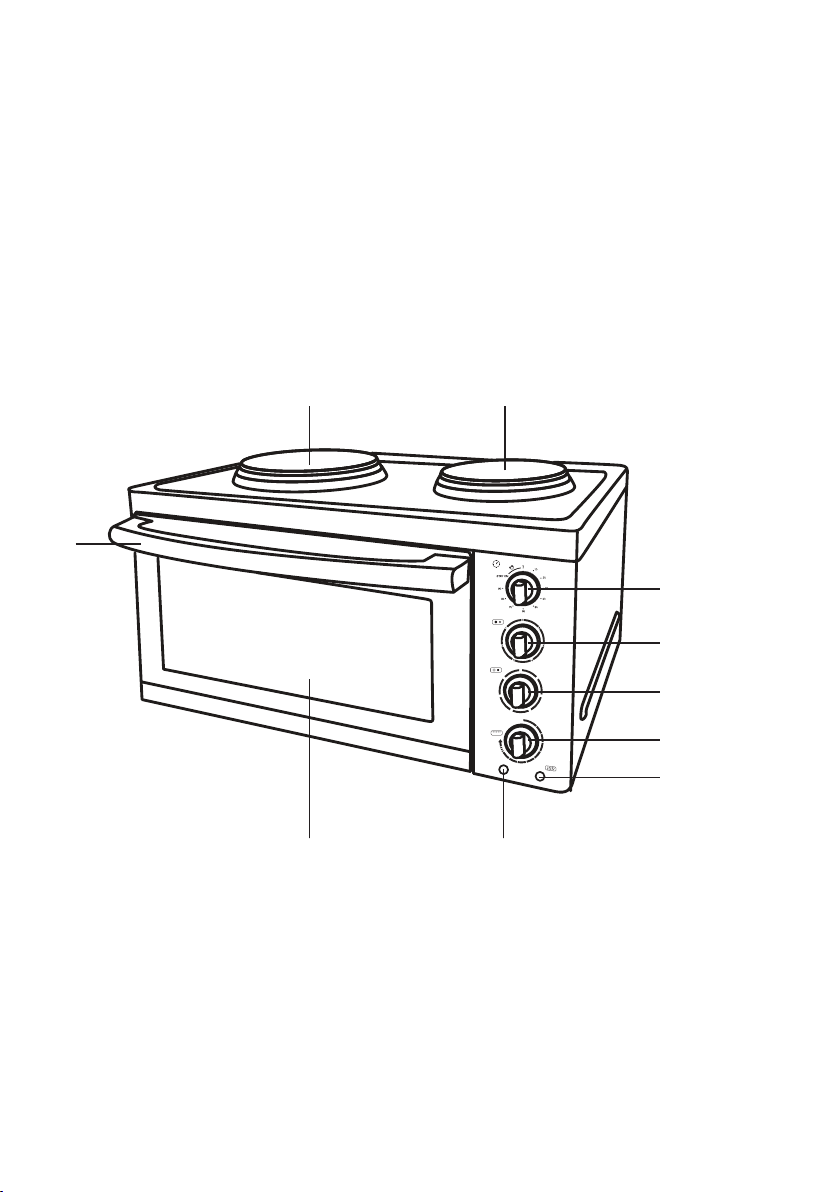
LOCATION OF CONTROLS
Door
handl e
Large h ot pl ate
Doubl e gl ass see
throu gh o ven door
Small h ot pl ate
0
6
1
2
3
4
0
50
250
225
150
175
200
OVEN
POWER
Tempera tu re
indic at or light
(Ambe r)
Tim er knob
Contr ol k nob for
large h ot plate
5
70
100
120
Contr ol k nob for
small h ot plate
Contr ol k nob for ove n
and gri ll
Opera ti on
light (A mber)
- 3 -
Page 5

INSTALLATION INSTRUCTIONS
1- Ensure that this appliance is positioned on a heat resistant surface
near to an electric socket of the correct rating.
2- If you want to install the cooker in a recess between units, then a
minimum of 1”(25mm) must be left around the sides and back of
your Compact Cooker to allow adequate ventilation and enable the
Compact Cooker to be pulled out for cleaning.
3- Ensure that no flammable materials are adjacent to the appliance as
the sides of the appliance become hot during operation.
1. Timer
The timer functions as a switch to connect or cut off the power
to the cooker. The timer length is 90 minutes, and when the set
time has finished, i.e. the knob points to “0”, the cooker will
automatically shut off power. When it points to “Stay On",
the cooker remains in power on mode with no time limit.
2. Hotplates
Adjust the hotplates to mid position (3) and leave on for
approximately 8 minutes in order to burn off the protective coating
on the hotplates. Do not place any pans or other cooking utensils
on the hotplates during this process. Fumes will be emitted during
the above operation but this is quite normal.
3. Oven
In order to burn off the protective coating, remove grill rack and
baking tray and turn the oven control knob to 200
o
C and run the
oven for approximately 15 minutes, again fumes will be emitted as
the protective coating is burnt off but this is quite normal.
4. Grill
To burn off the protective coating on the grill, set the control to
the grill position. turn the oven/grill knob in a clockwise direction
until the grey pointer line on the knob clicks into position in line
with the grill symbol which is located to the top left handside
of the knob. Operate for approximately 15 minutes with the oven
door open, again fumes will be emitted but this is quite normal.
IMPORTANT!
You must ensure that the above operations 1,2 and 3 are
conducted in a well ventilated area.
When burning off the protective coating, the oven door must
always be left open.
- 4 -
Page 6

OPERATING YOUR COMPACT COOKER
This appliance is designed to operate from a 10 AMP socket and for
safety reasons, the large hotplate will not operate whilst the grill or
oven is being used.
The following are examples of possible operating combinations:
- Small hotplate (Only)
- Large hotplate (Only)
- Both hotplates.
- Grill (Only).
- Oven (Only).
- Small hotplate and oven.
IMPORTANT NOTE: “LARGE HOT PLATE, WHICH IS ON THE
LEFT HAND SIDE, WILL NOT OPERATE FOR SAFETY
REASONS, WHEN BOTH THE SMALL HOT PLATE AND THE
OVEN (OR GRILL) ARE SWITCHED ON SIMULTANEOUSLY.”
The Compact Cooker has 2 shelf positions
(See diagram). A Baking tray and
integrated grill rack is supplied for
use with the cooker.
Select the correct shelf position before
pre-heating the oven for cooking as follows:
Level 1 : Baking tray and integrated grill rack for grilling and
browning of toppings etc.
Level 2 : Baking tray only for baking, roasting and stewing.
Shelf Level 1
Shelf Level 2
HOTPLATES OPERATION
Temperature controls for hotplates are situated on the panel beside
the oven door.
Each hotplate has adjustable settings from 1 to 6 and are operated
by turning in an anticlockwise or clockwise direction.
We recommend the following setting for hoplate knob adjusment:-
Positions
Applications Warming Simmering Cooking
1 2-3 4-5-6
Boiling
Frying
- 5 -
Page 7

- Always use flat bottomed pans to ensure perfect contact with
the hotplate surface.
- Ensure that the bottom of any saucepan used is clean and dry
before use.
- Size of pans should ideally be the size of the hotplate or slightly
larger. If you use pans with a smaller diameter then energy is
lost. Try and avoid any spillages onto the hotplates as this may
cause damage.
We recommend that you use the following size of pans: for small hotplate : 6”(150mm)
for large hotplate : 7”(180mm)
ALWAYS SWITCH OFF THE HOTPLATES AFTER USE.
OVEN OPERATION
The oven is thermostatically controlled.
Temperature adjustment of the oven is operated by turning the oven/
grill knob in a clockwise direction.
Temperature settings may be made from 50 C to 250 C.
oo
When the oven/grill knob is turned clockwise”POWER”and “OVEN”
lights will illuminate.The POWER light will glow to indicate the oven is on.
The POWER light will go out when the control knob is moved to the”O”
position.
The OVEN light positioned next to the POWER light is a temperature
indicator. The OVEN light will continue to illuminate until the preset
temperature set using the temperature control knob is reached.
Once the temperature has been reached the OVEN light will go off
and then cycle on and off during use to maintain the pre-set
temperature.
We recommend you to reduce cooking times compared to full size
cookers by about 1/5 and then ensure the food is cooked properly
(eg: piping hot)
- 6 -
Page 8

GRILL OPERATION
IMPORTANT!
When using the grill, the oven door must always be left open, As shown in
the diagrams below Status 1 or Status 2.
Please select the open status according to your food or recipe.
CAUTION:
Accessible parts may become hot when the grill is in use.
Children should be kept away
Status 1 Status 2
“To operate the grill, turn the oven/grill knob in a clockwise direction
until line on the knob clicks into position in line with the grill symbol
which is located to the top left handside of the knob. To click the knob to
the grilling position, turn the knob firmly beyond the ‘250’ mark”.
When the oven/grill knob is set to both”POWER”and OVEN lights will
illuminate.The POWERlight will continue to glow while the grill is in operation.
POWER light will go out once the control knob is turned to the “O” position.
Once the internally pre-set temperature is reached the OVEN light will
go off and then cycle on and off during use to maintain the internally
pre-set temperature. When the power to the grill element is cut off the
OVEN light will go off.
TO TURN THE GRILL OFF, ROTATE THE KNOB IN AN ANTI CLOCKWISE
DIRECTION TO “0” POSITION.
IMPORTANT!
A built-in safety feature of the appliance means that the grill will cycle on
and off during operation and this is indicated by the OVEN light. This
operation does not affect the grilling operation as radiant heat is
maintained at all times while the grill is in the on position.
- 7 -
Page 9

CLEANING AND CARE
Before cleaning always switch your Compact Cooker off at the socket
outlet and pull out the plug.
Warning
* Make sure that the oven, grill and hotplates are cool before you start
cleaning.
* As the hotplates are of a solid type, a residual heat will remain after
you switch off the Compact Cooker so take care not to touch hot
surfaces.
* Do not immerse your Compact Cooker in water.
Use a damp cloth to clean the interior and exterior. Never use any sharp
instruments, abrasive household cleaner, or detergents for cleaning. For
hard stains use suitable washing liquid.
After cleaning, warm the hotplates for a few minutes to dry any residual
moisture off. Ensure that the door seal is dry after cleaning. We
recommend that grill elements be wiped with a damp cloth to remove any
fat splashes. This will prevent fumes for any fat being burnt off when the
Compact Cooker is next used. Again before cleaning ensure the grill
elements are cool.
NOTE: Even though grease and other foodstuff may leave marks on hobs
when baked on, they will not affect the performance of the appliance
under normal conditions.
PROBLEM SOLVING
If the appkiance does not operate when switched on, check;
- The plug is inserted properly in the socket and that the power supply is
on. (To check the power supply to the socket, plug in another
appliance).
- The fuse has blown/circuit breaker has tripped/main distribution switch
has been turned off.
- The temperature control has been set correctly.
If the appliance is still not operating at all after above checks contact the
service agent in your area (refer warranty details.)
IMPORTANT NOTE: “large hot plate, which is on the left hand side, will not
operate for safety reasons, when both the small hot plate and the oven
(or grill) are switched on simultaneously.”
- 8 -
Page 10

DO’S AND DON’TS
DO : Clean your Compact Cooker regularly, ideally after each
use.
DO : Leave the oven door open when grilling.
DO : Use flat bottomed saucepans to ensure good contact
with the hotplates. This ensures energy efficient
operation.
DO : Make sure that overheating does not occur by
supervising at all times.
DO : Ensure that the Compact Cooker is positioned away from
the reach of children.
DO : Leave a gap of 1 1/2”(40 mm) both sides of the sheet to
ensure best results when using baking sheet.
DO : Use oven gloves to insert or remove grill rack and baking
tray
DON’T : Use saucepans that have diameters less than that of the
hotplates. If you use saucepans which have smaller
diameters than hotplates, then energy will be wasted and
also boiled over foodstuff may damage the hotplate.
DON’T : Use wire grill rack outside the oven.
DON’T : Leave your Compact Cooker unattended.
DON’T : Let the mains cable touch any part of your Compact
Cooker.
DON’T : Put anything on the oven door.
DON’T : Turn oven/grill knob in the wrong direction. You might
damage the appliance.
DON’T : Use cleaning material that may scratch the appliance.
DON’T : Leave the oven dirty after each roasting; this will avoid
DON’T : the extra cleaning which will be required if the fat
splashes are left to bake on.
DON’T : Put food to be cooked on the oven floor . Always use a
baking tray.
DON’T : Touch the door or external surfaces of your Compact
Cooker during operation as they may be hot.
DON’T : Cook with 2 baking trays in the oven at the same time as
it will affect the cooking performance of your Compact
Cooker.
- 9 -
Page 11

WARRANTY
ELEC TRIC AL DISTRI BUT ORS A USTRALIA PTY L T D
(ABN 11 051 297 557) a division of Home Appliances P ty Ltd
A ddre ss: 20 C a r lotta S treet, Arta rmon NSW 2064 Phone: 1800 805 300
E MAIL: s ervice@h apl.com.a u W ebsite : www.euromaid.com.a u
FOR A U STRALIA & NEW ZEALAND
T E RMS AND C O N DIT ION S
excluded under the Australian Consumer Law as prescribed and set
1 Electrical Distributors Australia Pty Ltd warrants this appliance to
for a period of 24 months
material be replaced free of charge, provided that all service work
is carried out by Electrical Distributors Australia Pty Ltd or nearest
appointed service agent.
3 months warranty
Regardless of the product type, warranty of appliances installed and
etc., is limited to Three (3) Months from date of purchase.
NOTE: Microwave Ovens & Portable products, ie., MC130T & BT44
are to be returned to the nearest service agent by the purchaser.
3 months warranty products
Regardless of the product type, warranty of appliances installed and
etc., is limited to Three (3) Months from date of purchase.
2 If you are located 25 kilometres outside a recognised Electrical
Distributors Australia Pty Ltd or its Appointed Service Agent service
area the purchaser must cover the cost of sending the appliance to
the service centre or any extra travel cost incurred by the technician
in order to service the appliance.
3 Electrical Distributors Australia Pty Ltd is not liable for any other loss
other than the appliance itself.
4 This warranty does not cover the following circumstances:
(i) An act or acts of God, any natural occurrence or other
circumstances not within the control of Electrical Distributors
(ii)
authorised service agent of Electrical Distributors Australia Pty
Ltd to repair or modify the appliance).
(iii)
plate have been rendered illegible.
(iv) If the appliances have been installed, operated or maintained in
by Electrical Distributors Australia Pty Ltd.
PROOF O F PURCH A S E
NO in house warranty repairs
(v)
if the power supply is inadequate or faulty. eg. 3 phase, 415V
where the links are not removed instead of single phase, 240V.
(vi) Normal wear and tear, misuse or damage to the appliance or use
of the appliance in a manner for which it was not intended.
(vii) Failure of electrical components due to power surges or outages.
(viiI) Electrical Distributors Australia Pty Ltd will not be obliged to
paid the full purchase price for the appliances.
6 The warranty does not extend to cover:
(i) Discoloured burners or trivets on gas cooktops or chrome
surrounds on electric cooktops
(ii)
use
(iii)
(iv)
(v)
(vi) Corrosion where the product is located within a corrosive
environment
(vii)
7
or warranty that cannot be excluded to the greater of (Electrical
(i) For goods, repairing or replacing those goods or paying for the
cost of those goods repaired or replaced;and
(ii) For services, resupplying the services or paying for the cost of
having those services resupplied.
8
claims.
9 Our goods come with guarantees that cannnot be excluded under
repaired if the goods fail to be of acceptable quality and the failure
does not amount to a major failure.
Built-In & Freestanding Appliances
Access must be granted within normal working hours and our Service
Agents must have easy access to these appliances. Any charges will be
the responsibility of the purchaser where the service technician cannot
repair.
• Delivery dockets;
• Retailer or supplier invoices;
• Credit card statements where the purchase of the appliances are clearly depicted.
The inability to provide proof of purchase will lead to the claim being treated as a service call with labour and parts costs being born by the claimant.
NOTE: There is no need to return this or any other warranty card to Electrical Distributors Australia Pty Ltd. Proof of purchase is the only requirement for warranty claim,
please keep a copy of the purchase receipt with this warranty card.
AUTHORISED SER VICE A GENTS
Below is a list of our main Metropolitan service agents although we have a much larger network of Service Agent
naonally. Visit www.customersupport.hapl.com.au and click on the ‘WARRANTY & NON WARRANTY’ tab to locate your
closest service agent or call us Toll Free 1800 805 300 (Australia Wide)
NSW
ALL GENERAL WHITEGOODS
4/11 HALLSTROM PLACE
WETHERILL PARK 2164 NSW
PH: 02 8788 8666
FAX: 02 9756 1091
WA
DACAPS APPLIANCE PARTS AND SERVICE
357 SEVENOAKS STREET
CANNINGTON WA 6107
PH: 1800 322 277
FAX: 1800 354 310
VIC
MASTER TECH APPLIANCE SERVICES
9 KIRKHAM ROAD
DANDENONG STH VIC 3175
PH: 1300 131 118
FAX: 1300 366 705
SA
PRESTIGE APPLIANCE SERVICE
UNIT 4/ 65 STEPHENS AVENUE
TORRENSVILLE SA 5031
PH: 08 8352 2022
FAX:08 8352 2044
QLD
ENDEAVOUR REFRIGERATION
UNIT 1/ 22 ZILLMERE ROAD
BOONDALL QLD 4034
PH: 07 3137 3600
FAX: 07 3137 3663
TAS
FARR ELECTRICAL CONTRACTOR
369A ARGYLE STREET
NORTH HOBART TAS 7002
PH: 03 6231 0275
FAX: 03 6231 0285
QLD - GOLD COAST
ROSHAD APPLIANCE SERVICE
1/13 LEDA DRIVE
BURLEIGH QLD 4220
PH: 07 5535 7044
FAX: 07 5535 7407
EDA_warranty_July 2013
Page 12

185.9514.43/R1/30.04.02
 Loading...