

Page 1
User Manual
Off Board T-Shape Canopy
Rangehoods
INLC60 & INLC90
Page 2

Product / Installer details
For future reference we suggest that you staple a copy of your purchase receipt here and complete the below so the
information is always at hand.
Product Details
Model number: ________________________________________________________________________________________
Description: ___________________________________________________________________________________________
Serial number: _________________________________________________________________________________________
(Located on the product rating label)
Purchase Details
Date of purchase: ______________________________________________________________________________________
Place of purchase: _____________________________________________________________________________________
Store name: ___________________________________________________________________________________________
Address: ______________________________________________________________________________________________
Telephone: ____________________________________________________________________________________________
Invoice / receipt number: ________________________________________________________________________________
Installation Details
Electrical date of installation: ___________________________________________________________________________
Electrician Installers Details: Company / Installers Name: _____________________________________________
Licence Number: ______________________________________________________
Telephone Number: ____________________________________________________
Gas date of installation: _________________________________________________________________________________
Gas installers details: Company / Installers Name: _____________________________________________
Licence Number: ______________________________________________________
Telephone Number: ____________________________________________________
Plumbing date of installation: ___________________________________________________________________________
Plumbers installers details: Company / Installers Name: _____________________________________________
Licence Number: ______________________________________________________
Telephone Number: ____________________________________________________
Page ii INLC60 & INLC90 Off Board T-Shape Canopy Rangehoods User Manual
Page 3

Dear Customer,
Congratulations on the purchase of your new product from
Home Appliances Pty Ltd.
We recommend you please take some time to read the instruction manual
thoroughly to familiarise yourself with the functionality and operations to ensure
optimum performance of your new appliance.
After reading the manual, please store it in a safe and accessible location for
future reference.
Installation
The installation of your new appliance must be carried out by a qualied
installer / technician in accordance to local regulations.
The packaging of your appliance has been selected from environmentally
friendly materials and can usually be recycled. Please ensure these are disposed
of correctly.
Customer Care
Our Customer Care centre is available should you wish to learn more about your
appliance in relation to how to use it to its best potential, or tips on cleaning as
well as available accessories.
For further details please contact our Customer Care team on
1800 444 357 or email: customercare@hapl.com.au
Thank you
Regards,
Home Appliances
INLC60 & INLC90 Off Board T-Shape Canopy Rangehoods User Manual Page iii
Page 4

Contents
Notice 1
Safety Warnings 2
Caution 3
Features 4
Schematic Diagram 5
Installation 6
Operation 9
Maintenance 10
Bulb Replacement 11
Troubleshooting and Possible Solutions 12
Supplied Accessories 13
HAPL Ducting Kit Solutions 14
Page 5
Notice
1. Thank you for choosing your Euromaid Off-Board Canopy Rangehood.
Please read the instruction manual carefully before use.
2. The installation work must be undertaken by a qualified and competent installer.
3. The manufacturer disclaims all liability for any damage or injury caused as a result of not
following the instructions for the installation and or operation contained within this instruction
manual.
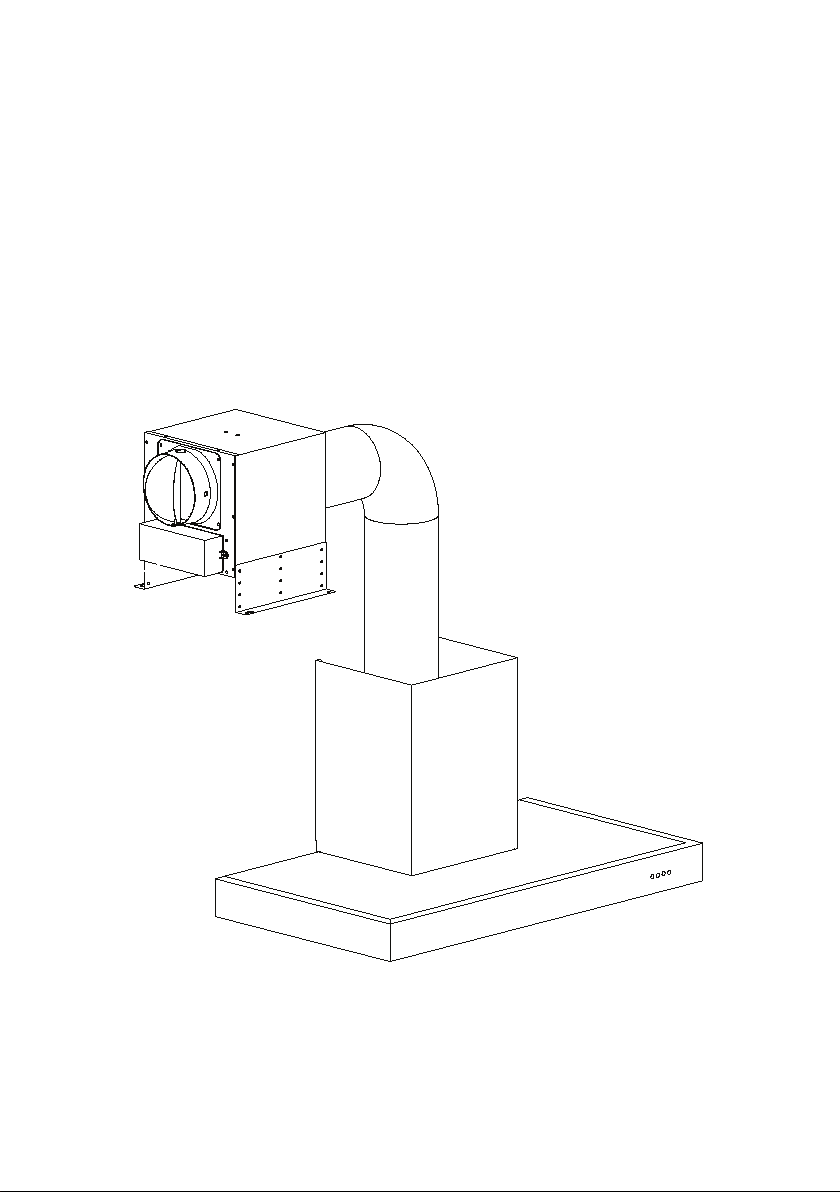
4. The Rangehood operates on 220/240V, 50Hz.
External fan motor
Extension pipe (ducting)
Main body of rangehood
INLC60 & INLC90 Off Board T-Shape Canopy Rangehoods User Manual Page 1
Page 6

Safety Warnings
• Please ensure that children do not use the Rangehood.
• Your Rangehood is for domestic use only, not suitable to be used with barbeque, or any
commercial applications.
• Any installation work must be carried out by a trained qualified electrician and or an experienced
installer.
• The Rangehood and its filter mesh should be cleaned regularly to keep them in good working
order.
• Before cleaning your Rangehood, please always ensure that the power has been switched off.
• Clean the Rangehood according to the instruction manual to ensure its longevity.
• If there is any fault with your Rangehood, please contact our service department for assistance
(1800 444 357).
• Please ensure the room has sufficient ventilation when operating this Rangehood with a gas hob.
• Do not flambé under the Rangehood
• The exhaust air from the Rangehood must not be discharged into any existing flue which may
carry combustion or fumes from any other sources such as kitchen appliances etc.
• Before installation and usage, please read the instructions and make sure that the voltage ( V)
and the frequency (Hz) indicated on your Rangehood are the same as the voltage (V ) and the
frequency (Hz) in your home.
• To get the most out of your Rangehood, please read the instruction manual before installing &
using, and keep it in a safe place.
• Please ensure that the warranty card and purchase receipt for your Rangehood are kept in a safe
place if you require service assistance.
Page 2 INLC60 & INLC90 Off Board T-Shape Canopy Rangehoods User Manual
Page 7

Caution
• Exhaust air must be discharged in accordance with the local regulations, it is recommended that
a suitable ducting kit should be used.
• Accessible par ts may become hot when used with cooking appliances.
• This Rangehood is not intended for used by persons (including children) with reduced physical,
sensor y or mental capabilities, or lack of experience and knowledge, unless they have been
given supervision or instruction concerning use of the appliance by a person responsible for
thei r sa fet y.
• Children should be supervised to ensure that they do not play with the Rangehood.
• If the power cord is damaged, it must be replaced by a recommended service agent to avoid a
hazard.
INLC60 & INLC90 Off Board T-Shape Canopy Rangehoods User Manual Page 3
Page 8

Features
• This Rangehood is designed to reduce the noise level within the kitchen by utilising a separate
fan motor that is positioned in the roof cavity of your home. The motor is designed to be fixed in
a suitable and secure position.
• This Rangehood uses high quality materials, Stainless steel construction with easy to operate
controls and is made with a streamlined design.
• Equipped with a large power low noise electric motor and centrifugal fan, it produces strong
suction and low noise.
• With the isolated low voltage circuit board control, 12vAC input, the lights are therefore safer.
Page 4 INLC60 & INLC90 Off Board T-Shape Canopy Rangehoods User Manual
Page 9

Schematic Diagram
1. The main body and the external motor are connected by the supplied 4 metre extension cable. A
separate cable is plugged into the power.
2. The supplied 3 metre extension ducting will connect the main body and external motor, and
cooking residues will be extracted and discharged to outside via a ducting kit.
Power cable
Extension cable from main
body to motor
INLC60 & INLC90 Off Board T-Shape Canopy Rangehoods User Manual Page 5
Page 10

Installation
1. The Rangehood should be placed at a distance of
65-75cm from the cooking surface for the best result. See
Pic 1.
2. Install the anchor hook to the wall at the required position
once the installation height is fixed, and keep it level. The
fixed position of the inside chimney bracket is where the
top of the chimney will be fixed. See Pic 2.
3. Install the 150mm outlet by ST4*8mm screws (supplied),
and fix the extension pipe (ducting), see Pic 3.
4. Place the Rangehood on the anchor hook. See Pic 4.
5. Fix the outside chimney bracket to the outside chimney,
and be sure that the inside chimney and the extension
pipe’s height can be freely adjusted. See Pic 5.
6. Install the chimney and fix the outside chimney bracket, See Pic 6.
After adjusting the position, fix the body with safety screws. See Pic 7.
Page 6 INLC60 & INLC90 Off Board T-Shape Canopy Rangehoods User Manual
Page 11

Installation (continued)
7. Connect the power cord on main body with extension cable, See Pic 8& 9
8. Adjust the height of the inside chimney to the position of the inside chimney bracket, and fix with
supplied screws, See Pic 10
9. Fix the left and right support bracket on the side of external motor, by using 6 pcs ST4*8mm
screws (supplied). See Pic 11
10. Fix the external motor on the ceiling or on the wall by using 4 pcs ST4*30mm screws, See Pic
12 & 13
11. Connect the extension pipe (ducting), See Pic 14
12. Connect the power cord to the motor with extension cable, See Pic15
INLC60 & INLC90 Off Board T-Shape Canopy Rangehoods User Manual Page 7
Page 12

Important points to consider for installation
1. The location of the fan unit shall allow access for maintenance and repair. Permanent fixed
means of access is required where the fan unit location is beyond the extent of normal steps or
ladders.
2. Before installation, please ensure the area is clean to avoid suction of the remaining bits of debris
and dust.
3. Please ensure that the fan motor is firmly secured to either a flat surface such as an MDF panel
affixed across the ceiling rafters, or fixed to the ceiling rafters themselves. Ensure the fan motor
is level and there is no vibration when in use.
4. The Rangehood cannot share the same air ventilation tube with other appliances such as gas
tube, warmer tube, and hot wind tube.
5. After installation, make sure that the main body is level to avoid grease collection at one end.
6. Please note the dimensions of the fan motor below for installation purposes.
7. The use of a ducting kit is imperative for the performance of the fan motor.
8. The bending of ducting tube should be ≥120°, parallel or above the start point and should be
connected to the external wall, roof or eave.
9. The recommended maximum lengths of ducting pipe should be no more than:
– Four (4) metres for connection between the hood body and fan motor.
– Three (3) metres for connection between the fan motor and outside.
Correct Incorrect
The fan motor must be secured using the supplied bracket and screws
Page 8 INLC60 & INLC90 Off Board T-Shape Canopy Rangehoods User Manual
Page 13

Operation
Low LightMid High
1. Push the low speed button, and the button will be backlit, and the motor runs at low speed. Push
it again and the motor will stop.
2. Push the middle button, and the button will be backlit, and the motor runs at mid speed. Push it
again and the motor will stop
3. Push the high button, and the button will be backlit, and motor runs on high speed. Push it again
and the motor will stop
4. Push the light button, and the button will be backlit, and the two LED lights will be illuminated.
Push it again and the LED lights will turn off.
INLC60 & INLC90 Off Board T-Shape Canopy Rangehoods User Manual Page 9
Page 14

Maintenance
Cleaning and Maintenance:
• To clean the grease filters, remove the filter as shown in Pic. 17
• You can clean the filter using the following methods:
• Soak them for about 3 minutes in hot water (40-50 degrees) with a grease-loosening detergent
then brush it gently with a soft brush. Please do not apply too much pressure, avoid damaging it.
• The filters can be put into a dishwasher, please ensure the temperature is no more than 60
degrees.
• Change the carbon filters as per Pic. 18
• Please use non-abrasive cleaners on the main body of the Rangehood.
Note: Ensure the power to the Rangehood has been turned off before cleaning.
Page 10 INLC60 & INLC90 Off Board T-Shape Canopy Rangehoods User Manual
Page 15

Bulb Replacement
1. Firstly, switch the unit off at the power and pull out the plug.
2. Wait until the light bulb is cooled down before replacement.
3. Replace with the same type of bulb by pushing the bulb slightly and screwing in or out.
Please note:
Alternatively, you can change the bulb from the inside of the Rangehood, take out the metal filter and
have the bulb replacement from inside of the Rangehood.
INLC60 & INLC90 Off Board T-Shape Canopy Rangehoods User Manual Page 11
Page 16

Troubleshooting and Possible Solutions
Fault Cause Solution
Light on, but
motor does not
work
Light does not
work, motor does
not work
Oil leakage One-way valve and the air
Vibration of the
body
Insufficient
suction
The fan blocked Service call to clear the blockage
The capacitor damaged Service call to replace capacitor
The motor jammed bearing
damaged
A electrical or burning smell from
the motor
Beside the above mentioned, check the following:
Light damaged Replace lights
Power cord loosen from power
supply
ventilation entrance are not
tightly sealed
Leakage from the connection of
U-shaped section and cover
The fan is damaged and causes
vibration
The motor is loose Service call to repair tighten the motor
The hood is not securely fixed
to the wall
The distance between the body
and the gas top is incorrect
Service call to replace motor
Service call to replace motor
Switch off power and carefully engage
plug
Service call to repair one-way valve
and seal.
Service call to repair
Service call to repair fan
Refer to installation section to secure
to the wall
Readjust to the specified mandatory
distance
Too much ventilation from open
doors or windows
For product enquires including warranty support, please contact our Customer Care team on
1800 444 357 or via email, customercare@hapl.com.au
Page 12 INLC60 & INLC90 O ff Board T-Shape Canopy Rangehoods User Manual
Choose a new place and resemble the
machine
Page 17

Supplied Accessories
Part picture QTY - hood body QT Y - motor
Wall plug 9 4
Screw
(4mm x 40mm)
7 /
Screw
(4mm x 30mm)
2 4
Screw
(4mm x 8mm)
8 10
Outlet 1 2
flap / 2
Hook 1 /
outer chimney brac ket 1 /
inner chim ney brac ket 1 /
INLC60 & INLC90 Off Board T-Shape Canopy Rangehoods User Manual Page 13
Page 18

HAPL Ducting Kit Solutions
The ducting kit connects to the outlet of the external roof cavity fan motor. There is a ducting solution
available for most installations. Please ensure you have selected the correct kit for your requirements.
The HAPL ducting kits include all parts required to complete off-board Rangehood installation.
Wall Ducting Kit - DK W
Tile Roof Ducting Kit - DKRT
*Please contact HAPL on 1800 805 300 for information regarding your local retailer of the
recommended ducting kit solutions from Home Appliances.
Pag e 14 INLC60 & INLC90 Off Board T-Shape Canopy Rangehoods User Manual
Eave Ducting Kit - DKE
Metal Roof Ducting Kit - DKRM
Page 19

Page 20

For all product enquiries (including warranty support),
please contact our Customer Care team on
1800 444 357 or via email: customercare@hapl.com.au
 Loading...