

EUROM DryBest 20 Instruction Booklet

L - Instructieboekje
DE - Bedienungsanleitung
EN - Instruction booklet
FR - Manuel d’utilisation
RO - Manual de utilizare
IT - Manuale d’istruzioni
ES - Manual de Instrucciones
PT - Manual de instruções
DryBest 10&20
Luchtontvochtiger - Dehumidifier
Luftentfeuchter - Déshumidificateur
Dezumidifator - Deumidificatore -
Deshumidificador - Desumidificador de ar
Art.nr. DB10 : 37.097.3 Art.nr. DB20 : 37.098.0
2
NL Dit symbool op uw apparaat betekent: niet afdekken!
EN This symbol on your device means: do not cover!
DE Dieses Symbol auf Ihrem Gerät bedeutet: Nicht abdecken!
FR Ce symbole sur votre appareil signifie : ne pas couvrir !
DA Dette symbol betyder: Må ikke tildækkes!
SV Den här symbolen betyder: får ej övertäckas!
NO Dette symbolet på apparatet betyr: Må ikke dekkes til!
FI Tämä laitteessa oleva symboli tarkoittaa: ei saa peittää!
HU A készülékén lévő szimbólum jelentése: ne takarja le!
CS Tento symbol na vašem zařízení znamená: nezakrývejte!
PL Ten symbol na urządzeniu oznacza: nie zakrywać!
SK Tento symbol na vašom zariadení znamená: nezakrývajte!
RO Acest simbol care apare pe aparatul dumneavoastră înseamnă: nu acoperiţi
RU Этот символ на вашем устройстве означает: не накрывать!
IT Questo simbolo sul dispositivo indica: non coprire!
ES Este símbolo en el aparato significa: ¡no cubrir!
PT Este símbolo no seu aparelho significa: não tapar!
3
Nederlands
Lees en bewaar deze instructies
om ze in de toekomst nog eens te kunnen raadplegen!
Dank
Hartelijk dank dat u voor een EUROM apparaat hebt gekozen. U hebt daarmee een goede
keus gemaakt! Wij hopen dat hij tot uw volle tevredenheid zal functioneren.
Om het beste uit uw apparaat te halen is het belangrijk dat u dit instructieboekje vóór gebruik
aandachtig en in zijn geheel doorleest en ook begrijpt. Schenk daarbij speciaal aandacht aan
de veiligheidsvoorschriften; die worden vermeld ter bescherming van u en uw omgeving!
Bewaar het instructieboekje vervolgens om het in de toekomst nog eens te kunnen
raadplegen. Bewaar ook de verpakking: dat is de beste bescherming voor uw apparaat
tijdens de opslag buiten het seizoen. En mocht u het apparaat ooit aan iemand anders
overdragen, lever er dan het instructieboekje en de verpakking bij.
Technische gegevens
DryBest 10
DryBest 20
Aansluitspanning
220-240 Volt / 50 Hz
220-240 Volt / 50 Hz
Testcondities
DB 30°C, RH 80%
DB 30°C, RH 80%
Ontvochtigiongscapaciteit
10 liter per dag
20 liter per dag
Stroomverbruik
230 Watt
410 Watt
Luchtverplaatsing max.
180 m³/uur
180 m³/uur
Koelvloeistof
R134a
R134a
Werkingtemperatuur
5 – 35°C
5 – 35°C
Inhoud watertank
2.0 liter
5.0 liter
Geluidsniveau
≤ 42 dB(A)
≤ 47 dB(A)
Hygrostaat + +
Timer
+
+
Regelbare ventilator
-
+
Afmetingen (l x b x h)
19 x 27.5 x 48.5 cm.
24.5 x 28 x 51 cm
Gewicht
9.5 kg.
14 kg.
Dit apparaat creëert een drogere en meer comfortabeler leefomgeving door ongewenst vocht
uit de lucht in huis of werkomgeving te verwijderen. Het maakt daarbij gebruik van
koeltechnieken. Het apparaat is licht van gewicht en voorzien van zwenkwielen, zodat het
eenvoudig van kamer naar kamer kan worden verplaatst. Het apparaat gebruikt weinig
energie en brengt slechts minimaal geluid voort.
Uw DryBest luchtontvochtiger kan door de hygrostaat de ruimte op een vooraf ingesteld
vochtigheidsniveau houden. Hij is verder uitgevoerd met een timer die het apparaat
automatisch in- en uit kan schakelen.

4
Waarschuwingen voor gebruik
Uitsluitend geschikt voor gebruik binnenshuis.
Houd het apparaat altijd rechtop in verticale stand. Als het apparaat niet stabiel rechtop staat
kan er water vanuit de tank in het binnenwerk terechtkomen en daar schade aanrichten of
een gevaarlijke situatie veroorzaken!
Voordat u de luchtontvochtiger verplaatst, reinigt of er onderhoud aan uitvoert dient u hem
éérst uit te schakelen, de stekker uit het stopcontact te nemen en de watertank leeg te
maken. Pak de stekker daartoe in de hand; trek nooit aan het koord!
Laat het apparaat na transport of overhellen (max. 45°, bijv. tijdens reiniging) altijd een uur
rusten voor u de stroom weer aansluit.
Zorg ervoor dat de luchtinvoer- en uitlaatopeningen altijd vrij zijn van blokkades en vuil.
Voorkom dat vreemde voorwerpen of vingers door de ventilatie- of uitblaasopeningen de
kachel binnendringen. Dit kan een elektrische schok, brand of beschadiging veroorzaken.
Aansluitspanning en frequentie, vermeld op het apparaat, dienen overeen te komen met die
van het te gebruiken stopcontact. De elektrische installatie dient beveiligd te zijn met een
aardlekschakelaar (max. 30 mAmp.). Sluit het apparaat uitsluitend aan op een geaard
stopcontact!
Rol de elektrokabel volledig af voor u de stekker in het stopcontact steekt. Leid de kabel niet
onder tapijt door, bedek hem niet met matten, lopertjes o.i.d. en houd de kabel buiten de
looproute. Zorg ervoor dat de kabel niet heet wordt, er niet op getrapt wordt en er geen
meubels op worden gezet. Leid de kabel niet om scherpe hoeken en wind hem na gebruik
niet te strak op!
Als het elektriciteitssnoer is beschadigd dient het, om gevaarlijke situaties te voorkomen,
door een gekwalificeerd elektricien te worden vervangen.
Gebruik nooit de stekker om het apparaat in- en uit te schakelen. Gebruik daarvoor de
schakelaar op het controlepaneel.
Gebruik geen agressieve schoonmaakmiddelen of bijv. insectenspray op de omkasting. Stel
het apparaat niet bloot aan de invloed van chemicaliën.
Giet of spuit nooit water over het apparaat. Dompel het apparaat niet onder water en plaats
het niet in de onmiddelijke nabijheid van water of kranen o.i.d.
Plaats het apparaat niet in de nabijheid licht-ontvlambare en/of gevaarlijke stoffen.
Ga niet op het apparaat staan of zitten en zet er niets bovenop.
Verwijder het water dat zich in het reservoir heeft verzameld regelmatig en op de
voorgeschreven wijze.
Gebruik het apparaat niet in een te kleine, afgesloten ruimte als een toilet o.i.d.; dat kan
brand veroorzaken.
Stel het apparaat niet in werking wanneer u beschadigingen constateert aan apparaat,
elektrokabel of stekker, of wanneer het slecht functioneert, is gevallen of op andere wijze een
storing vertoont. Neem onmiddellijk de stekker uit het stopcontact en breng het complete
apparaat terug naar uw leverancier of een erkend elektricien voor controle en/of reparatie.
Vraag altijd om originele onderdelen.
Dit apparaat is niet geschikt om te worden gebruikt door personen (incl. kinderen) met een
fysieke- zintuiglijke- of mentale beperking, of gebrek aan ervaring en kennis, ongeacht of er
toezicht is of instructie is gegeven aangaande het gebruik van het apparaat door een
persoon die verantwoordelijk is voor hun veiligheid. Er dient op te worden toegezien dat
kinderen niet met het apparaat spelen.
Wanneer de temperatuur lager dan 10°C is en de luchtvochtigheid is vrij laag, is het niet
nodig te ontvochtigen.
BELANGRIJK! Gebruik de luchtontvochtiger niet wanneer de temperatuur lager dan 5°C is. Er
kan dan ijsafzetting ontstaan op de verdamper!
Het apparaat (incl. elektrokabel en stekker) mag uitsluitend worden geopend en/of gerepareerd
door daartoe bevoegde en gekwalificeerde personen.

5
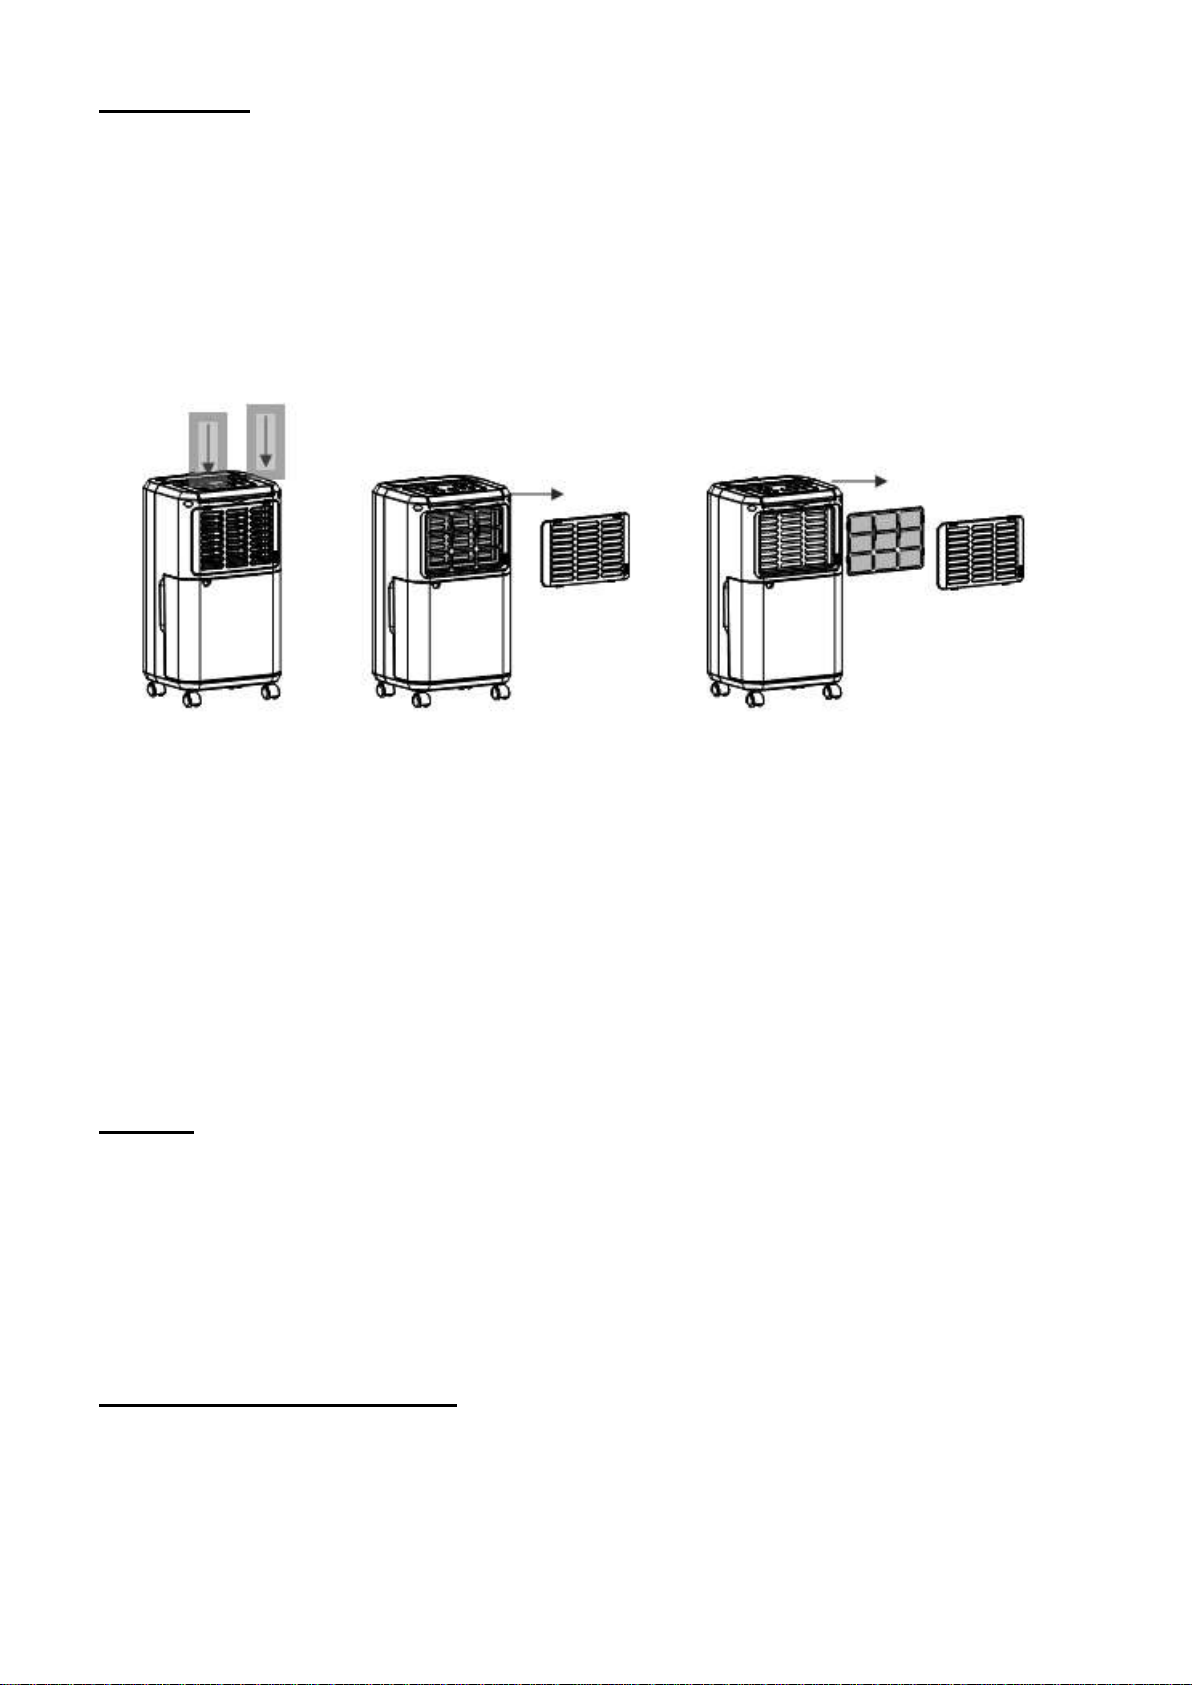
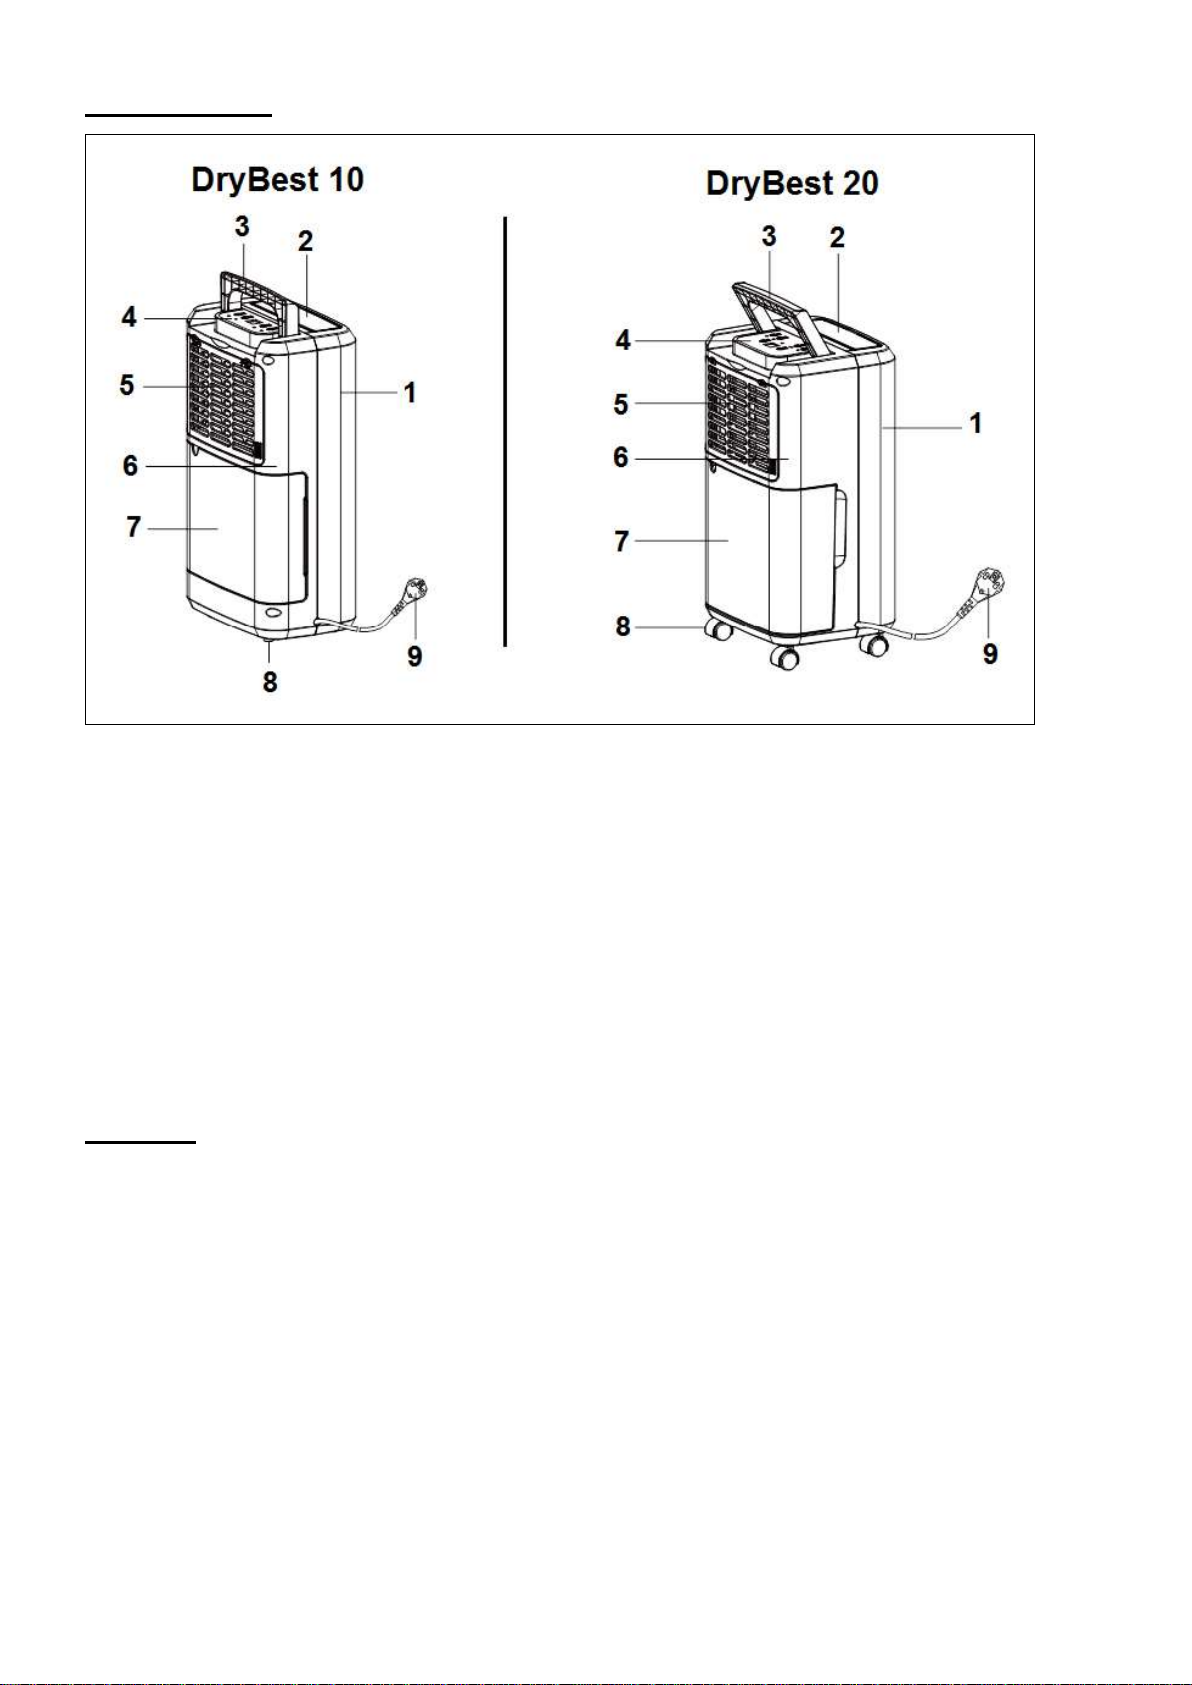
Beschrijving
1. Voorpaneel
2. Luchtuitlaat
3. Handgreep
4. Bedieningspaneel
5. Filter
6. Achterpaneel
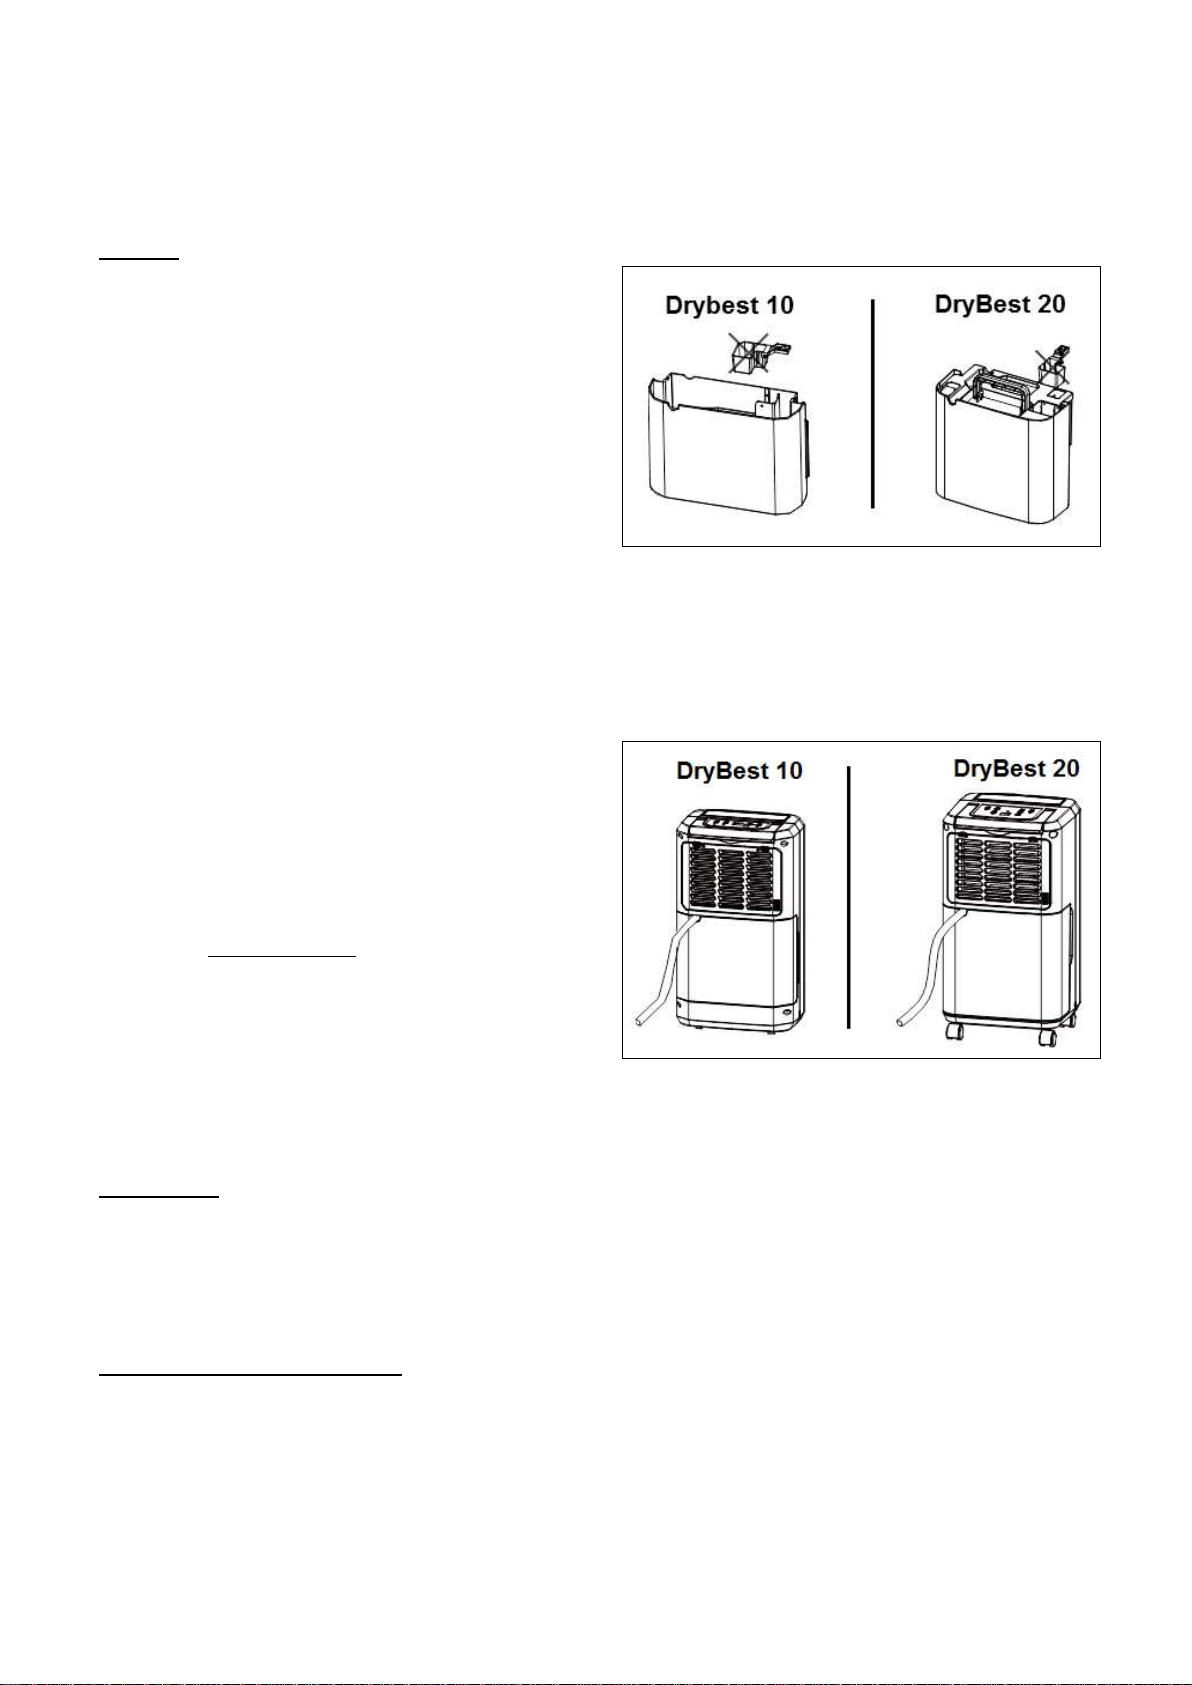
7. Watertank
8. Rubberen voetjes (DryBest 10)
Zwenkwielen (DryBest 20)
9. Elektrokabel
Dit apparaat is een luchtontvochtiger. Het regelt de luchtvochtigheid door lucht door het
apparaat en langs koelelementen (verdamper) te voeren. Een teveel aan vocht condenseert
door de kou en wordt vervolgens veilig de watertank in geleid. De gedroogde lucht wordt
door de condensator licht opgewarmd en vervolgens de ruimte weer ingevoerd. Uw
gezondheid en bezittingen gedijen het best bij een luchtvochtigheid tussen de 45% en 65%.
Positie
Teveel aan vocht trekt door uw hele huis, net als bijv. kookgeurtjes. Zoek daarom een plaats
voor uw ontvochtiger vanwaaruit hij de vochtige lucht uit het hele huis naar zich toe kan
trekken. Hebt u een serieus probleem in een bepaalde ruimte, dan kunt u om te beginnen het
apparaat daar neerzetten, en het later naar een meer centrale plek verplaatsen.
Zorg ervoor dat de luchtontvochtiger tijdens het gebruik op een stevige, vlakke en horizontale
ondergrond staat. Het apparaat dient aan alle kanten minimaal 20 cm. vrije ruimte te hebben
om de luchtstromen niet te belemmeren. Wanneer u het apparaat wilt verplaatsen, dient u
het eerst uit te schakelen, de stekker uit het stopcontact te nemen en de watertank te
ledigen.
Het gebruik van een verlengsnoer wordt afgeraden; zoek dus een plaatsje in de buurt van
een stopcontact. Is het gebruik van een verlengsnoer absoluut onvermijdelijk, gebruik dan
een snoer met randaarde, met een minimale draaddoorsnee van 1,5 mm². en rol het snoer
helemaal af tijdens het gebruik.
6
Plaats het apparaat niet in de buurt van een kachel, haard of andere warmtebron en niet in
de volle zon.
Als de luchtontvochtiger in werking is dient u deuren en ramen naar buiten zoveel mogelijk
gesloten te houden om het ontvochtigen efficiënt te laten verlopen. Gebruik het apparaat
echter niet in een luchtdicht afgesloten of zeer kleine ruimte.
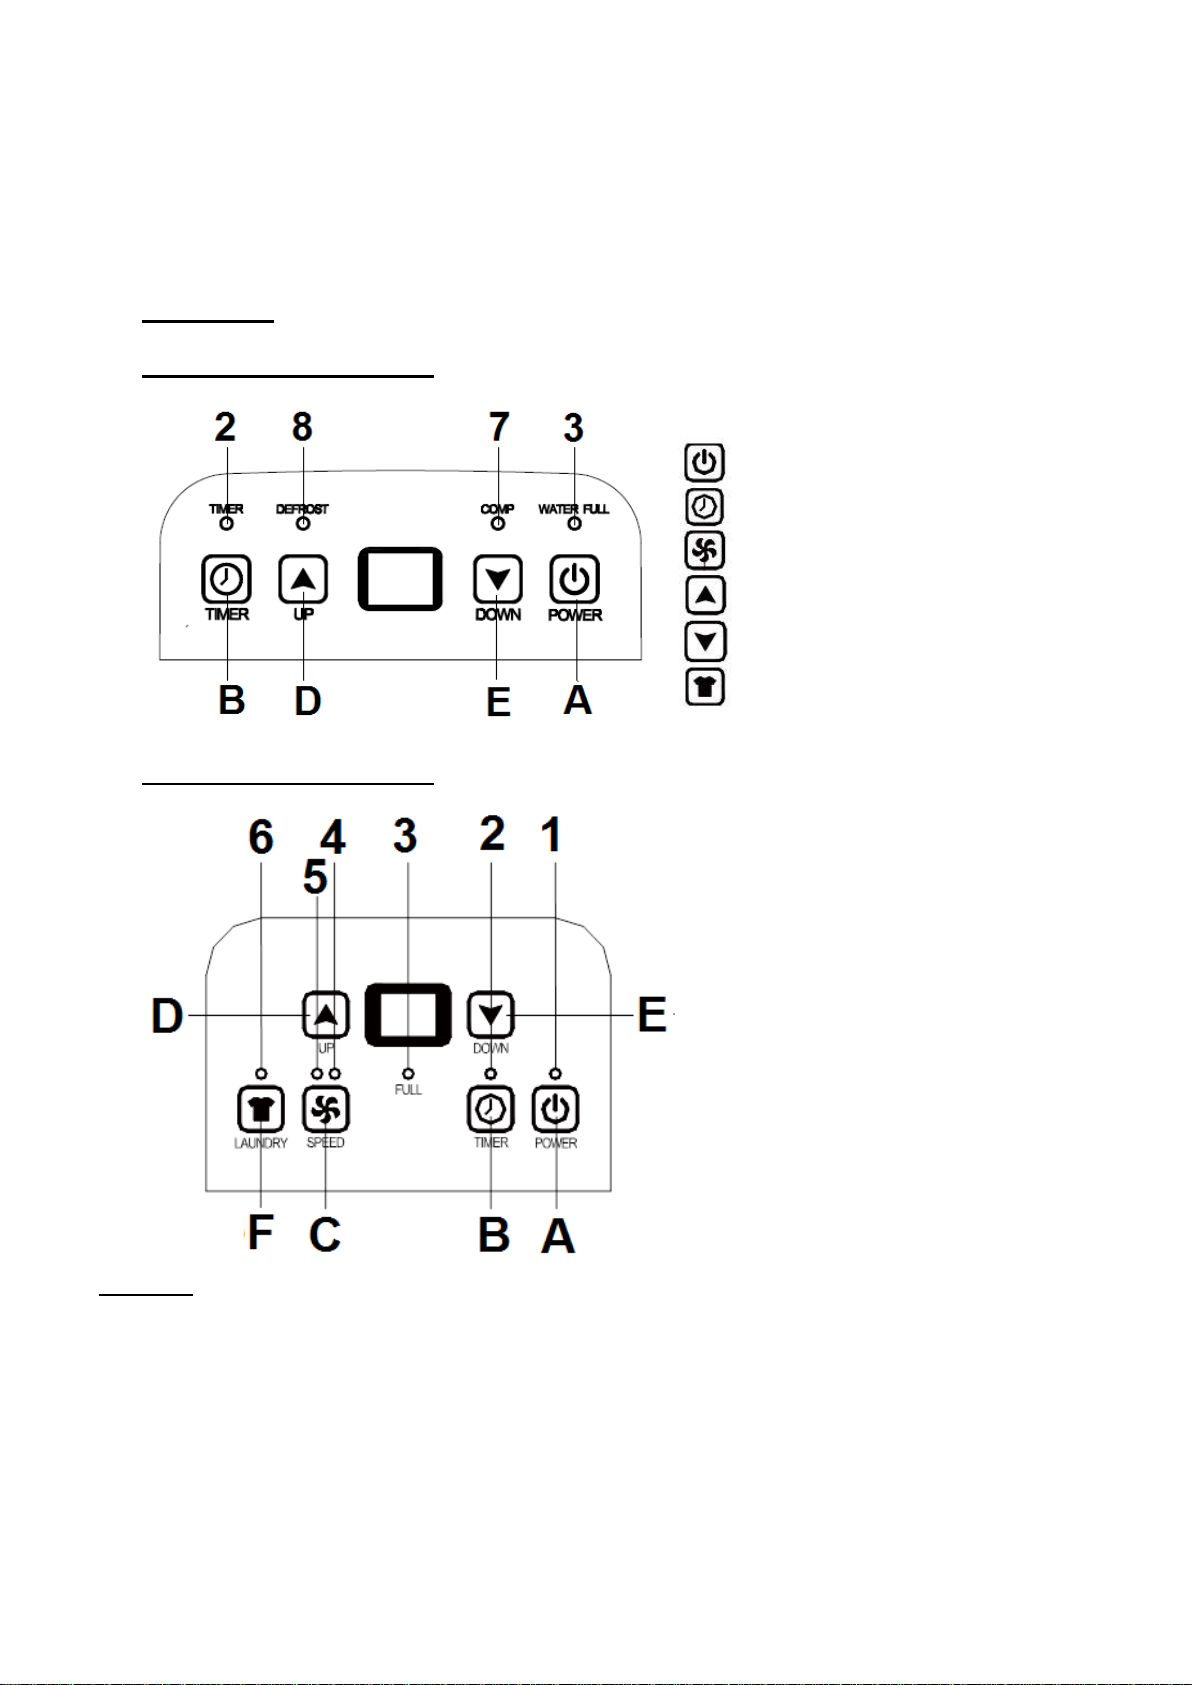
Werking
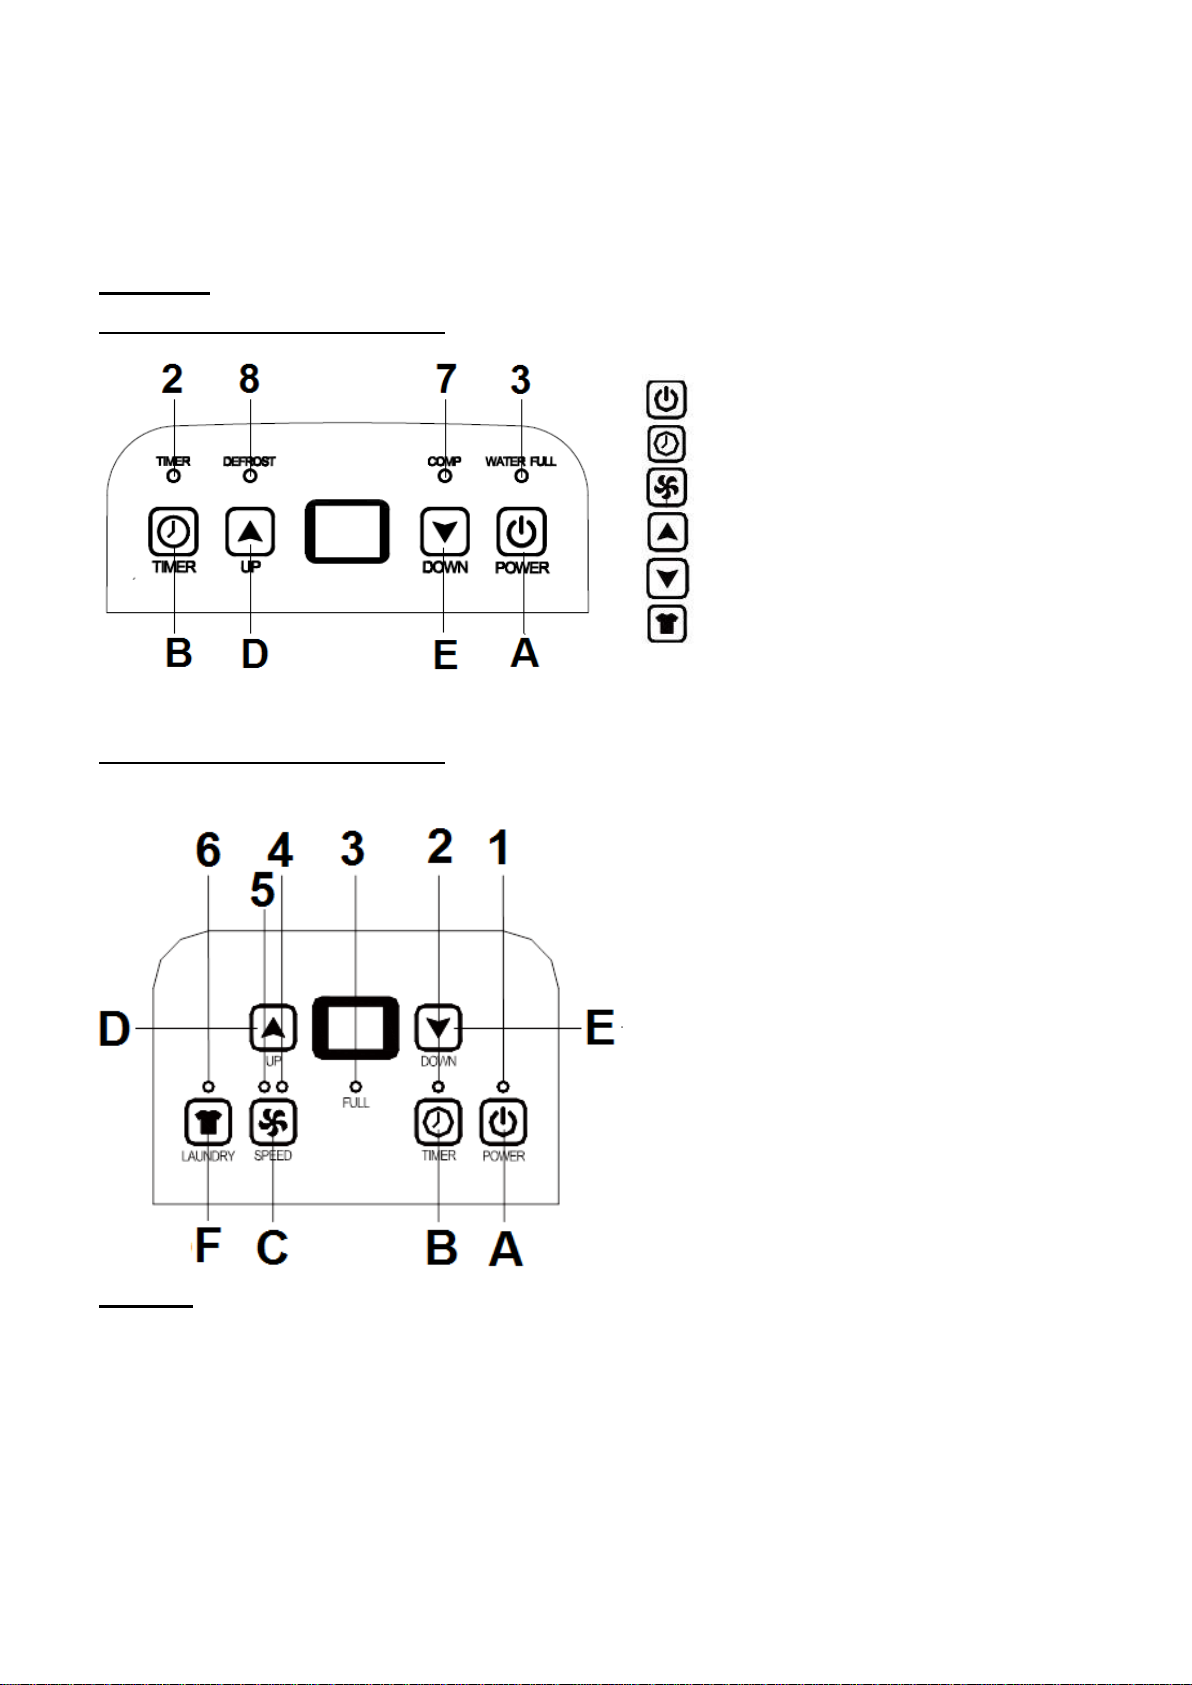
Bedieningspaneel DryBest 10:
Bedieningspaneel DryBest 20:
A. Aan/uit knop
B. Timer knop
C. Ventilatorsnelheid knop
D. Luchtvochtigheid hoger knop
E. Luchtvochtigheid lager knop
F. Was drogen-knop
1. Lampje werking
2. Lampje timer
3. Lampje ‘watertank vol’
4. Lampje ‘ventilator laag’
5. lampje ‘ventilator hoog’
6. Lampje ‘ was drogen’
7. Lampje compressor
Display:
Het display toont standaard de luchtvochtigheid in de ruimte.
Als u een gewenste vochtigheid instelt, toont het gedurende enkele seconden de ingestelde
luchtvochtigheid.
Als u met de timer een in- of uitschakeltijd instelt , toont het display enkele seconden het
ingestelde aantal uren.
Als de luchtvochtigheid lager is dan 35%, toont het “LO” (laag)
Als de luchtvochtigheid hoger is dan 95%, toont het “HI” (hoog)
7
Ingebruikname
1. Steek de stekker in een passend stopcontact, overeenkomend met de specificaties op het
typeplaatje. Sluit het apparaat uitsluitend aan op een geaard stopcontact! (DryBest 10: het
lampje ‘comp’ (7) knippert; DryBest 20: Het lampje ‘Power’ (1) knippert).
2. Druk de AAN/UIT-knop (A) in; u hoort de compressor en de ventilator aanslaan (het lampje
‘comp’ c.q. ‘power’ brandt nu continu). Het apparaat start zijn werking. Op het display
verschijnt de luchtvochtigheid in de ruimte. Door nogmaals op de AAN/UIT-knop te
drukken schakelt u het apparaat weer uit (het lampje ‘comp’ c.w. ‘power’ knippert weer).
3. D.m.v. de ‘Hoger’ en ‘Lager’ knoppen (D&E) kunt u nu de gewenste luchtvochtigheid
instellen van 30% tot 90% (intervallen van 5%). Het display toont enige seconden de
ingestelde luchtvochtigheid, daarna weer de huidige luchtvochtigheid. Wanneer het
gewenste niveau is bereikt (± 2%) zal de compressor stoppen; de ventilator stopt zijn
werking 3 minuten later. Als de luchtvochtigheid weer tot 3% boven de ingestelde waarde
stijgt zal het apparaat weer starten. Tussen stoppen en weer starten neemt de compressor
altijd minimaal 3 minuten beschermingstijd in acht.
Als u de luchtvochtigheid d.m.v. de ‘Lager’-knop instelt op ‘Co’ zal het apparaat continu
blijven werken.
4. Met de Timer-knop (B) kunt u instellen wanneer het apparaat moet starten dan wel
stoppen. Druk daartoe op de Timer-knop (B); het lampje (2) gaat branden. Wanneer u dit
doet terwijl het apparaat buiten werking is (wel de stekker in het stopcontact!) stelt u de
starttijd in; doet u dit bij een werkend apparaat, dan stelt u de stoptijd in. Op het display
verschijnt het ingestelde aantal uren. Elke keer wanneer u op de ‘Timer’ knop drukt komt
daar een uur bij (van 1 tot 24 uur in te stellen). U kunt de timer-instelling annuleren door de
ingestelde tijd op 0 te zetten (na 24 komt weer 0). De ingestelde tijd wordt ‘vergeten’
wanneer u het apparaat handmatig uitschakelt, maar blijft in het geheugen als het
apparaat stopt omdat de watertank vol is of tijdens het ontdooiïngsproces.
5. DryBest 20: Door op de ventilatorsnelheid knop te drukken wisselt de ventilator-snelheid
van hoog naar laag en terug. Het lampje geeft aan welke capaciteit werkt.
6. Drybest 20: Door op de ‘was drogen’ knop te drukken zal het apparaat continu
ontvochtigen met hoge ventilatorsnelheid.
7. Neem na gebruik altijd de stekker uit het stopcontact.
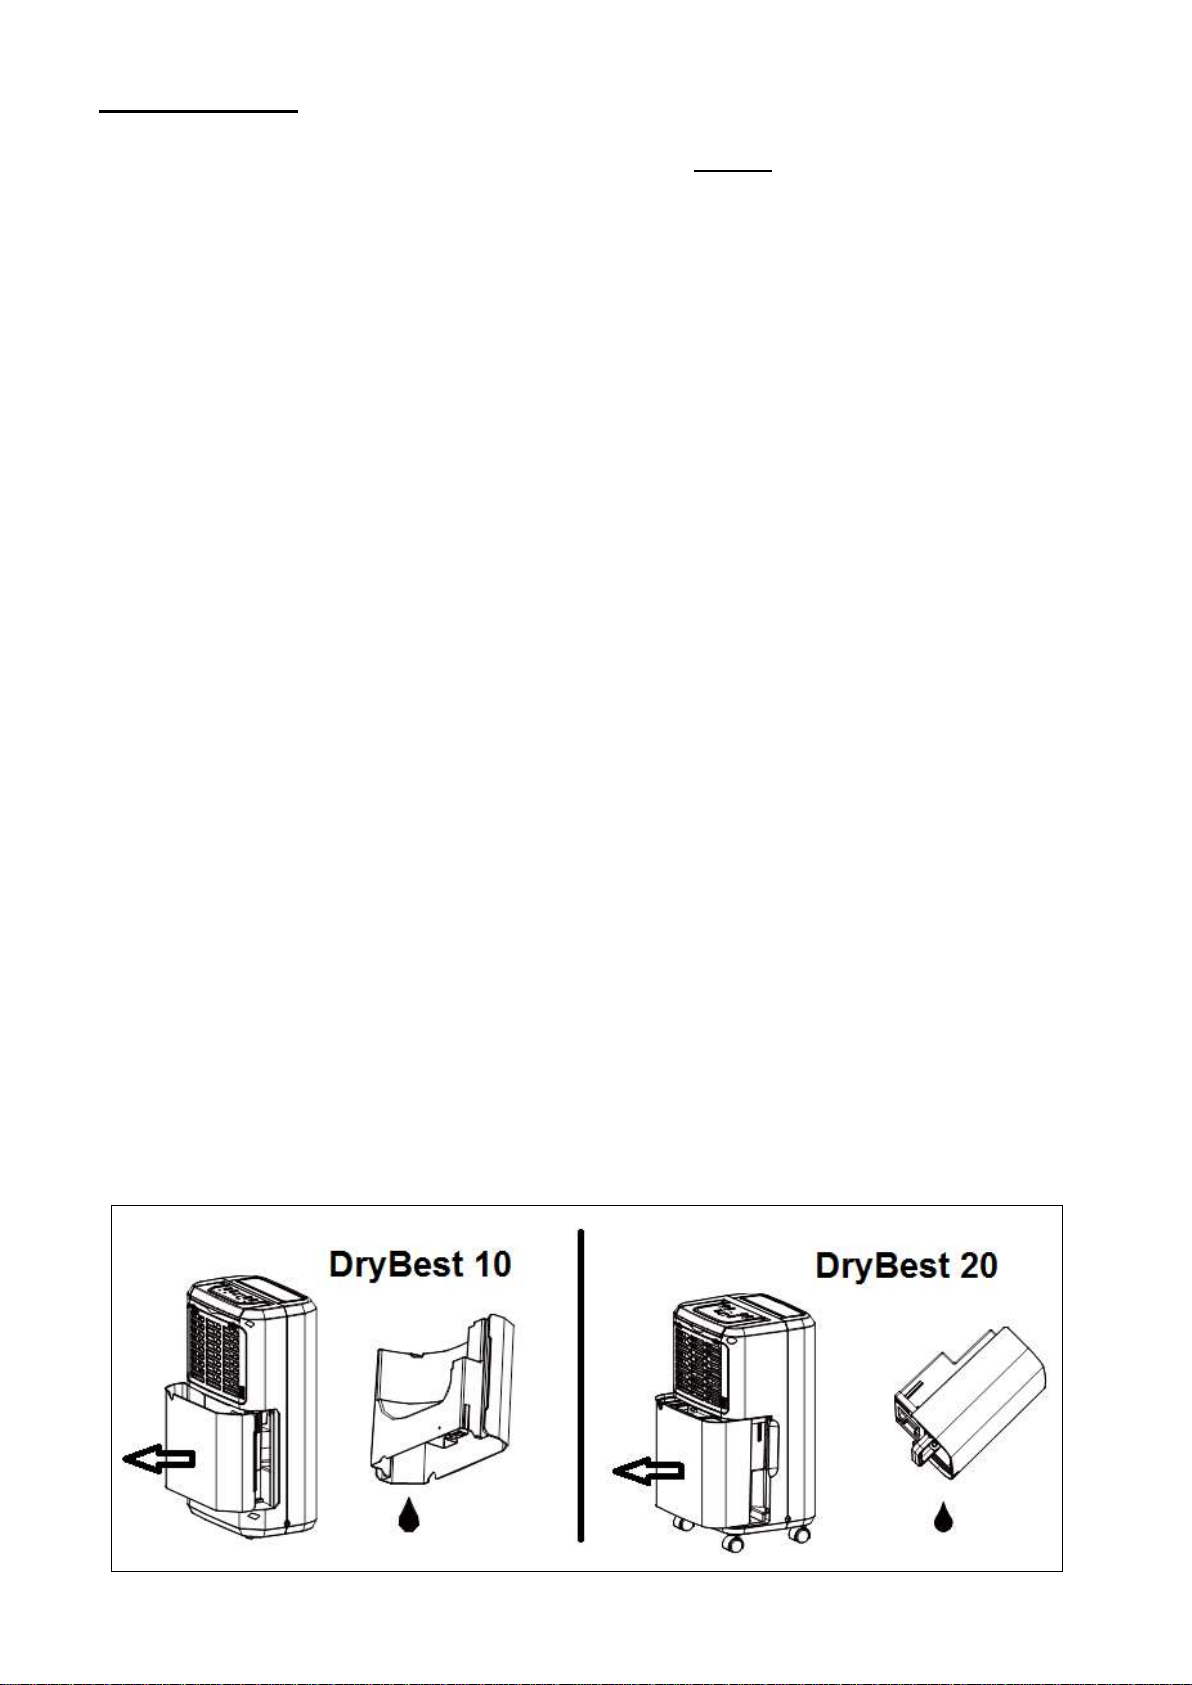
Waterafvoer
Als de watertank vol is zal de compressor om veiligheidsredenen automatisch uitschakelen.
Het indicatielampje ‘watertank vol’ zal beginnen te branden en er klinkt 15x een piepje om de
gebruiker erop te attenderen dat de tank geledigd dient te worden.
Druk daartoe met beide handen licht op de zijkanten van de tank en trek hem voorzichtig en
8
rechtstandig uit het apparaat. Nadat u hem geledigd hebt plaatst u hem in dezelfde positie
terug.
Let op: wanneer de watertank niet in de goede positie zit, zal het ‘watertank vol’-lampje
blijven oplichten. Het apparaat werkt dan niet.
Let op!
Verwijder de vlotter niet uit de watertank.
Dan wordt er geen signaal ‘tank vol’ meer
gegeven en kan er water uit de tank lekken.
Als de watertank vuil is, maak hem dan
schoon met koud of lauw water. Gebruik
nooit vluchtige chemicaliën, benzine,
scherpe reinigingsmiddelen, chemisch
geprepareerde doeken, schuurmiddelen of
andere reinigingsoplossingen. Dat zou de
tank kunnen beschadigen en lekkage
veroorzaken.
Continu-afvoer
Naarmate het apparaat in een vochtiger omgeving werkt, zal de tank vaker moeten worden
leeggemaakt. Soms is het dan ook doelmatiger een continu-afvoer aan te brengen. Ga
daartoe als volgt te werk:
1. Trek de watertank uit het apparaat.
2. Sluit een passend slangetje (tuinslang o.i.d.)
met een slangklem aan op het
waterafvoerpijpje. Let op: dat slangetje
wordt niet meegeleverd!
3. Plaats de watertank terug en leid daarbij het
slangetje door de opening voor continuafvoer naar beneden in een afvoer of
grotere opvangbak. Let op: wanneer de
watertank niet in de goede positie zit, zal het
‘watertank vol’-lampje rood oplichten. Het
apparaat werkt dan niet.
4. Controleer of het water vlot wegloopt en het slangetje op zijn plaats blijft zitten. Pas op! Bij
erg koude omstandigheden dient u het slangetje te beschermen tegen bevriezing!
Ontdooien
Wanneer het apparaat bij lage temperatuur werkt, kan de verdamper bevriezen. Dat heeft
invloed op het ontvochtigen. In dat geval zal het apparaat automatisch zijn werking
onderbreken en ontdooien (de ventilator blijft draaien). (DryBest 10: het lampje ‘defrost’gaat
branden; DryBest 20 heeft geen lampje, maar ontdooit wel automatisch).
Bescherming compressor
Wanneer u het apparaat hebt uitgeschakeld (of het zichzelf heeft uitgeschakeld) is het de
eerste 3 minuten daana niet weer in te schakelen, als bescherming voor de compressor.
9
Onderhoud
Neem altijd de stekker uit het stopcontact voordat u het apparaat schoonmaakt of er
onderhoud aan uitvoert.
Het schoonmaken van de buitenzijde
Gebruik een zachte doek om het apparaat schoon te wissen. Gebruik nooit vluchtige
chemicaliën, benzine, scherpe reinigingsmiddelen, chemisch geprepareerde doeken,
schuurmiddelen of andere reinigingsoplossingen. Zij zouden de omkasting kunnen
beschadigen.
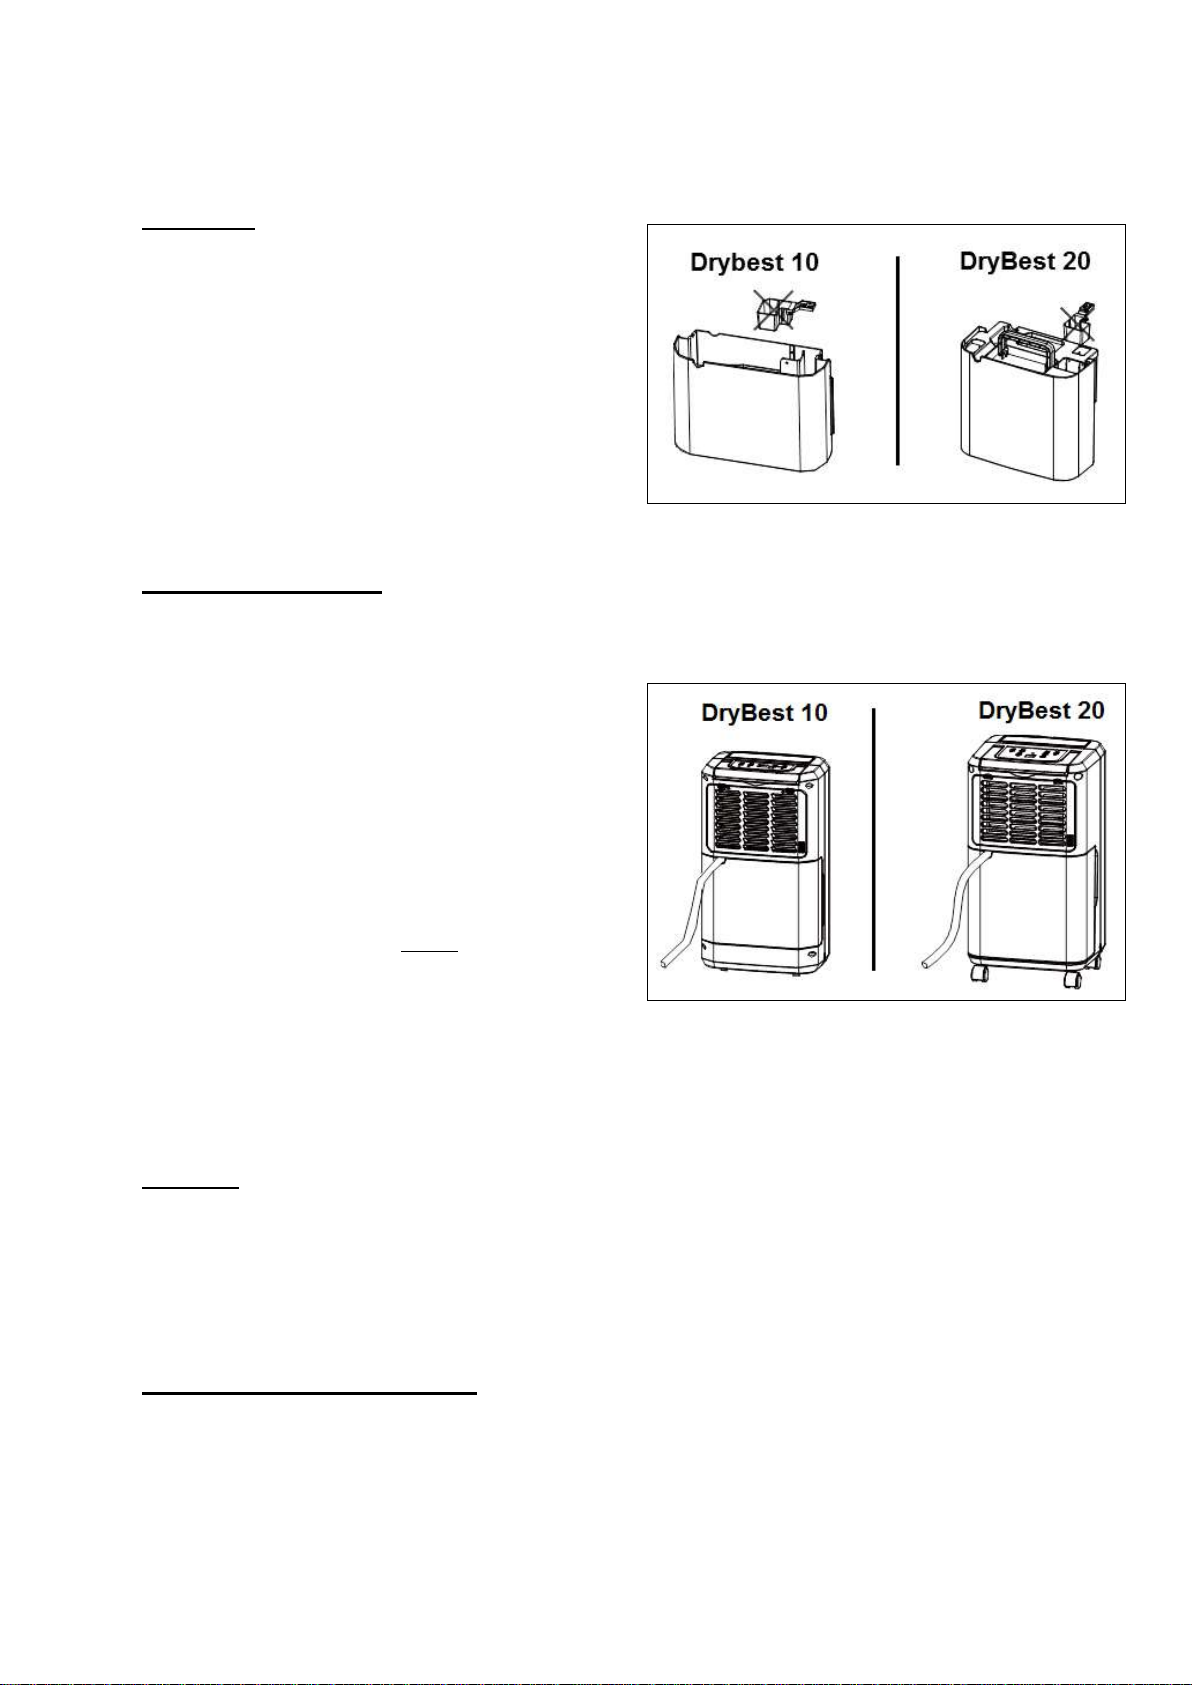
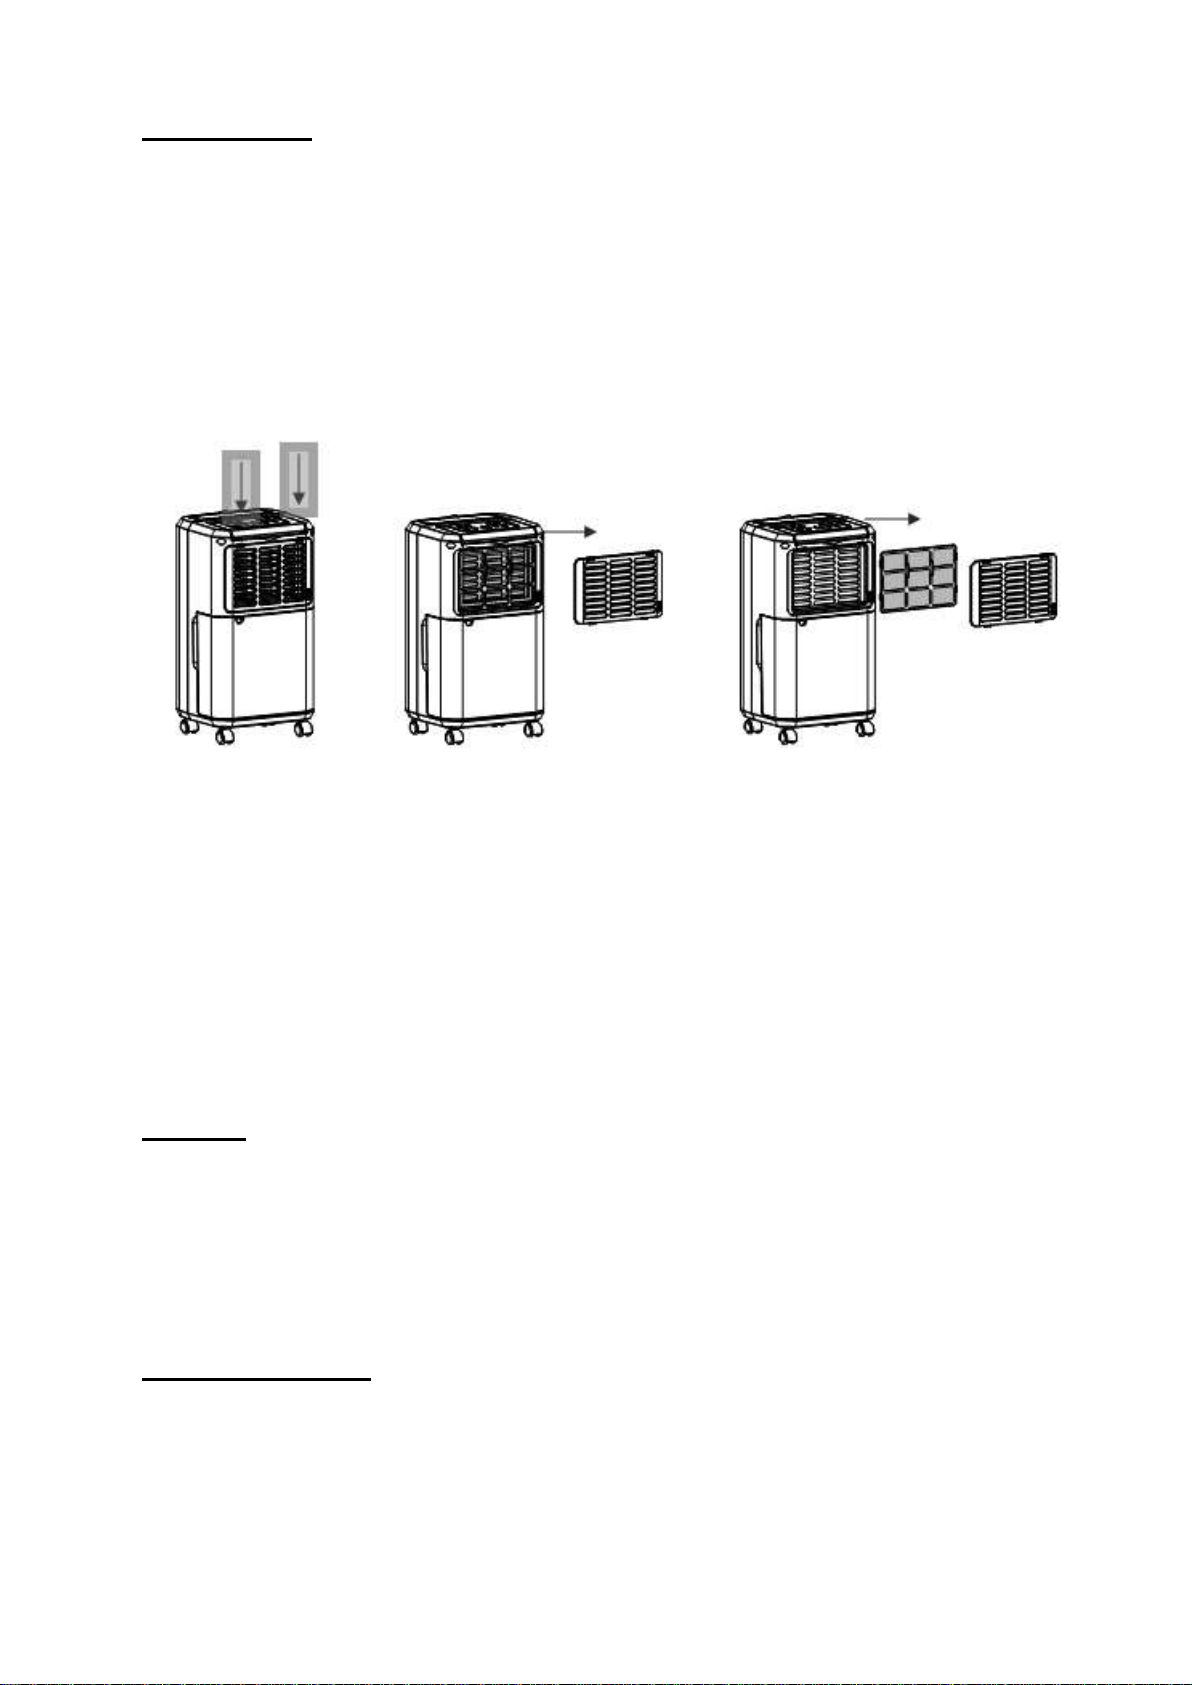
Het reinigen van het filter
Neem de filterhouder uit het apparaat.
Klop het anti-stoffilter zachtjes schoon of zuig het voorzichtig af met een stofzuiger. Als het
filter erg vuil is kunt u het voorzichtig afspoelen in warm water (max. 40°C) met een mild
reinigingsmiddel.
Zorg ervoor dat het filter door-en-door droog is voordat u het terugplaatst. Stel het filter
niet bloot aan zonlicht.
Gebruik het apparaat nooit zonder filter!
Het apparaat (incl. elektrokabel en stekker) mag uitsluitend worden geopend en/of
gerepareerd door daartoe bevoegde en gekwalificeerde personen.
Opslag
Wanneer u het apparaat voor een langere tijd niet denkt te gebruiken s.v.p. als volgt
handelen:
Draai het apparaat uit, neem de stekker uit het stopcontact en rol de elektrokabel op
Maak de watertank goed leeg en wrijf hem schoon en droog.
Maak het filter schoon.
Dek het apparaat af (bij voorkeur in de originele verpakking) en ruim het weg op een
koele, droge plaats buiten het bereik van direct zonlicht.
Problemen en oplossingen
Het apparaat werkt niet:
Zit de stekker wel in het stopcontact?
Is er geen sprake van doorgebrande zekeringen of stroomuitval?
Ligt de temperatuur wel tussen de 5 en 35°C? Anders werkt het apparaat niet!

10
Is de watertank niet vol, en zit hij goed op z’n plaats?
Zijn de luchtinvoer- en uitlaatopeningen niet geblokkeerd?
Het apparaat lijkt weinig te doen:
Is het filter misschien stoffig, vuil of beschadigd?
Zijn de luchtinvoer- en uitlaatopeningen niet verstopt of vervuild?
Is de luchtvochtigheid misschien al erg laag?
Staan er deuren en/of ramen open?
Is er iets in de ruimte dat veel vocht produceert?
Het apparaat lekt:
Controleer of het apparaat of de watertank geen beschadigingen, scheurtjes of
vervormingen vertoont.
Staat het apparaat wel stabiel en volkomen horizontaal?
Het apparaat maakt teveel lawaai:
Controleer of het wel stevig, vlak en horizontaal staat.
Is het filter misschien stoffig, vuil of beschadigd?
Een warme luchtstroom uit de luchtuitlaat is normaal. Ook kan de circulatie van de
koelvloeistof wat geluid maken tijdens het starten en stoppen.
Neem voor andere problemen contact op met uw servicepunt. Het apparaat (incl.
elektrokabel en stekker) mag uitsluitend worden geopend en/of gerepareerd door daartoe
bevoegde en gekwalificeerde personen.
CE – verklaring
Hierbij verklaart Eurom - Genemuiden-NL dat de Luchtontvochtiger, merk EUROM, type
DryBest 10 & 20 voldoet aan de LVD-richtlijn 2014/35/EU en aan de EMC-richtlijn
2014/30/EU en in overeenstemming is met de onderstaande normen:
EN 60335-1:2012+A11 :2014
EN 60335-2-40:2003+A11:2004+A12:2005
+A1:2006+A2:2009:A13:2012
EN 62233:2008
EN 55014-1:2006+A1:2009+A2:2011
EN 55014-2:2015
EN 61000-3-2:2014
EN 61000-3-3:2013
Genemuiden, 15-11-2017
W.J. Bakker, alg.dir.

11
English
Read and retain these instructions for future reference!
THANK YOU
Thank you very much for choosing for an EUROM device. You have made a good choice!
We hope you will be satisfied about its functioning.
To get maximum profit from your device, it is important to read this manual attentive and
totally before use, and to understand what is written. Read especially the safety instructions:
they are there to protect you and your environment.
Keep the manual in a safe place for future reference. Store also the package: that is the
best protection for your device in times of no-use. And if you at any time pass the appliance
on, pass on the manual and package too.
Technical specifications
DryBest 10
DryBest 20
Power supply
220-240 Volt / 50 Hz
220-240 Volt / 50 Hz
Test condition
DB 30°C, RH 80%
DB 30°C, RH 80%
Dehumidification capacity
10 liter per day
20 liter per day
Power consumption
230 Watt
410 Watt
Lair volume (max.)
180 m³/hour
180 m³/hour
Refrigerant
R134a
R134a
Working range
5 – 35°C
5 – 35°C
Water tank
2.0 liter
5.0 liter
Noise level
≤ 42 dB(A)
≤ 47 dB(A)
Humidistat + +
Timer
+
+
Size (WxDxH)
19 x 27.5 x 48.5 cm.
24.5 x 28 x 51 cm
Weight
9.5 kg.
14 kg.
This appliance creates a dryer and more comfortable living environment by removing
unwanted moisture from the air in the home or in the working environment. To do this, it
makes use of cooling techniques. The lightweight appliance is fitted with swivelling wheels,
so that it can be easily moved from room to room. The appliance uses little energy and only
emits a minimum amount of noise.
Your DryBest air dehumidifier's hygrostat keeps the space at a pre-set humidity level. It is
also fitted with a timer, which automatically turns the appliance on or off.

12
Cautions before use
For indoor use only.
Always keep the unit in vertical position. If the device is not stable and upright,, water from
the tank can get into the interior of the device and damage something or cause a
dangerous situation!
Before moving, cleaning or perform maintenance on the unit, first switch off, then unplug
and empty the water tank. Pull on the plug to remove from the socket, never pull on the
cord.
Leave the unit to stand for one hour before connecting to the mains supply after transport
or when it has been tilted (max. 45°, e.g. during cleaning).
Keep air-intake or output openings clean and unobstructed. Prevent foreign objects or
fingers from entering the equipment via the venting or exhaust openings as this may lead
to electric shock, fire or damage.
The supply voltage and utility frequency, specified on the machine, need to match those of
the socket that is used. The electrical installation needs to be protected by an earth
leakage circuit breaker (max. 30 mAmp). Only connect the equipment to an earthed
socket!
Fully extend the cord before plugging in. Do not run the cord underneath carpeting; do not
cover it with mats, carpet strips, or similar and make sure it is not placed in any
passageways. Make sure the cord cannot be stepped on and that no furniture is placed on
top of it. Prevent that the cable gets hot. Do not lead the cord around sharp corners and do
not roll it up too tightly after use!
If the supply cord is damaged, it must be replaced by an approved service representative
or a similar qualified person in order to avoid a hazard.
Never use the plug to start and stop the unit. Always use switch on the control panel.
Don't use bug sprays or other flammable cleaners on the unit. Do not expose the device to
the influence of chemicals.
Never pour or spray water over the unit. Never immerse the appliance in water or place it
in the immediate vicinity of water or taps etc.
Never place the appliance in the vicinity of highly inflammable and/or hazardous
substances.
Do not stand or sit on the appliance, or put anything on it.
Regularly remove the water that is collected in the reservoir in the prescribed manner.
Do not use the appliance in small, closed spaces such as a toilet etc., this can cause a
fire.
Do not turn on the appliance if you have discovered damage to the appliance, cord or plug,
if the appliance is malfunctioning, if it has been dropped or if there are signs of any other
defect. Immediately disconnect the plug from the socket and return the complete product
to the vendor or to a certified electrician for inspection and/or repair. Always ask for
original parts.
This appliance is not intended for use by persons (including children) with reduces
physical, sensory or mental capabilities, or lack of experience and knowledge, unless they
have been given supervision or instruction concerning use of the appliance by a person
responsible for their safety. Children should be supervised to ensure that they do not play
with appliance.
When the temperature is below 10 ° C and the humidity is relatively low, it is not necessary
to dehumidify.
IMPORTANT! Do not use this unit at ambient temperatures below 5°C, to prevent the
possibility of a heavily ice up evaporating coil.
The appliance (incl. cord and plug) may only be opened and/or repaired by properly
authorised and qualified persons.

13
Description
1. Front panel
2. Air outlet
3. Handle
4. Control panel
5. Filter
6. Back panel
7. Water tank
8. Rubber feet (DryBest 10)
Castors (DryBest 20)
9. Electric cable
This product is a dehumidifier. It controls relative humidity by passing the air through the
unit, forcing the excess moisture to condensate over the cooling elements (evaporator).
Contact with this cold surface causes the moisture in the air to condense. This condensed
water then drains safely into the water tank. The dried air then passes through the
condenser where it is slightly warmed and re-enters the room at a slightly elevated
temperature. Your health and possessions thrive best in a humidity between 45% and
65%.
Position
Excess moisture will travel throughout your home, in the same way that cooking smells
waft to every room in the house. For this reason, the dehumidifier should be positioned, so
that it can draw this moist air towards it from all over the home.
Alternatively, if you have a serious problem in one area you can begin by positioning the
dehumidifier close to this area and later moving it to a more central point.
When positioning the dehumidifier, ensure that it is placed on a level surface and that
there is a minimum of 20 cm (8") of space on either side of the unit to allow for efficient
airflow.
If you move the unit, it should first be switched off and the water tank emptied.
We do not recommend the use of an extension lead, so please try to ensure that the unit is
sufficiently close to a fixed mains socket. If it is necessary to use am extension lead, use
14
one with earthing and please ensure the diameter of the wires of the cable is at least 1,5
mm².
Don’t place the device near a heater, stove or other heat source, and not in full sunshine.
When the dehumidifier is in operation, outside doors and windows should be closed
when necessary for most efficient use. However, do not use the device in a sealed or
very small space.
Operating
Control panel Drybest 10:
A. On/Off button
B. Timer button
C. Fan speed button
D. Air humidity higher button
E. Air humidity lower button
F. Clean dryer button
Control panel Drybest 20:
1. Power lamp
2. Timer lamp
3. "Water reservoir full" lamp
4. "Fan low" lamp
5. "Fan high" lamp
6. "Clean dryer" lamp
7. Compressor lamp
Display:
The display normally shows the air humidity in the space.
If you set a required humidity, it will show the set air humidity for a few seconds.
If you set a switching on or off time with the timer, the display will show the set number of
hour for a few seconds.
If the air humidity is less than 35%, it will show "LO" (low)
If the air humidity is higher than 95%, it will show "HI" (high)

15
Initial operation
1. Insert the plug into an appropriate socket, in accordance with the specifications on
the type plate. Only connect the appliance to an earthed socket! (DryBest 10: the
"comp" lamp (7) flashes, DryBest 20 The Power lamp (1) flashes).
2. Press the ON/OFF button (A); you will hear the compressor and the fan start up (the
"comp" lamp c.q. the “power” lamp will now light up continuously). The appliance will
start working. The display will show the air humidity in the space. By pressing the
ON/OFF button again, you will switch the appliance off (the "comp" lamp c.q. ‘power’
lamp will flash again).
3. Using the "Higher" and "Lower" buttons (D&E), you can now set the required air
humidity between 30% and 90% (at intervals of 5%). The display will show the set air
humidity for a few seconds, afterwards the current air humidity will be shown. Once
the required level has been reached (± 2%), the compressor will stop, the fan will
stop 3 minutes later. If the air humidity rises once more to more than 3% above the
set value, the appliance will start again. The compressor has a time lag of at least 3
minutes protection time between stopping and starting.
If you set the air humidity with the "Lower" button to "Co", the appliance will operate
continuously.
4. Using the Timer button (B), you can set starting and stopping times for the appliance.
To do this, press the Timer button (B); lamp (2) will light up. If you do this while the
appliance is not in operation (but with the plug in the socket), you will set the starting
time; if you do this while the appliance is in operation, you will set the stopping time.
The number of hours set will appear on the display. Each time you press the "Timer"
button, an hour will be added (setting from 1 to 24 hours). You can cancel the timer
setting by setting the time to 0 (0 comes after 24). The time setting is "forgotten"
when you switch the appliance off manually, but is kept in memory if the appliance
stops because the reservoir is full or during the thawing process.
5. DryBest 20: Pressing the fan speed button changes the fan speed from high to low
and back. The lamp indicates the operational capacity.
6. DryBest 20: Pressing the clean dryer button will continually dehumidify the appliance
at a high fan speed.
7. Make sure that you then remove the plug from the socket after use.
Drainage
While the water tank is full, the compressor will stop for self-protection and the water full
indicator will turn on and A tone will sound 15 times to warn the user that the reservoir
needs emptying. To do this, press the sides of the reservoir lightly with both hands, and
pull it carefully and straight out of the appliance.
16
.After empting the water tank, place the water tank into space.
Please note: in case, the water tank has not been positioned well, the water full indicator
keeps burning. The equipment does not work.
Attention!
Do not remove the float from the
reservoir. No full reservoir signal will then
be given and water will be able to leak out
of the tank.
If the reservoir is dirty, clean it with cold or
lukewarm water.
Don't ever use volatile chemicals,
scouring pads, gasoline, detergents,
chemically treated clothes, or other
cleansing solutions. This can damage the
tank and cause leaks.
Continuous drainage
When the dehumidifier is operated at very high humidity levels, the water tank will require
more frequent drainage. In this situation, it may be more convenient to set the unit up for
continuous drainage with the following
procedures:
1. Pull out the water tank.
2. Connect an appropriate tube (gardenhose
or something like that) with a clamp on the
drain pipe. Please note: the water tube is
not supplied with the unit.
3. Put the water tank back to its position
and lead the tube through the opening for
continuous drainage down into a drain or
a big container. Please note: in case, the
water tank has not been positioned well,
the water full indicator will turn into red. The equipment does not work
4. Ensure the water will always drain away freely and the tube will remain in right place.
Note! In very cold weather conditions, precautions should be taken to prevent the
water tube from freezing.
Thawing
If the appliance is operating at a low temperature, the evaporator can freeze. This will
influence dehumidification. In that case the operation of the appliance will be
automatically interrupted and it will start to thaw (the fan will continue turning). (DryBest
10: the "defrost" lamp will light up, DryBest 20 does not have a lamp, but does thaw
automatically.
Protection of the compressor
If you have switched the appliance off (or if it has switched itself off), then it cannot be
switched on again for 3 minutes, this is to protect the compressor.
17
Maintenance
Always unplug the unit from the mains before carrying out any maintenance or cleaning
of the unit.
Cleaning the body
Use a soft cloth to wipe the unit clean. Don't ever use volatile chemicals, gasoline,
detergents, chemically treated clothes, or other cleansing solutions. These all could
possibly hurt the cabinet.
Cleaning the filter
Extract the filter holder.
Use a vacuum cleaner or tap the filter lightly for easy cleaning. If the filter is
particularly dirty, use warm water (max. 40°C) with a small amount of a mild
detergent.
Make sure the filter is completely dry before replacing. Do not expose the filter to
sunlight.
Never use the appliance without a filter!
The appliance (incl. cord and plug) may only be opened and/or repaired by properly
authorised and qualified persons.
Storage
If not use the unit for an extended period of time. Please:
Press the unit off, unplug and tidy AC cord.
Completely empty the water tank and wipe it clean.
Clean the filter.
Cover the unit and store it in a cool and dry place, where it will not receive direct
sunlight.
Trouble shooting
The unit does not operate:
Is the unit plugged in?
Is the house electricity on?

18
Is the room temperature below 5°C or above 35°C? If so, then it is out of the working
range of the unit.
Check the water tank is positioned properly in the unit and it is not full.
Make sure the air inlet and outlet are not obstructed.
The unit seems to do little:
Is the filter dusty, contaminated ?
Is the air intake or outlet blocked up?
Is the room humidity already quite low?
Are too many windows or doors open?
Is there something in the room producing lots of humidity?
The unit is leaking:
Make sure the unit and the watertank are not damaged and don’t show cracks or
deformations.
Is the machine is stable and perfectly horizontal?
The unit is too noisy:
Check whether the unit is sitting on a level, flat and solid surface.
Is the filter dusty, contaminated ?
Warm air from the air outlet is normal. The circulation of the refrigerant can also make
some noise during start and stop.
For other problems, please contact your service facility. The appliance (incl. cord and
plug) may only be opened and/or repaired by properly authorised and qualified persons.
CE-statement
Eurom - Genemuiden-NL hereby declares that the EUROM dehumidifier, type
DryBest 10 & 20, complies with the LVD guideline 2014/35/EU and the EMC guideline
2014/30/EU and meets the following standards:
EN 60335-1:2012+A11 :2014
EN 60335-2-40:2003+A11:2004+A12:2005
+A1:2006+A2:2009:A13:2012
EN 62233:2008
EN 55014-1:2006+A1:2009+A2:2011
EN 55014-2:2015
EN 61000-3-2:2014
EN 61000-3-3:2013
Genemuiden, 15-11-2017
W.J. Bakker, alg.dir.
19
Deutsch
Lesen Sie diese Anleitung durch und bewahren Sie sie,
um später darin nachschlagen zu können!
DANK
Herzlichen Dank, dass Sie sich für ein EUROM Gerät entschieden haben. Sie haben damit
eine gute Wahl getroffen! Wir hoffen, dass sie zu Ihrer vollen Zufriedenheit funktioniert. Um
Ihren Gerät optimal zu nutzen, ist es wichtig, dass Sie dieses Handbuch vor der Nutzung
aufmerksam und komplett lesen und auch verstehen. Achten Sie dabei besonders auf die
Sicherheitsvorschriften, die zu Ihrem persönlichen Schutz und zum Schutz Ihrer Umgebung
genannt werden.
Außerdem empfehlen wir Ihnen, dieses Handbuch aufzubewahren, um es bei Bedarf in
Zukunft noch einmal konsultieren zu können. Bewahren Sie auch die Verpackung. Sie ist der
beste Schutz, wenn Sie das Gerät außerhalb der Saison lagern. Und sollten Sie das Gerät
irgendwann weitergeben, legen Sie das Handbuch und die Verpackung bei.
Technische Daten
DryBest 10
DryBest 20
Anschlußspannung
220-240 Volt / 50 Hz
220-240 Volt / 50 Hz
Testbedingungen
DB 30°C, RH 80%
DB 30°C, RH 80%
Entfeuchtungskapazität
10 L/Tag
20 L/Tag
Stromverbrauch
230 Watt
410 Watt
Luftverdrängung max.
180 m³/Stunde
180 m³/Stunde
Kältemittel
R134a
R134a
Betriebstemperatur
5 – 35°C
5 – 35°C
Inhalt Wassertank
2.0 Liter
5.0 Liter
Lautstärke
≤ 42 dB(A)
≤ 47 dB(A)
Hygrostat + +
Timer
+
+
Abmessungen L x B x H
19 x 27.5 x 48.5 cm.
24.5 x 28 x 51 cm
Gewicht
9.5 kg.
14 kg.
Dieses Gerät schafft eine trockenere und komfortablere Wohnumgebung, indem es
unerwünschte Feuchtigkeit aus der Luft im Haus oder der Arbeitsumgebung entfernt. Dabei
werden Kühltechniken angewendet. Das Gerät ist leicht und mit Rollrädern ausgestattet, so
dass es von einem Zimmer ins andere geschoben werden kann. Das Gerät verbraucht wenig
Strom und erzeugt nur minimale Geräusche.
Ihr DryBest Luftentfeuchter kann den Raum aufgrund des Hygrostats auf dem vorab
eingestelten Feuchtigkeitsniveau halten. Er ist auβerdem mit einem Timer ausgestattet, der
das Gerät automatisch ein- und ausschalten kann.

20
Warnungen bei der Nutzung
Nur für den Innenbereich.
Das Gerät muss immer aufrecht stehen. Wenn das Gerät nicht stabil und aufrecht steht, kann Wasser
aus dem Tank in das Innere fliessen und dort Schaden oder eine gefährliche Situation verursachen!
Bevor Sie den Luftentfeuchter umsetzen, sauber machen oder Wartungsarbeiten ausführen müssen
Sie ihn erst ausschalten, den Stecker aus der Steckdose ziehen und den Wassertank entleeren.
Nehmen Sie den Stecker dazu in die Hand, ziehen Sie niemals an der Anschlussleitung.
Lassen Sie das Gerät nach dem Transport oder Ankippen (max. 45°, z. B. bei der Reinigung) immer
eine Stunde ruhen, bevor Sie den Strom wieder anschließen.
Sorgen Sie dafür, dass die Lufteinlass- und Luftauslassöffnungen stets frei und sauber sind.
Verhindern Sie, dass fremde Gegenstände oder Finger durch die Ventilationsöffnungen in den Ofen
gelangen können. Dies kann zu einem elektrischen Schlag, Brand oder Beschädigung führen.
Anschlussspannung und Frequenz, angegeben auf dem Gerät, müssen der benutzten Steckdose
entsprechen. Die elektrische Installation muss mit einem Leitungsschutzschalter (max. 30 mAmp.)
gesichert sein. Stecken Sie das Gerät nur an eine geerdete Steckdose an!
Rollen Sie die Anschlussleitung komplett ab, bevor Sie den Stecker in die Steckdose stecken. Führen
Sie die Anschlussleitung nicht unter einem Teppich durch, bedecken Sie sie nicht mit Matten, Läufern
und dergleichen und halten Sie die Anschlussleitung außerhalb des Laufwegs. Sorgen Sie dafür, dass
nicht darauf getreten wird und keine Möbel darauf gestellt werden. Verhindern Sie, dass das Kabel
heiß wird. Führen Sie die Anschlussleitung nicht um scharfe Ecken und wickeln Sie sie nach
Benutzung nicht zu straff auf.
Ein defektes Stromkabel ist von einem Elektriker zu ersetzen, um Gefahrensituationen zu vermeiden.
Verwenden Sie nie den Stecker, um das Gerät ein- oder auszuschalten. Verwenden Sie dafür den
Schalter am Schaltpult.
Verwenden Sie am Gehäuse keine aggressiven Reinigungsmittel oder beispielsweise Insektenspray.
Das Gerät nicht auf den Einfluss von Chemikalien aussetzen.
Gießen oder sprühen Sie nie Wasser auf das Gerät. Das Gerät nicht in Wasser tauchen und nicht in
unmittelbarer Nähe von Wasser oder Wasseranschlüssen aufstellen.
Das Gerät nicht in unmittelbarer Nähe von leicht entzündlichen und/oder gefährlichen Stoffen
aufstellen.
Nicht auf dem Gerät stehen oder sitzen und nichts darauf stellen.
Das Wasser, das sich im Reservoir angesammelt hat, regelmäβig und nach Vorschrift ablassen.
Das Gerät nicht in einem zu kleinen geschlossenen Raum wie z.B. einer Toilette oder einem ähnlichen
Raum aufstellen; dies kann einen Brand verursachen.
Setzen Sie das Gerät nicht in Betrieb, wenn Sie Beschädigungen am Gerät, an der Anschlussleitung
oder am Stecker feststellen oder wenn es schlecht funktioniert, heruntergefallen ist oder auf eine
andere Weise eine Störung anzeigt. Trennen Sie sofort den Stecker aus der Steckdose und bringen
Sie das komplette Gerät zur Kontrolle und/oder Reparatur zurück zu Ihrem Lieferanten oder einem
anerkannten Elektriker. Bitten Sie immer um Originalersatzteile.
Dieses Gerät ist nicht geeignet, um von Kindern oder von Personen bedient zu werden, die
eingeschränkte physische, sinnliche oder geistige Fähigkeiten, zu wenig Erfahrungen mit oder
Kenntnisse des Geräts haben, auch dann nicht, wenn sie jemand beaufsichtigt, der für ihre Sicherheit
verantwortlich ist, oder wenn Anweisungen gegeben wurden. Es ist darauf zu achten, dass Kinder
nicht mit dem Gerät spielen.
Wenn die Temperatur unter 10 ° C und die Feuchtigkeit relativ niedrig ist, ist es nicht notwendig, zu
entfeuchten.
WICHTIG! Verwenden Sie den Luftentfeuchter nicht bei Temperaturen unter 5 °C. Auf dem
Verdampfer kann sich Eisansatz bilden!
Das Gerät (inkl. Anschlussleitung und Stecker) darf ausschließlich durch dazu befugte und qualifizierte
Personen geöffnet und/oder repariert werden.
21
Beschreibung
1. Vorderpaneel
2. Luftauspuff
3. Handgriff
4. Bedienungspult
5. Filter
6. Rückpaneel
7. Wassertank
8. Gummi Füssen (DryBest 10
Lenkrolle (DryBest 20)
9. Elektrokabel
Dieses Gerät ist ein Luftentfeuchter. Es regelt die Luftfeuchtigkeit, indem es Luft durch das
Gerät und an Kühlelementen (verdampfer) entlang führt. Ein Zuviel an Feuchtigkeit
kondensiert durch die Kälte und wird sicher in den Wassertank geleitet. Die getrocknete Luft
wird vom Kondensator leicht erwärmt und dann an den Raum abgegeben. Ihre Gesundheit
und Besitz gedeihen am besten in einer Luftfeuchtigkeit zwischen 45% und 65%.
Position
Ein Zuviel an Feuchtigkeit zieht durch Ihr ganzes Haus, ebenso wie beispielsweise
Kochgerüche. Suchen Sie daher für Ihren Entfeuchter einen Platz, von wo aus er die feuchte
Luft aus dem ganzen Haus ansaugen kann. Ist ein bestimmter Raum eindeutig zu feucht, dann
können Sie das Gerät zunächst dort abstellen und es später an einen zentraleren Ort stellen.
Der Luftentfeuchter muss während der Nutzung immer auf einem festen, ebenen und
waagerechten Untergrund stehen. Rings um das Gerät müssen mindestens 20 cm Freiraum
sein, um die Luftströme nicht zu beeinträchtigen. Bevor Sie den Luftentfeuchter umsetzen,
müssen Sie ihn erst ausschalten, den Stecker aus der Steckdose ziehen und den Wassertank
entleeren.
Von der Verwendung eines Verlängerungskabels wird abgeraten – suchen Sie also einen
Platz in der Nähe einer Steckdose. Ist die Verwendung eines Verlängerungskabels
 Loading...