

Eurolux FVN 47 6M W, FVN 47 6EPB W, FVN 47 6EPB N, FVN 07SL 6M NX, FVN 07SL 6E NX Instructions For Use Manual
...
INSTRUCTIONS FOR USE
ENG
Multifunction oven
Your Style...Your Life
FVN 47 6E W / N
FVN 47 6M W / N
FVN 47 6EPB W / N
FVN 07SL 6M NX
FVN 07SL 6E NX
FVN 07SL 6EPB NX
FVN 07C 6EPB XS
FVN 07 6M S
FVN 07 6E S
FVN 07 6EPB S

ENGLISH
1 - GB
Before leaving the factory, this appliance was tested and regulated by expert and
skilled personnel to give the best operating results. Any repair or regulation that
may subsequently be necessary must be carried out with the greatest care and
attention. For this reason, we recommend you always contact the Dealer you
bought the appliance from or our nearest Service Centre, specifying the type of
problem and the model of your appliance. Please remember as well that the
original spare parts are available only from our Technical Service Centres. Do not
leave the packaging unguarded, both for the safety of children and for the
protection of the environment, but dispose of it in a centre for differentiated waste.
The
symbol on the product or on the packaging means that the product must
not be consi
dered as normal household refuse, but must be taken to the
appropriate collection point for the recycling of electric and electronic equipment.
The appropriate disposal of this product helps avoid potential negative
consequences on the environment and for health, which could be caused by
inappropriate disposal of the product. For more detailed information on the
recycling of this product, please contact your municipal offices, the local waste
disposal service or the store where the product was purchased.
This appli
ance complies with the following Directives:
- 2006/95/EC (low voltage equipment)
- 2004/108/EC (electromagnetic compatibility)
- 89/109/EC (articles intended to come into contact with foodstuffs)
- 2002/96/EC (WEEE).
TABLE OF CONTENTS
General warnings
Instructions for use
Instructions for cooking
Cleaning and maintenance
Instructions for installation
Technical characteristic
Page 2 - 3
Page 4 - 12
Page 13 - 15
Page 16 - 18
Page 19 - 20
Page 21
- 2005/32/CE (EuP).

GENERAL WARNINGS
2 - GB
Dear Customer,
Thank you for having chosen our product. This appliance is easy to use; before
installing it and using it however, you must read this booklet carefully. You will find
all the correct indications for the optimal installation, use and maintenance of the
product.
This product is intended for cooking and heating up food. Do not use it for any
other purposes.
It is very important to keep this instruction booklet together with the
appliance in the case that it is transferred to another person.
This appliance has been designed for non-professional domestic use. It
must be used by competent adults and therefore children must be kept
away from it and not play with it. During use, the accessible front parts
may become very hot. Watch over children and non-self-sufficient people
throughout use so that they do not touch the hot parts and are not near
the appliance when it is operating.
The product must be installed by competent and trained fitters, who are
familiar with the rules and regulations on installation currently in force.
The power supply cable of the appliance must not be replaced by the user. For
replacement, contact exclusively qualified personnel.
Never line the oven with sheets of aluminium foil, both not to close the holes and
not to alter the regular heat exchange, with consequent damage to the enamel.
IMPORTANT: the accessible parts can become very hot during use.
Children should be kept away from the appliance. Take care not to touch
the heating elements in the oven.
IMPORTANT: take care with the front part of the oven: hot air and steam
may come out of it.
!
!
!
!
!
GENERAL WARNINGS
3 - GB
Before using the oven for the first time, any protecti
ve film on the oven door must
be removed and the oven must be heated, empty, to the maximum temperature for
about 45 minutes (elimination of odours and smoke caused by production
residue).Then clean the inside of the oven thoroughly with soapy water and rinse
well without using an excessive quantity of water that otherwise could penetrate
and damage internal components.
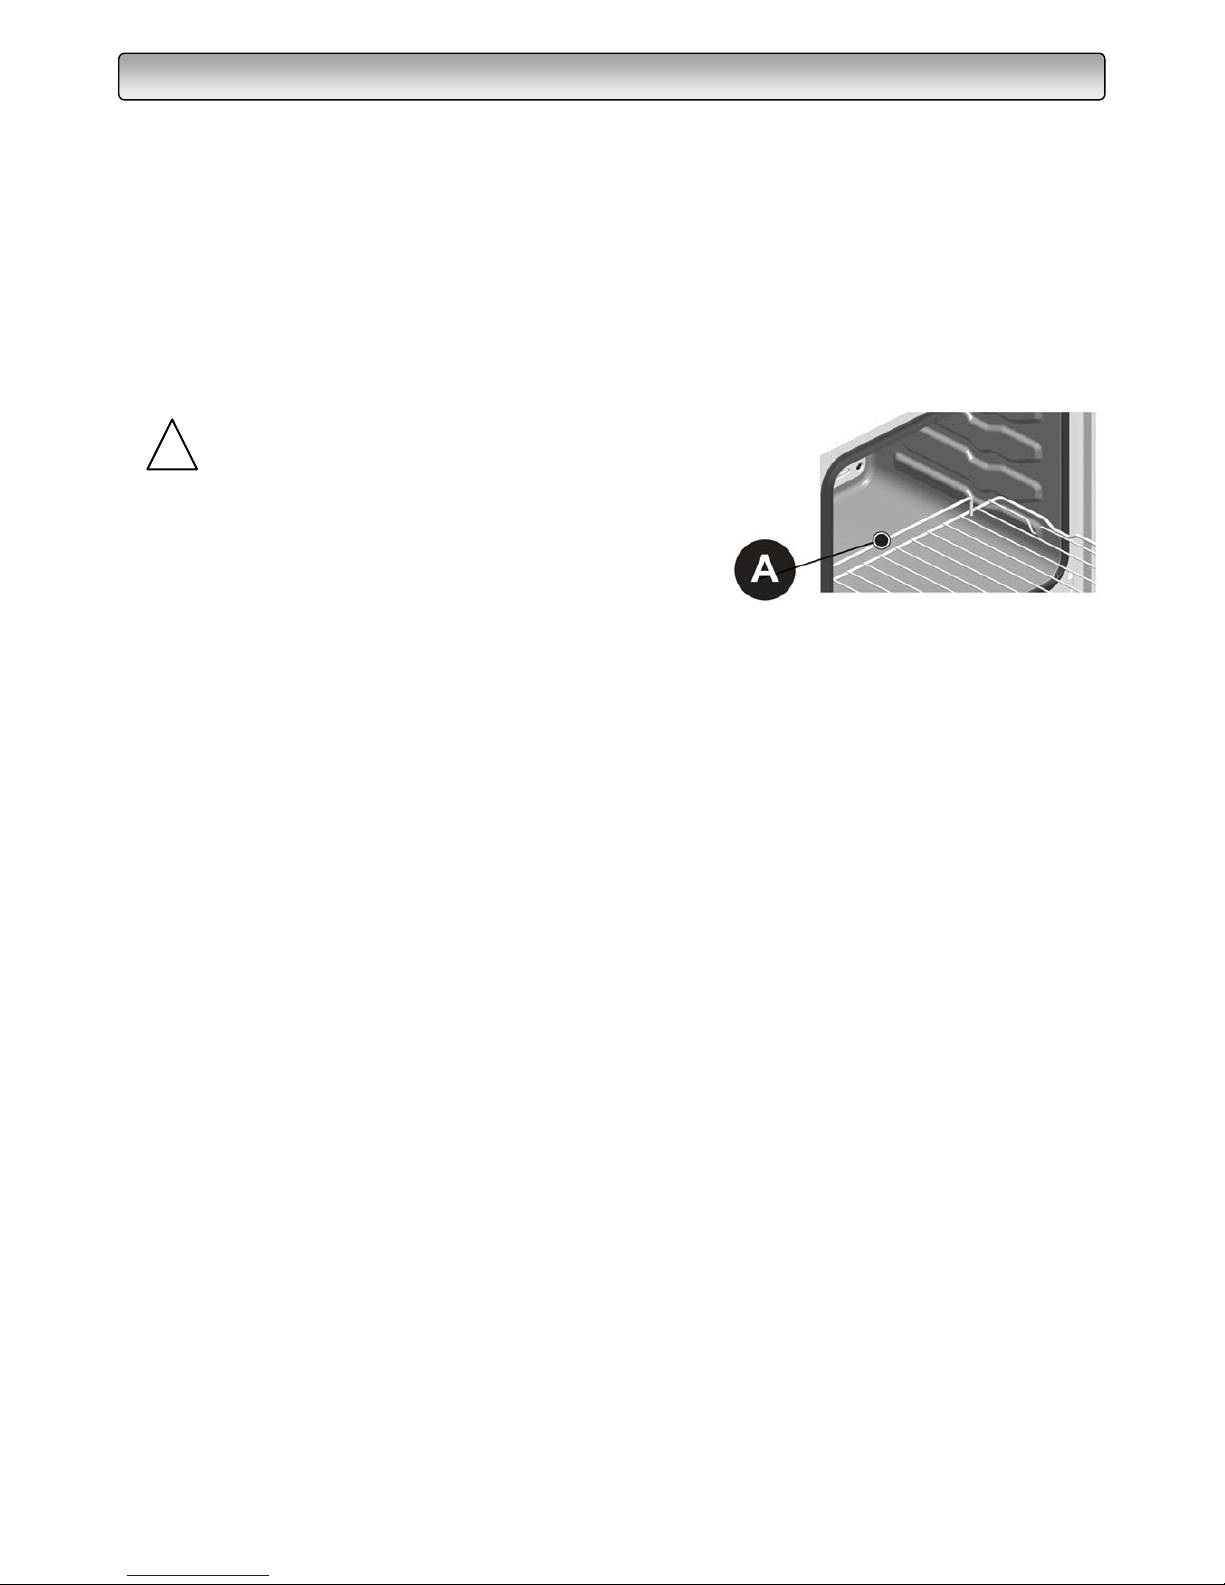
Grill racks
Important: for the anti-tilting system to
work properly, insert first part “A”
holding it facing up as shown in the
figure.
For any repairs, always contact an authorized Technical Service Centre and
demand original spare parts. Repairs made by incompetent people may cause
damage.
!
INSTRUCTIONS FOR USE
4 - GB
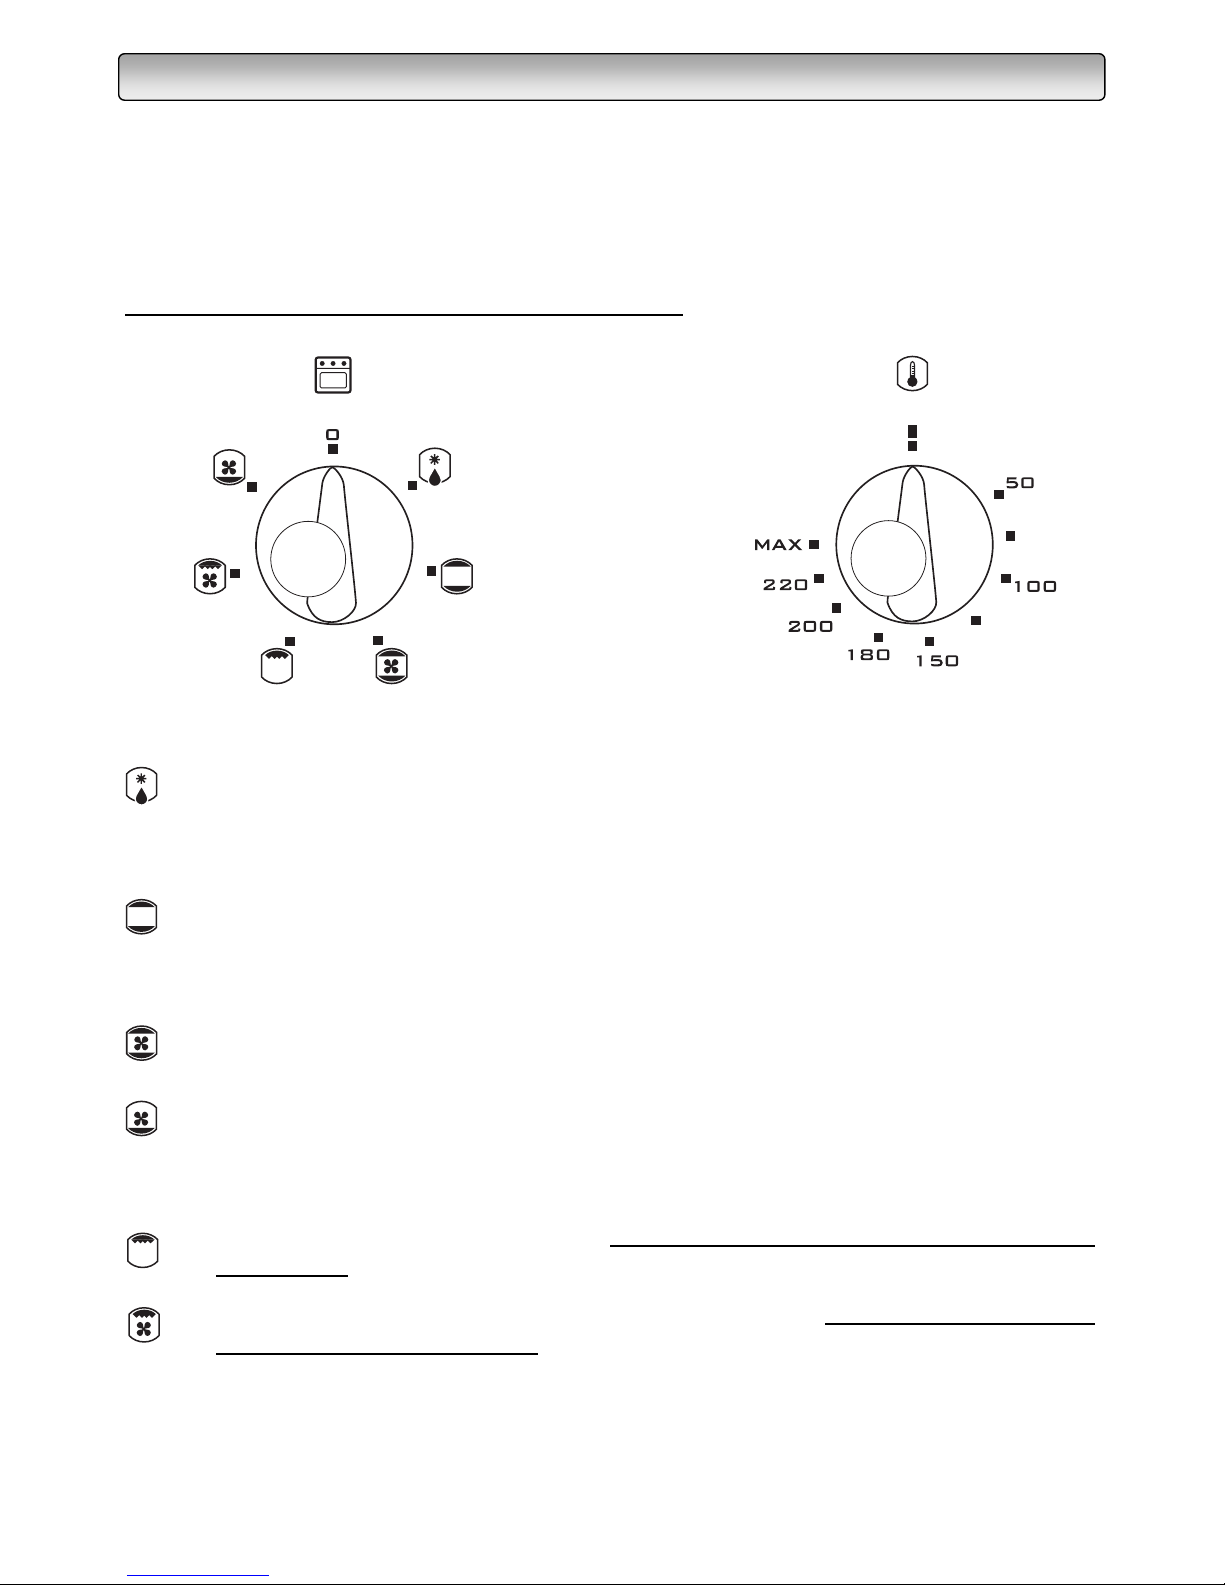
The knobs of switch A and of thermostat B allow selecting the different functions of
the oven and choosing the different cooking temperatures most suitabl
e for the
food to be cooked. In some models, the knobs are recessed; before making the
selection, you must press to make them appear and then press them again to
recess them.
When the oven is functioning, the light stays on.
The grill heating element and the back fan are on.
A
djust the temperature
to 200°C on the thermostat.
The oven door must always be closed for all types of cooking.
Thawing
The back fan is on and, by moving the air in the oven, it helps rapidly thaw
out frozen food. No heating element is activated.
Traditional cooking
The upper and lower heating elements are on. The temperature can be
adjusted on the whole scale of the thermostat.
Convection cooking
The upper and lower heating elements and the back fan are on. The
temperature can be adjusted on the whole scale of the thermostat.
The lower heating element and the back fan are on. The temperature can
be adjusted on the whole scale of the thermostat.
Grilling
The grill heating element is on.
A
djust the temperature to 200°C on the
thermostat.
A
B
INSTRUCTIONS FOR USE
5 - GB
DEPENDING ON THE MODEL, THE OVEN COULD HAVE ONE OF THE
FOLLOW
ING COMPONENTS:
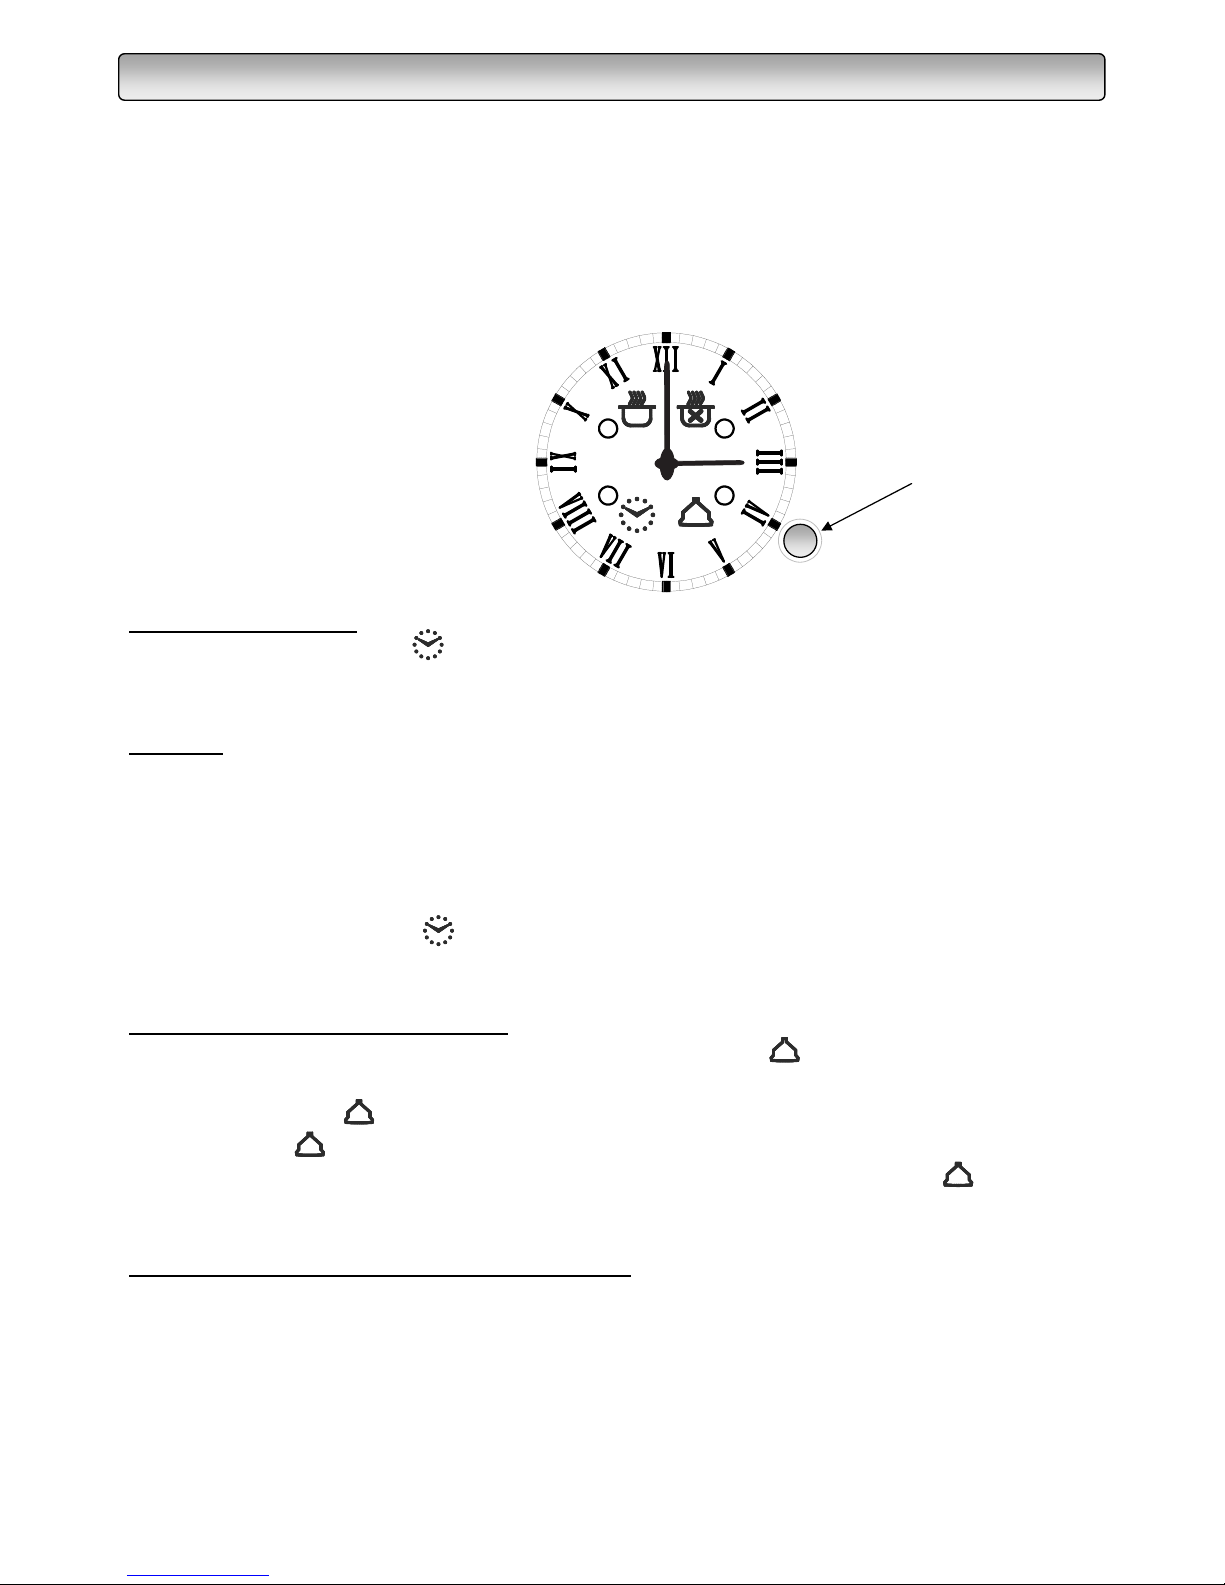
Programmable clock
Setting current tim
e
Press the knob until the light flashes and in 10 seconds set the ti
me rotating the
knob. Press again to confirm.
General
• if not deactivated (as per the instructions below), the buzzer stops after 1 minute
• to cancel a setting that has been programmed, keep the knob pressed for about
3 seconds and the lights go out
• the minimum programming time is 2 minutes
• if there is a power cut, all the settings programmed stay memorized and when
the power returns, the light flashes. Press the knob and, when the setting that
has been programmed ends,
reset the current time.
Timer buzzer (max 180 minutes)
To use as a simple buzzer, press the knob until the light flashes and set the
desired ti
me rotating the knob in less than 10 seconds; the current time will
reappear and the light will stay on. To check the setting memorized, press the
knob until
the light flashes.
To deacti
vate the buzzer, press the knob for about 3 seconds (the light goes
out).
Setting end of cooking time (max 15 hours)
To start cooking immediately and automatically set the cooking time, follow this
procedure:
• select the function and temperature desired through the function selector and
the thermostat
Knob

INSTRUCTIONS FOR USE
6 - GB
Timer
To use the timer, you have to wind up the
buzzer by rotating the knob right round one in a
clockwise direction; then, turning back, until
the
time desired (max. 60 minutes). When the time
set has lapsed, the buzzer sounds. This does
not switch the oven off.
automatically; to deactivate the buzzer, press the knob, the light goes out and
the oven returns to the manual mode.
Setting the start and end of cooki
ng
To set both the start and the end of the cooking time, follow this procedure:
• select the function and desired temperature with the function selector and the
thermostat
• press the knob until the
light flashes and in less than 10 seconds rotate it to
select the start of the cooking time desired (maximum 12 hours from the current
time)
•
press the knob again until the light flashes and in less than 10 seconds
rotate it to select the end of cooki
ng time desired; confirm by pressing the knob.
The current time will reappear and the
and lights will stay on.
To check the settings mem
orized, press the knob once.
With the start of cooking, the light goes off; at the end the buzzer sounds and
the oven switches off autom
atically. To deactivate the buzzer, press the knob, the
light goes off and the oven returns to manual mode.
The maxi
mum programming time, i.e. the total of the hours of delay plus the
cooking time, is 15 hours (e.g. setting the delay in 12 hours, the maximum cooking
time is 3 hours).
• press the knob until the
light flashes, rotate it in less than 10 seconds to
select the end of cooking ti
me.
• Confirm by pressing the knob. The current time will reappear and the light
will stay on.
The end of cooking time
can be checked by pressing the knob until the light
flashes.
At the end of the cooking time, the buzzer sounds and the oven swi
tches off
 Loading...