

Eurolux FFA 9M1 XS, FFA 9M5 XS, FFA 5E1 XS, FFA 5E5 XS, FFA 9E1 XS Instruction Manual
...
Your Style...Your Life
M u l t i f u n c t i o n a l o v e n s
F FA 5 M1 S
F FA 9 M 1 X S
F FA 9 M 5 X S
F FA 5 E 1 X S
F FA 5 E 5 X S
F FA 9 E 1 X S
F FA 9 E 2 X S
F FA 9 E 3 X S
F FA 9 E 5 X S
F FA P B 9 E 5 XS
F FA P B 6 0 0 4 X W/ B L
FF B 4ST S
FF B 5M S

Table of contents
Technical specifications 3
Installation instruction 3-5
Control panel 6
Description of cooking functions 7-8
Cooking table 9
Using the grill 10
Using the rotisserie 10
Minute minder 11
End of cooking 120’ 11
Analog programmer 12
Analog timer 12
Electronic programmer 13-19
Replacing the oven light 20
Removing the oven door 20
Optional 21
Cleaning and maintenance 22
1

Thank you for choosing one of our products. It will offer you many years of
excellent performance. Please carefully read the instructions and suggestions
contained in this manual for correct use of our products.
INSTALLATION INSTRUCTION
Technical details
This appliance conforms to the standard
regarding suppression of radio reception
interference.
Voltage regulations
230 V a.c. - 50 Hz / 220 V a.c. - 60 Hz
Muffle dimensions:
Height : 340 mm
Length : 440 mm
Depth : 390 mm
Volume : 59 lt
Voltage of heating elements
Static oven 1:
- Lower heating element : 1,3 kW
- Top heating element : 0,9 kW
- Maximum input of heating element : 2,65 kW
Static oven 2:
- Lower heating element : 1,3 kW
- Top heating element : 0,9 kW
- Grill element : 1,35 kW
- Maximum input of heating element : 2,25 kW
Fan oven :
- Fan heating element : 2,3 kW
- Grill heating element : 1,35 kW
- Maximum input of heating element : 2,38 kW
Fan-Multifunction oven:
- Lower heating element : 1,3 kW
- Top heating element : 0,9 kW
- Grill element : 1,35 kW
- Maximum input of heating element : 2,28 kW
Multifunction oven :
- Lower heating element : 1,3 k W
- Top heating element : 0,9 kW
- Fan heating element : 2,3 kW
- Grill element : 1,35 kW
- Maximum input of heating element : 2,38 kW
Built-in installation
IMPORTANT: The unit must be correctly
installed in accordance with Manufacturers
instructions and by qualified person.
Maintenance and service must be carried
out after the power supply has been
disconnected.
ELECTRICAL CONNECTION: Make sure
that the voltage supply is the same as what
is on the rating plate which can be found on
the lower part of the front of the oven.
The oven must be connected at the back
using a cable with minimum section of 1.5
mm, providing an omnipole switch in
compliance with current regulations with a
contact opening distance of at least 3 mm.
Warning: this appliance must be earthed.
Our company declines any liability for failures in the earth connection of for earth
connection that is not in compliance with
the regulation in force.
Oven preparation and pre-use
Before using the oven, thoroughly clean the
inside with non-abrasive soap and
lukewarm water. Fit the rack and drip pan
in their runners. Once you have completed
the operation, bring the oven to maximum
temperature for approximately 20 minutes
in order to eliminate any remains of
manufacturing grease, oil or resins that can
produce unpleasant smells during cooking
DQGYHQWLODWHWKHURRP.
3
A
A
A
A
Once you have done this operation, the oven is
ready for the first cooking.
IMPORTANT: Each time you want to clean the
oven, make sure the warning light is off and
the oven is disconnected.
CAUTION: ALWAYS KEEP CHILDREN
OFF THE OVEN WHEN HOT.
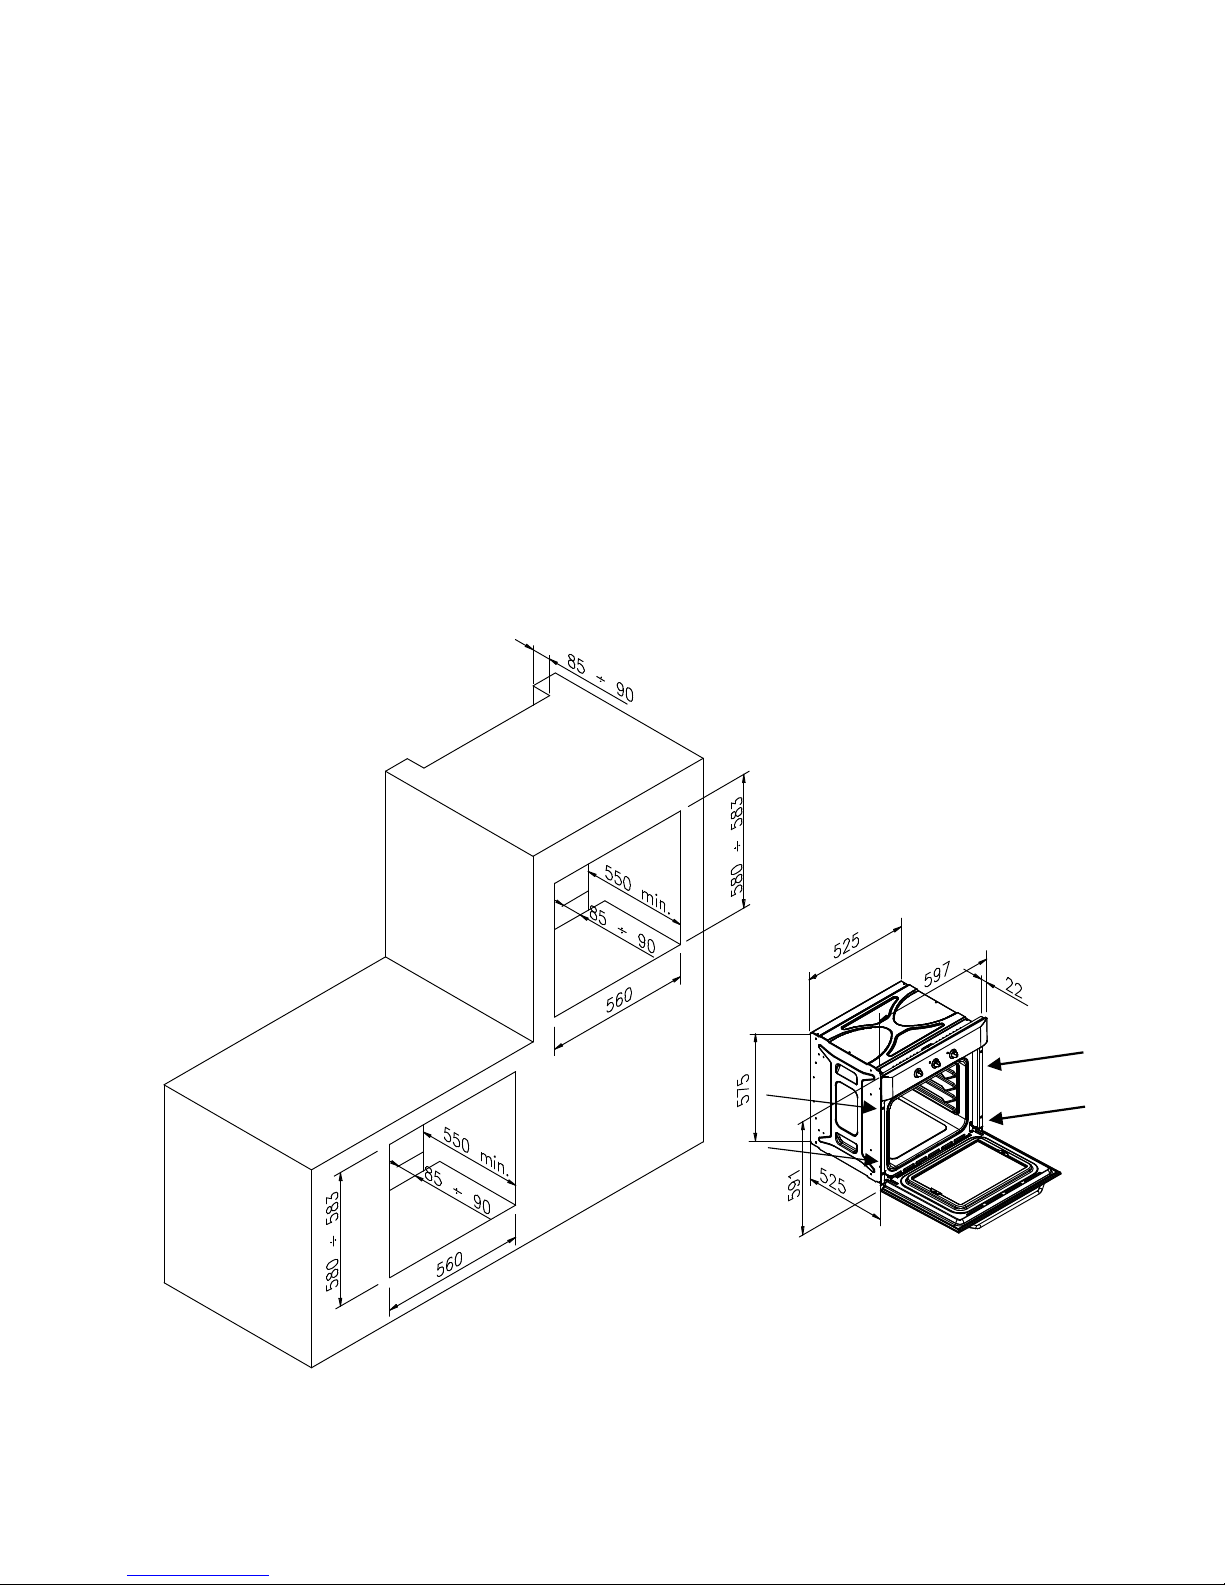
Important notices for the installation:
The oven can be built into a standard 600 mm
housing Unit as shown in fig. 1 when builtunder the work top, or in a tall housing unit
when built-in a column.
This appliance must be installed by a
competent person and with particular
attention to ventilation.
In both cases ventilation provisions must be
made.
This being a gap at the back of the housing
unit between 85 and 90 mm as indicate in
fig.1. The fixing of the oven in the cabinet is
made by 4 screws “A” that are on the corner
of the oven door-frame.
When placing the oven in the housing unit, do
not use the oven door as a lever for lifting the
oven.
Do not put excess pressure on the open door
once opened.
Fig. 1
Slot-in unit for fan and multifunction oven
4
580-583
580-583
470 min.
470 min.
.
90
90
90
465
A
A
A
A
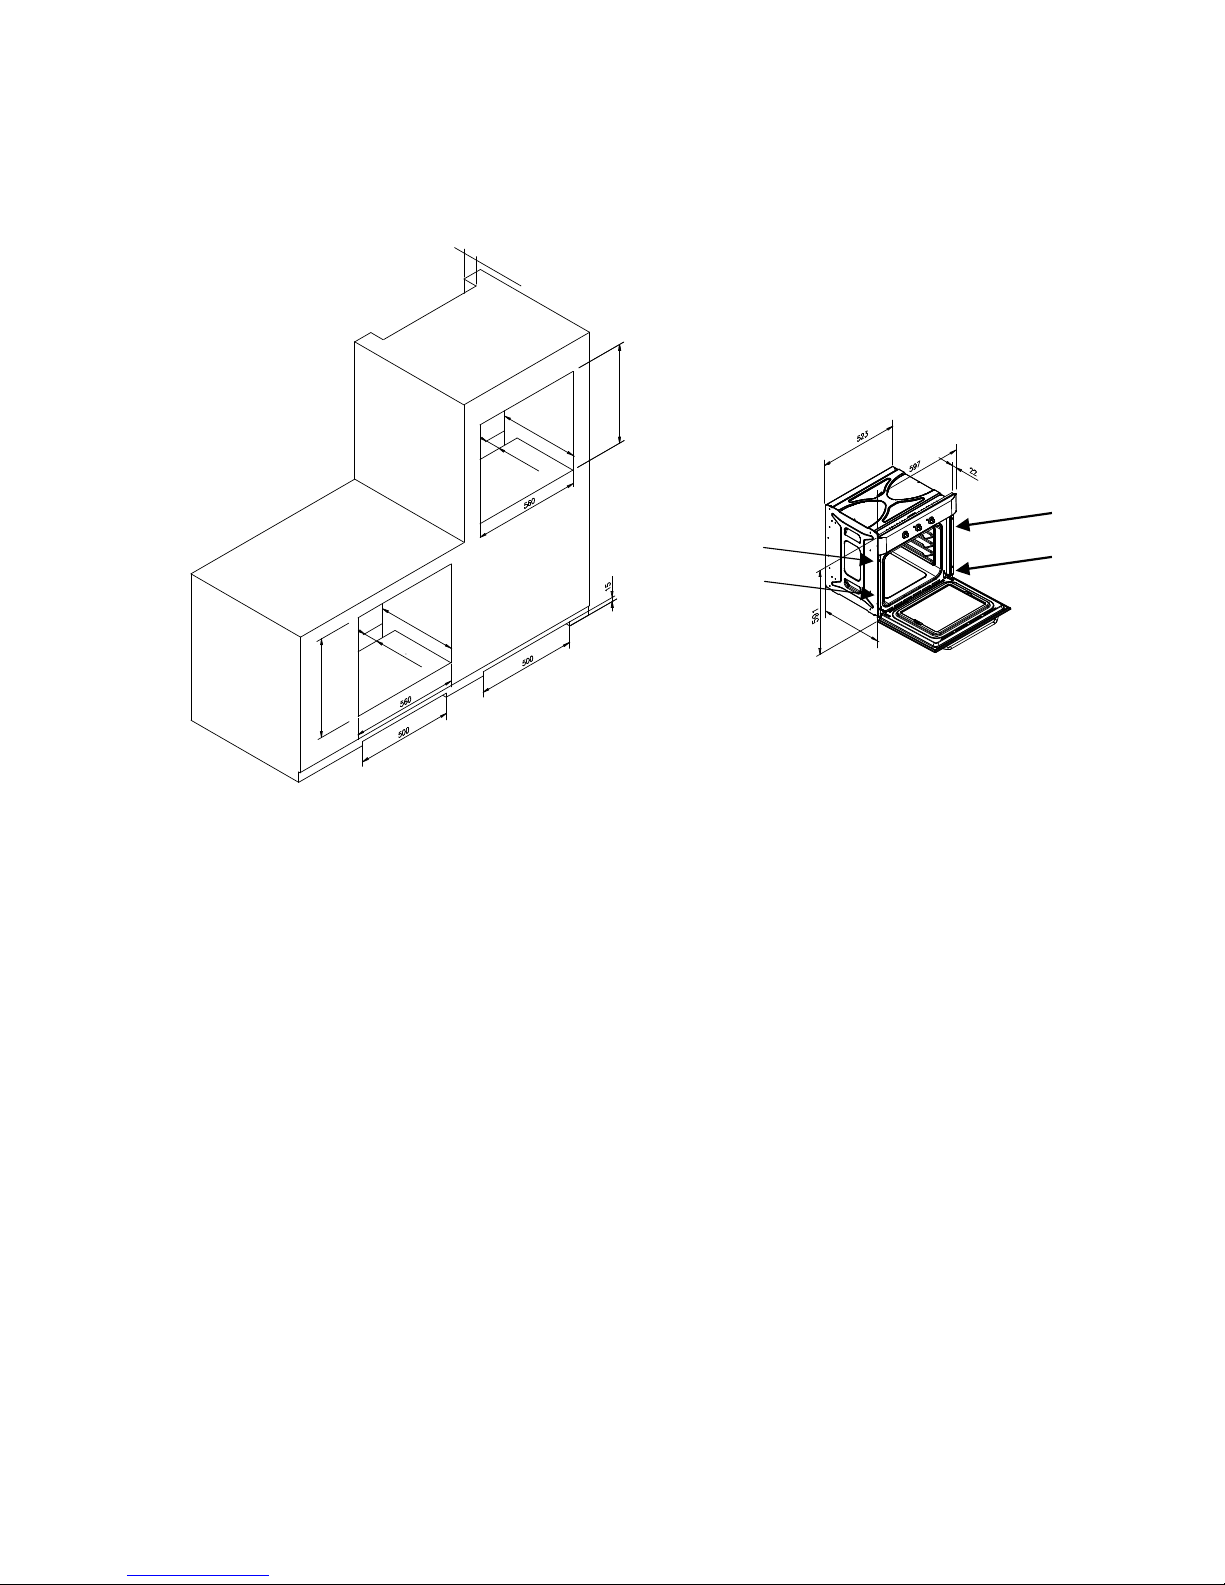
5
Slot-in unit for static oven
Fig. 1a
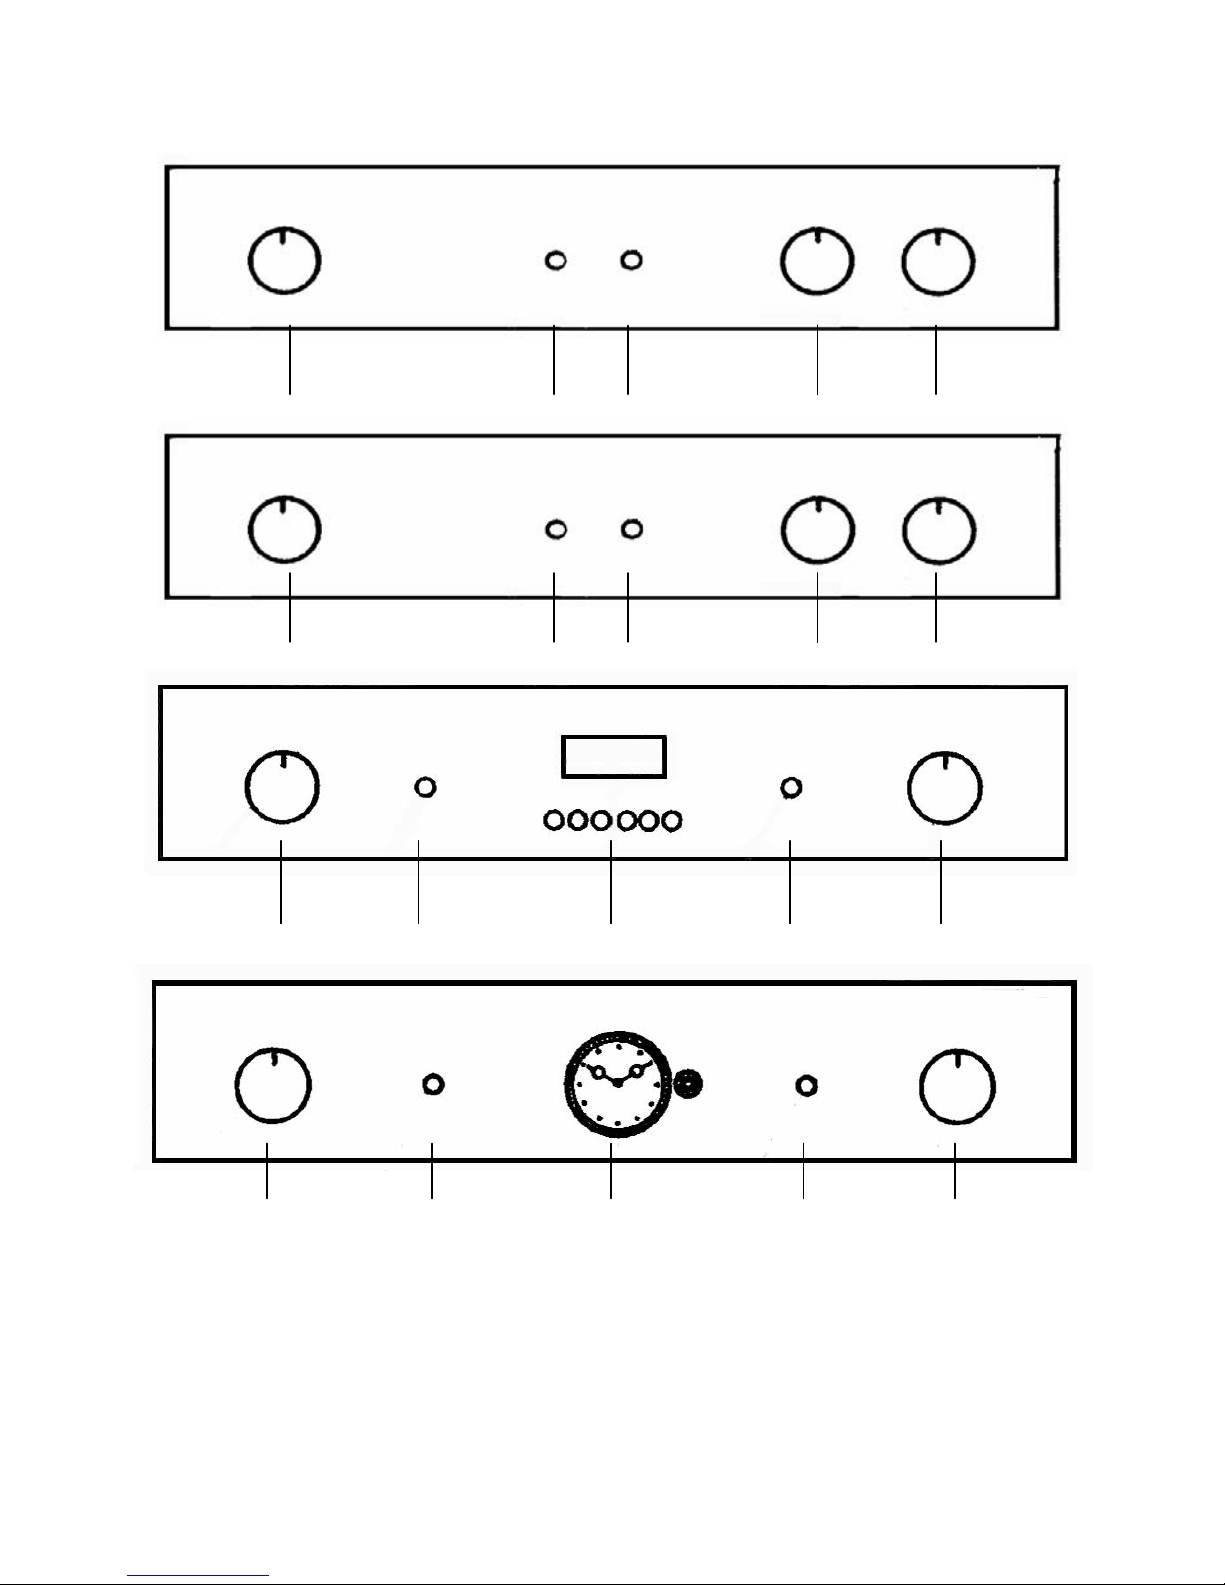
Control panel
1. Thermostat
2. Selector
3. Electronic timer
4. End of cooking
4 5 6 2 1
1 6 3 5 2
5. Green light
6. Yellow light
7. Minute minder
8. Analog programmer and
Analog timer
7 5 6 2 1
1 6 8 5 2
6
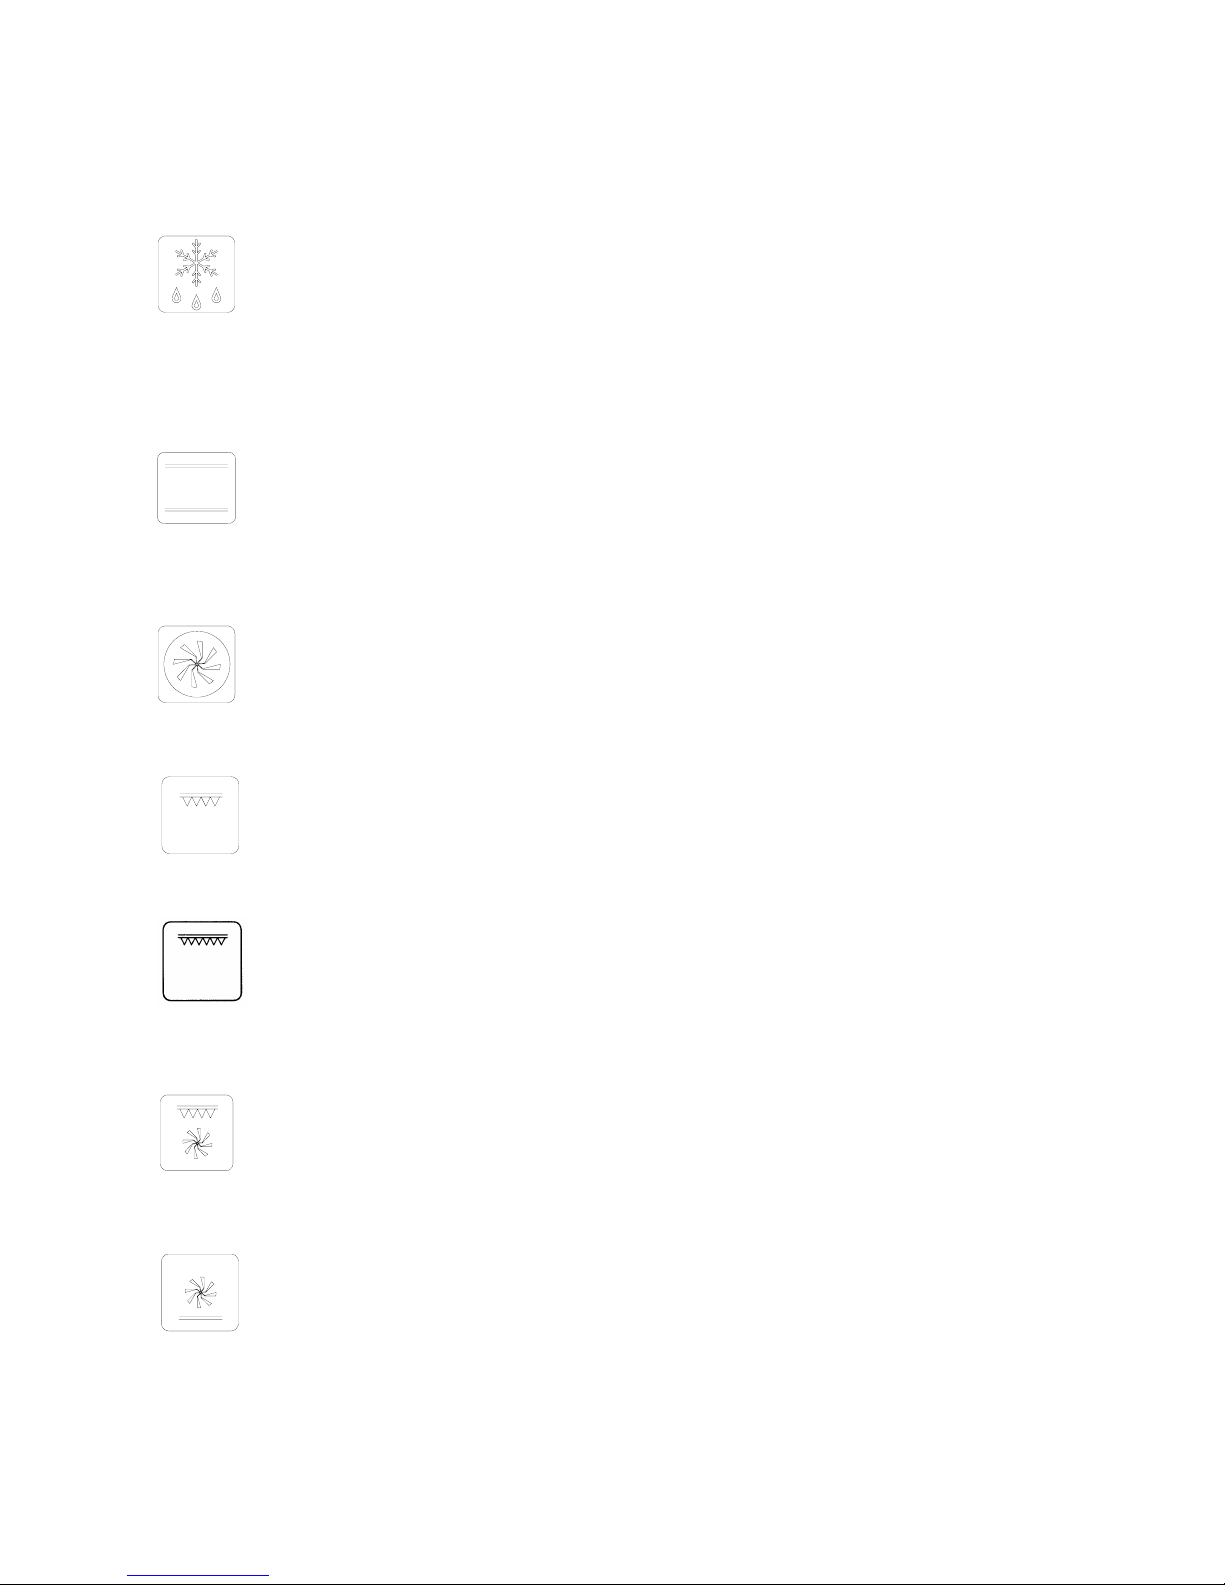
Selector functions:
TRADITIONAL OVEN COOKING
By turning the thermostat knob, a desired temperature of 50°C to 250°C
can be selected. The yellow light will go off when the oven has reached the
desired temperature. It is recommended that the oven is pre-heated before
introducing the food.
CENTRAL GRILL ELEMENT
By turning the thermostat knob, a desired temperature of 50°C to 250°C
can be selected, keeping the door closed.
Recommended use: for grilling smaller items of food.
MULTIFUNCTION
The fan and the circular element come on. The heat is diffused by the fan to
give an even temperature in the oven by adjusting the thermostat, a desired
temperature of 50°C to 250°C can be obtained.
It is not necessary to pre-heat the oven before introducing the food.
DOUBLE GRILL ELEMENT
By turning the thermostat knob, a desired temperature of 50°C to 250°C
can be selected, keeping the door half-open or closed. In the latter case the
use of the grill deflector is not necessary.
Recommended use: for grilling larger area of food.
DEFROSTING
The oven and the green light will stay on during this and all the following
functions.
The fan motor comes on, but there is no heat. The oven door should be kept
in the close position. Recommended use: for defrosting frozen foods in
general, this will help cut down the defrosting time by about on third of the
normal time.
SEMI FORCED AIR CONVECTION
The thermostat has to be set at the desired temperature between 50°C and
250°C. The fan and the grill element allow a fast and deep cooking for
particular food. It is recommended that the oven be pre-heated for a few
minutes.
SEMI FORCED AIR CONVECTION WITH LOWER ELEMENT
The thermostat has to be set to the desired temperature. It is not
recommended that you have to pre-heat the oven.
Recommended use: for warming or very slow cooking of food.
7
 Loading...