

Page 1
Code: 012050
Dishwasher
DW9-CBE7
Instructions for Use
Page 2

1
Index
en
Safety i n fo r ma ti o n
Installation
Getting to know your dishwasher
How to fill the salt
How to fill rinse aid
How to fill the detergent
Not suitable for the dishwasher
Arranging crockery, glasses, etc. in the dishwasher
Programme overview
Washing dishes
How to keep your dishwasher in shape
Care and maintenance
Fault finding
Technical data
Important information
2
4
11
12
14
15
16
17
19
21
26
27
28
32
32
Page 3

2
Safety information
en
The dishwasher must only be used by adults for the washing of household dishes and cooking utensils.
This appliance cannot be installed outdoor, not even if the area in which it is installed is covered by a
roof; it is also very dangerous to leave it exposed to the rain and elements.
Do not place any heavy objects or stand on the door when it is open. The appliance could tip forward.
The water inside the dishwasher is not suitable for drinking.
Do not use solvents of any kind inside your dishwasher. They could cause an explosion danger.
Open the door very carefully if the dishwasher is operating. There is a risk of water squirting out.
During normal use
Do not touch the heating element during or after a wash cycle.
Fundamental rules to follow when using the appliance:
- Never touch the dishwasher when barefoot or with wet hands or feet;
- We discourage the use of extension cords and multiple sockets;
- If the appli an c e is not op er ating p r operly o r m aintena nc e must be perf o r m ed, dis c onnect the
appliance from the power supply.
Place the dishwasher and connect it up in accordance with the installation instructions.
The dishwasher must not be connected to the electricity supply while installation is being carried out.
Ensure that the domestic wiring is properly earthed.
The mains electricity supply must conform to the details shown on the dishwasher nameplate.
Do not connect the dishwasher to the electricity supply via an extension cable.
Built-under and built-in appliances s hould alway s be installed under a continuous work s ur face whic h
is attached to the adjacent cupboards, in order to ensure that the appliance is entirely stable.
After the appliance has been installed,the mains plug should still be easily accessible.
The plastic hous ing on the water in let co ntains an electrically o pera ted va lve.The connecting wir es
are inside t he inle t hose.Do not cut thr ough t his hos e and do not im mer s e the plastic housing in water .
During installation, the power supply cord must not be excessively or dangerously bent or flattened.
During installation
For Switzerland only:
There are no restrictions on installing the appliance between wooden or plastic walls as part of a fitted
kitchen. If the appli ance is not plugged into a wal l soc ket, it mus t be connec ted to the m ains v ia a
separator for all poles within the domestic wiring system. This device must have a gap of at least 3mm
between open contacts, in order to conform with relevant safety regulations.
At time of delivery
Check packaging and dishwasher immediately for signs of transport damage. If the appliance is
damaged, do not put it into use but contact your supplier or customer service without delay.
Please dispose of packaging materials properly.
Page 4
3
If your family in clud es children
This appliance is not intended for use by persons (including children) with reduced physical,sensory
or mental capcab ilities, or lack of experienc e and knowledge,unless they hav e bee n giv en su perv ision or instruction concerning use of the appliance by a person responsible for their safety.
Children should be supervised to ensure that they to not play with the appliance.
Keep detergents out of the reach of children, who m us t also be kept away from the dishwasher when
it is open.
If a fault occurs
If the appliance malfunctions, turn off water supply to the appliance and disconnect the plug from the
wall socket. Then, consult the section entitled, "Fault finding" . I f you cannot solve the problem, contact a service center.
Only specialised personnel are authorised to make repairs.
If the supply cord is damaged ,it mus t be replace d by the man uf acture ,its servic e agent of similarly
qualified persons in order to avoid a hazard.
To maintain the EFFICIENCY and SAFETY of this appliance,we recommend:
- call only the Service Centers authorized by the manufacturer.
- always use original Spare Parts.
When disposing of old appliances
Appliances whic h a r e no longer being used mus t be m ade inoperable by c ut ting the power s upply
cord and removing the door lock.
Take the appliance to a designated waste disposal center.
Warning
Children could get locked in the appliance (risk of suffocation)
or get stuck in other positions. Therefore: Remove the mains
plug, cut the mains wire and set aside. Damage the door lock so
that the door can no longer be closed.
Dangerous voltage
en
Page 5
4
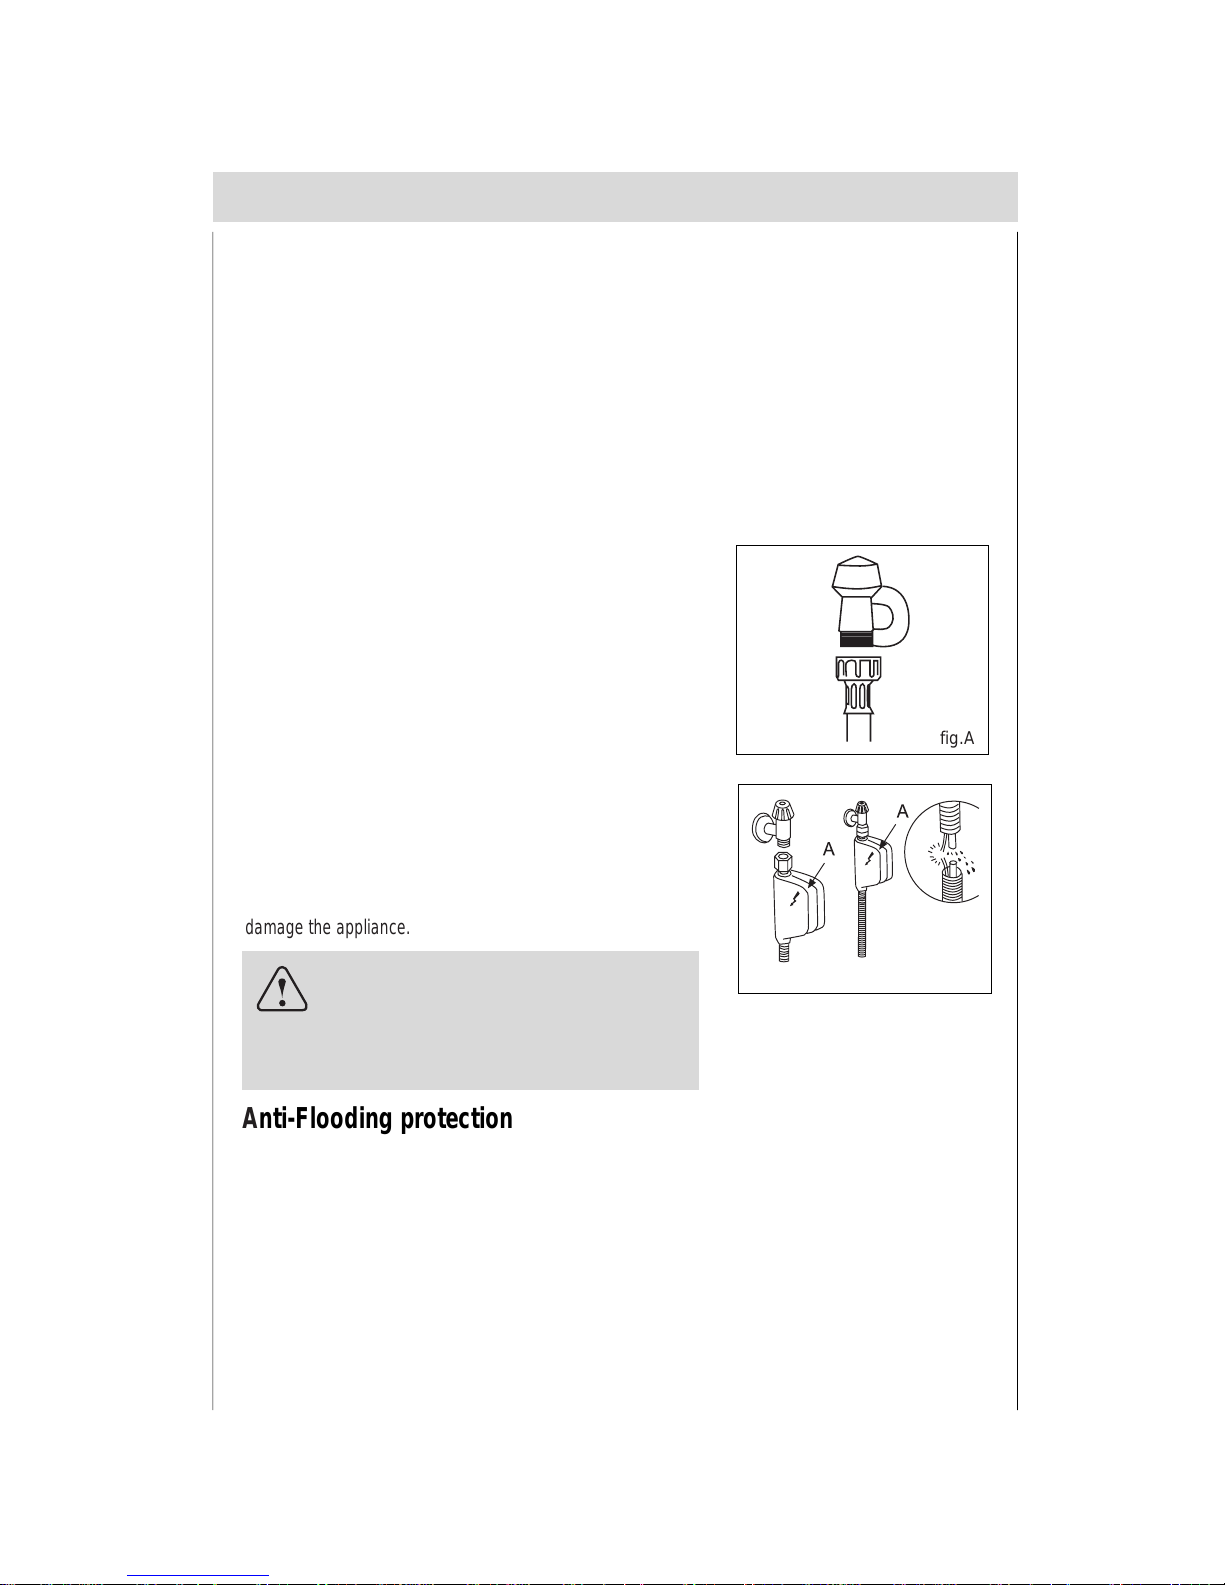
Cold wat er connectio n
Connect the water supp ly hose to a threaded 3/4 (gas)
connector, making sure that it is fastened tightly in place (see
fig.A).
Some models are fitted with an "Aquastop" wat er su pply hose
(see fig .B ) in w hic h the s mall filt er is alr eady hous ed in th e
threaded end.
If the water pipes are new or have not been us ed for an ex tended period of time, let the water run to make sure that the
water is c lear and fr ee of impur ities. If this prec aution is not
taken, there is a risk that t he water inlet can ge t blocke d and
damage the appliance.
Positioning the appliance
Change the ap plianc e in t he de sir ed lo cation. The back sho uld r est agains t the wall behind i t, and the
sides , alo ng the ad jac ent ca binet s or wal l. T he dis hwas her is e quipp ed wi th w ate r supp ly an d d rain
hoses that can be positioned to the right or the left to facilitate proper installation.
fig.A
Anti-Flooding protection
If dishwasher is equipped with a system that stops the supply of water in the event of a problem with the water
supply hose, or leaks within the unit, in order to prevent damage to your home. If for any reason the box
containing th e el ectric al com ponents happ ens to get da m aged, remove the pl ug f or th e app li ance from the
socket immediately. In order to guarantee that the anti-flooding feature operates properly, the "A" box with water
supply hose must be attached to the water supply tap as shown in fig.B. No other type of con nection is a cceptable.
The water supply hose must not, under any circumstances, be cut, as it contains electrical parts which are live.
If the length of the hose is not adequate to make a proper connection, the hose must be replaced with one which
is long enough. This hose is available upon request from specialised retailers and service center.
fig.B
Levelling the appliance
Once the appliance is positioned, adjust t he feet (screwing t hem
in or out) to adjus t the dishwasher, mak ing it level. In any ca se ,
the appliance should not be inclined more than 2˚. If the appliance is levelled, it will help ensure proper performance.
Installation
Warning
The appliance is to be connected to the
water mains using new hose-sets and
that old hose-sets should not be reused.
en
Page 6
5
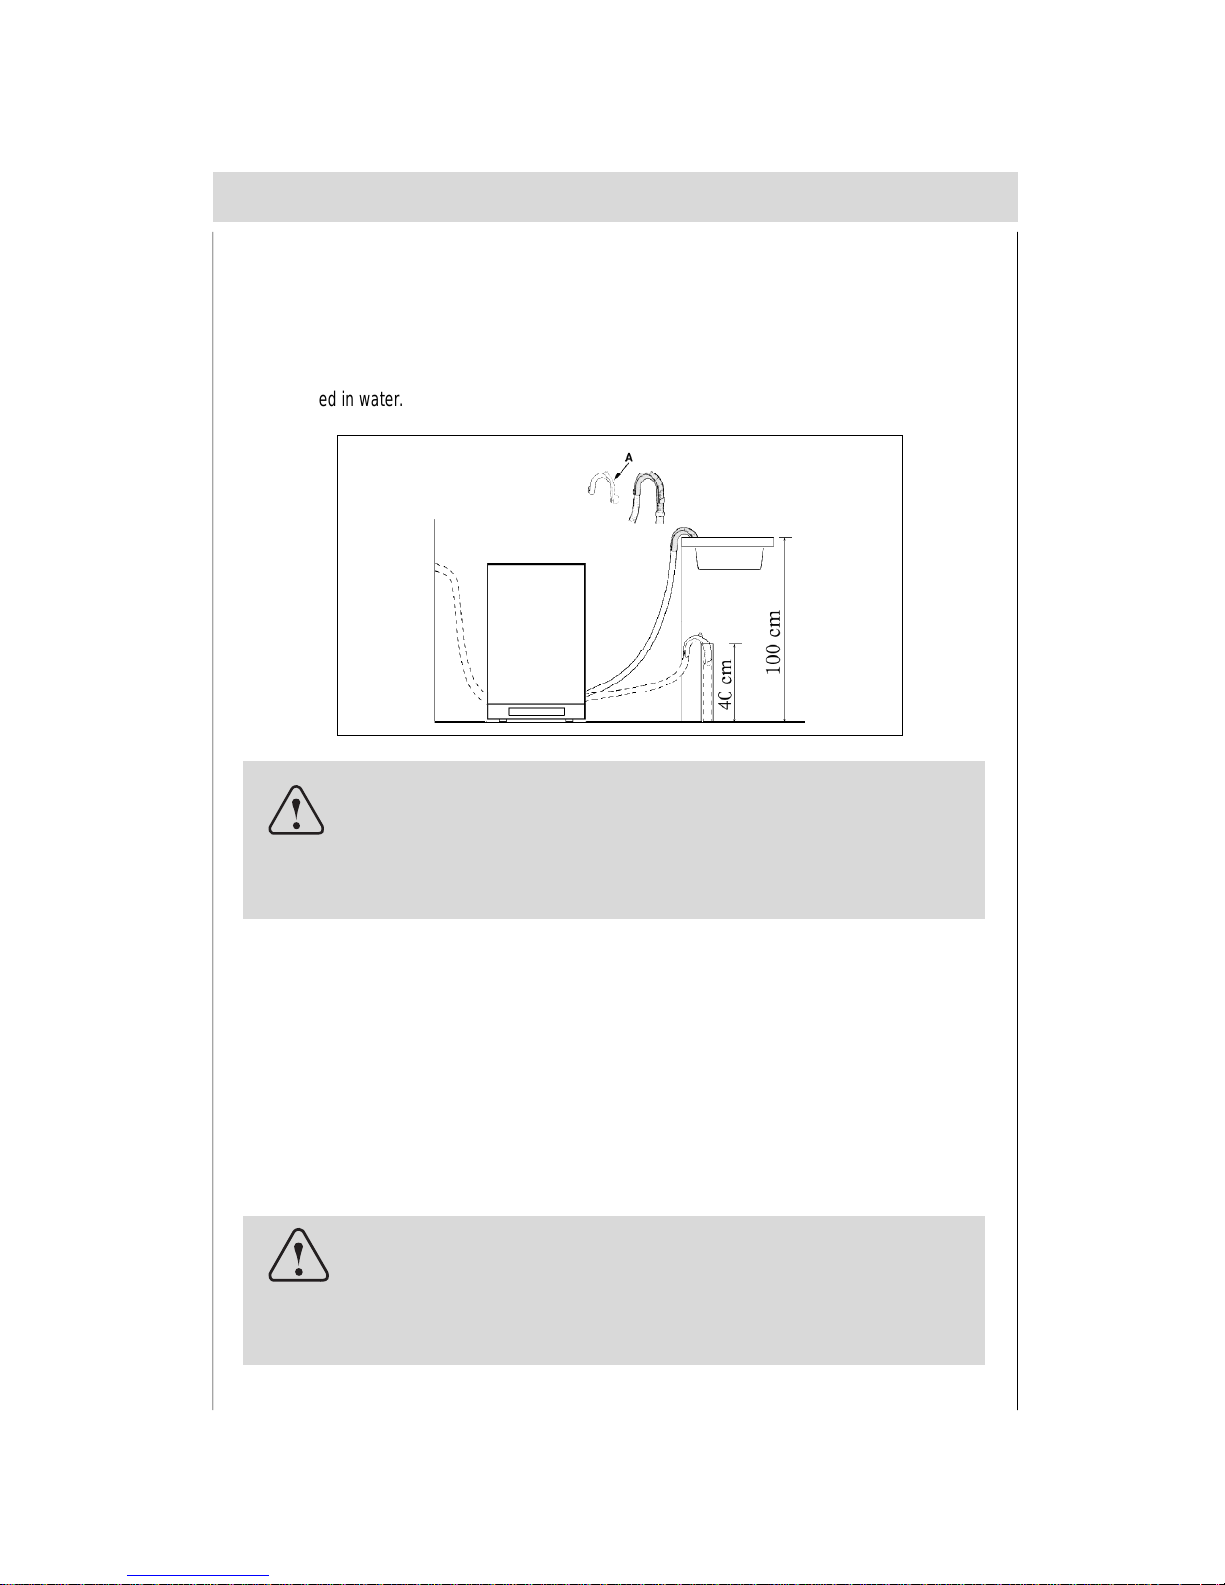
Drain hose co nnect ion
Insert the drain hose into a drain pipe with a minimum diameter of 4cm , or let it run into the sink, making
sure to avoid bending or crimping it. If necessary, fit a syphon trap (U-bend) with a connecting piece for
the drain hos e ( fig.C) . The free end of the hose m us t be at a height between 40 and 100 cm and mus t not
be immers ed in wa t er.
fig.C
Attention:
The connecting piece for syphon trap (U-bend) must be solidly
fastened to the wall to prevent the drain hose from moving and
allowing water to spill outside the drain.
Electrical Connection
After making sure that the voltage and frequenc y v alues for the c ur r ent in the home cor r esp ond to those
on the r ating plat e (locat ed on the st ainles s st eel inner door of the ap pli ance) and that the elec tric al
system is correc t for the maximum voltage on the rating pl at e, inse rt t he p lug int o an electrical sock et
which is earthed properly (the earthing of the appliance is a safety requirement mandated by law).
If the electrical socket to which the appliance must be connected is not appropriate for the plug, replace
the who le cab le, rathe r than using ad aptor s or the sim ilar lik e as the y c ould c ause o ver heatin g an d
burns.
Caution:
The dishwasher plug must be accessible even when the appliance is installed as a built-in unit so that maintenance can be
done safely.
en
Page 7
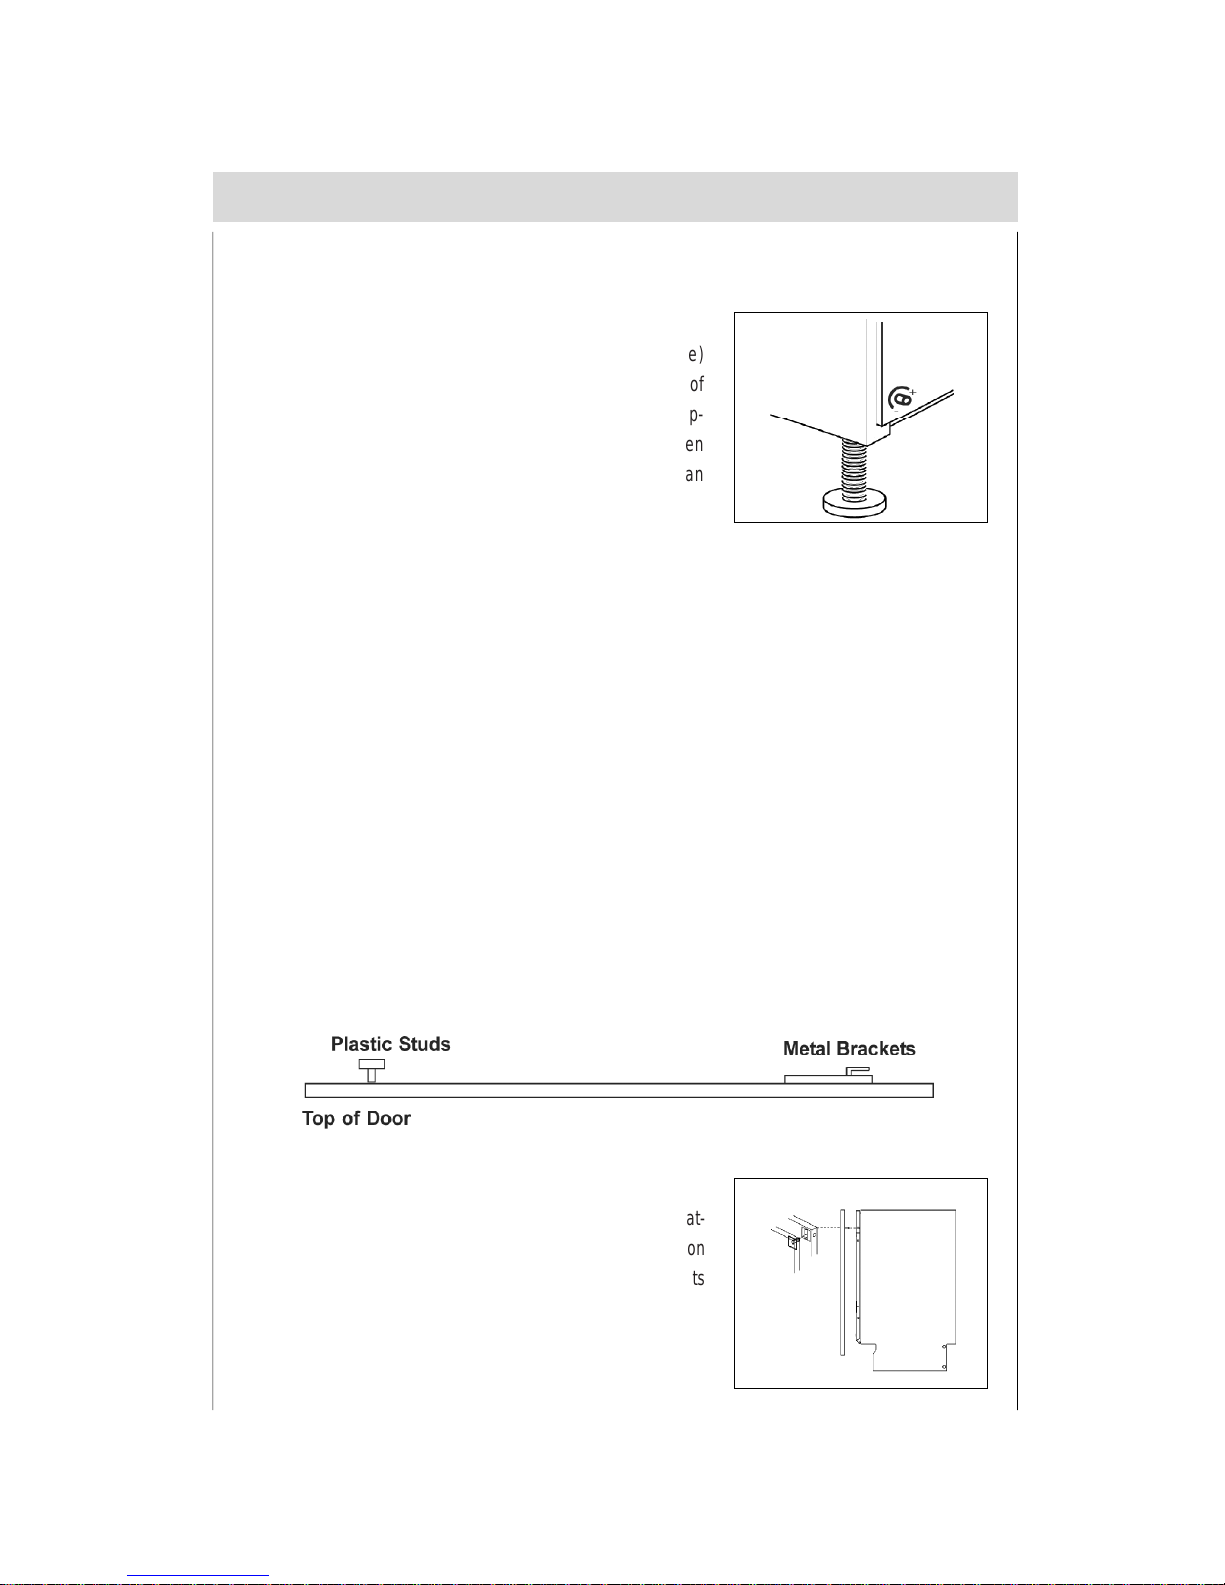
Supplied with the appliance is a plastic (self adhesive)
anticon dens ation str ip, this should be fixed to t he under side of
your worktop along the front edge. The adjustable feet of the ap-
pliance allow it to be r aised up t o 870 mm, i f the spac e between
the floor and the under side of the work sur face is greater tha n
870mm, then the appliance should be positioned on suitable
Stage 1
Installatio n cont ..
fig 1a
wooden spacers whi ch should always be fixed to the floor. A lway s us e a spir it level to make s ur e that the
appliance is level left to right and front to back.(If the appliance is installed on a carpet, ensure there is
clearance beneath the appliance). The four adjustable feet should be adjusted to the correct height; the
rear feet are adjustable via studs at the front of the appliance (fig 1a).
To prevent damage to the floor covering, the a ppl iance mus t be install ed using the plas tic skids p r ov ided.
Stage 2
Connect the wat er , drain and electrical supplies (220V~240V, 50Hz) . We recommend that the appliance
is connected to a cold water supply.
Measure the width of the decor door.Align the template on the rear of the door with the top of the door
level with the top of the templa te, and t he l eft hand edge of the door in line with the measured door width.
Mark the four fixing poisitions. Repeat on the right hand side. Remove the template, and drill pilot holes
in the door in all eight positions using a suitable drill (take care not to drill through the door). Attach the
upper plastic studs and lower fixing brackets to the decor door as shown below.
Stage 3
Position the decor door onto the front of the dishwasher by locat-
ing the brackets into the two plastic studs m ounted either side on
the top of the doo r. Lift the decor door until t he low er br ack ets
locate into the slots in the appliance door.
Stage 4
6
en
Page 8
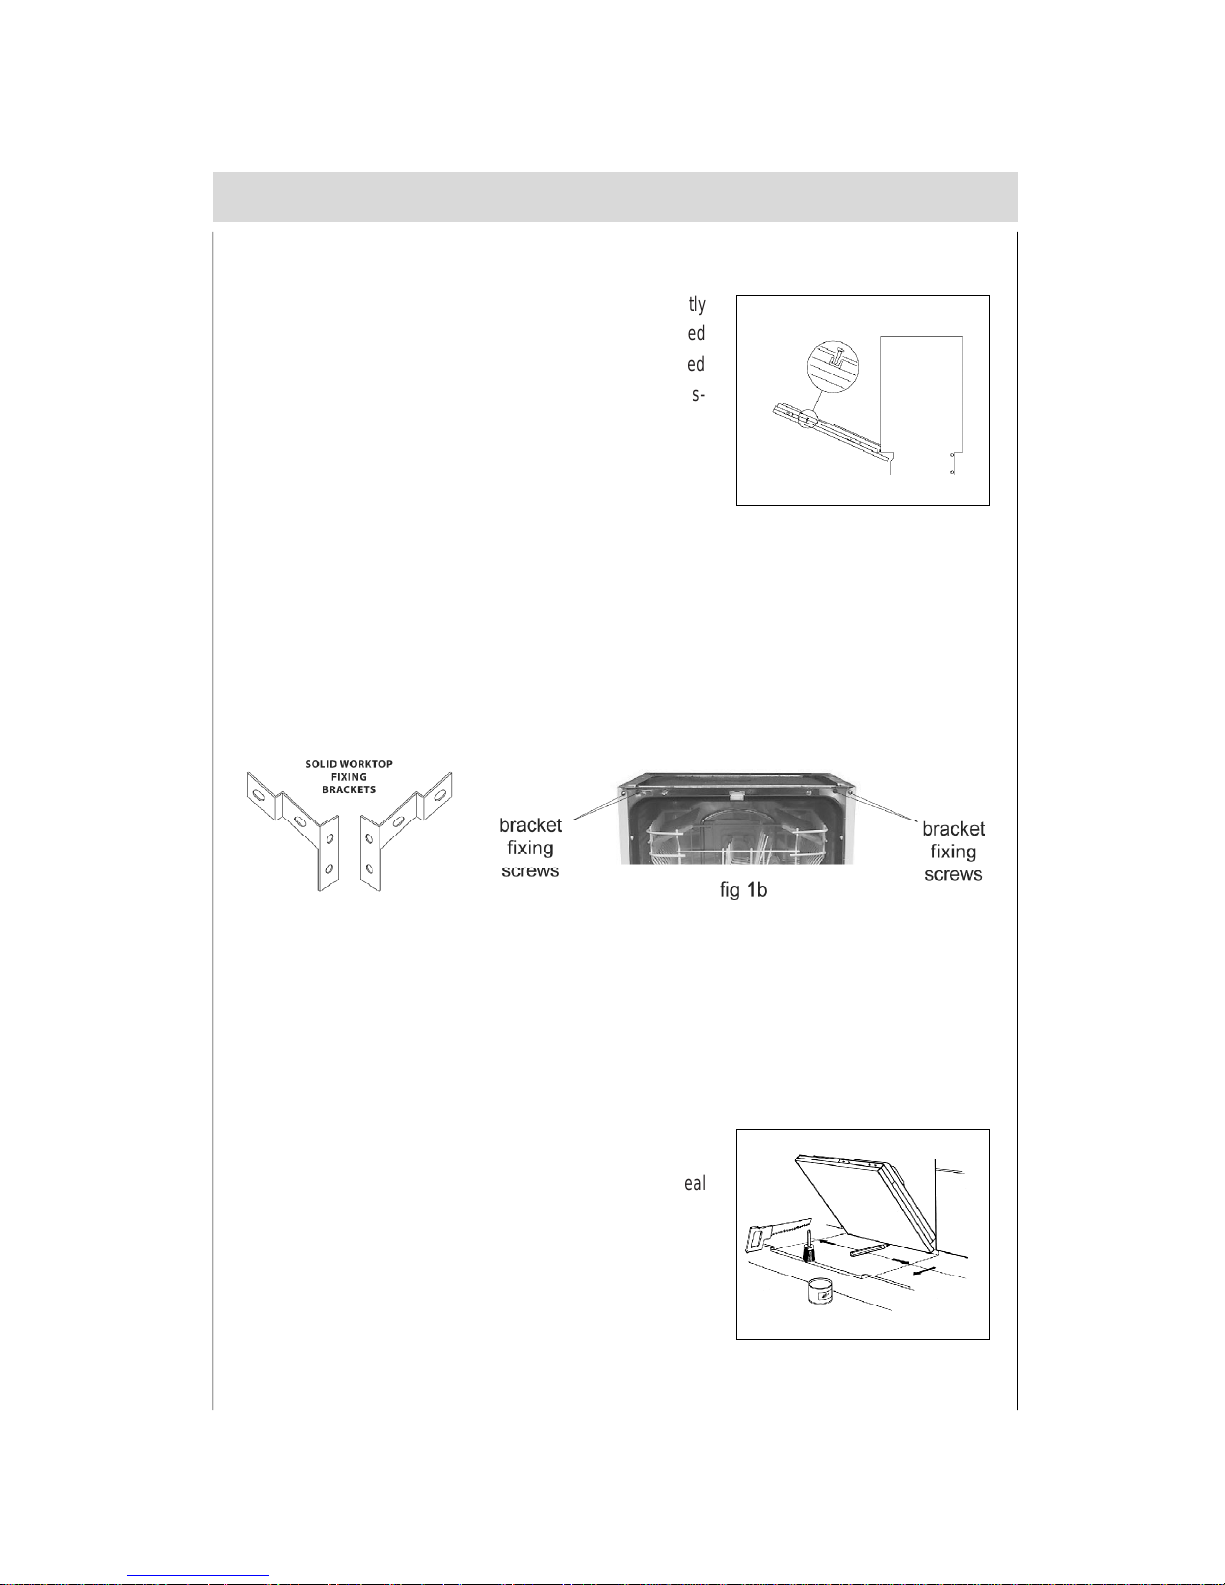
Align the top of the decor door with adjacent cabinets. Gently
open door whilst supporting the decor door. Once in the lowered
position, secure the decor door using t he fixing screws provided
as shown in the diagram. Cover the screw heads using the plas-
tic caps provided.
Stage 5
The dishwasher should now be screwed t o the under side of t he wor ktop, via the t wo fixin g holes in t he
top trim.
For non-wooden worktops (e.g. marble) two brackets are provided to allow the appliance to be secured
to the sides of the adjacent cabinets. The should be secur ed to the appliance using the two screws at the
top of t he cha ssis (s ee fig 1b) , adj usted to th e cor rect width an d th en sc rewe d to th e adja cent sid es
panels using suitable screws.
Stage 6
The door bala nce can be adus ted via t wo screws accessed thr ough two hol es in the top of the front
frame. Adjust these until the door just remains open under its own weight and is level when open.
Stage 7
Cut clearance in t he pli nth to allow t he door to open fully and s eal
edges with a suitable varnish to prevent water ingress.
Stage 8
7
en
Page 9
Assemb ly Inst ructio ns for Integr ated Dishwasher
Mounting the Wooden Panel onto the Door and Sliding the Dishwasher into
the Cabinet
During the preparatory stages for installing the dis hwas her into the kitchen cabinet, holes m ust not be
drilled in the sides, or door , in order t o av oid compro mis ing the per f ormance an d/ or oper ation of the
appliance. Before working on any internal components, the unit must be disconnected from the power
supply .The maximum dime nsions for the wood panel that can be installed on the door are: Hei ght 725 mm for the completely built-in version; Width - 448 mm; Thickness-20 mm.
The height dimension of 725 mm must be reduced if the height of the control panel is increased
through the use of the spacers. In addition, the base must be trimmed if it interferes with the opening
of the door.
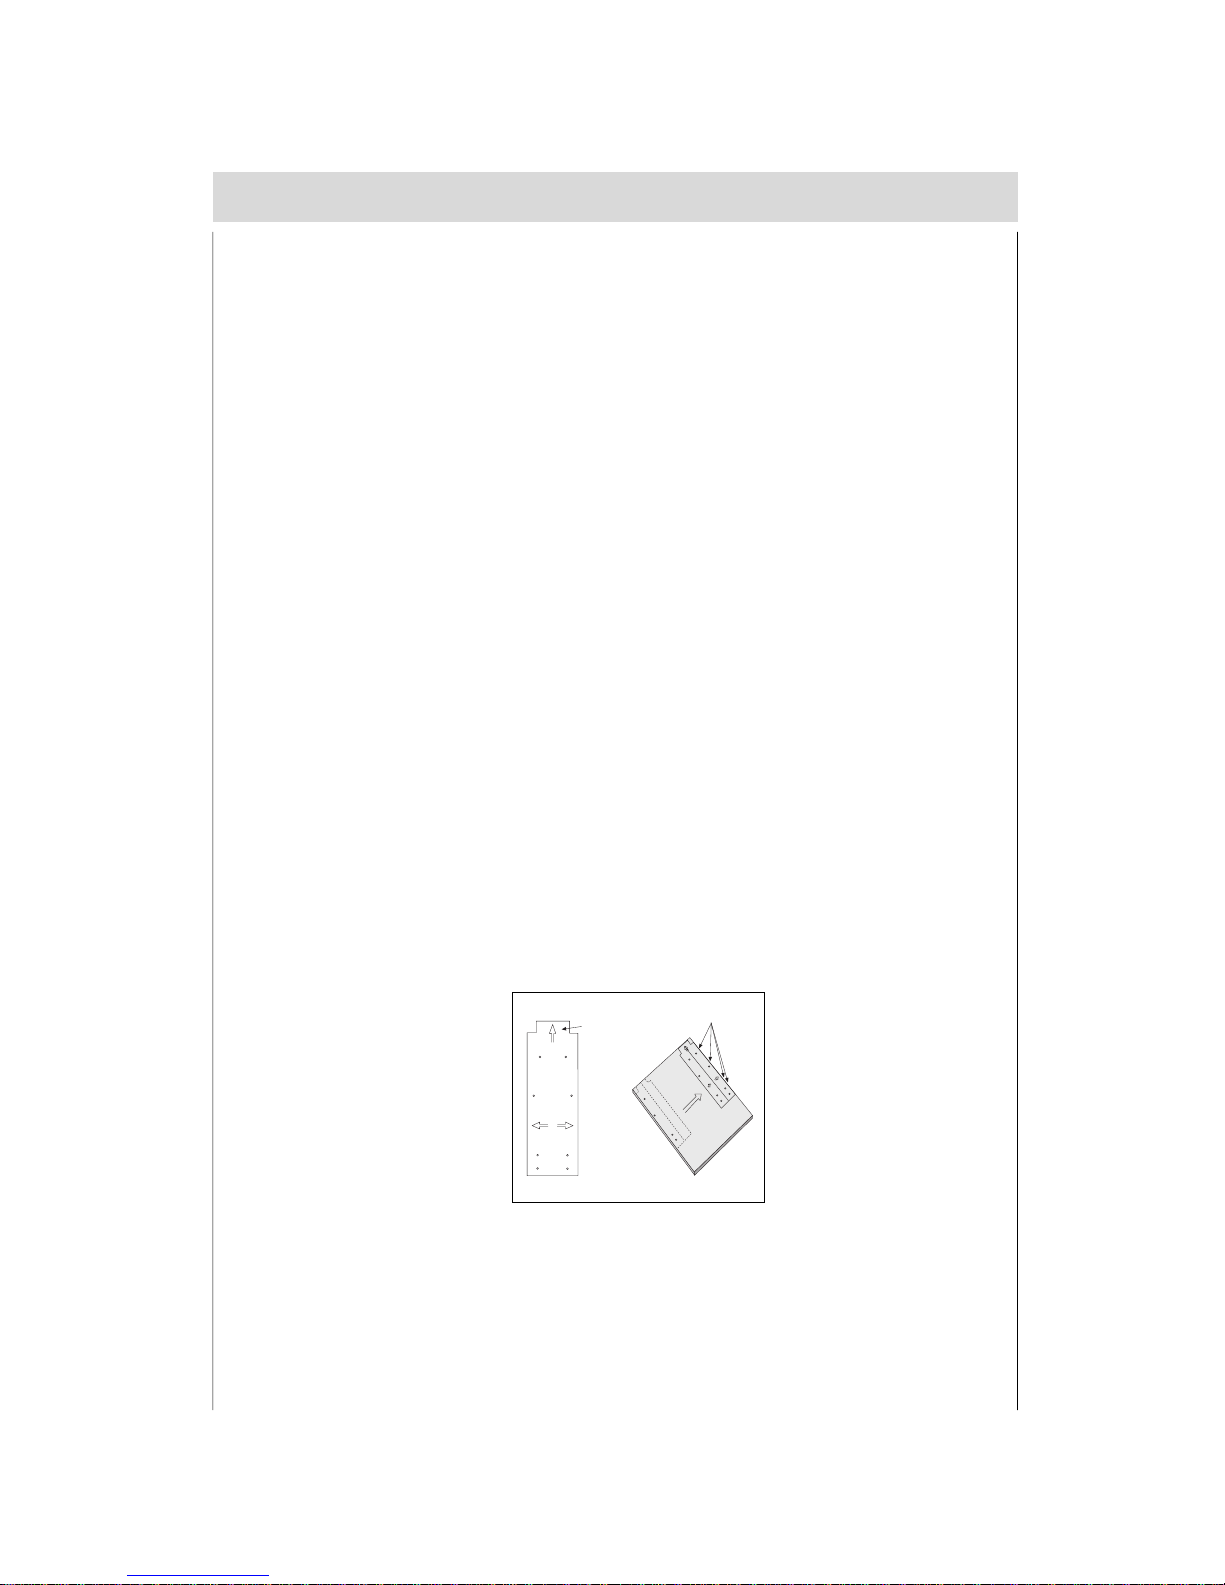
Align the top edge of the t empl ate ( ident ified with the “A ” arrow ) with the top edge of the panel. On
both sides of the template (top and bottom ) are written the various dimensions that correspond to the
differ ent pos sibl e wid ths f or the pa ne l. Al ign t he te mpla te w ith the s ide o f t he p anel ( lef t or righ t),
making sure that the panel coincide s with the appropriate dim ens ions. M ark the posit ions for the holes
for the screws, using the tip of a drill or a pencil. Th e three holes clos es t to the side sh ould be used (B).
Repeat this step on the other side of the panel ,using the corresponding side of the template.
Using the Drilling Template
8
en
A
B
Fig.1
Page 10
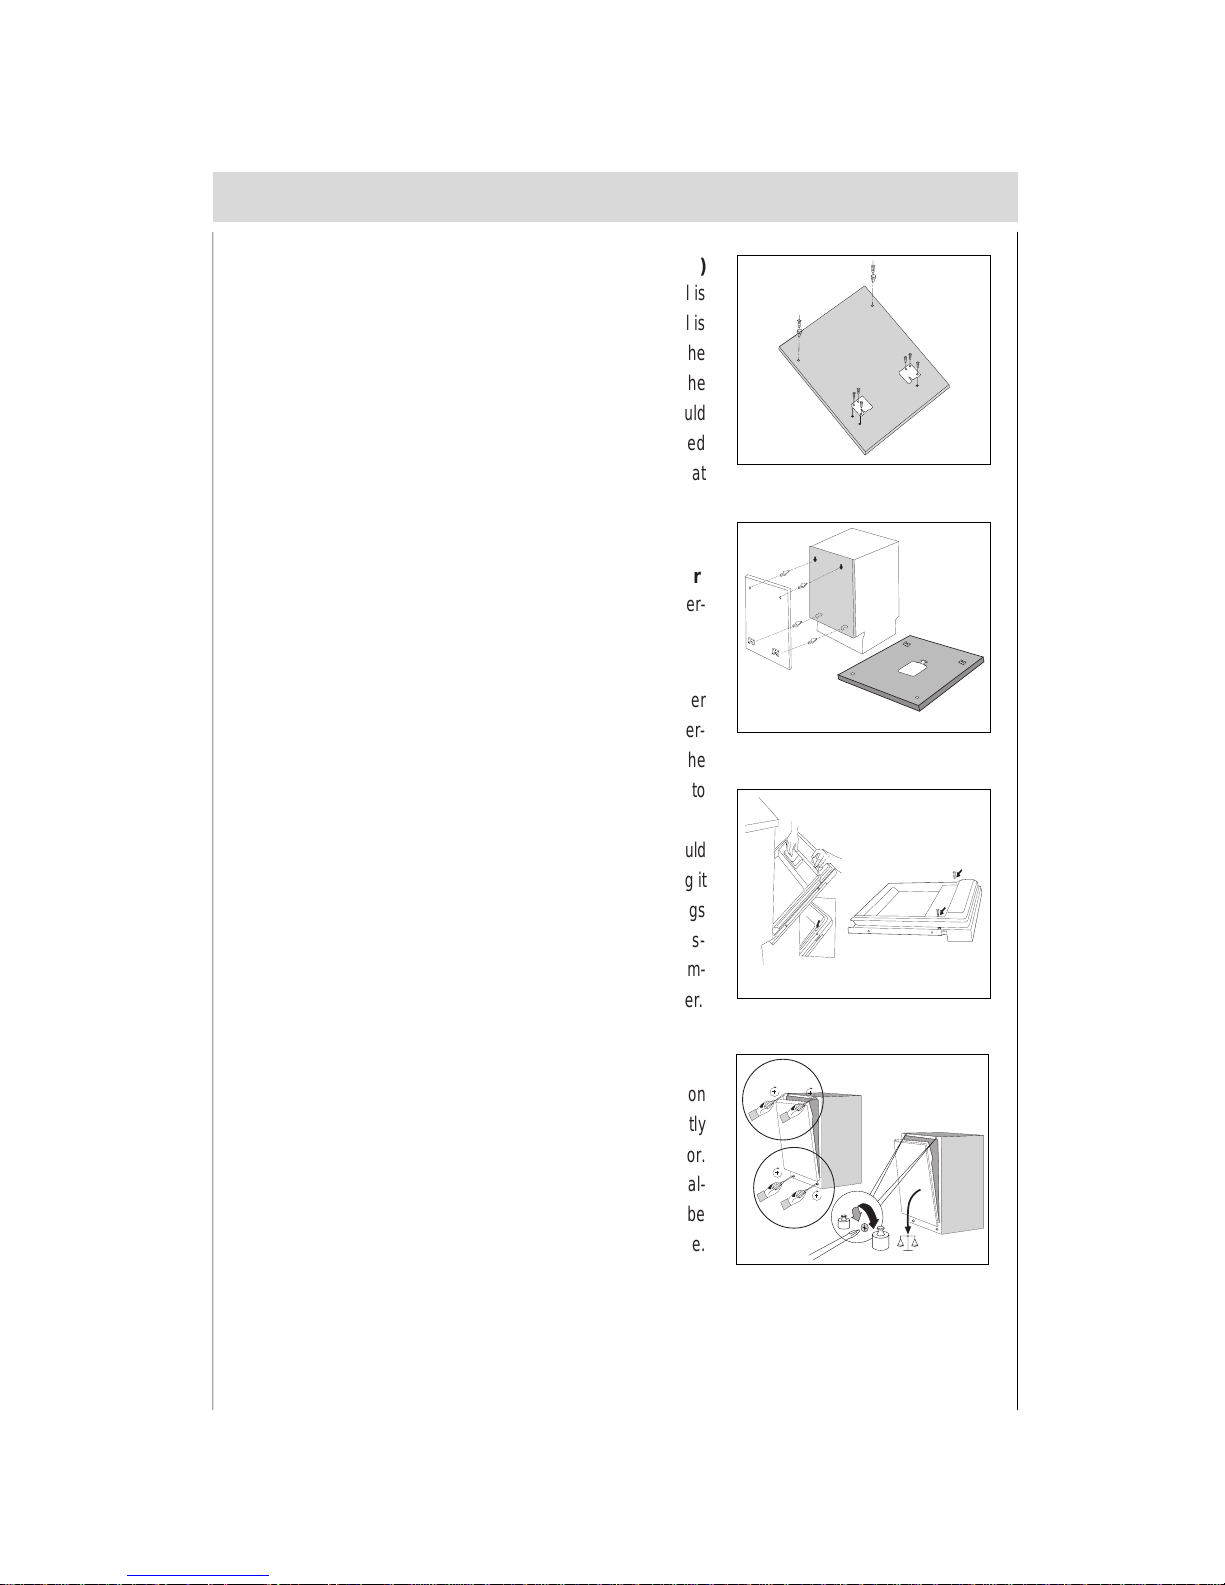
At the point marked, drill holes 2 mm in diameter . If the panel is
made of chip board , only drill through the veneer. If the panel is
made of solid wood, the holes can be made deeper. Position the
two brackets so that they are lined up with the holes m ade in the
bottom part of the panel. The holes furthest to the outside should
be used to fasten the brackets. The small f ins should be t urned
downward. The hook s s hould be s crewed int o the t wo holes at
the top.
Fastening the Bracket to the Wooden Panel (Fig.2 )
Place the wood panel onto the door of the dishwasher. Then per-
form the installation steps described below,
Mounting the Wood Door Panel onto the Dishwasher
Insert the top hooks into t he appropriat e slots in the dis hwasher
control panel. Then push t he panel upwards until it stops. After-
wards , s lide the panel down w ard again, moving t he bottom of the
panel toward the door so that the fins on the brackets slide into
their slots (Fig.3).
In both cases, open the doo rs of the dishwasher (the pa nel should
stay in place by itself) and ali gn the panel w ith the door, keeping it
in contact with the control panel. Remove the small plastic plugs
that cover the hole s on the inside of the dishwa sher door and fas-
ten the panel in place with the screws provided (Fig. 4). Remem-
ber to cover the two holes with the plastic plugs removed earlier.
The door must be perfectly balanced. In the factory , the tension
of the springs is regulated to ensure that the door is perfectly
balanced when light wood door panels are mounted on the door.
If heavier, solid wood door panels are used, the door can be bal-
anced b y s impl y tur ning th e tw o scr ews (bot h s crews mu st be
turned the same amount) located on the top part of the machine.
Adjusting the Door Springs (Fig.5B)
9
en
2-7Kg
Fig.3
A
B
2Kg
7Kg
Fig.5
Fig.4
Fig.2
Page 11
Installation of Continuous Base Moulding
Position t he w as hing machi n e i n the cut-out in the kit chen c a bi n et :
1. Install the continuous base moulding , following the
manufacturer’s instructions .
2. Slowly open the door of the dishwasher to check to see if the
door strikes or rubs against the base moulding.
3. If so, rest the bottom edge of t he panel on the bas e mou lding
and mark the part to be cut. Leave at least 3 mm of the play
between the panel and the base moulding to allow for the door to
rotate freely (Fig.6).
4.
Remove the base moul ding and trim it as needed, protecting the
surface that has been cut with a paint or similar wood finish (Fig.11).
5. Install the base moulding again (Fig.7).
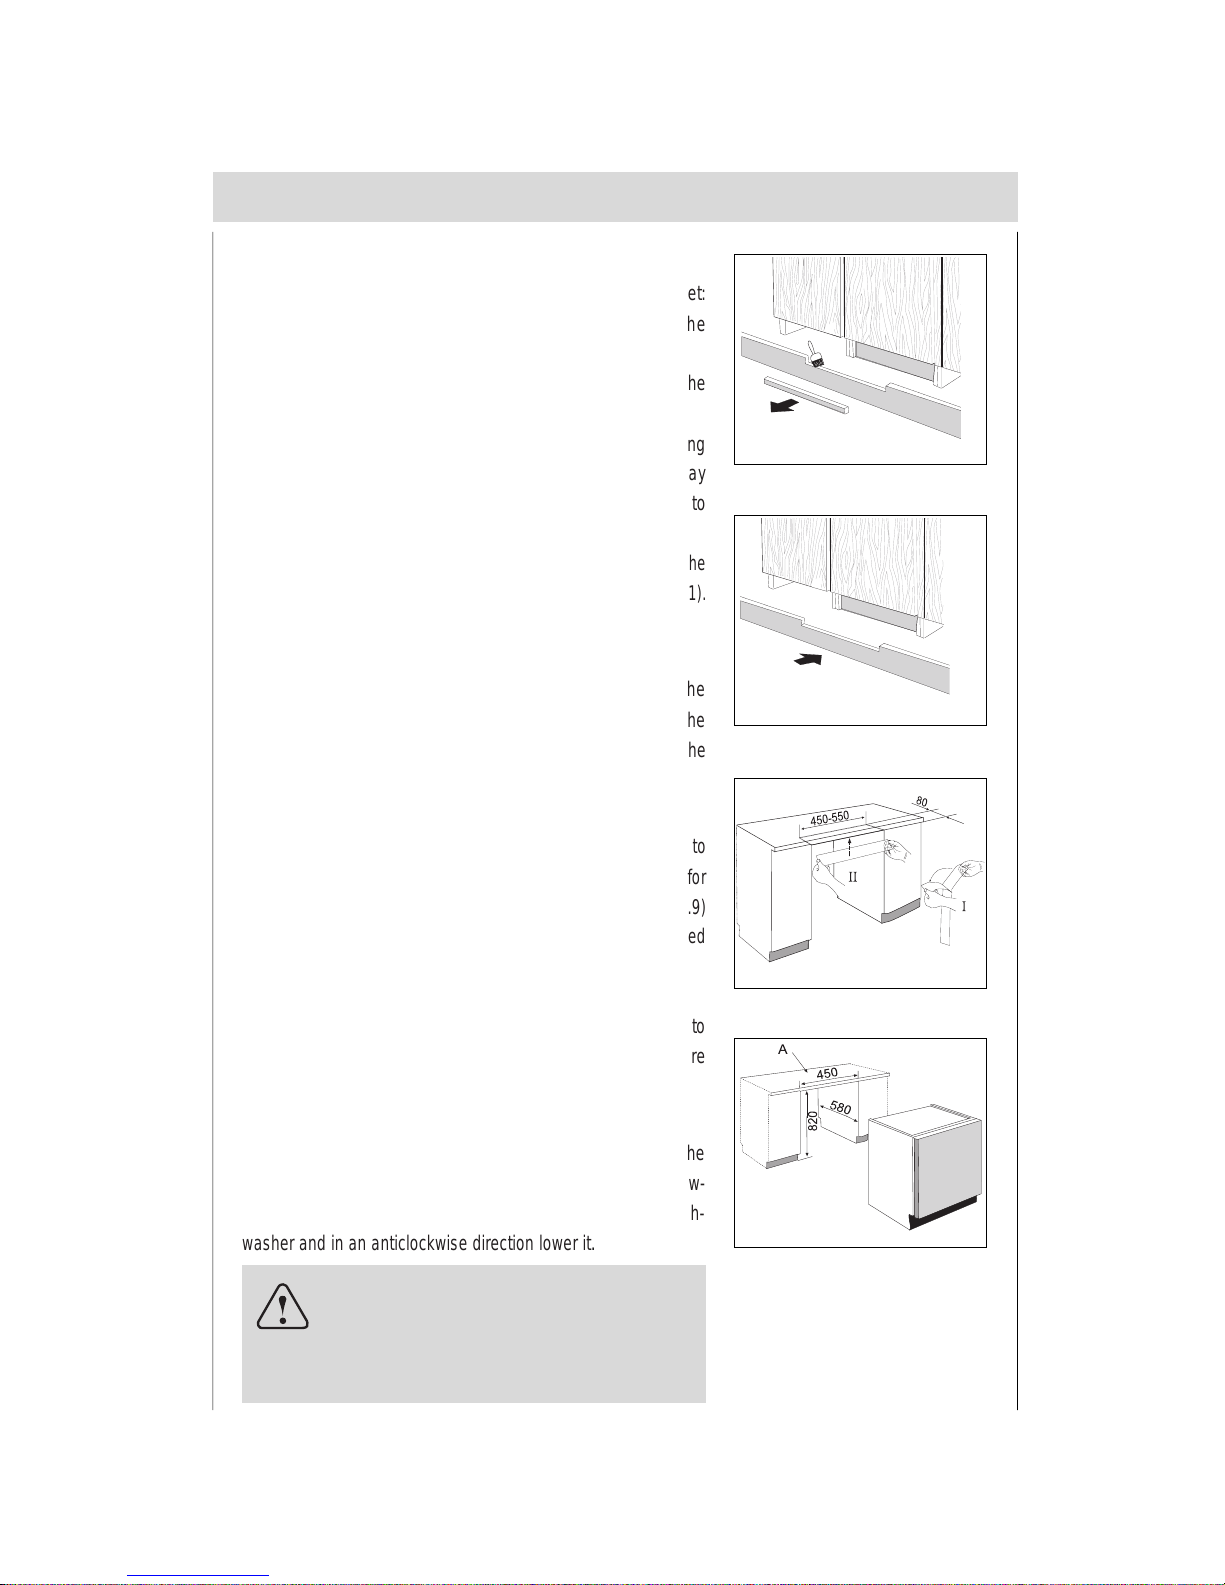
Positioning the Unit within the Cutout (Fig.9)
Push the dishwasher into the cutout opening and turn the feet to
make it level and to adjust for heigh t so that the crosspie ce (A) for
fasteni ng it in pla c e loca ted on the to p part of the mach ine (Fig.9 )
comes into contact with the counter .Align the door panel mounted
on the dishwasher with the doors on the adjacent cabinet (2).
Important:
The dishwashe r m us t absolutely be fastened to the counter t op to
prevent the machine from tipping when the loaded dish racks are
pulled out.
How to use water-proof plastic
First ly tak e off the wat er -proof plas tic fr om t he s tick er with th e
appliance ( s ee ¢æ, Fig.8). Sec ondly s t ick it on the bottom of t he
kitchen board (see ¢ , Fig.8). All of this can avoid humidity in the
kitchen.
Adjustment of Back Feet (Fig.5A)
Insert the appliance in the cutout and then adj ust the heig ht of t he
machine using the screws located at the bottom f ront . Use a screw-
driver to t ur n the scr ews in a cl ock wis e di rection t o rais e the dish-
washer and in an anticlockwise direction lower it.
NOTICE:
If power screwdrivers are used to make the
adjust ment, make t he final adj us tment manually wit h
a normal sc re wd river.
10
en
Fig.6
Fig.7
Fig.8
Fig.9
Page 12

Getting to know your dishwasher
Close-up view (control panel)
11
Dishwasher in terio r
en
A
C
B
EGI
DHFJ
Low Salt Indicator
A
B
C
D
E
Low Rinse Aid Indicator
Programme Indicator
Programme Button
"3 in 1" Button
F
G
H
I
J
ON-OFF Button
" 1/2 " Button
Delayed Start Button
ON-OFF Indicator
Time-remaining Indicator
a
b
c
d
e
f
g
h
a
b
c
d
Upper Rack
Rack Height Adjustor
Top Spray Arm
Lower Rack
Washing Filter
Detergent and Rinse Aid Dispenser
Bottom Spray Arm
Third Sprayer
e
f
g
h
Page 13

Salt
The hardness of the water varies from place to plac e. I f hard water is use d in the dishw asher , deposits
will form on the dishes and utensils.
The appliance is equipped with a special softener that uses a salt specifically designed to eliminate lime
and minerals from the water.
How to fill the salt
Loading the salt into the container
Always use salt intended for use with dishwashers.
The salt container is located beneath the lower rack and should be filled as follows:
12
When the low salt indicator “E” lights, you must fill the salt.
Remove the lower rack and then unscrew and remove
the cap from the salt container;
If you are filling the container for th e first time, fill it with
water;
Place the end of the funnel (supplied) into the hole and
introduce about 2 kg of salt . It is nor m al for a small amount
of water to come out of the salt container.
Carefully screw the cap back on.
E
Important
To prevent the formation of rust, load the salt just before beginning a
wash cycle.
en
Page 14

Adjusting salt consumption
The dishwasher is designed to allow for adjusting the amount
of salt consumed based on the hardness of the water used.
This is int ended t o op t imize and customiz e the level of salt
consumption so that it remains at a minimum.
To adjust salt consumption, proceed as follows:
Unscrew the cap from the salt container;
There is a ring on the container with an arrow on it (see
figure to the side),
If necessary, rotate the ring in an anticlockwis e dir ection
from the "-" setting towards the "+" sign, based on the
hardness of the water being used.
It is recommended that adjustments be made in accordance with the following table:
Water Hardness
Clarke
degrees
ºdH
mmol/l
Selector
position
Salt
consumption
(Grams/cycle)
Autonomy
(cycles/2kg)
0 - 14 0 - 17
0 - 1,7
1,8 - 4,418 - 4414 - 36
36 - 71 45 - 89 4,5 - 8,9
>89>71 >8,9
/
"-"
middle
/0
20
40
60"+"
60
40
25
Level
1
2
3
4
13
en
Page 15

Rinse aid
This product makes dishes sparkle and helps them to dry without spotting. The dispenser is located on
the inside panel of the door .
Important
Proper dosage of the rinse aid improves drying.
If drops of water remain on the dishes or spotting occurs, the dosage
adjuster should be turned to a higher setting.
If the dishes have white streaks, turn the dosage adjuster to a lower
setting.
Loading the rinse aid
Regardless of the type of detergent disp enser installed on
your appliance, you must proceed as indicated below when
loading the rinse aid.
To open the dispenser, t ur n the "1" cap in an anti- c loc k wis e
direction and then pour in the rinse aid, making sure not to
overfill. The amount of rinse aid used for each cycle can be
regulated by turning the "2" dose adjuster, located beneath
the "1" cap, with a screwdriver.
There are 6 different settings; the normal dosage setting is
3.
D
How to fill rinse aid
When the low rinse aid ind ic a tor “ D ” lights , you must load
rinse aid .
14
en
1
2
Page 16

15
en
Detergent
Detergent specifically intended for use with dishwashers
must be used. The dispenser must be refilled before t he start
of each wash cycle following the instructions provided in t he
"Programme overview". The detergent dispenser is located
on the inside panel of the door.
Loading the detergent
Notice:
To facilitate closing the cover, remove any excess of detergent on
the edges of the dispenser.
To open the " 3 " cover on the dispenser, press the " 4 "
button.
The detergent for the wash cycle should be poured into
the " 5 " compartment.
The detergent for the pre-wash cycle should be poured
into the “ 6 ” compartment.
After the detergent has been placed in the dispenser,
close the cover and press down until it clicks in place.
How to fill the detergent
5
6
4
3
Notice:
The usage of 3 in 1 or similar tablets is forbidden when Heat wash,
Rapid Wash and Soak programmes are selected.
Page 17

16
en
Not suitable for the dishwasher
What you should not put into the dishwasher
Cutlery and tableware manufactured in whole or par t fr om wood . They bec om e f aded and unsightly in
appearanc e.Fur therm ore,the adhe siv es that are us ed are not s uitable for the temper ature t hat occur
inside the dishwasher.Delicate decorative glassware and vases ,special antique or ir replaceable china.
The decorative patterns on such items will not be dishwasher-proof.
Plastic obj ect s tha t are not res istan t to h ot w ater , copp er a nd p ewt er u tens ils ar e al so no t sui tab le.
Decorative patterns printed or painted ont o the s urface of crockery, glas ses, etc., alum inium an d silv er
items tend to become discoloured or faded if was hed in the diswasher. S om e types of glass c an bec om e
opaqu e in app ear ance a fter they have b een wa shed many times in a di shwa sher . Hi ghly absor bent
materials, such as sponges and towels,should never be placed in the dishwasher.
Our recommendation
In future, only purchase table or kitchenware that has been confirmed as being dishwasher-proof.
Important
Dishes or cutlery that have been soiled by tobacco ash, wax,
Iubricating grease or paint, should not be put in the dishwasher.
Damage to glassware and other dishes
Possible causes
type of glass or manufacturing process
chemical composition of detergent
water temperature and duration of dishwasher programme.
Use glassware or porcelain dishes that have been m arked ‘dishwas her- proof’ by the m anufacturer .
Use a mild detergent that is described as ‘kind to dishes’. If necessary, seek further inform ation from
detergent manufacturers.
Select a programme with a low temperature and a short duration as possible.
To prevent damage, take glass and cutlery out of the dishwasher as soon as possible after the
programme has ended.
Suggested remedy
Page 18

17
en
Arranging crockery, glasses, etc. in the dishwasher
Before placin g the dishes in the dishwasher, rem ove lar ger f ood p artic les t o pr eve nt t he filter from becoming clogged, which results in reduced performance.
If the pots and pans have baked-on food that is extremely hard to remove, we recommend that they are
soaked before washed. This will eliminate the need for extra wash cycles.
Pull out the rack to load the dishwasher.
How to use the lower rack
We recommend that you place the most difficult to clean items
on the bottom rack: pots, pans, lids, serving dishes and bowls,
as shown in the figure to the right.
It is preferable to place serving dishes and lids on the sides of
the racks in order to avoid blocking the rotation of the top spray
arm.
Pots, serving bowls, etc. must always be placed face down
(see fig.D) .
Deep pots should be slanted to allow the water to flow out.
fig.D
Normal daily load
Warning
knives and other utensils with sharp
points must be loaded in the basket
with their points down or placed in a
horizontal position.
E1
E2
E3
The lower rack features fold down tine rows (see fig. E) so
that larger or more pots and pans can be loaded.
fig.E
Page 19

18
en
fig.G
Shelf
Lean tall glasses and thos e wit h long stems agains t t he shelfnot against other items to be washed.
Place glass es , cups and sm all bowls on t he additional cup rack.
The additional cup r ack ca n be s wivel led in o r out as req uired
(see fig.G).
The upper rack is designed to ho ld mor e delicate and light er
dishware, such as glasses, cups and saucers, plates, small
bowls and shallow pans (as long as they are not too dirty).
How to use the upper rack
fig.F
Adjust the upper basket to t he h ig her l eve l and you have
more space to acco m mo d ate those tal ler pa ns and trays in
the bottom basket.
Position the dishes and cookware so that they do not get
moved by the spray of water.
The upper r ac k c a n be adju s t ed for height by using the kn obs
located on the sides of the rack itself (see fig.F).
Page 20

Programme overview
Wash
programme
Type of
crokery e.g.
china, pots/
pan s,
cutiery,
glasses, etc
Amount of
food
remains
Description of cycle
Condi-
tion of
food
remains
1/2
Load
Pre-wash with hot water.
Extended wash at 70°C.
Rinses with cold water.
Rinse with hot water.
Drying.
Pre-wash use cold water.
Extended wash at 55°C.
Rinse with cold water.
Rinse with hot water.
Drying.
Short wash at 40°C.
Cold rinse.
Short cold wash to prevent food residue from
drying on the dishes .
Pre-wash use cold water.
Extended wash at 50°C.
Rinse with cold water.
Rinse with hot water.
Drying.
Wash at 45°C.
Rinse with cold water.
Hot rinse.
Drying.
Soups,
casseroles,
sauces,
potatoes,
pasts, rice,
eggs, roast or
fried food.
a lot
a little
stuck
on hard
Soups,
potatoes,
pasta, rice,
eggs, roast or
fried food.
loosely
attached
Coffee,cakes,
milk, sausage,
cold drinks,
salads
Very little
loosely
attached
Rinse off if the dishes have been
stacked for several days in the dishwasher prior to washing.
Type of
food
remains
Nondelicate
Mixed
Intensive
Wash
Normal
Wash
Light Wash
(EN50242)
Glass ware
Soak
Rapid wash
19
en
Heat wash
Hot rinse at 65°C.
Drying.
For dishes that need to be rinsed
and dried only.
3 in 1
Page 21

Delayed
Start
Detergent
Extended
Wash
Prewash
Rinse Aid
Duration in
minutes
Energy
consump-
tion in kWh
Water
consump-
tion in litres
25g
25g
25g
25g
25g
25g
15g
10g
15g
10g
5g
5g
5g
5g
5g
5g
112
94
102
90
162
140
92
82
32
28
54
48
12
12
1.44
1.25
1.11
1.00
0.80
0.76
1.01
0.95
0.40
0.30
0.90
0.78
0.02
0.02
18
16
15
14
15
13
12
10
9
8
5.5
5
3
3
20
en
Page 22

Washing dishes
Program me selectio n
The most appropriate programme can be identified by comparing t he type of crocker y, cutlery, etc., as
well as the amount and condition of food remains, with the details contained in t he wash cycl e table.The
corresponding pr ogr am m e s equen ce, durat ion and co nsum ption details ar e s hown in the right half of the
overview.
For example:
Use the« normal» pro gram me for dis hes and ut ensil s wh ich h ave plenty of f ood r emai ns st uck on
hard.
Earn savings
If only a sm all nu mber of dis hes have b een l oad ed int o the dis hwas her,s el ectin g a pr ogr amm e that
operates at the next lowest temperature will usually be sufficient.
Programme data
The stated programme data are based on standard operating conditions. The values can vary considerably according to:
different amounts of dishes
temperature of mains water supply
pressure of mains water supply
ambient temperature
fluctuations in mains voltage
machine-related factors (e.g. temperature, water volume,...)
21
en
Page 23

Switchin g the dishw asher O N
End of programme
Six beeps will indicate that the wash cycle has finished.
22
en
Turn on the tap.
Open the door.
Set ON-OFF button “I” to ON.
Press programme button “B” , programme indicator
“ A” lights and the time-remaining indicator “ F ” displays the time of the programme..
Close the door, the programme indica tor “ A” bec om es
to light and the programme starts automatically.
Int err u pp in g th e pr o g r am me
A cycle that is underway can be m odified if it has only been runn ing for a sh ort ti me. Ot herwise, the
detergent may have alr eady been used, and the appliance may have already dr ained t he was h water.
If this is the case, the detergent dispenser must be refilled ( see the paragraph entitled, “ Loading the
detergent ”).
Open the door. Caution! There is a risk of water squirting out from inside the appliance. Do not open
the door fully until spray arm has stopped rotating.
When you open the door, the dishwasher will beep ten times every thirty seconds.
If the appliance has already heated up or the hot water was switched ON and then the appliance door
opened, leave the door ajar for s everal mi nut es and then clos e. O therwis e, t he applian ce doo r ma y
open due to expansion.
Switching the dishwasher OFF
Several minutes after the programme has ended:
Open the door.
Set ON-OFF button “ I ” to OFF.
Remove dishes, etc. when they have cooled down.
IF G
A
B
Page 24

Close the door, t he delay ed start indicat or “ G ” blinks , the time-remaining indicator “ F ” will blink and
decrease, the programme will start until the delayed start indicator “ G ” goes out .
23
en
Delayed st art program min g
You can delay the start of a programme in increments of 1 hour up to 24 hours.
Switch dishwasher ON.
Press programme button “ B ” to choose the desired programme.
Immediately press the Delayed Start button “ G ”, the delayed start indicator lights, the delayed start
time ind ic at or “ F ” changes to “ ”.
Press the Delayed Start button “ G ” as many times as nec essary u ntil t he numerical displa y shows
the required delay.
To cancel the t ime delay setting, pressing the Delayed Start but ton unt il t he del ayed star t indic at or
goes out.
1/2 Load Button
This button “H” (see" Close-up View (Contr ol Panel) ) makes it pos sible to was h dishes using on ly the
upper rack if there are not enough dishes for a full load. This will allow y ou to sav e on water and ener gy
consumption.
To select 1/2 load:
Select the programme ( see the paragraph entitled“ Switching the dishwaher ON”)
Press the 1/2 load button “ H ” , 1/2 load indicator lights.
Close the door, the programme starts automatically.
A
F G
I
H
B
- Please keep in mind that the amount of detergent should also be adapted to the 1/2 load.
To cancel the 1/2 load while underway
Press programme button “ B ” and hold it in for about 3 seconds.
Page 25

24
en
3in1 function
When using "3 in 1"c om bination products, the rinse- aid and salt lights are no lon ger useful. It m ay be
helpful therefore to s wit ch the r inse aid off (ple ase not e that only some dishwa sher s have t his facility)
and selecting the lowest possible setting for water hardness.
If you decide to switch to the use of a standard detergent system we advise that you:
1: Refill both the salt and rinse aid compartments.
2: Switc h the wate rhardnes s s etting to the high est pos sible po sition and run for three nor mal cycles
without a load.
3: Readjust the waterhardness setting again according to the conditions for your region (For more information please refer to your instruction manual).
Memory Function Module
If the dishwas her is s wit c hed off thr ough the ON/OFF butt on, or a current leak ha ppens while the s electe d was hing pr ogr am is ac tive , the p rogr am is not c anc elled. The c ont rols us e a m icr oproc es sor
device, to memor ize the inform ation about the selected washi ng pr ogram . O nce the mac hine i s aga in
powered on, the dishwasher will be resumed from the point it was interrupted.
Canceling or modifying a washing program cycle
1:To modify or cancel the carrying out of a washing cycle (being the door opened), it's nec ess ary to
reset t he previous pr ogramm ing, by holding pus hed the progr amm e selec tor button “B ” for at least 3
seconds, and the buzzer emits one short warning signal.
2:If the reset operatio n wa s s uc c essf ul, a drain phas e is star t ed. O nc e the drain phase is en ded, t he
dishwasher stands waiting for a new programming
3:A cycle that is unde rway can b e modi fied if it has o nly be en run ning f or a short time. O therwis e, t he
detergent may have already been us ed, and the appliance may hav e alr eady drained the wash water . If
this is the case, the detergent dispenser must be refilled.
CB
Notice:
Do not place the tablet s in the t ub or t he cut lery basket as this will result in
poorer wash results. The tablets should be placed in the detergent doser.
Page 26

Tabs
With Classic Tabs you can put your dirtiest dishes straight into the dishwasher. The tab contains
StainSoakers which di ssolve in stant ly to s oft en rea lly d ried o n food re sidues su ch as bak ed on egg and
cheese s auc es . T he blue lay er t hen wor k s t o br eak down and lift off food remains whil e t he whit e layer
cleans all traces of dirt away for a spotless and brilliant finish.
For best results use with Rinse Aid and Special Salt.
Directio ns: Simply unwr ap one tab a nd plac e in t he dete rgen t dis pens er of y our dishw asher . For be st
results, use with Rinse Aid and Special Salt.
3in1 Tabs
With powerful greas e c utt ing ac tion, 3in1 Tabs ef fectiv ely rem ove toug h stains, so you don't hav e t o r ewash!
The blue la yer con t ains p ower ful det er gent and Red StainSoaker sp eckles t o soften a nd br eak down
tough dried-on stains.
The white layer, with its integrated salt function, so ftens the water and prev ents limes ca le whils t removing all traces of residue.
The 3in1 tab contains a rinse aid ball to deliver a spotless, streak free brilliant shine.
3in1 tabs are pre-measured so there's never any guessing, measuring, mess or waste.
Directions: Simply unwrap one tab and place in the detergent dispen ser of your dishwash er. No need to
add additio nal salt or rins e aid. 3in1 Tabs' s alt-ac tion is ef fectiv e in soft, medium and hard water up t o
26°„e (around 95% of households).
5in1 Tabs
Are you looking for unbeatable cleaning performance from your dishwashing detergent? 5in1 Tabs have
taken dishwas hing to the nex t lev el w it h an ex t r a c leaning power t o r em ov e enc rus t ed s tains f or an ex treme clean.
1. The tablet is for mulated with powerful d et erge nt and r ed S t ainSo aker s peck les to help penetrate and
break down the toughest baked-on and dried-on stains, even tea stains.
2. Using a rinse aid function, the tab is developed for a spotless, streak-free sparkling shine.
3. In the white laye r of the tablet , the 5in1 Salt- ac tion prevents limes c ale de posits in your m ach ine that ca n
result in residue on your glasses.
4. Protector Action helps prevent permanent glass corrosion, a source of cloudy glasses.
5. The tab gives extra cleaning power to help remove encrusted stains for a complete clean.
Directions : S im ply unwr ap one tab an d place in t he detergent d is pens er of y our dis hwas her. 5in1 S alt Action is effective in soft, medium and hard water up to 26°„ e (approximately 95% of households).
25
en
Page 27

How to keep your dishwasher in shape
After Every Wash
After ev er y wash , set the main switch “I” to of f and leave the door s lightly ajar s o that moist ure and od ors
are not trapped inside.
Remove the p lug
Before cleaning or performing maintenance, always remove the plug from the socket. Do not run risks.
No solvents or Abrasive Cleaning Products
To cle an the ext er ior a nd r ubber par ts of t he d ishw ash er, do no t use solv ent s o r abra siv e cle anin g
products. Rather, use only a cloth and warm soapy water.
To remove spots or stains from the surface of the interior, use a cloth dampened with water and a little
while vinegar, or cleaning product made specifically for dishwashers.
Moving the Appliance
If the a ppli anc e m us t be m ov ed, tr y t o k eep i t in a vertic al position. If a bs olut ely n ec es s ar y , it c an be
positioned on its back.
Seals
One of the factors that cause odors to form in the dishwasher is food that remains trapped in the seals.
Periodic cleaning with a damp sponge will prevent this from occurring.
The door should not be left in the open position since this could present a tripping hazard.
When You Go on Holiday
When you go on holiday, it is recommended that you run a wash cycle with the dishwasher empty and
then r emove t he plug fr om the s ock et, tur n off the wate r s upply and l eave the doo r of the appl ia nce
slightly ajar. This will help the seals last longer and prevent odors from forming within the appliance.
26
en
Page 28

Care and maintenance
Dishwasher salt
Check the LOW SALT indicator “E”. Top up with salt, if r equir ed .
Regular inspec tion and maintenance of y our appli ance helps t o pr ev ent pr oblem s fr om o cc urring. This
saves time and aggravation.You should ther ef ore caref ully inspect t he inside of your dishwasher from
time to time.
Overall condition of appliance
Check that no grease or scale has accumulated on the inside of the dishwasher.
If you discover any deposits:
Clean the interior of the dishwasher thorughly with a detergent solution.
Rinse-aid
Check the LOW RINSE AID indicator “ D ”, on the front panel.
Top up with rinse-aid,if required.
Filters
The filters “7”,“8” prevent larger partic les of f ood in t he water
from reaching the pump.These particles may occasionally block
the filters.
When the appliance has finished washing, check the filters
for particles of food and, if required, clean.
After undoing the coarse micro-filter “7 ” , the filter unit
“ 9” can be removed. Remove any particles of food and
rinse the filters under running water.
Insert the filter unit “ 8 ” and tighten the coarse micro-filter.
27
en
D
E
Inspect the nozzles in the spray arms for blocked holes
due to remnants of food.
If necess ar y , pull t he lo wer arm “ 10 ” upwards and lif t it off.
Unscrew the upper spray arm “ 9 ”.
Clean both spray arms under running water.
Refit the spray ar m s. E nsu re that the lower ar m has lock ed
into place and the upper one is screwed tight.
Spray arms
Lime and remnants of food in the washing water can block the
nozzles in the spr ay arms “ 9 ” and “ 10 ” and t he ar m mountings.
8
7
9
10
Page 29

Resolving minor problems yourself
Experience has shown t hat you can resolve mos t problems that rise during normal daily usage yourself ,
without hav ing to call out a ser vice engineer .Not only does this save cost s,but it also means that the
appliance is av ailable for us e agai n t hat much s ooner . T he following list of common occ ur r enc es and
their remedies should help you identify the causes of most problems.
Problems...
...when th e applianc e is swit ched on
Appliance does not start up
...with th e appliance it self
Error display on the time-remaining indicator
When “ ” (F) blinks.
Have you checked whether:
the door is closed properly.
Fault finding
Fault with fuse in mains electricity supply.
Plug not inserted in wall socket.
Appliance door not closed properly.
Programme button has not been pressed.
Water tap not turned on.
Blocked strainer in water intake hose.
- The strainer is situated in the Aquastop or supply-hose connection.
28
en
F
F
When “ ” (F) blinks.
Have you checked whether:
the drain hose is too low.
Caution
Do not forget that repairs should only be carried out by a qualified
specialist. Improper repairs can lead to considerable equipment damage as well as danger to the user.
Page 30

If you take all thes e checks an d the dishwas her still does not function or your dishwasher have any other error di splay, you can power the dish washer OFF, and wait a few
minutes. You can power the dishwasher on, try it again , if the dishwasher still does not
function and/or the problem persists, contact the nearest authorised service center and
provide them with the following information:
the nature of the problem.
the model type number (Mod...) And the seri al number (S /N...), which are indi cated on the p late
located on the side of the inner part of the door.
Lower spray arm rotates with difficulty
Spray arm is blocked by small items or food remains.
Lid in detergent compartment cannot be closed
Detergent compartment has been overfilled.
Mechanism is clogged with remnants of detergent.
Indicator lamps do not extinguish after washing has finished
Main switch is still set to ON.
Remnants of detergent stuck inside dispenser
Compartme nt was damp when it wa s filled up w ith deter gent. Compartm ent mus t be dry befo re
detergent is added.
29
en
F
F
When “ ” (F) blinks.
Have you checked whether:
the drain hose is crimped or bent.
the drain hose is too high.
When “ ” (F) blinks.
Have you checked whether:
the water is turned on and the hose is connected properly;
the water supply t o the house is on a nd has suf ficient pressur e;
the water supply hose is crimped or bent;
the filter for the water supply hose is clogged.
the drain hose is too low.
Page 31

Water remains inside appliance after programme has ended
Blockage or kind in drainage hose.
Pump is jammed.
Filters are blocked.
The programme is still running. Wait for the programme to end .
...during washing
Unusual amount of foam is creased
Normal washing up liquid has been poured into the rinse-aid container.
Appliance stops suddenly while washing is taking place
Cut off electricity supply to appliance.
Water supply has been interrupted.
Knocking sound can be heared while washing is taking place
A spray arm is knocking against the dishes inside the appliance.
Rattling sound can be heared while washing is taking place
Crockery has not been stacked properly inside the appliance.
Knocking sound coming from inlet valves
This is caused by the way the water pipes have been laid and it has no effect upon the way the
appliance functions. There is no remedy for this.
Remove any spilled rinse aid with a c loth as it could ot herwise lead t o excessive f oaming d uring the
next washing cycle.
...with th e dishes,cut lery, et c.
Remnants of food are stuck to the dishes, cutlery,etc.
Dishwasher was not loaded properly. Jets of water could not reach all parts of the dishes, etc.
Too many items in the rack.
Items in the rack were touching each other.
Not enough detergent was added to dispenser.
Selected wash programme was not intensive enough.
Rotation of spray arm was obstructed by dishes, etc.
Nozzles in spray arm are blocked by remnants of food.
Filters are blocked.
Filters have been incorrectly fitted.
Waste-water pump is jammed.
30
en
Page 32

Not enough detergent was added to dispenser.
Detergen t has insuf fcient bleaching properties. Use a de tergent c o ntaining a chemic al bleachi ng agent.
Plastic items are discoloured
Not enough detergent was added to dispenser compartment.
Amount of rinse-aid was set too low.
Although water is quite hard, no salt has been put in appliance.
Water softener was set too low.
Lid on salt container is not screwed tight.
If you used a phosphate-free detergent , try a detergent containing phos phates and compar e r esu lts.
White stains are left on crockery, glasses have a milky appearance
Selected programme did not include drying function.
Amount of rinse-aid was set too low.
Items were removed from dishwasher too soon.
Dishes,cultlery,etc.have not been dried
Amount of rinse-aid was set too low.
Glasses have a dull appearance
Detergent does not have a sufficient bleaching effect.
Washing temperature was set too low.
Tea stains or traces of lipstick have not been completely removed
Cutlery is not sufficiently rustproof.
Salt content in washing water is too high.
Traces of rust on cutlery
Unsuitable detergent was used.
Glasses are not dishwasher-proof.
Glasses become clouded and discoloured; coating cannot be wiped off
Amount of rinse-aid set too high.
Smears left b ehind on glasses and cutlery; g lasses have acquired a metallic appearance
- Lid on salt container is not screwed tight.
- Too much salt was spilt while filling container.
31
en
Page 33

Technical data
9 standard place settings
Width
Depth
Height
Capacity
Mains water pressure
Power voltage
Total absorbed power
44.6cm
55 cm
82 cm
0.03-0.6MPa
220-230V~ 50Hz
2150W
Maximum current intensity
13A
32
en
Important information
Notes on w aste dispo sal
Old appliances still ha ve some res idual v alue. A n env ironment -fri endly method o f disposal will ensure
that valuable raw materials can be recovered and used again.
When an ap plianc e has reac hed the en d of i ts wor king li fe,un plug it from the m ains. Cut t hroug h the
mains cable and dispose of it together with the plug.
Destroy the door locking mechanis m . This will ensur e that children at play ca nnot becom e lock e d insi de
and are not exposed to the risk of suffocation.
Your new applia nce was protec ted by sui t able pa cka ging w hile it w as o n it s w ay to you. A ll m ateria ls
used for this purpose are environment-friendly and can be recycled. Please make a contribution to
protecting the environment by disposing of the packaging appropriately.
Do not allow children to play with any parts of the packaging. There is a risk of suffocation by the
cardboard boxes and the plastic wrapping.
Up-to -date information concerning options for disposal can obtained from your retailer or local municipal administration.
General inf ormat ion
Measures must be taken to ensure that built-under and bui lt -in u nit s that a re s ubs equent ly re -sit ed as
free-standing appliances cannot topple over. This can be achieved by bolting the dishwasher to the wall
or fitting it under a continuous work surface which is screwed to the adjacent cupboards.
Page 34

33
en
Height-adjustable top-basket must be inserted in the uppermost position.
If the comparability tests do not comply fully with EN 50242, e.g., degree of soiling, type of dishes and
cutlery, etc., contact the appliance manufacturer before starting the test.
Fig.1 Fig.2
Information on comparability tests implemented in compliance with
EN 50242
Appliance loaded in accordance with standard specifications.
Example of loaded dishwasher: See Fig 1 and 2.
Capacity: 9 place settings
Comparability programme: Light wash
Rinse-aid setting: 5
Detergent: 25g+5g
Page 35

34
en
WB
DS
WS
DP
DV SLV SV
OS
IV
WP
TL
TL
HE
HR
SSS
SRS
TS
The symbol on the product or on its packaging indicates that this pr oduc t may not
be treated as household waste. Instead it sh all be handed over to the applicable collection point for the recycling of electrical and electronic equip m ent. B y ensur ing this product is disposed of correctly, you will help prevent pot ential negat ive conseq uences f or
the environment and human health, which could otherwise be caused by inappropriate
waste handling of this product.
For more detailed information about recycling of this product, please contact your local city
office, your household waste disposal service or the shop where you purchased the product.
WB: Wiring box
DS: Door switch
WS: Water level switch
DP: Drain pump
DV: Dispenser valve
SLV: Sing le la yer valve
SV: Softener valve
OS: Overflow switch
IV: Inlet valve
WP: Washing pump
TL: Temperature limiter
HE: Heating element
HR: Heating element relay
SSS: Spy salt switch
SRS: Spy r in se a id swi t ch
TS: Temperature sensor
Page 36

 Loading...