

Eurolux DW10V-AAA-6 Instruction Manual
Dishwasher
Instruction
InstructionInstruction
Instruction Manual
Manual Manual
Manual


1
ENGLISH
ENGLISH
CONTENTS
Getting familiar with your machine . . . . . . . . . . . . . . . . . . . . . . . . . . . . . . . . . . 2
Safety information and Recommendations . . . . . . . . . . . . . . . . . . . . . . . . . . . . 4
Installing the machine . . . . . . . . . . . . . . . . . . . . . . . . . . . . . . . . . . . . . . . . . . . . . 6
Preparing the machine for use . . . . . . . . . . . . . . . . . . . . . . . . . . . . . . . . . . . . . . 8
Loading your dishwasher . . . . . . . . . . . . . . . . . . . . . . . . . . . . . . . . . . . . . . . . . . 13
Switching on the machine and selecting a programme . . . . . . . . . . . . . . . . . . 17
Maintenance and Cleaning . . . . . . . . . . . . . . . . . . . . . . . . . . . . . . . . . . . . . . . . .
Failure codes and what to do in case of failure . . . . . . . . . . . . . . . . . . . . . . . . 21
Practical and useful information . . . . . . . . . . . . . . . . . . . . . . . . . . . . . . . . . . . . 23
• Technical specifications . . . . . . . . . . . . . . . . . . . . . . . . . . . . . . . . . . . . . . . . . 4
• Conformity with the standards and Test data . . . . . . . . . . . . . . . . . . . . . . . . . 4
• Recycling . . . . . . . . . . . . . . . . . . . . . . . . . . . . . . . . . . . . . . . . . . . . . . . . . . . . 4
• Safety information . . . . . . . . . . . . . . . . . . . . . . . . . . . . . . . . . . . . . . . . . . . . . . 4
• Recommendations . . . . . . . . . . . . . . . . . . . . . . . . . . . . . . . . . . . . . . . . . . . . . 5
• Items not suitable for dishwashing . . . . . . . . . . . . . . . . . . . . . . . . . . . . . . . . . 6
• Positioning the machine . . . . . . . . . . . . . . . . . . . . . . . . . . . . . . . . . . . . . . . . . 6
• Water connections . . . . . . . . . . . . . . . . . . . . . . . . . . . . . . . . . . . . . . . . . . . . . 6
• Water inlet hose . . . . . . . . . . . . . . . . . . . . . . . . . . . . . . . . . . . . . . . . . . . . . . . 6
• Water outlet hose . . . . . . . . . . . . . . . . . . . . . . . . . . . . . . . . . . . . . . . . . . . . . . 7
• Electrical connection . . . . . . . . . . . . . . . . . . . . . . . . . . . . . . . . . . . . . . . . . . . . 7
• Prior to using the machine . . . . . . . . . . . . . . . . . . . . . . . . . . . . . . . . . . . . . . . 8
• The importance of water decalcification . . . . . . . . . . . . . . . . . . . . . . . . . . . . . 8
• Filling with salt . . . . . . . . . . . . . . . . . . . . . . . . . . . . . . . . . . . . . . . . . . . . . . . . . 8
• Testing strip . . . . . . . . . . . . . . . . . . . . . . . . . . . . . . . . . . . . . . . . . . . . . . . . . . . 9
• Adjusting salt consumption . . . . . . . . . . . . . . . . . . . . . . . . . . . . . . . . . . . . . . . 9
• Detergent usage . . . . . . . . . . . . . . . . . . . . . . . . . . . . . . . . . . . . . . . . . . . . . . . 11
• Filling the detergent compartment . . . . . . . . . . . . . . . . . . . . . . . . . . . . . . . . . 11
• Combined detergent . . . . . . . . . . . . . . . . . . . . . . . . . . . . . . . . . . . . . . . . . . . . 11
• Filling with rinse aid and making the setting . . . . . . . . . . . . . . . . . . . . . . . . . . 12
• Top Basket . . . . . . . . . . . . . . . . . . . . . . . . . . . . . . . . . . . . . . . . . . . . . . . . . . . 13
• Alternative basket loads . . . . . . . . . . . . . . . . . . . . . . . . . . . . . . . . . . . . . . . . . 14
• Standart loading and test data . . . . . . . . . . . . . . . . . . . . . . . . . . . . . . . . . . . . 15
• Programme items . . . . . . . . . . . . . . . . . . . . . . . . . . . . . . . . . . . . . . . . . . . . . . 16
• Switching on the machine . . . . . . . . . . . . . . . . . . . . . . . . . . . . . . . . . . . . . . . . 17
• Programme follow-up . . . . . . . . . . . . . . . . . . . . . . . . . . . . . . . . . . . . . . . . . . . 17
• Changing a programme . . . . . . . . . . . . . . . . . . . . . . . . . . . . . . . . . . . . . . . . . 17
• Changing a programme with resetting . . . . . . . . . . . . . . . . . . . . . . . . . . . . . . 18
• Switching the machine off . . . . . . . . . . . . . . . . . . . . . . . . . . . . . . . . . . . . . . . .
• Filters . . . . . . . . . . . . . . . . . . . . . . . . . . . . . . . . . . . . . . . . . . . . . . . . . . . . . . .
• Spray arms . . . . . . . . . . . . . . . . . . . . . . . . . . . . . . . . . . . . . . . . . . . . . . . . . . . 20
• Hose filter . . . . . . . . . . . . . . . . . . . . . . . . . . . . . . . . . . . . . . . . . . . . . . . . . . . . 20
19
19
18
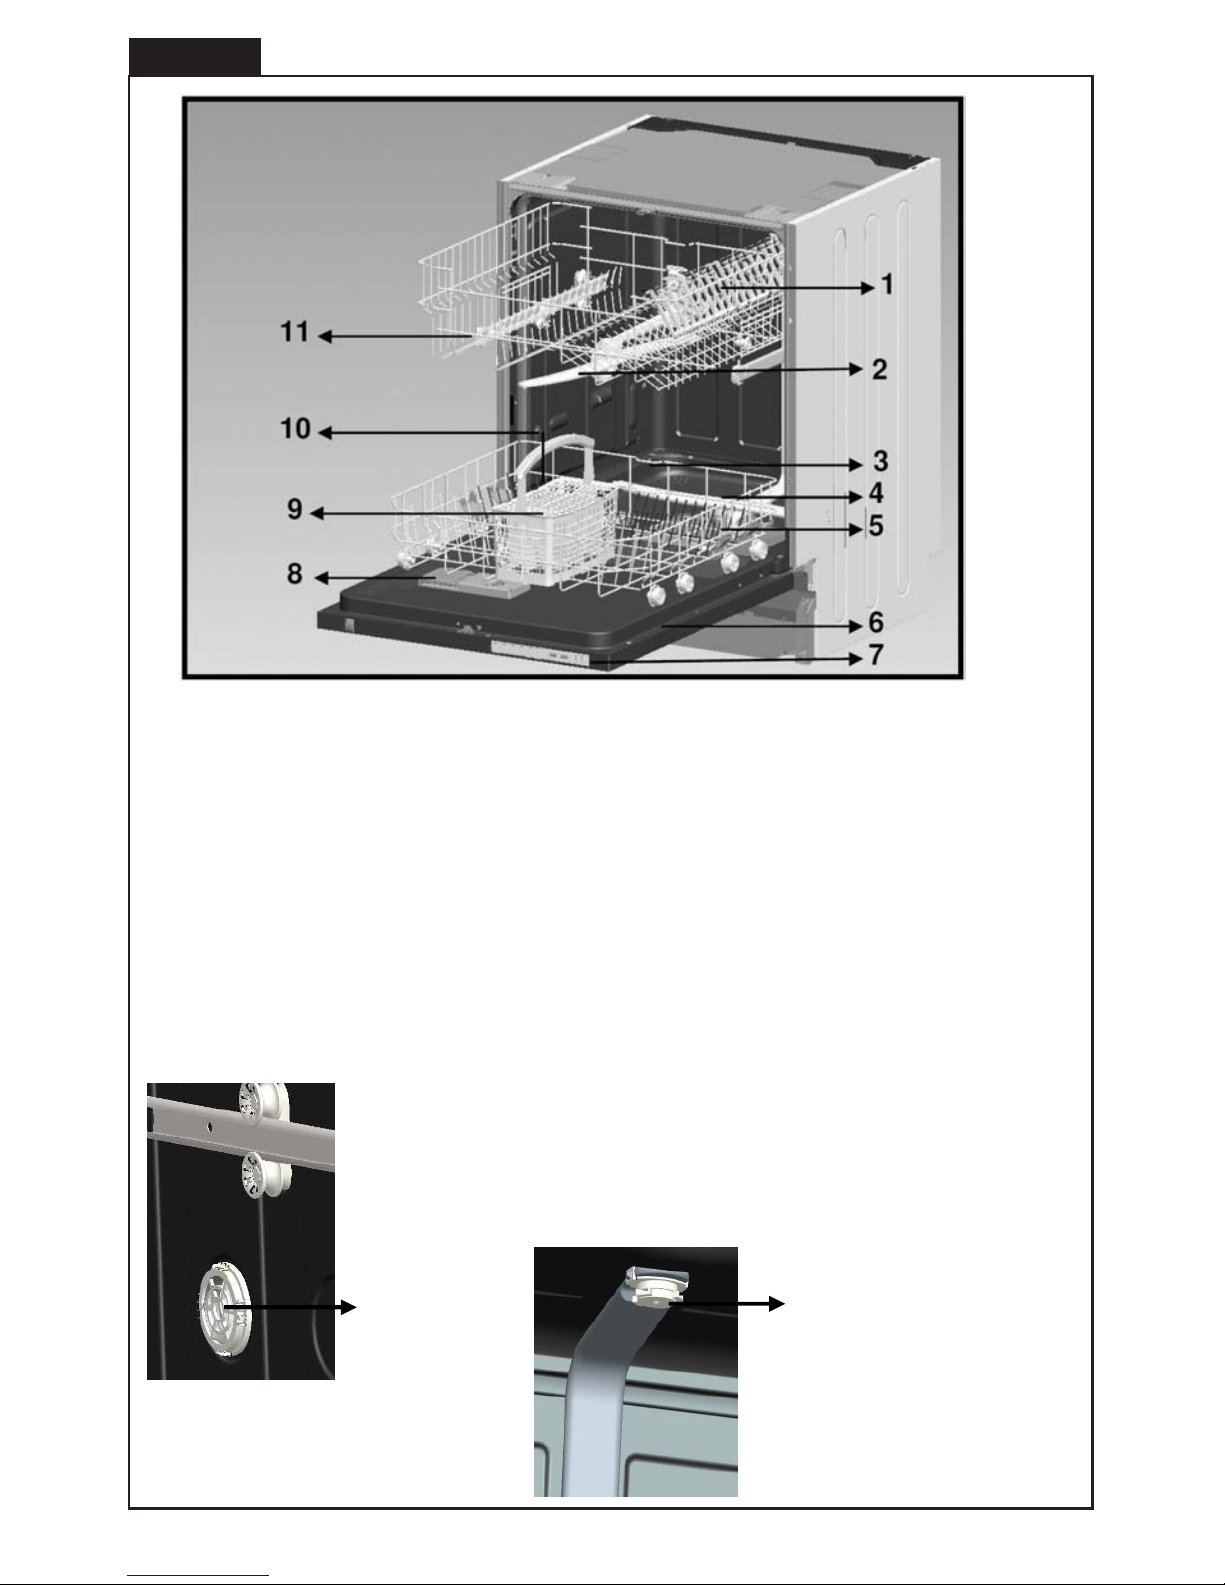
2
1. Upper basket with racks
2. Upper spray arm
3. Lower basket
4. Lower spray arm
5. Filters
6. Rating plate
7. Control Panel
8. Detergent and rinse-aid dispenser
9. Cutlery basket
10. Salt dispenser
11. Upper basket track latch
ENGLISH
12
Active Drying Unit: Th
is system provides
better drying performance for your dishes.
Ceiling Spray Arm: It provides
better washing for the dishes at
upper basket.
13
3
ENGLISH
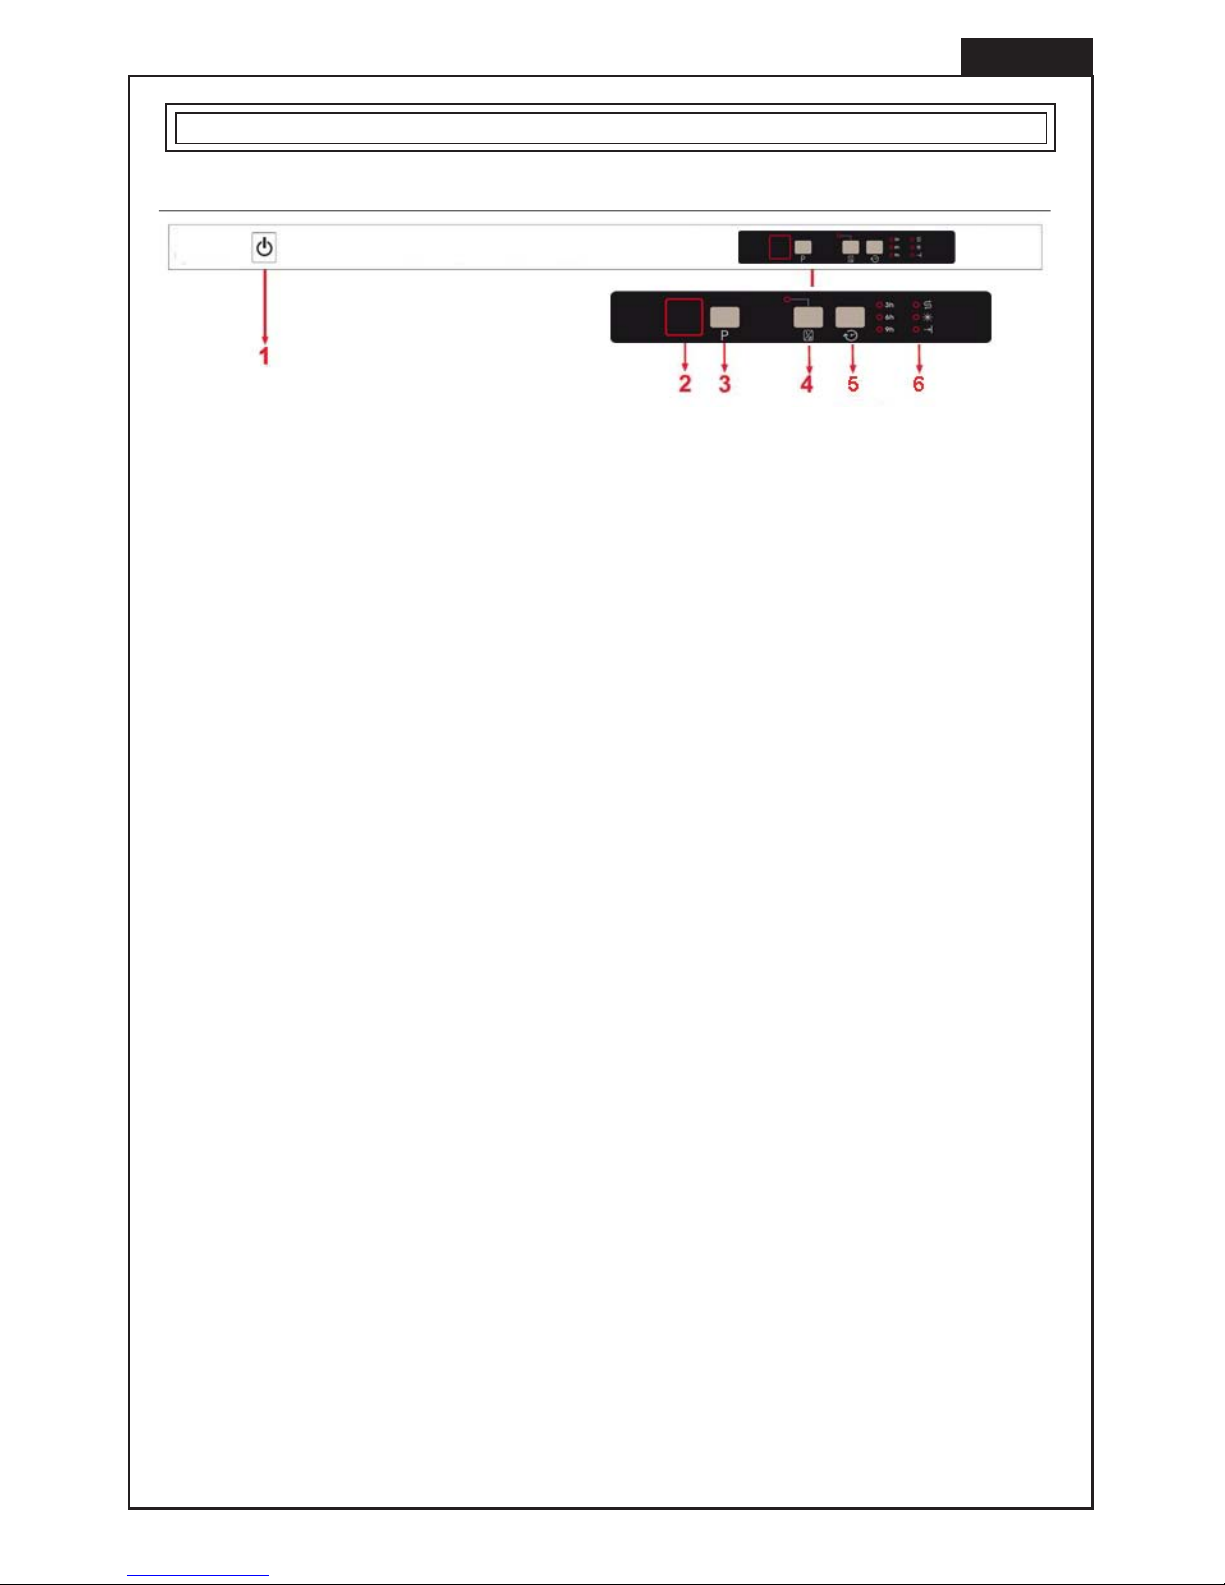
GETTING FAMILIAR WITH YOUR MACHINE
1.) Power On/Off Button
When the Power On/Off button is pressed, end of program
indicator starts lighting.
2.) Program Display
Program display indicates the number of the selected program.
3.) Program selection button
With the program selector button, you can select a suitable
program for your dishes.
4.) Half load option
By using the 'half load' feature of your dishwasher, you can reduce
the duration of your selected programs, and decrease your power
and water consumption by using less electricity and water.
5.)Delay Timer Button
Note 1
.
Thanks to the delay feature of your machine, you can delay the start time of the
program for 3-6-9 hours by pressing Delay button.
When you pres delay button, 3h led comes on. If you continue pressing Delay
Buton , 6h-9h leds will come on respectively on each press. when you select
delay time and the desired program,after closing the door the program with delay
will be activate If you want you can firstly choose the programme and then delay
time, this is also possible. If you want to change or cancel the delay time, you can
adjust by pressing Delay timer button.
When you delay a program, you can check the remaining time through display.
For example; when you select 9h delay time, 9h delay led comes on. When
remaining time is down to 6h, then 6h led comes on. In this way, you can follow
up the remaining time.
(only models with extra features): If you have used an extra feature on the
latest washing program, this feature will remain active also on the next washing
program. If you do not want to use this feature on the newly selected washing
program, press the selected feature button again, and check that the lamp on the
button goes off.

4
.) Salt Lack Warning indicator
Rinse aid Lack Warning indicator
In order to see whether softening salt in your machine is sufficient or not, check
salt lack warning light on the display.When salt lack warning light starts coming
on, you need to fill in the salt chamber.
In order to check that there is sufficient rinse aid in your machine check rinse aid
lack warning light on the display.When rinse aid lack warning light starts coming
on , fill in rinse aid chamber.
End of Program Indicator
End of program indicator on the control panel turns on when the selected washing
program is completed .Your machine also gives a buzzer sound for “5 times”
when the program is completed.
Technical specifications
Producer company has its right to amend design and technical specifications reserved.
The machine's service life is 10 years (the duration required to keep spare parts for the
machine to fulfil its usage functions).
All stages related to the machine are executed in accordance with the safety rules provided in
all relevant directives of the European Community.
2004/108/EC, 2006/95/EC, IEC 436/DIN 44990, EN 50242
• Certain components and the packaging of your machine have been produced from
recyclable materials.
• Plastic parts are marked with international abbreviations: (>PE< , >PS< , >POM<, >PP<...)
• Cardboard parts have been produced from recycled paper and they should be disposed of
into waste paper collection containers for recycling.
• Such materials are not suitable for being disposed of into garbage bins. They should be
delivered to recycling centres instead.
• Contact relevant centres in order to obtain information on methods and points of disposal.
• Check for any damage to your machine or to its packaging. Never start a machine
damaged in any way, make sure to contact an authorised service.
• Unwrap the packaging materials as indicated and dispose of them in accordance with the
rules.
• Choose a suitable, safe and level place to install your machine.
• Carry out the installation and connection of your machine by following the instructions.
• This machine should be installed and repaired by an authorised service only.
• Only original spare parts should be used with the machine.
• Before installing, be sure that the machine is unplugged.
• Check whether the indoor electrical fuse system is connected according to the regulations.
• All electrical connections must match the values indicated on the rating plate.
• Pay special attention and be sure that the machine does not stand on the electricity supply
cable.
• Never use an extension cord or a multiple socket for making a connection. The plug should
be comfortably accessible after the machine has been installed.
• Please assemble the dishwasher, which is inserted under or in the kitchen platform,
according to the instruction. Be sure that the product is fixed properly.
• After installing the machine to a suitable place, run it unloaded for the first time.
Conformity with the standards and Test data / EC Declaration of Conformity
Recycling
Safety Information
The points to pay attention during machine installation
SAFETY INFORMATION AND RECOMMENDATIONS
When you take delivery of your machine
ENGLISH
Capacity …………………………
Height…………………………….
Width ……………………………..
Depth …………………………….
Net Weight ……………………...
Electricity input ……………........
T
otal Power ……………………..
Heating Power …………………..
Pump Power …………………….
Drain Pump Power ……………..
Water supply pressure...............
Current …………………………..
10 place settings
815 mm – 870 mm
596 mm
450 mm
34 kg
220-240 V, 50 Hz
19000 W
18000 W
100 W
30 W
0.03 MPa (0,3 bar) - 1 MPa (10 bar)
10 A

In daily use
For your children's safety
In case of malfunctioning
Recommendations
• This machine is for household use; do not use it for any other purpose. Commercial usage
of the dishwasher will void the guarantee.
• Do not get up, sit or place a load on the open door of the dishwasher, it may fall over.
• Never put into the detergent and rinse aid dispensers of your machine anything other than
those detergents and rinse aids which are produced specifically for dishwashers. Our
company will not be responsible for any damage that might occur in your machine
otherwise.
• The water in the machine's washing section is no drinking water, do not drink it.
• Due to danger of explosion, do not put into the machine's washing section any chemical
dissolving agents such as solvents.
• Check whether plastic items are heat-resistant before washing them in the machine.
• Do not put into your machine those items which are not suitable for dishwashing. Also, do
not fill any basket above its capacity. Our company will not be responsible for any scratch
or rust to form on the inner frame of your machine due to basket movements otherwise.
• Especially because hot water may flow out, the machine door should not be opened under
any circumstances while the machine is in operation. In any case, a safety devices
ensures that the machine stops if the door is opened.
• Do not leave your dishwasher's door open. Failure to do so may lead to accidents.
• Place knives and other sharp-ended objects in the cutlery basket in blade-down position.
• This appliance is not intended for use by persons (including children) with reduced
physical, sensory or mental capabilities, or lack of experience and knowledge, unless they
have been given supervision or instruction concerning use of the appliance by a person
responsible for their safety.
• After removing the machine's packaging, make sure that the packaging material is out of
reach of children.
• Do not allow children to play with or start the machine.
• Keep your children away from detergents and rinse aids.
• Keep children away from the machine while it is open because there may still be residues
of cleaning substances inside the machine.
• Be sure that your old machine does not pose any threat to your children. Children are
known to have gotten themselves locked in old machines. To forestall such a situation,
break your machine's door lock and tear off the electrical cables.
• Any malfunction in the machine should be repaired definitely by qualified persons. Any
repair work performed by anyone other than the authorised service personnel will cause
your machine to be left outside the scope of warranty.
• Prior to any repair work on the machine, be sure that the machine is cut off from the mains.
Switch off the fuse or unplug the machine. Do not pull by the cable when unplugging. Make
sure to turn off the water tap.
• For energy and water saving, remove coarse residues on your dishes before placing the
dishes into the machine. Start your machine after having fully loaded it
• Use the pre-wash programme only whenever necessary.
• Place such hollow items as bowls, glasses and pots into the machine in such a way that
they will face down.
• You are recommended not to load into your machine any dishes different or more than
indicated.
ENGLISH
Items not suitable for dishwashing:
Warning:
Positioning the machine
Water connection
Water Inlet Hose
• Cigarette ashes, candle leftovers, polish, paint, chemical substances, iron-alloy materials;
• Forks, spoons and knives with wooden or bone, or ivory or nacre-coated handles; glued
items, items soiled with abrasive, acidic or base chemicals.
• Plastic items that are not heat-resistant, copper or tin-coated containers;
• Aluminium and silver objects (they may discolour, become dull)
• Certain delicate glass types, porcelains with ornamental printed patterns as they fade even
after the first wash; certain crystal items as they lose their transparency over time, adhered
cutlery that is not heat-resistant, lead crystal glasses, cutting boards, items manufactured
with synthetic fibre;
• Absorbent items as sponges or kitchen rags are not suitable for dishwashing.
Take care to buy dishwasher-proof sets in your future purchases.
When determining the place to put your machine on, take care to choose a place where you
can easily load and unload your dishes.
Do not put your machine in any location where there is the probability for the room
temperature to fall below 0°C.
Before positioning, take the machine out of its packaging by following the warnings located on
the package.
Position the machine close to a water tap or drain. You need to site your machine, taking into
consideration that its connections will not be altered once they are made.
Do not grip the machine by its door or panel in order to move it.
Take care to leave a certain clearance from all sides of the machine so that you can
comfortably move it back and forth during cleaning.
Make sure that the water inlet and outlet hoses do not get squeezed while positioning the
machine. Also, make sure that the machine does not stand on the electrical cable.
Adjust the machine's adjustable feet so that it can stand level and balanced. Proper
positioning of the machine ensures problem-free opening and closing of its door.
If the door of you machine does not close properly, check if the machine is stable on the floor it
stands; if not, adjust the adjustable feet and ensure its stable position.
Be sure that the indoor plumbing is suitable for installing a dishwasher. Also, we recommend
that you fit a filter at the entrance of your place or apartment so as to avoid any damage to
your machine because of any contamination (sand, clay, rust etc.) that might be occasionally
carried in through the mains water supply or the indoor plumbing, and to forestall such
complaints as yellowing and formation of deposits after washing.
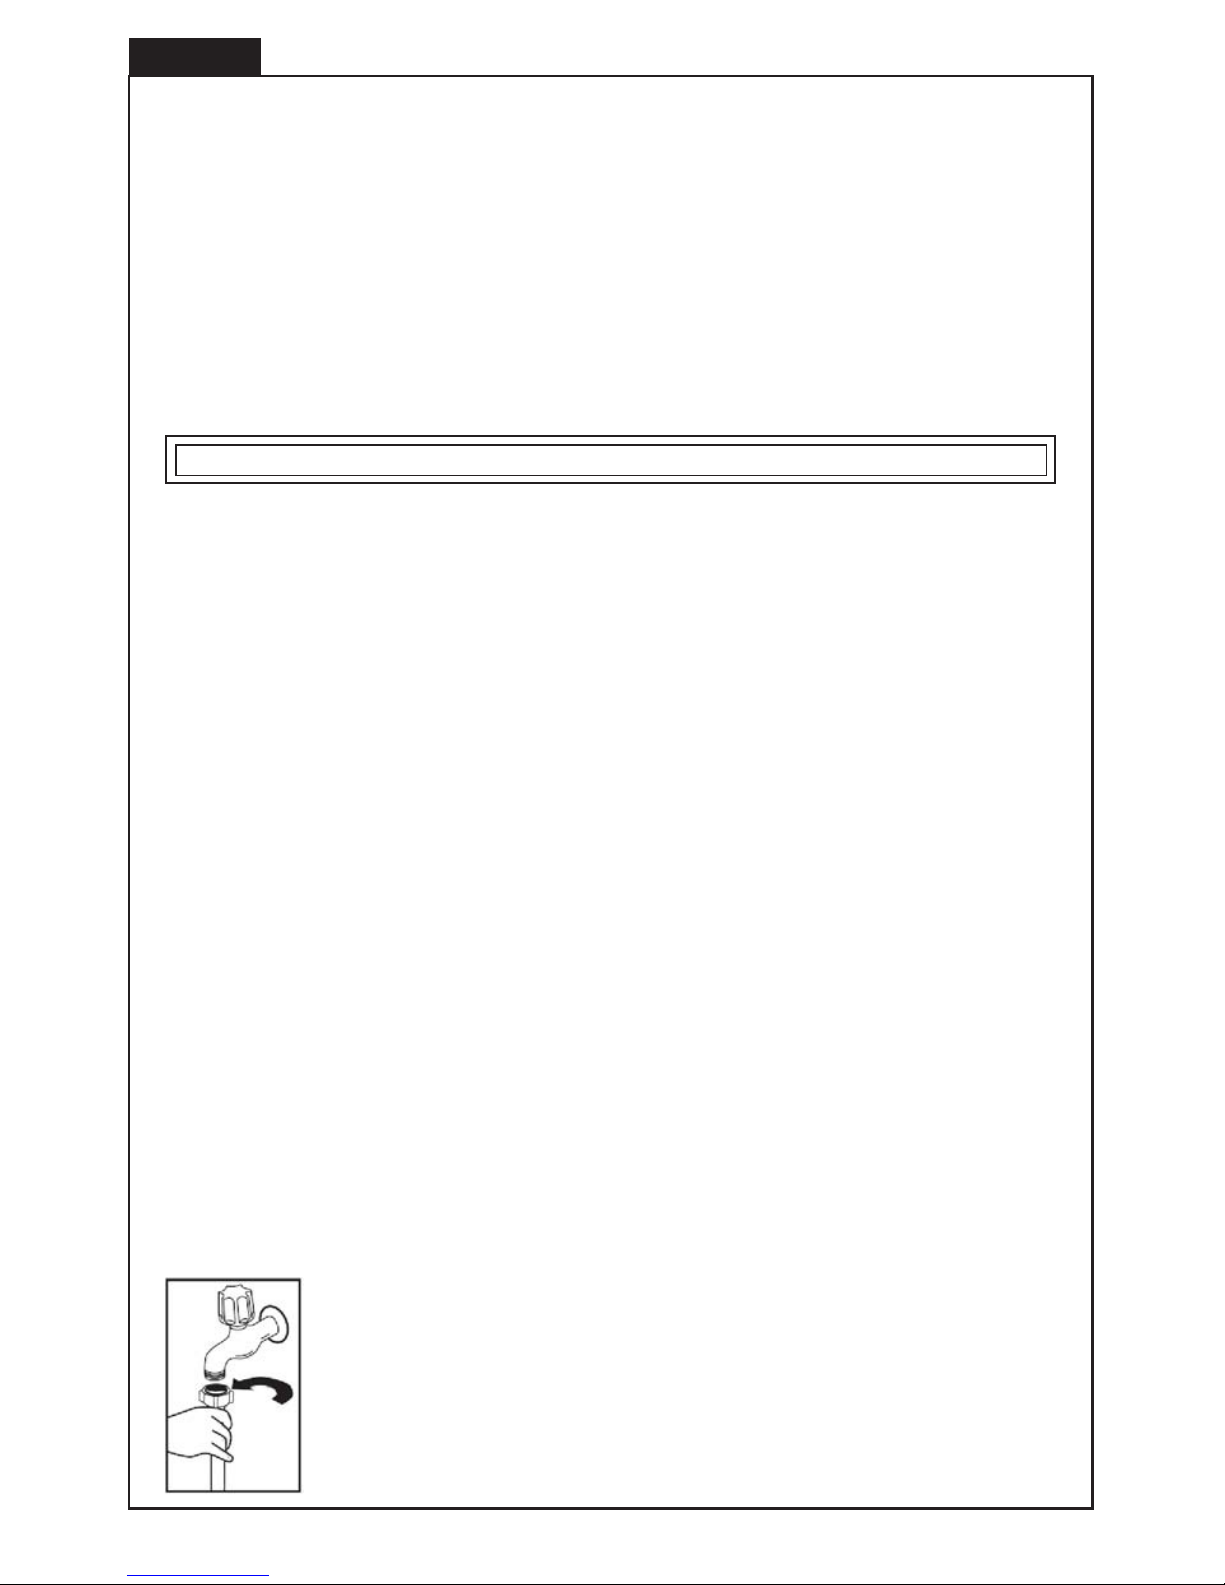
Do not use the water inlet hose of your old machine, if any. Use the new
water inlet hose supplied with your machine instead. If you are going to
connect a new or long-unused water inlet hose to your machine, run
water through it for a while before making the connection. Connect the
water inlet hose directly to the water inlet tap.The pressure supplied by
the tap should be at a minimum of 0.03 Mpa and and at a maximum of 1
Mpa.
INSTALLING THE MACHINE
ENGLISH
 Loading...