

Euro-Line Solar ApolloFLEX Mono Instructions Manual
ApolloFLEX Mono Instructions - English
!
1) Foreword
!
Thank you for purchasing the ApolloFLEX Mono™, a high quality solar panel designed and manufactured in
Germany. Please read the following instructions carefully in order to install, use and maintain the solar panel
correctly. Incorrect installation and negligent care can damage your module over time and void your warranty.!
!
2) Legal Disclaimer
!
Euro-Line Solar does not accept any liability for damage, loss or costs incurred due to incorrect and/or
nonprofessional installation and electrical connection of the solar panels. All information in this instruction
manual is correct according to current knowledge at the time of publication, nevertheless Euro-Line Solar
makes no legal warranty or guarantee, expressed or implied, as to the correctness of the manual. Euro-Line
Solar reserves the right to change these product and product properties at any time without prior notice, as
well as the content of this manual.!
!
3) Product Description
!
The ApolloFLEX Mono™ is a flat and flexible solar panel designed for installation on vehicles such as cars,
trucks, motorhomes, camping cars and caravans, and on boots such as motorboats, sailboats, narrowboats,
yachts and other water vehicles.!
Due to the high efficient and powerful mono-crystalline solar cells, the ApolloFLEX Mono is one of the most
efficient flat solar panels in the world. !
!
4) Important Information
!
•
Do not attempt to open the junction box attached to the panel.!
•
The panels may only be mounted on smooth surfaces without any bumps, gutters, edges or some other type
of raised or uneven surface.!
•
ApolloFLEX Mono panels are semi-flexible, not completely bendable. Over-bending the solar panel will
permanently damage the panel and the photovoltaic cells, and invalidate the warranty.!
•
Take note that it is difficult to remove the panels once they are glued down and that damage can occur to the
panels if you do so. Only a complete flat glueing of the surface is acceptable, no dots or bubbles of glue. !
•
When mounting the solar panel with screws, only use the pre marked screw locations in the corners to avoid
compromising the panel. Do not attempt to drill holes in any other location on the solar panel.!
•
Solar panels generate electricity when exposed to light. To avoid shock, fire and/or injury cover the panels
when handling the electrical wires.!
•
Only walk on a solar panel with soft soled shoes and only when the panel is mounted above a fully
supported solid surface. It is not recommended to install the panel in a high traffic area.!
•
Remove all metallic items such as watches or jewelry when installing solar panels.!
•
Do not handle the output cables with bare hands when panel is out in the sun.!
•
These solar panels are not intended to be installed and connected to more than three units in an array.
Without additional electrical protection and safety measures, do not connect more than three panels in series
or parallel. This will void the warranty.!
•
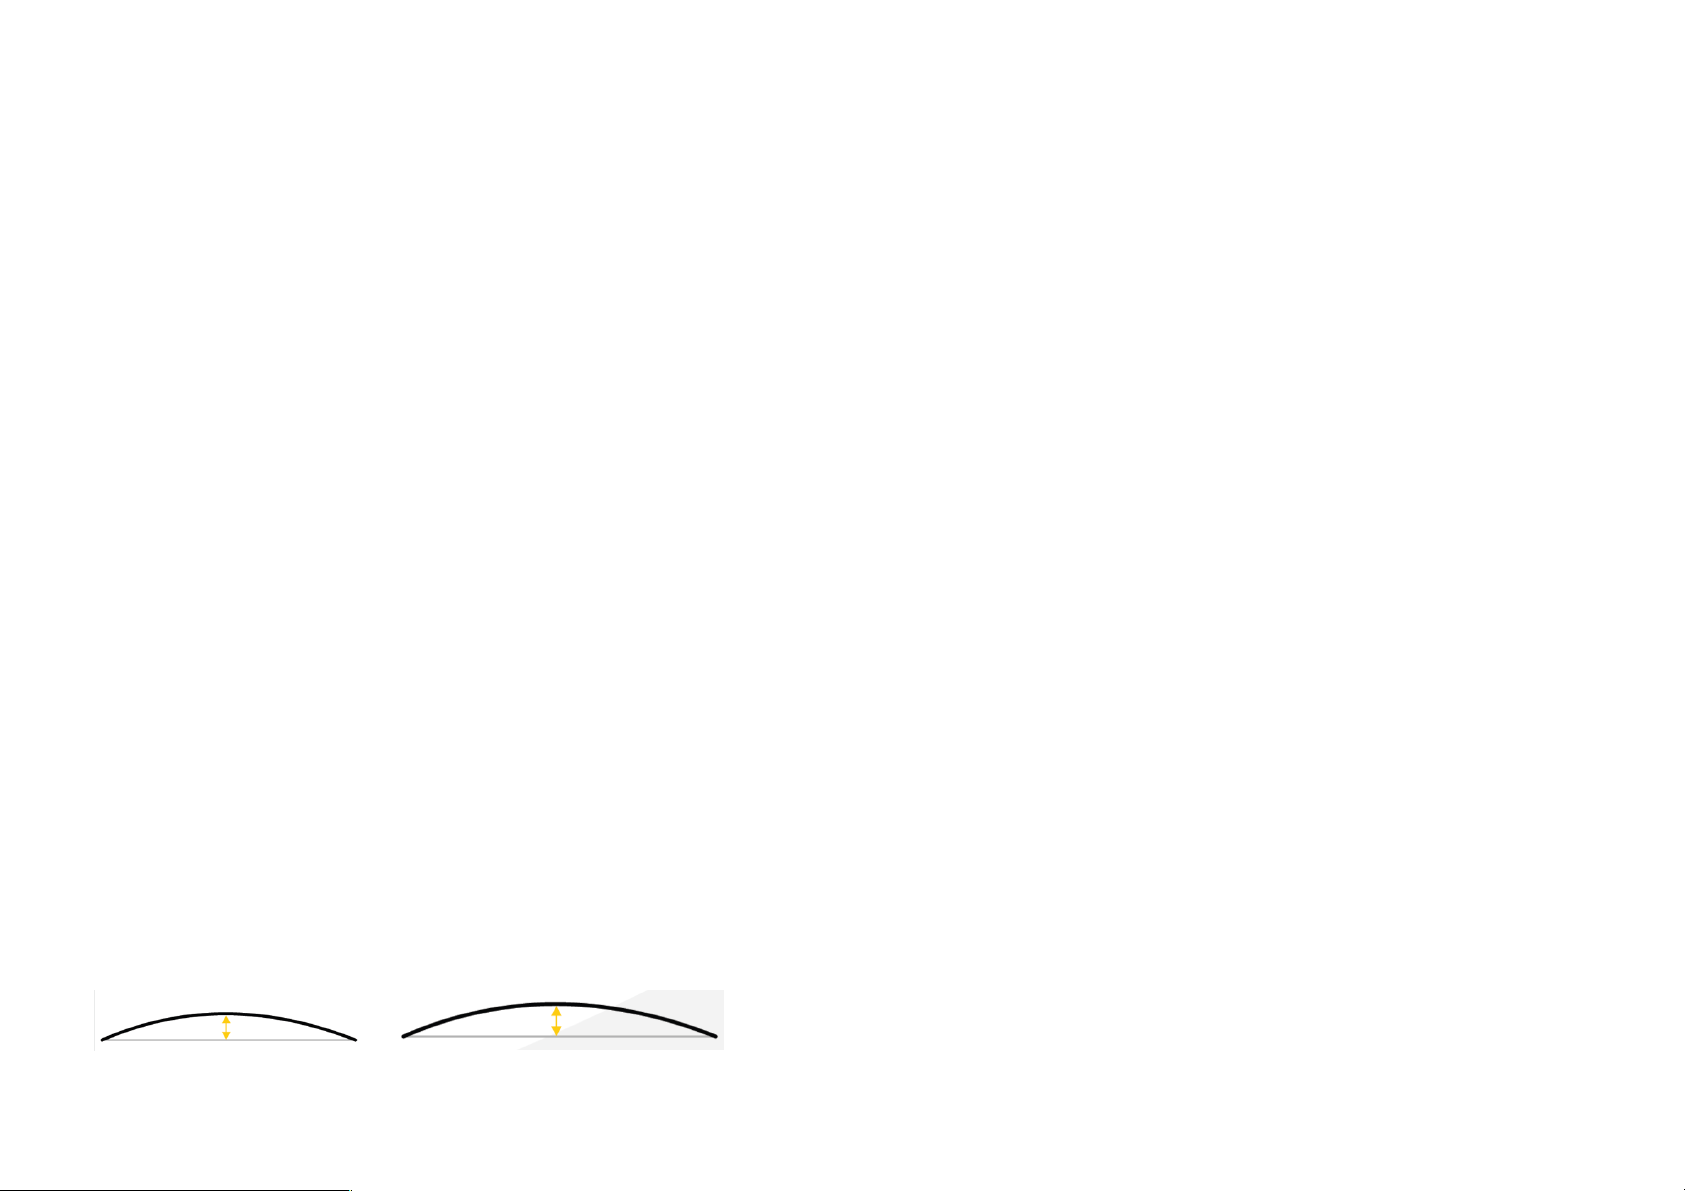
The ApolloFLEX Mono panels are only bendable to the maximal radius as seen in the following pictures: !
!
!
!
!
70 Watt Panel
107 Watt Panel
Maximum curvature: 50mm
Maximum curvature: 100mm
Any other panel other than the ones mentioned above may not be bent.!
!
5) Installation / Mounting
!
Choosing a mounting location:!
!
The solar panel will function most efficiently with the sun shining onto it at a vertical angle. Choose a location
that is free from shade and directed towards the equator (south facing in the Northern Hemisphere and north
facing in the Southern Hemisphere) !
However such a location is rarely possible on a vehicle or boat due to movement, lack of space and location of
the sun, thus a good location to mount the panel is on a flat, horizontal surface, away from objects which might
cause shadows on the solar panel.!
!
In addition, the mounting location should be done on a surface which is strong and rigid. Permanent mounting
on canvas or cloth, for example, is not suitable. Damage caused to panel due to installation on non-smooth
and/or non-rigid surfaces will not be covered under warranty.!
!
The maximum bend radius of each panel is:!
!
ApolloFLEX Mono 70W: 50mm!
ApolloFLEX Mono 107W: 100mm!
!
Do not attempt to bend the solar panel any further. It is very possible that you may damage the solar cells or
the panel and invalidate your warranty.!
!
If using the cable roof enclosure, attempt to install it as close to the solar panel as possible to avoid loose
cable.!
!
Preparation:!
!
It is important before mounting the solar panel to clean and dry the surface to remove any dirt, rust or grease.
The cleaner the surface before installation, the better the adhesive will work. No special pretreatment with
chemicals is needed if using Dekasyl MS-5 adhesive.!
!
To avoid short circuits and/or injury, cover the solar panel while making electrical connections.!
!
Mounting ApolloFLEX Mono:!
!
a) Mounting with glue:!
!
Tools needed: !
Adhesive glue / sealant (if not provided in kit)!
Caulking gun!
Putty knife or spackle tool!
!
When using glue to mount the ApolloFLEX Mono to a surface, we recommend using Dekalin Dekasyl MS-5.
Apply the glue as shown in Picture (2). Then use a wide putty knife or spackle tool to spread the glue evenly
across the panel. This is important to eliminate air pockets. Leave a 5cm space between the glue and the
edges of the panel. Do not break the line of glue, it is also a sealant to prevent water from getting under the
panel. !
!
Once panel with glue has been placed on mounting surface, apply even downward pressure to the entire
surface of the panel. Eliminate any air pockets. If glue comes out the sides of the panel, only remove it with a
putty knife or similar. Do not use chemicals. Do not move or adjust the panel once it has been glued, this will
result in loss of adhesion. Allow the glue to harden for a minimum of six (6) hours before continuing with
electrical connection to minimize loss of adhesion.!
b) Mounting at the screw holes:!
!
Tools needed: !
Screw driver!
Drill with drill bit!
4x M6 Screw Bolt!
4x M6 Nut for Screw Bolt!
4x M6 Washers!
!
All ApolloFLEX panels have screw hole markings where holes may be drilled through the panel. ONLY drill
holes at these locations. !
Due to different surfaces and roof types, there are many ways to mount using screws. The actual mounting
process will depend on the application.!
The best method is to use a bolt and nut with plain washers, all made of stainless steel, on the top and bottom
of the solar panel. Hardware should be compatible with the solar panel and mounting surface to avoid galvanic
corrosion. !
Pre-drill the holes according to the screw hole markings on the panel. Make sure not to use too much pressure
on the panel when drilling.!
Make sure the screw hole is waterproof and insulated by inserting a sealant before the screw. Dekalin Dekasyl
MS-5 in recommended. !
!
Mounting cable roof enclosure:!
!
Tools needed: !
Screw driver!
Drill with drill bit!
Putty knife!
!
After choosing an optimal location, sketch around the enclosure with a pencil. In the middle drill a hole large
enough for the cable of the solar panel to fit through. Fit the cable through the roof enclosure and the hole.
Apply glue to the bottom of the enclosure and adhere it to the surface around the drill hole. Remove excess
glue with a putty knife. Allow the glue to adhere for a minimum of six (6) hours. Do not move or adjust
enclosure once glue has started to adhere.!
!
6) Electrical Connection
!
To avoid short circuits and/or injury, cover the solar panel while making electrical connections.!
!
All ApolloFLEX Mono solar panels must be used in conjunction with a solar charger controller. Failure to do so
may result in damaging the battery. Votronic charge controllers are recommended. ApolloFLEX solar panels
can also be connected to any other type of charge controller.!
!
Important: Make sure the charge controller you have chosen is compatible with the type of battery which you
are using.!
!
Preparation:!
!
Choose a mounting location for the solar charge controller. Follow the manufacturer’s instructions of how to
mount it. The recommended distance between solar charge controller and main battery is 1.5 meters. If you
are using the battery connection cable that comes with the ApolloFLEX Mono kit, a fuse is already integrated
into the cable. If not, attach a fuse to the positive (+) cable which is twice the amount of amps which are
produced by the panels.!
Measure the length of cable needed to connect the ApolloFLEX Mono solar panel to the charge controller. If
the cable is too long, cut the cable to the appropriate length. Strip the wires and crimp an insulated ferrule
each to the end of the positive and negative wires. Using a ferrule allows for a more efficient electrical
connectivity than bare stranded wire.!
!
When connecting to a 24V electrical system, you must connect two 12V panels in series. A 24V compatible
solar charge controller is also required. !
!
Example of serial connection of solar panels see Picture 3!
!
Example of parallel connection of solar panels see Picture 4 !
!
Connection:!
!
a) Connect the solar charge controller to the main battery. Always observe correct polarity. Allow the controller
to initialize and recognize the battery.!
b) Make sure the solar panel is covered. !
c) Connect the solar panel to the solar charge controller. Always observe correct polarity.!
!
Note: Euro-Line Solar GmbH takes no responsibility for damages on the module caused by wrong installation
and by not following this installation manual.!
!
7) Technical Details
!
!
8) Maintenance and Care
!
ApolloFLEX Mono solar panels are designed for long product life and require no maintenance outside of
cleaning. If the angle of the installation of the solar panel is more than 5 degrees, normal rainfall should be
sufficient to keep the panel surface clean of dirt. !
!
•
Panels should be cleaned periodically to remove salt deposits, dirt, dust and bird droppings.!
•
Only water and mild nonabrasive cleaners should be used with a cloth. !
•
Do not use chemicals.!
•
Do not use sharp objects.!
•
Flat mounted panels may need to be cleaned more often.!
•
Biannual check of system wiring is recommended.!
!
9) Customer Service
!
Should a technical problem arise, please contact the retailer from which you ordered the panel first. Most
problems can be solved easily with a telephone call.!
•
Always contact your retailer first before returning a module or charge controller.!
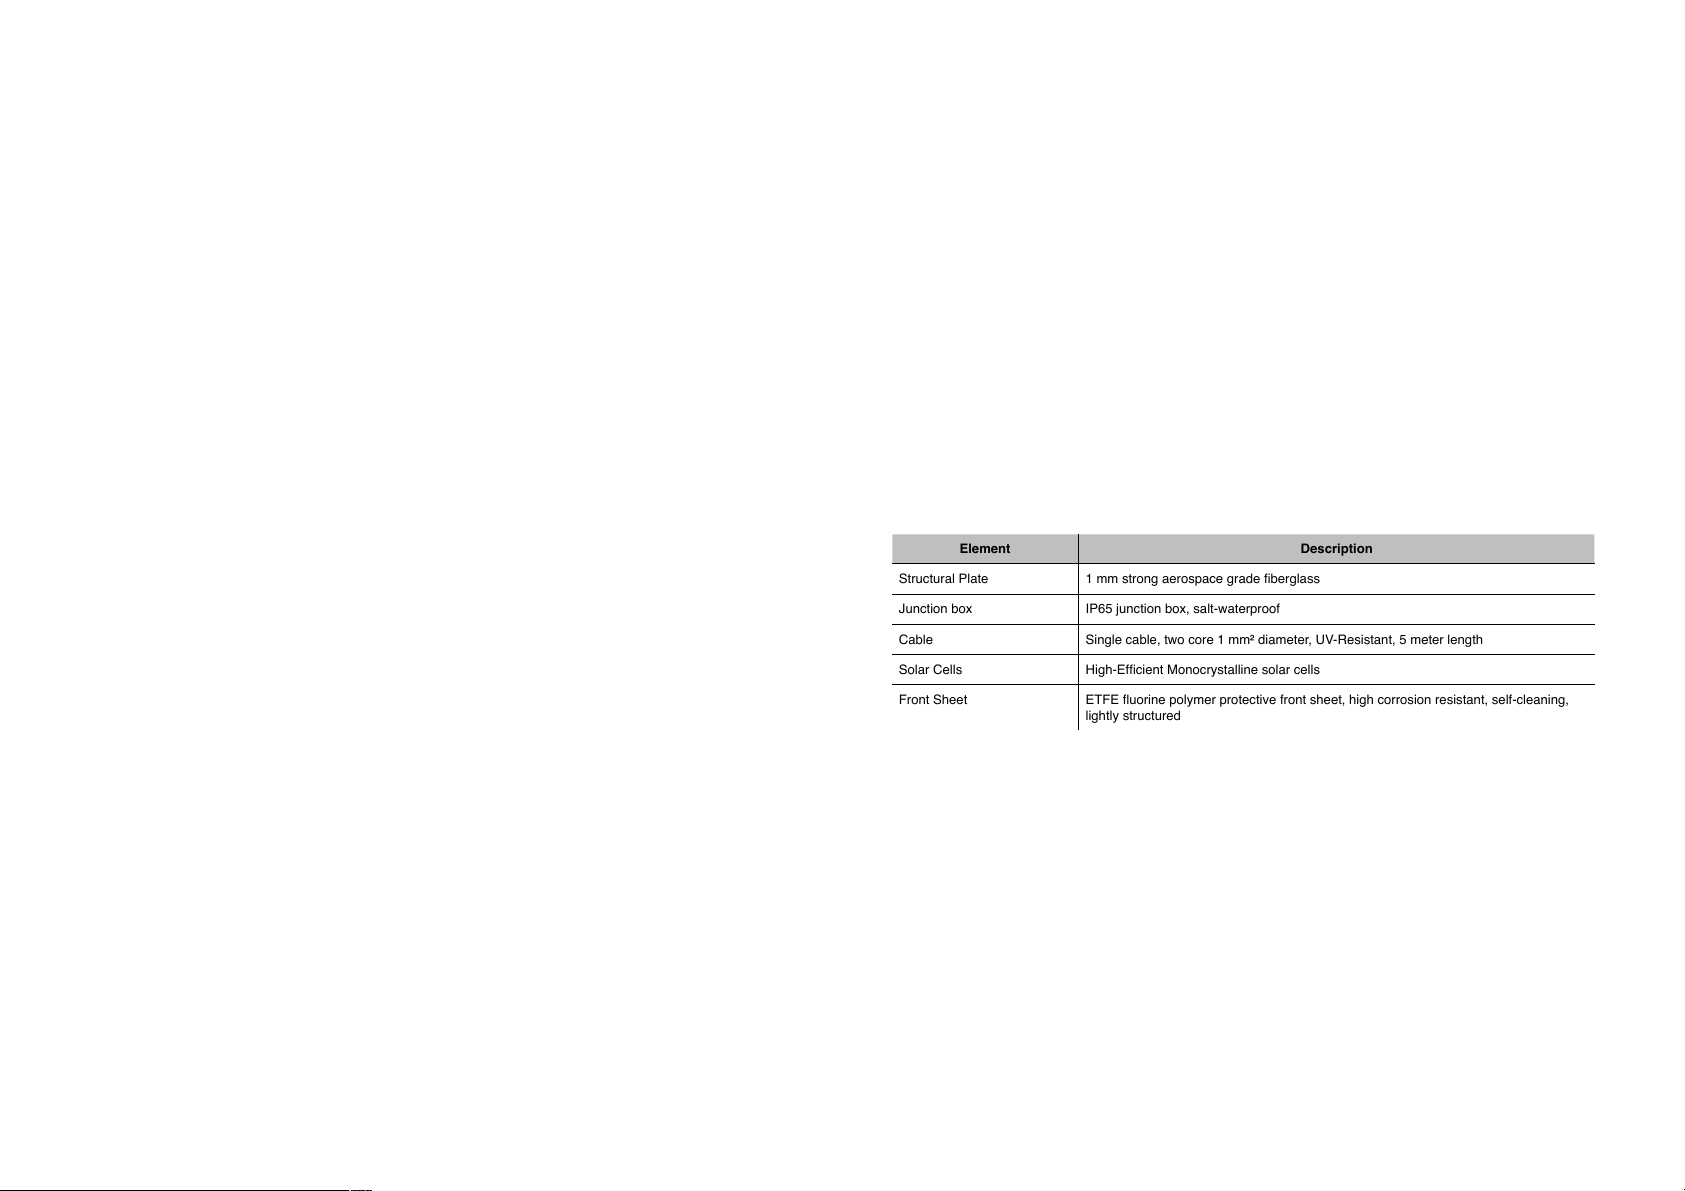
Element
Description
Structural Plate
1 mm strong aerospace grade fiberglass
Junction box
IP65 junction box, salt-waterproof
Cable
Single cable, two core 1 mm² diameter, UV-Resistant, 5 meter length
Solar Cells
High-Efficient Monocrystalline solar cells
Front Sheet
ETFE fluorine polymer protective front sheet, high corrosion resistant, self-cleaning,
lightly structured

•
Please make sure to keep the original invoice and the serial number of the product at hand.!
!
10) Warranty Information
!
Euro-Line Solar GmbH provides the following product warranty:
!
10.1 The warranty period for any solar products manufactured by Euro-Line Solar GmbH is two (2) years from
the time of purchase to the original user. This product warranty covers material and workmanship defects. The
panels must be installed with no possibility of moving freely. It must be permanently mounted. They must also
not exceed the maximum curvature allowed: 50mm for 70W panel and 100mm for 107W panel. Any damage
incurred due to improper installation or handling resulting from non-compliance to the instructional manual is
not covered under warranty.
!
10.2 Any defects within the meaning of section 10.1 must be formalized in writing and submitted to the seller
within the period set forth under section 10.1. There is a statutory assumption under Article 476 of the German
Civil Code (BGB) that a defect within the meaning of section 10.1 existed at the time of transfer of risk if it
emerges within six months following the transfer of risk, unless this assumption cannot be applied to the
module supplied by Euro-Line Solar GmbH or the nature of the defect.
!
The statutory guarantee rights shall apply during the statutory guarantee period (24 months). If a defect within
the meaning of section 10.1 is identified within this period, defective modules will be repaired or replaced
within a reasonable period of time, unless specifically agreed otherwise.
!
10.3 Any and all transport costs incurred during the return of panels, defect or otherwise, as well as transport
of replacement or repaired panels are not covered under warranty and are the responsibility of the user. Any
and all costs incurred during the removal of panels, defect or otherwise, as well as the installation of
replacement or repaired panels is not covered under warranty and is the responsibility of the user.
!
10.4 Any and all claims not expressly granted under these special guarantee terms and conditions are
excluded. This exclusion in particular applies to all compensation claims for indirect and/or consequential
damage (e.g. lost feed-in compensation, interest expenses, costs for obtaining replacement electricity etc.) or
for damage not caused by the modules themselves, unless the claim is based on the intentional or grossly
negligent conduct of Euro-Line Solar GmbH or on injury to life, limb or health. The statutory provisions under
the Product Liability Law are not affected thereby.
!
11) Performance Guarantee
!
Euro-Line Solar GmbH provides the following performance guarantee: 90% of the minimum performance
specified for three (3) years from the time of purchase to the original user.
!
11.1 If the performance of a module falls below 90% of the minimum performance specified on the data sheet
within the above-mentioned guarantee period, Euro-Line Solar GmbH shall, at its discretion, compensate for
the shortfall in performance by supplying additional modules or by repairing or replacing the module.
!
A prerequisite for granting the performance guarantee is that the relevant module was used in accordance with
the specifications.
!
11.2 Apart from the guaranteed minimum performance, the performance guarantee does not cover modules
which exhibit further defects, e.g. due to external influences (including force majeure), which have been
destroyed or damaged as a result of modifications or improper installation, use, operation, storage, transport
or handling, or which were exposed to interference from third parties, in particular in the case of noncompliance with the installation, operation and maintenance instructions provided by Euro-Line Solar GmbH.
The guarantee will be invalidated if there are signs that the serial number or the type plate have been
tampered with, if they are not unambiguously identifiable for other reasons or if the module has been removed
from its original installation site.
!
ApolloFLEX Mono is a trademark of Euro-Line Solar GmbH. All other trademarks are property of their
respective owners.
ApolloFLEX Mono Bedienungsanleitung - Deutsch
!
1) Vorwort
!
Vielen Dank, dass Sie ein ApolloFLEX Mono™ erworben haben – ein hochwertiges Solarpanel, konstruiert!
und hergestellt in Deutschland. Bevor Sie beginnen, lesen Sie bitte die folgenden Anweisungen sorgfältig!
durch, um das Solarpanel richtig zu installieren, zu benutzen und zu warten.!
!
2) Haftungsausschluss
!
Die Euro-Line Solar GmbH übernimmt keine Haftung für Schäden, Verluste oder Mehrkosten, die durch den
nicht sach- und fachgerechte Anschluss bzw. Verwendung der betreffenden solaren Leichtmodule gemäß
dieser Anleitung zurückzuführen sind. Sämtliche Angaben in dieser Anleitung werden nach dem aktuellen
Wissensstand als korrekt angesehen; dennoch sind damit keine direkten oder indirekten rechtlichen
Zusicherungen oder Gewährleistungen verbunden. Die Euro-Line Solar GmbH behält es sich vor, Produkte
und Produkteigenschaften ohne vorherige Ankündigung zu ändern, dasselbe gilt für die Inhalte dieser
Anleitung.!
!
3) Produktbeschreibung
!
Das ApolloFLEX Mono™ ist ein flaches und leicht flexibles Solarpanel für die Installation an Fahrzeugen wie!
Personen- und Lastwagen, Wohnmobilen und Campingwagen sowie auf Booten wie Motor-, Segel-, und!
Hausbooten, Yachten und anderen Wasserfahrzeugen.!
!
Dank der hocheffizienten und leistungsstarken monokristallinen Solarzellen ist das ApolloFLEX Mono das
effizienteste Flachsolarpanel der Welt.!
!
4) Wichtige Informationen
!
•
Versuchen Sie nicht, die an dem Panel befestigte Anschlussdose zu öffnen.!
•
Nur vollflächiges Aufbringen auf Unterlage mit glatter Oberfläche ist erlaubt. (also, ohne Noppen, Riefen,
Kanten, Erhebungen usw.).!
•
ApolloFLEX Mono-Panels sind semi-flexibel, aber nicht vollständig biegbar. Durch zu starkes Biegen des
Solarpanels werden das Panel und die Photovoltaikzellen dauerhaft geschädigt, was zu einem Verlust des
Garantieanspruchs führt. Grundsätzlich ist das Leichtmodule so zu befestigen dass es nicht schwingen
kann!!
•
Verwenden Sie bei der Montage des Solarpanels mit Schrauben nur die gekennzeichneten
Schraubenpositionen, um eine Beschädigung des Panels zu vermeiden. Bohren Sie keine Löcher an
anderen Stellen des Solarpanels.!
•
Solarpanels erzeugen Strom, wenn sie Licht ausgesetzt werden. Decken Sie bei der Handhabung der
elektrischen Kabel vor und während der Installation die Panels ab, um elektrische Schläge, Feuer und/oder
Verletzungen zu vermeiden.!
•
Begehen Sie das Solarpanel nur mit Schuhen mit weichen Sohlen und nur, wenn das Panel auf einer festen
Oberfläche vollständig abgestützt ist. Installieren Sie das Panel möglichst nicht in stark frequentierten
Verkehrsbereichen.!
•
Tragen Sie bei der Montage von Solarpanels keine metallischen Gegenstände wie Uhren oder Schmuck.!
•
Berühren Sie die Anschlusskabel nicht mit bloßen Händen, wenn das Panel der Sonne ausgesetzt ist.!
•
Diese Module sind nicht dafür vorgesehen, mehr als 3 Module zusammenzuschalten und damit eine
größere Generatoranlage zu betreiben. Ohne zusätzliche elektrische Sicherheitsmaßnahmen dürfen
nicht mehr als 3 Leichtmodule in Reihe oder Parallel geschaltet werden.!
 Loading...