

EUROIMMUN Medizinische Labordiagnostika AG Sprinter XL Instructions For Use Manual
EUROIMMUN
Medizinische
Labordiagnostika
AG
Instructions for use
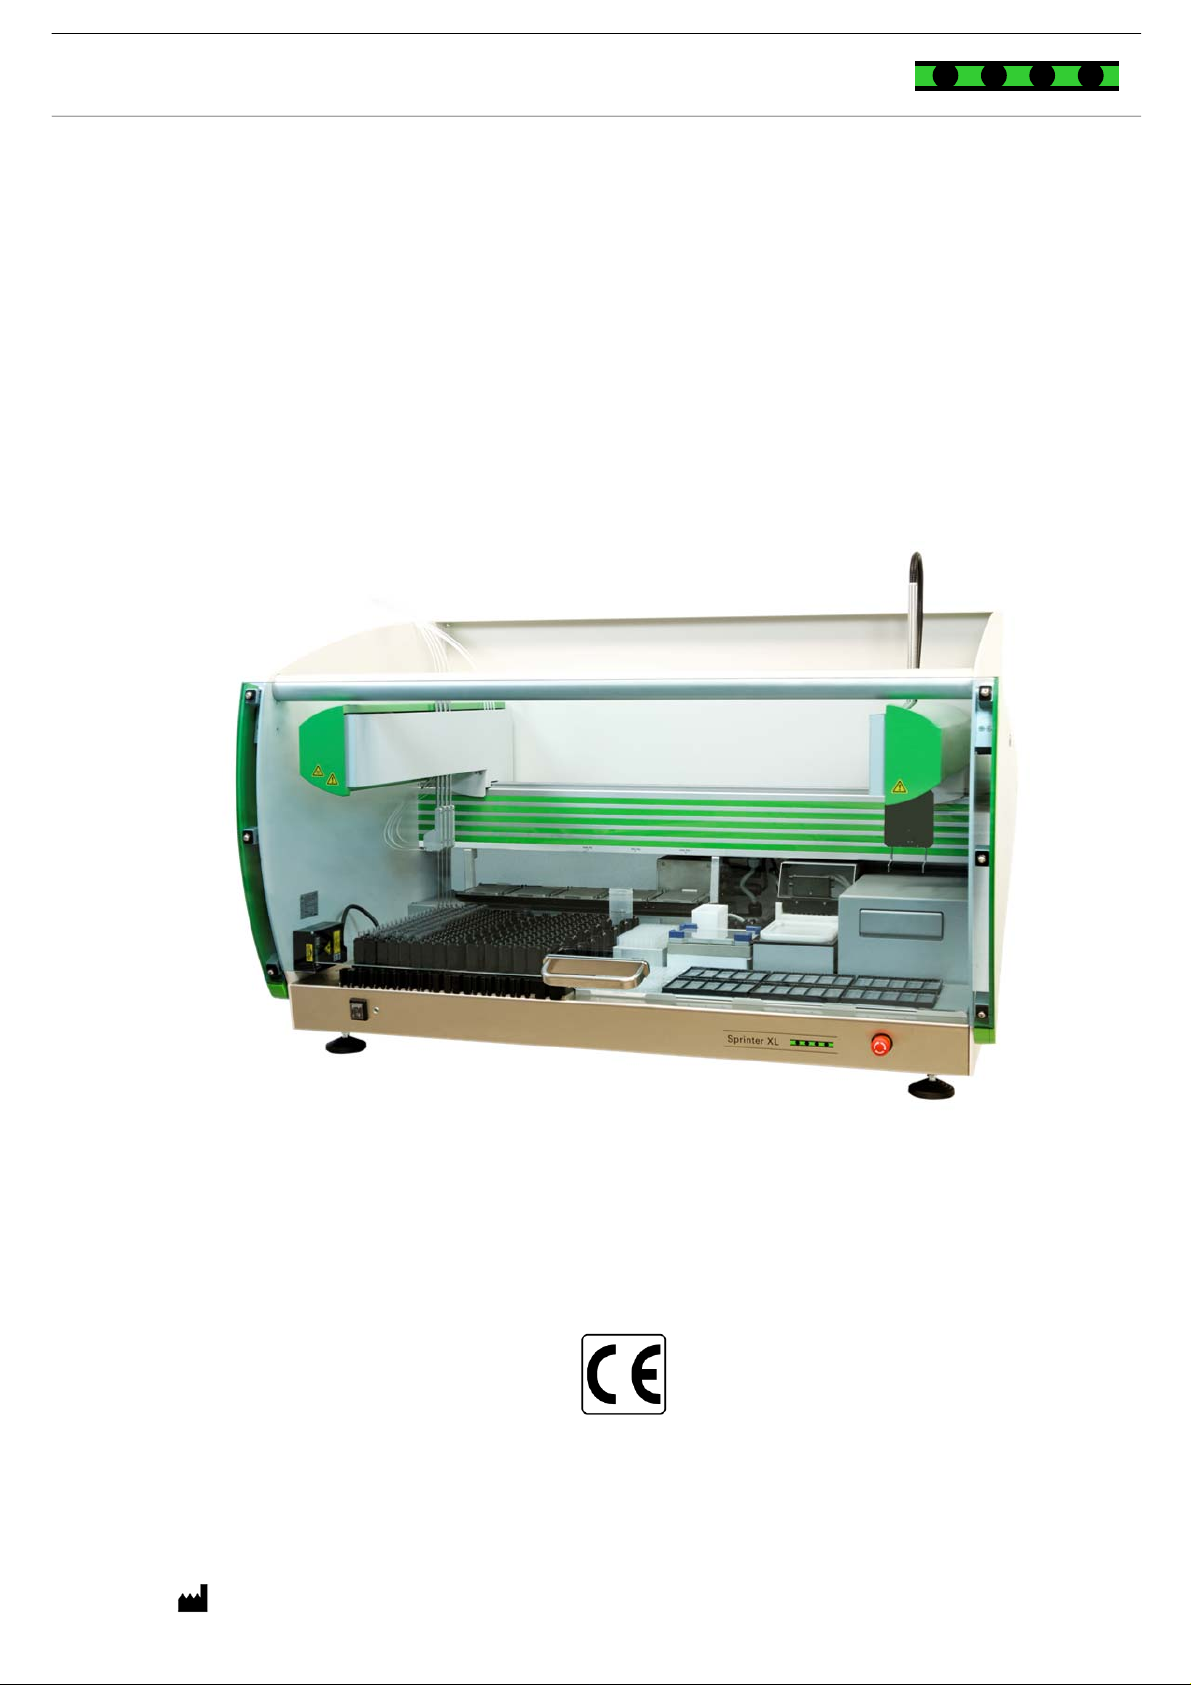
Sprinter XL
EUROIMMUN Medizinische Labordiagnostika AG · D-23560 Lübeck · Seekamp 31 · Tel. 0 45 1/58 55-0 · Fax 58 55-591

Medizinische
EUROIMMUN
Knowledge of this manual is required for operation of the instrument. Therefore, please make yourself
familiar with the contents of this manual and pay attention to the notes on the safe operation of the
instrument.
The specifications are subject to change; the manual is not covered by an update service.
© Unless expressly authorised, forwarding and duplication of this document, and the utilisation and
communication of its contents are not permitted. Violation will entail an obligation to pay
compensation. All rights reserved in the event of granting of patents or registration of a utility
model.
Labordiagnostika
AG
Publisher: EUROIMMUN Medizinische Labordiagnostika AG
Seekamp 31
23560 Luebeck, Germany
Phone: +49 (0) 451 5855 0
Fax: +49 (0) 451 5855 591
Internet: www.euroimmun.com

Medizinische
EUROIMMUN
Labordiagnostika
AG
1 Table of contents
1 TABLE OF CONTENTS - 1 -
2 WARNING, SAFETY AND OTHER NOTICES - 3 -
3 INTRODUCTION - 5 -
3.1 Intended use - 5 -
3.2 Validation - 5 -
4 SAFETY NOTES - 6 -
4.1 General - 6 -
4.2 Instrument safety and EMC - 10 -
4.3 Photobiological safety - 10 -
4.4 Position of the safety labels and the nameplate - 10 -
4.5 Maintenance - 11 -
4.6 Disposal - 11 -
4.7 Warranty notes - 12 -
5 GENERAL INFORMATION ON THE INSTRUMENT - 13 -
5.1 Technical data - 13 -
5.2 Instrument description - 16 -
6 INSTALLATION PROCESS - 21 -
6.1 Scope of delivery - 21 -
6.2 Unpacking, transport, storage - 21 -
6.3 Ambient conditions - 22 -
6.4 Installation and commissioning - 22 -
7 OPERATING INSTRUCTIONS - 24 -
7.1 The Sprinter XL software - 24 -
7.2 Before and after each worklist - 27 -
7.2.1 Flushing with the system liquid - 27 -
7.2.2
Decontamination of the pipetting needles - 29 -
7.2.3 Rinsing the washer head - 30 -
7.2.4 Completing a worklist - 31 -
7.3 Creating a worklist - 31 -
7.3.1 Manual creation of a worklist with non-barcoded samples - 31 -
7.3.2 Importing a worklist from lab software - 32 -
7.3.3 Scanning barcoded samples - 32 -
7.3.4 Editing a worklist - 35 -
7.4 Running a test - 37 -
7.4.1 Loading the Sprinter XL for immunofluorescence - 38 -
7.4.2 Optional: Reading of slide ID (2DBarcode) - 45 -
7.4.3 Loading the Sprinter XL for ELISA - 49 -
7.4.4 During the test run (Start, Pause, Stop) - 56 -
1 Table of contents - 1 -

EUROIMMUN
8 RESULT REPORTS - 59 -
9 CLEANING AND MAINTENANCE - 64 -
10 ERROR REMEDIES - 68 -
11 CONSUMABLES AND ACCESSORIES - 70 -
9.1 Maintenance schedule - 64 -
9.1.1 Daily maintenance work - 64 -
9.1.2 Weekly maintenance work - 64 -
9.1.3 Monthly cleaning - 65 -
9.2 Service plan (for service technicians) - 67 -
9.3 Instrument disinfection - 67 -
9.4 Decommissioning the system - 67 -
10.1 Error message: No Liquid found - 68 -
10.2 Error message: Movement of (33) blocked - 68 -
10.3 Error message: Action not startable - 69 -
Medizinische
Labordiagnostika
AG
12 APPENDIX - 73 -
12.1 Customer service - 73 -
12.2 Table of figures - 73 -
- 2 - 1 Table of contents

EUROIMMUN
Medizinische
Labordiagnostika
AG
2 Warning, safety and other notices
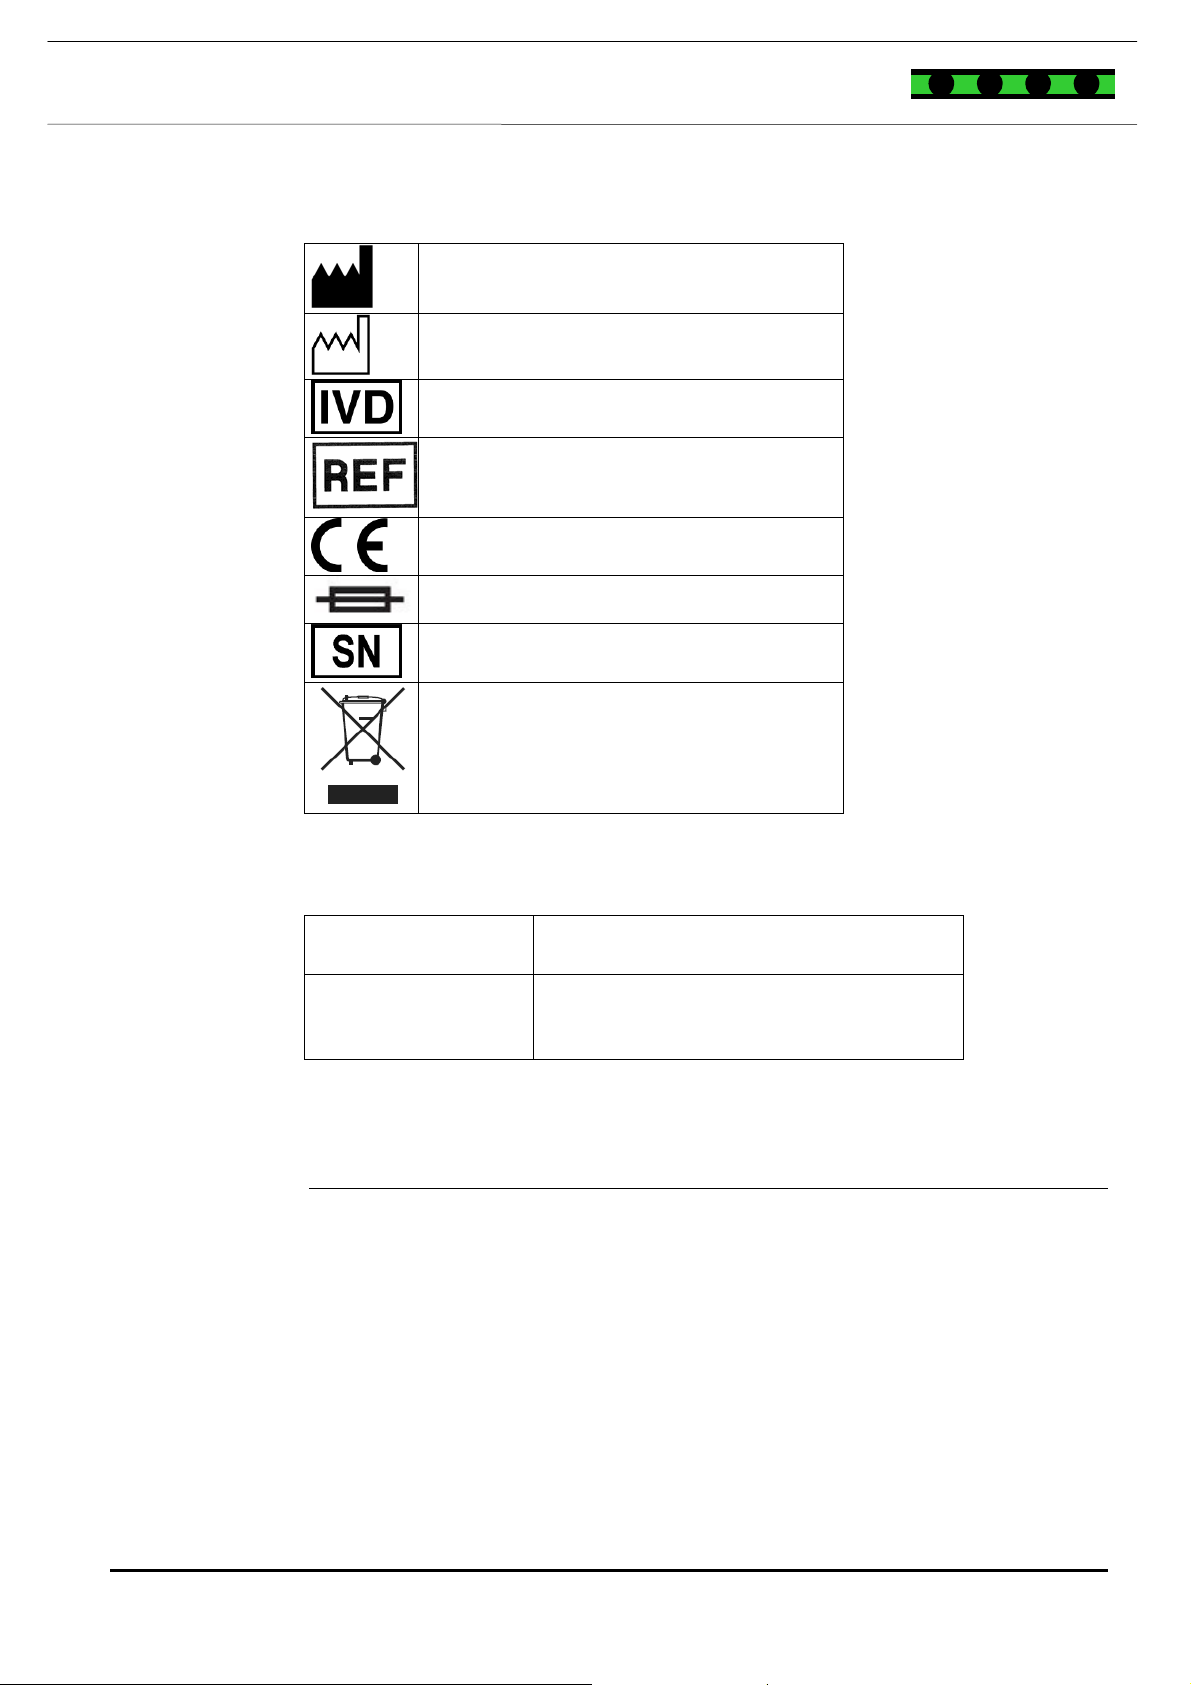
The symbols described here are used in this manual, on individual instrument
parts and the packaging. In addition, a specific notation is used to refer to certain
particular elements, e.g. buttons, keys.
NOTES
Notes are indicated with a symbol and printed in bold and italics. The symbols
are as follows:
Read the manual before use!
Information is identified with this symbol. It contains useful information.
Disconnect the plug-in power unit before opening the instrument!
WARNING MESSAGES
Warning messages are displayed using a safety symbol and printed in bold and
italics. The danger symbols are as follows:
Caution, hazard risk! Consult the operating manual!
Bio hazard!
Electrical hazard!
Laser hazard!
Mechanical hazard!
2 Warning, safety and other notices - 3 -
EUROIMMUN
SYMBOLS
Medizinische
Labordiagnostika
AG
Produced by
Completed by
In vitro diagnostic medical device
Order Number
CE label
Fuse
Serial number
The instrument should not be placed in
ordinary domestic waste.
SPECIAL WRITING CONVENTIONS
Menu items
Keys/buttons
Menu items are printed in bold.
Example: Main menu
Keys and buttons are printed in italics or
are shown as a symbol.
Example: Press Enter
ABBREVIATIONS
Abbreviation
°C Celsius
Hz Hertz
IVD In vitro diagnostic medical device
kg Kilogramme
l Litre
ml Millilitre
SN Serial number
- 4 - 2 Warning, safety and other notices
EUROIMMUN
Medizinische
Labordiagnostika
AG
3 Introduction
This document is used to explain the Sprinter XL. After familiarising himself with
this manual, the operator should be able to operate the Sprinter XL safely.
Figures and illustrations may deviate slightly, depending on the configuration of
the instrument.
3.1 Intended use
The Sprinter XL provides fully automated processing of microscope slides for
indirect immunofluorescence, from sample preparation to the final washing step.
ELISA and EUROASSAYS for in vitro determination of human autoantibodies in
serum or plasma in autoimmune diagnostics, infectious serology and allergology
may also be processed with this device. The test systems are provided by
EUROIMMUN AG. The system was developed for use in diagnostic institutions.
The results should always be checked for correctness by medically qualified
personnel. For diagnosis, the clinical symptoms of the patient should always be
taken into account along with the serological findings.
The instrument should be operated in a fixed place under laboratory conditions
and can be used several times a day. The instrument should only be used by
trained personnel.
For IVD compliant use of the Sprinter XL, all test methods and kits must be
validated by the user in conjunction with the device. Here the usual clinical
laboratory practice, locally applicable laws and the current state of the art are to
be observed.
3.2 Validation
Proper functioning of the instrument was tested using representative test systems
from EUROIMMUN AG.
Changes of any kind to the Sprinter XL, the software or the firmware
invalidate the warranty for the instrument and result in the loss of IVD
conformity.
Only CE-labelled test kits may be used for clinical diagnostic applications.
3 Introduction - 5 -

EUROIMMUN
Medizinische
Labordiagnostika
AG
4 Safety notes
4.1 General
Heed all warnings and follow all instructions listed on the instrument and in
the operating manual.
The instrument should only be used by trained personnel.
It is very strongly recommended that all first-time users familiarise themselves
with the manual before using the instrument.
The instrument should only be used according to its intended use.
Only the consumables and accessories (e.g. dilution plates etc., see Chapter 11)
described in the manual should be used. The manufacturer is not liable for
damages which result through negligence or improper operation of the
instrument.
The user should perform exclusively the service described in the
corresponding chapter.
Only parts approved by the manufacturer may be used for procedures carried out
on the device.
The tests and service prescribed by the manufacturer should be performed to
ensure the safety of the user and the proper function of the instrument.
Procedures and service to the instrument listed in this manual may only be
performed by trained, qualified and authorised service personnel.
The system was developed and tested according to the provisions of the
IVD directive.
Unauthorised procedures invalidate all claims against the warranty. Unauthorised
procedures performed on the instrument result in the invalidity of the
manufacturer’s conformity statement. In this case, the responsibility to meet the
applicable regulations lies solely with the customer.
The instrument should only be opened, serviced and repaired by trained,
qualified and authorised personnel.
ELECTRICAL SAFETY
Applicable laws must be followed for the safe electrical operation of the
instrument.
The Sprinter XL may only be operated with the voltage source which is noted on
the nameplate. If you are unsure whether the voltage is suitable, please contact
an authorised seller or your local energy utility.
A 3-pin cable must be used to connect the instrument to the mains network.
Only use an extension cable with a protective conductor and an earth connection.
You must ensure that the system and its peripheral devices are equally earthed.
Earth contacts may never be interrupted.
If the protective conductor inside or outside of the instrument is interrupted or the
connection is broken, there is a risk of an electrical shock.
- 6 - 4 Safety notes

EUROIMMUN
The instrument must be connected to the power supply with the included
connection cable.
For the international market only: Please note that the cables provided with
this device are adapted for the German market. In some countries it may
therefore be necessary to use other cables instead.
Do not place anything on the mains connection cable.
If safe work can no longer be assured, the instrument is to be switched off
and disconnected from the power supply.
If liquid gets into the instrument, the instrument should be switched off and
disconnected from the power supply. The corresponding parts are to be
cleaned and dried.
Surfaces (floors, work surfaces) must be dry when working with the
instrument.
Medizinische
Labordiagnostika
AG
Only use bottles, tubes and accessories which are explicitly intended for the
storage of liquids and for the system.
Replacement fuses must meet the specifications (nominal voltage, nominal
current strength, type) of the manufacturer.
Always replace burnt-out fuses, never repair.
Never short-circuit fuse sockets.
The instrument is to be switched off and disconnected from the power
supply before service jobs.
Only connect the instrument to the mains supply if this is expressly required. If
the instrument is connected, procedures performed on components with an open
cover should only be carried out with the greatest care.
Never remove safety devices or safety components.
Electrical connection parts (sockets, jacks etc.) can be live (carry current).
Some electrical components like condensers can still be under voltage even
when the instrument has been shut off. All parts which are live can trigger
electrical shocks and are therefore a potential source of danger.
During installation of the instrument you should ensure that it can easily be
disconnected from the power supply in the event of an emergency.
The instrument meets all requirements of standard IEC 61326.
4 Safety notes - 7 -

EUROIMMUN
MECHANICAL SAFETY
Never place the instrument on an instable table, carriage or similar item. The
instrument can fall and suffer considerable damage as a result or injure the user.
Please comply with the section in the service manual on instructions regarding
lifting and transporting the instrument.
Never open the hood while the instrument is running and never reach into
Medizinische
Labordiagnostika
AG
the work area.
There is always a potential risk of injury through mechanically moving parts with
all automated machines in operation. The instrument is constructed for automatic
processing without any required intervention by the user during operation. The
cover must always remain closed during operation.
By default, a sensor is activated which detects when the cover is open so that the
instrument is automatically paused.
If no sensor is activated, ensure that the pipetting unit is idle when opening
the flap or cover before you reach into the work area.
There is a risk of limbs being crushed or pinched while the robotic arm is in
motion. There is also a potential risk of injury from the pipette tip.
Only reach into the instrument when it is paused and a dialogue window
prompts you to do so. Reaching into the instrument while it is running can
result in injuries and/or affect incubation.
Read all software error messages attentively in the event of an error and perform
the next action carefully.
Avoid coming into contact with the pipette and other moveable parts while the
instrument is in operation. Improper handling can result in damage to the
instrument or injure the user.
BIOLOGICAL SAFETY
- 8 - 4 Safety notes
Infection risk!
Handling of samples and reagents:
Avoid skin/mucous membrane contact with samples/test reagents or instrument
parts which come into contact with samples/test reagents. The aforementioned
items should be handled as potentially infectious material.
Direct contact with reagents can result in irritations of the skin and mucous
membrane.
Wear appropriate gloves, a lab coat and eye protection (e.g. safety
glasses)!
The safety equipment provides protection from contamination with patient sera
when loading and unloading the machine.
Follow the instructions in the test kit enclosure to ensure correct usage of the
reagents.
EUROIMMUN
If sample material is spilled in the system, the instrument should be
disinfected and cleaned immediately.
No guarantee can be made regarding the resistance of reagent vessels and tube
materials (system liquid and waste) to organic solvents. Therefore organic
solvents should only be used if they are explicitly allowed.
Containers for liquids and waste cannot be autoclaved!
SAFETY MEASURES
It is important that the work area of the Sprinter XL is constructed as described in
the manual. Ensure that there are no unnecessary items in the work area.
The liquid waste container should be emptied on a daily basis to avoid an
overflow of the washing station when rinsing the needles. This results in the
contamination of the instrument and can have a negative effect on following
incubations. Ensure that the tube leads directly from the needle washing station
straight down into the waste tank, pointing downward, without loops and kinks.
Always ensure that all other tubes are free of kinks and links.
Medizinische
Labordiagnostika
AG
Always ensure that the system liquid container is adequately filled with system
fluid. The minimum is a litre. Always also ensure that the container is at the same
height as the instrument.
The Sprinter XL must be positioned in such a way that the user can hear
the alarm generated by the PC in the event of an error and can act
accordingly.
The Sprinter XL must be connected to an uninterrupted power supply system
(UPS). In the event of a power outage, this ensures that the instrument can still
work for an additional 30 minutes. It also ensures that the voltage peaks are
filtered and any potential danger to the instrument from voltage fluctuations is
minimised.
The computer keyboard must be placed within reach of the instrument in order to
ensure fast access to the escape key in the event of an emergency stop.
The continuous worklist cannot be reconstructed following a power outage.
Local accident prevention regulations and the national industrial safety
regulations apply in addition to the instructions in this manual.
4 Safety notes - 9 -
EUROIMMUN
4.2 Instrument safety and EMC
The Sprinter XL was constructed, manufactured and inspected according to
standard EN 61010-1. The system has left the factory in flawless condition in
terms of safety.
The Sprinter XL meets the requirements of the IVD directive 98/79/EC “In vitro
diagnostics directive” of the European Union.
Conformity with the above EC directive is documented by the CE label.
4.3 Photobiological safety
The Sprinter XL includes a barcode reader for reading of samples. The barcode
reader works with a LASER. The LASER is assigned to class 2 according to
EN 60825-1:A2:2000.
Optional a 2D-Barcode reader for reading the Slide ID can be ordered. The 2Dbarcode reader works with a LED, The LED is assigned to class “exempt risk
group” according to EN 62471.
The light emitted from this LASER/LED can cause damage to the eyes.
Medizinische
Labordiagnostika
AG
Do not look directly into the light path of the barcode readers!
4.4 Position of the safety labels and the nameplate
If one of the safety labels gets lost, it should be replaced by a comparable
one!
GENERAL DANGER LABELS
General danger labels are located on:
o the moveable robotic arm
o the rear panel next to the power connection
“BIOHAZARD” LABELS
“Biohazard” labels are located on:
o the moveable robotic arm with the pipetting needles
o the waste container
“LASER HAZARD” LABELS
“Laser hazard” labels are located on:
o the integrated barcode reader on the left side panel
o barcode reader for Slide ID on 2D barcode reader, if installed
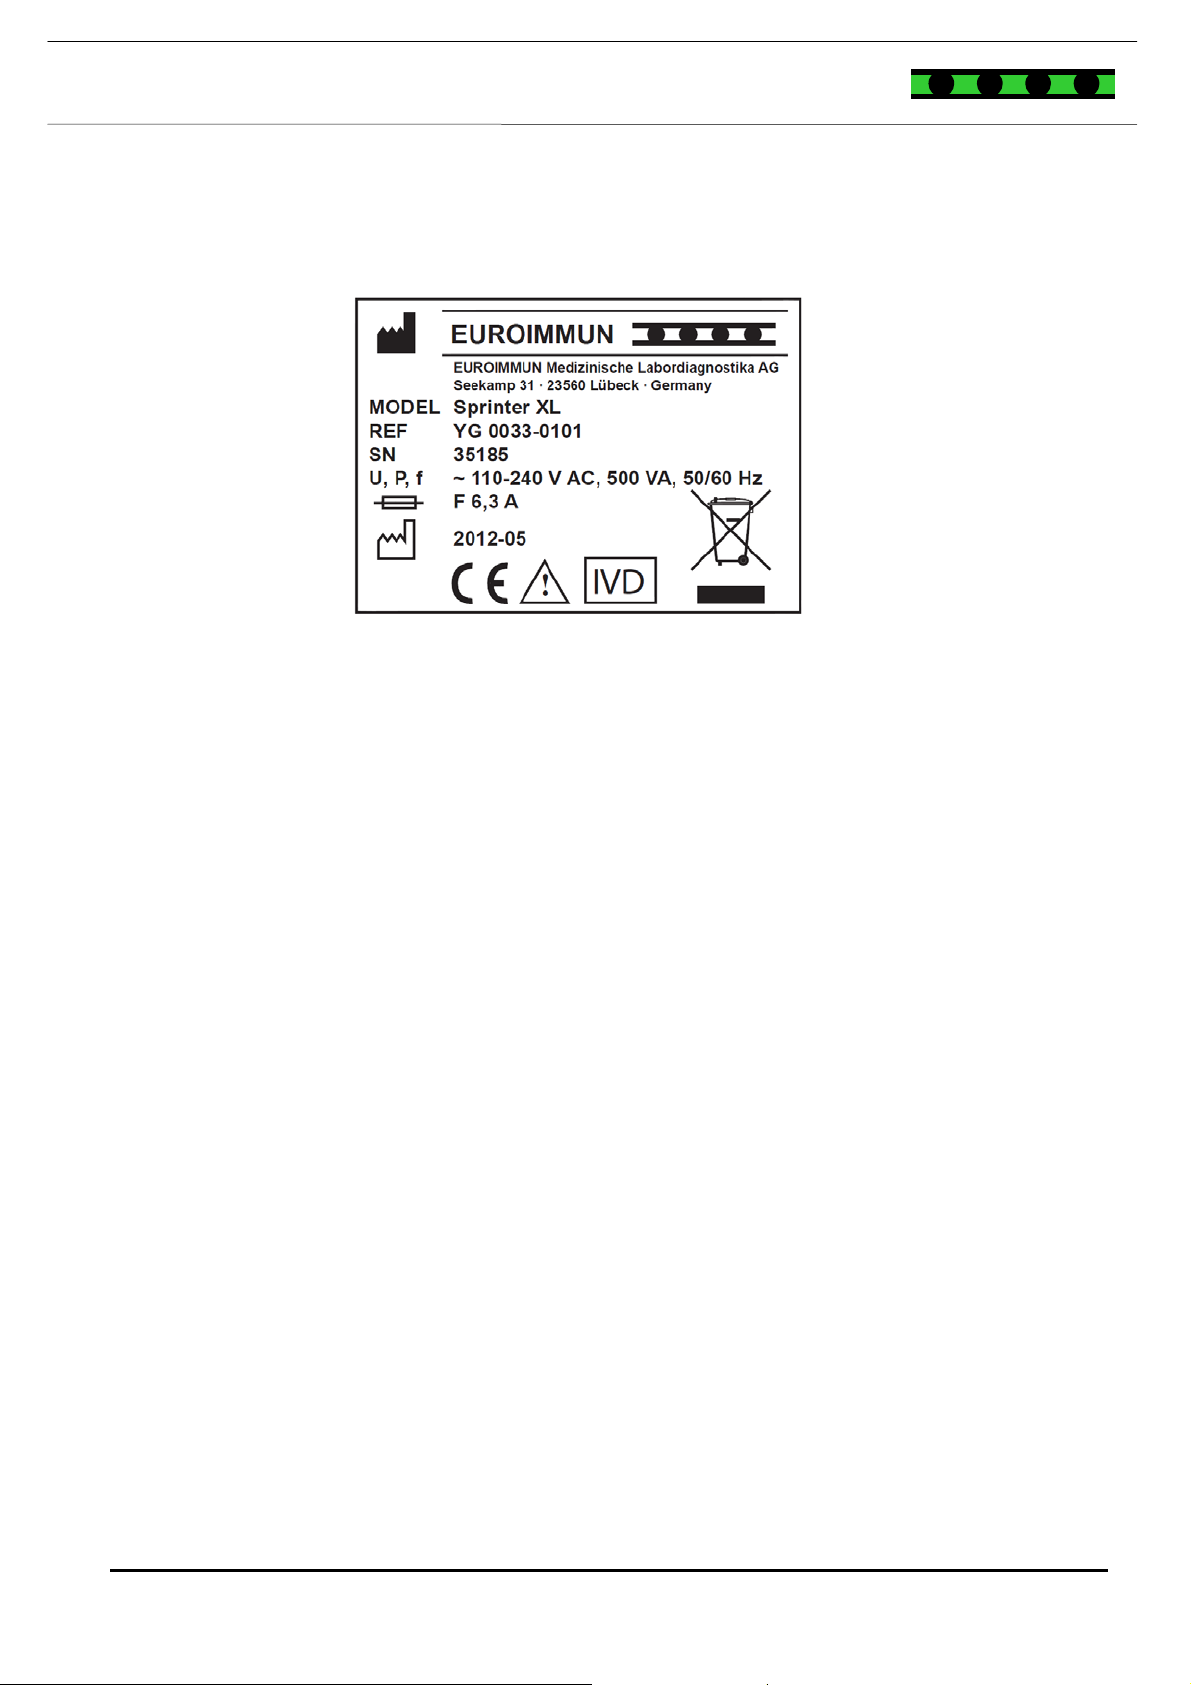
NAMEPLATE
- 10 - 4 Safety notes
EUROIMMUN
The nameplate is located on the left side panel of the instrument next to the
integrated barcode scanner.
The manual should be kept near the instrument and must be accessible to
the user at all times.
4.5 Maintenance
The instrument is to be switched off and disconnected from the power
Medizinische
Labordiagnostika
AG
supply for cleaning or disinfection.
Liquid detergents or disinfectants may neither be shaken nor sprayed into
the instrument.
Use a cloth dipped into a detergent for cleaning or disinfection. Only use
approved detergents or disinfectants. The applicable regulations are to be
followed for cleaning or disinfection.
4.6 Disposal
Potentially infectious material and all parts which can come into contact
with potentially infectious material must be disposed of according to the
applicable legal provisions.
All parts which are replaced must be disposed of according to applicable laws.
The instrument must be disposed of according to applicable laws. The packaging
material must be disposed of according to applicable laws.
Do not reuse dilution blocks.
4 Safety notes - 11 -

EUROIMMUN
4.7 Warranty notes
The Sprinter XL, including its original accessories, may only be used for the
analytical methods described in this manual. Please observe the following
warranty notes for the Sprinter XL:
- The manufacturer guarantees that the instrument has no material and
- The warranty period is 12 months following the installation date.
- You must inform us of any defects immediately and do everything
- If EUROIMMUN AG is informed of such a defect, it is obligated to remove
- No guarantee is provided for defects caused by natural wear (wearing
EUROIMMUN AG is not liable for damages which result from:
- Failure to follow this manual,
- Improper operation or negligence,
- Improper usage,
- Usage by non-qualified personnel,
- Usage of non-approved spare parts,
- Self-made retrofits or interventions by the user,
- Non-approved deactivations of safety devices.
Medizinische
Labordiagnostika
AG
production defects when delivered.
possible to minimise the damage.
it; it is EUROIMMUN’s decision whether it does this by repairing the
instrument or by delivering an instrument free of any defect.
parts in particular) or improper use.
- 12 - 4 Safety notes

EUROIMMUN
Medizinische
Labordiagnostika
AG
5 General information on the instrument
The Sprinter XL is a system with a modular structure which allows the automatic
processing of IFA microscope slides and ELISA microplates, from sample
preparation to the final washing or measuring step.
The system is able to detect and identify sample barcodes.
An archiving function of the results is present and is managed with the
RepExplorer program.
5.1 Technical data
System
Max. load
Accessories 8/12 sample racks (each with 20 positions Ø 10-16 mm)
Pipetting unit
Needle system 4 washable needle (ceramic-coated)
Level detection
Clot detection Yes
Needle volume 5-1000 µl increments of 1 µl
Precision CV < 1% with a volume > 20 µl
Wash unit
160/240 samples (depending on device configuration)
Capacitive, sensitivity 200 µl
162 screening dilutions, individually configurable
192 titer dilutions, individually configurable
30 microscope slides/6 microplates (depending on device
configuration)
64/49 standards/controls (depending on device configuration)
20/12 secondary reagents (depending on device configuration)
6/9 sample buffer (depending on device configuration)
4 wash buffer
(depending on device configuration)
4/1 control/standard racks (each with 16/49 positions Ø 18 mm)
(depending on device configuration)
2/1 reagent racks (each with 10/12 positions Ø 30 mm)
(depending on device configuration)
1 sample buffer rack (with 6/9 positions Ø 45 mm)
(depending on device configuration)
2 containers for wash buffer 2 l and 4 l
1 container for liquid waste 10 l
1 container for system liquid 5 l
Station for system liquid
(NaCl solution in 16 mm tubes)
2% with a volume of 10 µl
5 General information on the instrument - 13 -

EUROIMMUN
Wash method Flooding the microscope slides in a 5-slide tray/strip-by-strip
Washer head 8-channel washer head
Reader
Software
Number of saved tests Unlimited
Number of steps in a test Unlimited
Duration of the incubation step 1-1000 minutes in increments of 1 min each
Combinability Unlimited (depending on device configuration)
Dilutions 13 freely definable dilutions per test
Processing steps Dilution and transfer
Miscellaneous
Barcode scanner CCD camera (semi-aut omatic)
Pump Highly precise micro-gear pump
Optional accessories Covers for microscope slide racks
System
Operating system Microsoft Windows XP SP2/Windows 7 (32 Bit)
Hardware Dual core processor with 1.6 GHz or higher
Connection CAN bus on USB 2.0 port
Bidirectional communication ASCII, XML, optional HL7
Current/Voltage
Current supply 110-240 V AC
Power consumption
Medizinische
Labordiagnostika
AG
washing of ELISA plates
8-channel photometer. Measurable wavelength range 400-800 nm.
4 filters (405, 450, 492, 620 nm)
Incubation, shaking, heating,
Washing
Dispensing
Measuring step
Heating plate, shaker,
Manual and integrated 2D-Barcode-Scanner,
ELISA reader, instrument cover
1 GB RAM
15’’ monitor (resolution > 1280 x 1024 pixels)
50/60 Hz
max. 2 A
max. 500 Watt
- 14 - 5 General information on the instrument

EUROIMMUN
Physical
External dimensions 112 cm (B) x 85 cm (T) x 55 cm (H)
Weight Approx. 150 kg
Temperature 15°C to 30°C
Relative humidity
Noise emission 56 dB (max.)
Medizinische
Labordiagnostika
AG
10 to 85% at 30°C
5 General information on the instrument - 15 -

EUROIMMUN
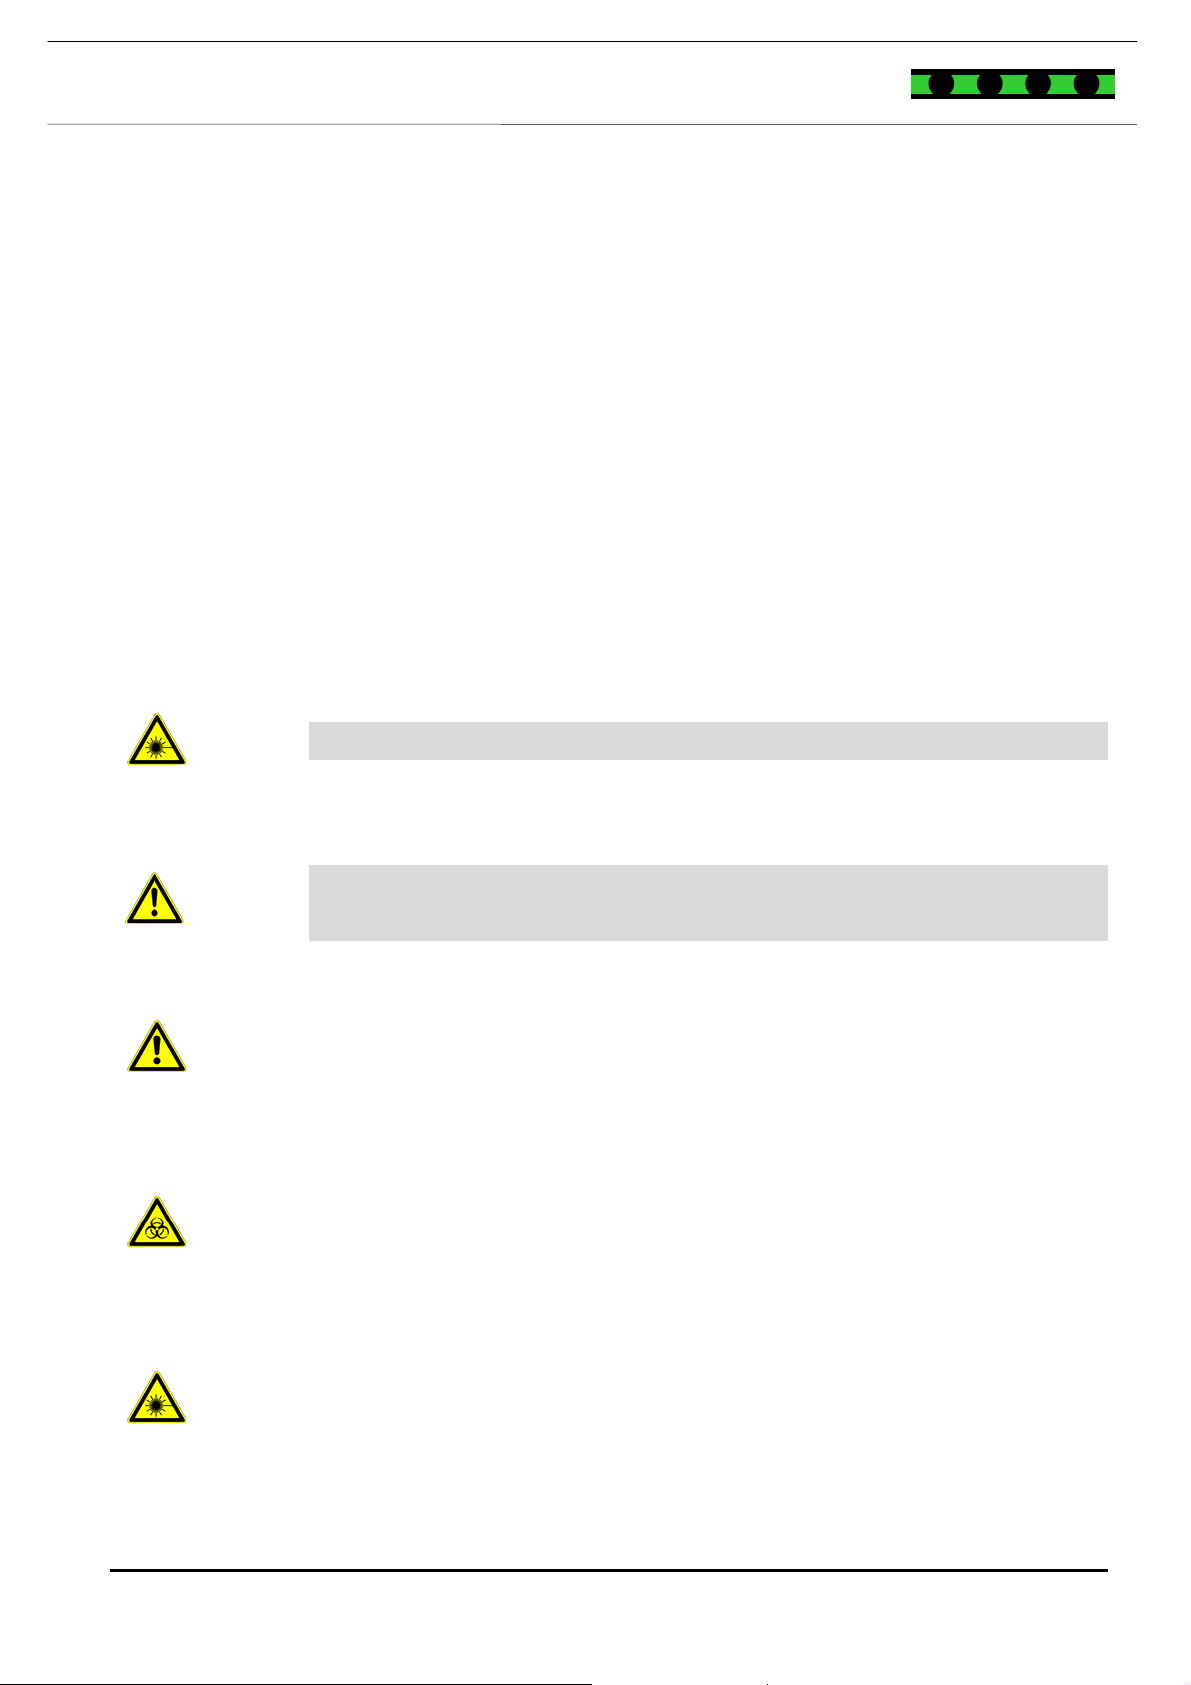
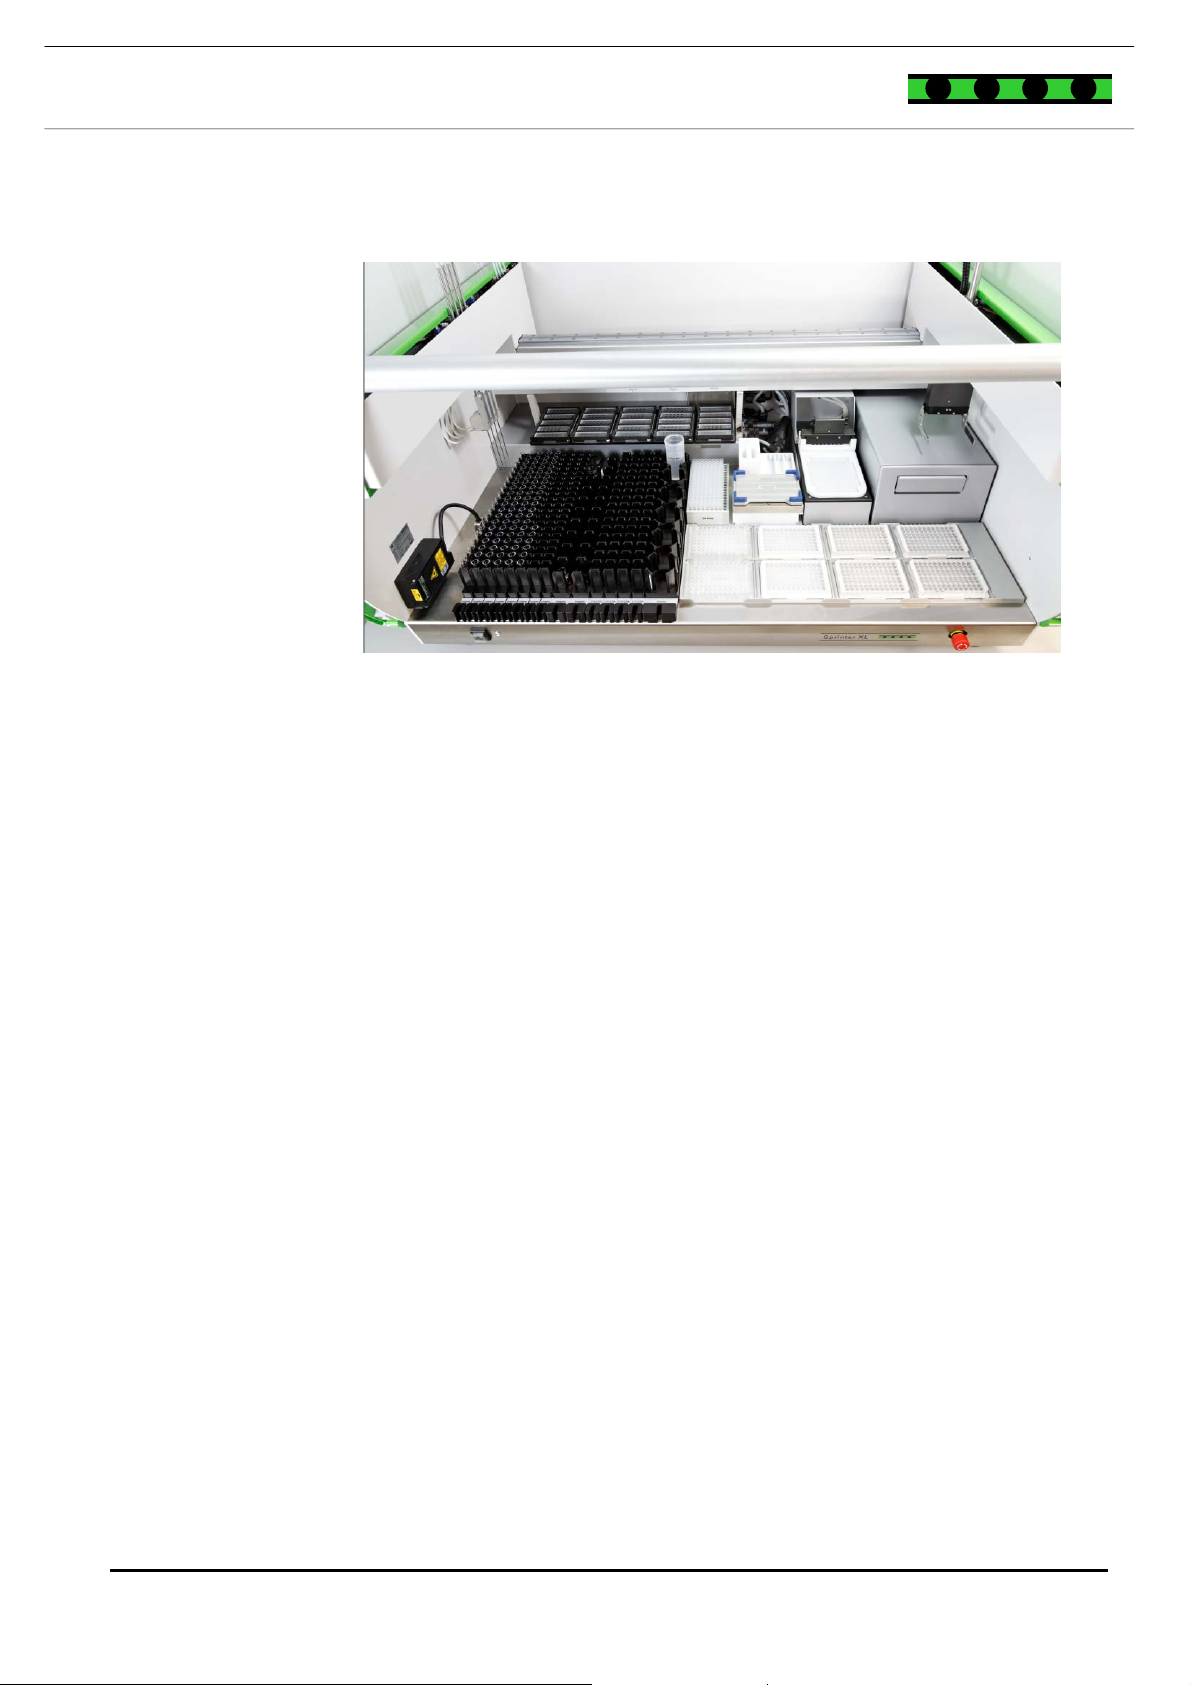
5.2 Instrument description
The moveable robotic arm guides four washable pipetting needles, which pipette
the samples and reagents. The fullness levels of the individual liquids are
determined via a capacitive measurement system.
On the robotic arm there is a gripping system to transport microscope slide
racks/microplates and to guide the washer head.
A barcode scanner system reads and detects the barcodes of the fed samples.
Samples and reagents are loaded into the instrument via slide racks.
Optionally, a manual or integrated 2D-Barcode-Scanner can be used for reading
barcode on slides.
The washing unit consists of 8 coaxial dispensing and aspirating channels and
4 wash buffer feeding channels.
There is also an area to create initial dilutions in a dilution tube (2 ml) and an
area for the creation of serial dilutions in a microplate.
In the middle of the instrument there is a shaker that serves as pipetting station.
Medizinische
Labordiagnostika
AG
There are generally 6 positions for microplates or microscope slide racks, which
can be each equipped with up to 5 standard slides or with a 50 well slide. A
combination of slide racks and microplates is also possible. A cover for standard
slide plates during incubation is optionally available.
The cover flap of the instrument can be conveniently flipped up or down to allow
the user to gain access to the inside of the instrument for handling and service.
A PC with the corresponding software is available to select and edit the tests.
The software allows the user to edit pre-defined tests. The clear structure with
intuitive user prompts makes system operation easy and rapid for daily usage.
A serial cable connects the instrument to the PC via a USB dongle. The power
supply of the instrument is guaranteed via an integrated switch mains adaptor
according to the technical specifications. The supply connection is located at the
back left of the instrument. The power switch is located to the front left of the
instrument. The emergency stop is front right.
In addition, a personal computer, a computer mouse, keyboard, LCD monitor and
a laser printer and, optionally, a device table are part of the equipment.
- 16 - 5 General information on the instrument
8
15
12
EUROIMMUN
FRONT VIEW IMMUNOFLUORESCENCE
Medizinische
Labordiagnostika
AG
16
6
5
4
2
1
14
1 Integrated barcode scanner
2 Sample racks 8x
3 Reagent racks 2x
4 Control racks 4x
5 Buffer rack 1x
6 Initial dilution plate
7 Titer dilution plate 2x
8 Shaker/Pipetting station
9 Incubation positions for microscope slide plates 6x
10 Washing module
11 Photometer module
12 Needle washing station
13 Emergency stop
14 On/Off switch
15 Accessory module with 5 incubation positions
16 Moveable arm with 4 pipetting needles
17 Moveable arm with gripper
3
7
Figure 5-1: Sprinter XL – Standard configuration IFA
10
9
17
11
13
5 General information on the instrument - 17 -
EUROIMMUN
4
17
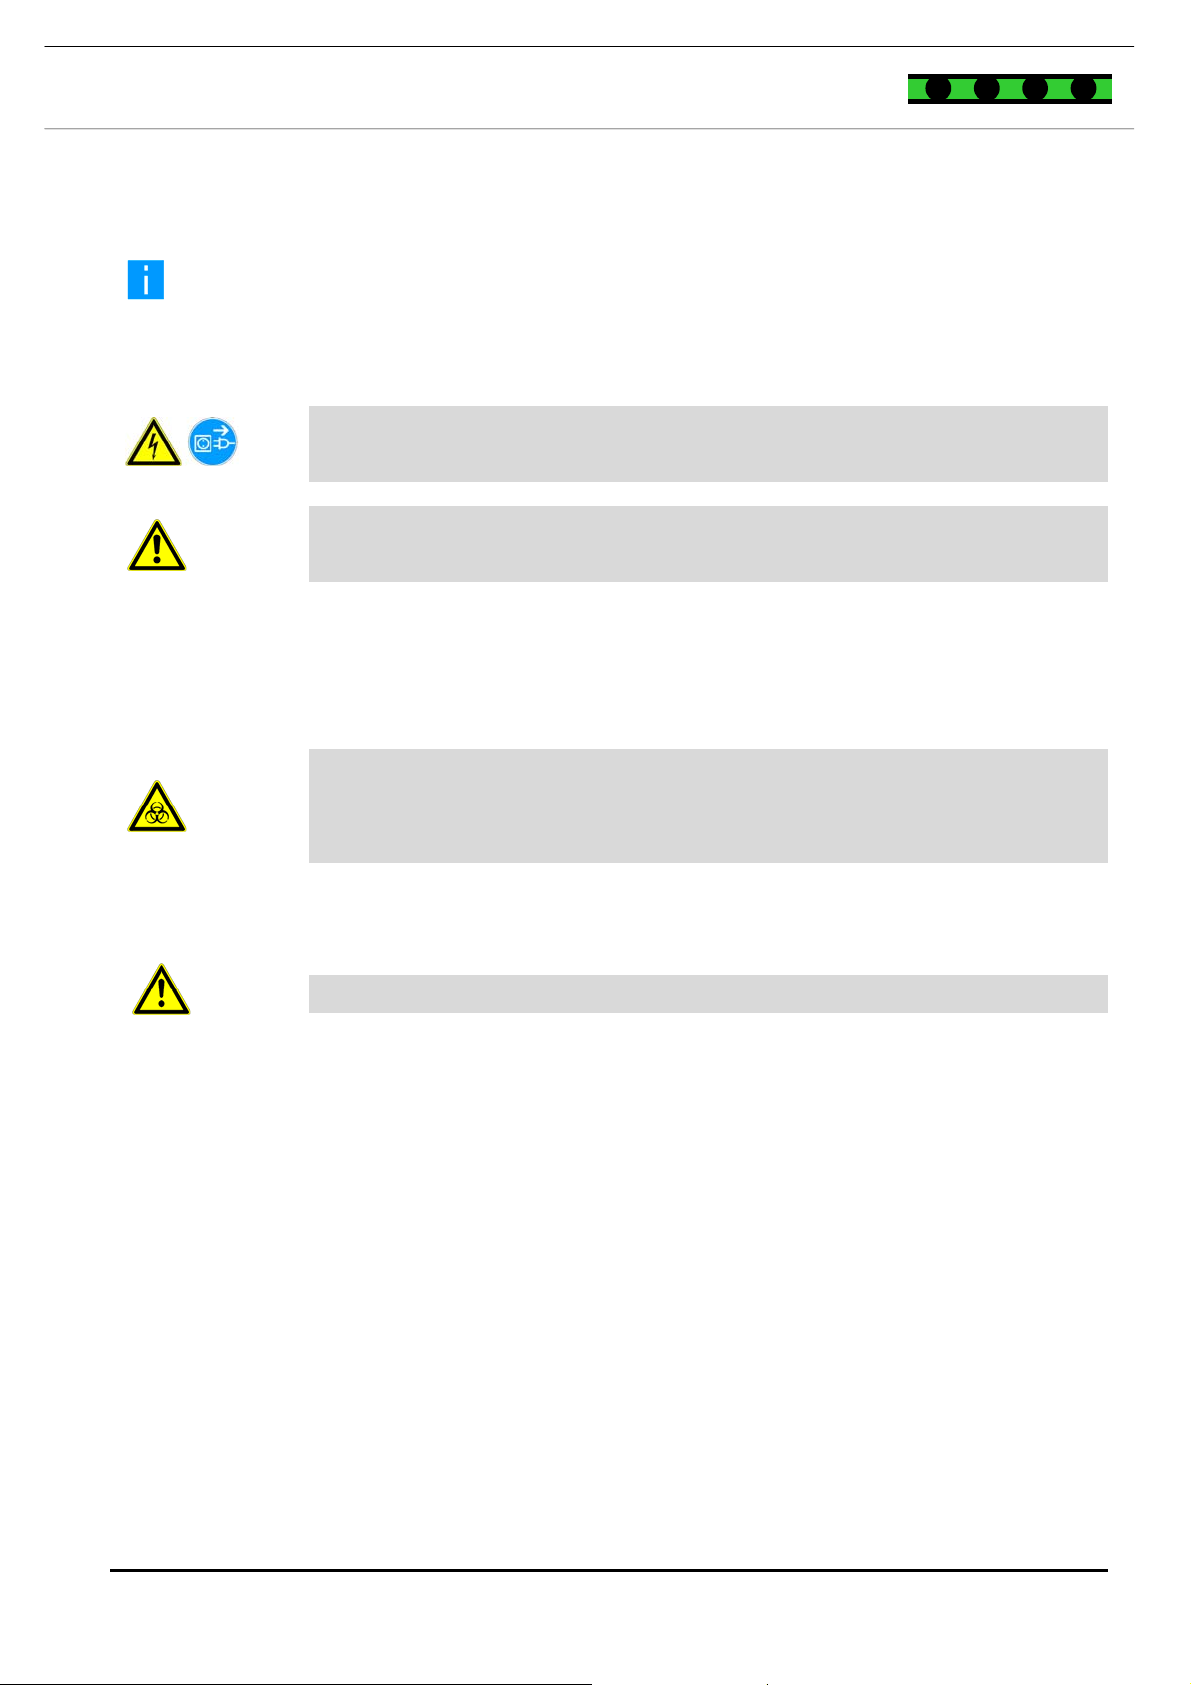
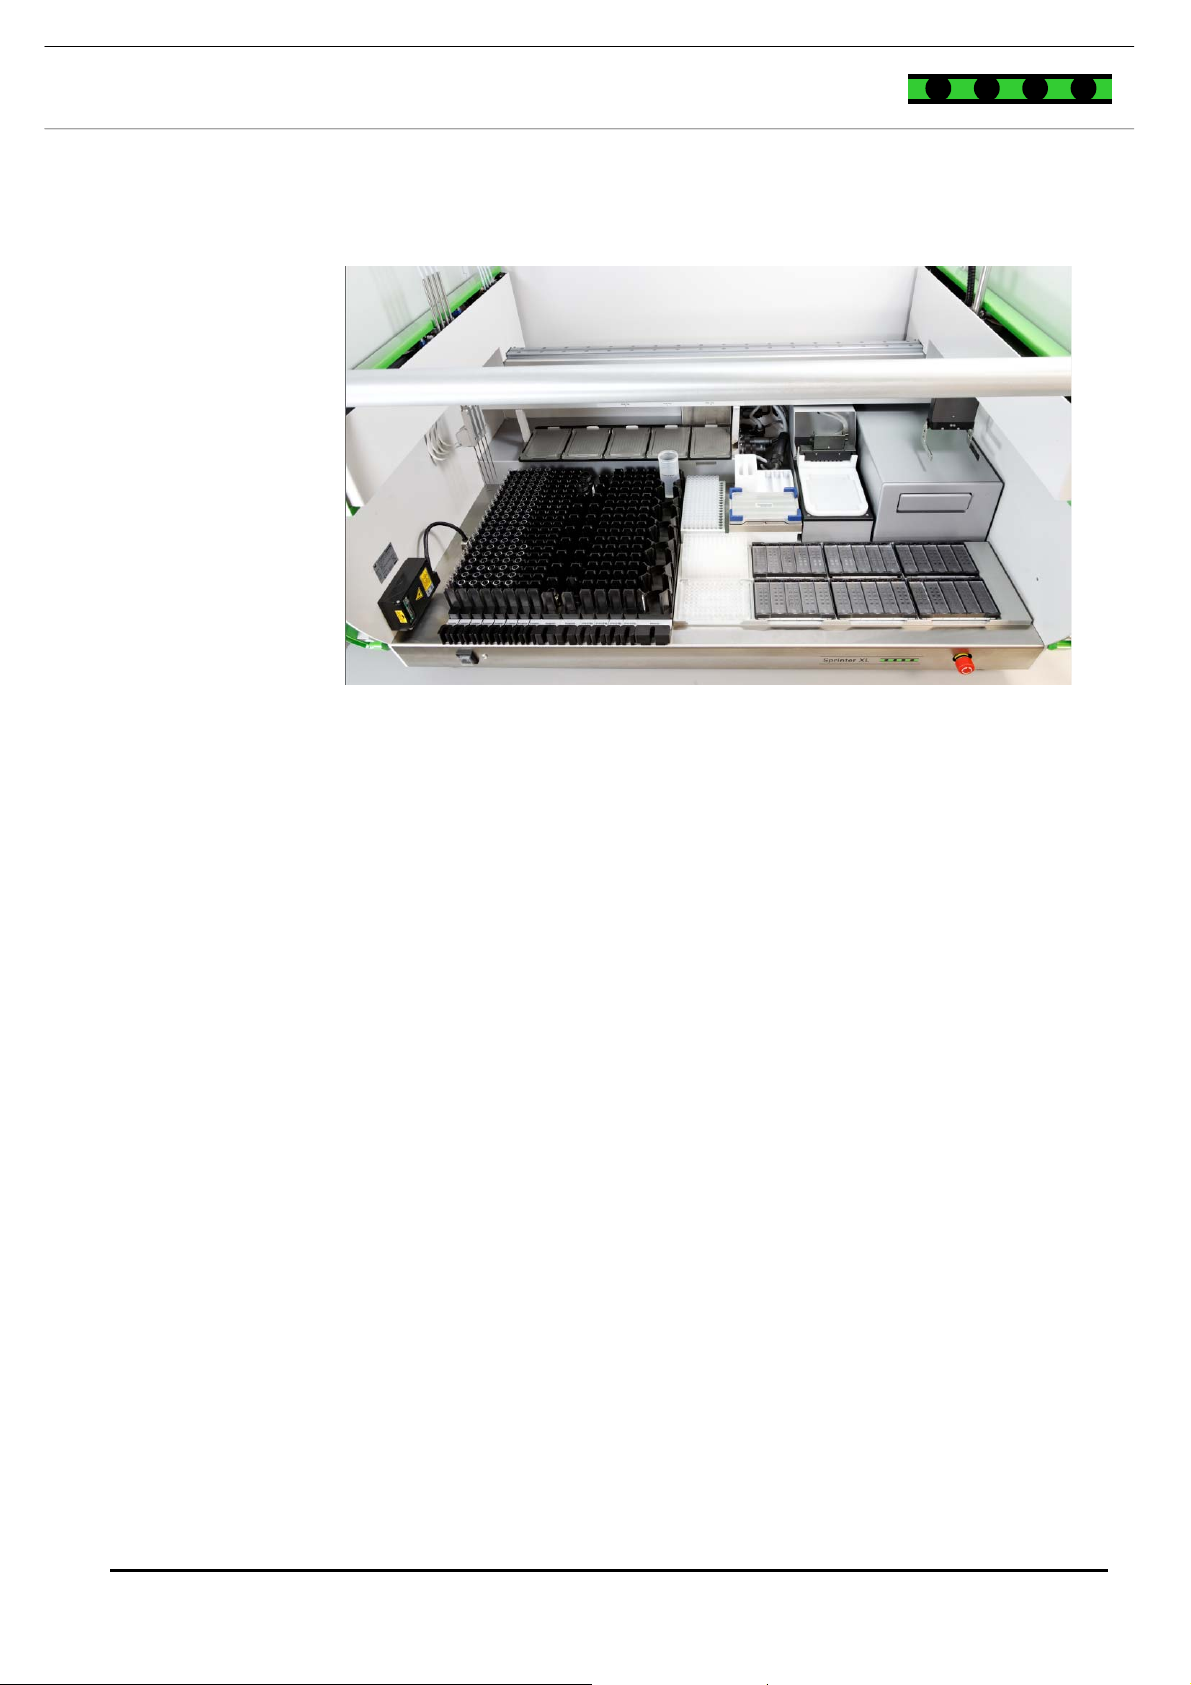
FRONT VIEW ELISA
Medizinische
Labordiagnostika
AG
16
2
1
1 Integrated barcode scanner
2 Sample racks 8x
3 Reagent racks 2x
4 Standard/Control rack 4x
5 Sample buffer rack 1x
6 Dilution area 1
7 Dilution area 2
8 Needle washing station
9 Shaker/Pipetting station
10 Microplate incubation positions 6x
11 Washing module
12 ELISA photometer
13 More microplate incubation positions/37°C
14 Emergency stop
15 On/Off switch
16 Moveable arm with 4 pipetting needles
17 Moveable arm with gripper
14
13
6
3
Figure 5-2: Sprinter XL – Standard configuration ELISA
5
4
8
7
11
9
10
12
15
- 18 - 5 General information on the instrument
6
13
15
EUROIMMUN
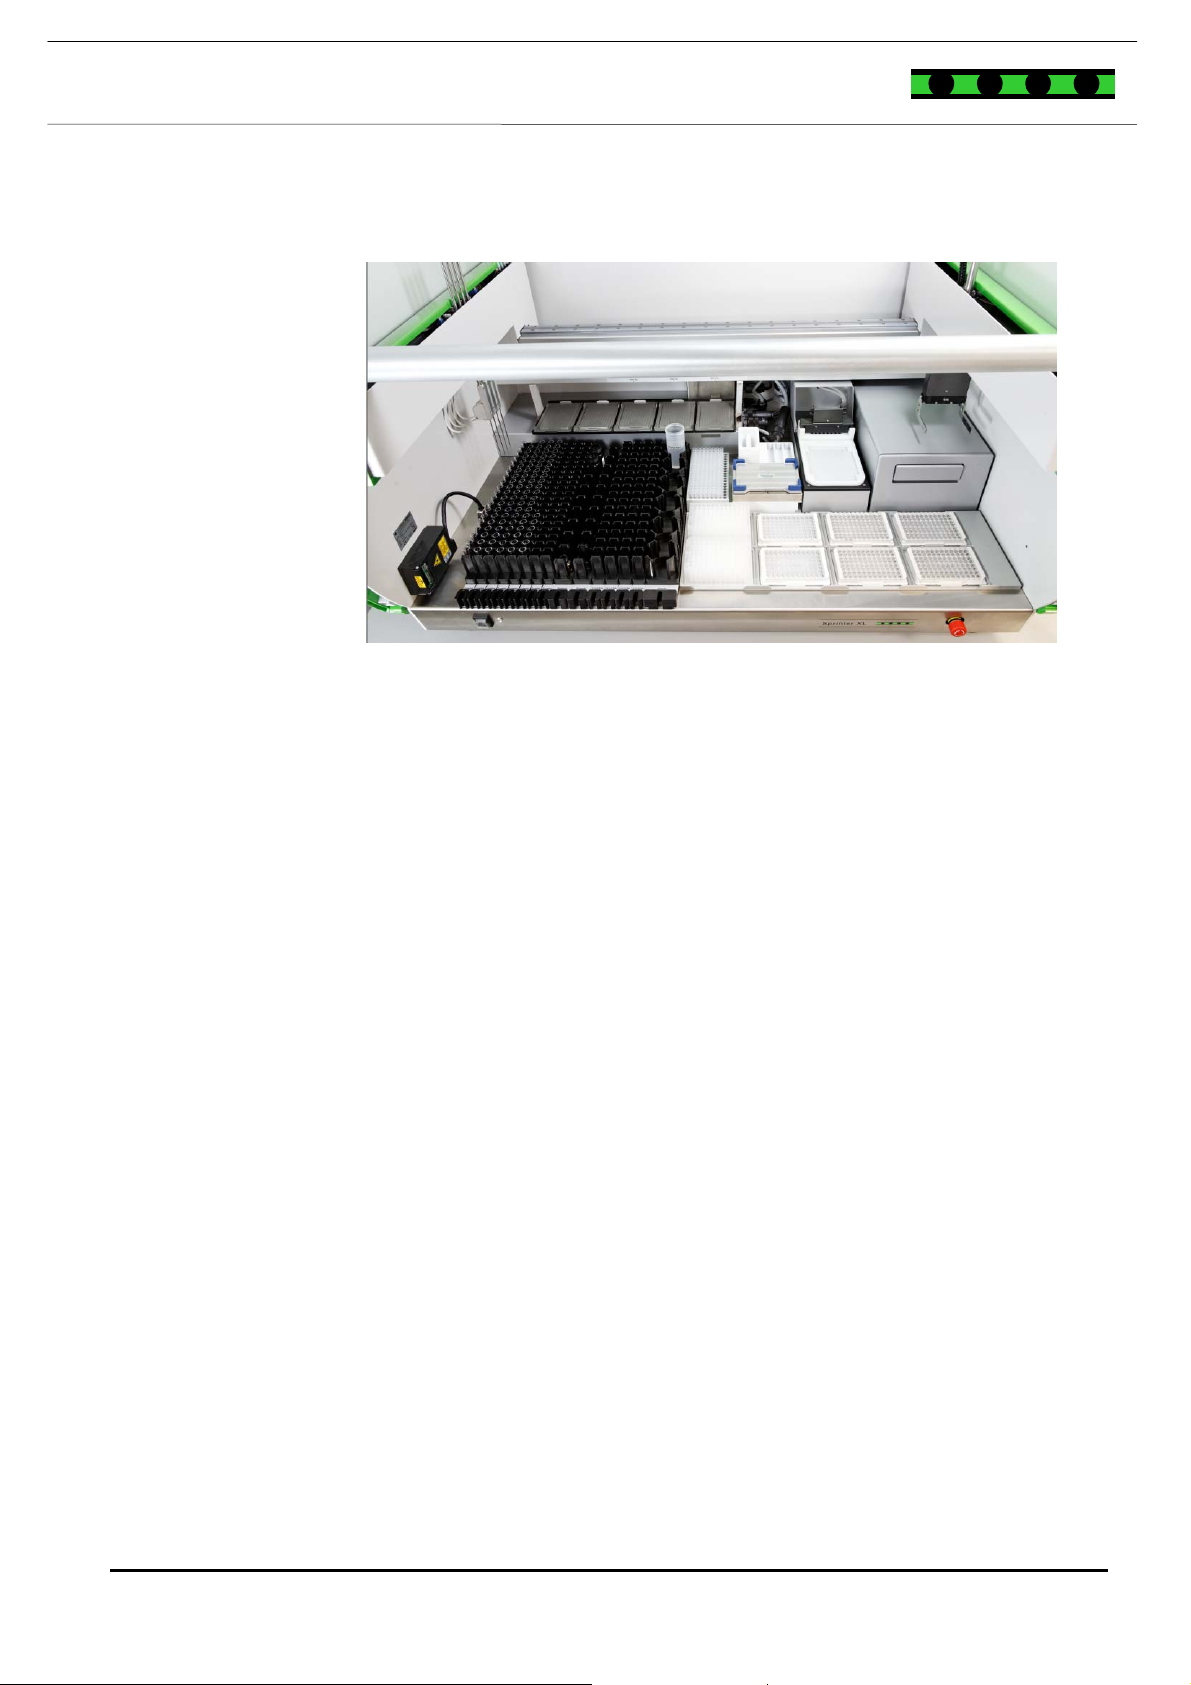
FRONT VIEW ELISA/IFA COMBINATION
Medizinische
Labordiagnostika
AG
13
8
9
5
4
2
1
1 Integrated barcode scanner
2 Sample racks 8x
3 Reagent racks 2x
4 Standard/Control racks 4x
5 Sample buffer rack 1x
6 Initial dilution area
7 Serial dilution area
8 Needle washing station
9 Shaker/Pipetting station
10 Microplate incubation positions 6x
11 Washing module
12 ELISA photometer
13 Incubation positions for microscope slide plates 5x
14 On/Off switch
15 Emergency stop
14
Figure 5-3: Sprinter XL – Standard configuration ELISA/IFA
3
7
11
12
10
5 General information on the instrument - 19 -
EUROIMMUN
NAMEPLATE
Medizinische
Labordiagnostika
AG
Figure 5-4: Nameplate
- 20 - 5 General information on the instrument

EUROIMMUN
Medizinische
Labordiagnostika
AG
6 Installation process
This chapter provides the information required for instrument installation.
6.1 Scope of delivery
The scope of delivery of the Sprinter XL includes:
o Sprinter XL, microscope slide racks with a cover
o Slide racks for samples and reagents
o PCAN bus system, USB dongle, network cable
o Container for wash buffer 2 l and 4 l
o Waste container 10 l
o Container for system liquid 5 l and matching station
o Tweezers, cleaning brush, reagent vessels
o Sprinter XL manual, maintenance manual and quick-start manual
o Personal computer with monitor, mouse, keyboard and printer
o Speaker
o Optional: ELISA reader, 37°C incubation module
If parts are damaged, please contact the relevant field service employee or
EUROIMMUN AG.
6.2 Unpacking, transport, storage
Please observe the following safety notes when unpacking, transporting and
storing the Sprinter XL:
o The Sprinter XL is supplied in a wooden case on a pallet. Check the
container for damage before opening.
o When unpacking, use the delivery note to ensure that all system
components are present.
o Ensure transport and storage temperatures in accordance with the
technical data.
o Place the system onto a stable work surface.
o Compare the serial number of the instrument on the nameplate to the
side with the serial number on the delivery note.
o Check the instrument for visibly loose, bent or broken parts.
o Retain the packaging for longer storage periods or to return the
instrument to the manufacturer.
When unpacking, use the scope of delivery described in section 6.1 to
6 Installation process - 21 -
ensure that all system components are present.
EUROIMMUN
6.3 Ambient conditions
The instrument is intended for use in closed rooms. Select the installation
location in such a way that the instrument is protected from dust, vibrations,
strong magnetic fields, direct sunlight, a high level of moisture and large
temperature fluctuations.
Operating temperature +15°C to +30°C
Warehouse temperature 15°C to 30°C
Max. installation height for
operation
Max. relative moisture
Medizinische
Labordiagnostika
AG
10% to 85% at 30°C, no condensing moisture
NOTE: If the instrument was subjected to temperatures outside of
this area, it may only be operated again once the prescribed
temperature range has been reached. Premature commissioning
can damage the instrument.
Up to 2000 m over sea level
6.4 Installation and commissioning
Commissioning and installation of the Sprinter XL may only be performed
by an authorised service technician of EUROIMMUN AG.
o Place the instrument on the work surface in such a way that the main
switch and the emergency stop are easily accessible. The instrument
should be as free-standing as possible to ensure the installation and
other handling of the system for system liquids and the wash buffer
container. Also enough space is required to flip the instrument cover up.
o Remove all packaging materials and clean the instrument.
o Align the instrument horizontally using a spirit level. The instrument can
be adjusted with the bottom adjustable feet.
o Connect the system liquid tube to the pipetting needles and attach them
with the headless screw. Ensure the correct orientation of the pin on the
needle!
o Insert the shaker module and connect it to the instrument connections
using the black connecting cables. Pass the cables under the needle
washing station.
o The waste tubes of the needle washing station and the washing module
exit the instrument on the right. Lead both tubes to the waste container.
The tubes should not be too long or droop!
o Place the station for system liquid to the right next to the instrument.
Use the inserts and the end of the system tube with the filter, fill the
container with system liquid and place it on the station. Connect the
station with the mains adapter to the power supply and turn it on.
Connect the system tubes to the station.
o The containers for the wash buffers are placed to the side and the wash
buffer tubes are inserted.
o Only connect the instrument with the USB dongle to the PC once the
required software and the driver have been installed.
- 22 - 6 Installation process
 Loading...