

Eurogreen 373367 User Manual
Distributor:
DIRECTIONS FOR USE
MODEL:# 89061
P/N: 906116

FEDERAL COMMUNICATION COMMISSION
INTERFERENCE STATEMENT
This equipment has been tested and found to comply with the limits for
a Class B digital device, pursuant to Part 15 of the FCC Rules. These
limits are designed to provide reasonable protection against harmful
interference in a residential installation. This equipment generates,
uses and can radiate radio frequency energy and, if not installed and
used in accordance with the instructions, may cause harmful
interference to radio communications. However, there is no guarantee
that interference will not occur in a particular installation. If this
equipment does cause harmful interference to radio or television
reception, which can be determined by turning the equipment off and
on, the user is encouraged to try to correct the interference by one of
the following measures:
- Reorient or relocate the receiving antenna.
- Increase the separation between the equipment and receiver.
- Connect the equipment into an outlet on a circuit different from that
to which the receiver is connected.
- Consult the dealer or an experienced radio/TV technician for help.
This device complies with Part 15 of the FCC Rules. Operation is
subject to the following two conditions: (1) This device may not cause
harmful interference, and (2) this device must accept any interference
received, including interference that may cause undesired operation.
FCC Caution: Any changes or modifications not expressly approved by
the party responsible for compliance could void the user's authority to
operate this equipment.
This transmitter must not be co-located or operating in conjunction with
any other antenna or transmitter.

Table of contents
Contents Pages
Remote Control Important - - - - - - - - - - - - - - - - - - - - - - - - - - -2
Electromagnetic Interference - - - - - - - - - - - - - - - - - - - - - - - - -3
Release and Assemble the Wheels - - - - - - - - - - - - - - - - - - - - 4
Assemble Upper Bag Holder - - - - - - - - - - - - - - - - - - - - - - - - -5
Opening the Trolley - - - - - - - - - - - - - - - - - - - - - - - - - - - - - - - - 6
Handle Height adjustment- - - - - - - - - - - - - - - - - - - - - - - - - 8
Precaution - - - - - - - - - - - - - - - - - - - - - - - - - - - - - - - - - - - - - 9
Auto. Switch Off / Electronic System - - - - - - - - - - - - - - - -- - 10
Direction for use - Distance remote - - - - - - - - - - - - - - - - - 11
How to pair remote transmitter with your caddy- - - - - - - - - - - - 12
Battery for remote transmitter - - - - - - - - - - - - - - - - - - - - 13
Motor brake – option model - - - - - - - - - - - - - - - - 14
Folding the trolley- - - - - - - - - - - - - - - - - - - - - - - - - - - - - - - 15
Battery and Charger- - - - - - - - - - - - - - - - - - - - - - - - - - - - - - 18
Battery Charger - - - - - - - - - - - - - - - - - - - - - - - - - - - - - - - - - 19
Battery Care & Maintenance - - - - - - - - - - - - - - - - - - - - - - - 20
How to Move the Trolley to Your Car - - - - - - - - - - - - - - - - -- - 21
Repackaging Instruction - - - - - - - - - - - - - - - - - - - - - - - - - - - 22
NOTE
Battery, Scorecard holder and Wheels may vary from each market.
SAVE THIS MANUAL FOR FUTURE REFERENCE.
- 1 -
REMOTE CONTROL IMPORTANT
(For Distance Remote model)
Keeping extra care while use this distance remote caddy, be careful
to avoid mis-press from the buttons of remote transmitter and always
dis-connect main battery connector while not in use.
Read this manual before you start to use this trolley.
This remote control was preset in factory for full speed.
Do not operate around cars or building with remote control.
Do not direct trolley towards to other players or carts with remote
control.
Always keep watch while operating remote control.
Don’t operate remote control while unattended.
The remote distance may be reduced by possible effected of
Electromagnetic Interference on your remote golf trolley.
Do not operate remote control when up and down slopes.
Use manual mode in car parks, down steep hills, confined space or
where there are lots of peoples.
Do not operate in indoor with remote control.
It is recommend to use remote control within 50 yards, this trolley is
designed to operate within range of 50 yards.
The remote distance may be reduced by possible effected of
Interference on your remote golf trolley. Interference can be included
electromagnetic, high voltage power lines, cellular phones or CB
radios, or certain obstructions such as mounds, clusters of trees, will
possible reduce the distance of transmission.
Keep shipping carton in dry place after unpacking your unit for in case
should need to be shipped for service.
- 2 -
ELECTROMAGNETIC INTERFERENCE
(For Distance Remote model)
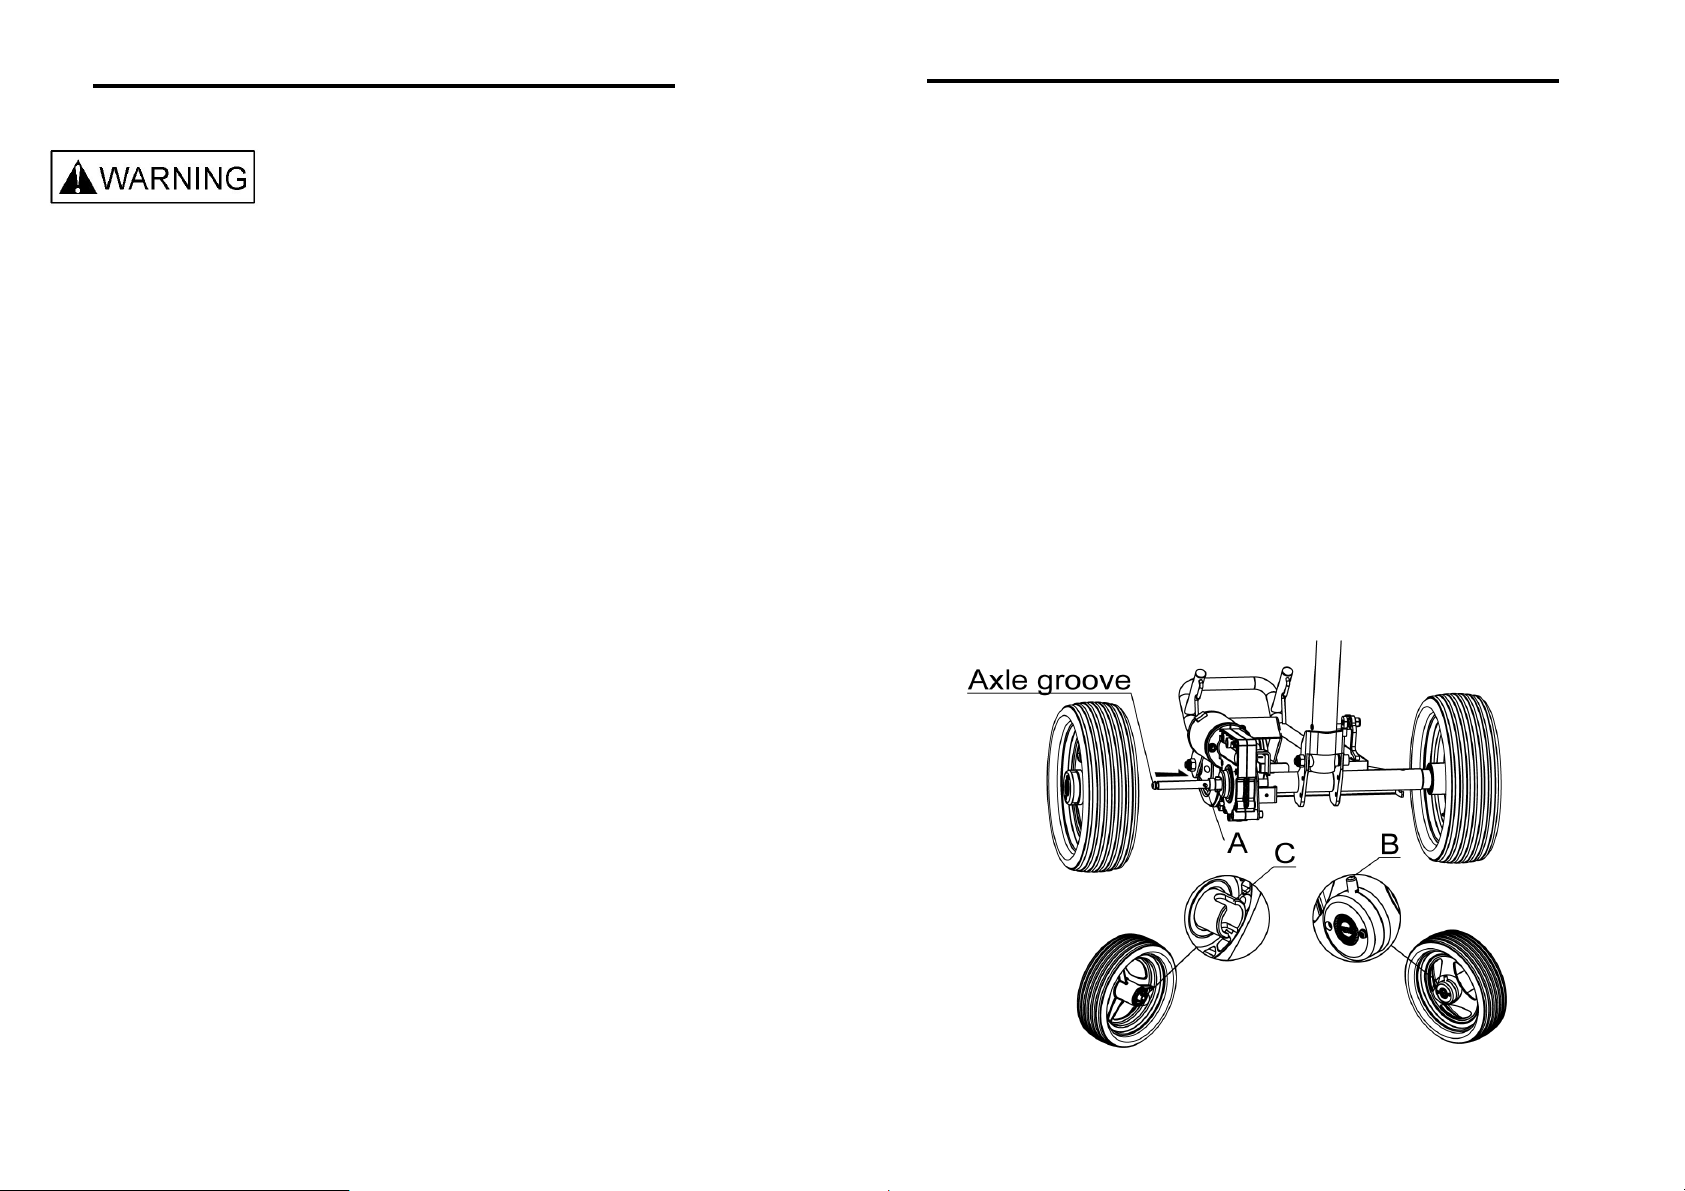
RELEASE AND ASSEMBLE THE WHEELS
To assemble the wheels:
Insert the wheel on the axle in the direction of the arrow.
: It is very important that you notice and understand
this information regarding the possible effects of Electromagnetic
Interference on your remote golf trolley.
Electric remote golf trolley may be susceptible to electromagnetic
interference (EMI), which is interfering electromagnetic energy (EM)
emitted from sources such as radio stations, TV stations, amateur radio
(HAM) transmitters, two-way radios, and cellular phones. The
interference (from radio wave sources) can cause the remote golf
trolley, reduced its remote distance, move by itself, or move in
unintended directions.
It is recommended to do following when your trolley is unattended:
Always disconnect main battery connector before leaving your trolley
or while unattended.
This trolley complies with current telecommunications regulations for
conforms to CE and FCC, but we strong recommend you read this
manual completely before you start to use your trolley.
- 3 -
Open the locking system B, then insert onto the axle, put slot C onto
the pin A.
Release locking system B and make sure the wheels have been
locked.
On the inside of the wheel, there is a color mark, the red dot for the
right side and blue dot on the left side.
Free wheeling: (for Motor brake model)
In case of power failure, for easier to push your trolley, the wheels can
be disengaged from motor by putting the locking system on outside of
axle groove.
To release the wheels:
Open the locking system B, then pull out the wheel.
Inflate the air tire model to a maximum of 1.2 bar (18 PSI) for air tire.
- 4 -
 Loading...