

Page 1
DICHIARAZIONE DI CONFORMITA' - DECLARATION OF CONFORMITY
DECLARATION DE CONFORMITE' - KONFORMITÄTS ERKLÄRUNG
Noi - The following - Nous soussignés - Der Unterzeichner :
dichiariamo sotto la nostra esclusiva responsabilità che il prodotto
hereby declares under full responsability that the following product
attestons sous notre entière responsabilité que le produit suivant
erklärt unter eigener Verantwortung, dass unten aufgeführtes Produkt
LAVABICCHIERI – LAVE-VERRES - GLASSWASHING MACHINE - GLÄSERSPÜLMASCHINE
mod.S400-ek / S460-ek / S480-ek
al quale questa dichiarazione si riferisce è conforme alle seguenti norme:
for which this declaration refers to the conformity of the following standards:
auquel se réfère cette déclaration, est conforme aux normes suivantes:
folgendem Standard entspricht:
- EN 60335-1 (1994) + A11,A1,A12,A13,A14,A15
Sicurezza degli apparecchi elettrici d'uso domestico e similare. Norme generali
Safety of household and similar electrical appliances-General requirements.
- EN 60335-2-58 (1997)
Sicurezza degli apparecchi elettrici d'uso domestico e similare. Parte 2':Norme particolari lavastoviglie uso
collettivo.
Safety of household and similar electrical appliances-Part 2':Particular requirements for commercial electric
dishwashing machines.
- EN 292-2 (1992) Part 1' - PART 2'
Sicurezza del macchinario-Concetti fondamentali-Principi generali progettazione-Specifiche e principi tecnici.
Safety of machinery-Basic concepts-General principles for design-Tecnical principles an specification
- EN 61770- (2000)
Apparecchi elettrici connessi alla rete idrica. Disposizioni per evitare il ritorno d’acqua per effetto sifone e il
guasto dei complessi di raccordo
Electric appliances connected to the water mains. Avoidance of backsiphonage and failure of hose-sets
in base a quanto previsto dalle Direttive:
selon ce qui est prévu par les Directives:
on the basis of what is foreseen by the Directives:
aufgrund der vorgesehenen Richtilinien:
73/23/CEE, 89/392/CEE, 91/368CEE,92/31CEE, 93/44CEE, 93/68CEE
Decliniamo ogni responsabilità per sinistri a persone o a cose derivanti da manomissioni da parte di terzi o da carenze di manutenzione o riparazione.
Nous déclinons toute responsabilité pour sinistres à personnes ou à objets qui derivent de l'intervention de la part de tiers non specialistes ou de
carences de manutention ou reparation.
We decline any responsability for injuries or damage derived from machine misuse, abuse by others or improper machine maintenance or repairs.
Wir Iehnen jegliche Verantwortung für Schäden an Personen oder Dingen ab, die auf fehlerhaftes Eingreifen Dritter oder auf mängelhafte Wartung oder
Reparation zurückzuführen.
li 01/01/06
(data/date/Datum)
Page 2

- EMC -
Noi - Nous soussignés - The following - Der Unterzeichner :
LAMBER snc di Affaba F. e c.
Via Italia 6
26855 Lodivecchio (LO) ITALY
dichiariamo sotto la nostra esclusiva responsabilità che il prodotto
attestons sous notre entière responsabilité que le produit suivant
hereby declares under full responsability that the following product
erklärt unter eigener Verantwortung, dass unten aufgeführtes Produkt
LAVABICCHIERI – LAVE-VERRES - GLASSWASHING MACHINE - GLÄSERSPÜLMASCHINE
mod.S400-ek / S460-ek / S480-ek
al quale questa dichiarazione si riferisce è conforme alle seguenti norme:
auquel se réfère cette déclaration, est conforme aux normes suivantes:
for which this declaration refers to the conformity of the following standards:
folgendem Standard entsprechen:
• Electromagnetic compatibility – Requirements for household appliances, electric tools and
similar apparatus – Part 1: Emission – Product family standard – EN 55014-1 (2000) + A1
(2001)
Compatibilità elettromagnetica – Prescrizioni per gli elettrodomestici, gli utensili elettrici e gli apparecchi similari –
Parte 1: Emissione Norma di famiglia di prodotti – EN 55014-1 (2000) + A1 (2001)
• Electromagnetic compatibility (EMC) – Part 3-2: Limits – Limits for harmonic current
emissions (equipment input current ≤ 16 A per phase) – EN 61000-3-2 (2000)
Compatibilità elettromagnetica (EMC) – Parte 3-2: Limiti – Limiti per le emissioni di corrente armonica
(apparecchiature con corrente di ingresso ≤ 16 A per fase) – EN 61000-3-2 (2000)
• Electromagnetic compatibility (EMC) – Part 3-3: Limits – Limitation of voltage fluctuations
and flicker in low-voltage supply systems for equipment with rated current ≤ 16 A – EN
61000-3-3 (1995) + A1 (2001)
Compatibilità elettromagnetica (EMC) – Parte 3-3: Limiti – Limitazione delle fluttuazioni di tensione e dei flicker in
sistemi di alimentazione in bassa tensione per apparecchiature con corrente nominale ≤ 16 A – EN 61000-3-3
(1995) + A1 (2001)
• Electromagnetic compatibility - Requirements for household appliances, electric tools and
similar apparatus - Part 2: Immunity - Product family standard - EN 55014-2 (1997) + A1
(2001)
Compatibilità elettromagnetica - Requisiti di immunità per apparecchi elettrodomestici, utensili e degli apparecchi
elettrici similari – Parte 2: Immu nità – Norma di famiglia di prodotti- EN 55014-2 (1997) + A1 (2001)
in base a quanto previsto dalle Direttive:
selon ce qui est prévu par les Directives:
on the basis of what is foreseen by the Directives:
aufgrund der vorgesehenen Richtilinien: 89/336 CEE, 92/31 CEE, 93/68 CEE
li 01/01/06
(date of issue)
Page 3

INDICE ITALIANO
Note generali pag 05
Introduzione e norme di sicurezza pag. 06
Fate conoscenza con l'apparecchio pag. 10
Parte prima - NORME PER L'UTILIZZATORE pag. 11
Pannello Comandi pag. 12
Funzionamento ed uso, detersivi, manutenzione, inconvenienti possibili pag. 13
Parte seconda - NORME PER L'INSTALLATORE pag. 29
Schema allacciamenti pag. 30
Collegamento elettrico, scarico, alimentazione idrica pag. 31
Schema collegamenti pag. 39
Schema regolazioni pag. 40
Schema elettrico pag. 41
Componenti pag. 43
Dati tecnici pag. 44
SOMMAIRE FRANÇAIS
Remarques générales pag. 05
Introduction et normes de sécurité pag. 07
Faites connaissance avec l'appareil pag. 10
Première partie - INSTRUCTIONS POUR L'UTILISATEUR pag. 11
Emploi contrôles pag. 12
Fonctionnement et emploi, détersifs, entretien, inconvénients pag. 17
Deuxième partie – INSTRUCTIONS POUR L’INSTALLATEUR pag. 29
Installation pag. 30
Branchement hydraulique, vidange, branchement électrique pag. 33
Schéma branchements pag. 39
Schéma régulations pag. 40
Schéma électrique pag. 41
Composants pag. 43
Données techniques pag. 44
CONTENTS ENGLISH
General notes pag. 05
Introduction and safety notes pag. 08
Learn to use the appliance pag. 10
First section - FOR THE USER pag. 11
Control panel pag. 12
Working and use, cleansing agents, maintenance, possible troubles pag. 21
Second section - FOR THE INSTALLER pag. 29
Installation pag. 30
Water drain, water connections, electrical connections pag. 35
Connections scheme pag. 39
Regulations scheme pag. 40
Wiring diagram pag. 41
Components pag. 43
Specifications pag. 44
INDEX DEUTSCH
Allgemeines pag. 05
Einführung und Sichereitsnormen pag. 09
Wollen Sie den Apparat kennenlernen pag. 10
Teil 1 - FÜR DEN BENUTZER pag. 11
Steuertafel pag. 12
Arbeitsweise und Anwendung, Reinigungsmittel, Wartung, Mögliche Störungen pag. 25
Teil 2 - FÜR DEN INSTALLATEUR pag. 29
Installationsblatt pag. 30
Wasserablauf, Wasserversorgung,Elektrischer Anschluss pag. 37
Anschlussschema pag. 39
Eichung pag. 40
Schaltschema pag. 41
Komponenten pag. 43
Technische Daten pag. 44
Page 4

NOTE GENERALI ITALIANO
Vi ringraziamo per la scelta da Voi fatta nell'acquisto della Vostra LAVABICCHIERI.
Il perfetto funzionamento della macchina e risultati di lavaggio ottimali sotto il profilo igienico-sanitario
potranno essere garantiti solo se tutte le avvertenze del presente Manuale verranno rispettate.
Ci auguriamo che le informazioni contenute nel presente manuale Vi siano di aiuto. Esse sono basate sui
dati e sulla nostra attuale migliore conoscenza.
Leggete attentamente quanto riportato nel manuale, comprese le raccomandazioni ed i suggerimenti.
Leggete anche le condizioni di garanzia.
REMARQUES GENERALES FRANÇAIS
Nous Vous remercions de Votre choix lors de l'achat de votre LAVE-VERRES.
Le fonctionnement parfait de l'appareil et les résultats de lavage optimaux sous le profil hygiénique-
sanitaire, peuvent seulement être garantis si tous les avertissements dans ce manuel-ci sont respectés.
Nous souhaitons que les renseignements contenus dans ce manuel vous soient utiles. Ils sont basés sur les
donneés et sur notre meilleure connaissance actuelle.
Lisez attentivement ce qui est énoncé dans le manuel, y compris les recommandations et les suggestions.
Lisez aussi les conditions de vente, y compris celles qui limitent la garantie.
GENERAL NORMS ENGLISH
Thank You for purchasing our Glasswashing Machine.
Perfect washing-up results as regards hygiene and a correct operation of the dishwashing machine can be
assured only in case the instructions reported in the present manual are carefully followed.
We hope the information reported in the present manual will be helpful to you.
They are based on data and our best updated knowledge.
Carefully read the Instructions reported in the manual, recommendations and suggestions included.
Carefully read the terms of sale too, the ones limiting warranty included.
ALLGEMEINES DEUTSCH
Wir danken Ihnen, daß Sie unsere Gläserspülmaschine gewählt haben.
Der perfekte Betrieb und die optimalen Reinigungsergebnisse können nur garantiert werden, wenn alle
Anweisungen beachtet werden.
Wir hoffen, daß Ihnen die in vorliegendem Gebrauchshandbuch enthaltenen Informationen hilfreich sein
werden. Die Angaben beruhen auf unserem aktuellen Kenntnisstand.
Lesen Sie bitte aufmerksam das vorliegende Gebrauchshandbuch sowie die darin enthaltenen
Empfehlungen und Hinweise. Lesen Sie bitte ebenfalls die Verkaufsbedingungen sowie die Konditionen, die
die Garantieleistungen regeln.
5
Page 5

INTRODUCTION ENGLISH
AND SAFETY NORMS
INTRODUCTION
- The machine is an industrial glass-washing machine.
- The machine is in conformity to the European Norms 89/336/CEE for the radio noises.
- According to EEC directive no. 23 of 19/02/1973 and the law of actuation no.791 of 18/10/1987, our
appliances are built-up according to the good technique notes in force in Italy and abroad.
- Noise level of the machine, less than 70 dB(A).
PRELIMINARY OBSERVATION
Carefully read the instructions reported in the present user manual, as it gives important indications about
safety of installation, operation and maintenance:
- carefully keep the present manual for further consultations;
- the illustrations and drawings showing the machine are intended for general reference only and are
not necessarily accurate in every instance;
- the dimensions and characteristics of the machine, given in this Manual, are not to be considered
binding and may be changed without prior notice;
- once removed the packing material, check that all the equipment is present. If there is any doubt, do
not use it and contact qualified personnel. The packing elements (plastic bags, nails, etc.) should be
kept away from children, because they are dangerous.
GENERAL SAFETY REGULATIONS
THIS SAFETY CODE HAS BEEN COMPILED IN YOUR INTEREST. Strict adherence to these rules will
reduce the risks of injury both to yourself and to others;
Personnel working with this machine must adhere strictly to all statutory safety regulations as well as the
specific rules listed below. Failure to do so may result in personal injury and damage to the machine;
- DO NOT attempt to move, install, set up or operate this machine until you have read and fully
understood this Manual. If doubt persists, ask your supervisor;
- never leave tools, parts or other loose material on or in the machine;
- Before switching the equipment on, make sure that the model plate data conform to those of the
electrical and water distribution network;
- remember that even with the mains indicator in the “OFF” position, the incoming cables are still live;
- BEFORE starting the machine or the cycle, after any maintenance or repair work, make sure all
protective are correctly installed;
- be vigilant at all times, remember that your safety and that of your fellow workers depends on you;
- when moving or lifting the machine, care must be taken to comply with all the relevant regulations
governing such operations;
- installation should be carried out by qualified personnel according to the manufacturer's instructions.
- this equipment should be destined to the use which it has been conceived for. Any other application
should be considered improper and consequently dangerous;
- the equipment should only be used by personnel trained for its use;
SPECIAL SAFETY REGULATIONS
- adjustement and repairs must be carried out only by qualified personnel. Repair carried out by
unskilled personnel may be dangerous;
- perfect washing-up results as regards hygiene and a correct operation of the washing machine can be
assured only in case the instructions reported in the present handbook are carefully followed;
- the machine must be used only by authorized personnel who must comply with sanitary measures;
- do not leave the machine in an environment with temperatures lower than 0°C;
- the machine protection degree is IP21, therefore it should not be washed with direct high pressure jets
of water.
8
Page 6
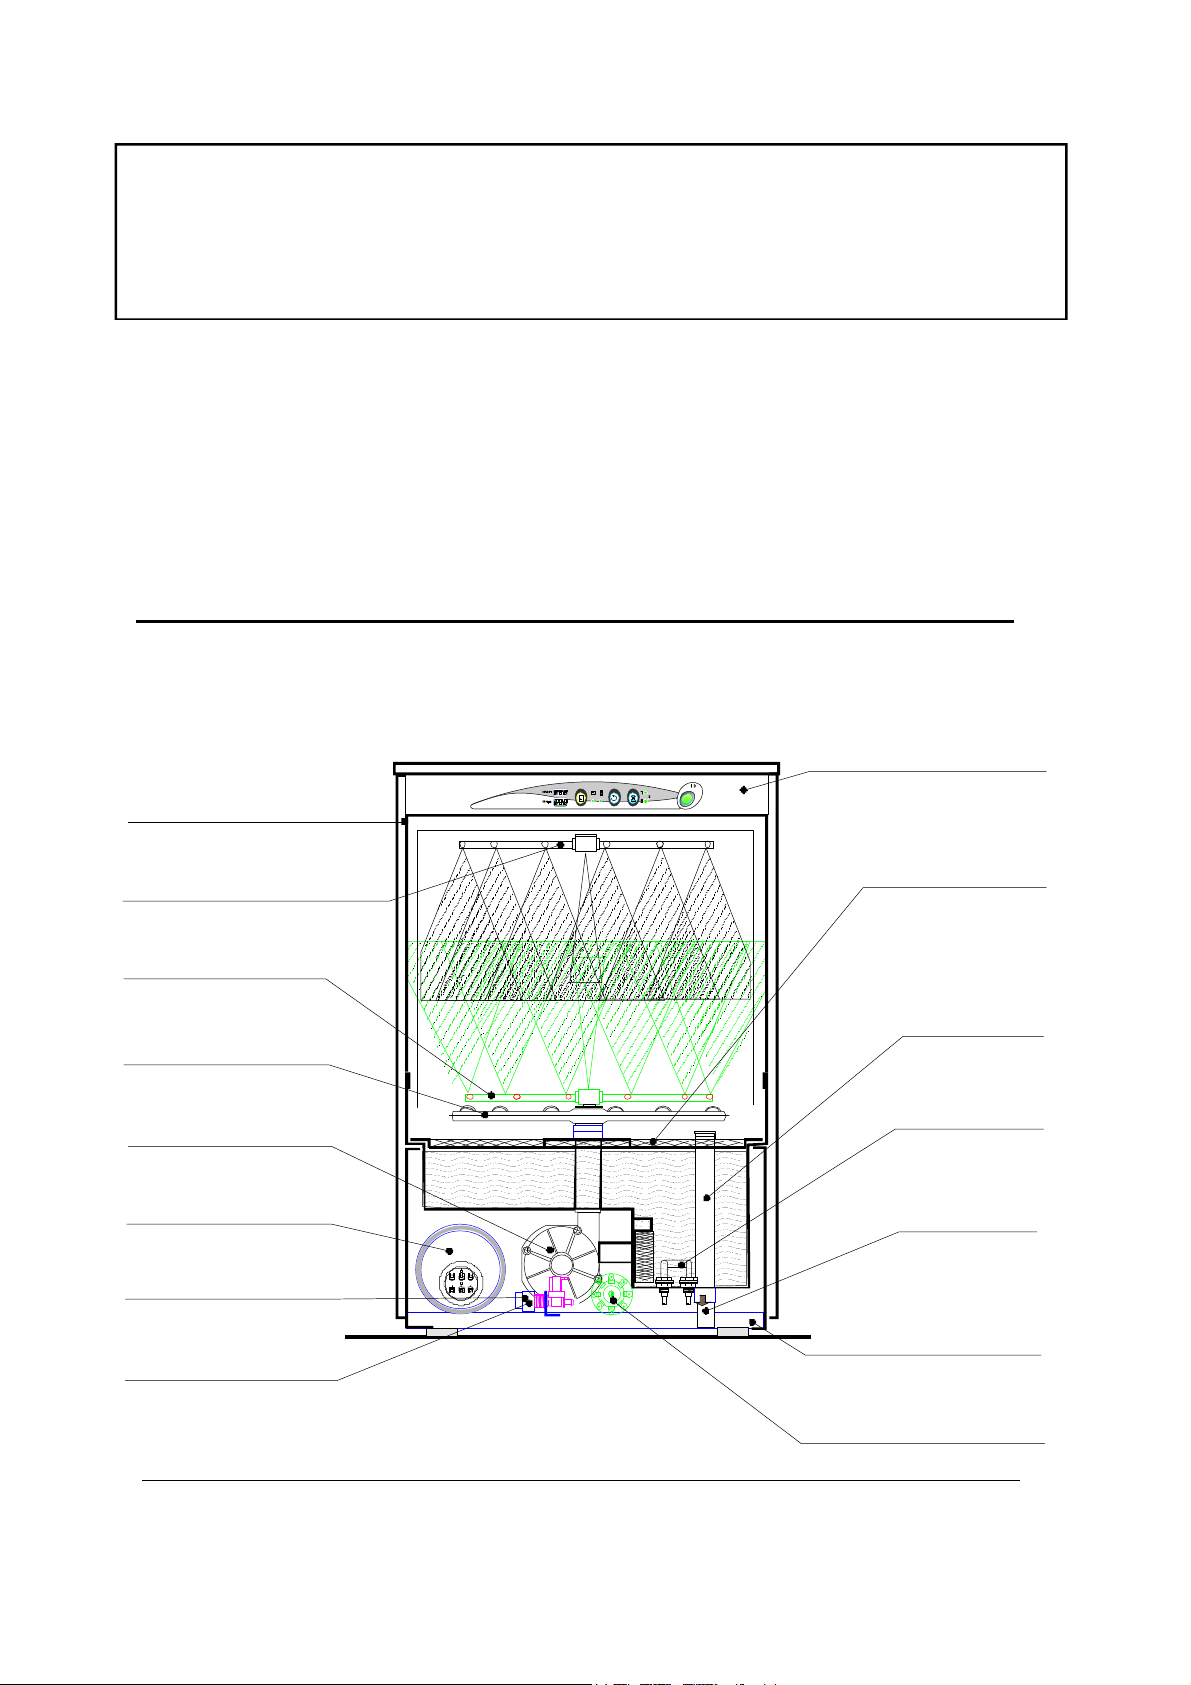
Fate conoscenza con l'apparecchio
Faites connaissance avec l'appareil
Learn to use the appliance
Wollen Sie den Apparat kennenlernen
Pannellatura doppia parete
Double paroi
Double skin
Doppelwandig
Risciacquo superiore rotante in acciaio inox (cono 90°)
Rinçage supérieur rotatif en acier inoxydable (cône 90°)
Stainless steel Upper rotating rinsing (90°)
Oberes Spülsystem rotierendes aus CNS (Konus 90°)
Risciacquo inferiore rotante in acciaio inox (cono 90°)
Rinçage inférieur rotatif en acier inoxydable (cône 90°)
Stainless steel Lower rotating rinsing (90°)
Unteres Spülsystem rotierend aus Inox (Konus 90°)
Lavaggio inferiore rotante in acciaio inox
Lavage inférieur rotatif en acier inoxydable
Stainless steel Lower rotating washing
Unterer Wascharm rotierender aus CNS
Pompa Lavaggio
Pompe Lavage
Washing pump
Pumpenmotor
Boiler coibentato in acciaio inox
Surchauffeur isolé en acier inox
Stainless steel Boiler with insulation
Isolierter Boiler aus CNS
Elettrovalvola Risciacquo
Electrovanne Rinçage
Rinsing solenoid valve
Elektrisches Spülventil
Elettrovalvola Entrata acqua
Electrovanne Entrée d 'eau
Water inlet solenoid valve
Elektrisches Wassereinlaufventil
Pannello di comando
Panneau de contrôle
Control panel
Steuertafel
Filtro aspirazione pompa in acciaio inox
Filtre aspiration pompe en acier inoxydable
Stainless steel Suction pump filter
Pumpenansaugfilter aus CNS
Troppopieno
Trop-plein
Overflow
Uberlaufstutzen
Resistenza vasca
Résistance cuve
Tank Heating element
Tankheizung
Scarico vasca
Vidange cuve
Tank drain
Wannenablauf
Telaio,vasca e capot in acciaio inossidabile
Châssis, cuve et capot en acier inoxydable
Body,tank and Top in Stainless steel construction
Gehäuserahmen und Verblendungen aus CNS
Dosatore additivo di risciacquo
Doseur de produit pour rinçage
Rinse aid dispenser
Nachspülmitteldosiergerät
descr-s400-ek-elettronica-2006
Page 7

NORME PER L'UTENTE
INSTRUCTIONS POUR L'UTILISATEUR
INSTRUCTIONS FOR THE USER
BEDIENUNGSANLEITUNG
Page 8

PANNELLO COMANDI EMPLOI CONTROLES
.
.
CONTROL PANEL STEUERTAFEL
Interruttore generale
Interrupteur général
Main switch
A
Hauptschalter
Pulsante selezione tempo lavaggio
Bouton sélecteur temps de lavage
Wash time selection pushbutton
B
Programmwahlschalter
Pulsante ciclo
Bouton cycle
Cycle pushbutton
C
Programmdrucktaste
G
Lampada ciclo
Lampe indicatrice de cycle
Cycle lamp
Programmkontrollampe
Lampada temperatura
Lampe température
Température lampe
D
Temperaturlampe
Lampada sportello aperto
Lampe indicatrice de porte ouverte
Door opening lamp
E
Netzkontrollampe
Pulsante depuratore o pompa scarico
Bouton adoucisseur ou pompe de vidange
Water Softener or drain pump pushbutton
F
Taste für Wasserenthärter / Ablaufpumpe
Termometri temperatura di lavaggio e risciacquo
Thermomètre témperature de lavage et rinçage
Wash and rinse thermometer
Wasch-und Nachspültemperaturthermometer
Dis.1
Qc-sqs-ek-
OPTIONAL
12
Page 9

ENGLISH
First Section - FOR THE USER
WORKING AND USE
The glasswashing machine can wash up to 900 mixed-size glasses every hour.
The machine protection degree is IP21, therefore it should not be washed with direct high pressure jet water.
The objects to be washed should be correctly arranged for a good washing-up result.
We suggest to descale glasses, from time to time, in order to remove calcareous and/or starchy sediments
by soaking them in suitable solutions suggested by your cleansing agent supplier.
If you need to buy new dishes remember the following: Dishes and cups: preference must be given to
china or non-porous pottery articles, with smooth surface. Glasses: choose a glass suitable to be washed
in dish-washing machines. Surfaces must be smooth and bottoms as flat as possible.
OPERATION BEFORE WASHING
BEFORE STARTING THE WORKING OPERATION BE
SURE THAT:
- the cock is open;
- the filters and the overflow are in
their housings;
- the wash arm and the rinse arm are free to
pivot;
- brightener and washing powder dispenser
containers are loaded.
THEN PROCEED:
A - Open the door and put into the tank,
possibly over the pump filter, about 40 gr.
of non-lathering detergent in powder.
Every 10 cycles add about 20 gr. of detergent.
If the machine is provided with an automatic
dosing device, control that the detergent is in its
container.
B - Place the dishes in the basket minding to
previously remove all solid waste and fat.
Do not overload baskets, dishes must not be
placed one upon the other, water must have the
way to run on each part of the same.
C - Turn the machines on by wall switch and
push the switch “A” situated in Dis.1.
At this moment the thermometer display lights up
And the tank fills up. When the tank is full the
control lamp for cycle “2” lights up.
D – Introduce the basket in the dishwasher.
The control lamp “E” will flash in case the door of
the dishwasher is open.
Before you start the cycle be sure that the control
lamp “D” is flashing. This means that the water for
the washing cycle and the rinsing water
temperature reached the ideal temperature for
working.
E – Choose the washing period cycle and push
the button “B” between the following items:
- lamp 1 flashing – short cycle of 1 minute
- lamp 2 flashing – medium cycle 2 minutes
- lamps 1 and 2 lightening at the same time
long cycle of 3 minutes.
The washing period cycle has to be chosen
regarding the dirt that has to be removed.
F – Close the door of the dishwasher.
Push the button cycle “C”
The dishwasher starts the washing with the period
you chosen. Additional to this period will be a
pause of 5 seconds and a rinsing period of 18
seconds (23 seconds for machines with Water
softener) with clean water about 85° to 90°C.
The control cycle lamp is flashing up to the end of
the complete washing period. Finished the
washing period the control lamps will stop
lightening.
The lighting of the control lamp “D” means that
the water reached the needed temperature of 85°
to 90°C.
The rinsing will start working of by the reached
temperature need. That means the period of the
washing cycle you chosed will be extended up to
having reached the exact temperature.
G – Extracting the basket inclines and shakes it
carefully. So the rest of the water drops will be
eliminated.
Leave the dishes in the basket until its will be dry
by evaporation. Take the dishes away from the
basket and pay attention not to touch the dishes
on its border and put the on clean shelves.
21
Page 10

To continue carry a new basket, introduce it in
the machine, close the door and press button
“C”.
ACHIEVEMENTS
Any deficiency in the washing process is
apparent when dirty residuals are visible. An
insufficient rinsing might cause any halos: in this
case, check that the rinsing jets are clean and
there is a sufficient pressure in the water
distribution network.
In the case that residuals are present, check
that:
• the washing jets are clean
• there is detergent
• the pump suction filter is clean
• the positions of the objects in the rack are
correct.
GLASSES POSITIONING
In order to obtain a successful dishwashing, it is
suitable to take care of the way dishes are placed. It
is suitable to place glasses, inside the wire basket
with the concave side towards the bottom. Place
mixed cutlery in a vertical position into the suitable
container minding not to cram them and with hafts
towards the bottom (see the drawing).
S400-ek=MAX 240
S460-ek=MAX 260
S480-ek=MAX 300
RINSING ADDITIVES
To grant a perfect rinsing, a quick drying and to
avoid calcareous sediments on glasses and cups
you must add a surfactant on water (Brightener).
Your cleansing agent supplier will be able to suggest
the most suitable product. Your machine is equipped
with a rinse aid dispenser. Mean concentration used
is 0,15 g/lt.
REGENERATING
(for machines with Water softener)
If the glasswasher is equipped with a Water
softener it is possible to regenerate the resins.
This operation must be done when lamp “E”
is flashing with door open and door closed .
Lift the overflow out of the tank and close the
door .
Push the button "F" fot three seconds until the
lamp "E" is lighted. After twenty (20) minutes
the lamp "E" is OFF.
The regeneration of resins has been completed
automatically and the machine is ready to go into
operation again.
Every 6 days add 1 kg of salt in tablet-form in
the bottle placed on the bottom of the tank.
The flashing-signalling will be signs after 45
washing-cycles.
SALT CONTROL
When it is necessary to add salt in the container, the
“E” lamp blinks quickly.
This operation is programmed to be performed every
10 regeneration cycles.
Unscrew the plug of the salt container at the
bottom of the tank and put 1 kg coarse salt tablets
in it. Clean the gasket and screw the plug.
After having added the salt into the container, perform
the REGENERATION operation by following the
instructions indicated in the previous paragraph.
Attention!
The lack of salt in the container damages the
machine because of limestone, besides a
defective washing of glasses and dishes.
These damages are not covered by the warranty.
DRAIN PUMP INSTRUCTION
(only for machines with drain pump)
The drain pump starts up automatically just
during the washing cycle to discharge the
exceeding water coming from the rinsing cycle.
At the end of the working day, in order to
completely discharge the tank, it is necessary
to perform the following operations:
1. Open the door of the dishwasher
2. Remove the overflow pipe from the tank;
3 Afterwards push button “F” for 3 seconds.
Alternatively are flashing the control lamp “E” and
the cycle lamp (chosen before)
The discharge will stop automatically after 5
minutes. The control lamps will stop flashing.
Please note: in case the door is open the control
lamp “E” will continue flashing.
Reinstall the flow over and shut the door.
22
Page 11

CLEANING AND PREVENTIVE
MAINTENANCE
PRECAUTION AND CLEANING
INSTRUCTIONS
- IMPORTANT: Before carrying out the
cleaning and maintenance operations,
disconnect the equipment from the mains
power supply.
- High temperatures can be reached inside
the machine (90°C). After power supply has
been removed, wait until the machine has
reached room temperature, before working
on it.
- The machine protection degree is IP21,
therefore it should not be washed with
direct high-pressure jets of water.
- Never leave tools, parts or other loose
material on the machine or inside of it.
- BEFORE starting machine or cycle, after
any maintenance or repair work, make sure
all protective are correctly installed.
DAILY MAINTENANCE
- Disconnect the machine with pushbutton
"A";
- Lift the overflow pipe and let the water
drain out of the tank;
- Wash thoroughly the tank and the filter
housings to remove all impurities;
- Take the filters out and clean them under
running water;
- Re-assemble the overflow pipe and the
filters in their housings;
- Check and clean the washing and the
rinsing jets;
- Clean the outer surface of the machine by
using a wet sponge; do not use water jets
because, besides being dangerous, they
could damage the electrical parts; do not
use abrasive detergents;
- When the machine is to remain idle for a
long time, drain all the water from the
boiler and from the electro pump.
Also leave the door open.
NEVER WASH THE EXTERNAL PART OF
THE MACHINE WITH A WATER JET
POSSIBLE TROUBLES - CAUSES - SOLUTIONS
PROBLEMS CAUSES SOLUTIONS
The machine doesn't catch Main switch is switched off Turn ON the main switch
The water doesn't go in Water cock closed Open water cock
The Overflow is not in place Reassemble the Overflow in
place
Insufficient Washing Wrong detergent or insufficient
dosage Use anti-foam detergent in the
right dosage and never with
cold water
Low temperature in the tank Wait until the water gets hot
Dirty wash filter Clean filter
Insufficient Rinsing Rinsing nozzles blocked Unscrew and clean nozzles
under running water
Hydraulic pressure lower than Wait until the pressure is on or
1 bar - 100 kPa buy a booster pump
The lamp “E” is flashing slowly Resins exhausted Start regenerating of resins
(see page 22)
The lamp “E” is flashing quickly Salt exhausted Add salt in the container
(see page 22)
CAUTION! FOR ANY OTHER TROUBLE, CALL SERVICE
23
Page 12

CLEANSING AGENTS
The choice of a suitable cleansing agent is an essential condition if you want to obtain extremely good washing
results as regards hygienic results. That’s why it’s important to consider some points. First of all only highly alkaline
and chlorine-active antifoam products, especially made for industrial dish-washing machines, must be used and they
must be produced by well-known reliable Firms. Mean concentration of the cleansing agents in powder must be
1,5÷2,5 g/lt. Mean concentration of liquid cleansing agents must be 2÷4 g/lt.
In order to avoid scales and corrosions, put cleansing agent above water level on the nearest area of the sucking
pump filter, in this way it will immediately dilute and will not deposit on the tank bottom.
DESCALING
When hard water is used you can find inside the machine and also on dishes calcareous sediments which must be
removed both for hygienic and operating reasons by a descaling operation.
Operating process and frequency of this intervention are suggested by your cleansing agent supplier who has
suitable products, generally containing phosphoric acid.
In order to avoid damage to the machine do not increase the quantities and once operations end rinse abundantly.
SANIFICATION
At least each 30 days it would be useful to do this operation which guarantees the complete hygienic conditions of the
machine. We suggest to contact your cleansing agent supplier who will give you quantity and name of the most
suitable product you can use and that is generally an active chloride powder (100÷200 ppm).
In order to avoid damage to the machine do not increase the quantities and once operations end rinse abundantly.
USEFUL HINTS FOR STAINLESS STEEL MAINTENANCE
Stainless steel is so called because it is not affected by oxidation; this dues its resistance to a thin molecular layer of
oxide on the surface which protects againts further oxidation. There are, however, substances which can modify or
destroy this layer, giving rise to corrosion: besides preventing the protective film of oxide from reforming, these
substances corrode the stainless steel itself and can cause irreparable damage. It is therefore necessary to prevent this
by choosing correct cleaning products and by complying with the following simple recommendations: never forget
that when using these appliances, the first and fundamental rule is to guarantee that the cleaning products are
both non-toxic and hygienic.
Before using any detergent to clean either the stainless steel or the immediate and sorrounding floor area, always ask
your supplier for the most suitable product which does not cause corrosion on the steel itself; the onset of rust is most
commonly caused by the use of unsuitable cleaning materials (strongly acid chlorate based detergents) or on
inadequate maintenance.
Our appliances are made of stainless steel AISI 304 (18-10 type) for exterior panelling,upper tops, tanks etc.
Comply with the following instructions when cleaning and servicing parts in stainless steel.
Ordinary daily maintenance
Carefully and frequently clean the surfaces using a damp cloth; use soap and water or normal detergents,so long as
these do not contain abrasives or chlorine based substances such as sodium hypochlorite (bleech) ,hydrochloric
acid or other such solutions:These products quickly and irreparably corrode stainless steel. When cleaning floors
underneath or near the appliances, never use the above mentioned products as vapours or splashes could subject the
steel to similar destructive effects.
Only ever rub in the direction of the satining, then thoroughly rinse with clean water and carefully dry.
Rust : water supply pipes, inevitably convey particles of rust dissolved in the water especially in new installation plants
or when taps are opened after a period of inactivity. These iron deposits must not be allowed to remain on the stainless
steel since they produce rust by contamination.
Use suitable products to remove any rust marks,from companies which produce detergents for industrial use. After
application, thoroughly rinse with clean water, neutralizing the action of the product with an alkaline detergent normally
used to clean such appliances or with another specific product.
DO NOT USE METAL MATS TO CLEAN THE STAINLESS STEEL
24
Page 13

NORME PER L’INSTALLATORE
Le istruzioni che seguono sono rivolte a personale qualificato, il solo
autorizzato ad attuare le verifiche e le eventuali riparazioni.
La Ditta declina ogni responsabilità nel caso di interventi effettuati da
personale non qualificato e/o utilizzo di ricambi non originali.
INSTRUCTIONS POUR L'INSTALLATEUR
Les instructions suivantes sont adressées à un personnel qualifié, qui est le
seul autorisé à effectuer les vérifications et les réparations éventuelles.
Le constructeur décline toute responsabilité en cas d'interventions effectuées
par du personnel non qualifié.
INSTRUCTIONS FOR THE INSTALLER
The following instructions are addressed to a qualified personnel, the only one
authorised to carry out checks and repair, if any.
The Manufacturer declines any responsibility in the case of interventions
made by a non qualified personnel.
AUFSTELLUNGSANLEITUNG
FÜR DEN INSTALLATEUR
Die folgenden Hinweise sind an das Fachpersonal gerichtet; nur das
Fachpersonal darf Prüfungen und eventuelle Reparaturen durchführen.
Unsere Firma ist von jeglicher Verantwortung befreit, wenn unqualifiziertes Personal
Eingriffe vornehmen und/oder keine Originalsatzteile verwenden sollte.
29
Page 14

SCHEMA ALLACCIAMENTI
INSTALLATION
S400-ek/S460-ek/S480-ek
INSTALLATION
INSTALLATIONSBLATT
482
S460-ek=695
S480-ek=740
S400-ek=675
S
L
285
E
135
75
E
L
S
50
S
E
50
A
510
S
S400-ek=275
S460-ek=295
S480-ek=325
S480-ek=300
S460-ek=260
S400-ek=240
315
510
35
A
E
L
S
Altezza massima per scarico a muro - Hauteur maximale pour vidange à mur
Maximum height for drain to wall - Maximale Bodenhöhe für Wandwasserablauf
Entrata acqua - Chargement eau
Water inlet - Wasseranschluß
Linea elettrica - Branchement électrique
Electric input - Netzanschluß
Scarico acqua - Evacuation Eau
Drain - Ablauf
32 mm - 1"1/4 G
3/4" G
230 V 50Hz
Dis.2
Page 15

ENGLISH
Second Section - FOR THE INSTALLER
During installation carry out a good machine levelling, which is a prerequisite for a correct
operation thereof.
The Manufacturer cannot assume any responsability for any damage to persons or
property deriving from the non-observance of the above specified norms.
For a correct installation see the drawing on page 30.
ELECTRICAL CONNECTION
Before connecting the machine,
make sure the voltage outlet of the
mains is the same as the voltage
specified on the data plate of the
machine.
A main switch must be installed between
the mains and the machine. This safety
measure also requires that the minimum
distance between the switch contacts is at
least 3 mm and the disconnection on all
poles according to EN 60204 (VDE 113).
Fuses on the main switch must be 16 A.
The mains must be wired to be able to
handle the current drawn by the
machine.The system must also be provided
with a proper ground lead in accordance
with the existings norms. The electric cable
must be of the following type: H07RN-F.
For the right choice of the cross section
area refer to the following table:
Cross Section area Total loading
mm² A
0,75 < 6
1 6 ÷ 10
1,5 10 ÷ 16
2,5 16 ÷ 25
The electrical safety of this equipment is
only assured if it is connected as follows.
It is necessary to connect the equipment to
an effective ground installation, as
specified by the electrical safety regulations
in force.
Check that this basic requirement is
complied with and, in case of doubt, ask for
a careful check of the installation by a
qualified personal.
In addition, the equipment shall be part of
an equipotential system, the effectiveness
of which should be checked according to
the regulations in force.
The connection should be made at the
screw marked by the respective label
located on the equipment back side ( ).
THE MACHINE SHALL BE
CONNECTED WITH AN EFFECTIVE
GROUND CLAMP.
The manufacturer declines any
responsibility for any damages
caused by lack of an effective
ground installation.
Page 16

WATER CONNECTIONS
WORK TEMPERATURES
Carefully comply with any national or
regional regulations in force.
Water installation must have the following
characteristics:
Temperature: 10÷12 °C.
Dynamic Pressure :
- 2 ÷ 4 bar (200÷400 kPa)
-for machines with incorporated Watersoftener:
Dynamic Pressure: 3 ÷ 4 bar (300 ÷ 400
kPa).
WARNING!
If the water pressure is higher than 3 bar, fit
the pressure reducer “A” supplied into the
solenoid valve as shown in the drawing.
If the dynamic pressure is lower than
specified on the data plate of the machine,
it is advisable to install a Booster Pump.
Hardness: between 7,2 and 12,5 °French.
If the hardness values are higher than
those mentioned above, it is advisable to
install a water-softener.
Washing temperature 55°÷ 60°C
Rinse temperature 80°÷ 85°C
n.b.: To help a correct working of the
thermocontrol system, do NOT adjust the
thermostat during the washing cycle.
DO NOT TAMPER WITH THE
THERMOSTAT CALIBRATION
WATER DRAIN
According to the dimensions of the
drawing, water drain and feeding pipe
should have the same diameter of the
water inlet of the machine.
It must be furnished with a siphon and have
a right slope.
The machine is provided with a flexible pipe
for the connection with the water-work.
Make sure there are no throttlings along the
pipe.
Carefully comply with any national or
regional regulations in force.
36
Page 17

SCHEMA COLLEGAMENTI
SCHEMA BRANCHEMENTS
CONNECTIONS SCHEME ANSCHLUßSCHEMA
3
3
Resistenza BOILER - Résistance SURCHAUFFEUR
BOILER Elements - BOILERHEIZUNG
1
2
Resistenza VASCA - Résistance CUVE
TANK Elements - TANKHEIZUNG
Marrone - Marron
1
Brown - Braun
Blu - Bleu
2
Blue - Blau
Ponticelli - Ponts
3
Staples - Brücke
Marrone - Marron
Brown - Braun
Blu - Bleu
Blue - Blau
vite di regolazione
vis de régulation
regulation screw
Einstellschraube
Cod.0500060
Colle-s400-EK-2005
REGOLAZIONE DOSATORE DI LAVAGGIO
+
Portata pompa dosatrice
Portée pompe doseur de lavage
Detergent pump delivery
Wassermenge
1 cc/sec=3,6 Lit/h
REGULATION DOSEUR THE LAVAGE
DETERGENT PUMP REGULATION
WASCHMITTELDOSIERPUMPE
- Per aumentare la dose
di detergente ruotare in senso
orario la vite di regolazione.
- Tourner dans le sens des
aiguilles d'une montre la vis de
régulation .
- To increase the detergent
dose turn CW the regulation
screw .
- Um die Reinigungsmittelsmenge
zu erhöhen, drehen Sie den
Schraubenzieher im Uhrzeigersinn.
Page 18

SCHEMA ELETTRICO
WIRING DIAGRAM
con dosatore di lavaggio
avec doseur de produit lessiviel
with detergent pump
mit Waschspülmitteldosiergerät
SCHEMA ELECTRIQUE
SCHALTSCHEMA
230 V 50Hz
Fa4
Fa7
Fa10
Fa11
R
N
T
1
2 Ad
IN
MT1
CT3
15
R1
Fa2
Ev5
3
4
T
Dos
5
11
CP
6
P
CT1
v
12
14
Fc
MT1
EV1
MT1
7
8
CT2
v
R2
10
18
13
3
Fa8
Fa15
Fa5
Fa3
Fa1
s400-ek-08-02-06-r02
IN
Interruttore generale
Fc
Finecorsa
R1
Resistenza boiler
R2
Resistenza vasca
MT1
Contattore resistenza boiler
MT4
Contattore finecorsa
CP
Pressostato
CT1
Termostato boiler
CT2
Termostato vasca
CT3
Termostato di sicurezza
PM
Pompa lavaggio
EV1
Elettrovalvola carico
PC
Pulsante ciclo
Ad
Filtro antidisturbo
Dos
Dosatore di lavaggio
EV5
Elettrovalvola rigenera
T
Termometri digitali
MT8
Relay pompa scarico
PS
Pompa scarico
16
19
Interrupteur général
Microinterrupteur
Résistance Surchauffeur
Résistance Cuve
Contacteur rés. surchauffeur
Contacteur Microinterrupteur
Pressostat
Thermostat Surchauffeur
Thermostat Cuve
Thermostat de sureté
Pompe de lavage
Electrovanne chargement
Bouton cycle
Filtre ante-ennui
Petit moteur régénération
Electrovanne régénération
Thermomètres digitaux
Relais pompe de vidange
Pompe de vidange
Main switch
Limit switch
Boiler elements
Tank elements
Boiler elements contactor Limit
Switch contactor
Pressure switch
Boiler thermostat
Tank thermostat
Security thermostat
Electric pump
Loading solenoid valve
Cycle pushbutton
Suppressor
Detergent pump
Water softener solenoid valve
Digital thermometers
Drain pump relay
Drain pump
PM
17
P.S.
Hauptschalter
Endschalter
Boilerheizung
Tankheizung
Schütz für Boilerheizung
Schaltrelais Fc
Druckwächter
Boilerthermostat
Tankthermostat
Schützthermostat
Pumpe
Elektrisches Wassereinlaufventil
Hauptschalter
Entstörfilter
Waschspülmitteldosiergerät
Elektrisches Reinigungsventil
Digitale Displayanzeige
Schüts für Ablaufpumpe
Ablaufpumpe
Fa6
IN
Fc
R1
R2
MT1
MT4
CP
CT1
CT2
CT3
PM
EV1
PC
Ad
Dos
EV5
T
MT8
PS
Page 19

SCHEDA ELETTRONICA FICHE ELECTRONIQUE
.
.
P.C.BOARD ELEKTRONISCHE STEURUNG
FA1 19 SCARICO VIDANGE DRAINPUMP ABLAUFPUMPE
FA2 15 RIGENERA REGENERATION REGENERATIN ENTKALKUNG
FA3 16 LAVAGGIO LAVAGE WASHING WASCHUNG
FA4 5 RISCIACQUO RINÇAGE RINSING SPÜLUNG
FA5 3 FASE PHASE' PHASE PHASE
FA6 4 NEUTRO NEUTRE NEUTRAL UNGELADEN
FA7 11 LIVEL LOPRESSOSTATO NIVEAUPRESSOSTAT PRESSOSTATLEVEL DRUCKWÄCHTER
FA8 18 TEMPERATURA(TERMOSTATO) TEMPERATURE /THERMOSTAT) TEMPERATURE (THERMOSTAT) TEMPERATURE(THERMOSTAT)
FA10-FA15 12/13 MICRO PORTA MICRO PORTE DOORMICRO-SWITCH ENDSCHALTER
FA11-FA15 13/14 TERM OCONTROL THERMOCONTROL THERMOCONTROL THERMOCONTROL
FUNZIONE CICLO
FONCTION CYCLE
CYCLE FUNCTION
ABLAUFSAUFGABE
CICLO MANUALE
CYCLE MANUEL
MANUAL CYCLE
HANDABLAUF
ON
CICLO AUTOMATICO
CYCLE AUTOMATIQUE
AUTOMATIC CYCLE
SELBSTTÄTIGER
ON
filo/fil/wire/d raht ITA FRA ENG DEU
- TABELLA SELEZIONE TEMPI DI LAVAGGIO
- TABLEAU SELECTION TEMPS DE LAVAGE
- WASH TIME SELECTION TABLE
- AUSWAHLSTAFEL FÜR SPÜLUNGSZEIT
DIP
ON
ON
1122334
lavaggio-lavage
washing-wasch
risciacquo-rinçage
rinse-spülung
LED1=ON LED2=ON
60”
4
120”
PC-BOARD
120”
180”
LED1+2=ON
180”
240”
1122334
- FUNZIONE
RIGENERAZIONE
1
- FONCTION
REGENERATION
- REGENRATION
FUNCTION
- AUFARBEITUNGSAUFGABE
1122334
2
4
OFF
ON
4
ON
ON
- TABELLA SELEZIONE
TEMPI DI RISCIACQUO
- TABLEAU SELECTION
3
TEMPS DE RINÇAGE
- RINSE TIME
SELECTION TABLE
- AUSWAHLSTAFEL
FÜR SPÜLUNGSZEIT
DIP
ON
1 2 3 4
ON
1 2 3 4
18”
23”
Cod.0500403
4
CON ADDOLCITORE
AVEC ADOUCISSEUR
WITH WATER-SOFTENER
MIT REINIGUNGSAPPARAT
ON
ON
1
2 3 4
1 2 3
FA1
15
FA2
16
FA3
3 4
5
FA4
FA5
11 18
FA6
FA7
FA8
19
4
Cod.0300824
B
FA9
FA10
FA11
1 2 3 4
A
A
12
Cod.0502000
FA12
14
FA13
FA14
13
FA15
B
 Loading...