

Euro Communication EquipementS BTSUPER Users Manual
OPERATI NG MANUAL
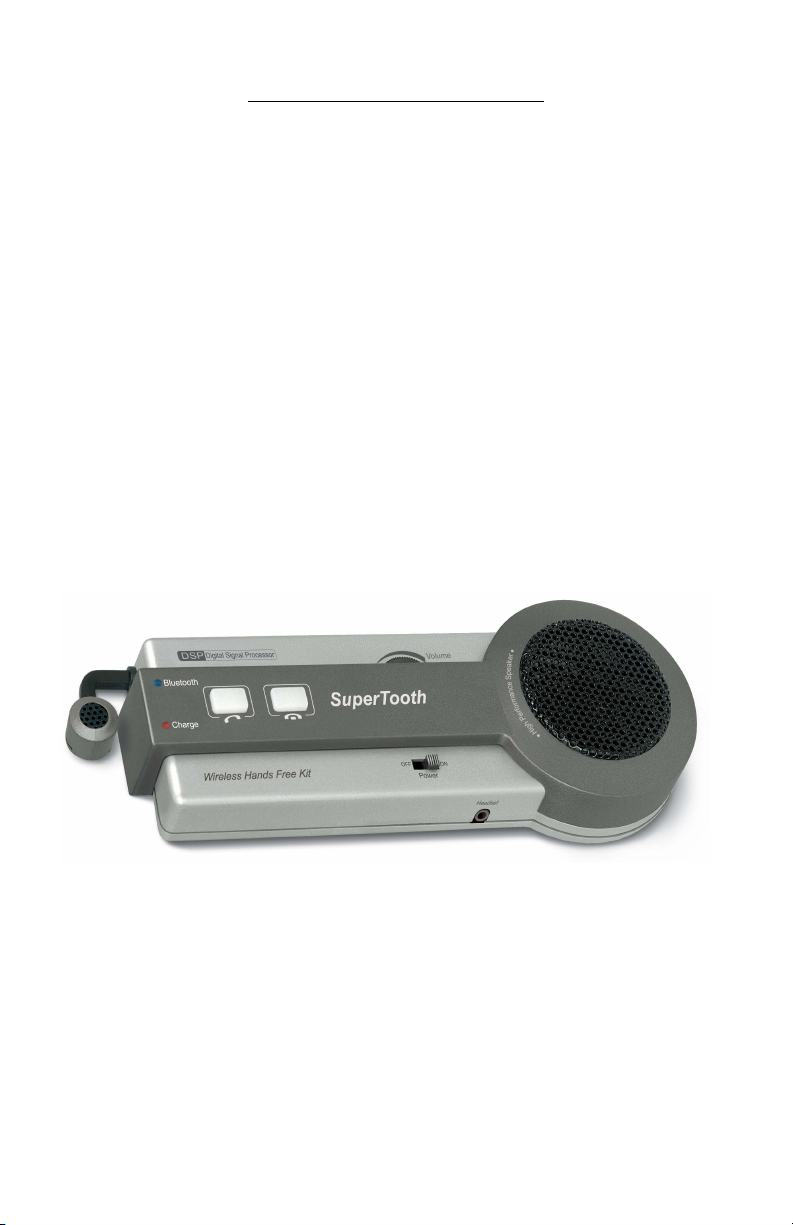
Super Toot h
I nde pe nde nt H an dsf re e Kit
w ith Blu et oot h a nd D SP
OVERV I EW
The Supertooth is equipped with Bluetooth and Digital Signal Processor that allows wireless
communications on devices such as cellular phones. This is designed to be a totally portable wireless
handsfree kit. This also provides convenience to the user by communicating with the hands free.
Supertooth will work on any Bluetooth cellular phones available provided that they respect the Bluetooth
protocol. However, if your phone is non-Bluetooth phone, SuperDongle is also available as an accessory
that you need to attach into your non-Bluetooth phone before using the Supertooth.
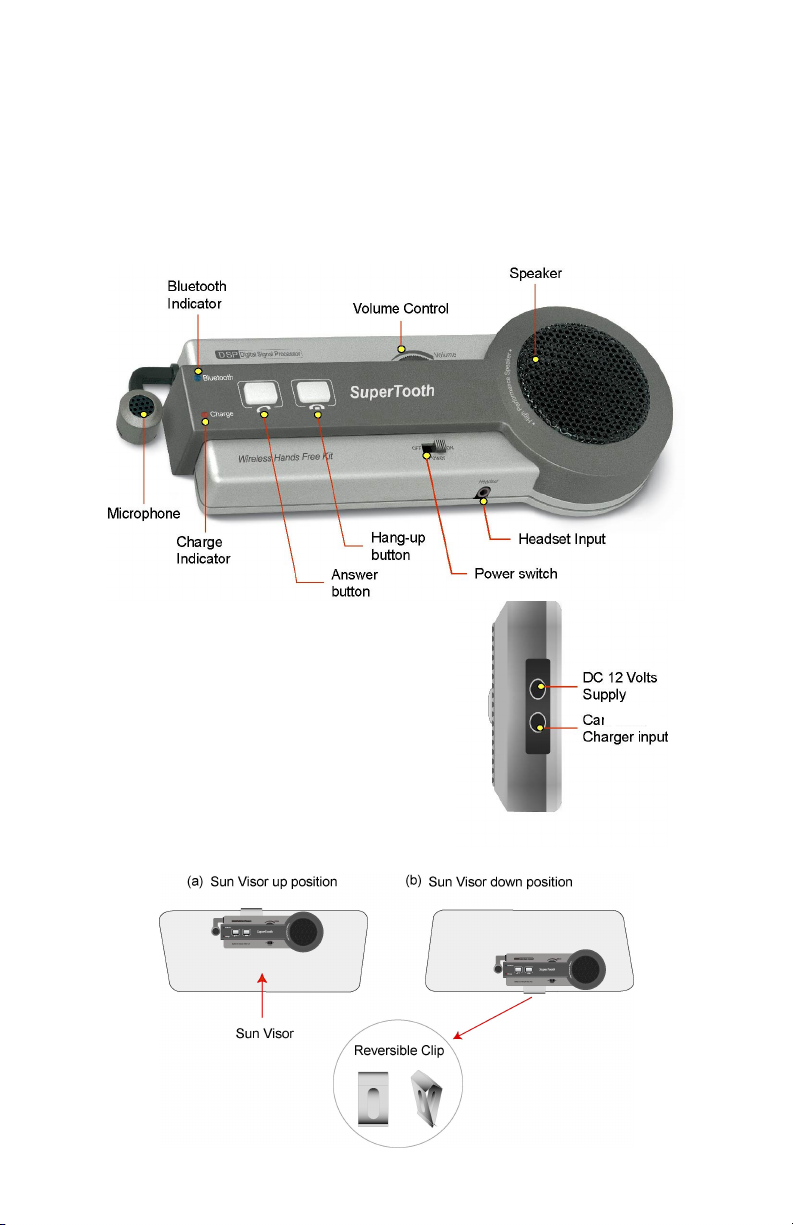
A. I LLU ST RATI ON
Charact erist i cs:
• Full Duplex.
• Frequency : 2.4 GHz
• Built-in noise canceling microphone.
• Internal Digital Signal Processing DSP for noise
cancellation and echo suppression.
• Charging time : about 2 hours.
• High power 50mm speaker.
• Size: 150 x 60 x 25mm.
• Weight : 130g
Placem en t Guide:
The SuperTooth must be placed near your mouth. The sun visor clip is designed reversible to easily
transfer the SuperTooth in case you change the position of the sun visor.
1

B. TU RN I N G ON / OFF TH E SU P ERTO OTH
1. To turn the Supertooth ON, slide the switch to the right. The Bluetooth indicator will light blue.
The kit is now ready and is waiting for a call (standby mode). (Note: If the charge indicator
becomes blinking red, it means that the battery on the kit is low. Re-charge it immediately
with the supplied charger. Refer to Section D for the charging operations.)
2. To turn the Supertooth OFF, slide the switch to the left. The indicator light becomes red then
turns off after a few seconds.
3. Wait at least 4 seconds before turning the Supertooth ON again.
C. SU PERT OOT H OPER AT I ONS
Before use, the kit must be paired with the phone. Pairing is done only once. After being paired, the
phone and the kit will be automatically connected anytime when the phone is used. (Please see
SuperTooth Operations For Popular Cell Phones section on the next page for the instruction).
Important Remarks:
• On some versions of Nokia’s software, the kit will not connect automatically to the cell phone.
You will need to press the answer button once to connect it to the cell phone.
• If disconnection problem will be encountered on some Nokia cell phones, kindly turn off the
keypad tone of your cell phone.
D. CH ARGI N G OPERAT I ONS
The Supertooth can be charged in a car using the Supertooth Fast charger
1. Connect the charger jack to the charger input of the Supertooth.
2. The red/green charge indicator will alternately blink during charge. The charge indicator turns
green when the Supertooth has fully charged and trickle charge will start.
3. Disconnect the charger on the Supertooth.
Note: Charging time will take about 2 hours using the supplied car charger
E. P ERMAN ENT SUP PLY
Connect the 12 Volts car adapter (optional) to the DC 12 Volts input. This input will charge the
battery on trickle mode only.
2

SUPERTOOTH OPERATIONS FOR POPULAR
CELL PHONES
Note 1: If your phone is not included on the following list of this manual, kindly refer to the manual of your
phone.
Note 2: Softwares and menus could be modified by the cell phone’s manufacturers without prior notice. If
the manual does not match with your cell phone operations, kindly refer to the manual of your cell phone.
Note 3: Multi-pairing is now possible.
Sony Ericsson T68/T68i
a. Activating the Bluetooth ………………………………………… 6
b. Pairing to the Cellular Phone ………………………………………… 6
c. Answering/Receiving a Call ………………………………………… 6
d. Making a Call with the Supertooth on ………………………………………… 6
e. Audio Transfer ………………………………………… 7
f. Rejecting a Call ………………………………………… 7
g. Setting the Volume ………………………………………… 7
h. Activating the Voice Dialing ………………………………………… 7
i. Recording for Voice Dialing ………………………………………… 7
Sony Ericsson T39m
a. Activating the Bluetooth ………………………………………… 8
b. Pairing to the Cellular Phone ………………………………………… 8
c. Answering/Receiving a Call ………………………………………… 8
d. Making a Call with the Supertooth on ………………………………………… 8
e. Audio Transfer ………………………………………… 9
f. Setting the Volume ………………………………………… 9
g. Activating the Voice Dialing ………………………………………… 9
h. Recording for Voice Dialing ………………………………………… 9
Sony Ericsson P800 / P900
a. Activating the Bluetooth ………………………………………… 9
b. Pairing to the Cellular Phone ………………………………………… 9
c. Answering/Receiving a Call ………………………………………… 10
d. Making a Call with the Supertooth on ………………………………………… 10
e. Audio Transfer ………………………………………… 10
f. Setting the Volume ………………………………………… 10
g. Activating the Voice Dialing ………………………………………… 10
h. Recording for Voice Dialing ………………………………………… 10
Sony Ericsson T610
a. Activating the Bluetooth ………………………………………… 11
b. Pairing to the Cellular Phone ………………………………………… 11
c. Answering/Receiving a Call ………………………………………… 11
d. Making a Call with the Supertooth on ………………………………………… 11
e. Audio Transfer ………………………………………… 11
f. Rejecting a Call ………………………………………… 11
g. Setting the Volume ………………………………………… 12
h. Activating the Voice Dialing ………………………………………… 12
i. Recording for Voice Dialing ………………………………………… 12
Sony Ericsson T628
a. Activating the Bluetooth ………………………………………… 12
b. Setting to Low Power Mode ………………………………………… 12
c. Pairing to the Cellular Phone ………………………………………… 12
d. Answering/Receiving a Call ………………………………………… 12
e. Making a Call with the Supertooth on ………………………………………… 13
f. Audio Transfer ………………………………………… 13
g. Setting the Volume ………………………………………… 13
h. Activating the Voice Dialing ………………………………………… 13
i. Recording for Voice Dialing ………………………………………… 13
3

Sony Ericsson Z600
a. Activating the Bluetooth … … …… … …… … …… … …… … …… 13
b. Setting to Low Power Mode … … … … … … … … … … … … … … … … 13
c. Pairing to the Cellular Phone …… … … …… … … … … … … … … … … 14
d. Answering/Receiving a Call … …… …… …… …… …… …… …… … 14
e. Making a Call with the Supertooth on … … … … … … … … … … … … … … … … 14
f. Audio Transfer … … …… … …… … …… … …… … …… 14
g. Setting the Volume … … …… … …… … …… … …… … …… 14
h. Activating the Voice Dialing … … …… … …… … …… … …… … …… 14
i. Recording for Voice Dialing … …… … … … … … … … … … … … … … 15
Nokia 6310/6310i
a. Activating the Bluetooth … … …… … …… … …… … …… … …… 15
b. Pairing to the Cellular Phone … … …… … …… … …… … …… … …… 15
c. Auto Accept Mode … … …… … …… … …… … …… … …… 15
d. Answering/Receiving a Call … …… …… …… …… …… …… …… … 16
e. Making a Call with the Supertooth on … … … … … … … … … … … … … … … … 16
f. Audio Transfer … … …… … …… … …… … …… … …… 16
g. Rejecting a Call … … …… … …… … …… … …… … …… 16
h. Setting the Volume … … …… … …… … …… … …… … …… 16
i. Recording for Voice Dialing … …… … … … … … … … … … … … … … 16
Nokia 8910
a. Activating the Bluetooth … … …… … …… … …… … …… … …… 17
b. Pairing to the Cellular Phone … … …… … …… … …… … …… … …… 17
c. Auto Accept Mode … … …… … …… … …… … …… … …… 17
d. Answering/Receiving a Call … …… …… …… …… …… …… …… … 17
e. Making a Call with the Supertooth on … … … … … … … … … … … … … … … … 18
f. Audio Transfer … … …… … …… … …… … …… … …… 18
g. Rejecting a Call … … …… … …… … …… … …… … …… 18
h. Setting the Volume … … …… … …… … …… … …… … …… 18
i. Recording for Voice Dialing … …… … … … … … … … … … … … … … 18
Nokia 8910i
a. Activating the Bluetooth … … …… … …… … …… … …… … …… 18
b. Pairing to the Cellular Phone … … …… … …… … …… … …… … …… 19
c. Auto Accept Mode … … …… … …… … …… … …… … …… 19
d. Answering/Receiving a Call … …… …… …… …… …… …… …… … 19
e. Making a Call with the Supertooth on … … … … … … … … … … … … … … … … 19
f. Audio Transfer … … …… … …… … …… … …… … …… 20
g. Rejecting a Call … … …… … …… … …… … …… … …… 20
h. Setting the Volume … … …… … …… … …… … …… … …… 20
i. Recording for Voice Dialing … …… … … … … … … … … … … … … … 20
Nokia 3650
a. Activating the Bluetooth … … …… … …… … …… … …… … …… 20
b. Pairing to the Cellular Phone … … …… … …… … …… … …… … …… 20
c. Auto Accept Mode … … …… … …… … …… … …… … …… 21
d. Answering/Receiving a Call … …… …… …… …… …… …… …… … 21
e. Making a Call with the Supertooth on … … … … … … … … … … … … … … … … 21
f. Audio Transfer … … …… … …… … …… … …… … …… 21
g. Rejecting a Call … … …… … …… … …… … …… … …… 21
h. Setting the Volume … … …… … …… … …… … …… … …… 21
i. Recording for Voice Dialing … …… … … … … … … … … … … … … … 22
Nokia 6650
a. Activating the Bluetooth … … …… … …… … …… … …… … …… 22
b. Pairing to the Cellular Phone … … …… … …… … …… … …… … …… 22
c. Auto Accept Mode … … …… … …… … …… … …… … …… 22
d. Answering/Receiving a Call … …… …… …… …… …… …… …… … 23
e. Making a Call with the Supertooth on … … … … … … … … … … … … … … … … 23
f. Audio Transfer … … …… … …… … …… … …… … …… 23
g. Rejecting a Call … … …… … …… … …… … …… … …… 23
h. Setting the Volume … … …… … …… … …… … …… … …… 23
i. Recording for Voice Dialing … …… … … … … … … … … … … … … … 23
4

Nokia 6600
a. Activating the Bluetooth … … …… … …… … …… … …… … …… 24
b. Pairing to the Cellular Phone … … …… … …… … …… … …… … …… 24
c. Auto Accept Mode … … …… … …… … …… … …… … …… 24
d. Answering/Receiving a Call … …… …… …… …… …… …… …… … 24
e. Making a Call with the Supertooth on … … … … … … … … … … … … … … … … 24
f. Audio Transfer … … …… … …… … …… … …… … …… 25
g. Rejecting a Call … … …… … …… … …… … …… … …… 25
h. Setting the Volume … … …… … …… … …… … …… … …… 25
i. Recording for Voice Dialing … …… … … … … … … … … … … … … … 25
Siemens S55
a. Activating the Bluetooth … … …… … …… … …… … …… … …… 25
b. Pairing to the Cellular Phone … … …… … …… … …… … …… … …… 25
c. Answering/Receiving a Call … … …… … …… … …… … …… … …… 26
d. Making a Call with the Supertooth on … … … … … … … … … … … … … … … … 26
e. Audio Transfer … … …… … …… … …… … …… … …… 26
f. Rejecting a Call … … …… … …… … …… … …… … …… 26
g. Setting the Volume … … …… … …… … …… … …… … …… 26
h. Recording for Voice Dialing … … … … … …… … …… … …… … …… 26
Suggested Pairing Modes
Cell Phone Models
Ericsson T68
Ericsson T68i (R6 and below)
Ericsson T68i (R7)
Ericsson T39m
Ericsson P800 / P900
Ericsson T610
Ericsson T628
Ericsson Z600
Nokia 6310/6310i
Nokia 8910
Nokia 8910i
Nokia 3650
Nokia 6650
Nokia 6600
Note 1: Handsfree Pairing mode
Note 2: Headset Pairing mode
Siemens S55
- From the OFF state, press the answer button for 10 seconds or until the red and
blue indicator will alternately blink.
- From the OFF state, press the answer button for 10 seconds or until the red and
blue indicator will alternately blink.
- Press the answer button again for a short time to access Headset pairing mode.
Pairing Mode
Handsfree Headset
5
a. ACTIVATING THE BLUETOOTH
You must activate your Bluetooth to establish a Bluetooth connection between your mobile phone
and other Bluetooth devices.
1. Go the Menu Key by pressing the joystick. Scroll to Connect, YES. Select Bluetooth, YES.
Select Options, YES. Operation mode, YES. On, YES.
2. Continue pressing NO, to exit.
QUICK ACCESS:
Press Menu followed by the sequence of numbers below.
Connect Bluetooth Options Operation mode
T68 8 3 - 2
b. PAIRING TO THE CELLULAR PHONE (Not possible during charging)
c. ANSWERING/RECEIVING A CALL
d. MAKING A CALL with the Supertooth on
Normal dialing
T68i 8 4 (or 3 for T68i R7) 4 1
1. Bring the cellular phone at about 20 cm from the Supertooth.
2. Turn off the Supertooth and wait for about 4 seconds.
3. Turn ON the Supertooth while pressing the answer button for 10 seconds or until a distinctive
tone will be heard at the same time the red and blue indicator will alternately blink. This
indicates that the unit is now ready for pairing.
4. For T68 and T68i older versions, R6 and below, press the answer button once again for
a short time, to access headset pairing mode.
5. Go the Menu Key by pressing the joystick. Scroll to Connect, YES. Select Bluetooth, YES.
6. Select Paired devices, YES. Add device, YES. Choose Phone initiates, YES. Choose
Headset/Handsfree, YES. The phone will then search the device to be added. After the
device is found, press YES.
QUICK ACCESS (for steps 5 and 6):
Press Menu then follow the sequence of numbers below:
T68 8 3 2 Yes 1 2
T68i 8 4 (or 3 for T68i R7) 2 Yes 1 2
7. Enter “0000” as the passkey. If the pairing is successful, the alternating red/blue lights will
stop. Press YES to confirm the name of the device. If the pairing is unsuccessful, the steps
above may be repeated.
8. Continue pressing NO to exit the menu key.
The Supertooth is paired and ready to use. An icon, will appear during the standby mode indicating
that the Supertooth is linked with the phone.
When the phone is receiving a call, a ring tone will be heard on the Supertooth.
1. Just press the answer button down once to answer the call.
2. If you wish to answer a call on the cellular phone, just press YES and the call is automatically
transferred to the phone. Pressing the answer button transfers the call on the kit.
3. To terminate the call, press the hang-up button.
1. Enter the contact number and press YES. Audio can be heard on the Supertooth at the
2. Press the hang-up button to hang-up and terminate the call.
Voice dialing
Refer to step h and i for the procedure when activating and recording for voice dialing.
1. Press the answer button once to activate the voice dialing.
2. A beep will then be heard on the Supertooth prompting the user to say the name of the
USING WITH SONY ERICSSON T68/T68i
Connect Blue tooth
same time, a question will be displayed. Retrieve call in phone?, ignoring or pressing
No, transfers the call to the Supertooth. Pressing Yes, transfers the call to the cell
phone.
person to call.
Paired
devices
Add
device
Phone
initiates
Headset/
Handsfree
6
3. Say the name. The name will be played back to you. The phone will then place the call
automatically. In case the cell phone does not recognize the name spoken, the steps
above may be repeated.
e. AUDIO TRANSFER
f. REJECTING A CALL
For T68i R7, press the hang-up button to reject the incoming call.
g. SETTING THE VOLUME
h. ACTIVATING THE VOICE DIALING
i. RECORDING FOR VOICE DIALING
4. Press the hang-up button to terminate the call.
Redialing
For T68i R6 and R7, make a long press on the answer button once. Call is automatically
transferred on the Supertooth.
Audio Transfer can be done by pressing the answer button or accessing the cell phone’s menu
during ongoing calls.
Setting the volume can be done using the volume control.
1. Turn it clockwise to increase the volume.
2. Decrease the volume by turning it counter-clockwise.
If the volume is too high, it can cause feedback (whistling sound), echo or background noise during
calls on some cell phones.
Use your phone when recording for the voice dialing. Before voice dialing, you must first turn on the
name dialing function and record your voice. To turn voice dialing on:
Using T68 Sony Ericsson
1. Go to the Menu Key by pressing the joystick. Scroll to Settings, YES. Voice control,
YES.
2. Voice settings, YES. Voice dialing, YES. Select On, YES.
3. Continue pressing NO to exit
Using T68i Sony Ericsson
1. Go to the Menu Key by pressing the joystick. Scroll to Settings, YES. Voice control,
YES. Voice dialing, YES.
2. Select On, YES.
3. Continue pressing NO to exit
QUICK ACCESS:
Press Menu followed by the sequence of numbers below.
Settings
T68 5 8 1 1 1
T68i 5 6 - 1 1
Using T68 Sony Ericsson
1. Go to the Menu Key by pressing the joystick. Scroll to Settings and press YES. Choose
Voice control, YES. Voice Commands, YES. Select a contact, YES. Add voice, YES.
2. Follow the instructions in the display. An icon will appear next to a contact name which
has a voice command.
3. Continue pressing NO to exit.
Using T68i Sony Ericsson
1. Go to the Menu Key by pressing the joystick. Scroll to Settings and press YES. Choose
Voice control, YES then go to Voice dialing, YES. Edit name, YES. Add voice, YES.
2. Select a contact, YES.
3. Follow the instructions in the display. An icon will appear next to a contact name which
has a voice command.
4. Continue pressing NO to exit.
QUICK ACCESS:
Press Menu followed by the sequence of numbers below.
T68 5 8 2 4
Settings Voice control Voice commands Contacts
Voice
control
7
Voice
settings
Voice
dialing
On
Settings Voice control Voice dialing Edit names
T68i 5 6 1 2
Note: Record your voice command in a quiet place so that only your voice will be recorded on
the phone.
a. ACTIVATING THE BLUETOOTH
You must activate your Bluetooth to establish a Bluetooth connection between
your mobile phone and other Bluetooth devices.
1. Press the Menu Key. Scroll to Extras and press YES. Select Operation mode, YES. On,
YES.
2. Continue pressing NO, to exit.
QUICK ACCESS:
Press Menu followed by the sequence of numbers below.
b. PAIRING TO THE CELLULAR PHONE (Not possible during charging)
1. Bring the cellular phone at about 20 cm from the Supertooth.
2. Turn off the Supertooth and wait for about 4 seconds.
3. Turn ON the Supertooth while pressing the answer button for 10 seconds or until a distinctive
tone will be heard and at the same time the red and blue indicator will alternately blink. This
indicates that the unit is now ready for pairing.
4. Press the answer button once again for a short time, to access headset pairing mode.
5. Press the Menu Key. Scroll to Extras, YES. Select Bluetooth, YES. Select Paired devices,
YES. Add device, YES. Choose Phone initiates, YES. Choose Headset, YES. The phone will
then search the device to be added. After the device is found, press YES.
QUICK ACCESS (for steps 5 and 6):
Press Menu then follow the sequence of numbers below:
T39m 5 6 2 Yes 1 2
6. Enter “0000” as the passkey. If the pairing is successful, the alternating red/blue lights will
stop. Press YES to confirm the name of the device. If the pairing is unsuccessful, the steps
above may be repeated.
7. Continue pressing NO to exit the menu key.
The Supertooth is paired and ready to use.
c. ANSWERING/RECEIVING A CALL
When the phone is receiving a call, a ring tone will be heard on the Supertooth.
1. Just press the answer button down once to answer the call.
2. If you wish to answer a call on the cellular phone, just press YES and the call is automatically
transferred to the phone. Pressing the answer button transfers the call on the Supertooth.
3. To terminate the call, press the hang-up button.
d. MAKING A CALL with the Supertooth on
Normal dialing
Voice dialing
1. Enter the contact number and press YES. Audio can be heard on the Supertooth at the
2. Press the hang-up button to hang-up and terminate the call.
Refer to step g and h for the procedure when activating and recording for voice dialing.
1. Press the answer button once to activate the voice dialing.
USING WITH SONY ERICSSON T39m
Extras Blue tooth Operation mode
T39m 5 6 4
Extras Blue tooth
same time, a question will be displayed. Retrieve call in phone?, ignoring or pressing
No, transfers the call to the Supertooth. Pressing Yes, transfers the call to the cell
phone.
Paired
devices
8
Add
device
Phone
initiates
Headset
 Loading...