

EUROCOM M120 Owner's Manual


Introduction (English)
This Concise User’s Guide introduces the main features
of your computer. The English version of this guide begins on page 1. The expanded User’s Manual is on the
Device Drivers & Utilities + User’s Manual CD-ROM.
Einführung (Deutsch)
Dieses Ausführliche Benutzerhandbuch führt Sie in die
Hauptfunktionen des Notebooks ein. Die deutsche Version des Handbuchs beginnt auf Seite 39. Das erweiterte
Benutzerhandbuch finden Sie auf der CD-ROM für die
Gerätetreiber und Hilfsprogramme (CD-ROM Device
Drivers & Utilities + User's Manual).
Présentation (Français)
Ce Guide Utilisateur Concis présente les fonctionnalités
principales de votre ordinateur. La version française de
ce guide commence à la page 77. Le Manuel de l'Utilisa-
teur complet se trouve sur le CD-ROM de Pilotes & Utilitaires + Manuel de l'Utilisateur (CD-ROM Device
Drivers & Utilities + User's Manual).
Introducción (Español)
Esta Guía del Usuario Concisa le presenta las características principales de su ordenador. La versión española de
esta guía comienza en la página 115. El Manual del usua-
rio completo se encuentra en el CD-ROM de Controladores del dispositivo y Utilidades + Manual del usuario
(CD-ROM Device Drivers & Utilities + User's Manual).
Introduzione (Italiano)
La presente Guida Rapida per l'Utente introduce le caratteristiche principali del computer. La versione italiana di
questa guida inizia da pagina 153. Il Manuale utente
completo si trova nel CD contenente driver e utilità +
Manuale utente (CD-ROM Device Drivers & Utilities +
User's Manual).
I

Contents
Notice ................................................................................................1
About this Concise User Guide .........................................................2
Instructions for Care and Operation ..................................................3
Quick Start Guide .............................................................................7
System Map: Top View with LCD Panel Open ................................ 9
System Map: Front & Left Views ..................................................12
System Map: Right View ................................................................13
System Map: Bottom View .............................................................14
Video Features ................................................................................ 15
Power Management Features ..........................................................20
Wireless LAN (Network) & Bluetooth Modules ............................22
PC Camera ......................................................................................23
Driver Installation ...........................................................................24
Troubleshooting ..............................................................................33
Specifications ..................................................................................35
Inhalt
Hinweis ...........................................................................................39
Über das Ausführliche Benutzerhandbuch .....................................40
Hinweise zu Pflege und Betrieb ......................................................41
Schnellstart ......................................................................................45
Nicht enthalten ................................................................................46
Systemsoftware ...............................................................................46
Systemübersicht: Ansicht von oben mit geöffnetem
LCD-Bildschirm ..............................................................................47
Systemübersicht: Ansicht von vorne und links ...............................50
Systemübersicht: Ansicht von rechts ..............................................51
Systemübersicht: Ansicht von unten ...............................................52
Grafikfunktionen .............................................................................53
Einstellungen des Grafiktreibers .....................................................54
Energieverwaltungsfunktionen ........................................................58
Wireless-LAN- (Netzwerk) und Bluetooth-Modul .........................60
PC-Kamera ......................................................................................61
Installation der Treiber ....................................................................62
Fehlerbehebung ...............................................................................71
Technische Daten ............................................................................73
Sommaire
Avertissement ..................................................................................77
A propos de ce Guide Utilisateur Concis ........................................78
Instructions d’entretien et d’utilisation ...........................................79
Guide de démarrage rapide .............................................................83
Non inclus .......................................................................................84
Logiciel système ..............................................................................84
Carte du système : Vue du dessus avec l’écran LCD ouvert ..........85
Carte du système : Vues de face & gauche .....................................88
Carte du système : Vue droite .........................................................89
Carte du système : Vue d’en dessous ..............................................90
Caractéristiques vidéo .....................................................................91
Caractéristiques de Gestion de l’Alimentation ................................96
II

Modules LAN sans fil et Bluetooth ................................................98
Caméra PC ......................................................................................99
Installation du Pilote .....................................................................100
Dépannage .....................................................................................109
Spécifications ................................................................................111
Contenidos
Aviso .............................................................................................115
Acerca de esta Guía del Usuario Concisa .....................................116
Instrucciones de cuidado y uso .....................................................117
Guía rápida para empezar ............................................................. 121
No incluido ....................................................................................122
Software de sistema ...................................................................... 122
Mapa del sistema: Vista superior con panel LCD abierto ............ 123
Mapa del sistema: Vistas frontal y izquierda ................................126
Mapa del sistema: Vista derecha ...................................................127
Mapa del sistema: Vista inferior ...................................................128
Parámetros de vídeo ......................................................................129
Funciones de administración de energía .......................................134
Módulos LAN inalámbrica y Bluetooth .......................................136
Cámara PC ....................................................................................137
Instalación de controladores .........................................................138
Solución de problemas ..................................................................147
Especificaciones ............................................................................149
Sommario
Avvertenza ....................................................................................153
Informazioni sulla Guida Rapida per l’Utente ..............................154
Istruzioni per la manutenzione e l’uso ..........................................155
Guida di avvio rapido ....................................................................159
Non compreso ...............................................................................160
Software del sistema ......................................................................160
Descrizione del sistema: Vista superiore con pannello LCD
aperto .............................................................................................161
Descrizione del sistema: Vista anteriore e sinistra ........................164
Descrizione del sistema: Vista destra ............................................165
Descrizione del sistema: Vista inferiore ........................................166
Funzioni video ...............................................................................167
Funzioni di risparmio energetico ...................................................172
Moduli LAN Wireless e Bluetooth ...............................................174
Camera PC .....................................................................................175
Installazione driver ........................................................................176
Risoluzione dei problemi ..............................................................185
Specifiche tecniche ........................................................................187
III

IV

Concise User’s Guide
Notice
The company reserves the right to revise this publication or to change its contents without notice. Information contained herein is for reference only and does not constitute a commitment on the part of the manufacturer or any subsequent vendor. They assume no responsibility or liability for any errors or inaccuracies that may appear in this
publication nor are they in anyway responsible for any loss or damage resulting from the use (or misuse) of this publication.
This publication and any accompanying software may not, in whole or in part, be reproduced, translated, transmitted
or reduced to any machine readable form without prior consent from the vendor, manufacturer or creators of this publication, except for copies kept by the user for backup purposes.
Brand and product names mentioned in this publication may or may not be copyrights and/or registered trademarks
of their respective companies. They are mentioned for identification purposes only and are not intended as an endorsement of that product or its manufacturer.
©September 2004
Trademarks
This product incorporates copyright protection technology that is protected by method claims of certain U.S. patents
and other intellectual property rights owned by Macrovision Corporation and other rights owners. Use of this copyright protection technology must be authorized by Macrovision Corporation, and is intended for home or other limited
viewing uses only unless otherwise authorized by Macrovision Corporation. Reverse engineering or disassembly is
prohibited.
Intel and Pentium are registered trademarks of Intel Corporation.
English
Notice - 1

Concise User’s Guide
About this Concise User Guide
This quick guide is a brief introduction to getting your system started. This is a supplement, and not a substitute for
the expanded English language User’s Manual in Adobe Acrobat format on the Device Drivers & Utilities + User’s
Manual CD-ROM supplied with your computer. This CD-ROM also contains the drivers and utilities necessary for
English
the proper operation of the computer.
Some or all of the computer’s features may already have been setup. If they aren’t, or you are planning to re-configure
(or re-install) portions of the system, refer to the expanded User’s Manual. The Device Drivers & Utilities + User’s
Manual CD-ROM does not contain an operating system.
Regulatory Information
Regulatory notices and information are contained in the expanded User’s Manual on the Device Drivers & Utilities
+ User’s Manual CD-ROM.
2 - About this Concise User Guide

Concise User’s Guide
Instructions for Care and Operation
The notebook computer is quite rugged, but it can be damaged. To prevent this, follow these suggestions:
1. Don’t drop it, or expose it to shock. If the computer falls, the case and the components could be damaged.
2. Keep it dry, and don’t overheat it. Keep the computer and power supply away from any kind of heating element. This is an
electrical appliance. If water or any other liquid gets into it, the computer could be badly damaged.
3. Avoid interference. Keep the computer away from high capacity transformers, electric motors, and other strong magnetic
fields. These can hinder proper performance and damage your data.
4. Follow the proper working procedures for the computer. Shut the computer down properly and don’t forget to save your
work. Remember to periodically save your data as data may be lost if the battery is depleted.
5. Take care when using peripheral devices.
Wireless Device Operation Aboard Aircraft
The use of any portable electronic transmission devices aboard aircraft is usually prohibited. Make sure the modules are OFF if you are using the computer aboard aircraft.
English
Instructions for Care and Operation - 3

Concise User’s Guide
Power Safety
The computer has specific power requirements:
• Only use a power adapter approved for use with this computer.
• Your AC adapter may be designed for international travel but it still requires a steady, uninterrupted power supply. If
English
you are unsure of your local power specifications, consult your service representative or local power company.
• The power adapter may have either a 2-prong or a 3-prong grounded plug. The third prong is an important safety feature; do not defeat its purpose. If you do not have access to a compatible outlet, have a qualified electrician install one.
• When you want to unplug the power cord, be sure to disconnect it by the plug head, not by its wire.
• Make sure the socket and any extension cord(s) you use can support the total current load of all the connected devices.
• Before cleaning the computer, make sure it is disconnected from any external power supplies.
Power Safety Warning
Before you undertake any upgrade procedures, make sure that you have turned off the power, and disconnected all peripherals and cables (including telephone lines). It is advisable to also remove your battery in order to prevent accidentally
turning the machine on.
4 - Instructions for Care and Operation

Concise User’s Guide
Cleaning
Do not apply cleaner directly to the computer, use a soft clean cloth. Do not use volatile (petroleum distillates) or abrasive cleaners on any part of the computer.
Servicing
Do not attempt to service the computer yourself. Doing so may violate your warranty and expose you and the computer to electric shock. Refer all servicing to authorized service personnel. Unplug the computer from the power supply. Refer servicing to qualified service personnel under any of the following conditions:
• When the power cord is damaged or frayed.
• If the computer has been exposed to rain or other liquids.
• If the computer does not work normally when you follow the operating instructions.
• If the computer has been dropped or damaged (do not touch the poisonous liquid if the LCD panel breaks).
• If there is an unusual odor, heat or smoke coming from your computer.
Power Off Before Traveling
Make sure that your notebook is completely powered off before putting it into a travel bag (or any such container). Putting
a notebook which is powered on in a travel bag may cause the vent(s)/fan intake(s) to be blocked. To prevent your computer from overheating make sure nothing blocks the vent(s)/fan intake(s) while the computer is in use.
English
Instructions for Care and Operation - 5

Concise User’s Guide
Battery Precautions
• Only use batteries designed for this computer. The wrong battery type may explode, leak or damage the computer.
• Do not continue to use a battery that has been dropped, or that appears damaged (e.g. bent or twisted) in any way.
Even if the computer continues to work with a damaged battery in place, it may cause circuit damage, which may pos-
English
sibly result in fire.
• Recharge the batteries using the notebook’s system. Incorrect recharging may make the battery explode.
• Do not try to repair a battery pack. Refer any battery pack repair or replacement to your service representative or qualified service personnel.
• Keep children away from, and promptly dispose of a damaged battery. Always dispose of batteries carefully. Batteries
may explode or leak if exposed to fire, or improperly handled or discarded.
• Keep the battery away from metal appliances.
• Affix tape to the battery contacts before disposing of the battery.
• Do not touch the battery contacts with your hands or metal objects.
Battery Disposal & Caution
The product that you have purchased contains a rechargeable battery. The battery is recyclable. At the end of its useful
life, under various state and local laws, it may be illegal to dispose of this battery into the municipal waste stream. Check
with your local solid waste officials for details in your area for recycling options or proper disposal.
Danger of explosion if battery is incorrectly replaced. Replace only with the same or equivalent type recommended by
the manufacturer. Discard used battery according to the manufacturer’s instructions.
6 - Instructions for Care and Operation

Concise User’s Guide
Quick Start Guide
This guide assumes that you are already familiar with computers and can tell at a glance what and where all the key
components are. If you are not that comfortable with this type of device, then please refer to the following pages,
which give an overview of the system.
1. Remove all packing materials.
2. Securely attach any peripherals you want to use with the notebook (e.g. keyboard and mouse) to their ports.
3. Attach the AC adapter to the DC-In jack at the rear of the computer, then plug the AC power cord into an outlet, and
connect the AC power cord to the AC adapter.
4. Raise the lid/LCD to a comfortable viewing angle.
5. Press the power button to turn “on”.
Peripheral Devices
Please note that peripherals (printers, digital cameras, etc.) which attach to your computer by USB ports may be connected after Windows
is up and running. All other peripherals must be connected before you
turn on the system.
English
Quick Start Guide - 7

Concise User’s Guide
Not Included
Operating Systems (e.g. Windows XP) have their own manuals as do applications (e.g. word processing, spreadsheet
and database programs). If you have questions about the operating systems or programs then please consult the appropriate manuals.
English
System Software
Your computer may already come with system software pre-installed. Where this is not the case, or where you are reconfiguring your computer for a different system, you will find this manual refers to the Microsoft Windows XP operating system. Further information on installing the drivers and utilities is available in Chapter 4 of the expanded
User’s Manual on the Device Drivers & Utilities + User’s Manual CD-ROM.
Design Differences
This manual refers to the two notebook designs pictured.
The designs vary slightly in external appearance (one
has a wide screen). Photographs used throughout
this manual are of Design I.
In addition to the basic designs, there are also gloss
style top cover designs. Note the specific care instructions for this type of cover in the expanded User’s Manual..
Design I
Figure 1 - Design Differences
Design II
8 - Quick Start Guide
Concise User’s Guide
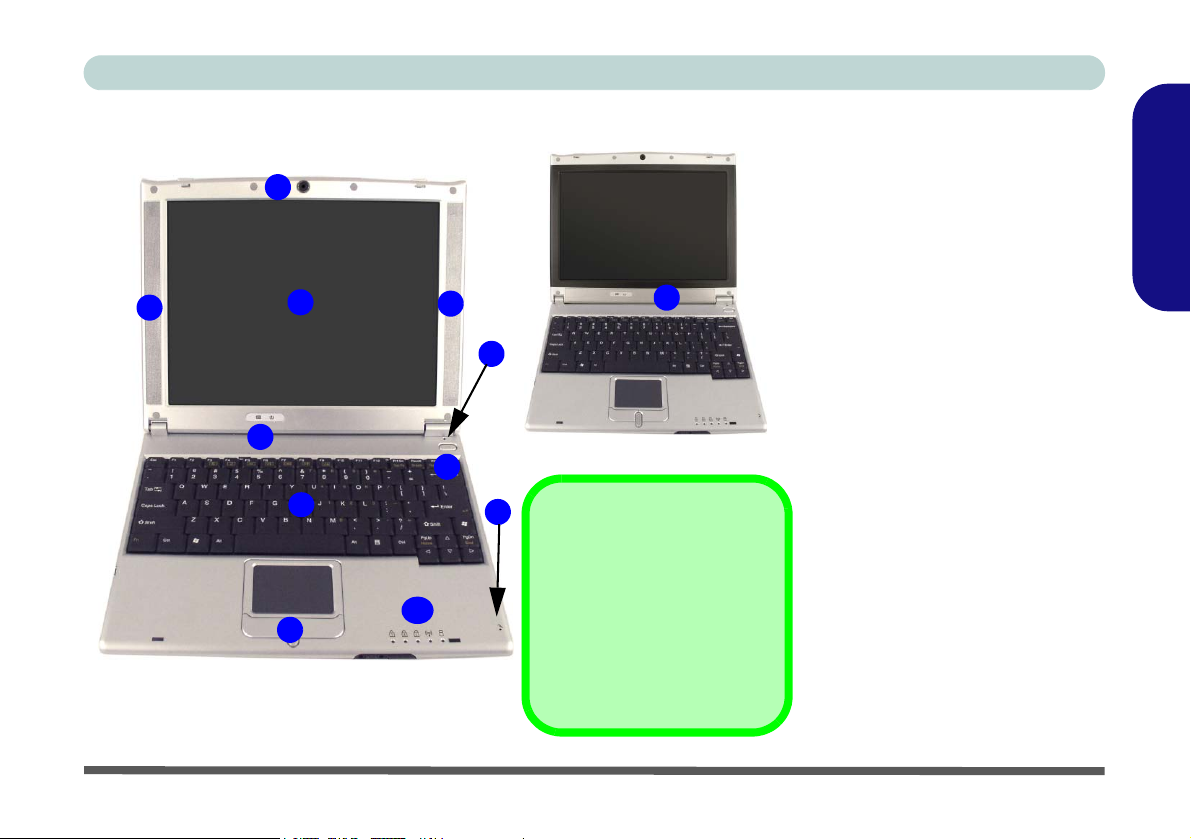
System Map: Top View with LCD Panel Open
1
3
2
3
3
6
4
7
8
Design I
5
9
10
Design II
Design Differences
The difference between the 2
model designs is the screen
width. Design II incorporates a
wider screen, and therefore
the speakers are located below the screen as indicated.
Top View with LCD Panel
1. Optional PC Camera
2. LCD Panel
3. 2 * Built-In Speakers
4. LED Power Indicators
5. Power Button
6. Close Cover Switch
7. Keyboard
8. TouchPad and Buttons
9. Built-In Microphone
10. LED Status Indicators
English
Figure 2
Open
System Map: Top View with LCD Panel Open - 9
Concise User’s Guide
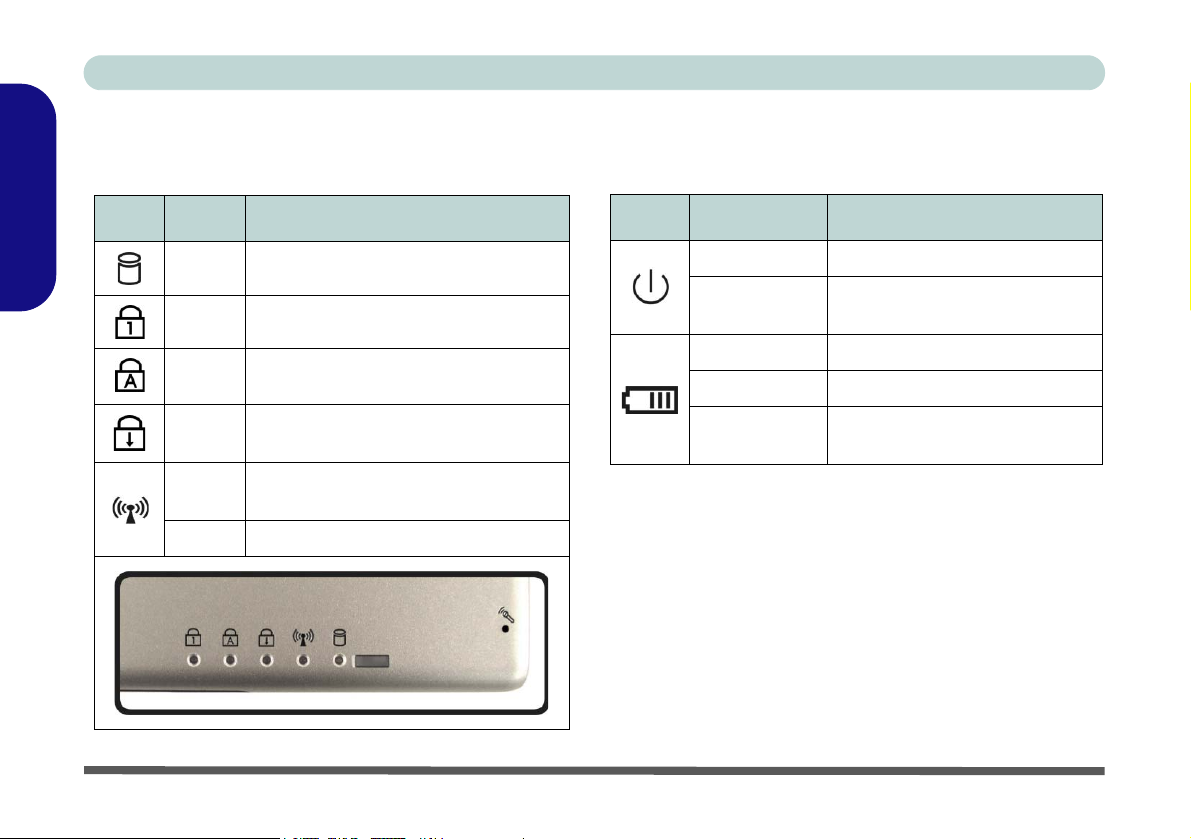
LED Indicators
Icon Color Description
English
Table 1 - LED Status Indicators
Green Hard Disk/CD/DVD device activity
Green Num Lk (numeric keypad) is activated
Green Caps Lock is activated
Green
Green
Orange The Bluetooth module is powered on
Scroll Lock is activated (to activate
press Fn & ScrLk)
The Wireless LAN module is powered
on
Table 2 - LED Power Indicators
Icon Color Description
Green The computer is on
Blinking Green
Orange The battery is being charged
Green The battery is fully charged
Blinking
Orange
The computer is in standby
mode
The battery has reached critically low power status
10 - System Map: Top View with LCD Panel Open

Concise User’s Guide
Function Keys & Numeric Keypad
The keyboard has a numeric keypad to enable you to easily input numbers. Activate the Numeric Keypad feature
by pressing the Fn and Num Lk key combination. You
may check if the Numeric Keypad is enabled or not by
looking at the LED status indicators (Table 1 on
page 10). To type a number from the numeric keypad
make sure Num Lk is enabled, and then press the key on
the numeric keypad. (To type a letter from the numeric
keypad if Num Lk is enabled, hold down the Fn key and
press the appropriate letter key.)
Activate Scroll Lock by pressing the Fn and Scr Lk key
combination.
Figure 3 - Function Keys & Numeric Keypad
Function Keys
Numeric Keypad
Fn Key
Num Lk &
Scr Lk Keys
Table 3 - Function Keys
Keys Description
Fn Function Key
Fn + F3 Mute Toggle
Fn + F4 Sleep/Resume Toggle
Fn + F5 Decrease Audio Volume
Fn + F6 Increase Audio Volume
Fn + F7 Display Toggle
Fn + F8 Decrease LCD Brightness
Fn + F9 Increase LCD Brightness
Fn + F11 Wireless LAN Module Power Toggle
Fn + F12 Bluetooth Module Power Toggle
Fn + Num Lk Num Lk (numeric keypad) Toggle
Fn + Scr Lk Scroll Lock Toggle
English
System Map: Top View with LCD Panel Open - 11
Concise User’s Guide
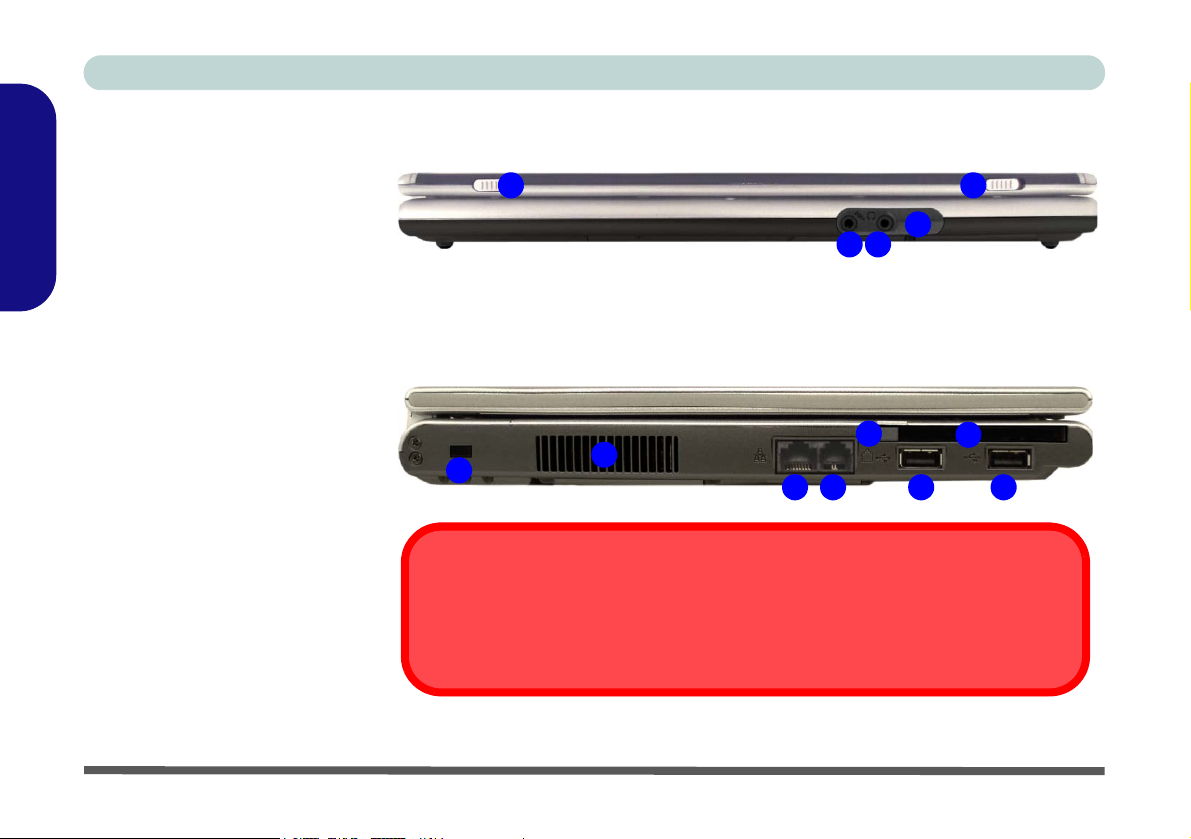
System Map: Front & Left Views
English
1. LCD Latches
2. Microphone-In Jack
3. Headphone-Out Jack
4. Infrared Transceiver
1. Security Lock Slot
2. Vent
3. RJ-45 LAN Jack
4. RJ-11 Phone Jack
5. 2 USB 2.0/1.1 Ports
6. PC Card Slot
7. PC Card Slot Eject Button
Figure 4
Front View
Figure 5
Left View
1
4
312
7
1
2
3 4
6
5
5
Overheating
To prevent your computer from overheating make sure nothing blocks the vent(s)/fan
intake(s) while the computer is in use.
12 - System Map: Front & Left Views
Concise User’s Guide
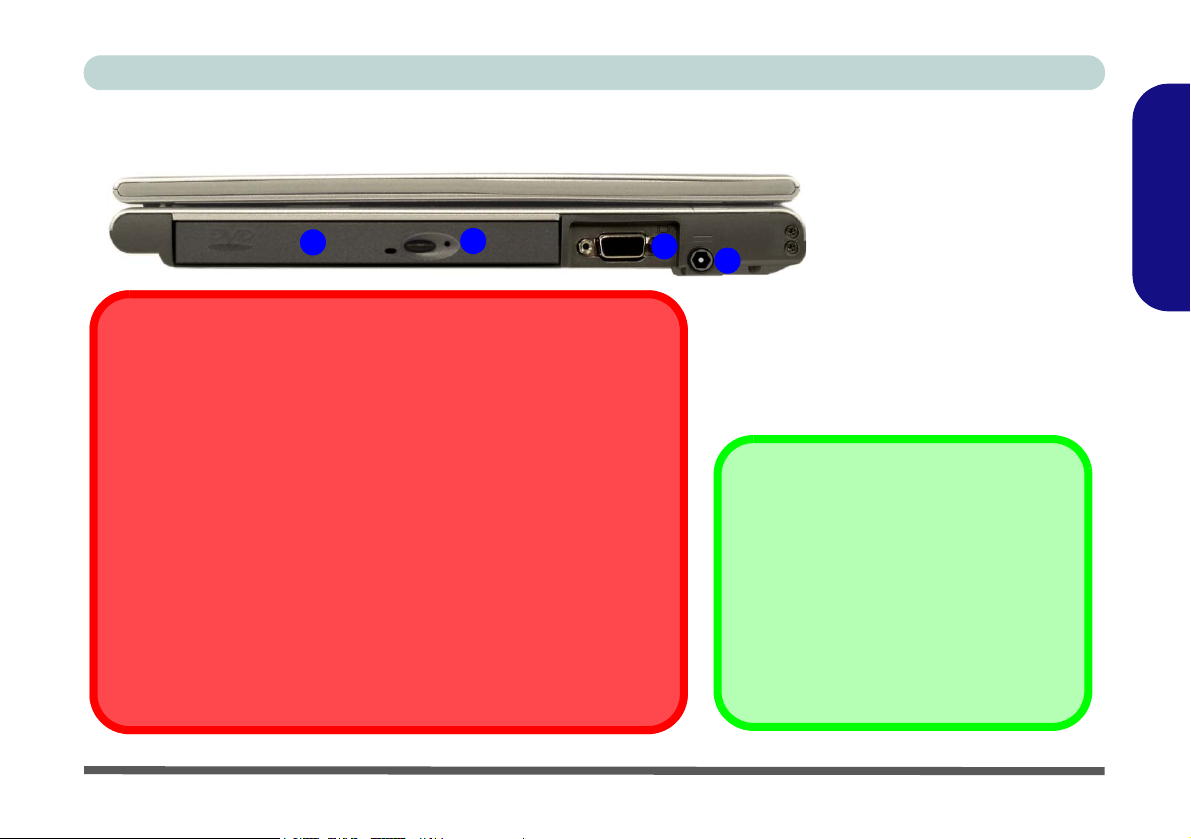
System Map: Right View
1
CD Emergency Eject
If you need to manually eject a CD/DVD (e.g. due to an unexpected power
interruption) you may push the end of a straightened paper clip into the
emergency eject hole. Do not use a sharpened pencil or similar object that
may break and become lodged in the hole.
DVD Regional Codes
DVD region detection is device dependent, not OS-dependent. You can
select your module’s region code 5 times. The fifth selection is permanent.
This cannot be altered even if you change your operating system or you
use the module in another computer.
Media Warning
Don’t try to remove a floppy disk/CD while the system is accessing it. This
may cause the system to “crash”.
2
English
Figure 6
Right View
3
4
1. Optical Device Bay
2. Emergency Eject Hole
3. External Monitor (VGA) Port
4. DC-In Jack
Changing DVD Regional Codes
Go to the Control Panel and double-click
System > Hardware (tab), click Device
Manager, then click the + next to DVD/CDROM drives. Double-click on the DVD-ROM
device to bring up the Properties dialogue
box, and select the DVD Region (tab) to
bring up the control panel to allow you to
adjust the regional code.
System Map: Right View - 13
Concise User’s Guide
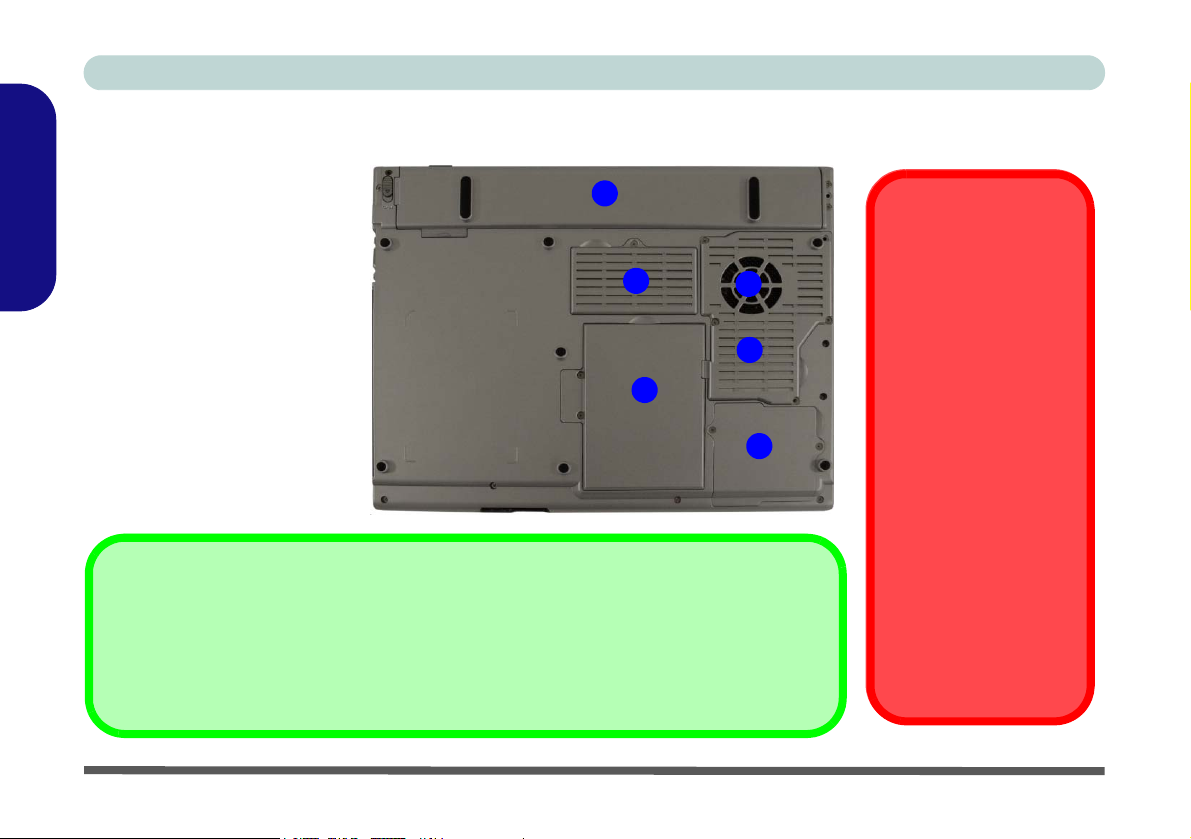
System Map: Bottom View
English
1. Vent/Fan Intake
2. Battery
3. Memory (RAM) Socket Cover
4. Hard Disk Cover
5. WLAN Module Cover
6. CPU Cover
Always completely discharge, then fully charge, a new battery before using it. Use the computer
with battery power until it shuts down due to a low battery. When charging the battery, don’t stop
until the LED charging indicator light changes from orange to green. Completely discharge and
charge the battery at least once every 30 days or after about 20 partial discharges.
Figure 7
Bottom View
Battery Information
2
CPU
3
1
6
4
5
The CPU is not a user
serviceable part. Opening this compartment, or
accessing the CPU in
any way, may violate
your warranty.
Drive Warning
Don’t try to remove the
hard disk (HDD) while
the system is on. This
could cause data loss or
damage. Unauthorized
removal or tampering
with the HDD may violate your warranty. If you
are in doubt, consult
your service representative.
14 - System Map: Bottom View

Concise User’s Guide
Video Features
This section is about making adjustments for the LCD, and switching display devices. You can use the Fn + F8/
F9 keys to adjust screen brightness, and the Fn + F7 key combination to toggle through display options if a monitor
is attached.
Dynamic Video Memory Technology
Intel® DVMT automatically and dynamically allocates as much (up to 64MB) system memory (RAM) as needed to
the video system (the video driver must be installed). DVMT returns whatever memory is no longer needed to the
operating system.
System Memory Maximum Memory Allocated for Graphics by DVMT
0MB - 127MB Not Supported
128MB - 255MB 32MB
256MB - Maximum Memory 64MB
Table 4
DVMT Memory Allocation
English
Video Features - 15
Concise User’s Guide
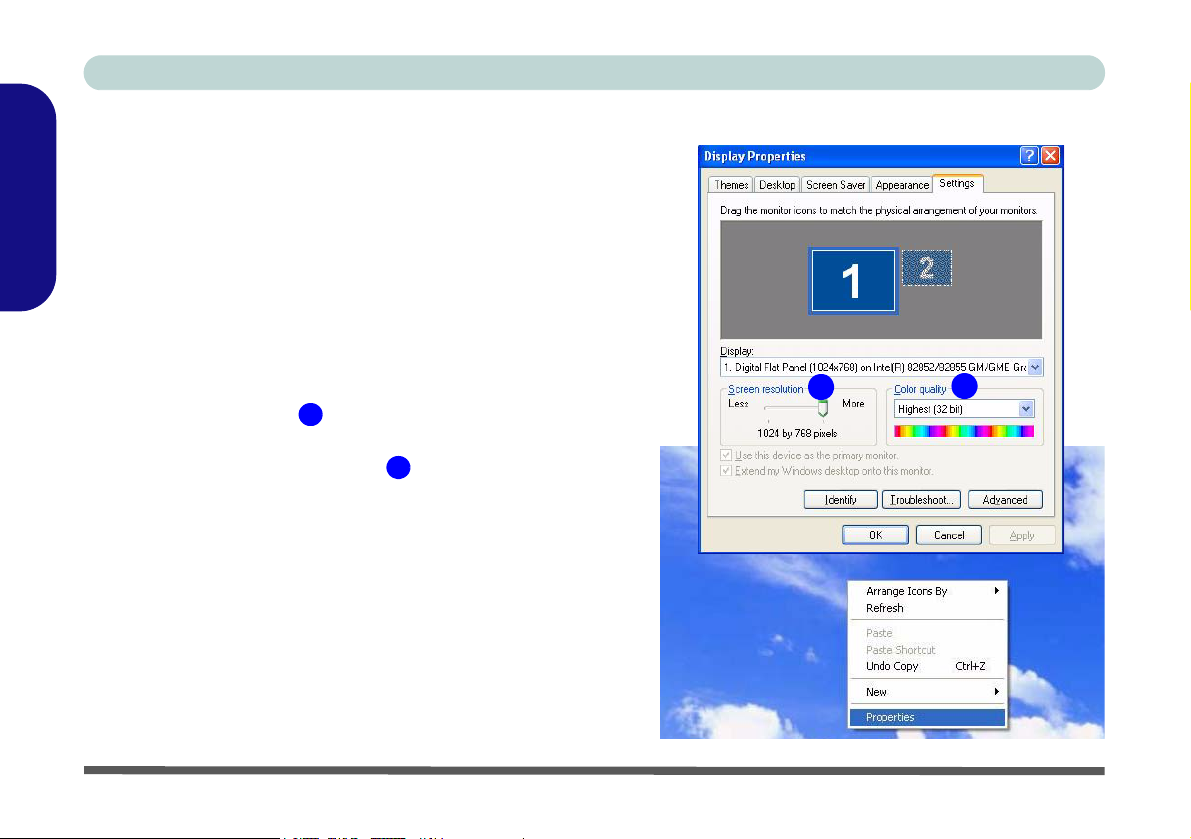
Video Driver Controls
You can switch display devices, and configure display options,
from the Display Properties control panel in Windows as long
as the video driver is installed.
English
1. Click Start, point to Settings and click Control Panel (or just
click Control Panel).
2. Double-click Display (icon) - In the Appearances and
Themes category.
3. In the Display Properties dialog box, click Settings (tab).
4. In Screen area/resolution, move the slider to the preferred
setting for resolution .
5. In Colors/Color quality, click the arrow and scroll to the
preferred setting for color depth .
You can also access Display Properties by right-clicking the
desktop and scrolling down and clicking Properties. Click Set-
tings (tab) and adjust as above.
1
2
1
2
16 - Video Features
Right-Click
Desktop
Figure 8 - Display Properties
& Right-Click Desktop
Concise User’s Guide
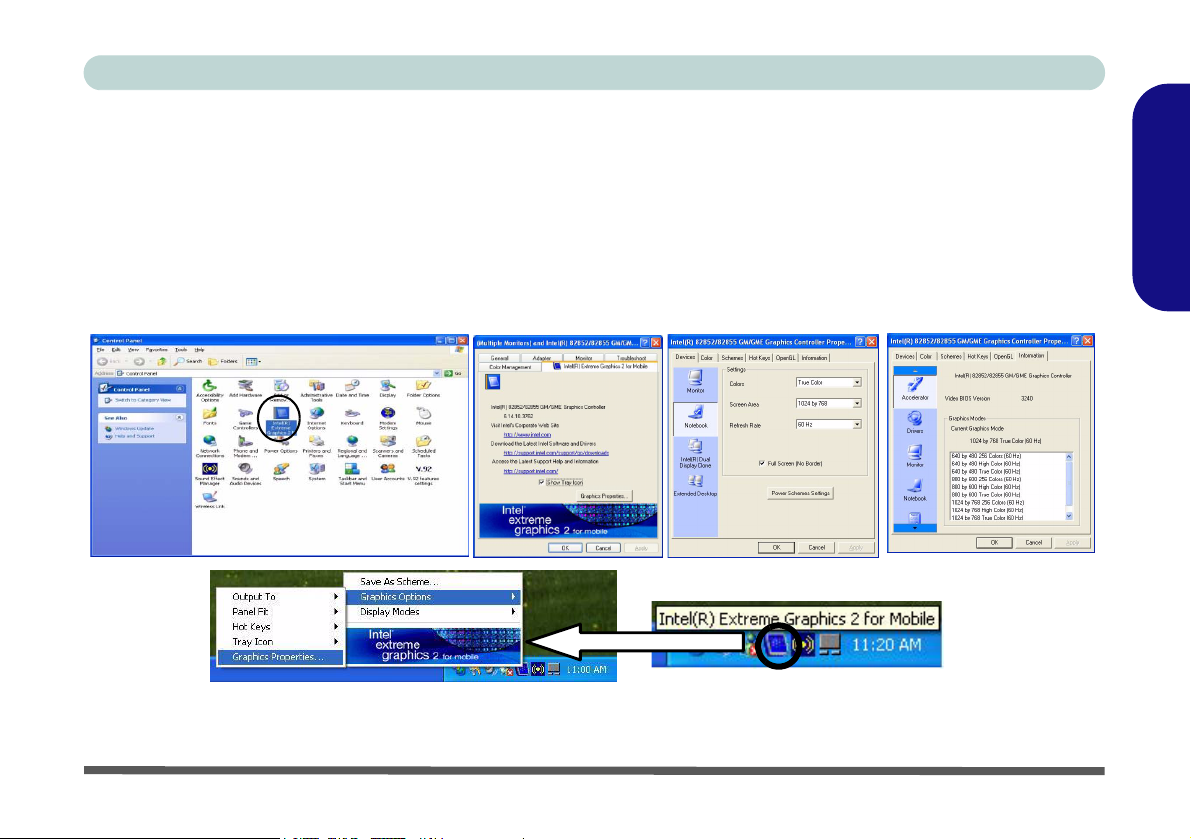
Intel Video Driver Controls
After installing the video driver there will be an additional control panel entitled Intel(R) Extreme Graphics 2 M.
To get to the control panel to make changes to the Graphics Properties, do the following:
1. Click Start, point to Settings (or just click Control Panel) and click Control Panel.
2. Double-click Intel(R) Extreme Graphics 2 M (icon) to bring up the Intel(R) 82852/82855 GM/GME Graphics Controller
Properties. (You may also access the control panel from the taskbar at the bottom right of the screen. Click on the icon to
bring up the menu and scroll to Graphics Options > Graphics Properties).
English
Figure 9 - Intel Graphics Control Panels
Video Features - 17
Concise User’s Guide
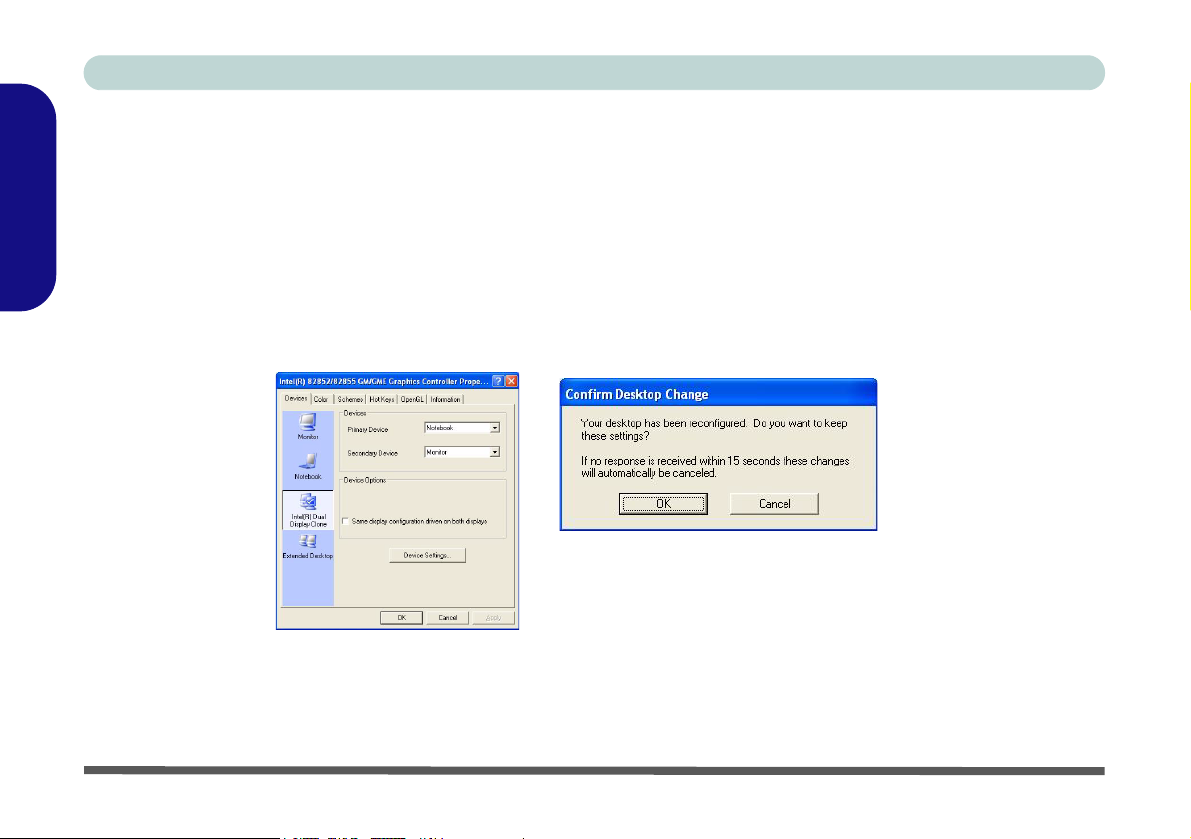
Switching/Enabling Displays
Besides the built-in LCD, you can also use an external monitor as your display device. A monitor connects to the external monitor (VGA) port. With the video driver installed, you can use its built-in controls to switch between the
displays as follows:
1. Plug your monitor into the external monitor (VGA) port.
English
2. Go to the Intel(R) 82852/82855 GM/GME Graphics Controller Properties control panel (see page 17) and select Devices
(tab).
3. Choose the display option from the list on the left and click Apply (and OK to confirm the settings change).
4. You can choose a device to be Primary or Secondary, and change the settings from Device Settings (button).
Figure 10
Switching Displays
With a monitor attached you may configure the displays to appear in Intel Dual Display Clone or Extended Desktop
mode. Intel Dual Display Clone mode drives multiple displays with the same content; Extended Desktop mode
(WinXP Only) allows a desktop to act as a large workspace (creating a lot more area for screen display). Instructions
on enabling Extended Desktop are outlined on the following page.
18 - Video Features
Concise User’s Guide
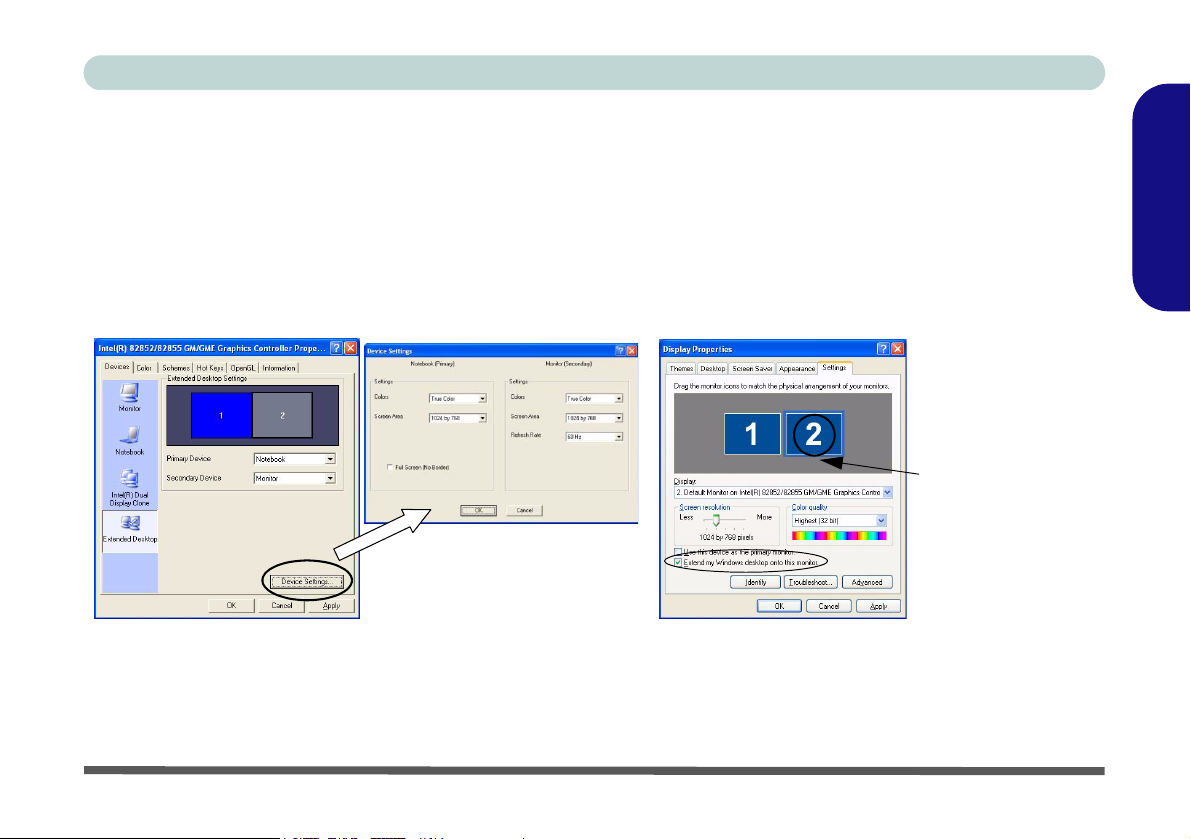
Enabling Extended Desktop Mode
1. Plug your monitor into the external monitor (VGA) port.
2. Go to the Intel(R) 82852/82855 GM/GME Graphics Controller Properties control panel and select Devices (tab).
3. Click the Extended Desktop icon in the Devices tab (this option is only available when you have attached the monitor).
4. Choose which device is to be the Primary display, and which is to be Secondary.
5. Adjust the settings by clicking the Device Settings (button) if necessary.
6. Click Apply > OK and close the control panels.
Note: See “Video
Driver Controls” on
page 16 for instruc-
tions on how to access
Display Properties.
Click the appropriate
monitor icon to be able
to select the option to
extend the desktop on
to it.
Figure 11
Extended Desktop Settings
English
Video Features - 19
Concise User’s Guide
Power Management Features
The Power Options control panel in Windows allows you to configure power management features for your computer.
You may conserve power through individual components such as the monitor or hard disk, or you may use either
Standby or Hibernate mode to conserve power throughout the system (enable Hibernate support from the Control
English
Panel). Windows Power Schemes will adjust the processor performance of your computer in order to save power
(see the expanded User’s Manual for full details).
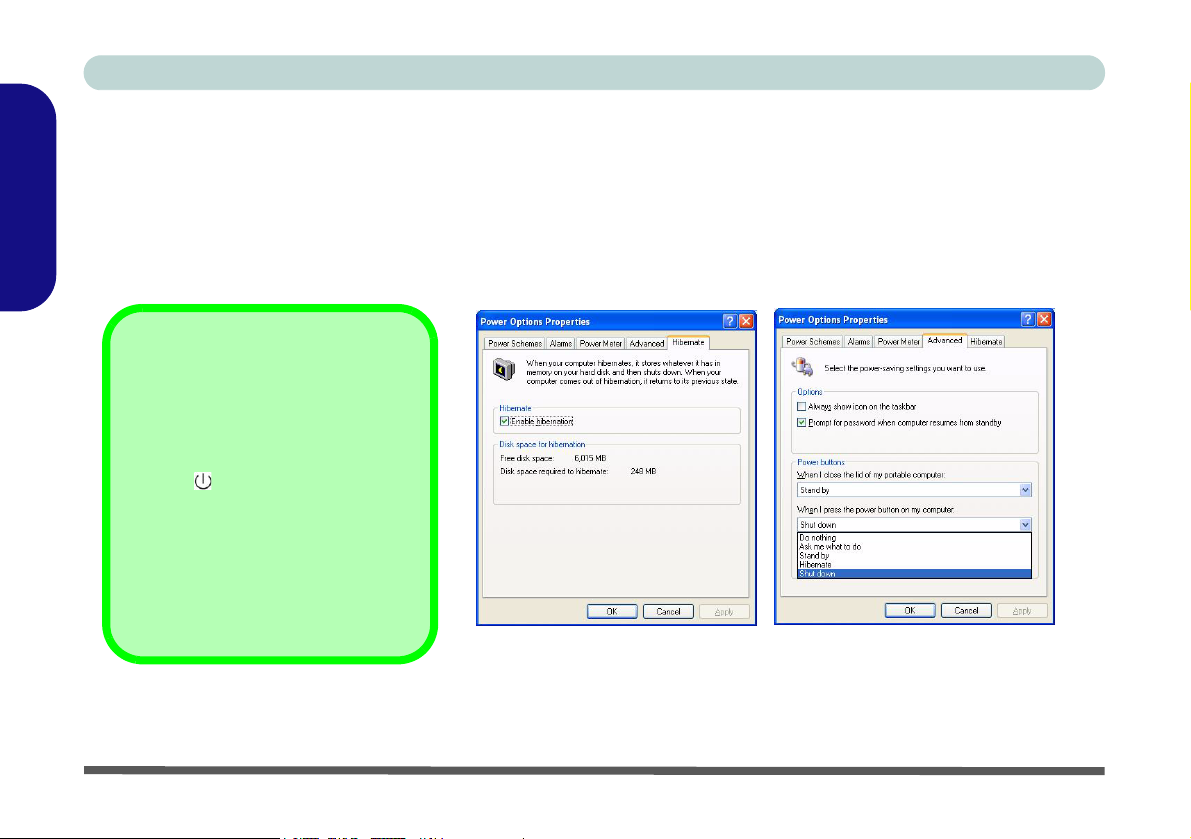
Configuring the Power Button
The power button may be set to send
the computer in to either Standby or
Hibernate mode. In Standby mode,
the LED will flash green. In Hiber-
nate mode the LED will be orange if the
computer is powered by the AC adapter (if powered by the battery the LED
will be off). If you are in a power saving
mode set to save power through individual components (e.g. hard disk,
monitor), the LED will remain green.
Figure 12 - Power Options Properties
The computer’s power button, sleep button (Fn + F4 key combination), and close cover switch may be set to send the
computer in to either Standby or Hibernate mode.
20 - Power Management Features
Concise User’s Guide
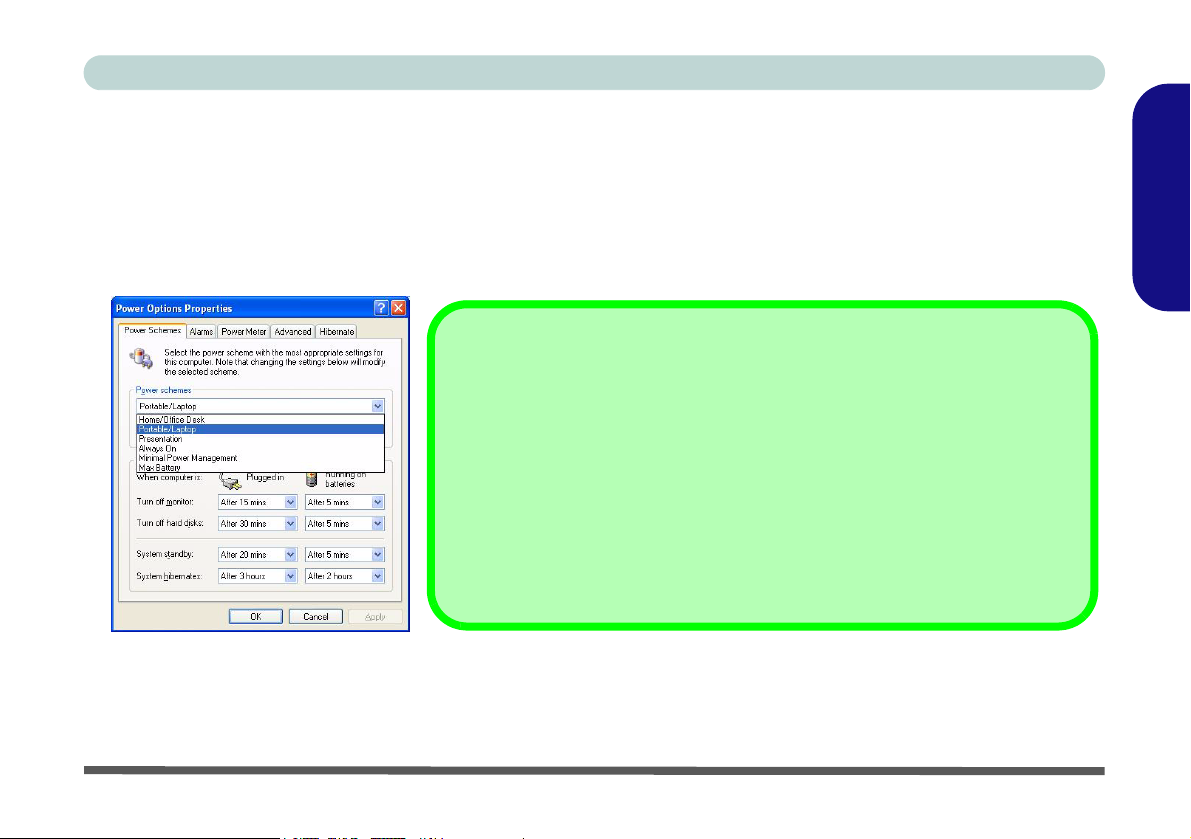
Power Schemes
You can set your computer to conserve power through individual components by means of Power Schemes. You can
also adjust the settings for each scheme to set the monitor to turn off after a specified time, and the computer's hard
disk motor to turn off if the hard disk drive has not been accessed for a specified period of time (if the system reads
or writes data, the hard disk motor will be turned back on). The schemes may also be set to set a specified time for
the system to enter Standby or Hibernate mode.
Windows Power Schemes
Choose the Home/Office Desk scheme for maximum performance when the computer is powered from an AC power source. Choose the Max Battery scheme (bear
in mind that this scheme may slow down the overall performance of the computer
in order to save power) for maximum power saving when the computer is battery
(DC power) powered.
Windows will use Portable/Laptop as the default scheme.
See the expanded User’s Manual for more information on balancing power saving
and processor performance.
Figure 13 - Power Schemes
English
Each Windows Power Scheme will also adjust the processor performance of your machine in order to save power.
This is worth bearing in mind if you are experiencing any reduced performance (especially under DC/battery power).
Power Management Features - 21

Concise User’s Guide
Wireless LAN (Network) & Bluetooth Modules
Your notebook computer will have either an Intel PRO/
Wireless 2100 (802.11b) OR 2200BG (802.11b/g) Mini
English
PCI Wireless LAN module, and may have an optional
Bluetooth module. The antenna and other components
are not externally visible. Make sure you install the appropriate driver(s) for it/them. Make sure any wireless
module is OFF when you are using the computer
aboard aircraft by using the appropriate key combination.
Wireless Device Operation Aboard Aircraft
The use of any portable electronic transmission devices
aboard aircraft is usually prohibited. Make sure the module(s) are OFF if you are using the computer aboard aircraft. When the computer first ‘Boots Up’ the module(s) will
be OFF.
If you restart the computer the power status of the module
will remain the same as it was before the restart. If you
shut down the computer the module will turn OFF.
Power Toggle for the Wireless LAN and Bluetooth
Modules
You will need to enable power to the modules by using
the following key combinations:
Fn + F11 = Wireless LAN Module Power Toggle
Fn + F12 = Bluetooth Module Power Toggle
When the Wireless LAN module is powered on, the
LED will be green.
When the Bluetooth module is powered on, the
LED will be orange.
Do not try to use the Wireless LAN module and the Bluetooth module at the same time, as this may cause a
communication conflict.
22 - Wireless LAN (Network) & Bluetooth Modules

Concise User’s Guide
PC Camera
A PC Camera module (and appropriate software CD) is
provided as an optional module for this computer model.
See “PC Camera (WinXP)” on page 28 for instructions
on installing the PC Camera driver.
AMCAP
AMCAP is a video viewer useful for general purpose
video viewing and testing, and can capture video files to
.avi format.
1. Run the AMCAP program from the Start > Programs/
All Programs > CMM PC Camera
2. Go to the Capture menu heading and select Start
Capture.
3. On the first run of the program (if you have not set the
captured file) you will be asked to choose a file name
and size (for the captured file).
4. Click OK to start the capture, and press Esc to stop.
5. You may go to the File menu and select Save Captured
Video As..., choose a file name and location, then click
Open (you can view the file using the Windows Media
Player).
menu.
English
PC Camera Audio Setup
Setup the audio recording options in Windows to capture
video & audio with your camera.
1. Go to the Start menu and point to Settings (or just click
Control Panel) and click Control Panel, then doubleclick the Sounds & Audio Devices icon (Category
View > Speech, and Audio Devices).
2. Click Advanced in the Volu me tab.
3. Click Options (Volume Control) and scroll down and
click Properties.
4. Click Recording (Adjust volume for) and click
Microphone (check box), then click OK.
5. Make sure the Select (check box) in the Recording
Control panel, under the Microphone section, is
checked (boost the volume as high as it will go).
6. Close the open windows.
PC Camera - 23
Concise User’s Guide
Driver Installation
The Device Drivers & Utilities + User’s Manual CDROM contains the drivers and utilities necessary (the In-
tel Wireless LAN module driver, the optional Blue-
English
tooth module driver and optional PC Camera driver are
on the separate CD-ROMs supplied) for the proper operation of the computer. This section covers driver and utility installation instructions for Windows XP only.
Table 5 lists what you need to install.
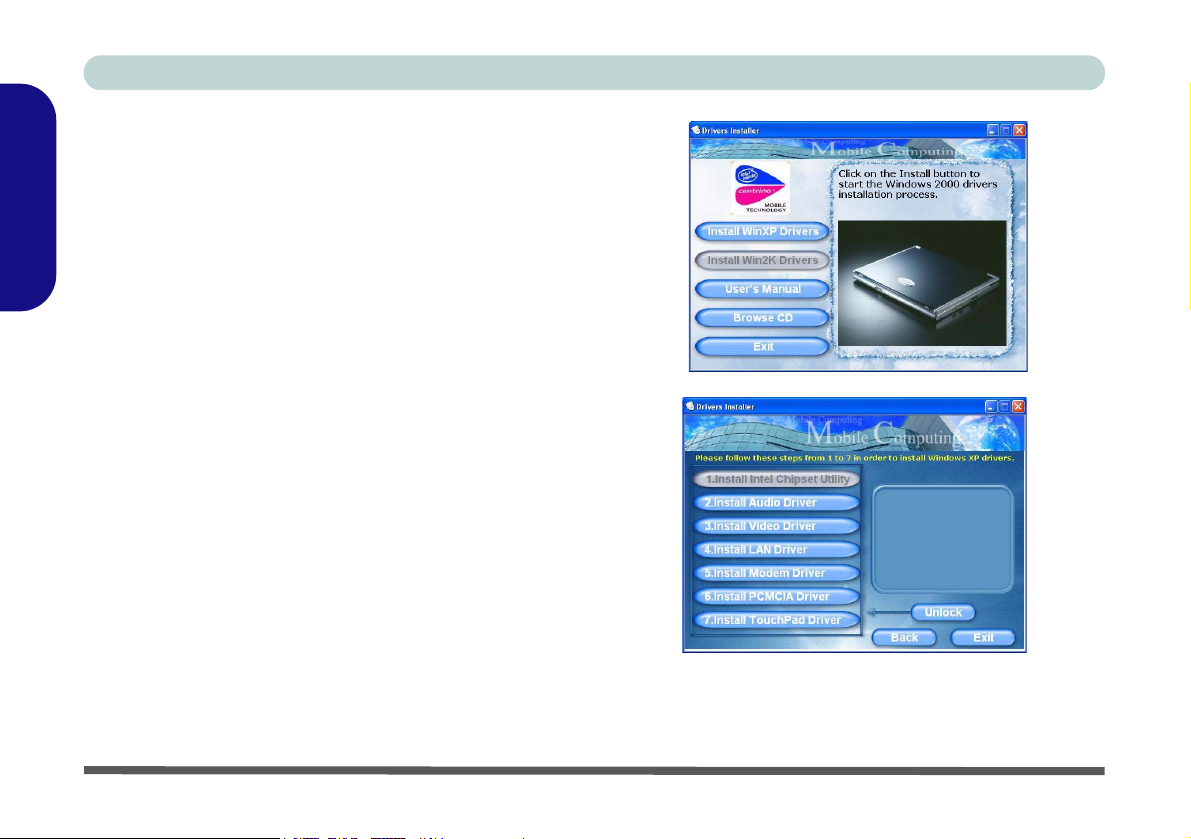
Drivers Installer Application
1. Insert the Device Drivers & Utilities + User’s Manual
CD-ROM and click the Install WinXP Drivers button.
2. Follow the driver installation order as listed in the menu
(numbers 1 to 7), which is the same as that listed in
Table 5 on page 25.
3. Click to select the driver you wish to install. After
installing each driver it will become grayed out (if you
need to reinstall any driver, click the Unlock button).
4. Follow the instructions from step 3 of each individual
driver install procedure as listed in the following
pages.
Figure 14
Drivers Installer
24 - Driver Installation
 Loading...