

Page 1

FUNK-WETTERSTATION
RADIO CONTROLLED WEATHER STATION
STATION METEO RADIO PILOTEE
DRAADLOOS WEERSTATION
EFWS 90 i
Best.-Nr. / Item No. / N° de commande / Bestelnr. 672719
BEDIENUNGSANLEITUNG
OPERATING INSTRUCTIONS
MODE D’EMPLOI
GEBRUIKSAANWIJZING
Page 2

INHALTSVERZEICHNIS
Seite
1. Einführung ....................................................................................................................... 4
2. Bestimmungsgemäße Verwendung .......................................................................... 5
3. Lieferumfang ..................................................................................................................6
4. Symbol-Erklärung .......................................................................................................... 6
5. Merkmale und Funktionen ............................................................................................ 7
a) Wetterstation .............................................................................................................7
b) Außensensor ..............................................................................................................7
6. Sicherheitshinweise ...................................................................................................... 8
7. Batterie- und Akkuhinweise ........................................................................................ 9
8. Anzeigen/Bedienelemente .......................................................................................... 11
a) Wetterstation ............................................................................................................ 11
b) Außensensor ............................................................................................................ 12
9. Inbetriebnahme............................................................................................................. 13
a) Außensensor ............................................................................................................ 13
b) Wetterstation ........................................................................................................... 14
10. DCF-Empfang ................................................................................................................. 16
a) Allgemein .................................................................................................................. 16
b) DCF-Empfang aus– und einschalten, DCF-Suche starten............................... 17
11. Außensensor(en) suchen ............................................................................................ 18
12. Funktion „Uhrzeit/Datum“.......................................................................................... 19
a) Uhrzeit manuell einstellen .................................................................................... 19
b) 12h-/24h-Modus umschalten ............................................................................... 20
c) Sprache für die Anzeige des Wochentags auswählen .................................... 21
d) Uhrzeitanzeige umschalten (Sekunde/Datum/Zeitzone) .............................. 21
e) Zeitzone einstellen ................................................................................................ 22
f) Weckfunktion wählen bzw. Weckzeit ansehen ................................................ 22
g) Weckfunktion ein-/ausschalten .......................................................................... 23
h) Weckzeit einstellen ................................................................................................ 23
i) Vor-Alarm ein-/ausschalten und einstellen...................................................... 24
j) Wecksignal beenden ............................................................................................. 24
2
Page 3

Seite
13. Funktion „Temperatur“ .............................................................................................. 25
a) Temperatureinheit umschalten °C/°F ............................................................... 25
b) Außensensor auswählen ...................................................................................... 25
c) Außensensoren automatisch umschalten........................................................ 25
d) Anzeige der Minimum-/Maximumwerte ........................................................... 26
e) Löschen der Minimum-/Maximumwerte........................................................... 26
f) Temperatur-Alarm auswählen, ein-/ausschalten............................................ 26
g) Temperaturwert für den Temperatur-Alarm einstellen ................................ 27
h) Tendenzanzeige für Innen-/Außentemperatur ............................................... 27
14. Funktion „Wetter/Tendenz“....................................................................................... 28
15. Batteriewechsel ........................................................................................................... 30
a) Wetterstation ..........................................................................................................30
b) Außensensor ........................................................................................................... 30
16. Behebung von Störungen ........................................................................................... 31
17. Reichweite ..................................................................................................................... 33
18. Wartung und Reinigung .............................................................................................. 34
19. Entsorgung .................................................................................................................... 35
a) Allgemein ................................................................................................................. 35
b) Batterien und Akkus .............................................................................................. 35
20. Konformitätserklärung (DOC) .................................................................................. 35
21. Technische Daten ........................................................................................................ 36
a) Wetterstation .......................................................................................................... 36
b) Außensensor ........................................................................................................... 36
3
Page 4
1. EINFÜHRUNG
Sehr geehrte Kundin, sehr geehrter Kunde,
wir bedanken uns für den Kauf dieses Produkts.
Dieses Produkt entspricht den gesetzlichen, nationalen und europäischen Anfor-
derungen.
Um diesen Zustand zu erhalten und einen gefahrlosen Betrieb sicherzustellen,
müssen Sie als Anwender diese Bedienungsanleitung beachten!
Diese Bedienungsanleitung gehört zu diesem Produkt. Sie enthält wichtige
Hinweise zur Inbetriebnahme und Handhabung. Achten Sie hierauf, auch
wenn Sie dieses Produkt an Dritte weitergeben.
Heben Sie deshalb diese Bedienungsanleitung zum Nachlesen auf!
Alle enthaltenen Firmennamen und Produktbezeichnungen sind Warenzeichen der
jeweiligen Inhaber. Alle Rechte vorbehalten.
Bei technischen Fragen wenden Sie sich bitte an:
Deutschland: Tel.-Nr.: 0180/5 31 21 11
Fax-Nr.: 0180/5 31 21 10
E-Mail: Bitte verwenden Sie unser Formular im Internet
www.conrad.de, unter der Rubrik "Kontakt".
Mo. - Fr. 8.00 bis 18.00 Uhr
Österreich: www.conrad.at
www.business.conrad.at
Schweiz: Tel.-Nr.: 0848/80 12 88
Fax-Nr.: 0848/80 12 89
E-Mail: support@conrad.ch
Mo. - Fr. 8.00 bis 12.00 Uhr, 13.00 bis 17.00 Uhr
4
Page 5

2. BESTIMMUNGSGEMÄSSE VERWENDUNG
Die Wetterstation dient zur Anzeige der Innen- und Außentemperatur.
Die Temperatur-Messdaten des Außensensors werden per Funk drahtlos zur Wet-
terstation übertragen.
Weiterhin errechnet die Wetterstation über den internen Luftdrucksensor und der
Aufzeichnung der Luftdruckveränderungen eine Wettervorhersage für die nächsten 12 - 24 Stunden, die mittels grafischen Symbolen im Display dargestellt wird.
Uhrzeit und Datum können per DCF-Zeitzeichensignal automatisch eingestellt werden. Es ist aber auch eine manuelle Einstellung möglich (z.B. bei Empfangsproblemen).
Eine Aufstellung mit allen Merkmalen und Eigenschaften des Produkts fin-
(
den Sie in Kapitel 5.
Der Hersteller übernimmt keine Verantwortung für inkorrekte Anzeigen, Messwerte
oder Wettervorhersagen und die Folgen, die sich daraus ergeben können.
Das Produkt ist für den Privatgebrauch vorgesehen; es ist nicht für medizinische
Zwecke oder für die Information der Öffentlichkeit geeignet.
Die Bestandteile dieses Produkts sind kein Spielzeug, sie enthalten zerbrechliche
bzw. verschluckbare Glas- und Kleinteile, außerdem Batterien. Das Produkt gehört
nicht in Kinderhände!
Betreiben Sie alle Komponenten so, dass sie von Kindern nicht erreicht werden
können.
Der Betrieb des Produkts erfolgt über Batterien.
Eine andere Verwendung als oben beschrieben kann zur Beschädigung des Pro-
dukts führen, außerdem bestehen weitere Gefahren.
Lesen Sie sich diese Bedienungsanleitung vollständig und aufmerksam durch, sie
enthält viele wichtige Informationen für Aufstellung, Betrieb und Bedienung. Beachten Sie alle Sicherheitshinweise!
5
Page 6
3. LIEFERUMFANG
Wetterstation
—
Standfuß für Wetterstation
—
Außensensor für Temperaturmessung
—
Halterung für Außensensor
—
Bedienungsanleitung
—
4. SYMBOL-ERKLÄRUNG
Das Symbol mit dem Ausrufezeichen im Dreieck weist auf wichtige Hinweise in dieser Bedienungsanleitung hin, die unbedingt zu beachten sind.
Das „Hand“-Symbol ist zu finden, wenn Ihnen besondere Tipps und Hinwei-
(
se zur Bedienung gegeben werden sollen.
6
Page 7

5. MERKMALE UND FUNKTIONEN
a) Wetterstation
Betrieb über 2 Batterien vom Typ AAA/Micro
—
DCF-Uhrzeit-/Datumsanzeige, manuelle Einstellung möglich
—
12/24-Stunden-Zeitanzeigeformat umschaltbar
—
Weckfunktion (zusätzlich aktivierbarer Vor-Alarm bei einer Außentemperatur
—
von < 0 °C)
Anzeige der Innentemperatur
—
Anzeige der Außentemperatur
—
Temperaturanzeige in Grad Celsius (°C) oder Grad Fahrenheit (°F) umschaltbar
—
Maximumwert- und Minimumwert-Speicher
—
Tendenzanzeigen für Innen- und Außentemperatur
—
Temperaturalarm bei Über- oder Unterschreiten einer bestimmten Temperatur
—
Symbole für Wettervorhersage der nächsten 12 - 24 Stunden (Berechnung über
—
interne Aufzeichnung des Luftdruckverlaufs)
Bis zu 3 Außensensoren umschaltbar (einer befindet sich im Lieferumfang, max.
—
2 weitere können als Zubehör bestellt werden)
Tischaufstellung über mitgelieferten Standfuß
—
Betrieb in trockenen, geschlossenen Innenräumen
—
b) Außensensor
Betrieb über 2 Batterien vom Typ AAA/Micro
—
Funkübertragung der Temperaturmesswerte zur Wetterstation (433 MHz-Tech-
—
nik)
Aufstellung oder Wandmontage möglich
—
Betrieb im geschützten Außenbereich
—
7
Page 8
6. SICHERHEITSHINWEISE
Bei Schäden, die durch Nichtbeachtung dieser Bedienungsanleitung verursacht werden, erlischt die Gewährleistung/Garantie. Für Folgeschäden übernehmen wir keine Haftung!
Bei Sach- oder Personenschäden, die durch unsachgemäße Handhabung
oder Nichtbeachten der Sicherheitshinweise verursacht werden, übernehmen wir keine Haftung! In solchen Fällen erlischt die Gewährleistung/
Garantie.
Sehr geehrte Kundin, sehr geehrter Kunde,
diese Sicherheitshinweise dienen nicht nur zum Schutz des Produkts, son-
dern auch zu Ihrer eigenen Sicherheit und der anderer Personen. Lesen Sie
sich deshalb dieses Kapitel sehr aufmerksam durch, bevor Sie das Produkt
in Betrieb nehmen!
Aus Sicherheits- und Zulassungsgründen (CE) ist das eigenmächtige Umbauen
—
und/oder Verändern des Produkts nicht gestattet. Öffnen/Zerlegen Sie es nicht
(bis auf die in dieser Anleitung beschriebenen Arbeiten zum Einlegen/Wechseln der Batterien)
Wartungs-, Einstellungs- oder Reparaturarbeiten dürfen nur von einem Fach-
—
mann oder einer Fachwerkstatt durchgeführt werden.
Verwenden Sie dieses Produkt nicht in Krankenhäusern oder medizinischen Ein-
—
richtungen. Obwohl der Außensensor nur relativ schwache Funksignale aussendet, könnten diese dort zu Funktionsstörungen von lebenserhaltenden Systemen führen. Gleiches gilt möglicherweise in anderen Bereichen.
Das Produkt ist kein Spielzeug, es gehört nicht in Kinderhände. Das Produkt
—
enthält Kleinteile, Glas (Display) und Batterien. Platzieren Sie das Produkt so,
dass es von Kindern nicht erreicht werden kann.
Die Wetterstation ist nur für trockene, geschlossene Innenräume geeignet. Set-
—
zen Sie sie keiner direkten Sonneneinstrahlung, starker Hitze, Kälte, Feuchtigkeit oder Nässe aus, andernfalls wird sie beschädigt.
Der Außensensor ist für den Betrieb im geschützten Außenbereich geeignet. Er
—
darf aber nicht in oder unter Wasser betrieben werden, dabei wird er zerstört.
Betreiben Sie das Produkt nur in gemäßigtem Klima, nicht in tropischem Klima.
—
Wenn das Produkt von einem kalten in einen warmen Raum gebracht wird (z.B.
—
bei Transport), kann Kondenswasser entstehen. Dadurch könnte das Produkt
beschädigt werden.
Lassen Sie deshalb das Produkt zuerst auf Zimmertemperatur kommen, bevor
Sie es verwenden. Dies kann u.U. mehrere Stunden dauern.
8
Page 9

In Schulen, Ausbildungseinrichtungen, Hobby- und Selbsthilfewerkstätten ist das
—
Betreiben des Produkts durch geschultes Personal verantwortlich zu überwachen.
Lassen Sie das Verpackungsmaterial nicht achtlos liegen, dieses könnte für Kin-
—
der zu einem gefährlichen Spielzeug werden.
Gehen Sie vorsichtig mit dem Produkt um, durch Stöße, Schläge oder dem Fall
—
aus bereits geringer Höhe wird es beschädigt.
7. BATTERIE- UND AKKUHINWEISE
Für die Wetterstation sind 2 Batterien vom Typ AAA/Micro erforderlich. Für
(
den Außensensor werden ebenfalls 2 Batterien vom Typ AAA/Micro benötigt.
Der Betrieb mit Akkus ist grundsätzlich möglich.
Durch die geringere Spannung von Akkus (Akku = 1,2 V, Batterie = 1,5 V) und
die geringere Kapazität kommt es jedoch zu einer kürzeren Betriebsdauer,
es ist auch eine Verringerung der Funkreichweite möglich. Außerdem sind
Akkus kälteempfindlicher als Batterien.
Wenn Sie trotz dieser Einschränkungen Akkus verwenden wollen, so sollten
Sie ausschließlich spezielle NiMH-Akkus mit geringer Selbstentladung einsetzen.
Für einen langen und sicheren Betrieb empfehlen wir Ihnen, in der Wetterstation und im Außensensor nur hochwertige Alkaline-Batterien einzulegen.
Batterien/Akkus gehören nicht in Kinderhände.
—
Achten Sie beim Einlegen der Batterien/Akkus auf die richtige Polung (Plus/+
—
und Minus/- beachten).
Lassen Sie Batterien/Akkus nicht offen herumliegen, es besteht die Gefahr, dass
—
diese von Kindern oder Haustieren verschluckt werden. Suchen Sie im Falle eines Verschluckens sofort einen Arzt auf.
Ausgelaufene oder beschädigte Batterien/Akkus können bei Berührung mit der
—
Haut Verätzungen verursachen, benutzen Sie deshalb in diesem Fall geeignete
Schutzhandschuhe.
Achten Sie darauf, dass Batterien/Akkus nicht kurzgeschlossen, zerlegt oder
—
ins Feuer geworfen werden. Es besteht Explosionsgefahr!
Herkömmliche nicht wiederaufladbare Batterien dürfen nicht aufgeladen wer-
—
den. Es besteht Explosionsgefahr! Laden Sie ausschließlich dafür vorgesehene
wiederaufladbare Akkus, verwenden Sie ein geeignetes Ladegerät.
9
Page 10

Bei längerem Nichtgebrauch (z.B. bei Lagerung) entnehmen Sie die eingeleg-
—
ten Batterien/Akkus. Bei Überalterung besteht andernfalls die Gefahr, dass Batterien/Akkus auslaufen, was Schäden am Produkt verursacht, Verlust von Gewährleistung/Garantie!
Wechseln Sie immer den ganzen Satz Batterien/Akkus aus, verwenden Sie nur
—
Batterien/Akkus des gleichen Typs/Herstellers und des gleichen Ladezustands
(keine vollen mit halbvollen oder leeren Batterien/Akkus mischen).
Mischen Sie niemals Batterien mit Akkus. Verwenden Sie entweder Batterien
—
oder Akkus.
Für die umweltgerechte Entsorgung von Batterien und Akkus lesen Sie bitte
—
das Kapitel „Entsorgung“.
10
Page 11
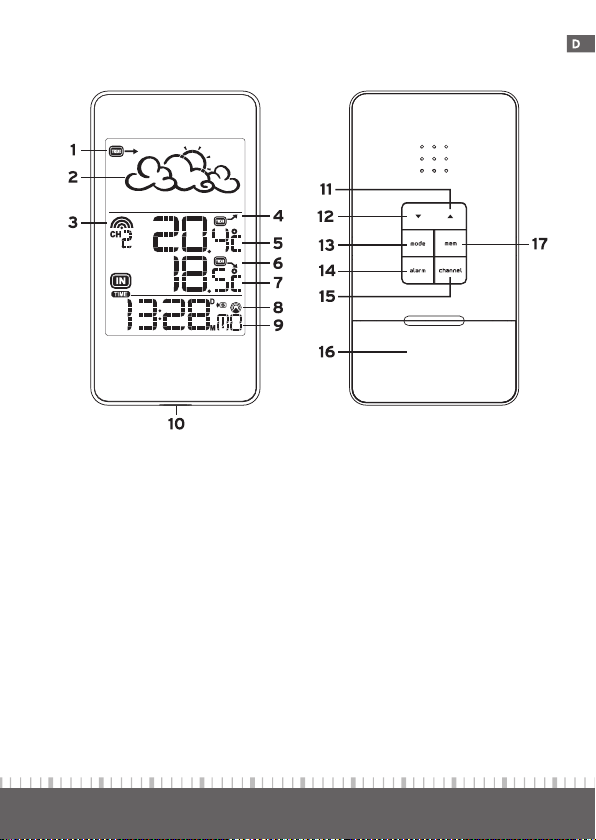
8. ANZEIGEN/BEDIENELEMENTE
a) Wetterstation
1 Wetter-Tendenzanzeige
2 Grafisches Symbol für Wettervorhersage
3 Empfangsanzeige/Kanalnummer des Außensensors
4 Tendenzanzeige für Außentemperatur
5 Außentemperatur (umschaltbar °C/°F)
6 Tendenzanzeige für Innentemperatur
7 Innentemperatur (umschaltbar °C/°F)
8 Empfangsanzeige für DCF-Signal
9 Anzeigebereich für Uhrzeit/Datum/Wochentag/Weckzeit
10 Öffnung für Standfuß
11 Taste „“
12 Taste „“
13 Taste „mode“
14 Taste „alarm“
15 Taste „channel“
16 Batteriefach für 2 Batterien vom Typ AAA/Micro
17 Taste „mem“
11
Page 12
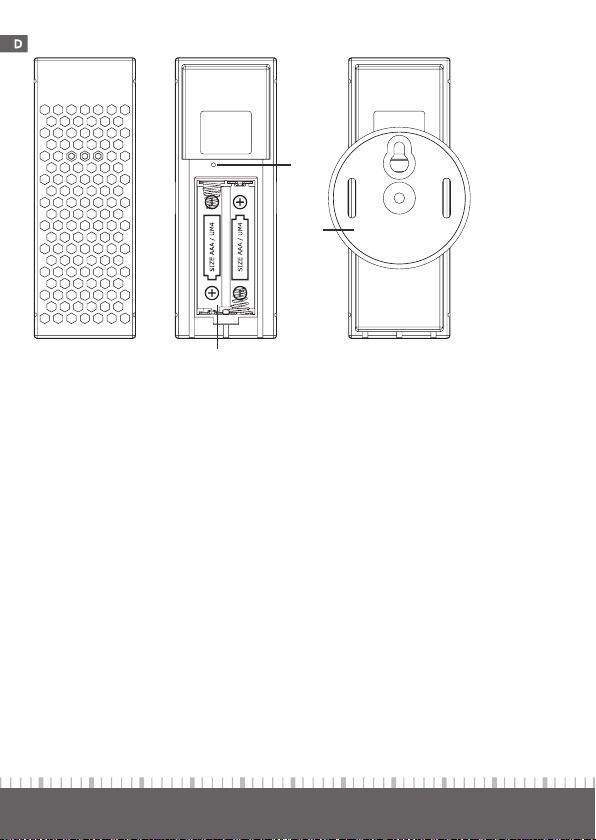
b) Außensensor
18
20
19
18 Taste „Test“ (versenkt angeordnet): Nur für interne Zwecke des Herstellers, nicht
betätigen!
19 Batteriefach für 2 Batterien vom Typ AAA/Micro
20 Halterung (auch als Standfuß verwendbar); an 3 Positionen am Außensensor
aufsteckbar (oben, unten, hinten)
Der mitgelieferte Außensensor ist fest auf Kanal 1 eingestellt, dies kann nicht
(
verändert werden.
12
Page 13
9. INBETRIEBNAHME
Legen Sie zuerst Batterien in den Außensensor ein und erst danach in die
(
Wetterstation. Dies gilt auch, wenn Sie mehr als einen Außensensor verwenden (als Zubehör erhältlich).
Während der Inbetriebnahme sollte sich der Außensensor in der Nähe der
Wetterstation befinden (innerhalb 1 m Abstand).
Halten Sie außerdem einen Abstand von mindestens 1 m zu anderen elektronischen Geräten (z.B. Fernseher, Computer, Telefon) und Metallteilen (z.B.
Heizkörper) ein. So stellen Sie sicher, dass die Wetterstation den Außensensor korrekt erkennt.
a) Außensensor
Öffnen Sie das Batteriefach (19) auf der Rückseite des Außensensors, schieben
—
Sie dazu den Batteriefachdeckel ein Stück nach unten, so dass er sich abnehmen lässt.
Legen Sie zwei Batterien vom Typ AAA/Micro polungsrichtig in das Batterie-
—
fach des Außensensors ein (Plus/+ und Minus/- beachten).
Verschließen Sie das Batteriefach wieder.
—
Die mitgelieferte Halterung (20) kann als Wandhalterung und als Standfuß ver-
—
wendet werden. Sie lässt sich je nach gewünschtem Montageort an der Oberseite, der Unterseite und auch an der Rückseite des Außensensors aufstecken.
Der Außensensor ist zum Betrieb im geschützten Außenbereich geeignet.
(
Er sollte so platziert werden, dass er weder direkter Sonneneinstrahlung
noch Regen/Schnee ausgesetzt ist, da es andernfalls zu falschen Messwerten
kommt.
Achten Sie bei der Montage des Außensensors darauf, dass das Batteriefach nach unten hin zeigt, da andernfalls Wasser eindringen kann.
Tauchen Sie den Außensensor niemals in oder unter Wasser, dadurch wird
er zerstört!
Die Wetterstation kann die Messdaten von bis zu 3 Außensensoren empfan-
(
gen und anzeigen. Jeder Außensensor muss auf einen eigenen Sendekanal
eingestellt werden.
Der mitgelieferte Außensensor ist fest auf Kanal 1 eingestellt, dies kann nicht
verändert werden.
Die als Zubehör erhältlichen Außensensoren verfügen über einen Kanalwahl-Schalter, stellen Sie diesen auf Kanal 2 bzw. Kanal 3 ein.
13
Page 14
b) Wetterstation
Öffnen Sie das Batteriefach (16) auf der Rückseite der Wetterstation, schieben
—
Sie den Batteriefachdeckel nach unten heraus, so dass er sich abnehmen lässt.
Legen Sie anschließend zwei Batterien vom Typ AAA/Micro polungsrichtig in
—
das Batteriefach der Wetterstation ein (Plus/+ und Minus/- beachten).
Verschließen Sie das Batteriefach wieder.
—
Im Display erscheinen nach dem Einlegen der Batterien kurz alle Display-
—
segmente.
Anschließend blinkt links im Display das Empfangssymbol (3).
—
Die Wetterstation sucht jetzt nach dem Signal des Außensensors. Sollte kein
Außensensor erkannt werden (z.B. weil noch keine Batterien eingelegt wurden),
so können Sie die Suche später manuell starten, siehe Kapitel 11.
Nach dem Ende der Sensorsuche blinkt die Empfangsanzeige (8) für das DCF-
—
Signal im Display. Je nach Empfangsstärke des DCF-Signals sind mehr Kreise
sichtbar.
Schwaches Signal -> starkes Signal
Platzieren Sie die Wetterstation z.B. nahe einem Fenster. Halten Sie minde-
(
stens 1 m Abstand zu anderen elektronischen Geräten (Fernseher, Computer, Telefon) und Metallteilen (z.B. Heizkörper) ein.
Ein schlechter Empfang ist zu erwarten z.B. bei metallbedampften Isolierglasfenstern, Stahlbetonbauweise, beschichteten Spezialtapeten oder in
Kellerräumen.
Wenn eine gute Empfangsposition gefunden wurde, so bewegen Sie in dieser Zeit die Wetterstation nicht. Betätigen Sie keine Tasten auf der Wetterstation.
Die Erkennung des DCF-Signals und dessen Auswertung kann einige Minuten dauern.
Beachten Sie für weitere Informationen zum DCF-Empfang das Kapitel 10.
14
Page 15

Nach der einwandfreien Erkennung des DCF-Signals und dessen Auswertung
—
erscheint die korrekte Uhrzeit unten im Display (9).
Ist dies nicht der Fall, so können Sie entweder die Batterien kurz aus der Wet-
terstation entnehmen oder eine weitere Suche nach dem DCF-Signal starten,
siehe Kapitel 10. b).
Auch eine manuelle Einstellung von Uhrzeit/Datum ist möglich, beachten Sie
dazu das Kapitel 12. a).
Stellen Sie die Wetterstation in den mitgelieferten Standfuß. Auf der Unterseite
—
der Wetterstation befindet sich dazu eine Öffnung (10).
Wählen Sie als Aufstellort eine Stelle, die nicht direktem Sonnenlicht ausge-
(
setzt ist (Messwertverfälschung der Temperaturmessung). Halten Sie auch
ausreichend Abstand zu Heizkörpern ein.
Schützen Sie wertvolle Möbeloberflächen mit einer geeigneten Unterlage,
sonst sind Kratzspuren möglich.
Beachten Sie außerdem für die Aufstellung von Außensensor und Wetterstation das Kapitel „17. Reichweite“.
Die Inbetriebnahme der Wetterstation und des Außensensors ist damit abge-
—
schlossen.
15
Page 16
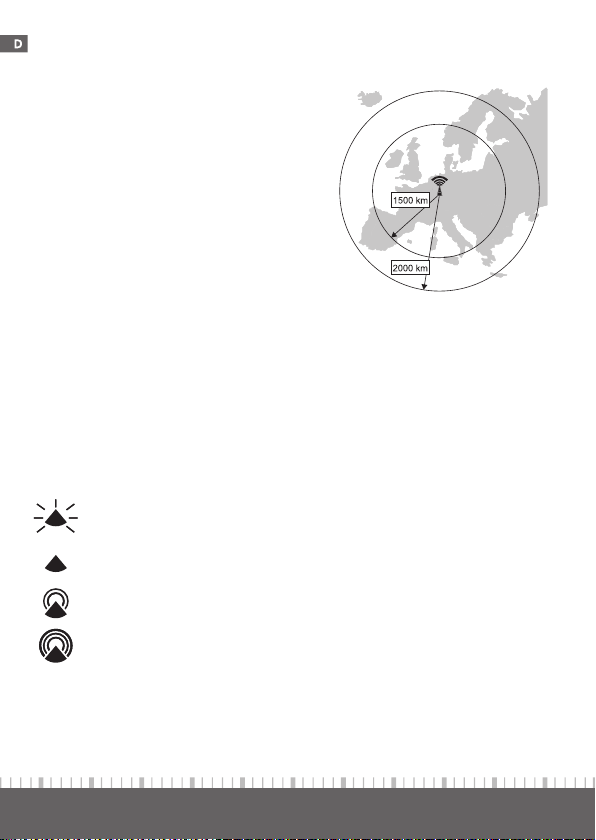
10. DCF-EMPFANG
a) Allgemein
Beim DCF-Signal handelt es sich um ein Signal,
das von einem Sender in Mainflingen (nahe
Frankfurt am Main) ausgesendet wird. Dessen
Reichweite beträgt bis zu 1500 km, bei idealen
Empfangsbedingungen sogar bis zu 2000 km.
Das DCF-Signal beinhaltet unter anderem die
genaue Uhrzeit (Abweichung theoretisch 1 Sekunde in einer Million Jahre!) und das Datum.
Selbstverständlich entfällt auch das umständliche manuelle Einstellen der Sommer- und Winterzeit an der Wetterstation, da die Zeitumstellung automatisch vorgenommen wird.
Der erste DCF-Empfangsversuch wird durchgeführt, wenn die Wetterstation die Suche nach den Außensensoren abgeschlossen hat.
Die Suche nach dem DCF-Signal und dessen Auswertung dauert mehrere
(
Minuten. Bewegen Sie in dieser Zeit die Wetterstation nicht, drücken Sie
keine Tasten.
Weitere Empfangsversuche werden um 00:00, 03:00, 06:00 und 12:00 Uhr durchgeführt. Bereits ein einziger erfolgreicher Empfang pro Tag hält die Abweichung
der in der Wetterstation integrierten Quarzuhr auf unter einer Sekunde.
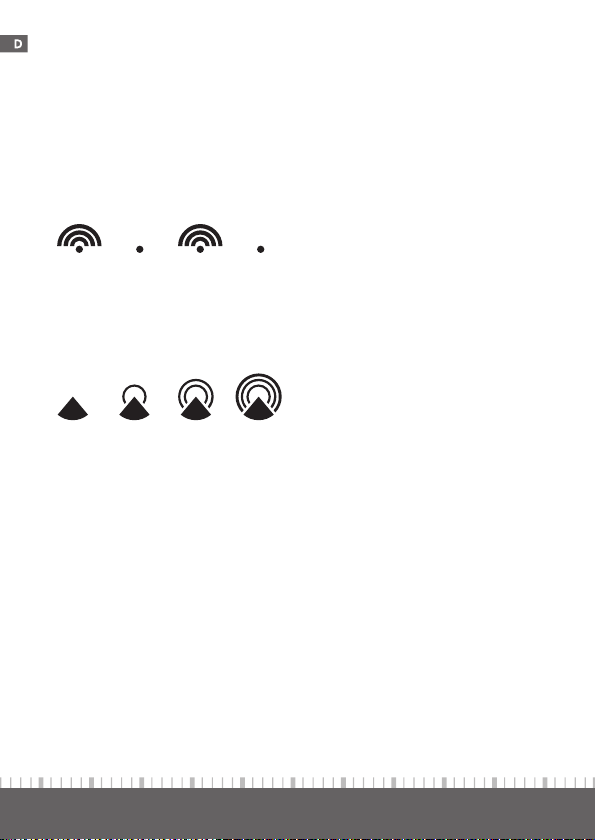
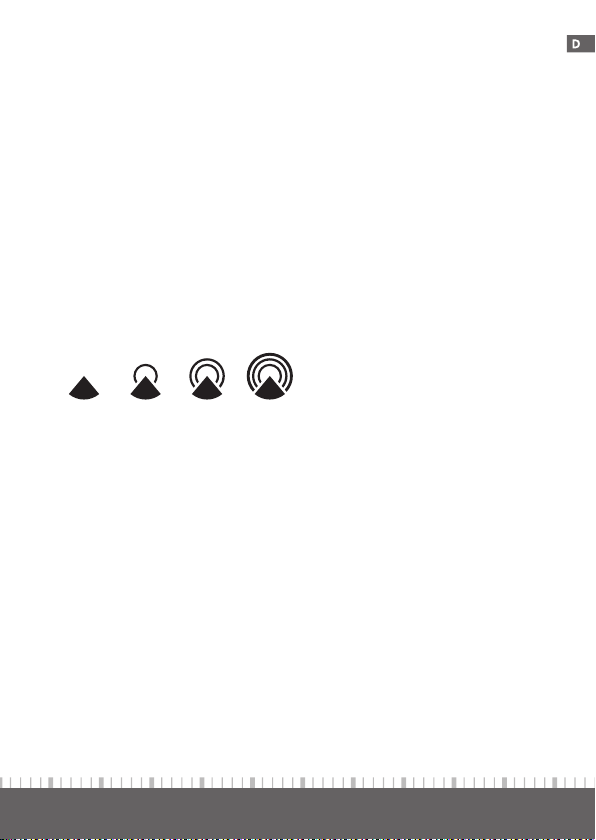
Wie gut das DCF-Signal erkannt wurde, ist anhand der Empfangsanzeige (8) zu
erkennen:
Symbol blinkt: Daten nicht erkannt
Kein DCF-Empfang in den letzten 24 Stunden
Schwaches DCF-Signal, jedoch Auswertung erfolgreich
Einwandfreies DCF-Signal
16
Page 17
Wenn bei der Erstinbetriebnahme aufgrund von Empfangsproblemen auch nach
mehr als 10 Minuten keine korrekte Uhrzeit angezeigt wird, so starten Sie einen
neuen Empfangsversuch. Gehen Sie dazu wie in Kapitel 10. b) beschrieben vor.
Im Kapitel „16. Behebung von Störungen“ und „17. Reichweite“ finden Sie
(
weitere Informationen, was bei der Wahl des Aufstellungsorts der Wetterstation zu beachten ist und was Sie versuchen können, einen einwandfreien
Empfang des DCF-Signals zu erreichen.
Ist am Aufstellungsort der Wetterstation kein DCF-Empfang möglich, so stellen Sie Uhrzeit und Datum manuell ein, siehe Kapitel 12. a).
b) DCF-Empfang aus– und einschalten, DCF-Suche starten
Zum Ausschalten bzw. Einschalten des DCF-Empfangs halten Sie die Taste „“ (11)
jeweils für etwa 3 Sekunden gedrückt.
Beim Ausschalten verschwindet die Empfangsanzeige (8) für das DCF-Signal.
—
Beim Einschalten des DCF-Empfangs führt die Wetterstation eine Suche nach
—
dem DCF-Signal durch. Je nach Empfangsstärke des DCF-Signals sind mehr Kreise sichtbar.
Schwaches Signal -> starkes Signal
Die Erkennung des DCF-Signals und dessen Auswertung kann einige Minu-
(
ten dauern.
Bewegen Sie in dieser Zeit die Wetterstation, nicht, drücken Sie keine Taste.
Ist am Aufstellungsort der Wetterstation kein DCF-Empfang möglich, so stel-
len Sie Uhrzeit und Datum manuell ein, siehe Kapitel 12. a).
17
Page 18

11. AUSSENSENSOR(EN) SUCHEN
Sollte die Wetterstation den Außensensor nicht finden (z.B. bei schlechten Empfangsbedingungen oder nach einem Batteriewechsel), so können Sie die Suche nach dem
bzw. den Außensensoren manuell starten.
Die Wetterstation kann die Messdaten von bis zu 3 Außensensoren empfan-
(
gen und anzeigen. Jeder Außensensor muss auf einen eigenen Sendekanal
eingestellt werden.
Der mitgelieferte Außensensor ist fest auf Kanal 1 eingestellt, dies kann nicht
verändert werden.
Die als Zubehör erhältlichen Außensensoren verfügen über einen Kanalwahl-Schalter, stellen Sie diesen auf Kanal 2 bzw. Kanal 3 ein.
Halten Sie die Taste „“ (12) so lange gedrückt, bis links im Display die Empfangsanzeige (3) für den Funkempfang der Außensensoren blinkt.
Die Sensorsuche kann einige Minuten dauern. Bewegen Sie in dieser Zeit die Wetterstation, nicht, drücken Sie keine Taste.
Falls der Außensensor nicht gefunden wird, so kontrollieren Sie dessen Bat-
(
terien; stellen Sie den Außensensor an einer anderen Stelle auf, verringern
Sie den Abstand zwischen Wetterstation und Außensensor.
Symbol blinkt: Sensorsuche
Signal des Außensensors einwandfrei erkannt
Kein Signal-Empfang in den letzten 24 Stunden
18
Page 19

12. FUNKTION „UHRZEIT/DATUM“
a) Uhrzeit manuell einstellen
Drücken Sie so oft kurz die Taste „“ (11) bzw. „“ (12), bis unten links im Dis-
—
play die Anzeige „ “ blinkt.
Halten Sie die Taste „mode“ (13) so lang gedrückt, bis unten rechts im Display
—
die Sprache für die Anzeige des Wochentags blinkt.
Mit den Tasten „“ (11) bzw. „“ (12) lässt sich jetzt die Sprache auswählen:
„DE“ = Deutsch
„Fr“ = Französisch
„IT“ = Italienisch
„SP“ = Spanisch
„Du“ = Niederländisch
„SW“ = Schwedisch
„En“ = Englisch
Drücken Sie kurz die Taste „mode“ (13), das Jahr blinkt.
—
Stellen Sie das Jahr mit den Tasten „“ (11) bzw. „“ (12) ein (für Schnellverstellung jeweilige Taste länger gedrückt halten).
Drücken Sie kurz die Taste „mode“ (13), der Monat blinkt.
—
Stellen Sie den Monat mit den Tasten „“ (11) bzw. „“ (12) ein (für Schnellverstellung jeweilige Taste länger gedrückt halten).
Drücken Sie kurz die Taste „mode“ (13), das Datum blinkt.
—
Stellen Sie das Datum mit den Tasten „“ (11) bzw. „“ (12) ein (für Schnellverstellung jeweilige Taste länger gedrückt halten).
Drücken Sie kurz die Taste „mode“ (13), die Reihenfolge für die Anzeige von
—
Monat („M“) und Datum („D“) blinkt im Display.
Mit den Tasten „“ (11) bzw. „“ (12) lässt sich jetzt die Reihenfolge umschal-
ten („D M“ = Datum/Monat, „M D“ = Monat/Datum).
Drücken Sie kurz die Taste „mode“ (13), anschließend blinkt „12 Hr“ bzw.
—
„24 Hr“ im Display.
Schalten Sie mit den Tasten „“ (11) bzw. „“ (12) zwischen dem 12h- bzw. 24h-
Modus um.
Beim 12h-Modus erscheint links neben der Uhrzeit in der ersten Tageshälfte
(
die Einblendung „AM“ und in der zweiten Tageshälfte „PM“.
19
Page 20
Drücken Sie kurz die Taste „mode“ (13), die Stunden blinken.
—
Stellen Sie die Stunden mit den Tasten „“ (11) bzw. „“ (12) ein (für Schnellverstellung jeweilige Taste länger gedrückt halten).
Drücken Sie kurz die Taste „mode“ (13), die Minuten blinken.
—
Stellen Sie die Minuten mit den Tasten „“ (11) bzw. „“ (12) ein (für Schnellverstellung jeweilige Taste länger gedrückt halten).
Drücken Sie kurz die Taste „mode“ (13).
—
Hiermit werden die Sekunden automatisch auf „00“ zurückgestellt und der Einstellmodus verlassen.
Es erscheint die zuvor eingestellte Uhrzeit.
Nach dem Start des Einstellmodus wird der DCF-Empfang deaktiviert. Soll
(
wieder ein DCF-Empfang stattfinden, so gehen Sie wie in Kapitel 10. b) beschrieben vor.
Wichtig:
Die Einstellungen für die Sprache der Anzeige des Wochentags und des 12h/24h-Modus bleiben dabei erhalten.
b) 12h-/24h-Modus umschalten
Drücken Sie so oft kurz die Taste „“ (11) bzw. „“ (12), bis die Anzeige „ “
—
blinkt.
Halten Sie die Taste „mode“ (13) so lang gedrückt, bis unten rechts im Display
—
die Sprache für die Anzeige des Wochentags blinkt.
Drücken Sie so oft kurz die Taste „mode“ (13), bis „12 Hr“ bzw. „24 Hr“ im
—
Display blinkt.
Mit den Tasten „“ (11) bzw. „“ (12) kann nun zwischen dem 12h- bzw. 24h-
Modus umgeschaltet werden.
Beim 12h-Modus erscheint links neben der Uhrzeit in der ersten Tageshälfte
(
die Einblendung „AM“ und in der zweiten Tageshälfte „PM“.
Drücken Sie so oft kurz die Taste „mode“ (13), bis keine Anzeige mehr blinkt.
—
Nach Abschluss des Einstellvorgangs ist der DCF-Empfang deaktiviert.
(
Um den DCF-Empfang wieder zu aktivieren, gehen Sie wie in Kapitel 10. b)
beschrieben vor.
20
Page 21
c) Sprache für die Anzeige des Wochentags auswählen
Drücken Sie so oft kurz die Taste „“ (11) bzw. „“ (12), bis die Anzeige „ “
—
blinkt.
Halten Sie die Taste „mode“ (13) so lang gedrückt, bis unten rechts im Display
—
die Sprache für die Anzeige des Wochentags blinkt.
Mit den Tasten „“ (11) bzw. „“ (12) lässt sich jetzt die Sprache auswählen:
„DE“ = Deutsch
„Fr“ = Französisch
„IT“ = Italienisch
„SP“ = Spanisch
„Du“ = Niederländisch
„SW“ = Schwedisch
„En“ = Englisch
Drücken Sie so oft kurz die Taste „mode“ (13), bis keine Anzeige mehr blinkt.
—
Nach Abschluss des Einstellvorgangs ist der DCF-Empfang deaktiviert.
(
Um den DCF-Empfang wieder zu aktivieren, gehen Sie wie in Kapitel 10. b)
beschrieben vor.
d) Uhrzeitanzeige umschalten (Sekunde/Datum/Zeitzone)
Drücken Sie so oft kurz die Taste „“ (11) bzw. „“ (12), bis die Anzeige „ “
—
blinkt.
Drücken Sie mehrfach kurz die Taste „mode“ (13), um zwischen den verschiede-
—
nen Anzeigearten umzuschalten:
Stunde : Minute : Sekunde
Stunde : Minute : Datum
Stunde : Minute : Datum (für zweite Zeitzone)
Stunde : Minute : Sekunde (für zweite Zeitzone)
Datum : Monat (bzw. Monat : Datum)
Werden Daten der zweiten Zeitzone angezeigt, erscheint rechts neben der
(
Uhrzeitanzeige die Einblendung „ZONE“. Die Einstellung der Zeitzone ist
auf der nächsten Seite beschrieben.
21
Page 22

e) Zeitzone einstellen
Drücken Sie so oft kurz die Taste „“ (11) bzw. „“ (12), bis die Anzeige „ “
—
blinkt.
Drücken Sie mehrfach kurz die Taste „mode“ (13), bis rechts neben der Uhrzeit-
—
anzeige die Einblendung „ZONE“ erscheint.
Halten Sie die Taste „mode“ (13) so lang gedrückt, bis unten die Anzeige der
—
Zeitzone blinkt („0:00+“).
Stellen Sie die Zeitzone mit den Tasten „“ (11) bzw. „“ (12) ein (für Schnell-
—
verstellung jeweilige Taste länger gedrückt halten). Der Einstellbereich liegt zwischen -13 und +15 Stunden (Anzeige „13:00-“ bis „15:00+“).
Drücken Sie kurz die Taste „mode“ (13), um den Einstellmodus zu beenden.
—
f) Weckfunktion wählen bzw. Weckzeit ansehen
Drücken Sie so oft kurz die Taste „“ (11) bzw. „“ (12), bis die Anzeige „ “
—
blinkt.
Drücken Sie mehrfach kurz die Taste „alarm“ (14), bis die gewünschte Weck-
—
funktion erscheint:
Symbol „
tag ausgelöst.
Symbol „
automatisch ausgeschaltet („OFF“).
Symbol „PRE AL“: Bei niedrigen Außentemperaturen unter 0 °C (gemessen
am Außensensor mit Kanal 1) wird zu einer einstellbaren Zeit (15, 30, 45, 60
oder 90 Minuten) vor der eigentlichen Weckzeit der sog. Vor-Alarm ausgelöst.
Dadurch haben Sie genug Zeit, um z.B. die Scheiben Ihres Autos eisfrei zu machen oder Schnee zu räumen.
(
W“: Die Weckfunktion wird nur an den Werktagen Montag bis Frei-
S“): Die Weckfunktion wird nur einmal ausgelöst, danach wird sie
Damit der Vor-Alarm (Anzeige „PRE AL“) eingeschaltet bzw. eingestellt
werden kann, muss zuerst entweder die Weckfunktion „ W“ oder „ S“
eingeschaltet werden.
22
Page 23
g) Weckfunktion ein-/ausschalten
Drücken Sie so oft kurz die Taste „“ (11) bzw. „“ (12), bis die Anzeige „ “
—
blinkt.
Drücken Sie mehrfach kurz die Taste „alarm“ (14), bis die gewünschte Weck-
—
funktion erscheint (siehe Kapitel 12. f).
Mit der Taste „“ (11) bzw. „“ (12) wird die ausgewählte Weckfunktion einge-
—
schaltet (Weckzeit erscheint) bzw. ausgeschaltet (im Display steht „OFF“).
Damit der Vor-Alarm (Anzeige „PRE AL“) eingeschaltet bzw. eingestellt
(
werden kann, muss zuerst entweder die Weckfunktion „ W“ oder „ S“
eingeschaltet werden, da sonst kein Vor-Alarm stattfinden kann.
h) Weckzeit einstellen
Drücken Sie so oft kurz die Taste „“ (11) bzw. „“ (12), bis die Anzeige „ “
—
blinkt.
Drücken Sie mehrfach kurz die Taste „alarm“ (14), bis die gewünschte Weck-
—
funktion „ W“ oder „ S“ erscheint (siehe Kapitel 12. f).
Schalten Sie die gerade ausgewählte Weckfunktion ein (Taste „“ (11) bzw. „“
—
(12) drücken), so dass anstatt „OFF“ eine Weckzeit angezeigt wird (z.B. „07:00“).
Halten Sie die Taste „alarm“ (14) so lange gedrückt, bis die Stunden der Weck-
—
zeit zu blinken beginnen.
Stellen Sie die Stunden der Weckzeit mit den Tasten „“ (11) bzw. „“ (12) ein
(für Schnellverstellung jeweilige Taste länger gedrückt halten).
Drücken Sie kurz die Taste „alarm“ (14), die Minuten der Weckzeit blinken.
—
Stellen Sie die Minuten der Weckzeit mit den Tasten „“ (11) bzw. „“ (12) ein
(für Schnellverstellung jeweilige Taste länger gedrückt halten).
Drücken Sie kurz die Taste „alarm“ (14), um den Einstellmodus zu beenden.
—
23
Page 24
i) Vor-Alarm ein-/ausschalten und einstellen
Der Vor-Alarm wird vor der eigentlichen Weckzeit („
wenn der Außensensor (nur Kanal 1) eine Temperatur unter 0 °C misst. Als Zeit für
den Vor-Alarm sind 15, 30, 45, 60 und 90 Minuten einstellbar.
Beispiel:
Sie stellen die Weckzeit auf 06:00 Uhr ein und den Vor-Alarm auf 45 Minuten. Wenn
der Außensensor (Kanal 1) um 05:15 Uhr eine Temperatur unter 0 °C misst, gibt die
Wetterstation ein vorzeitiges Wecksignal aus.
Schalten Sie zuerst wie in Kapitel 12. g) beschrieben eine Weckfunktion ein,
—
entweder „ W“ oder „ S“.
Wählen Sie dann den Vor-Alarm aus, drücken Sie so oft kurz die Taste „alarm“
—
(14), bis im Display „PRE AL“) angezeigt wird.
Schalten Sie den Vor-Alarm mit der Taste „“ (11) bzw. „“ (12) ein oder aus.
—
Bei ausgeschaltetem Vor-Alarm wird „OFF“ angezeigt.
(
Bei eingeschaltetem Vor-Alarm wird eine Zeit von 15, 30, 45, 60 oder 90
Minuten angezeigt.
Halten Sie die Taste „alarm“ (14) so lange gedrückt, bis die angezeigte Zahl (15,
—
30, 45, 60 oder 90) blinkt. Stellen Sie die Minuten des Vor-Alarms mit der Taste
„“ (11) bzw. „“ (12) ein.
Drücken Sie kurz die Taste „alarm“ (14), um den Einstellmodus zu beenden.
—
j) Wecksignal beenden
Wenn das Wecksignal zu der eingestellten Zeit ertönt, kann es durch Drücken der
Taste „alarm“ (14) beendet werden.
Wenn Sie das Wecksignal nicht manuell beenden, so wird es nach ca. 8 Mi-
(
nuten wiederholt (dies geschieht insgesamt 3 Mal).
W“ oder „ S“) ausgelöst,
24
Page 25
13. FUNKTION „TEMPERATUR“
a) Temperatureinheit umschalten °C/°F
Drücken Sie so oft kurz die Taste „“ (11) bzw. „“ (12), bis die Anzeige „ “
—
blinkt.
Halten Sie die Taste „mode“ (13) für etwa 3 Sekunden gedrückt, bis die
—
Temperatureinheit (°C/°F) für die Innen-/Außentemperatur umgeschaltet wird.
b) Außensensor auswählen
Die Wetterstation kann die Messdaten von bis zu 3 Außensensoren empfan-
(
gen und anzeigen. Jeder Außensensor muss auf einen eigenen Sendekanal
eingestellt werden.
Der mitgelieferte Außensensor ist fest auf Kanal 1 eingestellt, dies kann nicht
verändert werden.
Die als Zubehör erhältlichen Außensensoren verfügen über einen Kanalwahl-Schalter, stellen Sie diesen auf Kanal 2 bzw. Kanal 3 ein.
Drücken Sie kurz die Taste „channel“ (15), um den gewünschten Außensensor für
die Temperaturanzeige auszuwählen. Die zugehörige Kanalnummer wird links neben der Außentemperatur angezeigt (3).
c) Außensensoren automatisch umschalten
Wenn Sie mehr als einen Außensensor betreiben, kann die Wetterstation die bis zu
3 Kanäle auch automatisch wechseln. Die Messwerte werden dabei für jeweils ca. 5
Sekunden angezeigt.
Diese Funktion ist nur dann möglich, wenn mehr als ein Außensensor an der
(
Wetterstation angemeldet ist.
Zum Aktivieren der Funktion halten Sie die Taste „channel“ (15) so lange ge-
—
drückt, bis das Symbol „ “ erscheint (unterhalb der Kanalnummer).
Soll die Funktion wieder ausgeschaltet werden, so halten Sie die Taste „channel“
—
erneut (15) so lange gedrückt, bis das Symbol „ “ verschwindet.
25
Page 26
d) Anzeige der Minimum-/Maximumwerte
Drücken Sie so oft kurz die Taste „“ (11) bzw. „“ (12), bis die Anzeige „ “
—
blinkt.
Wenn Sie mehr als einen Außensensor betreiben, so wählen Sie jetzt mit der
—
Taste „channel“ (15) den entsprechenden Kanal (1, 2 oder 3) aus.
Drücken Sie kurz die Taste „mem“ (17), im Display werden die Minimumwerte
—
der Innen-/Außentemperaturen angezeigt, zusätzlich erscheint „MIN“.
Drücken Sie nochmals kurz die Taste „mem“ (17), im Display werden die
—
Maximumwerte der Innen-/Außentemperaturen angezeigt, zusätzlich erscheint
„MAX“.
Mit einem weiteren Druck auf die Taste „mem“ (17) gelangen Sie wieder zurück
—
zur Anzeige der aktuellen Messwerte.
e) Löschen der Minimum-/Maximumwerte
Drücken Sie so oft kurz die Taste „“ (11) bzw. „“ (12), bis die Anzeige „ “
—
blinkt.
Halten Sie die Taste „mem“ (17) für etwa 3 Sekunden gedrückt. Anschließend
—
werden die Minimum- und Maximumwerte gelöscht.
Als neue Minimum- und Maximumwerte werden die aktuellen Messwerte
(
gespeichert, bis sich wieder eine Veränderung ergibt.
f) Temperatur-Alarm auswählen, ein-/ausschalten
Für jeden der 3 Kanäle kann eine obere und untere Temperaturgrenze eingestellt
werden, bei deren Über- bzw. Unterschreiten ein Alarmton ausgegeben wird.
Drücken Sie so oft kurz die Taste „“ (11) bzw. „“ (12), bis die Anzeige „ “
—
blinkt.
Wählen Sie den gewünschten Außensensor mit der Taste „channel“ (15) aus.
—
Drücken Sie mehrfach kurz die Taste „alarm“ (14), um zwischen oberer
—
Temperaturgrenze (Symbol „ “), unterer Temperaturgrenze (Symbol „ “) und
der Normalanzeige umzuschalten.
Wenn das Symbol „ “ oder „ “ angezeigt wird, kann der entsprechende
—
Temperaturalarm ein- oder ausgeschaltet werden, indem die Taste „“ (11) bzw.
„“ (12) kurz gedrückt wird.
Bei ausgeschaltetem Temperatur-Alarm wird „OFF“ angezeigt.
Bei eingeschaltetem Temperatur-Alarm wird ein Temperaturwert angezeigt.
26
Page 27
Wenn der Alarmton ausgegeben wird (z.B. Sie haben als obere Temperaturgrenze
einen Temperaturwert von +30.0 °C eingestellt und der Messwert steigt über diese
Grenze), so lässt sich der Alarmton beenden, indem Sie kurz die Taste „alarm“ (14)
drücken.
g) Temperaturwert für den Temperatur-Alarm einstellen
Drücken Sie so oft kurz die Taste „“ (11) bzw. „“ (12), bis die Anzeige „ “
—
blinkt.
Wählen Sie den gewünschten Außensensor mit der Taste „channel“ (15) aus.
—
Drücken Sie ein- bzw. zweimal die Taste „alarm“ (14), um die obere Temperatur-
—
grenze (Symbol „ “) oder die untere Temperaturgrenze (Symbol „ “) auszuwählen.
Schalten Sie den jeweiligen Temperaturalarm ein (oder aus), indem die Taste
—
„“ (11) bzw. „“ (12) kurz gedrückt wird.
Bei ausgeschaltetem Temperatur-Alarm wird „OFF“ angezeigt.
(
Bei eingeschaltetem Temperatur-Alarm wird ein Temperaturwert angezeigt.
Halten Sie jetzt die Taste „alarm“ (14) so lange gedrückt, bis der Temperatur-
—
wert blinkt, lassen Sie die Taste dann wieder los.
Stellen Sie den Temperaturwert mit den Tasten „“ (11) bzw. „“ (12) ein (für
—
Schnellverstellung jeweilige Taste länger gedrückt halten).
Drücken Sie kurz die Taste „alarm“ (14), um die Einstellung zu speichern und
—
den Einstellmodus zu verlassen.
h) Tendenzanzeige für Innen-/Außentemperatur
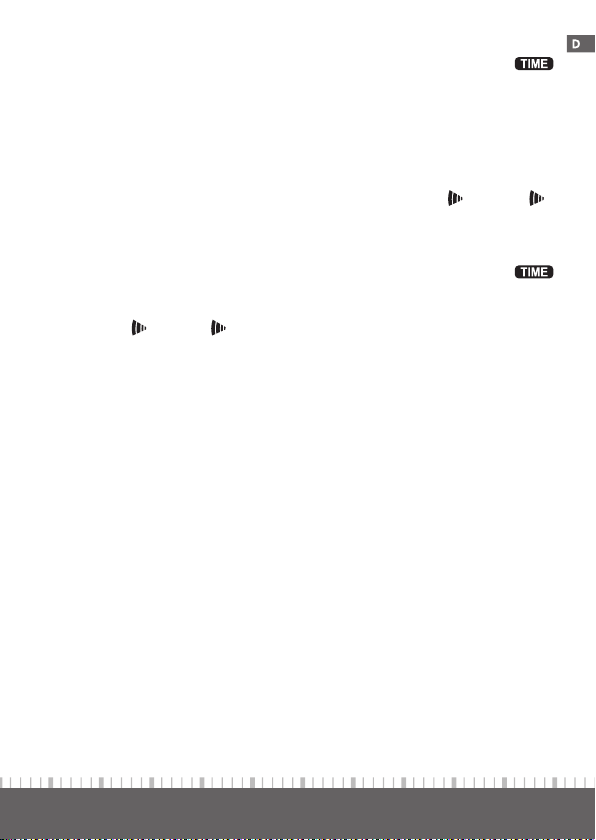
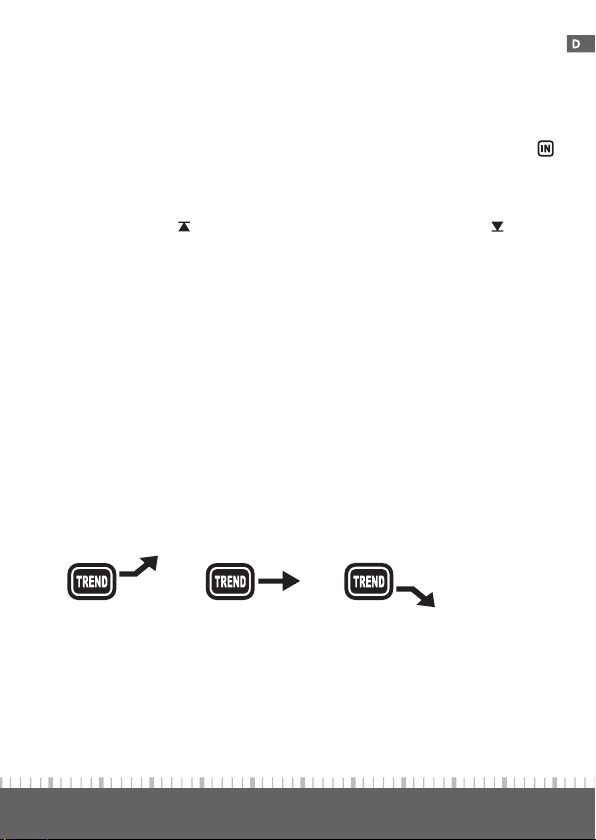
Die Pfeilsymbole rechts neben der Innen-/Außentemperatur zeigen Ihnen die jeweilige Tendenz der Messwerte:
Steigend Gleichbleibend Fallend
27
Page 28
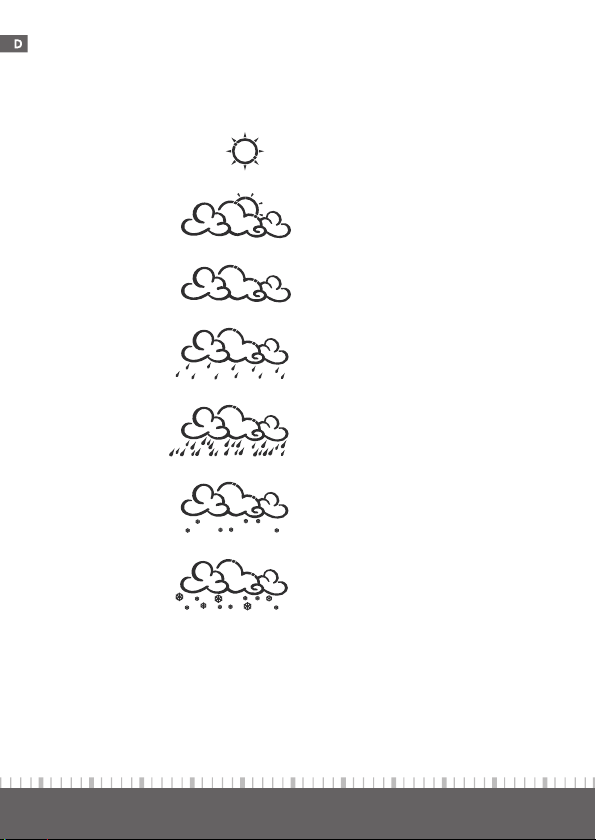
14. FUNKTION „WETTER/TENDENZ“
Die Wetterstation errechnet aus dem Luftdruckverlauf der vergangenen Stunden/
Tage eine Wettervorhersage für die nächsten 12 - 24 Stunden. Die erzielbare Genauigkeit liegt bei etwa 70%.
Sonnig
Teilweise bewölkt
Bewölkt
Leichter Regen
Starker Regen
Leichter Schneefall
Starker Schneefall
28
Page 29

Beachten Sie:
Wird in der Nacht „Sonnig“ angezeigt, bedeutet dies eine sternenklare Nacht.
—
Die Anzeige „Schneefall“ erscheint anstatt der Anzeige „Regen“, wenn die Au-
—
ßentemperatur kleiner als 0 °C ist (Temperatur über Außensensor mit Kanal 1
gemessen, dieser sollte deshalb nicht z.B. in einem Kellerraum o.ä. betrieben
werden!).
Die Anzeige stellt nicht die momentane Wetterlage dar, sondern es handelt sich
—
um eine Vorhersage für die nächsten 12 bis 24 Stunden.
Die Berechnung der Wettervorhersage nur auf Grundlage des Luftdrucks er-
—
gibt nur eine maximale Genauigkeit von etwa 70%. Das tatsächliche Wetter am
nächsten Tag kann deshalb komplett anders sein. Da der gemessene Luftdruck
nur für ein Gebiet mit einem Durchmesser von etwa 50 km gilt, kann sich das
Wetter auch schnell ändern. Dies gilt vor allem in Gebirgs- oder
Hochgebirgslagen.
Verlassen Sie sich deshalb nicht auf die Wettervorhersage der Wetterstation,
sondern informieren Sie sich vor Ort, wenn Sie z.B. eine Bergwanderung machen wollen.
Bei plötzlichen oder größeren Schwankungen des Luftdrucks werden die An-
—
zeigesymbole aktualisiert, um die Wetterveränderung anzuzeigen. Wechseln die
Anzeigesymbole nicht, dann hat sich entweder der Luftdruck nicht verändert
oder die Veränderung ist so langsam eingetreten, dass sie von der Wetterstation nicht registriert werden konnte.
Wenn die Wettervorhersage „Sonnig“ oder „Regen“ erscheint, verändert sich
—
die Anzeige auch dann nicht, wenn sich das Wetter bessert (Anzeige „Sonnig“)
oder verschlechtert (Anzeige „Regen“), da die Anzeigesymbole bereits die beiden Extremsituationen darstellen.
Die Symbole zeigen eine Wetterbesserung oder -verschlechterung an, was aber
nicht unbedingt (wie durch die Symbole angegeben), Sonne oder Regen bedeuten muss.
Nach dem ersten Einlegen der Batterien sollten die Wettervorhersagen für die
—
ersten 12 bis 24 Stunden nicht beachtet werden, da die Wetterstation erst über
diesen Zeitraum auf konstanter Höhe Luftdruckdaten sammeln muss, um eine
genauere Vorhersage treffen zu können.
Wird die Wetterstation an einen Ort gebracht, der deutlich höher oder tiefer als
—
der ursprüngliche Standplatz liegt (z. B. vom Erdgeschoss in die oberen Stockwerken eines Hauses), so kann die Wetterstation dies u.U. als Wetteränderung
erkennen.
29
Page 30

15. BATTERIEWECHSEL
a) Wetterstation
Ein Batteriewechsel ist erforderlich, wenn der Displaykontrast nur noch sehr schwach
ist oder das Symbol „
Tauschen Sie die Batterien dann gegen neue aus, siehe Kapitel 9. b).
b) Außensensor
Bei schwachen Batterien im Außensensor erscheint links neben der Anzeige der
Außentemperatur das Symbol „
Sind die Batterien vollständig leer und der Außensensor überträgt keine Messdaten
mehr, so werden nur noch Striche für Außentemperatur angezeigt.
Gehen Sie für einen Batteriewechsel wie in Kapitel 9. a) beschrieben vor.
Wenn die Wetterstation den Außensensor nicht mehr findet, so führen Sie
(
eine manuelle Suche nach den Außensensoren durch.
Halten Sie dazu die Taste „“ (12) so lange gedrückt, bis links im Display
das Symbol (3) für den Funkempfang der Außensensoren blinkt.
Die Sensorsuche kann einige Minuten dauern. Bewegen Sie in dieser Zeit
die Wetterstation, nicht, drücken Sie keine Taste.
“ im Bereich der Uhrzeitanzeige erscheint.
“.
30
Page 31

16. BEHEBUNG VON STÖRUNGEN
Mit der Wetterstation haben Sie ein Produkt erworben, welches nach dem Stand
der Technik gebaut wurde und betriebssicher ist. Dennoch kann es zu Problemen
und Störungen kommen. Deshalb möchten wir Ihnen hier beschreiben, wie Sie mögliche Störungen beheben können.
Kein Empfang des Signals eines Außensensors
Wenn die Wetterstation keine Messdaten vom Außensensor empfängt, so werden
für die Außentemperatur nur noch Striche im Display der Wetterstation angezeigt.
Beachten Sie in diesem Falle folgende Hinweise:
Starten Sie eine manuelle Suche nach dem Signal des Außensensors (siehe
—
Kapitel 11).
Die Batterien des Außensensors sind schwach oder leer. Setzen Sie versuchs-
—
weise neue Batterien in den Außensensor ein.
Der Abstand zwischen Wetterstation und Außensensor ist zu groß. Verändern
—
Sie den Aufstellungsort von Wetterstation oder Außensensor.
Der mitgelieferte Außensensor ist fest auf Kanal 1 voreingestellt (nicht verän-
—
derbar).
Bei den als Zubehör erhältlichen Außensensoren ist eine Einstellung des Sende-
kanals möglich. Stellen Sie hier Kanal 2 bzw. 3 ein. Achten Sie darauf, dass jeder
Außensensor auf einen anderen Kanal eingestellt ist, sonst stören sich die Außensensoren gegenseitig.
Sehr niedrige Außentemperaturen (unter -20 °C) verringern die Leistungsfä-
—
higkeit von Batterien (bei Akkus ist dieser Effekt noch stärker). Dadurch nimmt
die Reichweite ab bzw. der Außensensor funktioniert nicht mehr richtig.
Ein anderer Sender auf der gleichen oder benachbarten Frequenz stört das
—
Funksignal des Außensensors. Möglicherweise hilft es hier, den Abstand zwischen Wetterstation und Außensensor zu verringern oder einen anderen Aufstellungsort zu wählen.
Gegenstände bzw. abschirmende Materialien (metallisierte Isolierglasfenster,
—
Stahlbeton usw.) behindern den Funkempfang. Die Wetterstation steht zu nahe
an anderen elektronischen Geräten (Fernseher, Computer). Verändern Sie den
Aufstellungsort der Wetterstation und des Außensensors.
31
Page 32

Kein DCF-Empfang
Gegenstände bzw. abschirmende Materialien (metallisierte Isolierglasfenster,
—
Stahlbeton usw.) behindern den Empfang. Die Wetterstation steht zu nahe an
anderen elektronischen Geräten (Fernseher, Computer), Kabeln oder Steckdosen. Verändern Sie den Aufstellungsort der Wetterstation.
Bei der Aufstellung der Wetterstation in einem Kellerraum o.ä. ist das DCF-
—
Signal zu schwach, ein Empfang ist nicht möglich. Gleiches gilt, wenn die Wetterstation zu weit vom DCF-Sender entfernt ist.
Stellen Sie die Uhrzeit und das Datum manuell ein, siehe Kapitel 12. a).
Die Wetterstation unternimmt jeden Tag mehrere Empfangsversuche für das
—
DCF-Signal (um 00:00, 03:00, 06:00 und 12:00 Uhr). Lassen Sie deshalb die
Wetterstation einfach einen Tag stehen, vielleicht ist der Empfang zu anderen
Tageszeiten störungsfrei.
Bereits ein einziger erfolgreicher Empfang pro Tag hält die Abweichung der in
der Wetterstation integrierten Quarzuhr auf unter einer Sekunde.
Starten Sie eine erneute Suche nach dem DCF-Signal, beachten Sie dazu das
—
Kapitel 10. b).
32
Page 33

17. REICHWEITE
Die Reichweite der Übertragung der Funksignale zwischen Außensensor und Wetterstation beträgt unter optimalen Bedingungen bis zu 30 m.
Bei dieser Reichweiten-Angabe handelt es sich jedoch um die sog. „Freifeld-
(
Reichweite“.
Diese ideale Anordnung (z.B. Wetterstation und Außensensor auf einer glatten,
ebenen Wiese ohne Bäume, Häuser usw.) ist jedoch in der Praxis nie anzutreffen.
Normalerweise wird die Wetterstation im Haus aufgestellt, der Außensensor z.B.
unter einem Carport oder seitlich am Fenster.
Aufgrund der unterschiedlichen Einflüsse auf die Funkübertragung kann leider keine bestimmte Reichweite garantiert werden.
Normalerweise ist jedoch der Betrieb in einem Einfamilienhaus ohne Probleme
möglich.
Wenn die Wetterstation keine Daten vom Außensensor erhält (trotz neuer Batterien), so beachten Sie das Kapitel 16.
Die Reichweite kann teils beträchtlich verringert werden durch:
Wände/Mauern, Stahlbetondecken
—
Beschichtete/bedampfte Isolierglasscheiben, Aluminiumfenster o.ä.
—
Fahrzeuge
—
Bäume, Sträucher, Erde, Felsen
—
Nähe zu metallischen & leitenden Gegenständen (z.B. Heizkörper)
—
Nähe zum menschlichen Körper
—
Breitbandstörungen, z.B. in Wohngebieten (DECT-Telefone, Mobiltelefone, Funk-
—
kopfhörer, Funklautsprecher, andere Funk-Wetterstationen, Baby-Überwachungssysteme usw.)
Nähe zu elektrischen Motoren, Transformatoren, Netzteilen
—
Nähe zu Steckdosen, Netzkabeln
—
Nähe zu schlecht abgeschirmten oder offen betriebenen Computern oder an-
—
deren elektrischen Geräten
33
Page 34

18. WARTUNG UND REINIGUNG
Das Produkt ist für Sie wartungsfrei. Eine Wartung oder Reparatur ist nur durch
eine Fachkraft oder Fachwerkstatt zulässig. Es sind keinerlei für Sie zu wartende
Bestandteile im Inneren der Bestandteile des Produkts, öffnen Sie es deshalb niemals (bis auf die in dieser Bedienungsanleitung beschriebene Vorgehensweise bei
dem Wechseln der Batterien).
Zur Reinigung der Außenseite der Wetterstation und des Außensensors genügt ein
trockenes, weiches und sauberes Tuch.
Drücken Sie nicht zu stark auf das Display der Wetterstation, dies kann zu
(
Kratzspuren führen oder zu Fehlfunktionen der Anzeige.
Staub auf der Wetterstation kann mit Hilfe eines langhaarigen, weichen und sauberen Pinsels und einem Staubsauger leicht entfernt werden.
Zur Entfernung von stärkeren Verschmutzungen am Außensensor kann ein leicht
mit lauwarmen Wasser angefeuchtetes weiches Tuch verwendet werden.
Verwenden Sie auf keinen Fall aggressive Reinigungsmittel, Reinigungsalkohol oder andere chemische Lösungen, da dadurch das Gehäuse angegriffen (Verfärbungen) oder gar die Funktion beeinträchtigt werden kann.
34
Page 35

19. ENTSORGUNG
a) Allgemein
Elektronische und elektrische Produkte dürfen nicht in den Hausmüll.
Entsorgen Sie das unbrauchbar gewordene Produkt gemäß den geltenden
gesetzlichen Bestimmungen.
b) Batterien und Akkus
Sie als Endverbraucher sind gesetzlich (Batterieverordnung) zur Rückgabe aller
gebrauchten Batterien und Akkus verpflichtet; eine Entsorgung über den Hausmüll
ist untersagt!
Schadstoffhaltige Batterien/Akkus sind mit nebenstehendem Symbol gekennzeichnet, das auf das Verbot der Entsorgung über den Hausmüll hinweist.
Ihre verbrauchten Batterien/Akkus können Sie unentgeltlich bei den Sammelstellen Ihrer Gemeinde, unseren Filialen oder überall dort abgeben, wo
Batterien/Akkus verkauft werden!
Sie erfüllen damit die gesetzlichen Verpflichtungen und leisten Ihren Beitrag zum
Umweltschutz.
20. KONFORMITÄTSERKLÄRUNG (DOC)
Hiermit erklären wir, Conrad Electronic, Klaus-Conrad-Straße 1, D-92240 Hirschau,
dass sich dieses Produkt in Übereinstimmung mit den grundlegenden Anforderungen und den anderen relevanten Vorschriften der Richtlinie 1999/5/EG befindet.
Die Konformitätserklärung (DOC) zu diesem Produkt finden Sie unter:
(
www.conrad.com
35
Page 36

21. TECHNISCHE DATEN
a) Wetterstation
Stromversorgung ....................... 2 Batterien vom Typ AAA/Micro
Batterielebensdauer .................. ca. 1 Jahr
Anzahl Außensensoren ............. max. 3
Temperatur-Messbereich ......... -10 °C bis +60 °C
Auflösung ..................................... 0,1 °C
Genauigkeit .................................. ±1 °C (im Bereich von 0 °C bis +40 °C)
Abmessungen (B x H x T) ......... 70 x 129 x 16 mm (ohne Standfuß)
Gewicht ......................................... 106 g (ohne Batterien, ohne Standfuß)
b) Außensensor
Stromversorgung ....................... 2 Batterien vom Typ AAA/Micro
Batterielebensdauer .................. ca. 1 Jahr
Temperatur-Messbereich ......... -30 °C bis +60 °C
Auflösung ..................................... 0,1 °C
Genauigkeit .................................. ±1 °C (im Bereich von -10 °C bis +40 °C)
Sendefrequenz ............................ 433 MHz
Reichweite .................................... bis 30 m (im Freifeld, siehe Kapitel 17)
Übertragungsintervall ............... ca. alle 43 - 47 Sekunden
Abmessungen (B x H x T) ......... 38 x 105 x 18 mm (ohne Halterung)
Gewicht ......................................... 36 g (ohne Batterien, ohne Halterung)
36
Page 37

TABLE OF CONTENTS
Page
1. Introduction ..................................................................................................................39
2. Intended Use ................................................................................................................. 40
3. Scope of Delivery .......................................................................................................... 41
4. Explanation of Symbols ............................................................................................... 41
5. Features and Functions .............................................................................................. 42
a) Weather Station ..................................................................................................... 42
b) Outdoor Sensor ...................................................................................................... 42
6. Safety Information ...................................................................................................... 43
7. Information on Batteries and Rechargeable Batteries ....................................... 44
8. Displays/Operating Elements ...................................................................................46
a) Weather Station .....................................................................................................46
b) Outdoor Sensor ...................................................................................................... 47
9. Commissioning ............................................................................................................. 48
a) Outdoor Sensor ......................................................................................................48
b) Weather Station ..................................................................................................... 49
10. DCF-Reception ............................................................................................................... 51
a) General Information ............................................................................................... 51
b) Switching DCF Reception Off and On, Starting DCF Search ........................ 52
11. Searching for Outdoor Sensor(s) ............................................................................. 53
12. „Time/Date“ Function................................................................................................. 54
a) Setting the Time Manually ................................................................................... 54
b) Switching 12/24h Mode ......................................................................................... 55
c) Selecting Weekday Display Language ..............................................................56
d) Switching Time Display (Second/Date/Time Zone) ....................................... 56
e) Setting the Time Zone .......................................................................................... 57
f) Select Alarm Clock Function or View Alarm Time ......................................... 57
g) Switching the Alarm Function On/Off ............................................................... 58
h) Setting the Alarm Time ........................................................................................58
i) Switching Pre-Alarm On/Off and Setting It ..................................................... 59
j) Stopping the Alarm Signal................................................................................... 59
37
Page 38

Page
13. „Temperature“ Function ............................................................................................ 60
a) Switching between °C/°F Temperature Units .................................................60
b) Selecting Outdoor Sensor.................................................................................... 60
c) Switching Outdoor Sensors Automatically ...................................................... 60
d) Display of Minimum/Maximum Values............................................................... 61
e) Deleting Minimum/Maximum Values.................................................................. 61
f) Selecting Temperature Alarm, Switching Alarm On/Off ............................... 61
g) Setting Temperature Value for Temperature Alarm...................................... 62
h) Trend Display for Indoor/Outdoor Temperature ............................................. 62
14. „Weather/Trend“ Function ........................................................................................ 63
15. Battery Change ............................................................................................................ 65
a) Weather Station ..................................................................................................... 65
b) Outdoor Sensor ......................................................................................................65
16. Troubleshooting ........................................................................................................... 66
17. Range ............................................................................................................................. 68
18. Maintenance and Cleaning ........................................................................................ 69
19. Disposal .......................................................................................................................... 70
a) General Information .............................................................................................. 70
b) Batteries and Rechargeable Batteries.............................................................. 70
20. Declaration of Conformity (DOC) ............................................................................. 70
21. Technical Data ...............................................................................................................71
a) Weather Station ...................................................................................................... 71
b) Outdoor Sensor ....................................................................................................... 71
38
Page 39

1. INTRODUCTION
Dear Customer,
Thank you for purchasing this product.
This product complies with the statutory national and European requirements.
To maintain this status and to ensure safe operation, you as the user must observe
these operating instructions!
These operating instructions are part of this product. They contain important
notes on commissioning and handling. Also consider this if you pass on the
product to any third party.
Therefore, retain these operating instructions for reference!
All company names and product names are trademarks of their respective owners.
All rights reserved.
If there are any technical questions, contact:
Germany: Tel. no.: +49 9604 / 40 88 80
Fax. no.: +49 9604 / 40 88 48
E-mail: tkb@conrad.de
Mon. to Thur. 8.00am to 4.30pm, Fri. 8.00am to 2.00pm
39
Page 40

2. INTENDED USE
The weather station is used to display the indoor/outdoor temperature.
The temperature data measured by the outdoor sensor are wirelessly transferred
to the weather station.
Furthermore, the weather station calculates a weather forecast for the next 12 - 24
hours using an internal air pressure sensor and recording the changes in air pressure,
which is then indicated on the display with graphic symbols.
The time and date can be automatically set by DCF time signal. It can also be set
manually, however (e.g. in case of reception problems).
For a list of all features and characteristics of the product, see chapter 5.
(
The manufacturer assumes no responsibility for incorrect displays, measured values
or weather forecasts and their consequences.
The product is intended for private use; it is not suitable for medical use or informing
the public.
The parts of this product are no toys. They contain fragile and swallowable glass
and small parts, as well as batteries. Keep the product away from children!
Operate all components so that they cannot be reached by children.
The product is operated with batteries.
Any other use than described above may damage the product and poses additional
dangers.
Read these operating instructions completely and attentively; they contain a lot of
important information on setup, function and operation. Always observe the safety
information!
40
Page 41

3. SCOPE OF DELIVERY
Weather station
—
Stand for weather station
—
Outdoor sensor for temperature measurement
—
Bracket for outdoor sensor
—
Operating instructions
—
4. EXPLANATION OF SYMBOLS
An exclamation mark in a triangle indicates important notes in these
operating instructions that must be strictly observed.
The „hand“ symbol indicates special information and advice on operation of
(
the device.
41
Page 42

5. FEATURES AND FUNCTIONS
a) Weather Station
Operation via 2 batteries type AAA/micro
—
DCF time/date display, manual setting possible
—
12/24 hr time display format can be set
—
Alarm clock function (additional pre-alarm can be activated at an outdoor
—
temperature of < 0 °C)
Display of indoor temperature
—
Display of outdoor temperature
—
Temperature display in Celsius (°C) or Fahrenheit (°F) selectable
—
Maximum and minimum memory
—
Trend display of indoor and outdoor temperature
—
Temperature alarm for exceeding or undercutting of a specific temperature
—
Icons for weather forecast for the next 12 to 24 hours (calculation via air pressure
—
curve recording)
Up to 3 outdoor sensors can be selected (one included in the delivery, max. 2
—
more can be ordered as accessories)
Table setup via the included base
—
For use in dry, closed inner rooms
—
b) Outdoor Sensor
Operation via 2 batteries type AAA/micro
—
Radio transmission of the measured temperatures to the weather station
—
(433 MHz technology)
Standing or wall mounting possible
—
Operation in protected outdoor area
—
42
Page 43

6. SAFETY INFORMATION
In case of damage caused by non-compliance with these operating
instructions, the warranty/guarantee will expire. We do not assume
any liability for consequential damage!
We do not assume any liability for damage to property or personal injury
caused by improper use or the failure to observe the safety instructions!
In such cases the warranty/guarantee will expire.
Dear Customer,
this safety information serves not only to protect the product, but also your
own safety and the safety of other persons. Therefore, read this chapter
very carefully before taking the product into operation!
For safety and licensing (CE) reasons, unauthorised conversion and/or
—
modifications to the product are not permitted. Do not open or disassemble the
product (apart from the necessary steps for inserting/changing the batteries)
Maintenance, adjustment, or repair work must only be carried out by a specialist
—
or a specialist workshop.
Do not use this product in hospitals or medical institutions. Although the outdoor
—
sensor emits only relatively weak radio signals, they may lead to functional
impairment of live-supporting systems there. The same may apply for other
areas.
The product is not a toy and should be kept out of the reach of children. The
—
product contains small parts, glass (display) and batteries. Place the product so
that it cannot be reached by children.
The weather station is only suitable for dry, closed rooms. Do not expose it to
—
direct sunlight, heavy heat, cold, dampness or wetness; otherwise, it will be
damaged.
The outdoor sensor is suitable for operation in protected outdoor areas. Do not
—
operate the product in or under water; it would be destroyed.
The product is only suitable for use in temperate, not tropical, climates.
—
If the product is brought from a cold into a warm room (e.g. for transport reasons),
—
it is possible that condensation develops. This may damage the product.
Therefore, first let the product reach room temperature before using it. This
may take several hours.
In schools, training centres, hobby and self-help workshops, the use of the
—
product must be supervised by trained personnel in a responsible manner.
43
Page 44

Do not leave packing materials unattended. They may become dangerous playing
—
material for children.
Handle the product with care. It will be damaged through impact, blows, or
—
accidental drops, even from a low height.
7. INFORMATION ON BATTERIES AND
RECHARGEABLE BATTERIES
The weather station requires 2 AAA/micro batteries. The outdoor sensor
(
also requires 2 batteries type AAA/micro.
Operation with rechargeable batteries is generally possible.
The lower voltage of rechargeable batteries (rechargeable battery = 1,2 V,
battery = 1,5 V) and the lower capacity, however, leads to a shorter operating
duration and may reduce the radio range. Moreover, the rechargeable
batteries are more cold-sensitive than batteries.
If you want to use rechargeable batteries in spite of these limitations, use
special NiMH batteries with a low self-discharge only.
For long and secure operation, we recommend that you insert only highquality alkaline batteries in the weather station and the outdoor sensor.
Batteries/rechargeable batteries have no place in the hands of children.
—
Check that the polarity is correct when inserting the batteries/rechargeable
—
batteries (pay attention to plus and minus).
Do not leave batteries/rechargeable batteries lying about openly. There is a
—
risk that the batteries can be swallowed by children or pets. If swallowed, consult
a doctor immediately.
Leaking or damaged batteries/rechargeable batteries can cause chemical burns
—
to skin when touched without the use of adequate protective gloves.
Make sure that (rechargeable) batteries are not short-circuited or thrown into
—
the fire. There is a danger of explosion!
Do not recharge normal, non-rechargeable batteries. There is a danger of
—
explosion! Only charge rechargeable batteries which are intended for this
purpose; use a suitable battery charger.
If not used for a longer period (e.g. in case of storage), remove the inserted
—
batteries/rechargeable batteries. There is a danger of old batteries/rechargeable
batteries leaking, which causes damage to the product, loss of warranty/
guarantee!
44
Page 45

Always exchange the entire set of batteries/rechargeable batteries, only use
—
batteries/rechargeable batteries of the same type and by the same manufacturer
with the same charge status (do not mix full with semi-full or empty batteries/
rechargeable batteries).
Never mix normal batteries with rechargeable ones. Either use batteries or
—
rechargeable batteries.
Regarding environmentally compatible disposal of batteries and rechargeable
—
batteries, please read the chapter on „disposal“.
45
Page 46

8. DISPLAYS/OPERATING ELEMENTS
a) Weather Station
1
2
3
10
1 Weather trend display
2 Graphic icon for weather forecast
3 Receiver display/channel number of the outdoor sensor
4 Trend display for outdoor temperature
5 Outdoor temperature (switchable between °C/°F)
6 Trend display for indoor temperature
7 Indoor temperature (switchable between °C/°F)
8 Receiver display for DCF signal
9 Display range for time/date/weekday/alarm time
10 Aperture for base
11 „“ button
12 „“ button
13 „mode“ button
14 „alarm“ button
15 „channel“ button
16 Battery compartment for 2 type AAA/micro batteries
17 „mem“ button
11
4
12
5
13
6
14
7
15
8
9
16
17
46
Page 47

b) Outdoor Sensor
18
20
19
18 Button „Test“ (countersunk): For internal purposes of the manufacturer only, do
not operate!
19 Battery compartment for 2 type AAA/Micro batteries
20 Bracket (can also be used as a base) can be plugged on in 3 positions on the
outdoor sensor (top, bottom, rear)
The included outdoor sensor is firmly set to channel 1; this cannot be changed.
(
47
Page 48

9. COMMISSIONING
Insert the batteries in the outdoor sensor first and only then into the weather
(
station. This applies as well if you have more than one outdoor sensor
(available as accessories).
During commissioning, the outdoor sensor should be nearby the weather
statio0n (within 1 m distance).
Also maintain a distance of at least 1 m to other devices (e.g. TV, computer,
phone) and metal parts (e.g. radiator). This ensures that the weather station
recognises the outdoor sensor correctly.
a) Outdoor Sensor
Open the battery compartment (19) on the outdoor sensor’s rear by pushing
—
the battery compartment lid downwards slightly so that it can be taken off.
Insert two batteries of the type AAA/micro with correct polarity into the battery
—
compartment of the outdoor sensor (observe plus/+ and minus/-).
Close the battery compartment again.
—
The included bracket (20) can be used as wall bracket and base. It can be pushed
—
on at the top, bottom and on the rear of the outdoor sensor, depending on desired
assembly site.
The outdoor sensor is suitable to be used in a protected outdoor area. It
(
should be placed so that it is not subject to direct solar irradiation or rain/
snow, because measured values may otherwise be incorrect.
When installing the outdoor sensor, ensure that the battery compartment
points down so that no water may enter.
Never immerse or submerge the outdoor sensor in water; it would be
destroyed!
The weather station can receive and display the measured data of up to 3
(
outdoor sensors. Each outdoor sensor must be registered on a different
transmission channel.
The included outdoor sensor is firmly set to channel 1; this cannot be changed.
The outdoor sensors available as accessories have a channel selection switch;
set it to channel 2 or 3.
48
Page 49

b) Weather Station
Open the battery compartment (16) on the weather station’s rear by pushing
—
the battery compartment lid downwards a bit so that it can be taken off.
Then insert two batteries of the type AAA/micro into the battery compartment
—
of the weather station with correct polarity (observe plus/+ and minus/-).
Close the battery compartment again.
—
After inserting the batteries, the display briefly shows all display segments.
—
Then the receiver icon flashes on the left of the display (3).
—
The weather station is now scanning for the outdoor sensor signal. If no outdoor
sensor is recognised (e.g. because no batteries are inserted yet), you may start
the search manually later, see chapter 11.
After completion of the sensor search, the receiver display (8) for the DCF signal
—
in the display flashes. Depending on receiver strength of the DCF signal, more
circles will be visible.
Low signal -> strong signal
Place the weather station, e.g., close to a window. Maintain a distance of at
(
least 1 m to other electronic devices (TV, computer, phone) and metal parts
(e.g. radiator).
A bad reception can also be caused by, e.g. metallised insulated glass,
reinforced concrete construction design, coated special wallpaper or an
installation in cellars.
If a good reception position was found, do not move the weather station
during that time. Do not push any buttons on the weather station.
Recognition of the DCF signal and its assessment may take a few minutes.
For more information about DCF reception, see chapter 10.
49
Page 50

After proper recognition of the DCF signal and evaluation, the correct time is
—
displayed at the bottom of the display (9).
If this is not the case, remove the batteries from the weather station briefly or
start another search for the signal, see chapter 10. b).
Manual setting of the time/(date is possible as well; observe chapter 12. a).
Put the weather station into the included base. There is an aperture for this on
—
the bottom of the weather station (10).
Select the site of setup so that it is not exposed to direct sunlight (wrong
(
measured values for temperature). Also maintain sufficient distance to
radiators.
Protect expensive furniture surfaces with suitable pads. Otherwise, they may
be scratched.
Also observe the chapter „17. Range“ for setting up the outdoor sensor and
weather station.
Weather station and outdoor sensor commissioning is now complete.
—
50
Page 51

10. DCF-RECEPTION
a) General Information
The DCF signal is a signal that is sent by a
transmitter in Mainflingen (near Frankfur t on the
Main). Its range is up to 1500 km, and under
perfect reception conditions even up to
2000 km.
The DCF signal contains, among others, the
precise time (deviation theoretically 1 second in
one million years!) and the date.
This means you do not have to switch manually
between daylight savings time and normal time
at the weather station; the time is adjusted
automatically.
The first DCF reception test is performed when the weather station has completed
the search for the outdoor sensors.
Search for the DCF signal and its evaluation will take several minutes. Do
(
not move the weather station during this time and do not press any buttons.
More reception attempt are performed at midnight, 00:00, 03:00, 06:00 and
12:00 hours. A single successful reception per day will keep the deviation of the
quartz clock in the weather station below a second.
How well the DCF signal was recognised can be told by the reception display (8):
Icon flashes: Data not recognised
No DCF reception in the last 24 hours
Weak DCF signal but evaluation successful
Perfect DCF signal
51
Page 52

If no correct time is displayed at initial commissioning even after more than 10
minutes due to reception problems, start a new reception attempt. Proceed as
described in chapter 10. b).
For more information on what to observe when selecting the site of setup
(
for the weather station, see chapters „16. Troubleshooting“ and „17. Range“;
they also offer information on what to try to achieve perfect DCF signal
reception.
If no DCF reception is possible at the weather station setup site, set the
time and date manually; see chapter 12. a).
b) Switching DCF Reception Off and On, Starting DCF Search
keep the button „“ (11) pressed for about 3 seconds to switch the DCF reception
on or off.
After switching off, the receiver display (8) for the DCF signal disappears.
—
When the DCF signal is switched on, the weather station scans for the DCF
—
signal. Depending on receiver strength of the DCF signal, more circles will be
visible.
Low signal -> strong signal
Recognition of the DCF signal and its assessment may take a few minutes.
(
Do not move the weather station during this time and do not press any button.
If no DCF reception is possible at the weather station setup site, set the
time and date manually; see chapter 12. a).
52
Page 53

11. SEARCHING FOR OUTDOOR SENSOR(S)
If the weather station does not find the outdoor sensor (e.g. in case of bad reception
conditions or after a battery change), you can start search for the outdoor sensor
or sensors manually.
The weather station can receive and display the measured data of up to 3
(
outdoor sensors. Each outdoor sensor must be registered on a different
transmission channel.
The included outdoor sensor is firmly set to channel 1; this cannot be changed.
The outdoor sensors available as accessories have a channel selection switch;
set it to channel 2 or 3.
Keep the „“ button (12) pressed until the icon for radio reception (3) flashes at
the left of the display.
The sensor search can take several minutes. Do not move the weather station during
this time and do not press any button.
If the outdoor sensor is not found, check its batteries; place the outdoor
(
sensor in another location, lower the distance between the weather station
and the outdoor sensor.
Icon flashes: Sensor search
Proper outdoor sensor signal recognition
No signal received in the last 24 hours
53
Page 54

12. „TIME/DATE“ FUNCTION
a) Setting the Time Manually
Briefly press the „“ (11) or „“ button (12) repeatedly until the display „ “
—
flashes at the bottom left of the display.
Keep the „mode“ button (13) pressed until the weekday display language flashes
—
in the lower right of the display.
The buttons „“ (11) or „“ (12) can be used to select the language now:
„DE“ = German
„Fr“ = French
„IT“ = Italian
„SP“ = Spanish
„Du“ = Dutch
„SW“ = Swedish
„En“ = English
Briefly press the „mode“ (13) button; the year flashes.
—
Set the year with the „“ (11) or „“ (12) buttons (for quick adjustment, keep
the button pressed down).
Briefly press the „mode“ button (13); the month flashes.
—
Set the month with the „“ (11) or „“ (12) buttons (for quick adjustment, keep
the button pressed down).
Briefly press the „mode“ button (13); the date flashes.
—
Set the date with the „“ (11) or „“ (12) buttons (for quick adjustment, keep
the button pressed down).
Briefly press the button „mode“ (13); the display sequence of month („M“) and
—
day („D“) flashes on the display.
Use the buttons „“ (11) and „“ (12) to change the sequence („D M“ = day/
month, „M D“ = month/day).
Briefly press the „mode“ button (13); „12 Hr“ or „24 Hr“ flashes on the display.
—
Use the buttons „“ (11) or „“ (12) to switch between 12h and 24 h mode.
In 12h mode, „AM“ is displayed to the left of the time during the first half of
(
the day, „PM“ during the second half of the day.
54
Page 55

Briefly press the „mode“ button (13); the hours flash.
—
Set the hours with the „“ (11) or „“ (12) buttons (for quick adjustment, keep
the button pressed down).
Briefly press the „mode“ button (13); the minutes flash.
—
Set the minutes with the „“ (11) or „“ (12) buttons (for quick adjustment,
keep the button pressed down).
Briefly press the button „mode“ (13).
—
This automatically resets the seconds to „00“ and leaves the setting mode.
The previously set time is displayed.
After starting setting mode, the DCF reception is deactivated. If DCF
(
reception is to be activated again, proceed as described in chapter 10. b).
Important:
The settings for weekday display language and 12h/24h mode remain active.
b) Switching 12/24h Mode
Briefly press the „“ (11) or „“ button (12) repeatedly until the display „ “
—
flashes.
Keep the „mode“ button (13) pressed until the weekday display language flashes
—
in the lower right of the display.
Briefly press the „mode“ button (13) several times, until „12 Hr“ or „24 Hr“ flashes
—
on the display.
Now use the buttons „“ (11) or „“ (12) to switch between 12h and 24 h mode.
In 12h mode, „AM“ is displayed to the left of the time during the first half of
(
the day, „PM“ during the second half of the day.
Briefly press the „mode“ button (13) repeatedly until no display flashes anymore.
—
After completion of the setting mode, the DCF reception is deactivated.
(
To re-activate DCF reception, proceed as described in chapter 10. b).
55
Page 56

c) Selecting Weekday Display Language
Briefly press the „“ (11) or „“ button (12) repeatedly until the display „ “
—
flashes.
Keep the „mode“ button (13) pressed until the weekday display language flashes
—
in the lower right of the display.
The buttons „“ (11) or „“ (12) can be used to select the language now:
„DE“ = German
„Fr“ = French
„IT“ = Italian
„SP“ = Spanish
„Du“ = Dutch
„SW“ = Swedish
„En“ = English
Briefly press the „mode“ button (13) repeatedly until no display flashes anymore.
—
After completion of the setting mode, the DCF reception is deactivated.
(
To re-activate DCF reception, proceed as described in chapter 10. b).
d) Switching Time Display (Second/Date/Time Zone)
Briefly press the „“ (11) or „“ button (12) repeatedly until the display „ “
—
flashes.
Briefly press the button „mode“ (13) repeatedly to switch between the different
—
display types:
Hour: minute: Second
Hour: minute: Date
Hour: minute: Date (for second time zone)
Hour: minute: Second (for second time zone)
Date: Month (or month : Date)
If data is displayed for the second time zone, „ZONE“ is displayed at the
(
right of the time display. The time zone setting is described on the next
page.
56
Page 57

e) Setting the Time Zone
Briefly press the „“ (11) or „“ button (12) repeatedly until the display „ “
—
flashes.
Briefly press the button „mode“ (13) repeatedly until „ZONE“ is displayed to the
—
right of the time.
Hold down the „mode“ button (13) until the time zone display flashes at the
—
bottom („0:00+“).
Set the time zone with the „“ (11) or „“ (12) buttons (for quick adjustment,
—
keep the button pressed down). The adjustable value is between -13 and
+15 hours (display „13:00-“ to „15:00+“).
Briefly press the button „mode“ (13) to terminate setting mode.
—
f) Select Alarm Clock Function or View Alarm Time
Briefly press the „“ (11) or „“ button (12) repeatedly until the display „ “
—
flashes.
Briefly press the button „alarm“ (14) repeatedly until the desired alarm time
—
appears:
Icon „
W“: The alarm clock function is only triggered on weekdays.
S“): The alarm function is only triggered once, then it is automatically
Icon „
switched off („OFF“).
Icon „PRE AL“: At low outdoor temperatures below 0 °C (measured at the
outdoor sensor with channel 1), the so-called pre-alarm is triggered at a set
time (15, 30, 45, 60 or 90 minutes) before the actual alarm time. This gives you
enough time to, e.g., de-ice the windshield of your car or to clear snow.
For the pre-alarm (display „PRE AL“) to be switched on or set, the alarm
(
clock function „ W“ or „ S“ must be set first.
57
Page 58

g) Switching the Alarm Function On/Off
Briefly press the „“ (11) or „“ button (12) repeatedly until the display „ “
—
flashes.
Briefly press the button „alarm“ (14) repeatedly until the desired alarm clock
—
function appears (see chapter 12. f).
The „“ (11) or „“ (12) buttons are used to switch the selected alarm function
—
on (alarm time is displayed) or off („OFF“ is displayed).
For the pre-alarm (display „PRE AL“) to be switched on or set, the alarm
(
clock function „ W“ or „ S“ must be set first, or no pre-alarm can take
place.
h) Setting the Alarm Time
Briefly press the „“ (11) or „“ button (12) repeatedly until the display „ “
—
flashes.
Briefly press the button „alarm“ (14) repeatedly until the desired alarm clock
—
function „ W“ or „ S“ appears (see chapter 12. f).
Switch on the alarm clock function you just selected (press „“ (11) or „“
—
(12)), so that the alarm time is displayed instead of „OFF“ (e.g. „07:00“).
Press the „alarm“ (14) button until the hours of the alarm time start to flash.
—
Set the hours of the alarm time with the „“ (11) or „“ (12) buttons (for quick
adjustment, keep the button pressed down).
Briefly press the „alarm“ button (14); the alarm time minutes flash.
—
Set the minutes of the alarm time with the „“ (11) or „“ (12) buttons (for
quick adjustment, keep the button pressed down).
Briefly press the button „alarm“ (14) to terminate setting mode.
—
58
Page 59

i) Switching Pre-Alarm On/Off and Setting It
The pre-alarm is triggered before the actual alarm time („
outdoor sensor (only channel 1) measures a temperature below 0 °C. The time for
the pre-alarm can be set to 15, 30, 45, 60 and 90 minutes.
Example:
Set the alarm time to 06:00 a.m. and the pre-alarm to 45 minutes. If the outdoor
sensor (channel 1) measures a temperature below 0 °C at 05:15 a.m., the weather
station issues a preliminary alarm signal.
First switch on the alarm clock function as described in chapter 12. g) to either
—
„ W“ or „ S“.
Then select the pre-alarm and press the „alarm“ button (14) briefly until
—
„PRE AL“ is displayed.
Switch the pre-alarm on or off with the „“ (11) or „“ (12) button.
—
If the pre-alarm is switched off, „OFF“ is displayed.
(
When a pre-alarm is set, a time of 15, 30, 45, 60 or 90 minutes is displayed.
Press the „alarm“ (14) button until the number displayed (15, 30, 45, 60, 90)
—
starts to flash. Adjust the pre-alarm minutes with the button „“ (11) or „“
(12).
Briefly press the button „alarm“ (14) to terminate setting mode.
—
j) Stopping the Alarm Signal
When the alarm signal sounds at the time set, it may be stopped with the „alarm“
(14) button.
If you do not manually terminate the alarm signal, it is repeated after approx.
(
8 minutes (this takes place 3 times in total).
W“ or „ S“) if the
59
Page 60

13. „TEMPERATURE“ FUNCTION
a) Switching between °C/°F Temperature Units
Briefly press the „“ (11) or „“ button (12) repeatedly until the display „ “
—
flashes.
Keep the „mode“ (13) button pressed for about 3 seconds until the temperature
—
unit (°C/°F) for the indoor/outdoor temperature is switched.
b) Selecting Outdoor Sensor
The weather station can receive and display the measured data of up to 3
(
outdoor sensors. Each outdoor sensor must be registered on a different
transmission channel.
The included outdoor sensor is firmly set to channel 1; this cannot be changed.
The outdoor sensors available as accessories have a channel selection switch;
set it to channel 2 or 3.
Briefly press the „channel“ (15) button to select the desired outdoor sensor for
temperature. The respective channel number is displayed to the left of the outdoor
temperature (3).
c) Switching Outdoor Sensors Automatically
When using more than one outdoor sensor, the weather station can automatically
switch the up to 3 channels. The measured values are displayed for approx. 5 seconds
each.
This function is only available when more than one outdoor sensor is logged
(
in at the weather station.
Keep the „channel“ (15) button pressed until the icon „ “ is displayed to
—
activate the function (below the channel number).
To switch off the function again, keep the „channel“ (15) button pressed again
—
until the icon „ “ disappears.
60
Page 61

d) Display of Minimum/Maximum Values
Briefly press the „“ (11) or „“ button (12) repeatedly until the display „ “
—
flashes.
If you are operating more than one outdoor sensor, select the corresponding
—
channel (1, 2 or 3) now with the „channel“ (15) button.
Press the „mem“ button (17) briefly; the display shows the minimum values for
—
indoor/outdoor temperature; „MIN“ is displayed additionally.
Press the „mem“ button (17) briefly; the display shows the maximum values for
—
indoor/outdoor temperature; „MAX“ is displayed additionally.
Press the button „mem“ (17) again to return to display of the current measured
—
values.
e) Deleting Minimum/Maximum Values
Briefly press the „“ (11) or „“ button (12) repeatedly until the display „ “
—
flashes.
Hold the „mem“ button (17) for about 3 seconds. The minimum and maximum
—
values are then deleted.
The new maximum and minimum values stored are the current measured
values, until they are changed again.
f) Selecting Temperature Alarm, Switching Alarm On/Off
An upper and lower temperature range can be set for each of the 3 channels and an
alarm signal can be emitted when the values leaves the range.
Briefly press the „“ (11) or „“ button (12) repeatedly until the display „ “
—
flashes.
Select the desired outdoor sensor with the button „channel“ (15).
—
Repeatedly press the „alarm“ button (14) briefly to switch between the upper
—
temperature limit (icon „ “), lower temperature limit (icon „ “) and normal
display.
When the „ “ or „ “ icons are displayed, the respective temperature alarm
—
can be switched on or off by briefly pressing the „“ (11) or „“ (12) buttons.
If the temperature alarm is switched off, „OFF“ is displayed.
If the temperature alarm is activated, a temperature value is displayed.
When the alarm tone is emitted (e.g. if you have set +30.0 °C as the upper
temperature limit and the measured value exceeds this limit), the alarm tone can
be stopped by briefly pressing the „alarm“ button (14).
61
Page 62

g) Setting Temperature Value for Temperature Alarm
Briefly press the „“ (11) or „“ button (12) repeatedly until the display „ “
—
flashes.
Select the desired outdoor sensor with the button „channel“ (15).
—
Press the „alarm“ button (14) one or two times to switch between the upper
—
temperature limit (icon „ “) and the lower temperature limit (icon „ “).
Switch the respective temperature alarm on (or off) by briefly pressing the button
—
„“ (11) or „“ (12).
If the temperature alarm is switched off, „OFF“ is displayed.
(
If the temperature alarm is activated, a temperature value is displayed.
Press the „alarm“ (14) button until the temperature value flashes; then, release
—
the button again.
Set the temperature value with the „“ (11) or „“ (12) button (for quick
—
adjustment, keep the button pressed down).
Briefly press the „alarm“ button (14) to store the setting and to leave the setting
—
mode.
h) Trend Display for Indoor/Outdoor Temperature
The arrow icons to the right of the indoor/outdoor temperature show the respective
trend of measured values:
Rising Consistent Dropping
62
Page 63

14. „WEATHER/TREND“ FUNCTION
The weather station calculates a weather forecast for the next 12 - 24 hours from
the barometric pressure development of the last hours/days. The achievable
accuracy is at about 70%.
Sunny
Slightly overcast
Overcast
Light rain
Strong rain
Slight snow
Heavy snow
63
Page 64

Note:
If „Sunny“ is displayed at night, this means a starlit night.
—
The „Snowfall“ display appears instead of „rain“ when the outside temperature
—
is below 0 °C (temperature measured over outdoor sensor „1“, which therefore
should not be in a basement room but outside!).
The display does not represent the momentary weather situation, but is a
—
forecast for the next 12 to 24 hours.
The calculation of the weather forecast only based on the barometric pressure
—
only results in a maximum accuracy of about 70%. The actual weather at the
next day may be completely different. Since the barometric pressure measured
only applies for an area with a diameter of approx. 50 km, the weather may also
change quickly. This particularly applies in mountain or high mountain areas.
Therefore, do not rely on the weather station’s forecast but gather information
on site, e.g. for mountain tours.
In case of sudden or larger air pressure fluctuations, the display symbols are
—
updated to indicate the weather change. If the display symbols do not change,
either the barometric pressure did not change or the change is so slow that it
could not be registered by the weather station.
If the weather forecast „Sunny“ or „Rainy“ appears, the display also does not
—
change when the weather turns better (display „Sunny“) or worse (display
„Rain“), as the display symbols already show the two extreme situations.
The display symbols indicate a weather change for the better or worse, which
does not have to mean sun or rain, however, as indicated by the symbols.
After first insertion of the batteries, disregard the weather forecasts for the
—
first 12 to 24 hours, because the weather station first has to collect barometric
pressure data in this period at a constant height to make a more exact forecast.
If you take the weather station to a place that is significantly lower or higher
—
than the original site (e.g. from the ground floor to the top stories of a building),
the weather station may interpret this as a weather change.
64
Page 65

15. BATTERY CHANGE
a) Weather Station
The batteries require changing when the display contrast is very weak or the „
icon is displayed in the time field.
Replace the batteries with a new set according to chapter 9. b).
b) Outdoor Sensor
When the batteries in the outdoor sensor are weak, the icon „
left of the outdoor temperature display.
When the batteries are completely flat and the outdoor sensor no longer transmits
measured data, only dashes are displayed for the outdoor temperature.
When changing the batteries, proceed as described in chapter 9. a).
If the weather station no longer finds the outdoor sensor, perform a manual
(
search for the outdoor sensors.
Keep the „“ button (12) pressed until the icon (3) flashes at the left of the
display.
The sensor search can take several minutes. Do not move the weather station
during this time and do not press any button.
“ is displayed to the
“
65
Page 66

16. TROUBLESHOOTING
With this weather station, you purchased a product built to the state of the art and
operationally safe. Nevertheless, problems or errors may occur. The following
contains descriptions for the removal of possible interference.
No reception of the signal of the outdoor sensor?
If the weather station does not receive any measured data from the outdoor sensor,
only dashes are displayed for outdoor temperature by the weather station.
In this case, observe the following notes:
Start manual search for the outdoor sensor signal (see chapter 11).
—
The batteries of the outdoor sensor are weak or empty. Try inserting new
—
batteries in the outdoor sensor.
The distance between weather station and outdoor sensor is too large. Change
—
the installation site of the weather station or outdoor sensor.
The included outdoor sensor is firmly present to channel 1 (this cannot be
—
changed).
For the outdoor sensors available as accessories, the transmission channel can
be set. Set channel 2 or 3 here. Observe that each outdoor sensor must be set
to a different channel. Otherwise, they would interfere with each other.
Very low outdoor temperatures (less than -20 °C) decrease battery performance
—
(this effect will be stronger for rechargeable batteries). This reduces the range
or the outdoor sensor will no longer work properly.
A different transmitter on the same or an adjacent frequency interferes with
—
the radio signal of the outdoor sensor. It may be helpful to reduce the distance
between the weather station and outdoor sensor or to choose another setup
site.
Objects or shielding materials (metallised insulated glass windows, reinforced
—
concrete, etc.) interfere with radio reception. The weather station is too close
to other electronic devices (TV, computer). Change the site of setup of the
outdoor sensor or the weather station.
66
Page 67

No DCF Reception
Objects or shielding materials (metallised insulated glass windows, reinforced
—
concrete, etc.) interfere with reception. The weather station is too close to other
electronic devices (TV, computer), cables or mains sockets. Change the site of
setup of the weather station.
When setting up the weather station in the basement or similar, the DCF
—
signal is too weak and reception is therefore not possible. The same applies of
the weather station is too far away from the DCF transmitter.
Set the time and date manually; see chapter 12. a).
The weather station performs several reception attempts for the DCF signal
—
every day (at 00:00, 03:00, 06:00 and 12:00 hours). Therefore, just leave the
weather station standing for a day; maybe reception will be free of interference
at another time of the day.
A single successful reception per day will keep the deviation of the quartz clock
in the weather station below a second.
Start search for the DCF signal again; observe chapter 10. b).
—
67
Page 68

17. RANGE
The range for radio signal transmission between the outdoor sensor and the weather
station is up to 30 m under best conditions.
However, the range values refer to the so-called „free field range“.
(
This perfect alignment (e.g. weather station and outdoor sensor on a smooth, level
meadow without trees, houses, etc.), however, is never present in practice.
Normally the weather station is set up in the house and the outdoor sensor, e.g.
below a car port or at the side of a window.
Due to the different influences on radio transmission, no specific range can be
guaranteed for, unfortunately.
Usually, however, any operation in a family home is possible without any problems.
When the weather station doesn’t receive any data from the outdoor sensor (in
spite of new batteries), observe chapter 16.
The range may be considerably reduced by:
walls/masonry, reinforced concrete ceilings
—
coated/metallised insulated glass, aluminium windows, etc
—
vehicles
—
trees, shrubbery, earth, rocks
—
proximity to metallic & conductive objects (e.g. heating elements)
—
proximity to human body
—
broadband interferences, e.g. in residential areas (DECT telephones, mobiles,
—
radio-controlled headphones, radio-controlled speakers, other radio-controlled
weather stations, baby phones etc.)
proximity to electric motors, transformers, mains adapters
—
proximity to mains sockets, mains cables
—
proximity to improperly shielded or uncovered operating computers or other
—
electric devices
68
Page 69

18. MAINTENANCE AND CLEANING
The product is maintenance-free for you. Servicing or repair must only be carried
out by a specialist or specialist workshop. There are no components on the inside
of the product that require maintenance by you. Therefore, you should never open
it (apart from the procedure for replacing the batteries as described in these
instructions).
To clean the exterior of the weather station or the outdoor sensor, a dry, soft and
clean cloth is sufficient.
Do not apply too much pressure to the display of the weather station, this
(
can cause scratch marks or failures of the display.
Remove dust on the weather station with a long-haired, soft and clean brush and a
vacuum cleaner.
Use a slightly damp soft cloth to remove stronger contamination from the outdoor
sensor.
Never use any aggressive cleaning agents, cleaning alcohol or other chemical
solutions, since these may damage the casing (discolouration) or even impair
function.
69
Page 70

19. DISPOSAL
a) General Information
Electrical and electronic products must not be disposed of in domestic waste.
Dispose of the product according to the relevant statutory regulations at
the end of its service life.
b) Batteries and Rechargeable Batteries
You as the end user are required by law (Battery Ordinance) to return all used
batteries/rechargeable batteries. Disposing of them in the household waste is
prohibited!
Batteries and rechargeable batteries containing hazardous substances are
marked with adjacent symbol to indicate that disposal in the household waste
is prohibited.
You may return used batteries/rechargeable batteries free of charge at the
official collection points of your community, in our stores, or wherever
batteries/rechargeable batteries are sold!
You thus fulfil your statutory obligations and contribute to the protection of the
environment.
20. DECLARATION OF CONFORMITY (DOC)
We, Conrad Electronic, Klaus-Conrad-Straße 1, D-92240 Hirschau, hereby declare
that this product complies with the fundamental requirements and the other relevant regulations of the directive 1999/5/EC.
The declaration of conformity (DOC) for this product can be found at:
(
www.conrad.com
70
Page 71

21. TECHNICAL DATA
a) Weather Station
Power supply ..................................2 type AAA/Micro batteries
Battery lifetime .............................. Approx. 1 year
Number of outdoor sensors ........max. 3
Temperature measuring range .. -10 °C to +60 °C
Resolution ....................................... 0.1 °C
Accuracy .......................................... ±1 °C (in the range of 0 °C to +40 °C)
Dimensions (W x H x D) ................ 70 x 129 x 16 mm (without standing base)
Weight ..............................................106 g (without batteries, without standing base)
b) Outdoor Sensor
Power supply ..................................2 type AAA/Micro batteries
Battery lifetime .............................. Approx. 1 year
Temperature measuring range .. -30 °C to +60 °C
Resolution ....................................... 0.1 °C
Accuracy .......................................... ±1 °C (in the range of -10 °C to +40 °C)
Transmission frequency ............... 433 MHz
Range ............................................... up to 30 m (in the free field, see Chapter 17)
Transmission interval ................... approx. every 43 - 47 seconds
Dimensions (W x H x D) ................ 38 x 105 x 18 mm (without bracket)
Weight ..............................................36 g (without batteries, without bracket)
71
Page 72

TABLE DES MATIÈRES
Page
1. Introduction ..................................................................................................................74
2. Utilisation conforme ................................................................................................... 75
3. Étendue de la livraison ............................................................................................... 76
4. Explication des symboles ........................................................................................... 76
5. Caractéristiques et fonctions ................................................................................... 77
a) Station météo ......................................................................................................... 77
b) Capteur extérieur .................................................................................................. 77
6. Consignes de sécurité ................................................................................................ 78
7. Remarques spécifiques aux piles et batteries ...................................................... 79
8. Éléments d’affichage et de commande ................................................................... 81
a) Station météo .......................................................................................................... 81
b) Capteur extérieur .................................................................................................. 82
9. Mise en service ............................................................................................................. 83
a) Capteur extérieur .................................................................................................. 83
b) Station météo ......................................................................................................... 84
10. Réception DCF ..............................................................................................................86
a) Généralités ..............................................................................................................86
b) Activation et désactivation de la réception DCF,
lancement de la recherche DCF ......................................................................... 87
11. Recherche du (ou des) capteur(s) extérieur(s) .................................................... 88
12. Fonction « Heure / Date » ......................................................................................... 89
a) Réglage manuel de l’heure .................................................................................. 89
b) Sélection du mode 12 h ou 24 h ..........................................................................90
c) Sélection de la langue pour l’affichage du jour de la semaine .................... 91
d) Commutation de l’affichage de l’heure
(secondes / date / fuseau horaire) ..................................................................... 91
e) Réglage du fuseau horaire .................................................................................. 92
f) Sélection de la fonction réveil et affichage de l’heure de réveil ................ 92
g) Activation et désactivation de la fonction réveil ........................................... 93
h) Réglage de l’heure du réveil ............................................................................... 93
i) Activation / désactivation et réglage de la préalarme ................................. 94
j) Arrêt du signal du réveil ...................................................................................... 94
72
Page 73

Page
13. Fonction « Température » ......................................................................................... 95
a) Commutation de l’unité de température °C / °F ............................................ 95
b) Sélection du capteur extérieur........................................................................... 95
c) Commutation automatique des capteurs extérieurs .................................... 95
d) Affichage des valeurs minimales et maximales ............................................. 96
e) Suppression des valeurs minimales et maximales ........................................ 96
f) Sélection, activation et désactivation de l’alarme de température ........... 96
g) Réglage de la température pour l’alarme de température .......................... 97
h) Affichage de la tendance pour la température intérieure / extérieure .... 97
14. Fonction « Météo / tendance » ................................................................................. 98
15. Remplacement des piles .......................................................................................... 100
a) Station météo ....................................................................................................... 100
b) Capteur extérieur ................................................................................................ 100
16. Dépannage .................................................................................................................... 101
17. Portée ............................................................................................................................103
18. Entretien et nettoyage ............................................................................................. 104
19. Élimination .................................................................................................................. 105
a) Généralités ............................................................................................................ 105
b) Piles et batteries .................................................................................................. 105
20. Déclaration de conformité (DOC) .......................................................................... 105
21. Caractéristiques techniques ................................................................................... 106
a) Station météo ....................................................................................................... 106
b) Capteur extérieur ................................................................................................ 106
73
Page 74

1. INTRODUCTION
Chère cliente, cher client,
Nous vous remercions pour l’achat du présent produit.
Ce produit est conforme aux exigences légales des directives européennes et na-
tionales en vigueur.
Afin de maintenir l’appareil en bon état et d’en assurer un fonctionnement sans
danger, l’utilisateur doit impérativement respecter le présent mode d’emploi !
Le présent mode d’emploi fait partie intégrante du produit. Il contient des
remarques importantes pour la mise en service et la manipulation du produit.
Tenez compte de ces remarques, même en cas de cession de ce produit à un
tiers.
Conservez le présent mode d’emploi afin de pouvoir le consulter à tout
moment !
Tous les noms d’entreprises et appellations de produits contenus dans ce mode
d’emploi sont des marques déposées des propriétaires respectifs. Tous droits
réservés.
Pour toute question technique, veuillez vous adresser à :
France : Tél. : 0892 897 777
Fax : 0892 896 002
e-mail : support@conrad.fr
Du lundi au vendredi de 8h00 à 18h00
le samedi de 8h00 à 12h00
Suisse : Tél. : 0848/80 12 88
Fax : 0848/80 12 89
e-mail : support@conrad.ch
Du lundi au vendredi de 8h00 à 12h00 et de 13h00 à 17h00
74
Page 75

2. UTILISATION CONFORME
La station météo permet d’afficher la température intérieure et la température
extérieure.
Les températures mesurées par le capteur extérieur sont transmises par liaison
radio à la station météo.
À l’aide du capteur de pression atmosphérique interne et de l’enregistrement de
l’évolution de la pression atmosphérique, la station météo affiche également les
prévisions météorologiques pour les prochaines 12 à 24 heures sous forme de
symboles graphiques sur l’écran.
L’heure et la date peuvent automatiquement être réglées à l’aide du signal horaire
DCF. Un réglage est cependant également possible (par ex. en présence de
problèmes de réception).
Un récapitulatif de toutes les caractéristiques et propriétés du produit est
(
fourni dans le chapitre 5.
Le fabricant décline toute responsabilité pour l’affichage incorrect des valeurs de
mesure et des prévisions météorologiques ainsi que pour les conséquences
inhérentes.
Le produit est conçu pour un usage personnel ; il ne convient pas à des fins médicales
ou à l’information du grand public.
Les composants de ce produit ne sont pas des jouets ; ils comprennent des pièces
fragiles, des pièces en verre et des pièces de petite taille qui peuvent être avalées
ainsi que des piles. Conserver le produit hors de portée des enfants !
Utilisez tous les composants en veillant à ce qu’ils restent inaccessibles pour les
enfants.
Le produit fonctionne sur piles.
Toute utilisation autre que celle décrite ci-dessus peut endommager le produit et
engendrer d’autres dangers.
Lisez attentivement l’intégralité du présent mode d’emploi. Il contient des
informations importantes à propos de l’installation, du fonctionnement et de
l’utilisation. Observez toutes les consignes de sécurité !
75
Page 76

3. ÉTENDUE DE LA LIVRAISON
Station météo
—
Pied pour la station météo
—
Capteur extérieur pour la mesure de la température
—
Support pour le capteur extérieur
—
Mode d’emploi
—
4. EXPLICATION DES SYMBOLES
Le symbole avec le point d’exclamation placé dans un triangle signale les
informations importantes du présent mode d’emploi qui doivent
impérativement être respectées.
Le symbole de la « main » précède les conseils et remarques spécifiques à
(
l’utilisation.
76
Page 77

5. CARACTÉRISTIQUES ET FONCTIONS
a) Station météo
Fonctionnement avec 2 piles du type AAA / Micro
—
Affichage DCF de l’heure et de la date, possibilité de réglage manuel
—
Commutation de l’affichage au format 12 ou 24 heures
—
Fonction réveil (préalarme supplémentaire activée en présence d’une
—
température extérieure < 0 °C)
Affichage de la température intérieure
—
Affichage de la température extérieure
—
Affichage de la température en degrés Celsius (°C) ou en degrés Fahrenheit
—
(°F)
Mémoire pour les valeurs maximales et minimales
—
Affichage des tendances pour la température intérieure et la température
—
extérieure
Alarme en cas de température supérieure ou inférieure à la température définie
—
Symboles pour les prévisions météorologiques des 12 à 24 prochaines heures
—
(calcul à partir de l’enregistrement interne de l’évolution de la pression
atmosphérique)
Possibilité de commutation entre max. 3 capteurs extérieurs (un capteur est
—
fourni, 2 capteurs supplémentaires peuvent être commandés séparément)
Installation sur une table à l’aide du pied fourni
—
Utilisation uniquement en intérieur dans les locaux fermés et secs
—
b) Capteur extérieur
Fonctionnement avec 2 piles du type AAA / Micro
—
Transmission sans fil des températures mesurées vers la station météo
—
(technologie 433 MHz)
Installation sur pied ou montage mural
—
Utilisation extérieure sous abri
—
77
Page 78

6. CONSIGNES DE SÉCURITÉ
Tout dommage résultant du non-respect du présent mode d’emploi
entraîne l’annulation de la garantie légale / du fabricant. Nous déclinons
toute responsabilité pour les dommages consécutifs !
De même, nous n’assumons aucune responsabilité en cas de dommages
matériels ou corporels résultant d’une utilisation de l’appareil non
conforme aux spécifications ou du non-respect des présentes consignes
de sécurité ! De tels cas entraînent l’annulation de la garantie.
Chère cliente, cher client,
Les présentes consignes de sécurité servent non seulement à la protection
du produit, mais permettent également de garantir votre propre sécurité
ainsi que celle des autres personnes. Veuillez donc très attentivement lire
ce chapitre avant la mise en service du produit !
Pour des raisons de sécurité et d’homologation (CE), il est interdit de transformer
—
et / ou de modifier le produit de manière arbitraire. N’ouvrez et ne démontez
jamais le produit (sauf pour effectuer les travaux décrits dans le présent mode
d’emploi pour l’insertion ou le remplacement des piles)
Les travaux d’entretien, de réglage et de réparation doivent uniquement être
—
confiés à un spécialiste ou à un atelier spécialisé.
N’utilisez pas ce produit dans les hôpitaux ou les établissements médicaux. Bien
—
que le capteur extérieur n’émette que des signaux radio de faible intensité, il
risquerait toutefois de provoquer des dysfonctionnements des équipements
médicaux de survie. Ceci est éventuellement également valable dans d’autres
domaines.
Le produit n’est pas un jouet, gardez-le hors de portée des enfants. Le produit
—
contient de petites pièces, du verre (écran) et des piles. Installez le produit de
sorte à ce qu’il se trouve hors de la portée des enfants.
La station météo est uniquement conçue pour une utilisation en intérieur dans
—
les locaux fermés et secs. Ne l’exposez pas directement au rayonnement solaire,
à une forte chaleur, au froid, à l’humidité et aux liquides. Vous risqueriez sinon
de l’endommager.
Le capteur extérieur convient pour une utilisation extérieure sous abri. Il ne
—
doit pas être utilisé dans ou sous l’eau au risque de le détruire.
Utilisez uniquement le produit en présence de conditions climatiques modérées
—
et non tropicales.
Lorsque le produit est déplacé d’un local froid dans un local chaud (par ex. en
—
cas de transport), de l’eau de condensation peut se former. Cela peut
endommager le produit.
78
Page 79

Avant toute utilisation, attendez donc que le produit ait atteint la température
ambiante. Dans certains cas, cela peut durer plusieurs heures.
Dans les écoles, centres de formation, ateliers de bricolage et de réinsertion,
—
l’utilisation du produit doit être surveillée par un personnel responsable,
spécialement formé à cet effet.
Ne laissez pas traîner le matériel d’emballage sans surveillance, il pourrait
—
constituer un jouet dangereux pour les enfants.
Ce produit doit être manipulé avec précaution ; les coups, les chocs ou une chute,
—
même d’une faible hauteur, peuvent l’endommager.
7. REMARQUES SPÉCIFIQUES AUX PILES ET
BATTERIES
2 piles du type AAA / Micro sont requises pour le fonctionnement de la station
(
météo. 2 piles du type AAA / Micro sont également requises pour le
fonctionnement du capteur extérieur.
L’appareil fonctionne également avec des batteries.
La tension inférieure des batteries (batterie = 1,2 V, pile = 1,5 V) et leur
capacité inférieure réduisent toutefois l’autonomie ainsi que la portée radio.
Les batteries sont également plus sensibles aux variations thermiques que
les piles.
Si vous souhaitez tout de même utiliser des batteries, il est recommandé
d’utiliser des batteries NiMH spéciales à faible autodécharge.
Afin de garantir un fonctionnement prolongé en toute sécurité, nous vous
recommandons de n’insérer que des piles alcalines de qualité supérieure
dans la station météo et le capteur extérieur.
Conserver les piles et batteries hors de portée des enfants.
—
Lors de l’insertion des piles ou batteries, respectez la polarité (ne pas inverser
—
plus/+ et moins/-).
Ne laissez pas traîner les piles et les batteries, les enfants ou les animaux
—
domestiques risqueraient de les avaler. En cas d’ingestion, consultez
immédiatement un médecin.
En cas de contact avec la peau, les piles et batteries qui fuient ou sont
—
endommagées peuvent provoquer des brûlures à l’acide. Veuillez donc, le cas
échéant, porter des gants de protection appropriés.
Veillez à ne pas court-circuiter, démonter ni jeter les piles et batteries dans le
—
feu. Il y a danger d’explosion !
79
Page 80

Il est interdit de recharger les piles jetables traditionnelles. Il y a danger
—
d’explosion ! Rechargez uniquement les batteries rechargeables prévues à cet
effet et n’utilisez que des chargeurs appropriés.
Si vous n’utilisez pas le produit pendant une période prolongée (par ex. en cas
—
de stockage), retirez les piles ou batteries insérées. Lorsque les piles ou batteries
sont trop vieilles, elles peuvent également fuir et ainsi endommager le produit,
entraînant ainsi la perte de la garantie !
Remplacez toujours le jeu complet de piles ou batteries. Employez uniquement
—
des piles ou batteries du même type et du même fabricant et avec le même état
de charge (ne pas mélanger des piles ou batteries pleines avec des piles ou
batteries à moitié déchargées ou complètement déchargées).
Ne mélangez jamais piles et batteries. Utilisez soit des piles soit des batteries.
—
Pour une élimination écologique des piles et batteries, veuillez lire le chapitre
—
« Élimination ».
80
Page 81

8. ÉLÉMENTS D’AFFICHAGE ET DE COMMANDE
a) Station météo
1
2
3
10
1 Affichage de la tendance pour la météo
2 Symbole graphique pour les prévisions météorologiques
3 Affichage de la réception / numéro du canal du capteur extérieur
4 Affichage de la tendance pour la température extérieure
5 Température extérieure (en °C ou °F)
6 Affichage de la tendance pour la température intérieure
7 Température intérieure (en °C ou °F)
8 Indicateur de réception pour le signal DCF
9 Plage d’affichage pour l’heure / la date / le jour de la semaine / l’heure du réveil
10 Orifice pour le pied
11 Touche « »
12 Touche « »
13 Touche « mode »
14 Touche « alarm »
15 Touche « channel »
16 Logement des piles pour 2 piles du type AAA / Micro
17 Touche « mem »
11
4
12
5
13
6
14
7
15
8
17
9
16
81
Page 82

b) Capteur extérieur
18
20
19
18 Touche « Test » (noyée) : réservée aux fins internes du fabricant, ne pas enfoncer
cette touche !
19 Logement des piles pour 2 piles du type AAA / Micro
20 Support (s’utilise également comme pied) ; peut être fixé sur 3 emplacements
du capteur extérieur (au-dessus, au-dessous, à l’arrière)
Le capteur extérieur fourni a été réglé en usine sur le canal 1, ce canal ne
(
peut pas être modifié.
82
Page 83

9. MISE EN SERVICE
Insérez d’abord les piles dans le capteur extérieur puis dans la station météo.
(
Cela est également valable en cas d’utilisation de plusieurs capteurs
extérieurs (à acheter séparément).
Durant la mise en service, le capteur extérieur doit se trouver à proximité
de la station météo (à 1 m max.).
Observez également une distance minimale de 1 m par rapport à d’autres
appareils électroniques (par ex. téléviseur, ordinateur, téléphone) et objets
métalliques (par ex. radiateur). Assurez-vous que la station météo détecte
correctement le capteur extérieur.
a) Capteur extérieur
Ouvrez le logement des piles (19) au dos du capteur extérieur en faisant glisser
—
le couvercle du logement des piles vers le bas de sorte à pouvoir le retirer.
Insérez deux piles du type AAA / Micro dans le logement des piles du capteur
—
extérieur en respectant la polarité (ne pas inverser plus / + et moins / -).
Refermez le logement des piles.
—
Le support fourni (20) peut être employé comme support mural ou comme pied.
—
Selon l’emplacement de montage, enfoncer le support au-dessus, au-dessous
ou à l’arrière du capteur extérieur.
Le capteur externe peut être utilisé à l’extérieur sous abri. Il doit être installé
(
de manière à ne pas être exposé directement au rayonnement solaire ni à la
pluie et la neige. Les températures transmises seraient sinon incorrectes.
Lors du montage du capteur extérieur, veillez à ce que le logement des piles
pointe vers le bas afin d’éviter toute infiltration d’eau.
Ne plongez jamais le capteur externe dans ou sous l’eau, vous risqueriez de
le détruire !
La station météo peut, au maximum, recevoir et afficher les données de
(
mesure de 3 capteurs extérieurs. Chaque capteur extérieur doit être réglé
sur un propre canal d’émission.
Le capteur extérieur fourni a été réglé en usine sur le canal 1, ce canal ne
peut pas être modifié.
Les capteurs extérieurs disponibles dans le commerce sont munis d’un
interrupteur pour la sélection du canal, réglez alors le canal 2,
respectivement 3, pour ces capteurs.
83
Page 84

b) Station météo
Ouvrez le logement des piles (16) au dos de la station météo en faisant glisser le
—
couvercle du logement des piles vers le bas de sorte à pouvoir le retirer.
Insérez ensuite deux piles du type AAA / Micro dans le logement des piles de la
—
station météo en respectant la polarité (ne pas inverser plus / + et moins / -).
Refermez le logement des piles.
—
Après l’insertion des piles, tous les segments d’affichage s’affichent brièvement
—
sur l’écran.
Le symbole de réception (3) clignote ensuite sur la gauche de l’écran.
—
La station météo recherche maintenant le signal du capteur extérieur. Si elle ne
détecte aucun capteur extérieur (par ex. car vous n’avez pas encore inséré les
piles), vous pouvez redémarrer manuellement cette procédure par la suite, voir
chapitre 11.
Après la fin de la recherche des capteurs, l’indicateur de réception (8) pour le
—
signal DCF clignote sur l’écran. Selon la puissance du signal DCF, plusieurs cercles
sont visibles.
Signal faible -> Signal puissant
Installez par ex. la station météo à proximité d’une fenêtre. Observez une
(
distance d’au moins 1 m par rapport à d’autres appareils électroniques
(par ex. téléviseur, ordinateur, téléphone) et objets métalliques (par ex.
radiateur).
Les fenêtres en verre isolant métallisé, les constructions en béton armé, les
revêtements spéciaux de papier peint ou l’installation dans une cave peuvent
par ex. également gêner la réception.
Si vous avez trouvé une bonne position de réception, évitez alors, à ce
moment, de déplacer la station météo. N’appuyez sur aucune touche de la
station météo.
La détection et l’exploitation du signal DCF peuvent durer plusieurs minutes.
Pour de plus amples informations à propos de la réception du signal DCF,
reportez-vous au chapitre 10.
84
Page 85

Après la réception correcte et l’exploitation du signal DCF, l’heure actuelle
—
s’affiche en bas de l’écran (9).
Le cas contraire, vous pouvez soit retirer brièvement les piles de la station météo
soit lancer une nouvelle recherche du signal DCF, voir chapitre 10. b).
Un réglage manuel de l’heure et de la date est également possible, observez à
ce propos le chapitre 12. a).
Installez la station météo dans le pied fourni. La face inférieure de la station
—
comporte un orifice (10) prévu à cet effet.
Pour l’installation, choisissez un emplacement qui ne soit pas directement
(
exposé au rayonnement solaire (falsification des valeurs mesurées pour la
température). Observez également une distance suffisante par rapport aux
radiateurs.
Protégez les meubles de valeur avec une protection appropriée, vous
risqueriez sinon de les rayer.
Pour l’installation du capteur extérieur et de la station météo, observez
également les informations fournies dans le chapitre 17 « Portée ».
La mise en service de la station météo et du capteur extérieur est maintenant
—
terminée.
85
Page 86

10. RÉCEPTION DCF
a) Généralités
Le signal DCF est un signal qui est transmis par
un émetteur installé à Mainflingen (en
Allemagne, près de Francfort-sur-le-Main). Sa
portée est d’environ 1 500 km, voire même de
2 000 km dans des conditions de réception
idéales.
Le signal DCF comprend notamment l’heure
exacte (écart théorique d’une seconde dans un
million d’années !) et la date.
Il n’est, bien entendu, plus nécessaire de régler
manuellement les heures d’été et d’hiver sur la
station météo étant donné que le changement
d’heure est automatique.
La première tentative de réception du signal DCF est effectuée après la recherche
des capteurs extérieurs.
La recherche du signal DCF et son exploitation durent plusieurs minutes.
(
Pendant ce temps, ne déplacez pas la station météo et n’appuyez sur aucune
touche.
De nouvelles tentatives de réception sont effectuées à 00:00, 03:00, 06:00 et
12:00 heures. Une seule réception par jour suffit pour maintenir l’écart de précision
de l’horloge à quartz intégrée dans la station météo au-dessous d’une seconde.
La qualité de la réception du signal DCF est indiquée par l’indicateur de réception
(8) :
Symbole clignotant : pas de réception des données
Absence de réception DCF au cours des dernières 24 heures
Signal DCF faible, mais réussite de l’exploitation
Signal DCF irréprochable
86
Page 87

Si vous rencontrez des problèmes de réception lors de la première mise en service
et que l’heure actuelle ne s’affiche pas au bout de 10 minutes, effectuez une nouvelle
tentative de réception. Procédez alors de la manière décrite dans le chapitre 10. b).
Les chapitres 16 « Dépannage » et 17 « Portée » contiennent de plus amples
(
informations à propos du choix de l’emplacement pour l’installation de la
station météo ainsi qu’à propos des facteurs permettant d’améliorer la
réception du signal DCF.
Lorsque la réception du signal DCF s’avère impossible à l’emplacement de
la station météo, réglez l’heure manuellement, voir chapitre 12. a).
b) Activation et désactivation de la réception du signal DCF, lancement de la
recherche du signal DCF
Pour activer ou désactiver la réception du signal DCF, maintenez la touche « »
(11) enfoncée pendant 3 secondes environ.
Lorsque la réception du signal DCF est désactivée, l’indicateur de réception (8)
—
disparaît de l’écran.
Dès que la réception du signal DCF est activée, la station météo recherche le
—
signal DCF. Selon la puissance du signal DCF, plusieurs cercles sont visibles.
Signal faible -> Signal puissant
La détection et l’exploitation du signal DCF peuvent durer plusieurs minutes.
(
Pendant ce temps, ne déplacez pas la station météo et n’appuyez sur aucune
touche.
Lorsque la réception du signal DCF s’avère impossible à l’emplacement de
la station météo, réglez l’heure manuellement, voir chapitre 12. a).
87
Page 88

11. RECHERCHE DU (OU DES) CAPTEUR(S)
EXTÉRIEUR(S)
Si la station météo ne détecte aucun capteur extérieur (par ex. en présence de
mauvaises conditions de réception ou après le remplacement des piles), vous pouvez,
par la suite, redémarrer manuellement cette procédure.
La station météo peut, au maximum, recevoir et afficher les données de
(
mesure de 3 capteurs extérieurs. Chaque capteur extérieur doit être réglé
sur un propre canal d’émission.
Le capteur extérieur fourni a été réglé en usine sur le canal 1, ce canal ne
peut pas être modifié.
Les capteurs extérieurs disponibles dans le commerce sont munis d’un
interrupteur pour la sélection du canal, réglez alors le canal 2, respectivement 3, pour ces capteurs.
Maintenez la touche « » (12) enfoncée jusqu’à ce que l’indicateur de réception
(3) pour la réception sans fil des capteurs extérieurs clignote sur la gauche de
l’écran.
La recherche de capteurs peut durer plusieurs minutes. Pendant ce temps, ne
déplacez pas la station météo et n’appuyez sur aucune touche.
Lorsque la station météo ne détecte aucun capteur extérieur, contrôlez les
(
piles, déplacez le capteur extérieur, réduisez la distance entre la station
météo et le capteur extérieur.
Symbole clignotant : recherche du capteur en cours
Détection irréprochable du signal du capteur extérieur
Absence de réception de signal au cours des dernières 24 heures
88
Page 89

12. FONCTION « HEURE / DATE »
a) Réglage manuel de l’heure
Appuyez plusieurs fois brièvement sur la touche « » (11) ou « » (12) jusqu’à
—
ce que le symbole « » clignote.
Maintenez la touche « mode » (13) enfoncée jusqu’à ce que la langue de
—
l’affichage du jour de la semaine clignote en bas à droite.
Vous pouvez maintenant sélectionner la langue à l’aide des touches « » (11)
et « » (12) :
« DE » = Allemand
« Fr » = Français
« IT » = Italien
« SP » = Espagnol
« Du » = Néerlandais
« SW » = Suédois
« En » = Anglais
Appuyez brièvement sur la touche « mode » (13), l’année commence à clignoter.
—
Réglez l’année à l’aide des touches « » (11) et « » (12) (maintenir la touche
enfoncée pour un défilement rapide).
Appuyez brièvement sur la touche « mode » (13), le mois commence à clignoter.
—
Réglez le mois à l’aide des touches « » (11) et « » (12) (maintenir la touche
enfoncée pour un défilement rapide).
Appuyez brièvement sur la touche « mode » (13), la date commence à clignoter.
—
Réglez la date à l’aide des touches « » (11) et « » (12) (maintenir la touche
enfoncée pour un défilement rapide).
Appuyez brièvement sur la touche « mode » (13), l’ordre d’affichage du mois
—
(« M ») et du jour (« D ») commence à clignoter sur l’écran.
Vous pouvez maintenant permuter l’ordre d’affichage (« D M » = jour / mois,
« M D » = mois / jour) à l’aide des touches « » (11) et « » (12).
Appuyez brièvement sur la touche « mode » (13), le symbole « 12 Hr » ou
—
« 24 Hr » commence à clignoter sur l’écran.
À l’aide des touches « » (11) et « » (12), sélectionnez le mode 12 h ou 24 h.
En mode 12 h, l’indication « AM » s’affiche le matin à gauche de l’heure et
(
l’indication « PM » l’après-midi.
89
Page 90

Appuyez brièvement sur la touche « mode » (13), les heures commencent à
—
clignoter.
Réglez les heures à l’aide des touches « » (11) et « » (12) (maintenir la
touche enfoncée pour un défilement rapide).
Appuyez brièvement sur la touche « mode » (13), les minutes commencent à
—
clignoter.
Réglez les minutes à l’aide des touches « » (11) et « » (12) (maintenir la
touche enfoncée pour un défilement rapide).
Appuyez brièvement sur la touche « mode » (13).
—
Les secondes sont alors automatiquement réinitialisées (« 00 ») et vous quittez
le mode de configuration.
L’heure préalablement réglée s’affiche maintenant sur l’écran.
La réception du signal DCF est désactivée dès que vous ouvrez le mode de
(
configuration. Pour effectuer une nouvelle tentative de réception du signal
DCF, procédez de la manière décrite dans le chapitre 10. b).
Important :
Les réglages pour la langue d’affichage du jour de la semaine et le mode
12 h/24 h sont alors conservés.
b) Sélection du mode 12 h ou 24 h
Appuyez plusieurs fois brièvement sur la touche « » (11) ou « » (12) jusqu’à
—
ce que le symbole « » clignote.
Maintenez la touche « mode » (13) enfoncée jusqu’à ce que la langue de
—
l’affichage du jour de la semaine clignote en bas à droite.
Appuyez plusieurs fois brièvement sur la touche « mode » (13) jusqu’à ce que le
—
symbole « 12 Hr » ou « 24 Hr » clignote sur l’écran.
À l’aide des touches « » (11) et « » (12), vous pouvez sélectionner l’affichage
de l’heure au format 12 h ou 24 h.
En mode 12 h, l’indication « AM » s’affiche le matin à gauche de l’heure et
(
l’indication « PM » l’après-midi.
Appuyez plusieurs fois brièvement sur la touche « mode » (13) jusqu’à ce que
—
l’écran ne clignote plus.
Après la procédure de réglage, la réception du signal DCF est désactivée.
(
Pour réactiver la réception du signal DCF, procédez de la manière décrite
dans le chapitre 10. b).
90
Page 91

c) Sélection de la langue pour l’affichage du jour de la semaine
Appuyez plusieurs fois brièvement sur la touche « » (11) ou « » (12) jusqu’à
—
ce que le symbole « » clignote.
Maintenez la touche « mode » (13) enfoncée jusqu’à ce que la langue de
—
l’affichage du jour de la semaine clignote en bas à droite.
Vous pouvez maintenant sélectionner la langue à l’aide des touches « » (11)
et « » (12) :
« DE » = Allemand
« Fr » = Français
« IT » = Italien
« SP » = Espagnol
« Du » = Néerlandais
« SW » = Suédois
« En » = Anglais
Appuyez plusieurs fois brièvement sur la touche « mode » (13) jusqu’à ce que
—
l’écran ne clignote plus.
Après la procédure de réglage, la réception du signal DCF est désactivée.
(
Pour réactiver la réception du signal DCF, procédez de la manière décrite
dans le chapitre 10. b).
d) Commutation de l’affichage de l’heure (secondes/date/fuseau horaire)
Appuyez plusieurs fois brièvement sur la touche « » (11) ou « » (12) jusqu’à
—
ce que le symbole « » clignote.
Appuyez plusieurs fois brièvement sur la touche « mode » (13) pour commuter
—
entre les différents formats d’affichage :
Heures : Minutes : Secondes
Heures : Minutes : Jour
Heures : Minutes : Date (pour le second fuseau horaire)
Heures : Minutes : Secondes (pour le second fuseau horaire)
Jour : Mois (ou Mois : Jour)
Lorsque les données du second fuseau horaire sont affichées, l’indication
(
« ZONE » s’affiche à droite de l’heure. Le réglage du fuseau horaire est décrit
sur la page suivante.
91
Page 92

e) Réglage du fuseau horaire
Appuyez plusieurs fois brièvement sur la touche « » (11) ou « » (12) jusqu’à
—
ce que le symbole « » clignote.
Appuyez plusieurs fois brièvement sur la touche « mode » (13) jusqu’à ce que
—
l’indication « ZONE » s’affiche à droite de l’heure.
Maintenez la touche « mode » (13) enfoncée jusqu’à ce que l’affichage du fuseau
—
horaire clignote (« 0:00+ »).
Réglez le fuseau horaire à l’aide des touches « » (11) et « » (12) (maintenir
—
la touche enfoncée pour un défilement rapide). La plage de réglage est comprise
entre -13 et +15 heures (affichage « 13:00- » à « 15:00+ »).
Appuyez brièvement sur la touche « mode » (13) pour quitter le mode de
—
configuration.
f) Sélection de la fonction réveil et affichage de l’heure de réveil
Appuyez plusieurs fois brièvement sur la touche « » (11) ou « » (12) jusqu’à
—
ce que le symbole « » clignote.
Appuyez plusieurs fois brièvement sur la touche « alarm » (14) jusqu’à ce que
—
la fonction réveil souhaitée s’affiche sur l’écran :
Symbole «
Symbole «
désactivée (« OFF »).
Symbole « PRE AL » : lorsque la température extérieure (mesurée par le capteur
extérieur sur le canal 1) est inférieure à 0 °C, une préalarme est déclenchée à
une heure réglable (15, 30, 45, 60 ou 90 minutes) avant l’heure de réveil
programmée. De cette manière, vous avez suffisamment de temps pour, par ex.,
dégivrer les vitres de votre voiture ou dégager la neige.
Pour activer ou régler la préalarme (affichage « PRE AL »), vous devez
(
d’abord activer soit la fonction réveil « W » soit la fonction réveil « S ».
W » : la fonction réveil est uniquement active du lundi au vendredi.
S » : la fonction réveil est activée une seule fois et est ensuite
92
Page 93

g) Activation et désactivation de la fonction réveil
Appuyez plusieurs fois brièvement sur la touche « » (11) ou « » (12) jusqu’à
—
ce que le symbole « » clignote.
Appuyez plusieurs fois brièvement sur la touche « alarm » (14) jusqu’à ce que
—
la fonction réveil souhaitée s’affiche sur l’écran (voir chapitre 12. f).
La touche « » (11) ou « » (12) permet d’activer (l’heure de réveil s’affiche)
—
ou de désactiver (« OFF » s’affiche sur l’écran) la fonction réveil sélectionnée.
Pour activer ou régler la préalarme (affichage « PRE AL »), vous devez
(
d’abord activer soit la fonction réveil « W » soit la fonction réveil « S »
sans quoi la préalarme ne sera pas déclenchée.
h) Programmation de l’heure de réveil
Appuyez plusieurs fois brièvement sur la touche « » (11) ou « » (12) jusqu’à
—
ce que le symbole « » clignote.
Appuyez plusieurs fois sur la touche « alarm » (14) jusqu’à ce que la fonction
—
réveil souhaitée « W » ou « S » s’affiche sur l’écran (voir chapitre 12. f).
Activez la fonction réveil que vous venez de sélectionner (en appuyant sur la
—
touche « » (11) ou « » (12)) de manière à ce que l’indication « OFF » soit
remplacée par l’heure de réveil (par ex. « 07:00 »).
Maintenez la touche « alarm » (14) enfoncée jusqu’à ce que les heures de l’heure
—
de réveil commencent à clignoter.
Réglez les heures de l’heure de réveil à l’aide des touches « » (11) et « »
(12) (maintenir la touche enfoncée pour un défilement rapide).
Appuyez brièvement sur la touche « alarm » (14), les minutes de l’heure de réveil
—
commencent à clignoter.
Réglez les minutes de l’heure de réveil à l’aide des touches « » (11) et « »
(12) (maintenir la touche enfoncée pour un défilement rapide).
Appuyez brièvement sur la touche « alarm » (14) pour quitter le mode de
—
configuration.
93
Page 94

i) Activation/désactivation et réglage de la préalarme
La préalarme est déclenchée avant l’heure de réveil programmée («
« S ») lorsque le capteur extérieur (uniquement sur le canal 1) mesure une
température inférieure à 0 °C. La préalarme peut être déclenchée 15, 30, 45, 60 ou
90 minutes avant l’heure de réveil.
Exemple :
Vous réglez l’heure de réveil sur 6 heures et sélectionnez 45 minutes pour la
préalarme. Lorsque le capteur extérieur (canal 1) mesure, à 5 heures 15, une
température inférieure à 0 °C, la station météo déclenche le signal de réveil plus
tôt.
Activez d’abord une fonction de réveil, « W » ou « S », de la manière décrite
—
dans le chapitre 12. g).
Sélectionnez ensuite la préalarme : appuyez plusieurs fois sur la touche
—
« alarm » (14) jusqu’à ce que l’indication « PRE AL » s’affiche sur l’écran.
Activez ou désactivez la préalarme à l’aide de la touche « » (11) ou « » (12).
—
Lorsque la préalarme est désactivée, l’indication « OFF » est affichée sur
(
l’écran.
Lorsque la préalarme est activée, la valeur 15, 30, 45, 60 ou 90 minutes est
affichée sur l’écran.
Maintenez la touche « alarm » (14) enfoncée jusqu’à ce que la valeur affichée
—
(15, 30, 45, 60 ou 90) commence à clignoter. Réglez les minutes pour la
préalarme à l’aide de la touche « » (11) ou « » (12).
Appuyez brièvement sur la touche « alarm » (14) pour quitter le mode de
—
configuration.
j) Arrêt du signal de réveil
Lorsque le signal de réveil retentit à l’heure programmée, il suffit d’appuyer sur la
touche « alarm » (14) pour l’arrêter.
Si vous n’arrêtez pas manuellement le signal du réveil, il est répété toutes
(
les 8 minutes env. (au total, 3 fois de suite).
W » ou
94
Page 95

13. FONCTION « TEMPÉRATURE »
a) Commutation de l’unité de température °C / °F
Appuyez plusieurs fois brièvement sur la touche « » (11) ou « » (12) jusqu’à
—
ce que le symbole « » clignote.
Maintenez la touche « mode » (13) enfoncée pendant environ 3 secondes jusqu’à
—
ce que l’unité de température (°C / °F) soit commutée pour la température
intérieure / extérieure.
b) Sélection du capteur extérieur
La station météo peut, au maximum, recevoir et afficher les données de
(
mesure de 3 capteurs extérieurs. Chaque capteur extérieur doit être réglé
sur un propre canal d’émission.
Le capteur extérieur fourni a été réglé en usine sur le canal 1, ce canal ne
peut pas être modifié.
Les capteurs extérieurs disponibles dans le commerce sont munis d’un
interrupteur pour la sélection du canal, réglez alors le canal 2, respectivement 3, pour ces capteurs.
Appuyez brièvement sur la touche « channel » (15) pour sélectionner le capteur
extérieur souhaité pour la mesure de la température. Le numéro du canal
correspondant s’affiche à gauche de la température extérieure (3).
c) Commutation automatique des capteurs extérieurs
Si vous utilisez plus qu’un capteur extérieur, la station météo peut également
automatiquement commuter entre les 3 canaux. Les valeurs mesurées sont alors
affichées pendant env. 5 secondes.
Cette fonction est uniquement disponible lorsque plusieurs capteurs
(
extérieurs sont inscrits sur la station météo.
Pour activer cette fonction, maintenez la touche « channel » (15) enfoncée
—
jusqu’à ce que le symbole « » s’affiche sur l’écran (au-dessous du numéro
du canal).
Pour désactiver cette fonction, maintenez à nouveau la touche « channel » (15)
—
enfoncée jusqu’à ce que le symbole « » disparaisse de l’écran.
95
Page 96

d) Affichage des valeurs minimales et maximales
Appuyez plusieurs fois brièvement sur la touche « » (11) ou « » (12) jusqu’à
—
ce que le symbole « » clignote.
Si vous utilisez plusieurs capteurs extérieurs, sélectionnez maintenant le canal
—
correspondant (1, 2 ou 3) à l’aide de la touche « channel » (15).
Appuyez brièvement sur la touche « mem » (17), les valeurs minimales pour la
—
température intérieure / extérieure s’affichent sur l’écran avec l’indication
« MIN ».
Appuyez encore une fois brièvement sur la touche « mem » (17), les valeurs
—
maximales pour la température intérieure / extérieure s’affichent sur l’écran
avec l’indication « MAX ».
Une pression supplémentaire sur la touche « mem » (17) permet de revenir à
—
l’affichage des valeurs actuelles.
e) Suppression des valeurs minimales et maximales
Appuyez plusieurs fois brièvement sur la touche « » (11) ou « » (12) jusqu’à
—
ce que le symbole « » clignote.
Maintenez la touche « mem » (17) enfoncée pendant env. 3 secondes. Les valeurs
—
minimales et maximales sont ensuite effacées.
Les valeurs mesurées actuelles sont enregistrées jusqu’à ce que de nouvelles
valeurs soient disponibles pour les valeurs minimales et maximales.
f) Sélection, activation et désactivation de l’alarme de température
Une limite de température supérieure et inférieure peut être réglée pour chacun
des 3 canaux. Une alarme retentit dès qu’un seuil défini est dépassé.
Appuyez plusieurs fois brièvement sur la touche « » (11) ou « » (12) jusqu’à
—
ce que le symbole « » clignote.
Sélectionnez le capteur extérieur souhaité en appuyant sur la touche « channel »
—
(15).
Appuyez plusieurs fois sur la touche « alarm » (14) pour commuter entre la
—
limite supérieure de température (symbole « »), la limite inférieure de
température (symbole « ») et l’affichage normal.
Lorsque le symbole « » ou « » est affiché, vous pouvez activer ou désactiver
—
l’alarme de température correspondante en appuyant brièvement sur la touche
« » (11) ou « » (12).
Lorsque l’alarme de température est désactivée, l’indication « OFF » est
affichée sur l’écran.
Lorsque l’alarme de température est activée, une température est affichée
sur l’écran.
96
Page 97

Lorsque l’alarme retentit (par ex. lorsque vous avez programmé une limite
supérieure de température de +30.0 °C et que la valeur mesurée dépasse cette
limite), vous pouvez arrêter l’alarme en appuyant brièvement sur la touche « alarm »
(14).
g) Réglage de la température pour l’alarme de température
Appuyez plusieurs fois brièvement sur la touche « » (11) ou « » (12) jusqu’à
—
ce que le symbole « » clignote.
Sélectionnez le capteur extérieur souhaité en appuyant sur la touche « channel »
—
(15).
Appuyez une ou deux fois sur la touche « alarm » (14) pour sélectionner la limite
—
supérieure de température (symbole « ») ou la limite inférieure de
température (symbole « »).
Activez (ou désactivez) l’alarme de température correspondante en appuyant
—
brièvement sur la touche « » (11) ou « » (12).
Lorsque l’alarme de température est désactivée, l’indication « OFF » est
(
affichée sur l’écran.
Lorsque l’alarme de température est activée, une température est affichée sur
l’écran.
Maintenez ensuite la touche « alarm » (14) enfoncée jusqu’à ce que la
—
température commence à clignoter puis relâchez la touche.
Réglez la température à l’aide des touches « » (11) ou « » (12) (maintenir la
—
touche enfoncée pour un défilement rapide).
Appuyez brièvement sur la touche « alarm » (14) pour enregistrer le réglage et
—
quitter le mode de configuration.
h) Affichage de la tendance pour la température intérieure / extérieure
Les symboles de flèche à droite de la température intérieure / extérieure indiquent
la tendance respective des valeurs mesurées :
À la hausse Constante À la baisse
97
Page 98

14. FONCTION « MÉTÉO / TENDANCE »
La station météo calcule les prévisions météorologiques pour les 12 à 24 heures à
venir à partir de l’évolution de la pression atmosphérique des dernières heures ou
des derniers jours. La précision des résultats se situe aux alentours de 70 %.
Ensoleillé
Partiellement nuageux
Nuageux
Pluie faible
Pluie forte
Faible chute de neige
Forte chute de neige
98
Page 99

Veuillez noter :
Si la station météo affiche « Ensoleillé » la nuit, cela signifie une nuit étoilée.
—
Le symbole « Pluie » est remplacée par le symbole « Neige » lorsque la
—
température extérieure est inférieure à 0 °C (température mesurée par le
capteur extérieur sur le canal 1, celui-ci ne doit donc pas être installé dans une
cave ou une pièce similaire !).
L’affichage n’indique pas la météo actuelle, il s’agit d’une prévision pour les 12 à
—
24 heures à venir.
Le calcul des prévisions météorologiques uniquement basé sur la pression
—
atmosphérique permet d’obtenir une précision maximale de 70 % environ. La
météo réelle du lendemain peut donc être complètement différente. Comme la
pression mesurée ne s’applique qu’à un rayon d’env. 50 km, la météo peut donc
très vite changer. Ceci vaut notamment en montagne et en haute montagne.
Ne vous basez donc pas sur les prévisions météorologiques de la station météo
mais informez-vous sur place lorsque vous souhaitez par ex. entreprendre une
randonnée en montagne.
En cas de variations soudaines ou importantes de la pression atmosphérique,
—
les symboles sont actualisés sur l’écran afin d’indiquer le changement de temps.
Si les symboles ne changent pas, cela signifie que la pression n’a pas changé ou
que le changement est survenu si lentement qu’il n’a pas pu être enregistré par
la station météo.
Lorsque les symboles « Soleil » ou « Pluie » s’affichent pour les prévisions
—
météorologiques, l’affichage ne change pas non plus si le temps s’améliore
(symbole « Soleil ») ou se gâte (symbole « Pluie ») étant donné que les symboles
affichés représentent déjà les deux situations extrêmes.
Les symboles indiquent une amélioration ou dégradation du temps, ce qui ne
signifie pas forcément que le soleil brille ou qu’il pleuve (comme indiqué par les
symboles).
Après avoir inséré les piles, il ne faut pas tenir compte des prévisions
—
météorologiques pour les premières 12 ou 24 heures car la station météo doit
d’abord collecter des informations sur la pression atmosphérique à une altitude
constante pendant cette période avant de pouvoir fournir des prévisions
météorologiques plus précises.
Si la station météo est installée à un emplacement nettement plus élevé ou
—
plus bas que l’emplacement initial (par ex. en cas de déplacement du rez-dechaussée aux étages supérieurs d’une maison), la station peut traduire ce
déplacement comme étant un changement de temps.
99
Page 100

15. REMPLACEMENT DES PILES
a) Station météo
Les piles doivent être remplacées lorsque le contraste de l’écran est très faible ou
que le symbole «
Remplacez alors les piles par des piles neuves, voir chapitre 9. b).
b) Capteur extérieur
Lorsque les piles du capteur extérieur sont faibles, le symbole «
l’écran à gauche de la température extérieure.
Lorsque les piles sont complètement vides et que le capteur extérieur ne transmet
plus de mesures, la température extérieure est remplacée par des tirets sur l’écran.
Pour remplacer les piles, procédez de la manière décrite dans le chapitre 9. a).
Lorsque la station météo ne trouve plus le capteur extérieur, effectuez une
(
recherche manuelle des capteurs extérieurs.
Maintenez la touche « » (12) enfoncée jusqu’à ce que le symbole (3) pour
la réception sans fil des capteurs extérieurs clignote sur la gauche de l’écran.
La recherche de capteurs peut durer plusieurs minutes. Pendant ce temps,
ne déplacez pas la station météo et n’appuyez sur aucune touche.
» s’affiche dans la zone de l’horloge.
» s’affiche sur
100
 Loading...