

Eurocave Classic 83 Technical Manual
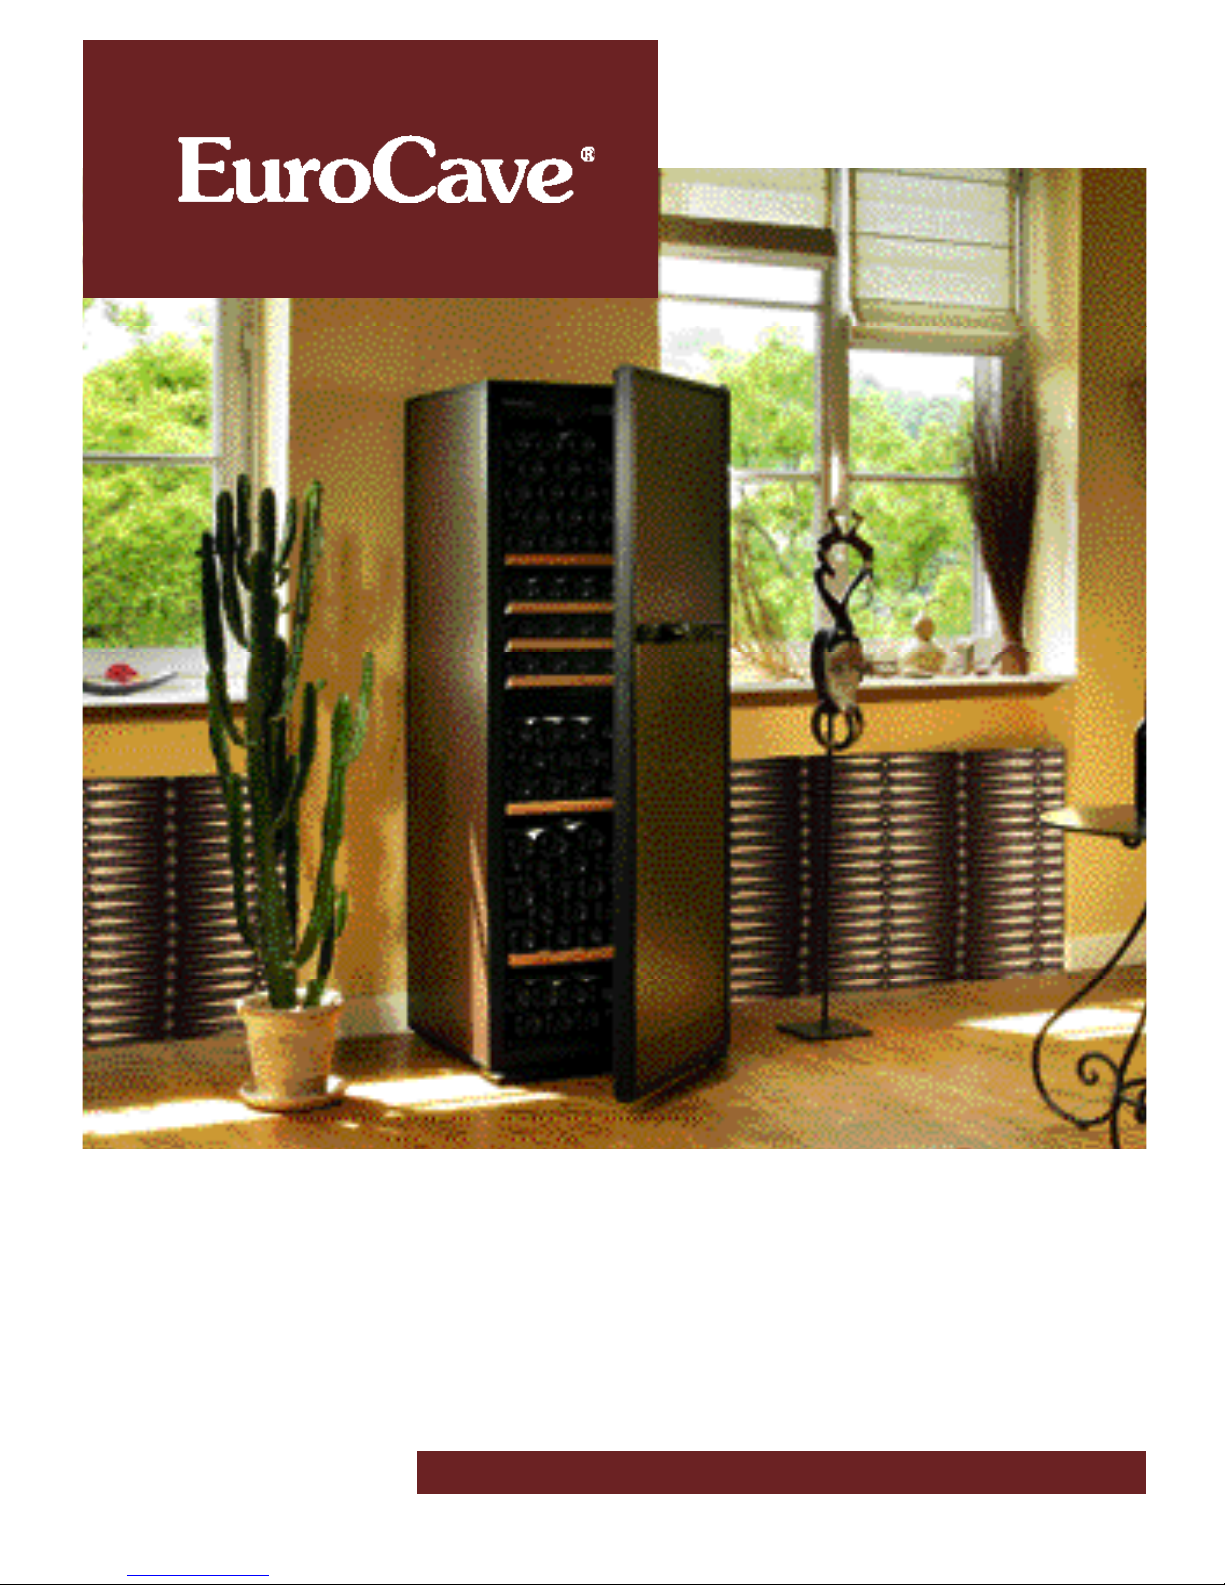
Mode d’emploi - Gamme Classic 83
Technical Manual - Classic 83 range
Gebrauchsanweisung - Classic 83
Modo de empleo - Gamma Classic 83
2
3 English
Our principle aim is to the best of our ability to enhance your enthusiasm for wine throughout the years …To achieve
this, EuroCave uses all its know-how to bring together the 6 criteria essential to wine maturing:
Temperature:
The two worst enemies of wine are extreme temperatures and wildly fluctuating temperatures. A constant temperature
of 10 to 14°C (50 to 57°F) is considered ideal for wine to reach its apogee.
Humidity:
This is an essential factor, enabling the corks to retain their sealing characteristics.The humidity level should, ideally, be
higher than 50% (between 60 and 75%).
Darkness:
Light, and more especially its ultra-violet content, has a rapid and harmful effect on wine through the irreversible oxidation
of the tannins. For this reason it is strongly recommended that you store your wine in the dark and away from U.V. rays.
Lack of vibration:
Vibration disturbs the slow process of biochemical evolution in wine and is often fatal to the finer ‘crus’.
Storage:
Moving your wine bottles around too often is detrimental to correct wine preservation. Having appropriate storage that
cuts down on handling is essential.
Natural ventilation:
A constant supply of filtered air from the outside is indispensable if unpleasant smells and mould development are to be
avoided.
All of these criteria are embodied in the EuroCave Classic cabinet that you have just acquired.We thank you for the faith
you have shown in us.
French Wines
Alsace 10°C / 50°F
Beaujolais 13°C / 55°F
Sweet white Bordeaux 6°C / 43°F
Dry white Bordeaux 8°C / 46°F
Bordeaux reds 17°C / 63°F
White Burgundy 11°C / 52°F
Burgundy reds 18°C / 64°F
Champagne 6°C / 43°F
Jura 10°C / 50°F
Languedoc-Roussillon 13°C / 55°F
Provence Rosé 12°C / 54°F
Savoie 9°C / 48°F
Dry white Loire wines 10°C / 50°F
Sweet white Loire wines 7°C / 45°F
Loire reds 14°C / 57°F
Rhône wines 15°C / 59°F
Sweet wines from the South-West 7°C / 45°F
Reds from the South-West 15°C / 59°F
Australian Wines
Cabernet franc 16°C / 61°F
Cabernet sauvignon 17°C / 63°F
Chardonnay 10°C / 50°F
Merlot 17°C / 63°F
Muscat à petit grain 6°C / 43°F
Pinot noir 15°C / 59°F
Sauvignon blanc 8°C / 46°F
Semillon 8°C / 46°F
Shiraz 18°C / 64°F
Verdhelo 7°C / 45°F
Other wines
Californian 16°C / 61°F
Chilli 15°C / 59°F
Spanish 17°C / 63°F
Italian 16°C / 61°F
Standard wine service temperatures
W
ELCOME TO THE WORLD OF
E
UROCAVE

4
C
ONTENTS
1 • DESCRIPTION OF YOUR WINE CABINET p. 5
2 • I
MPORTANT SAFETY RECOMMENDATIONS p. 6
3 •
POWER SUPPLY
p. 6
4 • E
NVIRONNEMENTAL PROTECTION AND POWER SAVING
p. 6
5 • I
NSTALLING YOUR WINE CABINET
l- In general p. 7
II- Fitting the handle and left and right hand door fitting p. 8
a- Parts list p. 8
b- Fitting the handle (solid door) p. 9
c- Changing a solid door from right to left hinge p. 10
d- Changing a glass door from right to left hinge p. 11
6 • A
RRANGEMENT AND STORAGE
l- Various storage methods p. 12
lI- Advice on arranging your wine cabinet p. 12
lII- Adding sliding shelves p. 12
lV- Changing the shelf arrangement in the wine cabinet p. 13
7 • C
OMMISSIONING YOUR WINE CABINET
1- Connecting the cabinet p. 13
II- Switching on the cabinet p. 13
III- Description of the control panel p. 14
IV- Temperature adjustments
a- 1-temperature models (V083 - V183 - V283) p. 15
b- 2-temperature models (D183 - D283) p. 16
c- 3-temperature models (E183 - E283) p. 17
d- Multi-temperature models (S083 - S183 - S283) p. 18
V- Relative humidity level display p. 19
VI- Lighting mode adjustment p. 19
VII- Adjusting the display contrast p. 19
VIII- Carbon filter counter log display p. 19
8 • A
LARMS
1- Temperature p. 20
II- Open door p. 20
III- Humidity rate p. 20
IV- Carbon filter p. 21
9 • S
TANDARD MAINTENANCE
p. 21
10 • O
PERATING FAULTS
1- Temperature p. 21
II- Hot and cold circuits p. 21
III- Temperature probes p. 22
IV- Frost prevention device p. 22
V- Lighting p. 22
11 • T
ECHNICAL SPECIFICATIONS
p. 22
12 • S
TORAGE LAYOUT EXAMPLES
p. 83
5
1 -
Cabinet case
2 -
Hinge
3 -
Door (fitted with handle and a double
movement lock)
4 -
Sliding shelf
5 -
Storage shelf
6 -
Location of temperature probes in 1, 2 and
3 temperature models
6
Cont.
-
Location of temperature probes in 2 and
multiple temperature models
7-
Logo
8 -
2 adjustable levelling feet
9-
Plinth
10 -
Door pivot guide
11 -
Free air circulation hole
12 -
Cabinet bracing bar (do not re m o ve )
13 -
Air circulation hole + Active carbon filter
14 -
Control and adjustment panel
15 -
2 lights
16 -
Humidity cassette (1 & 2 temperature models)
17 -
Grid
18 -
Closing clip
1 - D
ESCRIPTION OF YOUR WINE CABINET
1
2
3
4
12
5
6
6
bis
7
10
8
11
13
15
14
9
18
16
17
6
2 - I
MPORTANT SAFETY RECOMMENDATIONS
Only use your wine cabinet for its intended purpose as described in this manual.
Never disconnect the wine cabinet by pulling on the power supply lead. To remove the plug, grip firmly and pull
in a straight line.
Do not use a power lead that is frayed or showing signs of wear. Have any damaged power lead replaced
immediately by a qualified electrician.
Do not allow children to climb, sit on, stand on or hang from the shelves of the wine cabinet. They could damage
the wine cabinet and cause themselves serious injury.
Take care to keep keys out of reach of children in order to avoid them locking themselves in the cabinet.
NB: to ensure optimum safety, the wine cabinet is fitted with a double movement lock. In order to open or close
the door you should first push the key, then turn it (see figure 6 page 9).
To avoid all risk of electric shock, the wine cabinet's power supply lead is fitted with a plug designed to
fit into a standard earthed socket.
Have the power supply socket checked by a qualified electrician to confirm that it is earthed, and, if
necessary have the work done to bring it into compliance.
If the power supply lead is damaged obtain a new one from your usual dealer.
The power lead should be replaced by an original manufacturer’s part.
I M P O R TA N T : a n y intervention should be carried out by a qualified electrician.
Caution
When using your wine cabinet
a l w a ys take certain basic
p r e c a u t i o n s , e s p e c i a l l y :
Make sure that the plug is earthed and that the installation's circuit is protected
by a 30 mA fuse.
3 - P
OWER SUPPLY
For your personal safe t y, the wine cabinet should be pro p e r ly eart h e d .
Cabinet disposal:
If you wish to dispose of your wine cabinet, check with your local municipal refuse department in order to comply with the correct environmental friendly
disposal procedures.
• Some substances and parts contained in EuroCave wine cabinets, particularly the refrigeration gases, use recyclable materials that require special disposal
procedures.
Remove the lock so that children cannot become trapped inside the cabinet.
Disable non operable appliances and disconnect and cut the power lead into short lengths.
Disposal of packaging:
The packaging components used by EuroCave are made out of recyclable materials.
After unpacking your cabinet, take the discarded packaging, the majority of which is recyclable, to a refuse collection point.
To comply with environmental protection legislation, your wine cabinet does not contain C.F.C gases.
Power saving:
- Install your cabinet in an appropriate location (see page 7) which provides the recommended ambient temperature ranges.
- Do not keep the door open any longer than necessary.
- Make sure that the seal is not damaged and seals correctly. Contact your dealer if damaged.
4 - E
NVIRONMENTAL PROTECTION
AND POWER SAVING

7
5 - I
NSTALLING YOUR WINE CABINET
-On unpacking you wine cabinet after delivery, check for any obvious exterior damage (dents, malformation, etc.).
- Open the door and check that the inside of the appliance is complete and in good condition (walls, shelves, hinges, control panel,etc.).
- In the event of a problem,contact your dealer.
- Move your wine cabinet to your selected location. This location should:not be a confined space. There should be- allow air flow around the cabinet.
(not placed in a cupboard, etc.)
- away from any heat source
- not too wet (wash room, utility room, bathroom, etc.)
- be on a flat solid floor
- have an electrical power supply (standard 13A plug connected to a 30 mA circuit breaker)
- Never place your wine cabinet in a location liable to flooding.
- Avoid splashing water onto the base of the appliance.
- Place the clay humidity vessel (for 1 and 2-temperature models only), which you will find
inside your cabinet's "accessories" box) in the receptacle provided for it beneath the grid
located at the base of the cabinet (see diagram page 20). When using the vessel for the first
time, please soak it for ten minutes in water, and let it drain.
- Install the drip tray (which you will find inside your cabinet's "accessories" box) on the
compressor support at the back of the cabinet, locating it under the small pipe protruding
from the housing, the lower part of the tank being placed under this pipe (see diagram
opposite).
- Take the power lead (which you will find inside your cabinet's "accessories" box) and connect it to the socket provided
at the rear bottom left of the cabinet.
- Unwind the power supply lead so that it can be accessed and place the appliance leaving a space between 8 and 10 cm
space between the wall and the back of your wine cabinet.
- Place the power supply lead so that it is not in contact with any of the appliance's components.
- I M P O RTANT - Wait 48 hours befo r e switch
ing on to allow the fluids contained in the internal circuits to settle.
- Gently incline the wine cabinet backwards in order to adjust the front feet (screw adjustment) so that your wine cabinet
stands perfectly level (we recommend using a spirit level).
- Remove the protective items located inside your wine cabinet.
- Install the carbon filter,which you will find inside your cabinet's "accessories" box , by placing it in the air circulation hole located inside the cabinet on the
top left hand side (see diagram opposite).
N.B.: when moving your wine cabinet, do not incline it more than 45°,and always
toward side where the power lead is located.
Did you know?
A wine cabinet must be designed in such a way that bottles do not come into contact with the rear wall. In
some circumstances, condensation created on the rear wall can trickle down onto the shelves and damage the
bottle labels. Also, contact with a cold wall can create a frost point which is harmful to the wine.
I - In General

8
5 - I
NSTALLING YOUR WINE CABINET
II - Fitting the handle and left and right hand door fitting
a - Summary of parts
2 • Handle
3 • Pin
4 • Nut
5 • Lock
6 • Locking bar
7 • No.20 Torx screw
8 • EuroCave Logo
9 • 10 • 11 • 12 • Grommets
13 • No. 25 Torx screw 25
14 • Hinge
15 • Pivot
16 • Door pivot guide
17 • Washer
18 • Phillips screws
19 • Closing clip
X 3
X 3
X 3
X 4
X 2
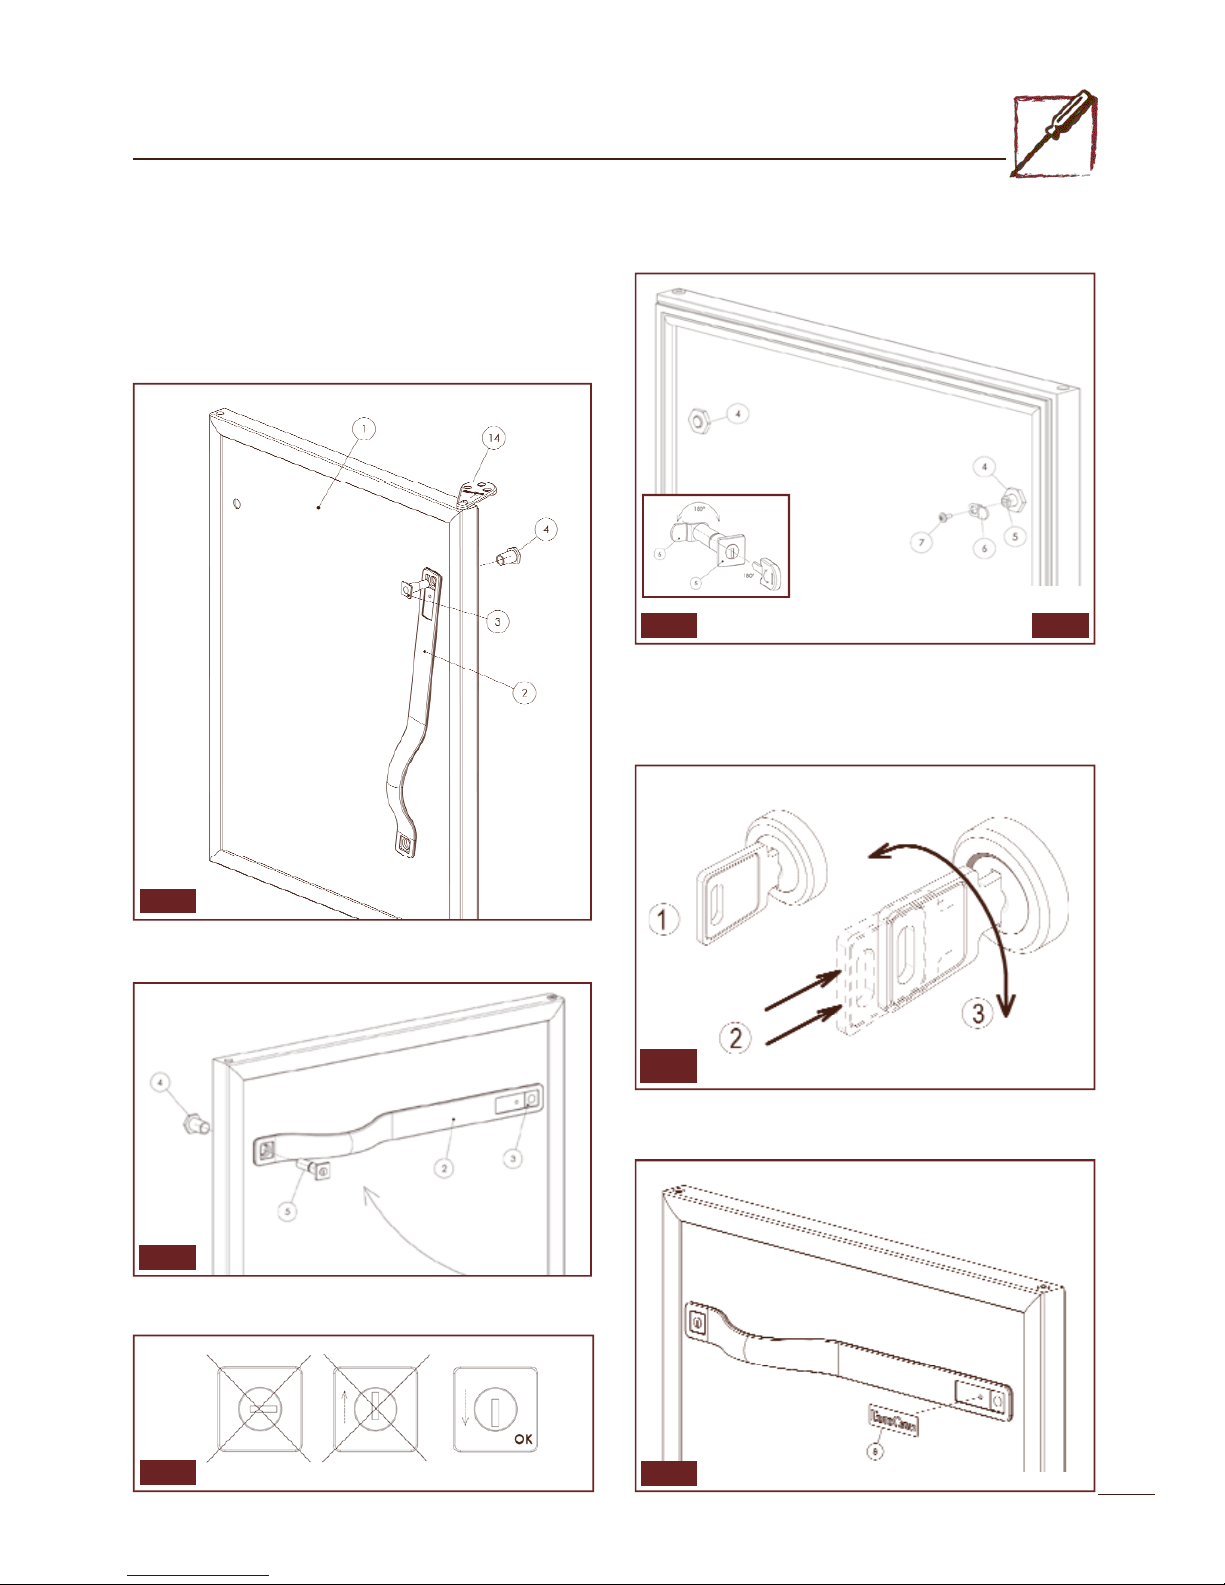
9
5 - I
NSTALLING YOUR WINE CABINET
b - Fitting the door handle (solid door)
The door handle is included in the box of accessories that you will find
inside the wine cabinet.
In order to fit it (example for a right hand door):
• Open the door (1)
• Place the handle (2) vertically (with the grip section downwards), see
Fig.1
• Use the plastic nut (4), to screw on the pin (3) (hinge side (14) of the
door) without fully tightening see Fig.1
* !!! Take care to ensure the direction in which the locking bar(6) rotates,
this should always be upwards (irrespective of whether the door is fitted
on the left or right)
• Lift the handle (2) to its final horizontal position see Fig.2
• By hand, use the plastic nut (4) to screw on the lock (5), see Fig.2
• Stick on the self-adhesive “EuroCave” logo (8), see Fig.7
Remember to peel off the protective film covering the logo.
• Hand tighten the two plastic nuts (4) to the maximum, then finish
tightening using a 28mm spanner (Maximum 1/2 turn of the spanner)
• Attach the locking bar (6), on the end of the lock (5), with the screw (7)
using a Torx "TX20" screwdriver, see Fig.4 and 5
!!! Ta ke note, for security re a s o n s , the key has a "double move m e n t " : yo u
must at the s ame time both push it in and turn it, see Fig.6
Fig. 1
Fig. 2
Fig. 3
Fig. 6
Fig. 7
Fig. 4 Fig. 5
• Place the lock so that the key hole is vertical, and always directed
downwards, see Fig.3
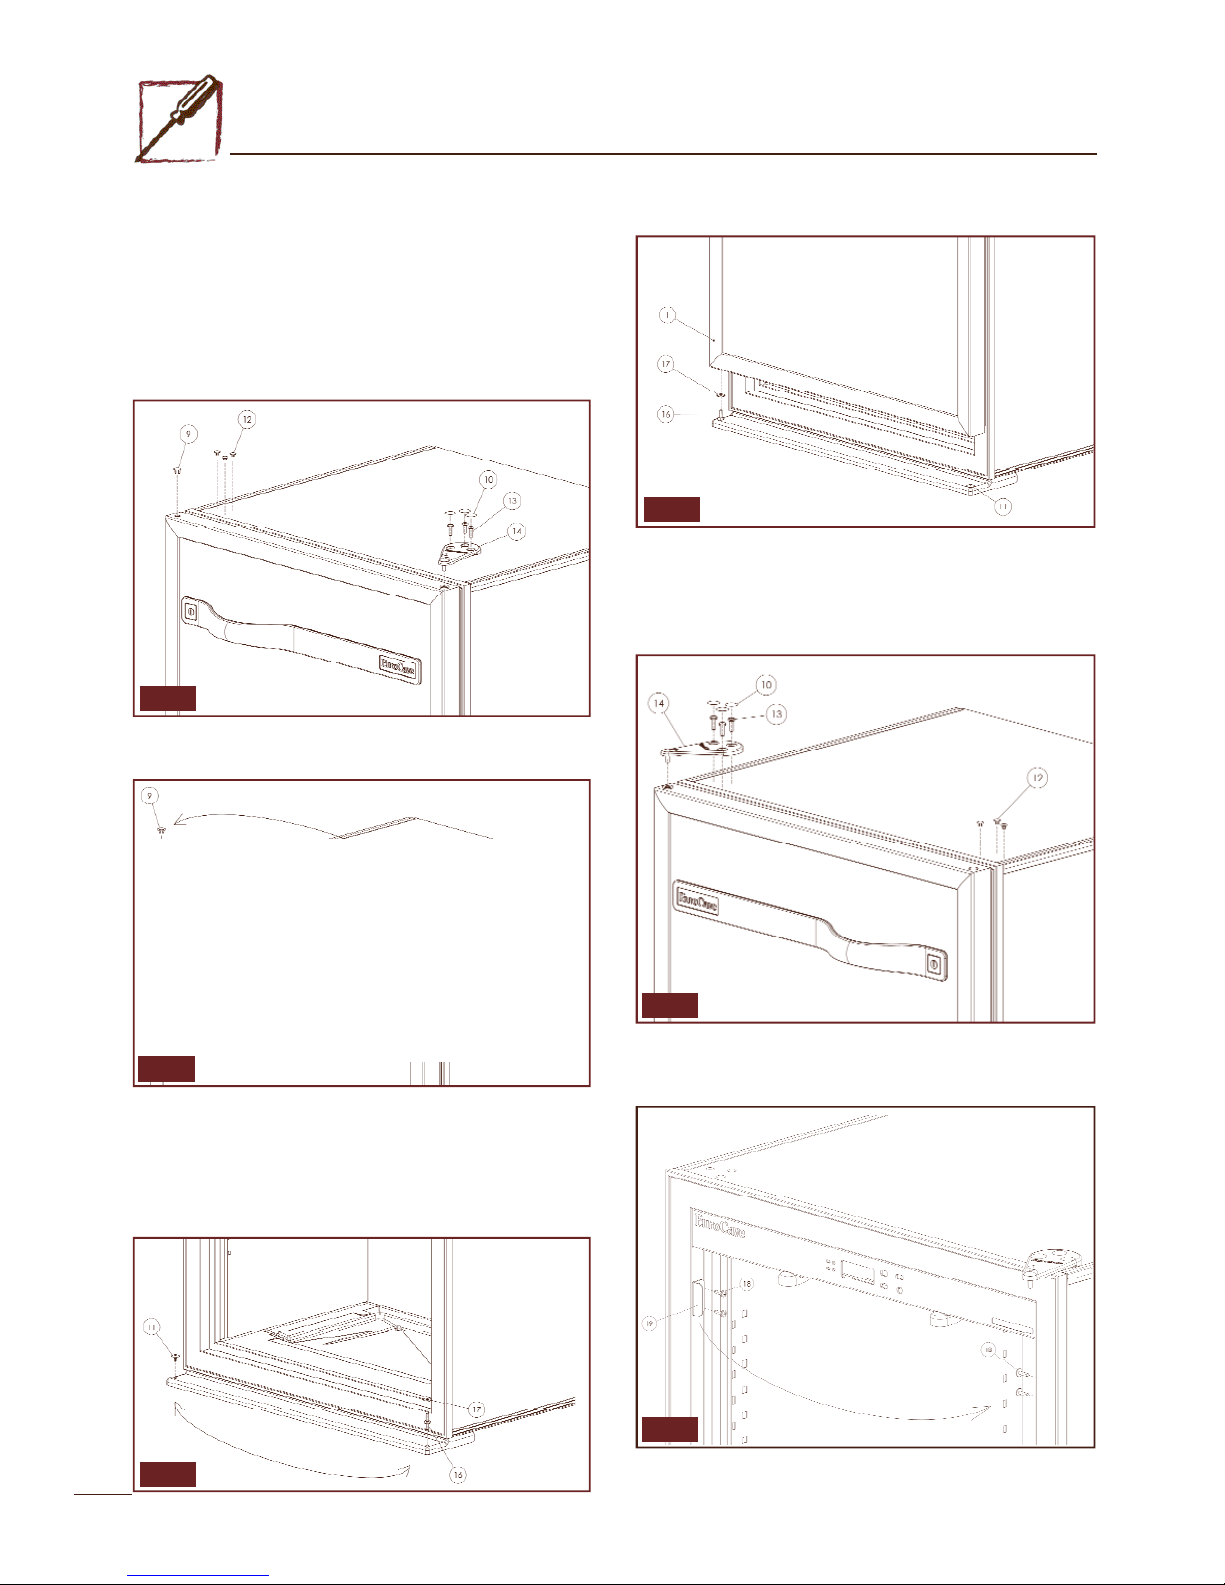
10
5 - I
NSTALLING YOUR WINE CABINET
c - A l t e r n a t i ve hanging of a solid door
The solid wine cabinet door can be hinged either left or right.
You can change which way it opens.
To do this, proceed as follows (example for changing a right hand door to
a left hand door):
• Close the door
• Remove the grommets (9-10-12) gently using a fine blade, see Fig. 8
• Loosen the three screws (13), see Fig. 8.
• Remove the upper hinge (14), see Fig. 8.
• Remove the plastic pivot (15) and the grommet (9) and and swap them
over, see Fig. 9
• Lift the door from the lower hinge by opening the door slightly and then
lifting it.
• Remove the grommet (11) gently using a fine blade, see Fig. 10
• Unscrew the door pivot guide (16) with the washer (17), then tighten it
onto the same part on the opposite side, see Fig.10 (a 10mm spanner can
be used)
• Relocate the grommet (11), on the opposite side see Fig.10
• Relocate the hinge (14), using the screws (13) in such a way so that the
door is parallel with the case, see Fig.12
• Check (by closing the door) that the seal adheres well to the housing and
is leak proof
• Replace the grommets (10) and (12), see Fig.12
• Replace the door (1) on its pivot guide (16), not forgetting the washer
(17), see Fig.11
• Change the handle opening direction (see chapter on handle assembly).
• Remove the logo by pushing on it (access behind handle).
Fig. 8
Fig. 9
Fig. 10
Fig. 11
Fig. 12
Fig. 13
• Loosen the four screws (18), see Fig. 13.
• Locate the foot (19) on the other side of the housing using the screws
(18) see Fig.13
 Loading...