

Eurocave 6182S, 6182V, 6074V, 6170D, 6074S User Manual
Série 6000
Solutions pour la mise en valeur & le service du vin
*
**
* Solutions for merchandising and the service of wine - 6000 Series – ** Fully customizable wine cabinets
Mode d’emploi • Technical Manual • Gebrauchsanweisung
Modo de empleo • Mode d’emploi • Technical Manual
Gebruiksaanwijzing • Modo de empleo • Mode
Des caves intégralement personnalisables
d’emploi • Istruzioni per l’uso • Gebrauchsanweisung
N6000-0815-7L-V9.indd 1 18/09/15 11:47

N6000-0815-7L-V9.indd 2 18/09/15 11:47

gB
WelCome
PleAse note
You have just purchased a EuroCave Professional product – thank you for your custom. We take particular care in
manufacturing our products in terms of their design, ergonomics and ease of use.
We hope that you will be completely satisfied with this product.
The information contained in this document may be changed without warning.
EuroCave Professional offers no guarantee for this appliance when it is used for purposes other than those for which it
was designed.
EuroCave Professional shall not be held responsible for any errors contained in this manual or for any damage linked to or
resulting from the supply, performance or use of this appliance.
This document contains original information, which is protected by copyright. All rights are reserved. Photocopying,
reproducing or translating this document, whether partially or completely, is strictly forbidden, without EuroCave
Professional’s prior written consent.
This appliance is intended solely for storing wine.
It is not designed to be used by people (including children) with reduced mental, sensorial or physical abilities, or by people
who have no experience or knowledge, unless they have first received instructions on how to use the machine or are
supervised by a person responsible for their safety.
Children must be supervised to ensure that they do not play with the appliance.
If the power lead is damaged, it must be replaced by a special cable or unit available from the manufacturer or its customer
service department.
WARNING:
- Ensure that the air vents in the appliance’s cavity and the flush-fitting structure are unobstructed.
- Do not use mechanical devices or other means to speed up the defrosting process other than those recommended by
the manufacturer.
- Do not damage the refrigeration circuit.
- Do not use electrical appliances inside the wine storage compartment, unless they have been recommended by the
manufacturer.
- Do not store in this appliance explosive substances such as aerosols containing flammable propellant gas.
This appliance is intended for domestic and similar applications such as:
- kitchenettes reserved for staff of shops, offices and other professional environments;
- gites and use by guests of hotels, motels and other environments which are residential in nature
- hotel rooms;
- the food service industry and other similar applications except for retail sale.
There is a name plate inside the cabinet. The name plate provides various technical information and safety notice with a
yellow flame triangle label, name and chemical symbol of the refrigerant.
The refrigerator contains flammable refrigerant (R600a: iso-butane). Requirements to ensure gas safety and safe use of
refrigerators: The refrigerator system behind and inside the refrigerator contains refrigerant. Do not allow any sharp
objects must come into contact with the refrigeration system.
- Do not use electrical appliances inside the wine cabinet.
Childrend should be supervised to ensure that the refrigerator should be used properly.
Do not use the mechanical devices or other means to accelerate the defrosting process, unless they are of the type
recommended by the manufacturer.
Do not block the openings on the circumstances of the refrigerator.
- In case of having damaged the refrigerant circuit, do not use electic items or fire equipments nearby, and open all the
windows to provide good ventilation. Please also contact your local maintenance agent to follow up
- Do not remove the bottom grill of the cabinet unless it is recommended by the manufacturer. Do not place directly the
wine bottles without the grill.
- The use of an extension cord is not recommended.
- DANGER: Risk of child entrapment. Before you throw away your old wine cabinet:
- Take off the doors
- Leave the shelves in place so that children may not easily climb inside.
The warning labels mentioned above should be kept throughout the life of the refrigerator. The user manual should be
handed over to any person who would use or handle the refrigerator whenever the refrigerator would be transferred to
another location and delivered to a recycling plant;
N6000-0815-7L-V9.indd 3 18/09/15 11:48
WelCome to the WoRld oF euRoCAve PRoFessionAl
Our priority is helping you to find the best solutions for your wine storage needs…To do so, EuroCave Professional has
drawn on its considerable expertise to combine the 6 essential criteria for serving wine:
Temperature
The two enemies of wine are extreme temperatures and sudden fluctuations in temperature. A constant temperature
allows wine to reach its full potential.
Humidity
It is an important factor, allowing the corks to retain their sealing qualities. The level of humidity must be above 50%
(ideally between 60 and 75%).
Protection from light
Light, particularly its ultraviolet component, causes wine to deteriorate very quickly by irreversible oxidation of tannins.
It is therefore strongly recommended that you store your wine in a place protected from U.V. light.
Lack of vibration
Vibration disturbs wine’s long development process and is often fatal for your finest wines. The “Main Du Sommelier”
supports adapt to the shape of the bottle and protect it from vibration (anti-vibration technology).
Circulation of air
A constant supply of fresh air prevents mould from developing in your cabinet. EuroCave Professional cabinets benefit
from a ventilation system by breather effect, which makes it very similar to the ventilation system found in a natural cellar.
Storage
Moving bottles around too often is harmful to your wine. Having suitable shelving which limits handling is essential.
Thank you for placing your trust in EuroCave Professional.
Standard temperatures for serving wine
French wines Australian wines
GB
Alsace
Beaujolais
Sweet White Bordeaux
Dry White Bordeaux
Bordeaux Reds
Burgundy Whites
Burgundy Reds
Champagne
Jura
Languedoc-Roussillon
Provence Rosé
Savoie
Dry White Loire Wines
Sweet White Loire Wines
Loire Reds
Rhône wines
Sweet Wines from the South-West
4
Reds from the South-West
10 °C
13 °C
6 °C
8 °C
17 °C
11 °C
18 °C
6 °C
10 °C
13 °C
12 °C
9 °C Other wines
10 °C
7 °C
14 °C
15 °C
7 °C
15 °C
Cabernet franc
Cabernet sauvignon
Chardonnay
Merlot
Muscat à petit grain
Pinot noir
Sauvignon blanc
Semillon
Shiraz
Verdhelo
California
Chile
Spain
Italy
16 °C
17 °C
10 °C
17 °C
6 °C
15 °C
8 °C
8 °C
18 °C
7 °C
16 °C
15 °C
17 °C
16 °C
N6000-0815-7L-V9.indd 4 18/09/15 11:48
Contents
1 - Description of your wine cabinet 6
2 - Power supply 7
3- Protecting the environment and saving energy 7
4 - Installing your wine cabinet 7
I - Door reversibility 8
5 - Layout – Storage 11-14
I- Adding or changing the position of a sliding shelf 12
II- Adding or changing the position of a storage shelf AXUH2 14
III- Assembly and use of shelf labels 14
6 - Commissioning your wine cabinet 15
I Connection and powring up 15
II-A Description (1 temperature model 6074V, 6182V) 15
II-B Temperature setting 15
III-A Description (2 temperatures model (6170D) 16
III-B Temperature setting 16
IV-A Description (multi temperatures model (6074S, 6182S) 17
IV-B Temperature setting 17
V - Relative humidity level display 18
VI - Setting the lighting mode 18
VII - Charcoal filter meter display 18
7 - Everyday maintenance 19
8 - Operating faults 20
9 - Energy and technical features 20-21
10 - Storage simulation 111-112
5
GB
N6000-0815-7L-V9.indd 5 18/09/15 11:48
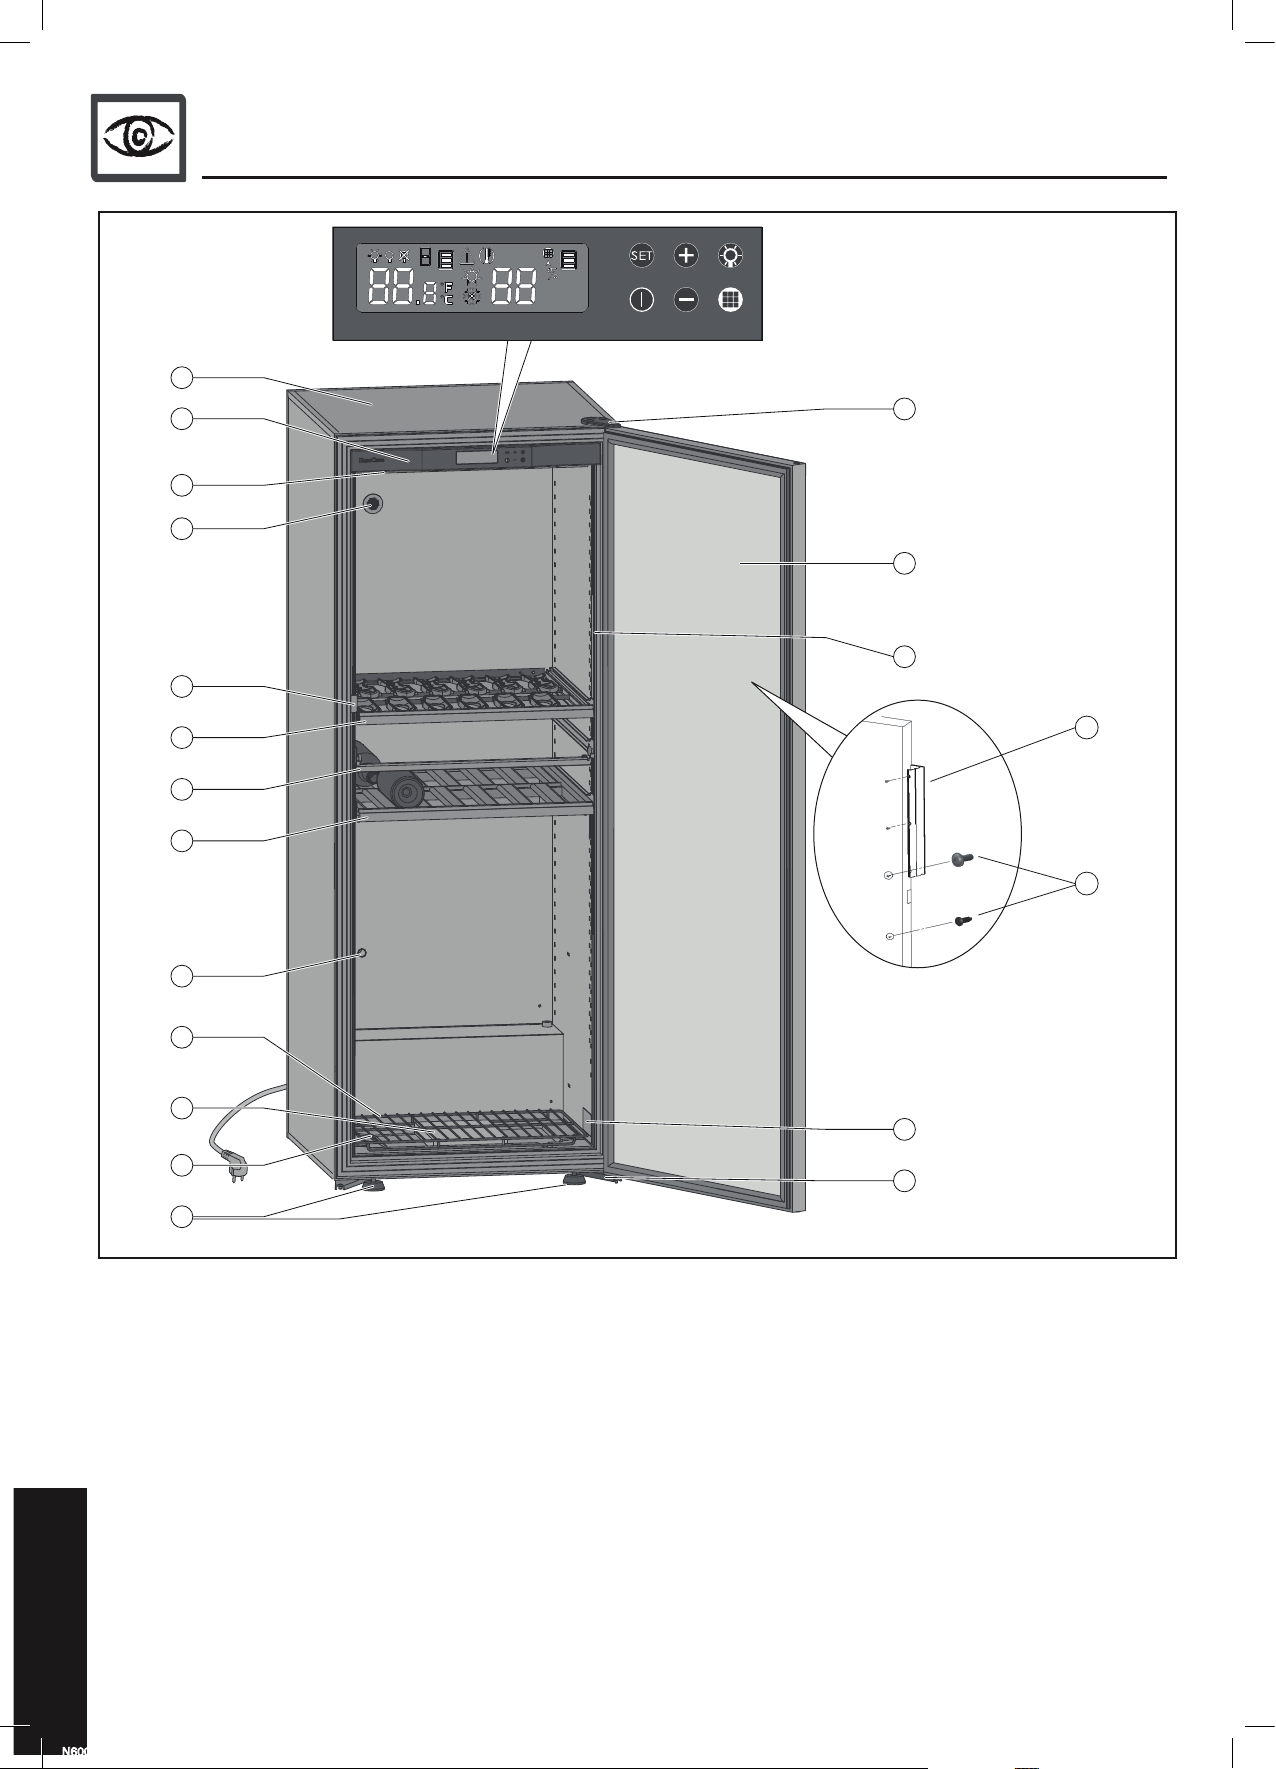
1 - desCRiPtion oF youR Wine CABinet
A
B
C
E
F
Q
P
D
G
H
I
O
J
K
R
L
A Cabinet body
B Setting and control panel
C Lighting (2 LEDs or 4 LEDs on 6170D model)
D Light strip (optional extra - except 6170D model)
E Breather hole + Active charcoal filter except 6170D
model
F Door catch
G Sliding shelf
H Cabint body stiffener (large models only) or shelf
separating the 2 compartments includes the stiffener
(6170D model only) - do not remove
I Storage shelf
6
GB
S
T
N
M
J Grill
K Humidity cartridge - 1-temperature model only
L 2 adjustable feet for levelling
M Lower hinge (x2)
N Product identification label
O Fresh air vent (except 6170D model)
P Door (fitted with a handle and a dual-action lock)
Q Upper hinge
R Condensate collection tray with outlet hole
S Detachable handle (Full Glass doors only)
T Three screws, three caps (Full Glass doors only)
N6000-0815-7L-V9.indd 6 18/09/15 11:48
2 - PoWeR suPPly
For your personal safety, the wine
cabinet must be correctly earthed.
Ensure that the socket is correctly
earthed and that your installation is
protected by a circuit breaker
(30 mA*)
*Not applicable to some countries.
3 - PRoteCting the enviRonment And sAving
eneRgy
4 - instAlling youR Wine CABinet
The wine cabinet’s power lead has a plug, to be plugged into a standard earthed outlet to prevent
The wine cabinet’s power lead has a plug, to be plugged into a standard earthed outlet to prevent
any risk of electric shock.
any risk of electric shock.
Have the power supply socket checked by a qualified electrician who will check that it is
Have the power supply socket checked by a qualified electrician who will check that it is
correctly earthed and will carry out, if necessary, work to ensure that the socket
correctly earthed and will carry out, if necessary, work to ensure that the socket
complies with current standards.
complies with current standards.
Contact your usual EuroCave Professional retailer to change the power lead if it is damaged. It
must be replaced by a EuroCave Professional original manufacturer’s part.
If you are moving to a foreign country, check that the supply characteristics of the cabinet
If you are moving to a foreign country, check that the supply characteristics of the cabinet
correspond to the country (voltage, frequency).
correspond to the country (voltage, frequency).
Disposal of packaging
All packaging used by EuroCave Professional is made
from recyclable materials.
After unpacking your cabinet, take the packaging to
a refuse collection point. For the most part, it will be
recycled.
Recycling: a caring gesture
Electrical and electronic equipment can have a harmful effect on the
environment and human health owing to the presence of hazardous
substances.
You should never therefore trash electronic and electrical equipment with
unsorted municipal waste.
When purchasing a new EuroCave Professional product, you can entrust
recycling of your old appliance to your EuroCave Professional retailer.
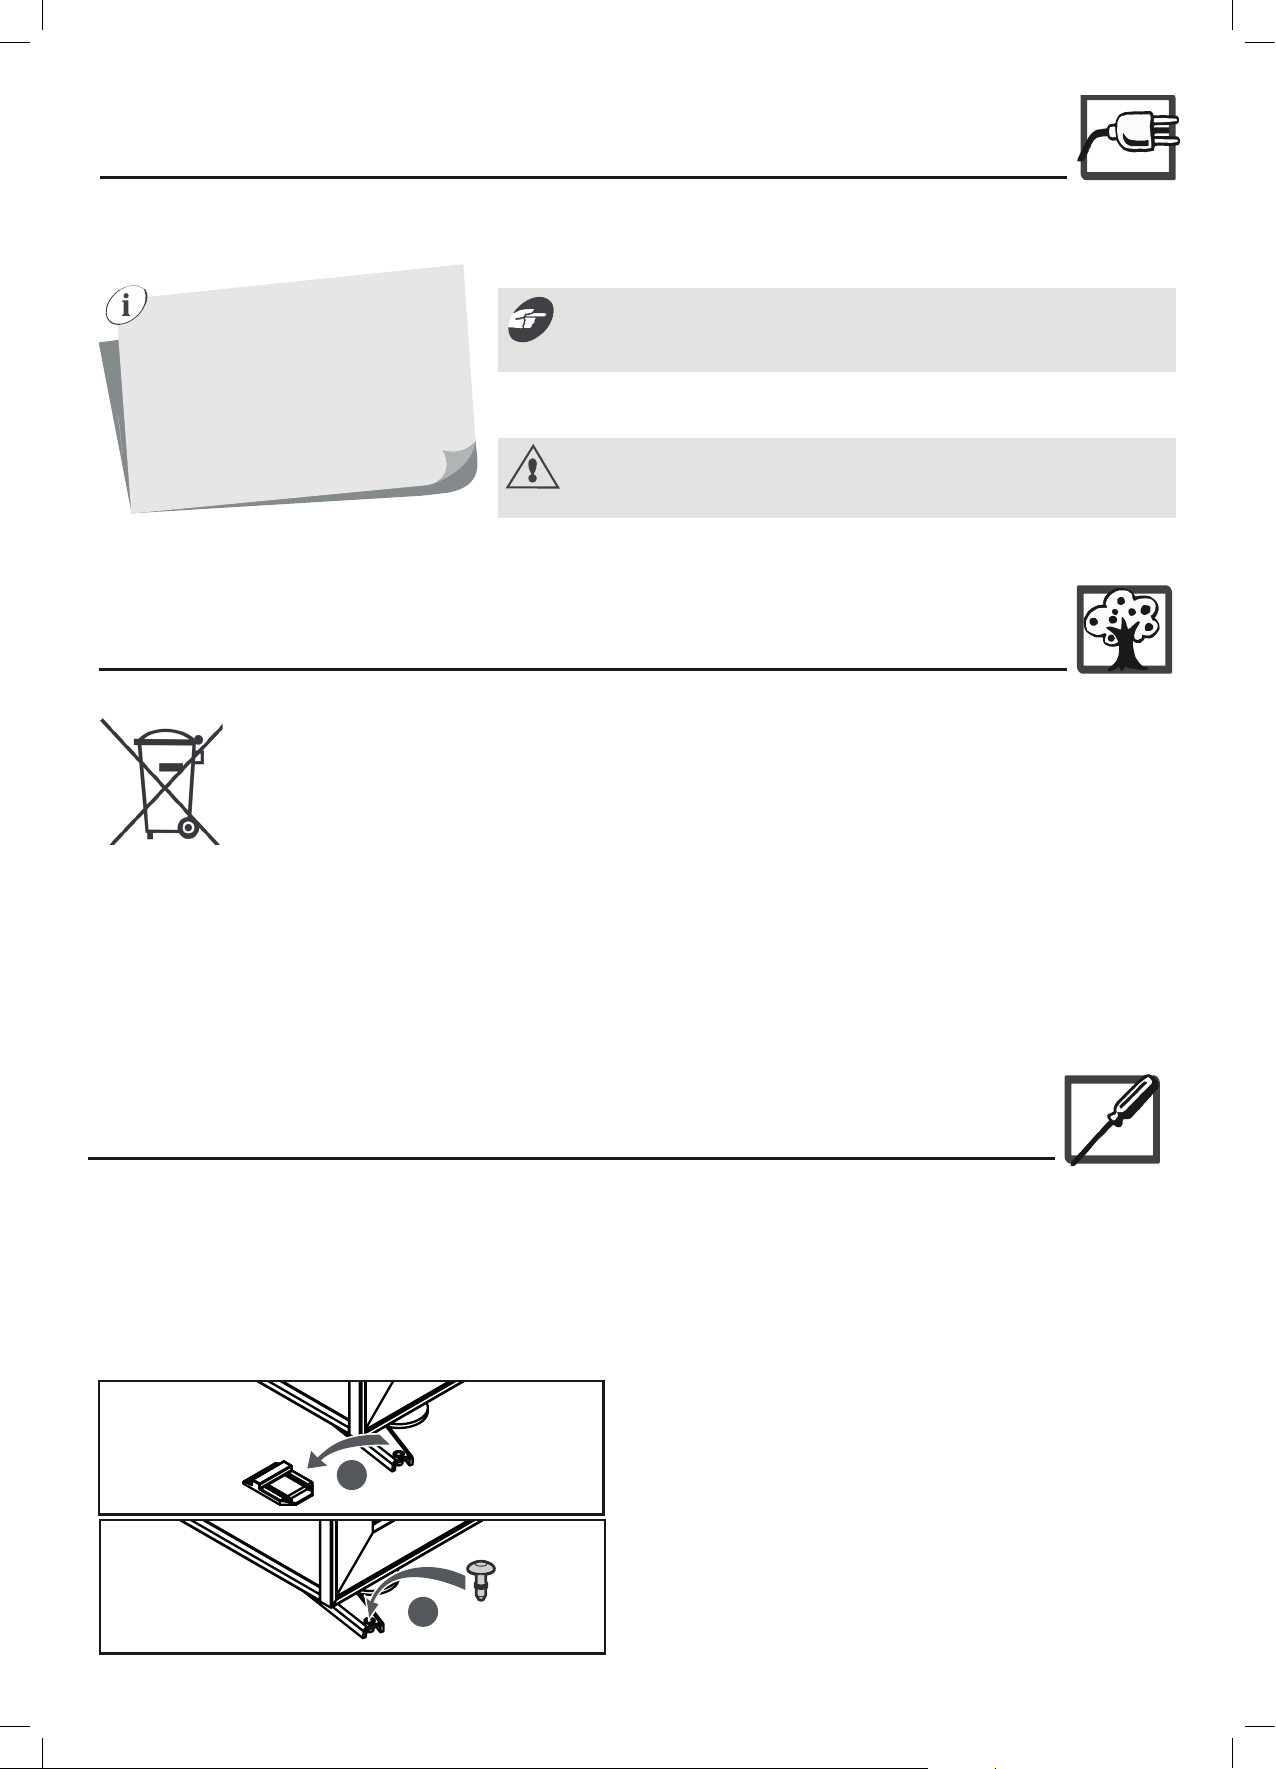
Unpacking
• When your cabinet is delivered, check the outside for signs of damage
(impact, warping…).
• Open the door and check that the various elements inside are intact
(walls, Main du Sommelier supports, hinges, bottle support…).
• Remove the protective elements found inside and outside your cabinet
including the lower hinge protector (see diagram (1))
• Fit the cap (see diagram 2), found in the accessories bag, used for sealing
1
Speak to your EuroCave Professional retailer. He will explain the removal
and collection arrangements set up in the EuroCave Professional network.
In compliance with legislation relating to protecting and caring for the
environment, your wine cabinet does not contain C.F.C.s or H.C.F.Cs.
To save energy
•Install your wine cabinet in a suitable location (see following page) and
observe the recommended temperature ranges.
• Keep the door open for as short a time as possible.
•Ensure that the door seal is in good working order and that it is not
damaged. If it is, contact your EuroCave Professional retailer.
Disable any unusable appliances by unplugging them and cutting off the
power lead.
the hole in the lower hinge.
Precautions
• Do not place your cabinet in an area liable to flood.
• Do not place your cabinet close to a source of heat or expose it to
direct sunlight
• Prevent water from splashing on any parts of the rear of the machine.
• Arrange the power lead so that it is accessible and does not come into
contact with any of the appliance’s components.
• Tilt the cabinet slightly backwards in order to adjust the front feet (by
screwing or unscrewing them) so that you can level your cabinet (spirit
level recommended).
2
7
GB
N6000-0815-7L-V9.indd 7 18/09/15 11:48
When moving your cabinet, never tilt it more than
45°, and always on its side (on the opposite side of
the flexible lead).
Fig.1
Fig.2
Fig.3
Fig.1
Fig.2
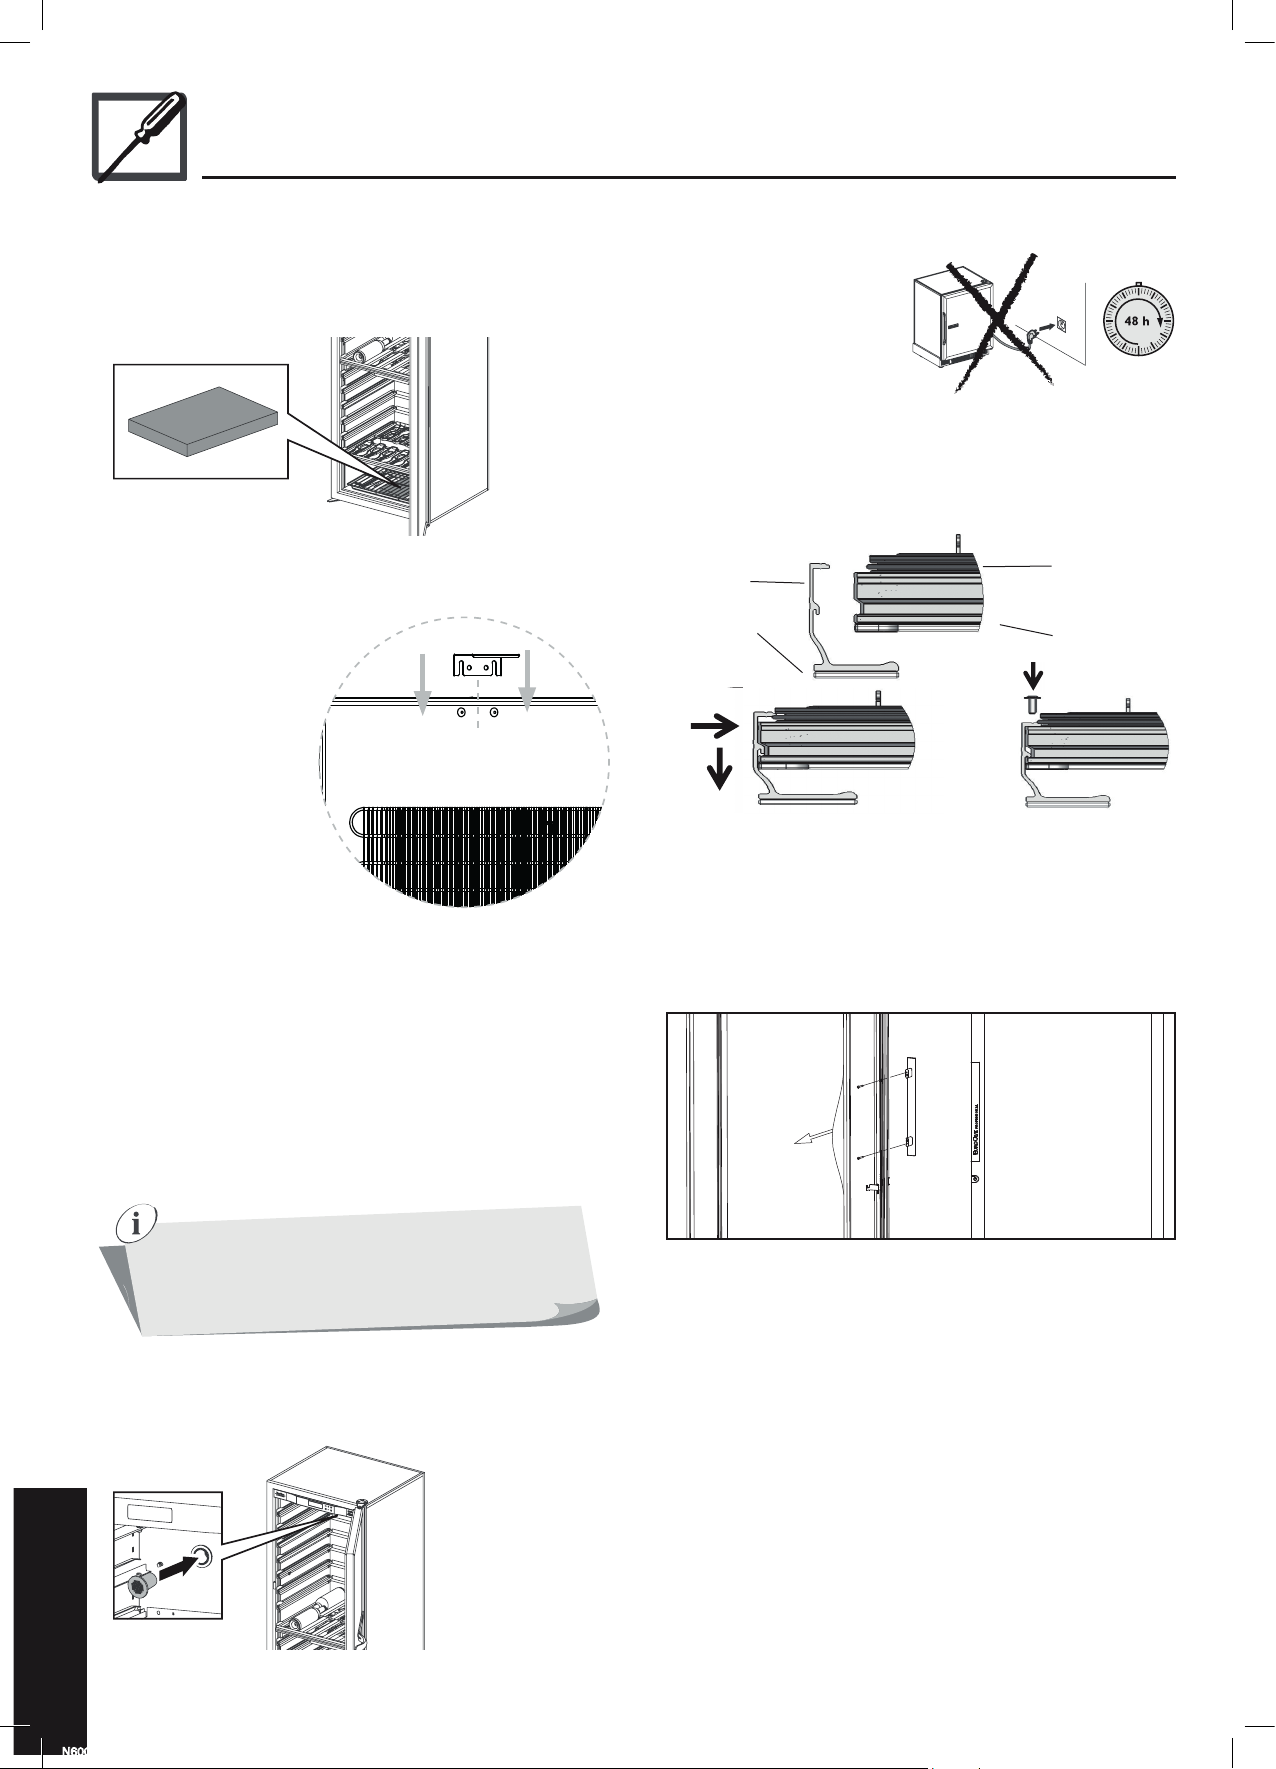
4 - instAlling youR Wine CABinet
Precautions (Continued)
• For 1-temperature models only, place the humidity cartridge (located in
your cabinet’s “accessories” bag) in the base of the cabinet, under the grid,
in the tray provided (see diagram below). When using for the first time,
immerse the entire cartridge in water for a few minutes to saturate it then
drain it thoroughly.
• Install the stop (which is located in the accessories bag) at the back of the
cabinet (see diagram).
• This allows a space of 7 cm
to be maintained between
the wall and the rear of the
cabinet. This spa
ce allows your cabinet’s
power consumption to be
optimised.
• Place the 2 caps in the 2
holes at the top of the
cabinet.
• Do not push the caps all the
way in, in order to allow the
rear stop to be installed.
• Slide the rear stop between
the caps and the wall of the
cabinet, then push the 2
caps all the way in.
Installation
Place your cabinet in the desired location.
• Take the lead and plug it into the connector, located at the back of the
cabinet, on the bottom left-hand side.
• Wait 48hrs before plugging in
your cabinet
• When using your cabinet for the
first time, the charcoal filter
alarm will display. Reset the filter
meter to 365 (see chapter 6, §
VII).
Fitting the handle
1. Full Glass door
• Unscrew the three screws placed on the side of the door, using the Allen
wrench, which you will find in the handle's box.
View from above
Handle
Front
Figure 1
Figure 2
Seal
Door frame
Figure 3
• Position the handle on the specially designed groove on the door frame
(figure 2).
• Insert the handle all the way into the groove using a forward movement
(figure 2).
• Screw the three screws back on (figure 3).
• Take care not to catch the seal when screwing.
Note: adjustment of the handle is possible thanks to the oblong holes.
2. Glass door with black frame and plain door
It must:
• be open to the outside and well ventilated (not in an enclosed cupboard,
for example),
• not be too damp (utility room, laundry room, bathroom...),
• have a flat, stable floor,
• be supplied with power (standard outlet, 16 A, earthed with 30mA*
circuit breaker). (* not applicable to some countries).
• Place your cabinet in the desired location.
• Fit the charcoal filter (located in the “accessories” bag) by inserting it into
the breather hole located on the top left-hand side of the inside of your
cabinet (except 6170D model).
The handle can be found in its protective bag. It is attached to the rack at the
bottom of your cabinet.
• Move the seal away from the handle position.
• Screw the 2 screws using the Allen key (3 mm) provided in the bag of
accessories.
• Reposition the seal ensuring that it is correctly clipped in place.
Installing two cabinets side by side
N.B.: If you are placing two cabinets side by side, ensure that you leave a
gap of at least 1 cm between each cabinet.
8
GB
N6000-0815-7L-V9.indd 8 18/09/15 11:48
 Loading...