

EURO EGZ700FGS, EGZ70CTFGSX, EGZ600FDS, EGZ60WCTSX, EPZ2GFFDS Use & Installation Manual
MODELS: EGZ700FGS - EGZ70CTFGSX
EGZ600FDS - EGZ60WCTSX
EPZ2GFFDS
We ask that you carefully read the instructions within this booklet to enable you to abtain quality results from the outset.
The appliance must be installed only by an authorised person in compliance with the instructions provided. The manufacturer
declines all responsability for improper installation which may harm persons and animals and damage property.
The appliance must be used for the purpose for which it was expressly designed. Any other use (eg heating rooms) is considered to
be improper and consequently dangerous. The manufacturer declines all responsability for damage resulting from improper and
irresponsible use.
The manufacturer shall not be held responsible for any inaccuracies in this handbook due to printing or transcription errors. The
designs in the figures are purely indicative.
The manufacturer also reserves the right to make any modifications to the products as may be considered necessary, useful or in the
interests of the user, without jeopardizing the main functional and safety features on the products themselves.
If your cooktop requires service, please contact your local customer service centre or your nearest Eurostyle agent listed at the back
of this booklet.
OD. 04037HM - 11.05.2012
Dear Customer
Thank you for purchasing a Eurostyle Cooktop.
Before we continue telling you about this cooktop, we cordially invite you to become part of the Eurostyle family by
subscribing to ongoing information and invitations.
You will find that the clean lines and modern look of your Eurostyle Cooktop blends perfectly with your kitchen
décor. It is easy to use and performs to a high standard.
There are models to complement your new Eurostyle Cooktop.
Of course we make every effort to ensure that our products meet all your requirements, and our Customer
Relations department is at your disposal, to answer your questions and to listen to all your suggestions (see back
cover of manual).
Please complete the warranty section of this manual and keep your receipt as proof of purchase. Retain all
documents relating to the purchase of this products.
Eurostyle is committed to providing increasingly efficient products that are easy to use, respect the environment
and are attractive and reliable.
Eurostyle
USE, INSTALLATION AND MAINTENANCE
INSTRUCTIONS FOR BUILT-IN HOT PLATES

2
NATURAL U-LPG
1 Ultra rapid gas burner/WOK 14.5 MJ/h 11.4 MJ/h
2 Rapid gas burner 12.0 MJ/h 10.4 MJ/h
3 Semirapid gas burner right front 7.1 MJ/h 6.2 MJ/h
4 Semirapid gas burner left back 7.1 MJ/h 6.2 MJ/h
5 Auxiliary gas burner 4.1 MJ/h 3.5 MJ/h
6 Trivet pan support 2F
7 Trivet pan support 1F
8 Burner n° 1 control knob
9 Burner n° 2 control knob
10 Burner n° 3 control knob
11 Burner n° 4 control knob
12 Burner n° 5 control knob
13 Electric ignition button
Attention: this appliance has been manufactured for domestic use only and it employment by
private. Do not modify this appliance.
DESCRIPTION OF THE HOT PLATES
MODEL: EPZ2GFFDS MODEL: EGZ600FDS
MODEL: EGZ60WCTSX
MODEL: EGZ70CTFGSX-EGZ700FGS

1) BURNERS
A diagram is screen-printed above each knob on
the front panel. This diagram indicates to which
burner the knob in question corresponds. After
having opened the gas mains or gas bottle tap, light
the burners as described below:
- manual ignition
Push and turn the knob corresponding to the
required burner in an anticlockwise direction until it
reaches the full on position (large flame fig. 1), then
place a lighted match near the burner.
- Automatic electrical ignition
Push and turn the knob corresponding to the
required burner in an anticlockwise direction until it
reaches the full on position (large flame fig. 1), then
depress the knob.
- Lighting burners equipped with flame failure
device
The knobs of burners equipped with flame failure
device must be turned in an anticlockwise direction
until they reach the full on position (large flame fig. 1)
and come to a stop. Now depress the knob in
qu estion an d re peat the previ ously indicated
operations.
Keep the knob depressed for about 10 seconds
once the burner has ignited.
Note: you are advised not to try and light a
burner if the flame divider (burner Cap) is not
correctly placed
HOW TO USE THE BURNERS
Bear in mind the following indications in order to
achieve maximum efficiency with the least possible
gas consumption:
- use adequate pans for each burner (consult the
following table and fig. 2).
- When the pan comes to the boil, set the knob to
the reduced rate position (small flame fig. 1).
- Always place a lid on the pans.
- Use only pan with a flat bottom.
WARNINGS:
- burners with flame failure device may only be
ignited when the relative knob has been set to
the Full on position (large flame fig. 1).
- Matches can be used to ignite the burners in a
blackout situation.
- Never leave the appliance unattended when the
burners are being used. Make sure there are no
children in the near vicinity. Particularly make
sure th at th e pan handles are correctly
posit ion ed and keep a check on fo ods
requiring oil and grease to cook since these
products can easily catch fire.
- The machine must not be used by people
(including children) with impaired mental or
physical capacities, or without experience of
using electrical devices, unless supervised or
instructed by an expert adult responsible for
their care and safety. Children should not be
allowed to play with the equipment.
- Never use aerosols in the vicinity of this appliance
while it is in operation.
- If the built-in hot plate has a lid, any spilt food
should be immediately removed from this
before it is opened. If the appliance has a glass
lid, this could shatter when the hot plate
becomes hot. Always switch off all the burners
before closing the lid.
- Do not store or use flammable liquids or items
in the vicinity of the hotplate.
- THIS PRODUCT IS NOT FOR USE IN MARINE
CRAFT, CARAVANS OR MOBILE HOMES.
- Containers wider than the unit are not
recommended.
- Do not modify this appliance.
3
USE
FIG. 1 FIG. 2
Burners
Power ratings
Pan Ø in cm
NATURAL U-LPG
Ultra rapid/WOK 14.5 MJ/h 11.4 MJ/h
22 ÷ 24
Rapid 12.0 MJ/h 10.4 MJ/h
20 ÷ 22
Semirapid right front 7.1 MJ/h 6.2 MJ/h
16 ÷ 18
Semirapid left back 7.1 MJ/h 6.2 MJ/h
16 ÷ 18
Auxiliary 4.1 MJ/h 3.5 MJ/h
10 ÷ 14
In the event of the Burner flames being accidentally
extinguished, turn off the burner control and do not
attempt to re-ignite the burner for a least 1 minute.
4
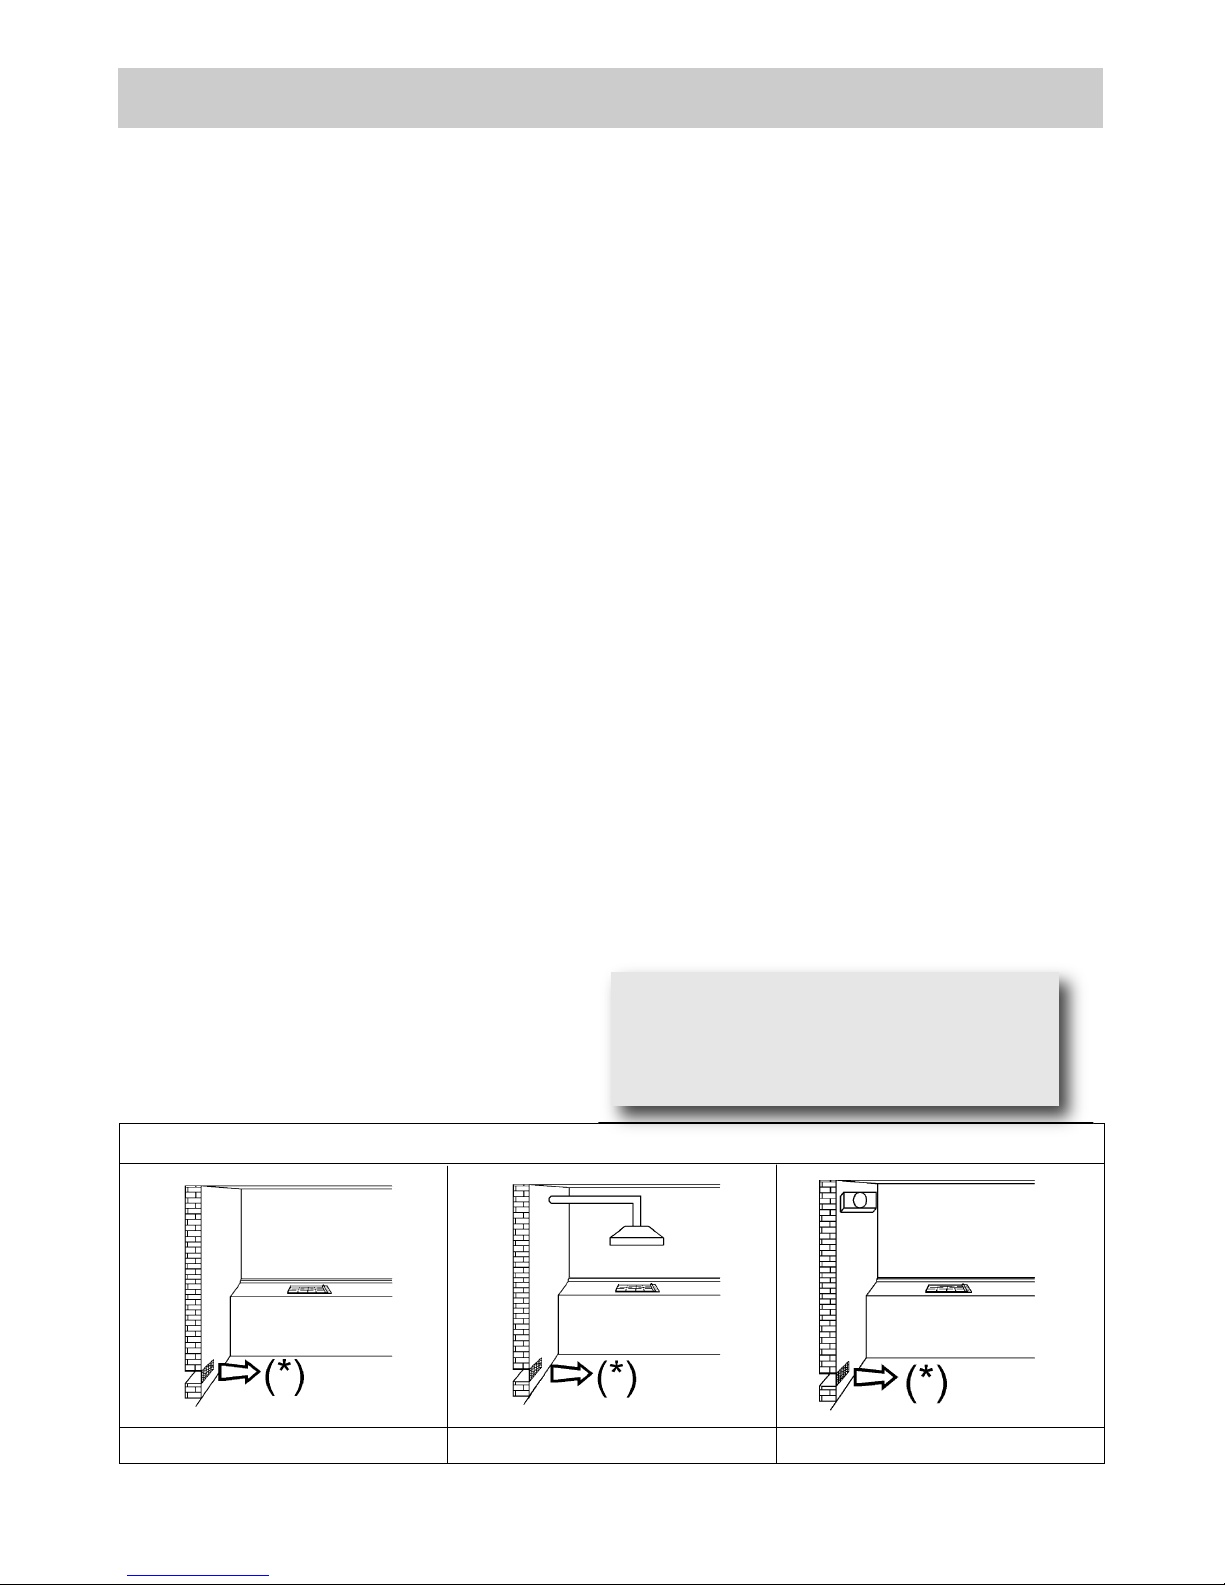
USE
FIG. 3 FIG. 4 FIG. 5
(*) Air inlet - minimum section 100 cm
2
Notes:
use of a gas cooking appliance produces heat and moisture in the room in which it is installed. The
room must therefore be well ventilated by keeping the natural air vents clear (fig. 3) and by
activating the mechanical aeration device (suction hood or electric fan fig. 4 and fig. 5).
Intensive and lengthy use of the appliance may require additional ventilation. This can be achieved
by opening a window or by increasing the power of the mechanical exhausting system if installed.
Do not attempt to change the technical characteristics of the product because it can be dangerous.
- If you should not to use this appliance any more (or replace an old model), before disposing of it,
make it inoperative in conformity with current law on the protection of health and the prevention
of environmental pollution by making its dangerous parts harmless, especially for children who
might play on an abandoned appliance.
- Do not touch the appliance with wet or damp hands or feet.
- Do not use the appliance barefoot.
- The manufacturer will not be liable for any damage resulting from improper, incorrect or
unreasonable use.
- During, and immediately after operation, some parts of the cook top are very hot: avoid touching
them.
- After using the cook top, make sure that the knob is in the closed position and close the main tap
of the gas supply or gas cylinder.
- If the gas taps are not operating correctly, call the Service Department.
Abnormal Operation:
any of the following are considered to be abnormal operation and may require servicing:
- yellow tipping of the hob burner flame.
- Sooting up of cooking utensils.
- Burners not igniting properly.
- Burners failing to remain alight.
- Burners extinguished by cupboard doors.
- Gas valves which are difficult to turn.
Warning:
during operation the work surfaces of the
cooking area become very hot: keep children
away!

FIG. 6
5
Note:
continuous use could cause the burners to
change colour due to the high temperature.
IMPORTANT:
always disconnect the appliance from the gas
and electricity mains before carrying out any
cleaning operation.
2) HOT PLATE
Periodically wash the hot plate, the enamelled steel
pan support, the enamelled burner caps “C” and the
burner heads “T” (see fig. 6) with lukewarm soapy
water. Following this, all parts should be thoroughly
rinsed and dried. Never wash them while they are
still warm and never use abrasive powders. Do not
allow vinegar, coffee, milk, salted water, lemon or
tomato juice from remaining in contact with the
enamelled surfaces for long periods of time.
WARNINGS:
comply with the following instructions, before
remounting the parts:
- check that burner head slots “T” (fig. 6) have
not become clogged by foreign bodies.
- Check that enamelled burner cap “C” (fig. 6)
have correctly positioned on the burner head.
It must be steady.
- The exact position of the pan support is
established by the rounded corners, which
should be set towards the side edge of the hot
plate.
- Do not force the taps if they are difficult to
open or c lose. Contac t the tech nical
assistance service for repairs.
- Don’t use steam jets for cleaning the cooktop.
CARE & MAINTENANCE
To optimi ze the appe arance and u p keep o f
stainless steel:
1) ALWAYS keep stainless steel out of contact from
acid/acid based solvent (liquid or vapour form).
2) After installation, wipe clean all stainless steel
products with a soft damp cloth to remove any
traces of dirt (e.g. cement dust) or condensation
marks.
In the event where persistent marks appear:
immediately clean affected areas with stainless
steel cleaner, using a clean damp soft cloth.
Ensure surface is rinsed and thoroughly clean of all
marks and stainless steel cleaner.
PREVENTATIVE MAINTENANCE
This c ooktop s hou ld n ot r equire ongo ing
maintenance provided you ensure:
- all spillages are cleaned up as soon as they occur.
- Burners are kept clean.
- Burner ports are free of debris, food or anything
else that may cause an obstruction.
- Electrode and thermocouples are kept clean.
- Burners are re-assembled correctly.
- Do not get water in the area where the injectors
are located.
 Loading...