

Euro EP200 User Manual
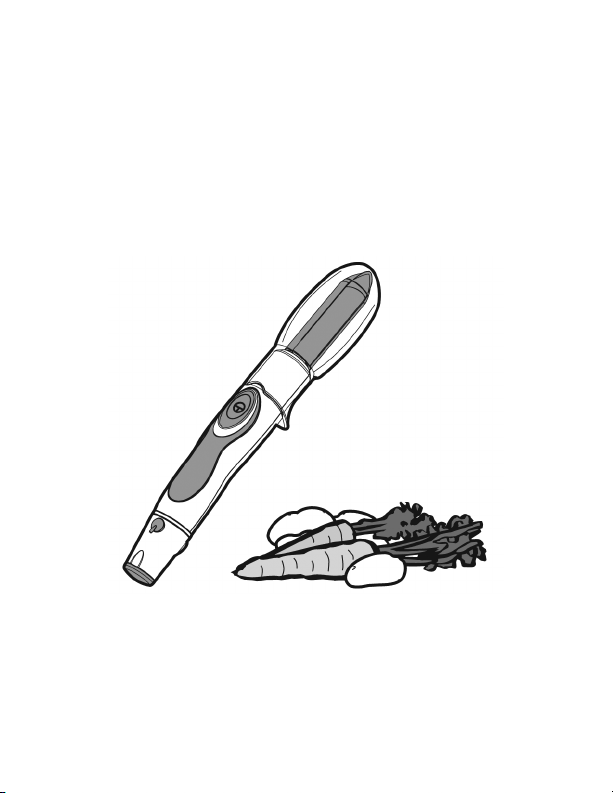
The Prep Machine
The Fast & Easy Way for Kitchen Prep
Peels Rough Skinned Vegetables, Scales Fish
Froths Milk, and Mixes
Before Operating this Unit
Please Read These Instructions
Model Number EP200
V6 033008

CONTENTS
3. Important Safeguards
6. Introduction
6. Know Your Prep Machine
7. Changing The Attachments
8. Charging The Power Handle
9. How To Use
14. Self Cleaning
15. Battery Pack Disposal
16. Trouble Shooting
17. Technical Specifications
17. Contact Information
2

IMPORTANT SAFEGUARDS
Because we are interested in your safety while using this fine
Euro-Cuisine product, we have included this list of general
safeguards; please take the time to carefully read them.
They provide important information regarding safe use and
maintenance of the appliance. Nonobservance of these
safeguards may compromise the safety of the appliance,
result injury, and/or void the warranty.
READ ALL INSTRUCTIONS
To protect against risk of electrical shock, never submerge
1.
the appliance or cord in water or other liquid. Although
the unit is designed to be water proof we recommend you
don’t completely submerge. If appliance or cord falls into
liquid, unplug the cord from the outlet immediately. Do not
reach into the liquid.
To avoid possible accidental injury, close supervision is
2.
necessary when any appliance is used by or near children.
Unplug battery charger from the outlet when not in use.
3.
To unplug, grasp adaptor and pull from the electrical
outlet. Never pull cord.
Never put your fingers or cutlery onto the spinning parts.
4.
Do not operate any appliance and or battery charger
5.
with damaged cord or plug, or after appliance
malfunctions, or after the appliance or battery charger
has been dropped or damaged in any way. Return
3

IMPORTANT SAFEGUARDS (cont.)
appliance or battery charger to nearest authorized
service center for examination, repair, or electrical or
mechanical adjustment.
The use of attachments not recommended or sold by the
6.
manufacturer may cause fire, electrical shock, or injury.
Do not use outdoors.
7.
Do not let cord hang over edge of table or counter.
8.
Do not let cord contact hot surface, including the stove.
9.
Do not use an extension cord. Plug charger directly into
10.
an electric outlet.
Use only with the charger provided with the appliance.
11.
Do not attempt to use this charger with any other product.
Likewise, do not attempt to charge this appliance with
any other charger.
Do not operate this or any other motor-driven appliance
12.
while under the influence of alcohol or other substances
that affect your reaction time or perception.
Do not use the appliance while barefoot.
13.
Store the appliance and all of its parts out of the reach of
14.
children.
Do not charge the batteries at temperatures lower than
15.
40°F or higher than 100°F.
Do not touch the battery charger with wet or damp hands.
16.
4

IMPORTANT SAFEGUARDS (cont.)
After each use, clean all parts that have come in contact with
17.
food by following the cleaning instructions in this booklet.
Do not incinerate this appliance even if it is severely damaged.
18.
The batteries can explode in a fire.
The appliance is solely for domestic use to peel vegetable,
19.
scale fish, froth milk and mix liquids.
Do not place the power handle in a dishwasher under any
20.
circumstance
Do not use an appliance for any purpose other than its
21.
intended use.
Do not place an appliance on/or near a hot gas flame, electric
22.
element, or in a heated oven. Don’t place on top of any other
appliance.
Always use with safety splash guard in place for safety and to
23.
prevent unwashed splashes from the heads.
Prior to initial use, wash all the parts which come into contact
24.
with food. Clean and dry the power handle and peeler
attachment thoroughly after every use.
Keep charging for the unit when not in use to keep the unit fully
25.
charged at all times.
Do not try to peel waxed fruit.
26.
SAVE THESE INSTRUCTIONS HOUSEHOLD USE ONLY
5
INTRODUCTION
Congratulations on your new purchase.
The Prep Machine has been specially designed to allow a quick
convenient method of : 1) Peeling rough skinned vegetables, 2)
Cleaning vegetables and fruit, 3) Whisking eggs and sauces, 4)
Frothing milk, and 5) Blending soup and liquids. Please read all the
instructions carefully before use.
KEEP INSTRUCTIONS IN A SAFE PLACE FOR FUTURE REFERENCE.
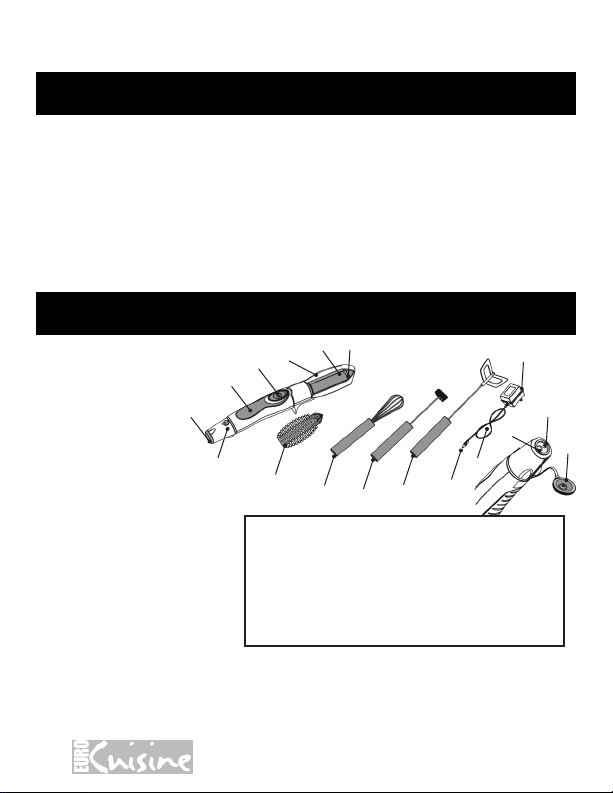
KNOW YOUR PREP MACHINE
(UNDER Blade Unit, Not Visible In Sketch, See Page 7)
3
12
2
1
11
14
15
13
9
7
8
10
IMPORTANT
1. Safety splash guard
2. Blade unit (peeler)
3. Steel shaft (pivot)
4. Start button
5. Power handle
6. Protective cap
7. Charging LED
8. Battery recharger socket
9. Battery recharger (adaptor)
10. Recharger lead
11. Recharger plug
12. Brush attachment
13. Whisk attachment
14. Frother attachment
15. Soup blender attachment
16. High and low speed control
6
4
5
16
Starter Button- The unit features a “bias
off” button which means as soon as
you take your thumb or finger off the
switch it will stop. This is a simple
precautionary safety feature.
We recommend you read the complete instruction manual before
use. Please note incorrect use could damage The Prep Machine
and may invalidate your warranty.
6
6

CHANGING THE ATTACHMENTS
Select the desired attachment
•
depending on the use
and required result.
Make sure the
battery recharger
has been
unplugged from
the power main,
being careful
not to push the start button.
Slide the desired attachment onto the steel shaft of the
•
power handle and push firmly down until it clicks into place,
pull the end of the attachment to ensure it’s firmly located.
Replace the safety splash guard onto the power handle and
keep in place at all times. The safety splash guard to be
used with peeler and brush attachment only.
Removal of the Attachment
Remove the safety splash guard (1) (when applicable).
•
Pull the attachment firmly out of the steel shaft (3) until it
•
clicks out of place.
3 Steel Shaft
7

CHARGING THE POWER HANDLE
Place the unit in a safe convenient location on the kitchen
1.
work top. Open the protective cap (6) and put the plug
(11) of the battery recharger into the socket (8).
Completely unwind the recharger’s feed lead (10) and
2.
plug the battery charger (9) into the power main. The LED
(7) will light up, indicating recharging.
The first charge must last at least 16 to 20 hours.
3.
When charging is completed, unplug the battery recharg-
4.
er (9) from the power main, pull the plug (11) from the
Prep Machine and replace the protective cap (6).
Important:
Always locate the unit in a dry area on the kitchen work
1.
surface for charging.
Ensure the Protective cap has been closed completely
2.
before operate.
It is normal for the Prep Machine to warm up during recharging.
3.
If, after repeated use, the Prep Machine works for a
4.
shorter time this does not mean that it is defective. Keep it
running until the motor stops and recharge it for 18 hours.
This should improve recharging capacity. If necessary,
repeat a number of times.
8
HOW TO USE
Peeler Attachment:
After Charging, turn the speed control (16) to “high
•
speed” setting.
Hold the power hand of The Prep Machine (5) with one
•
hand and with the other the root vegetable to peel (carrot,
potato, zucchini) or the fish to scale.
Rest the blade unit (2) against the foodstuff and push the
•
start button (4); the blade unit will start to turn. Releasing
the start button (4) the blade stop turning.
Gradually rub the spinning blade unit (2) over the entire
•
surface of the foodstuff, going from one side to the other.
When necessary exerting slight pressure: the continuous rotation of the blade will quickly remove the skins/scales. Any
splashed will be blocked by the safety splash guard (1).
The ends of blade unit (2) are specially designed ribs
•
that can be used on hard to reach areas and spots on the
vegetable.
9

HOW TO USE (cont.)
Notes
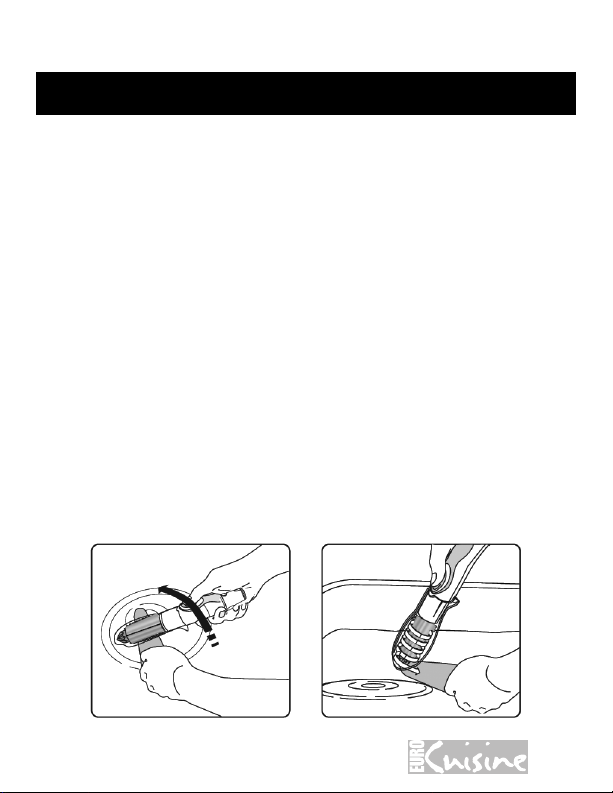
You can peel the foodstuff under gently running water.
•
Be careful to limit contact with water to the safety splash
guard (1) and the blade unit (2). Point the unit into the
sink to prevent any spray back.
Place a sieve or colander into a bowl of water to make
•
it easy to collect shaved skin. The action of The Prep Machine removes a fine layer of skin only.
Brush Attachment:
To clean dirt off of vegetables and fruits use the brush with it’s
innovative convex design and follow the above instructions.
10

HOW TO USE (cont.)
General Instructions For Other Attachments:
Wash the milk frother, whisk and soup blender attachments
before first using. Use hot soapy water to thoroughly clean all
the surfaces of all the attachments.
Before inserting an attachment, make sure the unit is
1.
turned off.
Always start the speed control at “low speed” setting.
2.
Before using and while operating the milk frother, whisk,
3.
and soup blender attachments you must remove the splash
guard.
To prevent splashing, place attachment head of unit into
4.
container before turning on the unit. Turn unit off before
removing milk frother and whisk attachments from the
mixture.
Do not use The Prep Machine in any pan directly on
5.
stove top. Remove pan from heating surface before whisking or frothing.
11
 Loading...