

EURO EID14GSA Instruction Manual

EID14GSA
euro
Compartment
Witheachwashcycle.
Compartment
For programmes with pre-wash only.
(Follow the user instructions!)
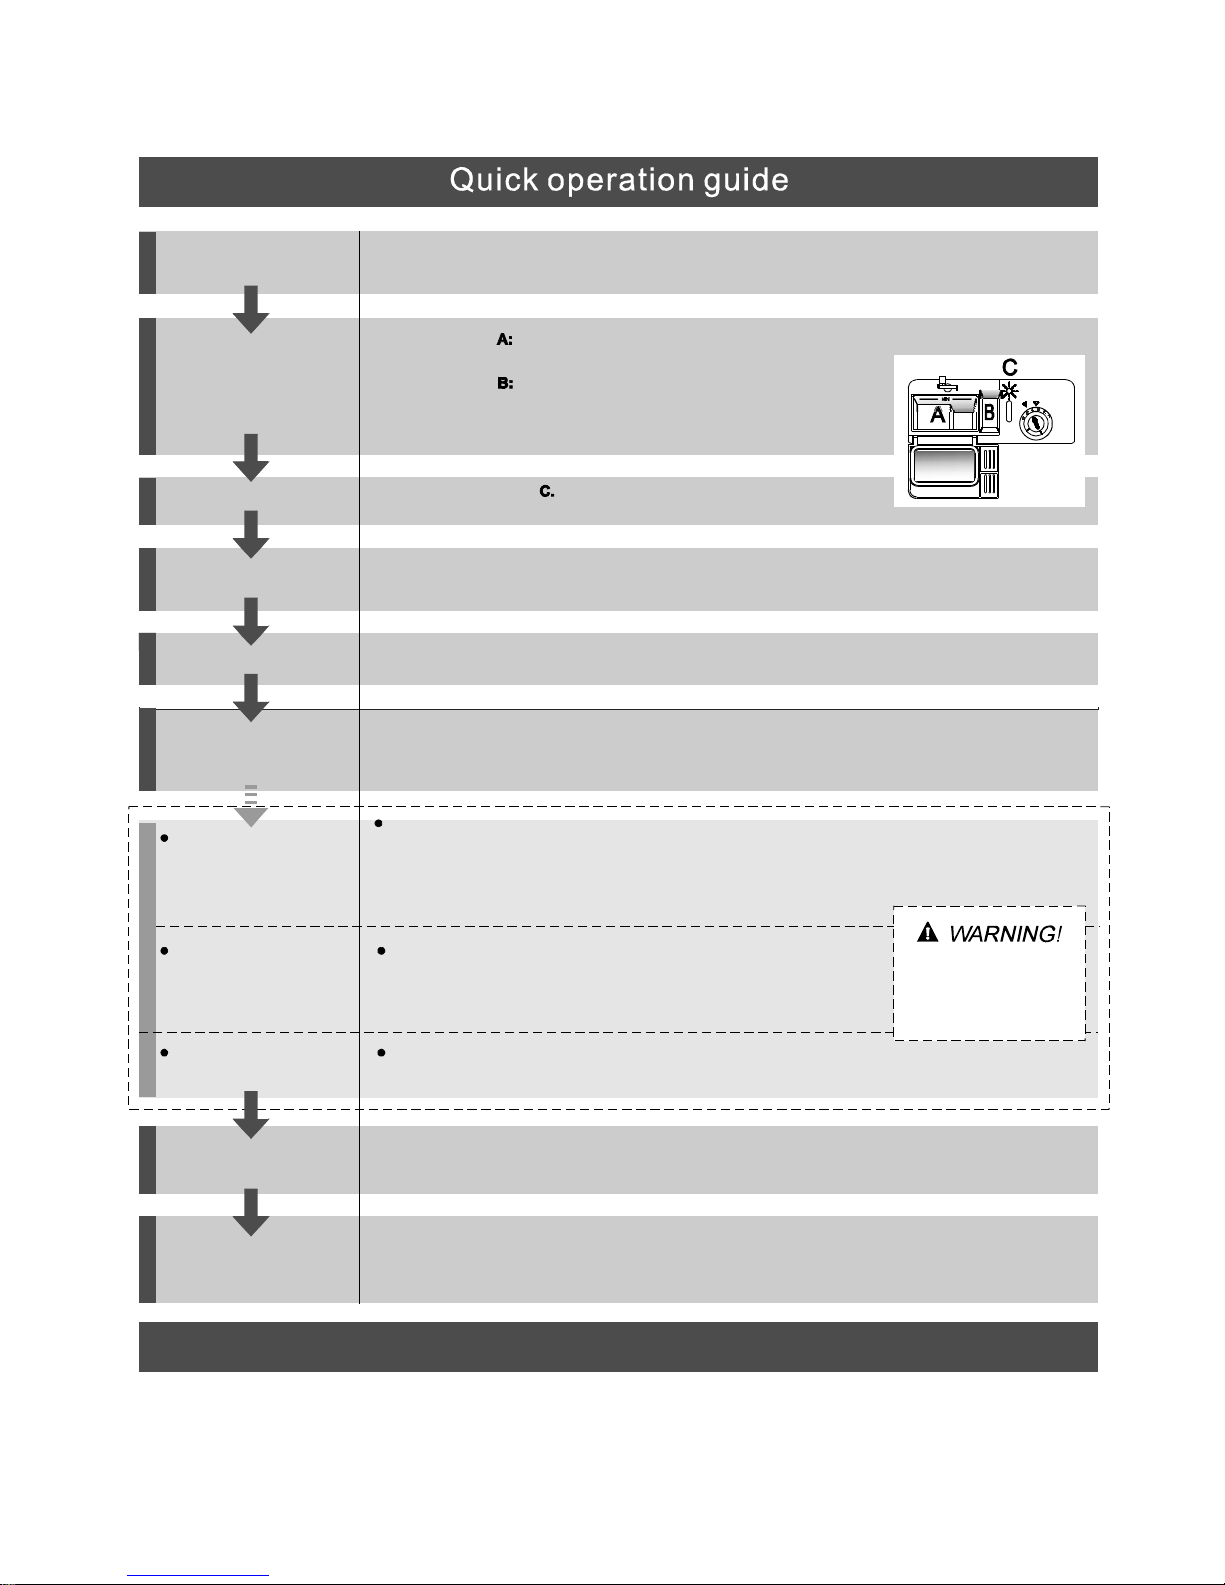
Mechanical indicator
Check the rinse aid level
Load the baskets
Select a programme
Turn on the water tap, close the door, t he machine will start working after about 10 seconds.
Running the dishwasher
Switch off the appliance
Turn off the water tap,
unload the baskets
Fill the detergent dispenser
Warning: wait a few minutes (about 15 minutes) before unloading the dishwasher to avoid handling
the dishes and utensils while they are still hot and more susceptible to break.
They will also dry better. Unload the appliance, starting from the lower basket.
Changing theprogramme
Add forgottendishes in the
dishwasher.
Scrapeoff any large amountof leftover food.S oftenremnantsof burntfood inpans,
thenload thebaskets.Referto the dishwasherloadinginstructions.
Press the Program button to select a desired program..
( See the section entitled Operationg instruction )“”
When the working cycle has finished, the buzzer of the dishwasher will sound 8 times, then stop.
Turn off the appliance using the ON/OFF button.
If the appliance is switched
off during a wash cycle.
Open t he door carefully.
Hots team may escape
when the dooris opened!
If the appliance is switched off during a wash cycle, when switched
on again, please re-select the washing cycle and operate the dishwasher
according to the original Power-on state ).
Switch on the appliance Open the door,press the On/Off button to switch on the appliance.
1.Open the door a little to stop the dishwasher.
2.After the spray arms stop working, you can open the door completely.
3.Add the forgotten dishes.
4.Close the door, thedishwasher will start running again after 10 seconds.
Electric indicatoron controlpanel(if provided).
Fordetailedoperatingmethod read thecorrespondingcontentont he instruction manual.
1.A runningcycle canonly be modified ifit has been runningfor a short time.Otherwise thedetergent
may have already been released and the water already drained. If this is the case, the detergent
dispenser must be refilled.
2. Open the door , then press the program button for more than 3 seconds
to cancel the running program.
3. Select a new program.
4. Close the door, the machine will start to work after 10 seconds..
alittletostopthedishwasher
Dishwasher Features....... ............................. ...2
Attention before or after loading the Dishwasher
Baskets..........................................................6
Filtering System............................... .............13
Caring for the Dishwasher...............................14
A、Fill the Rinse AidDispenser
.........................3
B、Functionof Detergent
.................................4
Loading the upper Basket.................................6
Loading the Lower Basket.................................7
Cutlery Basket........................................... ...9.
Wash Cycle Table...........................................11
Turning on theAppliance................................12
Change the Programme.................................. 12.
At the End of theWash Cycle........................... 12.
Before calling for service.................................22
Error codes...................................................23
Technical information.....................................24
ControlPanel...................................................2
WaterConnection...........................................21
Please carefully read the installation instruction
.....................................................................
....16Aesthetic panel's dimensions and installation
Tension adjustment of the door spring 18..............
Connection of drain hoses.......................................18
Dishwasher installation steps..........................19
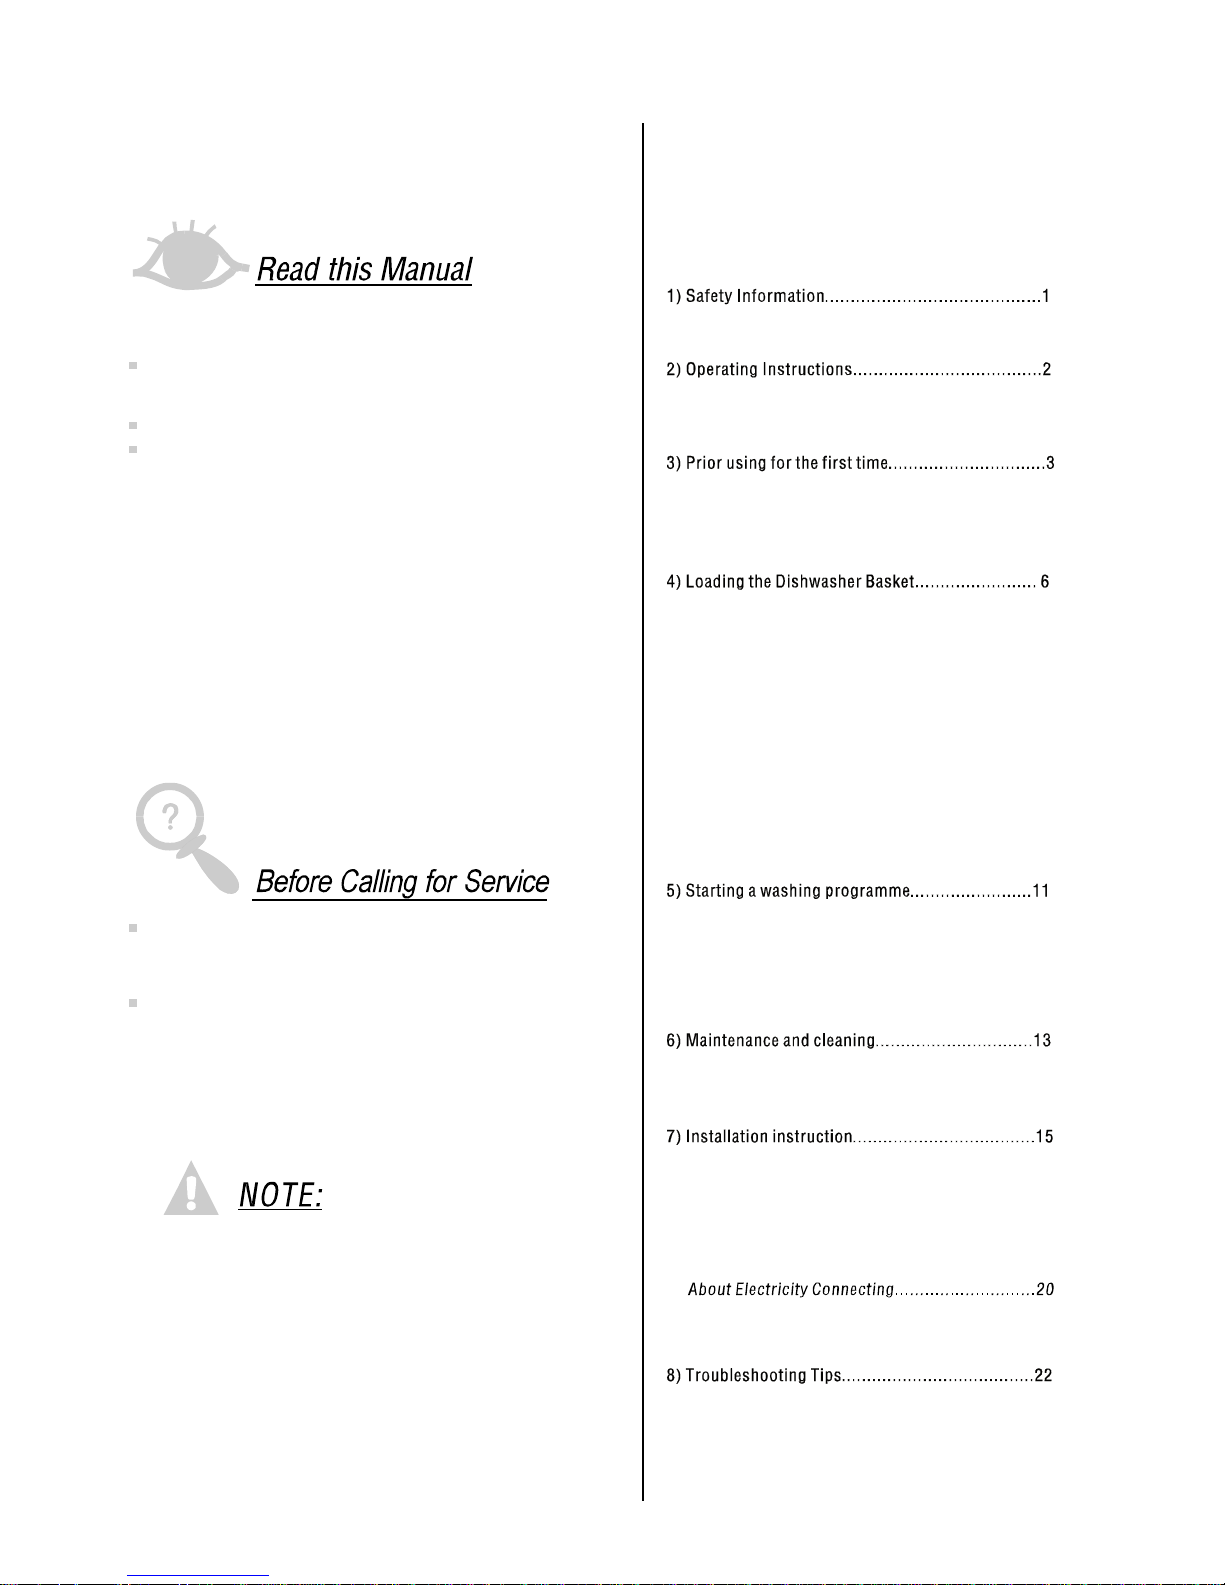
To review the section on troubleshooting Tips
will help you to solve some common problems
by yourself .
Dear Customer,
Please carefully read this manual before using the
dishwasher, it will help you to use and maintain the
dishwasher properly.
Pass it on to any subsequent owner of the appliance.
This manual contains sections on safety Instructions,
Operating Instructions, Installation Instructions and
Troubleshooting Tips, etc.
The manufacturer, following a policy of constant
development and updating of the product, may
make modifications without giving prior notice.
Keep it to referto itat a laterdate.
Ifyoucannot solvethe problems by yourself ,
pleaseask for the help of professional technicians.
Cup shelves..................... ....7...........................
How to adjust the upper Basket.........................7
Lower basket with Extra Rack ....8.......................
Folding Spikes ...8...................... .......................
Loading the Cutlery basket........................... ..9.

1
This appliance must be grounded. In the event of a
malfunction or breakdown, grounding will reduce
theriskof anelectricshockbyprovidingapathof
least resistance of electric current. This appliance
is equipped with a cord having an equipmentgrounding conductor and a grounding plug.
The plug must be plugged into an appropriate outlet
that is installed and grounded in accordance with
all local codes and ordinances.
Keep children away fromdetergent and rinseaid, keep
children away from the open door of the dishwasher,
there could still be some detergent left inside.
Do notabuse, sit on, or stand on the door or dish
rack of the dishwasher.
Do not touch the heating element during or
immediately after use.
(This instruction is only applicable to machines
with a visual heating element.)
Do notwash plastic items unless they are marked
dishwasher safe or the equivalent. For plastic items
n
ot so marked, check the manufacturer's
recommendations.
Use only detergent and rinse additives
designed for an automatic dishwasher.
Never use soap, laundry detergent, or hand
washing detergent in your dishwasher. Keep
these products out of the reach of children.
During installation, the power supply must not
beexcessively or dangerously bentor flattened.
Do not tamper with controls.
Do not place any heavy objects on or stand on the
door when it is open. The appliance could tip
forward.
When loading items to be washed:
1)Locatesharp itemsso thattheyarenotlikely
to damage the door seal;
2) Warning: Knives and other utensils with
sharp points must be loaded in the basket
withtheir pointsdownor placed in a
horizo ntal posi tion.
When using your dishwasher, you should
prevent plastic items from coming into contact
with the heating element.(This instruction is only
applicableto machines with a visual heating
element.)
If the supply cord isdamaged, it must be replaced
by the manufactureror its service agent or a
similarly qualified person in order to avoid a
hazard.
Please dispose of packing materials properly.
Use the dishwasher only for its intended function.
Remove the door to the washing com part ment when
removing an old dishwasher from service or discarding it.
Dishwasher detergents are strongly alkaline, they
can be extremely dangerous if swallowed. Avoid
contact with skin and eyes and keep children away
from the dis hwas her when the door is open.
Check that the detergent comparment is empty
after completion ofthe washcycle.
The appliance is to be connected to the water
mains using new hose sets and that old h ose-sets
should not be reused.
The maximum number of place settings to be
washed is .14
The maximum permissible inlet water pressure is
1Mpa.
The minimum permissible inlet water pressure is
0.04Mpa.
Children should be supervised to ensure that they do
not play with the appliance.
This appliance isnot intended for use bypersons
(includingchildren )with reduced physical, sensory or
mental capabilities,or lackofexperience and
knowledge ,unless theyhavebeengivensupervision
or instruction concerning use of the appliance by a
person responsible for their safety.
When using your dishwasher, follow the precautions listed below:
WARNING!
The door should not be left open,
since this could increase the risk of tripping.
Do not operate your dishwasher unless all
enclosure panels are properly in place. Open
the door very carefully if the dishwasher is
operating, there is a risk of water squirting out.
Improperconnection of the equipment-grounding
conductor can result in the risk of an electric shock.
Check with a qualified electrician or servi ce
representative if you are in doubt whether the
appliance is properly grounded. Do not modify the
plug pro vided with the appliance; If i t does not fit
the outlet.Havea properoutlet installed by a
qualified electrician.
To get the best performance from your dishwasher, read all
operating instructions before using it for the first time.
2
10
11
Back View
1
2
3
4
5
6
7
8
9
on
Off
Front view
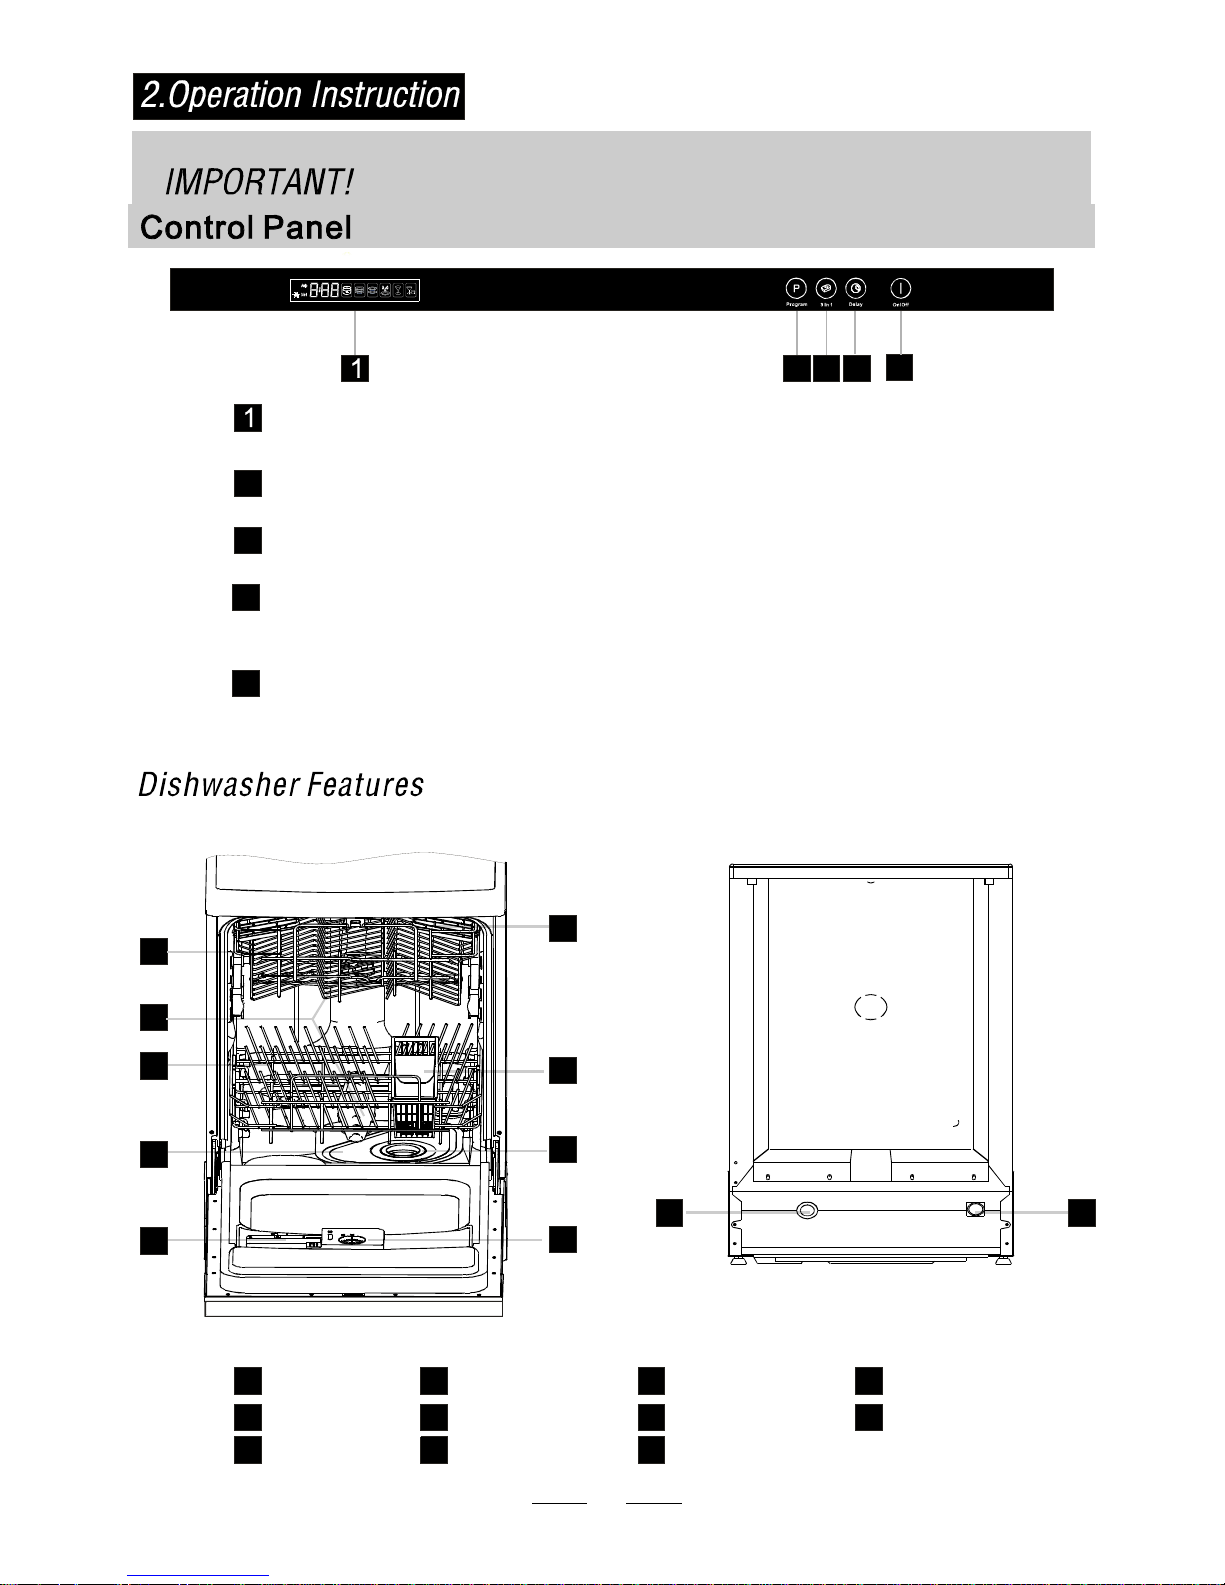
Main Filter
Detergent Dispenser
Cup Shelf
Cutlery Basket
Coarse Filter
Rinse Aid Dispenser
Inletpipe connector
Drain pipe connector
Lower Basket
Spray Arms
Upper Basket
1
5
6
7
8
9
10
11
3
2
4
5
Pr ogra m butt on: Tos elect one of t h e s ix progra m s .
2
3
4
3in1 functionbutton: Toselectandshow 3in1function.
Display win dow: Program r emaini ng time, delay tim e, runni ng indicat or, P rog ram indicat or,
rinse aid indicator,Errorcodes,etc.
Powe r swit ch : Toturn on/off t h e power sup ply.
2
3
4
5
Delayed Start Button: Topreset thewashti mer and delay the starting time up to24ho urs.
Every pressof this button increases t hetimeby onehour. for example:one press for an
hour, two fort wo hours... ...
(
)
Before using your dishwasher for the first time:
3
A. Fill the rinse aid dispenser
B. Fill in detergent
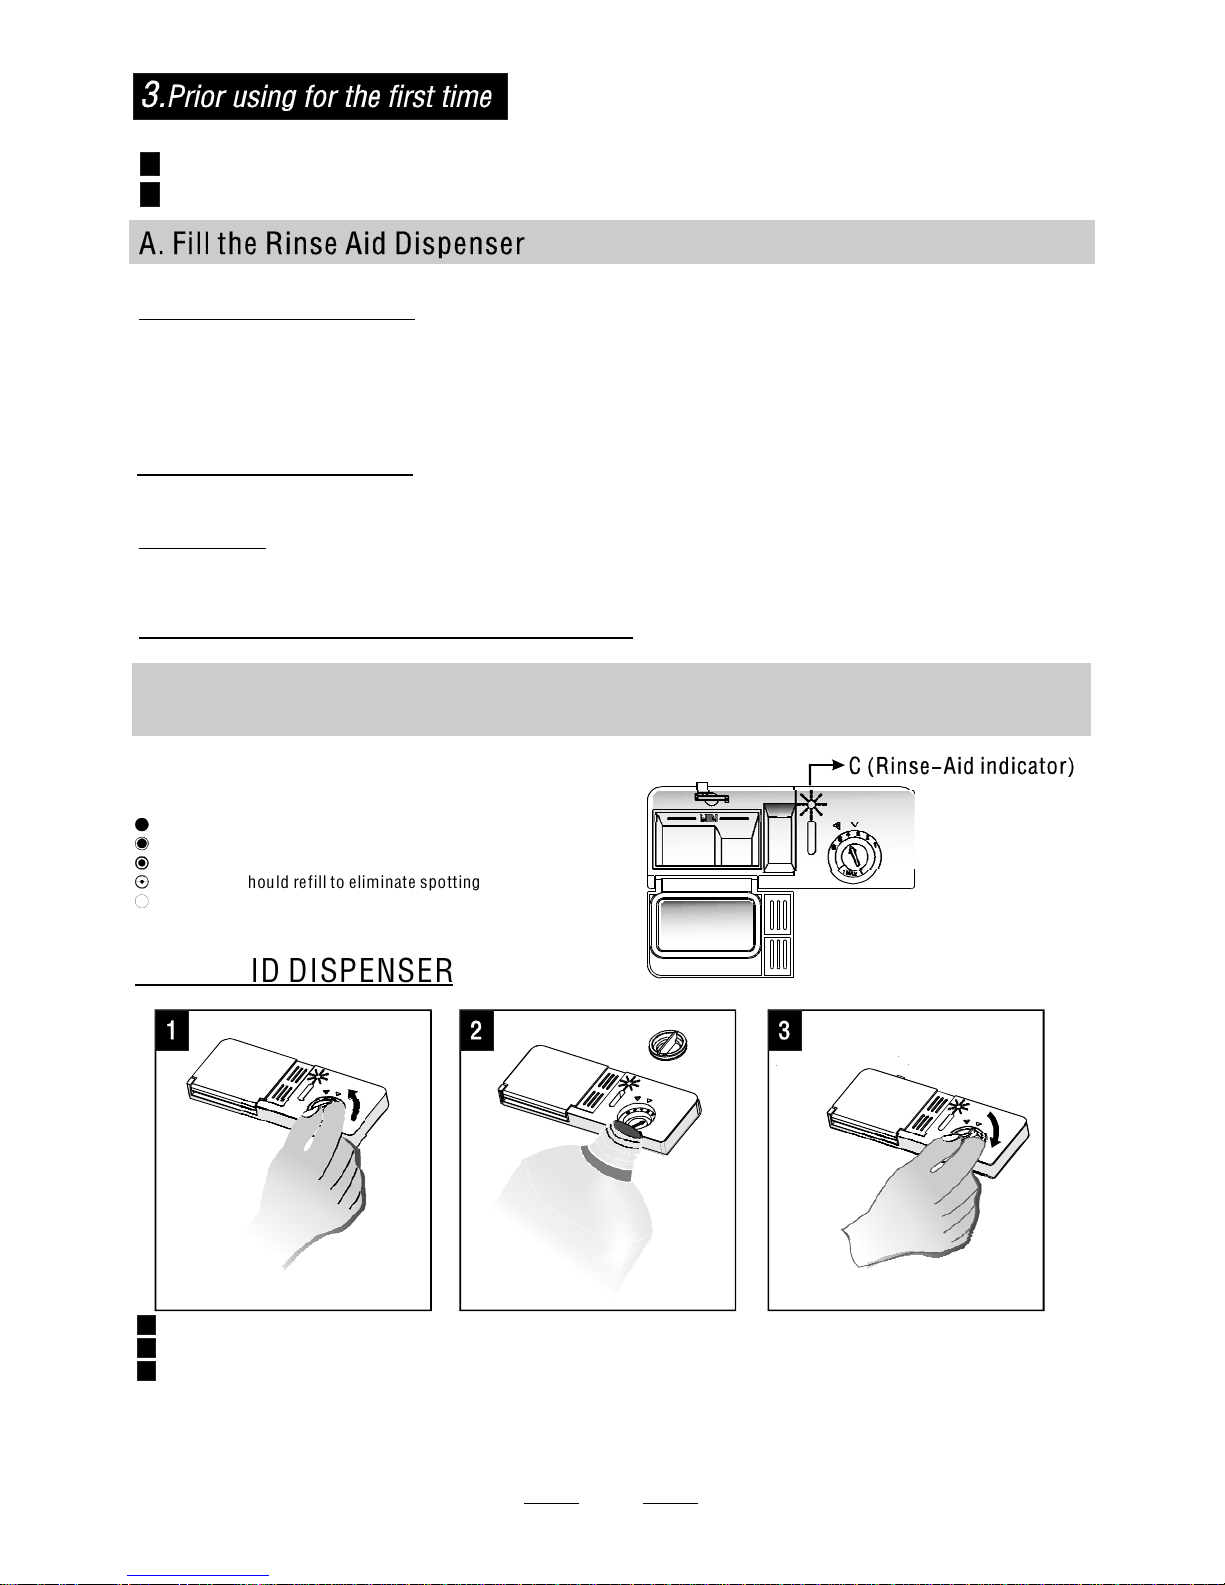
The rinse aid is released during the final rinse to prevent water from forming droplets on your dishes, which can
leave spots and streaks. It also improves drying by allowing water to roll offthedishes.Your dishwasheris
designed to use liquid rinse aids. The rinse aid dispenser is located inside the door next to the detergent dispenser.
To fill the dispenser, open the cap and pour therinse aid into the dispenser until the level indicator turns completely
black. The volume of the rinse aid container is about 110ml.
Rinse Aid Dispenser
Function of Rinse Aid
Rinseaid is automatically added during the last rinse, ensuring thorough rinsing, and spot and streak free drying.
Attention!
Only use branded rinseaid for dishwasher. Neverfill the rinse aid dispenser withany other substances
(e.g. Dishwasher cleaning agent, liquid detergent). This would damage the appliance.
As the rinse aid diminishes, t he size of the black dot
on the rinse aid level indicator changes, as illustrated below.
Full
3/4full
1/2full
1 / 4 full - Should refill to eliminate spotting
Empty
If there is no rinse-aid warning light in the control pa nel, you can judge the amount of rinse-aid by the color ofthe optical level
indicator "D" located next to the cap. When the rinse-aid container is full, the whole indicator will be dark .As the rinse-aid
diminishes, the size of the dark dot decreases. You should neverlet the rinse aid get below 1 / 4 full.
When to Refill the Rinse Aid Dispenser
RINSE AID DISPENSER
To open the dispenser, turn the cap to the "open" (left) arrow and lift it out.
Pour the rinse aid into the dispenser, being careful not to overfill.
Replace the cap by inserting it aligned with "open" arrow and turning it to the closed (right) arrow.
Becareful notto overfill the dispenser,becausethis could causeover sudsing.Wipeawayanyspills
with a damp cloth. Don't forget to replace the cap before you close dishwasherdoor.
Attention!
Clean up any rinseaidsplit during fillingwith an absorbent clothto avoid excess foaming
during the next wash.
1
2
3

4
Adjusting Rinse Aid Dispenser
Therinseaiddispenser has six . Always start withthedispenserseton"4".
If spots and poor drying are a problem, increase the amount of rinse aid dispensed
by removing the dispenser lid and rotating the dial to"5". If the dishesstill are not
drying properly or are showspots, adjust the dial to the nexthigher lever untilyour
dishes are spot-free. The recommended setting is "4". (Factory value is "4".)
scales
Increasethedoseiftherearedropsofwaterorlimespotsonthedishesafter washing.
Reduce it if there are sticky whitish stains on your dishes or a bluish film on glassware or
knife blades.
NOTE:
Detergents with its chemical ingredients are necessary to remove dirt, crush dirt and transport it out of the dishwasher.
Mostof the commercialquality detergentsare suitablefor thispurpose.
Deterg ents
There are3 sortsof det ergents
1.With phosphate a n d w ith ch lori ne
2.Withphos phate and without chlorine
3.Without phospha t e a nd withou t c hlor ine
Based on theirchemical composition, detergents can besplitintwobasi c types:
The use of norm al washing programs in combination with concentrat ed detergents
reduces poll u t i on an d is good for you r dish es; the se wash pro grams are specific a lly ma t ched
tothedirt-dissolving properties of the enzymes of the concentrated detergent. For this reason
normal wash programs in which concentrated detergents are used can achieve thes ame
results thatcano ther wise only be achieved using intensive programs.
“”
“”
“”
Detergent tablets of different brands dissolve atdifferentspeeds. Forthisr eas on some
detergent tablets cannot dissolve and develop theirfull cleaning power duringshort
programs. Therefore please use long programs when using detergent tablets, to
ensure t h e c o m plet e remo v al of deter gent r esid uals.
The dispensermust bere filled before the start of each washcyclefollowingtheinstructions
provided inthewash cyclet able . Your dishwasher uses lessdetergent and rinse aid than
Conventionaldishwasher. Generally, onlyone tablespoon of detergentisneeded for
anormal washload.Moreheavilysoileditemsneed more detergent.Alwaysaddthe
detergent ju st bef or e starting the dishwasher, o t herwise it cou ldget damp an d will n o t
dissolve properly.
Conc entrated D etergent
DetergentTablets
DetergentDispenser
conventional,alkaline detergents with causticcomponents
lo w alkal i ne co n centrated detergents with n atura l e n zy mes
Normally new pulverised detergent is without phosphate.Thus thewatersof tener function of
pho s phat e is not given. In thi s case we r ecom mend to fi ll s alt in t he sal t container ev e n when
the hardness of water isonly6 d H. If detergents without phosphate are used in the caseofhard wat er
oftenwhitespots appearon dishes and glasses.In thiscasepleaseaddmore detergenttoreach
better results. Detergents without chlorine do only bleach a little.Strong andcoloured s pots will not
beremoved completely.I n this case please choose aprogram withahi gher temperat ure.
°
5
Amountof DetergenttoUse
Proper Use of Detergent
Use only detergentspecifically made for theusein d ishwashers. Keep your detergent fresh and dry.
Don'tputpowdered d etergent intothedispenser untilyou're readyto washdishes.
Dishwasher detergent is corrosive! Takecare to keep it out ofreachofc hildren.
Always add thed ete rgent just before starting each wash cycle.
Only usebrandeddetergent aidford ishwashe r.
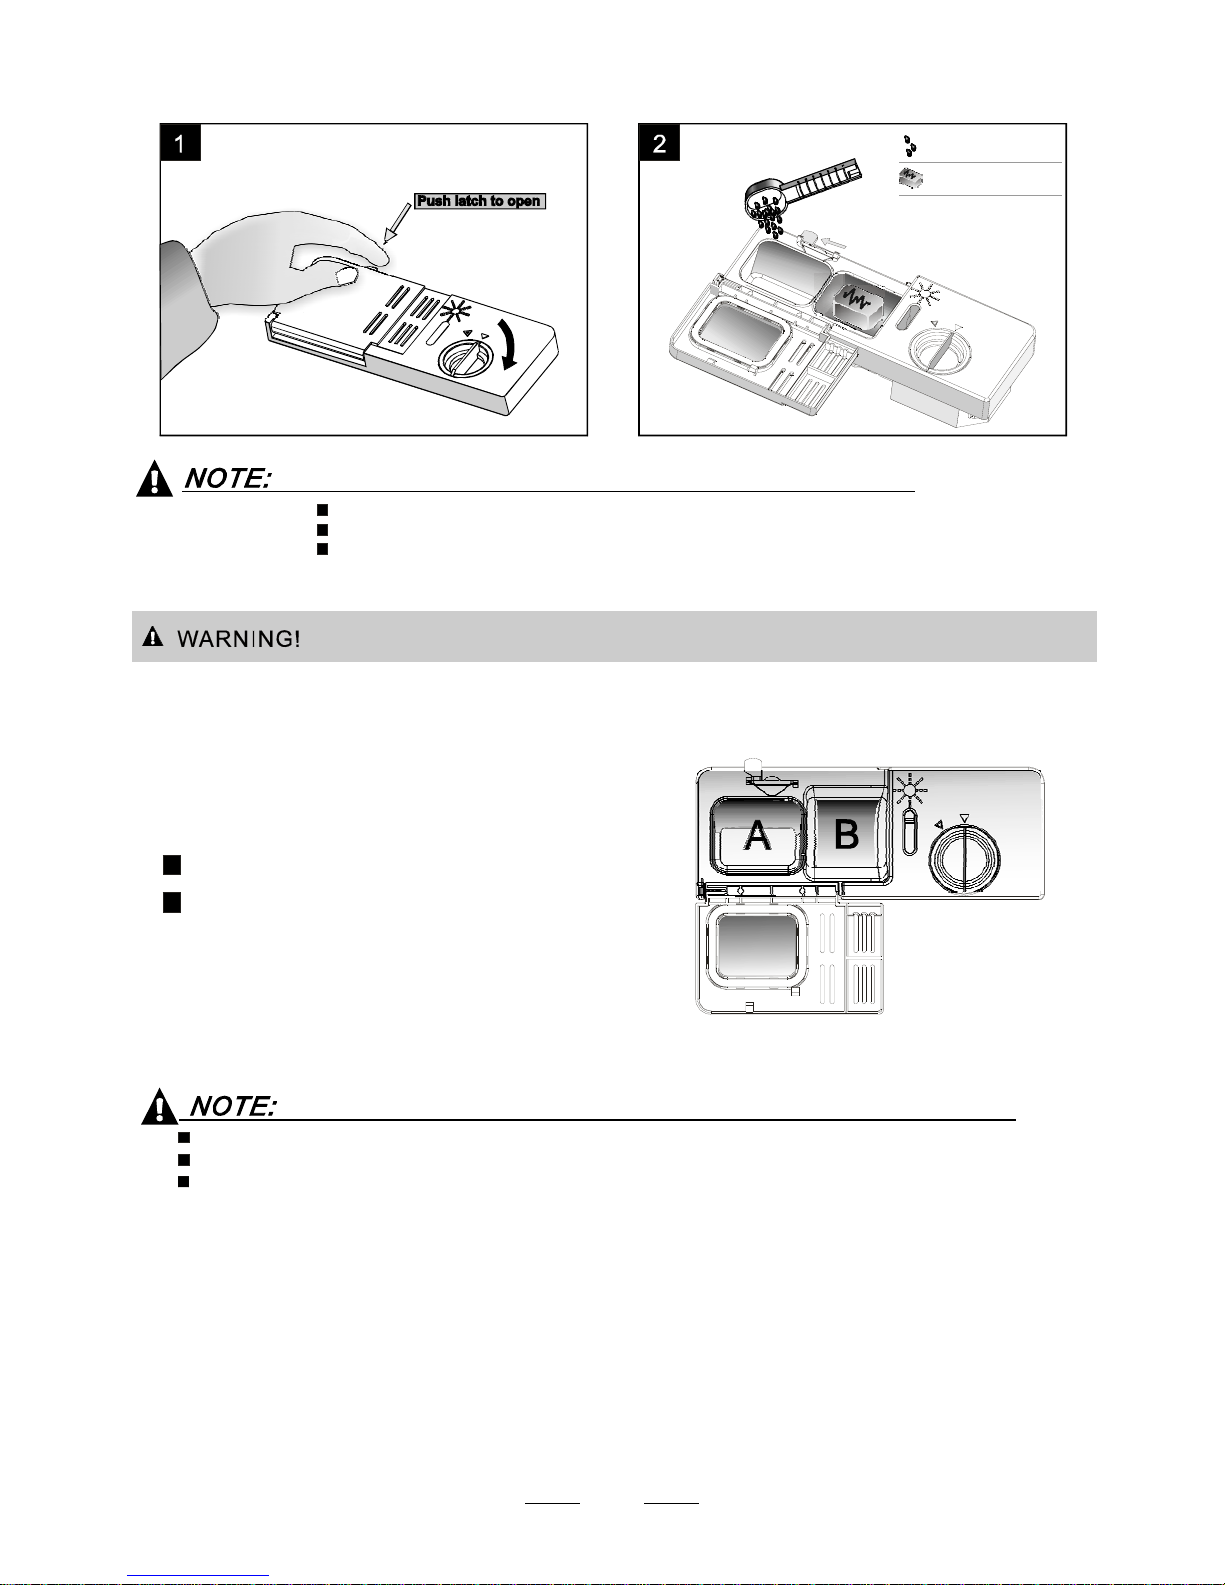
If the lid is closed: pr ess rele ase butt o n. The lid will spring open.
Deter gent tablet
Deter gent powder
Fillthedetergent dispenserwith detergent.
The ma rkin g ind i cate s the dosi n g lev els , as
illustratedontheright:
The place of mainwash cycled etergent place d.
The place of pre-wash cycledetergent placed.
Please observe themanufacturers dosing and storage
Recommendations as stated on the detergent packaging.
Close the lid and pressuntili t locks in place.
Ifthed ishes are heavily soiled, place an additional
detergentdosei nthepre-wash detergent chamber. T his detergentwill takeeffect duringthepre-washphase.
A
B
FillinDetergent
You findinformation about the amount ofdetergent forthes ingle progra mme on the last page.
Please aware, that according to the levelsoiling andthespecifichardness of water differences are possible.
Please observe the manufacturer's recommendati ons on the detergent packaging.
6
For best performanceof the dishwasher, follow these loading guidelines. Features and
appearance of baskets and cutlery baskets mayvary from your model.
Attention before or after Loading the Dishwasher Baskets
Scrape off any large amounts of leftover food. Soften remnants of burnt foodinpans.
It isnot necessary to rinse the dishes under running water.
Place objects in the dishwasher in following way:
1.Items such as cups, glasses, pots/pans, etc. are faced downwards.
2.Curved items, or ones with recesses, should be loaded aslant so that water can run off.
3.Allutensilsare stacked securely and cannot tip over.
4.Allutensils are placedin the waythat the spray arms can rotatefreely during washing.
Very small items should not be washed in the dishwasher as they could easily fall out of the baskets.
Removing the Dishes
To prevent water dripping from the upper basket into the lower back, we recommend that you
empty the lower basket first and then the upper basket.
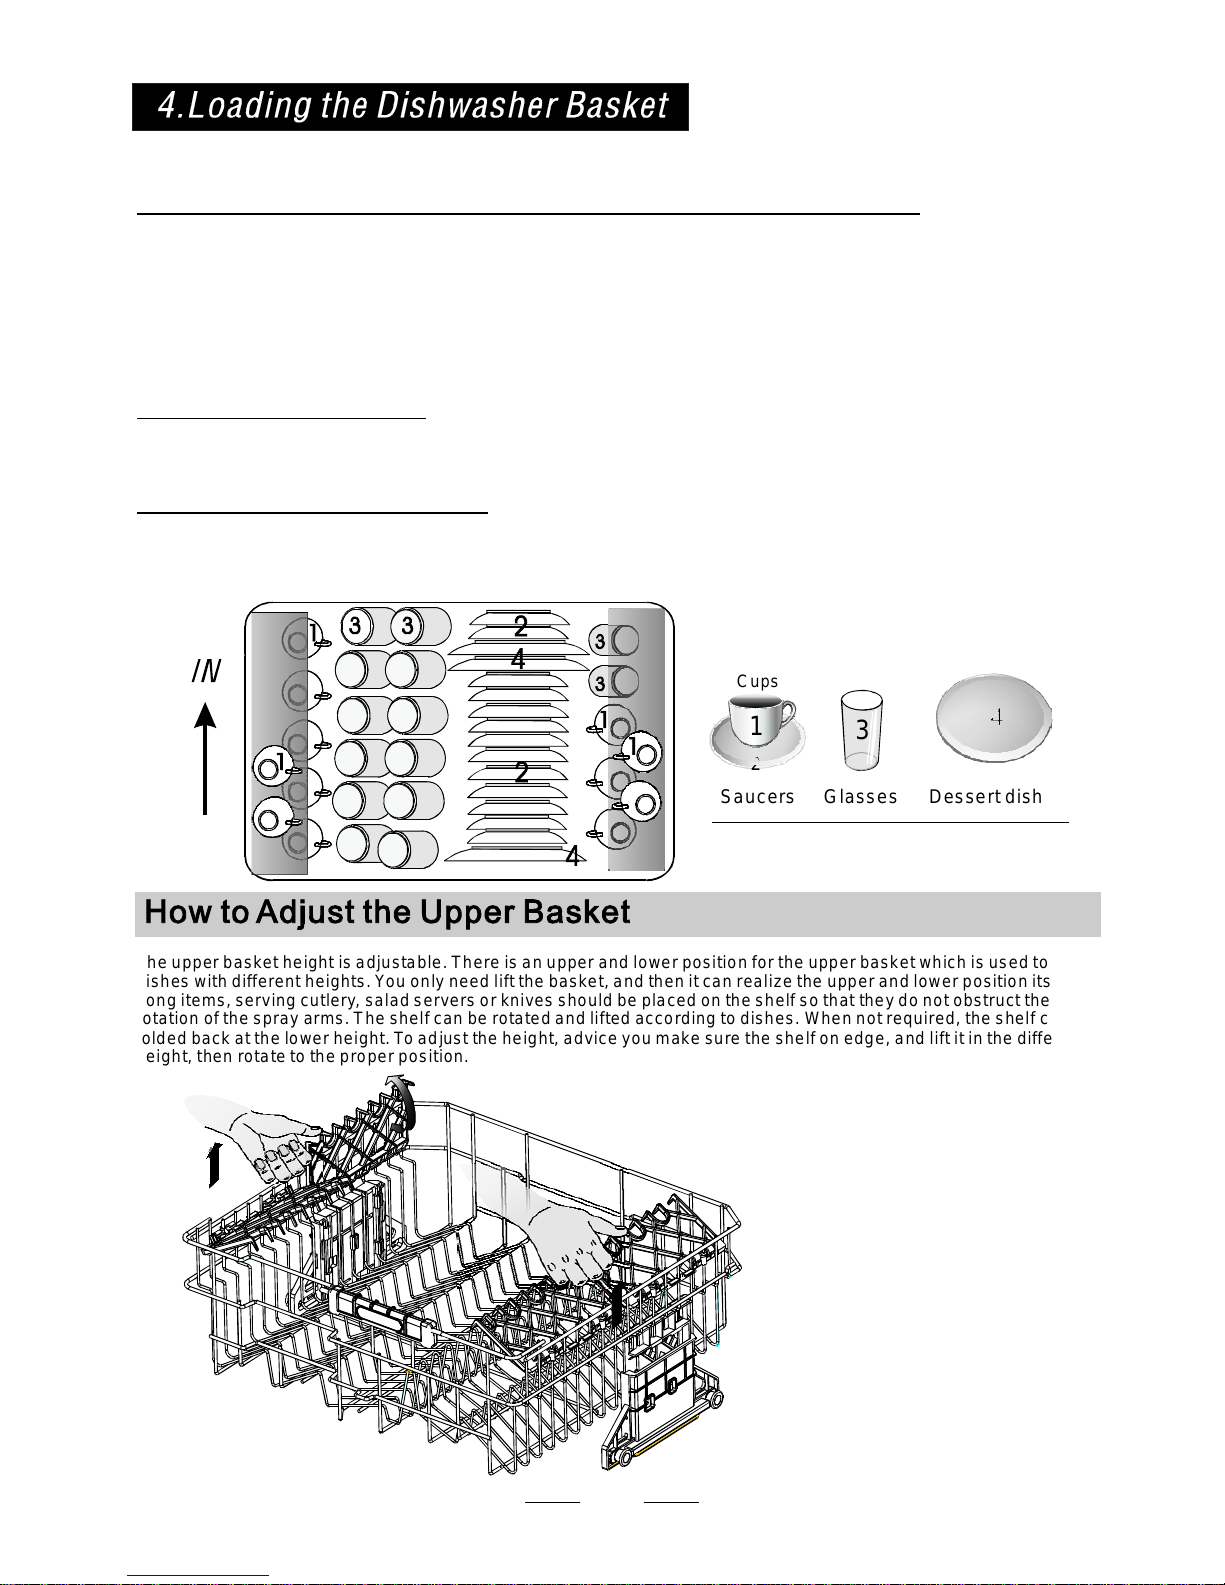
Loading the Upper Basket
The upper basket is designed to hold more delicate and lighter dishware such as glasses,coffee
and tea cup and saucers, as wellas plates, small bowls and shallow pans (as long as they are
not too dirty).
Position the dishes and cookware so that they do not get moved by the spray of water.
3
GlassesSaucers
2
1
Cups
Dessert dishes
4
4
Theupperbasketheightisadju stable. There is anupperandlowerposi tion for the upper basket whichisus ed to wash
dishes withdifferent heights.Youon ly need lift the basket,andtheni t can realize the upper andlowerpositioni tself .
Longitems,serving cutlery, saladserversork nives should be placed on thesh elf so that theydonotobstr uct the
rotation ofthespray arms.The shelf can be rotated and lifted according to dishes. When not required, theshelf canbe
folded back at the lower he ight . Toad just the heig ht, advi ce you mak e sure the she lf on edge, and li ft it in the differen t
height,thenrotateto the proper position.
 Loading...