

EURO EDV600WH, EDV600SS Instruction Manual

EDV600WH/EDV600SS
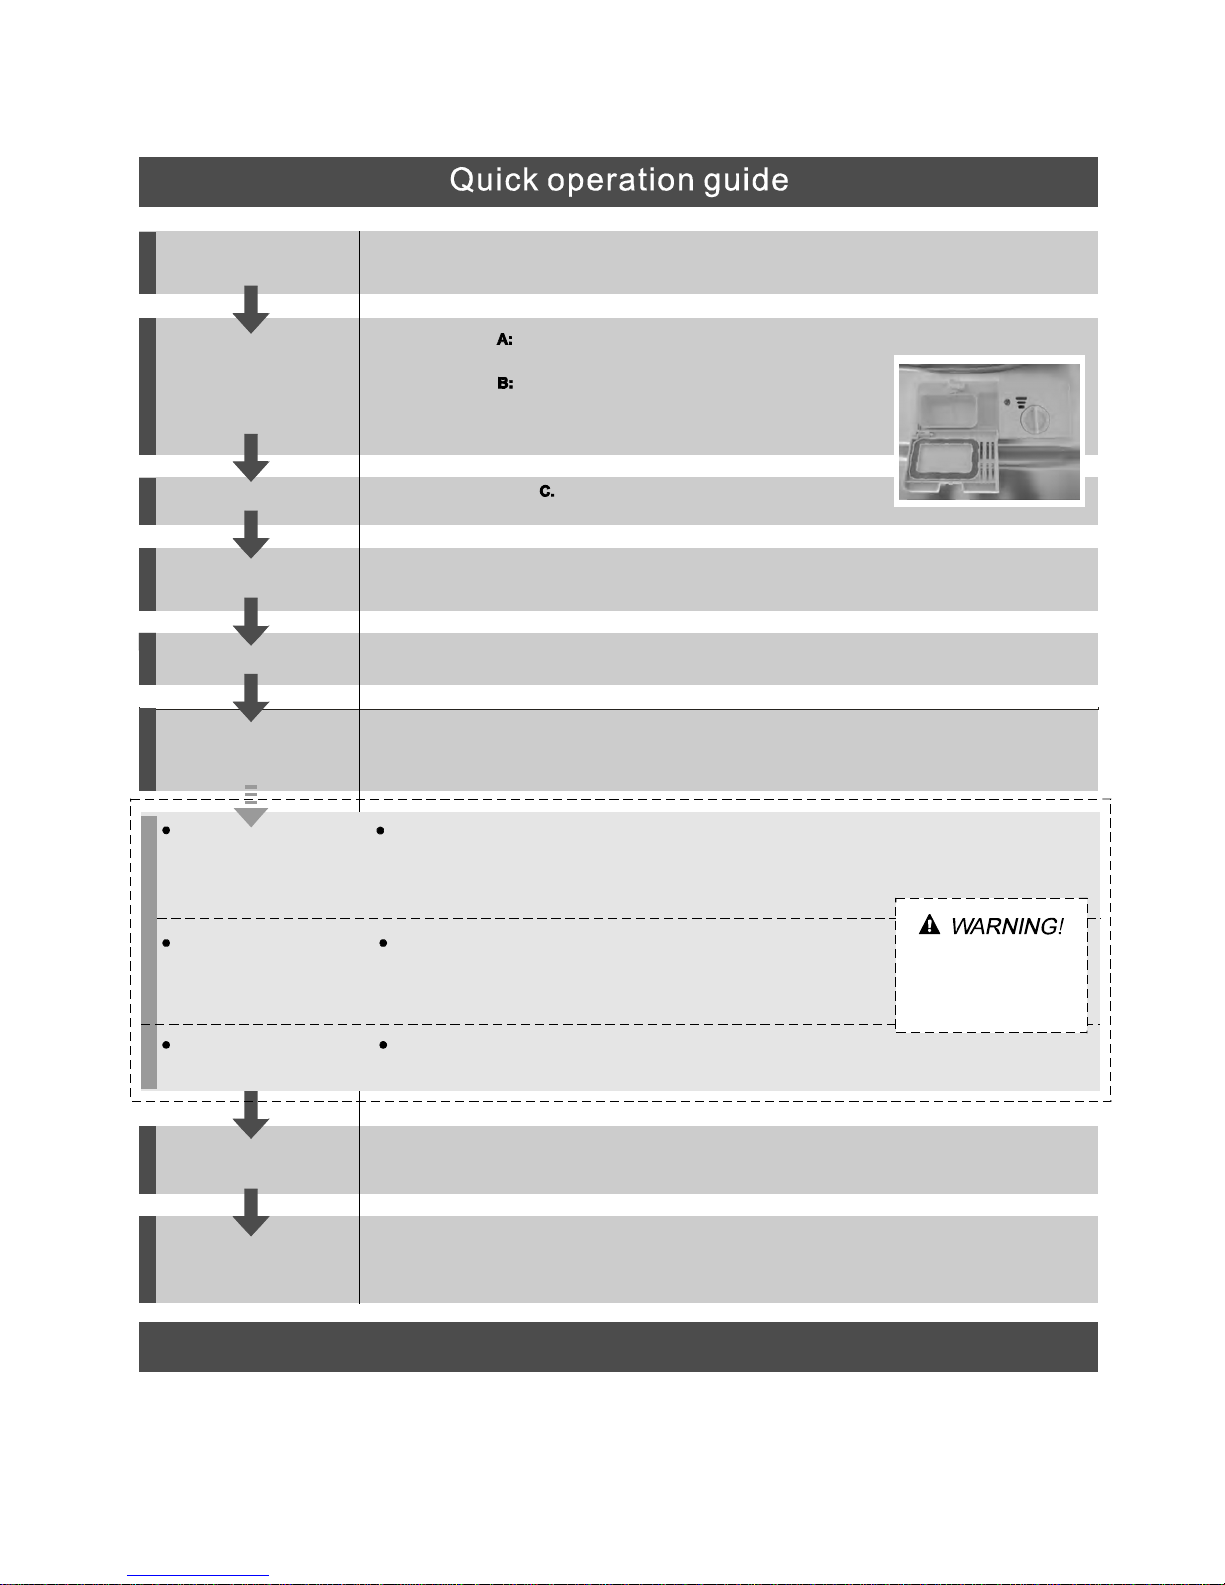
Compartment
Fillmain-washdetergent.
Compartment
Fill pre-wash detergent.
(Follow the user instructions!)
Mechanical indicator
Check the rinse aid level
Load the baskets
Select a programme
Turn on the water tap and press the Start/Reset button. The machine will start working
after about 10 seconds.
Running the dishwasher
Switch off the appliance
Turn off the water tap,
unload the baskets
Fill the detergent dispenser
Warning: wait a few minutes (about 15 minutes) before unloading the dishwasher to avoid handling
the dishes and utensils while they are still hot and more susceptible to break.
They will also dry better. Unload the appliance, starting from the lower basket.
Scrapeoff any large amount of leftover food.Soften remnantsof burntfoodin pans,
thenl oad the baskets.Refer to the dishwasherloadinginstructions.
Close the door,press the Programme button until the selected programme lights up.
( See the section entitled Operationinstruction )“”
When the working cycle has finished, the buzzer of the dishwasher will sound 8 times, then stop.
Turn off the appliance using the ON/OFF button.
Switch on the appliance Press the On/Off button to switch on the appliance, Open the door.
Electric indicatoron controlpanel(if provided).
Fordetailed o peratingmethodread the correspondingcontenton the instruction manual.
Changing the programme
Add forgottendishesin the
dishwasher.
If the appliance is switched
off during a wash cycle.
Openthe doorcarefully.
Hotsteam m ay escape
whenthedoor is opened!
If the appliance is switched off during a wash cycle, when switched
on again, please re-select the washing cycle and operate the dishwasher
according to the original Power-on state.
1.Open the door a little to stop the dishwasher.
2.After the spray arms stop working, you can open the door completely.
3.Add the forgotten dishes.
4.Close the door, the dishwasher will start running again after 10 seconds.
1. A running cycle can only be modified if it has been running for a short time. Otherwise the detergent
may have already been released and the water already drained. If this is the case, the detergent
dispenser must be refilled.
2. Press the Start/Reset button for more than 3 seconds to cancel the running programme.
3. Select a new programme.
4. Restartthedishwasher.
A
B
C
Toreview the section on t roublesho oting Tips
willhelpyou t osolvesome common problems
byyourself .
Dear Custo m er,
Pleasecarefully read thismanualbeforeusingthe
dishwasher,i t will helpyouto use and maintaint he
dishw ash er properly.
Passit on to any s ubsequent owner of the appliance.
This ma nual c on tain s sec t ion s on s afe ty In stru ct io ns ,
Operating Instructions, Installation Instructions and
Troubles hooting Tips , etc .
The man ufacturer, f ollowing a policy of c onstant
development and u pdati ng of the pr oduct, may
make m odifications witho ut giving prior notice.
Keepit to refer to it ata laterdate.
Ifyou can not solve t he problems by yourself ,
please ask fo r t he help o f professiona l technician s.
Dishwasher Features.......................................2
Attentio n before or afte r loading the Dish washe r
Baskets..........................................................6
FilteringSystem.............................................11
Caringforthe Dishwasher..................... .........12.
A Fillthe RinseAid Disp enser............. .. ..3、 ..... ...
B Function o f Detergent .........................4、 ........
Loading t he upper ................ ........... ...7Baske t ...
Load ing the Lowe r ........... ...... ... .. .........7Basket ..
CutleryBasket................................................8
Wash Cycle Table...........................................9
Turningon theAppliance................................10
ChangetheProgramme.............. ................10....
At the E nd of theWashCycle...........................10
Positio ni ng the Applia n ce. ..... . ... ..... . .. . .......... 13..
Water Connec ti on.... ... .... .. . ... ..... . .. ... .... .. .......14.
AboutPower Connection........................ .......13.
Startof dishwasher................................ ......15..
Before c al l ing fo r ser vic e......... . ... . ... ... .. .. .. . .....16.
Errorcodes.................................... ..............17.
Technical in formation.............................. .....18..
Contr o l Pan el.... . .. ........ . ... . ... ... ... . . ... . ... ... ... . ......2
Thisapplianceis intended to b eusedin householdand
similarapplications such as:
staffkitche n areas in shops, offices and othe r working
env i r onment s;
farm ho uses;
byclientsin hotels,motelsandother residential type
env i r onment s;
bed and breakfast type environm ents.
–
–
–
–
1
This appliance must be grounded. In the event of a
malfunction or breakdown, grounding will reduce
the risk of anelectric shock by providing a path of
least resistance of electric current. This appliance
is equipped with a cord having an equipmentgrounding conductor and a grounding plug.
The plug must be plugged into an appropriate outlet
that is installed and grounded in accordance with
all local codes and ordinances.
Improper connection of the equipment-grounding
conductor can result in the risk of an electric shock.
Check with a qualified electrician or service
representative if you are in doubt whether the
appliance is properly grounded. Do not modify the
plug provided with the appliance; If it does not fit
the outlet. Have a proper outlet installed by a
qualified electrician.
Keep children away from detergent and rinse aid, keep
child awayfromthe opendoorof the dishwasher,
there could still be some detergent left inside.
ren
Do not abuse, sit on, or stand on the door or dish
rack of the dishwasher.
Do not touch the heating element during or
immediately after use.
(This instruction is only applicable to machines
with a visual heating element.)
Do not wash plastic items unless they are marked
dishwasher safe or the equivalent. For plastic items
n
ot so marked, check the manufacturer's
recommendations.
Use o nly detergent and rinse additives
designed for an aut omatic dishwasher.
Never u se soap, laundr y de terg ent, or h and
washing detergent in your dishwasher.Keep
these products out of t he reach of children.
Duringinstallation,t hepowersupply mustnot
be excessively or dangerously bentorflattened.
Do not tamper with controls.
Do not operate your dishwasher unless all
enclosure panels are properly in place. Open
the door very carefully if the dishwasher is
operating, there is a risk of water squirting out.
Do not place any heavy objects the
door when it is open. The appliance could tip
forward.
on or stand on
When load in g items to be w ashed :
1) L ocatesharp items so thattheyare not likely
todamage thedoorseal;
2 Warning:Knives and other utensils with
sh a rp points must be load ed in th e basket
with their points d own or p lace din a
horizontalposition.
)
When us ing your dishwasher, yo u should
prevent plastic items from coming i nto contact
with the he ating element.(T his instruction i s only
applicable to m achines with a visual h eat ing
element.)
If th e s upply cord is d am aged, it must be replaced
by th e m anufact urer or its se rvice agent or a
similar ly quali fie d person i n orde r to avoid a
hazard.
Please d ispose of packing materials properl y.
Use the dishwasher only for its intended function.
Remove the door to the washingcompartment when
removing an old dishwasher from service or discarding it.
Dishwasher detergents are stronglyalkaline,they
can be extrem e ly dange r ous if swa llow e d.Avoid
contact with skin and eyes and k eep children away
from the dishw asher when the door is open.
Check thatthedetergentcomparmentisempty
after com pletio n o f the wash cycle.
The app liance i s to b e connected to t he water
mains u sing new hosesets and thatoldhose-sets
sho uld not be re u sed.
The maximum number of place settings to be
washed i s 12 .
The maximum permissible inlet water pressure is
1Mp a .
The minimum permissible inlet w ater pressure is
0.04Mpa.
Children shouldbe supervised to ensure thatthey do
not play with the appliance.
This appliance is not intended for use by persons
(including children with reduced physical, sensory or
mental capabilities, or lack of experience and
knowledge ,unless they have been given supervision
or instruction concerning use of the appliance by a
person responsible for their safety.
)
When using your dishwasher, follow t he precautions listed below:
The doo r sh ould not be left o pen,
since th is could increase the risk of trippi ng.

10 11
Back Vie w
Front view
2
Main Filter
Detergent D ispenser
Cup Shelf
Cutlery Basket
Coarse Filter
Ri ns e Ai d Dis p ens er
Inletpipeconnector
Drainpipeconnector
Lower Basket
Spray Ar ms
Upper Baske t
1
5
6
7
8
9
10
11
3
2
4
1
2
3
4
5
6
7
8
9
before u sing it fo r the f irst time.
Toget the bestperformancefrom yourdishwasher,read alloperating instructions
3h
6h
9h
12h
Prog.
Start/Reset
On Off
/
Delay
12
1
2
3
6
4
5
10
8
11
9
7
7
Power indicator light: To showthe power supply.
2
Power switch: Toturn on/off the power s uppl y.
3
Rinse aid war ning l ight: To show
when the dispe n ser n e ed to be ref illed.
Child lo c k in dic a tor light: Toshow w hen the
program is lock ed.
Start/Resetbutton:Tostarttheselected
washing program or r eset the washing program
when the mac hine is working.
4
5
Washing Program Selector:To sele ct o ne of
thesix wa shingp rograms.
6
Program in dicator lights: Toshow t he washing
program.
7
Half l oad function Button and indicator light:
Toselect Half load f unction. When Half load
is select ed, all s prayers will be r unning and
all bask ets could be lo aded.
8
Child l ock button: p r ess the delay and half load
buttons simultaneouslytolock t heprogram.
Delay B ut ton : ToPr ess the button to de lay.
9
Delay time/Washing Phases indicator li ghts:
To show the delay time(3, 6, 9,12 h ours, when
the do or is c lo se d, re l eva n t lig h t wil l be bl in king)
and w ashing phase (during the cycle, the indi cator
lightwillbeontoshowtherelevantwashing
phases of cycle).
10
11
Program step indicators:
Pre-wash indicatorlight:
Main-wash indicator light:
Rinse i ndicat or l ight:
Drying indicator light:

Before u sing your dishwasher for the first time :
3
A. Fill the rinse aid dispenser
B. Fill in detergent
The r inse a id is r elea se d d u ring the final rin se to preve nt water fro m forming droplets on your dish es, which can l eave
spots andstreaks. It also improves d rying by allowing water to roll off the d ishes . Yourdishwasher is designed to
usel iquid rin se aids. The rin se aid di spenser is l ocated inside the d oor next to the detergentdi spenser.To fill the
dispenser, open thecapand pourthe rinseaidi ntothedispenser until the levelindicatorturns completelyblack.
Thevol ume of t he rinse aid container is about 110ml.
RinseAi dDispenser
Function of RinseAid
Rinse ai d is automat ically added during the last rinse, ensuring thorough rinsi ng, and spot and streak free drying.
Attention!
Onlyusebrandedrinseaidfor dishwasher.Never filltherinseaid dispenserwith any othersubstances
(e.g. Dishwasher cleaning ag ent, liqu id d eterg ent). This would damage the app liance.
To op e n t he dispen ser, turn the cap to the " ope n" (left ) arrow and lift it out .
Pour t he rinse ai d into the dispe nser,be ing careful not to overfi ll.
Replace the ca p by inserting it aligned with "op en" arrow and turning it to the cl osed (right) arrow.
1
2
3
As t he rinse aid d iminis hes, t he size of the b lack dot
on t he rinse aid l evel indica tor changes, as illust rated b elow.
Full
3/4full
1/2full
1 / 4 full - S hould refill to elimin ate s potting
Empty
Whento Refillthe RinseAid Dispenser
Ifthere is no rinse-aid warninglight in thecontrol panel, youcanestimatethe amount from thecolour
of t he opt ical leve l indic ator C loc ated nex t to th e c ap. When the rins e - aid c ont aine r i s full, the whole
indicator will be da rk .A s the rinse-aid diminishes, the size of t he dark dot decr eases. Youshou ld ne ver let
therinseaidlevelfall1 /4 full.
during the n ext wash.
Don't forget to replace the cap before you close dishwasher door.
Clean up a ny rinse aid s pilt while du ring fillin g wit h an absorbent clo th to a vo id ex cessive foa m ing
""
4
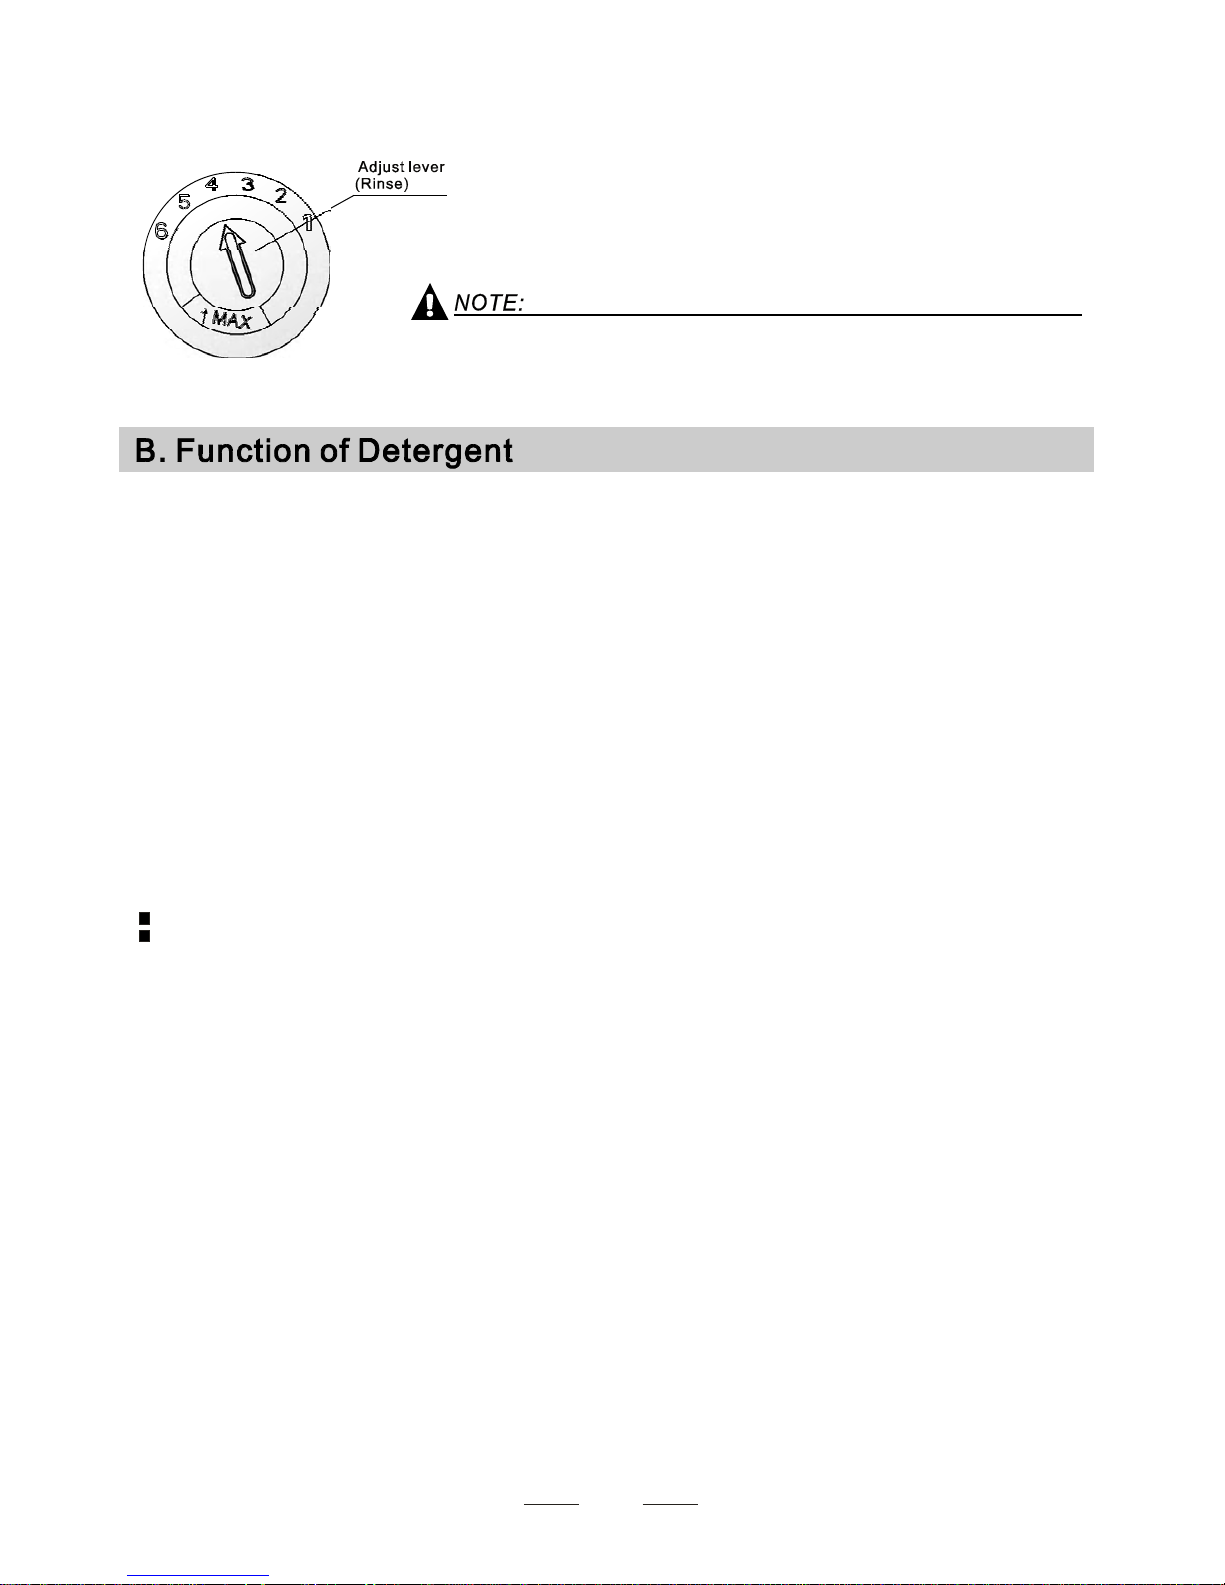
Adjusti ng R inseA id Dispenser
The r inse aid dispenser has six or four settings. Al ways start with the dispens er
set o n "4". If sp ots and poor drying are a problem, increa se the amount o f rinse
aid d ispensed by removing the dispe nser lid and r otating the dial to "5". If the
dishes a re still not drying properly or show spots, adjust the dial to t he next
higher lever until your dishes are spot-free. The recommended setti ng is "4".
(Factoryvalue is "4".)
Increasethe doseif there aredrops of watero rlime spotsonthedishesafter washing.
Reduce i tif there are stickywhitish stainson your dishesor a bluishfilm onglasswareor
knifeblades.
Detergents with its chemic al ingredients a re necessary to remove dirt, crus h dirt an d transport it ou t of t he dishwasher.
Use onl y det ergent specifically made for th e us e i n dishw ashers .
Deterg ents
There are 3 sorts of detergents
1.With phosphateand with ch lorine
2.Withphosphate and without chlorine
3.Withoutphosphate and without chlorine
Basedontheirchemical composition,detergents can be splitintwobasictypes:
The use of normal washing programsincombination with concentrated detergents
reduces pollution a nd is good for your dishes; these wash p rog rams are spe cifically mat ched
toth e dirt- diss olving properti es of the enzyme s of the con cent rate d detergent. For this reason
normal washprograms in whichconcentrateddetergentsareused canachieve thesame
results thatcanotherwise onlybe achieved using intensive programs.
“”
“”
“”
Detergent tabletsof differentbrands dissolve at different speeds. Forthis r eason some
detergent ta blets cannot dissolve and develop their fu ll cleaning power during short
programs. T herefore please use long programs when using detergent tablet s, t o
ensure the c omplete rem oval of deter g e n t residuals.
The dispens er m ust be refilled before the start of each was h cy cle f ollowing the instructi ons
provided in t he w ash cycle table . Yourdis hwasher uses less de tergent and rinse aid t han
Conventionaldishwasher. Generally, onlyonetablespoonofdetergent isneeded for
anormal washload. More heavilysoiled itemsneedmoredetergent. Alwaysadd the
detergen t just be fore star ting the dis h was her, otherwis e it could ge t da mp a nd will not
dissol v e pro pe r ly.
Concentr ated Detergent
DetergentTablets
DetergentDispenser
conventional,alkalinedetergents withcausticcomponents
lo w alk al i ne concentrated d et ergen t s w ith natu r a l e nzymes
Normally ne w pulverised detergent is without phospha te. T hus the water so ftener function of
phosphate is not given. In this cas e w e r e commend to f i ll salt in th e salt con t a in er even when
the hard ness o f water is o nly 6 dH. If detergents w itho ut ph osphate are used in the caseof hard water
often wh ite s pots appear on dishes and glasses. I n this case please add m ore detergent to reach
better r esul ts. D etergen ts wi thout ch lorine d o only blea ch a li t tle. Stro ng a nd co lo u red spots will not
beremo ved completely.In this case please choose a p rogram with a higher temperature .
°
 Loading...