

EURO EDS845SX Instruction Manual

EDS845SX
10 place settings
euro
Compartment A:
Witheachwashcycle.
Compartment B:
For programmes with pre-wash only.
(Follow the !)User Manual
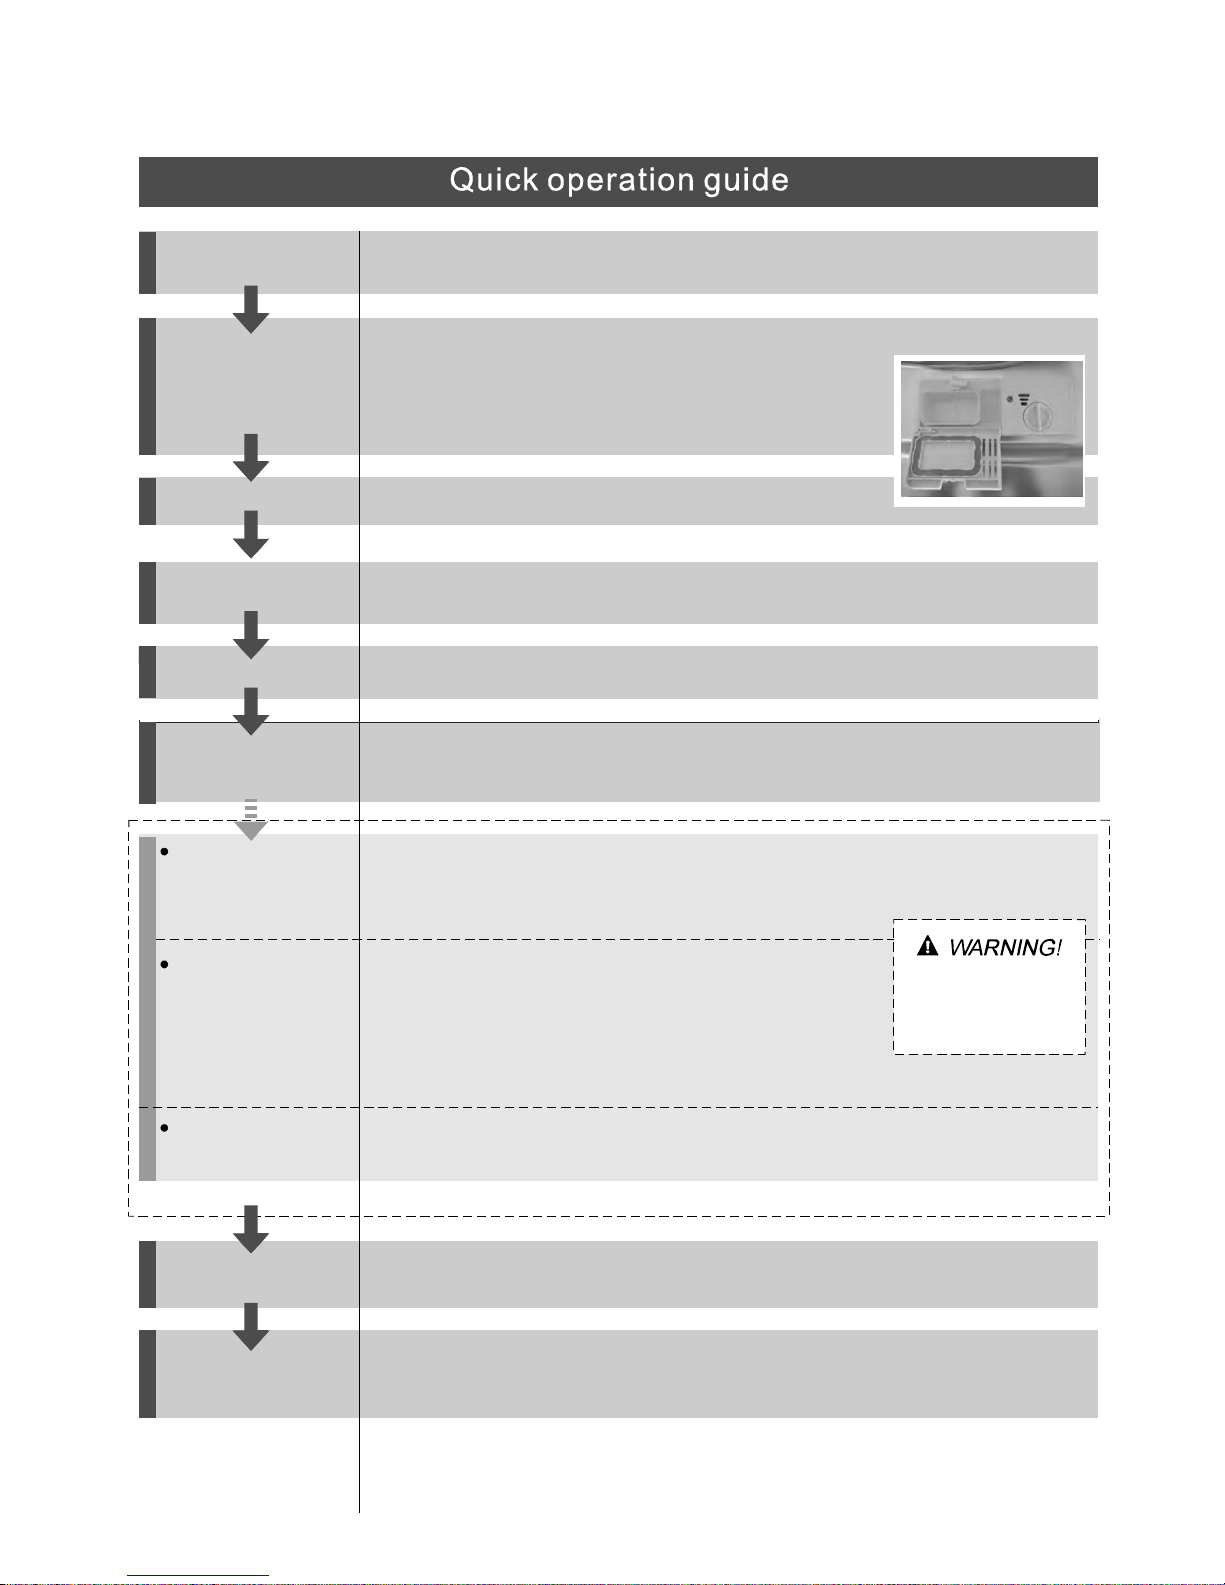
Mechanical indicator C.
Electric indicator on controlpanel (if provided).
Check the rinse aid level
Load the baskets
Select a programme
Turn on the water tap and p ress the . The machine will start working
after about 10 seconds.
Start/Pause Button
Running thedishwasher
Switch off the appliance
Turn off the water tap,
unload the baskets
Fill the detergent dispenser
Warning: wait afew minutes(about 15 minutes) before unloading the dishwasher to avoid handling
the dishes and utensils while they are still hot and more susceptible to break.
They willalso dry better.Unloadthe appliance, startingfromthe lowerbasket.
Changing the programme
Add forgottendishes in the
dishwasher.
Scrapeoffany large amount of leftover food. Softenremnants ofburntfood in pans,
thenload the baskets.Referto thedishwasherloading instructions.
Close the door,press the Programme Button until the selected programme lights up.
( See the section entitled Operationinstruction )“”
When the working cycle has finished, the buzzer of the
dishwasher will sound 8 times, then stop.
Turn offthe appliance using the On/Off Button.
If the appliance is switched
off during a wash cycle.
Open thedoor caref ully.
Hotst eam mayescape
when thedoor is opened!
If the appliance is switched off during a wash cycle, when switched
on again, please re-select the washing cycle and operate the dishwasher
according to the original Power-on state.
Switch on the appliance Press the On/Off button to switch on the appliance, Open thedoor.
Fordetailed operatingmethod read thecorrespondingcontent onthe instructionmanual.
1.A runningcycle can o nly be modified if ithas been running for ashort time.Otherwisethe detergent
may have already been released and the water already drained. If this is the case, the detergent
dispensermust be refilled.
2.
Press the Start/Pause button, press the programbutton for more than three seconds,the
machine will be in standby state, then you can change the program to the desired cyclesetting
1.Press the St a rt/Paus e Button to stop thewashing.
2.Open the door a little .
3.After the spray arms stop working, you can open the door
completely.
4.Addforgottendishes.
5.Close the do or.
6.Press the Start/Pause Button, thedishwasher will run
after 10 seconds.
A
B
C
Tore view the sectiono n troubleshooting Tips
will helpyouto solvesome common problems
byyourse lf .
Dear Customer,
Pleasecarefully read this manual before usingthe
dishwasher, it will help you to use andmaintain the
dishwasher properly.
Passit onto any sub sequentownerof theappliance.
Thismanual containssectionson safetyInstructions,
Operating I nstructions, Installation I nstructions and
Troubles ho o tin g Tips, etc.
The manufacturer, following apol icy ofcon stant
development andu pdati ng oft he product, may
make modifications withoutgivi ng prior notice.
Keep it as are f er in the later days .
Ifyo u cannot solve thepr oblems by yourself ,
please askfo r thehelp of professional technicians.
This appliance isintend ed tobe used inhous ehold
andsimilarapplicationssuchas:
-staff kitchen areasin shops, offices andother
working enviro nme nts;
-farm houses;
-by clients inhotels , motels and other residential
ty pe e nviro nments;
-bed andbreakfast typeenvironments.
DishwasherFeatures..................................... ..2
AttentionbeforeorafterloadingtheDishwasher
Baskets..........................................................6
FilteringSystem.............................................10
Caringfor theDishwasher..................... .........11.
A Fill the Rinse A idDispenser............. .. ..3、 ..... .. .
B F unction o f Detergent .........................4、 ........
........... 7
TheMethod ofLoadi ng Norm al Dish w a re
WashCycleTable...........................................8
Turning on theApp lian ce ... ... ... ... . ...................9
Changethe Programme.............. ................9....
At the endof the Wash Cycle...........................9
PositioningtheA ppliance................... ..........12..
Water Connect i on...... . .... ... .. .... ... .. . ..... ... .......1 3.
AboutPowerConnection........................ .......12.
Startof dishwasher................................ . .....14..
Befo re call ing for servic e............ . ... . ... .. ... .. ... . .1 5.
Errorcodes.................................... ..............16.
Technicalinformation.............................. .....17..
Contro l Pane l.... ... . ... ........... . ... .........................2

This appliance must be grounded. In the event of a
malfunction or breakdown, grounding will reduce
the risk of anelectric shock by providing a path of
least resistance of electric current. This appliance
is equipped with a cord having an equipmentgrounding conductor and a grounding plug.
The plug must be plugged into an appropriate outlet
that is installed and grounded in accordance with
all local codes and ordinances.
Keep children away from detergent and rinse aid, keep
child away from the open door of the dishwasher,
there could still be some detergent left inside.
ren
Donotabuse,siton,orstandonthedoorordish
rack of the dishwasher.
Do not touch the heating element during or
immediately after use.
(This instruction is only applicable to machines
with a visual heating element.)
Do not wash plastic items unless they are marked
dishwasher safe or the equivalent. For plastic items
n
ot so marked, check the manufacturer's
recommendations.
Use onlydeter gent and rinse additives
design ed for ana utom atic dishwa sher.
Never usesoap, laundry detergent, orhand
washing detergent inyou r dishwasher.Ke ep
these produ cts out of th e re ach of children.
During installation, the po wer supply mustnot
be excessively ordan gerously bent orflatt ened.
Do not tamper with controls.
Do not place any heavy objects the
door when it is open. The appliance could tip
forward.
on or standon
When loading items to bewashed :
1) Locatesharp items sothat they arenot likely
to damaget he door seal;
2 Warning: Knives andother utensils with
sharp points mustbe loaded inthe basket
with their poi nts down orplaced in a
horizontal position.
)
When usingy our dishwasher,yo u should
pr ev ent pla stic item s fr o m c oming in t o co ntact
with theh eating element.(This instruction is only
applicable to machines witha visual heating
element. )
Ifthesupply cordis damaged, it mustbereplaced
bythemanufactureroritsserviceagentora
similar ly qualifi ed person in order toav oid a
hazard.
Pleasedispose of packingmaterials properly.
Use the dishwasher only for its intended function.
Remove the door to the washing compartment when
removing an old dishwasher from service or discarding it.
Dishwasher detergents arestro ngly alkaline, they
can beextremel y dangerous ifswallowed. Avoid
contact withskin and eyesand keep children away
from the dishwasher when thedoor is open.
Check that the detergent comparm ent is empty
after completion ofthe washc ycle.
The appliance isto be connect ed tothe water
mains using new hose setsandthatold hose-sets
should not be reused.
Them aximum numbe r of pl ace settings to be
washedis10.
Them aximum permissible inle t wa t er p ressur e i s
1Mpa.
Them inimum permissi ble inle t wa ter pressure is
0.04Mpa.
Children should be supervised to ensure that they do
not play with the appliance.
This appliance is not intended for use by persons
(including children with reduced physical, sensory or
mental capabilities, or lack of experience and
knowledge ,unless they have been given supervision
or instruction concerning use of the appliance by a
person responsible for their safety.
)
When using your dishwasher, follow the precautions listed below:
The doorsh ould not beleft open,
since thiscoul d increaset he risk oftripping.
Improper connection of the equipment-grounding
conductor can result in the risk of an electric shock.
Check with a qualified electrician or service
representative if you are in doubt whether the
appliance is properly grounded. Do not modify the
plug provided with the appliance; If it does not fit
the outlet. Have a proper outlet installed by a
qualified electrician.
Do not operate your dishwasher unless all
enclosure panels are properly in place. Open
the door very carefully if the dishwasher is
operating, there is a risk of water squirting out.
The dishwasher must always be connected to
the water system using new hose sets.
Ift he appliance isin stalle d ona carpet floor,
take care that the openi ngs in its base are not obstruct ed .

before using itforthe firsttime.
Tog et thebestperformancefromyourdishwasher,read alloperating instructions
10
11
Back View
1
2
3
4
5
6
7
8
9
Front view
Lower basket
Dispenser
Cupshelf
Spra y arm s
Fil t er asse mbly
Inletpipeconnector
Drainpipe
Upperbasket
Cutleryrack
Top spray arm
1
Inner pipe
5
6
7
8
9
11
10
3
2
4
8.Extra Dryingi ndicator:
Extradrying:An increasedtemperature during the final
rinse t o increase drying well.There is aslight increase
in the energy consumption.
2.DelayButton : Pressthe button to add thedelaytime.
1.On/Off Button: to s witchOn/Off theappliance.
6.Display screen:toshowthe remainingtime and
thestate(runningstate, delaytime, etc)error codes
3.Half load an d Extra dryfunctions Button: To select
Half-load function orExtra Dry function.
4.Program Button : To Press the button to select
appropriate Program.
5.Start /P ause button: To st art the sel e c ted
washing program o r pause thewashing program
when themach ine isworki ng.
7.Haft l oa d indicator :To showwhen you selectthe
haft loadfuncti on. If you have only about orle ss than
half offull load dishesof the dishwasher, youc an select
the half loadfunctionandyour desiredprogram
according to the dishesc ontaminated degree (The rapid
programs can t select th is function). Apr ogram select
the half loadfunction,itcansavetime,energy, and water
compare tothe program hasn t select thehal f load
function. Aft er thehal f loadfu nction is selected , all the
sprayarmsare r unning,youcanloadallthe baskets.
’
’
9.Program indicators: Toshow which program youhave
chose.
10.Other indicators:
RinseAid indicator:
Indicates whenthe dispenser needs tobe refilled.
Chi ld lock indicator:
Water faucetindica tor:
Toshow when the water faucet isf orgo t to open.
Attention:
Child lockf unction: press Delaybutt on andH alf load/Exra
dry buttonsimu ltaneous ly tol ock thepro gram, the same
waytounlocktheoperation.
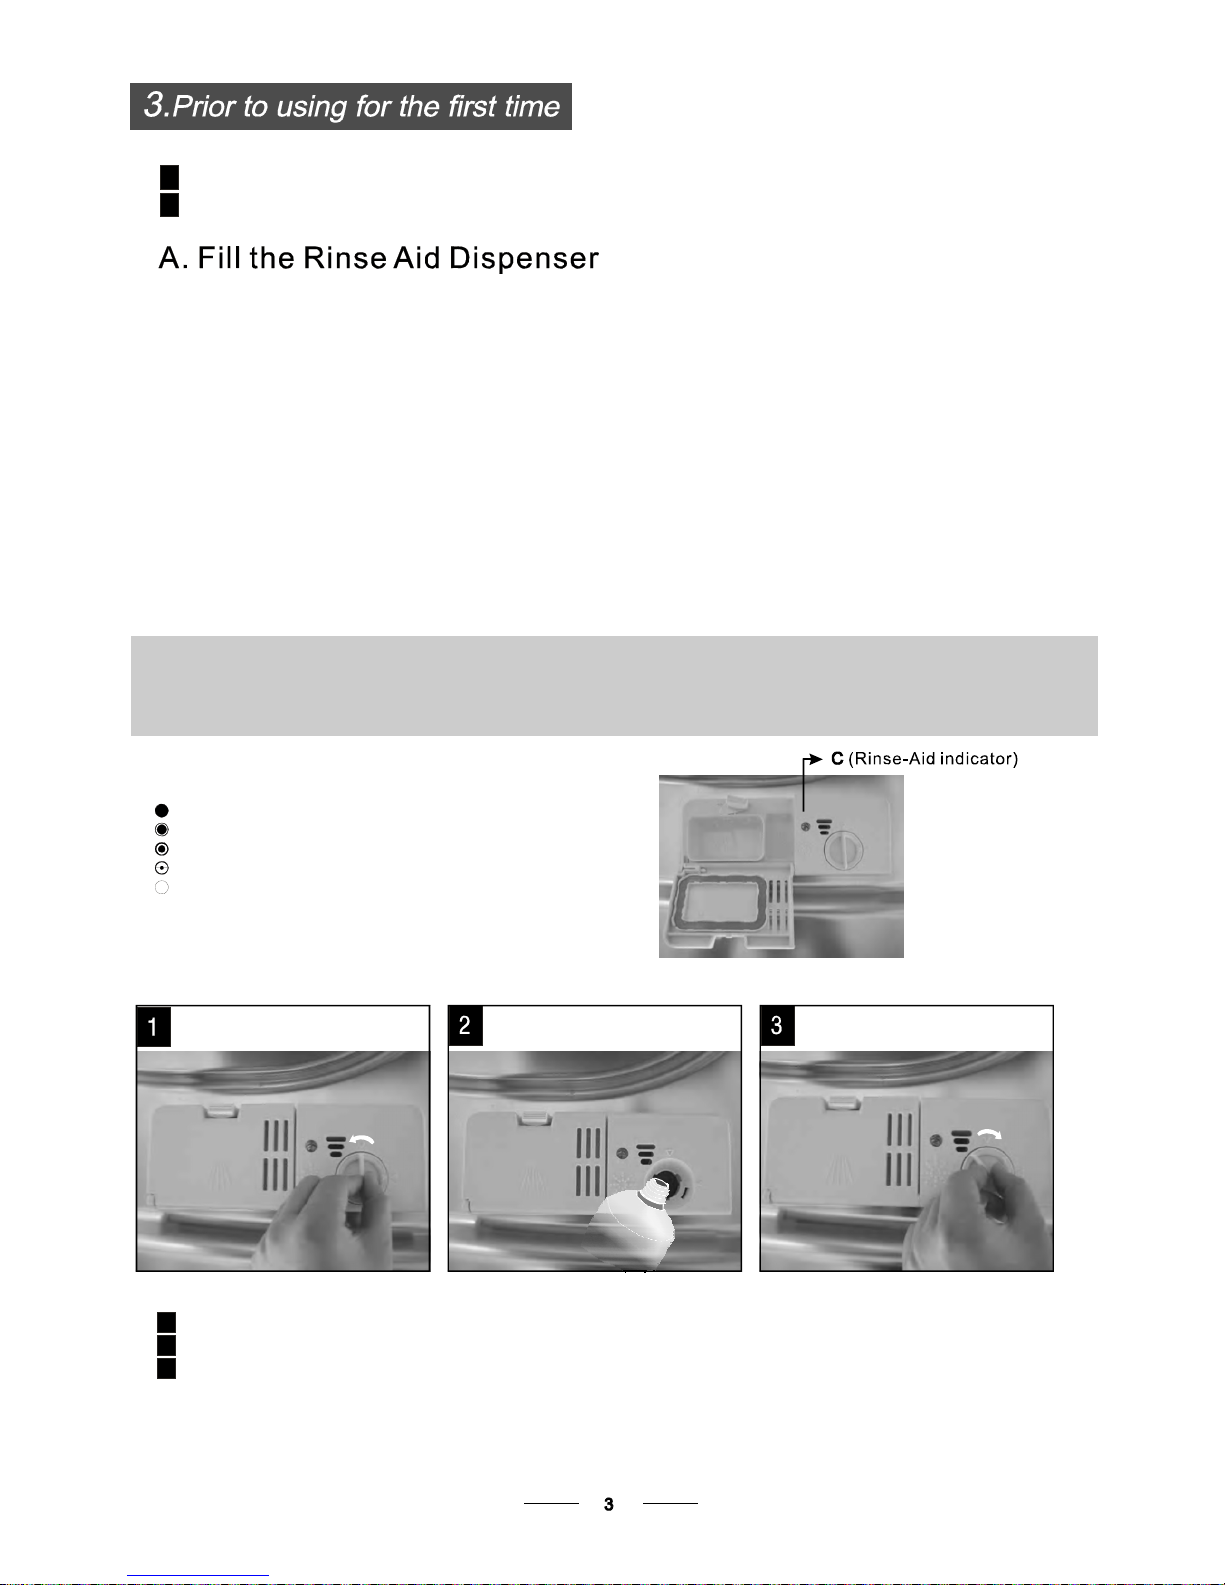
Before usingy our dishwasher for thefirst time:
A. Filltherinse aid dispenser
B. Fi ll in deterge n t
The rinse aid is released duringthe finalrinseto preventwaterfrom formingdroplets on your dishes,which can
leave spotsand streaks.It also improves dryingby allowingwaterto rolloff the dishes.Yourdishwasher is
designedto use liquidrinseaids.The rinseaid dispenser is locatedinsidethe doornext to the detergentdispenser.
Tof ill the dispenser, o pen the capand pour the rinseaid into thedi spenser until thelevel indicator turns completely
black.The volumeof the rinse aid container is about 110ml.
Rins eAid D is pen se r
Functi on of RinseAi d
Rinse aid isaut omati call y added during thelas t rinse, ensuring thorough rinsing, and spot andst rea k free drying.
Attenti on!
Only use branded rinseaid for dishwasher. Neverfillthe rinse a id dispenser with anyothersubstances
(e.g. Dishwasher cleaning agent, liquid detergen t). This w oul d damage the appliance.
As the rinse aid diminishes, the size of thebl ack dot
on the rinse aid l ev el indicator changes, asillust rated below.
Full
3/4full
1/2full
1/4full-Shouldrefilltoeliminatespotting
Empty
If therei s nori nse-aid warning light in thecontrol panel, you canjudg e the amount of rinse-aid byt he color ofthe
optical level indicator "C" located next tothe cap. When the rinse-aid container is full,the whole indicator willb e
dark .Ast he rinse-aid diminishes, the sizeof the darkd ot decreases. You shouldneve r let therinse aid getb elow
1/4full.
When to Ref ill the Rin seAi d Dis pen ser
RINSEAIDDISPENSER
To openthe dispenser, turnthe cap tothe "open" (left) arrowand lift itout.
Pour the rinse aid intot he dispens er, being careful not too ver fil l.
Replacethe cap by insertingitalignedwith "open"arrow and turningit to the closed(right)arrow.
Be carefulno t toover fill the dispenser,because this could causeover sudsing. Wipe away any spills
witha dampcloth.Don't forgettoreplace thecap before you closethe dishwasherdoor.
Attention!
Clean upany rinse aid spiltduring filling with anabsorbe nt cloth toavoid excess foaming
during thene xt wash.
1
2
3
Adjust ing R inseAid D ispenser
The rinse aiddispen ser hass ix or f our settings.A lways start with t he dispenser
set on"4 ". Ifs pots and poordryi ng area proble m, increaset he amount ofr inse
aid dispensed byremoving thedispenserlidandrotating thedialto "5".If the
dishes are stillnot drying properly orare showing spots, adjust thedial tot he next
higher lever u ntil your dishes arespot-f ree. Therecom mended setting is "4".
(Factoryvalue is"4".)
Increase the doseif there aredrops of watero r lime spotson the dishes afterwa shing.
Reduce itif there are stickywhitis h stains onyour dishes or abluish film on glassware or
knifeblades.
Detergents with its chemical ingredients are necessaryt o remove dirt,cru sh dirt andtranspo rt itou t ofthe dishwasher.
Most o f the commercial quality detergentsar e suitable fort his purpose.
Detergen ts
There are3 sorts ofdet ergents
1.Withphos phate and withchlori ne
2.Withphos phate and without chlorine
3.Withoutpho sphate and without chlorine
Based on theirchemicalcomposition, detergents can be splitin two basictypes:
The useof normal washingp rograms in combination withconcent rated detergents
reducespollutionandis goodforyourdishes; thesewashprogramsarespecifically matched
to thedirt- dissolving properties ofthe enzymes oft he concentrated detergent. Forthis reason
normal wash p rogra ms inwhich concentrated detergents are used can achieve t he same
results thatc an otherwise onlybe achieved using intensive p rograms.
“”
“”
“”
Detergent tablets ofdifferent brands dissolveat different speeds. Forthis reason some
detergent tablets cannotd issolve and developtheir full cleaning powerdu ring short
programs. Therefore pleaseuse long programs whenusi ng detergent tablets, to
ensure thecompleteremoval of detergentresiduals.
Thedispensermus t be refilled before the start ofeach wash cycle followingth einstructions
provided in the wash cycletable .Your dishwasheruses less detergent an d rinse aidthan
Conventional dishwasher. G enerally, onlyone tablespoon of detergent is neededf or
a normalwashload. Moreheavily soileditems needmoredetergent. Always addthe
detergent just beforest arting the dishwasher,otherw ise itcoul d getd amp and w ill not
dissolve properly.
ConcentratedDetergent
Detergent Ta blets
DetergentDispenser
conventional , alkalined etergents with caustic components
low alkalinec oncentr ated detergents with natural enzymes
Normally new pulverisedd etergent is withoutp hosphate. Thus thewater softener function of
phosphate is notgiven. In thiscase we recommendto fill saltin thes alt container evenw hen
the hardness ofwater is only6 dH. Ifdeterg ents without phosphate areused int he case ofhard water
often white spots appear ondishes and glasses. Inthis case pleaseadd more detergent toreach
better results. Detergents without chlorine doo nly bleacha little. Strong andcoloure d sp ots willn ot
beremoved completely. In thiscase please choose a program witha higher temperature.
°
 Loading...