

Page 1
Vac
Cleaner
©2004 Electrolux Home Care Products Ltd. Printed in U.
........................
.................................................
...................................................
...................................
..........................................
return this product to the store.
1-800-800-8975*
www.sanitairevac.com
www.sanitairevac.com
Page 2

the motor or the brush roll. The
Do not use outdoors or on wet surfaces.
Do not allow to be used as a toy. Close attention is
Use only as described in this manual. Use only manufacturerʼs
Do not pull or carry by cord, use cord as a handle, close a
vacuum cleaner.
Page 3
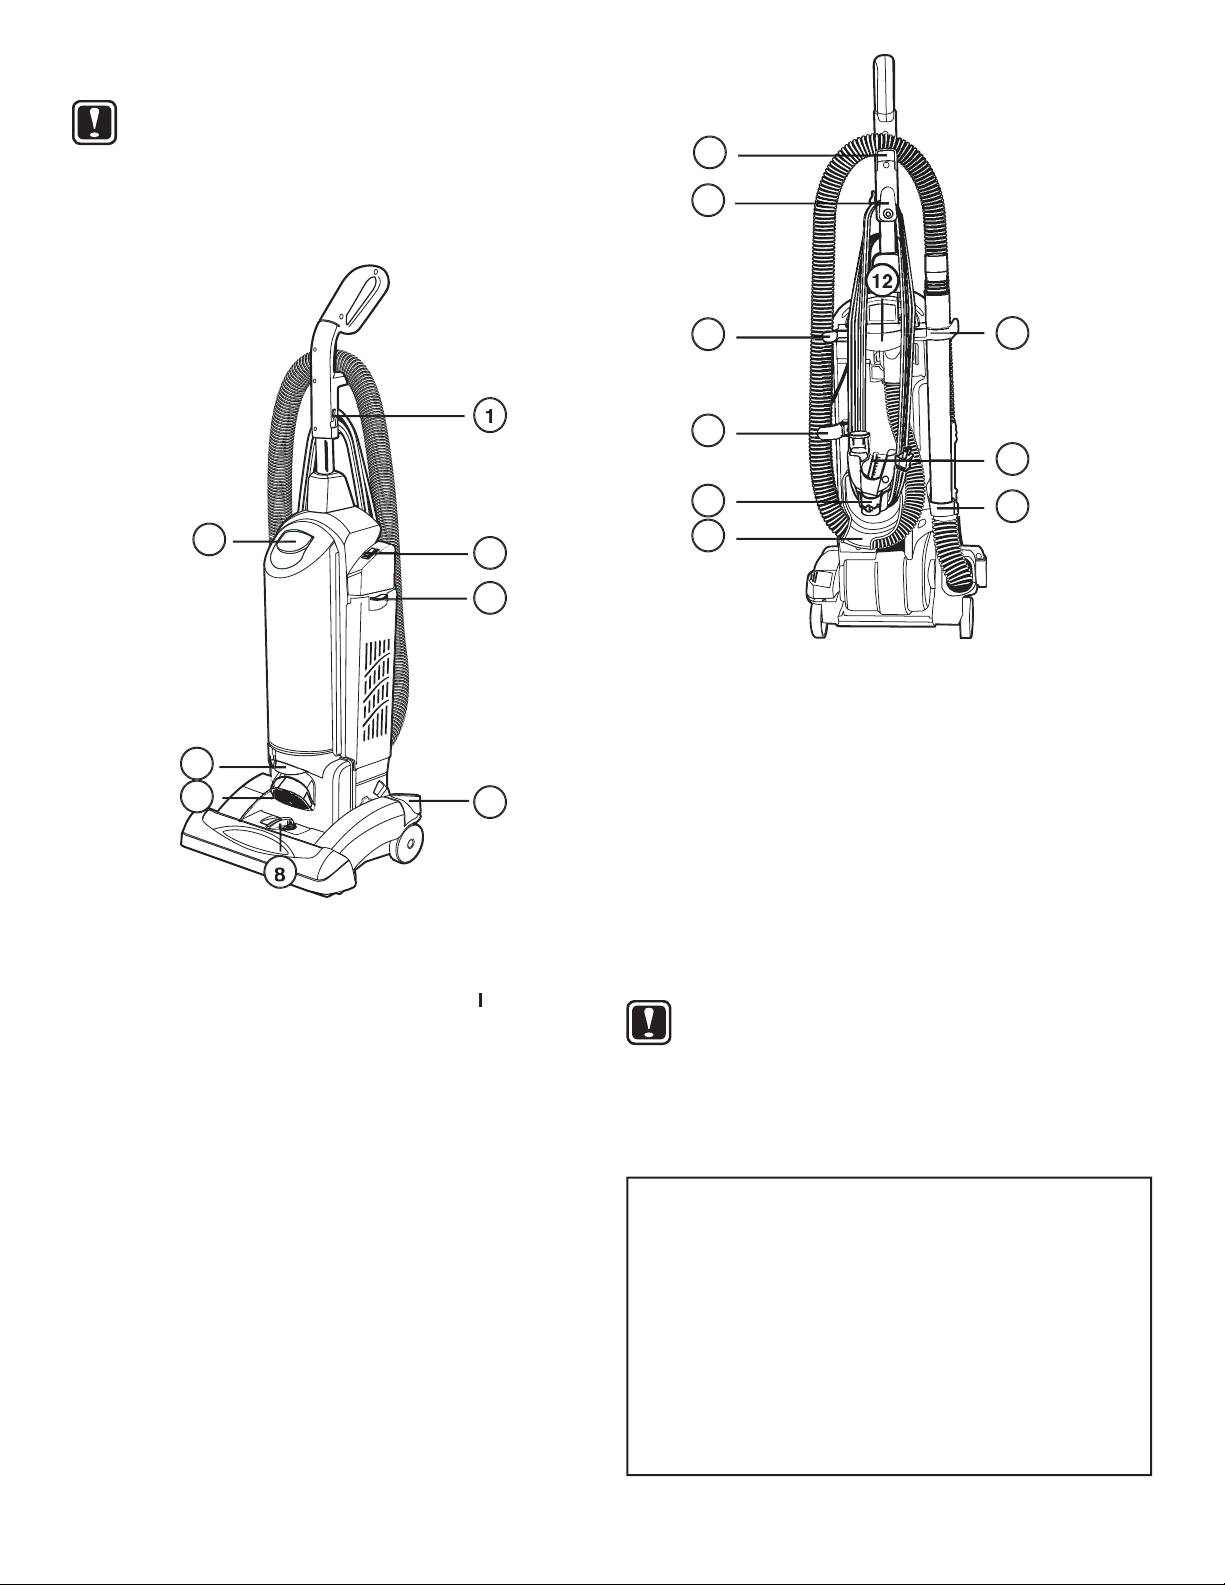
1. Cord Retainer.
To use, push electrical cord down into
2. ON/OFF Switch
means On,
O
means Off.
3. Bag Compartment Latch.
4. Filter Door Latch.
Push down on latch and pivot out for
5. Stair Handle
6. Headlight.
7. Handle Release
8. Cleaner Height Setting
9. Hose Retainers (4)
Store the dusting
Page 4
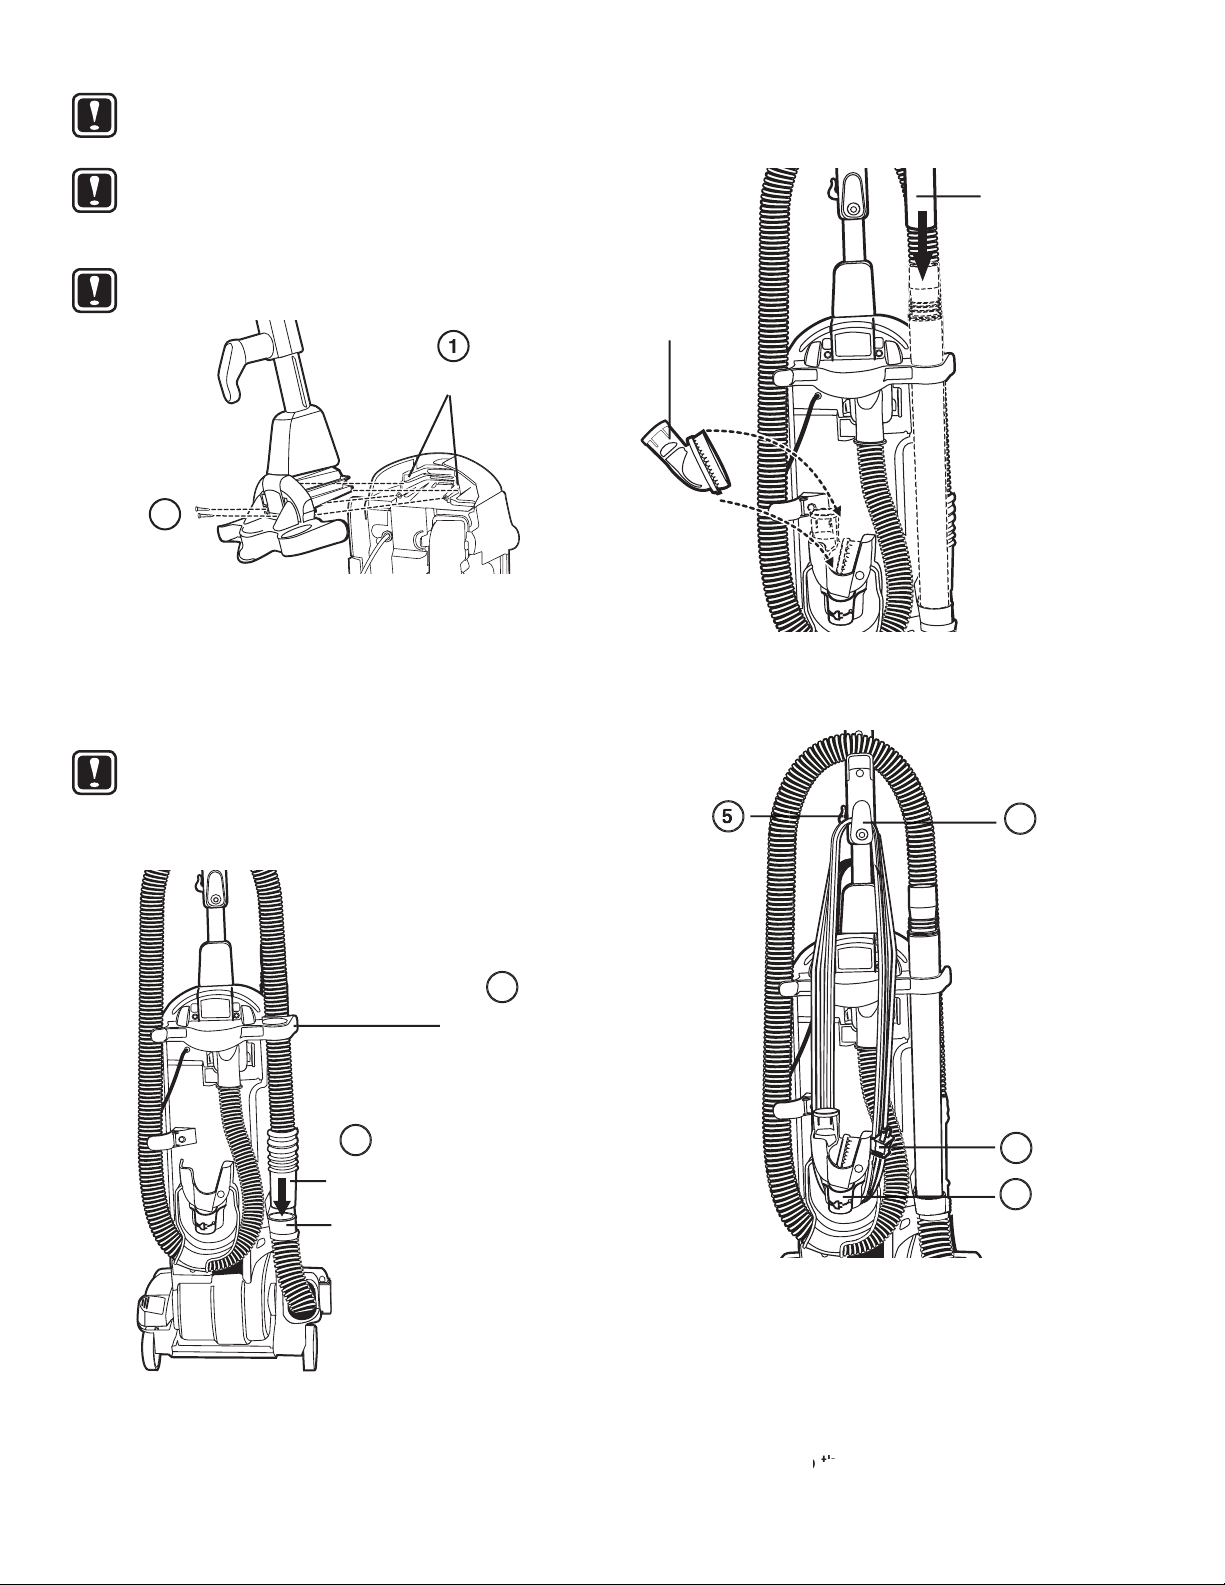
Moving parts, make sure on/off switch is
head screwdriver.
Page 5
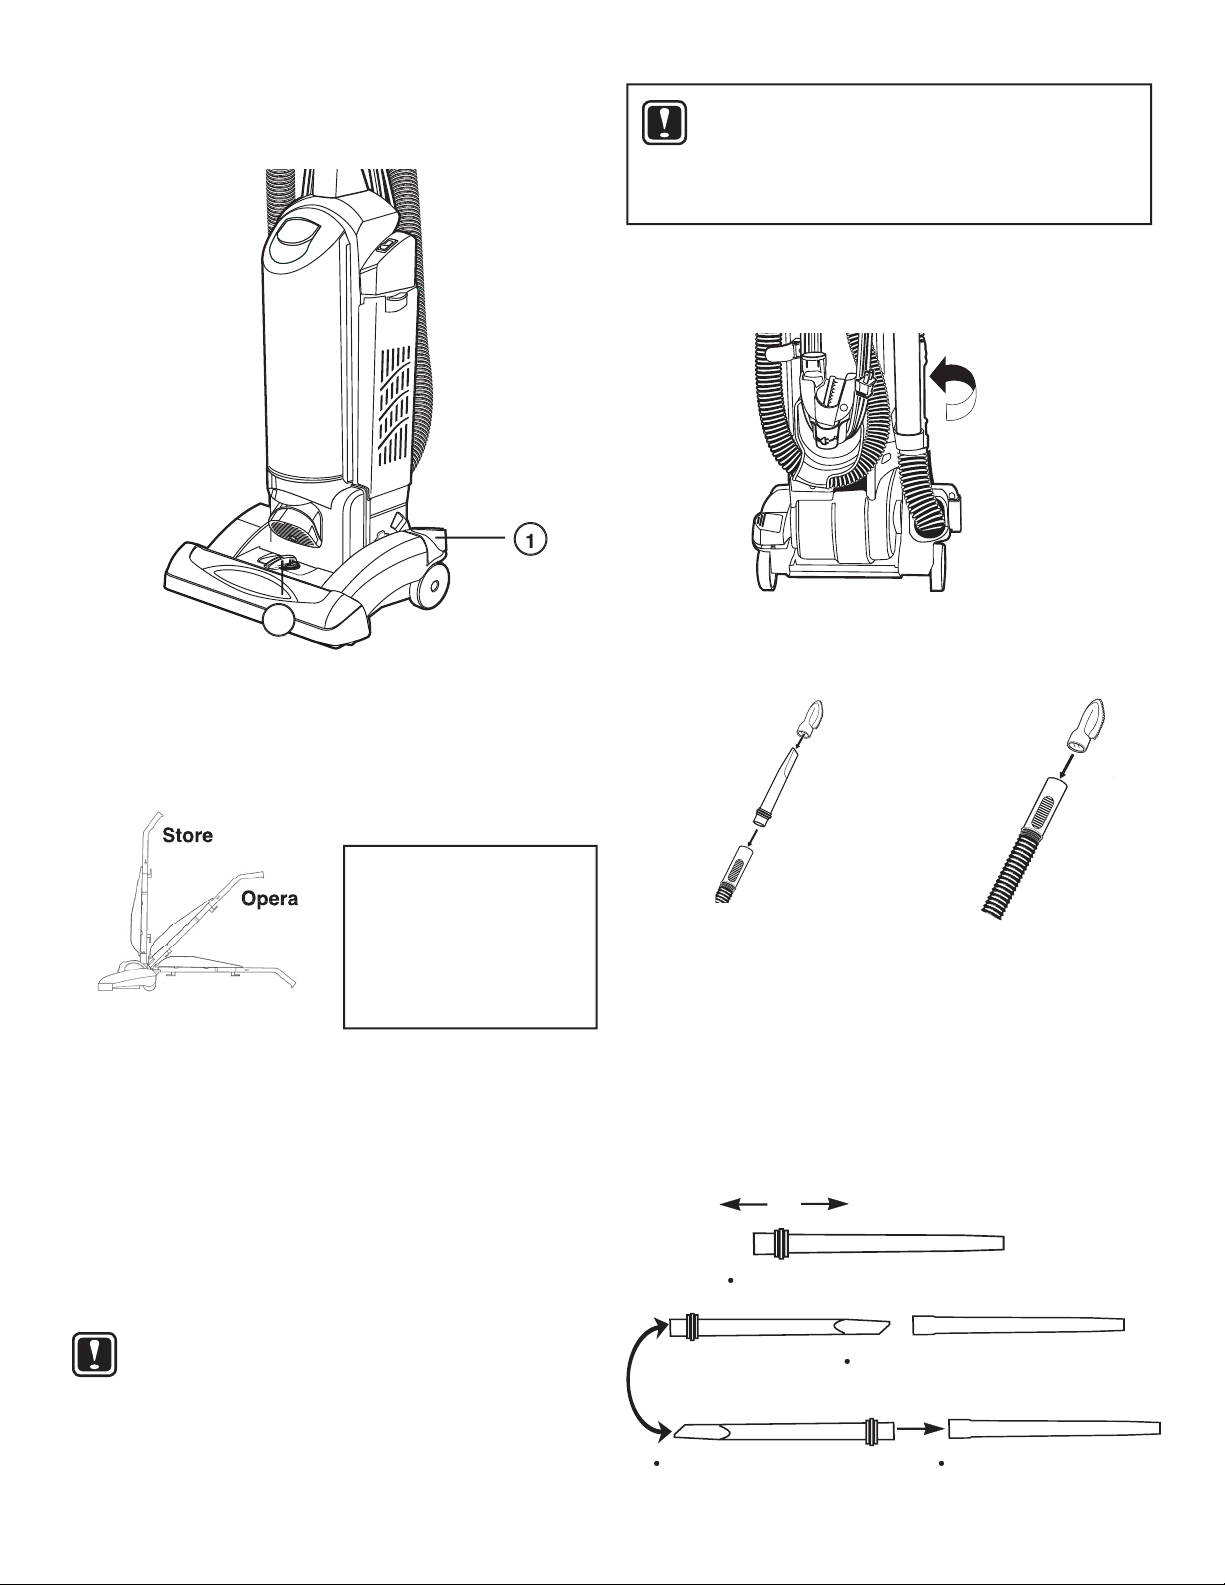
The brush
vacuum hose.
to add reach.
Page 6
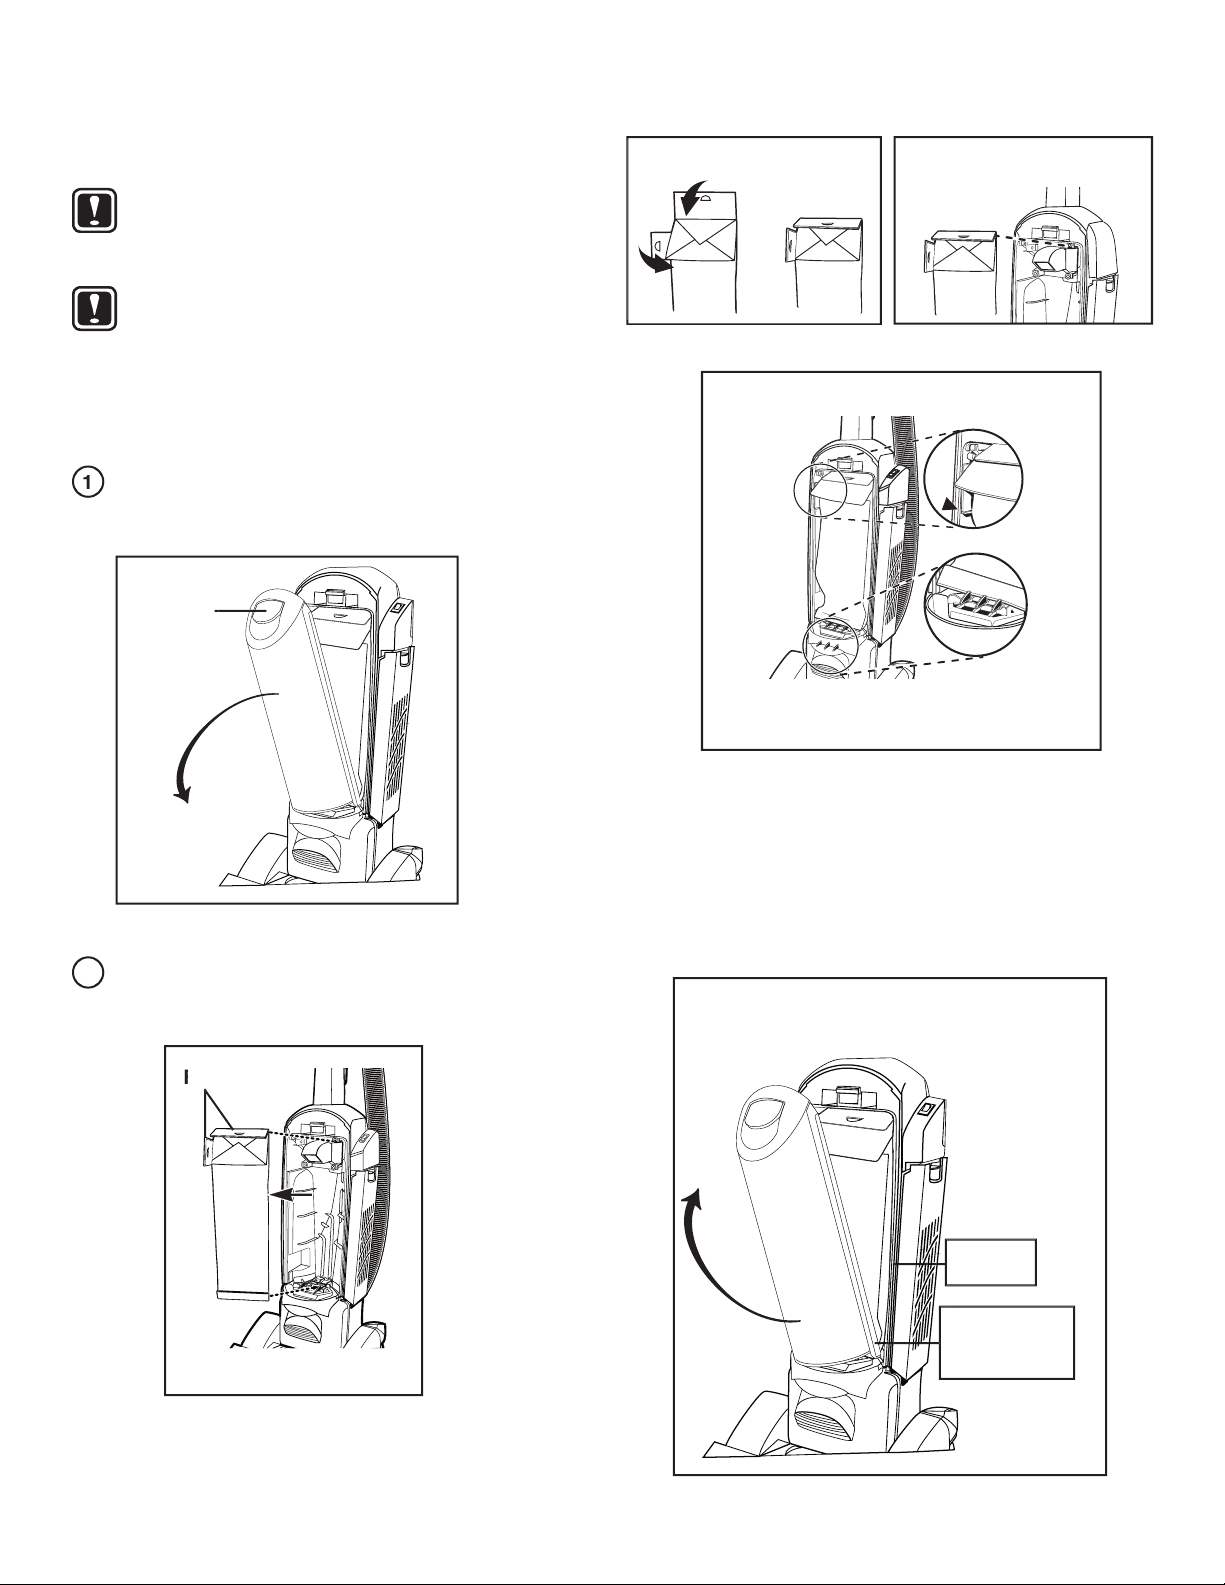
fine substances, the filters or bag will
the fi lter assembly in place.
➀
BEND FLAPS FORWARD
➁
PLACE BAG FLANGE
ON TOP OF SHELF
➂
PUSH BAG INTO HOUSING
➃
➂
➃
POSITION BAG BOTTOM
BEHIND RIBS
Page 7
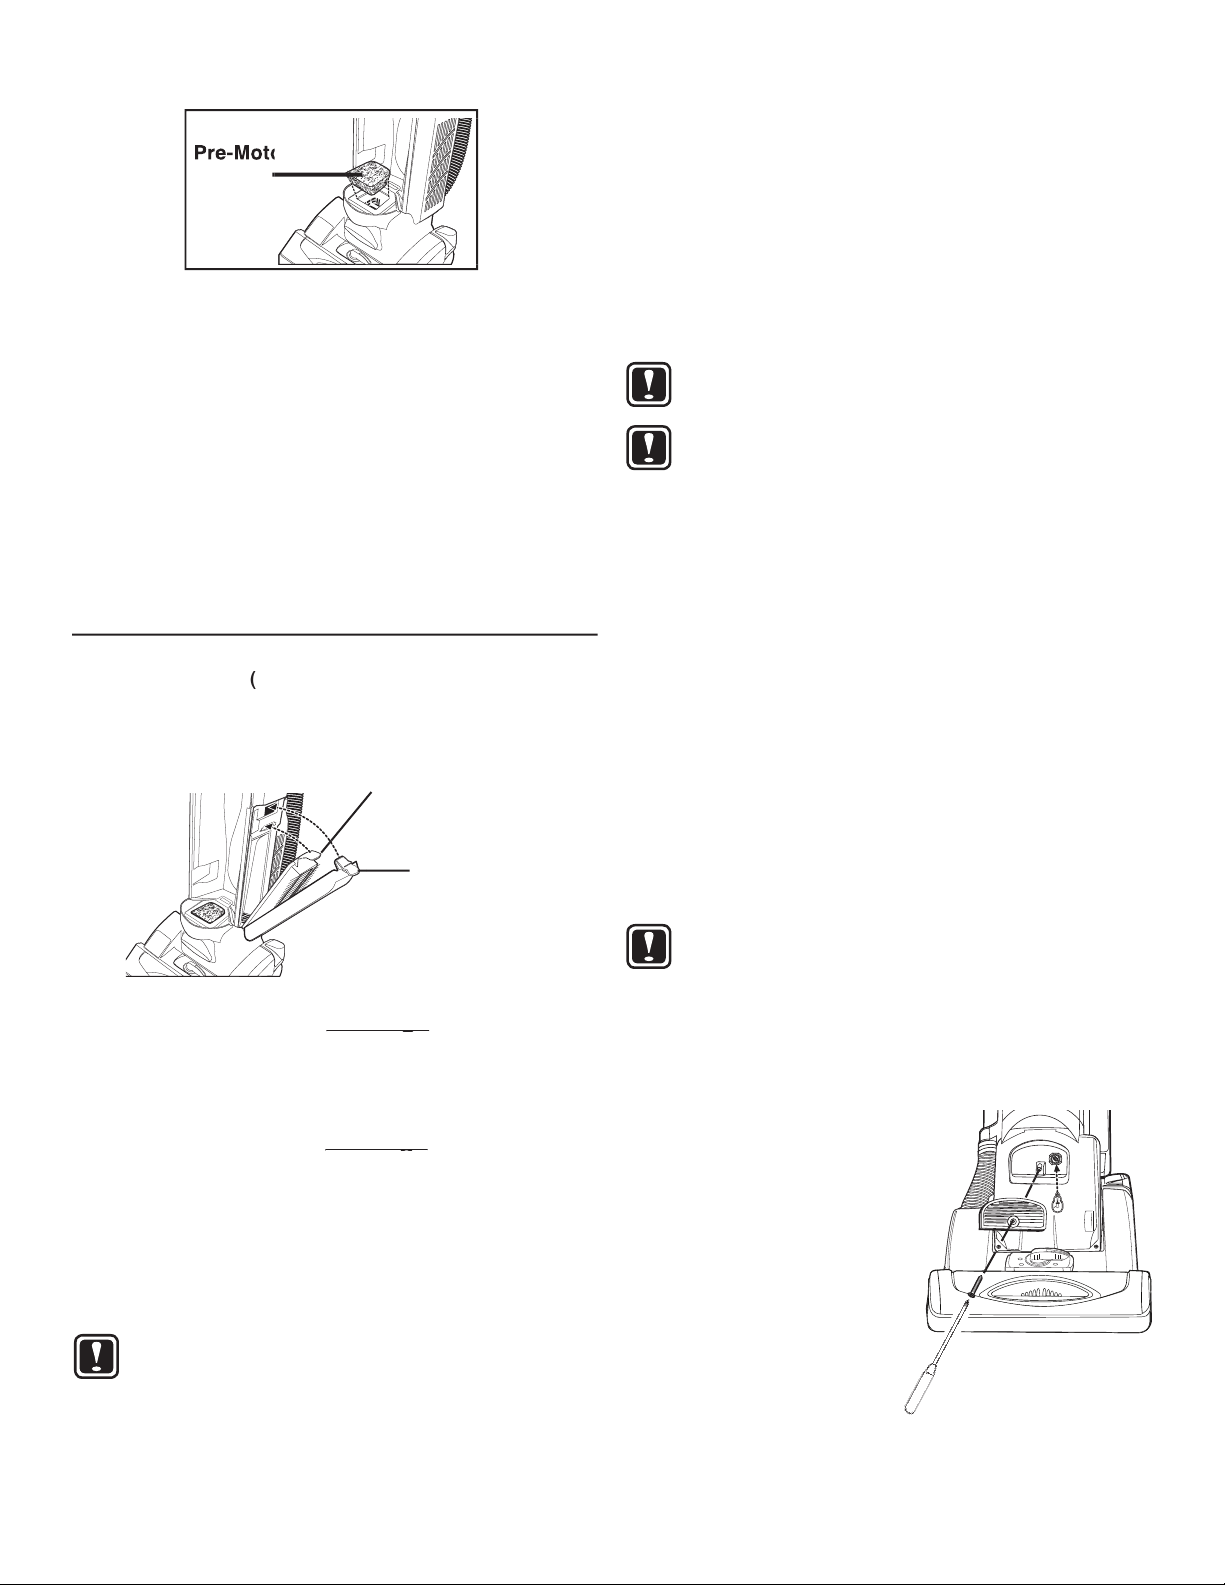
(continued)
fi lter
fi lter
the electrical cord before changing light
Page 8
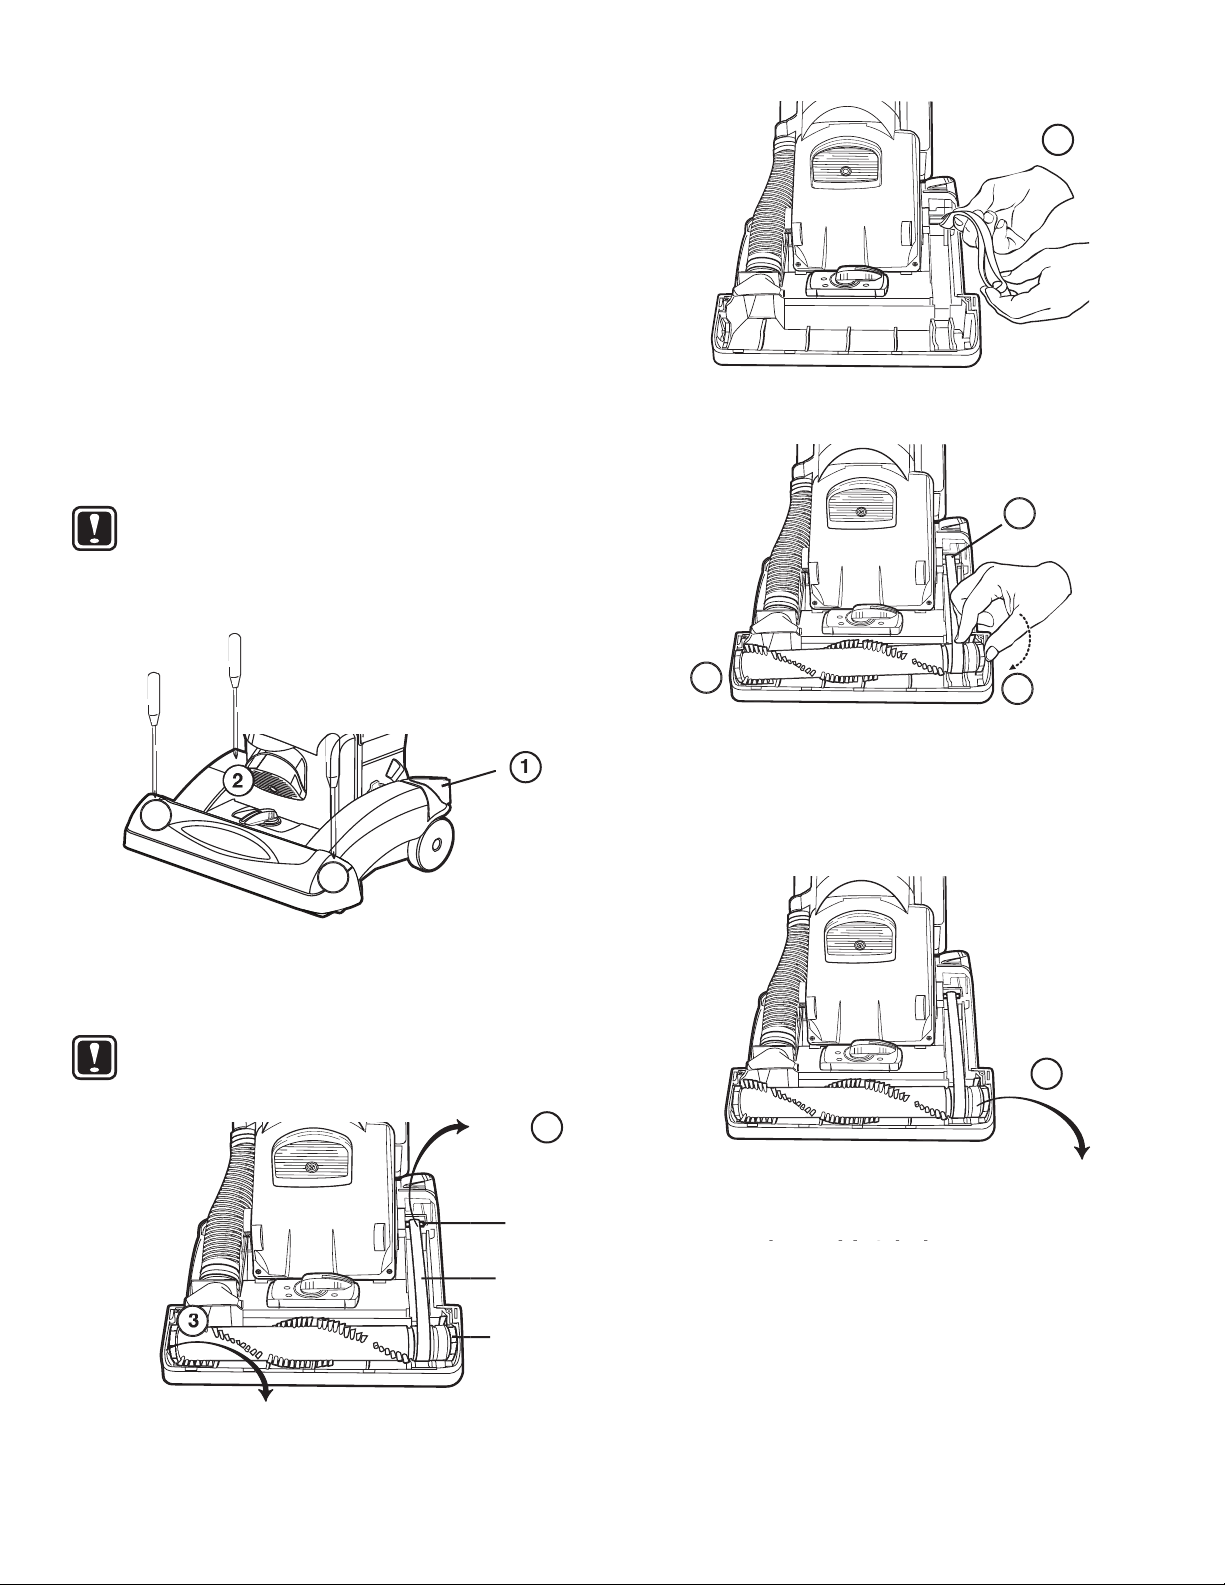
the lowest or highest position to remove
Rotate brush roll by hand two full rotations
5. Place new belt around motor shaft.
6. Place belt around brush roll pulley.
7. Align left brush roll end cap with base. Push end cap
8. Push right end cap into base until it snaps into place.
Page 9
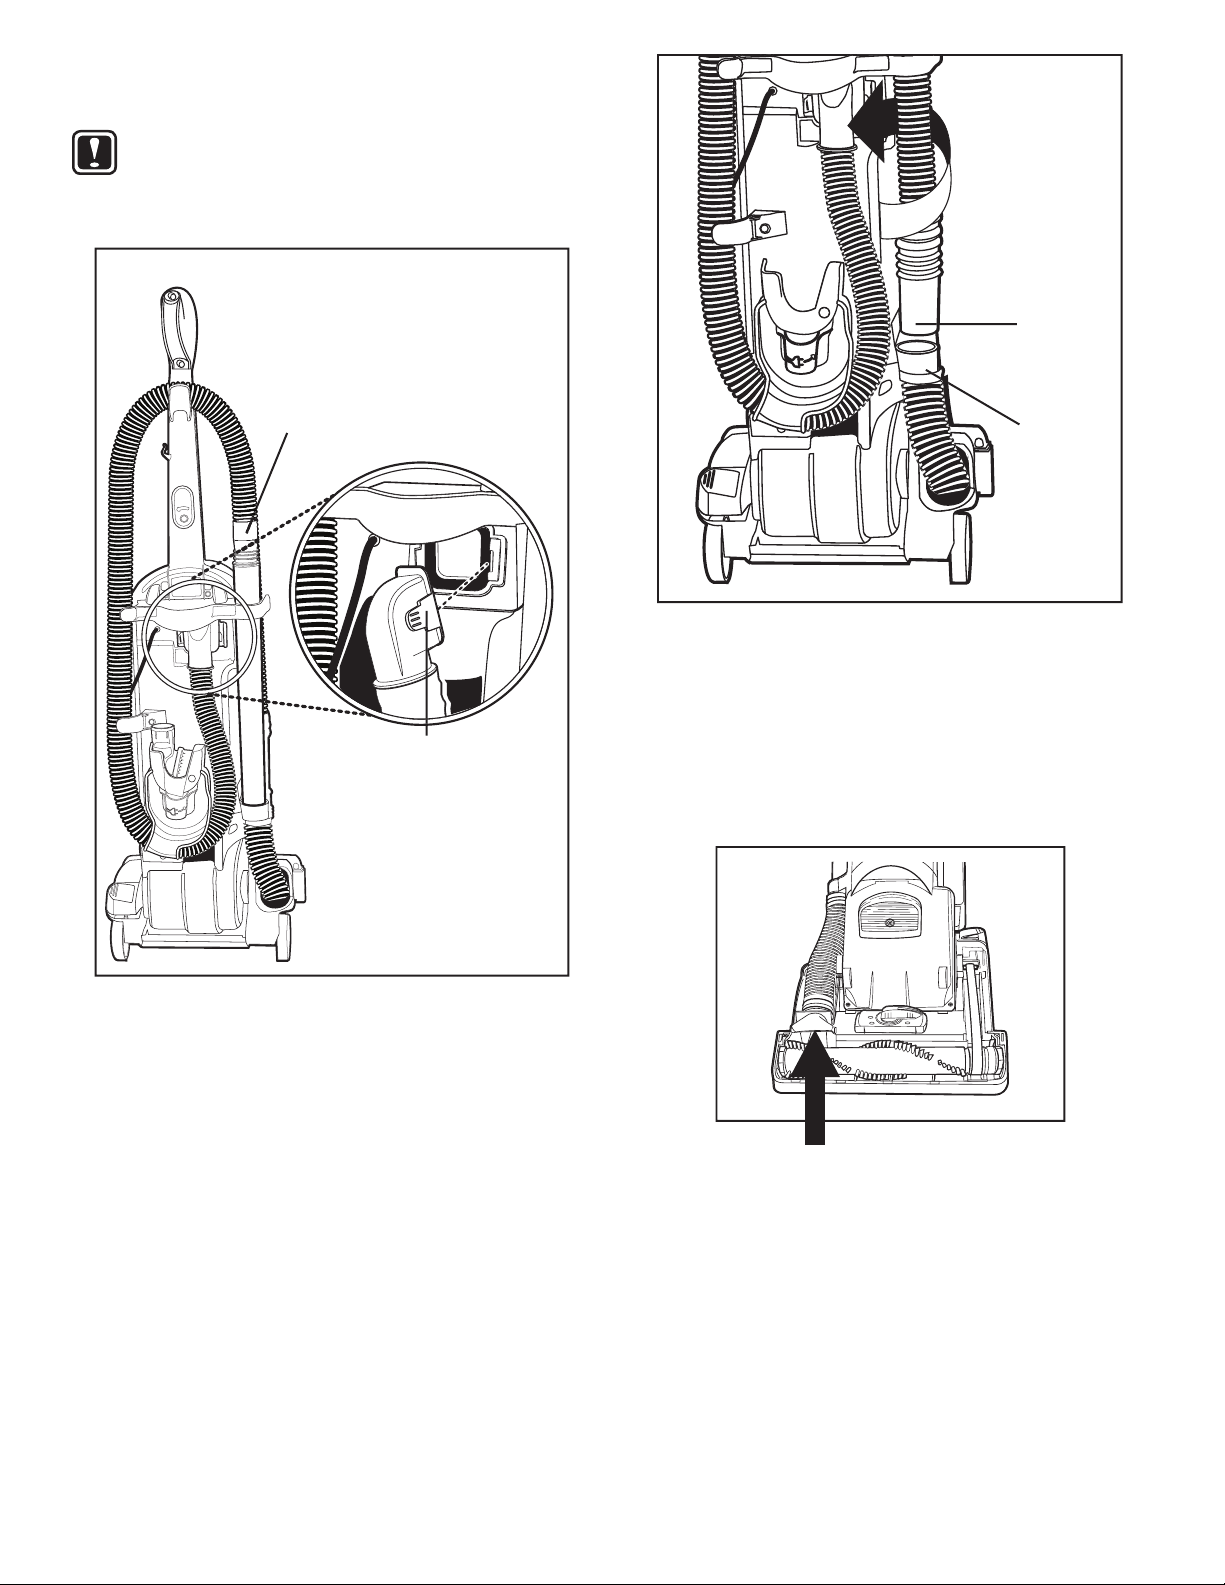
5. Locate lower hose adapter on the back of the cleaner.
6. Remove lower hose adapter from rear of cleaner by lifting
7. Check for blockages in the hose and base hose. Flexing
8. Remove hood from cleaner and check for a blockage in
9. After the blockage is found and cleared, replace the hood
1.
2. Remove nested wands from back of cleaner for easy
3. Press hose adapter tabs together and pull hose adapter
4. Check for blockages at cleaner opening and in hose.
If blockage
Page 10
Try another outlet.
Check circuit breaker.
If picking
look dirty,
when it blocks the airfl ow through the fi lters.
Be sure the dust bag is properly seated into the
Replace dust bag. Page 6.
Be sure hose adapter is secure on back of
Check base hose and long hose. Page 9.
Replace a broken, cut, loose or out of shape
Clean hair and thread from bristles and end cap
Replace brush roll if bristles are worn. Page 8.
Clean or replace fi lters.
If picking up fi ne
look dirty, but a
Remove any clogs from the hose that restrict
the airfl ow. Check base hose and long hose.
Replace dust bag. Page 6.
working.
Replace a broken, cut, loose or out of shape
Replace a broken, cut loose or out of shape
Put handle in operating position. Tilt the
will not turn. cleaner back to raise the front wheels off fl oor.
the dust bag cardboard fl ange is on the support
the cleaner height setting is in the lowest or
All three screws must be removed from the top
Your Sanitaire cleaner is warranted to be free from all defects in material and
the Ownerʼs Guide.
Eureka/Sanitaire parts.
Electrolux Home Care Products North America will, at its option, repair or replace a
policy, Electrolux Home Care Products North America will not refund the consumerʼs
purchase price.
E
xtended Warranty for Upright Cleaner (Only)
The base of the Sanitaire Upright cleaner is warranted for fi ve years from the original
E
E
xtended Warranty for SYSTEM_PRO Canisters
The motor for SYSTEM_PRO canister cleaners is warranted for fi ve years from the
Please fi ll out and return the warranty registration card accompanying your cleaner.
To obtain warranty service you must return the defective cleaner or cleaner part along
You will fi nd the nearest location in the Yellow Pages, under “Vacuum Cleaners–Service
For the location of the nearest Sanitaire Authorized Warranty Station or for service
If you prefer, you can write to Electrolux Home Care Products North America, Service
If it is necessary to ship the cleaner outside your community to obtain warranty repair, you
the model, type, and serial numbers from the data plate on the cleaner.
Any warranty that may be implied in connection with your purchase or use of the
Your relief for the breach of this warranty is limited to the relief expressly provided
This warranty gives you specifi c legal rights. You may also have other rights which
Why should I use only Genuine Eureka/Sanitaire paper bags, belts, and parts in my
Eureka/Sanitaire vacuum cleaner?
 Loading...