

Page 1

HELIOS
LIBRETTO ISTRUZIONI
USER HANDBOOK - GEBRAUCHANWEISUNGEN
MANUEL D’INSTRUCTIONS - INSTRUCCIONES DE MANEJO
Istruzioni Originali - Translation of the Original Instructions -
Übersetzung der Originalanleitungen - Traduction des Instructions Originales -
Traducción de las Instrucciones Originales
Page 2

IT IT
AVVERTENZE E SICUREZZE
Il costruttore ha ragionevolmente previsto ogni sicurezza possibile onde garantire
l’incolumità degli utilizzatori, ma le svariate condizioni di installazione e/o movimentazione
possono creare situazioni incontrollabili o non prevedibili; per cui è necessario valutare
sempre eventuali rischi residui e tenere in considerazione i seguenti suggerimenti:
• Prima di collegare l’apparecchio accertarsi che i dati di targa siano rispondenti a quelli
della rete di distribuzione elettrica.
• L’installazione e la riparazione devono attenersi alle norme di sicurezza e ai regolamenti
vigenti nel paese d’installazione.
• È obbligatorio il collegamento di messa a terra, nonché la rispondenza dell’impianto
con le normative vigenti nel paese di installazione.
• È sconsigliabile l’uso di adattatori prese multiple e/o prolunghe.
• Non utilizzare questa macchina in caso di danneggiamenti al cavo d’alimentazione.
In caso di malfunzionamento, spegnere l’apparecchio e portarlo al più vicino centro
assistenza autorizzato.
• Non immergere la macchina, il cavo e le spine in acqua o altri liquidi e non far entrare
le parti interne della macchina a contatto con liquidi.
• Non utilizzare per la pulizia getti d’acqua, detergenti non adatti o pulitori a vapore.
• Durante l’utilizzo posizionare l’apparecchio su di un piano orizzontale, stabile ed in
grado di sopportare il peso della macchina.
• Il macinadosatore dovrà essere destinato al solo uso di macinazione del caffè in grani
tostato, ogni altro uso è da considerarsi improprio e quindi pericoloso. Il costruttore
non può essere considerato responsabile per eventuali danni derivanti da usi impropri,
erronei o irragionevoli.
• L’apparecchio non può essere utilizzato in condizioni ambientali estreme e comunque
non al di fuori dell’intervallo di temperature -5°C ÷ +30°C.
• Questi apparecchi sono destinati all’uso per applicazioni commerciali, per esempio
nelle cucine di ristoranti, mense, ospedali e in imprese commerciali come panetterie,
macellerie, ecc., ma non per produzione in serie continua di alimenti.
• Non consentire l’uso della macchina a bambini o personale non addestrato.
• Questo apparecchio può essere utilizzato da bambini di età pari o superiore a 8 anni
e da persone con ridotte capacità fisiche, sensoriali o mentali, o da persone senza
adeguata conoscenza o esperienza se supervisionate e avendo avuto istruzioni sull’uso
dell’apparecchio. La pulizia non può essere effettuata da bambini senza supervisione.
AVVERTENZE FONDAMENTALI
• Non tirare il cavo di alimentazione o l’apparecchio stesso per staccare la spina dalla
presa.
• Non usare l’apparecchio con mani umide o bagnate.
• Non usare l’apparecchio a piedi nudi.
• Prima di effettuare qualsiasi operazione di pulizia o di manutenzione, disinserire
l’apparecchio dalla rete di alimentazione elettrica staccando la spina.
II
Page 3

• Non lasciare l’apparecchio inutilmente inserito. Staccare la spina della rete di
alimentazione quando l’apparecchio non è utilizzato.
• Non ostruire le aperture o fessure di ventilazione o di smaltimento calore né tanto
meno introdurvi acqua o liquidi di alcun genere.
• Mentre l’apparecchio è in funzione non introdurre mai nel beccuccio o nel contenitore
del caffè in grani cucchiai, forchette o altri utensili per effettuare prelievi o interventi.
• Per estrarre eventuali otturazioni dal beccuccio erogatore, spengere sempre prima
l’apparecchio.
• Nel caso un corpo estraneo blocchi il motore, spengere immediatamente la macchina
e contattare un centro assistenza autorizzato.
• Non esporre la macchina agli agenti atmosferici (sole, pioggia, ecc..).
• I bambini devono essere controllati affinché non giochino in qualsiasi momento con
l’apparecchiatura.
• Il proprietario è responsabile del controllo dell’installazione della macchina in condizioni
ambientali tollerabili tali da non creare un pericolo per la salute o per la sicurezza di
coloro che usano la macchina.
• Allorché si decida di non utilizzare più un apparecchio di questo tipo si raccomanda
di renderlo inoperante, dopo aver staccato la spina dalla presa di corrente, tagliare il
cavo di alimentazione.
• In caso di guasto o di cattivo funzionamento dell’apparecchio, spegnerlo e non
manometterlo.
CONSERVAZIONE DEL MANUALE
II presente manuale deve essere sempre a disposizione dell’utilizzatore e/o manutentore,
il quale deve essere informato sull’uso corretto della macchina e su eventuali rischi
residui. Deve essere conservato in luogo asciutto, pulito e protetto dal calore. Impiegare
il manuale in modo tale da non danneggiarne tutto o in parte il contenuto. Non asportare,
strappare o riscrivere per alcun motivo parti del manuale. In caso di smarrimento del
manuale o di richiesta di ulteriori informazioni, contattare il rivenditore di zona oppure il
costruttore.
RIMOZIONE DELL’IMBALLAGGIO
• Assicurarsi che non vi siano segni di danni alla macchina controllando il rivestimento
esterno della confezione.
• Dopo aver rimosso con cura l’imballaggio, verificare che la macchina non presenti
segni di danneggiamento.
• Verificare l’integrità dei componenti, in caso di difetti o danni alla macchina avvisare
immediatamente il rivenditore autorizzato.
• Gli elementi di imballo (cartone, cellophane, punti metallici, polistirolo, ecc..) possono
tagliare, ferire o divenire pericolosi se non maneggiati con cura o usati impropriamente;
non lasciare alla portata di bambini o persone non responsabili.
III
Page 4
• Questo simbolo sul prodotto o sulla confezione indica che il prodotto non deve essere
considerato come un normale rifiuto domestico ma deve invece essere
consegnato ad un punto di raccolta appropriata per il riciclo di apparecchi
elettrici ed elettronici. Assicurandovi che questo prodotto sia smaltito
correttamente, voi contribuirete a prevenire potenziali conseguenze
negative per l’ambiente e per la salute che potrebbero altrimenti essere
causate dal suo smaltimento inadeguato. Il riciclaggio dei materiali aiuta a conservare
le risorse naturali. Per informazioni più dettagliate circa il riciclaggio di questo prodotto,
potete contattare l’ufficio comunale, il servizio locale di smaltimento rifiuti oppure il
rivenditore dove l’avete acquistato.
IMPORTANZA DEL MANUALE
Il manuale è destinato all’utilizzatore e/o manutentore della macchina ed è considerato
parte integrante della stessa. II presente manuale ha la funzione di fornire informazioni
per uso corretto della macchina ed un’appropriata manutenzione, nonché di tutelare
la sicurezza dell’operatore. II manuale deve essere conservato per tutta la vita della
macchina e deve essere passato a qualsiasi altro utente o successivo proprietario. Le
indicazioni riportate nel presente manuale non sostituiscono le disposizioni di sicurezza ed
i dati tecnici per l’installazione ed il funzionamento applicati direttamente sulla macchina
e sugli imballi.
II presente manuale rispecchia lo stato della tecnica al momento attuale e non potrà
essere considerato inadeguato solo perché successivamente aggiornato in base a
nuove esperienze. II costruttore si riserva altresì il diritto di modificare il manuale senza
l’obbligo di aggiornare le edizioni precedenti, salvo casi eccezionali. Un uso improprio
della macchina o difforme da quanto descritto nel presente manuale preclude ogni
condizione di garanzia o responsabilità del costruttore; l’utilizzo deve essere effettuato da
parte di una persona adulta e responsabile. È necessario conservare con cura il presente
manuale, poiché il costruttore non risponde di danni arrecati a persone o cose, o subiti
dalla macchina se utilizzata in modo difforme da quanto in esso descritto o nel caso non
vengano rispettate le prescrizioni di manutenzione e sicurezza.
IV
Page 5

EN EN
SAFETY INSTRUCTIONS
The producer has reasonably considered every precaution possible, so to assure
user’s safety. Anyway, in installing and using the grinder, various conditions may create
uncontrollable and unpredictable events; so, it’s always necessary to evaluate any risks
and consider what follows:
• Before connecting the grinder, it’s necessary to verify that plate data match with
electric net ones.
• Both installation and repair must respect safety instructions and the inforce rules of
the country in which the grinder is installed.
• The grounding wire is necessary, like the installation. Both must respect the inforce
rules of the country in which the grinder is installed.
• Adaptors, multiple outlets and extension cables are not suggested.
• Do not use this grinder if it is damaged on the cable. In case of malfunctioning, switch
off the grinder and take it to the closest authorised service center.
• Do not immerse the grinder, the cable or the plug into water or other liquids. It’s
necessary to avoid that internal parts enter in contact with other liquids.
• Do not use any water jets, unsuitable detergents or steam-cleaners to clean.
• During its use, install the grinder on a flat and stable surface being able to sustain the
weight of the grinder.
• The grinder is intended to be used only to grind roasted coffee beans. A different
use is considered unsuitable and dangerous. The producer cannot be considered
responsible for possible damages related to misuse or erroneous and unreasonable
actions.
• The grinder cannot be used in extreme enviromental conditions. In any case, use the
grinder just between -5° C ÷ + 30° C degrees.
• This grinder has been conceived for commercial use, like restaurant kitchen, cantines,
hospitals and shops, like bakeries and butchers. It is not suitable for continous food
production.
• Do not allow children or untrained people to use the grinder.
• The grinder can be used by children being 8 years old or above and by people
with reduced physical, sensory or mental capabilities ; by people without adequate
experience just when monitored and if these have received user instruction on the
grinder. Cleaning cannot be performed by unmonitored children.
IMPORTANT WARNINGS
• Do not pull the cable or the grinder itself to disconnect its power cable.
• Do not use the grinder with wet or damp hands.
• Do not use the grinder when you are barefoot.
• Before cleaning or servicing, unplug the grinder from the electric net.
• Do not leave the grinder switched on when not necessary. When it is not working,
unplug the grinder.
• Do not obstruct the fan or heat elimination systems. Do not enter any water or liquids.
Page 6
• While the grinder is working, do not enter spoons, forks or other utensils in the spout
or the coffee container to perform anything.
• To solve any blockage in the spout, always switch off the grinder before.
• In case of failure of the motor, switch off the grinder and contact an authorised service
center.
• Prevent the grinder to be used under any weather conditions (sun, rain, ecc.).
• Children must be monitored to prevent they play with the grinder.
• The owner is responsible for monitoring the installation of the grinder, so to assure
it has been installed in enviromental conditions that will not create a safety or health
danger for the users.
• If you decide not to use anymore this grinder, we suggest to make it inoperative. After
having it unplugged, cut the cable. In case of failure, switch it off and do not tamper
with.
CONSERVATION OF THE MANUAL
This manual must always be at any user disposal. The user must be informed on the
correct use of the grinder and on potential risks. It must be conserved in a dry, clean and
heat-protected place. Use the manual so to avoid any damage to itself. Do not remove,
rip or write on any manual parts. In case you cannot find the manual, take contact with the
re-seller or the producer for further information.
UNPACKING THE GRINDER
• It’s necessary to check out that there is not any damage on the grinder, looking at the
external packacing
• After having removed the packing, check out there are no damages on the grinder.
• Check out the entirety of all components. In case of defects or damages, inform
immediately the authorised reseller.
• The packing (box, cellophane, metallic parts, styrofoam, etc.) can cut, wound or be
dangerous if mismanaged. Prevent children or non-responsible people entering in
contact with the packing.
• This symbol on the grinder or on the packing informs that the grinder cannot be
considered like a usual home waste ; it must be delivered to a suitable
waste collection facility that recycle electric and electronic devices. If
this grinder is correctly disposed of, you will prevent potential damages
to both environment and health; these damages may occur in case the
grinder is not correctly disposed of. Waste recycling protects natural
sources. For further information on the recycling of this product, you can contact your
local authority, local recycling center or the reseller you purchased the grinder from.
VI
Page 7

IMPORTANCE OF THE MANUAL
This manual is adressed to the user of the grinder and it is considered part of this product.
It shares information on its correct use and maintanance, including information on user’s
safety. This manual must be held during all the grinder’s lifespan and must be transmitted
to any user or future owner. All information in this manual do not replace safety rules
and techicnal data on the installation and functioning of the grinder and its packing. This
manual reflects the nowadays state of the art and it cannot be considered inadaquate just
because revised on the base of new techologies. The producer may modify the manual
without revising previous editions, except in special cases. A misuse of the grinder, or
a different use than the one described on the manual, will invalidate any warranty or
responsability of the producer. The grinder can be used just by a responsible adult. It’s
necessary to preserve the manual, as the producer cannot be held responsible for any
damage on people or things, or any damage on the grinder in case it is misused or in case
safety and maintenance rules are not respected.
VII
Page 8

DE DE
WARNUNGEN UND SICHERHEITSVOR-
KEHRUNGEN
Der Hersteller hat jede erdenkliche Sicherheit vorausgesehen, um die Sicherheit
der Benutzer zu gewährleisten, aber die verschiedenen Installations- und/oder
Handhabungsbedingungen können unkontrollierbare oder unvorhersehbare Situationen
schaffen; daher ist es notwendig, immer alle Restrisiken zu bewerten und die folgenden
Vorschläge zu berücksichtigen:
• Vergewissern Sie sich vor dem Anschluss des Geräts, dass die Plattendaten mit denen
des elektrischen Verteilungsnetzes übereinstimmen.
• Installation und Reparatur müssen den im Land der Installation geltenden
Sicherheitsstandards und -vorschriften entsprechen.
• Der Erdungsanschluss und die Übereinstimmung des Systems mit den im Land der
Installation geltenden Vorschriften sind obligatorisch.
• Die Verwendung von Mehrfachsteckdosenadaptern und/oder -verlängerungen wird
nicht empfohlen.
• Verwenden Sie dieses Gerät nicht, wenn das Netzkabel beschädigt ist. Schalten Sie im
Falle einer Fehlfunktion das Gerät aus und bringen Sie es zum nächsten autorisierten
Servicezentrum.
• Tauchen Sie das Gerät, das Kabel und die Stecker nicht in Wasser oder andere
Flüssigkeiten ein und lassen Sie die inneren Teile des Geräts nicht mit Flüssigkeiten
in Berührung kommen.
• Verwenden Sie zur Reinigung keine Wasserstrahlen, ungeeigneten Reinigungsmittel
oder Dampfreiniger.
• Wenn Sie das Gerät verwenden, stellen Sie es auf eine horizontale, stabile Oberfläche,
die das Gewicht des Geräts tragen kann.
• Die Maschine kann nicht unter extremen Umweltbedingungen und auf keinen Fall
außerhalb des Temperaturbereichs -5°C ÷ +30°C eingesetzt werden.
• Die Kaffeemühle sollte nur zum Mahlen von gerösteten Kaffeebohnen verwendet
werden, jede andere Verwendung ist als unsachgemäß und daher gefährlich
anzusehen. Der Hersteller kann nicht für Schäden verantwortlich gemacht werden, die
durch unsachgemäßen, falschen oder unangemessenen Gebrauch entstehen.
• Diese Geräte sind für den Einsatz im gewerblichen Bereich bestimmt, z.B. in den
Küchen von Restaurants, Kantinen, Krankenhäusern und in gewerblichen Betrieben
wie Bäckereien, Metzgereien usw., nicht aber für die kontinuierliche Serienproduktion
von Lebensmitteln.
• Erlauben Sie Kindern oder ungeschultem Personal nicht, das Gerät zu benutzen.
• Dieses Gerät kann von Kindern ab 8 Jahren und von Personen mit eingeschränkten
körperlichen, sensorischen oder geistigen Fähigkeiten oder von Personen ohne
angemessene Kenntnisse oder Erfahrung benutzt werden, wenn sie beaufsichtigt
werden und eine Anleitung zur Benutzung des Geräts erhalten haben. Die Reinigung
darf nicht von Kindern ohne Aufsicht durchgeführt werden.
VIII
Page 9

GRUNDSÄTZLICHE WARNUNGEN
• Ziehen Sie nicht am Netzkabel oder am Gerät selbst, um den Stecker aus der
Steckdose zu ziehen.
• Verwenden Sie das Gerät nicht mit nassen oder feuchten Händen.
• Benutzen Sie das Gerät nicht barfuß.
• Vor der Durchführung von Reinigungs- oder Wartungsarbeiten ist das Gerät durch
Ziehen des Netzsteckers von der Stromversorgung zu trennen.
• Lassen Sie das Gerät nicht unnötig eingeschaltet. Ziehen Sie den Netzstecker, wenn
das Gerät nicht in Gebrauch ist.
• Blockieren Sie keine Lüftungs- oder Kühlkörperöffnungen oder -schlitze und leiten Sie
kein Wasser oder Flüssigkeiten jeglicher Art in das Gerät ein.
• Stecken Sie niemals Löffel, Gabeln oder andere Utensilien in den Ausguss oder
Kaffeebohnenbehälter, während das Gerät in Betrieb ist.
• Um Füllungen aus dem Auslauf zu entfernen, schalten Sie das Gerät immer zuerst
aus.
• Wenn ein Fremdkörper den Motor blockiert, schalten Sie die Maschine sofort ab und
wenden Sie sich an eine autorisierte Kundendienststelle.
• Setzen Sie die Maschine nicht atmosphärischen Einwirkungen aus (Sonne, Regen
usw.).
• Kinder müssen überprüft werden, damit sie zu keiner Zeit mit dem Gerät spielen.
• Der Eigentümer ist dafür verantwortlich, die Installation der Maschine unter tolerierbaren
Umgebungsbedingungen zu kontrollieren, die keine Gefahr für die Gesundheit oder
Sicherheit der Benutzer der Maschine darstellen.
• Wenn Sie beschließen, ein solches Gerät nicht mehr zu verwenden, empfiehlt es
sich, es außer Betrieb zu setzen, nachdem Sie den Netzstecker aus der Steckdose
gezogen und das Netzkabel abgetrennt haben.
• Bei Ausfall oder Fehlfunktion des Geräts schalten Sie es aus und manipulieren Sie es
nicht.
ERHALTUNG DES HANDBUCHS
Dieses Handbuch muss dem Benutzer und/oder dem Wartungstechniker stets zur
Verfügung stehen, der über den korrekten Gebrauch der Maschine und eventuelle
Restrisiken informiert sein muss. Es muss an einem trockenen, sauberen und
hitzegeschützten Ort gelagert werden. Verwenden Sie das Handbuch so, dass sein Inhalt
weder ganz noch teilweise beschädigt wird. Entfernen, zerreißen oder überschreiben Sie
keine Teile des Handbuchs aus irgendeinem Grund. Wenn das Handbuch verloren geht
oder wenn Sie weitere Informationen benötigen, wenden Sie sich an Ihren Händler vor
Ort oder an den Hersteller.
IX
Page 10

ENTFERNUNG DER VERPACKUNG
• Vergewissern Sie sich, dass keine Anzeichen von Schäden an der Maschine vorhanden
sind, indem Sie die Außenhülle der Verpackung überprüfen.
• Nachdem Sie die Verpackung vorsichtig entfernt haben, überprüfen Sie die Maschine
auf Anzeichen von Beschädigungen.
• Prüfen Sie die Unversehrtheit der Komponenten. Sollten Mängel oder Schäden an der
Maschine auftreten, benachrichtigen Sie umgehend Ihren Vertragshändler.
• Die Verpackungselemente (Karton, Zellophan, Heftklammern, Polystyrol usw.) können
schneiden, verletzen oder gefährlich werden, wenn sie nicht sorgfältig behandelt
oder unsachgemäß verwendet werden; nicht in Reichweite von Kindern oder
unverantwortlichen Personen lassen.
• Dieses Symbol auf dem Produkt oder auf der Verpackung weist darauf hin, dass das
Produkt nicht als normaler Hausmüll zu betrachten ist, sondern
stattdessen einer geeigneten Sammelstelle für das Recycling von
elektrischen und elektronischen Geräten übergeben werden sollte.
Indem Sie sicherstellen, dass dieses Produkt ordnungsgemäß entsorgt
wird, tragen Sie dazu bei, mögliche negative Folgen für Umwelt und
Gesundheit zu vermeiden, die andernfalls durch seine unsachgemäße Entsorgung
verursacht werden könnten. Das Recycling von Materialien hilft, natürliche Ressourcen
zu schonen. Für genauere Informationen zum Recycling dieses Produkts wenden Sie
sich bitte an Ihr örtliches Stadtamt, Ihren örtlichen Abfallentsorgungsdienst oder den
Händler, bei dem Sie das Produkt gekauft haben.
BEDEUTUNG DES HANDBUCHS
Das Handbuch richtet sich an den Benutzer und/oder Wartungspersonal der Maschine und
gilt als integraler Bestandteil der Maschine. Der Zweck dieses Handbuchs besteht darin,
Informationen für den korrekten Gebrauch der Maschine und eine angemessene Wartung
zu liefern sowie die Sicherheit des Bedieners zu gewährleisten. Das Handbuch muss
während der gesamten Lebensdauer der Maschine aufbewahrt und an jeden anderen
Benutzer oder späteren Besitzer weitergegeben werden. Die in diesem Handbuch
enthaltenen Informationen ersetzen nicht die Sicherheitshinweise und technischen Daten
für Installation und Betrieb, die direkt auf die Maschine und die Verpackung angewendet
werden.
Dieses Handbuch spiegelt den aktuellen Stand der Technik wider und kann nicht nur
deshalb als unzulänglich betrachtet werden, weil es aufgrund neuer Erfahrungen
aktualisiert wurde. Der Hersteller behält sich auch das Recht vor, das Handbuch
zu ändern, ohne die Verpflichtung, frühere Ausgaben zu aktualisieren, außer in
Ausnahmefällen. Eine unsachgemäße oder von der in diesem Handbuch beschriebenen
Verwendung des Geräts abweichende Verwendung schließt jede Garantiebedingung
oder Herstellerverantwortung aus; die Verwendung muss von einer erwachsenen
und verantwortlichen Person vorgenommen werden. Dieses Handbuch ist sorgfältig
X
Page 11

aufzubewahren, da der Hersteller nicht für Personen- oder Sachschäden haftet, die an
der Maschine entstehen, wenn sie nicht entsprechend ihrer Beschreibung verwendet wird
oder wenn die Wartungs- und Sicherheitshinweise nicht beachtet werden.
XI
Page 12

FR FR
CONSEILS DE SECURITE
Le constructeur a raisonnablement prévu tout type de sécurité prévisible pour de garantir
la protection des utilisateurs, mais la grande variété des conditions d’installations et
d’utilisations peuvent créer des situations incontrôlables ou imprévisibles. Pour cela il est
nécessaire d’évaluer les risques résiduels et prendre en considération les suggestions
suivantes:
• Regarder pour s’assurer que le donnés de la plaque correspondent à ceux montrés
sur le réseau électrique.
• L’installation et l’entretien doivent se conformer aux régulations et les règles de sécurité
du réseau électrique local.
• Le système de terre est nécessaire et doit respecter les règles du Pays où il est installé.
• Nous ne conseillons pas l’usage d’adaptateurs multiples et des prolongations des
câbles.
• Ne pas utiliser ce moulin s’il y a des dommages sur le câble, sur la prise ou s’il y a
n’importe quelle défaillance. Rapporter le moulin au centre de réparation autorisé plus
proche, pour toutes examens, réparations ou ajustements.
• Ne pas immerger l’appareil, le câble et la prise dans l’eau ou dans d’autres liquides.
• Ne pas utiliser des jets d’eau, des détergents inappropriés ou jets de vapeurs pour le
nettoyage.
• Pendant l’utilisation, installer le moulin sur une surface horizontale, stable en mesure
de supporter le poids du moulin.
• Le moulin a été conçu seulement pour le broyage des grains de café torréfiés. Tout
emploi diffèrent doit être considéré inapproprié et, donc, dangereux. Le fabriquant ne
sera pas considéré responsable pour tout dommage causé par un emploi inapproprié.
• Le moulin n’a été pas conçu pour l’emploi dans températures extrêmes. Utiliser le
moulin entre -5°c et +30°c.
• Le moulin a été conçu pour applications commerciales, par exemple dans des
cuisines des restaurants, cantines, hôpitaux et entreprises commerciales telles que
boulangeries, boucheries, etc. La production massive alimentaire est exclue.
• Ne pas permettre aux enfants ou à personnes sans formation d’utiliser le moulin.
• Le moulin peut être utilisé par les enfants à partir de 8 ans et par personnes à
mobilité, capacités sensorielles et mentales réduites ou par personnes qui n’ont pas
d’expériences et des connaissances, s’elles sont surveillées ou formées sur l’utilisation
du moulin. Le nettoyage ne devra pas être effectué par des enfants sans supervision.
AVERTISSEMENTS ESSENTIELS
• Ne pas tirer le câble ou le même moulin pour le débrancher de la prise.
• Ne pas utiliser le moulin avec mains humides.
• N’utiliser le moulin quand on est à pieds nus.
• Débrancher toujours le moulin de la prise de puissance avant de nettoyer ou effectuer
toute entretien.
• Ne pas laisser le moulin allumé en cas d’inactivité. Débrancher le câble d’alimentation
XII
Page 13

quand on n’utilise pas le moulin.
• Ne pas obstruer la ventilation et/ou la dissipation thermique et/ou ne pas introduire
eau ou toute liquide dans le moulin.
• Pendant le fonctionnement du moulin, ne pas introduire jamais dans le bec ou dans la
trémie du cafés en grains des cuillères , fourchettes ou d’autres couverts pour effectuer
des prélèvements ou interventions.
• Pour éliminer toute obstruction dans le bec de distribution, éteindre toujours le moulin
avant.
• Dans le cas où un corps étranger bloque le moteur, éteindre l’appareil tout de suite et
contacter un concessionnaire autorisé et/ou un centre de réparation.
• Ne pas exposer le moulin aux agents atmosphériques (soleil, pluie, etc.)
• Les enfants doivent etre surveillés pour éviter qu’ils jouent avec le moulin.
• Le propriétaire est responsable de s’assurer que le moulin a été installé dans des
conditions environnementales tolérables pour ne pas créer des risques pour la sécurité
et la santé de l’utilisateur du moulin.
• Si vous décidez de n’utiliser plus le moulin, nous vous conseillons de le rendre
inopérant: débrancher le moulin de la prise principale et couper le fil d’alimentation.
• En cas de panne ou mauvais fonctionnement, éteindre le moulin et ne le pas forcer.
CONSERVATION DU MANUEL
Ce manuel doit être toujours disponible pour les utilisateurs et/ou pour les personnes qui
s’occupent de l’entretien. Elles doivent être informées sur les corrects modes d’emploi et
sur les risques. Le manuel doit être conservé dans un lieu propre et sec, ainsi à n’affecter
aucune partie. Ne pas enlever, déchirer ou remanier les parties du manuel. En cas de
perte ou pour des informations supplémentaires, contacter le revendeur ou le fabriquant.
DEMONTAGE DE L’EMBALLAGE
• S’assurer qu’il n’y a pas des signes des dommages sur le moulin en regardant le
revêtement extérieur de l’emballage.
• Une fois que on a enlevé le moulin de l’emballage, s’assurer que le moulin n’a pas des
signes de dommages.
• Vérifier l’intégrité des composants. En cas de défauts ou dommages du moulin,
informer le revendeur autorisé.
• Les éléments de l’emballage (carton, cellophane, parties en métal, polystyrol,
exc.) peuvent couper, blesser ou être dangereux s’on ne pose pas assez
d’attention; conserver l’emballage loin des enfants ou personnes irresponsables.
XIII
Page 14
• Ce symbole sur l’appareil ou sur l’emballage signifie que l’appareil ne doit pas être
considéré comme un déchet domestique normal; il doit être livré à un
centre approprié de recyclage d’appareils électriques et électroniques.
Assurez-vous que l’appareil sera éliminé correctement ; de cette façon
on évitera des conséquences négatives sur l’environnement et la santé
qui pourraient se produire à cause de l’élimination inadaptée. Le
recyclage des matériaux protège les ressources naturelles. Pour informations
supplémentaires concernant le recyclage de ce moulin, contactez votre conseil ou le
centre local des déchets ou le revendeur dont vous avez acheté le produit.
IMPORTANCE DU MANUEL
Le livret est destiné à l’utilisateur et/ou au manutentionnaire de la machine, et est
considéré faisant partie intégrante de la machine.
Le présent livret a pour fonction de fournir des informations pour un usage correct et un
entretien approprié de la machine, et aussi de garantir la sécurité de l‘opérateur.
Le livret doit être conservé durant toute la vie de la machine et doit être livré à tous
les utilisateurs ou propriétaires suivants. Les indications de ce livret ne remplacent pas
les dispositions de sécurité et les caractéristiques techniques pour l’installation et le
fonctionnement appliqués directement sur la machine et sur l’emballage. Ce livret se
réfère à l’état actuel de la technique et ne pourra à l’avenir être considéré inappropriée
car ajourné sur la base de nouvelles expériences. Le constructeur se réserve le droit
de modifier ce livret sans avoir l’obligation d’ajourner les éditions précédentes, sauf cas
exceptionnels.
Un usage inappropriée de la machine, ou différent de celui indiqué dans ce livret, annulé
toute possibilité de garantie ou responsabilité du constructeur; l’utilisation doit être
effectuée par une personne adulte et responsable.
Il est nécessaire de conserver soigneusement le présent livret, car le constructeur ne
répond pas des dommages causés aux personnes ou aux choses, ou subies par la
machine si utilisée de manière non conforme au livret, ou dans le cas où les prescriptions
d’entretien et sécurité ne sont pas respectées.
XIV
Page 15

ES
ES
ADVERTENCIAS Y PRECAUCIONES
El fabricante ha previsto razonablemente toda la seguridad posible para garantizar la
seguridad de los usuarios, pero las diversas condiciones de instalación y/o manipulación
pueden crear situaciones incontrolables o imprevisibles; por lo tanto, es necesario
evaluar siempre los riesgos residuales y tener en cuenta las siguientes sugerencias:
• Antes de conectar el aparato, asegúrese de que los datos de la placa corresponden
a los de la red de distribución eléctrica.
• La instalación y la reparación deben cumplir las normas y reglamentos de seguridad
vigentes en el país de instalación.
• La conexión a tierra y la conformidad del sistema con la normativa vigente en el país
de instalación son obligatorias.
• No se recomienda el uso de adaptadores y/o extensiones de enchufes múltiples.
• No utilice esta máquina en caso de que se dañe el cable de alimentación. En caso
de mal funcionamiento, apague la máquina y llévela al centro de servicio autorizado
más cercano.
• No sumerja la máquina, el cable y los enchufes en agua u otros líquidos y no permita
que las partes internas de la máquina entren en contacto con líquidos.
• No utilice chorros de agua, detergentes inadecuados o limpiadores de vapor para la
limpieza.
• Al usar la máquina, colóquela sobre una superficie horizontal y estable capaz de
soportar el peso de la máquina.
• El molinillo solo debe utilizarse para moler granos de café tostado, cualquier otro
uso debe considerarse impropio y por lo tanto peligroso. El fabricante no puede ser
considerado responsable de ningún daño resultante del uso impropio, incorrecto o
irrazonable.
• La máquina no puede ser utilizada en condiciones ambientales extremas y en ningún
caso fuera del rango de temperatura -5°C ÷ +30°C.
• Estos aparatos están destinados a ser utilizados en aplicaciones comerciales, por
ejemplo en las cocinas de restaurantes, comedores, hospitales y en empresas
comerciales como panaderías, carnicerías, etc., pero no para la producción continua
en serie de alimentos.
• No permita que niños o personal no cualificado utilicen la máquina.
• Este aparato puede ser utilizado por niños de 8 años o más y por personas con
capacidades físicas, sensoriales o mentales reducidas, o por personas sin
conocimientos o experiencia adecuados si son supervisadas y han recibido
instrucciones sobre cómo utilizar el aparato. La limpieza no puede ser llevada a cabo
por niños sin supervisión.
ADVERTENCIAS BÁSICAS
• No tire del cable de alimentación o de la propia máquina para desconectar el enchufe
de la toma de corriente.
• No utilice la máquina con las manos mojadas o húmedas.
XV
Page 16

• No use el aparato descalzo.
• Antes de realizar cualquier operación de limpieza o mantenimiento, desconecte el
aparato de la fuente de alimentación desenchufándolo.
• No deje el aparato encendido innecesariamente. Desconecte el enchufe de la red
cuando el aparato no esté en uso.
• No bloquee ninguna abertura de ventilación o de disipación de calor, ni introduzca
agua o líquidos de ningún tipo en el aparato.
• Nunca ponga cucharas, tenedores u otros utensilios en el conducto o en la tolva
mientras la máquina esté en funcionamiento.
• Para quitar cualquier relleno del conducto, siempre apague la máquina primero.
• Si un cuerpo extraño bloquea el motor, apague la máquina inmediatamente y póngase
en contacto con un centro de servicio autorizado.
• No exponga la máquina a los agentes atmosféricos (sol, lluvia, etc.).
• Los niños deben ser controlados para que no jueguen con el aparato en ningún
momento.
• El propietario es responsable de controlar la instalación de la máquina en condiciones
ambientales tolerables que no creen un peligro para la salud o la seguridad de quienes
la utilizan.
• Cuando decida dejar de usar un aparato de este tipo, se recomienda que lo inutilice,
después de desenchufarlo de la toma de corriente, corte el cable de alimentación.
• En caso de fallo o mal funcionamiento de la máquina, apáguela y no la manipule.
CONSERVACIÓN DEL MANUAL
Este manual debe estar siempre a disposición del usuario y/o del encargado del
mantenimiento, a quienes se debe informar sobre el uso correcto de la máquina y los
posibles riesgos residuales. Debe ser almacenado en un lugar seco, limpio y protegido
del calor. Utilice el manual de tal manera que no dañe todo o parte de su contenido. No
quite, rompa o reescriba partes del manual por ningún motivo. Si se pierde el manual
o si necesita más información, póngase en contacto con su distribuidor local o con el
fabricante.
QUITAR EL EMBALAJE
• Asegúrate de que no hay signos de daños en la máquina comprobando la carcasa
exterior del paquete.
• Después de retirar cuidadosamente el embalaje, compruebe que la máquina no esté
dañada.
• Compruebe la integridad de los componentes. Si hay algún defecto o daño en la
máquina, notifique inmediatamente a su distribuidor autorizado.
• Los elementos del embalaje (cartón, celofán, grapas, poliestireno, etc.) pueden cortar,
lesionar o volverse peligrosos si no se manipulan con cuidado o se utilizan de manera
inadecuada; no los deje al alcance de los niños o de personas no responsables.
XVI
Page 17

• Este símbolo en el producto o en el embalaje indica que el producto no debe
considerarse como un residuo doméstico normal, sino que debe
entregarse en un punto de recogida adecuado para el reciclaje de
aparatos eléctricos y electrónicos. Asegurándose de que este producto
se deseche adecuadamente, ayudará a prevenir las posibles
consecuencias negativas para el medio ambiente y la salud que, de
otro modo, podrían ser causadas por su eliminación inadecuada. El reciclaje de
materiales ayuda a conservar los recursos naturales. Para obtener información más
detallada sobre el reciclaje de este producto, póngase en contacto con la oficina
municipal, el servicio local de eliminación de residuos o el minorista donde lo compró.
IMPORTANCIA DEL MANUAL
El manual está destinado al usuario y/o al encargado del mantenimiento de la máquina y
se considera parte integrante de la misma. El propósito de este manual es proporcionar
información para el uso correcto de la máquina y el mantenimiento adecuado, así como
para proteger la seguridad del operador. El manual debe conservarse durante toda la
vida de la máquina y debe transmitirse a cualquier otro usuario o propietario posterior.
La información que figura en este manual no sustituye a las instrucciones de seguridad y
los datos técnicos de instalación y funcionamiento aplicados directamente a la máquina
y al embalaje. Este manual refleja el estado actual de la técnica y no puede considerarse
inadecuado solo porque se ha actualizado de acuerdo con las nuevas experiencias.
El fabricante también se reserva el derecho de modificar el manual sin obligación de
actualizar las ediciones anteriores, salvo en casos excepcionales. El uso inadecuado de
la máquina o un uso que difiera del descrito en este manual excluye cualquier condición
de garantía o responsabilidad del fabricante; el uso debe ser realizado por un adulto y una
persona responsable. Este manual debe conservarse con cuidado, ya que el fabricante
no se hace responsable de los daños causados a personas o cosas, ni de los que sufra
la máquina si se utiliza de manera no conforme a su descripción o si no se observan las
instrucciones de mantenimiento y seguridad.
XVII
Page 18
1
2
3
9
8
7
6
5
4
1
XVIII
Page 19
2
3
4
7
5
8
6
9
XIX
Page 20
XX
Page 21

• VERSIONE ITALIANA 2
• ENGLISH VERSION 12
• DEUTSCHE VERSION 22
• VERSION FRANÇAISE 32
• VERSIÓN ESPAÑOLA 42
XXI
Page 22
1 INFORMAZIONI GENERALI
COSTRUTTORE:
CONTI VALERIO - Via Luigi Longo 39/41 - 50019 Sesto Fiorentino (FI) - ITALY
MODELLO:
HELIOS 65 - HELIOS 80
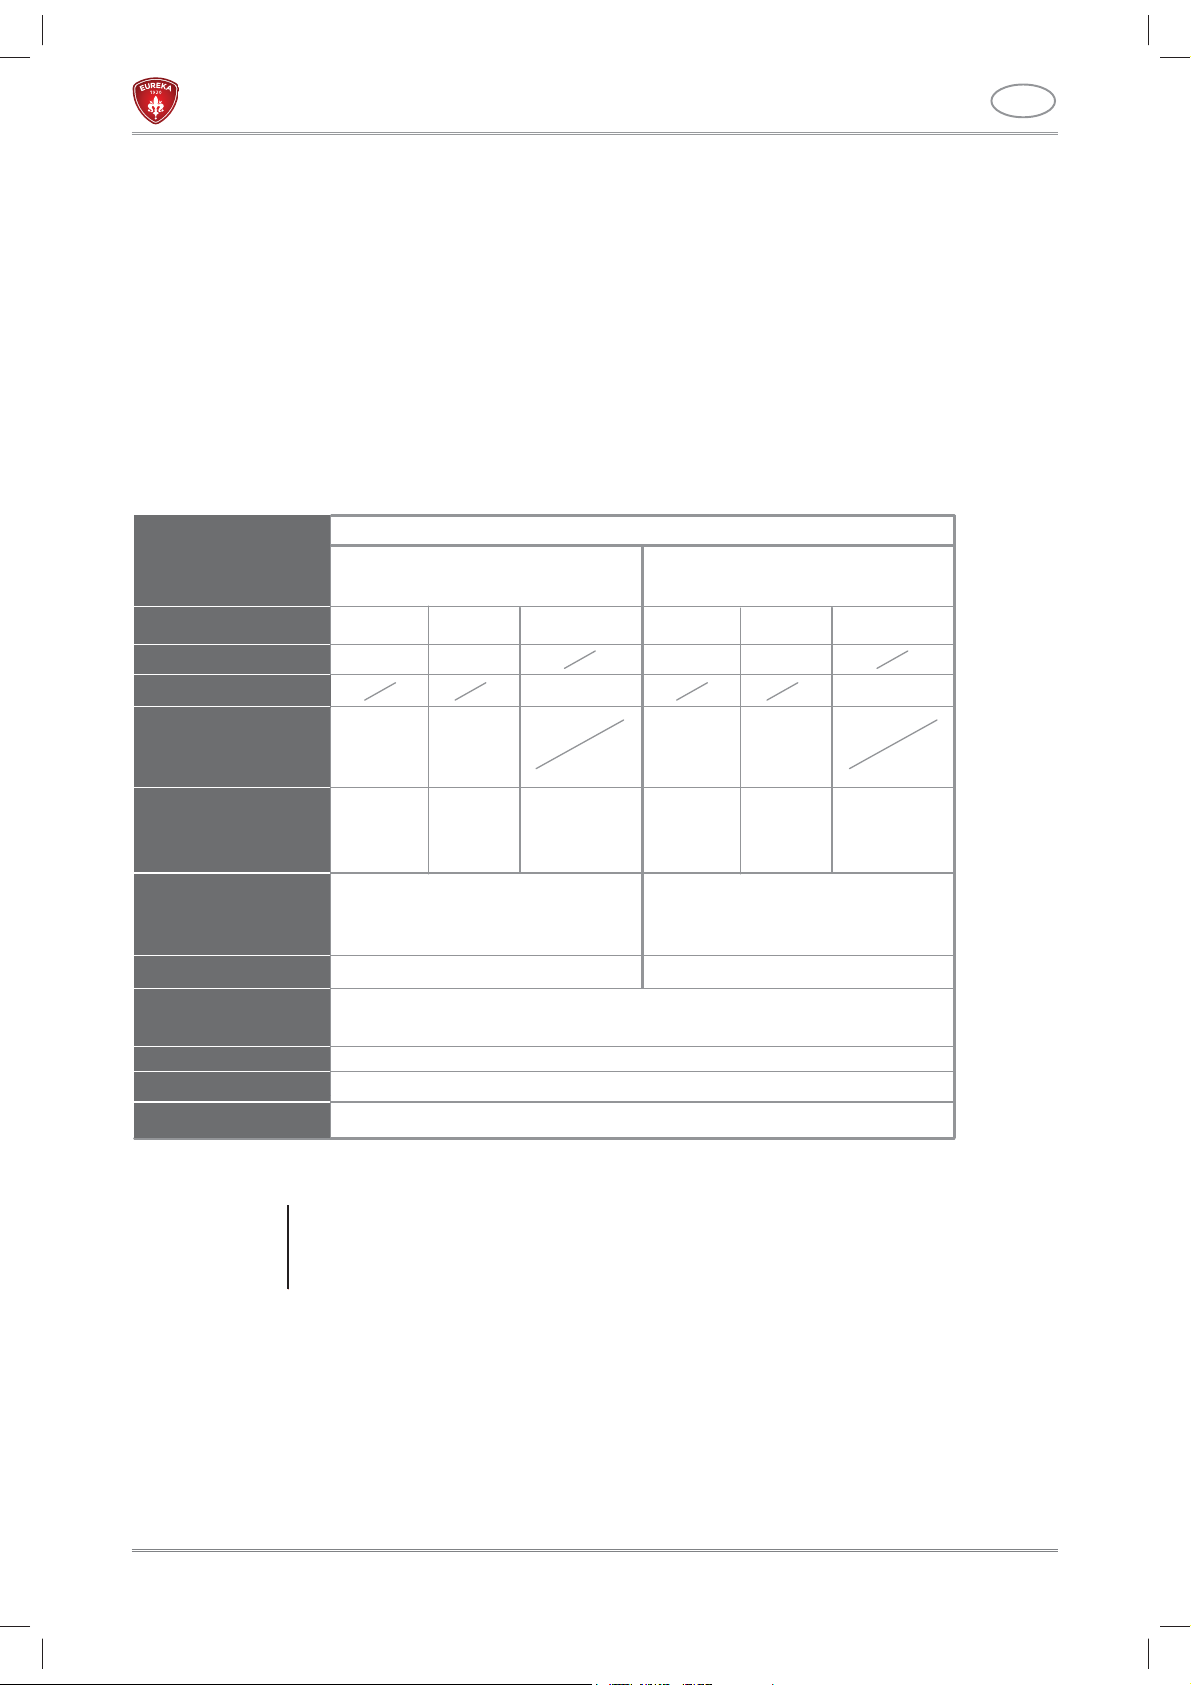
2 DATI TECNICI
MODELLO
DESCRIZIONE
HELIOS 65
HELIOS 80
IT
Voltaggio (V) 220/240
Frequenza (Hz)
Corrente (A)
Assorbimento
(W)
Giri al minuto
(rpm)*
Produttività
(g/s)
Peso a vuoto(Kg)
Capacità campana
(Kg)
Altezza (mm)
Larghezza (mm)
Profondità (mm)
50 60
280 460 340 340
1370 1500
220
3,5 - 5,0
12,0
110/120
4.2
1700
220/240
50 60
1350 1650
1,2
600
220
250
* Il valore indicato si riferisce ai giri effettivi delle macine
220
6,5 - 8,0
15,2
110/120
8.3
1670
HELIOS 65
• Ton: 30 s
• Toff: 270 s
2
HELIOS 80
• Ton: 30 s
• Toff: 160 s
Page 23

IT
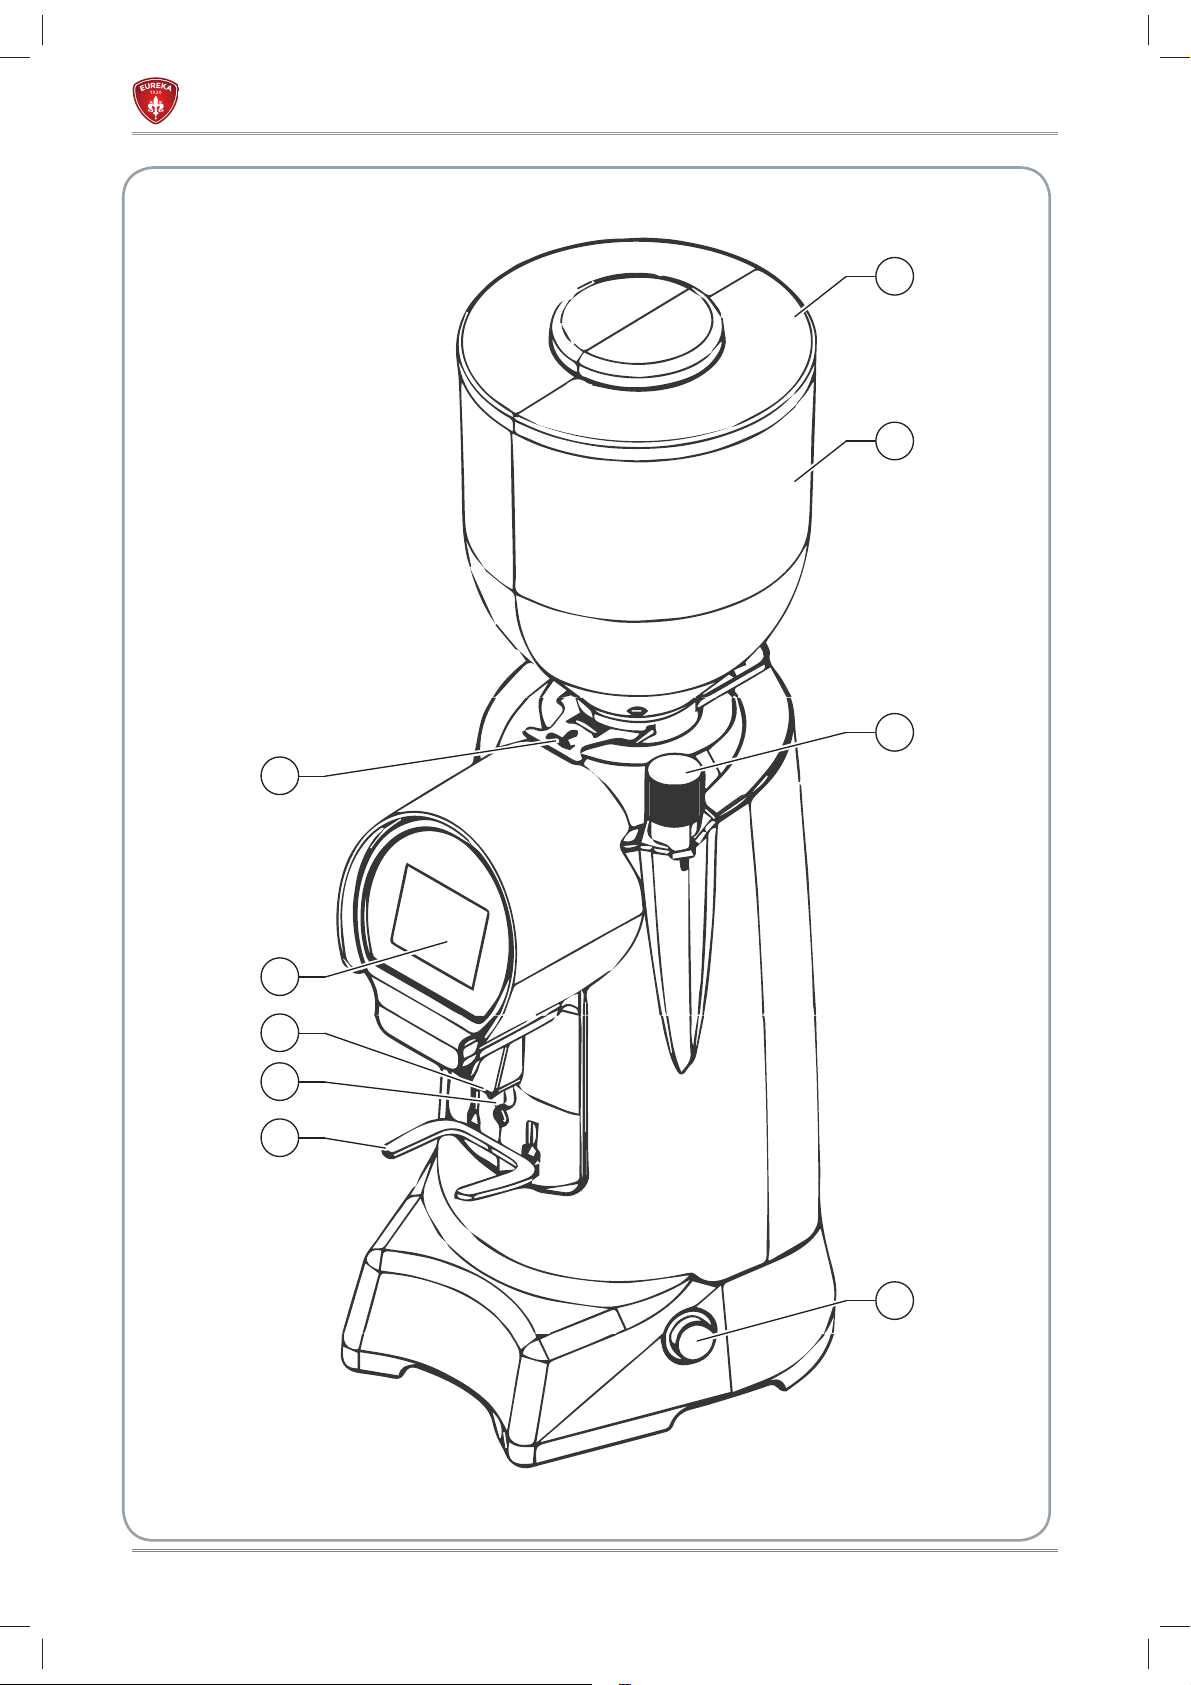
3 DESCRIZIONE DELL’APPARECCHIO
1. Coperchio contenitore
2. Contenitore per caffè in grani
3. Pomello regolazione macinatura
4. Interruttore di accensione
5. Forcella portafiltro
6. Pulsante attivazione macinatura
7. Bocchetta di erogazione
8. Display touchscreen
9. Linguetta apertura/chiusura contenitore
per caffè in grani
4 REGOLAZIONI E USO
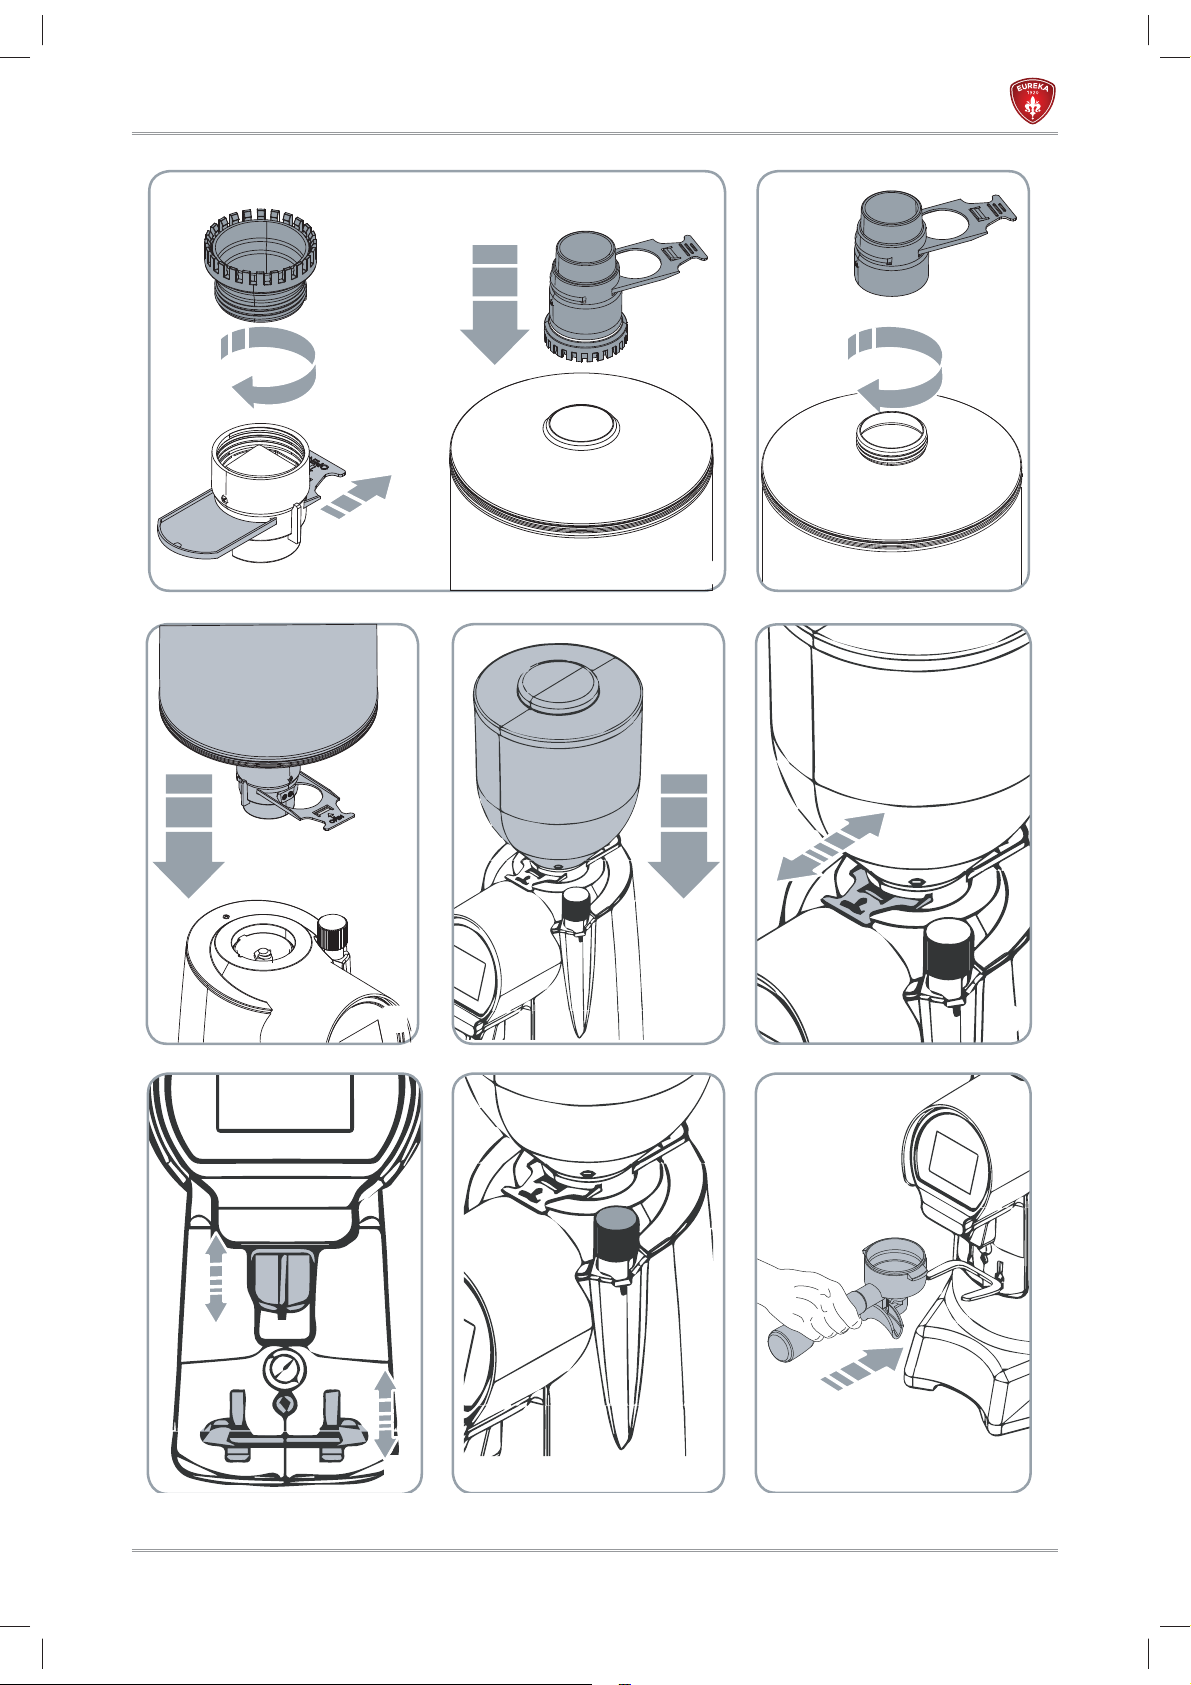
4.1 OPERAZIONI PRELIMINARI
È necessario mettere a punto la macchina prima di cominciare a lavorare, in base al tipo
di miscela di caffè (più o meno tostata) e il grado di macinatura.
• Nel caso di utilizzo di contenitori in metallo, montare l’adattore per imbocco a incastro
(Fig.2) oppure avvitare l’adattatore a vite (Fig.3). Successivamente inserire il
contenitore nella relativa sede (Fig.4).
• Nel caso di utilizzo del contenitore per caffè in grani (2), inserirlo nella relativa sede
(Fig. 5).
• Togliere il coperchio (1) dal contenitore (2) e riempirlo di caffè in grani.
• Reinserire il coperchio (1) e spingere la linguetta (9) permettendo il passaggio dei
grani di caffè.
ATTENZIONE
Quando si rimuove il contenitore per caffè in grani (2) con la macchina accesa, il
display si spegne e il macinacaffè diventa inattivo. Una volta reinserito il contenitore
nella sua sede, il display si riaccende e la macchina ritorna operativa.
4.2 ACCENSIONE MACCHINA
Portare l’interruttore (4) in posizione di accensione (si accende il led del pulsante).
Alla prima accensione, l’apparecchio risulterà predisposto nella modalità impostata
all’uscita della fabbrica e comunque, negli avvii successivi, si predisporrà sempre
come nell’ultima modalità precedente lo spegnimento.
All’accensione, il display visualizza immediatamente la schermata operativa.
3
Page 24

IT
4.3 REGOLAZIONE MACINATURA
Per regolare la macinatura, agire sul pomello di regolazione (3), ruotandolo in senso orario
per fare la polvere più fine o in senso antiorario per aumentarne la grana come riportato
sul pomello. La regolazione è senza punti di fermo; deve essere effettuata gradualmente,
macinando un po’ di caffè ogni 2 tacche al massimo.
ATTENZIONE
Se il pomello viene ruotato di un giro a motore fermo, la macchina può bloccarsi.
4.4 REGOLAZIONE BOCCHETTA DI EROGAZIONE
In base al portafiltro e al tipo di caffè in grani utilizzato, regolare la bocchetta di erogazione
(7) in altezza e inclinazione per consentire una corretta fuoriuscita del caffè.
4.5 REGOLAZIONE FORCELLA PORTAFILTRO
• La forcella è adatta a qualsiasi tipo di portafiltro presente in commercio.
• Con un cacciavite a croce allentare la vite di fissaggio della forcella portafiltro (5).
• Sollevare o abbassare la forcella per regolarla in base alle dimensioni del portafiltro.
• Una volta trovata la posizione corretta, stringere la vite di fissaggio della forcella (5).
4.6 FUNZIONAMENTO
Selezionare la dose da erogare tramite i rispettivi pulsanti (B), (L) o (C). Appoggiare la
coppa del portafiltro sulla forcella (5), facendo attenzione che sia precisamente sotto alla
bocchetta di erogazione (7) (Fig. 7) e spingerla in avanti fino a premere il pulsante (6).
L’erogazione termina quando è trascorso il tempo impostato nella programmazione
e il tempo di macinatura ritorna al valore impostato e il macinadosatore
è pronto per una nuova macinatura. Se selezionata la dose continua (H)
l’erogazione dura per il tempo di pressione del pulsante di avvio macinatura (6).
Quando viene rilasciato il pulsante di avvio macinatura (6), termina l’erogazione continua
e la macchina torna alla modalità automatica di selezione dose.
ATTENZIONE
È possibile fermare l’erogazione automatica prima che sia finito il tempo di
macinatura. Durante l’erogazione premere con il portafiltro il pulsante di avvio
della macinatura (5) per fermare l’erogazione:
• Premere di nuovo il pulsante di avvio macinatura (6) per riprendere l’erogazione
per il tempo rimanente;
• Premere un qualsiasi pulsante dose per terminare l’erogazione. Il tempo di
macinatura ritorna al valore impostato.
4
Page 25

IT
P O N
MA
B
C
D
FE
5 PROGRAMMAZIONE MACCHINA
A. Contatore parziale dose 1
B. Selezione dose 1
C. Selezione dose 3
D. Сontatore parziale dose 3
E. Pulsante decremento
F. Pulsante incremento
G. Contatore parziale dose continua
H. Selezione dose continua
I. Visualizzatore tempo dose selezionata
L. Selezione dose 2
M. Contatore parziale dose 2
N. Allarme attivo
O. Accesso al menu
P. Programmazione bloccata
L
I
H
G
5.1 REGOLAZIONE DOSI
• Premere un tasto (B), (L) o (C) per selezionare una dose da impostare.
• Premere i tasti (E) o (F) per diminuire o aumentare il tempo di erogazione della dose
selezionata di più o meno 5 centesimi di secondo. Se premuti a lungo, il tempo viene
aumentato o diminuito del tempo di pressione del pulsante stesso.
5.1.1 BLOCCO REGOLAZIONE DOSI
Premere a lungo i tasti (E)+(F) per bloccare la regolazione del tempo di erogazione delle
dosi. Sul display comparirà il simbolo (P).
Premere di nuovo a lungo i tasti (E)+(F) per sbloccare.
5
Page 26

IT
5.2 MENU PRINCIPALE
Per accedere al menu principale, premere (O)nella schermata iniziale.
5.2.1 CONTATORI ASSOLUTI
Questa schermata permette di visualizzare i contatori assoluti (non azzerabili) per ogni
dose erogabile.
Pagina precedente
CONTATORI
Pagina successiva
Uscita menu
Accesso al menu tecnico
5.2.2 INFORMAZIONI MACCHINA
Questa schermata permette di visualizzare le informazioni della macchina relative al
modello e alla versione del firmware, necessarie per ogni tipo richiesta di intervento
tecnico.
Model:
Modello:
X.XX
X.XX
Firmware:
Firmware:
X.XX
X.XX
Pagina precedente
Pagina successiva
Uscita menu
Accesso al menu tecnico
5.3 MENU TECNICO
Per accedere al menu tecnico, premere nella schermata del menu principale.
5.3.1 RESET CONTATORI PARZIALI
Questa schermata permette di azzerare i contatori parziali per ogni dose erogabile, visibili
nella schermata iniziale. Premere a lungo il tasto RESET per azzerare i contatori.
6
Page 27

IT
CONTATORI
DOSI PAZIALI
Pagina precedente
Pagina successiva
Uscita menu
5.3.2 LUMINOSITÀ DISPLAY
Questa schermata permette di impostare la luminosità del display da 0 a 10 utilizzando i
tasti
LUMINOSITÁ
Pagina precedente
Pagina successiva
Uscita menu
5.3.3 COLORE SFONDO DISPLAY
Questa schermata permette di impostare il colore dello sfondo del display utilizzando i
tasti
Blu
Rosso
.
COLORE SCHERMO
Pagina precedente
ROSSO
Verde
Giallo
Pagina successiva
Uscita menu
7
Page 28

IT
5.3.4 MODALITÀ SELEZIONE DOSI
Questa schermata permette di impostare la modalità di selezione delle dosi.
• ON: ad ogni erogazione è necessario selezionare la dose.
• OFF: resta selezionata l’ultima dose erogata.
SELEZIONARE
SELECT DOSE
SEMPRE LA DOSE?
EVERY TIME?
Pagina precedente
Pagina successiva
Uscita menu
5.3.5 MANUTENZIONE MACINE
Questa schermata permette di resettare il contatore di cambio macine oltre che abilitare
o disabilitare l’allarme di cambio macine. Il pulsante RESET, se premuto a lungo, azzera
il contatore di cambio macine (invisibile sul display).
MANUTENZIONE
MACINE
Pagina precedente
IMPOSTA
Pagina successiva
Uscita menu
Premendo il tasto ON, si accede al menu per impostare la dimensione e tipo di macine.
AVVISO DI MANUTENZIONE
MISURA MACINE
TIPO MACINE
Uscita menu
Indietro
8
Page 29

IT
5.4 RIPRISTINO IMPOSTAZIONI DI FABBRICA
Questa schermata permette di riportare le impostazioni della macchina a quelle impostate
dal Costruttore.
Premere a lungo il tasto RESET per effettuare il ripristino alle impostazioni di fabbrica.
RIPRISTINO
FACTO RY
DATI DI FABBRICA
DATA RESET
RESET
RESET
Pagina precedente
Pagina successiva
Uscita menu
6 PULIZIA E MANUTENZIONE
ATTENZIONE
Disinserire l’apparecchio dalla rete di alimentazione elettrica prima di effettuare
qualsiasi operazione di pulizia e manutenzione.
Non tirare il cavo di alimentazione o l’apparecchio stesso per staccare la spina
dalla presa di alimentazione elettrica.
ATTENZIONE
Le operazioni di manutenzione e pulizia devono essere effettuate da personale
specializzato e autorizzato dal costruttore.
ATTENZIONE
Non effettuare riparazioni di fortuna o precarie, né tanto meno utilizzare ricambi
non originali.
6.1 PULIZIA
La pulizia è un aspetto fondamentale per il corretto funzionamento del macinacaffè.
Un macinacaffè trascurato può avere un impatto negativo sull’erogazione del caffè
e sull’accuratezza della dose e della macinatura. Prima di pulire, assicurarsi che
l’apparecchio sia scollegato dalla rete elettrica.
6.2 PULIZIA DELLA CAMPANA
Dopo aver tolto la campana dalla macchina, lavare l’interno della campana con acqua
e sapone neutro togliendo lo strato oleoso lasciato dai chicchi di caffè. Risciacquarla e
asciugarla accuratamente. Ripetere il processo per il coperchio in plastica. Non lavare in
9
Page 30

IT
lavastoviglie.
Si raccomanda di effettuare la pulizia almeno una volta a settimana.
6.3 PULIZIA SISTEMA DI MACINATURA
Rimuovere la campana e successivamente pulire le macine e le altre parti interne con un
pennello o un panno asciutto. Se necessario utilizzare un’aspirapolvere o un getto d’aria
compressa. Dopo aver affettuato la pulizia, inserire nuovamente la campana.
Per una completa igienizzazione utilizzare delle compresse detergenti per macinacaffè
presenti in commercio.
ATTENZIONE
Tutte le operazioni di pulizia e igienizzazione, devono essere effettuate con prodotti
approvati per uso alimentare.
6.4 MANUTENZIONE
Per garantire il corretto funzionamento dell’apparecchio, controllare ed eventualmente
sostituire le macine ogni 250 kg di caffè. Per la manutenzione delle macine, disinserire
l’apparecchio dalla rete elettrica e rimuovere il contenitore del caffè in grani.
Successivamente svitare la vite posta sul coperchio e le viti sottostanti che fissano il
portamacine superiore. Per la pulizia delle macine utilizzare un pennello o un panno
asciutto, se necessario utilizzare un’aspirapolvere o un getto di aria compressa.
ATTENZIONE
La manutenzione deve essere eseguita solo da personale specializzato autorizzato
dal produttore.
ATTENZIONE
Non effettuare riparazioni di fortuna o precarie, né tanto meno utilizzare ricambi
non originali.
10
Page 31

IT
7 RICERCA GUASTI
CONDIZIONI MACINACAFFÈ CAUSA POSSIBILE RIMEDIO
All’accensione tramite il pulsante
(4), il display non si accende
Contenitore del caè (2) non
inserito correttamente o non
inserito.
Controllare la posizione del
contenitore (2) e inserirlo
correttamente.
Richiesta di sostituzione delle
macine.
Il funzionamento del macinino
non è compromesso, ma il
risultato ottenuto potrebbe non
ATTENZIONE!
MANUTENZIONE MACINE
essere ottimale. Questo messaggio viene visualizzao per alcuni
secondi ad ogni accensione della
macchina, mentre la spia
rimane accesa durante il
funzionamento.
Se il problema persiste, contattare personale specializzato.
Contattare un tecnico qualicato
per la sostituzione delle macine.
Dopo la sostituzione, resettare il
contatore nella schermata di
manutenzione delle macine e
impostare la taglia e il tipo di
macine installate.
11
Page 32

1 GENERAL INFORMATION
MANUFACTURER:
CONTI VALERIO - Via Luigi Longo 39/41 - 50019 Sesto Fiorentino (FI) - ITALY
MODEL:
HELIOS 65 - HELIOS 80
2 TECHNICAL DATA
MODEL
DESCRIPTION
HELIOS 65
HELIOS 80
EN
Volts (V) 220/240
Frequency (Hz)
Current (A)
50 60
220
110/120
4.2
220/240
50 60
Power consumption
(W)
RPM
Production rate
(g/s)
Empty weight (kg)
280 460 340 340
1370 1500
3,5 - 5,0
12,0
1700
1350 1650
Hopper capacity
(Kg)
Height (mm)
Width (mm)
Depth (mm)
1,2
600
220
250
(*)The value given is for the actual revolutions of the burrs.
220
6,5 - 8,0
15,2
110/120
8.3
1670
HELIOS 65
• Ton: 30 s
•
Toff: 270 s
12
HELIOS 80
• Ton: 30 s
• Toff: 160 s
Page 33

EN
3 GRINDER DESCRIPTION
1. Lid hopper
2. Coffee beans hopper
3. Regulation knob
4. Power button
5. Filter-holder fork
6. Micro-switch
7. Coffee outlet
8. Touch-screen display
9. Opening/closing tab for coffee beans
4 SETTING AND USE
4.1 PREPARATORY OPERATIONS
It is necessary to set up the grinder before working with it, considering the kind of coffee
(more or less roasted) and the grinding type.
• In case you are using metal cans, install the adapter in the joint slot (Fig.2) or use the
adapter via the screw (Fig.3). Then, install the hopper in the right spot (Fig.4).
• In case of coffee-beans hoppers (2), install it in the right spot (Fig. 5).
• Take off the lids (1) from the hopper (2) and fill it up with coffee beans.
• Install back the lid (1) and push the tab (9) so to let the coffee beans pass trough.
ATTENTION
When you take off the coffee beans hopper (2) while the grinder is on, the display
is switching off and so does the grinder. When you install back the hopper, the
display turns on, and so does the grinder.
4.2 SWITCHING ON THE GRINDER
Press the button (4) to switch on the grinder (the led button is switching on).
At first, the grinder is set in the mode originally set by the company. Then, it will
always keep the same mode previously set before switching off.
When you switch it on, the operation screen will appear on the display.
13
Page 34

EN
4.3 GRINDING REGULATION
To set the grinding, use the regulation knob (3), turning it clockwise to grind finer or
counterclockwise to grind it coarser (like displayed on the knob). There is no block;
grinding regulation must be gradually performed, grinding a little bit of coffee each 2 steps
maximum.
ATTENTION
If the knob is turned a full round when the motor is not working, the grinder can
stop
4.4 DISPENSING SYSTEM REGULATION
Considering the filter holder and the type of coffee, set the dispensing chute (7) in height
and grade so to have a correct coffee outlet.
4.5 REGULATE THE FILTER HOLDER FORK
• The fork is suitable to all filter holders in the market.
• With a crosshead screwdriver, loosen the fixing screw of the filter holder fork (5).
• Raise or lower the fork depending on the filter holder size.
• Once you find the right position, tighten the fixing screw of the fork (5).
4.6 FUNCTIONING
Select the dose to be dispensed trough the buttons (B), (L) or (C). Lay the filter holder on
the fork (5), so to have it right under the chute (7) (Fig. 7) and push it forward so to press
the micro-switch (6).
Dispensing stops when the set time is over and the grinding time returns to the original
pre-set time and the grinder is ready to work again. If the continuous mode is on (H) the
dispensing lasts the same time you keep the microswitch pressed (6).
When you release the button (6), continuous mode stops and the grinder sets back the
automatic dose selection
ATTENTION
It’s possible to stop the automatic dispensing before the grinding time is over.
During dispensing, use the filter holder to press the microswitch so to stop
dispensing (5):
• Press again the microswitch (6) to restore the dispensing for the remaining time;
• Press any dose button to stop dispensing. The grinding time comes back to the
one previously set.
14
Page 35

EN
P O N
MA
B
C
D
FE
5 PROGRAMMING THE GRINDER
A. Partial 1 dose counter
B. Select dose 1
C. Select dose 3
D. Partial 3 dose counter
E. Deacreasing key
F. Increasing key
G. Counter partial dose
H. Select continuous dose
I. Displaying time of the selected dose
L. Select dose 2
M. Partial 2 dose counter
N. Alarm on
O. Menu access
P. Locked programming
L
I
H
G
5.1 DOSE REGULATION
• Press a button (B), (L) or (C) to select a dose to set.
• Press buttons (E) or (F) to decrease or increase the dispensing time of the selected
dose up to 5 hundredths of second. If pressed longer, time is increased or decreased
depending on the pression of the button.
5.1.1 LOCKING DOSES REGULATION
Press longer the buttons (E)+(F) to lock the time regulation of dose dispensing. On the
screen, you will see (P).
Press again longer buttons (E)+(F) to unlock.
15
Page 36

EN
5.2 MAIN MENU
To access the main menu, press (O) on the home screen.
5.2.1 COUNTERS
The screen displays the overall counters (not resettable) for each dispensed dose.
Previous page
Next page
Menu exit
Technical menu access
5.2.2 GRINDER INFORMATION
This screen displays information of the model and the firmware of the grinder. These are
mandatory for any technical assistance.
Model:
X.XX
Firmware:
X.XX
Previous page
Next page
Menu exit
Technical menu access
5.3 TECHNICAL MENU
To access the technical menu, press on the screen of the main menu.
5.3.1 RESET PARTIAL COUNTERS
This screen allows to reset partial counters for each dispensed dose, as displayed on the
home screen. Press longer RESET to reset the counters.
16
Previous page
Next page
Menu exit
Page 37

EN
5.3.2 DISPLAY BRIGHTNESS
This screen allows to set the brightness of the display from 0 to 10, using
buttons
Previous page
Next page
Menu exit
5.3.3 DISPLAY COLOUR
This screen allows to set the color of the display, using buttons .
Blue
Red
Green
Yellow
Previous page
Next page
Menu exit
5.3.4 SELECTION DOSE MODE
This screen allows to set the selection dose mode
• ON: you must select the dose for each dispensing.
• OFF: you keep selected the last dispensed dose.
SELECT DOSE
EVERY TIME?
Previous page
Next page
Menu exit
17
Page 38

EN
5.3.5 BURRS MAINTENANCE
This screen allows to reset the counter of burrs maintenance and enable/disable the burrs
maintenance alert. Press longer RESET to reset the counter of burrs maintenance
(invisible on the display). .
Previous page
Next page
Menu exit
Pressing ON, you have access to the menu and you can set both the size and the type of
the burrs.
Menu exit
Back
5.3.6 RESTORING FACTORY SETTINGS
This screen allows to restore the grinder to factory settings. Press longer RESET to
restore factory settings.
FACTO RY
DATA RESET
RESET
Previous page
Next page
Menu exit
18
Page 39

EN
6 CLEANING AND MAINTENANCE
ATTENTION
Unplug the grinder from the electrical net before performing any cleaning and
maintenance. Do not pull the feeding cable or the grinder itself to unplug.
ATTENTION
Maintenance and cleaning must be performed by trained technicians, authorised
by the producer.
ATTENTION
Do not perform any approximate maintenance and always use original spare parts.
6.1 CLEANING
Cleaning is fundamental for the correct use of the grinder. A neglected grinder can
negatively impact on the coffee dispensing and on the precision of the dose and the grind.
Before cleaning, check if the grinder is unplugged.
6.2 HOPPER CELANING
After having removed the hopper, clean the internal parts of it with water and neutral soap,
taking off any oil left by the coffee beans. Rinse and dry it carefully. Perform the same on
the cover. Do not use the dish-washer.
6.3 GRINDING SYSTEM CLEANING
After having removed the lid, open the upper burr holder. Then, clean the blades and the
other internal parts with a brush or a dry cloth. If necessary, use a vacuum cleaner or an
air compressed jet. After having installed back the upper burr holder and the lid, install the
hopper. For a complete cleaning, use detergent pills.
ATTENTION
Any cleaning operation must be performed with food use approved products.
6.4 MAINTENANCE
To ensure correct operation of the appliance check and possibly replace the blades every
250 kg of coffee. For burrs maintenance, unplug the grinder from the electric net and
remove the coffee beans container. Then, unscrew the screw being on the lid and the
screws fixing the upper burr holder. To clean the blades, use a brush or a dry cloth. If
necessary, use a vacuum cleaner or air compressed jet.
19
Page 40

EN
ATTENTION
Maintenance must be performed only by trained technicians, authorised by the
producer.
ATTENTION
Do not perform any approximate maintenance and always use original spare parts.
7 TROUBLESHOOTING
GRINDER CONDITION CAUSE POSSIBLE SOLUTION
When starting by means of the
key (4), the display does not
turns on.
Coee containers (2) not inserted
or not inserted properly.
Check the position of the coee
container (2) and insert it
properly.
Request of burr replacement.
The operation of the grinder is
not jeopardised, but the outcome
could not be optimal.
This message is also shown for
some seconds every time the
grinder is switched on, while
the light remains on even
during operation.
If the problem persists, contact trained personnel.
Contact a skilled technician for
replacement of the burrs.
After replacement, reset the
counter in the maintenance
screen of the burrs and set
the size and the type of burrs
installed.
20
Page 41

EN
21
Page 42

1 ALLGEMEINE INFORMATIONEN
HERSTELLER:
CONTI VALERIO - Via Luigi Longo 39/41 - 50019 Sesto Fiorentino (FI) - ITALY
MODELLE:
HELIOS 65 - HELIOS 80
2 DATI TECNICI
MODELLE
BESCHREIBUNG
HELIOS 65
HELIOS 80
DE
Spannung (V) 220/240
Frequenz (Hz)
Stromstärke(A)
50 60
220
110/120
4.2
220/240
50 60
220
110/120
8.3
Stromaufnahme
(W)
Umdrehungen
pro Minute
Produktionsleistung
(rpm)*
(g/s)
Leergewicht (kg)
280 460 340 340
1370 1500
3,5 - 5,0
12,0
1700
1350 1650
6,5 - 8,0
1670
15,2
Behältervolumen
(Kg)
Höhe (mm)
Breite (mm)
Tiefe (mm)
1,2
600
220
250
* Der angegebene Wert bezieth sich auf die effektive Drehzahl der Mahlwerke.
HELIOS 65
• Ton: 30 s
• Toff: 270 s
22
HELIOS 80
• Ton: 30 s
• Toff: 160 s
Page 43

DE
3 BESCHREIBUNG DES GERÄTS
1. Bohnenbehälterdeckel
2. Bohnenbehälter
3. Mahlgradeinstellung-Knauf
4. Zündschalter
5. Siebträgergabel
6. Mikroschalter
7. Auslauf
8. Touchscreen-Display
9. Lasche für die Öffnung/Schließung des
Bohnenbehälters
4 EINSTELLUNG UND VERWENDUNG
4.1 VORLÄUFIGE VERFAHREN
Sie müssen die Einstellung der Kaffeemühle vornehmen, bevor Sie mahlen beginnen,
abhängig von der Art der Kaffeemischung (mehr oder weniger geröstet) und dem
Mahlgrad.
• Wenn Metallbehälter verwendet werden, verwenden Sie den Adapter (Abb.2) oder
schrauben Sie den Schraubadapter (Abb.3). Setzen Sie dann den Behälter in seinen
Sitz ein (Abb.4).
• Wenn Sie den Bohnenbehälter (2) verwenden, setzen Sie ihn in seinen Sitz ein (Abb.
5).
• Nehmen Sie den Deckel (1) vom Bohnenbehälter (2) ab und füllen Sie ihn mit
Kaffeebohnen.
• Setzen Sie den Deckel (1) wieder ein und drücken Sie die Lasche (9), sodass die
Kaffeebohnen durchlaufen können.
WARNUNG
Wenn Sie den Bohnenbehälter (2) bei eingeschaltetem Gerät entfernen,
schaltet sich das Display aus und das Mahlwerk wird stillgelegt. Nachdem der
Bohnenbehälter wieder eingesetzt wurde, schaltet sich das Display wieder ein
und das Gerät kehrt zum normalen Betrieb zurück.
23
Page 44

DE
4.2 ZÜNDUNG DER MASCHINE
Schalten Sie den Schalter (4) ein (die LED auf der Taste leuchtet).
Beim ersten Einschalten wird das Gerät auf den am Werksausgang eingestellten
Modus eingestellt, und bei den folgenden Zündungen wird es auf jeden Fall immer
so eingestellt wie im letzten Modus vor dem Ausschalten.
Nach dem Einschalten zeigt das Display sofort den Betriebsbildschirm an.
4.2.1 MAHLGRADEINSTELLUNG
Um die Mahlung einzustellen, drehen Sie den Einstellknauf (3) im Uhrzeigersinn, um
den Kaffee feiner zu machen, oder gegen den Uhrzeigersinn, um die Körnung grober
zu machen, wie auf dem Knopf angegeben. Die Einstellung erfolgt stufenlos; sie muss
schrittweise erfolgen, wobei höchstens alle 2 Stufen ein wenig Kaffee gemahlen werden
soll.
WARNUNG
Wenn der Knopf bei abgestelltem Motor eine Umdrehung gedreht wird, kann die
Maschine blockieren.
4.3 AUSLAUF EINSTELLUNG
Stellen Sie den Auslauf (7) je nach Siebträger und Art der verwendeten Kaffeebohnen in
Höhe und Neigung so ein, dass der Kaffee richtig ausfließen kann.
4.4 SIEBTRÄGERGABEL EINSTELLUNG
• Die Siebträgergabel ist für jede Art von Siebträger auf dem Markt geeignet.
• Mit einem Kreuzschlitzschraubendreher die Befestigungsschraube (5) der
Siebträgergabel lösen.
• Heben oder senken Sie die Siebträgergabel, um sie an die Größe des Siebträgers
anzupassen.
• Wenn Sie die richtige Position gefunden haben, ziehen Sie die
Gabelbefestigungsschraube (5) an.
24
Page 45

DE
4.5 BEDIENUNG
Wählen Sie die Dosis mit den entsprechenden Tasten (B), (L) oder (C). Setzen Sie den
Siebträger auf die Siebträgergabel (5), achten Sie darauf, dass er sich genau unter dem
Auslauf (7) befindet (Abb. 7) und schieben Sie ihn nach vorne, bis der Mikroschalter (6)
gedrückt wird.
Das Mahlen endet, wenn die in der Programmierung eingestellte Zeit verstrichen ist
und die Mahlzeit wieder auf den eingestellten Wert zurückgeht und die Kaffeemühle für
ein neues Mahlen bereit ist. Wenn die kontinuierliche Dosis (H) gewählt wird, mahlt die
Kaffeemühle nur beim Druck des Mikroschalters (6).
Wenn der Mikroschalter (6) losgelassen wird, endet die kontinuierliche Abgabe und die
Maschine kehrt in den automatischen Dosisauswahlmodus zurück.
WARNUNG
Sie können die automatische Dosierung stoppen, bevor die Mahlzeit abgelaufen
ist. Drücken Sie während der Abgabe den Mikroschalter (5) mit dem Siebträger,
um die Abgabe zu stoppen:
• Drücken Sie den Mikroschalter für den Mahlvorgang (6) erneut, um das Mahlen
für die verbleibende Zeit fortzusetzen;
• Drücken Sie eine beliebige Dosis-Taste, um die Abgabe zu beenden. Die
Mahlzeit kehrt auf den eingestellten Wert zurück.
B
C
D
P O N
MA
L
I
H
G
FE
25
Page 46

DE
5 MASCHINENPROGRAMMIERUNG
A. Partialzähler Dosis 1
B. Dosis 1 Auswahl
C. Dosis 3 Auswahl
D. Partialzähler Dosis 3
E. Verringern Taste
F. Erhöhen Taste
G. Partialzähler kontinuierliche Dosis
5.1 DOSEN EINSTELLEN
• Drücken Sie eine Taste (B), (L) oder (C), um eine einzustellende Dosis auszuwählen.
• Drücken Sie (E) oder (F), um die Abgabezeit der gewählten Dosis um plus oder
minus fünf Hundertstelsekunden zu verkürzen oder zu verlängern. Wenn Sie die
Taste lange drücken, wird die Zeit um die Zeit, die Sie die Taste drücken, erhöht oder
verringert.
H. Kontinuierliche Dosis Auswahl
I. Anzeige der gewählten Dosiszeit
L. Dosis 2 Auswahl
M. Partialzähler Dosis 2
N. Aktiver Alarm
O. Zugriff auf das Menü
P. Blockierte Programmierung
5.1.1 BLOCK ZUR DOSISEINSTELLUNG
Drücken Sie die Tasten (E) + (F) lang, um die Dosiszeiteinstellung zu sperren. Das
Symbol (P) erscheint auf dem Display.
Zum Entsperren halten Sie die Tasten (E)+(F) erneut gedrückt.
5.2 HAUPTMENÜ
Um auf das Hauptmenü zuzugreifen, drücken Sie (O) auf dem Startbildschirm.
5.2.1 GESAMTE ZÄHLER
Auf diesem Bildschirm können Sie die gesamten (nicht rückstellbaren) Zähler für jede
Dosis anzeigen.
Vorherige Seite
DOSISZÄHLER
Nächste Seite
Menü-Ausgang
Zugang zum
technischen Menü
26
Page 47

DE
5.3 KAFFEEMÜHLE INFORMATIONEN
Auf diesem Bildschirm können Sie die Kaffeemühleinformationen in Bezug auf das
Modell und die Firmware-Version finden, die für jede Art von technischer Unterstützung
erforderlich sind.
Model:
Modell:
X.XX
X.XX
Firmware:
Firmware:
X.XX
X.XX
Vorherige Seite
Nächste Seite
Menü-Ausgang
Zugang zum
technischen Menü
5.4 TECHNISCHES MENÜ
Um auf das technische Menü zuzugreifen, drücken Sie auf dem HauptmenüBildschirm.
5.4.1 TEILZÄHLER ZURÜCKSETZEN
In diesem Bildschirm können Sie die Teilzähler für jede Dosis, die auf dem
Startbildschirm sichtbar ist, zurücksetzen. Drücken Sie die RESET-Taste lange, um die
Zähler auf null zurückzusetzen.
TEILZÄHLER
Vorherige Seite
Nächste Seite
Menü-Ausgang
27
Page 48

DE
5.4.2 DISPLAY-HINTERGRUNDFARBE
Auf diesem Bildschirm können Sie die Helligkeit der Anzeige von 0 bis 10 mit den Tasten
einstellen.
HELLIGKEIT
Vorherige Seite
Nächste Seite
Menü-Ausgang
5.4.3 DISPLAY-HINTERGRUNDFARBE
Auf diesem Bildschirm können Sie die Hintergrundfarbe der Anzeige mit den Tasten tasti
einstellen. .
Blau
DISPLAYFARBE
Rot
Vorherige Seite
ROT
Grün
Nächste Seite
Gelb
Menü-Ausgang
5.4.4 DOSIS-AUSWAHLMODUS
In diesem Bildschirm können Sie den Dosisauswahlmodus einstellen.
• ON: Sie müssen die Dosis für jede Abgabe auswählen.
• OFF: Die zuletzt abgegebene Dosis bleibt ausgewählt.
DOSIS JEDES
28
SELECT DOSE
MAL AUSWÄHLEN?
EVERY TIME?
EIN AUS
Vorherige Seite
Nächste Seite
Menü-Ausgang
Page 49

DE
5.4.5 MAHLSCHEIBEN-WARTUNG
Auf diesem Bildschirm können Sie den Mahlscheibenaustausch-Zähler zurücksetzen
sowie das Mahlscheibenwartung-Warnsystem aktivieren oder deaktivieren. Die RESETTaste setzt, wenn sie lange gedrückt wird, den Mahlscheibenaustausch-Zähler zurück
(auf dem Display unsichtbar).
MAHLSCHEIBEN
WARTUNG
EINSTELLEN
Durch Drücken der ON Taste zugreifen Sie in das Menü und der Einstellung von
Mahlwerksgröße und -typ.
Vorherige Seite
Nächste Seite
Menü-Ausgang
WARTUNGSMITTEILUNG
MAHLSCHEIBEN GRÖßE
MAHLSCHEIBEN TYP
Menü-Ausgang
Zurück
5.4.6 WERKSEINSTELLUNGEN WIEDERHERSTELLEN
In diesem Bildschirm können Sie die Maschineneinstellungen auf die vom Hersteller
festgelegten Einstellungen zurücksetzen.
Drücken Sie die RESET-Taste lange, um die Werkseinstellungen wiederherzustellen.
.
FACTO RY
AUF FACTORY-DATEN
DATA RESET
ZURÜCKSETZEN
RESET
RESET
Vorherige Seite
Nächste Seite
Menü-Ausgang
29
Page 50

6 REINIGUNG UND WARTUNG
WARNUNG
Trennen Sie das Gerät von der Stromversorgung, bevor Sie Reinigungs- und
Wartungsarbeiten durchführen. Ziehen Sie nicht am Netzkabel oder am Gerät
selbst, um den Netzstecker aus der Steckdose zu ziehen.
WARNUNG
Wartungs-und Reinigungsarbeiten müssen durch vom Hersteller autorisiertes
Fachpersonal durchgeführt werden.
WARNUNG
Keine behelfsmäßigen oder prekären Reparaturen vornehmen und keine NichtOriginal-Ersatzteile verwenden.
DE
6.1 REINIGUNG
Die Reinigung ist ein grundlegender Aspekt für das einwandfreie Funktionieren der
Kaffeemühle. Ein vernachlässigtes Mahlwerk kann sich negativ auf die Kaffeeabgabe
und die Dosis- und Mahlgenauigkeit auswirken. Stellen Sie vor der Reinigung sicher,
dass das Gerät nicht angeschlossen ist.
6.2 REINIGUNG DES BOHNENBEHÄLTERS
Nachdem Sie den Bohnenbehälter aus der Maschine genommen haben, waschen
Sie das Innere des Bohnenbehälters mit Wasser und neutraler Seife, indem Sie die
von den Kaffeebohnen hinterlassene Ölschicht entfernen. Spülen und trocknen Sie
es gründlich ab. Wiederholen Sie den Vorgang für den Kunststoffdeckel. Nicht in der
Geschirrspülmaschine waschen. Wir empfehlen eine Reinigung mindestens einmal pro
Woche.
6.3 REINIGUNG DES MAHLSYSTEMS
Nachdem Sie den Deckel entfernt haben, öffnen Sie den oberen Mahlscheibenträger.
Reinigen Sie dann die Mahlscheiben und andere Innenteile mit einer trockenen Bürste
oder einem trockenen Tuch. Falls erforderlich, verwenden Sie einen Staubsauger oder
einen Druckluftstrahl. Nachdem Sie den oberen Mahlscheibenträger und den Deckel
neu positioniert haben, setzen Sie den Bohnenbehälter ein. Verwenden Sie im Handel
erhältliche Reinigungstabletten für Kaffeemühlen, um eine vollständige Hygiene zu
gewährleisten
30
Page 51

DE
WARNUNG
Alle Reinigungs- und Desinfektionsvorgänge müssen mit für Lebensmittel
zugelassenen Produkten durchgeführt werden.
6.4 WARTUNG
Um den korrekten Betrieb der Maschine zu gewährleisten, sollten die Mahlscheiben
alle 250 kg Kaffee überprüft und ggf. ausgetauscht werden. Um die Mahlscheiben zu
warten, trennen Sie die Maschine vom Netz und entfernen Sie den Bohnenbehälter.
Lösen Sie dann die Schraube an der Abdeckung und die darunter liegenden Schrauben,
die den oberen Mahlscheibenträger sichern. Reinigen Sie die Mahlscheiben mit einer
trockenen Bürste oder einem trockenen Tuch, wenn nötig mit einem Staubsauger oder
einem Druckluftstrahl.
WARNUNG
Die Wartung darf nur von durch den Hersteller autorisiertem Fachpersonal
durchgeführt werden.
WARNUNG
Führen Sie keine Notfallreparaturen durch und verwenden Sie keine NichtOriginal-Ersatzteile.
7 FEHLERSUCHE
KAFFEEMÜHLE ZUSTAND URSACHE LÖSUNGSMÖGLICHKEITEN
Beim Einschalten mit der Taste (4)
leuchtet die Anzeige nicht auf.
WARNUNG!
MAHLSCHEIBEN ERSETZEN
Bohnenbehälter (2) nicht richtig
oder nicht eingesetzt.
Antrag auf Ersatz von Mahlscheiben.
Der Betrieb der Kaeemühle wird
nicht beeinträchtigt, aber das
erzielte Ergebnis ist möglicherweise nicht optimal. Diese
Meldung wird bei jedem
Einschalten des Motors für einige
Sekunden angezeigt, während die
Kontrollleuchte während des
Betriebs weiter leuchtet.
Überprüfen Sie die Position des
Bohnenbehälters (2) und setzen Sie
ihn korrekt ein.
Wenden Sie sich für den
Mahlscheibenaustausch an einen
qualizierten Techniker.
Setzen Sie nach dem Austausch
den Zähler im Wartungsbildschirm der Kaeemühle zurück
und stellen Sie die Größe und den
Typ der Mahlscheiben ein.
Wenn das Problem weiterhin besteht, wenden Sie sich an Fachpersonal.
31
Page 52

8 INFORMATIONS GÈNÈRALES
COSTRUCTEUR:
CONTI VALERIO - Via Luigi Longo 39/41 - 50019 Sesto Fiorentino (FI) - ITALY
MODELÉ:
HELIOS 65 - HELIOS 80
9 CARACTÉRISTIQUE TECHNIQUES
MODÈLE
DESCRIPTION
HELIOS 65
HELIOS 80
FR
Voltage (V) 220/240
Fréquence (Hz)
Courant (A)
50 60
220
110/120
4.2
220/240
50 60
Absorption
(W)
Nombre de
tours/minute (rpm)*
Productivité
(g/s)
Poids à vide (kg)
Capacité trémie
(Kg)
Hauteur (mm)
Largeur (mm)
Profondeur (mm)
280 460 340 340
1370 1500
3,5 - 5,0
12,0
1700
1350 1650
1,2
600
220
250
* La valeur indiquée se réfère aux tours effectifs des meules.
220
6,5 - 8,0
15,2
110/120
8.3
1670
HELIOS 65
• Ton: 30 s
• Toff: 270 s
32
HELIOS 80
• Ton: 30 s
• Toff: 160 s
Page 53

FR
10 DESCRIPTION MOULIN
1. Couvercle
2. Trémie grains de café
3. Pommeau de réglage
4. Bouton allumage
5. Fourche porte-filtre
6. Micro-switch
7. Glissière café
8. Écran tactile
9. Ouverture/fermeture languette pour les
grains de café
11 REGLAGE ET UTILISATION
11.1 OPERATIONS PRELIMINAIRES
Il est nécessaire de régler le moulin avant de l’utiliser, en considérant le type de café (plus
ou moins torréfié) et son broyage.
• Dans le cas où on utilise une boite de métal, installer l’adapteur dans sa position
(Fig.2) ou utiliser l’adapteur avec sa vis (Fig.3). Après, installer la trémie dans sa
position (Fig.4).
• Dans le cas où il y a la trémie (2), installer dans sa position (Fig. 5).
• •Enlever le couvercle (1) de la trémie (2) et la remplir avec grains de café.
• Installer à nouveau le couvercle (1) et pousser la languette (9) pour faire passer les
grains
ATTENTION
Quand on enlève la trémie (2) pendant le moulin est allumé, l’écran va s’éteindre.
Quand on remet la trémie, l’écran et le moulin vont s’allumer.
11.2 ALLUMER LE MOULIN
Appuyer sur le bouton (4) pour allumer le moulin (le LED va s’allumer).
Au début, le moulin est réglé de la même façon réglée par l’usine. Après, il va
conserver la modalité qui a été choisie auparavant, avant de s’éteindre.
Quand on allume le moulin, l’écran va montrer la modalité opérationnelle.
33
Page 54

FR
11.3 REGLER LE MOULIN
Pour régler le broyage, utiliser le pommeau de réglage (3), en tournant en sens horaire
pour broyer un café plus fin ou anti-horaire pour avoir un café plus gros (comme montré sur
l’écran). Il n’y a pas de blocages; la modalité de broyage doit être managé graduellement
, en broyant un peu de café chaque 2 steps maximum.
ATTENTION
S’on tourne le pommeau quand le moteur est coupé, le moulin peut s’éteindre.
11.4 REGLER LE SYSTEME DE DISTRIBUTION
En considérant le porte-filtre et le type de café, régler la glissière (7) en hauteur et sa
inclination pour avoir une sortie parfaite.
11.5 REGLER LA FOURCHE PORTE-FILTRE
• La fourche est appropriée pour toute porte-filtre.
• Avec une vis cruciforme, desserrer la vis de la fourche porte-filtre (5).
• Rehausser ou baisser la fourche en regardant les dimensions du porte-filtre.
• Une fois qu’on trouve la position correcte, serrer la vis (5).
11.6 FONCTIONNEMENT
Sélectionner la dose pour la distribuer avec les boutons (B), (L) ou (C). Poser le porte-filtre
sur la fourche (5), de manière à la positionner sous la glissière (7) (Fig. 7) et l’appuyer
sur le micro-switch (6).
La distribution s’arrête quand le temps réglé auparavant est fini et le temps de broyage
retourne à la valeur initiale et le moulin et prêt à broyer à nouveau. Si la modalité continue
est activée (H), la distribution dure le même temps dans lequel on s’appuie sur le microswitch (6).
Quand on relâche le bouton (6), la modalité continue s’arrête et le moulin retourne à la
modalité automatique de sélection.
ATTENTION
Il est possible d’arrêter la distribution automatique avant que le temps est fini.
Pendant la distribution, appuyer le porte-filtre sur le micro-switch pour arrêter la
distribution (5):
• Appuyer à nouveau sur le micro-switch (6) pour rétablir la distribution pour le
temps qui reste;
• Appuyer sur un bouton de la dose pour arrêter la distribution. Le temps de
broyage se réinitialise au même qu’avait été réglé.
34
Page 55

FR
P O N
MA
B
C
D
FE
12 PROGRAMMER LE MOULIN
A. Compteur partial 1 dose
B. Selectionner dose 1
C. Selectionner dose 3
D. Compteur partial 3 doses
E. Bouton diminuer
F. Bouton augmenter
G. Compteur dose partial
H. Selectionner dose continue
I. Afficher le temps de la dose selecitonné
L. Selectionner dose 2
M. Compteur partial dose 2
N. Alerte activée
O. Accès Menù
P. Programmation bloquée
L
I
H
G
12.1 REGLER LA DOSE
• Appuyer sur le bouton (B), (L) ou (C) ou sélectionner la dose à régler.
• Appuyer sur le bouton (E) ou (F) pour diminuer ou augmenter le temps de distribution
de la dose sélectionnée à 5 centimes de second. S’on appuie plus longtemps, le temps
augmente ou diminue : ça dépend de la pression sur le bouton.
12.1.1 BLOQUER LE REGLAGE DE LA DOSE
Appuyer plus longtemps sur les boutons (E)+(F) pour bloquer le temps de réglage de la
distribution de la dose. Sur l’écran, on voit (P).
Appuyer à nouveau sur les boutons (E)+(F) pour débloquer.
35
Page 56

FR
12.2 MENU PRINCIPAL
Pour accéder au menu principal, appuyer (O) sur la fenêtre « home »
12.2.1 COMPTEURS
Sur l’écran on affiche les compteurs totales (one peut pas les réinitialiser) pour chaque
dose distribuée.
Page précédente
COMPTEURS
Pagina suivante
Menu sortie
Accès au menu technique
12.2.2 INFORMATIONS SUR LE MOULIN
L’écran montre les informations sur le modèle et le firmware du moulin. C’est nécessaire
pour toute assistance technique.
Modèle:
Model:
X.XX
X.XX
Firmware:
Firmware:
X.XX
X.XX
Page précédente
Pagina suivante
Menu sortie
Accès au menu technique
12.3 MENU TECHNIQUE
Pour accéder au menu technique, appuyer sur l’écran du menu principal.
36
Page 57

FR
12.3.1 REINITIALISSER LE COMPTEUR PARTIEL
L’écran permet de réinitialiser le compteur partial pour chaque dose distribuée, comme
montrée sur le menu principale. Appuyer RESET pour réinitialiser les compteurs.
COMPTEURS
DOSES PARTIELLES
Page précédente
Pagina suivante
Menu sortie
12.3.2 LUMINOSITÈ ECRAN
L’écran permet de choisir la luminosité de l’écran, entre 0-10, en utilisant boutons
.
LUMINOSITÉ
Page précédente
Pagina suivante
Menu sortie
12.3.3 COULEUR ECRAN
Questa schermata permette di impostare il colore dello sfondo del display utilizzando i
tasti
Bleu
Rouge
.
COULEUR ECRAN
Page précédente
ROUGE
Verte
Jaune
Pagina suivante
Menu sortie
12.3.4 SELECTIONNER LA MODALITE DE LA DOSE
L ‘écran permet de choisir la modalité de la dose.
37
Page 58

FR
• ON: on doit sélectionner la dose chaque fois.
• OFF: on doit conserver la dernière dose sélectionnée.
SELECTIONNER
SELECT DOSE
TOUJOURS LA DOSE?
EVERY TIME?
Page précédente
Pagina suivante
Menu sortie
12.3.5 ENTRETIEN MEULES
L’écran permet de réinitialiser le compteur du système d’entretien des meules et
d’activation/désactivation de l’alarme d’entretien des meules.
ENTRETIEN MEULES
Page précédente
CONFIGURATION
Pagina suivante
Menu sortie
En appuyant ON, on accede au menu et on peut choisir les dimensioes et le type de
meules.
AVIS D'ENTRETIEN
DIAMETRE MEULES
TYPE MEULES
Menu sortie
En arrière
38
Page 59

FR
12.3.6 RETABLIR LES REGLAGES D’USINE
L’écran permet de rétablir les réglages d’usine. Appuyer plus longtemps sur RESET pour
rétablir les réglaes d’usine.
FACTO RY
REINITIALISATION
DATA RESET
D'USINE
RESET
RESET
Page précédente
Pagina suivante
Menu sortie
13 NETTOYAGE ET ENTRETIEN
ATTENTION
Débrancher la prise électrique avant d’effectuer n’importe quelle opération de
nettoyage ou manutention.Ne pas tirer le câble d’alimentation ou le même moulin
pour le débrancher de la prise électrique.
ATTENTION
L’entretien et de nettoyage doit être effectué par personnes spécialisées et
autorisées par le fabriquant.
ATTENTION
Ne pas effectuer des réparations superficiales. Il est nécessaire d’utiliser les pièces
de rechange originales.
13.1 NETTOYAGE
Le nettoyage est un aspect fondamental pour le bon fonctionnement du moulin. Un moulin
doseur négligé peut avoir des conséquences négatives non seulement sur l’extraction du
café de la machine, mais aussi sur la précision de la dose et de la mouture. Avant de
procéder aux opérations de nettoyage, contrôler que l’appareil soit débranché du réseau
électrique.
13.2 NETTOYAGE DE LA TREMIE
Après avoir enlevé la trémie, en nettoyer la partie intérieur de la trémie avec de l’eau et
du savon neutre, en enlevant l’huile laissé par les grains. Rincer et sécher avec attention.
Répéter tout ça sur le couvercle de plastique. Ne pas utiliser le lave-vaisselle.
On conseille de faire le nettoyage un fois par semaine.
39
Page 60

FR
13.3 NETTOYAGE SYSTEME DE BROYAGE
Après avoir enlevé le couvercle, ouvrir le porte meules supérieures. Après, nettoyer les
meules et les autres parties internes avec un brosse ou un tissue sec. S’il est nécessaire,
utiliser un aspirateur ou un jet d’air comprimée. Après avoir réinstallé la partie supérieure
du porte-meules et avoir dévissé la couverture, insérer la trémie.
Pour un nettoyage complète, utiliser un détergent spécifique pour le moulin, disponible
dans le marché.
ATTENTION
Toutes les opérations de nettoyage doivent être effectuées avec de produits idoines
pour une utilisation alimentaire.
13.4 ENTRETIEN
Contrôler et éventuellement remplacer les meules chaque 250 kg. de café. Pour l’entretien
des meules, débrancher le moulin de la prise et enlever la trémie. Après, dévisser la vis
sur le couvercle et les vis de fixation du porte-meules supérieur. Pour le nettoyage des
meules, utiliser une brosse ou un chiffon sec. Si nécessVaire, utiliser un aspirateur ou un
jet d’air comprimé.
ATTENTION
L’entretien doit être fait seulement par des personnes spécialisées et autorisées
par le producteur.
ATTENTION
Ne pas effectuer des réparations improvisées et utiliser des pièces de rechange
d’origine.
40
Page 61

FR
14 DEPANNAGE
STATUS DU MOULIN CAUSE SOLUTION POSSIBLE
S’on appuie sur le bouton (4),
l’écran ne s’allume pas.
La trémie (2) est installée de
manière incorrecte ou pas installée.
Contrôler la position de la trémie
(2) et l’installer correctement.
Contacter un technicien pour
remplacer les meules.
Après le remplacement,
réinitialiser le compteur sur l’écran
d’entretien et choisir les
dimensions et le type des meules
installés.
ATTENTION!
ENTRETIEN MEULES
Remplacement des meules
nécessaire.
Le moulin n’est pas endommagé,
mais le résultat ne pourrait pas
être le meilleur. L’alarme va
apparaitre pour quelques seconds
quand on allume le moulin.
L’alarme va apparaitre aussi
pendant le broyage.
Si le problème n’est pas résolu, contacter un technicien autorisé.
41
Page 62

1 INFORMACIÓN GENERALES
CONSTRUCTOR:
CONTI VALERIO - Via Luigi Longo 39/41 - 50019 Sesto Fiorentino (FI) - ITALY
MODELO:
HELIOS 65 - HELIOS 80
2 DATOS TÉCNICOS
MODELO
DESCRIPCIÓN
HELIOS 65
HELIOS 80
ES
Voltaje (V) 220/240
Frecuencia (Hz)
Corriente (A)
50 60
220
110/120
4.2
220/240
50 60
220
110/120
Absorción
(W)
Giros por minutos
(rpm)*
Productividad
(g/s)
Peso a vació (kg)
Capacidad
campana (Kg)
Alteza (mm)
Ancho (mm)
Profundidad (mm)
280 460 340 340
1370 1500
3,5 - 5,0
12,0
1700
1350 1650
6,5 - 8,0
1,2
600
220
250
15,2
* El valor indicado se refiere a las revoluciones reales de los molinillos.
8.3
1670
HELIOS 65
• Ton: 30 s
•
Toff: 270 s
42
HELIOS 80
• Ton: 30 s
• Toff: 160 s
Page 63

ES
3 DESCRIPCIÓN DEL MOLINO
1. Tapa de la tolva
2. Tolva para granos de café
3. Botón de regulación de la
granulometría
4. Interruptor de encendido
5. Horquilla portafiltro
6. Botón de activación de la molienda
7. Conducto dispensador
8. Pantalla táctil
9. Pestaña de apertura y cierre de la
tolva de café en granos
4 AJUSTES Y USO
4.1 OPERACIONES PRELIMINARES
Es necesario regular el molino antes de empezar a trabajar, dependiendo del tipo de
mezcla de café (más o menos tostada) y del grado de molienda.
• Si se utilizan tolvas de lata, monte el adaptador (Fig.2) o atornille el adaptador con
tornillo (Fig.3). A continuación, introduzca la tolva en su asiento (Fig.4).
• Si utiliza la tolva (2), introdúzcala en su asiento (Fig. 5).
• Quite la tapa (1) de la tolva (2) y llénala con granos de café.
• Reinserta la tapa (1) y empuje la pestaña (9), permitiendo que los granos pasen a
través de ella.
ATENCIÓN
Cuando se retira la tolva (2) con la máquina encendida, la pantalla se apaga y el
molinillo queda inactivo. Una vez que la tolva ha sido reinsertada, la pantalla se
enciende de nuevo y la máquina vuelve a funcionar normalmente.
4.2 IGNICIÓN DE LA MÁQUINA
Ponga el interruptor (4) en la posición de encendido (el LED del botón se enciende).
La primera vez que se encienda el molino, estará ajustado en el modo establecido
en la salida de fábrica y, en cualquier caso, en los siguientes inicios, siempre se
ajustará como en el último modo antes de apagarse.
Cuando se enciende, la pantalla muestra inmediatamente la pantalla de
funcionamiento.
43
Page 64

ES
4.3 AJUSTE DE LA MOLIENDA
Para ajustar la molienda, gire el botón de regulación (3), girándola en sentido horario
para tener un café más fino o en el sentido contrario para una granulometría más
gruesa, como descrito en la perilla. El ajuste es continuo; debe hacerse gradualmente,
moliendo un poco de café cada 2 etapas como máximo.
ATENCIÓN
Girar el botón una vuelta con motor parado puede bloquear el molino.
4.4 AJUSTE DEL CONDUCTO
Dependiendo del portafiltro y del tipo de granos de café utilizado, ajuste el conducto (7)
en altura e inclinación para permitir que el café salga correctamente.
4.5 AJUSTE DE LA HORQUILLA PORTAFILTROS
• La horquilla puede ser utilizada con cualquier tipo de portafiltros del mercado.
• Utilice un destornillador de estrella para aflojar el tornillo de la horquilla portafiltro (5).
• Levante o baje la horquilla para ajustarla al tamaño del portafiltro.
• Una vez que haya encontrado la posición correcta, apriete el tornillo de la horquilla
(5).
4.6 FUNCIONAMIENTO
Seleccione la dosis con los respectivos botones (B), (L) o (C). Coloque el portafiltro en
la horquilla (5), asegurándose de que está precisamente debajo al conducto (7) (Fig. 7)
y empujarlo hacia adelante presionando el botón (6).
La molienda termina cuando el tiempo establecido en la programación ha transcurrido y
el tiempo de molienda vuelve al valor establecido. El molino estará entonces listo para
una nueva molienda. Si se selecciona la dosis continua (H), la entrega dura el tiempo
de presión del botón de activación de molienda (6).
Cuando se suelta el botón de activación de molienda (6), la dispensación continúa se
detiene y el molino vuelve al modo de selección automática de dosis.
ATENCIÓN
Puede cancelar la dispensación automática antes de que termine el tiempo de
molienda. Durante la molienda, pulse el botón de activación (5) con el portafiltro
para cancelar la dispensación:
• Presione el botón de activación de molienda (6) de nuevo para reanudar la
dispensación durante el tiempo restante;
• Presione cualquier botón de dosis para cancelar la molienda. El tiempo de
molienda vuelve al valor establecido.
44
Page 65

ES
P O N
MA
B
C
D
FE
L
I
H
G
5 PROGRAMACIÓN DE LA MÁQUINA
A. Contador de dosis 1 parcial
B. Selección dosis 1
C. Selección dosis 3
D. Contador de dosis 3 parcial
E. Botón de disminución
F. Botón de incremento
G. Contador de dosis continua parcial
H. Selección dosis continua
I. Visualización del tiempo de dosis
seleccionada
L. Selección dosis 2
M. Contador de dosis 2 parcial
N. Alarma activa
O. OAcceder al menú
P. Programación bloqueada
5.1 AJUSTE DE LA DOSIS
• Pulse una tecla (B), (L) o (C) para seleccionar una dosis.
• Pulse la tecla (E) o (F) para disminuir o aumentar el tiempo de molienda de la
dosis seleccionada en más o menos 5 centésimas de segundo. Si se mantiene
presionada, el tiempo es aumentado o disminuido por el tiempo de presión del botón.
5.1.1 BLOQUE DE AJUSTE DE LA DOSIS
Mantenga presionadas las teclas (E) + (F) para bloquear el ajuste del tiempo de la
dosis. El símbolo (P) aparecerá en la pantalla.
Presione los botones (E) + (F) de nuevo el tiempo suficiente para desbloquear.
45
Page 66

ES
5.2 MENÚ PRINCIPAL
Para acceder al menú principal, pulse (O) en la pantalla de inicio.
5.2.1 CONTADOSIS TOTAL
Esta pantalla permite ver el contadosis total (no reseteable) de cada dosis dispensable.
Página anterior
CONTADOR DOSIS
Página siguiente
Salida menú
Acceso al menu técnico
5.2.2 INFORMACIÓN DE LA MÁQUINA
Esta pantalla permite visualizar la información de la máquina relativa al modelo y a la
versión del firmware, información necesaria para cualquier tipo de intervención técnica.
Modello:
Model:
X.XX
X.XX
Firmware:
Firmware:
X.XX
X.XX
Página anterior
Página siguiente
Salida menú
Acceso al menu técnico
46
Page 67

ES
5.3 MENÚ TÉCNICO
Para acceder al menú técnico, pulse en la pantalla del menú principal.
5.3.1 REINICIAR CONTADOSIS PARCIALES
Esta pantalla permite reiniciar los contadosis parciales para cada dosis dispensable,
visibles en la pantalla inicial. Mantenga presionada la tecla RESET para reiniciar los
contadores.
CONTADOR
DOSIS PARCIAL
Página anterior
Página siguiente
Salida menú
5.3.2 BRILLO DE LA PANTALLA
Esta pantalla le permite ajustar el brillo de la pantalla de 0 a 10 utilizando las teclas
.
BRILLO
Página anterior
Página siguiente
Salida menú
5.3.3 COLOR FONDO PANTALLA
Esta pantalla le permite ajustar el color del fondo de la pantalla utilizando las teclas
.
Azul
Rojo
COLOR
DE PANTALLA
Página anterior
ROJO
Verde
Amarillo
Página siguiente
Salida menú
47
Page 68

ES
5.3.4 MODO DE SELECCIÓN DE DOSIS
Esta pantalla le permite configurar el modo de selección de dosis.
• ON: Por cada molienda es necesario seleccionar la dosis.
• OFF: La última dosis molida queda seleccionada.
¿SELECCIONAR
SELECT DOSE
LA DOSIS CADA VEZ?
EVERY TIME?
Página anterior
Página siguiente
Salida menú
5.3.5 MANTENIMIENTO FRESAS
Esta pantalla le permite reiniciar el contador de cambio de las fresas, además de activar
o desactivar la alarma de cambio de las fresas. El botón RESET, si presionado por
algunos segundos, reiniciará el contador cambio fresas (invisible en la pantalla).
MANTENIMIENTO
MUELAS
Página anterior
CONFIGURA
Página siguiente
Salida menú
Pulsando la tecla ON, se accede al menú para la configuración del tamaño y tipo de
muelas.
AVISO DE MANTENIMIENTO
DIMENSIÓN MUELAS
MATERIAL MUELA
Salida menú
48
Vuelve
Page 69

ES
5.3.6 RESTABLECIMIENTO CONFIGURACIÓN DE FÁBRICA
Esta pantalla le permite restablecer la configuración del molino a la configuración del
fabricante.
Mantener pulsada la tecla RESET para restablecer la configuración de fábrica.
FACTO RY
RESTABLECER
DATA RESET
DATOS DE FÁBRICA
RESET
RESET
Página anterior
Página siguiente
Salida menú
6 LIMPIEZA Y MANTENIMIENTO
ATENCIÓN
Desconecte el aparato de la fuente de alimentación antes de realizar cualquier
operación de limpieza y mantenimiento. No tire el cable de alimentación o del
propio aparato para desenchufarlo de la toma de corriente.
ATENCIÓN
Las operaciones de mantenimiento y limpieza deben ser realizadas por personal
especializado y autorizado por el fabricante.
ATENCIÓN
No haga reparaciones improvisadas o precarias, ni use repuestos no originales.
6.1 LIMPIEZA
La limpieza es un aspecto fundamental para el buen funcionamiento del molino de
café. Un molino descuidado puede tener un impacto negativo en la molienda y en su
precisión. Antes de limpiar, asegúrese de que la máquina esté desconectada.
6.2 LIMPIAR LA TOLVA
Después de sacar la tolva de la máquina, lave el interior de la tolva con agua y
jabón neutro quitando la capa aceitosa que dejan los granos de café. Enjuágala y
sécala bien. Repita el proceso para la tapa de plástico. No la laves en el lavavajillas.
Recomendamos limpiar al menos una vez a la semana.
49
Page 70

ES
6.3 LIMPIEZA DEL SISTEMA DE MOLIENDA
Después de quitar la tapa, abre el portamuelas superior. Luego limpia las muelas y
otras partes internas con un cepillo o paño seco. Si es necesario, utilice una aspiradora
o un chorro de aire comprimido. Después de reposicionar el portamuelas superior
y la tapa, inserte la tolva. Utiliza las pastillas de limpieza de los molinillos de café
disponibles en el mercado para una higiene completa.
ATENCIÓN
Todas las operaciones de limpieza y desinfección deben realizarse con productos
aprobados para uso alimentario.
6.4 MANTENIMIENTO
Para asegurar el correcto funcionamiento de la máquina, compruebe y, si es necesario,
sustituya las muelas cada 250 kg de café. Para mantener las muelas, desconecte la
máquina de la red eléctrica y retire la tolva. Luego desatornille el tornillo de la tapa
y los tornillos de abajo que aseguran el portamuelas superior. Utilice un cepillo o un
paño seco para limpiar las muelas, si es necesario una aspiradora o un chorro de aire
comprimido.
ATENCIÓN
El mantenimiento sol debe ser realizado por personal especializado y autorizado
por el fabricante.
ATENCIÓN
No realice reparaciones improvisadas o precarias, y mucho menos utilice piezas
de repuesto no originales.
50
Page 71

ES
7 BÚSQUEDA DE AVERÍAS
CONDICIONES DEL MOLINO CAUSA POSIBLE REMEDIO
Al presionar el botón (4) la pantalla
no se enciende
Tolva (2) no insertada correctamente o no insertada.
Comprobar la posición de la tolva
(2) e insertarla correctamente.
Póngase en contacto con un
técnico cualicado para la
sustitución de las muelas.
Después de la sustitución, reinicie
el contador en la pantalla de
mantenimiento de las muelas,
eligiendo el tamaño y el tipo de
muelas instaladas.
¡ATENCIÓN!
MANTENIMIENTO MUELAS
Aviso de sustitución de las muelas.
El funcionamiento del molinillo no
está comprometido, pero el
resultado puede no ser optimal.
Este mensaje se visualiza durante
algunos segundos cada vez que se
enciende la máquina, mientras
que la luz de emergencia
permanece encendida
durante el funcionamiento.
Si el problema persiste, póngase en contacto con personal cualificado.
51
Page 72

11-2020
ME040-5-5A-A0-R00
CONTI VALERIO S.R.L.
Via Luigi Longo 39/41 - 50019 Sesto Fiorentino (FI) - ITALY
 Loading...