

Page 1
O
O
W
W
N
N
E
E
R
R’’
S
S
G
G
5890 Series
U
UII
D
D
E
E
GGuuííaa ddeell PPrrooppiieettaarriio
a
V
a
k
e
r
u
E
w
e
n
r
u
o
y
g
n
T
h
a
¡
n
G
k
r
a
y
c
o
a
i
u
s
f
p
o
o
i
s
a
h
c
r
u
p
r
c
a
l
r
o
m
p
a
r
u
s
e
d
Eureka Customer Service
Ilame al Servico al Cliente de Eureka
a
v
e
u
n
Before Returning, Call
Antes de enviar de regreso,
HELPLINE
r
i
p
s
a
LÍNEA DE AYUDA
a
d
o
a
r
E
c
u
u
o
u
m
e
k
r
a
1-800-282-2886
8 a.m. to 7:30 p.m. (CST), Monday - Friday
10 a.m. to 6:30 p.m. (CST), Saturday - Sunday
8 a.m. a 7:30 p.m. (CST), de lunes a viernes
10 a.m. a 6:30 p.m. (CST), sábado y domingo
!
!
Upright Vacuum Cleaner
Household Type
Aspiradora vertical
tipo doméstico
Promotional code: Code eurekaad1
Special Offer – receive 15% off parts and accessories
when ordering online. Promotion excludes vacuums.
Oferta especial – descuento de 15% cuando
compre partes y accesorios por internet. Oferta
excluye aspiradoras.
www.eureka.com
©
2010 Electrolux Home Care Products, Inc. Printed in China PN77101A_rev1
Page 2
!
Where to Find Important Vacuum Information
Keep this information
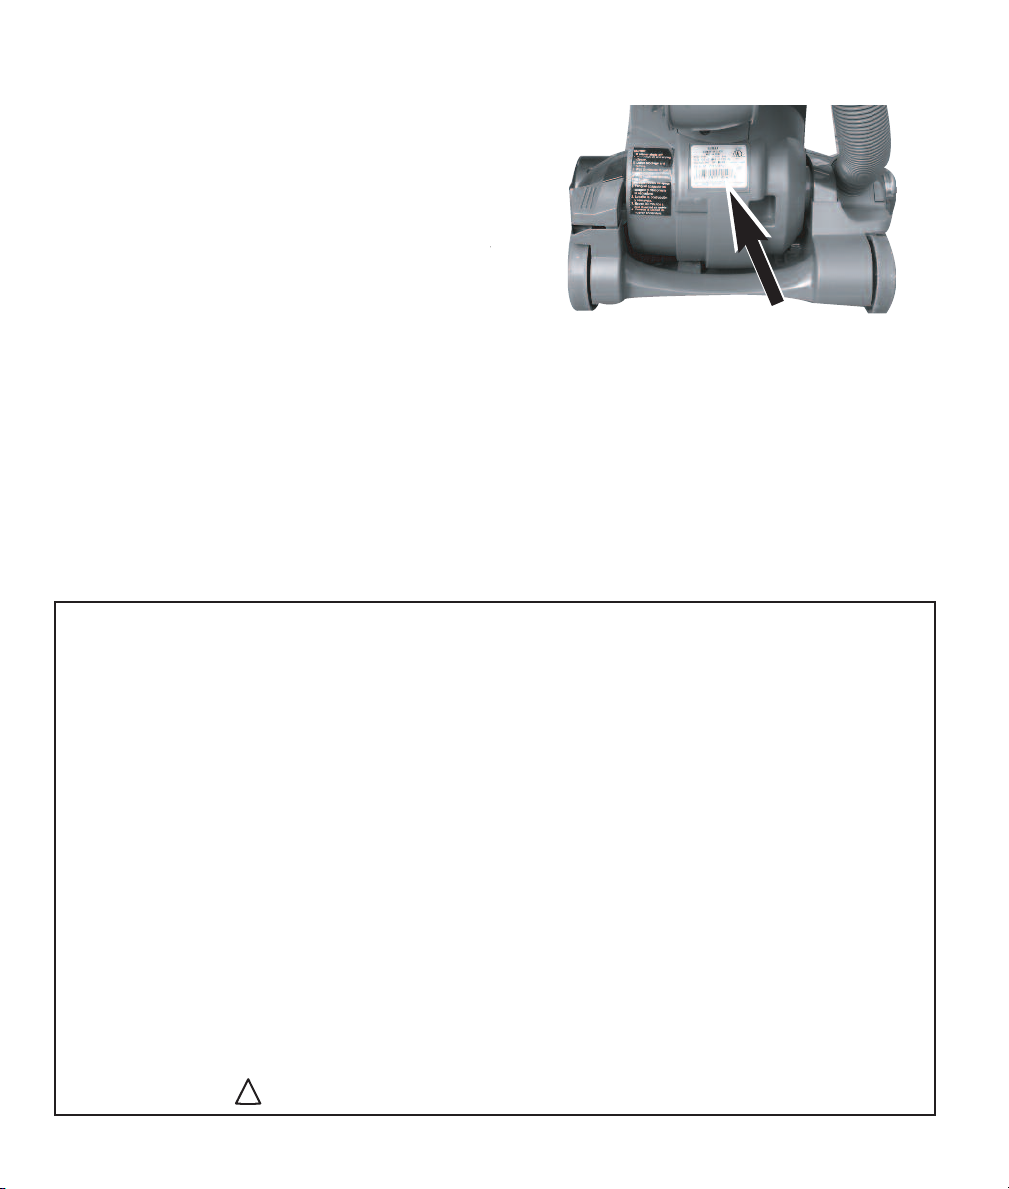
Write the model, type and serial number here:
Date of purchase (keep your receipt) _______________
Model number and type _________________________
Serial number _________________________________
Find these numbers on a label on the lower back side
of the vacuum cleaner. Refer to these numbers when
ordering parts and accessories or if service is needed.
Before You Start Your Vacuum Cleaner
Refer to Quick Start Guide for assembly and use.This Owner’s Guide provides
important instructions to prolong the life of your Eureka vacuum cleaner.
Inspection
Carefully unpack and inspect your new Eureka vacuum cleaner for shipping damage. Each unit is tested and
thoroughly inspected before shipping. For instructions regarding any shipping damage, call Eureka
Customer Service HELPLINE 1-800-282-2886 immediately.
Table of Contents
Important Safeguards
How to Identify Parts of Vacuum Cleaner
Maintenance Schedule . . . . . . . . . . . . . . . . . . . . . . . . . . . . . . . . . . . . . . . . . . . . . . . . . . . . . . . . . . . . . . . . . .2
Dust cup, foam filter, and HEPA filter
How to Use Accessories . . . . . . . . . . . . . . . . . . . . . . . . . . . . . . . . . . . . . . . . . . . . . . . . . . . . . . . . . . . . . . . .3
Telescopic self-cleaning duster, crevice tool, extension wand, dusting brush, turbo nozzle and stair hose
How to Maintain Your Vacuum Cleaner . . . . . . . . . . . . . . . . . . . . . . . . . . . . . . . . . . . . . . . . . . . . . . . . . .4-5
How to replace brush roll, brush roll reset button, how to change light bulb, and
how to clear a blockage.
Eureka Limited Warranty Information . . . . . . . . . . . . . . . . . . . . . . . . . . . . . . . . . . . . . . . . . . . . . . . . . . . . .6
Thermal Cut-Off and Problem Solving . . . . . . . . . . . . . . . . . . . . . . . . . . . . . . . . . . . . . . . . . . . . . . . . . . . .7
Spanish Owner’s Guide . . . . . . . . . . . . . . . . . . . . . . . . . . . . . . . . . . . . . . . . . . . . . . . . . . . . . . . . . . . . . .8-15
Order Forms and Parts List . . . . . . . . . . . . . . . . . . . . . . . . . . . . . . . . . . . . . . . . . . . . . . . . . . . . . . . . . . .16-17
Eureka Customer Service HELPLINE 1-800-282-2886
. . . . . . . . . . . . . . . . . . . . . . . . . . . . . . . . . . . . . . . . . . . . . . . . . . . . . . . . . . . . . . . . . .1
. . . . . . . . . . . . . . . . . . . . . . . . . . . . . . . . . . . . . . . . . .
Follow caution information wherever you see this symbol.
www.eureka.com
2
Page 3

!
IMPORTANT SAFEGUARDS
When using an electrical appliance, basic precautions should always be followed, including the following:
READ ALL INSTRUCTIONS BEFORE USING THIS VACUUM CLEANER
WARNING
To reduce the risk of fire, electric shock, or injury:
• Do not use outdoors or on wet surfaces.
• Do not leave vacuum cleaner when plugged in. Turn off the switch and unplug the
electrical cord when not in use and before servicing.
• Do not allow to be used as a toy. Close attention is necessary when used by or near children.
• Use only as described in this manual. Use only manufacturer's recommended attachments.
• Do not use with damaged cord or plug. If vacuum cleaner is not working as it should, has been
dropped, damaged, left outdoors, or dropped into water, return it to a service center before using.
• Do not pull or carry by cord. Do not use cord as a handle. Do not close a door on cord or pull cord
around sharp edges or corners. Do not run vacuum cleaner over cord. Keep cord away from
heated surfaces.
• Do not use extension cords or outlets with inadequate current carrying capacity.
• Turn off all controls before unplugging.
• Do not unplug by pulling on cord. To unplug, grasp the plug, not the cord.
• Do not handle plug or vacuum cleaner with wet hands.
• Do not put any object into openings. Do not use with any opening blocked; keep free of dust, lint,
hair, and anything that may reduce airflow.
• This vacuum cleaner creates suction and contains a revolving brush roll. Keep hair, loose
clothing, fingers, and all parts of body away from openings and moving parts.
• Do not place vacuum cleaner on furniture or stairs as the brush roll may cause damage. Use
extra care when cleaning on stairs. Place vacuum cleaner on floor with the handle in storage
position while using attachments.
• Do not pick up anything that is burning or smoking, such as cigarettes, matches, or hot ashes.
• Do not use without dust cup, filter screen, foam filter and HEPA exhaust filter in place.
• Belt pulleys can become hot during normal use. To prevent burns, avoid touching the belt pulley
when servicing the drive belt.
• Do not use to pick up flammable or combustible liquids such as gasoline, or use in areas where
they may be present.
• Store your vacuum cleaner indoors in a cool, dry area.
• Keep your work area well lighted.
• Unplug electrical appliances before vacuuming them.
• Unplug before connecting turbo nozzle.
ENGLISH
SAVE THESE INSTRUCTIONS
To reduce the risk of electric shock, this appliance has a polarized plug (one blade is wider
than the other). This plug will fit in a polarized outlet only one way. If the plug does not fit fully
into the outlet, reverse the plug. If it still does not fit, contact a qualified electrician to install the
proper outlet. Do not change the plug in any way.
Motor
Do Not Oil the motor or the brush roll at any time. The bearings are permanently lubricated
and sealed.
Eureka Customer Service HELPLINE 1-800-282-2886
www.eureka.com 1
Page 4
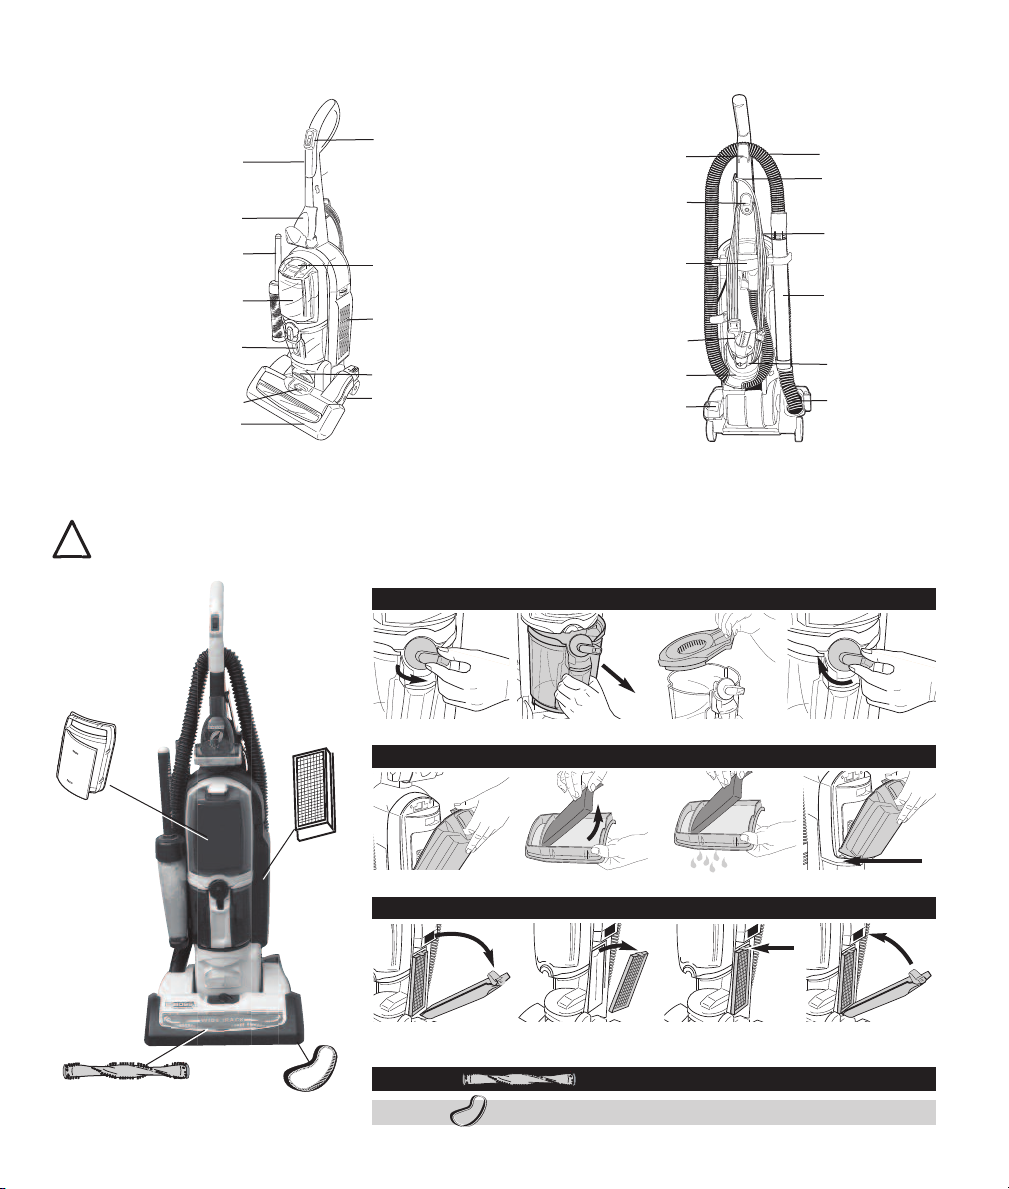
How to Identify Parts of Vacuum Cleaner
!
Handle
Turbo Nozzle
Self-Cleaning Duster
& Chamber
Foam Filter
& Filter Frame
Dust Cup & Latch
Height Adjustment Knob
Brush Roll Cover
Power Switch
(I ) Bare Floor
(II) Carpet
(O) Off
Filter Latch
HEPA Filter
Compartment
Headlight
Brush Roll
Reset Button
Hose Hook
Quick Release
Cord Wrap
Carrying Handle
Dusting Brush
Hose Sleeve
Handle Release
Hose
Cord Retainer
Power Cord
Nested Crevice
Tool &
Extension Wand
Bottom
Cord Wrap
Base Hose
Maintenance Schedule
Maintenance Schedule is also located on back side of dust cup.
READ ALL INSTRUCTIONS BEFORE USING THIS VACUUM CLEANER. Moving parts! Make sure power switch is in OFF (O) position before plugging in power cord.
DUST CUP – Empty after each use
FOAM FILTER ASSEMBLY DCF-15
Foam Filter
Assembly
DCF-15
Brush Roll
2
Eureka Customer Service HELPLINE 1-800-282-2886
HEPA
Filter
Cartridge
HF5
Cogged Belt
PULL UP FILTER LATCH
PUSH LATCH DOWN
TO REMOVE DOOR
PULL CUP FORWARDROTATE LATCH UP
REMOVE LID & EMPTY
Clean or replace regularly, to maintain suction
–
WASH & DRY THOROUGHLY LINE UP TABS & LOCKREMOVE FILTER & FRAME
REPLACE CUP & LOCK LATCH
HEPA FILTER HF5 – Replace within 6 months
& REMOVE CARTRIDGE
PLACE NEW CARTRIDGE
& PRESS FIRMLY TO LATCH
LINE UP DOOR
BRUSH ROLL – Clean monthly
COGGED BELT – Replace a worn or broken belt
www.eureka.com
& LOCKPUSH HEPA LATCH DOWN
Page 5
!
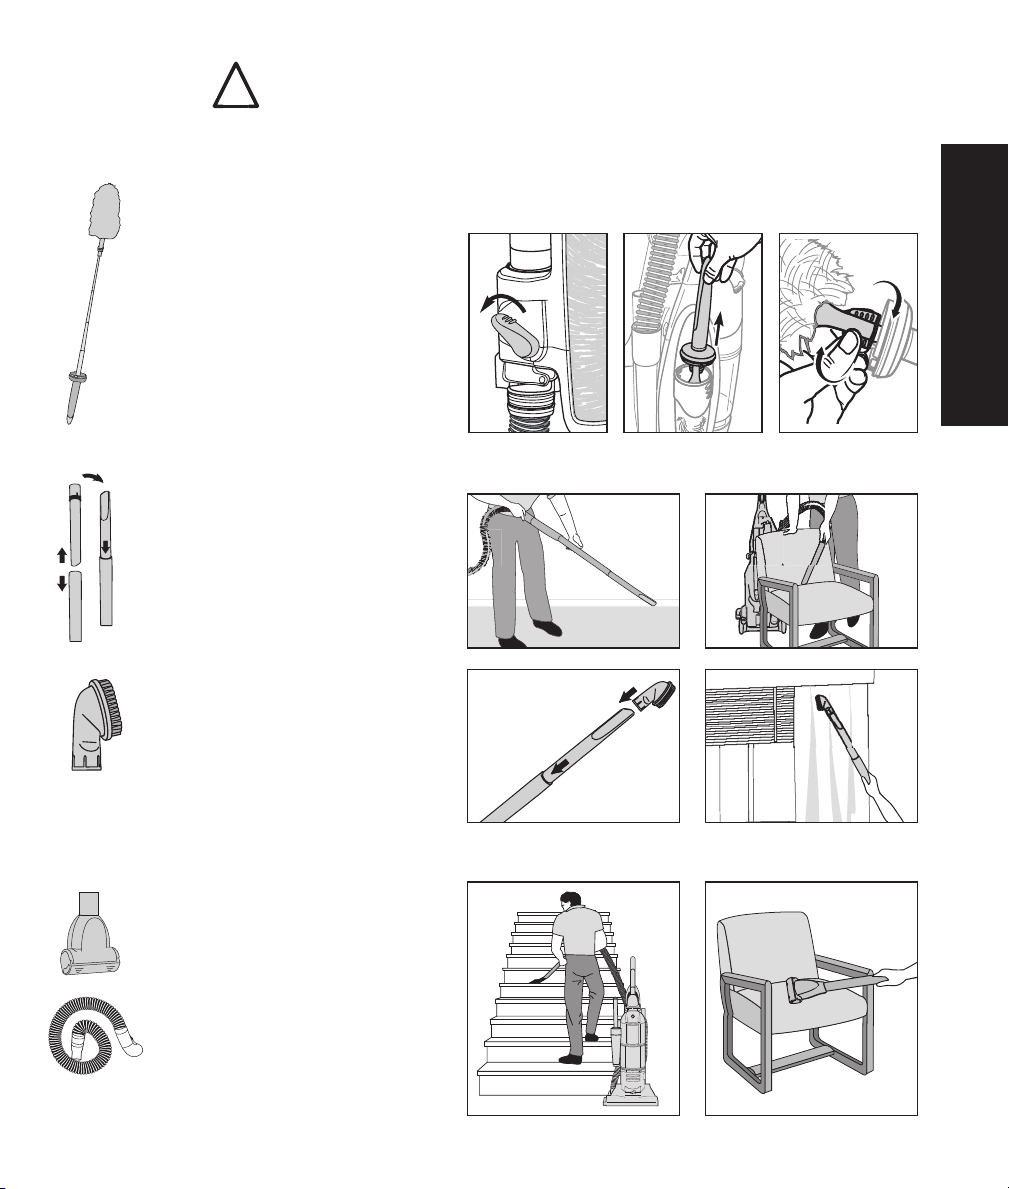
How to Use Accessories
Handle must be in upright position.
Raise height adjustment to ‘high carpet’ before using accessories.
Replace hose end into hose retainer after using accessories.
Telescopic Self-Cleaning Duster
Use for furniture, blinds, pictures and high-reach areas. Can be used in short or extended positions.
1) Activate static charge: Push power
switch ( I ) on and push lever down
for 10 seconds to clean or charge duster.
2) Turn vacuum off and remove duster
from cleaning chamber.
3) Short position: Dust low surfaces.
4) Extended position: Turn twist tabs
to extend. Push firmly to collapse
and turn to lock.
Crevice Tool and Extension Wand
Use for baseboards and corners.
Grasp crevice tool and wand near ridges
and pull apart. Push crevice tool into
wand and place on end of hose.
Dusting Brush
Use for furniture, drapes and vents.
Place dusting brush on end of hose,
wand or crevice tool.
(on some models)
ENGLISH
Turbo Nozzle and Stair Hose
(with some models or available for purchase)
Use for furniture and stairs.
Make sure vacuum is below you,
pushed against the bottom step.
1) If model has additional stair hose,
attach to end of hose.
2) Attach turbo nozzle to the end
of wand and hose.
Eureka Customer Service HELPLINE 1-800-282-2886
www.eureka.com
33
Page 6
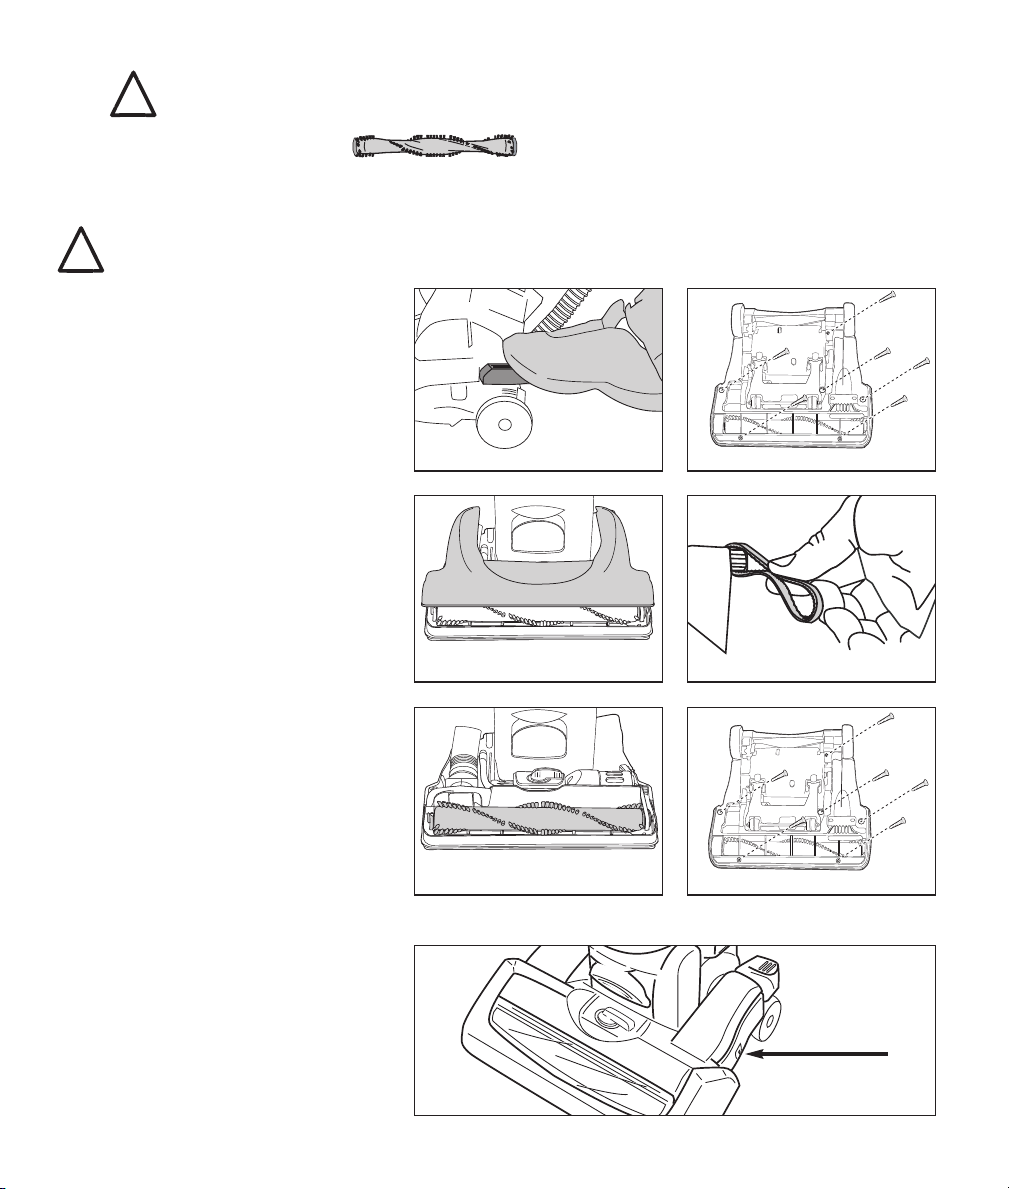
How to Maintain Your Vacuum Cleaner
!
!
Make sure vacuum cleaner is turned off and power cord is unplugged
Maintain Brush Roll
Motor can become hot with normal use.
Do not remove end caps. Remove hair and threads from brush roll periodically.
Check Cogged Belt. Replace if worn or broken
Avoid touching the motor shaft when checking brush roll or belt.
How to replace brush roll or belt
1) Adjust carpet height setting to the
lowest or highest position.
2) Press handle release twice to lower
handle flat onto floor (Fig. 1).
3) Turn vacuum over.
4) Remove 6 screws from the backside
of cover (Fig. 2). One screw is
located under the wheel carriage.
5) Turn vacuum back over to front side
and lift off brush roll cover (Fig. 3).
6) Lift left end of brush roll first.
Remove old brush roll and belt.
7) Thread belt around motor shaft
(Fig. 4). Place belt around the
pulley of new brush roll.
Fig. 1
Fig. 3
Fig. 2
Fig. 4
8) Align brush roll left end cap with
base and push into place. Push right
end cap into base until it snaps into
place (Fig. 5).
9) Rotate brush roll 2 turns to position
belt properly.
10) Replace brush roll cover (Fig.3).
11) Turn vacuum over and replace 6
screws (Fig. 6).
Fig. 5
Fig. 6
Brush Roll Reset Button
1) Clear interference that caused
brush roll to stall.
2) Press reset button on the side of
vacuum below brush roll cover
(Fig. 7).
Fig. 7
4
Eureka Customer Service HELPLINE 1-800-282-2886
www.eureka.com
Page 7
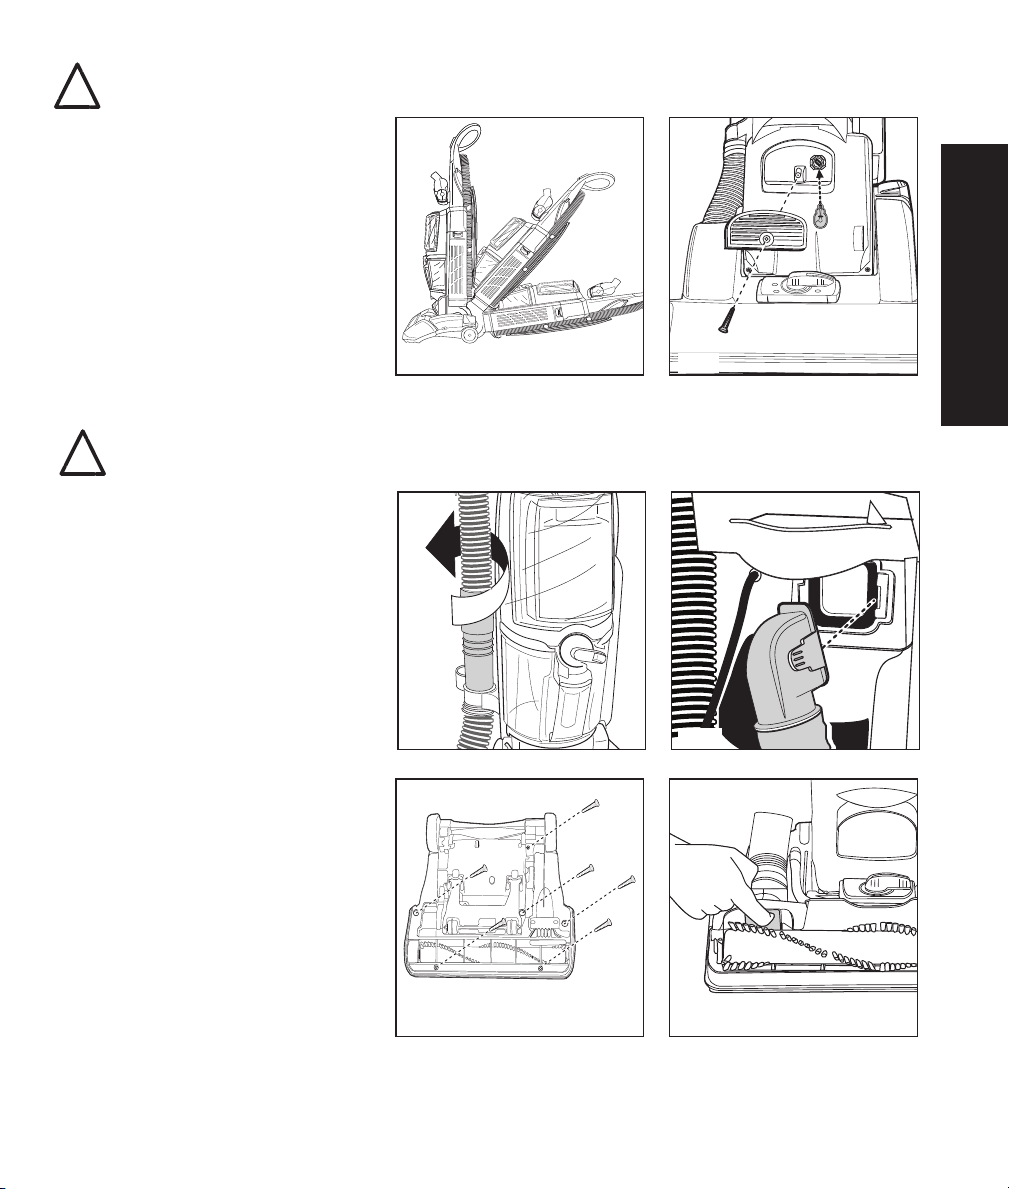
Change Light Bulb
!
!
Make sure vacuum is turned off and power cord is unplugged.
1) Lower handle to floor (Fig.1).
2) Unscrew the lens and remove old
bulb. Replace with bulb rated 12 v.,
10 w., Type 904.
3) Push in new bulb, replace lens
cover and replace screw (Fig. 2).
ENGLISH
Fig. 1
How to Clear a Blockage
Make sure vacuum is turned off and power cord is unplugged.
Hose
1) Remove hose end from duster
chamber (Fig. 3). Flex the hose
to help loosen any blockage.
Hose Connector
1) Unclip sides and clear blockage
in opening and hose (Fig. 4).
2) Clip back into place and
reconnect hose at both ends.
Fig. 3
Base Hose
1) Remove 6 screws and brush roll
cover (Fig 5).
2) Clear blockage from base hose
(Fig. 6). Check for debris in brush
roll and clean if needed.
3) Replace 6 screws and
brush roll cover.
Fig. 2
Fig. 4
Fig. 5
Eureka Customer Service HELPLINE 1-800-282-2886
Fig. 6
www.eureka.com
5
Page 8

The Eureka Limited Warranty
Eureka warrants this vacuum cleaner to be free from
defects in material and workmanship for a term of two
years for normal household use. Warranty is granted
only to the original purchaser and members of
immediate household.
This warranty is good for two years from the date of
purchase only when the vacuum cleaner is used in
the accordance with Eureka operating instructions.
Note: refurbished or remanufactured products
have a one year limited warranty.
TThhiiss WWaarrrraannttyy DDooeess NNoott CCoovveer
r
• Parts of the vacuum that require replacement
under normal use such as disposable dust bags,
filters, drive belts, light bulbs, brush roll, bristles,
impellers and cleaning.
• Damages or malfunctions caused by negligence,
abuse, and use not in accordance with the
Owner’s Guide.
• Defects or damages caused by unauthorized
service or the use of other than Genuine Eureka,
ARM & HAMMER
TM
and Filtrete
TM
by 3M parts.
What Eureka Will Do
Eureka will, at its option, repair or replace a defective
vacuum or vacuum part that is covered by this warranty.
As a matter of warranty policy, Eureka will not refund
the consumer’s purchase price.
Warranty Registration
Please fill out and return the warranty registration card
accompanying your vacuum.
Obtaining Warranty Service
To obtain warranty service you must return the vacuum
or vacuum part along with “proof of purchase” to any
Eureka Authorized Warranty Station. For Eureka
Authorized Warranty Station or Service Information, visit
www.eureka.com, write or telephone toll free:
SA: 1-800-282-2886
U
Electrolux Home Care
North America Service Division
P.O. Box 3900
Peoria, IL 61612
exico: (55) 5343-4384
M
Electrolux Home Care
anada: 1-800-282-2886
C
Electrolux Home Care
North America Service Division
5855 Terry Fox Way
Mississauga, Ontario L5V 3E4
Obtaining Warranty Service
Outside Your Community
You must pay the shipping charges to the Eureka
Authorized Warranty Station.
Return Shipping Charges will be paid by the Warranty
Station. When returning parts for repair, please include
the model, type and serial number located on the rating
plate on the lower backside of the vacuum.
Further Limitations and Exclusions
Any warranty that may be implied in connection with
your purchase or use of the vacuum, including any
warranty of Merchantability or any warranty for Fitness
For A Particular Purpose is limited to the duration of this
warranty. Some states do not allow limitations on how
long an implied warranty lasts, so the above limitations
may not apply to you.
Your relief for the breach of this warranty is limited to
the relief expressly provided above. In no event shall
the manufacturer be liable for any consequential or
incidental damages you may incur in connection with
your purchase or use of the vacuum.
Some states do not allow the exclusion or limitation of
incidental or consequential damages, so the above
limitation or exclusion may not apply to you.
This warranty gives you specific legal rights. You may
also have other rights, which may vary by state.
The ARM & HAMMER name is a trademark of Church and Dwight Co., Inc.
3M and Filtrete are trademarks of 3M Company, used by Electrolux Home
Care Products, Inc. under license.
6
Eureka Customer Service HELPLINE 1-800-282-2886
www.eureka.com
Page 9
Thermal Cut-Off
!
This vacuum cleaner has a special thermostat that protects the vacuum in case of motor overheating. If the vacuum
suddenly shuts off, push the power switch to off (O) and unplug the vacuum. Check the vacuum for a possible source of
overheating such as a full dust cup, blocked hose or clogged filter. If these conditions are found, fix them and wait at least
30 minutes before attempting to use the vacuum. After the 30 minute period, plug the vacuum back in and turn on the
switch. If the vacuum still does not work, take it to a Eureka authorized service center for repair or call 1-800-282-2886.
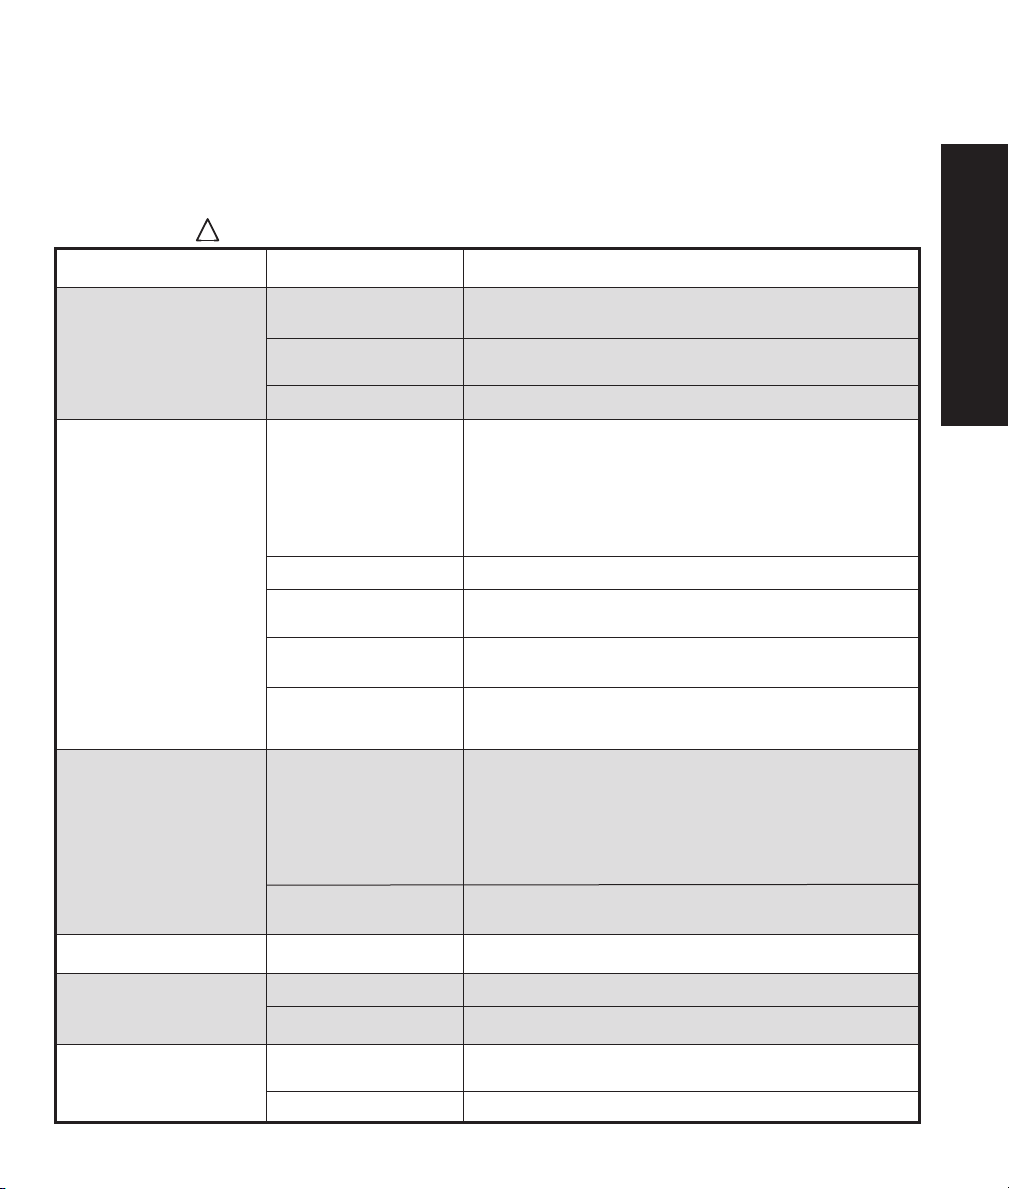
Problem Solving
Make sure vacuum is turned off and power cord is unplugged.
Problem Cause
Solution
ENGLISH
Motor will not start.
Vacuum does not clean
carpet or bare floor.
No suction at the
end of hose.
Power plug
Power switch
Thermal cut-off
Dust cup and filter
Belt
Hose
Switch setting
Carpet height setting
Dust cup and filter
Hose
• Push plug securely into outlet, try another outlet or
check circuit breaker.
• Switch (I) t urns on suction motor, (II) turns on brush roll motor
and (O) turns vacuum off.
• See above.
• Empty dust cup, clean and/or change filter.
• Clean or replace filters regularly to maintain suction. Page 2
• If picking up fine dust, the dust cup may not look full, but a fine
substance tends to reduce suction when it blocks air flow
through the filter and screen. Refer to page 2 for filter
maintenance. Make sure filter, screen and dust cup are installed
properly.
• Replace a worn, cut or out of shape belt. Page 4
• Remove clogs from the hose that restrict the airflow. Make sure
hose is replaced into hose retainer. Page 5
• Set power switch to (I) for bare floor cleaning. Set switch
to (II) for vacuuming carpets.
• For carpet cleaning, turn height adjustment knob to another
position. Make sure switch is set on (II) to ensure brush roll
motor is on.
• Empty dust cup, clean and/or change filter.
• Clean or replace filters regularly to maintain suction. Page 2
• If picking up fine dust, the dust cup may not look full, but a fine
substance tends to reduce suction when it blocks air flow
through the filter and screen. Refer to page 2 for filter
maintenance. Make sure filter, screen and dust cup are installed
properly.
• Remove clogs from the hose that restrict the airflow. Make sure
hose is replaced into hose retainer. Page 5
Turbo nozzle will not turn.
Vacuum is hard
to push.
Burning smell; brush roll
will not turn.
Rotating brush
Vacuum height setting
Belt
Belt
Brush roll reset button
Eureka Customer Service HELPLINE 1-800-282-2886
• Check turbo nozzle for debris.
• Adjust knob to a higher position.
• Replace a worn or broken belt. Page 4
• Check brush roll for debris. Page 4
• Replace worn or broken belt. Page 4
Press reset button on side of vacuum below brush roll cover. Page 4
•
www.eureka.com
7
 Loading...