

Page 1
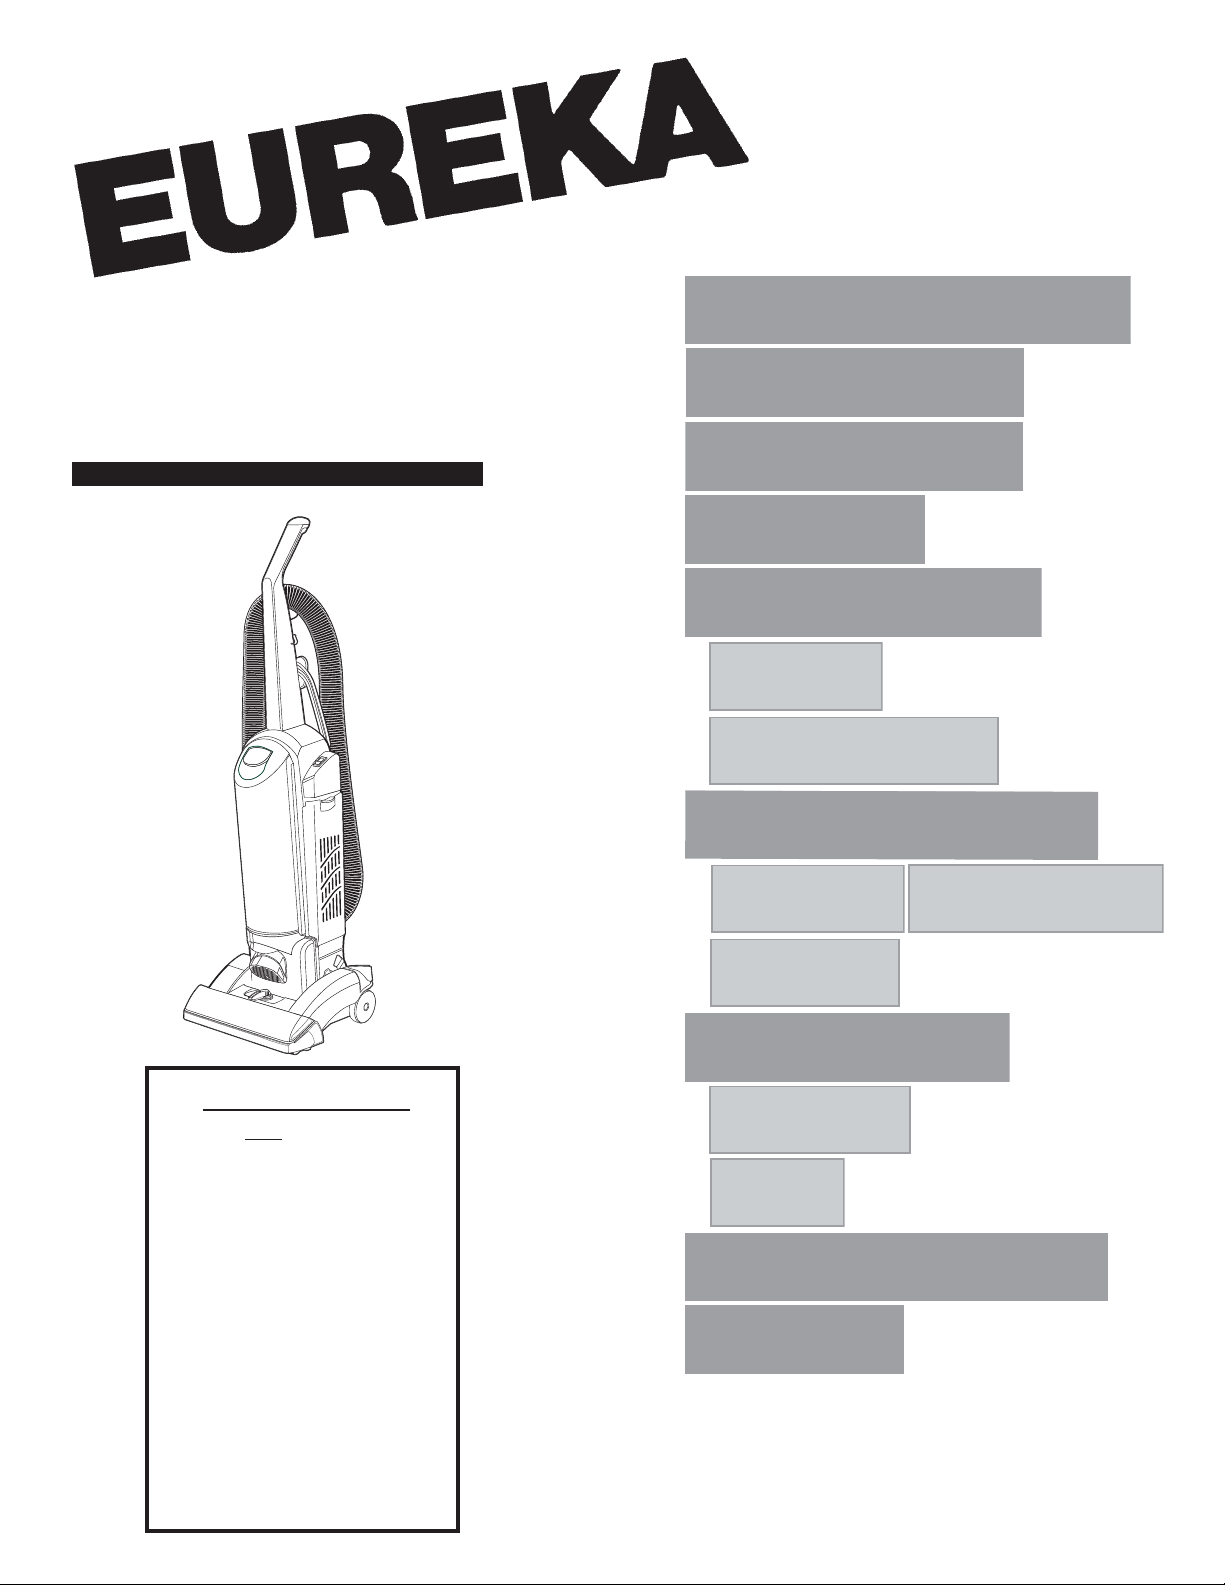
Upright V acuum Cleaner
PERIODIC MAINTENANCE
ROUTINE MAINTENANCE
Owner’s Guide
Household Type
5700 - 5739 Series
2-4
5-6
IMPORTANT INFORMATION
QUICK REFERENCE
5800 - 5829 Series
7-8
9
10
11
12
13
HOW TO ASSEMBLE
HOW TO USE
Dust Bag
Side Door Filters
Brush Roll
Brush Roll Belt
Light Bulb
IMPORTANT
Do not return this
product to the store.
For assembly problems or
questions contact: Eureka’s
Customer Service Division toll
free at 1-800-282-2886*, 7 a.m.
to 8 p.m., Central Standard
Time, Monday through
Saturday.
For replacement of broken
or missing items to be
shipped direct to you, call
1-800-438-7352*, 8 a.m. to
4:45 p.m., Central Standard
Time, Monday through F rida y.
*En Mexico llame al 5670-6169
14
15
17
18
PROBLEM SOLVING
Clear Hose
Guide
CUSTOMER ORDER FORM
WARRANTY
www.eureka.com
Page 2

IMPORTANT INFORMATION
When using an electrical appliance, basic precautions should always be f ollow ed, including the follo wing:
IMPORTANT SAFEGUARDS
READ ALL INSTRUCTIONS BEFORE USING THIS VACUUM CLEANER.
WARNING
To reduce the risk of fire, electric shock, or injury:
• Do not use outdoors or on wet surfaces.
• Do not leave vacuum cleaner when plug ged in. Turn off the switch and unplug the electrical cord when not in
use and before servicing.
• Do not allow to be used as a toy. Close attention is necessary when used by or near children.
• Use only as described in this manual. Use only manuf acturer’s recommended attachments.
• Do not use with damaged cord or plug. If vacuum cleaner is not working as it should, has been dropped,
damaged, left outdoors, or dropped into water , return it to a service center before using.
• Do not pull or carry by cord, use cord as a handle, close a door on cord, or pull cord around sharp edges or corners. Do not
run vacuum cleaner over cord. Keep cord away from heated surfaces.
• Do not use extension cords or outlets with inadequate current carrying capacity.
• Turn off all controls before unplugging.
• Do not unplug by pulling on cord. To unplug, grasp the plug, not the cord.
• Do not handle plug or vacuum cleaner with wet hands.
• Do not put any object into openings. Do not use with any opening bloc ked; keep free of dust, lint, hair, and an ything that may
reduce airflow .
• This vacuum cleaner creates suction and contains a rev olving brush roll. Keep hair , loose clothing, fingers, and all parts of
body away from openings and moving parts.
• Do not place cleaner on furniture or stairs as the brush roll may cause damage. Place cleaner on floor with the handle in
storage position while using attachments.
• Do not pick up anything that is burning or smoking, such as cigarettes, matches , or hot ashes .
• Do not use without the dust bag or filter(s) in place.
• Belt pulleys can become hot during normal use. To prevent burns, avoid touching the belt pulley when servicing the drive
belt.
• Use extra care when cleaning on stairs.
• Do not use to pick up flammable or combustib le liquids such as gasoline , or use in areas where the y may be present.
• Store your cleaner indoors in a cool, dry area.
• Keep your w ork area well lighted.
• Unplug electrical appliances before vacuuming them.
SA VE THESE INSTRUCTIONS
2
Page 3

CONSEILS DE SÉCURITÉ
Lors de l’utilisation d’un appareil électrique, quelques précautions élémentaires doivent être observées, incluant les suivantes:
LISEZ TOUTES LES INSTRUCTIONS AVANT D’UTILISER VOTRE ASPIRATEUR.
CONSEILS DE SÉCURITÉ
AVERTISSEMENT
Pour réduire le risque de feu, de choc électrique, ou de blessure:
• Ne pas utiliser à l’extérieur ou sur des surfaces mouillées.
• Fermez le commutateur et débranchez l’appareil lorsque vous ne l’utilisez pas ou avant le nettoyage ou l’entretien.
• Ne permettez pas qu’il soit utilisé comme jouet. Une attention particulière est nécessaire lorsque utilisé par ou prés d’un enfant.
• Suivez les recommandations d’utilisation de ce manuel. Utilisez uniquement les accessoires recommandés par le fabriquant.
• Ne pas utiliser si le cordon ou la fiche sont endommagés. Si l’aspirateur ne f onctionne pas comme il le devr ait, s’il a été échappé,
s’il est endommagé, s’il a été laissé à l’extérieur ou échappé dans l’eau, retournez-le à un centre de service avant d’utiliser.
• Ne pas le tirer ou le transporter par le cordon, ne pas utiliser le cordon en guise de poignée. Ne pas fermer une porte sur le cordon ou
tirer le cordon sur des coins ou bordures pointus. Ne pas circuler sur le cordon av ec l’aspir ateur. Tenir le cordon à distance des surfaces
chauffantes.
• Ne pas utiliser des rallonges ou des prises qui n’ont pas de capacité suffisante pour transporter le courant.
• Fermer tous les contrôles avant de débrancher.
• Ne pas débrancher en tirant sur le cordon. Pour débrancher, tenez la fiche et non le cordon.
• Ne pas manipuler la fiche ou l’aspirateur avec les mains mouillées.
• Ne pas rien insérer dans les ouvertures. Ne pas utiliser si des ouvertures sont bloquées; assurez-vous qu’elles soient dégagées de
poussière, mousse, cheveux ou toute autre chose qui pourrait réduire le passage de l’air.
• Cet aspirateur crée de la succion et contient un rouleau-brosse tournant. Tenir les par ties mobiles et les ouver tures loin des cheveux,
du linge, des doigts et de toute partie du corps.
• Ne pas mettre l’aspirateur sur les meubles ou sur les escaliers car le rouleau-brosse peut faire des dommages. Placer l’aspirateur sur
le plancher avec le manche en entreposage position temps que les accessoires sont en usage.
• Ne pas ramasser des objets qui brûlent ou fument comme les cigarettes, allumettes ou cendres chaudes.
• N’utilisez pas sans le coupe de poussière de ou filtre(s) en place.
• Les poulies du courroie peuvent dev enir chaudes pendant l’utilisation normale. P our prévenir des brûlures , évitez de touché la poulie du
courroie lorsque vous réparez la courroie.
• Portez une attention particulière lorsque vous nettoyez les escaliers.
• Ne pas utiliser pour ramasser des liquides inflammables ou combustib les comme de l’essence: Ne pas utiliser dans les endroits où ces
liquides pourraient être présents.
• Entreposez votre aspirateur à l’intérieur dans un endroit propre et sec.
• Maintenez un bon éclairage à l’endroit où vous travaillez.
• Débrancher les appareils électrique avant de les balayer.
CONSERVEZ CES INSTRUCTIONS
3
Page 4
T o reduce the risk of electric shock, this appliance has a polarized plug (one b lade wider than the other). This plug
IMPORTANT INFORMATION
will fit in a polarized outlet only one way. If the plug does not fit fully in the outlet, reverse the plug. If it still does not fit,
contact a qualified electrician to install the proper outlet. Do not change the plug in any w a y.
Afin de réduire le risque de choc électrique, cet appareil est muni d’une fiche polarisée (une des lames est plus
large). Cette fiche ne peut être insérée dans une prise polarisée que d’une seule f açon. Si la fiche ne peut être insérée
dans la prise, retourner la fiche. Si la fiche ne peut toujours pas être insérée dans la prise, faire installer une prise
adéquate par un électricien qualifié. Ne pas modifier la fiche.
GENERAL INFORMATION
The cleaner is designed to pick up dirt and dust particles. Av oid pic king up hard or sharp objects with the cleaner to
prevent hose clogs.
Service Information
The instructions in this booklet serve as a guide to routine maintenance. F or additional service information telephone
our toll free number for the nearest Eureka Authorized Warranty Station. You should know the model, type and
serial numbers when you call:
USA: 1-800-282-2886
Mexico: 5670-6169
Canada: 1-800-282-2886
If you prefer, you can write to The Eureka Company, Ser vice Division, 807 North Main Street, Bloomington, Illinois 61701,
USA. In Canada write to The Eureka Company, 866 Langs Drive, Cambridge, Ontario N3H 2N7. Ref er to The Eureka Limited
Warranty f or complete service information.
DO NOT OIL the motor or the brush roll at any time. The bearings are permanently lubricated and sealed.
Rating Plate
The model, type, and serial numbers are indicated on the rating plate
located on the back side of the cleaner. F or prompt and complete service
information, always refer to these numbers when inquiring about service.
Model & Type__________________________
Serial No. _____________________________
Attach your receipt to this owner’s guide and keep.
MODEL TYPE SERIAL NO.
VOLTS AMPS. HERTZ
SERVICE INFORMATION: 1-800-282-2886
THE EUREKA COMPANY
BLOOMINGTON, ILLINOIS 61701
Thermal Cut Off
This vacuum cleaner has a special thermostat that protects the cleaner in case of motor overheating. If the cleaner suddenly
shuts off, push the on/off switch off (0) and unplug the cleaner . Chec k the cleaner for a possible source of ov erheating such as
a full dust bag, a blocked hose or clogged filter. If these conditions are found, fix them and wait at least 30 minutes before
attempting to use the cleaner. After the 30 minute period, plug the cleaner back in and push the on/off switch on (l). If the
cleaner still does not run, then take it to a Eureka Authorized Service Center for repair .
4
Page 5
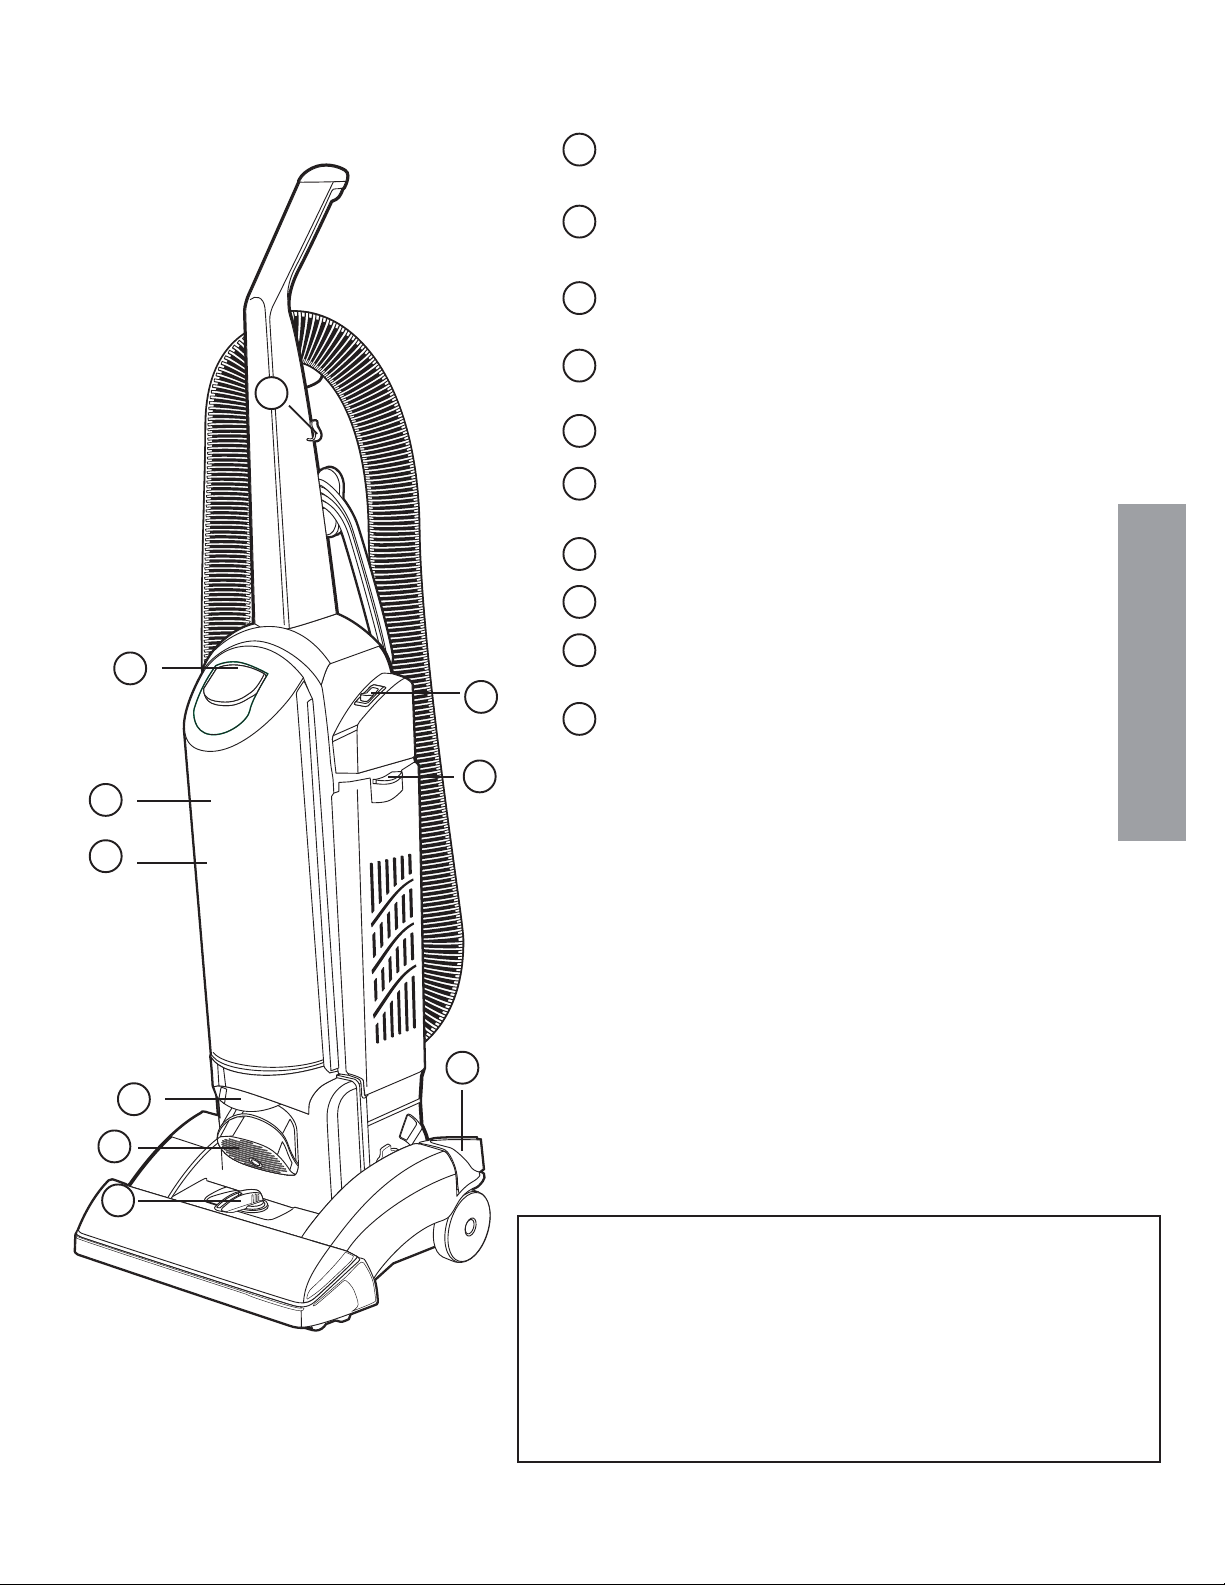
Cord Retainer. To use, push electrical cord down into cord
1
retainer.
ON/OFF Switch. International symbol I means On,
2
International symbol O means Off.
Dust Bag Cover Latch. Pull up on latch to remove bag co ver
3
giving access to the dust bag and motor filter.
Filter Door Latch. Push down on latch and pivot out f or access
4
1
to the filter compartment. Push up on latch to close door.
Dust Bag Cover.
5
Dust Bag. Inside the dust bag compartment. The debris
6
from cleaning is collected in the dust bag.
QUICK REFERENCE
Stair Handle. T o use when cleaning stairs .
7
Headlight.
8
Handle Release. Step on handle release to pull handle
3
2
4
5
9
back to a comfortable operating position.
10
Cleaner Height Setting. An adjustment that raises or
lowers the cleaner base to match the type of floor
surface.
6
WARNING: Avoid injury. Keep loose clothing, hair,
fingers, and all other parts of body awa y from
any moving part (such as the revolving
brush). Turn off the switch and unplug the
cleaner before changing the cleaner height
9
7
8
10
setting.
Helpful Information:
Listen to your cleaner. If you notice a change in the sound of the
motor or a change in performance, it could simply indicate a common
usage or maintenance issue. Such as , a need to raise or lower the
carpet height adjustment, possible blockage in hose or brush roll
area, or a broken or loose brush roll belt. These are all easy to fix
and the instructions are included in this owner’s guide. Becoming
familiar with the information in this guide will help you to get the best
possible performance from your new cleaner f or many years to come .
5
Page 6
11
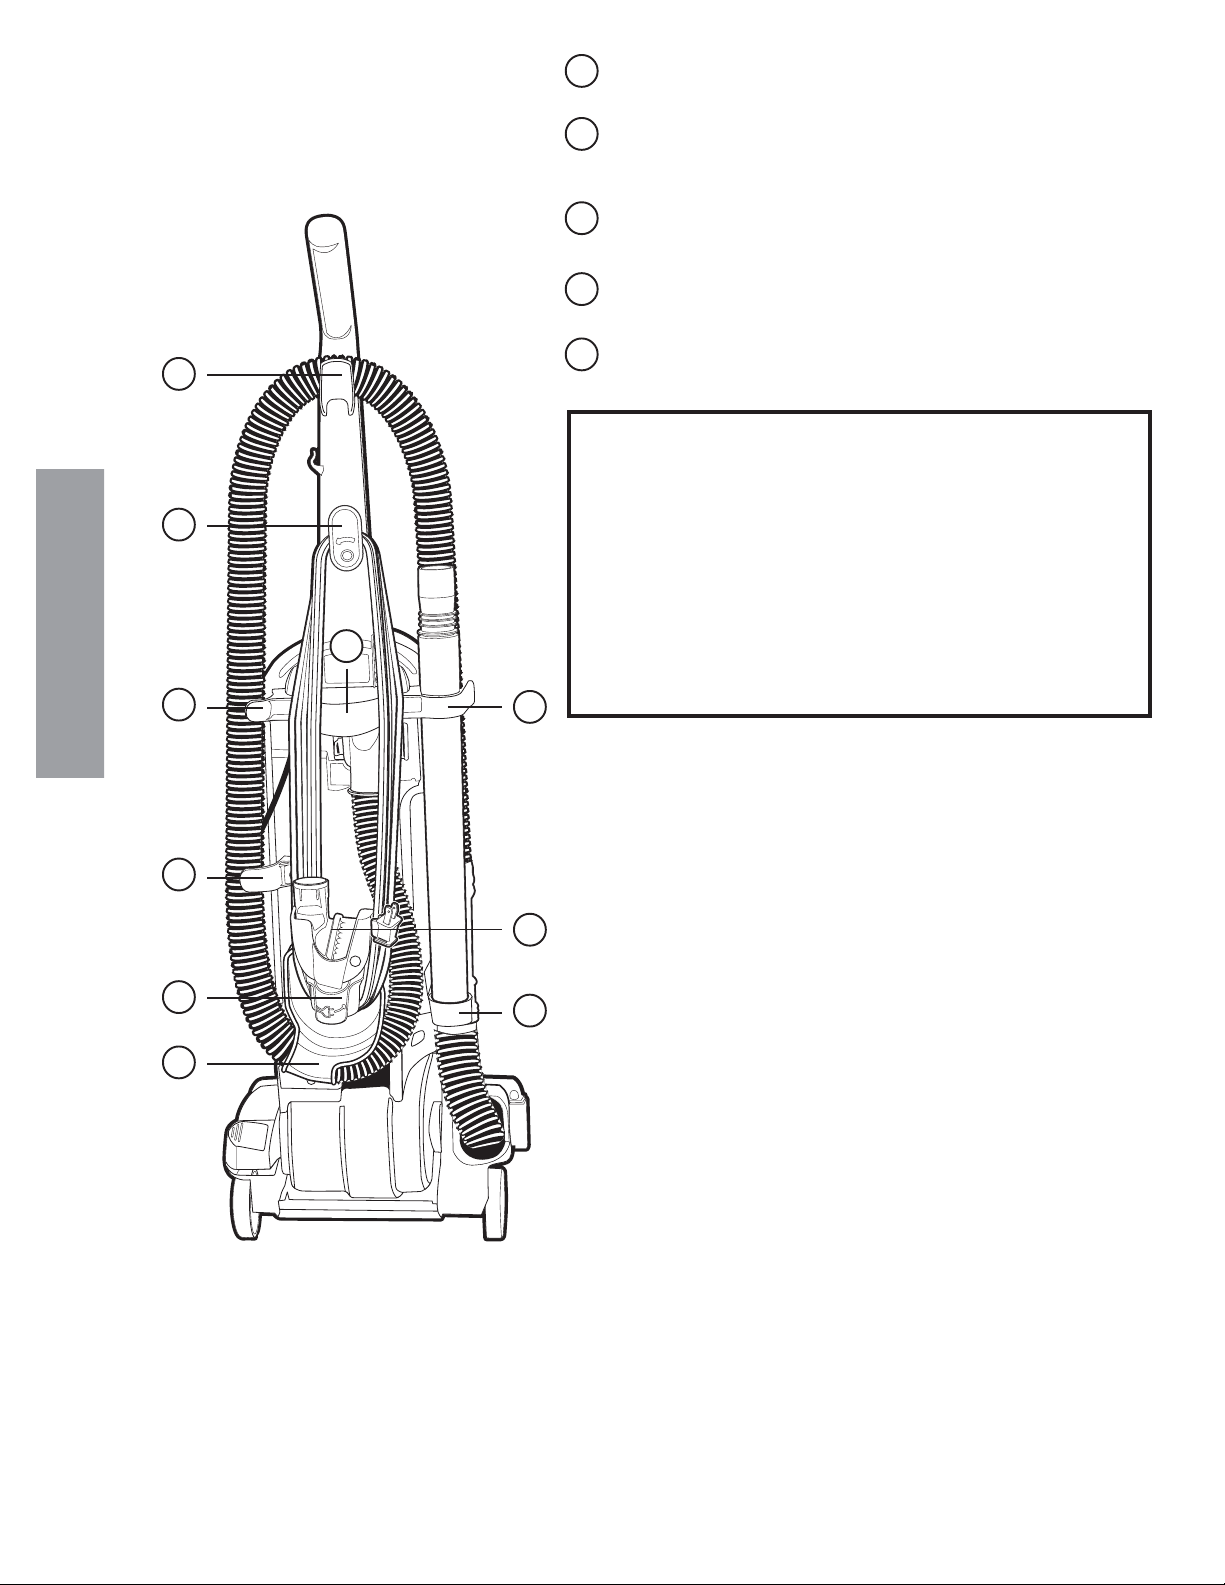
Hose Retainers (4). Place hose in retainers to store hose on
11
unit.
Electrical Cord Hooks (2). Wrap electrical cord around them
12
to store electrical cord on unit. The upper cord hook rotates for
quick cord release.
13
Nested Wand Storage. The crevice wand stores inside the
larger wand.
Carrying Handle. Use this handle to carry unit from one place
14
to another.
Dusting/Upholstery Brush Storage. Store the dusting brush
15
on back of cleaner.
QUICK REFERENCE
12
14
11
11
12
11
13
15
13
NOTE: WHEN UNIT IS RUNNING, DO NOT
ATTEMPT TO REMOVE ANY OBJECT
WHICH PREVENTS THE BRUSH ROLL
FROM TURNING.
First, turn off unit, unplug from the electrical
socket, then remove object from brush roll area.
As example: sock, rug, etc.
Thermal Cut Off
This cleaner has a special thermostat that protects the
cleaner in case of motor overheating. If the cleaner
suddenly turns off, f ollo w this procedure:
1. Push rocker s witch to off (O) position.
2. Unplug cleaner.
3. Check for source of ov erheating prob lem (i.e . full dust bag,
blocked hose , or clogged filter).
4. If a full dust bag, blocked hose or clogged filter is found,
change the dust bag, clear the hose or replace or clean the
filters.
5. Wait at least 30 minutes before attempting to reuse the
cleaner.
6. After 30 minute cool down period, plug the cleaner in and
push the rocker switch to the on (I) position. The cleaner
should turn on.
7. If the cleaner still does not operate, take it to any Eureka
Authorized Service Center for repair. Call 1-800-282-2886
for the nearest Eureka Authorized Service Center to you.
6
Page 7
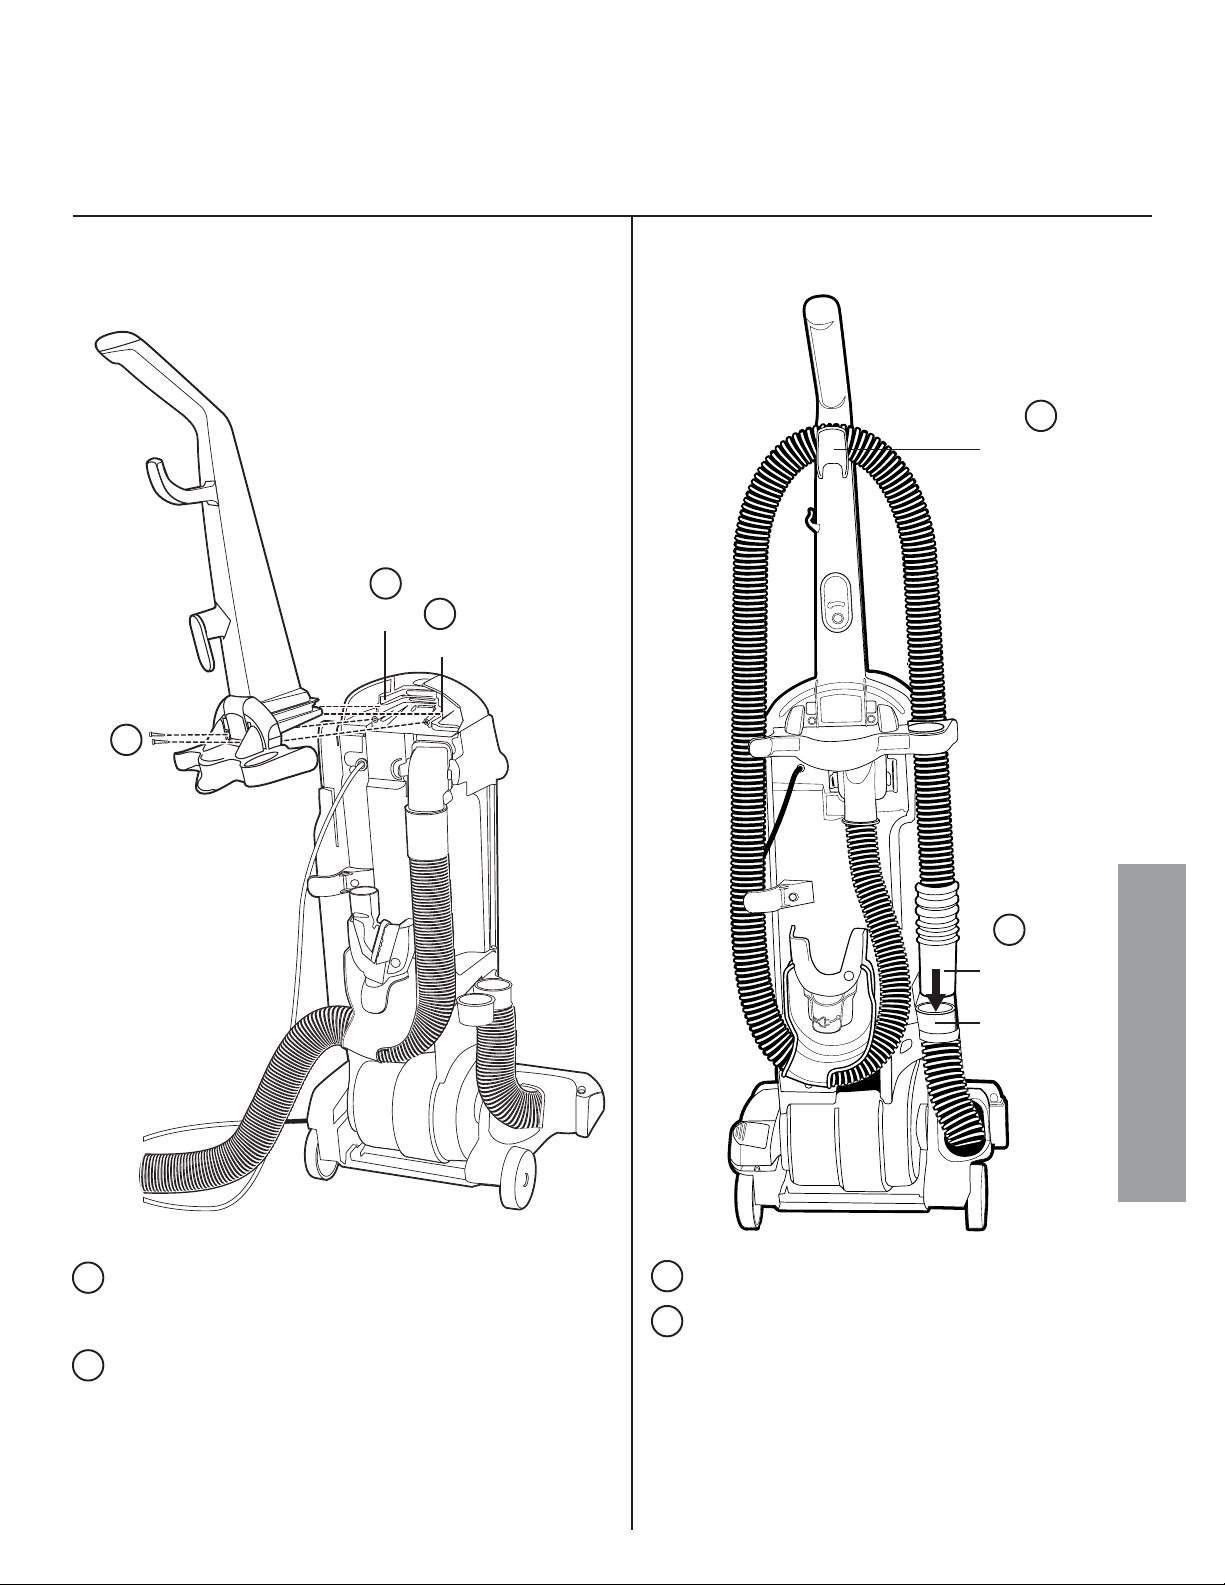
CAUTION: Assemble the cleaner before using.
CAUTION: Moving parts, make sure on/off switch is in off (0) position before plug ging in.
NOTE: Features may vary by model yet all parts assemble the same.
Attach Handle
CAUTION: Do not catch cord under handle.
1
Groove
2
1
Groove
Attach Hose
3
Upper
Hose
Retainer
From rear of cleaner, align handle with groove and
1
slide onto cleaner. If necessary , use thumb and finger
pressure to slide handle into position.
Attach handle with the two screws provided in the
2
assembly packet. Use a Phillips® head screwdriver .
NOTE: Hand tighten with screwdriver to be sure
both screws are firmly seated.
4
Hose
Lower
Hose
Retainer
3
Pick up hose and lay across upper hose retainer.
Push the end of the hose in the lower hose retainer
4
to secure.
HOW TO ASSEMBLE
7
Page 8
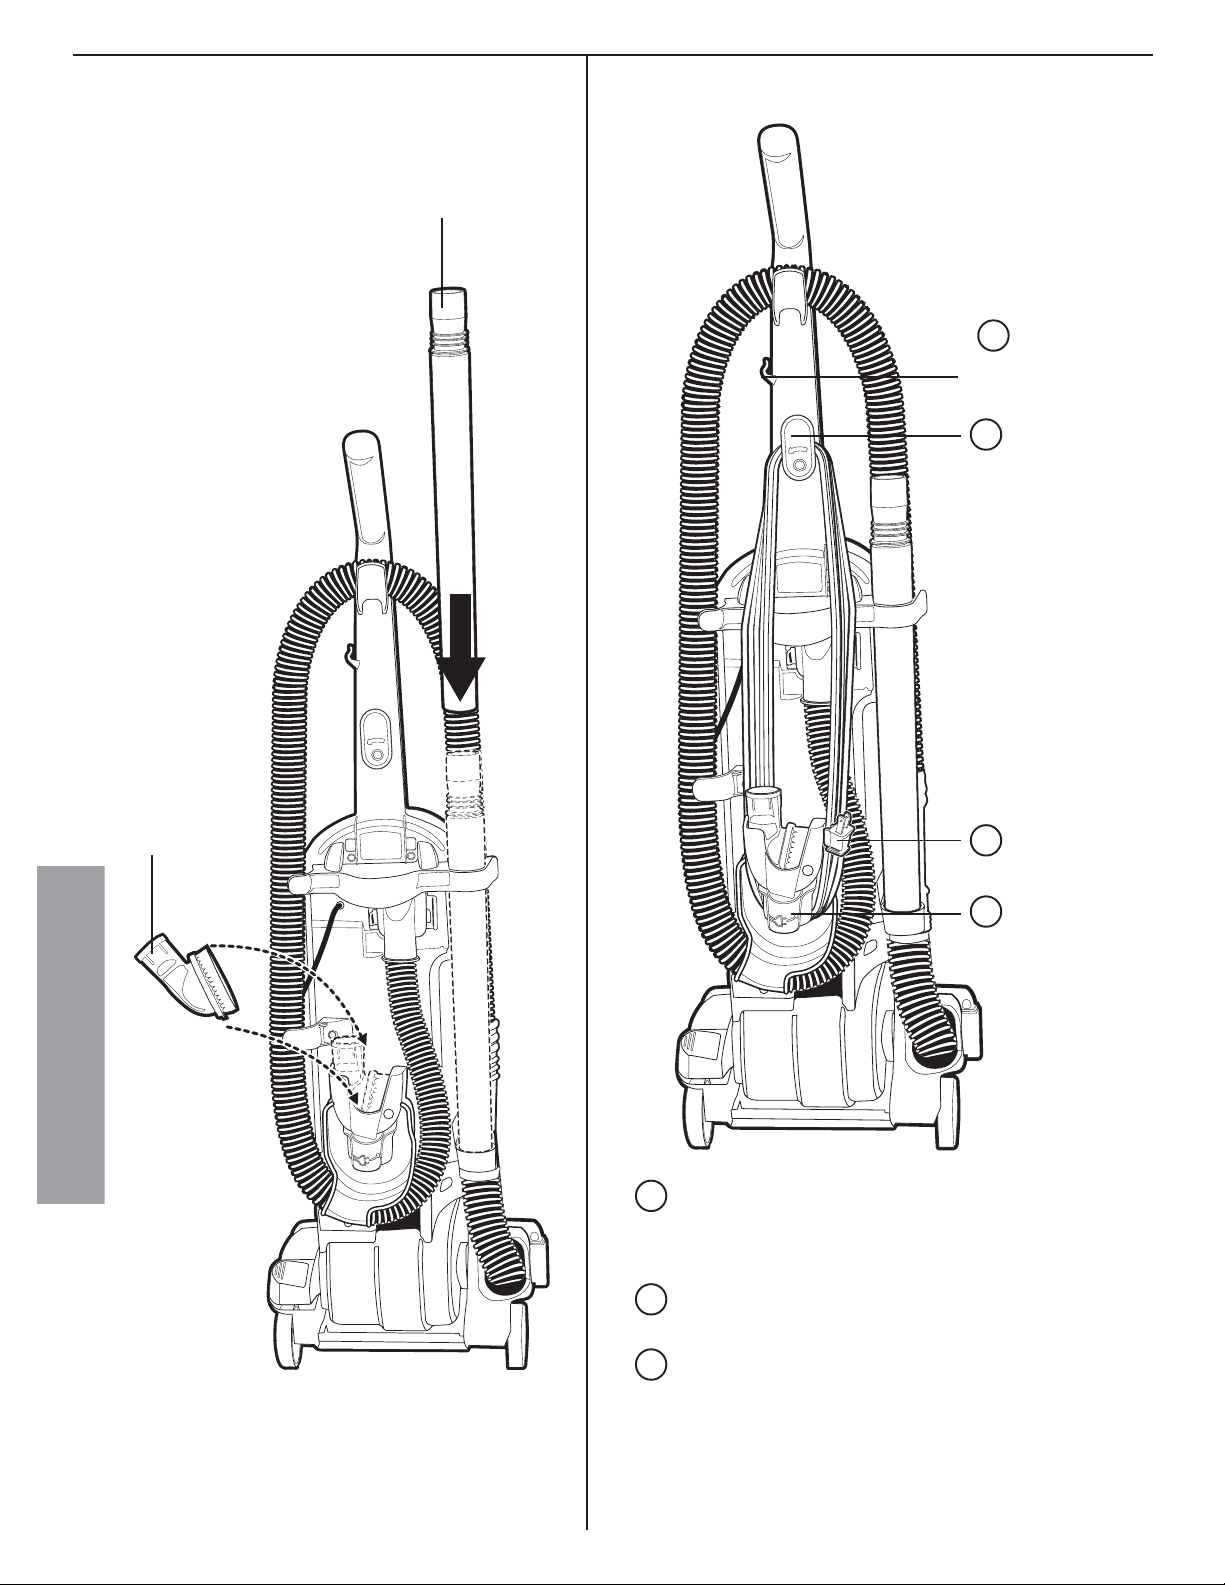
Store Hose and Accessories
Nested
Wands
Store Electrical Cord
5
Cord
Retainer
6
Cord Hook
Dusting
Brush
HOW TO ASSEMBLE
Plug
7
6
Cord Hook
You will find your cord retainer on the handle above the
5
upper cord hook. Firmly push the electrical cord down
into the cord retainer. This will place the cord out of the
way the next time you vacuum.
6
Next wind the cord around the two cord hooks on the
back side of cleaner .
7
Secure the plug to the cord to prevent unwinding.
8
Page 9
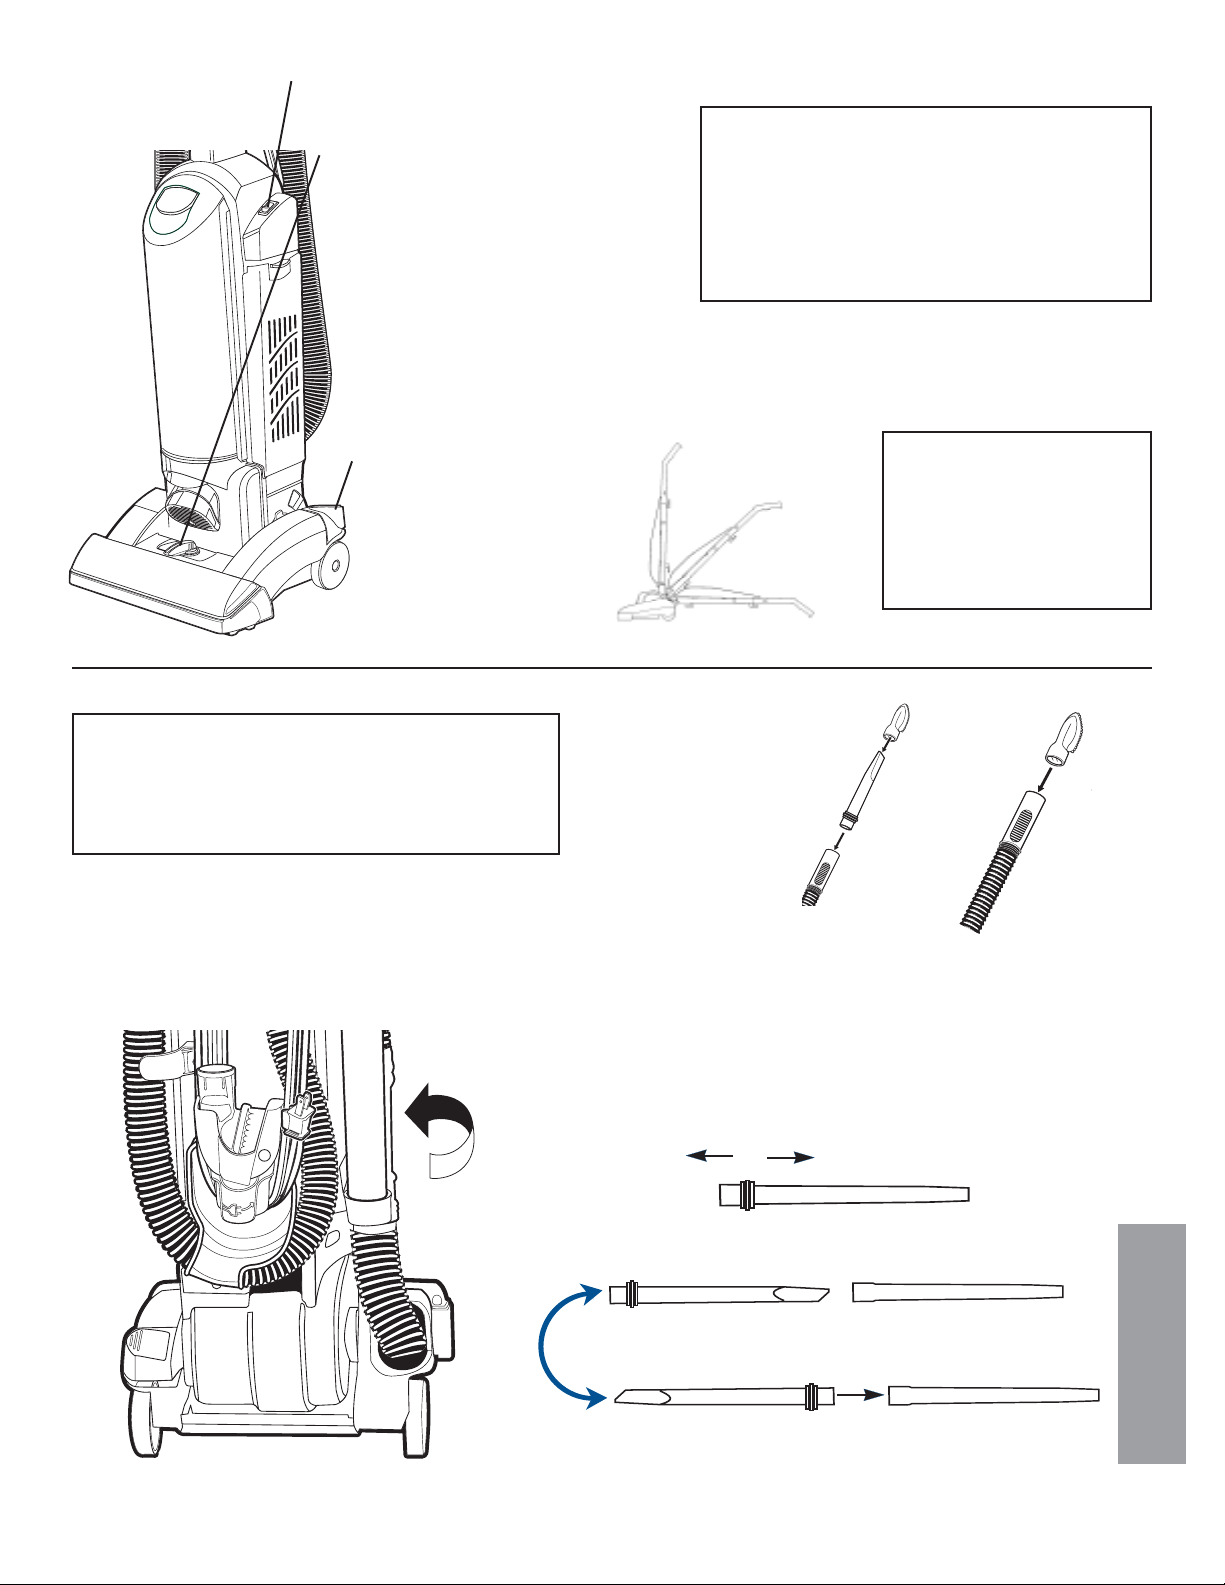
ON/OFF Switch. International symbol I means On, International symbol O means Off.
Cleaner Height Setting. An adjustment
that raises or lowers the cleaner base
to match the type of floor surface. With
the cleaner cord unplugged, set the
adjustment to lowest setting for
maximum carpet cleaning. If the
cleaner is difficult to push, move
adjustment to next highest setting
until cleaner is comfortable to push.
The brush roll must reach the carpet for effective cleaning. F or ease in moving the adjustment
knob, place handle in operating position and tilt cleaner back to remove weight from front
wheels.
Handle Release. Step on
handle release to pull
handle back to a
comfortable operating
position. To lower
handle completely to
the floor, depress
handle release a
second time.
NOTE: While using accessories, do not place
cleaner on furniture or steps as the brush
roll may cause damage. Place cleaner on
floor with the handle in storage position.
WARNING:Avoid injury. Keep loose clothing,
hair, fingers, and all other parts of
body away from any moving part
(such as the revolving brush). T urn
off the switch and unplug the
cleaner before changing the
cleaner height setting.
Store
Operate
Clean
Under
Crevice
Wand
Helpful Information:
Before cleaning under low
furniture, check area first for
objects that might harm the
unit or block the vacuum
hose.
Dusting/
Upholstery
Brush
1. To use accessories remove hose from rear of
cleaner by lifting up and twisting.
2. Place desired accessory onto end of hose or wand.
Hose
or
Wand
Dusting/Upholstery Brush is for furniture, blinds, books,
lamp shades, shelves, curtains, draperies, cushions and fabrics .
Crevice Wand cleans corners, stairs, baseboards, and
between cushions.
Nested extension wands to add reach.
• Grasp both wands near ridges.
• Pull apart.
• Turn ridge end to center. • Push wands together .
HOW TO USE
9
Page 10
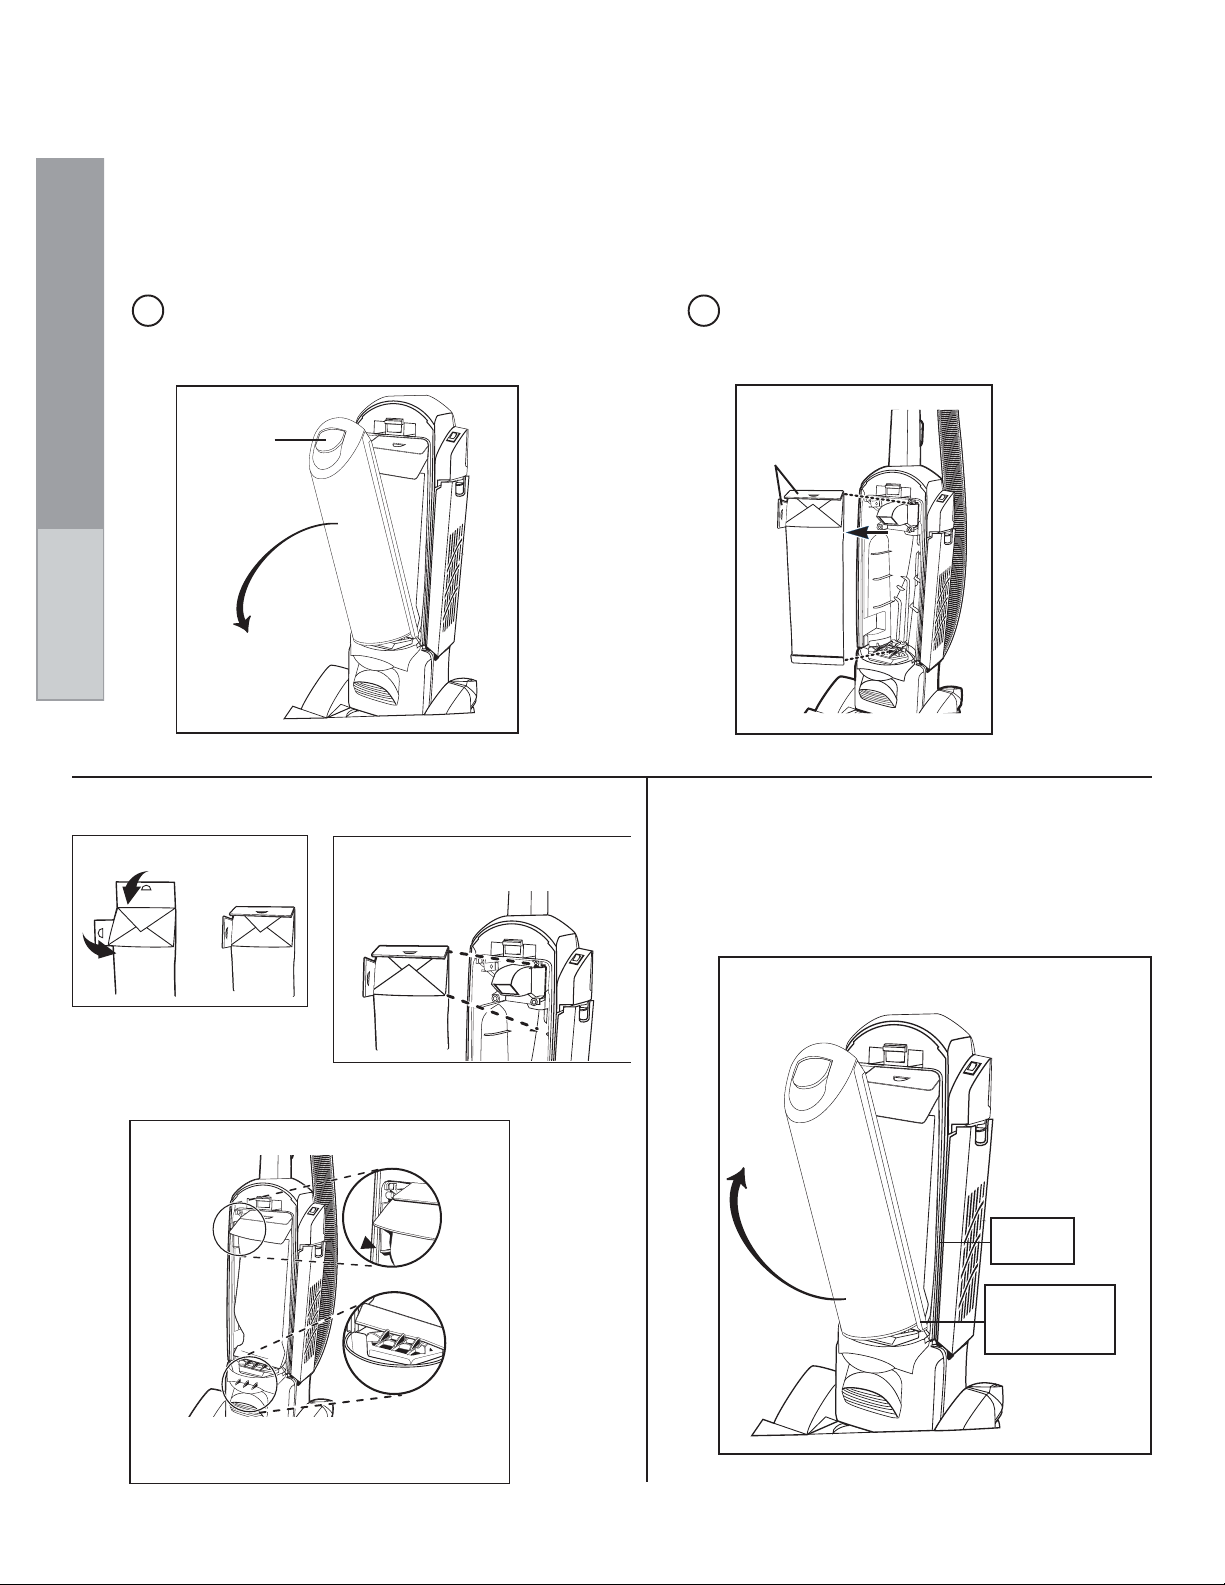
The instructions in this booklet serve as a guide to routine maintenance. To avoid unnecessary service calls, check the dust
bag, filters, belt, and brush roll often.
NOTE: When vacuuming carpet fresheners or cleaners, powder , plaster dust, or similar fine substances,
the dust bag and filters will require more frequent maintenance.
ROUTINE MAINTENANCE
NOT E: Turn off the switch and unplug the electrical cor d before routine maintenance. Never operate the
vacuum cleaner without the dust bag or filter assembly in place.
Removing the Dust Bag (Style LS):
Remove dust bag cover b y lifting up on latch and
pivoting dust bag cover out and a way from cleaner .
Latch
Dust Bag
Installing New Dust Bag:
BEND FLAPS FORWARD
➀
➁
PLACE BAG FLANGE
ON TOP OF SHELF
21
Grasp dust bag flaps and pull out from
cleaner.
Flaps
Reinstalling the Dust Bag Cover:
Place the bottom of the dust bag cover on cleaner
lining up grooves on outer edge of cov er with rails
on side of cleaner. Rotate cover up, pressing
against cleaner until it locks into place.
10
PUSH BAG INTO HOUSING
➂
POSITION BAG BOTTOM
➃
BEHIND RIBS
➂
➃
Rails on
Cleaner
Grooves on
inside edge
of bag cover
Page 11
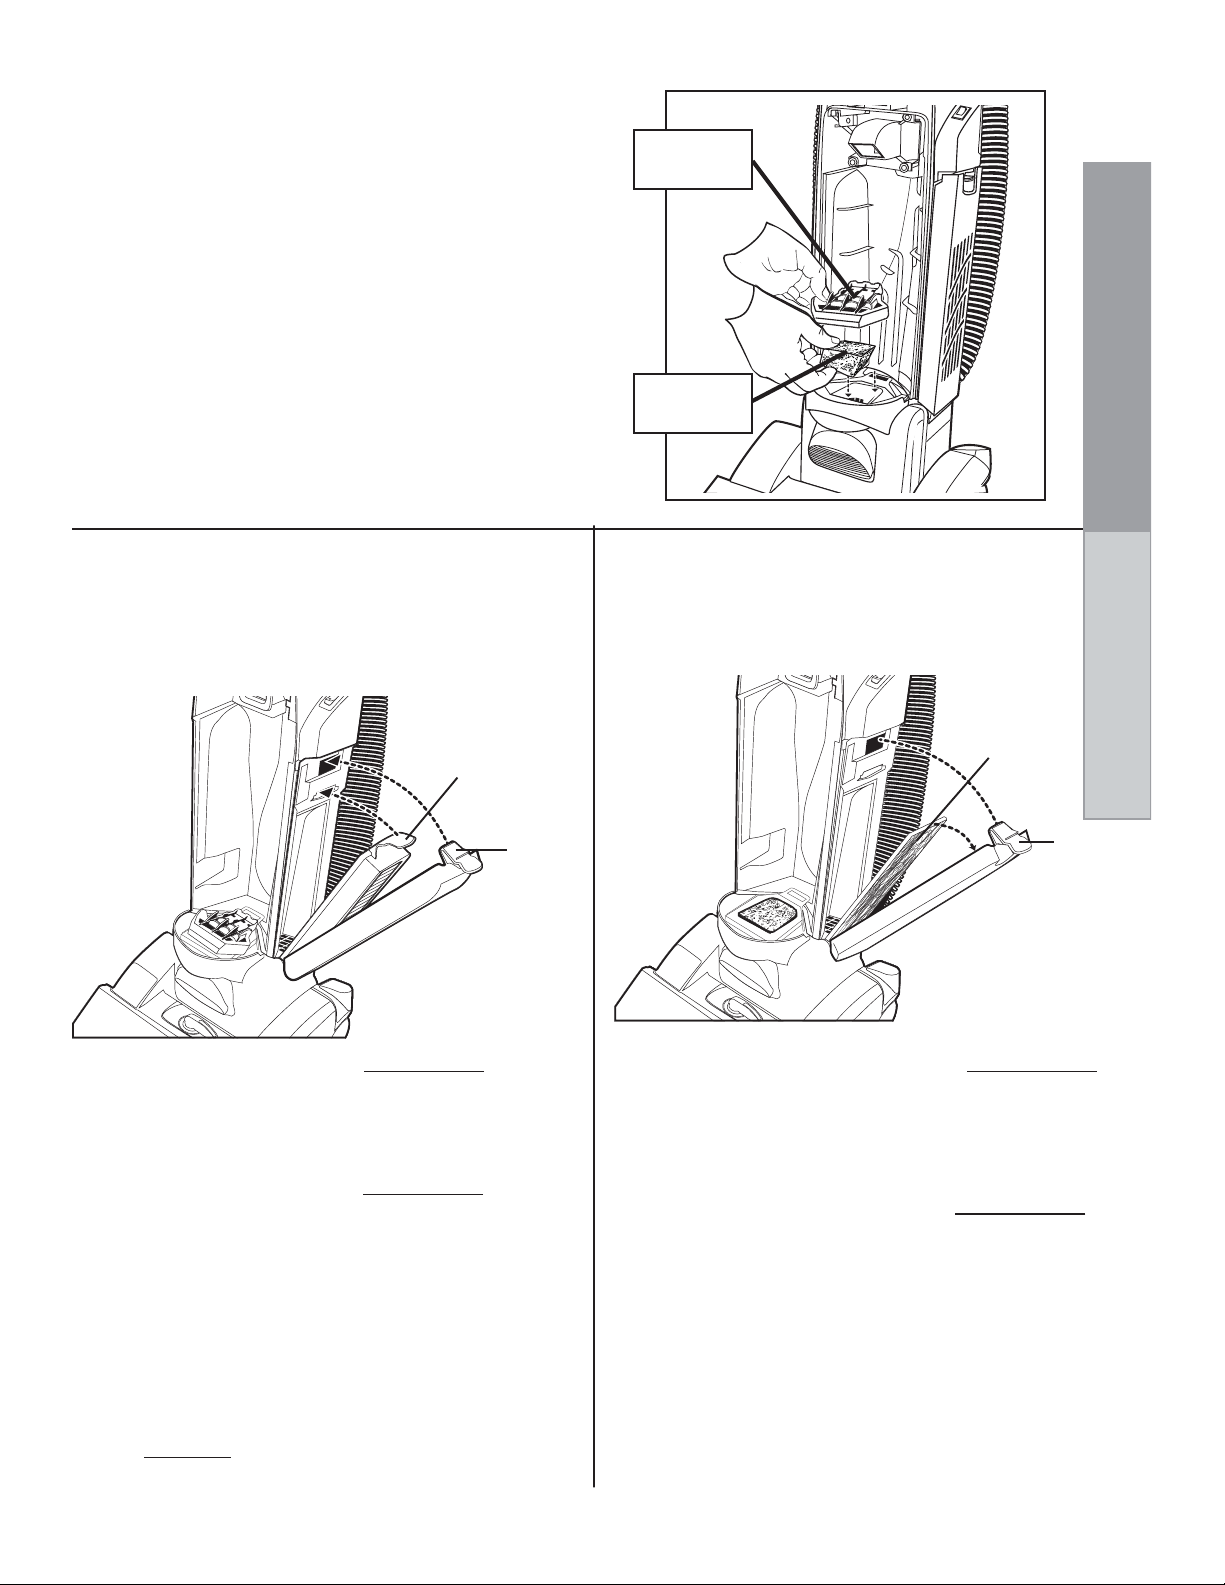
Pre-Motor Filter
Check the pre-motor filter each time the dust bag is changed.
Clean or replace as needed.
To Clean Pre-Motor Filter
1. Locate dust bag support in bottom of dust bag compartment.
Remove filter centered in the bottom of the dust bag
compartment.
2. Shake filter to remove excess dust. If necessary, the filter
can be cleaned by vacuuming with another cleaner or
washing with mild detergent.
3. Reinstall filter after completely dry.
Use GENUINE EUREKA replacement pre-motor filter, Part
No. 71480.
Dust Bag
Support
ROUTINE MAINTENANCE
Pre-Motor
Filter
Models equipped with Cartridge Filter
(Only cartridge style filters can be used with these
models.)
Check the True HEPA filter each time the dust bag is
replaced. Replace filter cartridge twice a year or as needed.
T rue HEPA
Cartridge
Latch
Filter
Door
Latch
To remove True HEPA
1. Push down on filter door latch and pull door away from
cleaner.
2 . Push down on HEP A cartridge latch and remove filter .
To replace True HEPA
1. Place bottom tabs of filter cartridge into slots. Rotate
filter toward cleaner, press fir mly against cleaner to
latch. Make sure True HEPA cartridge latch is
secured on both sides.
2. Replace filter door by placing tabs of door into slots on
cleaner. Rotate door up and against cleaner until it locks
into place.
NOTE: To have the benefit of a sealed True HEPA
system, you must use one of the True HEPA
cartridge
Use GENUINE EUREKA replacement True HEPA filter,
Style HF5.
filter systems.
cartridge
cartridge
filter
filter
Models equipped with Filter Pads
Check the filter pad each time the dust cup is
emptied. Replace twice a y ear or as needed.
Filter
Pad
To remove Filter Pad from
1. Push down on filter door latch and pull door away from
cleaner.
2. Lift filter pad up and out of filter door. Dispose of old filter
pad.
To replace Filter Pad into
1. Place new filter pad in filter door.
2. Replace filter door by placing tabs of door into slots on
cleaner. Rotate door up and against cleaner until it locks
into place.
Filter Pad Replacement Options:
HEPA, Style HF6
Use GENUINE EUREKA replacement filter pads.
filter door
filter door
Side Door Filters
Filter
Door
Latch
11
Page 12
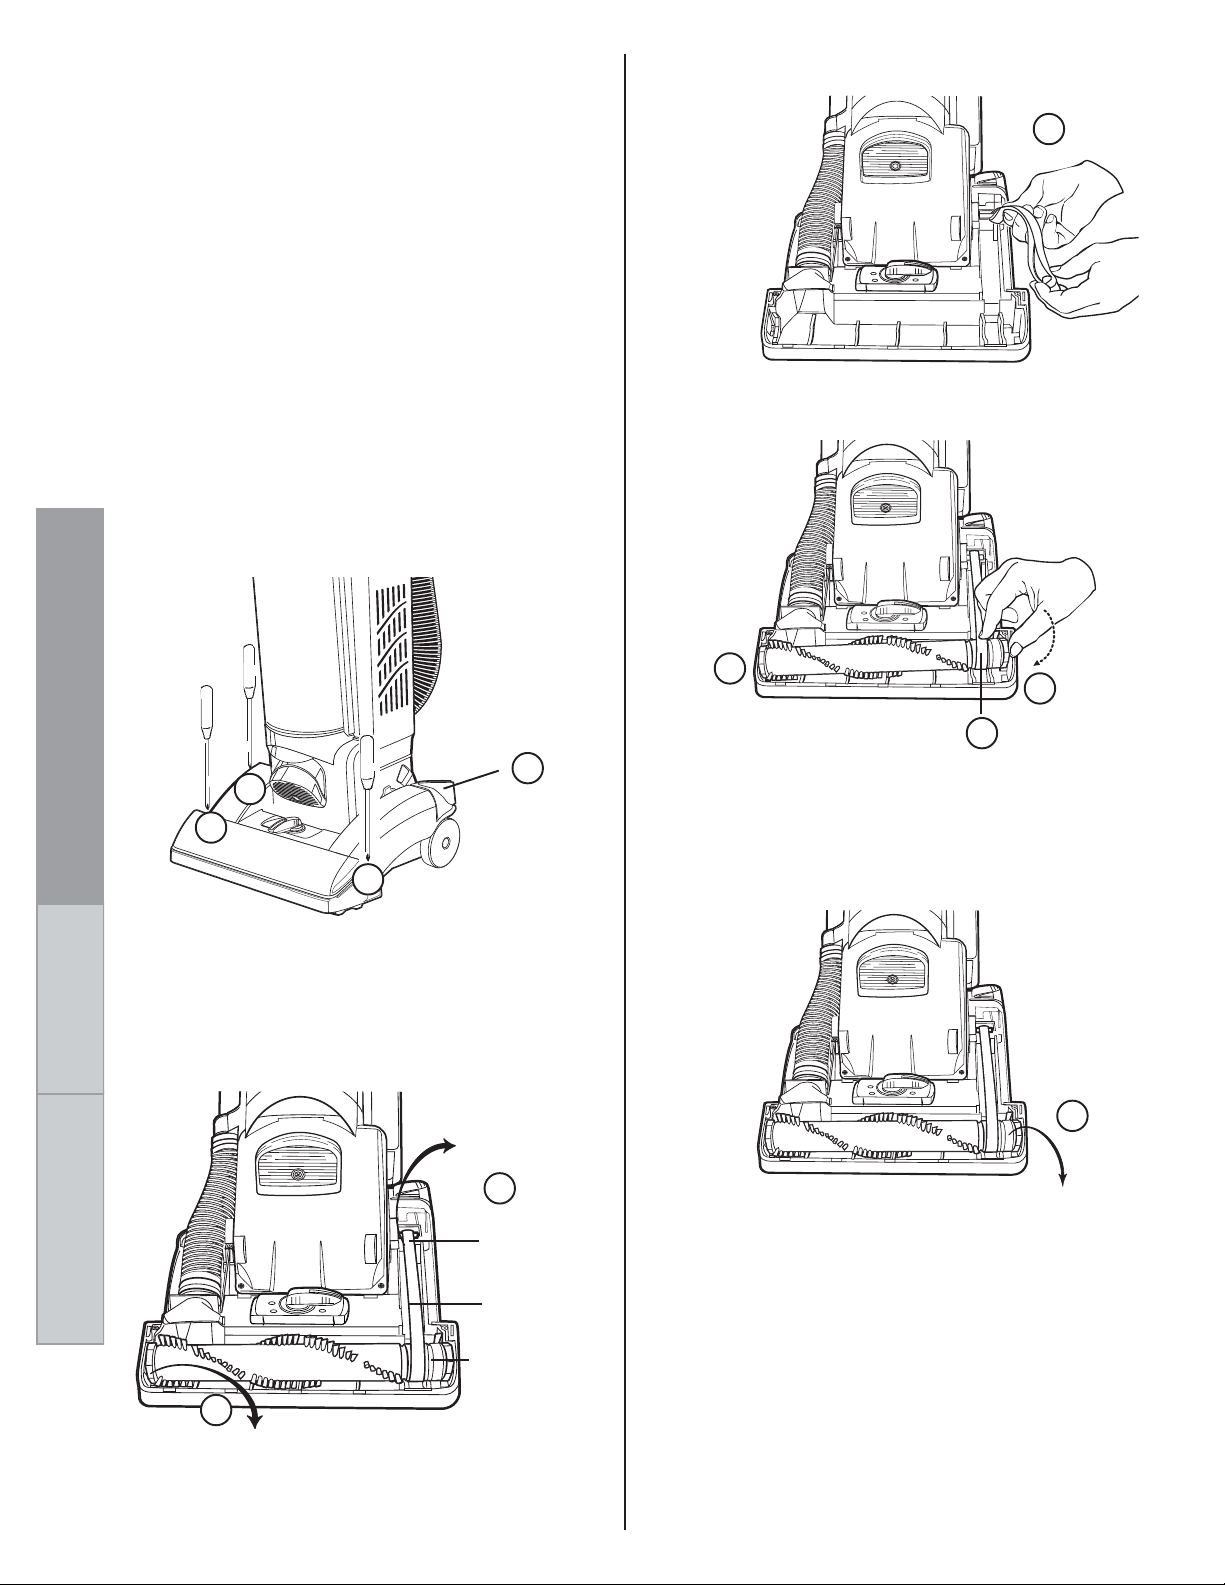
Brush Roll
The brush roll turns as it sweeps and combs the carpet nap.
Remove hair and threads from the brush roll so it continues
brushing the carpet. To maintain the most efficient cleaning,
the bristles must touch the carpet. To test the bristle length,
hold a ruler against the underneath side of the cleaner. If the
bristles no longer touch the ruler, replace the brush roll.
Brush Roll Belt, Style U
The brush roll belt turns the brush roll to agitate, sweep, and
comb the carpet nap. Chec k the belt regularly to be sure it is in
good condition. Replace the belt if it stretches , cracks or loses
tension. Cut a way an y hair or threads wound around the brush
roll or the belt pulley because the buildup could cause the belt
to rotate unevenly.
How To Replace Brush Roll Belt
NOTE: Turn off the switch and unplug the
electrical cord before replacing belt. Belt pulleys
PERIODIC MAINTENANCE
can become hot during normal use. To prevent
injury, avoid touching the motor shaft when
changing the belt.
5
5. Place new belt around motor shaft.
2
2
Brush Roll
1. Lower handle to floor to change belt.
2. Remove three screws indicated by screwdrivers in
above illustration. Lift hood to remove.
NOTE: The carpet height adjustment has to be in
the lowest or highest position to remove or reinstall
the hood.
Brush Roll Belt
7
1
2
4
Motor
Shaft
Belt
6. Place belt around brush roll pulley.
7. Align left end cap with base. Push end cap securely
into place.
8. Pull right side of brush roll to stretch belt. Secure right
end cap into base.
IMPORTANT
9. Rotate brush roll by hand two full
rotations to properly position belt.
8
6
9
3
3. Lift left end of brush roll.
4. Remove and discard belt.
12
Brush
Roll
10. Place hood back on cleaner. Make sure hood front
is behind furniture guard. Replace three screws.
11. Tighten screws.
Use GENUINE EUREKA replacement belt, Style U.
Look for the GENUINE EUREKA product symbol.
Page 13
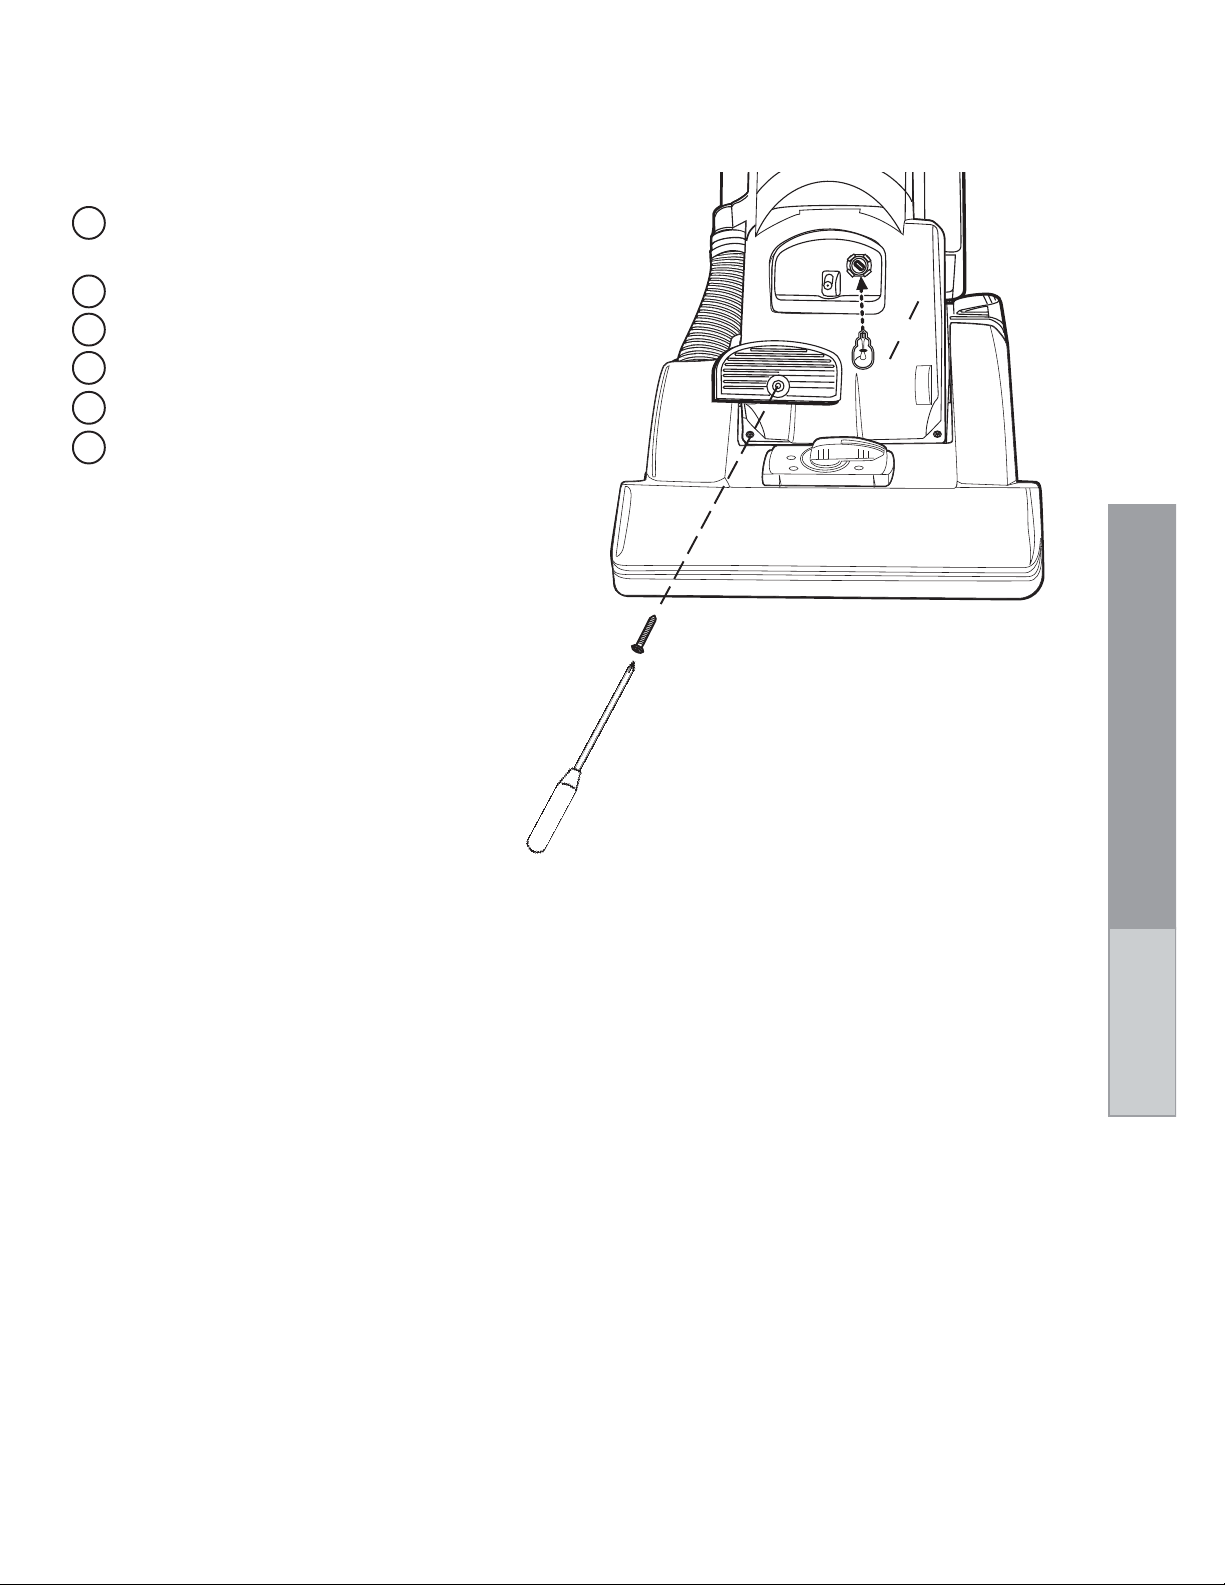
How T o Change Light Bulb (Only for models with a headlight)
NOTE: Turn off the power switch and disconnect the
electrical cord before changing light bulb.
1
Lower handle. Remove the screw from lens cover.
Requires a Phillips® head screwdriver .
Pull lens cover from cleaner.
2
Pull old light bulb out of socket.
3
Push new light bulb into socket.
4
Replace lens cover.
5
Secure with screw.
6
Use GENUINE EUREKA replacement light bulb,
Part No. 57940-2.
PERIODIC MAINTENANCE
Light Bulb
13
Page 14
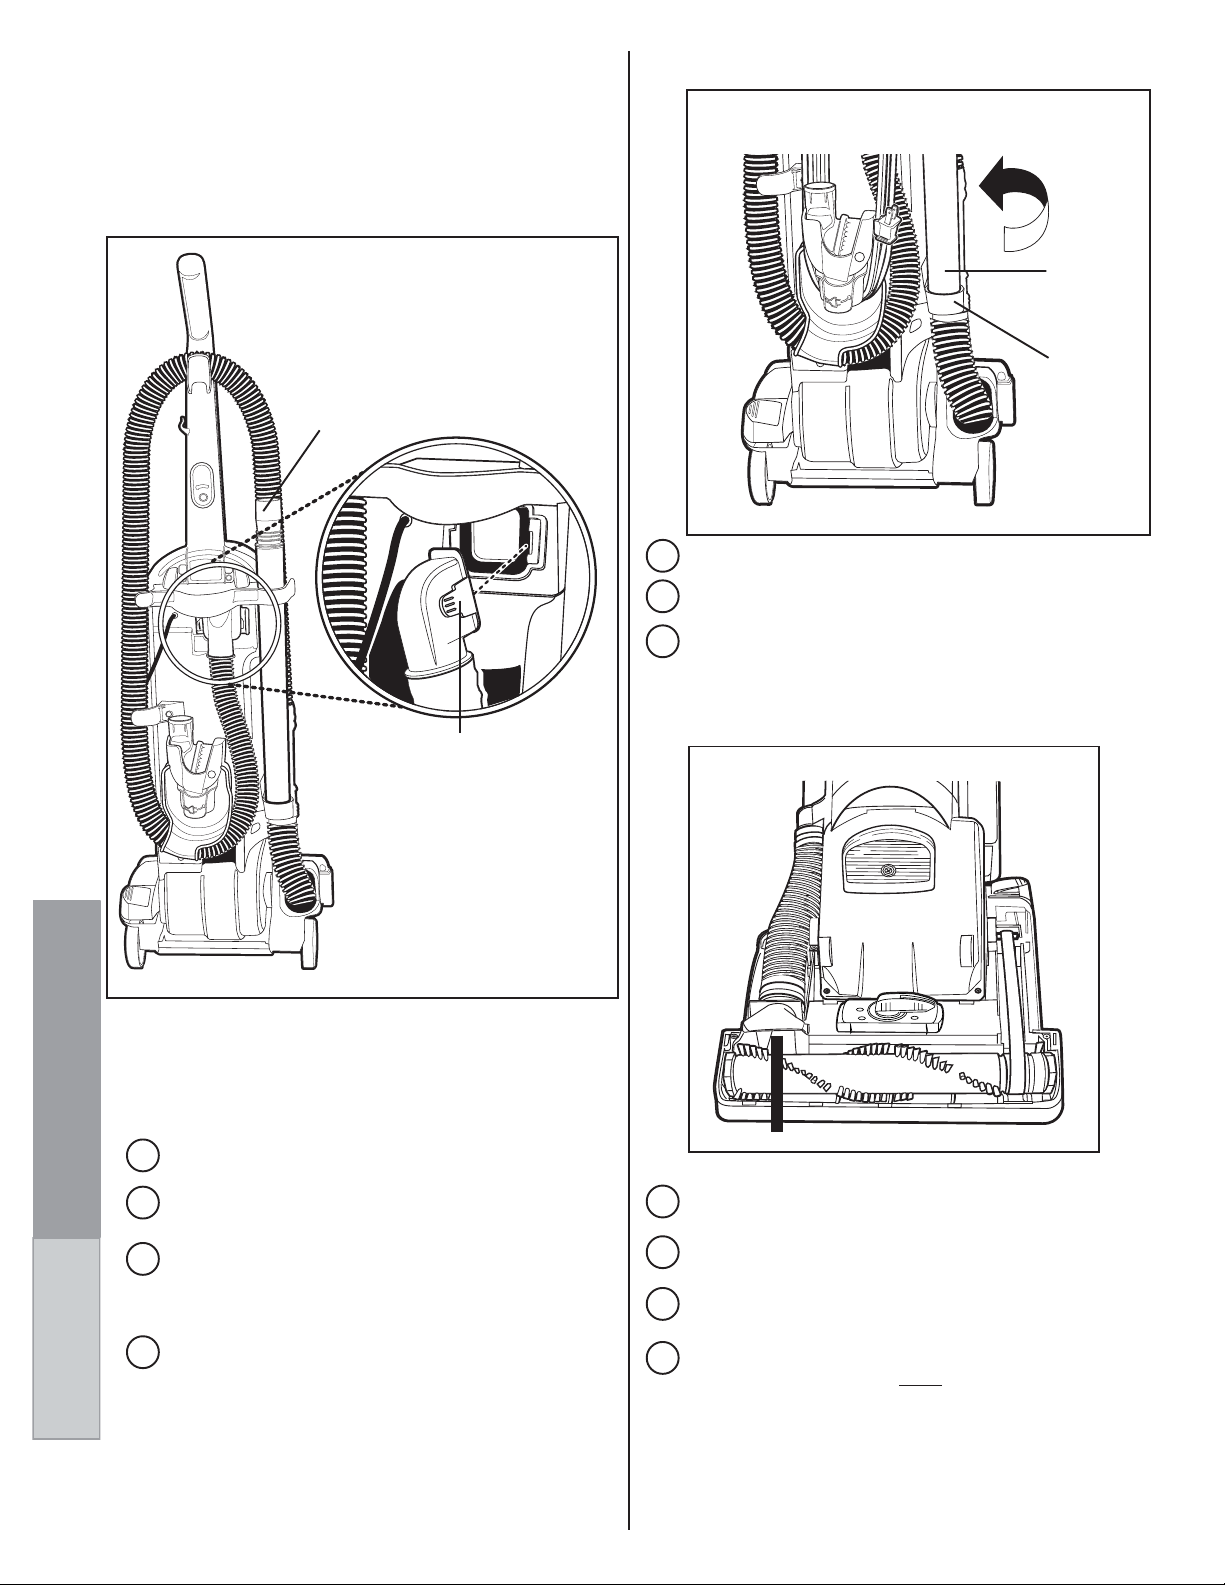
To Clear Blockages in Hose
Nested
Wands
Lower
Hose
Adapter
Base
Hose
5
Locate lower hose adapter on the back of the cleaner .
Remove lower hose adapter from rear of cleaner by
6
lifting up and twisting.
Check for b lockages in the hose and base hose. Flexing
7
the hose may help loosen any bloc kage. If no blockage
is found, continue to step 8. If blockage is found,
clear and continue to step 11.
PROBLEM SOLVING
NOTE: Turn off the switch and unplug the electrical
cord before c learing hose.
Locate upper hose adapter on the back of the
1
cleaner.
Remove nested wands from back of cleaner f or easy
2
access to hose adapter tabs.
Clear Hose
Press hose adapter tabs together and pull hose
3
adapter away from cleaner. The hose adapter will
unscrew off hose for easy access to debris if
necessary.
Check for blockages at cleaner opening and in hose .
4
If no blockage is found, continue to step 5. If
blockage is found, clear and contin ue to step 11.
Hose
Adapter
Tabs
▲
Remove hood from cleaner and check for a blockage
8
in the brush roll area. Mak e sure the hose inlet is clear.
After the blockage is found and cleared, replace the
9
hood on the cleaner.
Place lower hose adapter back into the base hose.
10
Install the upper hose adapter onto the back of the
cleaner, line it up with the cleaner opening and push it
11
against the cleaner until both tabs lock into place.
14
Page 15
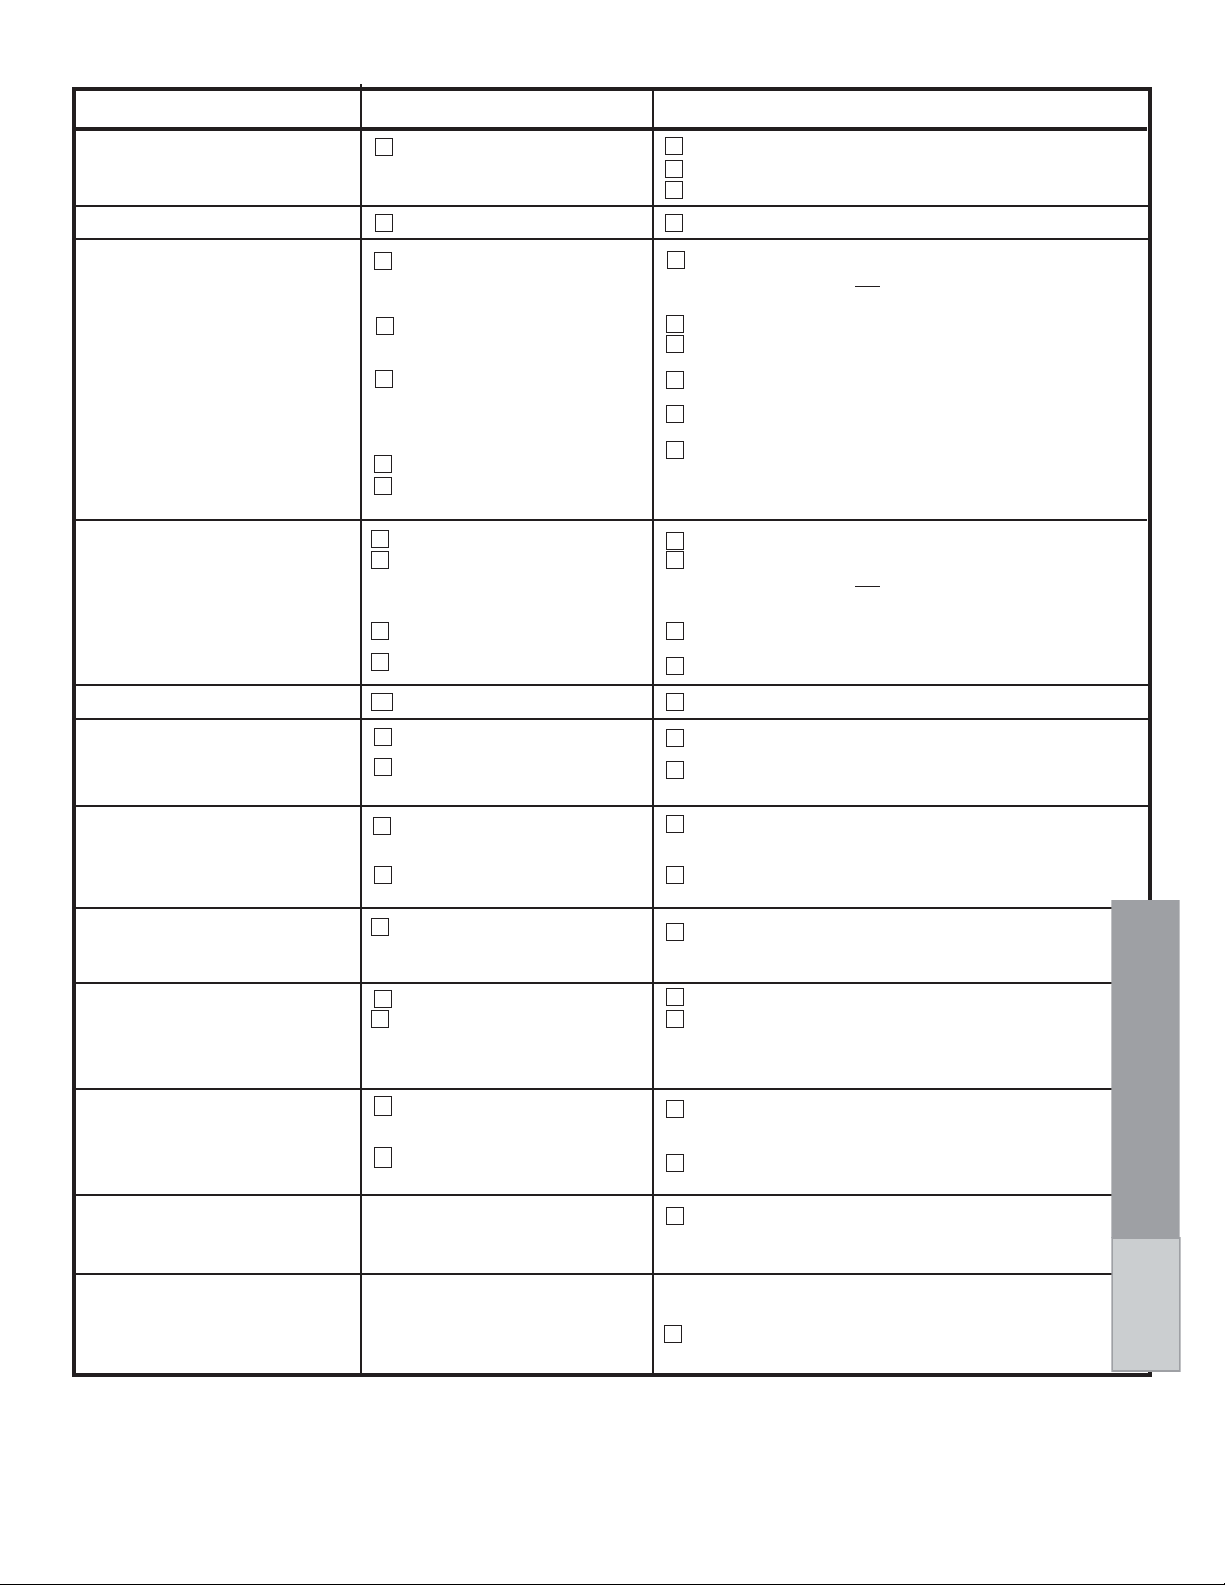
NOTE: Turn off the switch and unplug the electrical cord before servicing.
PROBLEM CAUSE SOLUTION
Motor will not start. Electric Plug Push plug securely into outlet.
Motor suddenly stops. Thermal Cut Off Page 6.
Does not clean the carpet Filters Clean or replace the filters. Hint: If picking up fine
or floor. dust, the filters may not look dirty but a fine substance
No suction at the end of hose. Hose Adapter Be sure hose adapter is secure. Page 14.
Headlight not working. Light Bulb Replace light bulb. Page 13.
✓
Try another outlet.
Check circuit breaker.
✓
✓
tends to reduce suction when it blocks the airflow
✓
Dust Bag Replace the dust bag with a new dust bag. Page 10.
✓
Hose Be sure hose adapter is secure on back of cleaner.
✓
Belt Replace a broken, cut, loose or out of shape belt.
✓
Brush Roll Clean hair and thread from bristles and end cap area.
through the filter(s).
Be sure the dust bag is properly seated into the
cleaner body. Page 10.
Page 14.
Remove any blockages from the hose that restricts the
airflow. Page 14.
Check base hose and long hose. Page 14.
Replace brush roll if bristles are worn.
✓
✓
Filters Clean or replace the filters. Hint: If picking up fine
✓
Hose Remove any clogs from the hose that restricts the
✓
Dust Bag Change dust bag.
dust, the filters may
tends to reduce suction when it blocks the airflow
through the filters.
airflow. Check base hose and long hose. Page 14.
not look dirty, but a fine substance
✓
Noise from the brush roll Brush Roll Remove hood and clean debris or items from the brush
area. roll area.
Cleaner is hard to push. Cleaner Height Setting Put handle in operating position. Tilt the cleaner
Cleaner height knob will Cleaner Height Setting Hint: Put handle in operating position. Tilt the
not turn. cleaner back to raise the front wheels off floor.
Bag cover will not go onto No Dust Bag in Cleaner Place a dust bag in the cleaner.
cleaner. Dust Bag Installed Properly Dust bag must be installed properly in cleaner or bag
Hood will not come off. Cleaner Height Setting Hood cannot be removed from cleaner unless the
Missing parts Call 1-800-438-7352 between 8:00 a.m. and 4:45 p.m.,
Questions? Call 1-800-282-2886 between 7 a.m. to 8:00 p.m.,
✓
✓
Belt Replace a broken, cut, loose or out of shape belt.
Page 12.
✓
back to raise the front wheels off floor. Then turn
✓
Belt Replace a broken, cut, loose or out of shape belt.
the knob to a higher setting.
Page 12.
✓
Then turn the knob.
✓
✓
cover will not go onto cleaner. Make sure the dust
bag cardboard flange is on the support shelf. See
page 10.
✓
cleaner height setting is in the lowest or highest
✓
Screws All three screws must be removed from the top of the
position.
hood. Page 12.
central standard time, Monday through Friday. Know the
model and serial numbers when you call.
central standard time, Monday through Saturday. Know
the model and serial numbers when you call.
PROBLEM SOLVING
Guide
15
Page 16

16
Page 17

Page 18
WARRANTY
THE EUREKA LIMITED WARRANTY
hat This Warranty Covers
W
Y our Eureka cleaner is warranted to be free fr om all defects in mater ial and workmanship in normal household use for a period o f one year. The warranty is granted only to the
original purchaser and members of his or her immediate household. The warranty is subject to the following provisions.
hat This Warranty Does Not Cover
W
• Parts of the cleaner that require replacement under normal use, such as disposable dust bags, filters, drive belts, light bulbs, and brush roll bristles
• Damages or malfunctions caused by negligence, abuse, or use not in accordance with the Owner’s Guide.
• Defects or damages caused by unauthorized service or the use of other than Genuine Eureka parts.
hat The Eureka Company Will Do
W
The Eureka Company will, at its option, repair or replace a defective cleaner or cleaner part that is covered by this warranty . As a matter of warranty policy, the Eureka Company
will not refund the consumer’s purchase price.
arranty Re gistration
W
Please fill out and return the warranty registration card accompanying your cleaner.
btaining W ar ranty Service
O
To obtain warranty service you must return the defective cleaner or cleaner part along with proof of purchase to any Eureka Authorized Warranty Station.
You will find the nearest location in the Yellow Pages, under “Vacuum Cleaners–Service and Repair.” Be certain that the Warranty Station is “Eureka Authorized.”
For the location of the nearest Eureka Authorized Warranty Station or for service information, telephone toll free:
USA: 1-800-282-2886
Mexico: 5670-6169
Canada: 1-800-282-2886
If you prefer, you can write to The Eureka Company , Service Di vision, 807 North Main Street, Bloomington, Illinois 61701, USA. In Canada write to The Eureka Company, 866
Langs Drive, Cambridge, Ontario N3H 2N7.
If it is necessary to ship the cleaner outside your community to obtain warranty repair, you must pay the shipping charges to the Eureka Author ized Warranty Station.
Return shipping charges will be paid by the Warranty Station. When returning parts for repair, please include the model, type, and serial number from the data plate on the cleaner.
urther Limitations and Exclusions
F
Any warranty that may be implied in connection with your purchase or use of the cleaner, including any warranty of Merchantability or any wa rranty for Fitness For A Particular
Purpose is limited to the duration of this warranty. Some states do not allow limitations on how long an implied warranty lasts, so the above limitations may not apply to you.
Your relief for the breach of this warranty is limited to the relief expressly provided above. In no event shall Eureka be liable for any consequential or incidental damages you
may incur in connection with your purchase or use of the cleaner. Some states do not allow the exclusion or limitation of incidental or consequential damages, so the above
limitation or exclusion may not apply to you.
This warranty gives you specific legal rights. You may also have other rights which vary by state.
GENUINE
EUREKA PRODUCT
uestions & Answers about Genuine Eureka Products
Q
Q:
Why should I use only Genuine Eureka paper bags, belts, and parts in my Eureka vacuum cleaner?
Using Genuine Eureka Products, which are made to our exacting specifications and engineered with emphasis on quality, performance, and customer satisfaction,
A:
ensures the long life and cleaning efficiency of your vacuum cleaner. Overall, this saves you money and helps to keep your home clean.
Q:
How can I be sure I am using only genuine Eureka products in my vacuum cleaner?
Typically, packaged products and paper bags can be identified by a “Genuine Eureka Product” symbol (see illustration above). For further identification assistance,
A:
you may call our toll-free number, 1-800-282-2886, for the location of a nearby Eureka Authorized Warranty Station.
Q:
Are there any differences between “made to fit” or “imitation” and Genuine Eureka paper bags, belts, and parts?
A:
Yes, there are some very impor tant differences in materials, quality, and reliability. Many customers have mistakenly purchased “imitation” paper bags and parts
while thinking they purchased genuine. Unfortunately, many of these customers discovered the differences after they experienced related difficulties.
For Genuine Eureka Value, Accept No Imitations!
THE EUREKA COMPANY
Household Warranty
abs 190
Bloomington, Illinois 61701
18
Page 19

Page 20
Questions?
Do Not Return To Store
Call
1-800-282-2886
7 a.m. to 8 p.m., Central Standard Time, Monday through Saturday
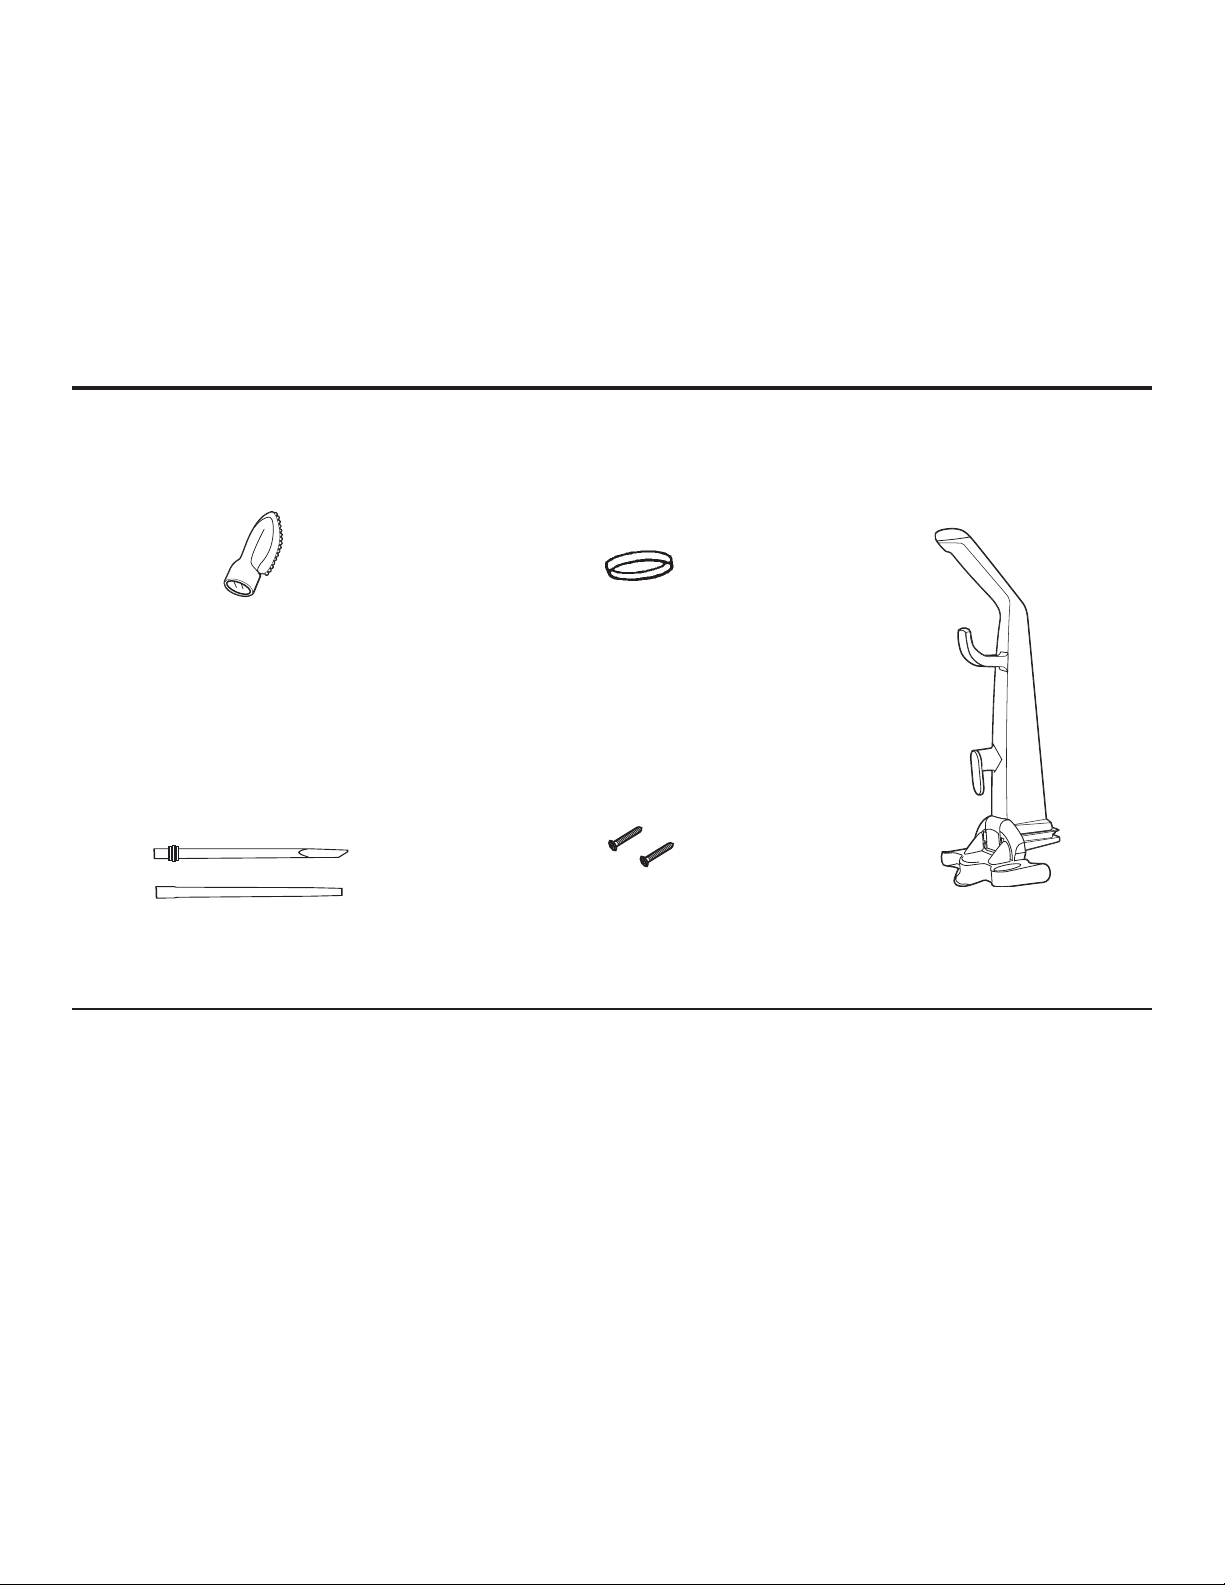
Accessory Items in This Car ton
1 Dusting/Upholstery Brush
1 wand, 1 crevice wand
1 extra belt
1 hardware package
(2 screws)
1 vacuum cleaner
handle
Thank you for selecting a Eureka cleaner.
Don’t Forget to Use
Genuine Eureka Bags, Belts and Filters
Caution: Damages caused b y the use of non-genuine
Eureka parts are not covered by the Eureka Limited
Warranty.
©2002 White Consolidated, Ltd.
Part No. 72104 (4/02) Printed in U.S.A.
 Loading...