

Eureka 4480, 4393rb, 4380 Owner's Manual
Upright Vacuum Cleaner
Household Type
Ownerʼs Guide
4380 Series, 4390 Series,
4480 Series, 4490 Series
IMPORTANT
Do not return this product to the store.
For assembly problems or questions
contact: Eurekaʼs Customer Service
Division toll free at 1-800-282-2886*,
8 a.m. to 7:30 p.m., (CST), Monday Friday and 10 a.m. to 6:30 p.m. Saturday.
*En Mexico llame al 5670-6169
www.eureka.com
PLEASE RETAIN
We suggest you record the model, type and serial
numbers below. They are located on the silver rating
plate on your cleaner. For prompt and complete
service information, always refer to these numbers
when inquiring about service.
Model & Type___________________________
Serial No.______________________________
It is also important to keep your receipt as proof of
date of purchase.
Part No. 70239C (12/03) ©2003 White Consolidated Ltd. Printed in U.S.A.

Index
IMPORTANT SAFEGUARDS
When using an electrical appliance, basic precautions
should always be followed, including the following:
READ ALL INSTRUCTIONS BEFORE USING THIS VACUUM CLEANER.
Important Safeguards..................2
Service Information .....................3
Assembly................................. 3-4
Use ..............................................5
Thermal Cut Off
Accessories .................................6
Cyclonic Cassette........................7
.................... 3 & 5
WARNING
To reduce the risk of re, electric shock, or injury.
• Do not use outdoors or on wet surfaces.
• Do not leave vacuum cleaner when plugged in. Turn off the switch and
unplug the electrical cord when not in use and before servicing.
• Do not allow to be used as a toy. Close attention is necessary when used
by or near children.
• Use only as described in this manual. Use only manufacturerʼs recommended
attachments.
• Do not use with damaged cord or plug. If vacuum cleaner is not working as
it should, has been dropped, damaged, left outdoors, or dropped into water,
return it to a service center before using.
• Do not pull or carry by cord, use cord as a handle, close a door on cord, or
pull cord around sharp edges or corners. Do not run vacuum cleaner over
cord. Keep cord away from heated surfaces.
• Do not use extension cords or outlets with inadequate current carrying
capacity.
• Turn off all controls before unplugging.
• Do not unplug by pulling on cord. To unplug, grasp the plug, not the cord.
Brush Roll....................................8
Brush Roll Belt.............................8
Hose Blockage ............................9
Filters..................................... 9-10
Warranty
Light Bulb ..................................11
Problem Solving ........................11
....................................10
• Do not handle plug or vacuum cleaner with wet hands.
• Do not put any object into openings. Do not use with any opening blocked;
keep free of dust, lint, hair, and anything that may reduce airow.
• This vacuum cleaner creates suction and contains a revolving brush roll.
Keep hair, loose clothing, ngers, and all parts of body away from openings
and moving parts.
• Do not place cleaner on furniture or stairs as the brush roll may cause
damage. Place cleaner on oor with the handle in storage position while
using attachments.
• Do not pick up anything that is burning or smoking, such as cigarettes,
matches, or hot ashes.
• Do not use without cyclonic cassette or lter(s) in place.
• Belt pulleys can become hot during normal use. To prevent burns, avoid
touching the belt pulley when servicing the drive belt.
• Use extra care when cleaning on stairs.
• Do not use to pick up ammable or combustible liquids such as gasoline, or
use in areas where they may be present.
• Store your cleaner indoors in a cool, dry area.
• Keep your work area well lighted.
• Unplug electrical appliances before vacuuming them.
SAVE THESE INSTRUCTIONS
2
To reduce the risk of electric shock, this appliance has a polarized plug (one blade wider than the other). This plug will t
in a polarized outlet only one way. If the plug does not t fully in the outlet, reverse the plug. If it still does not t, contact a
qualied electrician to install the proper outlet. Do not change the plug in any way.
GENERAL INFORMATION
The cleaner is designed to pick up dirt and dust particles. Avoid picking up hard or sharp objects with the cleaner to prevent
bag tears, hose clogs, and fan blade breakage with subsequent motor damage.
Service Information
The instructions in this booklet serve as a guide to routine maintenance. For additional service information telephone our toll
free number for the nearest Eureka Authorized Warranty Station. You should know the model, type and serial numbers
when you call:
.USA: 1-800-282-2886
Mexico: 5670-6169
Canada: 1-800-282-2886
If you prefer, you can write to:
The Eureka Company, Service Division, 807 North Main Street, Bloomington, Illinois 61701, USA.
In Canada write to The Eureka Company, 866 Langs Drive, Cambridge, Ontario N3N 2N7.
Refer to The Eureka Limited Warranty for complete service information.
DO NOT OIL the motor or the brush roll at any time. The bearings are permanently lubricated and sealed.
Thermal Cut Off
This vacuum cleaner has a special thermostat that protects the cleaner in case of motor overheating. If the cleaner suddenly
shuts off, push the switch pedal once and unplug the cleaner. Check the cleaner for a possible source of overheating such
as a full bag, a blocked hose or clogged lter. If these conditions are found, x them and wait at least 30 minutes before
attempting to use the cleaner. After the 30 minute period, plug the cleaner back in and turn on the switch. If the cleaner still
does not run, then take it to a Eureka Authorized Service Center for repair.
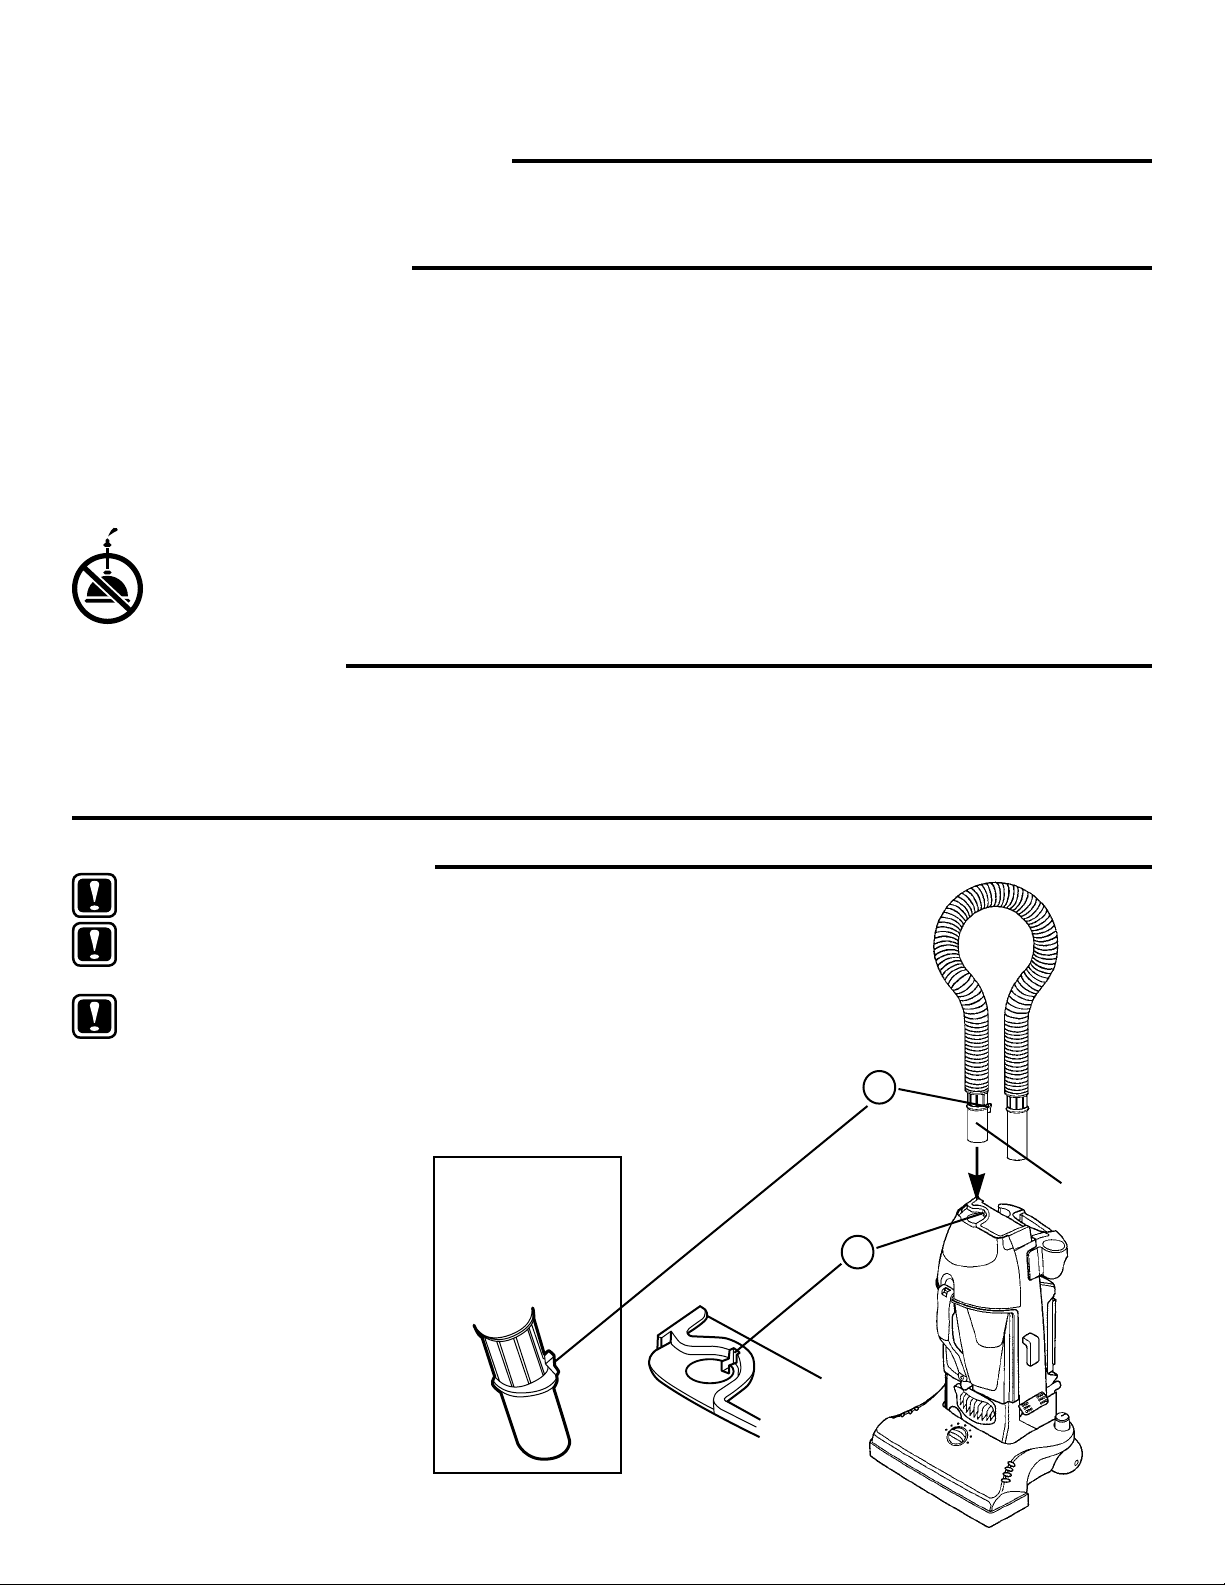
HOW TO ASSEMBLE
CAUTION: Assemble the cleaner before using.
CAUTION: Moving parts, make sure on/off switch
is in off position before plugging in.
NOTE: Features may vary by model yet all parts
assemble the same.
Step A Attach Hose
1. Locate the tab on the hose
adapter of the extension hose
(shortest end).
2. Insert hose adapter into
opening on top of unit. The
hose adapter tab must be
placed all the way down
into the notch.
IMPORTANT:
Hose
MUST BE
inserted
before attaching
the handle.
Tab
1
Hose
Adapter
Notch
2
3
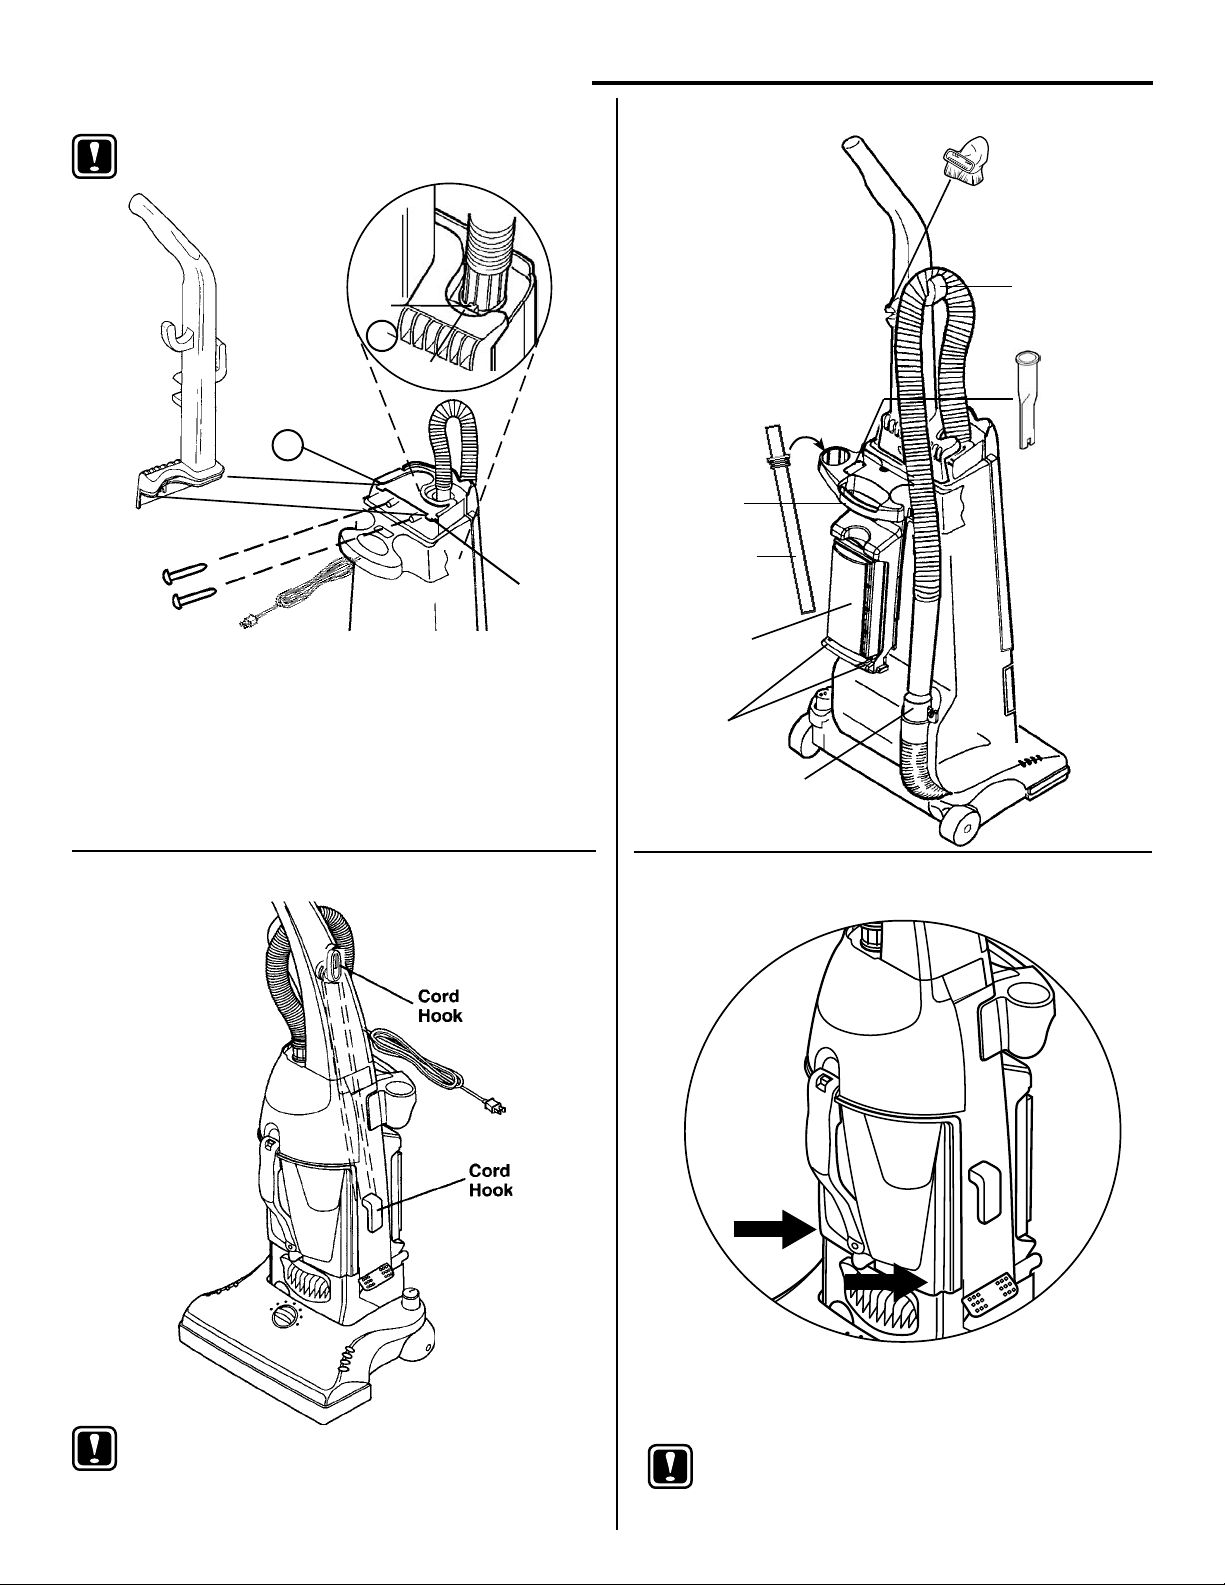
HOW TO ASSEMBLE (Continued)
Step B Attach Handle
CAUTION: Do not catch cord under handle.
Tab
4
Ledge
Groove
3
Groove
3. From rear of cleaner, align handle with groove and slide
onto cleaner. If necessary, use thumb and nger pressure
to slide handle into position.
4. Once handle is in place, check that the hose adapter tab
is completely secure under the ledge of the handle.
5. Attach handle with two 5/8 inch screws in the assembly
packet. Use either a slotted or Phillips® head screwdriver.
Step C Store Hose and Accessories
Combination
Tool
Hook
Crevice
Tool
Carrying
Handle
Extension
Wand or
Wands
HEPA Filter
(on some
models)
Tabs
Hose
Retainer
Step D Store Electrical Cord
NOTE: For easier access to bag compartment,
when you store the electrical cord use a
gure 8 pattern.
4
Step E Check Cyclonic Cassette
Make sure that the cyclonic cassette is fully seated in the
vacuum. Place thumbs on cyclonic cassette (marked by
arrows above) and push rmly.
NOTE: Do not lift cleaner by cassette handle, use
carrying handle on the back of cleaner.
 Loading...