

Page 1
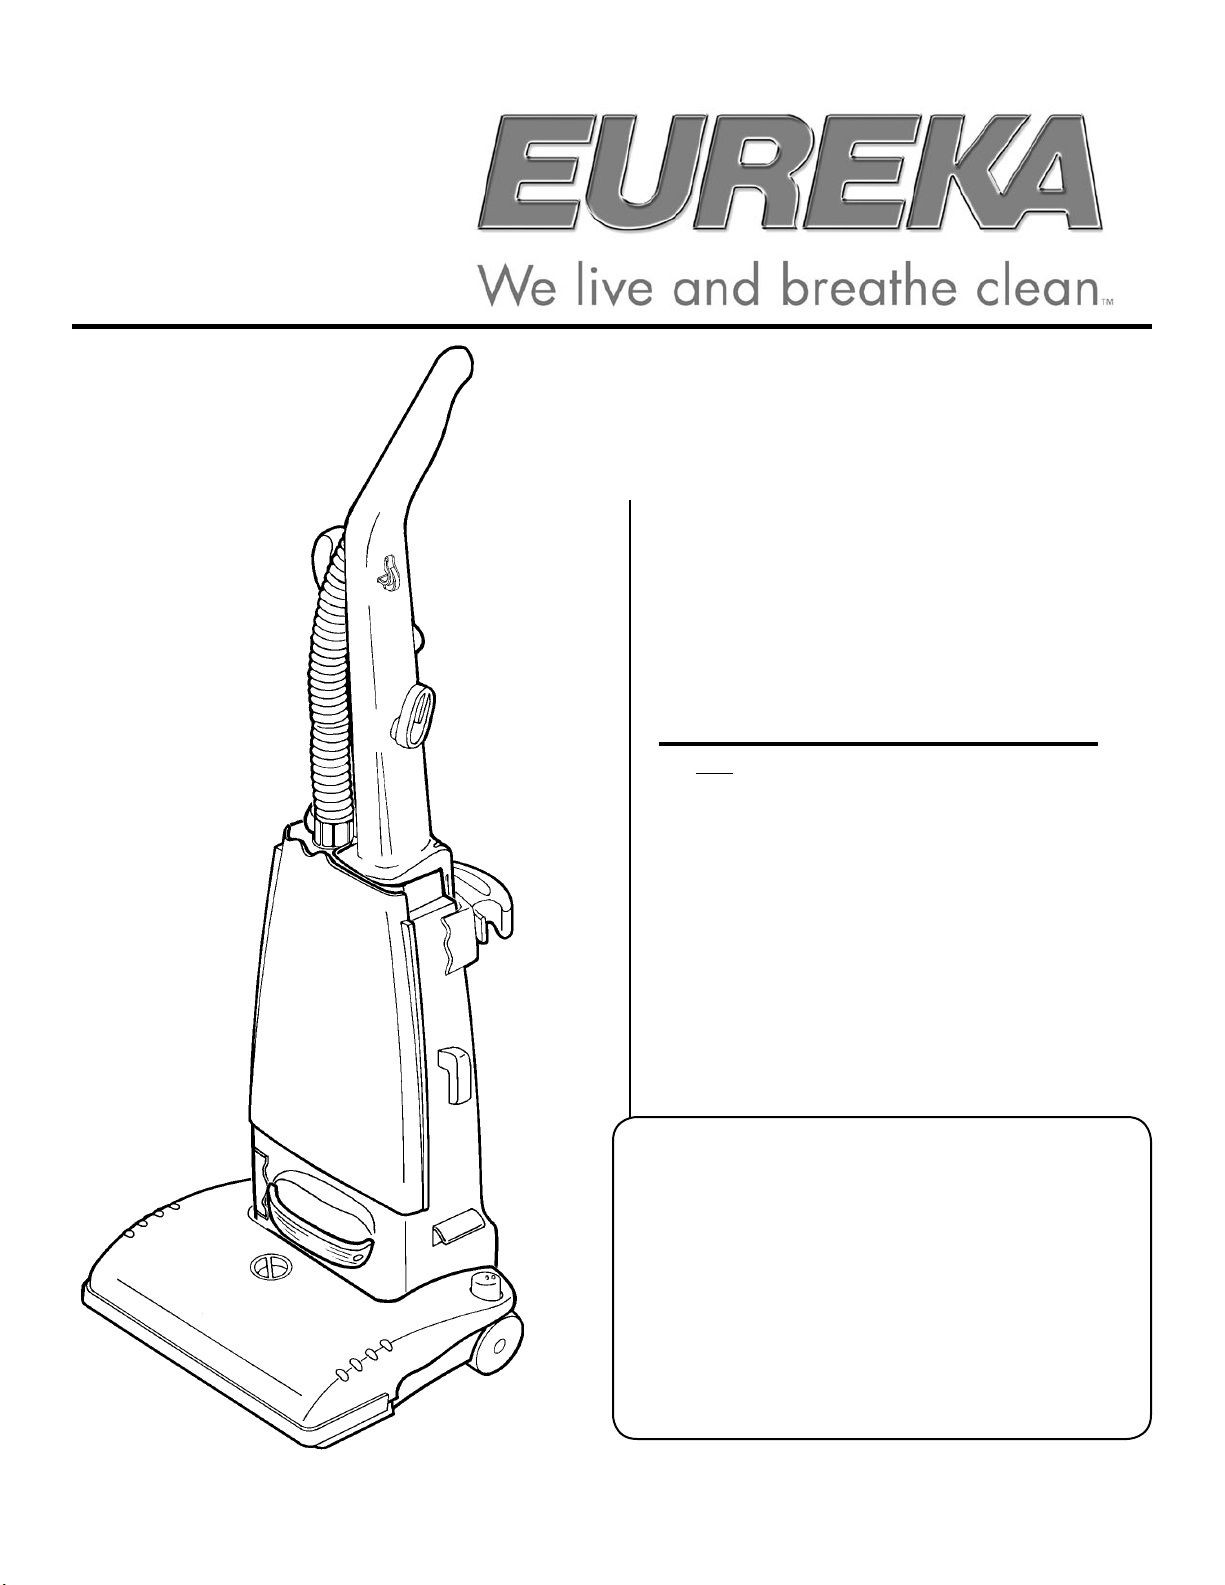
Upright Vacuum Cleaner
Household Type
Ownerʼs Guide
4320 – 4370 Series
4440 – 4470 Series
IMPORTANT
Do not return this product to the store.
For assembly problems or questions
contact: Eurekaʼs Customer Service
Division toll free at 1-800-282-2886*,
8 a.m. to 7:30 p.m., (CST), Monday Friday and 10 a.m. to 6:30 p.m. Saturday.
*En Mexico llame al 5670-6169
www.eureka.com
PLEASE RETAIN
We suggest you record the model, type and serial
numbers below. They are located on the silver rating
plate on your cleaner. For prompt and complete
service information, always refer to these numbers
when inquiring about service.
Model & Type___________________________
Serial No.______________________________
It is also important to keep your receipt as proof of
date of purchase.
Part No. 70262C (11/03) ©2003 White Consolidated Ltd. Printed in U.S.A.
Page 2

Index
IMPORTANT SAFEGUARDS
When using an electrical appliance, basic precautions
should always be followed, including the following:
READ ALL INSTRUCTIONS BEFORE USING THIS VACUUM CLEANER.
Important Safeguards..................2
Service Information .....................3
Assembly................................. 3-4
Use ..............................................5
Thermal Cut Off
Accessories .................................6
Brush Roll....................................7
.................... 3 & 5
WARNING
To reduce the risk of re, electric shock, or injury.
• Do not use outdoors or on wet surfaces.
• Do not leave vacuum cleaner when plugged in. Turn off the switch and
unplug the electrical cord when not in use and before servicing.
• Do not allow to be used as a toy. Close attention is necessary when used
by or near children.
• Use only as described in this manual. Use only manufacturerʼs recommended
attachments.
• Do not use with damaged cord or plug. If vacuum cleaner is not working as
it should, has been dropped, damaged, left outdoors, or dropped into water,
return it to a service center before using.
• Do not pull or carry by cord, use cord as a handle, close a door on cord, or
pull cord around sharp edges or corners. Do not run vacuum cleaner over
cord. Keep cord away from heated surfaces.
• Do not use extension cords or outlets with inadequate current carrying
capacity.
• Turn off all controls before unplugging.
• Do not unplug by pulling on cord. To unplug, grasp the plug, not the cord.
Brush Roll Belt.............................7
Dust Bag......................................8
Hose Blockage ........................ 8-9
Filters..................................... 9-10
Warranty
Light Bulb ..................................11
Problem Solving ........................11
....................................10
• Do not handle plug or vacuum cleaner with wet hands.
• Do not put any object into openings. Do not use with any opening blocked;
keep free of dust, lint, hair, and anything that may reduce airow.
• This vacuum cleaner creates suction and contains a revolving brush roll.
Keep hair, loose clothing, ngers, and all parts of body away from openings
and moving parts.
• Do not place cleaner on furniture or stairs as the brush roll may cause
damage. Place cleaner on oor with the handle in storage position while
using attachments.
• Do not pick up anything that is burning or smoking, such as cigarettes,
matches, or hot ashes.
• Do not use without dust bag in place.
• Belt pulleys can become hot during normal use. To prevent burns, avoid
touching the belt pulley when servicing the drive belt.
• Use extra care when cleaning on stairs.
• Do not use to pick up ammable or combustible liquids such as gasoline, or
use in areas where they may be present.
• Store your cleaner indoors in a cool, dry area.
• Keep your work area well lighted.
• Unplug electrical appliances before vacuuming them.
SAVE THESE INSTRUCTIONS
2
Page 3
To reduce the risk of electric shock, this appliance has a polarized plug (one blade wider than the other). This plug will t
in a polarized outlet only one way. If the plug does not t fully in the outlet, reverse the plug. If it still does not t, contact a
qualied electrician to install the proper outlet. Do not change the plug in any way.
GENERAL INFORMATION
The cleaner is designed to pick up dirt and dust particles. Avoid picking up hard or sharp objects with the cleaner to prevent
bag tears, hose clogs, and fan blade breakage with subsequent motor damage.
Service Information
The instructions in this booklet serve as a guide to routine maintenance. For additional service information telephone our toll
free number for the nearest Eureka Authorized Warranty Station. You should know the model, type and serial numbers
when you call:
.USA: 1-800-282-2886
Mexico: 5670-6169
Canada: 1-800-282-2886
If you prefer, you can write to:
The Eureka Company, Service Division, 807 North Main Street, Bloomington, Illinois 61701, USA.
In Canada write to The Eureka Company, 866 Langs Drive, Cambridge, Ontario N3N 2N7.
Refer to The Eureka Limited Warranty for complete service information.
DO NOT OIL the motor or the brush roll at any time. The bearings are permanently lubricated and sealed.
Thermal Cut Off
This vacuum cleaner has a special thermostat that protects the cleaner in case of motor overheating. If the cleaner suddenly
shuts off, push the switch pedal once and unplug the cleaner. Check the cleaner for a possible source of overheating such
as a full bag, a blocked hose or clogged lter. If these conditions are found, x them and wait at least 30 minutes before
attempting to use the cleaner. After the 30 minute period, plug the cleaner back in and turn on the switch. If the cleaner still
does not run, then take it to a Eureka Authorized Service Center for repair.
HOW TO ASSEMBLE
CAUTION: Assemble the cleaner before using.
CAUTION: Moving parts, make sure on/off switch
is in off position before plugging in.
Style B
NOTE: Features may vary by model yet all parts
assemble the same.
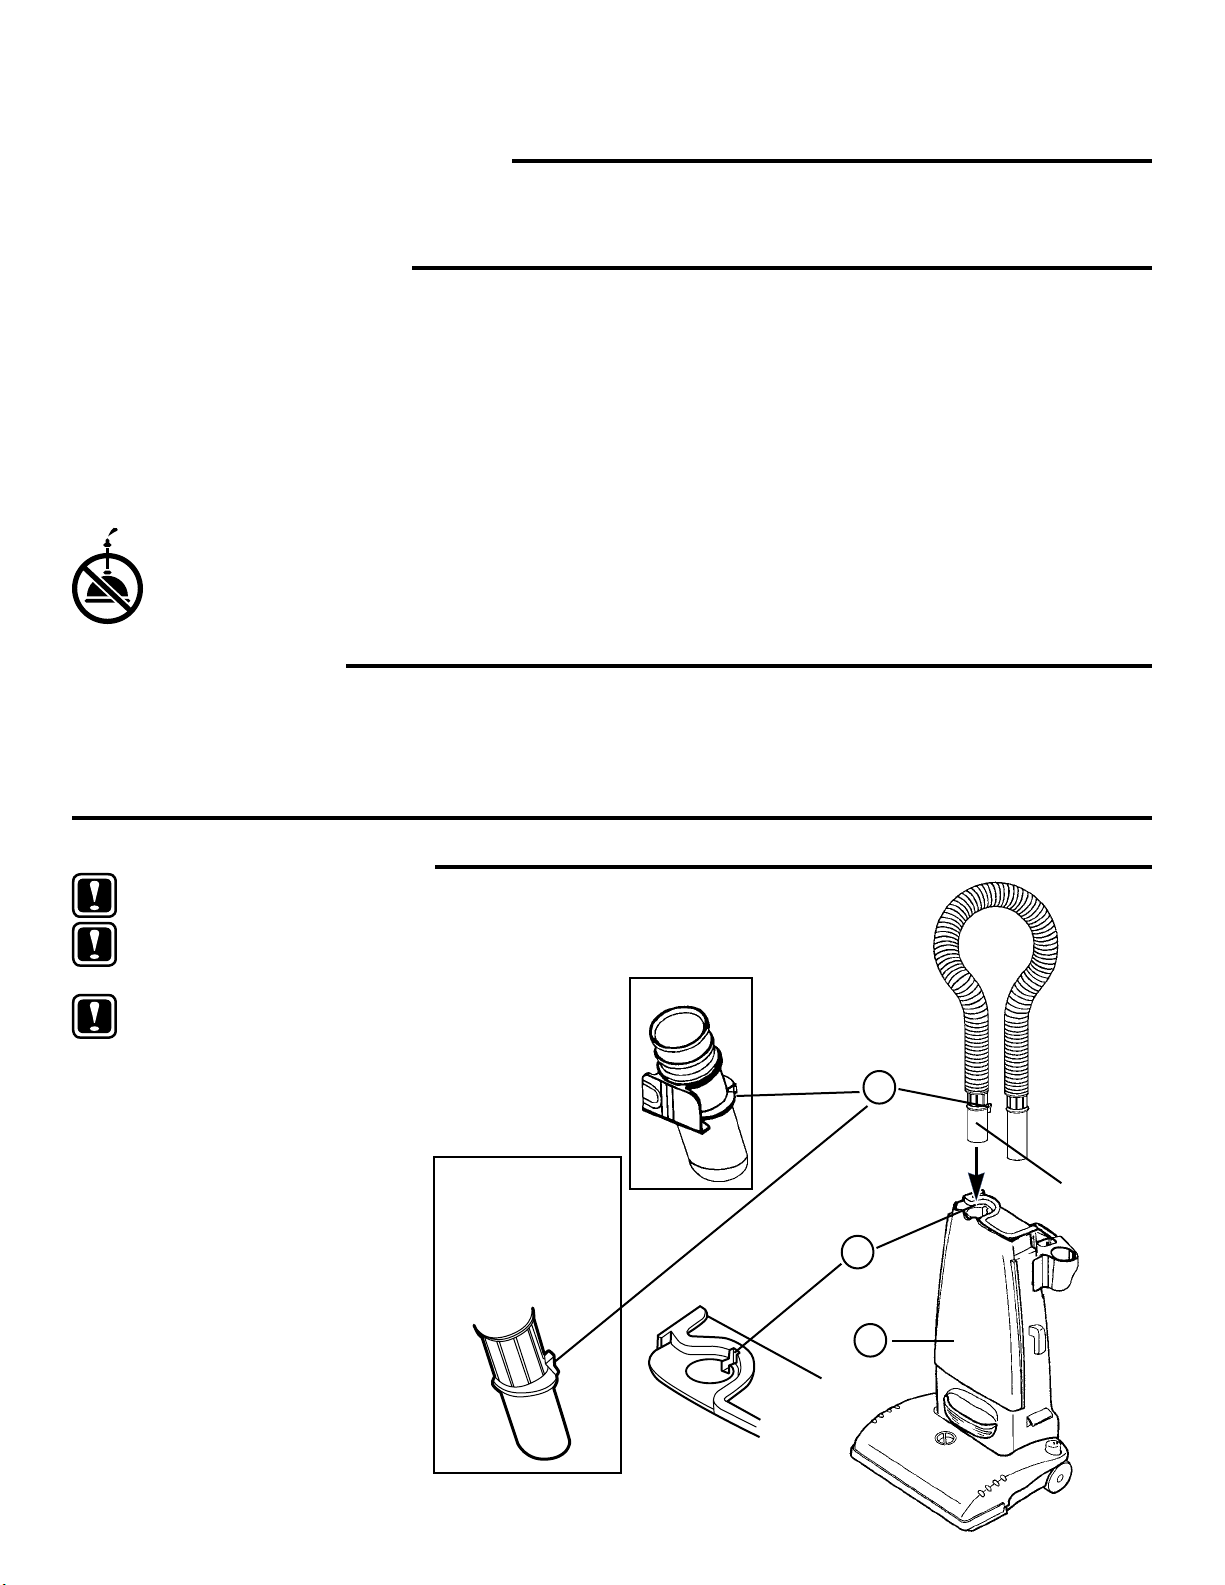
Step A Attach Hose
(Refer to your hose adapter style)
1. Remove the front bag cover.
(Only required with Style B
adapter.)
2. Locate the tab on the hose
adapter of the extension hose
(shortest end). There are two
styles, either A or B. Each
style assembles identically.
3. Insert hose adapter into
opening on top of unit. The
hose adapter tab must be
placed all the way down
into the notch.
Style A
IMPORTANT:
Hose
MUST BE
inserted
before attaching
the handle.
Tab
2
Hose
Adapter
Notch
3
1
3
Page 4
HOW TO ASSEMBLE (Continued)
Step B Attach Handle
CAUTION: Do not catch cord under handle.
Tab
5
Ledge
Groove
4
Groove
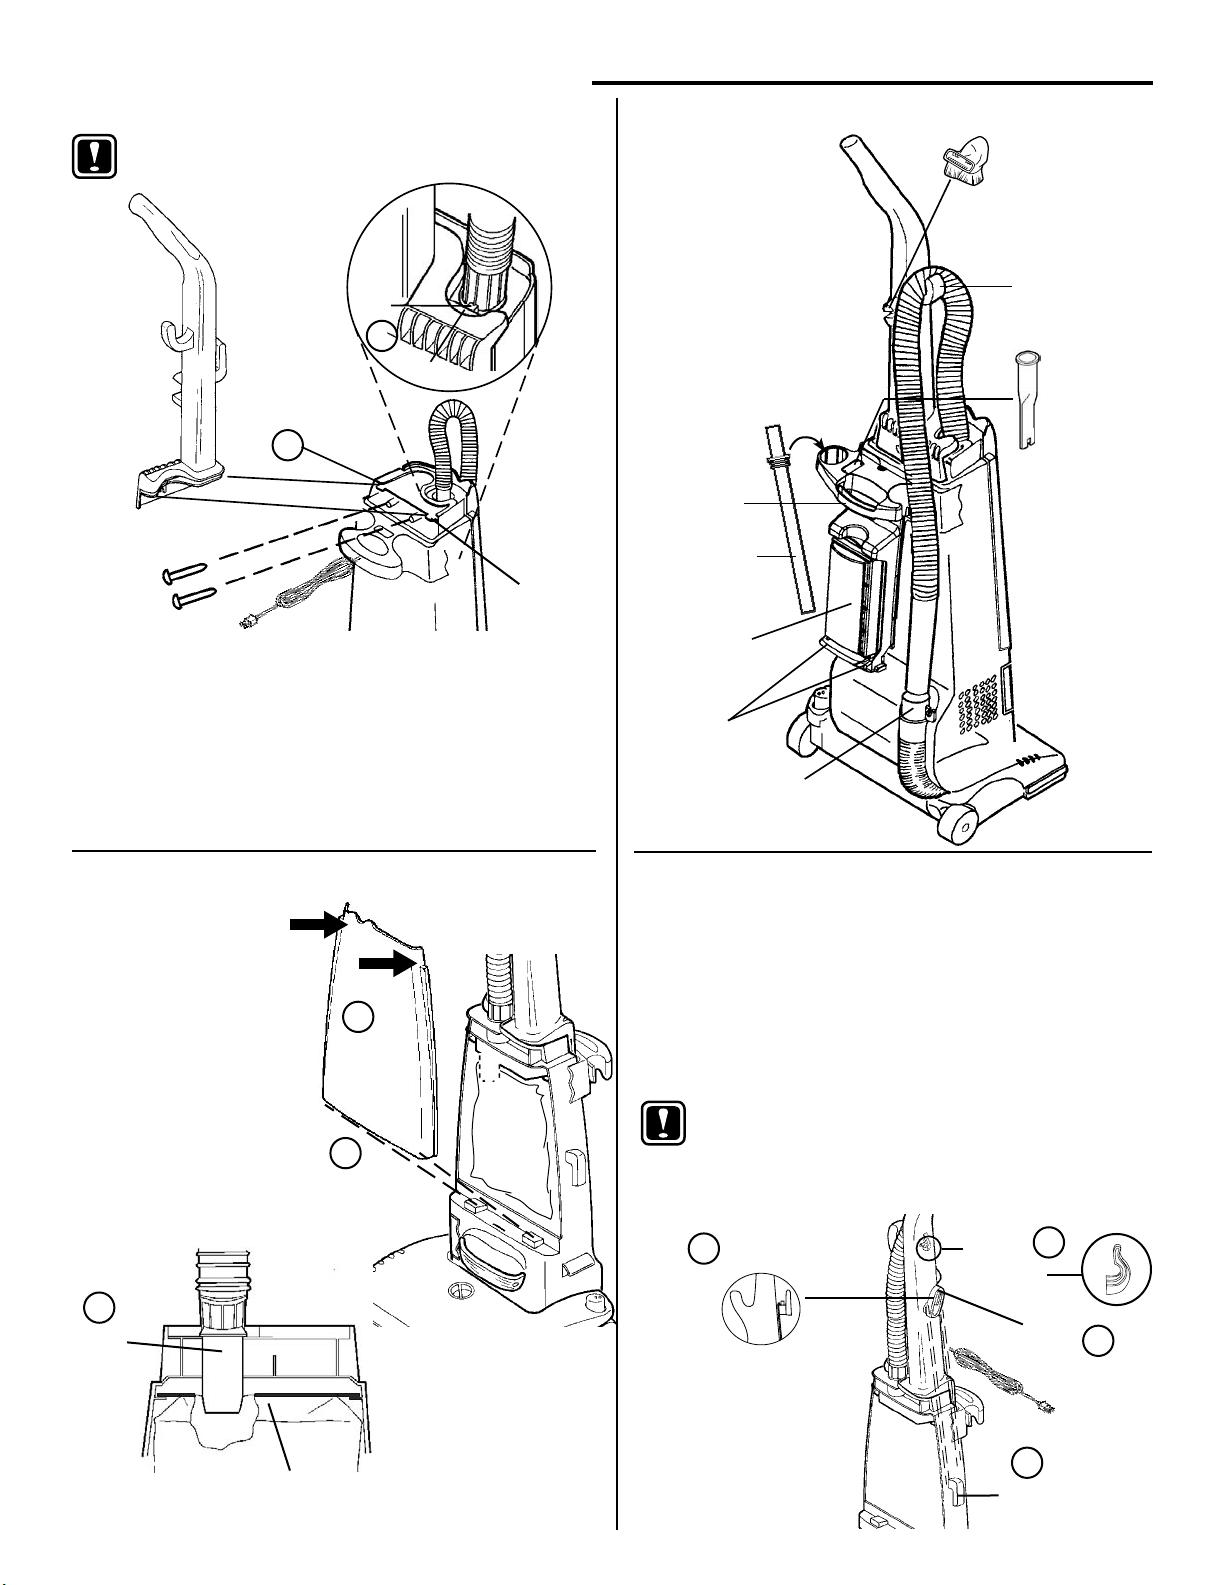
4. From rear of cleaner, align handle with groove and slide
onto cleaner. If necessary, use thumb and nger pressure
to slide handle into position.
5. Once handle is in place, check that the hose adapter tab
is completely secure under the ledge of the handle.
6. Attach handle with two 5/8 inch screws in the assembly
packet. Use either a slotted or Phillips® head screwdriver.
7. Replace front cover.
Step C Store Hose and Accessories
Combination
Tool
Hook
Crevice
Tool
Carrying
Handle
Extension
Wand or
Wands
HEPA Filter
(on some
models)
Tabs
Hose
Retainer
Step D Check Disposable Dust Bag
8. Remove front cover,
grasp both sides of
bag cover near top.
Push thumbs against
center of cover and
pull out on sides.
9. Check to be sure the
paper bag collar is
secure with the hose
adapter inside the
paper bag collar.
10. Replace front bag
cover.
9
Hose
Adapter
Paper Bag Collar
4
8
10
Step E Store Electrical Cord
11. You will nd your cord retainer either at the bottom of
the upper cord hook or on the handle above the upper
cord hook. Firmly push the electrical cord down into
either cord retainer. This will place the cord out of the
way the next time you vacuum.
12. Next wind the cord around the two cord hooks on the left
side of cleaner. On some models the upper cord hook turns
to release the cord. Turn the hook up to store the cord.
NOTE: For easier access to bag compartment,
when you store the electrical cord use a
gure 8 pattern.
13. Secure the plug to the cord to prevent unwinding.
11
Cord
Retainer
Cord
Retainer
11
Cord
Hook
12
Cord
Hook
12
Page 5
HOW TO USE
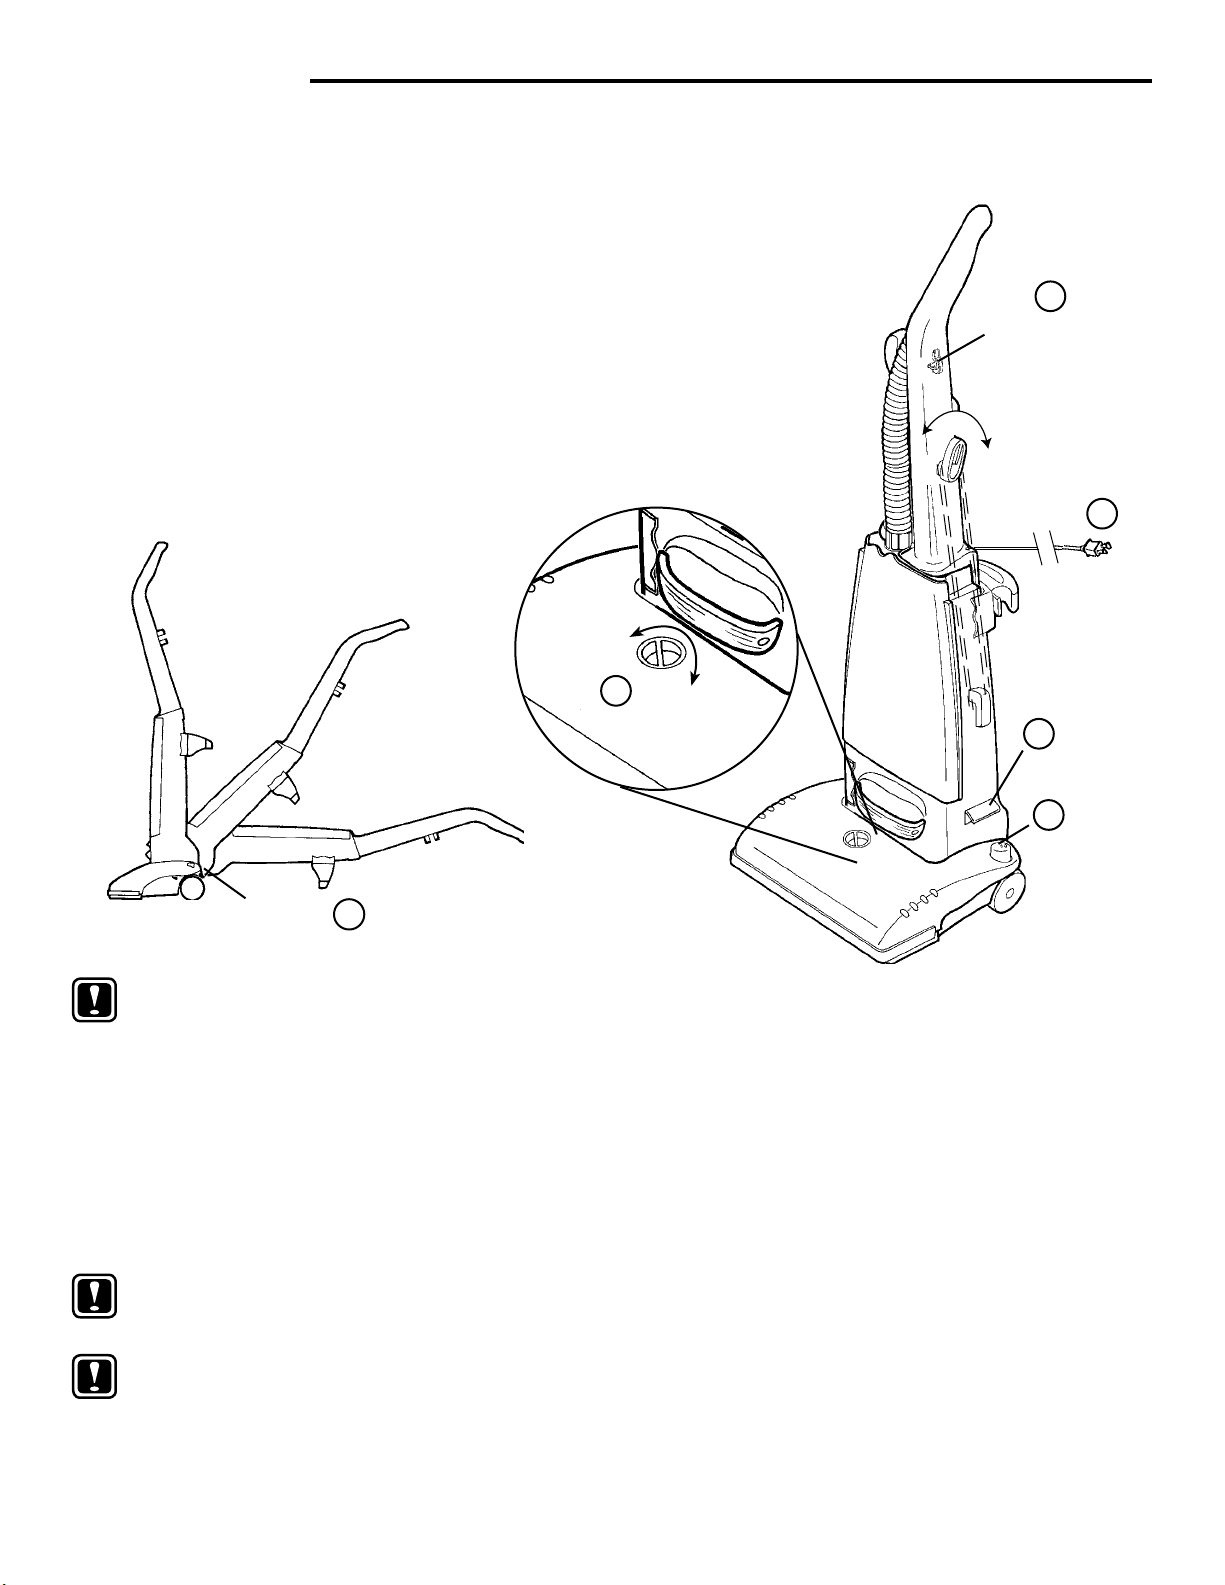
The upright vacuum cleaner design allows use on multiple types
of carpeting and on upholstery or bare oors with attachments.
When using the attachment tools, place the handle in the
upright position. Do not place cleaner on furniture or steps
as the brush roll may cause damage.
1. Adjust cleaner height setting knob to lowest position for
maximum cleaning. Adjust to a higher setting to make
pushing easier. For easy adjustments, tilt the cleaner back
to move the setting knob.
2. Unwind all of the electrical cord. Located above the cord
hook is the cord retainer. Firmly push the electric cord down
into the cord retainer. Using the cord retainer will keep the
electric cord up, out of the way while vacuuming.
3. Plug electrical cord into outlet.
4. Step on handle release. Pull handle back to a comfortable
position.
5. Push On or Off power switch.
Store or
Use Attachments
2
Cord Retainer
3
LOW HIGH
Handle
Release
Use
Clean
Under
3
Cleaner Height Setting
WARNING: Avoid injury. Keep loose clothing, hair,
fingers, and all other parts of body
away from any moving part (such as
the revolving brush). Turn off the switch
and unplug the cleaner before changing
the cleaner height setting.
The front of the cleaner has an adjustment that raises or lowers
the cleaner base to match the type of carpet. With the cleaner
cord unplugged, set the adjustment to lowest setting for maximum
cleaning. If the cleaner is difcult to push, move adjustment to
next highest setting until cleaner is comfortable to push. The
brush roll must reach the carpet for effective cleaning.
NOTE: For ease in moving the adjustment knob, place
handle in operating position and tilt cleaner
back to remove weight from front wheels.
NOTE: When handle is in upright position, brush
roll is lifted off carpet. This is normal. Height
adjustment will not change brush roll level
until the cleanerʼs handle is moved into the
operating position.
1
5
4
Thermal Cut Off
This cleaner has a special thermostat that protects the
cleaner in case of motor overheating. If the cleaner
suddenly turns off, follow this procedure:
1. Push on/off pedal once.
2. Unplug cleaner.
3. Check for source of overheating problem (i.e. full bag,
clogged hose or clogged lter).
4. If a full bag, clogged hose or clogged lter is found,
replace the bag, unclog the hose or replace the lters.
5. Wait at least 30 minutes before attempting to reuse the
cleaner.
6. After 30 minute cool down period, plug the cleaner in and
push the switch pedal. The cleaner should turn on.
7. If the cleaner still does not operate, take it to any Eureka
Authorized Service Center for repair.
ON/OFF
Handle
Release
5
Page 6
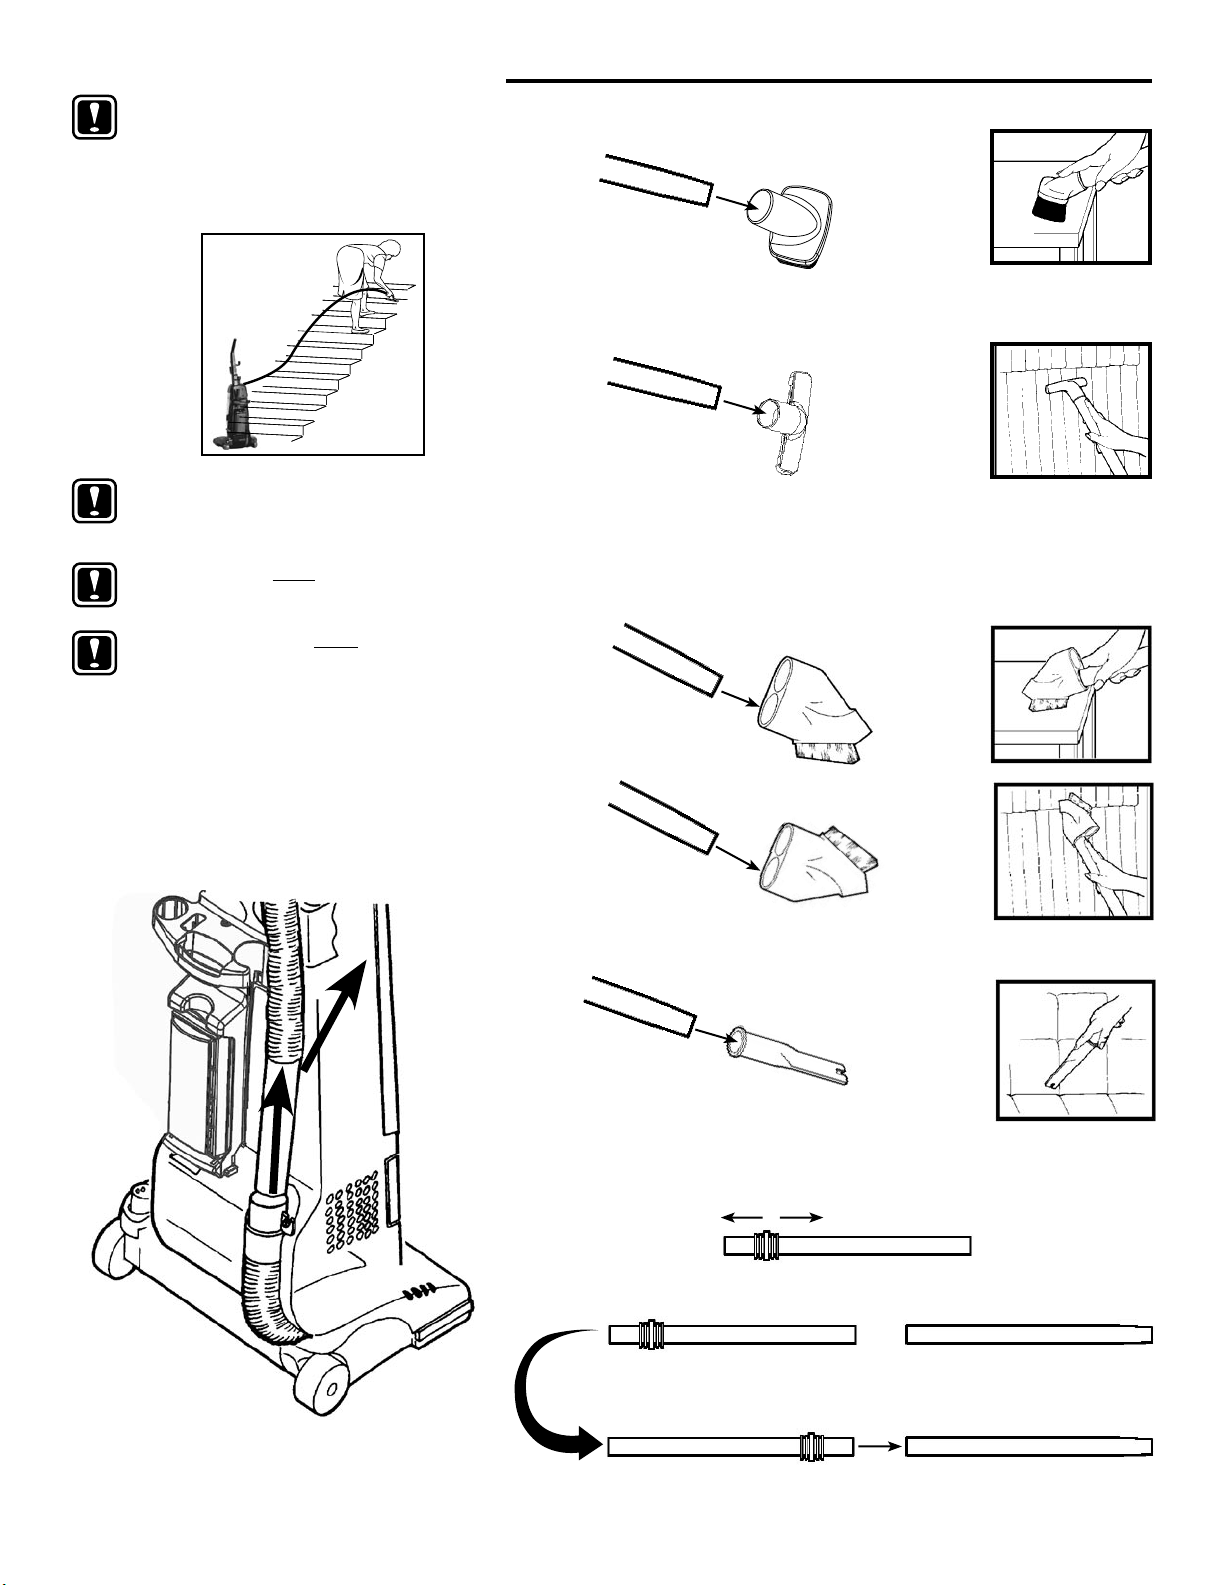
How To Use Accessories
NOTE: Do not place cleaner on furniture or
steps as the brush roll may cause
damage. Place cleaner on oor with
the handle in storage position while
using accessories.
Always work with the cleaner below you,
pulling hose from side of cleaner; not the
back or the front of the cleaner.
Dusting Brush is for furniture, blinds, books, lamp shades,
shelves. (On some models.)
Dusting Brush
Upholstery Nozzle is for curtains, draperies, cushions,
fabrics. (On some models.)
Upholstery
Nozzle
Combination Tool gives two types of cleaning tools. (On some
models.)
NEVER STAND ANY CLEANER ABOVE
YOU.
NEVER POSITION ANY CLEANER ON
THE STAIRS AS THIS COULD DAMAGE
THE CARPET.
Depending on which cleaner you purchased, you can
have any combination of the following accessories.
1. Remove hose from rear of cleaner.
2. Place desired accessory onto end of hose or
wand.
• Use brush side to dust furniture, blinds, books, lamps, shelves.
• Use upholstery side for curtains, draperies, cushions, fabrics.
Dusting
Side
Upholstery
Side
Crevice Tool cleans corners, baseboards, between cushions.
Crevice Tool
Extension Wands (Some models use 1 wand)
Nested Extension Wands to add reach.
• Grasp both wands near ridges.
• Pull apart.
6
• Turn ridge end to center. • Push wands together.
Page 7
HOW TO MAINTAIN
The instructions in this booklet serve as a guide to routine
maintenance. To avoid unnecessary service calls, check the
bag, belt, and brush roll often.
Brush Roll
The brush roll turns as it sweeps and combs the carpet nap.
Remove hair and threads from the brush roll so it continues
brushing the carpet. To maintain the most efcient cleaning, the
bristles must touch the carpet. To test the bristle length, hold a
ruler against the underneath side of the cleaner. If the bristles
no longer touch the ruler, replace the brush roll.
Brush Roll Belt
The brush roll belt turns the brush roll to agitate, sweep, and
comb the carpet nap. Check the belt regularly to be sure it is in
good condition. Replace the belt if it stretches, cracks or loses
tension. Cut away any hair or threads wound around the brush
roll or the belt pulley because the buildup could cause the belt
to rotate unevenly.
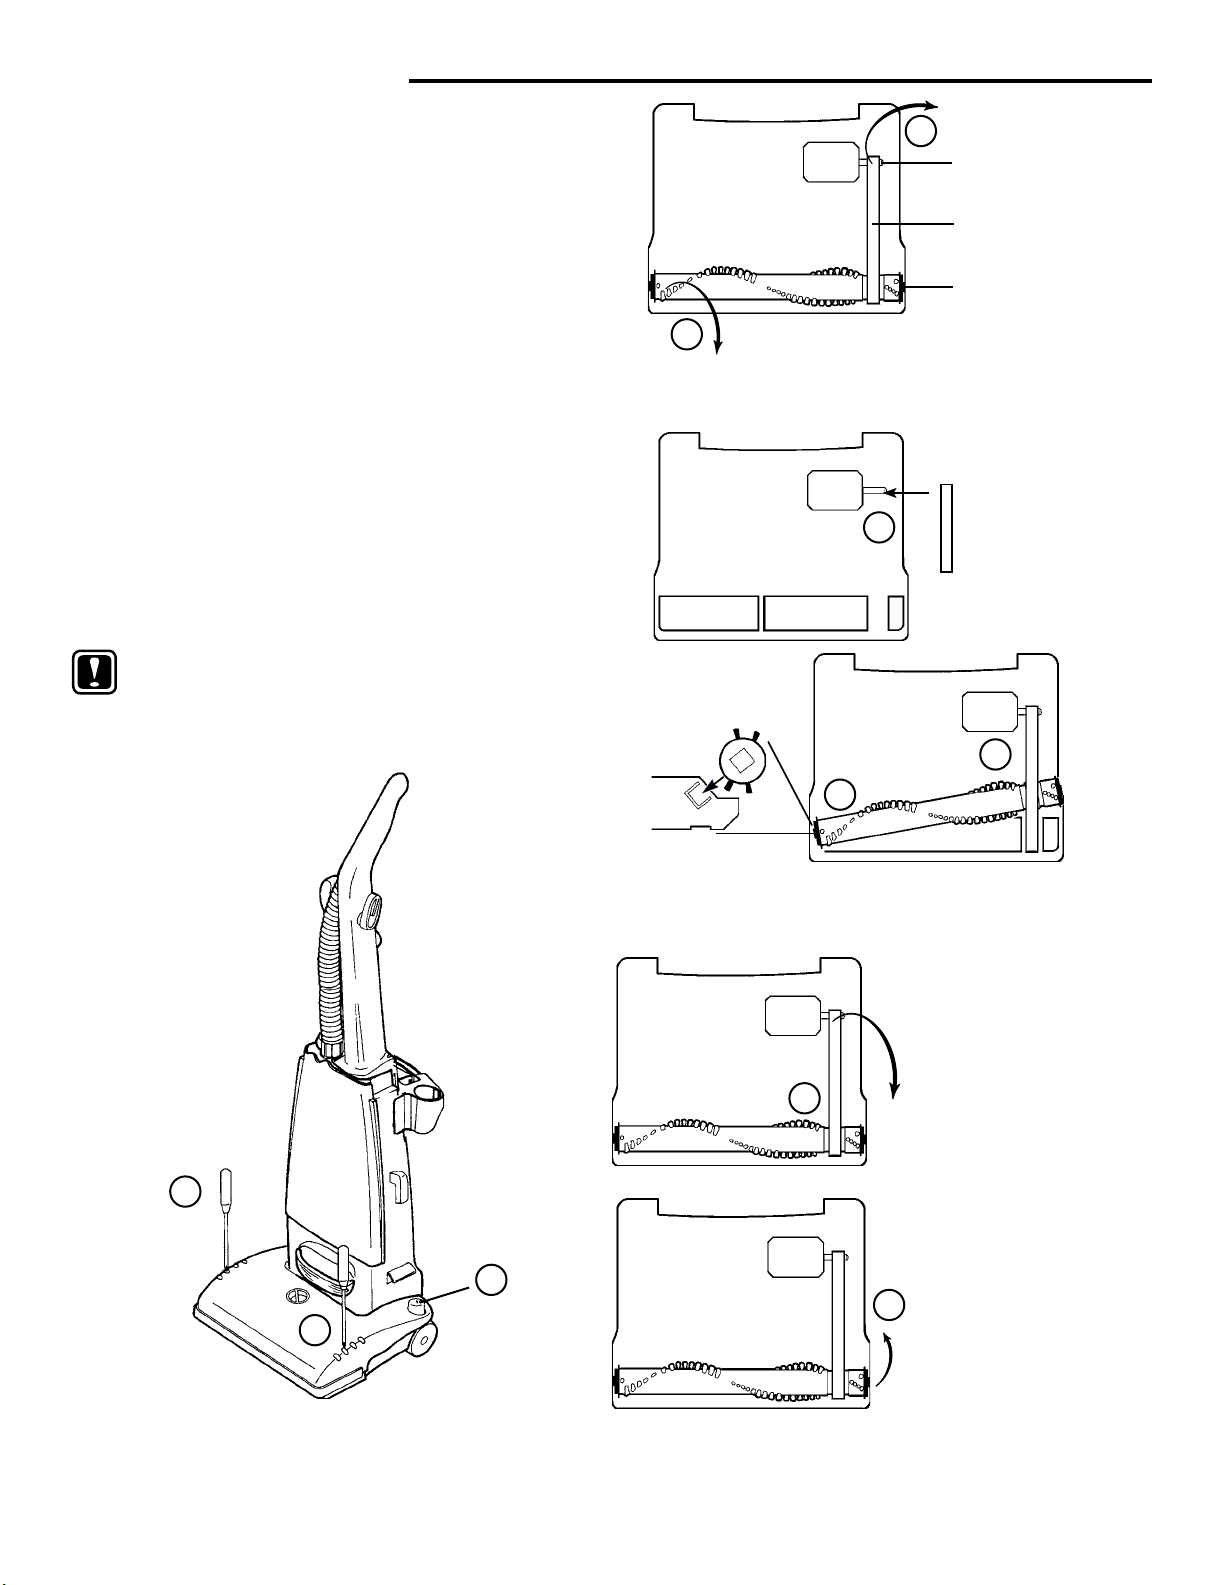
How To Replace Brush Roll Belt
NOTE: Turn off the switch and unplug the electrical
cord before replacing belt. Belt pulleys can
become hot during normal use. To prevent
injury, avoid touching the motor pulley when
checking the belt.
3
3. Lift left end of brush roll.
4. Remove and discard belt.
5
7
4
Motor
Pulley
Belt
Brush
Roll
5. Place new belt
around motor
pulley.
6
2
1
2
1. Lower handle to oor to change belt.
2. Loosen, but do not remove, two screws to release
hood. Lift hood to remove.
Left Side View
6. Place belt around brush roll pulley.
7. Align left end cap with square in base. Push end
cap into place; see left side view.
8. Pull right side of brush
roll to stretch belt. Se-
8
Use GENUINE EUREKA replacement belt, 54312.
Look for the GENUINE EUREKA product symbol.
cure right end cap into
base.
9. Rotate brush roll to seat
belt.
10. Replace the hood. Make
sure hood front is behind
furniture guard. Hood
9
should seat onto selflocating screw tabs.
11. Tighten screws.
7
Page 8
HOW TO MAINTAIN (Continued)
Disposable Dust Bag and Filters
The disposable dust bag plays a very important role in
the efciency of a vacuum cleaner. The purpose of the
paper bag is to trap dirt. As the bag traps dirt, it must also
be porous enough to allow air to pass on through. If the
paper bag becomes clogged, no air can pass through the
cleaner and no cleaning can take place regardless of how
powerful the unit. Change the dust bag and check the
lters frequently. Some ne particles can restrict airow
very quickly and will decrease performance even before
the bag appears to be full.
When vacuuming carpet fresheners or cleaners, powder,
plaster dust, or similar ne substances, the bag and lters
may require more frequent maintenance.
How To Replace Bags–Style AA Filteraire
NOTE: Turn off the switch and unplug the
electrical cord before changing dust
bag. Never operate the vacuum cleaner
without the dust bag or the lter.
NOTE: Style AA Filteraire bags must be used
to maintain HEPA grade ltration and
prolong the life of the HEPA lter. Also
use AA Filteraire bags to maintain Micron
grade ltration and prolong the life of the
Micron lter.
NOTE: Models without HEPA or Micron lter
option, may use Style AA bags rather
than Style AA Filteraire.
It may be more convenient to lower the handle to the oor
before changing the bag.
* We recommend using only Genuine Eureka Filteraire
Bags, part number 58623.
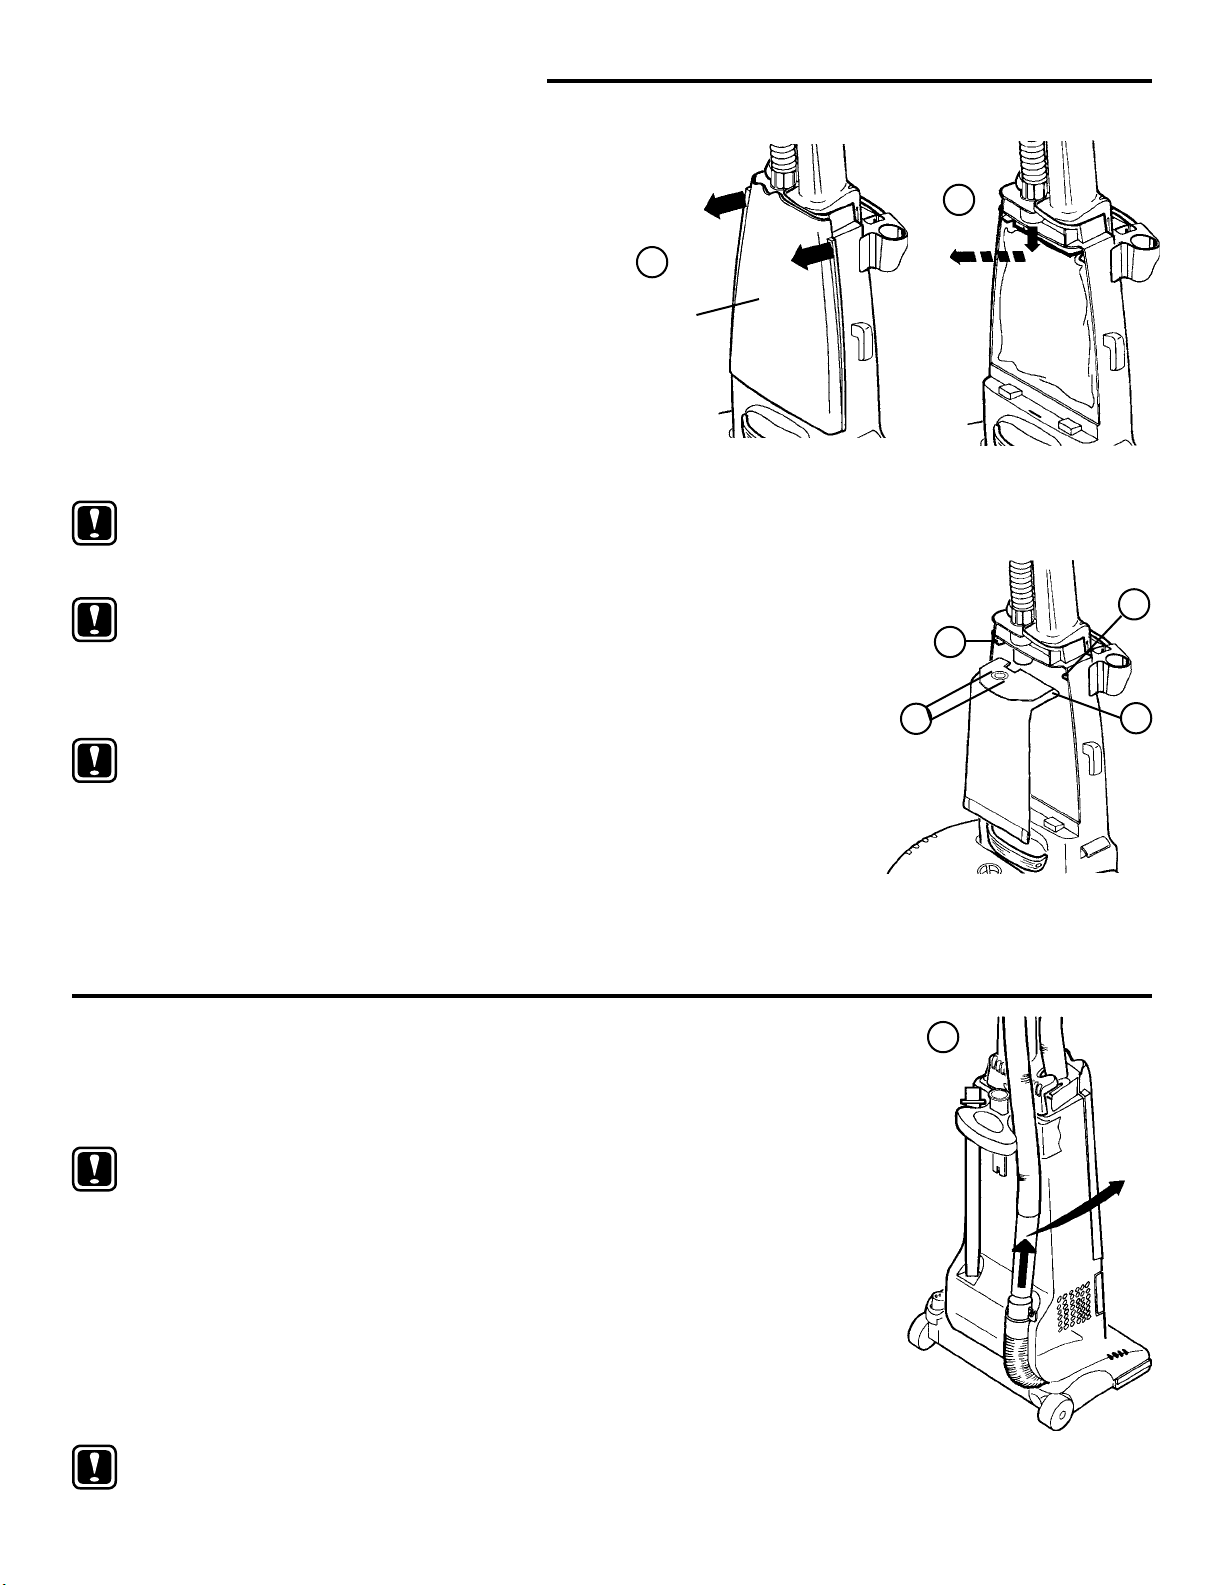
To Remove Bag:
B
A
Front
Cover
A. Remove front cover. Grasp both sides of bag cover near
top. Push thumbs against center of cover and pull out on
sides.
B. Grasp bag collar; pull down slightly and out to remove bag.
To Replace New Bag:
C. Fold sides of paper bag
below bag collar.
D. Align bag collar hole and
notch with hose adapter.
E. Place bag collar corners
on ledges. Push collar
to rear of compartment.
Check to be sure hose
adapter inserts into bag
collar.
F. Tuck bag into bottom and along sides.
G. Replace front cover. Make sure disposable bag does not
catch under front cover.
E
D
E
C
How to Check and Clear Hose Blockages
Low suction or poor pickup may be due to a blockage in the vacuum cleaner.
1. Remove hose and check suction at end of hose - if little or no suction, check disposable
dust bag. Change if needed. If no improvement proceed to step 2.
NOTE: Turn off the switch and unplug the electrical cord before clearing hose.
2. Remove the handle from the vacuum cleaner by removing the two screws and sliding
the handle towards the rear.
3. Once the handle is removed, disconnect the attachment hose from the unit by lifting
straight up on the hose adapter.
Check for any obstructions that may be in the hose. Any obstructions can be removed by
using a blunt instrument to clear the hose. Flexing the hose may help loosen the clog.
4. Reinstall the hose after clearing the clog. Make sure the hose is inserted into the top of
the vacuum cleaner before reattaching the handle.
NOTE: If no improvement in performance on carpet, proceed to following page.
8
1
1. Remove hose and check
suction at end of hose.
Page 9
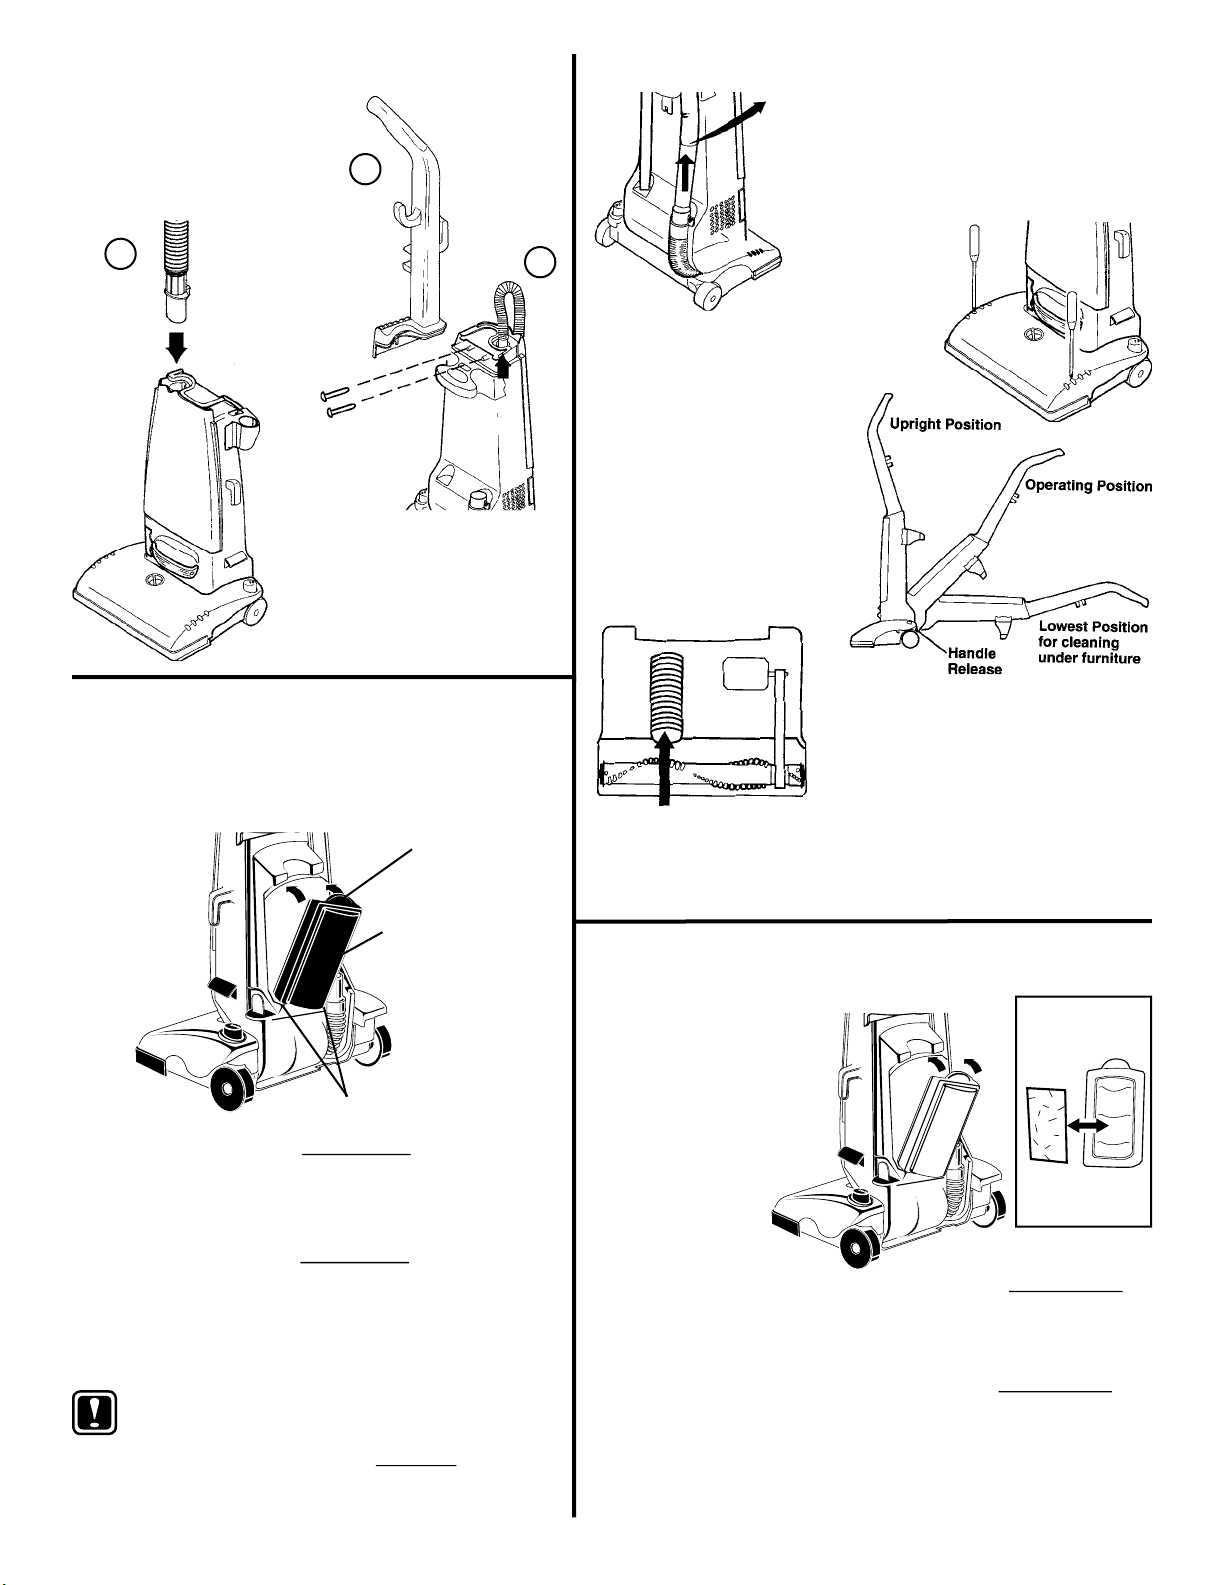
How to Check and Clear Hose
Blockages
2. Remove handle.
3. Disconnect hose.
(Continued)
2
How to Check and Clear Blockages in Base
1. Remove the attachment hose from
the lower hose retainer and look into
the hose retainer for any obstructions.
Proceed to Step 2 to check for any other
blockages.
4
4. Reinstall the hose
and handle.
3
HEPA Cartridge Filters
(Only for models with HEPA cartridge.)
Check the HEPA lters with each disposable dust bag
change. Replace twice a year or after every six bag
changes.
Latch
Filter Cartridge
(One complete
unit)
Tabs
To remove HEPA
1. Push down latch and pull lter cassette back.
Then lift lter up and remove.
2.
cartridge
lters
2. Remove the hood by loosening the
two screws located on the top of
the hood and lifting upward.
Step on the handle release
3.
and lower the handle all
the way to the oor.
4. Check for blockages in the brush roll
area and remove any obstructions
found there. The base hose can be
cleared of any blockage by using a
blunt instrument.
5. After the blockage is removed, replace the hood and tighten
the two hood screws (see Fig. 2). Raise the handle to the
upright position (see Fig. 3) and replace the hose into the
lower hose retainer.
HEPA/Micron Filters in Filter Frame
models with HEPA/Micron lter frame)
Check the HEPA/Micron
lter with each disposable
dust bag change. Replace
twice a year or after every
six bag changes.
(Only for
Filter Frame plus
lter (depending
on your vacuum
model)
Filter
Filter
Frame
To replace HEPA
1. Place bottom tabs of lter cassette into slots.
Rotate lter toward cleaner.
2.
3. Push upward on the latch to secure into
place.
NOTE: To have the benet of a sealed
HEPA system, you must use
one of the HEPA cartridge
systems.
cartridge
lters
lter
To remove HEPA/Micron lters from lter frame
1. Push down latch and pull lter frame back.
Then lift lter up and out of lter frame.
2.
To replace HEPA/Micron lters into
Place new lter in lter frame. Place bottom tabs of lter frame
1.
into slots.
2. Rotate lter frame toward cleaner.
3. Push upward on the latch to secure into place.
lter frame
.
.
9
Page 10
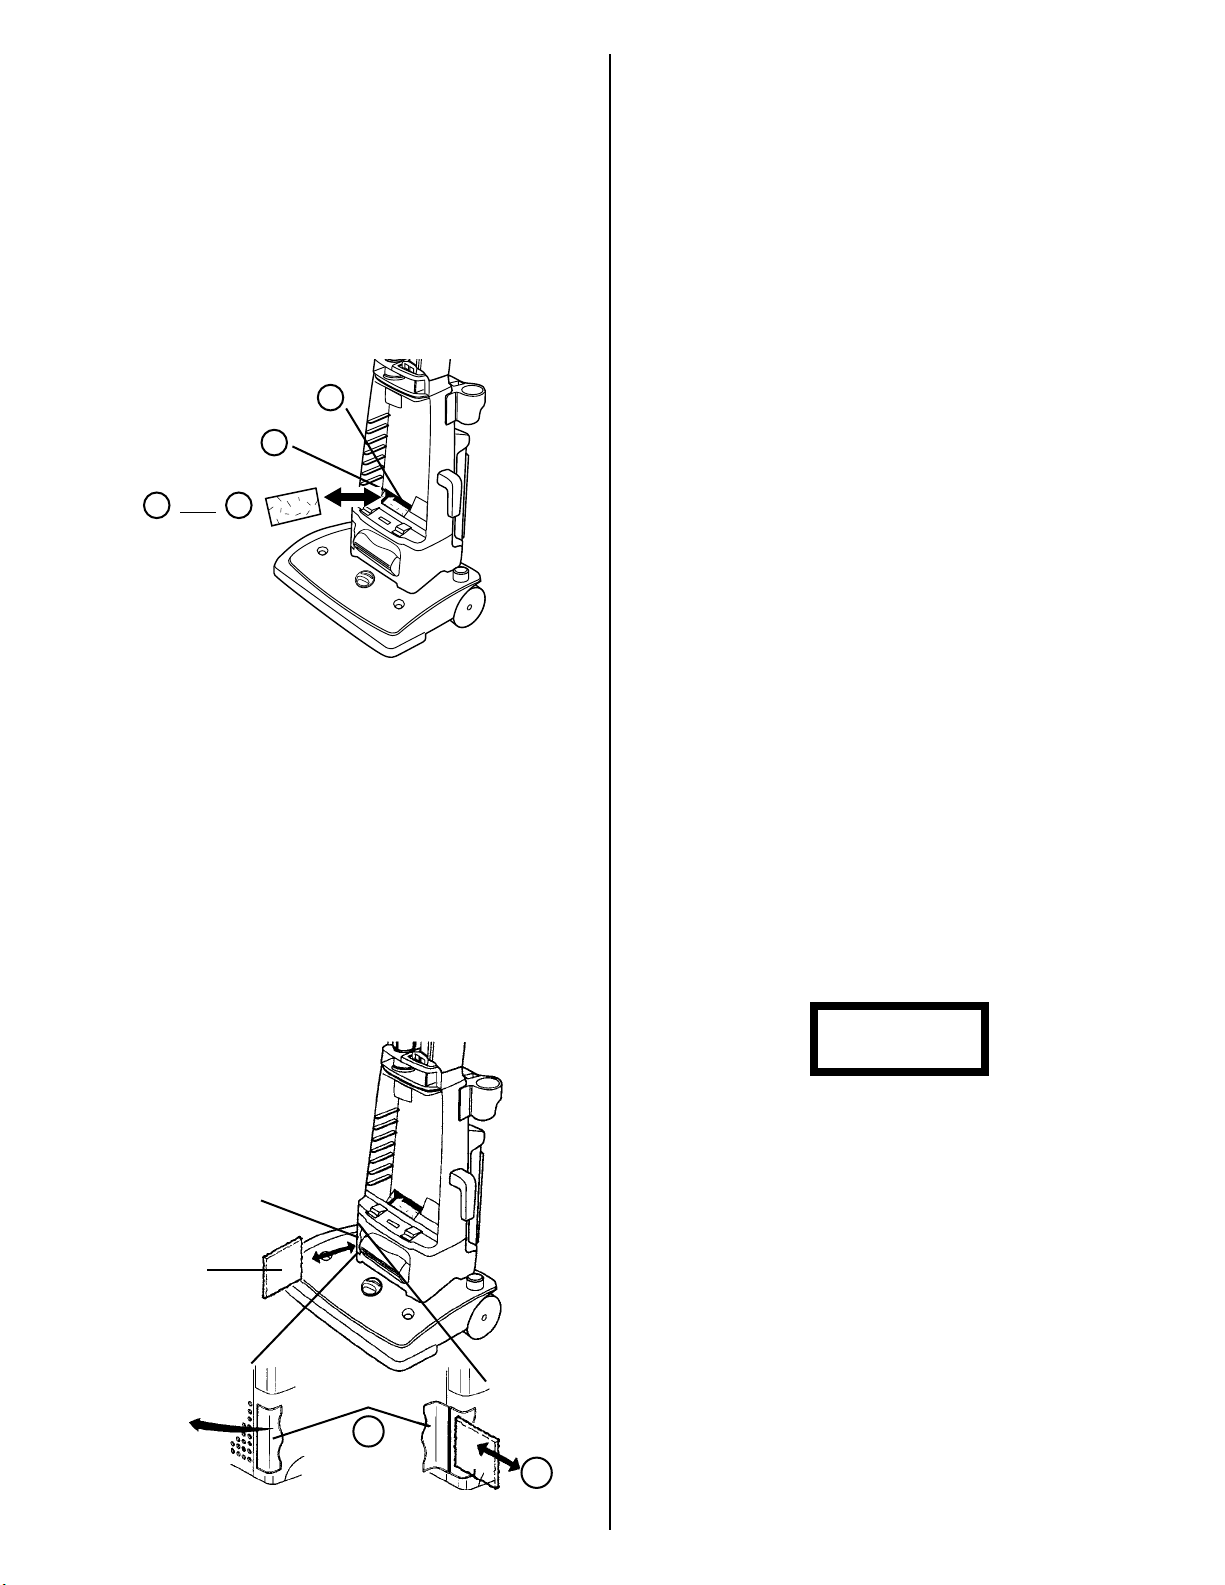
Motor Filter
Check the motor lter with each disposable dust bag change.
Clean or replace as needed.
To Clean Motor Filter
1. Remove lter from inside bag compartment, lower left
side.
2. Shake lter to remove excess dust. If necessary, the lter
can be cleaned by vacuuming with another cleaner.
3. Reinstall lter with stiff/printed side down. Slide under
back ledge and lter retainer. Install with colored/smooth
side down.
Back Ledge
Filter Retainer
3
3
31 and
Micron and HEPA Exhaust Filters
(Only for models with the exhaust lter door)
Change micron or HEPA exhaust lter every 3 months.
To Replace Micron or HEPA
Exhaust Filter
1. Lower the handle. Open exhaust lter door; push toward
the left side.
2. Grasp lter and pull out.
3. Push new lter into cleaner, smooth side facing out .
4. Close exhaust lter door; push toward right side.
Replace all lters with genuine Eureka replacement
lters.
THE EUREKA LIMITED WARRANTY
What This Warranty Covers
Your Eureka cleaner is warranted to be free from all defects in material and workmanship
in normal household use for a period of one year. The warranty is granted only to the
original purchaser and members of his or her immediate household. The warranty is
subject to the following provisions.
What This Warranty Does Not Cover
• Parts of the cleaner that require replacement under normal use, such as disposable dust
bags, lters, drive belts, light bulbs, and brush roll bristles, impellers and cleaning.
• Damages or malfunctions caused by negligence, abuse, or use not in accordance with
the Ownerʼs Guide.
• Defects or damages caused by unauthorized service or the use of other than Genuine
Eureka parts.
What The Eureka Company Will Do
The Eureka Company will, at its option, repair or replace a defective cleaner or cleaner
part that is covered by this warranty. As a matter of warranty policy, the Eureka Company
will not refund the consumerʼs purchase price.
Warranty Registration
Please ll out and return the warranty registration card accompanying your cleaner.
Obtaining Warranty Service
To obtain warranty service you must return the defective cleaner or cleaner part along with
proof of purchase to any Eureka Authorized Warranty Station.
You will nd the nearest location in the Yellow Pages, under “Vacuum Cleaners–Service
and Repair.” Be certain that the Warranty Station is “Eureka Authorized.”
For the location of the nearest Eureka Authorized Warranty Station or for service
information, telephone toll free:
USA: 1-800-282-2886
Mexico: 5670-6169
Canada: 1-800-282-2886
If you prefer, you can write to The Eureka Company, Service Division, 807 North Main
Street, Bloomington, Illinois 61701, USA. In Canada write to The Eureka Company, 866
Langs Drive, Cambridge, Ontario N3H 2N7.
If it is necessary to ship the cleaner outside your community to obtain warranty repair,
you must pay the shipping charges to the Eureka Authorized Warranty Station.
Return shipping charges will be paid by the Warranty Station. When returning parts for repair,
please include the model, type, and serial number from the data plate on the cleaner.
Further Limitations and Exclusions
Any warranty that may be implied in connection with your purchase or use of the cleaner,
including any warranty of Merchantability or any warranty for Fitness For A Particular
Purpose is limited to the duration of this warranty. Some states do not allow limitations
on how long an implied warranty lasts, so the above limitations may not apply to you.
Your relief for the breach of this warranty is limited to the relief expressly provided
above. In no event shall Eureka be liable for any consequential or incidental damages
you may incur in connection with your purchase or use of the cleaner. Some states do not
allow the exclusion or limitation of incidental or consequential damages, so the above
limitation or exclusion may not apply to you.
This warranty gives you specic legal rights. You may also have other rights which
vary by state.
GENUINE
EUREKA PRODUCT
10
Micron or
HEPA
Filter
Exhaust
Filter
Door
Exhaust Filter
Door
2
Questions & Answers about Genuine Eureka Products
Q: Why should I use only Genuine Eureka paper bags, belts, and parts in my Eureka
vacuum cleaner?
A:
Using Genuine Eureka Products, which are made to our exacting specications
and engineered with emphasis on quality, performance, and customer satisfaction,
ensures the long life and cleaning efciency of your vacuum cleaner. Overall, this
saves you money and helps to keep your home clean.
Q: How can I be sure I am using only genuine Eureka products in my vacuum
cleaner?
A:
Typically, packaged products and paper bags can be identied by a “Genuine Eureka
Product” symbol (see illustration above). For further identication assistance, you
may call our toll-free number, 1-800-282-2886, for the location of a nearby Eureka
Authorized Warranty Station.
Q: Are there any differences between “made to t” or “imitation” and Genuine Eureka
paper bags, belts, and parts?
A:
Yes, there are some very important differences in materials, quality, and reliability.
Many customers have mistakenly purchased “imitation” paper bags and parts
while thinking they purchased genuine. Unfortunately, many of these customers
discovered the differences after they experienced related difculties.
3
Household Warranty
abs 190
For Genuine Eureka Value, Accept No Imitations!
THE EUREKA COMPANY
Bloomington, Illinois 61701
 Loading...