

Eureka 437AZ, 430 Owner’s Manual
UprightVacuumCleaner
HouseholdType
Owner'sGuide- 430Series
ForQuickAssembly Instructions, seebackcover.
Aspiradoravertical
Tipodornestico
Guiadel Propietario- Serie430
Veaaldorsolasinstruccionesde armadorapido,
iMPORTANT
De not return this product to the store.
Forassembly problems or questions, for replacement of
broken or missing items, orto order replacement parts and
accessories to be shipped directly to you contact: Eureka
CustomerService toll free at 1-800-282-2885", 8 a.m. to
7:30 p.m. (CST),Monday - Fridayand 10 a.m. to 5:30 p.m.
Saturday. Or visit our web site, www.enreka.com.
*In Mexico call (55) 5343-4384.
®
)
I ,
1
IMPORTANTE
Nodevuelva esteproducte a la tienda.
Sitiene problemas con el ensamblajeo cualquier pregunta,
parareemplazarpiezasfaltantes o daSadaso parahacer
pedidosdirectosde piezasde repuestoy accesorios,p6ngase
en contacto con:Servicio al cliente Eurekaal nt_merogratuito
1-800-282-2886" de lunesa viernes de 8:00 a.m.a7:30 p.m.
(heradelcentre)y lossabados de 10:00 a.m. a 6:30 p.m.
Tambienpuedevisitar nuestrositioen Internet:
www.eoreka.eom.
*En M_xice iiame al (55) 5343-4384.
PartNo.77297(4/06) ©2006 ElectroluxHomeCareProductsLtd. Printedin China
/!7:/1(7_LS_4
PleaseRetain
Wesuggest yourecordthe model,type and serialnumbers
below.They are locatedonthe back ofyourcleaner.For
prompt and completeservice information,always refer to
these numberswhen inquiring about service.
Model& Type
SerialNo.
it is also important to keepyour receipt as proof of date
of purchase.
Perfavor gnardeestainformaciCn
Lesugerimosque registre los numerosde models,tipoyserie
acontinuacion.Los mismosestanubicadosen la parletrasera
de la aspiradora.Paraobtenerinfou_aciCndeserviciorapiday
completa,siempremencieneestos numeroscuandesolicite
dichainfou_aciCn.
Modeloy Tipe
No.de serie
Tambi_nes importante guardar el recibo de compra
come comprobante de la fecha de compra.
index
ImportantSafeguards ............................... 3
PartsList......................................... 5
Howto Assemble .................................. 6
Howto Use ..................................... 6-8
Howto Maintain................................. 8-10
CustomerOrderForm ........................... 11-12
Warranty ........................................ 13
Generalinformation
Usethe cleanerto pick updirt anddust particles.Avoid picking
up hard or sharp objects that could damagethe vacuum cleaner.
DONOTOILthe motororthe brushrollat anytime. The
motorand brushroll are permanentlysealed andlubricated.
AutomaticMotorShut-Off
Toprotectfrom overheating, this vacuumcleaner isequipped
with athermostat which automaticallyshuts off the suction
motor if it overheats.Shouldthis happen:
1.Turnoff the switch and unplug the cleanerbecausethe
thermostat will allowthe cleanerto automaticallystart running
againwhen the motor cools(approximately30 minutes).
2. Checkthe dust cup and filter regularly,as afull dust cup or
dirty filter could cause the motorto overheat.
3. Calla Eureka AuthorizedWarrantyStation ifthe cleaner
will not operate after cooling forapproximately 30 minutes.
Serviceinformation
Theinstructions in this booklet serve asa guide to routine
maintenance.Foradditionalserviceinformation,telephone our
toll free numberfor the nearest EurekaAuthorized Warranty
Station.Yon shouldknow the model, type and serial nnmber
or date codewhen you call:
If you prefer,you can write to ElectroluxHomeCareProducts
NorthAmedca, Customer Service,RO.Box3900, Peoria,Illinois,
61612, USA.In Canada,write to ElectroluxHomeCareProducts
Canada,5855Terry FoxWay,Mississauga,OntarioLSV 3E4.
Referto the EurekaWarrantyforcomplete service information,
USA:1-800-282-2886
Mexico: (55) 5343-4384
Canada: 1-800-282-2886
vtww.eureka.com
Indice
Precaucionesimportantes............................ 4
Lista de partes ...................................... 5
Armado ......................................... 6
Modedeuse .................................... 6-8
Mantenimiento ................................. 8-10
Fou_ulario de pedidodelcliente ................... 11-12
6arantia limitada ................................. 14
InformaciCngeneral
Usela aspiradoraparaaspirar tierra y particulas depelvo.Evite
aspirar objetosduros ofilosos que puedandafiarla.
(_NO LUBRIOUEel motor o elcepillo giraterioen ningt]n
memento.Ambosestan permanentementeselladosy
lubricades.
Corteautom_tice del motor
Parapretegerla de que se recaliente,esta aspiraderaviene
equipadacon un termostato queapaga autom&ticamenteel
motor si se recalienta.Si esto sucede:
1.Apague el interrupter decorriente y desenchnfe la
aspiradora porque el termestato permitira que la aspiradera
arranqueautomaticamentecuandoel motorse enfrie
(aproximadamente30 minutes).
2. Revise la mangnera, el recipiente para polvo y el fiitro
regularmente ya que lamanguera obstruida, el recipiente
para polveIleno e elfiltro sucio puede causarque el motor
se recaliente.
3. Llame al Servicio de reparaciones y partes de Eureka si la
aspiradera no funcienadespuesde haberseenfriade
aproximadamente30 minutes.
InformaciCndel servicio
Las instruccionesde estefolleto sirvencome guia para el
mantenimientode rutina.ParainformaciCnadicionalsobre el
servicio,Ilamea nuestronumero teldCnico gratuito afin de
conocer la direcciCndel Centrede GarantiaAutorizadode Eureka
mas cercano. Cumrdollame, debetenor a mane el modelo,
tipo y n_mero de serie o el cCdigo defeeha:
Si Io prefiere, puede dirigirse per escrito a ElectroluxHomeCare
Products NorthAmerica, CustomerService,RO.Box 3900,
Peoria,Illinois, 51612, USA.EnCanada,difijasea Electrolux
HomeCareProductsCanada,5855 TerryFoxWay,Mississauga,
OntarioLgv 3E4.Para obtenerlainfeu_aciCn completa sobreel
servicio,refierase a la6arantiade Eureka.
EE.UH.:1-800-282-2886
Mexico: (55) 5343-4384
Canada: 1-800-282-2886
www.eureka.com
IMPORTANTSAFEGUARDS
Whenusinganelectricalappliance,basicprecautionsshouldalwaysbe followed, includingthefollowing:
READALL INSTRUCTIONSBEFOREUSINGTHISVACUUM CLEANER.
WARNING
Toreduce the riskof fire, electric shock,or injury:
" Donotuse outdoorsor onwet surfaces.
,, Denet leavevacuum cleaner when plugged in. Turnoff theswitch and unplugthe electricalcordwhen notin
use and beforeservicing.
,, Donotallow to beusedasa toy. Closeattentionis necessarywhen used by or near children.
,, Useonly as describedin this manual.Useonly manufacturer'srecommendedattachments.
• Donotuse with damagedcordor plug.If vacuumcleaneris notworking as itshould, hasbeen dropped,damaged,
left outdoors,or droppedinto water,return it to aservice centerbefore using.
,, Donotpull or carry bycord, usecord as a handle,closedooroncord, orpull cord around sharpedgesor corners.
Donotrun vacuumcleanerovercord. Keepcord awayfrom heatedsurfaces.
,, Donotuse extensioncordsor outletswith inadequatecurrent carryingcapacity.
,,Turn off all controls beforeunplugging.
• Donotunplug by pullingon cord.Tounplug, graspthe plug, not the cord.
,, Donothandleplug or vacuum cleanerwith wet handsor operatewithout shoes.
,, Donotput any objectinto openings.Donotusewith any opening blocked; keepfree of dust,lint, hair,andanything
that mayreduceairflow.
,,This vacuumcleanercreatessuctionand containsarevolvingbrushroll. Keephair,looseclothing,fingers, and all
partsof bodyawayfrom openings andmovingparts.
• Donotpick upanythingthat isburning or smoking,suchas cigarettes,matches,or hot ashes.
,, Donotuse without dust cup orfilter in place.
,, Useextra carewhencleaningonstairs.
• Donotuseto pickup flammableor combustibleliquidssuch asgasoline,or useinareaswhere they maybepresent.
,, Storeyour cleaner indoorsin a cool,dry area.
,, Keepyour work areawell lighted.
• Unplugelectricalappliancesbeforevacuumingthem.
,, Unplugbeforeconnectingtheturbine nozzle.
SAVETHESEINSTRUCTIONS
Toreduce the risk ef electric shock, this appliance hasa polarizedplug (onebladeis wider thanthe other).This
plug will fit in a polarizedoutletonly oneway.If the plug doesnotfit fully into theoutlet, reversethe plug.If it still
doesnotfit, contact a qualified electricianto installthe properoutlet. Donotchangethe plug in any way.
PRECAUCIONESIMPORTANTES
Cuandoutilice un electrodom_stico,deberatenerciertas precaucionesbasicas,incluyendolassiguientes:
LEATODASLAS INSTRUCCIONESANTES DE UTILIZARESTAASPIRADORA.
ADVERTENCIA
Parareducirel riesgode incendios,electrocuci6n o lesiones:
• Nodejeenchufadala aspiradoracuando no laest6 usando.Apagueel interrupterde corrientey desenchufeel
cord6nel_ctrico cuandono est6en useyantes delimpiarla.
• Nodejequeseusecomounjuguete.Esnecesarioprestarleespecialatenci6nal serusadaporni_osocercadeellos.
,, Uselas61ocome Ioindica estemanual.Uses61olos accesoriosrecomendadosper el fabricante.
,, Nola usecon el cord6no enchufeenmal estado.Si la aspiradoranofuncionacomodebe,se ha caido,da_ado,
dejadoala intemperieo dejadocaer en agua,devu61valaal centrodeservicio de reparacionesy partes antesde
volverausarla.
,, Nolajale ni la Ilevedel cord6n,ni useel cord6ncomo unmango,no cierre puertassobre el cord6n,nijale el
cord6nde modoque roce hordesfilosos oesquinas.Nopaselaaspiradorasobreel cord6n.Evite laproximidaddel
cord6na superficiescalientes.
,, Nouse cordonesel6ctricosextraso tomacorrientescon menoscapacidaddecorrienteque lanecesaria.
• Apaguetodoslos controlesantesde desenchufarla.
,, Noladesenchufejalando del cord6n.Paradesenchufarla,tome el enchufe,noelcord6n.
,, Notoqueel enchufenila aspiradoracon lasmanosht_medasni laoperedescalzo.
• Noponganingt_nobjetoen las aberturas.Nolausesi cualquierade las aberturasest_bloqueada;mant6ngalalibre
depolvo,pelusa,cabelloy cualquiercosa que puedareducir el pasodelaire.
,, Estaaspiradoracreasucci6ny contieneun cepillocircular giratorio. Mantengacabellos,ropasuelta, dedosy todas
lasdemos partesdel cuerpoalejadasdelas aberturasy de laspartesmovibles.
,, Noaspirenadaquese est6quemandoohumeando,como ser:cigarrillos,f6sforos (cerillos)o cenizascalientes.
,, Nola usesin elrecipienteparapolvo yel filtro ensu lugar.
• Tengacuidado especialal limpiar escalones.
• No la use para aspirarliquidos inflamables o combustiblestales come gasolina, ni lause enlugares donde
puede haberlos.
• Guardesu aspiradorabajotechoen unlugarfresco yseco.
,, Mantengabieniluminada su areade trabajo.
,, Desenchufeloselectrodom6sticosantes depasarlesla aspiradora.
• Desenchufelaaspiradoraantes deconectarla boquillade la turbina.
CONSERVEESTASINSTRUCCIONES
Parareducirel riesgo de una descarga el_ctrica,este electrodom_sticotiene un enchufepolarizado(unode los
dientesesragsanchoqueel otro). Esteenchufeentra enuntomacorrientepolarizadode unasolamanera.Si el
enchufenoentradel todo en eltomacorriente,delovuelta. Sitodavia no entra, contacte a unelectricistacalificado
paraquele instaleel tomacorriente correcto.Nomodifiqueel enchufede ningunamanera.
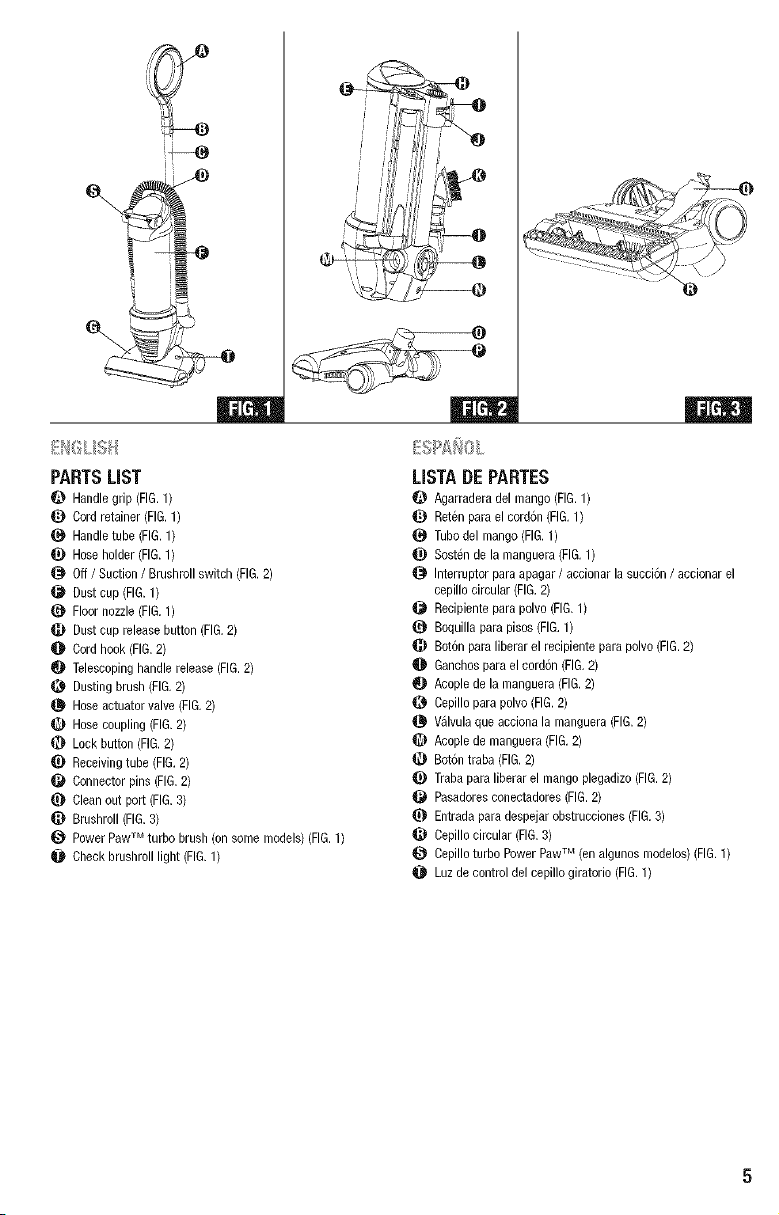
PARTSLiST
Handlegrip (FIG.1)
Cordretainer (FIG.1)
Handletube (FIG.1)
q_) Hoseholder (FIG.1) _)
Off/ Suction/ Brushroll switch (FIG.2)
Dust cup (FIG.1)
Floor nozzle(FIG.1)
Dust cup releasebutton(FIG.2)
Cordhook(FIG.2)
Telescopinghandle release(FIG.2)
Dusting brush (FIG.2)
Hoseactuatsr valve (FIG.2)
Hosecoupling (FIG.2)
Lock button (FIG.2)
_) Receivingtube (FIG.2)
Connectorpins (FIG.2)
Cleanout port (FIG.3)
_J} Brushrsll (FIG.3)
_t Power PawTM turbo brush(sn some models)(FIG.1)
Checkbrushrslllight (FIG.1)
USTADEPARTES
Agarraderadel mango (FIG.1)
Retenparael cord6n(FIG.1)
_! Tubodel mango(FIG.1)
Sosten de la manguera(FIG.1)
Interruptor paraapagar/accionar la succi6n / accionar el
cepills circular (FIG.2)
Recipientsparapolvs (FIG.1)
Bsquilla parapisss(FIG.1)
Bot6n paraliberar el recipients para polvs (FIG.2)
Ganchsspara el csrd6n (FIG.2)
Acspls de la manguera (FIG.2)
Cepillspara pslvo(FIG.2)
%lvula qus acciona la mangusra(FIG.2)
Acsplede manguera(FIG.2)
Bot6ntraba (FIG.2)
_) Trabapara libsrar elmango plegadizs(FIG.2)
Pasadoresoonectadsres (FIG.2)
_} Entradaparadespejarobstrucciones(FIG.3)
Cepillscircular (FIG.3)
Cepillsturbo PowerPawTM (en algunss modelos)(FIG.1)
0 Luz de control dsl cepillo giratoris (FIG.1)
 Loading...